Agile-DevSecOps Academy: 40 Ways Agile Transformations Fail

Agile transformation brings a superior combination of highly effective, innovative, and transparent cultures; alongside frameworks, methodologies, and best business/engineering practices to deliver the highest value and achieve the next level of agility in developing and deploying software applications. However, while many transformations are successful, some do fail, and here is why.

Why do Agile Transformations Fail?

Before talking about failures, it is important to understand the difference between Agile adoption and Agile transformation. The adoption is about deploying a chosen framework, business, and technical practices with the benefit of doing Agile. Transformation, on the other hand, is about shifting the entire organization's culture, values/principles, people, business, and technical paradigms towards the next level agility—being Agile.

10 Best Mind Mapping Software for IT Non-IT Businesses

Although there is a spike in Google Trends for Best Mind Mapping Software, I haven’t seen the programs’ actual application on the internet — that is just my observation. It does not imply that mind mapping software is not in demand. It’s just that some companies and individuals are still oblivious to their use. Instead, people rely on directly jumping on to plan to initiate, executing and deployment without giving the “brainstorming” element any thought.

Mind mapping makes brainstorming easier. It is like having your own “world’, a workspace where there are no constraints. All you have to do is visualize stuff, scribble down ideas, create flowcharts and do whatever it is necessary to set the cart in gear. Besides, mind maps are cool. You can understand the project’s underlying strategy long before it has even started.

Evolving Integration Strategy at Major Canadian Bank, Part 2

Integration Pattern

While understanding the importance of the APIF, we also recognize that good architectural practices and proper logical architecture of the application/services could be even more important than the service mesh. To support the integration strategy, CIBC has been developed Integration Pattern, which makes internal and external APIs the emerging standard for integration across the bank and beyond. This pattern transitions from existing legacy integration components and patterns to modern equivalents that embrace APIs and (micro)services by truly distributing all gateway and isolation layer functions.

The CIBC Integration Pattern is presented in the following diagram:

Business Intelligence in Microservices: Improving Performance

Do you know why microservice design is so popular within the development of BI tools? The answer is clear: it helps to develop scalable and flexible solutions. But microservice architecture has a great drawback. Its performance usually requires great improvements.

The FreshCode team also faced the problem and I’ve decided to show how we coped with it. The article is written together with FreshCode CTO and based on our recent case of development reporting microservice. You will find here its tech scheme, estimates, as well as a list of tools for on-premise and SaaS products.

Iterating Towards Professional Scrum: Full Lecture (Agile Week Riga)

This video is a presentation from Agile Week Riga titled, "Iterating Toward Professional Scrum". The "2019 Scrum Master Trends Report" by Scrum.org and the State of Agile 2018 shows numbers that provide insight into the maturity of Agile adoptions. More than 80% of the companies claim to be in or below a 'still maturing' level. With Scrum being the industry standard (at least in western Europe it is), these numbers are surprising. In this overview of iterations towards Scrum maturity, I describe the characteristics and main challenges to overcome in each maturity stage. This overview might help you as a Scrum Master or leader to assess your current situation and show you a direction in which you might find a solution for the problems you are facing implementing Scrum.

The Essential Guide To JavaScript’s Newest Data Type: BigInt

The Essential Guide To JavaScript’s Newest Data Type: BigInt

The Essential Guide To JavaScript’s Newest Data Type: BigInt

Faraz Kelhini

The BigInt data type aims to enable JavaScript programmers to represent integer values larger than the range supported by the Number data type. The ability to represent integers with arbitrary precision is particularly important when performing mathematical operations on large integers. With BigInt, integer overflow will no longer be an issue.

Additionally, you can safely work with high-resolution timestamps, large integer IDs, and more without having to use a workaround. BigInt is currently a stage 3 proposal. Once added to the specification, it will become the second numeric data type in JavaScript, which will bring the total number of supported data types to eight:

  • Boolean
  • Null
  • Undefined
  • Number
  • BigInt
  • String
  • Symbol
  • Object

In this article, we will take a good look at BigInt and see how it can help overcome the limitations of the Number type in JavaScript.

The Problem

The lack of an explicit integer type in JavaScript is often baffling to programmers coming from other languages. Many programming languages support multiple numeric types such as float, double, integer, and bignum, but that’s not the case with JavaScript. In JavaScript, all numbers are represented in double-precision 64-bit floating-point format as defined by the IEEE 754-2008 standard.

Under this standard, very large integers that cannot be exactly represented are automatically rounded. To be precise, the Number type in JavaScript can only safely represent integers between -9007199254740991 (-(253-1)) and 9007199254740991 (253-1). Any integer value that falls out of this range may lose precision.

This can be easily examined by executing the following code:

console.log(9999999999999999);    // → 10000000000000000

This integer is larger than the largest number JavaScript can reliably represent with the Number primitive. Therefore, it’s rounded. Unexpected rounding can compromise a program’s reliability and security. Here’s another example:

// notice the last digits
9007199254740992 === 9007199254740993;    // → true

JavaScript provides the Number.MAX_SAFE_INTEGER constant that allows you to quickly obtain the maximum safe integer in JavaScript. Similarly, you can obtain the minimum safe integer by using the Number.MIN_SAFE_INTEGER constant:

const minInt = Number.MIN_SAFE_INTEGER;

console.log(minInt);         // → -9007199254740991

console.log(minInt - 5);     // → -9007199254740996

// notice how this outputs the same value as above
console.log(minInt - 4);     // → -9007199254740996

The Solution

As a workaround to these limitations, some JavaScript developers represent large integers using the String type. The Twitter API, for example, adds a string version of IDs to objects when responding with JSON. Additionally, a number of libraries such as bignumber.js have been developed to make working with large integers easier.

With BigInt, applications no longer need a workaround or library to safely represent integers beyond Number.MAX_SAFE_INTEGER and Number.Min_SAFE_INTEGER. Arithmetic operations on large integers can now be performed in standard JavaScript without risking loss of precision. The added benefit of using a native data type over a third-party library is better run-time performance.

To create a BigInt, simply append n to the end of an integer. Compare:

console.log(9007199254740995n);    // → 9007199254740995n
console.log(9007199254740995);     // → 9007199254740996

Alternatively, you can call the BigInt() constructor:

BigInt("9007199254740995");    // → 9007199254740995n

BigInt literals can also be written in binary, octal or hexadecimal notation:


// binary
console.log(0b100000000000000000000000000000000000000000000000000011n);
// → 9007199254740995n

// hex
console.log(0x20000000000003n);
// → 9007199254740995n

// octal
console.log(0o400000000000000003n);
// → 9007199254740995n

// note that legacy octal syntax is not supported
console.log(0400000000000000003n);
// → SyntaxError

Keep in mind that you can’t use the strict equality operator to compare a BigInt to a regular number because they are not of the same type:

console.log(10n === 10);    // → false

console.log(typeof 10n);    // → bigint
console.log(typeof 10);     // → number

Instead, you can use the equality operator, which performs implicit type conversion before compering its operands:

console.log(10n == 10);    // → true

All arithmetic operators can be used on BigInts except for the unary plus (+) operator:

10n + 20n;    // → 30n
10n - 20n;    // → -10n
+10n;         // → TypeError: Cannot convert a BigInt value to a number
-10n;         // → -10n
10n * 20n;    // → 200n
20n / 10n;    // → 2n
23n % 10n;    // → 3n
10n ** 3n;    // → 1000n

const x = 10n;
++x;          // → 11n
--x;          // → 9n

The reason that the unary plus (+) operator is not supported is that some programs may rely on the invariant that + always produces a Number, or throws an exception. Changing the behavior of + would also break asm.js code.

Naturally, when used with BigInt operands, arithmetic operators are expected to return a BigInt value. Therefore, the result of the division (/) operator is automatically rounded down to the nearest integer. For example:

25 / 10;      // → 2.5
25n / 10n;    // → 2n

Implicit Type Conversion

Because implicit type conversion could lose information, mixed operations between BigInts and Numbers are not allowed. When mixing large integers and floating-point numbers, the resulting value may not be accurately representable by BigInt or Number. Consider the following example:

(9007199254740992n + 1n) + 0.5

The result of this expression is outside of the domain of both BigInt and Number. A Number with a fractional part cannot be accurately converted to a BigInt. And a BigInt larger than 253 cannot be accurately converted to a Number.

As a result of this restriction, it’s not possible to perform arithmetic operations with a mix of Number and BigInt operands. You also cannot pass a BigInt to Web APIs and built-in JavaScript functions that expect a Number. Attempting to do so will cause a TypeError:

10 + 10n;    // → TypeError
Math.max(2n, 4n, 6n);    // → TypeError

Note that relational operators do not follow this rule, as shown in this example:

10n > 5;    // → true

If you want to perform arithmetic computations with BigInt and Number, you first need to determine the domain in which the operation should be done. To do that, simply convert either of the operands by calling Number() or BigInt():

BigInt(10) + 10n;    // → 20n
// or
10 + Number(10n);    // → 20

When encountered in a Boolean context, BigInt is treated similar to Number. In other words, a BigInt is considered a truthy value as long as it’s not 0n:

if (5n) {
    // this code block will be executed
}

if (0n) {
    // but this code block won't
}

No implicit type conversion occurs when sorting an array of BigInts and Numbers:

const arr = [3n, 4, 2, 1n, 0, -1n];

arr.sort();    // → [-1n, 0, 1n, 2, 3n, 4]

Bitwise operators such as |, &, <<, >>, and ^ operate on BigInts in a similar way to Numbers. Negative numbers are interpreted as infinite-length two’s complement. Mixed operands are not allowed. Here are some examples:

90 | 115;      // → 123
90n | 115n;    // → 123n
90n | 115;     // → TypeError

The BigInt Constructor

As with other primitive types, a BigInt can be created using a constructor function. The argument passed to BigInt() is automatically converted to a BigInt, if possible:

BigInt("10");    // → 10n
BigInt(10);      // → 10n
BigInt(true);    // → 1n

Data types and values that cannot be converted throw an exception:

BigInt(10.2);     // → RangeError
BigInt(null);     // → TypeError
BigInt("abc");    // → SyntaxError

You can directly perform arithmetic operations on a BigInt created using a constructor:

BigInt(10) * 10n;    // → 100n

When used as operands of the strict equality operator, BigInts created using a constructor are treated similar to regular ones:

BigInt(true) === 1n;    // → true

Library Functions

JavaScript provides two library functions for representing BigInt values as signed or unsigned integers:

  • BigInt.asUintN(width, BigInt): wraps a BigInt between 0 and 2width-1
  • BigInt.asIntN(width, BigInt): wraps a BigInt between -2width-1 and 2width-1-1

These functions are particularly useful when performing 64-bit arithmetic operations. This way you can stay within the intended range.

Browser Support And Transpiling

At the time of this writing, Chrome +67 and Opera +54 fully support the BigInt data type. Unfortunately, Edge and Safari haven’t implemented it yet. Firefox doesn’t support BigInt by default, but it can be enabled by setting javascript.options.bigint to true in about:config. An up-to-date list of supported browsers is available on Can I use….

Unluckily, transpiling BigInt is an extremely complicated process, which incurs hefty run-time performance penalty. It’s also impossible to directly polyfill BigInt because the proposal changes the behavior of several existing operators. For now, a better alternative is to use the JSBI library, which is a pure-JavaScript implementation of the BigInt proposal.

This library provides an API that behaves exactly the same as the native BigInt. Here’s how you can use JSBI:

import JSBI from './jsbi.mjs';

const b1 = JSBI.BigInt(Number.MAX_SAFE_INTEGER);
const b2 = JSBI.BigInt('10');

const result = JSBI.add(b1, b2);

console.log(String(result));    // → '9007199254741001'

An advantage of using JSBI is that once browser support improves, you won’t need to rewrite your code. Instead, you can automatically compile your JSBI code into native BigInt code by using a babel plugin. Furthermore, the performance of JSBI is on par with native BigInt implementations. You can expect wider browser support for BigInt soon.

Conclusion

BigInt is a new data type intended for use when integer values are larger than the range supported by the Number data type. This data type allows us to safely perform arithmetic operations on large integers, represent high-resolution timestamps, use large integer IDs, and more without the need to use a library.

It’s important to keep in mind that you cannot perform arithmetic operations with a mix of Number and BigInt operands. You’ll need to determine the domain in which the operation should be done by explicitly converting either of the operands. Moreover, for compatibility reasons, you are not allowed to use the unary plus (+) operator on a BigInt.

What do you think? Do you find BigInt useful? Let us know in the comments!

Smashing Editorial (dm, yk, il)

Figma vs Sketch vs Adobe XD: Which Is the Better Design Tool?

Why you should care for Figma vs Sketch vs Adobe XD? There is no denying that in recent years we have seen monumental growth in the availability of UI design tools. When Sketch first came out, it completely changed the course of action for all designers. Just two years after its initial release, Sketch was awarded Apple’s Design Award.

How to find data from date to date and ID

I am working on my company's ledger and my accounts department need a search ledger by COA id with from date to date.

I am able to find the record from date to date but when I write the code for COA ID, then it ignore the date formula.

Below is my complete code that I tried

 {ledgerdetails.date} in {?datef}to{?dateto}

       and 
       {ledgerdetails.Accountnamedr} = {?tran} or 
      {ledgerdetails.accountnamecr}={?tran} 

I also tried

{ledgerdetails.date} >= {?datef}

         and

        {ledgerdetails.date} <= {?dateto}

For the backend, I'm using vb.net and MS SQL.

How to Create an Image Gallery in WordPress (Step by Step)

Are you looking to create an image gallery in WordPress?

An image gallery lets you add photos in rows and columns. This allows you to display more photos in less space while also making it easier for users to browse them.

In this article, we will show you how to easily create an image gallery in WordPress that makes your photos look even better.

How to create an image gallery in WordPress

Why Create an Image Gallery in WordPress?

WordPress makes it super easy to add an image to your blog posts and pages. You just need to add the image block and upload your image.

However, if you are adding multiple images, then all those images will appear one after another. It doesn’t look great, and your users will have to scroll a lot to view them all.

Adding Multiple Images in WordPress Post Without Creating a Gallery

By creating a gallery, you can display images in a grid layout with columns and rows. You can show thumbnails for your pictures, and users can click on them to see the full image.

This way, you will be able to show more photos in less space, and it will look a lot more professional.

Preview of WordPress Photo Gallery Using Default Gallery Block

WordPress actually comes with a built-in gallery feature for quickly creating photo galleries. The new WordPress block editor includes a Gallery block to let you make a WordPress gallery in just a few clicks.

You can also use WordPress image gallery plugins to create even more robust galleries with more features.

In this tutorial, we will show you both methods to make a photo gallery in WordPress.

Let’s start with the default WordPress gallery block.

Method 1. Create an Image Gallery without a Plugin

WordPress comes with a built-in feature that lets you create a gallery. This feature is very basic and does not have many options, but it gets the job done.

Here is how you would create an image gallery in WordPress without using a plugin.

First, you need to edit the post or page where you want to add the image gallery. On the post edit screen, click on the Add New Block icon and select the Gallery block.

Add Gallery Block to WordPress Post Editor

This will add the Gallery block to your WordPress editor where you can click on the ‘Upload’ button to upload photos from your computer. You can also select from previously uploaded photos in the media library.
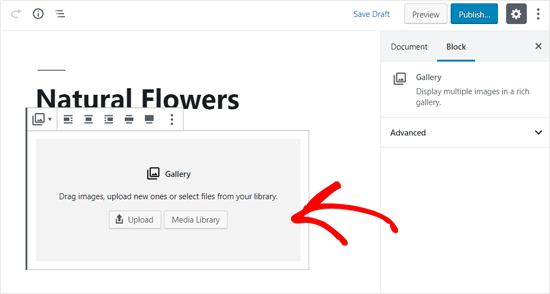
Image Upload Options in WordPress Gallery Block

If you click on the Upload button, then you can generally upload one photo at a time. However, you can select and open multiple images with Ctrl key pressed on your keyboard.
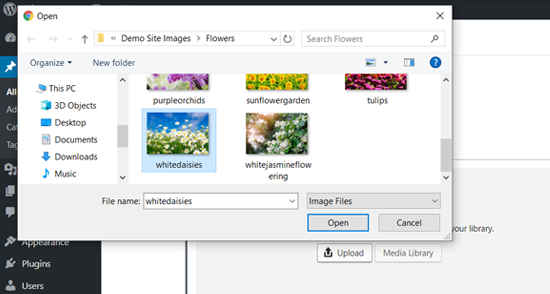
Upload Images to Your WordPress Photo Gallery from Computer

After you have uploaded all the images, you can add captions to your images. Simply click on the photos, and you will see ‘Write caption…’ option where you need to enter the caption.

Write Captions in Your Gallery Images

If you select the Media Library button, then you will be able to choose images for your gallery all at once. As you select images, you can also enter the image alt text, title, and caption from the attachment details panel on the right side.
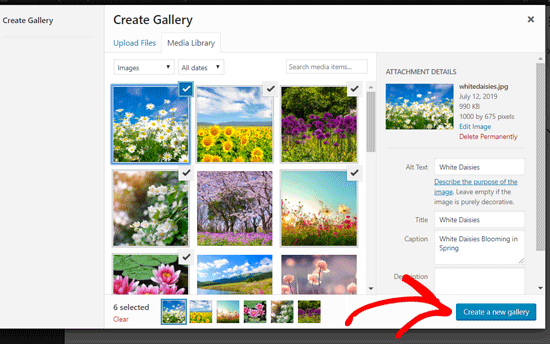
Select Images from WordPress Media Library

Select the images you want to add and click on the ‘Create a new gallery’ button at the bottom right corner.

Next, you will see ‘Edit Gallery’ page where you can add/review your image captions. Once done, click on the ‘Update Gallery’ button at the bottom right corner.
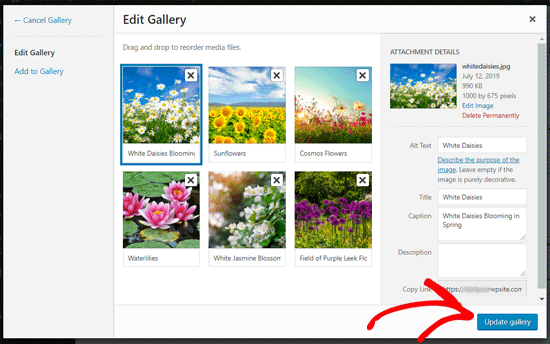
Update Your WordPress Library

After that, your post edit screen will open with the gallery block settings panel on the right side. Now, you can choose the number of columns for each row, enable or disable the Crop images option, and choose where to link your gallery images.
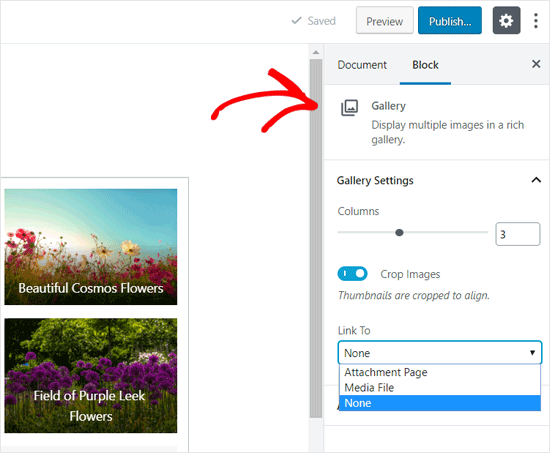
WordPress Gallery Block Settings

From the Link to options, you can choose None if you want your users to only view your photo. This option disables clicking feature for your images.

If you select the Media File option, then the images will be clickable, and the image file will open when clicked. Similarly, the attachment page will open if you select the Attachment Page option.

Once you are satisfied with the settings, you can publish the post and preview the gallery on your live website.

For example, here is how the image gallery appeared on our demo website.

Preview of WordPress Photo Gallery Using Default Gallery Block

Wasn’t that quick and easy?

It looks pretty too. However, if you create image galleries regularly, then you will soon notice that it lacks certain essential features.

For example, your images will either be not clickable or open in a new page. If you link your gallery images to the media file or attachment page, then the users will have to click on the back button to view the gallery again.

It is not user-friendly, and your gallery’s appearance depends on your theme. In most cases, you get just one very generic style.

You can’t organize your galleries into topics, albums, tags, etc. Your gallery is not stored anywhere and if you needed to add the same gallery again, then you’ll have to recreate it.

If you want to add more professional looking image galleries on your site, then you should use the next method.

Method 2. Create an Image Gallery Using Envira Gallery

For this method, we will be using the Envira Gallery plugin. It is the best WordPress image gallery plugin in the market.

Envira allows you to easily create fully-responsive, beautiful, and modern image galleries in WordPress. It is super fast and comes with many features like lightbox popup, easy image navigation, drag and drop builder, and professional gallery templates.

Let’s get started.

First thing you need to do is install and activate the Envira Gallery plugin. For more details, see our step by step guide on how to install a WordPress plugin.

Upon activation, you need to visit the Envira Gallery » Settings page to enter your license key. You can get this key from your account on the Envira Gallery website.
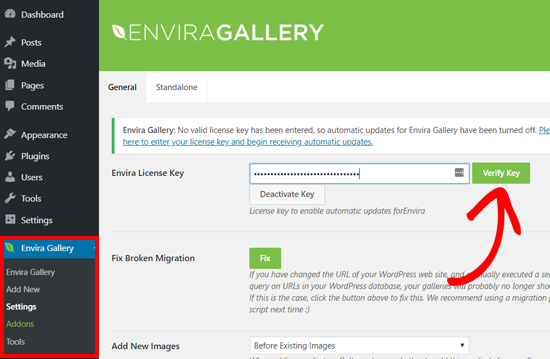
Enter Envira Gallery License Key

After verifying your license key, you can head over to Envira Gallery » Add New page to create your first gallery.
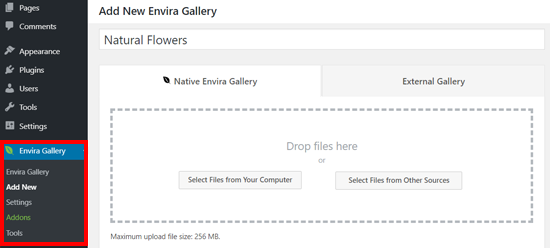
Creating a New Gallery with Envira Gallery WordPress Plugin

First, you need to provide a title for your gallery and then click on ‘Select files from computer’ button to upload your images.

You can also select files from your WordPress media library by clicking on ‘Select files from other sources’ button.

Once you upload the images, they will appear in the Gallery section.
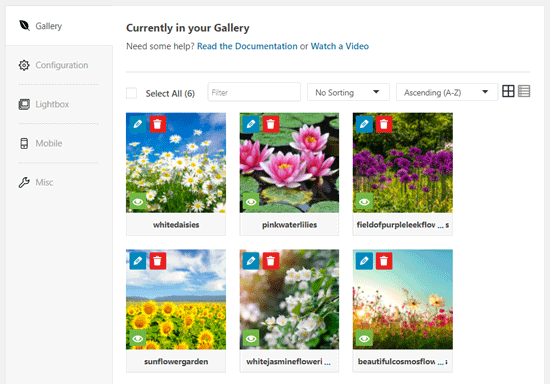
Images in Envira Gallery Builder

You can click the pencil icon on an image to add caption, title, and alt text for each image.
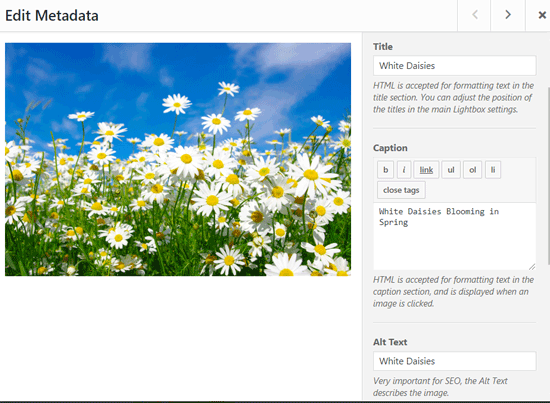
Edit Gallery Image Metadata

Next, you need to click on the ‘Configuration’ tab.

From here you can change your gallery settings like the number of columns, image lazy loading, title and caption positioning, margins, heights, thumbnail sizes, image dimensions, etc.
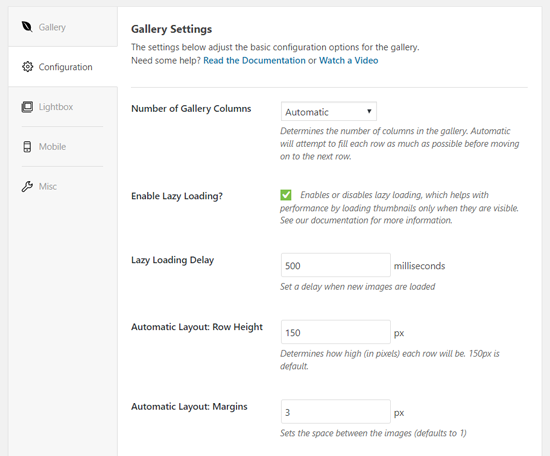
Configure Envira Gallery Settings

After that, you need to click on the ‘Lightbox’ tab.

The lightbox popup allows users to enlarge images and browse them without ever leaving the page.

The default settings will work very well for most websites, but you can review the options and change them if you like.
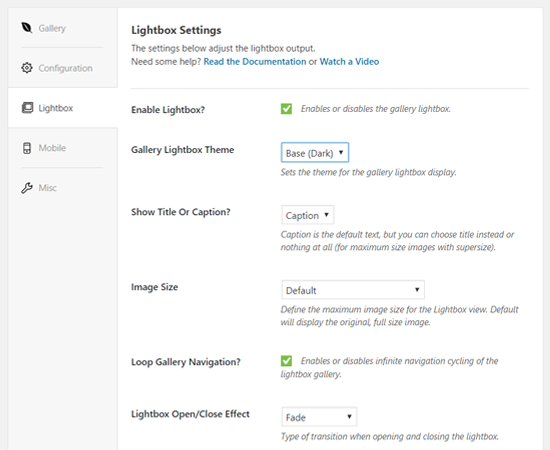
Envira Gallery Lightbox Options

Next, you can click on the ‘Mobile’ tab to configure your gallery settings for mobile devices. It allows you to choose image dimensions for mobile devices, enable or disable lightbox, and more.
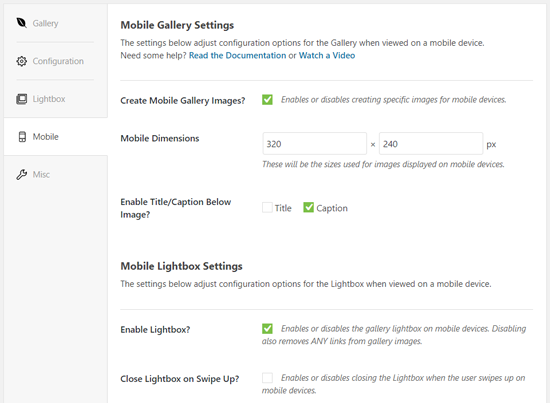
Envira Mobile Gallery Settings

After that, you can review more options like gallery slug and add custom CSS from the ‘Misc’ section.

You can now publish your gallery which will make it available to be added anywhere on your WordPress site.

Next, you need to edit a post or page where you want to display your gallery.

On the post edit screen, click on the Add New Block icon and select the Envira Gallery block.
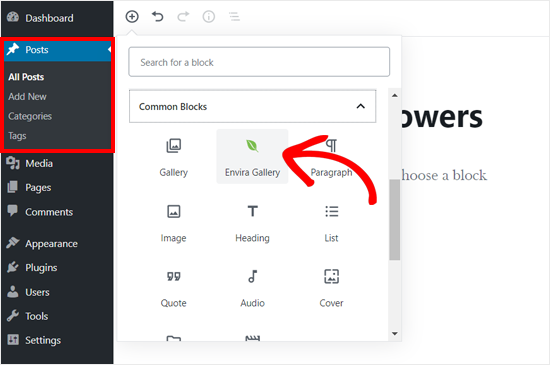
Add Envira Block to WordPress Post Editor

Clicking on it will add the Envira Gallery block in the post editor. Now you can search a gallery by its name or find it by clicking on the dropdown arrow icon.
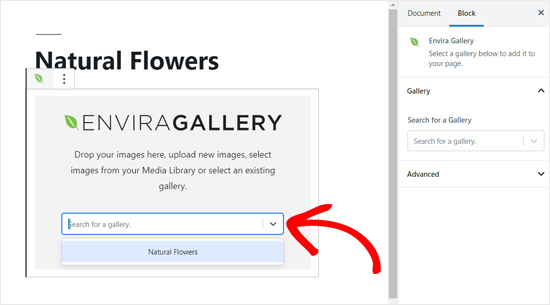
Choose an Envira Gallery to Add to your WordPress Post

After that, the plugin will load your gallery in the post editor.

Envira Gallery Added to WordPress Post Editor

Next, you can review your gallery settings one more time from the block settings panel on the right side.
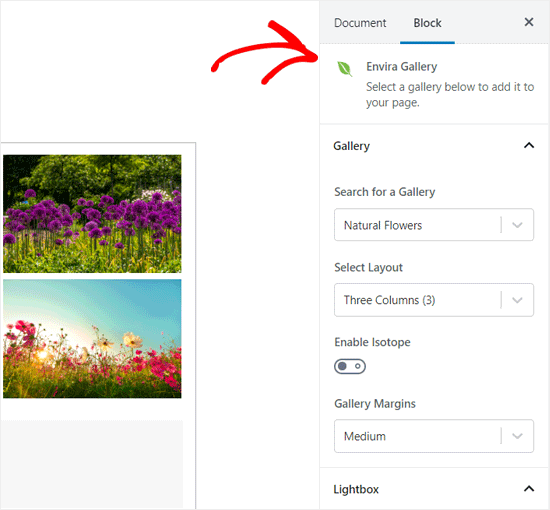
Envira Gallery Block Settings

You can now save your post and preview it to see the gallery on your live website.

WordPress Photo Gallery Created with Envira Gallery

Clicking on any image in the gallery will open it in the lightbox popup. You can browse images in the lightbox by pressing the left and right arrow keys on the screen or on your keyboard.

Envira Gallery Image in the Lightbox Popup

Your gallery will look equally great on mobile as well. Users will be able to tap on an image to enlarge it and swipe to view the next or previous image.

Responsive WordPress Photo Gallery

We hope this article helped you learn how to create an image gallery in WordPress. You may also want to see our guide on how to fix common image issues in WordPress.

If you liked this article, then please subscribe to our YouTube Channel for WordPress video tutorials. You can also find us on Twitter and Facebook.

The post How to Create an Image Gallery in WordPress (Step by Step) appeared first on WPBeginner.