Graphic designers are artists who create visual concepts that tell stories, captivate audiences, and create long-lasting memories. Although graphic designers tend to operate under the same title, they practice many different types of graphic design. The difference between the types of graphic design isn’t just in the name. Often, the principles of the heart of design […]
Al Baraka Islamic Bank (ABIB), a bank out of Bahrain, recently announced its Global API marketplace. Through the platform, ABIB invites FinTech innovators from around the world to test solutions within the ABIB ecosystem. ABIB built the marketplace to execute its strategy of innovation in the Open Banking era.
One cool thing about CSS custom properties is that they can be a part of a value. Let's say you're using multiple backgrounds to pull off a a design. Each background will have its own color, image, repeat, position, etc. It can be verbose!
You have four images:
body {

  background-position:
    top 10px left 10px,
    top 10px right 10px,
    bottom 10px right 10px,
    bottom 10px left 10px;

  background-repeat: no-repeat;

  background-image:
    url(https://s3-us-west-2.amazonaws.com/s.cdpn.io/3/angles-top-left.svg),
    url(https://s3-us-west-2.amazonaws.com/s.cdpn.io/3/angles-top-right.svg),
    url(https://s3-us-west-2.amazonaws.com/s.cdpn.io/3/angles-bottom-right.svg),
    url(https://s3-us-west-2.amazonaws.com/s.cdpn.io/3/angles-bottom-left.svg);

}
You want to add a fifth in a media query:
@media (min-width: 1500px) {
  body {
    /* REPEAT all existing backgrounds, then add a fifth. */
  }
}
That's going to be super verbose! You'll have to repeat each of those four images again, then add the fifth. Lots of duplication there.
One possibility is to create a variable for the base set, then add the fifth much more cleanly:
body {
  --baseBackgrounds:
    url(https://s3-us-west-2.amazonaws.com/s.cdpn.io/3/angles-top-left.svg),
    url(https://s3-us-west-2.amazonaws.com/s.cdpn.io/3/angles-top-right.svg),
    url(https://s3-us-west-2.amazonaws.com/s.cdpn.io/3/angles-bottom-right.svg),
    url(https://s3-us-west-2.amazonaws.com/s.cdpn.io/3/angles-bottom-left.svg);

  background-position:
    top 10px left 10px,
    top 10px right 10px,
    bottom 10px right 10px,
    bottom 10px left 10px;

  background-repeat: no-repeat;

  background-image: var(--baseBackgrounds);
}
@media (min-width: 1500px) {
  body {
    background-image:
      var(--baseBackgrounds),
      url(added-fifth-background.svg);
  }
}
But, it's really up to you. It might make more sense and be easier manage if you made each background image into a variable, and then pieced them together as needed.
Note, too, that with backgrounds, it might be best to include the entire shorthand as the variable. That way, it's much easier to piece everything together at once, rather than needing something like...
--bg_1_url: url();
--bg_1_size: 100px;
--bg_1_repeat: no-repeat;
/* etc. */
It's easier to put all of the properties into shorthand and use as needed:
body {
  --bg_1: url(https://s3-us-west-2.amazonaws.com/s.cdpn.io/3/angles-top-left.svg) top 10px left 10px / 86px no-repeat;
  --bg_2: url(https://s3-us-west-2.amazonaws.com/s.cdpn.io/3/angles-top-right.svg) top 10px right 10px / 86px no-repeat;
  --bg_3: url(https://s3-us-west-2.amazonaws.com/s.cdpn.io/3/angles-bottom-right.svg) bottom 10px right 10px / 86px no-repeat;
  --bg_4: url(https://s3-us-west-2.amazonaws.com/s.cdpn.io/3/angles-bottom-left.svg) bottom 10px left 10px  / 86px no-repeat;

  background:
    var(--bg_1), var(--bg_2),var(--bg_3),var(--bg_4);
}
Google this week distributed the fifth beta of Android Q. According to Google, this build is "very close" to what developers and consumers alike will see in the release version of Android Q later this summer. Google is urging developers to update their apps for Android Q as soon as they possibly can. Here's what app writers need to know.
Unlike WordPress membership plugins, adding password protection to your WordPress site doesn’t require user signup or login, which proves useful in many cases. You can block access to certain private WordPress pages and posts with a simple password. Sometimes, when setting up a private site for internal discussion and communications or while your website is […]
Edge computing aims to solve some of the challenges of cloud computing, especially in situations where latency and bandwidth issues would otherwise put operations at risk. This Refcard provides an overview of the concept of edge computing, explores several use cases, and details how to develop an organization-wide strategy for adoption.
In this article, we will discuss the Java persistence API configuration with EclipseLink and MySQL.
The Java Persistence API is a standard specification for ORM (Object Relational Mapping) implementations. Also, it shows how to define a PLAIN OLD JAVA OBJECT (POJO) as an entity and how to manage entities with relations.
If you need to implement QR-scanning into your Xamarin (Forms) app, chances are high you will be using the ZXing.Net.Mobile library (as it is the most complete solution out there). In one of my recent projects, I wanted to do exactly that. I have used the library already before and thought it might be an easy plan.
Distorted Reality…
Reality hit me hard when I realized that the preview is totally distorted:
A candlestick chart shows the open, high, low, and close values for a stock. It has a solid portion that is the body and two wicks extending above and below the body. The body shows the range between the open and close price. The top of the upper wick represents the highest trading price. The bottom of the lower wick is the lowest trading price. Candlestick charts are used to analyze patterns in price movements such as if the price is moving in an upward trend or a downward trend. Up next, we will create our chart using stock data we fetch from an API.
Most applications today serve users across the globe and need a way to deliver their content fast. To accomplish this, developers often rely on a Content Delivery Network (CDN), a network of servers that are geographically distributed with the intent of serving content to users as fast as possible.
Amazon CloudFront is one such CDN. In this article, I will describe how to upload files to S3 bucket and serve those files through CloudFront in Node.js.
In my "Specifications to the Rescue" article, I presented the ease and ability to leverage the JPA Specification in Spring Boot to provide filter options for your RESTful API. I followed up with another article, called "Testing those Specifications," which covered how those very specifications can be tested.
Taking things another step further, I thought I would demonstrate just how easy it is to add a job scheduler into the same Spring Boot application.
Data science development is an experimental and iterative process. It involves a lot of trial and error and it's easy to lose track of what's been tested and what hasn't. The following examples show how Prodmodel — an open-source data engineering tool I developed — helps to solve some of those problems. It works with Python 3.5 or above.
The idea behind Prodmodel is to structure your modeling pipeline as Python function calls. The tool then versions, caches, and reuses the objects returned by these functions. This way you don't have to keep in mind the various data or model files or pieces of codes you're experimenting with.
This is the third blog post in a three-part series about building, testing, and deploying a Clojure web application. You can find information on setting up previously mentioned applications like CircleCI in the first post here and the second here.
In this post, we will be focusing on how to use HashiCorp Terraform to stand up a fairly complex infrastructure to host our web application Docker containers with a PostgreSQL container and then use CircleCI to deploy to our infrastructure with zero downtime. If you don't want to go through the laborious task of creating the web application described in the first two posts from scratch, you can get the source by forking this repository and checking out the "part-2" branch.
If you want gorgeous visuals AND smooth UX, Be Theme offers you 450+ pre-built websites that you can easily customize. You can have your next A-Z website in less than 4 hours.
In this third part of a series, Michelle Barker takes a look at the different placement methods in CSS Grid and how to use auto-flow to avoid having to explicitly place every item.
We’ve looked at React Hooks before, around here at CSS-Tricks. I have an article that introduces them as well that illustrates how to use them to create components through functions. Both articles are good high-level overviews about the way they work, but they open up a lot of possibilities, too.
So, that’s what we’re going to do in this article. We’re going to see how hooks make our development process easier and faster by building a chat application.
Specifically, we are building a chat application using Create React App. While doing so, we will be using a selection of React Hooks to simplify the development process and to remove a lot of boilerplate code that’s unnecessary for the work.
There are several open source Reacts hooks available and we’ll be putting those to use as well. These hooks can be directly consumed to build features that otherwise would have taken more of code to create. They also generally follow well-recognized standards for any functionality. In effect, this increases the efficiency of writing code and provides secure functionalities.
Let’s look at the requirements
The chat application we are going to build will have the following features:
Get a list of past messages sent from the server
Connect to a room for group chatting
Get updates when people disconnect from or connect to a room
Send and receive messages
We’re working with a few assumptions as we dive in:
We’ll consider the server we are going to use as a blackbox. Don't worry about it working perfectly as we're going to communicate with it using simple sockets.
All the styles are contained in a single CSS file, can be copied to the src directory. All the styles used within the app are linked in the repository.
Getting set up for work
OK, we’re going to want to get our development environment ready to start writing code. First off, React requires both Node and npm. You can set them up here.
Let’s spin up a new project from the Terminal:
npx create-react-app socket-client
cd socket-client
npm start
Now we should be able to navigate to http://localhost:3000 in the browser and get the default welcome page for the project.
From here, we’re going to break the work down by the hooks we’re using. This should help us understand the hooks as we put them into practical use.
Using the setState hook
The first hook we're going to use is useState. It allows us to maintain state within our component as opposed to, say, having to write and initialize a class using this.state. Data that remains constant, such as username, is stored in useState variables. This ensures the data remains easily available while requiring a lot less code to write.
The main advantage of useState is that it's automatically reflected in the rendered component whenever we update the state of the app. If we were to use regular variables, they wouldn’t be considered as the state of the component and would have to be passed as props to re-render the component. So, again, we’re cutting out a lot of work and streamlining things in the process.
The hook is built right into React, so we can import it with a single line:
import React, { useState } from 'react';
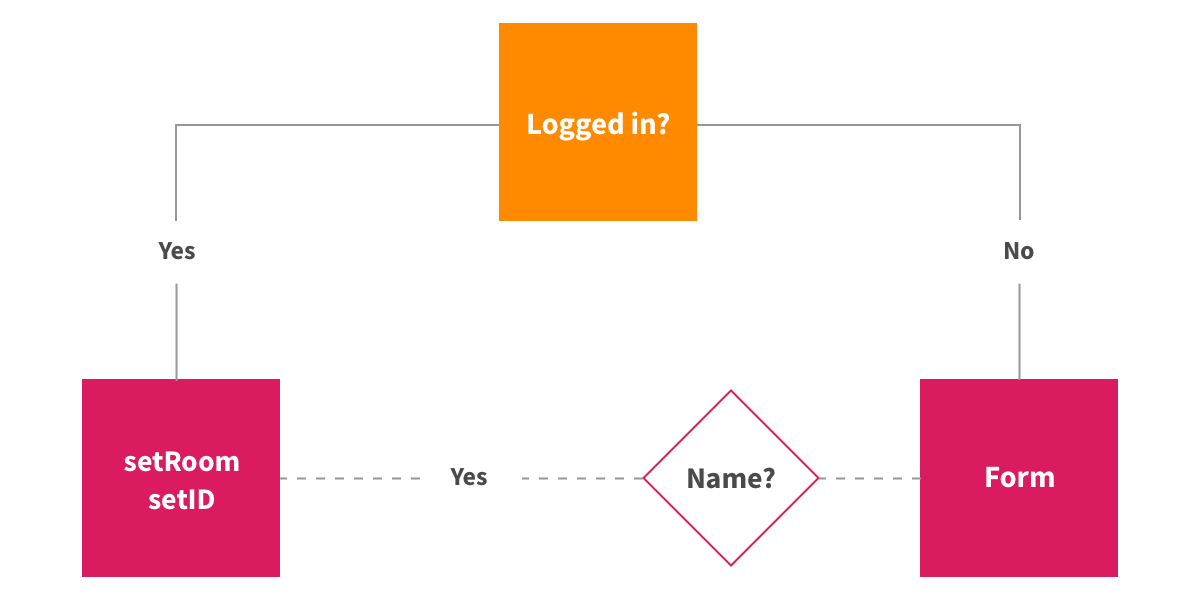
We are going to create a simple component that returns "Hello" if the user is already logged in or a login form if the user is logged out. We check the id variable for that.
Our form submissions will be handled by a function we’re creating called handleSubmit. It will check if the Name form field is completed. If it is, we will set the id and room values for that user. Otherwise, we’ll throw in a message reminding the user that the Name field is required in order to proceed.
// App.js

import React, { useState } from 'react';
import './index.css';

export default () => {
  const [room, setRoom] = useState('');
  const [id, setId] = useState('');

  const handleSubmit = e => {
    e.preventDefault();
    const name = document.querySelector('#name').value.trim();
    const room_value = document.querySelector('#room').value.trim();
    if (!name) {
      return alert("Name can't be empty");
    }
    setId(name);
    setRoom(document.querySelector('#room').value.trim());
  };

  return id !== '' ? (
    <div>Hello</div>
  ) : (
    <div style={{ textAlign: 'center', margin: '30vh auto', width: '70%' }}>
      <form onSubmit={event => handleSubmit(event)}>
        <input id="name" required placeholder="What is your name .." /><br />
        <input id="room" placeholder="What is your room .." /><br />
        <button type="submit">Submit</button>
      </form>
    </div>
  );
};
That’s how we’re using the useState hook in our chat application. Again, we’re importing the hook from React, constructing values for the user’s ID and chat room location, setting those values if the user’s state is logged in, and returning a login form if the user is logged out.
Using the useSocket hook
We're going to use an open source hook called useSocket to maintain a connection to our server. Unlike useState, this hook is not baked into React, so we’re going to have to add it to our project before importing it into the app.
npm add use-socket.io-client
The server connection is maintained by using the React Hooks version of the socket.io library, which is an easier way of maintaining websocket connections with a server. We are using it for sending and receiving real-time messages as well as maintaining events, like connecting to a room.
The default socket.io client library has global declarations, i.e., the socket variable we define can be used by any component. However, our data can be manipulated from anywhere and we won't know where those changes are happening. Socket hooks counter this by constraining hook definitions at the component level, meaning each component is responsible for its own data transfer.
The basic usage for useSocket looks like this:
const [socket] = useSocket('socket-url')
We’re going to be using a few socket APIs as we move ahead. For the sake of reference, all of them are outlined in the socket.io documentation. But for now, let’s import the hook since we’ve already installed it.
import useSocket from 'use-socket.io-client';
Next, we’ve got to initialize the hook by connecting to our server. Then we’ll log the socket in the console to check if it is properly connected.
Open the browser console and the URL in that snippet should be logged.
Using the useImmer hook
Our chat app will make use of the useImmer hook to manage state of arrays and objects without mutating the original state. It combines useState and Immer to give immutable state management. This will be handy for managing lists of people who are online and messages that need to be displayed.
Using Immer with useState allows us to change an array or object by creating a new state from the current state while preventing mutations directly on the current state. This offers us more safety as far as leaving the current state intact while being able to manipulate state based on different conditions.
Again, we’re working with a hook that’s not built into React, so let’s import it into the project:
npm add use-immer
The basic usage is pretty straightforward. The first value in the constructor is the current state and the second value is the function that updates that state. The useImmer hook then takes the starting values for the current state.
const [data, setData] = useImmer(default_value)
Using the setData hook
Notice the setData hook in that last example? We’re using that to make a draft copy of the current data we can use to manipulate the data safely and use it as the next state when changes become immutable. Thus, our original data is preserved until we’re done running our functions and we’re absolutely clear to update the current data.
setData(draftState => {
  draftState.operation();
});

// ...or

setData(draft => newState);

// Here, draftState is a copy of the current data
Using the useEffect hook
Alright, we’re back to a hook that’s built right into React. We’re going to use the useEffect hook to run a piece of code only when the application loads. This ensures that our code only runs once rather than every time the component re-renders with new data, which is good for performance.
All we need to do to start using the hook is to import it — no installation needed!
import React, { useState, useEffect } from 'react';
We will need a component that renders a message or an update based on the presence or absence of a sende ID in the array. Being the creative people we are, let’s call that component Messages.
Let’s put our socket logic inside useEffect so that we don't duplicate the same set of messages repeatedly when a component re-renders. We will define our message hook in the component, connect to the socket, then set up listeners for new messages and updates in the useEffect hook itself. We will also set up update functions inside the listeners.
Another touch we’ll throw in for good measure is a "join" message if the username and room name are correct. This triggers the rest of the event listeners and we can receive past messages sent in that room along with any updates required.
We only have a few more tweaks to wrap up our chat app. Specifically, we still need:
A component to display people who are online
A useImmer hook for it with a socket listener
A message submission handler with appropriate sockets
All of this builds off of what we’ve already covered so far. I’m going to drop in the full code for the App.js file to show how everything fits together.
That's it! We built a fully functional group chat application together! How cool is that? The complete code for the project can be found here on GitHub.
What we’ve covered in this article is merely a glimpse of how React Hooks can boost your productivity and help you build powerful applications with powerful front-end tooling. I have built a more robust chat application in this comprehensive tutorial. Follow along if you want to level up further with React Hooks.
Now that you have hands-on experience with React Hooks, use your newly gained knowledge to get even more practice! Here are a few ideas of what you can build from here:
A blogging platform
Your own version of Instagram
A clone of Reddit
Have questions along the way? Leave a comment and let’s make awesome things together.
This article is the first in a series of three articles which share my experience with troubleshooting the performance of Vert.x applications. The first article provides an overview of the Vert.x event loop model, the second article covers techniques to prevent delays on the event loop, and the third article focuses on troubleshooting of event loop delays.
Programming with Vert.x requires a good understanding of its event loop model. From what I saw in practice, delayed or blocked event loop threads are the number one contributor to performance problems with Vert.x applications. But don't worry. In this article, we are going to review the event loop model.
We spend more than 80% of our mobile use time interacting with apps. And by “we,” we mean 5 billion smartphone users all over the world. To mobile app development companies, this may sound exciting and intimidating at the same time. The competition is intense. The user demands are super high. What do you do? You make sure your app is spotless by testing it relentlessly. Mobile app testing can be a chore, but it doesn’t have to. Here are five ways to make your mobile app testing more efficient.
Stick to A Plan
Just as you’re planning the workflow and sprints of your mobile development team, you should have a plan for the mobile app testing process and, most importantly, stick to it. As test cycles get shorter, you won’t have the time to ponder about the types and methods you’re going to use halfway through the journey.


 Unlike WordPress membership plugins, adding password protection to your WordPress site doesn’t require user signup or login, which proves useful in many cases. You can block access to certain private WordPress pages and posts with a simple password. Sometimes, when setting up a private site for internal discussion and communications or while your website is […]