If you check this you will notice that at the bottom right hand side there's an added image which is also a link for the hosting site, note that I own the site you will see and I'm not the one who added that image but it was added automatically I believe with javascript by the host during the upload.
What I want to achieve is something similar to that or exactly that but obviousely the link and image, title will be different but I want my script which first perform some verification from data base by posting to the php file then based on the response I want to append for now let say that image on the site, but it should be this javascript that appends as the image will be different based on the response.
Here's the code that creates this image and I see theres also a javascript which follows this code and I believe it the script that generated this code to insert/append this image.
<div style="text-align: right;position: fixed;z-index:9999999;bottom: 0;width: auto;right: 1%;cursor: pointer;line-height: 0;display:block !important;"><a title="Hosted on free web hosting 000webhost.com. Host your own website for FREE." target="_blank" href="https://www.000webhost.com/?utm_source=000webhostapp&utm_campaign=000_logo&utm_medium=website&utm_content=footer_img"><img src="https://cdn.000webhost.com/000webhost/logo/footer-powered-by-000webhost-white2.png" alt="www.000webhost.com"></a></div>
If I can be able to DOM appendChild to create the above in javascript that would be great.
Atomize, a provider of revenue management systems for hotels, has released its open two-way API, making its property management systems (PMSs) accessible to integrations.
According to the company the hotel industry has long suffered from market fragmentation because of outdated technology and poor APIs, which for many years have generated vendor lock-ins. But the industry is going through a transformation where intelligent data-driven, cloud-based solutions are easily accessible.
This tutorial describes how to build a smart home project using ESP8266, Alexa, and Amazon Echo. In more detail, this project integrates ESP8266 with Alexa through Amazon Echo so that you can control devices connected to the ESP8266. As a result of this project, you can turn on and off several connected devices using voice commands. As you may already know, voice-enabled devices are gaining popularity. The voice interaction between humans and remote devices is evolving and opening new opportunities for home automation everywhere.
The target of this tutorial is to demonstrate how we can build a smart home system that can control LEDs using Alexa and Amazon Echo. This project can be further expanded by adding other kinds of devices. To make things simple, we will show how to add a remote IoT device to Amazon Echo and how to send a simple command using voice.
Jenkins X has just added initial support to install in Alibaba Container Service, its Kubernetes offering.
The following instructions allow installation in a managed Kubernetes cluster in any region outside of mainland China, where more configuration is needed to avoid using Google services blocked by Chinese authorities (Docker images in GCR). There is a pending issue for that.
This is the first installment in a series of blog posts on this topic.
Years have passed since the software world first gasped at the high-velocity achievements of Netflix, Etsy, Flickr, and others, watching in awe as they shipped features in less time than other companies could even begin to start planning them. The secrets to their success were collectively characterized as “DevOps” - a new approach to delivering software that focused intensely on continuous integration, continuous delivery, and breaking down barriers between engineering and operations teams in order to ship faster, and with less risk.
Regression Testing, by its definition, is a type of software testing to confirm that a recent program or code change has not adversely affected existing features.
It is done to make sure that the existing application is intact with the newly added features and nothing is broken. In order to achieve that, the existing test cases are executed selectively or sometimes completely. Regression testing ensures that the old code still works once the new code changes are done.
Assertions are an important part of any test automation framework, and Serenity gives us many options. You can, of course, use standard JUnit, Hamcrest or AssertJ assertions at any point in a Screenplay test. But more recent versions of Serenity Screenplay provide an alternative approach, which many developers find easier to use and faster to write: the serenity-ensure module.
Introducing serenity-ensure
The Ensure class produces a Performable, so you can integrate them directly into the attemptsTo() method. It also has a very readable DSL and lets you use code completion to discover the assertions you can use for different values, making writing assertions easier and quicker.
To understand the current and future state of DevSecOps, we gathered insights from 29 IT professionals in 27 companies. We asked them, "What have I failed to ask you that we need to consider with regards to implementing DevSecOps Trend Report?" Here's what they told us:
"DevSecOps"
The DevSecOps term is kind of funny, but I believe it should just be DevOps with security built in. If security is not built into DevOps, DevOps is failing.
I really don’t love the name. I would call it DevOps and say security is part of both the Dev and Ops domain. If we keep putting every responsibility people should do in the name, we’ll run out of room for the hashtag. #DevSecITSMTestAutomationMonitoringObservabilityPeopleFinanceMarketingQAOps.
Culture
Just like DevOps, think of DevSecOps as a culture shift first with the tools and processes next. Start with the security professionals to embrace automation to move at the pace of DevOps.
One final thought: tools don’t make DevSecOps. It’s a shift in behavior and mindset. The journey will be different for each organization based on cultural momentum. Collaboration is becoming even more important. That will create natural friction because of differences in opinion. Accept that as part of the change that will be necessary to inject security into DevOps.
When organizations are thinking about how they deliver software to their customers, it’s important for all developers to remember that they are in the business of delivering value to the business and the customer. Delivering secure code without vulnerabilities is one of the most valuable things they can do to be more valuable. Everything matters. You assume the apps on your phone are secure.
It may seem obvious that the reason development teams should care about DevSecOps is because they want (or should want) more secure software released quickly and with fewer blockers and hassles, resulting in a better working relationship with their security organization. But prioritizing DevSecOps might help development organizations with another goal — adoption of DevOps in the first place. Security and compliance requirements are often mandatory and well-defined, making the first steps of workflow automation clear to implement. Shifting security “left” might be an effective forcing function for an organization-wide adoption of basic DevOps practices, justifying the time and tool investments and making further iterations simpler. In that way, DevSecOps might actually be a shortcut to a broad and consistent DevOps practice.
The cultural aspect of DevSecOps is crucial. Discussions focused on security tools and how to apply those tools is important, however, it’s worth stressing that collaboration, shared responsibility and common KPIs needs to become a bigger focus to ensure teams implement DevSecOps successfully. Special emphasis also needs to be paid to thinking about which DevSecOps team structure works for your organization. Embedded security engineers, security trained Developers or cross-functional teams are all valid approaches to team formation. The same DevSecOps shoe does not fit everyone and it is important to think about what will provide the most benefit in your organizational and technology culture.
The most important takeaway is that DevSecOps is going to become mainstream and that solutions exist already to facilitate and enable companies to embark on this journey. Organizations must do their due diligence and pick a vendor that provides a comprehensive offering instead of building something that is outside of and detracts from their core business. Regardless of the approach, take this seriously, formulate a practical plan and execute it one step at a time.
Tools
1) If you’re not confident in your own security group there are a lot of companies with expertise in security and the security pipeline, so rent it and bring it in. Bring forward security in your own pipeline and mature your current security group to form a cross-functional product team. Use outside resources to help. 2) If you have a CI pipeline and haven’t implemented a code scanner yet, you need to do that tomorrow!
It’s interesting to look at how tools can help this process. Tools can be important in keeping a process sustainable on a team. The same way you think about CI/CD is how you should think about security. Implementing a tool to analyze security can be a great addition to DevSecOps. The more you can automate the tedious or repetitive elements of the security n to the SDLC the more they will stick with the process and not hinder productivity.
How to implement tools. The c-level and how they get involved. Changing the culture starts at the top. Others in the organization start to feel DevSecOps is important. People need to understand what security means in their day to day roles and responsibilities.
Other
This is a great story. I can’t emphasize enough that time, resources (+expertise) and money are critical in delivering true DSO. This is not academic — this is the reality.
Don’t get overconfident. There is value in traditional security. Don’t forget about your IAM set up. Don’t forget the fundamentals.
Help developers differentiate the signal from the noise. At KubeCon, there were three or four different service mesh technologies. How to choose the right technology. Help developers understand the difference. Get war stories about what does and doesn’t. Show your DevOps trump card.
Using technology helping to secure the data and integrity that leverages blockchain.
Node has become popular, the open source supply chain for the code will become more fragile. Really understanding your code supply chain will be critically important. Just because something is intangible doesn’t mean you don’t need to understand where it comes from. We have not seen the full impact of insecure code. The other thing any time a new project hits the PMO office, the security team is tightly aligned with the product management office to get visibility sooner rather than later and helps get the security team involved earlier.
There is huge potential in the area of infrastructure security and security considerations for Operations teams when monitoring products that can be discussed in more detail. Also, how AI and ML can help identify issues before they happen based on patterns is a very important part of the DevSecOps journey, that could be discussed in further detail.
Benefits of consistency and best practices for developers, CI/CD, and operations.
1) We often see companies adopting DevOps processes to deliver new code fast and they find success right away. However, proving compliance/security in an everything-as-code world isn’t easy, because the people with security expertise simply are not coders. 2) The more DevSecOps teams can show their work to the rest of the business, the easier it will be to comply with internal and external regulation. There will be fewer manual walk-throughs and compliance hurdles down the road, too.
Perhaps the more important question you did not ask: Where is regulatory compliance headed next?
Hi Spring fans! In this installment, Josh Long (@starbuxman) talks to @Datadog's Jason Yee (@gitbisect) about obersvability, operations, metrics, Kuberenets, language, and more.
Planning in Agile involves so much more than a simple checklist.
Today in organizations, we plan and estimate to make effective decisions that help us stay competitive. We engage in this activity to get answers for simple questions like:
What needs to be built?
When can we complete?
How much will this cost?
Who needs to do it?
In traditional software delivery, we have been planning and estimating by following a sequential plan-driven approach. As these projects are short-lived once completed, there is no long-term connection between the product and the teams who built it. Also, more of the unfinished work and technical debt is left behind.
I was developing a new functionality into Java::Geci to make it less prone to code reformatting. The current release of the code will overwrite an otherwise identical code if it was reformatted. It is annoying since it is fairly easy to press the reformatting key shortcut and many projects even require that developers set their editor to automatically format the code upon save. In those cases, Java::Geci cannot be used because as soon as the code is reformatted, the generator thinks that the code it generates is not the same as the one already in the source file, updates it, and signals the change of the code failing the unit tests.
The solution I was crafting compares the Java source files — first, converting them to a list of lexical elements. That way, you can even reformat the code inserting new lines, spaces, etc., so long as long the code remains the same. To do that, I needed a simplified lexical analyzer for Java. Writing a lexical analyzer is not a big deal, I created several for different reasons since I first read the Dragon Book in 1987. The only thing I really needed is the precise definition of what are the string, character, number literals, the keywords, and so on. In short, what is the definition of the Java language on the lexical level and how is it processed. Fortunately, there is a precise definition for that, the Java Language Specification, which is not only precise but also readable and has examples. So, I started to read the corresponding chapters.
In the world of likes and social statistics, reviews are very important method for leaving feedback. Users often like to know the opinions of others before deciding on items to purchase themselves, or even articles to read, movies to see, or restaurants to dine.
Developers often struggle with with reviews — it is common to see inaccessible and over-complicated implementations. Hey, CSS-Tricks has a snippet for one that’s now bordering on a decade.
Let’s walk through new, accessible and maintainable approaches for this classic design pattern. Our goal will be to define the requirements and then take a journey on the thought-process and considerations for how to implement them.
Scoping the work
Did you know that using stars as a rating dates all the way back to 1844 when they were first used to rate restaurants in Murray's Handbooks for Travellers — and later popularized by Michelin Guides in 1931 as a three-star system? There’s a lot of history there, so no wonder it’s something we’re used to seeing!
There are a couple of good reasons why they’ve stood the test of time:
Clear visuals (in the form of five hollow or filled stars in a row)
A straightforward label (that provides an accessible description, like aria-label)
When we implement it on the web, it is important that we focus meeting both of those outcomes.
It is also important to implement features like this in the most versatile way possible. That means we should reach for HTML and CSS as much as possible and try to avoid JavaScript where we can. And that’s because:
JavaScript solutions will always differ per framework. Patterns that are typical in vanilla JavaScript might be anti-patterns in frameworks (e.g. React prohibits direct document manipulation).
Languages like JavaScript evolve fast, which is great for community, but not so great articles like this. We want a solution that’s maintainable and relevant for the long haul, so we should base our decisions on consistent, stable tooling.
Methods for creating the visuals
One of the many wonderful things about CSS is that there are often many ways to write the same thing. Well, the same thing goes for how we can tackle drawing stars. There are five options that I see:
Which one to choose? It depends. Let's check them all out.
Method 1: Using an image file
Using images means creating elements — at least 5 of them to be exact. Even if we’re calling the same image file for each star in a five-star rating, that’s five total requests. What are the consequences of that?
More DOM nodes make document structure more complex, which could cause a slower page paint. The elements themselves need to render as well, which means either the server response time (if SSR) or the main thread generation (if we’re working in a SPA) has to increase. That doesn’t even account for the rendering logic that has to be implemented.
It does not handle fractional ratings, say 2.3 stars out of 5. That would require a second group of duplicated elements masked with clip-path on top of them. This increases the document’s complexity by a minimum of seven more DOM nodes, and potentially tens of additional CSS property declarations.
Optimized performance ought to consider how images are loaded and implementing something like lazy-loading) for off-screen images becomes increasingly harder when repeated elements like this are added to the mix.
It makes a request, which means that caching TTLs should be configured in order to achieve an instantaneous second image load. However, even if this is configured correctly, the first load will still suffer because TTFB awaits from the server. Prefetch, pre-connect techniques or the service-worker should be considered in order to optimize the first load of the image.
It creates minimum of five non-meaningful elements for a screen reader. As we discussed earlier, the label is more important than the image itself. There is no reason to leave them in the DOM because they add no meaning to the rating — they are just a common visual.
The images might be a part of manageable media, which means content managers will be able to change the star appearance at any time, even if it’s incorrect.
It allows for a versatile appearance of the star, however the active state might only be similar to the initial state. It’s not possible to change the image src attribute without JavaScript and that’s something we’re trying to avoid.
Wondering how the HTML structure might look? Probably something like this:
<div class="Rating" aria-label="Rating of this item is 3 out of 5">
  <img src="/static/assets/star.png" class="Rating--Star Rating--Star__active">
  <img src="/static/assets/star.png" class="Rating--Star Rating--Star__active">
  <img src="/static/assets/star.png" class="Rating--Star Rating--Star__active">
  <img src="/static/assets/star.png" class="Rating--Star">
  <img src="/static/assets/star.png" class="Rating--Star">
</div>
In order to change the appearance of those stars, we can use multiple CSS properties. For example:
.Rating--Star {
  filter: grayscale(100%); // maybe we want stars to become grey if inactive
  opacity: .3; // maybe we want stars to become opaque
}
An additional benefit of this method is that the <img> element is set to inline-block by default, so it takes a little bit less styling to position them in a single line.
This was once a fairly common implementation. That said, it still has its pros and cons.
For example:
Sure, it’s only a single server request which alleviates a lot of caching needs. At the same time, we now have to wait for three additional events before displaying the stars: That would be (1) the CSS to download, (2) the CSSOM to parse, and (3) the image itself to download.
It’s super easy to change the state of a star from empty to filled since all we’re really doing is changing the position of a background image. However, having to crack open an image editor and re-upload the file anytime a change is needed in the actual appearance of the stars is not the most ideal thing as far as maintenance goes.
We can use CSS properties like background-repeat property and clip-path to reduce the number of DOM nodes. We could, in a sense, use a single element to make this work. On the other hand, it’s not great that we don’t technically have good accessible markup to identify the images to screen readers and have the stars be recognized as inputs. Well, not easily.
In my opinion, background images are probably best used complex star appearances where neither CSS not SVG suffice to get the exact styling down. Otherwise, using background images still presents a lot of compromises.
SVG is great! It has a lot of the same custom drawing benefits as raster images but doesn’t require a server call if it’s inlined because, well, it’s simply code!
We could inline five stars into HTML, but we can do better than that, right? Chris has shown us a nice approach that allows us to provide the SVG markup for a single shape as a <symbol> and call it multiple times with with <use>.
<!-- Draw the star as a symbol and remove it from view -->
<svg xmlns="http://www.w3.org/2000/svg" style="display: none;">
  <symbol id="star" viewBox="214.7 0 182.6 792">
    <!-- <path>s and whatever other shapes in here -->
  </symbol>
</svg>

<!-- Then use anywhere and as many times as we want! -->
<svg class="icon">
  <use xlink:href="#star" />
</svg>

<svg class="icon">
  <use xlink:href="#star" />
</svg>

<svg class="icon">
  <use xlink:href="#star" />
</svg>

<svg class="icon">
  <use xlink:href="#star" />
</svg>

<svg class="icon">
  <use xlink:href="#star" />
</svg>
What are the benefits? Well, we’re talking zero requests, cleaner HTML, no worries about pixelation, and accessible attributes right out of the box. Plus, we’ve got the flexibility to use the stars anywhere and the scale to use them as many times as we want with no additional penalties on performance. Score!
The ultimate benefit is that this doesn’t require additional overhead, either. For example, we don’t need a build process to make this happen and there’s no reliance on additional image editing software to make further changes down the road (though, let’s be honest, it does help).
This method is very similar to background-image method, though improves on it by optimizing drawing the shape with CSS properties rather than making a call for an image. We might think of CSS as styling elements with borders, fonts and other stuff, but it’s capable of producing ome pretty complex artwork as well. Just look at Diana Smith’s now-famous “Francine" portrait.
Francine, a CSS replica of an oil painting done in CSS by Diana Smith (Source)
We’re not going to get that crazy, but you can see where we’re going with this. In fact, there’s already a nice demo of a CSS star shape right here on CSS-Tricks.
Or, hey, we can get a little more crafty by using the clip-path property to draw a five-point polygon. Even less CSS! But, buyer beware, because your cross-browser support mileage may vary.
This method is very nice, but very limited in terms of appearance. Why? Because the appearance of the star is set in stone as a Unicode character. But, hey, there are variations for a filled star (★) and an empty star (☆) which is exactly what we need!
Unicode characters are something you can either copy and paste directly into the HTML:
We can use font, color, width, height, and other properties to size and style things up a bit, but not a whole lot of flexibility here. But this is perhaps the most basic HTML approach of the bunch that it almost seems too obvious.
Instead, we can move the content into the CSS as a pseudo-element. That unleashes additional styling capabilities, including using custom properties to fill the stars fractionally:
Let’s break this last example down a bit more because it winds up taking the best benefits from other methods and splices them into a single solution with very little drawback while meeting all of our requirements.
Let's start with HTML. there’s a single element that makes no calls to the server while maintaining accessibility:
<div class="stars" style="--rating: 2.3;" aria-label="Rating of this product is 2.3 out of 5."></div>
As you may see, the rating value is passed as an inlined custom CSS property (--rating). This means there is no additional rendering logic required, except for displaying the same rating value in the label for better accessibility.
Let’s take a look at that custom property. It’s actually a conversion from a value value to a percentage that’s handled in the CSS using the calc() function:
--percent: calc(var(--rating) / 5 * 100%);
I chose to go this route because CSS properties — like width and linear-gradient — do not accept <number> values. They accept <length> and <percentage> instead and have specific units in them, like % and px, em. Initially, the rating value is a float, which is a <number> type. Using this conversion helps ensure we can use the values in a number of ways.
Filling the stars may sound tough, but turns out to be quite simple. We need a linear-gradient background to create hard color stops where the gold-colored fill should end:
Note that I am using custom variables for colors because I want the styles to be easily adjustable. Because custom properties are inherited from the parent elements styles, you can define them once on the :root element and then override in an element wrapper. Here’s what I put in the root:
The last thing I did was clip the background to the shape of the text so that the background gradient takes the shape of the stars. Think of the Unicode stars as stencils that we use to cut out the shape of stars from the background color. Or like a cookie cutters in the shape of stars that are mashed right into the dough:
Of the five methods we covered, two are my favorites: using SVG (Method 3) and using Unicode characters in pseudo-elements (Method 5). There are definitely use cases where a background image makes a lot of sense, but that seems best evaluated case-by-case as opposed to a go-to solution.
You have to always consider all the benefits and downsides of a specific method. This is, in my opinion, is the beauty of front-end development! There are multiple ways to go, and proper experience is required to implement features efficiently.
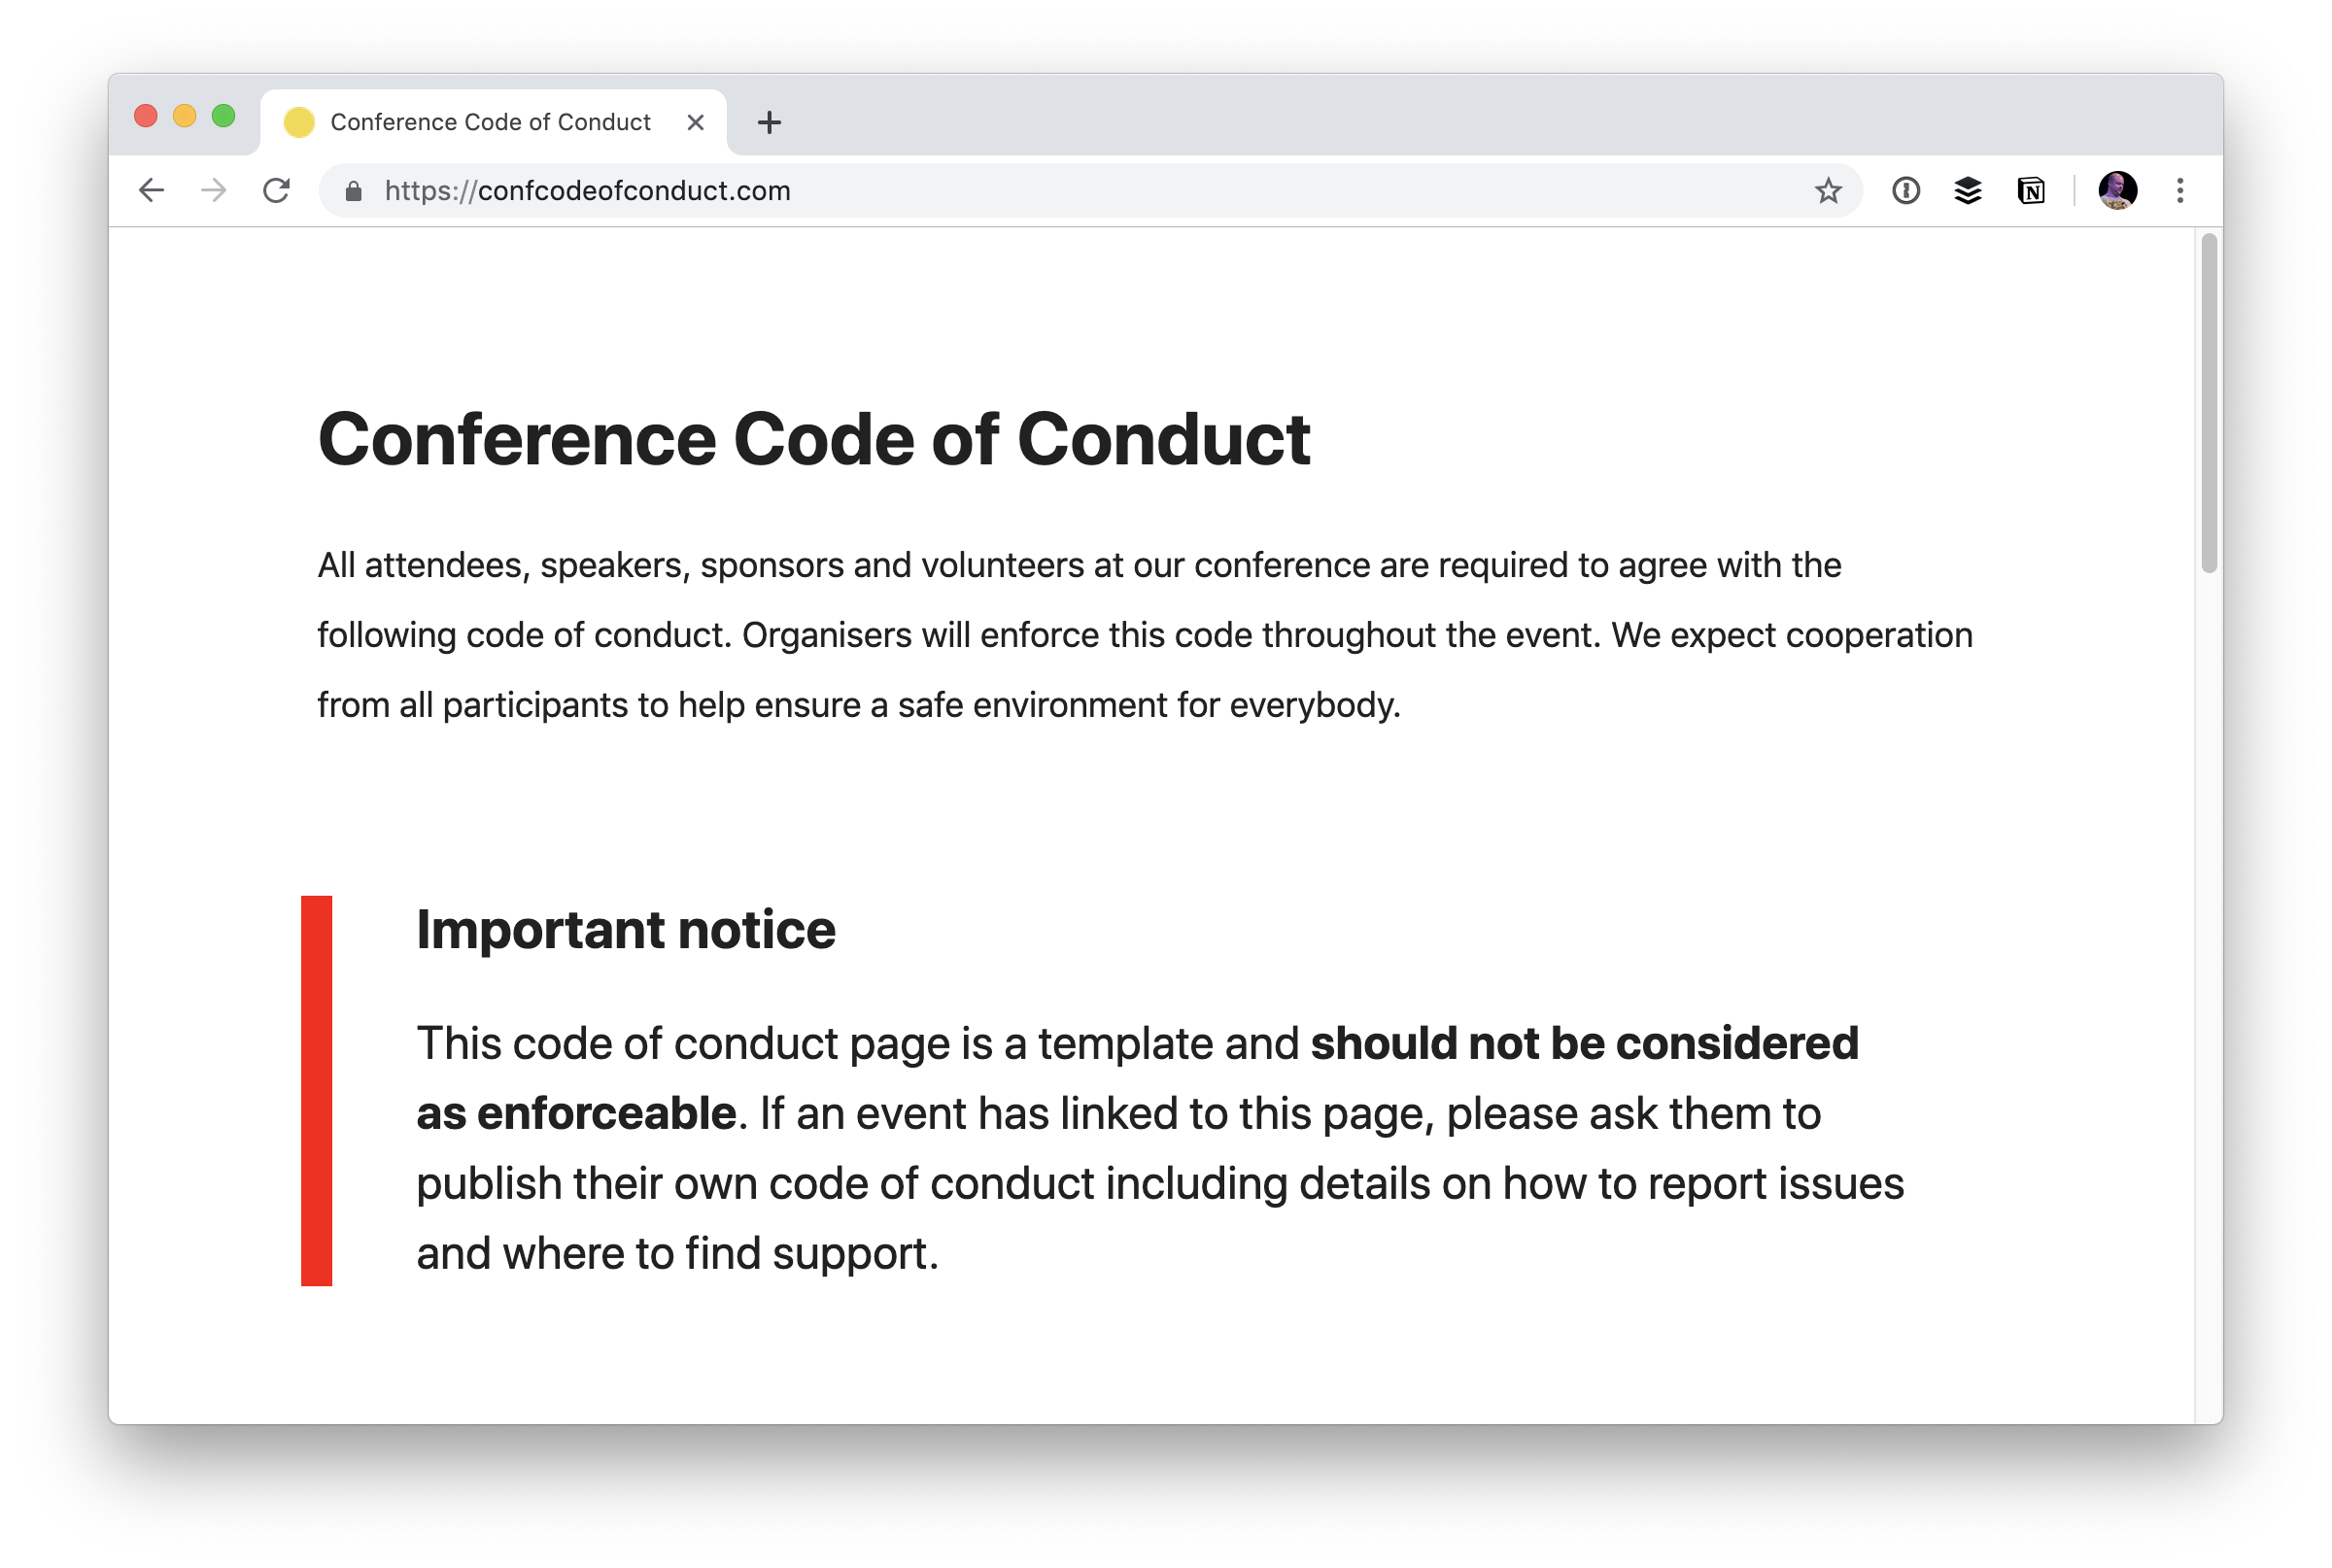
Now that we're running this, I've got loads of Pull Requests for conferences all around the world. I didn't realize that many (most?) conferences use the template at confcodeofconduct.com. In fact, many of them just link to it and call it a day.
That's why I'm very happy to see there is a new, bold warning about doing just that.
Important notice
This code of conduct page is a template and should not be considered as enforceable. If an event has linked to this page, please ask them to publish their own code of conduct including details on how to report issues and where to find support.
It's great that this site exists to give people some starter language for thinking about the idea of a code of conduct, but I can attest to the fact that many conferences used it as a way to appear to have a code of conduct before this warning while make zero effort to craft their own.
The primary concern about linking directly to someone else's code of conduct or copy and pasting it to a new page verbatim is that there is nothing about what to do in case of problems. So, should a conduct incident occur, there is no documented information for what people should do in that event. Without actionable follow-through, a code of conduct is close to meaningless. It's soul-less placating.
This is just one example:
It's not to single someone out. It's just one example of at least a dozen.
I heard from quite a few people about this, and I agree that it's potentially a serious issue. I've tried to be clear about it: I won't merge a Pull Request if the conference is missing a code of conduct or it simply links to confcodeofconduct.com (or uses a direct copy of it with no actionable details).
I know the repo is looking for help translating the new warning into different languages. If you can help with that, I'm sure they'd love a PR to the appropriate index HTML file.
We could all use a little advice, no matter where we are in our careers.
Over the last couple of months, I have met several young developers that are either looking for the first job or are still trying to get their bachelor's degree. Many of them asked me to give them my advice on how they can make their first steps in a software development career.
It’s really nice to see young people care so much about their career. I don’t remember that the guys of my age had the same mentality. Whatever the reason, I like it, and I'm happy to help.
Do you want to embed Bing Maps on your WordPress website? If you are looking for a Google Maps alternative, then Bing Maps is the right candidate for you.
Similar to Google Maps, you can use Bing Maps to show directions, traffic, routes, and navigation instructions on your WordPress site. Since it is owned by Microsoft, it is a great map application with a ton of useful data.
In this article, we will show you how to easily embed Bing Maps in WordPress, step by step.
Adding Bing Maps in WordPress (No Plugin Required)
First thing you need to do is go to Bing Maps website and search for the location or map you want to embed.
Once you have found the location, click on the ‘More’ option with three-dots icon, and select ‘Embed a map’ option.
After that, it will open a new tab where you can customize the map to embed in your website.
You can choose map size, map type (static or draggable map), map style (road or aerial), and map links. Review the customization options and then click on the Generate Code.
After that, it will provide you a code snippet. Go ahead and copy the code because you’ll need it in the next step.
Now, switch back to your WordPress site and create a new page or edit an existing one where you want to add the map.
On the page edit screen, click on the Add New Block icon and select the Custom HTML block.
After that, paste the Bing Map embed code that you copied earlier in the HTML field.
You can now save or publish your page and click on the preview button to see the map embedded in your page. Here is how the Bing Map appeared on our demo website.
Adding Bing Maps Using a Plugin
If you need to embed only one map on your website, then the manual method shown above is the best option.
However if you run a website where you often need to add maps, then using a plugin to add Bing Maps would be easier.
It is a free WordPress map plugin that lets you embed Bing maps, Leaflet maps, and other Google Maps alternatives in your WordPress blog.
To use this plugin with Bing maps, you will need to have a Bing Map API Key.
Simply create an account on Bing Maps Dev Center website. If you already have a Microsoft account, then you can simply sign in with your account credentials.
Once you have signed into your account, you need to click on the ‘My Account’ menu and select ‘My Keys’ option.
On the next screen, you need to fill out your website information to create a key.
After that, you can see a message ‘Key created successfully’ and the key details in a box.
You can simply click on the ‘Copy key’ link or ‘Show key’ link and copy the Bing Maps API key.
After that, you need to paste the key in your plugin settings.
Visit Ultimate Maps by Supsystic » Settings from your dashboard and select ‘Bing Microsoft’ as your maps engine. After that, paste the API key you copied earlier in the Bing Maps API key field.
Don’t forget to save your plugin settings.
After that, you need to add marker categories by visiting Ultimate Maps by Supsystic » Marker Categories » Add Category.
Create as many marker categories as you need.
Next, click on the Add Map menu to create a new map. Enter a name for your map, define the width and height of the map, choose navigation bar mode, etc.
You can also configure options to make the map draggable, use double click to zoom, and more. Most important of all, enter the location to display in the map center.
Next, scroll down and configure more options below. Once done, click on the ‘Save Map’ button below the map preview box.
After that, you can add markers to show the main location points in your map. Click on the Markers tab, and then add a name for your maker.
You can use the name of the place or organization as a marker name.
For example, we used ‘University of Florida’ as a marker name because we want to show some of the best colleges in Florida in our demo map.
After that, you can add marker description text as well as image.
Scroll down and choose an icon for your new marker. Next, you need to enter the address to point the marker. And, also select the marker category.
Review all the other options, and then click the ‘Save Marker’ button.
You can add more markers by following the same steps.
As you add the markers, you can preview them live on the preview box. Once you are happy with your map, navigate to the ‘Map shortcode’ option at the top, and copy the shortcode.
After that, create a new page or edit an existing one to embed your new Bing map.
Once in the page editor, click on the Add New Block icon and choose the Shortcode block under Widgets section.
Now you need to paste the Bing map shortcode that you copied before.
Once done, save or publish your page, and preview how the Bing map looks on your website.
Here is how the embedded Bing map appeared on our demo website.
We hope this article helped you to learn how to embed Bing Maps in WordPress easily. You may also want to see our guide on how to embed actual tweets in WordPress blog posts.
If you liked this article, then please subscribe to our YouTube Channel for WordPress video tutorials. You can also find us on Twitter and Facebook.
How To Build A Sketch Plugin With JavaScript, HTML And CSS (Part 1)
How To Build A Sketch Plugin With JavaScript, HTML And CSS (Part 1)
Matt Curtis
This tutorial is intended for people who know and use the Sketch app and are not afraid of dabbling with code. To profit from it the most, you will need to have at least some basic experience writing JavaScript (and, optionally, HTML/CSS).
The plugin we’ll be creating is called “Mosaic”. In part one, we’ll learn about the basic files that make up a Sketch plugin; we’ll write some JavaScript and create a user interface for our plugin with the help of some HTML and CSS. The next article will be about how to connect the user interface to the core plugin code, how to implement the plugin’s main features, and at the end of it, you will also learn how to optimize the code and the way the plugin works.
I’ll also be sharing the plugin’s code (JS, HTML, CSS) and files which you’ll be able to examine and use for learning purposes.
What Are Sketch Plugins, And How Do They Work?
In Sketch, plugins are a way to add features and functionality that aren’t present in Sketch “out of the box.” Considering that there’s almost always going to be some missing feature or integration in any given program (especially given the vast number of needs any individual designer might have!), one can begin to imagine how plugins might be especially useful and powerful. Sketch plugins are able to do pretty much everything you’d expect, like manipulating the color, shape, size, order, style, grouping, and effects of layers, but also able to do things like make requests to internet resources, present a user interface, and much, much more!
On the programming side, all Sketch plugins are written in JavaScript code. Well, actually, that’s not entirely true. It’s more accurate to say that most Sketch plugins are written in JavaScript, as it’s also possible to write a Sketch plugin in one of Apple’s programming languages, Objective-C and Swift, though even they require a small amount of JavaScript knowledge.
Don’t worry though. In this article, we’ll focus on how to build Sketch plugins using JavaScript, HTML, and CSS alone. We won’t be going over the basics of HTML, CSS, or JavaScript — this article assumes at least some knowledge and experience with all of these three. The MDN developer website provides a great place to learn more about web development.
Let’s Get Started!
Firstly, What Are We Making?
In this tutorial, I’ll teach you how to build a basic, beginner-friendly plugin that will be able to create, duplicate, and modify layers, as well as present the user with a nice user interface. By doing so, my goal is to establish a fundamental knowledge on which you can build on and use it to create your own plugins.
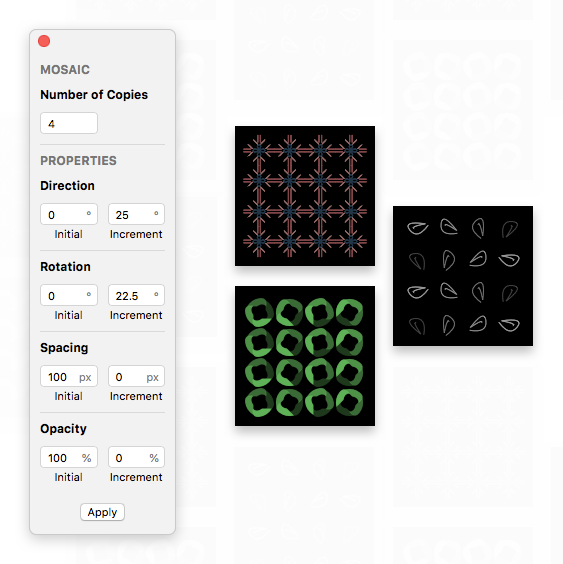
The plugin we’ll be building is called Mosaic, and is effectively a “pattern generator”. Feed it your layers, tweak a few settings, and it’ll create a pattern:
The Mosaic’s UI, and some examples of patterns made with it. (Large preview)
A bit of history: Mosaic is inspired in large part by an old-school Adobe Fireworks plugin called Twist-and-Fade. Twist-and-Fade was pretty powerful, able to duplicate a layer any number of times while adjusting its hue, position, rotation, size, and opacity. The plugin was even able to generate animated GIFs, like this one, where it created the frames for the two rotating elements in the cassette tape:
For the purposes of this tutorial, we’ll be building a somewhat similar plugin for Sketch, though intentionally simplified so as to keep the tutorial as accessible as possible. Specifically, our plugin will be able to:
Duplicate any Sketch layer (bitmap or vector) and tweak the duplicates’ layer’s position, rotation, and opacity. This will give us an introduction to manipulating layers using Sketch’s JavaScript APIs.
Display a user interface created using HTML, CSS, and JS, which will teach you about how to easily create an interface for the plugin, by using web technologies that you may already be familiar with. The plugin interface is pretty important since it’s how we’ll gather the user’s inputs regarding how the user wants the resulting mosaic image to look.
Creating Our Base Plugin In Ten Seconds Flat
First, we’ll be creating the “base” (or template) for the plugin we want to build. We could create all the necessary files and folders that make up a plugin manually, but luckily we don’t have to — because Sketch can do it for us. After we’ve generated the template plugin, we’ll be able to customize it as we see fit.
There’s a really quick and easy technique we can use to create the template plugin, which is pretty much my go-to method when I need to whip a plugin together to solve whatever problem I’m dealing with at a given moment. Here’s how it works:
With Sketch open, check the menu bar at the top of the screen and click Plugins -> Run Script. This will open up a dialog box that we can use to test and run the code. We can also save any code we enter in it as a plugin, which is the part we’re specifically interested in right now.
Clear whatever code is already in this dialog and replace it with the following demo code:
const UI = require("sketch/ui");

UI.message("😍 Hey there, you fantastic plugin developer you! This is your plugin! Talking to you from the digital computer screen! In Sketch! Simply stupendous!");
Next, hit Save Script as Plugin in the bottom-left of the window, enter whatever name you’d like for this plugin to have (in our case, this is “Mosaic”), then Save Script as Plugin once more.
Press “Save” in the bottom-left of the window and enter whatever name you'd like for this plugin to have. (Large preview)
Believe it or not, we’re already done — all that’s left is to eat the cake we just baked. Here comes the fun part. Opening the Plugins menu once again, you should see something like this: your brand-spanking-new plugin listed as “Mosaic”! Click on it!
Congratulations, you’ve just written your first Sketch plugin!
What you should see after clicking “Mosaic” should be like the short video above, with an unobtrusive tooltip message appearing at the bottom of the screen beginning with the words “Hey there…” — which is exactly what the code we pasted in tells it to do. This is what it makes this technique so great: it makes it easy to paste, modify and test code without having to build a plugin from scratch. If you’re familiar with or have ever played with your browser’s web console, this is basically that. Having this tool in your back pocket as you build and test code is a must-have.
Let’s do a quick rundown of what the code you added does:
First, it imports the sketch/uimodule of Sketch’s built-in JS library, and assigns it to the UI variable. This module contains a couple of useful interface-related methods, one of which we’ll use:
const UI = require("sketch/ui");
Next, it calls the message method (which is part of the sketch/ui module) with the string of text we want displayed in the tooltip we saw:
UI.message("😍 Hey there, you fantastic plugin developer you! This is your plugin! Talking to you from the digital computer screen! In Sketch! Simply stupendous!");
The message() method provides a great way to present an unobtrusive message to the user; it’s great for cases where you don’t need to steal focus (non-modal) and don’t need any fancy buttons or text fields. There’s also other ways to present common UI elements like alerts, prompts, and such, some of which we’ll be using as we build Mosaic.
Customizing Our Plugin’s Metadata
We now have a basic plugin to start from, but we still need to tweak it further and make it truly ours. Our next step will be to change the plugin’s metadata.
For this step, we’ll need to peek into what’s called the plugin bundle. When you hit save in the ‘Run Script’ window, Sketch saved your plugin as a folder named Mosaic.sketchplugin that you can find in the
~/Library/Application Support/com.bohemiancoding.sketch3/Plugins directory. That’s a bit long and annoying to remember; as a shortcut, you can also pull it up via Plugins -> Manage Plugins -> (right-click your plugin) -> Reveal Plugins Folder. Even though it appears in Finder as a single file, it’s actually a folder containing everything our plugin needs for Sketch to run it. The reason it appears as a single file despite being a folder is because when you first installed Sketch, Sketch registered the .sketchplugin extension as a “bundle” (a special kind of folder that appears as a file) and asked for it to automatically open in Sketch when opened.
Let’s take a peek inside. Right-click Mosaic.sketchplugin, then click “Show Package Contents”. Inside, you should see the following directory structure:
You might be wondering why there’s a file in there with the extension .cocoascript. Don’t worry — it’s just a regular JavaScript file, and only contains the code we entered earlier. Go ahead and rename this file to index.js, which will change the directory structure to look like the one below:
The most common way of organizing the files inside a plugin bundle is as follows: your code (JavaScript) and manifest.json belong in Sketch/, and resources (think images, audio files, text files, etc.) belong in Resources/.
Let’s start by tweaking the file named manifest.json. Open it inside your favorite code editor, such as Visual Studio Code or Atom.
You’ll see that at the moment there’s relatively little inside here, but we’ll add more soon. The plugin manifest serves primarily two purposes:
First, it provides metadata that describes the plugin to the user — things like its name, version, the author’s name, and so on. Sketch uses this information in the Sketch -> Preferences -> Plugins dialog to create a listing and description for your plugin.
Second, it also tells Sketch about how to get down to your business; that is, it tells Sketch how you’d like your plugin’s menu to look, what hotkeys to assign to your plugin, and where your plugin’s code lives (so Sketch can run it).
Considering purpose #1, describing the plugin to the user, you’ll probably notice that right now there’s no description or author given, which would be confusing for the user and make the plugin difficult to identify. Let’s fix that by adjusting the relevant keys’ values to:
{
        "description": "Generate awesome designs and repeating patterns from your layers!",
        "author": "=> Your name here <="
}
Next, let’s adjust the plugin’s identifier. This identifier uses what is called a “reverse domain notation” which is a really concise (or boring, take your pick) way to say “take your site’s domain, reverse the order, then put your product’s name at the end.” This will come out something like: com.your-company-or-your-name-its-not-that-big-a-deal.yourproduct.
You don’t have to stick to this naming convention — you can put whatever you want here, so long as it’s unique enough to avoid conflicts with other plugins (though it’s probably a good idea to stick to the RDN format, especially as it provides a simple, reusable system for your plugin identifiers).
To that effect, change your identifier to com.your-name.mosaic:
{
    "identifier": "com.your-name.mosaic"
}
I personally like to take all metadata related keys (title, author, identifier, etc.) and group them near the top of the manifest so they’re not spread out all over the place and help preserve my sanity when I need to find them.
Next, let’s take a look at the menu and commands keys. These two are responsible for telling Sketch what code to call and in response to what.
If you look at the menu key, you’ll see it contains a title key, whose value is the name our plugin will show up with in the Plugins menu. It also has an items key, which is a list of command identifiers:
Right now there’s only one command identifier in this list, "com.bohemiancoding.sketch.runscriptidentifier". Command identifiers always point to a command in the commands list. Right now our plugin only has one command, which is the one with this identifier:
Whenever you add a command identifier to a menu entry, Sketch will look up the command entry that has that identifier and will display the value of its name key (which in this case is “Mosaic”) and will show it in your plugin’s menu instead of the identifier.
As for the role commands play, we can think of a command entry as a way to tell Sketch what function in our plugin’s JavaScript code we want to run when that command is invoked, the “invocation” usually being the user’s click on the associated menu item. The command entry doesn’t do anything on its own, it’s just JSON — it simply provides a description to Sketch of where to look for the JavaScript it needs to run when the command is invoked.
So far, we’ve talked about what a command’s name and identifier keys do, but there are two other keys in a command that need to be addressed: script and handlers.
The script key tells Sketch where the JavaScript file that it should run is. Note how Sketch assumes that the script file in question is in the Sketch/ folder, which is why for simplicity’s sake you’ll want to make sure all your JavaScript code lives somewhere under the Sketch/ folder. Before we move on from this key it’s important that you make sure you change this key’s value to index.js, just like we renamed the file earlier. Otherwise, Sketch won’t be able to find and run your JavaScript file.
The value of the handlers key is what Sketch looks at to determine what function in your JavaScript to call. Here, we only have one handler set: run, with the value onRun. run is the name of a predefined, built-in Sketch action. This run action will always be called when a user clicks a menu item that references this command. onRun is the name of a function in the auto-generated script.cocoascript file (which we renamed to index.js), and the function we want to be called when the run event occurs, i.e., when the user clicks the menu item.
In the example we have so far, this process plays out something like this:
The user clicks our menu item.
Sketch finds the command associated with that menu item.
Sketch finds the script file the command refers to and runs it (which in this case means it executes the JavaScript in index.js).
Since this command was invoked by a menu item click, it’s considered a run action. That means Sketch will look at the command’s handlers.run value for the function to call next, which in this case is onRun.
Sketch calls the onRun function.
Commands are most commonly called in response to a user clicking on one of your menu items, but they can also be called in response to other user actions, such as the user changing the selection or a property on a layer. However, for this plugin, we won’t be using any of these other actions. (You can learn more about actions and how they work in the Action API help page.)
Before we move on from this manifest, we’ll want to make two other tweaks. Right now, our menu has the structure:
…which is a bit redundant since our plugin only has one menu item. It also adds a bit of unnecessary friction for our user as our plugin now takes two clicks to invoke rather than one. We can fix this by adding isRoot: true to our menu:
As for our second tweak, let’s go ahead and rename this command identifier to something less unwieldy. Since command identifiers only need to be unique within the context of an individual plugin, we can safely rename it to something more concise and obvious, like "open":
Before we move on, it’s useful to note that menus can contain also other menus. You could easily create a sub-menu by nesting another { title: ..., items: ... } entry inside another menu’s items list:
So far, we’ve written some demo code and customized our plugin’s manifest. We’ll now move on to creating its user interface, which is essentially a web page embedded in a window (similarly to the browsers you’re familiar with using):
Mosaic’s user interface design has its own window, which we can consider the most basic component; we’ll start with it. In order to create and display a window, we’ll have to make use of a class that’s built into macOS by default, called NSWindow. Over the remainder of this tutorial, we’ll actually be doing this quite a bit (using built-in APIs like NSWindow) which might seem a little daunting if you’re unfamiliar with it, but don’t worry — I’ll explain everything along the way!
Note: While we’re talking about built-in APIs, the reason we’re able to use this class at all is thanks to a bridge present in the JavaScript runtime used by Sketch plugins. This bridge automatically imports these built-in classes, methods, and functions that would normally only be available to native applications.
Open Sketch/index.js in your code editor, delete what’s already there, and paste in the following:
Let’s take a look at what this first bit of code does:
function onRun(context){
Remember earlier when we talked about commands and how they function, and we told Sketch to call in response to a menu-click was called onRun? (If you need a refresher, revisit that part above, then come back.) All this bit does is create that function. You’ll also notice our onRun function takes a context argument. This is an argument Sketch will call your command handlers with that can provide us with certain information. Later on, we’ll use it in order to get the URL of our plugin bundle on the user’s computer.
First, we call alloc() on NSWindow; this basically means “set aside some memory for an instance of NSWindow”. It’s sufficient to know that you’ll have to do this for every instance of a native class you want to create. The alloc method is available in every native class.
Next, we call NSWindow’s initializer method (that is, the method that actually creates an instance of NSWindow), which is named initWithContentRect:styleMask:backing:defer:. You’ll notice that’s different from what we call in our code above — it’s got a bunch of colons (:) between every argument. Since we can’t use that syntax in JavaScript, Sketch conveniently renames it to something we can actually use by replacing the colons with underscores, which is how we get its JS name: initWithContentRect_styleMask_backing_defer.
Next, we pass in each of the arguments the method needs. For the first argument, contentRect, we supply a rectangle with a size large enough for our user interface.
For styleMask, we use a bitmask which says that we want our window to have a close button, a title bar, and to be resizable.
The next two arguments, backing and defer, are always going to be set to NSBackingStoreBuffered and false, so we don’t really need to worry about them. (The documentation for this method goes into further detail as to why this is.)
Here we set NSWindow’s releasedWhenClosed property to false, which means: “Hey! don’t delete this window from memory just because the user closes it.” Then we call makeKeyAndOrderFront(null) which means: “Move this window to the forefront, and give it keyboard focus.”
Web View: The Interface
To make things easier, I’ve already written the HTML and CSS code of the plugin’s web user interface we’re going to be using; the only remaining code we’re going to have to add to it will deal with making sure we’re able to communicate between it and our Sketch plugin code.
Next, download the HTML and CSS code. Once you’ve downloaded it, extract it, then move the folder named “web-ui” into our plugin’s Resources folder.
Note: Writing and optimizing the actual HTML/CSS code is outside of the scope of this tutorial, as its focus is on JavaScript which powers the plugin’s core features; but there are a ton of tutorials on the web on this topic, should you want to learn more.
If you run our plugin now, you’ll see that it shows a window — yay, progress! But it’s empty, without a title, and not particularly useful yet. We need to get it to show our web interface. In order to do that, we’ll need to use another native class, WKWebView, which is a view specifically made for displaying web content.
We’ll add the code needed to create our WKWebView beneath the code we wrote for our window:
function onRun(context){
// Create window
const window = NSWindow.alloc().initWithContentRect_styleMask_backing_defer(
  NSMakeRect(0, 0, 145, 500),
  NSWindowStyleMaskClosable | NSWindowStyleMaskTitled | NSWindowStyleMaskResizable,
  NSBackingStoreBuffered,
  false
);
window.releasedWhenClosed = false;
// Create web view, and set it as the view for our window to display
const webView = WKWebView.alloc().init();
window.contentView = webView;
// Load our UI into the web view
const webUIFolderURL = context.scriptURL
  .URLByDeletingLastPathComponent()
  .URLByAppendingPathComponent("../Resources/web-ui/");
const indexURL = webUIFolderURL.URLByAppendingPathComponent("index.html");
webView.loadFileURL_allowingReadAccessToURL(indexURL, webUIFolderURL);
// Make window key and move to front
window.makeKeyAndOrderFront(nil);
};
If we run our plugin now, we’ll see that now we’ve got a window open that displays our web user interface. Success!
Again, before moving on, let’s examine what the code we added does:
const webView = WKWebView.alloc().init();
This should look familiar — it’s basically the same as what we did when we made our NSWindow: allocate memory for a web view, then initialize it.
window.contentView = webView;
This line of code tells our window to display the web view we just made.
Here our goal is to create a URL that points to the web-ui folder that we made earlier. In order to get that URL, we need some way to figure out where our plugin’s bundle is in the user’s filesystem. Here we use the context.scriptURL property, which gives us the URL of the currently running script. However, this doesn’t give us a JavaScript String as you might expect, but an instance of a native class, NSURL, that has a few methods on it that make manipulating URL strings easier.
Calling URLByDeletingLastPathComponent() again gives us file://path-to-your-plugin/Contents/
And lastly, adding Resources/web-ui/ onto the end using URLByAppendingPathComponent("Resources/web-ui/") gives us file://path-to-your-plugin/Contents/Resources/web-ui/
We also need to create a second URL that points directly to the index.html file:
Alright. So far, we have a window that displays our web user interface, just like we wanted. However, it’s not quite yet complete — our original design doesn’t have a title bar (or “chrome”), but our current window does. There’s also the fact that when we click inside a Sketch document, that document moves in front of our window, which isn’t what we want — we want the user to be able to interact with the plugin window and the Sketch document without having to constantly refocus from one window to the other.
To fix this, we first need to get rid of the default window chrome and keep only the buttons. Adding the two lines of code below will get rid of the title bar.
Note:Like before, all of the properties and methods we’re using below are documented in NSWindow’s documentation page.
These next two lines of code will remove the window buttons (also known as “traffic lights” in MacOS lingo) that we don’t need — “zoom” and “minimize” — leaving only the “close” button:
Next, we need to do something to keep our floating plugin window on top of other windows, so the user can interact with their Sketch documents without having to worry about the Mosaic’s window disappearing. We can use a special type of NSWindow for this, called NSPanel, which is able to “stay on top” of other windows. All that’s needed for this is to change NSWindow to NSPanel, which is a single-line code change:
We can also tweak our window so that it automatically reopens in the last position it was at:
window.frameAutosaveName = "mosaic-panel-frame";
This line basically says “remember this window’s position by saving it with Sketch’s preferences under the key mosaic-panel-frame”.
All together, we now have the following code:
function onRun(context){
// Create window
const window = NSPanel.alloc().initWithContentRect_styleMask_backing_defer(
NSMakeRect(0, 0, 145, 500),
NSWindowStyleMaskClosable | NSWindowStyleMaskTitled | NSWindowStyleMaskResizable,
NSBackingStoreBuffered,
false
);
window.becomesKeyOnlyIfNeeded = true;
window.floatingPanel = true;
window.frameAutosaveName = "mosaic-panel-frame";
window.releasedWhenClosed = false;
window.standardWindowButton(NSWindowZoomButton).hidden = true;
window.standardWindowButton(NSWindowMiniaturizeButton).hidden = true;
window.titlebarAppearsTransparent = true;
window.titleVisibility = NSWindowTitleHidden;
window.backgroundColor = NSColor.colorWithRed_green_blue_alpha(1, 0.98, 0.98, 1);
// Create web view, and set it as the view for our window to display
const webView = WKWebView.alloc().init();
window.contentView = webView;
// Load our UI into the webview
const webUIFolderURL = context.scriptURL
.URLByDeletingLastPathComponent()
.URLByAppendingPathComponent("../Resources/web-ui/");
const indexURL = webUIFolderURL.URLByAppendingPathComponent("index.html");
webView.loadFileURL_allowingReadAccessToURL(indexURL, webUIFolderURL);
// Make window key and move to front
window.makeKeyAndOrderFront(nil);
};
Organizing The Code
Before we move to the next part, it’s a good idea to organize our code so that it’s easier to navigate and tweak. Since we still have a lot more code to add and we want to avoid index.js becoming a messy dumping ground for all of our code, let’s split things up a bit and move our UI-specific code into a file named ui.js, under the Sketch folder. We’ll also extract some of the UI tasks we do, like creating the web view and window, into their own functions.
Create a new file called ui.js and insert the code below inside it:
There are a couple of key changes we made here that are important to note. Besides the fact that we’ve created specific functions for the creation, hiding and showing of our window and its web view, we’ve also modularized our user interface code.
Notice the module.exports = { loadAndShow, cleanup } line at the bottom? This is a way for us to specify exactly what objects and functions scripts who import this UI code can use (and hiding those we don’t want to them to worry about), which means we now have a more organized API for interacting with, showing and destroying our UI.
Let’s see what this looks like in practice. Back in index.js, remove the old code and add the following:
const UI = require("./ui");

function onRun(context){
        UI.loadAndShow(context.scriptURL);
};
We’re using a special function that Sketch automatically makes available to us, require, to import our ui.js code and assign the returned module to the UI variable. This gives us access to a simplified API for triggering our user interface. Things are much tidier now and easy to find!
Conclusion
Well done — you’ve come far! In the next part of this tutorial, we’ll give our web UI the ability to send us a message when the “Apply” button is clicked, and we’ll focus on the main plugin functionality: actually generating layer mosaics!
Whenever you start using new technologies in your development flow, you might feel at least a bit intimidated. Especially when there’s a myriad of npm packages out there in the wild. Mixing and matching things can sometimes take a lot of time and effort, and is usually frustrating. This is where the following Vue.js tutorial for beginner developers comes into play.
The online reputation of your brand or company constantly evolves and re-defined with each comment on your social media posts, customer review on social media or corporate website, and comments published on the blog posts. Potential customers discover a business online, and they observe these things and make buying decisions based on everything available online [...]