British Airways Faces 183m EU Fine Following Data Breach

The Information Commissioner's Office (ICO) has handed British Airways what it claims is the biggest penalty — and the first to be made public under new rules — since the General Data Protection Regulation (GDPR) came into play last year. According to the ICO, 500,000 customers had their personal information compromised during the 2018 breach, and the airline needs to pay up - to the tune of £183 million.

BA data breach facilitated by poor website security. 1.5% of global turnover or £185M GDPR fine levied. https://t.co/Wsn22Jm65X

This Week in Spring: Releases, Events, Podcasts, and More

Hi, Spring fans! Welcome to another installment of This Week in Spring! I've just returned from Medellín, Columbia, yesterday, and am now in sunny Chicago for the epic SpringOne Tour Chicago event. And tomorrow, it's off to Lima, Peru. It's figuring to be quite a week!

As usual, we've got a lot to get to, so let's do it!

Protecting Vue Routes with Navigation Guards

Authentication is a necessary part of every web application. It is a handy means by which we can personalize experiences and load content specific to a user — like a logged in state. It can also be used to evaluate permissions, and prevent otherwise private information from being accessed by unauthorized users.

A common practice that applications use to protect content is to house them under specific routes and build redirect rules that navigate users toward or away from a resource depending on their permissions. To gate content reliably behind protected routes, they need to build to separate static pages. This way, redirect rules can properly handle redirects.

In the case of Single Page Applications (SPAs) built with modern front-end frameworks, like Vue, redirect rules cannot be utilized to protect routes. Because all pages are served from a single entry file, from a browser’s perspective, there is only one page: index.html. In a SPA, route logic generally stems from a routes file. This is where we will do most of our auth configuration for this post. We will specifically lean on Vue’s navigation guards to handle authentication specific routing since this helps us access selected routes before it fully resolves. Let’s dig in to see how this works.

Roots and Routes

Navigation guards are a specific feature within Vue Router that provide additional functionality pertaining to how routes get resolved. They are primarily used to handle error states and navigate a user seamlessly without abruptly interrupting their workflow.

There are three main categories of guards in Vue Router: Global Guards, Per Route Guards and In Component Guards. As the names suggest, Global Guards are called when any navigation is triggered (i.e. when URLs change), Per Route Guards are called when the associated route is called (i.e. when a URL matches a specific route), and Component Guards are called when a component in a route is created, updated or destroyed. Within each category, there are additional methods that gives you more fine grained control of application routes. Here’s a quick break down of all available methods within each type of navigation guard in Vue Router.

Global Guards

  • beforeEach: action before entering any route (no access to this scope)
  • beforeResolve: action before the navigation is confirmed, but after in-component guards (same as beforeEach with this scope access)
  • afterEach: action after the route resolves (cannot affect navigation)

Per Route Guards

  • beforeEnter: action before entering a specific route (unlike global guards, this has access to this)

Component Guards

  • beforeRouteEnter: action before navigation is confirmed, and before component creation (no access to this)
  • beforeRouteUpdate: action after a new route has been called that uses the same component
  • beforeRouteLeave: action before leaving a route

Protecting Routes

To implement them effectively, it helps to know when to use them in any given scenario. If you wanted to track page views for analytics for instance, you may want to use the global afterEach guard, since it gets fired when the route and associated components are fully resolved. And if you wanted to prefetch data to load onto a Vuex store before a route resolves, you could do so using the beforeEnter per route guard.

Since our example deals with protecting specific routes based on a user’s access permissions, we will use in component navigation guards, namely the beforeEnter hook. This navigation guard gives us access to the proper route before the resolve completes; meaning that we can fetch data or check that data has loaded before letting a user pass through. Before diving into the implementation details of how this works, let’s briefly look at how our beforeEnter hook fits into our existing routes file. Below, we have our sample routes file, which has our protected route, aptly named protected. To this, we will add our beforeEnter hook to it like so:

const router = new VueRouter({
  routes: [
    ...
    {
      path: "/protected",
      name: "protected",
      component: import(/* webpackChunkName: "protected" */ './Protected.vue'),
      beforeEnter(to, from, next) {
        // logic here
      }
  ]
})

Anatomy of a route

The anatomy of a beforeEnter is not much different from other available navigation guards in Vue Router. It accepts three parameters: to, the “future” route the app is navigating to; from, the “current/soon past” route the app is navigating away from and next, a function that must be called for the route to resolve successfully.

Generally, when using Vue Router, next is called without any arguments. However, this assumes a perpetual success state. In our case, we want to ensure that unauthorized users who fail to enter a protected resource have an alternate path to take that redirects them appropriately. To do this, we will pass in an argument to next. For this, we will use the name of the route to navigate users to if they are unauthorized like so:

next({
  name: "dashboard"
})

Let’s assume in our case, that we have a Vuex store where we store a user’s authorization token. In order to check that a user has permission, we will check this store and either fail or pass the route appropriately.

beforeEnter(to, from, next) {
  // check vuex store //
  if (store.getters["auth/hasPermission"]) {
    next()
  } else {
    next({
      name: "dashboard" // back to safety route //
    });
  }
}

In order to ensure that events happen in sync and that the route doesn’t prematurely load before the Vuex action is completed, let’s convert our navigation guards to use async/await.

async beforeEnter(to, from, next) {
  try {
    var hasPermission = await store.dispatch("auth/hasPermission");
    if (hasPermission) {
      next()
    }
  } catch (e) {
    next({
      name: "dashboard" // back to safety route //
    })
  }
} 

Never forget where you came from

So far our navigation guard fulfills its purpose of preventing unauthorized users access to protected resources by redirecting them to where they may have come from (i.e. the dashboard page). Even so, such a workflow is disruptive. Since the redirect is unexpected, a user may assume user error and attempt to access the route repeatedly with the eventual assumption that the application is broken. To account for this, let’s create a way to let users know when and why they are being redirected.

We can do this by passing in a query parameter to the next function. This allows us to append the protected resource path to the redirect URL. So, if you want to prompt a user to log into an application or obtain the proper permissions without having to remember where they left off, you can do so. We can get access to the path of the protected resource via the to route object that is passed into the beforeEnter function like so: to.fullPath.

async beforeEnter(to, from, next) {
  try {
    var hasPermission = await store.dispatch("auth/hasPermission");
    if (hasPermission) {
      next()
    }
  } catch (e) {
    next({
      name: "login", // back to safety route //
      query: { redirectFrom: to.fullPath }
    })
  }
}

Notifying

The next step in enhancing the workflow of a user failing to access a protected route is to send them a message letting them know of the error and how they can solve the issue (either by logging in or obtaining the proper permissions). For this, we can make use of in component guards, specifically, beforeRouteEnter, to check whether or not a redirect has happened. Because we passed in the redirect path as a query parameter in our routes file, we now can check the route object to see if a redirect happened.

beforeRouteEnter(to, from, next) {
  if (to.query.redirectFrom) {
    // do something //
  }
}

As I mentioned earlier, all navigation guards must call next in order for a route to resolve. The upside to the next function as we saw earlier is that we can pass an object to it. What you may not have known is that you can also access the Vue instance within the next function. Wuuuuuuut? Here’s what that looks like:

next(() => {
  console.log(this) // this is the Vue instance
})

You may have noticed that you don’t technically have access to the this scope when using beforeEnter. Though this might be the case, you can still access the Vue instance by passing in the vm to the function like so:

next(vm => {
  console.log(vm) // this is the Vue instance
})

This is especially handy because you can now create and appropriately update a data property with the relevant error message when a route redirect happens. Say you have a data property called errorMsg. You can now update this property from the next function within your navigation guards easily and without any added configuration. Using this, you would end up with a component like this:

<template>
  <div>
    <span>{{ errorMsg }}</span>
    <!-- some other fun content -->
    ...
    <!-- some other fun content -->
  </div>
</template>
<script>
export default {
  name: "Error",
  data() {
    return {
      errorMsg: null
    }
  },
  beforeRouteEnter(to, from, next) {
    if (to.query.redirectFrom) {
      next(vm => {
        vm.errorMsg =
          "Sorry, you don't have the right access to reach the route requested"
      })
    } else {
      next()
    }
  }
}
</script>

Conclusion

The process of integrating authentication into an application can be a tricky one. We covered how to gate a route from unauthorized access as well as how to put workflows in place that redirect users toward and away from a protected resource based on their permissions. The assumption thus far has been that you already have authentication configured in your application. If you don’t yet have this configured and you’d like to get up and running fast, I highly recommend working with authentication as a service. There are providers like Netlify’s Identity Widget or Auth0’s lock.

The post Protecting Vue Routes with Navigation Guards appeared first on CSS-Tricks.

Frontend Masters: The New, Complete Intro to React Course… Now with Hooks!

(This is a sponsored post.)

Much more than an intro, you’ll build a real-world app with the latest features in React including 🎣 hooks, effects, context, and portals.

We also have a complete React learning path for you to explore React even deeper!

Direct Link to ArticlePermalink

The post Frontend Masters: The New, Complete Intro to React Course… Now with Hooks! appeared first on CSS-Tricks.

Understanding Docker Networking

When we talk about Docker, we say that containers are isolated. How do we communicate with our containers, or other applications like MySQL database? It is not useful if we can't access it.

Docker has a network concept. It has several network drivers to work with. Depending on how we want our container to behave, we can select our network. This helps us to connect container with a container or container with host.

Updating and Modernizing: Moving from Virtual Machines to Containers

There are a lot of benefits to be gained from containerization if you haven’t already made the progression yet. Development teams can move at a much faster pace with containers running microservices. The transition from on-premise development servers to cloud environments is more seamless thanks to platforms like Kubernetes. As well as K8s, we also have robust cloud computing solutions like Google Cloud, Microsoft Azure, and Amazon Web Services natively supporting containers.

Moving from virtual machines to containers is a logical step in today’s modern software development world—especially given the fact that recent trends are geared towards application architecture being microservice-oriented. If you want to modernize your apps and take them to the next level, making the switch to a container-based environment is the first thing to do. There are multiple approaches to choose from and different ways to move from VMs to containers; we are going to discuss them in this article.

Kubernetes vs OpenShift: What Is the Difference?

Containerization is the new buzz word for developing and deploying apps since they are an efficient way to accelerate development. Container usage has grown exponentially in the last years.

However, managing containers across the infrastructure can become such a complex task that a container management platform is an essential vehicle for any organization. Kubernetes and OpenShift are two of the most popular container management platforms in the market. What makes it interesting is that OpenShift is based on Kubernetes. Read on to learn more about their features and differences.

DevOps, The SDLC, and Agile Development

It is hard to imagine life without software. Software has entered almost all the aspects of life, and there is an unending race to be at the top and move faster and be more Agile without having to compromise on security and dependability. This has led to increasing pressure about the completion of projects in a timely manner and that they should not be put on hold. This is the point where DevOps comes into play by getting various groups which are working in an organization to meaningfully collaborate over a set of shared goals of timely delivery of software to customers. The basic practices are getting the Dev and Ops teams to come on a common platform on a group of various Agile processes and tools for the delivery of software stated below:

  • Testing and management of automated configuration.

Unified Agile-DevOps Transformation Model, Framework and Executable Roadmap for Large Organizations

Abstract

Agile-DevOps transformation and Continuous Delivery became the leading topic and highest priority for senior leadership, stakeholders, teams and customers alike. Agile-DevOps transformation is a fundamental change to the organization's culture, structure, people, and business/technical paradigms towards the next level of agility. It relies on Lean values and principles, and brings the highest level of collaboration, productivity, quality, flexibility and efficiency, cutting-edge technology, and competitive edge to your organization.

While some organizations succeed in their transformations, others fail. Agile-DevOps transformation can be ambiguous, disrupting, misdirecting, and even harmful if executed without the right guidance or led by the wrong people. Transformations primarily fail for two reasons. The first is the lack of a common vision, strategic approach and unified transformation model, framework, and roadmap that inhibits the agreement between change agents, leading to the inability to arrive at a single voice on how to orchestrate and implement change. The other is the agents’ limited knowledge and expertise or a tendency to follow on a previous success path regardless of the organization's uniqueness.

5 Barriers to Successful Test Automation

Organizations today have long understood the need to automate test execution, and 90% believe that automated testing allows testers to perform their tests quicker. Yet, QA teams are struggling to achieve sufficiently high rates of automated test execution. Slow and overly manual testing still abounds.

In 2018, 61% of organizations had automation rates lower than 50%. This article considers five reasons for these low rates of functional test automation, setting out some of the most common pitfalls to watch out for when adopting a test automation strategy.

New Technology, New Tools…New Automation Strategies?

Automation is one component of improving team performance. Automating repetitive manual tasks gives team members time to solve other problems and come up with innovations that help the business. Automated regression tests give teams fast feedback and let them add new capabilities to their product without fear of breaking anything.

Back in the 90s we had rudimentary automated test tools and dreamed of bigger solutions, tools that not only test system behavior, but also:

CI/CD Pipelines to Run Unit Testing in Docker [Video]

This video will focus on how to run unit testing inside a Docker container, and it will show how to run a unit test manually inside the container.

It takes a look at how to run unit tests as part of the CI/CD pipelines. It will explain in detail how Dockerfile builds Docker image to run unit tests and how to save test results as part of the Docker image and how to run a container from that image to see the test results.

Scrum Master: Creating Synergy at Work Is How the Magic Happens

Dramatization of what creating awesomeness through team synergy feels like

The world is changing more rapidly than ever, bringing with it more unknowns than known. And without strong leaders to guide our teams through this time of complexity and uncertainty, we won't fare very well at all.

But I can let you all in on a little secret: The key to enduring success in leadership is the ability to stay nimble and to "Leadershift," as John C. Maxwell explains in his book by the same name.

How to Create and Sell Online Courses with WordPress (Step by Step)

Did you know that you can create a successful online course with WordPress?

Selling online courses is a popular online business idea that you can start with a very small investment and no technical knowledge.

Whether you’re looking to create an online course to sell or simply add an online course for your existing students, this tutorial is for you!

In this guide, we will show you how to easily create an online course using WordPress. We will also show you how to make money from it and make your online course a success.
Easily creating an online course in WordPress

Here are the steps we will cover to help you create an online course with WordPress:

Ready? Let’s get started.

What Do You Need to Create / Sell an Online Course?

You will need the following things to create an online course.

  • A course idea where you can help others learn new skills.
  • A domain name. This will be your website’s address (Example, wpbeginner.com).
  • A WordPress hosting account. This is where your website’s files are stored.
  • An eLearning management add-on (also known as LMS plugin) to create and manage courses.
  • Your undivided attention for the next 45 minutes.

You can build an online course with WordPress in less than an hour, and we’ll walk you through every step of the process.

Let’s get started.

Step 1. Setting up Your WordPress Website

There are plenty of website builders and online course platforms that you can use to build your own website. However, we always recommend WordPress because it offers you the maximum flexibility and freedom.

WordPress powers over 39% of all websites on the internet.

There are two types of WordPress, and beginners often end up confusing them.

First, there is WordPress.com which is a hosting service, and then you have the original WordPress.org also known as self-hosted WordPress. See our guide on the difference between WordPress.com vs WordPress.org.

We recommend using WordPress.org because it gives you access to all the WordPress features that you’ll need.

To start a self-hosted WordPress.org website, you’ll need a domain name ($14.99 / year), WordPress hosting ($7.99 / month), and SSL certificate to accept online payments ($69.99 / year).

This is quite a lot of startup money.

Luckily, Bluehost, an officially recommended WordPress hosting provider, has agreed to offer our users a free domain name, free SSL certificate, and a 60% discount on web hosting. Basically, you can get started for $2.75 per month.

→ Click Here to Claim This Exclusive Bluehost Offer ←

After purchasing hosting, head over to our guide on how to create a WordPress website for step by step set up instructions.

Step 2. Install and Setup MemberPress LMS Plugin

Now that your WordPress website is ready, the next step is to install and setup a Learning Management System add-on. This will allow you to create your online course and add it to your website.

First, you need to install and activate the MemberPress plugin. For more details, see our step by step guide on how to install a WordPress plugin.

MemberPress is the best LMS plugin for WordPress. It is an all-in-one solution with complete course management, lesson plans, subscriptions, access control, payment management, and more.

Course creators around the world use MemberPress to create profitable courses and earn over $400 million dollars every year.

Upon activation, you need to visit MemberPress » Settings page to enter your license key. You can find this information under your account on the MemberPress website.
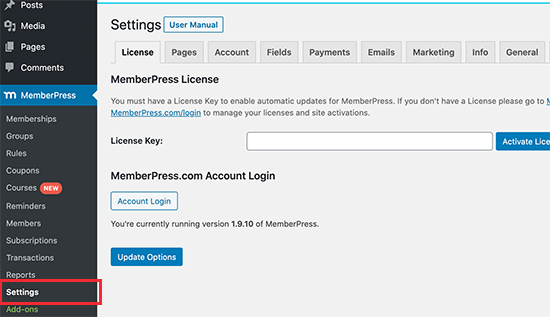
MemberPress license key

Once you have entered the information, click on the ‘Activate License Key’ button to store your settings.

Next, you need to switch to the ‘Payments’ tab and click on the (+) add button to set up a payment gateway. MemberPress supports PayPal and Stripe (Authorize.net support included in Pro and Plus plans).
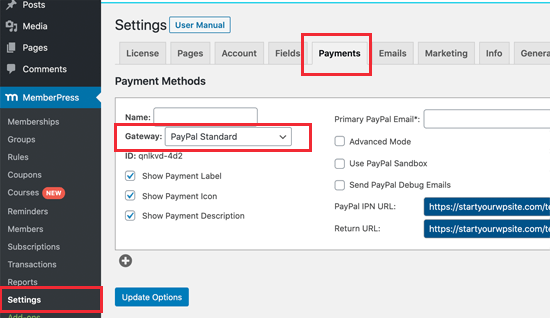
MemberPress payments settings

Simply select your payment gateway and then fill in the required information. You can also set up multiple payment methods by clicking on the (+) button again and repeat the process.

Don’t forget to click on the ‘Update Options’ button to save your payment settings.

Step 3. Creating Your First Course

The course creation process in MemberPress makes it super easy to create and manage online courses. It comes with a very easy to use course builder that allows you to create courses, add sections, edit lessons, and more.

First, you need to visit MemberPress » Courses page where you’ll see a button to install and activate the courses addon.

Activate courses addon for MemberPress

Clicking on it will automatically install and activate the MemberPress courses addon, and you’ll be redirected to the courses page.
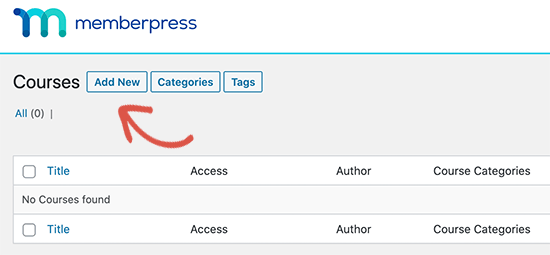
Add new course in MemberPress courses

Simply click on the ‘Add New’ button at the top to create your first course. This will launch the MemberPress course builder screen.
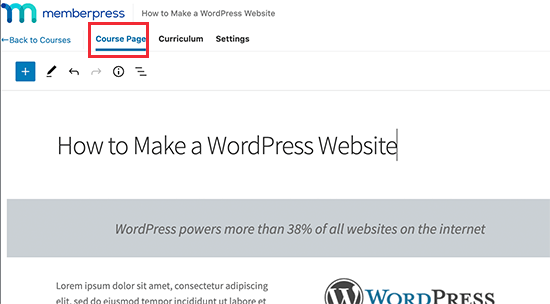
Creating the course page

First, you’ll see the ‘Course Page’ where you need to provide a course topic, title, and description. MemberPress course builder uses the default WordPress block editor, so you can get creative and make an impressive course page layout.

You can also add ‘Course Categories’ and ‘Course Tags’, set a featured image, and provide a course page excerpt under the course page settings.
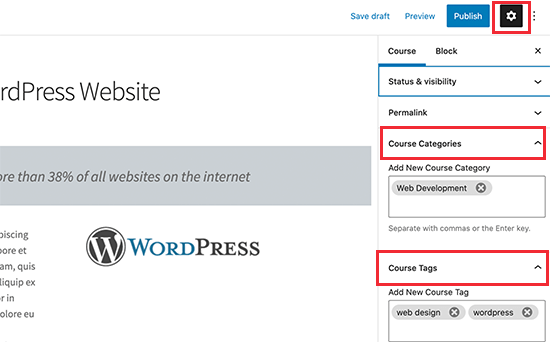
Course page settings

Step 4. Adding Sections and Lessons to Your Course

MemberPress also makes it easy to quickly start adding course contents for each course without switching to a different page.

Simply switch to the ‘Curriculum’ tab and click on the Add Section button to create your course outline.
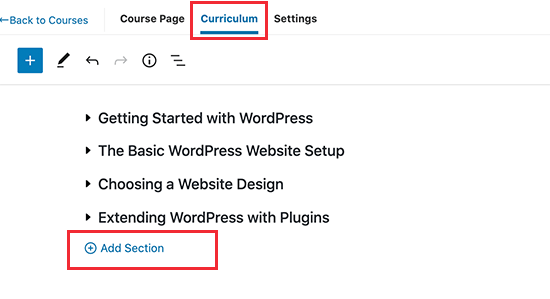
Add course sections in MemberPress

You need to provide a title for a section and then click on the Add Lesson button under the section to add lessons.
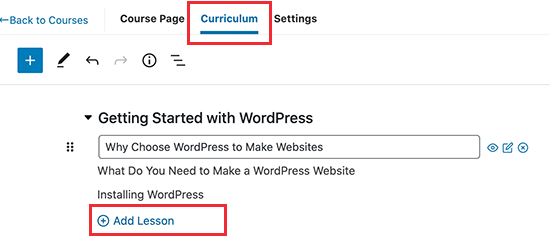
Adding lessons in MemberPress courses

After adding a lesson, you can start adding lesson content by clicking on the edit button next to each lesson.
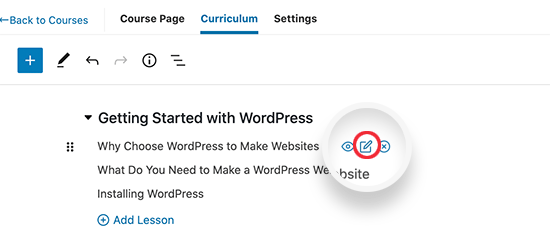
Editing a lesson

You will be asked to save your changes after that your lesson will open up with the familiar block editor screen.
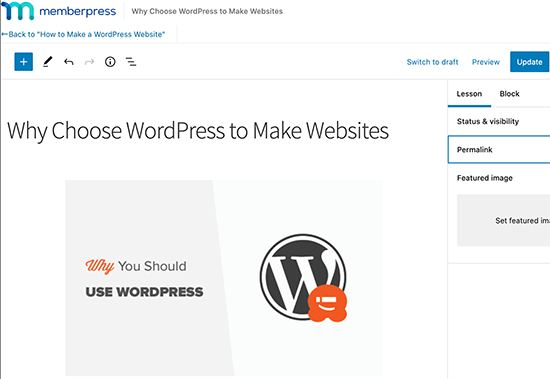
Adding lesson content

You can add your lesson content here with the full advantage of the block editor. This allows you to upload images, embed videos, add text, offer downloadable digital products such as powerpoints, PDF eBooks, actionable worksheets, and other course materials.

Don’t forget to click on the Update button to save your lesson. You can return back to the Course by clicking on the ‘Back’ link at the top of the editor.
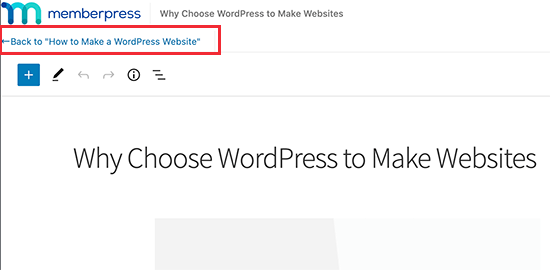
Back to the course editor

Repeat the process to add more lessons to your course.

Once you are finished adding course content, don’t forget to click on the ‘Publish’ button to make your course accessible to eligible users.

Step 5. Creating Course Membership Subscriptions

MemberPress allows you to easily sell online courses with subscription plans. You can create as many membership plans as you like, and users can select a plan to pay for your online course.

You can also sell all your courses under single membership, offer free courses, or you can add different courses for each plan. This depends on how you plan to structure your sales funnel.

A lot of people use a combination of free courses and paid courses to build their audience and maximize passive income.

To add a membership, simply go to MemberPress » Memberships page and click on the Add New button.
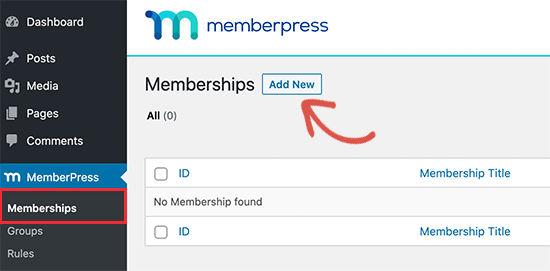
Create new membership

Next, you will reach the create new membership page. From here, you first need to provide a title for this membership plan and then add some description.
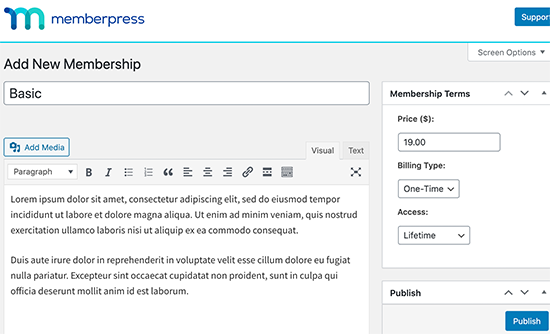
Create membership page

After that, you can enter the membership pricing under ‘Membership Terms’ box on the right. You can also choose the access duration from lifetime, expire (recurring), or fixed expire.

Next, you need to scroll down to the Membership Options section. This where you can configure advanced membership options like sign up button, welcome email, pricing box, and more.
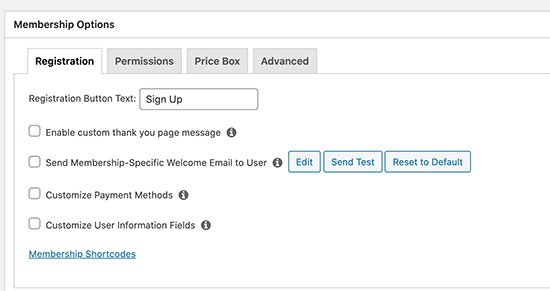
Membership options

Once you are finished, you can click on the Publish button to save your changes.

Repeat the process if you need to create more membership plans.

Step 6. Restrict Course Access to Membership Plans

The best part about using MemberPress is its powerful access control rules. They allow you to decide who gets access to your online course.

Simply, go to MemberPress » Rules page and click on the ‘Add New’ button.
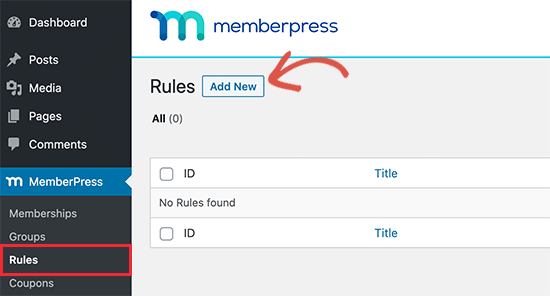
Create new access rule

This will bring you to the Rule wizard page. First, you need to select the content you want to protect under the ‘Protected’ content section.
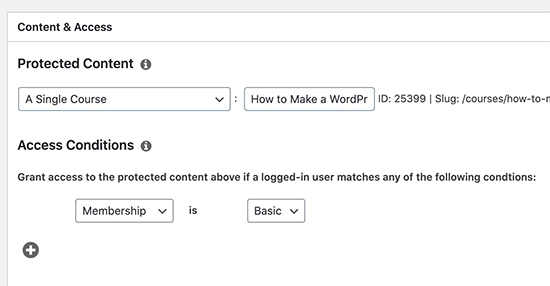
Content access rules

For instance, here we have chosen a single course under the protected content.

Below that, you need to select the conditions that need to be matched for users to access that content. For instance, we have chosen our membership plan here.

Don’t forget to click on the ‘Save Rule’ button to save your settings.

MemberPress makes it easy to easily send users to the page where they can register and sign up for your course by purchasing a membership plan.

It automatically generates a link for each membership plan that you can add anywhere on your site.

Simply edit a membership plan and you’ll see the link below the membership title. You can also manually type in your domain name followed by /register/your-membership-title/
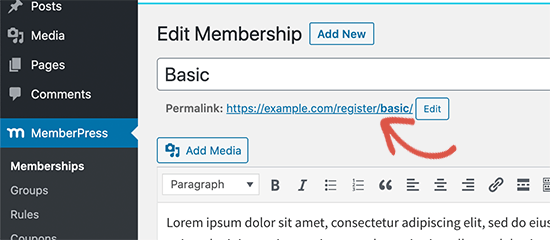
Membership sign up link

You can add this link anywhere on your website in a post, page, or navigation menu and it will take users to the registration page.
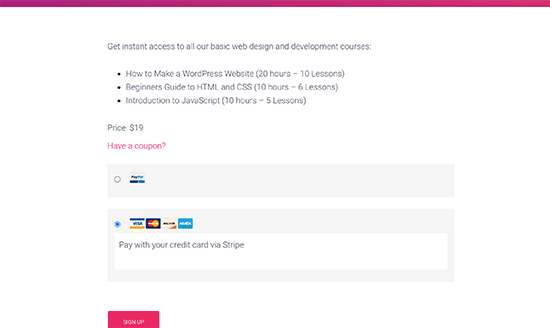
Registration page preview

You can even share this link in your sales pages, webinars, podcasts, Facebook group, social media, and other traffic channels.

Pro Tip: We recommend using PrettyLinks to create memorable short links to share in podcasts, webinars, and social media.

Step 8. Preview & Customize Your Online Course

MemberPress allows you to use the classroom mode by default, which means your course pages and content will always look good regardless of which WordPress theme you are using.

You can simply go to view a course by visiting:

https://example.com/courses/

Don’t forget to replace the example.com with your own domain name.

You’ll see all your courses listed there. You can click on the ‘Preview as’ menu to see how it would look to the logged out users.
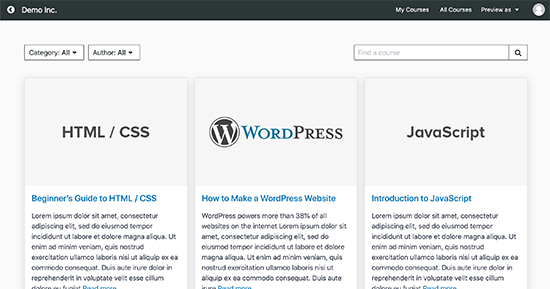
Courses page in MemberPress

Clicking on a course will open the course, and you will be able to see course overview, sections, and lessons. It is super easy to navigate and also keeps tracks of user’s progress so that they can continue where they left off.
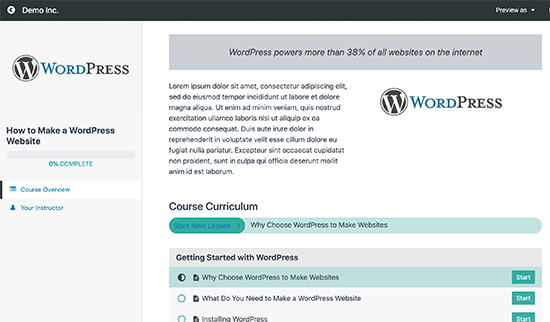
Course navigation

You can also customize the course page templates by visiting Appearance » Customize page and clicking on the ‘MemberPress Classroom’ tab.
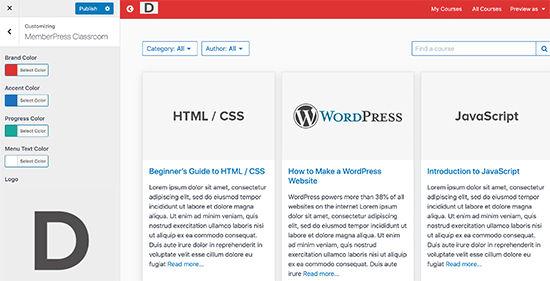
Customizing course view pages

Here, you can upload your brand logo and change colors to match rest of your website.

Don’t forget to click on the Publish button to save your changes.

Step 9. Selling Your Online Course with More Powerful Features

Both MemberPress and WordPress are super flexible. This allows you to use them with any other tools to grow your business and reach more users.

For example, you can create a powerful membership site / community that offers paid content and perks along with courses.

You can also use MemberPress with other LMS plugins like LearnDash. This allows you to use LearnDash for course creation and use MemberPress for powerful subscription, payments, memberships, and other features.

Alternatively, if you want to sell other items like physical goods related to your course, swags, etc, then you can use WooCommerce to manage payments and orders. This will let you build a proper online store for your website.

Step 10. Promoting Your Online Course

The other advantage of WordPress + MemberPress combo is that it also makes it easier for you to promote your online course and make money online.

Let’s take a look at few ways to promote your online course, attract target audience, and make it successful.

1. Create Landing Pages for Your Online Courses

Your WordPress theme would be able to help you create a highly engaging website. However, you may need to quickly create landing pages to describe course details, showcase instructors, highlight special offers, etc.

Custom landing pages and sales pages are proven to increase course sales.

We recommend using SeedProd. It is the best WordPress page builder and allows you to create professional landing page layouts without writing any code.
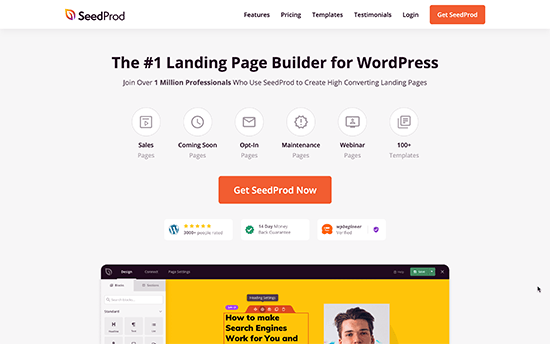
SeedProd

For detailed instructions, see our guide on how to create a custom page in WordPress.

2. Learn The SEO Basics

Search engines are the #1 traffic source for most websites on the internet. This is why you’ll need to learn how to make your online course website rank higher in search engines.

With the help of WordPress plugins and some basic SEO best practices, you’d be easily able to compete with the big guys.

We now recommend users to use All in One SEO for WordPress plugin.

To learn more, see our complete WordPress SEO guide for beginners with step by step instructions.

3. Track Marketing Data

A lot of beginners develop their marketing strategy based on guesswork. You don’t have to do that when you can get actual data to make informed decisions.

For that, you’ll need MonsterInsights. It helps you install Google Analytics and see human-readable reports inside your WordPress dashboard.

You can see where your visitors are coming from, what they do on your website, your most popular pages, and more. You can then improve your website to improve your conversions and boost sales.

4. Start Building an Email List

After a while, you would notice that most visitors who come to your website don’t sign up for your online course. The problem is that you would not be able to reach out to those users once they leave your website.

To address this, you need to start an email newsletter. This way you would be able to collect email addresses and reach out to those users and bring them back to your website.

We recommend using Constant Contact or ConvertKit for email marketing.

If you’re looking for alternatives, see our comparison of the best email marketing services.

5. Convert Website Visitors into Subscribers and Customers

Most visitors who come to your website will leave without enrolling into your online course. This is why it’s important to convert those abandoning visitors into subscribers or paying customers.

This is called conversion optimization.

The best tool for the job is OptinMonster. It is the best conversion optimization software on the market and helps you grow your business with more leads and sales.

For more details, see our guide on how to convert website visitors into customers.

Need even more tools? See our complete list of the best tools to grow your WordPress website like a total pro.

Frequently Asked Questions about Creating an Online Course (FAQs)

Over the last 10 years, we have helped thousands of entrepreneurs create their own online course. Below are the answers to the most frequently asked questions about creating an online course.

How can I create high-quality videos for my course?

Videos are an important element of online courses. It helps you better demonstrate your subject matter expertise and connect with your audience.

When first starting out, you don’t need to invest in fancy video equipments. A good Ultra HD webcam like Logitech Brio is sufficient for most users.

For screencasts and screen recording, you can use Camtasia or Screenflow for Mac.

Recently, our team has started using Descript online video editing platform, and it can significantly improve your workflow.

Can I use other online learning platforms with WordPress?

There are many online course platforms that you can use to build and sell courses.

This includes Teachable, Thinkific, Kajabi, Udemy, etc.

You can use any of them alongside your WordPress website. Depending on your needs, these platforms may offer an easier online course creation solution.

However they’re generally more expensive and/or take a revenue share from your course sales.

Which is the best webinar platform for course creators?

Nothing beats live webinars when it comes to online education. You can use to boost your audience engagement and improve membership retention.

We have compared the best webinar platforms here.

Most of these solutions will let you create live webinars, automated evergreen webinars, and come with tons of webinar engagement features.

How can I validate my course idea?

Creating online course content takes a lot of time and effort. This is why we always recommend users to validate their course idea before hands.

There are several ways to validate a course idea.

You can run a poll or survey on your website, ask for audience feedback on social media, or look at your most popular blog posts or YouTube videos because often the most popular ones can be turned into courses.

What’s the one “little-known” thing that I can do to make my online course successful?

While there are many tactics that you can use to make your online course idea successful and profitable.

The little-known tactic that works really well is case studies. Unfortunately not enough course creators use them.

A case study allows you to highlight the most successful students in your community. This not only provides encouragement to others, but it can also help those who don’t know how to take maximum advantage of your products.

We use case studies in many of our own businesses for social proof to boost conversions, but also to help our new users find encouragement and motivation.

We hope this article helped you easily create a successful online course in WordPress. You may also want to see our tips on how to add push notifications to connect with visitors after they leave your website, our our comparison of best live chat software for membership sites.

If you liked this article, then please subscribe to our YouTube Channel for WordPress video tutorials. You can also find us on Twitter and Facebook.

The post How to Create and Sell Online Courses with WordPress (Step by Step) appeared first on WPBeginner.

Visual Composer Hub Lets You Create WordPress Pages with Ease

You can be working with a first-class drag-and -drop website builder, but the results will only be as good as the content you can access. On the other hand, if you’re using the top-rated Visual Composer Website Builder, you have access to the Visual Composer Hub. As we shall see, the combination is a potent one.

The Hub’s massive library of content elements and templates makes anything possible, and in tandem with the Visual Composer builder, web design is faster and easier than ever.

As enormous as the library is, you don’t have to settle for “what’s there”, because every element and template is editable and customizable. With respect to what you want to build, the sky is literally the limit.

What is Visual Composer Hub?

The Visual Composer Hub is a cloud-based marketplace of web design goodies. It’s connected to your Visual Composer account, so you can use it to search for the content elements, page and block templates, and images you need.

Using the Hub is a much better deal than having to rely on a selection of plugins, or worse yet, custom code to get the results you’re looking for. It’s simply a matter of finding ready content and downloading it directly to your Visual Composer Website Builder account.

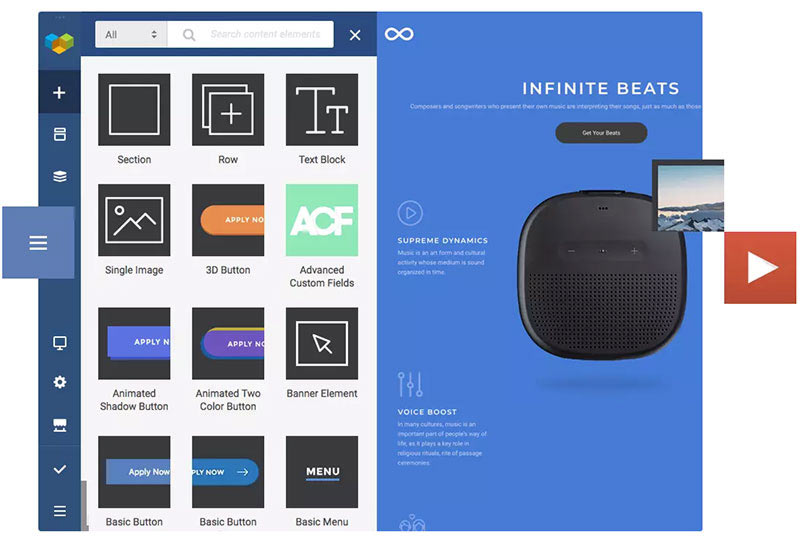
Screen from Visual Composer Hub.

Pick what you want and once it’s downloaded it will be sitting in your account waiting to be put to good use.

The Visual Composer Hub Library

The Visual Composer Hub library content is huge. Its content elements and templates work with any theme and can be used on any project. You’re free to view all the content, but a Visual Composer Premium account is required for total access to the content and unlimited downloads.

To make things easy, access to the cloud-based Hub and downloading is built right into the live-preview Visual Composer Website Builder.

What’s Inside the Visual Composer Hub

There 4 main types of Hub content:

  • Content Elements
  • Page templates
  • Block templates, and
  • Stock Images

1. Content Elements

With these content elements you can build your site without coding. With Visual Composer Premium the number of downloads you have is unlimited, and the Hub’s Content Elements are constantly updated.

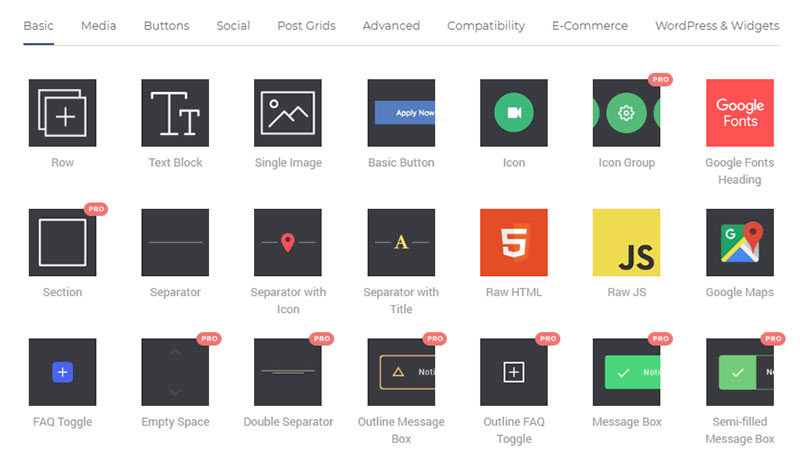
Visual Composer Hub Content Elements screen.

Content Elements consist of the following:

  • Buttons
  • Media
  • Post Grids
  • Social Compatibility Elements that can be integrated with MailChimp,Ninja Forms, Envira Gallery and more.
  • Advanced Elements including logo sliders, tabs, hover boxes, and more.
  • and, an E-Commerce Plugin

With Content Elements:

  • You can edit any element and there are multiple editing options, including editing Element CSS Animations to create exciting transitions.
  • You can easily replace elements and switch between them as well. With the Smart Replace option you can change the look of your content in an instant.
  • You also have access to some important advanced features that include turbo-powered flexibility, creating content “types” to organize and build hierarchies of elements, and leave notes to others. Certain advanced features are only accessible on Visual Composer Premium.

To get an even better idea of all the designer content elements available, take a peek at everything you can access with a Visual Composer Hub Premium account.

A selection of Visual Composer Content Elements.

2. WordPress Templates

A significant portion of the Hub library is devoted to page templates. You can find them for any WordPress theme, and when you find one you can edit it.

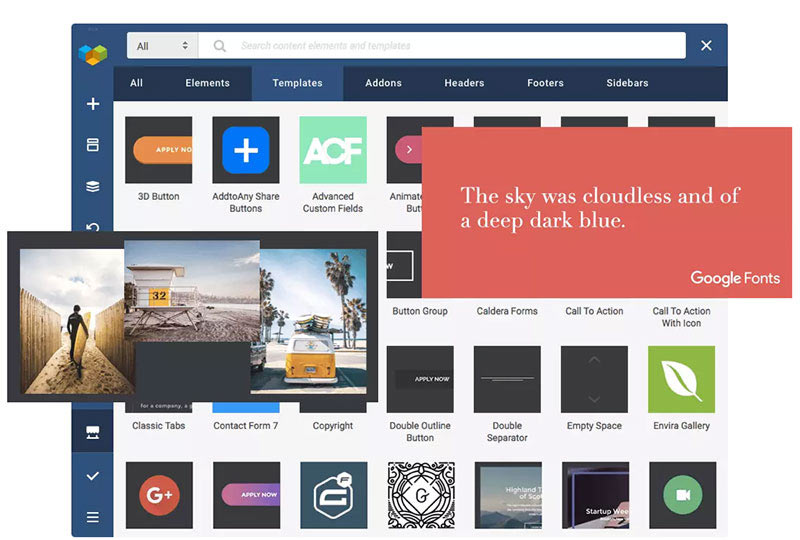
As you start building your site, you’ll want to be searching for templates that will fit your website’s look and feel. When you find one, click download. You’ll be notified with a pop up that it has been placed into your account, ready for you to adjust as appropriate to create a beautiful page in a matter of minutes.

WordPress Templates within Visual Composer Hub.

You can add templates to the WordPress Template section of the library and even save your own pages. Any page or template you save can be used again and customized if need be. Global templates can also be applied, and template widgets can be added and stored.

3. Block Templates

You have Content Elements for detailed design and page templates to make building your website quick and easy. What about the middle ground; something that offers a bit of both worlds?

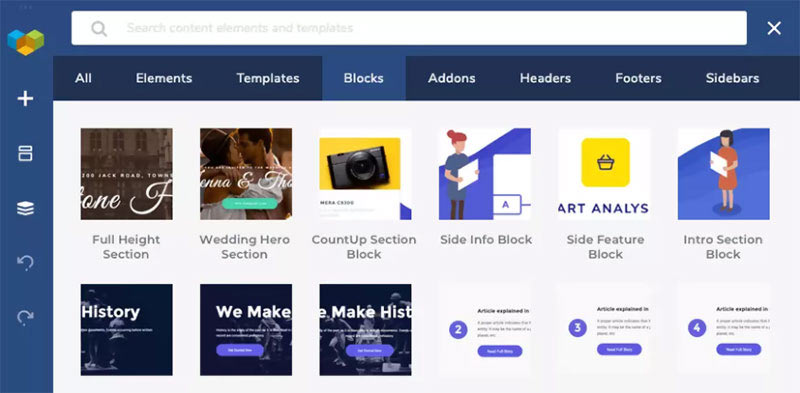
Block Templates fill that “sweet spot.” For the best of both the custom design and easy drag-and-drop functionality worlds, Block Templates are the answer.

Visual Composer Hub Block Templates.

Unlocking the Block Templates section of the Hub requires a Visual Composer Premium subscription. If you feel brave enough to take a next step and savor the added flexibility you’ll experience, you’ll want to try building pages in sections.

4. Stock Images

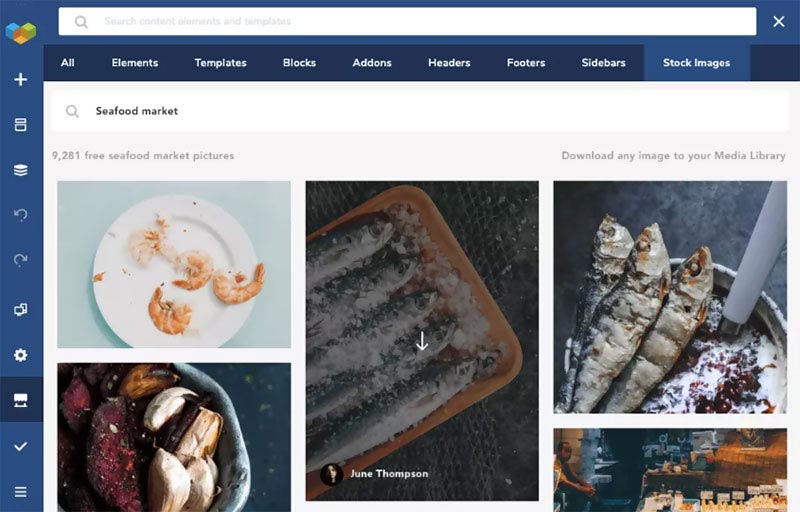
The Unsplash library of stock images is seamlessly integrated into the Hub, which enables you to download images directly into your Visual Composer Website Builder. Searching for these high-quality images can be done directly from the Frontend editor, and once downloaded they are placed in your account, which is about as easy as it gets.

Stock Images within Visual Composer Hub.

When you find an image you like and would like to view others by the same author, all that’s required is to hover over the author’s name and click; a good way to give your website a unified look and feel.

The Resources You Need to Build Top-Quality Websites

Yes, it’s indeed true that a top-rated website builder isn’t enough if you don’t have the resources to feed it. The Visual Composer Website Builder and Visual Composer Hub combination gives you everything you need to create one awesome website after another.

We’ve covered the Hub library’s Content Elements, Page and Block Templates, and Stock Images. It’s indeed a colossal resource to have access to, and there are add-ons and other premium hub elements you can check out too.

Why not log in now to the free version of the Visual Composer Hub? You have everything to gain, and nothing to lose.

The Importance of Empathy in the Workplace

If we want to build the best teams possible at work, we've got to learn some empathy.

The definition of 'empathy' is apparently more complex than I thought. However, in the context of the workplace, I believe the following suits best:

Empathy is the power of understanding and imaginatively entering into another person’s feelings.

That Was SmashingConf Toronto 2019

That Was SmashingConf Toronto 2019

That Was SmashingConf Toronto 2019

Rachel Andrew

We all enjoyed returning to Toronto for the second Smashing conference, and in this post, I am sharing some of the things that took place as well as the resources that were shared over the course of the two conference and two workshop days. Look out for the videos of all the presentations which will be released very soon.

The team worked hard to create a friendly welcoming space for everyone at the conference. We all know how it can be a little overwhelming to walk into a room of a few hundred strangers, knowing that you would love to make friends and have interesting discussions, but finding it hard to get started.

In order to avoid that, we asked everyone to read and follow our Code Of Conduct, try to create a range of spaces and activities where people can meet like-minded people, and also encourage everyone to follow “The Pac-Man Rule” when standing in a group.

Slide showing a graphic of the pacman rule
Pac-man rule for conversations (Large preview)
“It’s a genuine friendliness that the Smashing team possesses, and that serves as the foundation for an inclusive, approachable event. It turns out that little things like launching balloons to kick off the event and advocating for the Pac-Man Rule go a long way towards making everyone feel welcome.”

Dan Rose

The Presentations

The first thing you think about when attending a conference is to wonder who is speaking, and what they will be talking about. At SmashingConf Toronto, we had an amazing lineup of speakers, with people you might know quite well plus some new faces. As many of our speakers presented without slides, we don’t have a huge number of slide decks to share. However, the list below links to some of the resources our speakers shared. We will also have videos available very soon!

Stage with people throwing candy into the audience
Vitaly and Phil throw candy to audience members (Photo credit: Marc Thiele)

Day One

The Day One Collaborative Doc created by attendees is full of takeaways from day one of the conference.

Speaker Name Talk Title
Brad Frost Let’s Build a Design System
Sarah Drasner Let’s Write a Vue App From Scratch
Phil Hawksworth JAMStack: Silly Name. Serious Stuff.
Chris Gannon Make It Move! Create a Web Animation From Scratch
Kristina Podnar Help! I’m Your Ailing Website. The Digital Policy & Standards Rehab Hour
Steven Hoober Authentic Digital Design By The Numbers
Sarah onstage coding
Sarah Drasner writes a Vue app on stage. (Photo credit: Marc Thiele)

Day Two

Check out the Day Two Collaborative Doc for more resources and thoughts from our attendees and speakers.

Our mystery speaker was Seb Lester, and many of you were thrilled to get to hear his talk.

We then enjoyed talks covering a wide range of topics from our day two speakers.

Speaker Name Talk Title
Phil Nash Diving Into Service Workers, Live
Jules Forrest For The Love Of The Grid
Dan Rose Seeing The Pages For The Components
Diana Mounter The Secret Lives of Color Systems
Scott Jehl Move Fast & Don’t Break Things

We found a few blog posts sharing takeaways from these talks. Arshabhi Rai recapped Day 1 and Day 2; and kinopo shared their takeaways in What a lovely SmashingConf.

Workshops

Auditorium style lecture room with people working on laptops
Vitaly shares responsive design knowledge with his workshop group (Photo credit: Marc Thiele)

Our workshops are a big part of each of our Smashing conferences. In Toronto, we had two days of full-day workshops, with some attendees choosing to do a workshop day before and after the conference. Workshops this time round were as follows:

Name Talk Title
Rachel Andrew Next Steps With CSS Layout
Chris Gannon Designing Delightful Animations For The Web
The Deque Team How To Translate Wireframes Into Accessible HTML/CSS
Vitaly Friedman Smart Responsive UX Design Patterns
Scott Jehl Lightning Fast Web Performance
Sarah Drasner Intro To Vue.js
Brad Frost The Design System Process
Vitaly Friedman New Front-end Adventures, 2019 Edition
Cloudinary Hacking Lizard Brain: Improving Visual Experience On The Web

Side Activities

A conference isn’t just about the talks and speakers. We want to make spaces where attendees and speakers can learn from each other and share experiences in a more informal setting. To help with that, we ran various other things over the conference. At lunchtime, we had lunch sessions run by Deque on Day 1, and Netlify on Day 2, attendees could grab a plate of lunch and settle down in a more cozy environment to take part in those sessions.

We had a great lounge area, with the talks live-streamed for folks who wanted to step out of the movie theater for a while.

People on sofas watching a presentation via a live stream
Our lounge area (Photo credit: Marc Thiele)

Morning Run

If you follow me on Twitter, you’ll know that I’m a keen runner, and it’s always nice to have some company on an early morning run. For a few conferences now, we’ve been organizing pre-conference runs — Toronto was no exception. We had 12 runners on Day 1, and 6 hardy souls on Day 2 joining us despite having attended the party. We only got slightly off-track once, and got a nice view of Toronto to take our photos.

Jam Session

On the evening before the conference, we had a Jam Session at Shopify hosted by Tiffany Tse (and her lovely assistant Walnut). There was a speaker panel featuring Steven Hoober, Scott Jehl, Kristina Podnar, Brad Frost, Jules Forrest, Phil Hawksworth and myself, plus lightning talks from Tiffany Tse, Kelly Harrop, April Ellsey, Steve Pereira, and Christine Fowler.

Graffiti And Photo Walks

On the day before and last evening of the conference, walks took place to explore graffiti around Toronto and take photos of the city. A great way to meet people and explore the location for those coming from out of town.

People in a street taking photos of graffiti
On the graffiti walk (Photo credit: Scott Whitehead)

Conference Party

There has to be a party, and we always try to do something fun and perhaps a little unusual for our conference parties. This time, we went bowling — courtesy of sponsorship by SpeedCurve.

Focus On The Local Community

Between sessions on stage, we invited organizers of community groups in the Toronto area on stage to share information about their groups. We hope that local attendess found some new meetups to go to. The groups that we featured were:

Name Details
Women Who Code Toronto Twitter: @WomenWhoCode,
Introduced by Stephanie
DevHub Toronto & Vancouver Twitter: @devhubTO
Events, educational programs, collaboration, and co-working
Introduced by Emma
The DevOps Toronto meetup Twitter: @devopsto
Introduced by Steve
Designers & Coffee Twitter: @Doriganic
Meetups, hands-on design challenges and feedback sessions, to casual networking nights.
Introduced by Dorsa
DevTO Twitter: @DevTO
Coding stories, eats and drinks. Join us on the last Monday of every month!
Introduced by Nael.
Serverless Toronto meetup Introduced by Daniel Zivkovic
Toronto Web Performance Group Twitter: @towebperf
Introduced by Henri Helvetica

Want To Join In The Fun?

We packed a lot into those few days! If you were there, we hope that you enjoyed it as much as we did. It was great to meet so many of you.

Audience members throwing balloons
SmashingConf Toronto opened with balloons (Photo credit: Marc Thiele)

If you would like to be part of the SmashingConf fun next year, we already have tickets on sale for SmashingConf San Francisco and you can leave your email to be the first to know when SmashingConf Toronto 2020 goes on sale. The rest of the 2019 events (New York and Freiburg) are already sold out! There are a few workshop-only tickets available for New York 2019, but be quick!

Smashing Editorial (il)