So here's a little background to help with what I'm trying to accomplish (be mindful I'm also fairly new to MySQL):
I'm creating a dynamically built navigation for a website using PHP and MySQLi. I've created a class called Database where I've got helper functions, such as connect() for connecting to the database, and the like. Then I have another class called Navigation which extends Database, and there I'm creating helper functions to do specific things for the database that holds my navigation links, such as selecting and inserting and so on.
Now, the following code works flawlessly when working with my data:
function get() {
    $statement = $this->connect()->prepare(
        "SELECT * FROM `category` ORDER BY `parent_id`, `sort_order`, `category_name`"
    );

    $statement->execute();
    return $statement->get_result();
}
Later, I retrieve my data using:
$navigation_library = new Navigation();
$navigation = $navigation_library->get();
Finally, I throw the data it into some arrays I've set up:
I've got get() for SELECT, add() for INSERT queries, edit() for UPDATE queries, etcetera. Doing it that way, though, I'm reusing code by going through the prepared statements over and over again for each of those... and while that's perfectly fine, I'm trying to keep it cleaner by doing the prepared statements like the following:
$this->perform("SELECT * FROM `category` ORDER BY `parent_id`, `sort_order`, `category_name`");
This throws an exception later when the later code gets to the $navigation->fetch_assoc() part and gives me the Call to a member function fetch_assoc() on null error. I've been working almost non-stop for days and I'm feeling like I'm missing something that should be crazy obvious... but I'm stumped, as it doesn't particularly make sense: obviously there's no data there... yet there's no error in my error variable I have setup to collect the Exception result in try.
So now I come to you, DaniWeb denizens, to hopefully save the rest of the hair on my head. Please?
WordCamp Miami (WCMIA) is heading into its 11th year running this weekend, making it one of the longest running non-profit tech conferences in South Florida. Known for its many learning opportunities and workshops, the event spans three days from March 15 – 17 at Florida International University.
For the vast majority of the WordPress world that cannot make it to Miami, the next best alternative is tuning into the free livestream. WCMIA will be broadcasting a selection of workshops and sessions from the schedule, beginning with the Freelancer’s Workshop on Friday, March 15. The main event features six different tracks, and Saturday’s live broadcast will include sessions from “WordPress & The Web” and the “Design & Community” tracks. Sunday’s livestream will broadcast sessions from the Business track.
WCMIA is also hosting a worldwide WordPress trivia contest on Saturday, March 16, at 6PM EST. It is open to both in-person attendees and livestream viewers. Directions for how to sign into kahoot.it remotely for the game show are available on the event’s website. Digital prizes may be awarded to those playing online and winners will be announced on the WCMIA Twitter account.
Dear Newcomers! Confused about choosing the home for your website? Don’t Worry! You have landed at the right platform where comparison of WordPress Hosting Providers is available. For the smooth running of any Website, Web Hosting Provider plays a key role. Selection of the Hosting provider is one of the Important things one should take Read More →
Google this week released the first developer preview of Android Q, marking the beginning of a months-long journey that will eventually see the operating system reach phones, tablets, and more. As it does each year, Google jammed the OS upgrade with a batch of new APIs for developers to put to work.
I had so much fun at An Event Apart Seattle! There is something nice about sitting back and basking in the messages from a variety of such super smart people.
I didn't take comprehensive notes of each talk, but I did jot down little moments that flickered my brain. I'll post them here! Blogging is fun! Again, note that these moments weren't necessarily the main point of the speaker's presentation or reflective of the whole journey of the topic — they are little micro-memorable moments that stuck out to me.
Jeffrey Zeldman brought up the reading apps Instapaper (still around!) and Readability (not around... but the technology is what seeped into native browser tech). He called them a vanguard (cool word!) meaning they were warning us that our practices were pushing users away. This turned out to be rather true, as they still exist and are now joined by new technologies, like AMP and native reader mode, which are fighting the same problems.
Margot Bloomstein made a point about inconsistency eroding our ability to evaluate and build trust. Certainly applicable to websites, but also to a certain President of the United States.
Sarah Parmenter shared a powerful moment where she, through the power of email, reached out to Bloom and Wild, a flower mail delivery service, to tell them a certain type of email they were sending she found to be, however unintentionally, very insensitive. Sarah was going to use this as an example anyway, but the day before, Bloom and Wild actually took her advice and implemented a specialized opt-out system.
This not only made Sarah happy that a company could actually change their systems to be more sensitive to their customers, but it made a whole ton of people happy, as evidenced by an outpouring of positive tweets after it happened. Turns out your customers like it when you, ya know, think of them.
Eric Meyer covered one of the more inexplicable things about pseudo-elements: if you content: url(/icons/icon.png); you literally can't control the width/height. There are ways around it, notably by using a background image instead, but it is a bit baffling that there is a way to add an image to a page with no possible way to resize it.
Literally, the entire talk was about pseudo-elements, which I found kinda awesome as I did that same thing eight years ago. If you're looking for some nostalgia (and are OK with some cringe-y moments), here's the PDF.
Eric also showed a demo that included a really neat effect that looks like a border going from thick to thin to thick again, which isn't really something easily done on the web. He used a pseudo, but here it is as an <hr> element:
Rachel Andrew had an interesting way of talking about flexbox. To paraphrase:
Flexbox isn't the layout method you think it is. Flexbox looks at some disparate things and returns some kind of reasonable layout. Now that grid is here it's a lot more common to use that to be more much explict about what we are doing with layout. Not that flexbox isn't extremely useful.
Rachel regularly pointed out that we don't know how tall things are in web design, which is just so, so true. It's always been true. The earlier we embrace that, the better off we'll be. So much of our job is dealing with overflow.
Rachel brought up a concept that was new to me, in the sense that it has an official name. The concept is "data loss" through CSS. For example, aligning something a certain way might cause some content to become visually hidden and totally unreachable. Imagine some boxes like this, set in flexbox, with center alignment:
No "data loss" there because we can read everything. But let's say we have more content in some of them. We can never know heights!
If that element was along the top of a page, for example, no scrollbar will be triggered because it's opposite the scroll direction. We'd have "data loss" of that text:
We now alignment keywords that help with this. Like, we can still attempt to center, but we can save ourselves by using safe center (unsafe center being the default):
Rachel also mentioned overlapping as a thing that grid does better. Here's a kinda bad recreation of what she showed:
I was kinda hoping to be able to do that without being as explicit as I am being there, but that's as close as I came.
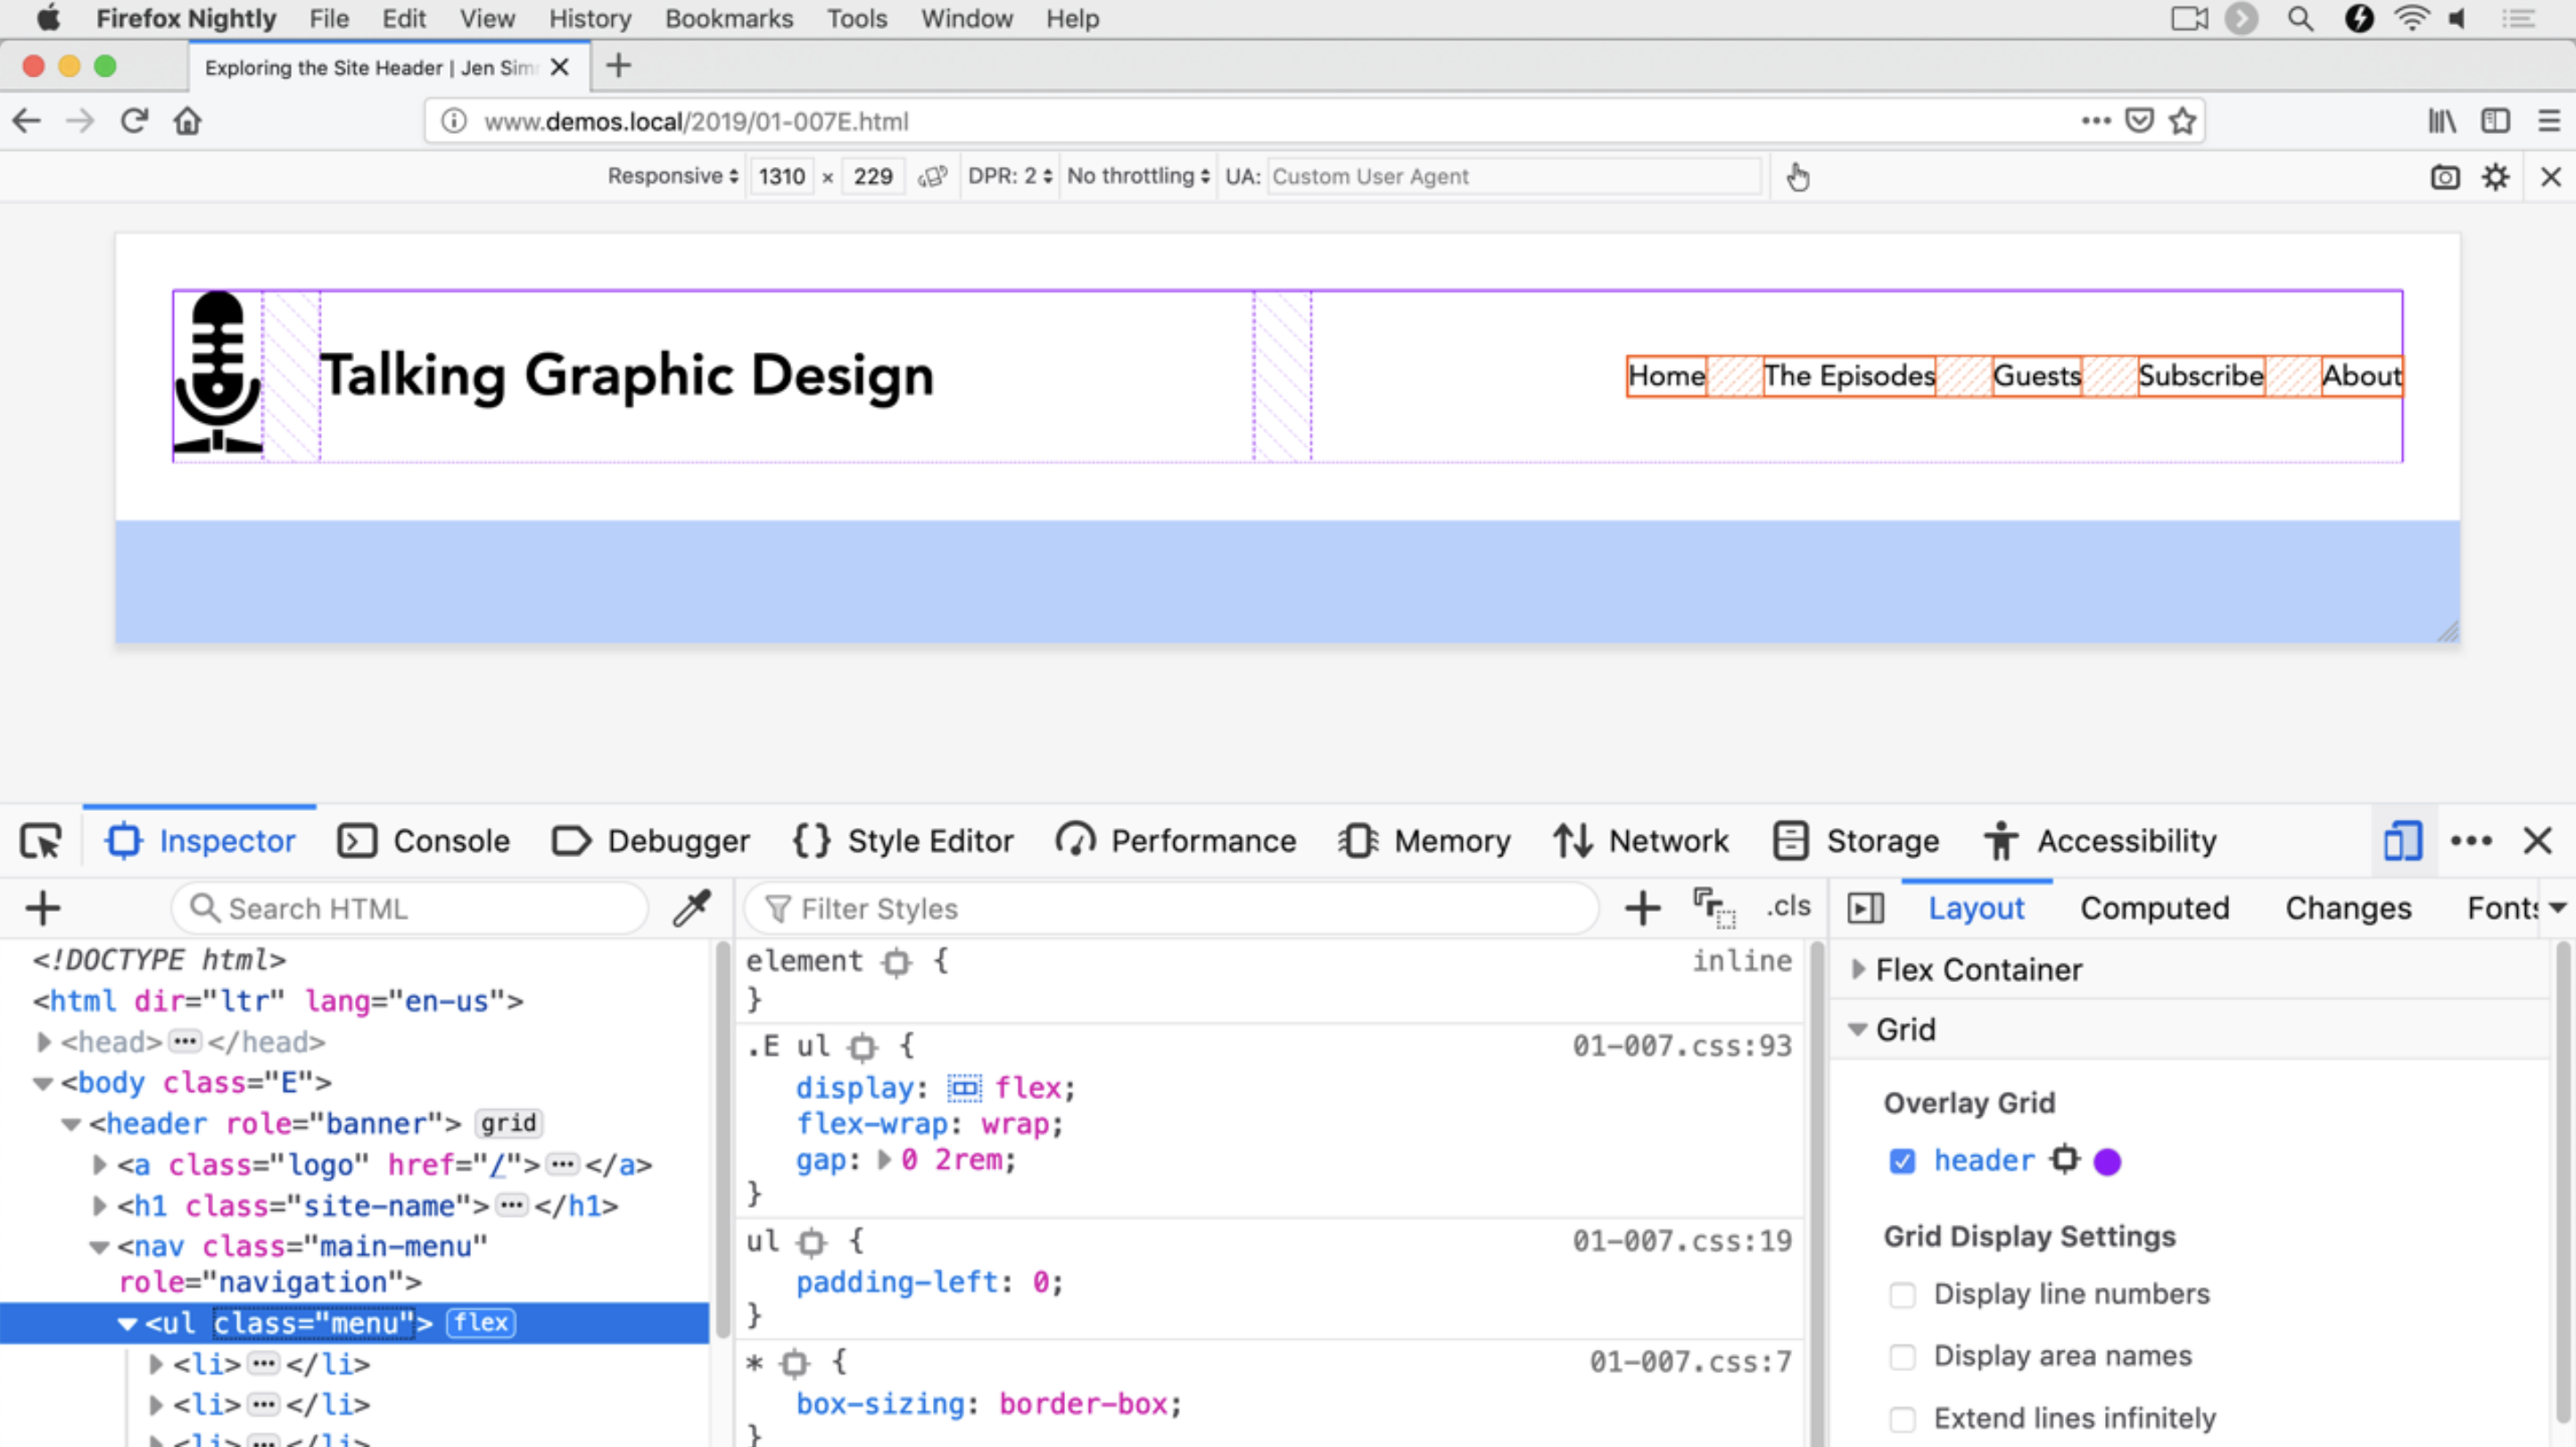
Jen Simmons showed us a ton of different scenarios involving both grid and flexbox. She made a very clear point that a grid item can be a flexbox container (and vice versa).
Perhaps the most memorable part is how honest Jen was about how we arrive at the layouts were shooting for. It's a ton of playing with the possible values and employing a little trial and error. Happy accidents abound! But there is a lot to know about the different sizing values and placement possibilties of grid, so the more you know the more you can play. While playing, the layout stuff in Firefox DevTools is your best bet.
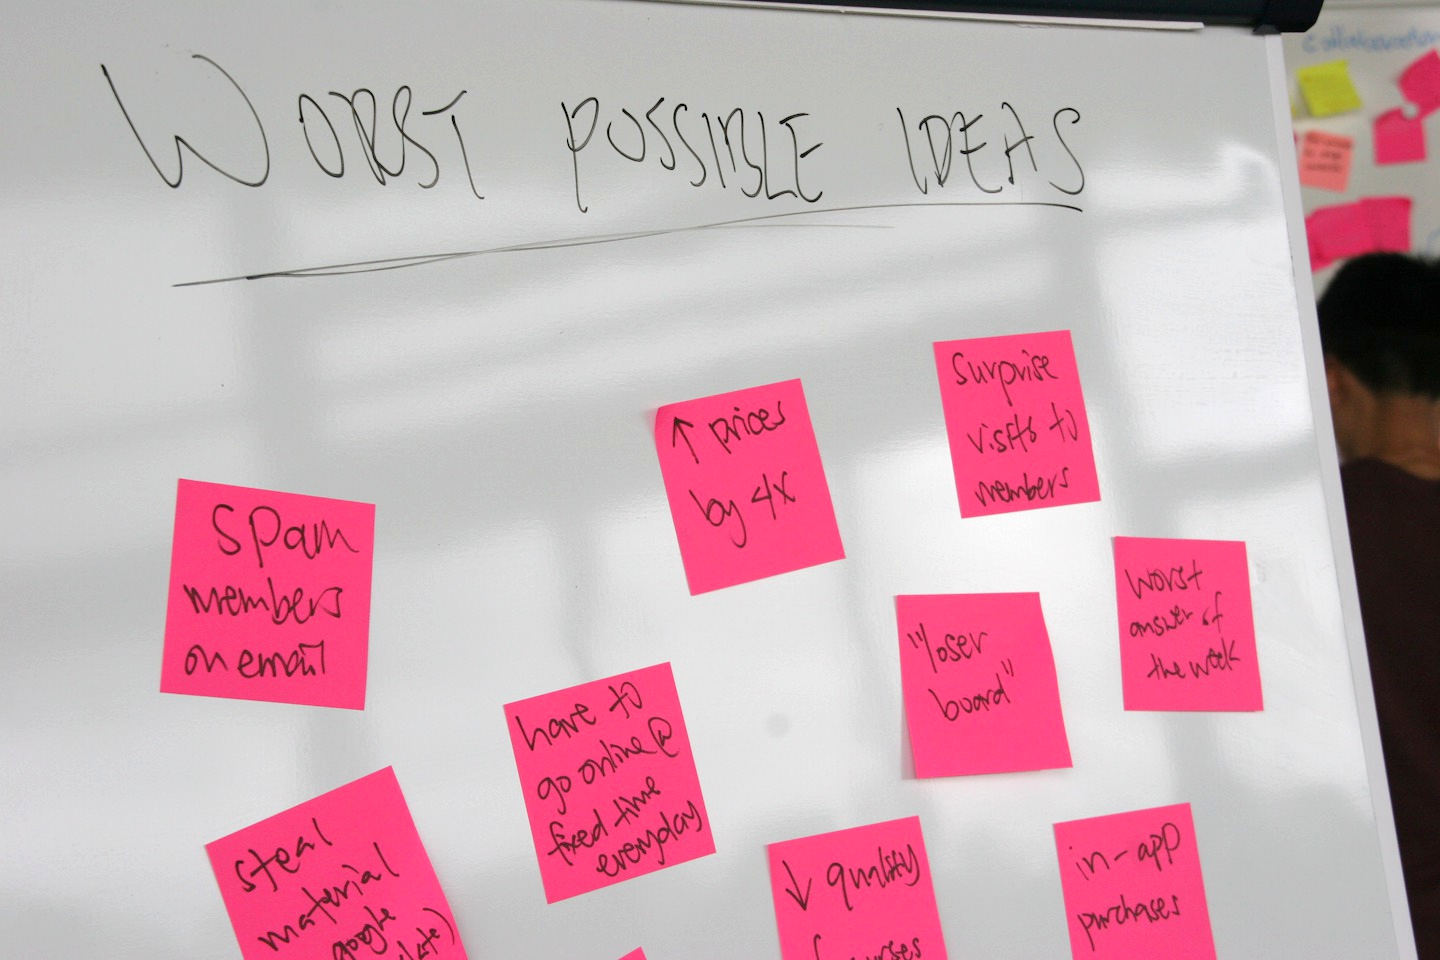
The idea is that even though brainstorm sessions are supposed to be judgment-free, they never are. Bad ideas are meant to be bad, so the worst you can do is have a good idea. Even better, starting with good ideas is problematic in that it's easy to get attached to an idea too early, whereas bad ideas allow more freedom to jump through ideation space and land on better ideas.
Scott Jehl mentioned a fascinating idea where you can get the benefits of inlining code and caching files at the same time. That's useful for stuff we've gotten used to seeing inlined, like critical CSS. But you know what else is awesome to inline? SVG icon systems. Scott covered the idea in his talk, but I wanted to see if it I could give it a crack myself.
The idea is that a fresh page visit inlines the icons, but also tosses them in cache. Then other pages can <svg><use> them out of the cache.
Here's my demo page. It's not really production-ready. For example, you'd probably want to do another pass where you Ajax for the icons and inject them by replacing the <use> so that everywhere is actually using inline <svg> the same way. Plus, a server-side system would be ideal to display them either way depending on whether the cache is present or not.
Jeremy Keith mentioned the incredible prime number shitting bear, which is, as you might suspect, computationally expensive. He mentioned it in the context of web workers, which is essentially JavaScript that runs in a separate thread, so it won't/can't slow down the operation of the current page. I see that same idea has crossed other people's minds.
I'm sad that I didn't get to see every single talk because I know they were all amazing. There are plenty of upcoming shows with some of the same folks!
There is absolutely no doubt that contact forms are a vital aspect of any online business. They have quickly become the norm and in a highly competitive online environment, it is a priceless asset to have. This is because providing an easy method for customers to voice their opinions, suggestions, concerns and anything else related Read More →
Last week Automattic published a video titled “A meditation on the open web” that calls out Facebook as the antithesis of the open web:
As you get closer the air gets smoggier and you realize it’s a vast metropolis. It’s surrounded by high concrete walls, completely contained. Inside it’s bustling, lots of honking traffic, people everywhere, the sound is deafening. You see people arguing in bars and chatting on street corners. Billboards and advertisements are everywhere, touting ever kind of good and service. It’s noisy and dense and overwhelming.
This is Facebook.
The video also likens Instagram to a cookie cutter housing development that is actually just a collection of billboards with no one living there.
My expectation before playing the video was that it would enumerate the positive aspects of the open web but I was surprised to find it juxtaposed with Facebook and Instagram in a somewhat jarring fashion midway through. It effectively communicates the stark contrast between the limitations and restrictions of social media silos and the freedom of owning your own website.
Open Web Meditation was created as a design experiment at Automattic that encourages viewers to look beyond the walls of dominant social media platforms and consider how our experiences on the web differ based on where we choose to share our ideas. The company is looking to gain global exposure for the video by inviting people to create their own versions of it in their own languages.
Automattic’s video is a timely message, as the world pauses to reflect on the 30th birthday of the World Wide Web this week. In his open letter published by the Web Foundation, Tim Berners-Lee urged companies, governments, and the web’s citizens not to give up on building a better web. He identified “system design that creates perverse incentives,” where user value is sacrificed, as one of the most dangerous threats to the web at this time.
“You can’t just blame one government, one social network or the human spirit,” Berners-Lee said. “Simplistic narratives risk exhausting our energy as we chase the symptoms of these problems instead of focusing on their root causes. To get this right, we will need to come together as a global web community.”
Many commercial entities have enjoyed extraordinary and unprecedented opportunities and influence because of the creation of the world wide web. Berners-Lee underscored their responsibility toward the public as stewards of the open web.
“Companies must do more to ensure their pursuit of short-term profit is not at the expense of human rights, democracy, scientific fact or public safety,” he said. “Platforms and products must be designed with privacy, diversity and security in mind. This year, we’ve seen a number of tech employees stand up and demand better business practices. We need to encourage that spirit.”
In an interview with the BBC, Berners-Lee said that global action is required tackle the web’s “downward plunge to a dysfunctional future.” This 30-year anniversary is a good time to re-examine our complex relationships with centralized services and return to the guiding principles that have made the web a universal, open place of opportunity.
RingCentral, cloud communications company, recently announced RingCentral Embeddable and additional APIs to better integrate communication functionality into existing systems. RingCentral Embeddable allows users to integrate voice and text functionality into third-party apps in a matter of minutes.
If you are a blogger you may be running several sites, which can take up most of your time. There is more to each blog the just the writing of it. You have to ensure that the content is up to date and correct, that it is interesting to your target audience and that it Read More →
That’s why I took the time to identify the best WordPress plugins for the most popular categories. I’ve already created extensive guides for each one of these 13 categories.
Every guide contains a list of the best WordPress plugins in each segment.
And if you’re after something specific, you should check out that post — many of plugins I recommend are for particular use cases.
In-Depth Reviews of the Best WordPress Plugins in 13 Categories
This my the complete list of my in-depth plugin reviews for…
Each of those posts reviews multiple plugins in each category. But most people don’t need to go that deep. That’s why I made this best of the best list. This is a resource to identify the top must-have plugin for each category.
The plugins on this list are not the niche options; these are the plugins that will appeal to the masses. They’re the WordPress plugins I’d recommend broadly.
Best SEO Plugin for WordPress — Yoast SEO
There are hundreds of WordPress plugins that will help improve your SEO strategy, but one stands above the rest.
Yoast SEO
Yoast SEO is an all-in-one solution for your WordPress SEO needs. With more than five million active installations, it’s one of the most popular WordPress plugins on the market. I’m not saying you should always follow the crowd, but a number that big is a great indication of quality.
Why I like it:
Create and manage XML sitemaps without having to code on your own
Identify and avoid duplicate content on your website
Comes standard with templates for meta-descriptions and titles
Cost: Free; $89 per year for premium
Best Google Analytics Plugin for WordPress — MonsterInsights
MonsterInsights is the best WordPress plugin for Google Analytics.
Google Analytics gives you in-depth knowledge and insights about your website traffic.
By installing a plugin, you can have access to all of your Google Analytics reports without leaving your WordPress dashboard.
This plugin lets you add your Google Analytics code to your website without any manual coding required. It’s advanced and versatile enough to handle analytics for all websites, including ecommerce shops. No wonder it has two million active installations.
Why I like it:
Detailed reports about your audience and their behavior on your website
Helps ecommerce sites track KPIs like conversion rates and average order value
Identifies your best content and top performing landing pages
Cost: $99.50 for a basic website, $199.50 for ecommerce sites, and $499.50 for agencies and developers — all plans billed annually
Best Membership Plugin for WordPress — MemberPress
Membership websites drive recurring revenue with a subscription business model.
Think of those blogs or web newspapers you see online that ask you to subscribe for their content. You can offer premium features and content to your paid members.
In order to set this up, you’ll need to install a plugin to manage memberships and payments on your WordPress site.
MemberPress is the best plugin for this category. It makes it easy for you to convert your existing website into a membership site, without having to start from scratch.
All you have to do is add the details of your payment gateway and set up your products and content in a members-only area.
Why I like it:
It supports payment gateways like PayPal and Stripe
Integrates with your email marketing software
Comes with pricing page templates for membership options
Cost: $129 per year for Basic, $249 per year for Plus, and $349 per year for Pro
Best WordPress Backup Plugin — VaultPress
In the event of a crash or malicious attack on your website, a backup plugin will be there to restore your content and minimize downtime. It will also act as a fail-safe against human error on your WordPress dashboard.
We’ve been using VaultPress here on Quick Sprout since 2011. So naturally, I think it’s the best WordPress backup plugin, or else I’d switch to something else. It’s so easy for you to set up and automatically back up your website content. You don’t need to be a tech wizard to use this plugin.
Why I like it:
Great for site migrations, restores, and file repairs
The calendar view allows you to locate and restore content from old backups
Built-in file scanning and spam defense helps reduce chances of malware, viruses, spam, or a malicious attack
Cost: Plans range from $39 to $299 per year
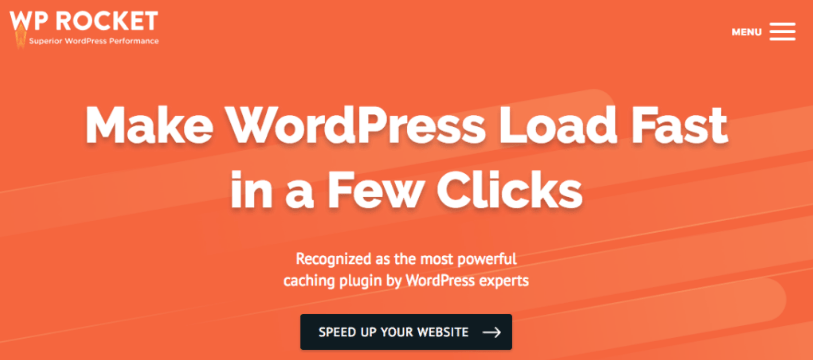
Best WordPress Cache Plugin — WP Rocket
Adding a cache plugin to your website will help you speed up your page loading times. Out of more than 900 cache plugins available, one stands out as the best.
The WP Rocket WordPress plugin is extremely versatile. It’s simple enough for beginners to figure it out, but has advanced features that can meet the needs of developers with more technical experience.
Why I like it:
Quick setup and simple navigation
Image on request feature (images are only loaded when the scroll depth is reached)
Minifies JavaScript, CSS, and HTML files to speed up loading times
Cost: $49 per year for one website, $99 per year for three websites, and $249 per year for unlimited websites
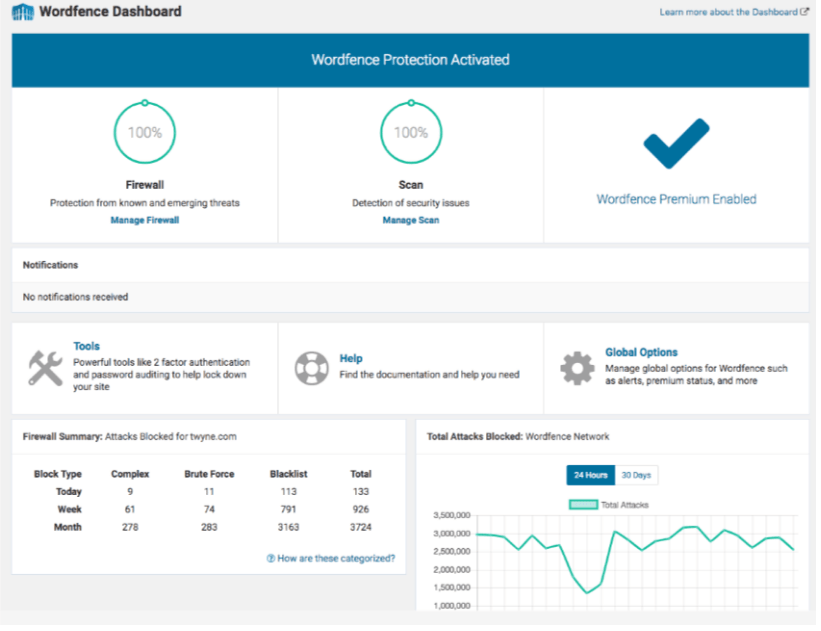
Best WordPress Security Plugin — WordFence Security
Roughly 90,000 websites get hacked every day — 83% of those websites use WordPress. Clearly, security needs to be at the top of your priority list. You can install a WordPress plugin to help beef up your website security.
More than two million WordPress websites are currently using the WordFence Security plugin as a security solution. The plugin fights against malware, spam, and other threats in real time. It’s a great option for those of you who don’t have a background in IT or cybersecurity. You’ll still be able to secure your website with WordFence Security.
Why I like it:
Block attacks from specific regions that are known for cybercrime
See trends and reports about any attempted hacks on your website
Firewall blocks and brute force attack protection comes standard
Cost: Free; premium version starts at $99 per year with other add-ons available for purchase
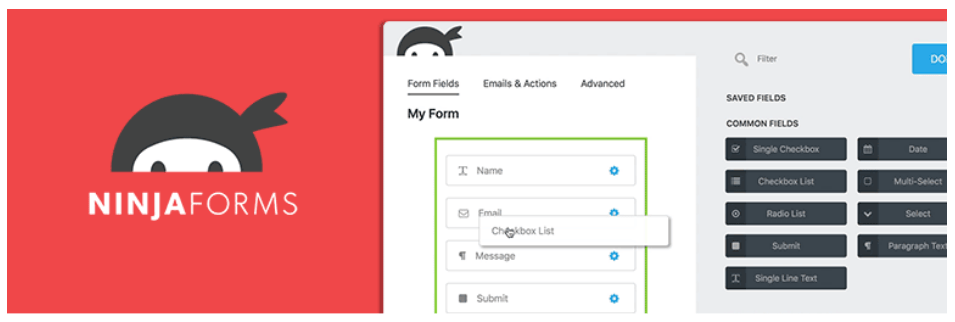
Best Form Plugin for WordPress — Ninja Forms
Website forms are crucial for collecting information. It’s the best way to get your website visitors to sign up for something, like your email subscription list.
Ninja Forms is great because of its seamless integration into your WordPress dashboard. Once you have this plugin installed, you can create your first form in just minutes. That’s why it’s no surprise that more than one million websites use Ninja Forms.
Why I like it:
Can integrate with your email marketing software
Collect payments with Stripe, PayPal Express, and Elavon
Export and analyze the data that’s submitted through forms
Cost: Free; $99 per year for Personal, $199 per year for Professional, $499 per year for Agency. Add-ons range from $29 to $129 per year.
Best WordPress Gallery Plugin — NextGEN Gallery
WordPress has a basic image gallery. However, I wouldn’t recommend using it because it’s so limited. For truly improving the visual appeal of your website, you’ll need something extra. A gallery plugin is ideal.
NextGEN Gallery is one of the best WordPress plugins because you’ll have so many different gallery options to choose from. Other plugins just give you a couple of basic templates for adding images. It’s a great option for photographers and artists.
Why I like it:
Customize slideshows with effects, transitions, and timing
Add watermarks and hotlink protection to your images
Ecommerce integration for selling images on your site
Cost: Free; paid versions available for $79, $99, and $139 per year
Best WordPress Slider Plugin — Smart Slider 3
Do you want to add a slider to your website? You can make sliders, carousels and blocks using a slider plugin. My favorite is Smart Slider 3, because it’s easy to use, reliable and super flexible.
Using Smart Slider 3, you’re able to create a slider on your WordPress website using powerful design tools, and pre-built templates.
There’s a free version and a pro version.
Why I like it:
Easy to build a slider with layers
Several different slider types to choose from
Prebuilt template and slider library
Cost: Free; aid versions available for $35-$250 depending on how many sites you want to implement the plugin on.
Best Social Media WordPress Plugin — Super Socializer
Your website needs to be integrated with your social media profiles. Otherwise, you’re not maximizing the potential of your social media. WordPress plugins can help you increase the exposure of your website content on social media.
There are so many social media WordPress plugins designed for specific features. But Super Socializer is more of an all-in-one solution. So if you don’t want to install multiple social media plugins, I’d definitely recommend Super Socializer.
Why I like it:
Site visitors can use their social login information to create an account on your website
Add social sharing icons to your pages
You can get more blog comments by enabling social comments
Cost: Free
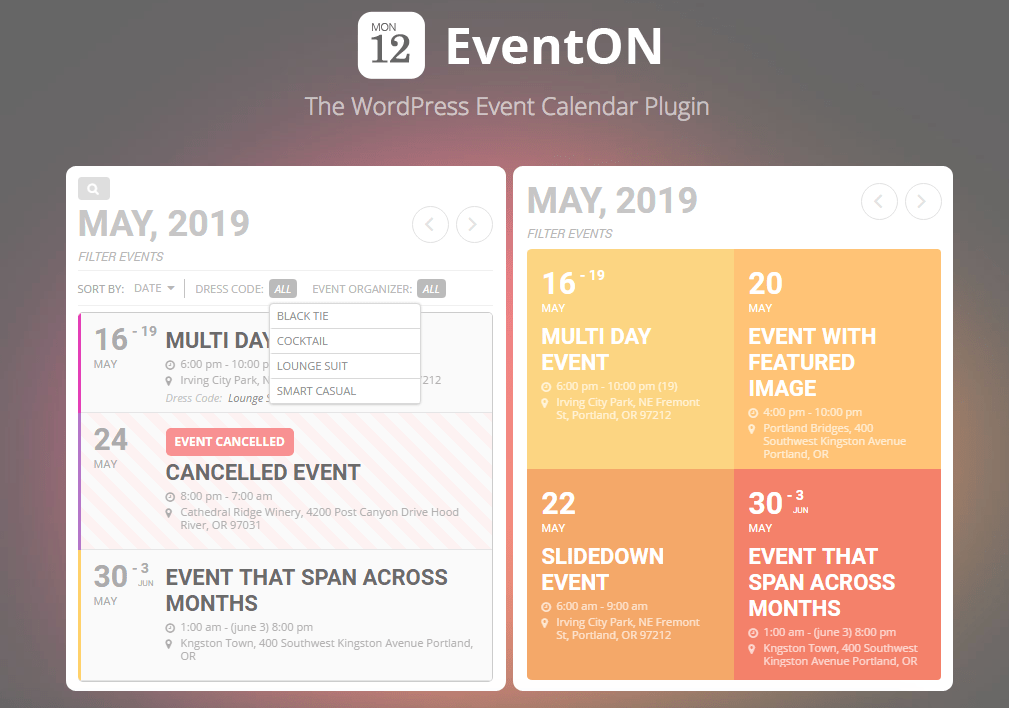
Best WordPress Calendar Plugin — EventON
Every business needs to stay organized. Calendar plugins can help you manage events, tasks, and bookings on your website. Some of these plugins are more advanced than others, but overall, there’s one that shines above the rest.
EventON allows you to create calendars that will “wow” your website visitors. We’ve all seen websites with boring calendars that look like they were designed a decade ago without any updates. That definitely isn’t be the case here. EventON has modern designs that are visually appealing and fully functional.
Why I like it:
It can manage events lasting for multiple days, weeks, or months at a time
Add images to your event listings and integrate them with Google Maps
Sell event tickets with Woocommerce support
Cost: $24; add-ons sold separately
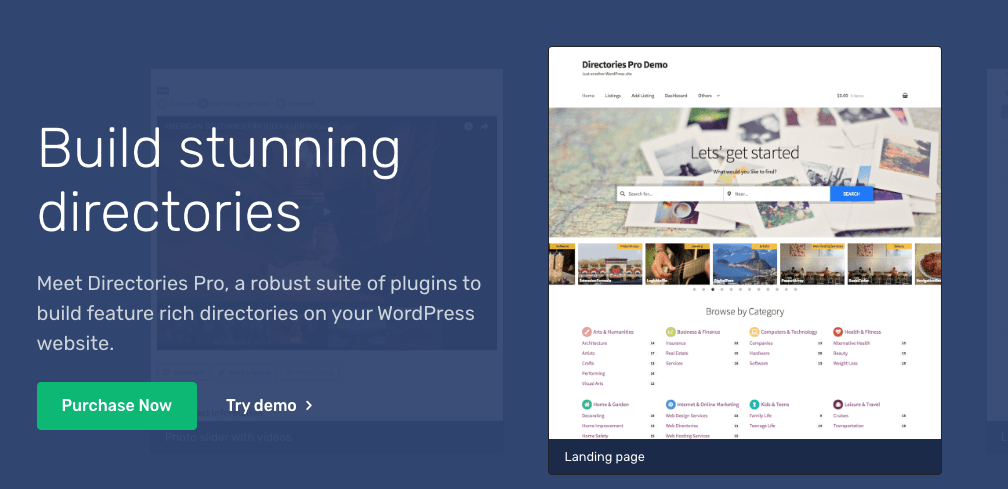
Best WordPress Directory Plugin — Directories Pro
Directories are extremely versatile. Whether you want to add a directory to your site for internal purposes or create a global platform of business directories, the right WordPress plugin can help you meet those needs.
No matter what type of directory you want to add to your website, the Directories Pro WordPress plugin will make it possible. This plugin is highly responsive and uses caching to boost your website’s performance. Make sure to enable reviews for your directory to enhance the content. You can even integrate listings with Google Maps.
Why I like it:
Drag-and-drop editor makes it easy for you to customize the directory without coding
Include an option for websites to claim their listing in your directory
Add paid listings to your directory
Cost: $39
Best WordPress Popup Plugin — Layered Popups
Do you want to add popups to your website? Popups can be great for getting email subscribers, driving downloads, generating sales, or enticing other actions on your website. Regardless of your intention, you’ll need a WordPress plugin to make it work.
Layered Popups is great because you can create popups that are visually appealing, so you have a chance to get creative. These popups will clearly stand out to your website visitors. It’s a chance for you to make unique popups compared to what people are used to seeing on other websites.
Why I like it:
Integrates with 56 of the most popular email marketing platforms
Run A/B tests to fully optimize the performance of each popup
Multiple options for triggering popups (such as exit intent or scrolling depth)
Cost: $21
Best WordPress Booking Plugin — Bookly
Booking plugins are necessary for any website that takes appointments or reservations. Online booking systems will optimize your process on the back end while simultaneously improving the customer experience. If you’re not allowing online bookings, you’re ignoring the preferences of the majority of your customers — 70% of people prefer to book appointments online with service providers.
Bookly has a sleek and modern design on both the frontend and backend. Booking options are completely customizable and fully responsive. You’ll definitely want to install Bookly if you’d like to take your customers through a quick and easy booking process.
Why I like it:
Custom pricing and availability for different employees (such as trainers at a gym)
Option to process payments or collect deposits at the time of booking
Customers can set up recurring appointments or get added to a waiting list
Cost: $89; add-ons sold separately
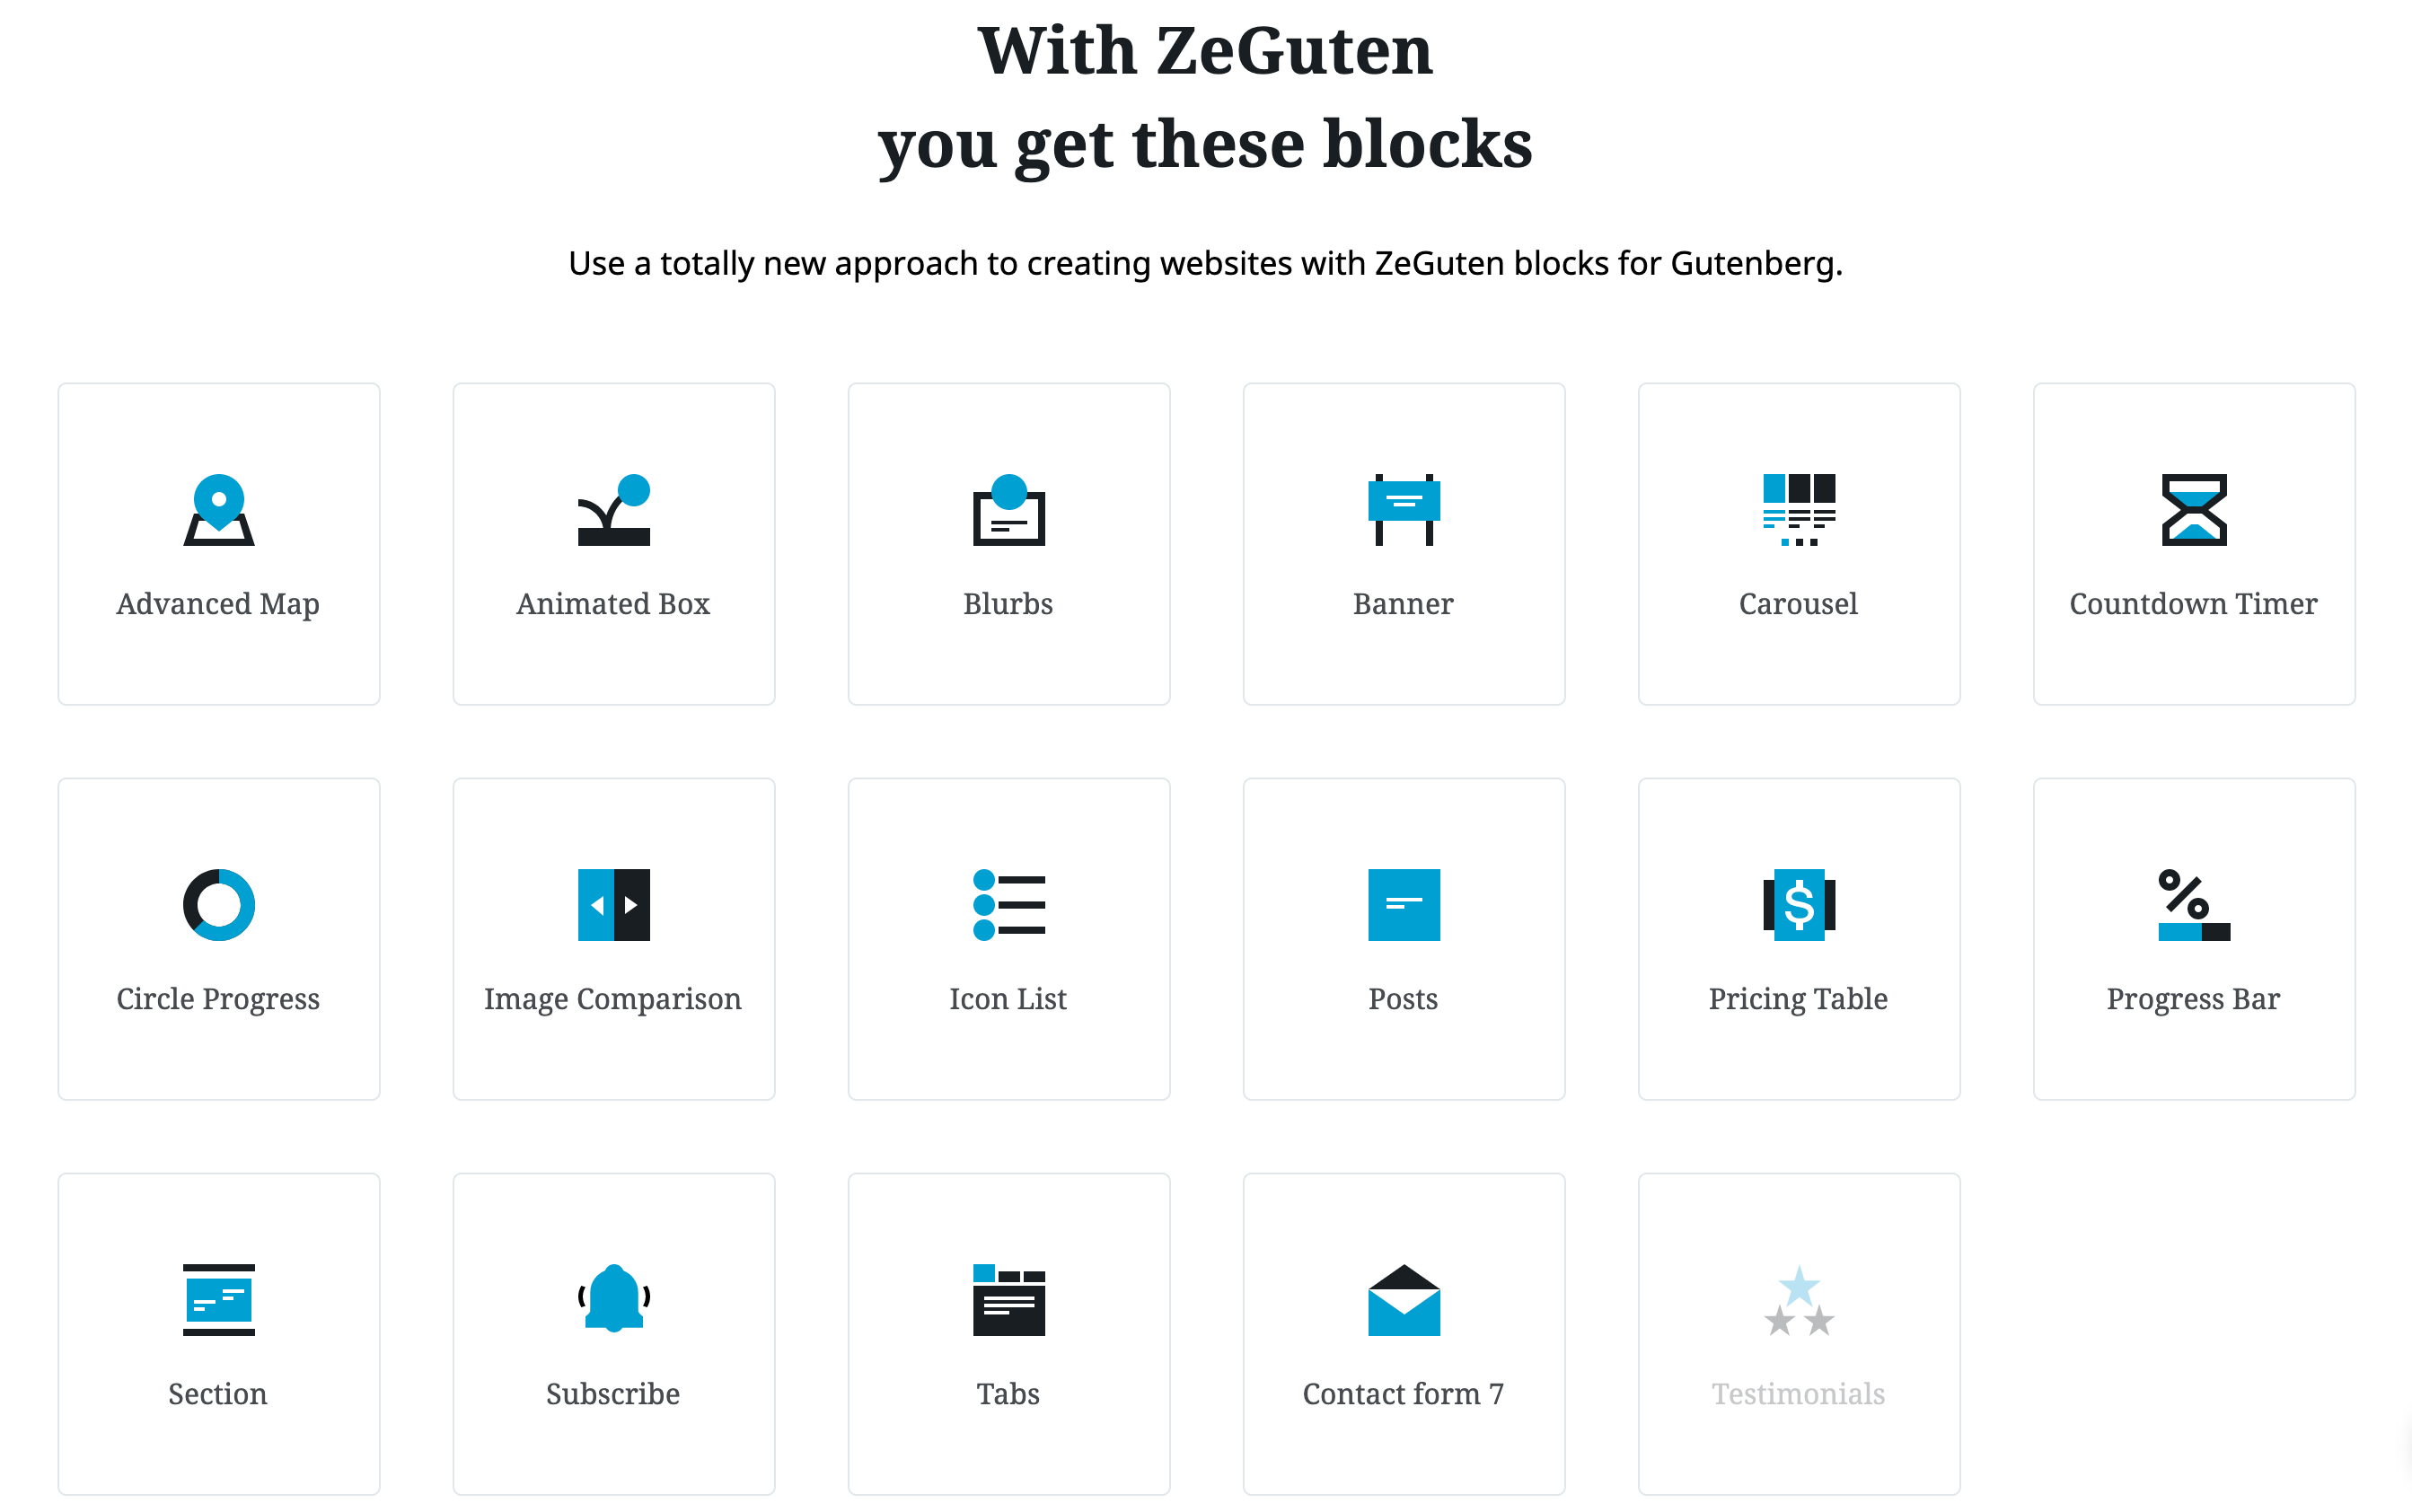
Best Website Builder Plugins — ZeGuten
ZeGuten is a website builder plugin. Instead of building your site line-by-line with code, you’ll use “blocks” to put it altogether. It works with everything from an online store to a fitness blog. It’s also responsiveness right out of the box so your website will looks great on mobile.
There are 17 easy-to-customize blocks that you’ll work with to build each page on your site. This is the perfect option if you want to customize your WordPress site beyond a basic theme but don’t want to code the whole thing yourself.
Why I like it:
No coding required, make your WordPress site look exactly the way you want
A bunch of extra design features like animation
SEO-friendly and requires no coding skills
Cost: $15
What exactly is a WordPress plugin?
It’s essentially an app for your website.
I love how WordPress is designed to be lean out of the box. This prevents code bloat — your website isn’t dragged down by bulky code for things you don’t need or use. The core of WordPress is simple. You can customize it with plugins.
The core of WordPress is designed to be lean and lightweight, to maximize flexibility and minimize code bloat. Plugins then offer custom functions and features so that each user can tailor their site to their specific needs.— WordPress Codex
Installing a plugin to your WordPress site provides you with advanced features that aren’t available with the bare bones version of WordPress.
These are the best overall options for each of the essential categories. Keep in mind, I identified these as the best because they appeal to the widest possible audience. Some of you may want plugins that have more specific features and functionality within each category.
For example, you might want an SEO plugin that specifically helps you identify relevant keywords while you’re blogging. Or maybe you want a social media plugin that just adds your Instagram feed to your website.
Do you want a Google Analytics WordPress that’s made for tracking specific events on your website? There’s a plugin for that too.
There are caching plugins that are better for things like the cloning and migrating content between servers. The list goes on and on.
So I’d definitely recommend reviewing the individual guides for each category as well. That way you’ll know for sure that you’re installing a plugin that meets your specific needs.
Block Kit: Slack’s Contribution To Building A Better Collaboration UI
Block Kit: Slack’s Contribution To Building A Better Collaboration UI
Suzanne Scacca
(This is a sponsored article.) Over the last few years, there’s been a major shift in terms of the way companies work. As more businesses become location independent, collaboration tools have become the standard way in which teams meet and get work done.
That said, just because we have collaboration apps that integrate our connected business processes and tools, that doesn’t mean the experience always leads to optimum efficiency or productivity. Why? Well, sometimes an unfriendly UI gets in the way.
That’s why, today, I’m going to talk about Block Kit, Slack’s contribution to building a better collaboration UI.
For those of you who have built a custom Slack app (for the app directory or for internal purposes), this will be your introduction to the new design tool. For those of you who haven’t, that’s okay. There are some valuable lessons to take away from this in terms of what makes for an engaging workspace that will improve collaboration.
Developers, Do You Know What Slack Has Been Working On?
Slack has made huge strides since its launch in 2013. What originally began as a messaging app has now blossomed into a powerful collaboration platform.
As of writing this: Slack has over 10 million active users daily — and they live all over the world (over 150 countries, to be exact).
Here’s an example of a Slack channel for Japanese speakers. (Image source: Slack) (Large preview)
It’s not just individuals using Slack either — nearly 585,000 teams of three persons or more collaborate within the platform. 65 of the Fortune 100 companies also happen to be on Slack.
A glimpse into real-time collaboration between Slack users (Image source: Slack) (Large preview)
This is all thanks to the Slack API which has opened the door for developers to create and publish publicly available apps that extend the functionality of Slack workspaces.
The front page of the Slack App Directory. (Image source: Slack) (Large preview)
This way, Slack users don’t have to bounce between their most commonly used business tools. Related processes may take place all from within Slack.
Sometimes, though, what’s available in the Slack App Directory just isn’t enough for what your organization needs internally. You may be able to bridge some of the divides between your business tools with what’s there, but you might also find a reason to build your own custom Slack apps.
Introducing Block Kit From Slack
Here’s the thing: while Slack has succeeded in allowing developers to craft their own apps to enhance collaboration within the platform, how are developers supposed to know how to create a good experience with it?
Until recently, Slack’s API and app directory provided limited flexibility and control. As Brian Elliott, the General Manager of the Platform, explained:
“Today, all apps are forced into a limited set of ways to display rich information. If you’ve looked at and seen and used all of the different apps in Slack, many of them end up with the same layout regardless of which functionality they’re trying to deploy. When in reality what you need is a set of components that let you build rich interactive displays that are easier for people to comprehend, digest and act on.”
Block Kit is a UI framework that enables developers, designers and front-end builders to display their messaging apps through a rich, interactive and intuitive UI. Further, by providing a set of stackable UI elements or blocks, Block Kit now provides developers with more control and flexibility over their app designs and layouts.
Note: If you’d like to see Block Kit in action, join the upcoming Slack session, “Building with Block Kit”, where you’ll get a live product demonstration and see how easy it is to customize the design of your app.
The building components are on the left. Simply click on the one you want to include and watch it get added to the preview of your app in the center.
Want further customization? Check out the text editor on the right. While Block Kit provides pre-made elements that follow best practices for designing messaging apps, you have the ability to make them your own if you prefer.
2. Block Kit Templates
While you can certainly craft a messaging interface from the Builder on your own, I’d suggest exploring the Templates provided as well:
These are just some of the templates Block Kit offers to users. (Image source: Block Kit) (Large preview)
The Slack Team has already seen really useful cases of Slack apps in action. Needless to say, they know what kinds of things your organization might want to leverage for the sake of improved collaboration.
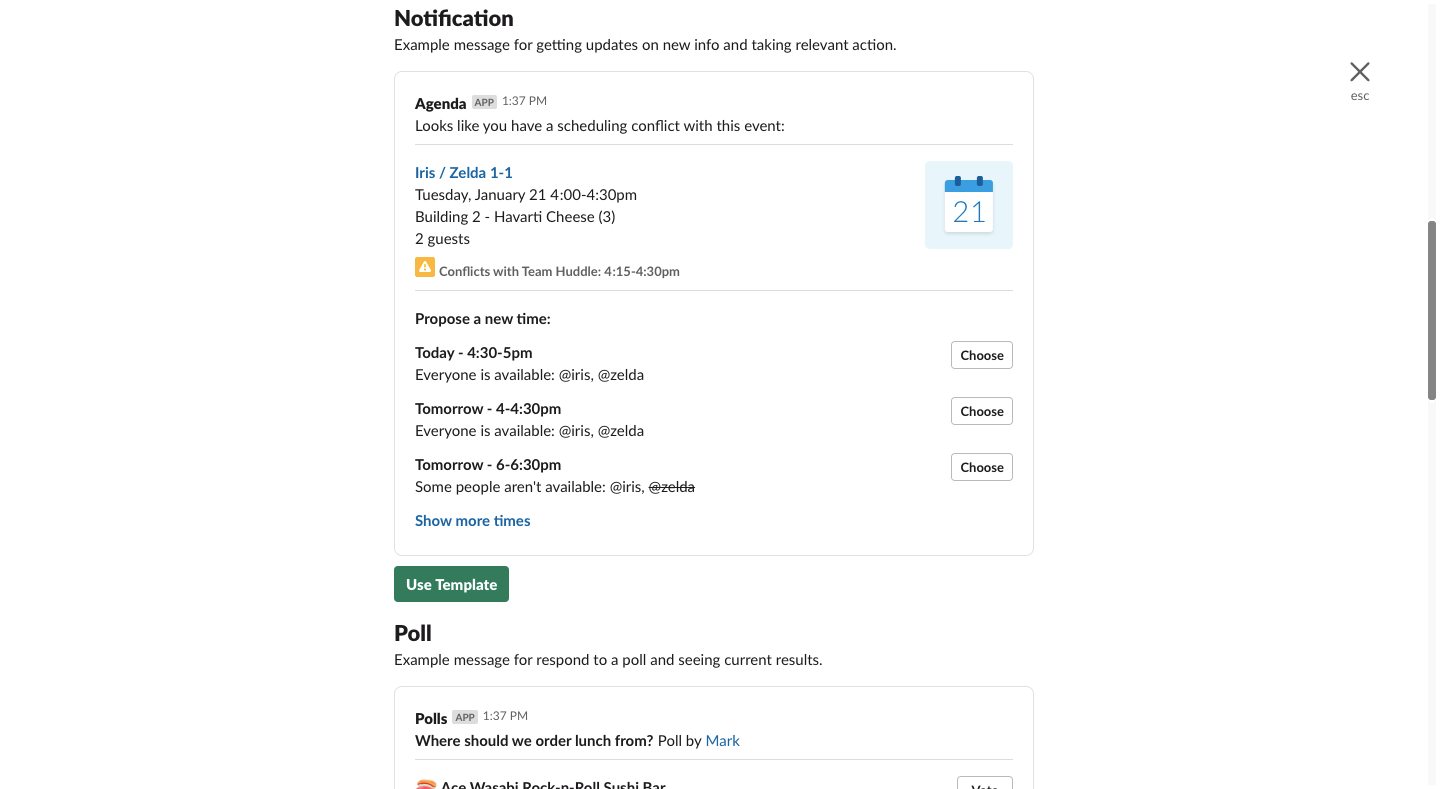
That’s why you’ll find common actions like the following already built out for you:
Reviewing requests for approval;
Taking action on new notifications;
Running polls and monitoring results;
Conducting a search.
Guru is one such tool that’s leveraged Block Kit to improve its Slack app:
Guru provides a database search function within Slack. Results are now quickly retrieved and more clearly displayed on the frontend of Slack.
The Keys To Building A Better Collaboration UI
Now that we’ve seen what’s coming down the line with Block Kit, we need to talk about how it’s going to help you create apps that lead to more productive collaboration.
Blocks
I recently spoke on the subject of Gutenberg and how designers can use it to their advantage. Although the new WordPress editor clearly has its flaws, there’s no questioning why the team at WordPress made the change:
I get that block builders tend to be the preferred tool for web designers and DIY users. Builders allow for visual frontend design and often include abundant customization options.
Some of the pre-made blocks included in Block Kit (Image source: Block Kit) (Large preview)
But Block Kit does much more than that, which means both designers and developers can build custom apps with ease.
Code
The key differentiator between something like a website builder and the Block Kit builder is the coding aspect.
In most cases, designers use page builders so they don’t have to bother with code. They might add some custom CSS classes or add HTML to their text, but that’s generally it. Developers don’t work like that though.
Block Kit includes a panel with pre-written JSON that developers can copy-and-paste into their own Slack app once it’s ready to go. Rather than leave developers to write their own code, Slack provides code that utilizes best practices for speed and design.
A sample of JSON you get when you build your rich messaging experience in the builder. (Image source: Block Kit) (Large preview)
This enables developers to focus on making customizations instead of on having to build their apps from the ground up.
Consistency
When Slack users step inside the platform, they know what to expect. Every interface is the same from workspace to workspace.
However, when an API allows developers to build apps to integrate with those spaces, there’s a risk of introducing elements that just don’t jibe well. When that happens, the unpredictability of the interface can create confusion and hesitation for the end user. Ill-fitting layout choices can also harm the experience.
Block Kit enables developers to build apps with stackable UI components that have been tried and tested. When customizing an experience within an already established platform, it can be difficult to know how far you can take it — or if it’ll even work. Slack has taken those questions out of the equation.
Spacing
This is what the traditional Slack exchange looks like:
An example of Slack users messaging one another (Image source: Slack) (Large preview)
It tends to be a single-column, back-and-forth exchange. And this works perfectly well for Slack channels where collaboration is simple. Employees message about the status of a task. A client uploads a missing asset. The CEO shares a link to a press release mentioning the company. But not all workspaces are that simple.
Block Kit helps you maximize and enhance the space that your app’s features occupy. For instance, Block Kit enables companies like Optimizely to display pertinent information in two-column formats for better readability.
This is indeed a better way to share pertinent details in your team’s Slack app.
Rich Interactions
Another way to elevate your app is by turning the integration into one that’s rich with interactions.
Blocks have been specially developed to enhance the most commonly used elements in Slack collaboration. For example:
Use the Sectional block for better organization.
Use the Text block to customize how messages display.
Use properly sized Image blocks so you can stop worrying about whether or not they’ll display correctly.
Use Context blocks to show bylines or additional context about messages (like author, comments, changes, etc.)
Use Divider blocks to improve the look of the app.
Use Action blocks like menu selection, button selection and calendar dates to bring better features into your app and make them display more intuitively.
Use 2-section blocks for cleaner layouts.
Doodle has a beautiful example of what can be done with rich interactions using Block Kit:
As you can see, users can work together to schedule meetings just as effectively as if they were using a third-party calendar. The only difference is that they can now do all of that within their Slack workspace.
Wrapping Up
Collaboration is an essential part of any organization’s success, and it doesn’t matter if it’s a team of 3 or a team of 300. But there’s a big difference between working together and productivelycollaborating.
Thanks to Slack’s API, developers have created some awesome ways to integrate related processes and tools into the platform. And thanks to Block Kit, those external contributions won’t disrupt the experience if the design of the elements falls short.
With intuitive block-building capabilities, developer-friendly coding options and more, Block Kit is going to help developers bring richer experiences and better collaboration to the Slack platform.
One last thing to mention:
Slack’s Frontiers conference is coming up soon. It’s going to be in San Francisco on April 24 and 25. If you’re planning to attend, note that the Developers track will include a full day’s training on Block Kit, including workshops, new feature demos, tutorials, as well as one-on-one mentoring. If you’re thinking about Block Kit, this is an opportunity you won’t want to miss.
I want you to take a second and think about Twitter, and think about it in terms of scale. Twitter has 326 million users. Collectively, we create ~6,000 tweets every second. Every minute, that’s 360,000 tweets created. That sums up to nearly 200 billion tweets a year. Now, what if the creators of Twitter had been paralyzed by how to scale and they didn’t even begin?
That’s me on every single startup idea I’ve ever had, which is why I love serverless so much: it handles the issues of scaling leaving me to build the next Twitter!
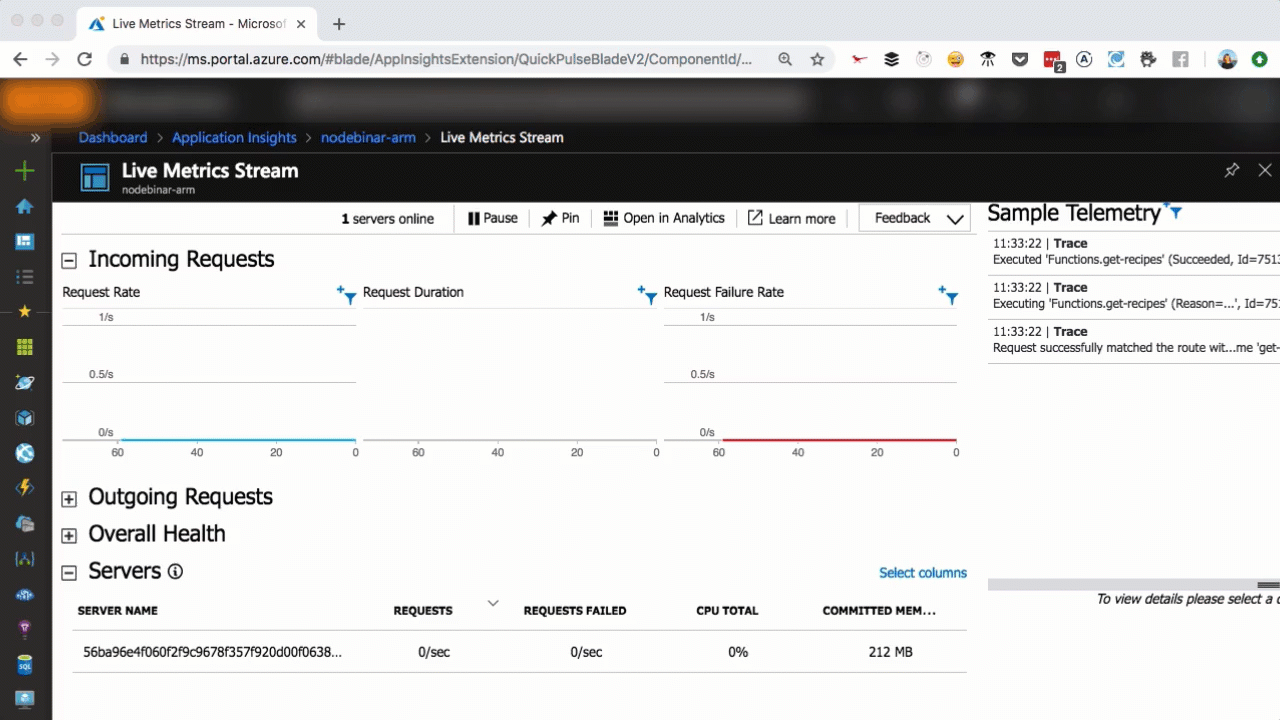
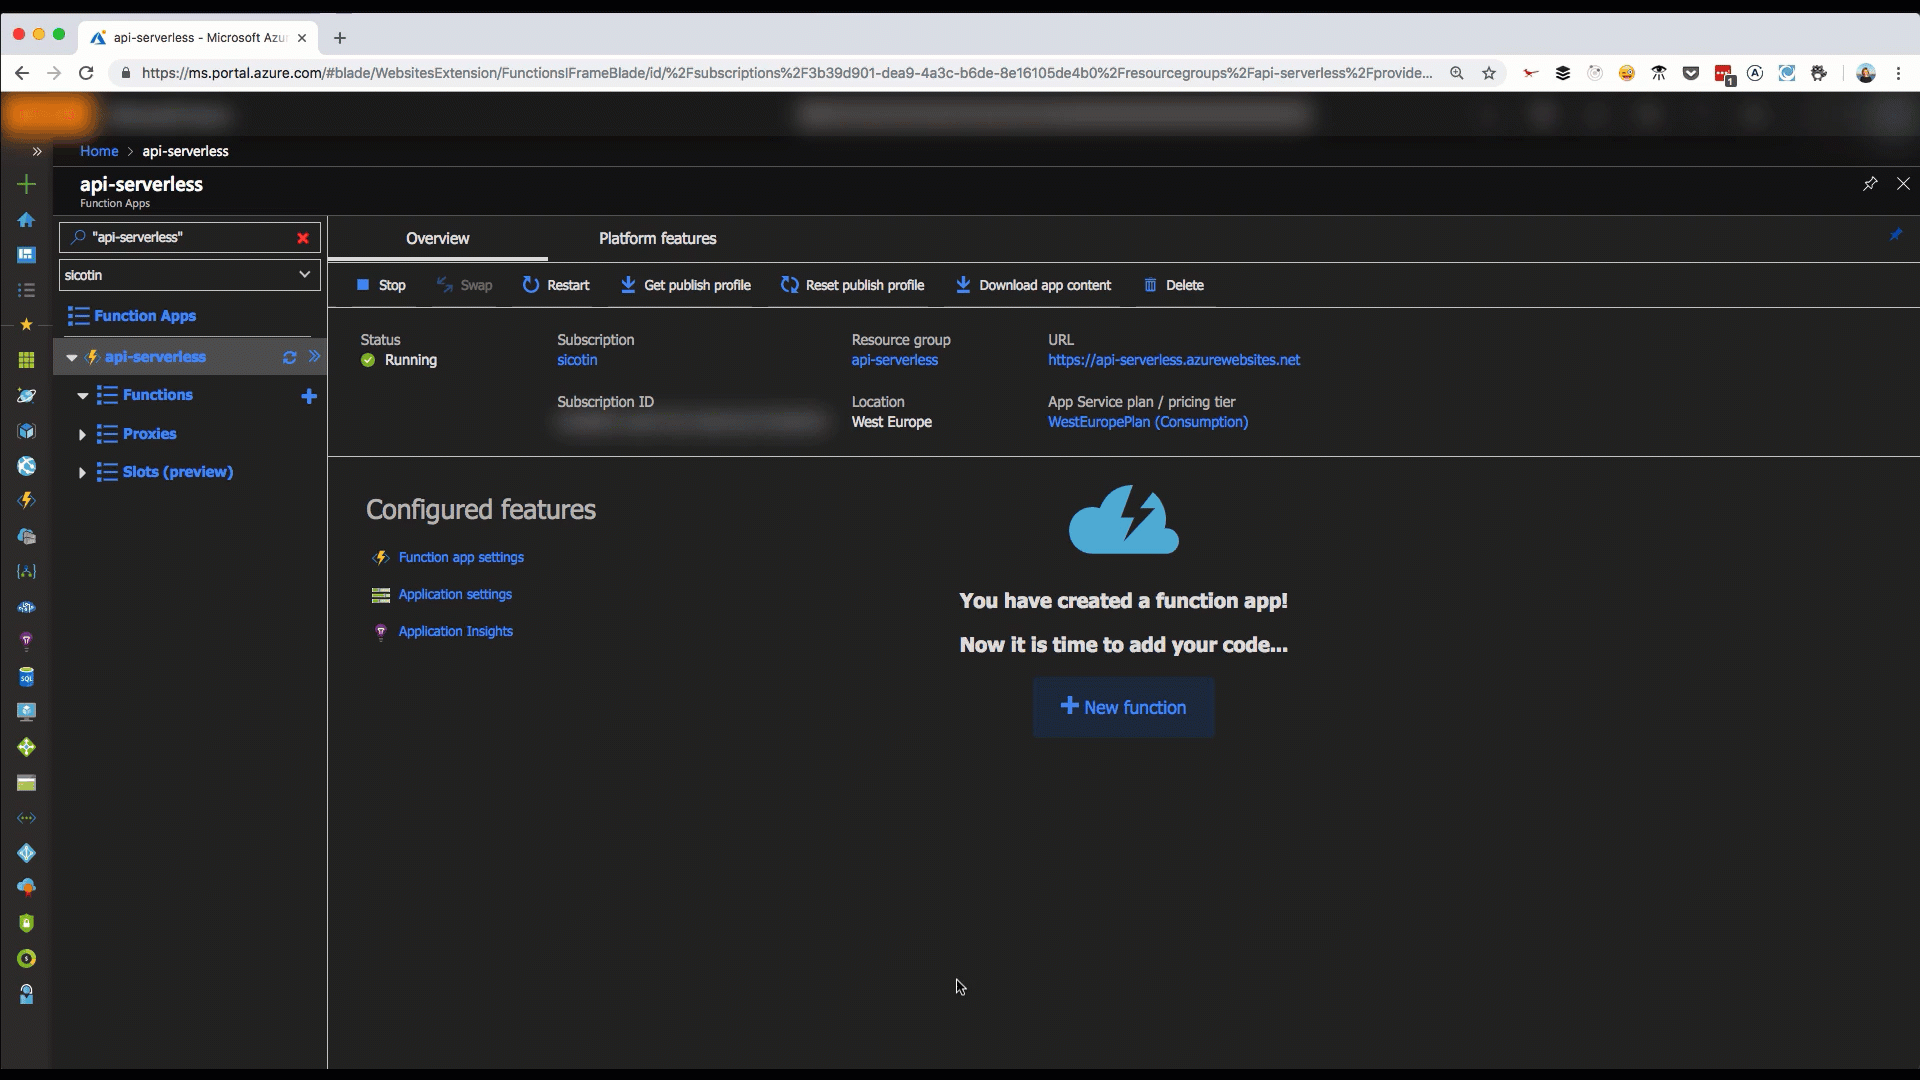
Live metrics with Application Insights
As you can see in the above, we scaled from one to seven servers in a matter of seconds, as more user requests come in. You can scale that easily, too.
So let's build an API that will scale instantly as more and more users come in and our workload increases. We’re going to do that is by answering the following questions:
With every new technology, we need to figure out what tools are available for us and how we can integrate them into our existing tool set. When getting started with serverless, we have a few options to consider.
First, we can use the good old browser to create, write and test functions. It’s powerful, and it enables us to code wherever we are; all we need is a computer and a browser running. The browser is a good starting point for writing our very first serverless function.
Serverless in the browser
Next, as you get more accustomed to the new concepts and become more productive, you might want to use your local environment to continue with your development. Typically you’ll want support for a few things:
Writing code in your editor of choice
Tools that do the heavy lifting and generate the boilerplate code for you
Run and debug code locally
Support for quickly deploying your code
Microsoft is my employer and I’ve mostly built serverless applications using Azure Functions so for the rest of this article I’ll continue using them as an example. With Azure Functions, you’ll have support for all these features when working with the Azure Functions Core Tools which you can install from npm.
npm install -g azure-functions-core-tools
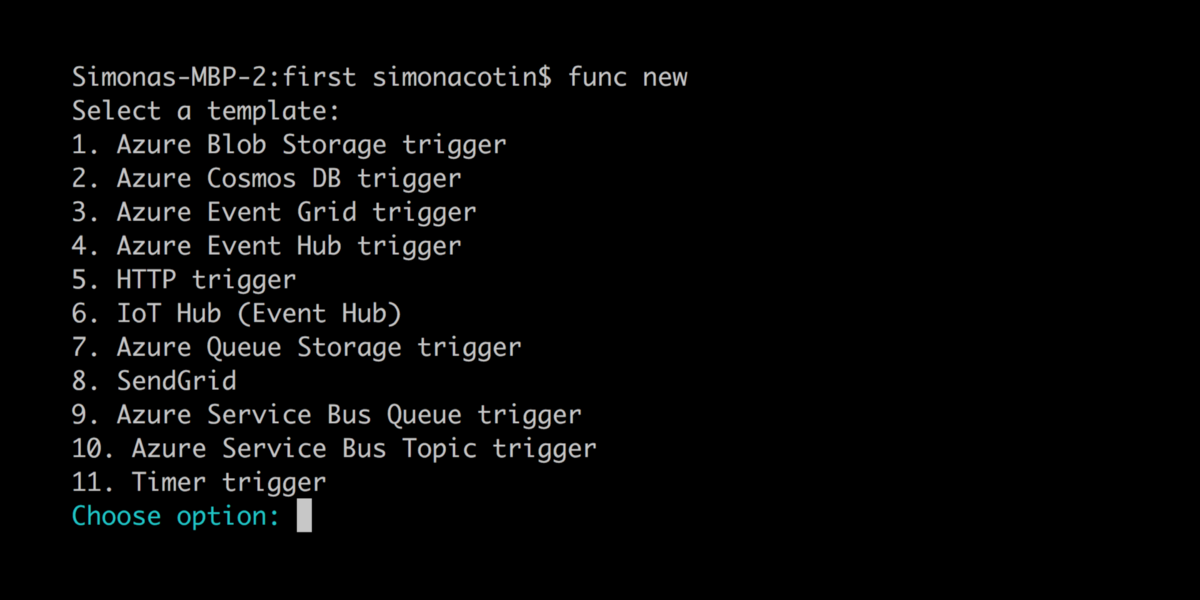
Next, we can initialize a new project and create new functions using the interactive CLI:
func CLI
If your editor of choice happens to be VS Code, then you can use it to write serverless code too. There's actually a great extension for it.
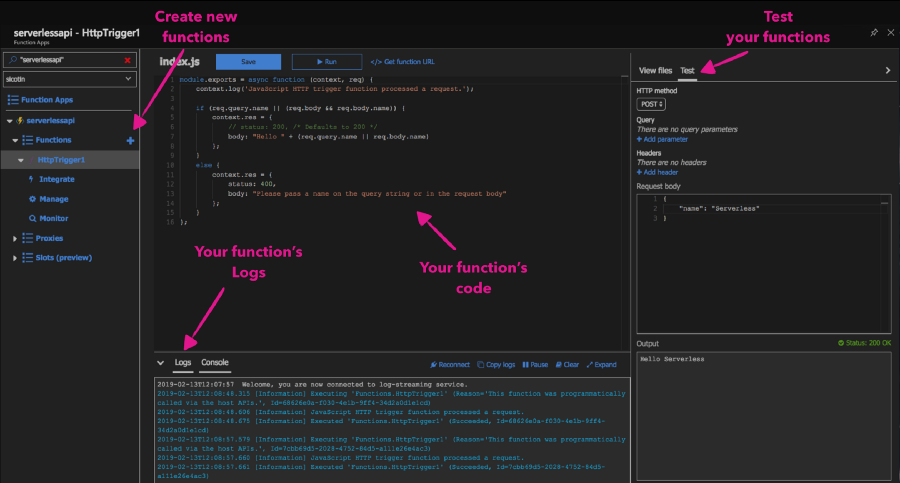
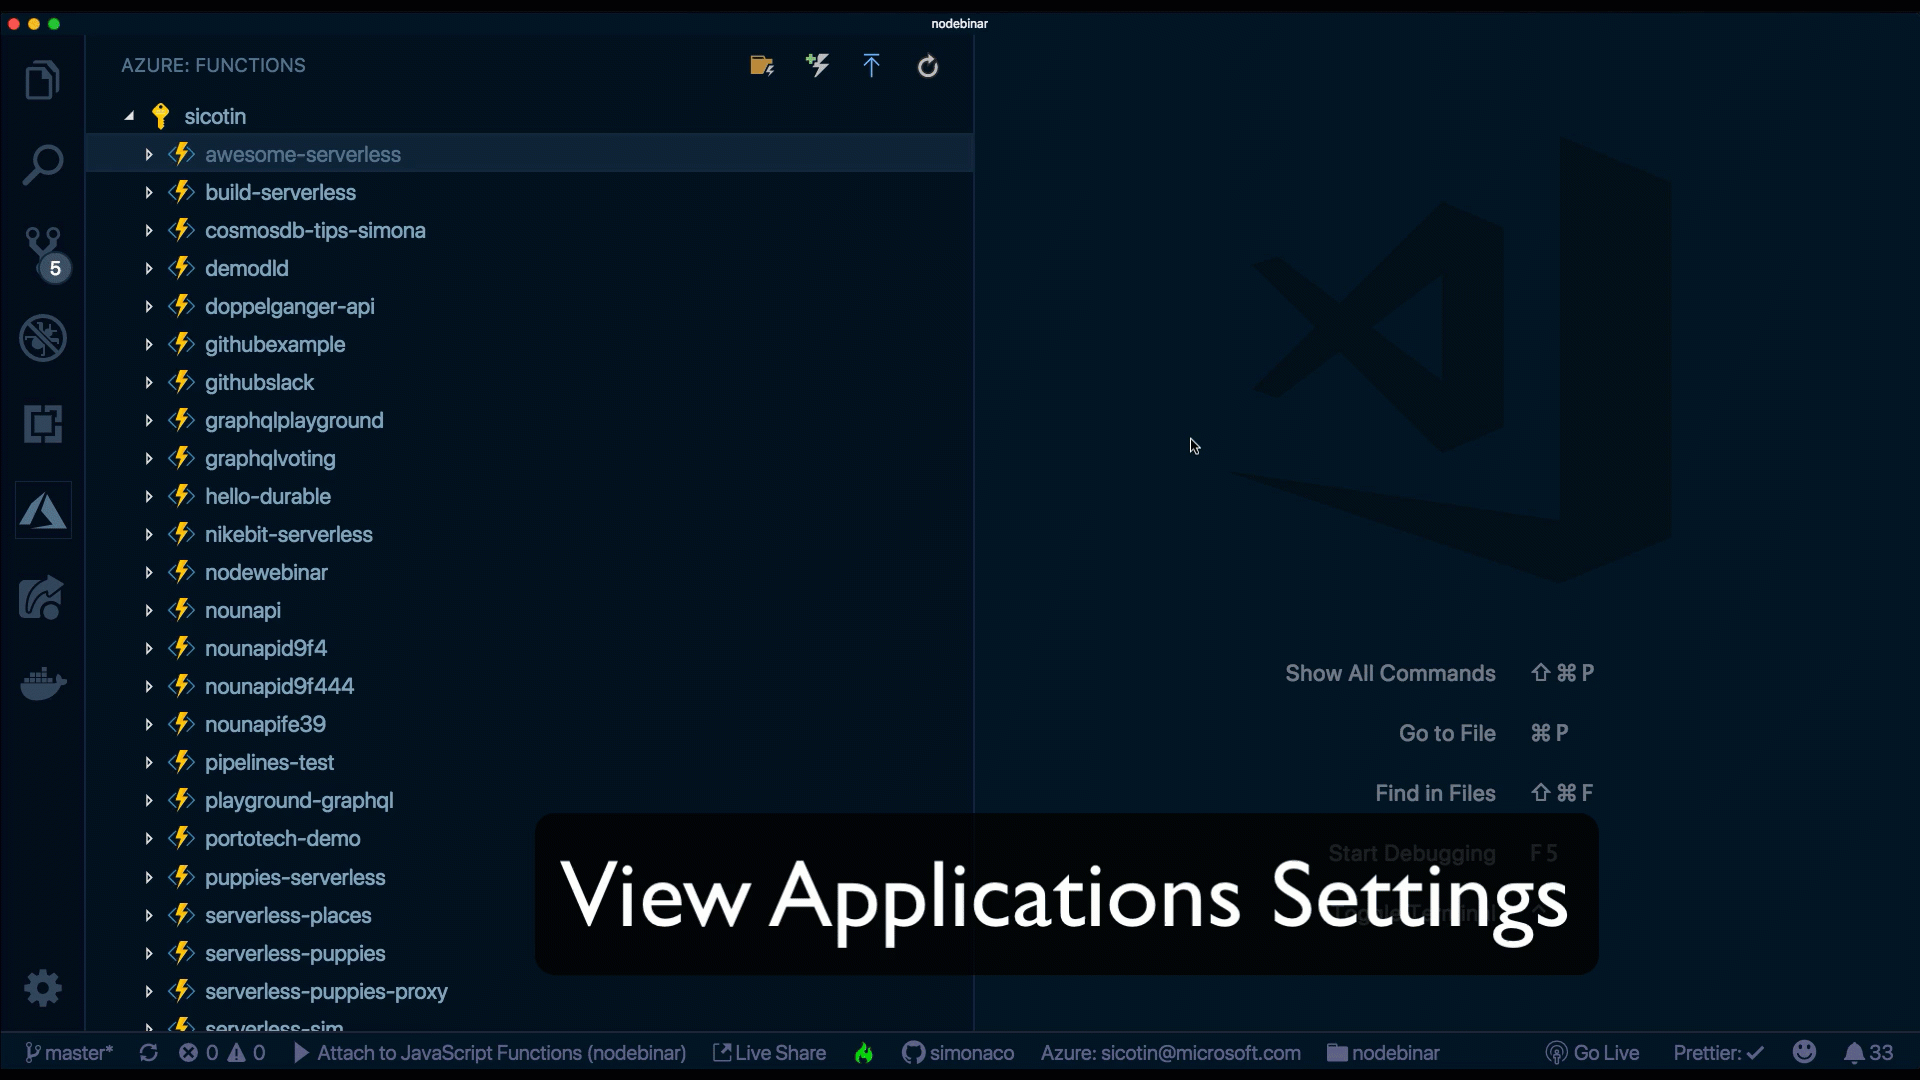
Once installed, a new icon will be added to the left-hand sidebar — this is where we can access all our Azure-related extensions! All related functions can to be grouped under the same project (also known as a function app). This is like a folder for grouping functions that should scale together and that we want to manage and monitor at the same time. To initialize a new project using VS Code, click on the Azure icon and then the folder icon.
Create new Azure Functions project
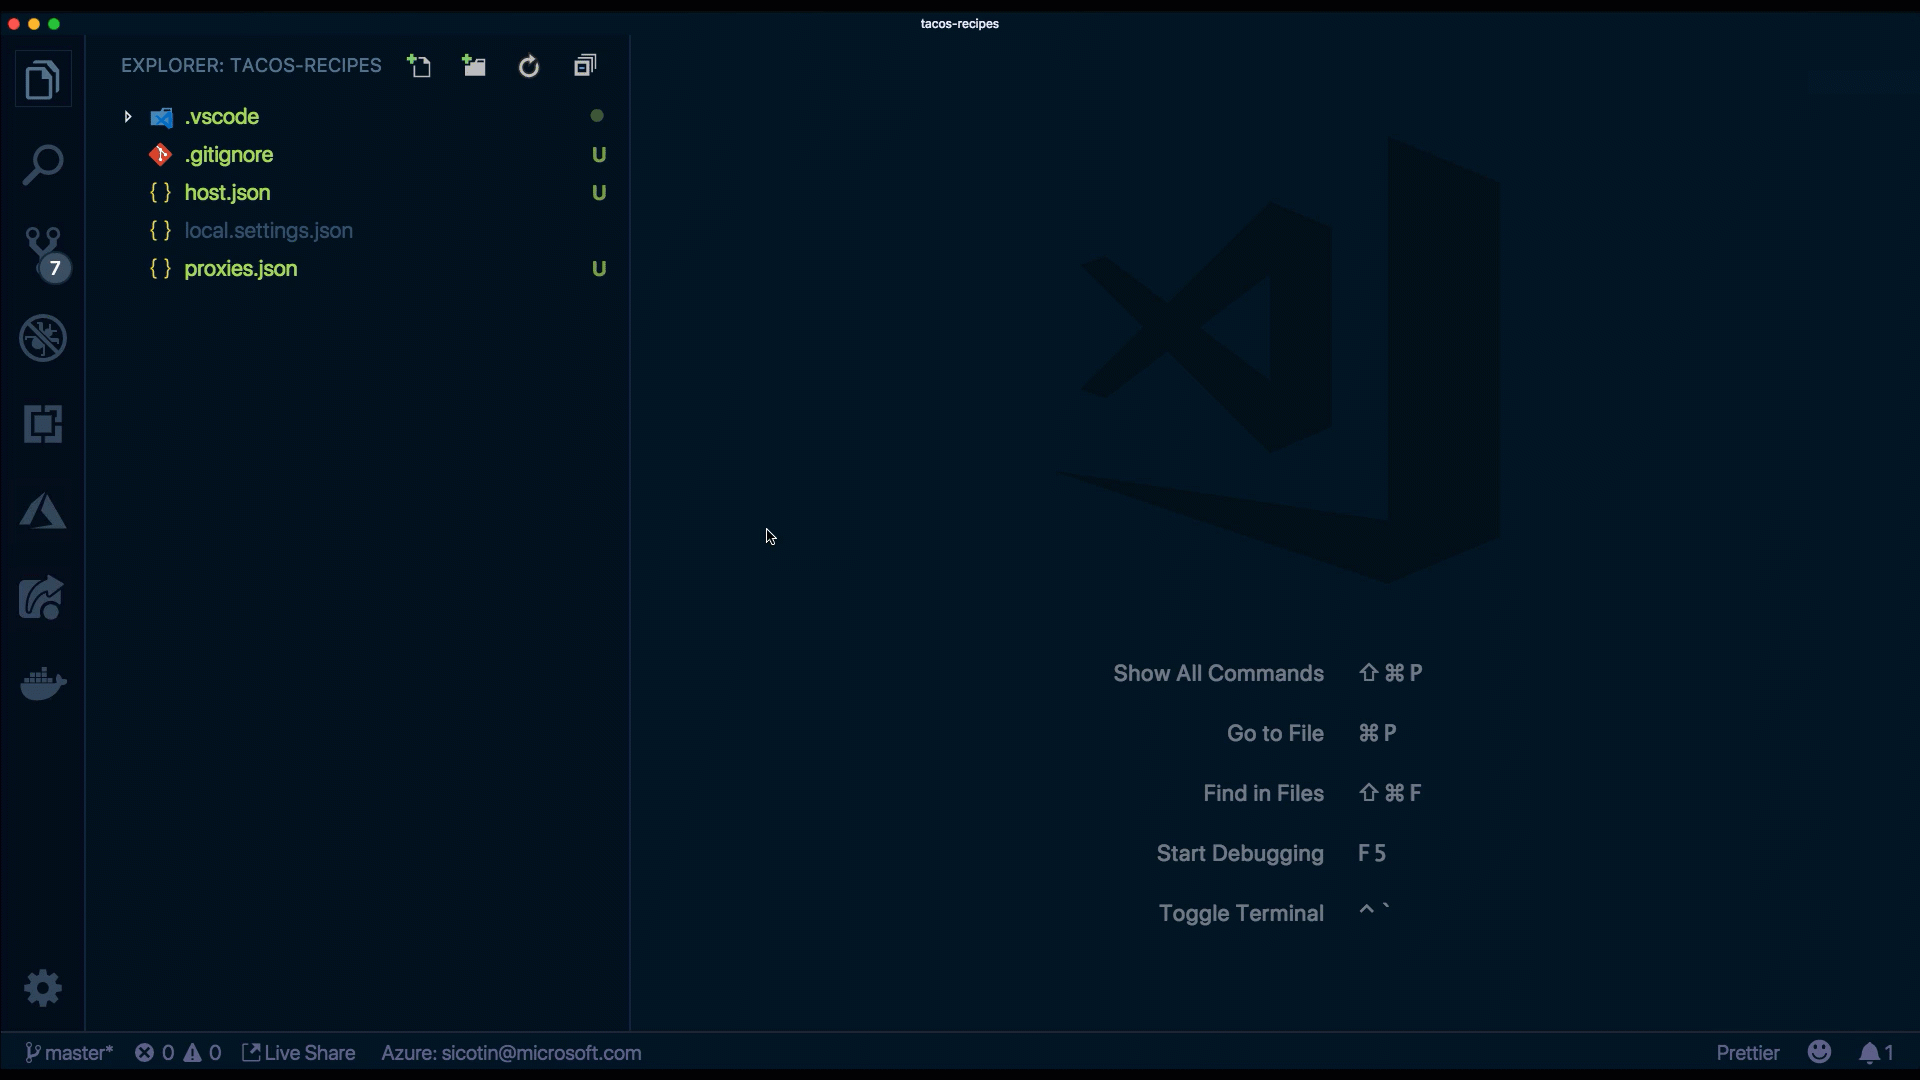
This will generate a few files that help us with global settings. Let's go over those now.
host.json
We can configure global options for all functions in the project directly in the host.json file.
In it, our function app is configured to use the latest version of the serverless runtime (currently 2.0). We also configure functions to timeout after ten minutes by setting the functionTimeout property to 00:10:00 — the default value for that is currently five minutes (00:05:00).
In some cases, we might want to control the route prefix for our URLs or even tweak settings, like the number of concurrent requests. Azure Functions even allows us to customize other features like logging, healthMonitor and different types of extensions.
Here's an example of how I've configured the file:
Application settings are global settings for managing runtime, language and version, connection strings, read/write access, and ZIP deployment, among others. Some are settings that are required by the platform, like FUNCTIONS_WORKER_RUNTIME, but we can also define custom settings that we’ll use in our application code, like DB_CONN which we can use to connect to a database instance.
While developing locally, we define these settings in a file named local.settings.json and we access them like any other environment variable.
Again, here's an example snippet that connects these points:
Azure Functions Proxies are implemented in the proxies.json file, and they enable us to expose multiple function apps under the same API, as well as modify requests and responses. In the code below we’re publishing two different endpoints under the same URL.
Create a new function by clicking the thunder icon in the extension.
Create a new Azure Function
The extension will use predefined templates to generate code, based on the selections we made — language, function type, and authorization level.
We use function.json to configure what type of events our function listens to and optionally to bind to specific data sources. Our code runs in response to specific triggers which can be of type HTTP when we react to HTTP requests — when we run code in response to a file being uploaded to a storage account. Other commonly used triggers can be of type queue, to process a message uploaded on a queue or time triggers to run code at specified time intervals. Function bindings are used to read and write data to data sources or services like databases or send emails.
Here, we can see that our function is listening to HTTP requests and we get access to the actual request through the object named req.
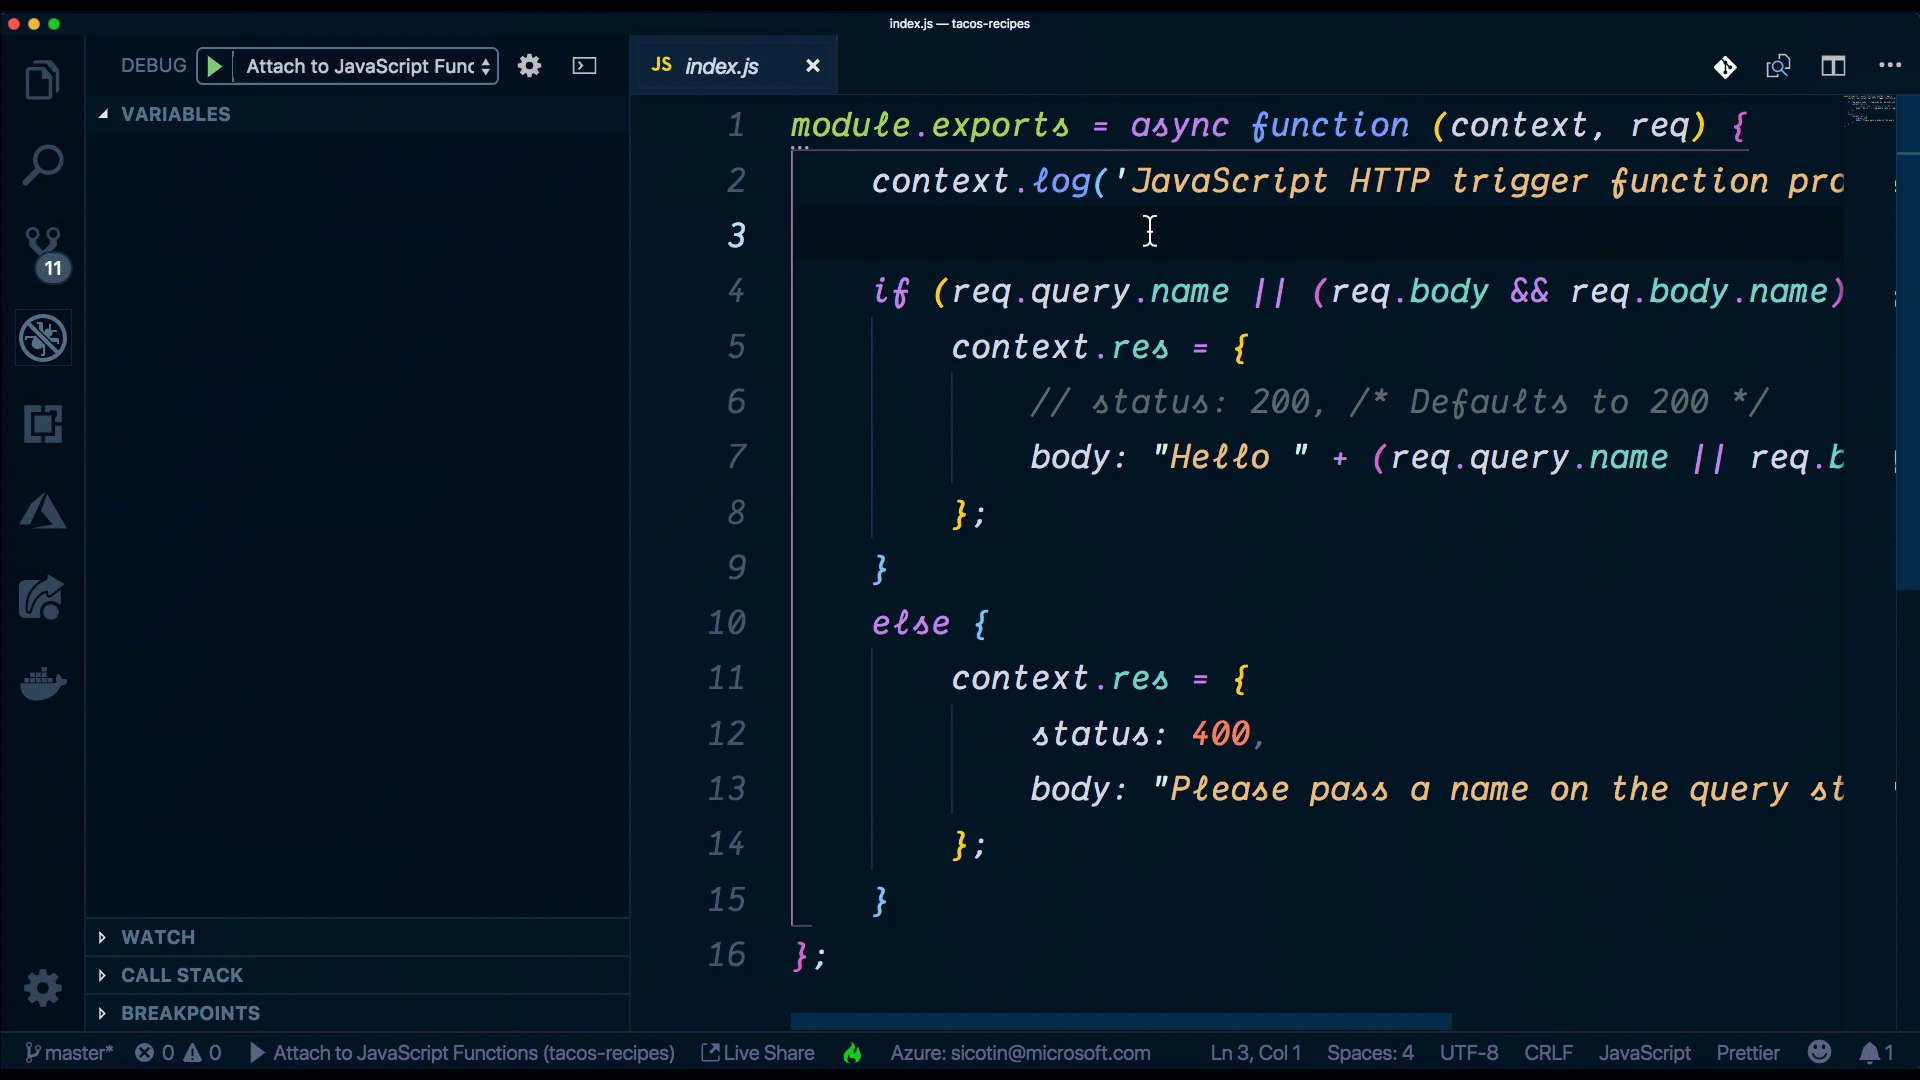
index.js is where we implement the code for our function. We have access to the context object, which we use to communicate to the serverless runtime. We can do things like log information, set the response for our function as well as read and write data from the bindings object. Sometimes, our function app will have multiple functions that depend on the same code (i.e. database connections) and it’s good practice to extract that code into a separate file to reduce code duplication.
//Index.js
module.exports = async function (context, req) {
  context.log('JavaScript HTTP trigger function processed a request.');

  if (req.query.name || (req.body && req.body.name)) {
      context.res = {
          // status: 200, /* Defaults to 200 */
          body: "Hello " + (req.query.name || req.body.name)
      };
  }
  else {
      context.res = {
          status: 400,
          body: "Please pass a name on the query string or in the request body"
      };
  }
};
Who’s excited to give this a run?
How do I run and debug Serverless functions locally?
When using VS Code, the Azure Functions extension gives us a lot of the setup that we need to run and debug serverless functions locally. When we created a new project using it, a .vscode folder was automatically created for us, and this is where all the debugging configuration is contained. To debug our new function, we can use the Command Palette (Ctrl+Shift+P) by filtering on Debug: Select and Start Debugging, or typing debug.
Debugging Serverless Functions
One of the reasons why this is possible is because the Azure Functions runtime is open-source and installed locally on our machine when installing the azure-core-tools package.
How do I install dependencies?
Chances are you already know the answer to this, if you’ve worked with Node.js. Like in any other Node.js project, we first need to create a package.json file in the root folder of the project. That can done by running npm init -y — the -y will initialize the file with default configuration.
Then we install dependencies using npm as we would normally do in any other project. For this project, let’s go ahead and install the MongoDB package from npm by running:
npm i mongodb
The package will now be available to import in all the functions in the function app.
How do I connect to third-party services?
Serverless functions are quite powerful, enabling us to write custom code that reacts to events. But code on its own doesn’t help much when building complex applications. The real power comes from easy integration with third-party services and tools.
So, how do we connect and read data from a database? Using the MongoDB client, we’ll read data from an Azure Cosmos DB instance I have created in Azure, but you can do this with any other MongoDB database.
//Index.js
const MongoClient = require('mongodb').MongoClient;

// Initialize authentication details required for database connection
const auth = {
  user: process.env.user,
  password: process.env.password
};

// Initialize global variable to store database connection for reuse in future calls
let db = null;
const loadDB = async () => {
  // If database client exists, reuse it
  if (db) {
    return db;
  }
  // Otherwise, create new connection
  const client = await MongoClient.connect(
    process.env.url,
    {
      auth: auth
    }
  );
  // Select tacos database
  db = client.db('tacos');
  return db;
};

module.exports = async function(context, req) {
  try {
    // Get database connection
    const database = await loadDB();
    // Retrieve all items in the Recipes collection
    let recipes = await database
      .collection('Recipes')
      .find()
      .toArray();
    // Return a JSON object with the array of recipes
    context.res = {
      body: { items: recipes }
    };
  } catch (error) {
    context.log(`Error code: ${error.code} message: ${error.message}`);
    // Return an error message and Internal Server Error status code
    context.res = {
      status: 500,
      body: { message: 'An error has occurred, please try again later.' }
    };
  }
};
One thing to note here is that we’re reusing our database connection rather than creating a new one for each subsequent call to our function. This shaves off ~300ms of every subsequent function call. I call that a win!
Where can I save connection strings?
When developing locally, we can store our environment variables, connection strings, and really anything that’s secret into the local.settings.json file, then access it all in the usual manner, using process.env.yourVariableName.
In production, we can configure the application settings on the function’s page in the Azure portal.
However, another neat way to do this is through the VS Code extension. Without leaving your IDE, we can add new settings, delete existing ones or upload/download them to the cloud.
Debugging Serverless Functions
How do I customize the URL path?
With the REST API, there are a couple of best practices around the format of the URL itself. The one I settled on for our Recipes API is:
GET /recipes: Retrieves a list of recipes
GET /recipes/1: Retrieves a specific recipe
POST /recipes: Creates a new recipe
PUT /recipes/1: Updates recipe with ID 1
DELETE /recipes/1: Deletes recipe with ID 1
The URL that is made available by default when creating a new function is of the form http://host:port/api/function-name. To customize the URL path and the method that we listen to, we need to configure them in our function.json file:
Moreover, we can add parameters to our function’s route by using curly braces: route: recipes/{id}. We can then read the ID parameter in our code from the req object:
const recipeId = req.params.id;
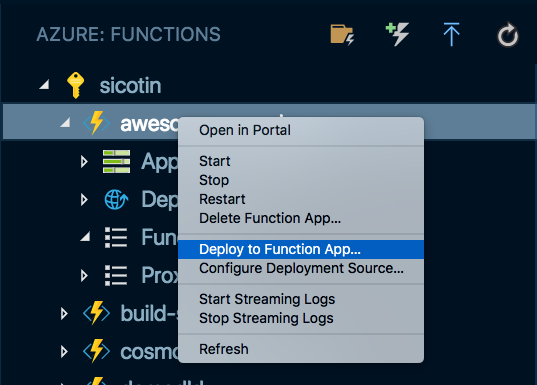
How can I deploy to the cloud?
Congratulations, you’ve made it to the last step! 🎉 Time to push this goodness to the cloud. As always, the VS Code extension has your back. All it really takes is a single right-click we’re pretty much done.
Deployment using VS Code
The extension will ZIP up the code with the Node modules and push them all to the cloud.
While this option is great when testing our own code or maybe when working on a small project, it’s easy to overwrite someone else’s changes by accident — or even worse, your own.
Don’t let friends right-click deploy!
— every DevOps engineer out there
A much healthier option is setting up on GitHub deployment which can be done in a couple of steps in the Azure portal, via the Deployment Center tab.
Github deployment
Are you ready to make Serverless APIs?
This has been a thorough introduction to the world of Servless APIs. However, there's much, much more than what we've covered here. Serverless enables us to solve problems creatively and at a fraction of the cost we usually pay for using traditional platforms.
Chris has mentioned it in other posts here on CSS-Tricks, but he created this excellent website where you can learn more about serverless and find both ideas and resources for things you can build with it. Definitely check it out and let me know if you have other tips or advice scaling with serverless.
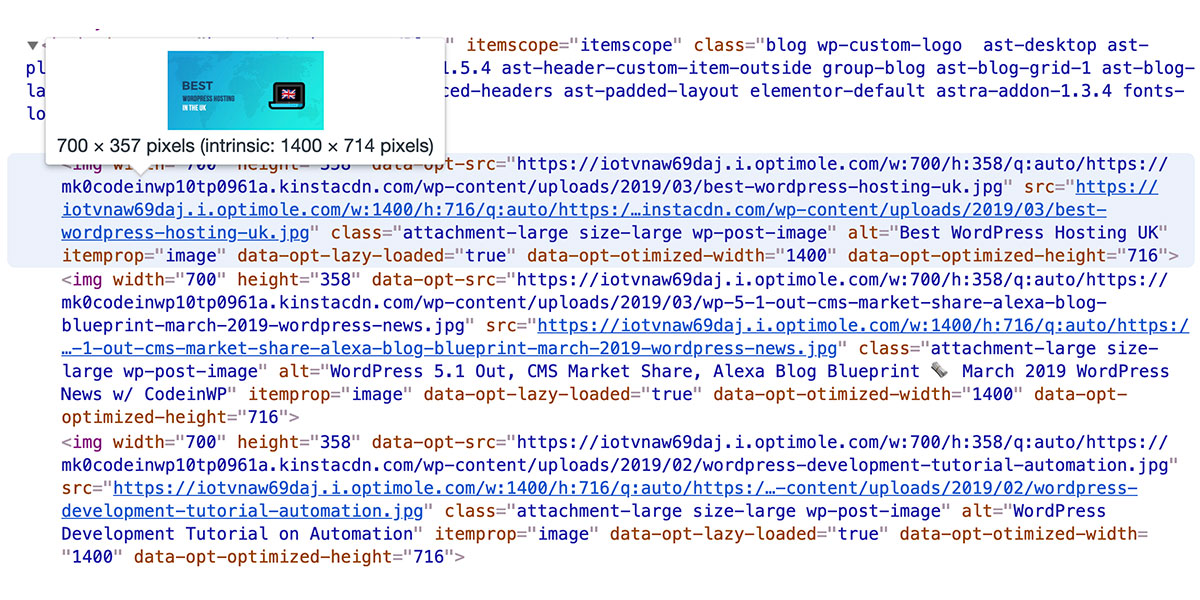
In 2015 there were 24,000 different Android devices, and each of them was capable of downloading images. And this was just the beginning. The mobile era is starting to gather pace with mobile visitors starting to eclipse desktop. One thing is certain, building and running a website in the mobile era requires an entirely different approach to images. You need to consider users on desktops, laptops, tablets, watches, smartphones and then viewport sizes, resolutions, before, finally, getting to browser supported formats.
So, what's a good image optimization option to help you juggle all of these demands without sacrificing image quality and on-page SEO strategy?
If you've ever wondered how many breakpoints a folding screen will have, then you'll probably like Optimole. It integrates with both the WordPress block editor and page builders to solve a bunch of image optimization problems. It's an all-in-one service, so you can optimize images and also take advantage of features built to help you improve your page speed.
What's different about Optimole?
The next step in image optimization is device specificity, so the traditional method of catch and replace image optimization will no longer be the best option for your website. Most image optimizers work in the same way:
Select images for optimization.
Replace images on the page.
Delete the original.
They provide multiple static images for each screen size according to the breakpoints defined in your code. Essentially, you are providing multiple images to try and Optimized? Sure. Optimal? Hardly.
Optimole works like this:
Your images get sucked into the cloud and optimized.
Optimole replaces the standard image URLs with new ones - tailored to the user's screen.
The images go through a fast CDN to make them load lightning fast.
Here's why this is better: You will be serving perfectly sized images to every device, faster, in the best format, and without an unnecessary load on your servers.
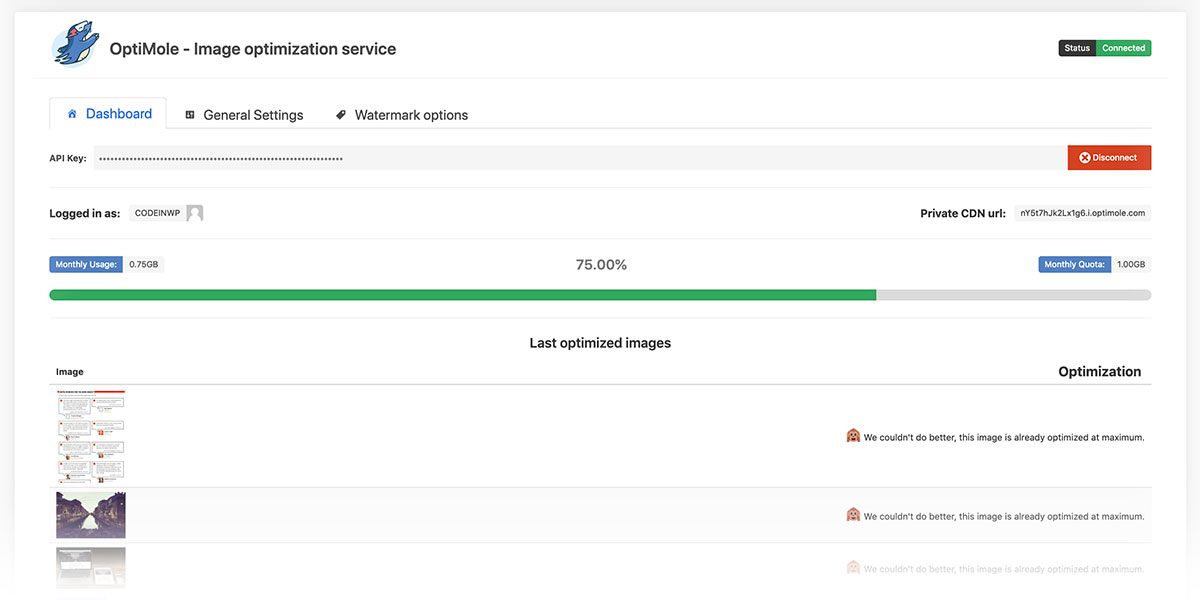
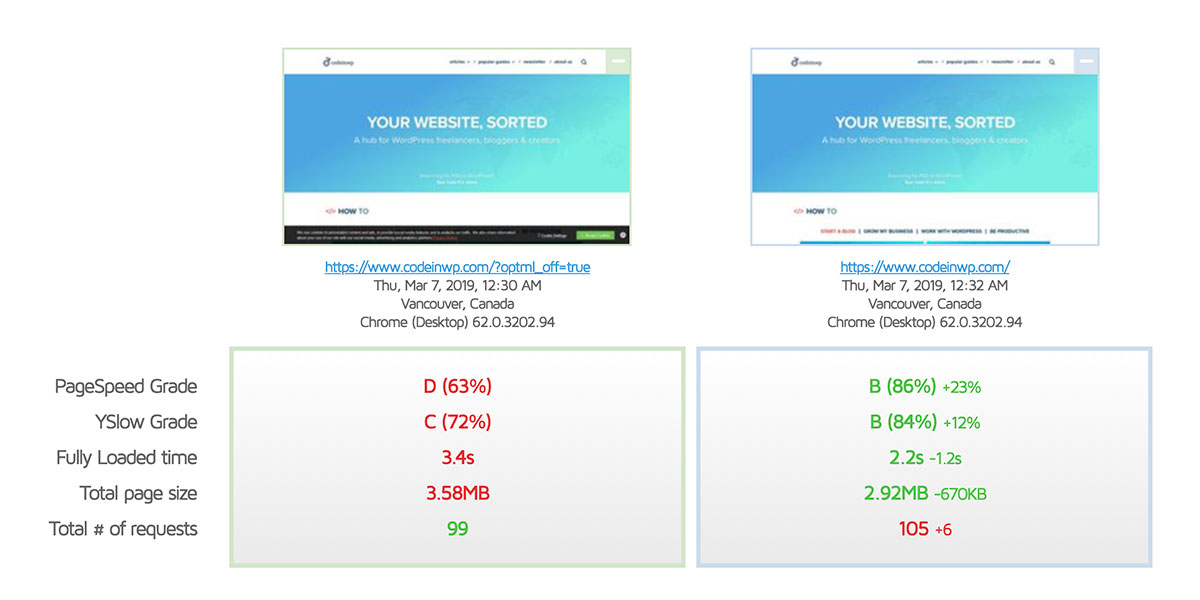
A quick case study: CodeinWP
Optimole's first real test was on CodeinWP as part of a full site redesign. The blog has been around for a while during which time is has emerged as one of the leaders in the WordPress space. Performance wise? Not so much. With over 150,000 monthly visitors, the site needed to provide a better experience for Google and mobile.
Optimole was used as one part of a mobile first strategy. In the early stages, Optimole helped provide a ~0.4s boost in load time for most pages with it enabled. Whereas, on desktop, Optimole is compressing images by ~50% and improving pagespeed grades by 23%. Fully loaded time and the total page size is reduced by ~19%.
Improved PageSpeed and quicker delivery
Along with a device-specific approach, Optimole provides an image by image optimization to ensure each image fits perfectly into the targeted container. Google will love it. These savings in bandwidth are going to help you improve your PageSpeed scores.
It's not always about the numbers; your website needs to conform to expected behavior even when rendering on mobile. You can avoid content jumping and shifting with any number of tweaks but a container based lazy loading option provides the best user experience. Optimole sends a blurred image at the exact container size, so your visitors never lose their place on the page.
We offer CDNs for both free and premium users. If you're already using CDN, then we can integrate it from our end. The extra costs involved will be balanced out with a monthly discount.
Picking the perfect image for every device
Everyone loves <srcsets> and <sizes> but it is time for an automated solution that doesn't leak bandwidth. With client hints, Optimole provides dynamic image resizing that provides a perfectly sized image for each and every device.
Acting as a proxy service allows Optimole to deliver unique images based on supported formats. Rather than replace an image on the page with a broad appeal, Optimole provides the best image based on the information provided by the browser. This dynamism means WebP and Retina displays are supported for, lucky, users without needing to make any changes.
Optimole can be set to detect slower connections, and deliver an image with a high compression rate to keep the page load time low.
Industrial strength optimization with a simple UI
The clean and simple UI gives you the options you need to make a site; no muss no fuss. You can set the parameters, introduce lazy loading, and test the quality without touching up any of the URLs.
You can reduce the extra CSS you need to make page builder images responsive and compressed. It currently takes time and a few CSS tricks to get all of your Elementor images responsive. For example, the extra thumbnails from galleries and carousels can throw a few curve balls. With Optimole all of these images are picked up from the page, and treated like any other. Automatically.
One of the reasons to avoid changing image optimization strategies is the, frightening, prospect of going through the optimization process again. Optimole is the set-and-forget optimization option that optimizes your images without making changes to the original image. Just install, activate and let Optimole handle the rest.
If you like what you see then you can get a fully functional free plan with all the features. It includes 1GB of image optimization and 5GB of viewing bandwidth. The premium plans start with 10GB of image optimization, and 50GB of viewing bandwidth, plus access to an enhanced CDN including over 130 locations.
If you're worried about making a big change, then rest assured Optimole can be uninstalled cleanly to leave your site exactly as before.
Website builders are great assets. If you’ve chosen to use one, we hope you like it. If you are debating which website builder to use, this post will go over seven different features to be mindful of when selecting the …
Selecting the best WiFi router depends entirely on the type of work (or play) you’ll be doing on your home or office network. Some folks are interested in a WiFi router to ensure that their small business has internet without any downtime or dead zones. Others have different needs. Regardless, we’re here to help you find the best WiFi router for your situation!
Do you want to create an online marketplace using WordPress? An online marketplace website allows users to buy and sell items by setting up their own mini-stores within your eCommerce platform.
It allows you to make money by sharing your online marketplace platform. Due to low overhead costs, it has become a popular online business idea.
In this article, we will show you how to easily create an online marketplace using WordPress without spending thousands of dollars.
What Do You Need to Start an Online Marketplace using WordPress?
First, you need to make sure that you are using the right website platform, and since you’re reading this article, you’re in the right place.
There are two types of WordPress available: WordPress.com vs WordPress.org. One is a limited blog hosting service while the other is known as the self-hosted WordPress which you’ve likely heard tons about. See the full comparison between WordPress.com vs WordPress.org.
We recommend using WordPress.org because it gives you the freedom and access to all WordPress features out of the box.
You will need the following items to build an online marketplace website using self-hosted WordPress.
A domain name (For example, wpbeginner.com)
Web hosting account (This is where your website’s files are stored)
The entire setup can take up to 40 minutes, and we will walk you through every step one by one.
Ready? Let’s get started.
Step 1. Setting up Your Ecommerce Platform
The first step is to buy a domain name and a web hosting account. You don’t just need a web hosting, but you will need a service that specializes in WooCommerce hosting because this is the software that we will be using as our eCommerce platform.
Typically a domain name costs $14.99/year, web hosting 7.99/month, and SSL certificate 69.99/year.
Now, this seems like a lot of money if you are just starting out.
Fortunately, Bluehost an officially recommended WordPress and WooCommerce hosting provider has agreed to offer our users free domain + SSL and discount on their cloud WordPress hosting.
Once you have purchased hosting, then follow our step by step tutorial on how to start an online store for complete setup instructions.
You would now have a WordPress website with WooCommerce installed on it.
However, by default WooCommerce assumes that your website is a single vendor website, so it is not possible for other users to add their own products and services to your website.
Let’s change this.
Step 2. Turn Your WooCommerce Site into an Online Marketplace
WC Vendors is a marketplace solution for WooCommerce. It simplifies building a marketplace website by turning WooCommerce into a multi-vendor platform.
Each vendor can sell their products while you keep full control of the website as the marketplace owner. You can choose your own business model, payment methods, product types, and more.
Upon activation, head over to WC Vendors » Settings page to configure marketplace settings.
First, you will see the general items. You need to make sure that the ‘Vendor Registration’ box is checked to allow users to sign up as Vendor on your website.
You can review other items on the page and then click on the ‘Save Changes’ button to store your settings.
Next, you need to click on the ‘Commission’ tab to set a commission rate for vendors across your website. This is the amount you’ll pay to the vendor for each sale.
Note: The global commission rate can be overridden for individual vendors and products.
Next, you need to click on the ‘Capabilities’ tab to set sitewide rules for vendors. This part of settings comes with three sections.
The general capabilities include allowing vendors to view and edit products and orders. The default options would work for most sites.
Next, switch to the ‘Products’ section and from here you can select which type of products vendors can add. For example, you can limit vendors to only add digital downloads or a physical product.
You can also select which data Vendors can see and use on the ‘Add Products’ page.
Lastly, switch to the ‘Orders’ section under ‘Capabilities’ to select what information vendors can see about the orders.
After setting up the capabilities, it is time to set up marketplace related pages on your website.
Switch to the ‘Display’ tab under plugin settings to set up pages. You can simply go to Pages » Add New to create a new page for each item and add the shortcode displayed in the settings to the page’s content area.
After creating all the pages and adding shortcodes to them, you can select them here.
Below the pages, you will also find ‘Store settings’ option on the same page. This where you can select a prefix to use in Vendor shop URLs, allow them to set custom headers for their shop pages, and use HTML in shop description.
Next step is to set up payments for your vendors. Most marketplace websites set a minimum threshold for their vendors and pay them on a monthly or weekly basis.
We recommend using manual payments to vendors as this gives customers enough time to request refunds or give feedback about the products.
However, if you want to payment withdrawal system for vendors, then you can buy premium add-ons. WC Vendors has add-ons available for Stripe, MangoPay, Escrow, and Manual Payouts.
Depending on the payment gateway you choose, you will need to set up a payment gateway by entering your API keys. Don’t forget to click on the ‘Save Changes’ button to store your settings.
Now that WC Vendors is ready, let’s set up WooCommerce for a multi-vendor environment.
Step 3. Enable Account Management in WooCommerce
First you need to visit WooCommerce » Settings page and click on the ‘Accounts’ tab. From here you need to check the boxes next to customer registration option.
Don’t forget to save your changes.
Step 4. Setting Up Navigation Menus
Now that your multi-vendor marketplace setup is finished. It is time to make it easy for your users to find their way around your website.
To do that, go to Appearance » Menus page. From here you need to add your user account and checkout pages to the navigation menu.
Don’t forget to click on the ‘Save Menu’ button to store your changes. For more detailed instructions, see our guide on how to add navigation menus in WordPress.
If you don’t have a My Account page, then simply create a new page in WordPress and add the following shortcode in the post editor
. [woocommerce_my_account]
Step 5. Testing Your Marketplace Website
Your online marketplace website is now ready for testing. You can visit your website in a new browser window and create a new account by clicking on the My Account link at the top.
From here, both customers and vendors can log in to their accounts as well as create a new account.
Once users create a new account, you will receive an email notification. If you are unable to receive email notifications, then take a look at our guide on how to fix WordPress not sending email issue.
You can also view new vendor applications by visiting Users » All Users page. You will see all new vendor requests as ‘pending vendor’, and you can approve or deny applications by clicking the link under their username.
Once approved, these vendors can log in to their accounts and add their products by visiting their vendor dashboard. They can also view their orders and sales reports.
The first thing your vendors need to do is to set up their shop settings by clicking on the ‘Store Settings’ link.
Depending on the payment methods you set up, they will need to provide their PayPal or Stripe email address to receive payments. They will also be able to provide bank account information for direct manual payments.
Once a vendor adds a new product, you will get a notification email and see an icon next to the products menu. You can then edit a product, approve it, or delete it.
Your shop page will clearly show the products sold by vendor’s shop name.
Step 6. Growing your Online Marketplace Website
First, you may want to choose a design for your marketplace website. WordPress comes with thousands of free and paid themes but not all of them are eCommerce ready.
See our pick of the best WooCommerce themes to find a suitable theme for your marketplace platform.
You would want to track which products are getting more traffic and which vendors are bringing more users. For that you will need to enable customer tracking in WooCommerce on your website.
The biggest hurdle in growing any eCommerce website is abandoned cart sales. Learn how to recover abandoned cart sales like a pro to increase your profits.
We hope this article helped you learn how to create an online marketplace using WordPress. You may also want to see our ultimate WooCommerce SEO guide to get search traffic to your website.
If you liked this article, then please subscribe to our YouTube Channel for WordPress video tutorials. You can also find us on Twitter and Facebook.


