CannaTrac, a provider of a cashless payment solution for cannabis dispensaries and retailers, has announced the launch of an API that allows third-parties to integrate with its offering.
I reckon that a lot of our uses of Sass maps can be replaced with CSS Custom properties – but hear me out for a sec.
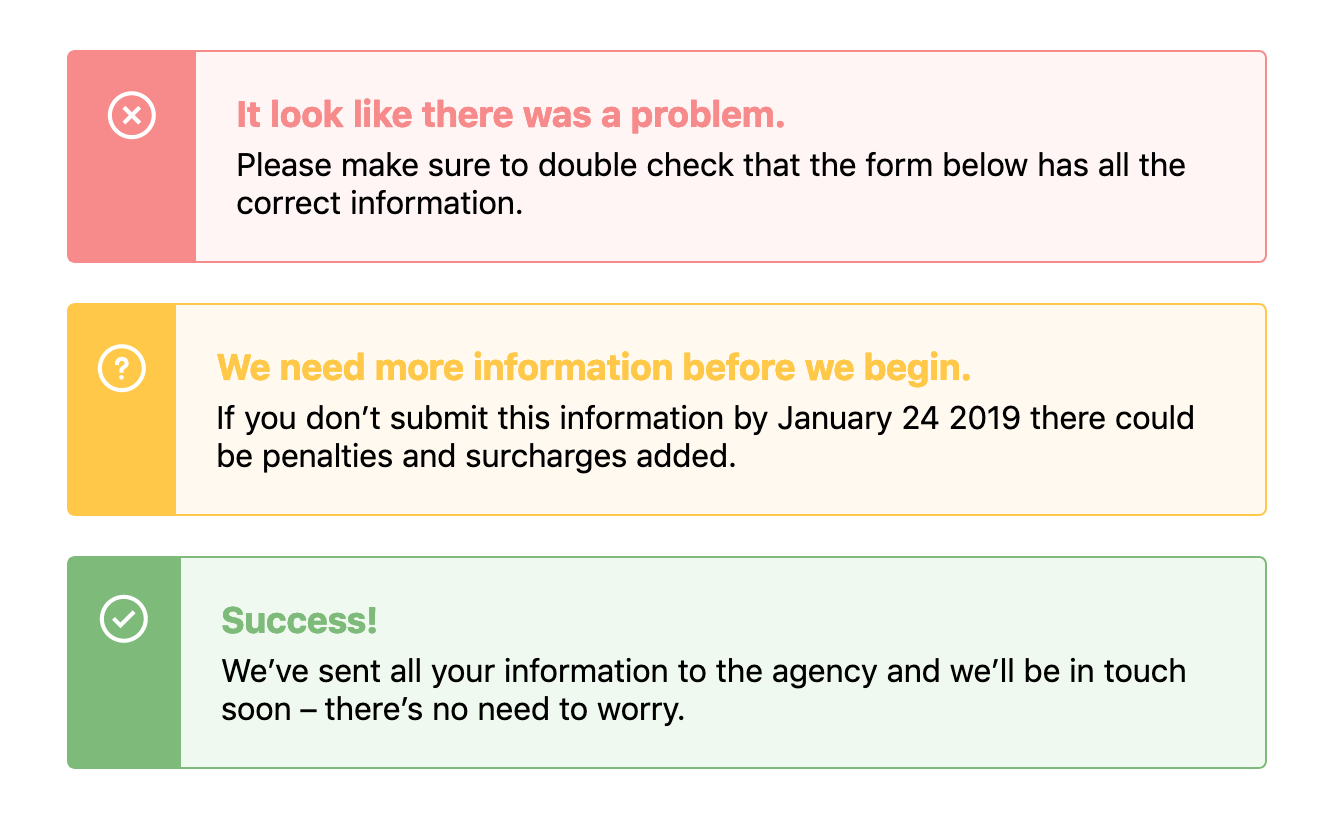
When designing components we often need to use the same structure of a component but change its background or text color based on a theme. For example, in an alert, we might need a warning style, an error style, and a success style – each of which might be slightly different, like this:
There’s a few ways we could tackle building this with CSS, and if you were asking me a couple of years ago, I would’ve tried to solve this problem with Sass maps. First, I would have started with the base alert styles but then I’d make a map that would hold all the data:
Pretty complicated, huh? This would output classes such as .alert-error, .alert-success and .alert-warning, each of which would have a bunch of CSS within them that overrides the default alert styles.
This would leave us with something that looks like this demo:
However! I’ve always found that using Sass maps and looping over all this data can become unwieldy and extraordinarily difficult to read. In recent projects, I’ve stumbled into fantastically complicated uses of maps and slowly closed the file as if I’d stumbled into a crime scene.
How do we keep the code easy and legible? Well, I think that CSS Custom Properties makes these kinds of loops much easier to read and therefore easier to edit and refactor in the future.
Let’s take the example above and refactor it so that it uses CSS Custom Properties instead. First we’ll set out core styles for the .alert component like so:
As we create those base styles, we can setup variables in our .alert class like this:
.alert {
  --theme: #ccc;
  --darkTheme: #777;
  --icon: '';
  background: var(--theme);
  border: 1px solid var(--darkTheme);
  /* other styles go here */

  &:before {
    background-image: var(--icon);
  }
}
We can do a lot more with CSS Custom Properties than changing an interface to a dark mode or theme. I didn’t know until I tried that it's possible to set an image in a custom property like that – I simply assumed it was for hex values.
Anyway! From there, we can style each custom .alert class like .alert-warning by overriding these properties in .alert:
However! I think there’s an enormous improvement here that’s been made in terms of legibility. It’s much easier to look at this code and to understand it right off the bat. With the Sass loop it almost seems like we are trying to do a lot of clever things in one place – namely, nest classes within other classes and create the class names themselves. Not to mention we then have to go back and forth between the original Sass map and our styles.
With CSS Custom Properties, all the styles are contained within the original .alert.
There you have it! I think there’s not much to mention here besides the fact that CSS Custom Properties can make code more legible and maintainable in the future. And I reckon that’s something we should all be a little excited about.
Although there is one last thing: we should probably be aware of browser support whilst working with Custom Properties although it’s pretty good across the board.
One of the the most important factors in WordPress’ growth is the software’s availability in 186 languages. Its vibrant community of translation volunteers, known as the Polyglots team, continually update the translations to ensure access for millions of non-English speakers around the world. In 2016, the team began hosting their own events dedicated to educational sessions and topics that affect the translation community, along with coordinated translation sprints.
The 4th edition of the Global WordPress Translation Day (GWTD) has been set for Saturday, May 11, 2019. It is a 24-hour virtual and in-person event that brings together new and experienced translators. The most recent event was held in 2017 with 71 local events in 29 countries. More than 1,300 people RSVP’d for local events and volunteers around the world translated 93,179 strings in core, themes, and plugins. The event was also successful at growing the local translation communities, adding 217 new translators to the project.
It’s hard to overstate the importance of events like this that support and grow WordPress’ vital translation community. This colorful chart shows the percentage of users running the software in different locales. WordPress has a diverse global user base, thanks in large part to the efforts of volunteer translators.
If you want to get involved in the next Global WordPress Translation Day, mark your calendar for May 11, 2019. For more information, check out the #GWTD4 tag on the Polyglots blog and join in on the #polyglots-events Slack channel.
In JavaScript, we have higher-order functions (HOC), which are basically functions that accept functions. In React, higher-order components are basically functions which accept component as parameters, inject or modify their props, and return a modified component.
Real world use case: Suppose you have a button that you want to be rendered with two different styles. Using the main ideas behind HOC, we do not need to create two buttons with different styles, but, rather, create a single button component and pass it through a wrapper function that modifies its props or styles and returns a new component.
GraphQL is a query language for APIs. Generally, while making REST endpoints in our APIs, the normal trend is to make an endpoint for a requirement. Let's say your endpoint is returning a list of employees, and each employee has general properties, such as name, age, and address (suppose address is another model mapped to the employee in such a way that each employee has an address). Now, at one point in time, you require data only for their address i.e. a list of all addresses in the database (only country, city, and street). For this, you will require an all-new endpoint in your service.
Here comes the power of GraphQL, which lets you deal with only a single endpoint and that changes its output based on the body of the request. Each request will call the same endpoint but with a different RequestBody. It will receive only the result that it requires.
The Micronaut Framework provides support for Kotlin built upon the Kapt compiler plugin. It also implements the most popular cloud-native patterns, like distributed configuration, service discovery, and client-side load balancing. These features allow you to include an application that's been built on top of Micronaut into an existing microservices-based system. The most popular example of such an approach may be integration with the Spring Cloud ecosystem. If you have already used Spring Cloud, it is very likely you built your microservices-based architecture using the Eureka discovery server and Spring Cloud Config as a configuration server. Beginning with version 1.1, Micronaut supports both these popular tools as part of the Spring Cloud project. That's good news because, in version 1.0, the only supported distributed solution was Consul, and there was no way to use Eureka discovery together with Consul's property source (running them together ends with an exception).
The popularity of microservices, or microservices architecture, is growing rapidly. The global cloud microservices market is forecasted to grow to $1.8 billion over the next five years – a 22.4 percent growth rate between 2018 and 2023.¹
Microservices architecture is gaining traction because of its inherent benefits for database and application development. A modular approach, microservices architecture breaks large software projects down into smaller, independent, and more manageable pieces. As a result, it offers a number of key benefits to IT teams and their enterprises. Here are seven of the top advantages of microservices.
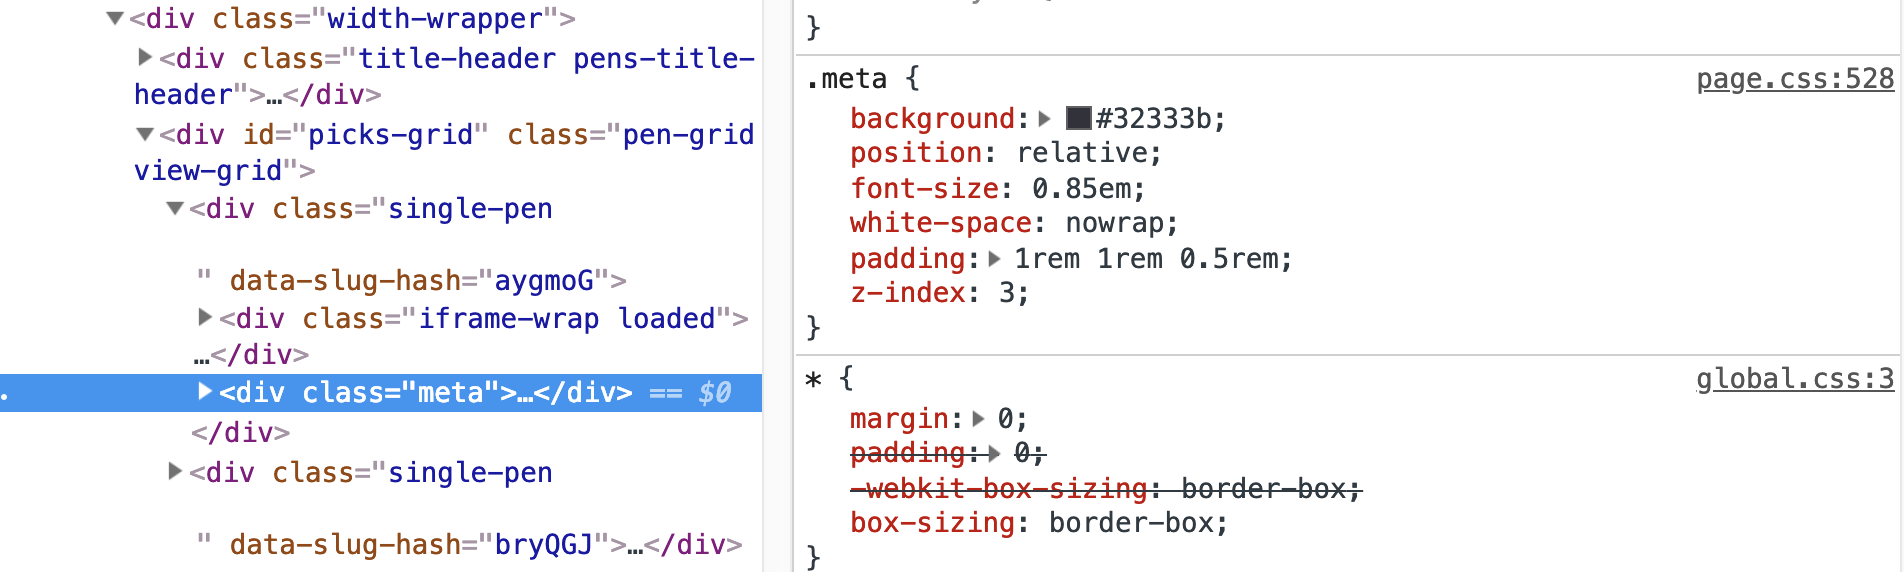
It's a valid question. A "source map" is a special file that connects a minified/uglified version of an asset (CSS or JavaScript) to the original authored version. Say you've got a filed called _header.scss that gets imported into global.scss which is compiled to global.css. That final CSS file is what gets loaded in the browser, so for example, when you inspect an element in DevTools, it might tell you that the <nav> is display: flex; because it says so on line 387 in global.css.
On line 528 of page.css</, we can find out that <code>.meta has position: relative;
But because that final CSS file is probably minified (all whitespace removed), DevTools is likely to tell us that we'll find the declaration we're looking for on line 1! Unfortunate, and not helpful for development.
That's where source maps come in. Like I said up top, source maps are special files that connect that final output file the browser is actually using with the authored files that you actually work with and write code in on your file system.
Typically, source maps are a configuration option from the preprocessor. Here's Babel's options. I believe that with Sass, you don't even have to pass a flag for it in the command or anything because it produces source maps by default.
So, these source maps are for developers. They are particularly useful for you and your team because they help tremendously for debugging issues as well as day-to-day work. I'm sure I make use of them just about every day. I'd say in general, they are used for local development. You might even .gitignore them or skip them in a deployment process in order to serve and store fewer assets to production. But there's been some recent chatter about making sure they go to production as well.
But source maps have long been seen merely as a local development tool. Not something you ship to production, although people have also been doing that, such that live debugging would be easier. That in itself is a great reason to ship source maps. [...]
Check out that issue thread for more interesting conversation about shipping source maps to production. The benefits boil down to these two things:
It might help you track down bugs in production more easily
It helps other people learn from your website more easily
Both are cool. Personally, I'd be opposed to shipping performance-optimized code for learning purposes alone. I wrote about that last year:
I don't want my source to be human-readable, not for protective reasons, but because I care about web performance more. I want my website to arrive at light speed on a tiny spec of magical network packet dust and blossom into a complete website. Or do whatever computer science deems is the absolute fastest way to send website data between computers. I'm much more worried about the state of web performance than I am about web education. But even if I was very worried about web education, I don't think it's the network's job to deliver teachability.
Shipping source maps to production is a nice middle ground. There's no hit on performance (source maps don't get loaded unless you have DevTools open, which is, IMO, irrelevant to a real performance discussion) with the benefit of delivering debugging and learning benefits.
The downsides brought up in recent discussion boil down to:
Sourcemaps require compilation time
It allows people to, I dunno, steal your code or something
I don't care about #2 (sorry), and #1 seems generally negligible for a small or what we think of as the average site, though I'm afraid I can't speak for mega sites.
One thing I should add though is that source maps can even be generated for CSS-in-JS tooling, so for those that literally inject styles into the DOM for you, those source maps are injected as well. I've seen major slowdowns in those situations, so I would say definitely do not ship source maps to production if you can't split them out of your main bundles. Otherwise, I'd vote strongly that you do.
While it is important to have a well-tested API, solid test coverage is a must for any React application. Tests increase confidence in the code and helps prevent shipping bugs to users.
That’s why we’re going to focus on testing in this post, specifically for React applications. By the end, you’ll be up and running with tests using Jest and Enzyme.
No worries if those names mean nothing to you because that’s where we’re headed right now!
Installing the test dependencies
Jest is a unit testing framework that makes testing React applications pretty darn easy because it works seamlessly with React (because, well, the Facebook team made it, though it is compatible with other JavaScript frameworks). It serves as a test runner that includes an entire library of predefined tests with the ability to mock functions as well.
Enzyme is designed to test components and it’s a great way to write assertions (or scenarios) that simulate actions that confirm the front-end UI is working correctly. In other words, it seeks out components on the front end, interacts with them, and raises a flag if any of the components aren’t working the way it’s told they should.
So, Jest and Enzyme are distinct tools, but they complement each other well.
For our purposes, we will spin up a new React project using create-react-app because it comes with Jest configured right out of the box.
yarn create react-app my-app
We still need to install enzyme and enzyme-adapter-react-16 (that number should be based on whichever version of React version you’re using).
yarn add enzyme enzyme-adapter-react-16 --dev
OK, that creates our project and gets us both Jest and Enzyme in our project in two commands. Next, we need to create a setup file for our tests. We’ll call this file setupTests.js and place it in the src folder of the project.
Here’s what should be in that file:
import { configure } from 'enzyme';
import Adapter from 'enzyme-adapter-react-16';
configure({ adapter: new Adapter() });
This brings in Enzyme and sets up the adapter for running our tests.
To make things easier on us, we are going to write tests for a React application I have already built. Grab a copy of the app over on GitHub.
Taking snapshots of tests
Snapshot testing is used to keep track of changes in the app UI. If you’re wonder whether we’re dealing with literal images of the UI, the answer is no, but snapshots are super useful because they capture the code of a component at a moment in time so we can compare the component in one state versus any other possible states it might take.
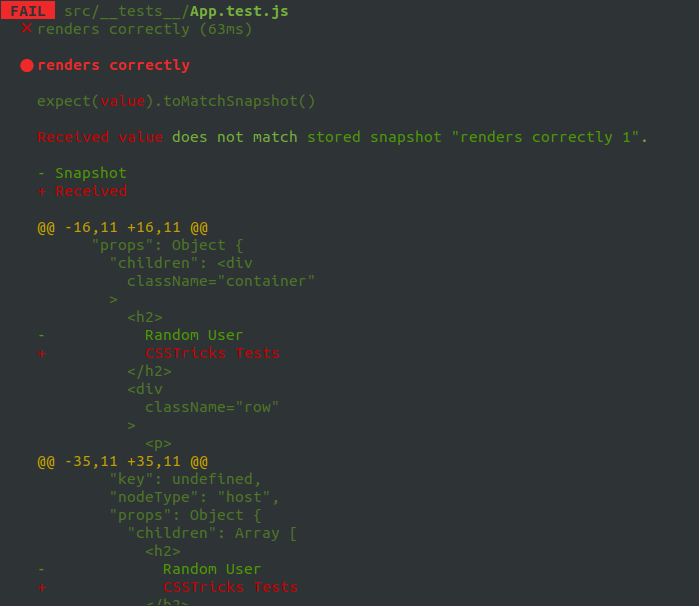
The first time a test runs, a snapshot of the component code is composed and saved in a new __snapshots__ folder in the src directory. On test runs, the current UI is compared to the existing. Here’s a snapshot of a successful test of the sample project’s App component.
Every new snapshot that gets generated when the test suite runs will be saved in the __tests__ folder. What’s great about that Jest will check to see if the component matches is then on subsequent times when we run the test, Jest will check to see if the component matches the snapshot on subsequent tests. Here’s how that files looks.
Let’s create a conditions where the test fails. We’ll change the <h2> tag of our component from <h2>Random User</h2> to <h2>CSSTricks Tests</h2> and here’s what we get in the command line when the tests run:
If we want our change to pass the test, we either change the heading to what it was before, or we can update the snapshot file. Jest even provides instructions for how to update the snapshot right from the command line so there’s no need to update the snapshot manually:
Inspect your code changes or press `u` to update them.
So, that’s what we’ll do in this case. We press u to update the snapshot, the test passes, and we move on.
Did you catch the shallow method in our test snapshot? That’s from the Enzyme package and instructs the test to run a single component and nothing else — not even any child components that might be inside it. It’s a nice clean way to isolate code and get better information when debugging and is especially great for simple, non-interactive components.
In addition to shallow, we also have render for snapshot testing. What’s the difference, you ask? While shallow excludes child components when testing a component, render includes them while rendering to static HTML.
There is one more method in the mix to be aware of: mount. This is the most engaging type of test in the bunch because it fully renders components (like shallow and render) and their children (like render) but puts them in the DOM, which means it can fully test any component that interacts with the DOM API as well as any props that are passed to and from it. It’s a comprehensive test for interactivity. It’s also worth noting that, since it does a full mount, we’ll want to make a call to .unmount on the component after the test runs so it doesn’t conflict with other tests.
Testing Component’s Lifecycle Methods
Lifecycle methods are hooks provided by React, which get called at different stages of a component's lifespan. These methods come in handy when handling things like API calls.
Since they are often used in React components, you can have your test suite cover them to ensure all things work as expected.
We do the fetching of data from the API when the component mounts. We can check if the lifecycle method gets called by making use of jest, which makes it possible for us to mock lifecycle methods used in React applications.
We attach spy to the component’s prototype, and the spy on the componentDidMount() lifecycle method of the component. Next, we assert that the lifecycle method is called once by checking for the call length.
Testing component props
How can you be sure that props from one component are being passed to another? We have a test confirm it, of course! The Enzyme API allows us to create a “mock” function so tests can simulate props being passed between components.
Let’s say we are passing user props from the main App component into a Profile component. In other words, we want the App to inform the Profile with details about user information to render a profile for that user.
Mock functions look a lot like other tests in that they’re wrapped around the components. However, we’re using an additional describe layer that takes the component being tested, then allows us to proceed by telling the test the expected props and values that we expect to be passed.
This particular example contains two tests. In the first test, we pass the user props to the mounted Profile component. Then, we check to see if we can find a <h4> element that corresponds to what we have in the Profile component.
In the second test, we want to check if the props we passed to the mounted component equals the mock props we created above. Note that even though we are destructing the props in the Profile component, it does not affect the test.
Mock API calls
There’s a part in the project we’ve been using where an API call is made to fetch a list of users. And guess what? We can test that API call, too!
The slightly tricky thing about testing API calls is that we don’t actually want to hit the API. Some APIs have call limits or even costs for making making calls, so we want to avoid that. Thankfully, we can use Jest to mock axios requests. See this post for a more thorough walkthrough of using axios to make API calls.
First, we'll create a new folder called __mock__ in the same directory where our __tests__ folder lives. This is where our mock request files will be created when the tests run.
We want to check and see that the GET request is made. We’ll import axios for that:
import axios from 'axios';
Just below the import statements, we need Jest to replace axios with our mock, so we add this:
jest.mock('axios')
The Jest API has a spyOn() method that takes an accessType? argument that can be used to check whether we are able to “get” data from an API call. We use jest.spyOn() to call the spied method, which we implemented in our __mock__ file, and it can be used with the shallow, render and mount tests we covered earlier.
it('fetches a list of users', () => {
  const getSpy = jest.spyOn(axios, 'get')
  const wrapper = shallow(
    <App />
  )
  expect(getSpy).toBeCalled()
})
We passed the test!
That’s a primer into the world of testing in a React application. Hopefully you now see the value that testing adds to a project and how relatively easy it can be to implement, thanks to the heavy lifting done by the joint powers of Jest and Enzyme.
Freemius, a monetization, analytics, and marketing library for WordPress plugin and theme developers, patched an authenticated option update vulnerability in its wordpress-sdk four days ago. The library is included with many popular plugins, such as NextGEN Gallery (1,000,000+ installs), 404 – 301 (100,000+ installs), WP Security Audit Log (80,000+ installs), and FooGallery (100,000 installs+). Freemius CEO Vova Feldman said he would classify it as “a severe vulnerability.”
Feldman had planned to wait to publish anything about the vulnerability until more plugin authors had updated, but the security team at PluginVulnerabilities.com published a detailed explanation of the vulnerability within 24 hours of plugin developers getting notified about the patch:
The vulnerability, an authenticated option update vulnerability, would allow anyone with access to a WordPress account to take complete control of the website. That is a type of vulnerability that hackers will try to exploit if there is significant usage of a plugin. Anyone that allows untrusted individuals access to WordPress accounts and is using a plugin with this library is at a pretty significant risk if they haven’t updated the plugin to a version that fixes this or deactivated the plugin.
Plugin developers using the library have already been notified by Freemius, the team at pluginvulnerabilities.com, and will soon be contacted by the WordPress.org plugin team. A full list of the plugins impacted by this vulnerability is not available yet, but Freemius has a page on its website showcasing 96 WordPress.org plugins and nine themes that use it.
“More than 60% of the developers who are using our SDK have already upgraded to the patched version,” Feldman said. As of today, Feldman said he has not received any reports of the vulnerability having been exploited.
Feldman published a summary of his company’s actions on the security issue and described how Freemius is working to mitigate exposure and try to give users more time to update. The company requested two things from developers using its wordpress-sdk library:
If this security upgrade will be included in your changelog, please only use generic wording like “Security fix”.
Even after updating and releasing the patched versions, please do not disclose this issue during the next 30 days, allowing enough time for all our partners and their users to update.
It is in a company’s best interest to keep the details of a product’s security issue under wraps for as long as possible, but that may leave some users exposed when the vulnerability has already been published on the web. Any user who sees an update for a plugin using Freemius is advised to act on that update immediately, regardless of whatever generic note appears in the changelog.
As a company providing a security service, PluginVulnerabilities.com had different priorities in publishing details about the vulnerability, according to a representative who identified himself as John:
In this case where we are not the discoverers. The biggest issue is that vulnerability looks to have already been being exploited when we came across it, so hiding the situation from the public seems highly irresponsible. Our customers pay us to warn them about vulnerabilities in their plugin, so we would need to warn them right away once we became aware of this. If we only warned our customers that obviously raises some serious questions since others in WordPress community would be left in the dark.
In cases like this, where developers are including a third-party library in their plugins, it can take longer for users to receive an update that fixes the vulnerability, since the need for a patch has to be communicated to multiple parties. The situation is similar to the recent vulnerability that Bootstrap patched two weeks ago. Bootstrap announced the vulnerability in the same week it was reported and fixed, instead of trying to delay disclosure, even though thousands of products across the web use the Bootstrap framework.
WordPress.org doesn’t currently have a mechanism to flag certain plugin updates as security updates, but if a security update is severe enough, the plugin team can push updates out faster with cooperation from plugin authors. That route has not yet been pursued in this case, but we will continue monitoring the situation. In the meantime, if you are using a plugin that includes Freemius and the author has not updated, you may want to consider turning the plugin off temporarily until a patch is available.
A remote code execution (RCE) vulnerability was recently discovered in Drupal's core code. Drupal was alerted to the vulnerability and started taking action on February 20th. Users potentially affected by the vulnerability include those with 8.6.x and 8.5.x installations. Drupal 7 installations that use the same REST module may also be vulnerable.
Microservices are one of the biggest buzzwords of recent years. However, it turns out that it is a bit like teenage sex: everyone talks about it, but nobody really knows how to do it. What does it take to make good use of this architecture? What conditions do we have to meet so that it’s something more than just an item on your CV? Read the article to find out.
Nothing New Under the Sun
Several years ago, conferences were all about Service Oriented Architecture. In a nutshell, it consists of building large systems with many logically divided services integrated with each other. The idea was to eliminate the main problems related to monolithic architecture. Most SOA implementations were based on, or shifted over time toward, the Enterprise Service Bus. The bus was responsible for communication routing, document mapping, handling different types of endpoints, auditing, and security. The idea was noble, but the versatility of the solution turned out to be a double-edged sword. After some time, the bus turned into another monolith. Centralization, bottlenecks, both in terms of development and efficiency, and a single point of failure contributed to the growing criticism of the solution. I know cases where a 60-80-person team working on the bus turned out to be insufficient and a part of the communication had to be point-to-point so as not to block business projects.
Can we be real for a second? OK, good. There’s a lot of really terrible advice out there for people trying to get ahead at the office. I mean, so horrific that I honestly wonder if these writers’ editors even read the work before publishing.
If you keep up to date with the latest developments in the world of databases, you are probably familiar with ClickHouse, an open-source columnar database management system designed for OLAP. Developed by Yandex, ClickHouse was open-sourced in 2016, which makes it one of the most recent database management systems to become widely available as an open-source tool.
Because ClickHouse supports real-time, high-speed reporting, it's a powerful tool, especially for modern DevOps teams who need instantaneous, fast, and flexible ways of analyzing data.
Code coverage reports for ASP.NET Core projects are not provided out-of-the-box, but by using the right tools we can build decent code coverage reports. I needed code coverage reports in some of my projects and here is how I made things work using different free libraries and packages.
Getting Started
To get started, we need a test project and some NuGet packages. Test project can be a regular .NET Core library project. Adda reference to web application project and write some unit tests if you start with a new test project. We also need some NuGet packages to make things work:
It wasn't too long ago when agriculture started reaping the benefits of technologies from precision farming, and now, there are many technologies available to help farmers maximize their profits. Now, farmers have many technology options available to get all the information needed for every phase of farming. The world's population is constantly growing and many farmers are leaving their profession, especially in developing countries, and the burden is growing on the remaining farmers that feed the world.
With the emergence of Bitcoin, the world has seen new capabilities of technology in completing safe and secure transactions that are low cost and trustworthy. However, it is important to understand the underlying technology used for Bitcoin and how it is beneficial for the agriculture industry. Until now, everyone has seen a central governing authority where single-party governs all transactions. Blockchain technology is shifting trust on a completely new level because there is no central authority that hack-prone, expensive, and/or time-consuming. On a blockchain, all nodes connected to the blockchain have their own copy, and before making a transaction, a consensus happens between nodes to allow the transaction. Technically, this is a distributed database, and if someone wants to hack the system, then it is extremely complex or, in simpler terms, chances are slim to none.
I heard the phrase “normal approximation to the Laplace distribution” recently and did a double take. The normal distribution does not approximate the Laplace!
Normal and Laplace Distributions
A normal distribution has the familiar bell curve shape. A Laplace distribution, also known as a double exponential distribution, it pointed in the middle, like a pole holding up a circus tent.