WordPress Designers Seek Feedback on Navigation Menu Block Prototype

Creating a block for navigation menus is one of the nine projects Matt Mullenweg identified as a priority for 2019, and the future of WordPress menus is starting to take shape. Designers working on the new Navigation Menu block have published a prototype this week with detailed notes on how users will interact with the block.

The proposed solution would automatically generate a menu and users would able to delete menu items using the keyboard or block settings ellipsis menu. Individual menu items can be moved right or left and more advanced options for reordering or nesting would be hidden behind the block inspector.

Adding a menu item opens a search bar that would give quick access to all the content in the site. From here users can create a new page or use advanced mode to bulk add more pages. The designs aim to hide most of the more complex tasks behind the block inspector.

Reading through the list of interactions this design is expected to cover, it’s clear that navigation menus are one of the most challenging interfaces to bring into the block editor. One of the principles the designs are based on is that “The editing state of the block itself should mimic as closely as possible the front-end output.” However, it’s difficult to fully visualize how this will work. Navigation menus are most likely to be used in the header and/or footer of a website, but it’s not yet clear how themes will reveal a navigation area to Gutenberg.

There are still many questions to be answered and the design team is seeking feedback on the prototype. Comments are open on the post and feedback on more specific interactions can be left on the relevant GitHub tickets or in Figma. The tickets related to the navigation block discussion are listed in the proposal. The design team is currently working on usability testing and aims to have a final design by the end of March.

WPWeekly Episode 347 – Chair Buying, Pressing Issues, and Block Management

In this episode, John James Jacoby and I start off by discussing the office chair purchasing process. I recently needed to buy a new chair and was surprised by some of the features that were highlighted.

We talked about block managers and some of the pitfalls that will need to be overcome. For example, what should WordPress do if a user disables a block that’s already used in a post?

We wrap up the show by sharing some of the most pressing issues people are having with WordPress.

Stories Discussed:

Yoast CEO Responds to #YoastCon Twitter Controversy, Calls for Change in the SEO Industry

WordPress 5.1 Improves Editor Performance, Encourages Users to Update Outdated PHP Versions

Block Management Features Proposed for WordPress 5.2

5.2 Proposed Scope and Release Schedule

UI/UX Changes for the Site Health Check Plugin

Jeffrey Zeldman Promoted to Automattic Employee

The Most Pressing Issues People Have with WordPress These Days

WPWeekly Meta:

Next Episode: Wednesday, March 6th 3:00 P.M. Eastern

Subscribe to WordPress Weekly via Itunes

Subscribe to WordPress Weekly via RSS

Subscribe to WordPress Weekly via Stitcher Radio

Subscribe to WordPress Weekly via Google Play

Listen To Episode #347:

WordPress Contributors Propose Shorter, Time-based Release Cycles

WordPress release cycles may soon take a more predictable cadence, as contributors are considering moving to a time-based approach. The discussion began during a recent core dev chat in mid-February when Gutenberg phase 2 lead Riad Benguella proposed the project move to shorter, automated release cycles.

The Gutenberg team has successfully been releasing a new version of the plugin every two weeks on schedule and any features that aren’t ready are postponed to the next releases automatically. Benguella contends that this type of release schedule has the potential to bring several benefits to WordPress:

  • Less stress for contributors
  • Predictability: People can plan around the release timelines easily
  • No delays as releases are not feature-based

Shortening major releases may prove more challenging for WordPress, which is at a much larger scale than the Gutenberg plugin. The plugin also has the added advantage of being able to manage releases and development on GitHub.

“I think there are a lot of infrastructure problems that need to be solved for WordPress before we could move to a fast, automated release cycle,” Gary Pendergast said.

“Having a major release once a month is achievable, it’s something I’d like us to get to, but the release process is too manual to have multiple releases running at the same time at the moment.”

Jonathan Desrosiers drafted a proposal that summarizes this discussion and outlines some of the manual tasks required for getting a major release out the door. These include time-consuming tasks like Trac gardening, creating a Field Guide, blog posts for the betas, RCs, and official release, documentation updates, videos, dev notes, and other items that are often completed by volunteers.

The 3-4 month release cycles that WordPress had from versions 3.9 – 4.7 allowed for all of the administrative overhead outlined above to be completed in a reasonable amount of time, but the general consensus is that some of these tasks could be more simplified and/or automated.

Desrosiers highlighted several benefits of moving to a shorter major release cycle, including less drastic change for users that might ultimately result in more users being comfortable enabling automatic updates for major releases. Detriments to shortening the release cycle are the increased burden it puts on volunteers as well as theme and plugin developers who need to push compatibility releases. It would also introduce more backporting work for security releases.

Several contributors have left feedback on the post with insight gleaned from other projects’ release scheduling. Jeremy Felt reviewed Firefox’s release owner table that assigns leadership and dates for several releases in advance.

“I think getting to a shorter release cycle in general will involve scheduling multiple releases and assigning their release leads in advance,” Felt said. “So far most of our scheduling is done as soon as the last release has been shipped.”

Joe McGill examined VS Code’s development process and found several similarities to the process he thinks WordPress could adopt in the future:

  1. A long term roadmap (theirs is 6–12 months) outlining major themes and features.
  2. A monthly release cadence based on 4 week sprints which begin with milestone planning and always results in a release of whatever was completed in that monthly iteration.
  3. Regular project triage, with release priorities managed at the team (i.e. Component) level.
  4. Documentation integrated into the development process.
  5. Automated testing of releases and upgrades.
  6. Only important regressions and security issues are handled in minor releases between monthly milestones, everything else is moved forward to the next release (or reprioritized in the backlog).

Several of these points echo feedback from other contributors who have identified documentation integrated into development and automated testing as ways to speed up major release cycles.

“If we don’t have the infrastructure and tooling to support a 1 month cycle, then I think we could attempt a 2 month cycle with a goal towards moving to shorter cycles,” McGill said.

The Gutenberg plugin’s relentless pace of iteration and predictable release cycles have opened up a world of new ideas for improving the process for WordPress core. Discussion around moving the project to shorter, time-based release cycles is still in the preliminary stages. No major changes have been agreed upon yet, but the process of exploring different ideas has put the spotlight on tasks that could afford to be tightened up in the release process. This falls in line with WordPress’ 2019 theme of “tightening up.”

10 Vital Customizations to Make in Google Analytics

Google Analytics can do just about whatever you want it to. It has a ton of depth.

It can also feel a bit overwhelming once you get into it.

After consulting on Google Analytics for years, both independently and as the head of marketing at an analytics startup, I have 10 customizations I consider vital for every site I run.

Once they’re in place, you’ll have:

  • Keyword data in Google Analytics. Yes, I’m completely serious. Keyword data is back.
  • An account structure that will save you if you ever accidentally nuke your Google Analytics data.
  • Metrics to help you drive your business.
  • A roadmap to clean up your URLs to make your reports accurate. (They’re not as accurate as you think they are.)
  • Alerts to help you catch catastrophic data failures within 25 hours.
  • The Google Analytics tracking script installed like the pros.
  • A method to filter out data from your office IP so your company doesn’t accidentally skew the reports.

Let’s dive in.

Connect Google Analytics to Google Search Console

Way back, Google Analytics used to have keyword data in all its standard reports. You were able to see which keywords sent traffic to which pages. And if you had ecommerce tracking or goals set up, you could see how much revenue each keyword produced for you.

It was amazing.

Then Google decided to remove the keyword data from Google Analytics.

So, instead of amazing keyword data, everything got lumped into the dreaded “not provided” group.

Google killed the keyword data in Google Analytics.

I thought the keyword data was done forever — I never expected to see it again. I resigned my fate to needing tools like SEMrush or Ahrefs for keywords.

Then a funny thing happened.

Google started investing a lot of time into improving Google Search Console. In the last few years, it’s gotten incredibly good. The data is a goldmine. Google also improved the integration between Google Search Console and Google Analytics so it’s now possible to get a lot of that missing keyword data back.

That’s right, keywords are back in Google Analytics. All you have to do is sign up for a free Google Search Console account and connect it to your Google Analytics account.

It’s pretty easy. There are only two steps:

  1. Create a free Google Search Console account and verify that you have access to your site. The easiest way to verify is if you already have Google Analytics installed.
  2. In your Property settings in Google Analytics, connect to your Google Search Console.

Here’s where to find the settings in Google Analytics to turn on Google Search Console:

Google Search Console Settings

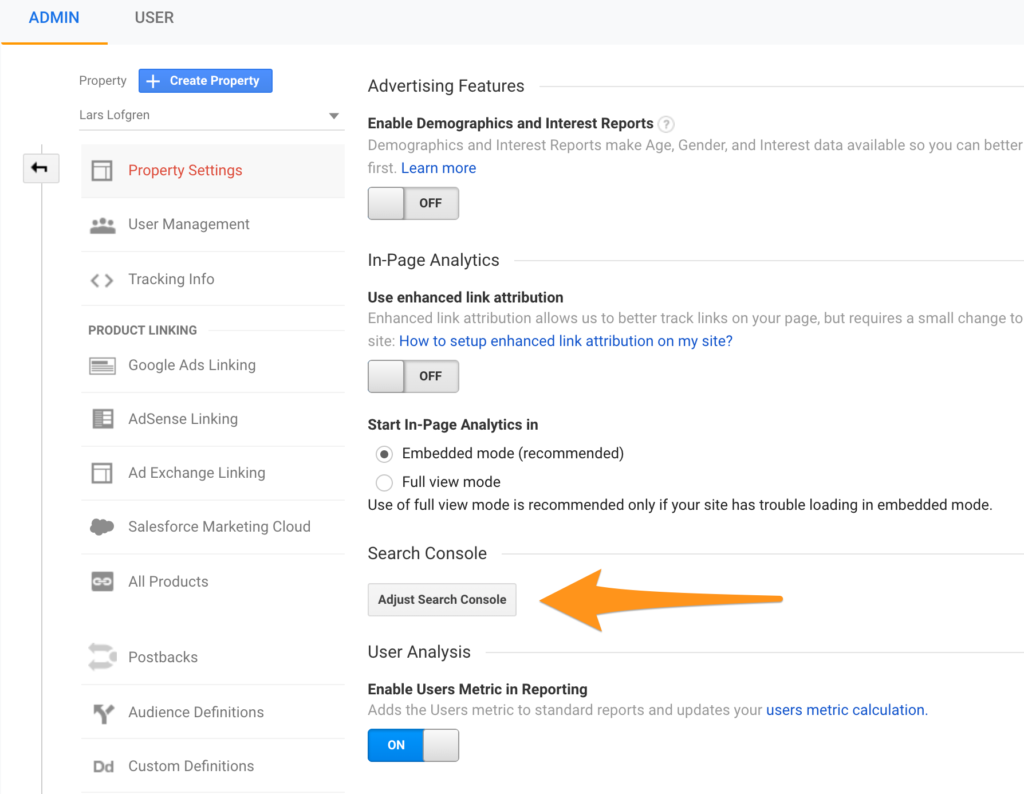
After the accounts are connected, all the reports under Acquisition – Search Console will start populating. Keep in mind that they have a 48 hour delay so give it a few extra days before checking for data.

Create Multiple Views

I consider this a mandatory customization for Google Analytics.

Once data makes it into your Google Analytics reports, it’s permanent. Nothing can change it. Google has an entire processing pipeline for all the data it collects. Once data has been processed, there’s no going back.

So what happens if you use one of these Google Analytics customizations and accidentally nuke your whole account?

That data is permanently gone. When you fix the setting in your account, you won’t get any of your old data back. Only data from that moment onward will be clean.

Even if you just make your reports a bit messier with the wrong setting, there’s no going back.

In other words, the stakes are high.

We all make mistakes. And it’s a good idea to create two extra views for your Google Analytics profile as a backup.

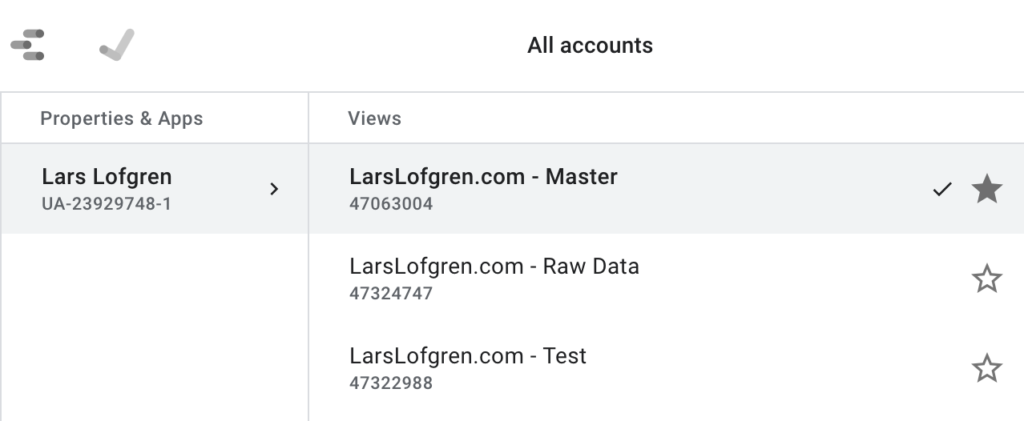
On every one of my Google Analytics properties, I create three views:

  1. Master View = This is the main view you’ll do all your analysis with.
  2. Test View = Before adding a new setting to your Master view, add it here first. This allows you to test it out before impacting your real data.
  3. Raw Data View = Leave this view completely untouched without any settings configured. If something goes horribly wrong, you always have this base data to work with.

Your Google Analytics views should look like this:

Customizations Views

Set Up Events

Google Analytics tracks a ton of stuff without any customization which is why it’s so popular. There’s a ton of value right out of the box.

Sometimes, there are other actions that are also worth tracking beyond the standard sessions, pageviews, bounce rates, and time on site. You might want to track:

  • Account creations
  • Email signups
  • PDF downloads
  • Video plays
  • Calculator or other tool usage
  • Contact form submissions
  • Webinar registrations
  • Clicks on important links

Anything that’s important to your site can be turned into a Google Analytics event so you can track how often it’s happening.

To trigger events, you will have to add some code to your site that sends the event data whenever the action occurs. Most likely, you’ll need a developer to help you set this up. All the event documentation is here.

Define Goals

In my experience, folks go overboard with goals. Hitting 10 pageviews per visit is a goal, signups are goals, PDF downloads get goals, random events are goals, goals goals goals everywhere.

Usually when I start working on a new site, I end up having to delete a bunch of goals that don’t matter.

My rule: only 1 or 2 goals per site. And they should be goals that closely track to revenue. So if the goal goes up, I expect revenue to also go up. If the correlation to revenue is weak, use an event instead of a goal.

Some examples of good goals:

  • Free trial sign up for your software
  • New email subscription
  • Demo request
  • Consultation request
  • Affiliate link click
  • Webinar registration if this leads to a sales funnel. If it’s a normal content-based webinar, I prefer not to set it up as a goal.

Any event that leads to a sales funnel is a good candidate for a goal. There are really two ways to set up goals like these.

URL Goal

If your site is set up in a way that users always hit the same URL after completing one of these key actions, you can tell Google Analytics to trigger a goal every time someone lands on that URL. This works great for “thank you” pages.

No code is needed for these, you can set it up right away.

Event Goals

It’s also possible to have Google Analytics trigger a goal any time an event fires. This gives you the flexibility to trigger a goal whenever you like since it’s possible to trigger events whenever you like.

You most likely need a developer to help you set these up. Ask them to create a Google Analytics event for you. Once you see the event tracking correctly in the Google Analytics event reports, then go set up a Goal using the values of your event.

Why go through the trouble of turning an event into a goal? Why not just look at the event reports? It makes getting conversions data in your reports a lot easier. Many of the reports are pre-configured to show conversions based on goals. It’s trickier to get the same reports based on just events.

Implement Ecommerce Tracking

If you have an ecommerce store, Google Analytics ecommerce tracking gets all your revenue data into your reports. It’s amazing.

You’ll be able to see:

  • Which traffic sources produce the most revenue
  • Traffic sources that produce a lot of traffic but no revenue
  • The pages that bring in new visitors who end up purchasing
  • The user flows on your site that lead to revenue
  • How users go through multiple traffic sources before they end up purchasing

Google Analytics doesn’t track any of your ecommerce purchases out of the box. You will need to set up some extra stuff.

There are only two ways to get this set up:

  • If you can edit the code of your checkout flow, there’s extra JavaScript tracking that will send purchase data to your Google Analytics account.
  • Some ecommerce tools have ecommerce tracking built in. All you have to do is turn it on, hook it up to your Google Analytics account, and the data will start showing up.

First, go check your ecommerce tool and see if it has a built-in integration. Shopify has one. And if you’re not on Shopify, consider migrating. It’s worth the switch.

If you need to set up ecommerce tracking by hand, all the developer documentation is here.

One last thing, remember to turn on ecommerce tracking in your Google Analytics settings:

Ecommcerce Setup Switch

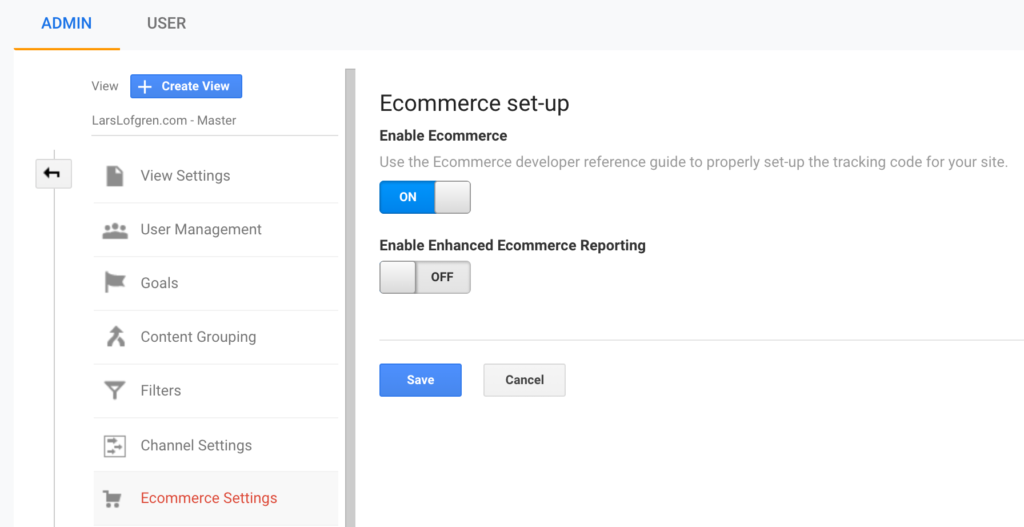
You need to flip the switch before data will start showing up.

Content Groups

Out of everything on the list, Content Groups are the most situational customization. Most sites don’t need to set these up — they’ll amount to nothing more than busy work that’s quickly forgotten about.

But for editorial and ecommerce sites, they make an enormous difference.

Google Analytics considers all your URLs to be equal. It doesn’t lump them into subgroups at all.

If you have a large site and manage the site by sections, this becomes a real problem. You might have Money, Heath and Fitness, and Political news sections that are all managed by different teams. Or, maybe you have different merchandize groups for your ecommerce store. How do you track the performance of those different sections of your site?

You can’t do it with an internal spreadsheet; new posts and products go up too fast to keep one accurate. Even if you can make it work, it’s a real pain to keep updated.

Setting up unique Google Analytics views is one option but only really works if every category has a clean subfolder in your URL. Plus, creating unique Google Analytics properties for each section creates all sorts of extra problems with referrals and tracking everything in aggregate.

The solution? Google Analytics Content Groups.

Using either the Google Analytics settings or by appending your Google Analytics JavaScript with a bit of extra code, you can categorize your site pages into whatever groupings you want.

Once you’ve set up Content Groups, you can take any report in Google Analytics and organize all the data by any content group you’ve set up. For major editorial and ecommerce sites, it saves countless reporting hours.

Clean Up Parameters

It’s pretty common to run into pages like this in your Google Analytics reports:

Junk Parameters

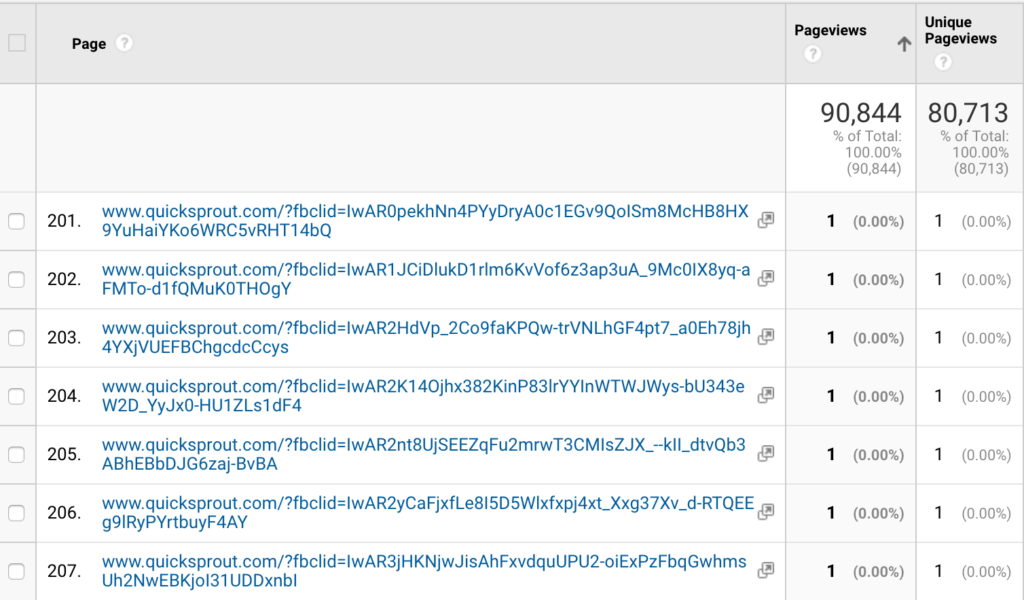
Anything after a “?” in a URL is a parameter. It’s common for tools to add URL parameters to a URL. These parameters don’t change the destination of the URL, they add extra data that various tools can then use.

The problem is that Google Analytics treats parameters as unique URLs. In other words, traffic to the same page will show up in Google Analytics as visiting different URLs simply because the parameters for each user were different.

This splits our pageviews across a bunch of different URLs instead of giving us the real total for a single page on our site. That’s exactly what’s happening in the Quick Sprout example above. Instead of having 7 pageviews for our homepage, we have 7 pageviews split across unique pages because of a unique fbclid parameter that was added.

There’s a bigger problem too.

A lot of marketing automation and email tools will add ID parameters to the end of every URL in their emails. That allows them to track what email subscribers are doing. Even worse, it can populate reports with personal information like email addresses and names. It’s against the Google Analytics terms of service to have personal info in any report so you definitely don’t want this data to end up in your reports.

Here’s how parameters work:

  • The end of the URL and the beginning of the parameters is marked with a “?”
  • Every parameter has a name and a value. The name is before the “=” and the value comes after.
  • Parameters are separated by an “&” so if you see an “&” in the URL, that means there’s multiple parameters.

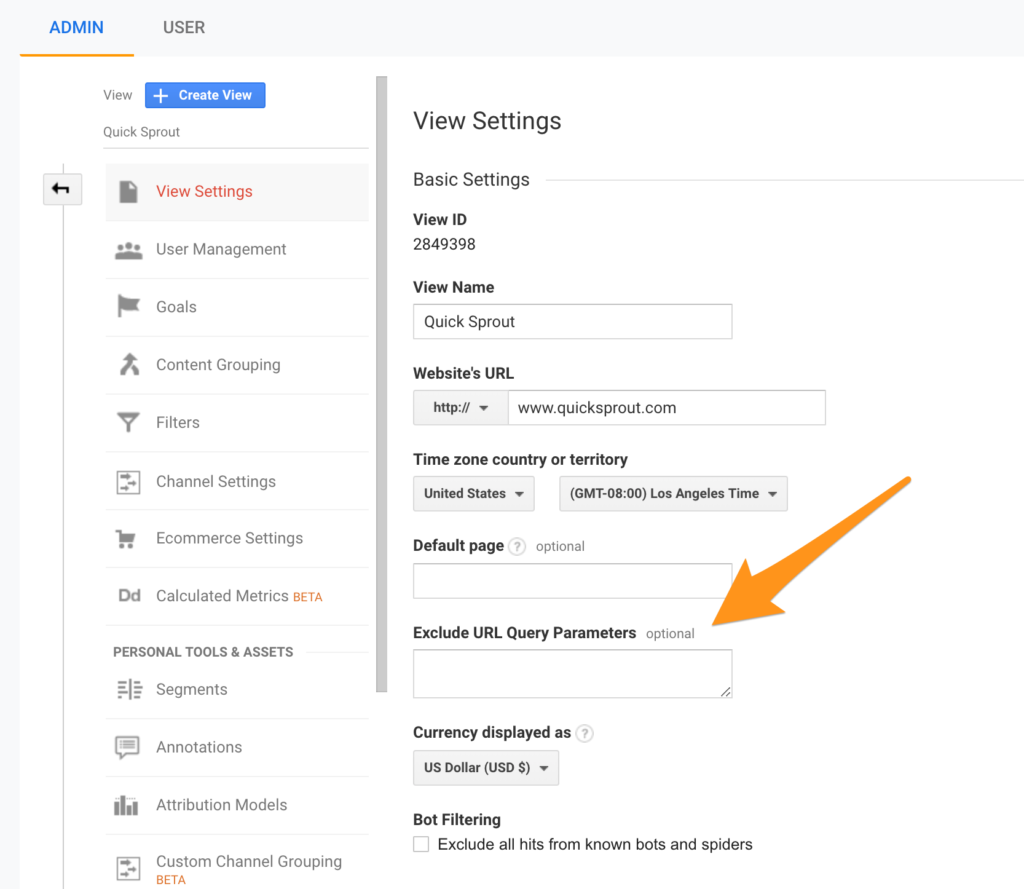
To clean up your reports and scrub personal data clean, go to the All Pages report. Then sort by least pageviews. This will give you a list of URLs that only had a single pageview. Scroll through about 100 pages and look for any parameters that don’t signify a real URL.

Once you have a list of parameters that are junking up your reports, go to your View settings and add all the parameters that you want excluded here:

Exclude Parameters

Be careful though. Some sites use parameters for different pages. I personally think it’s a terrible way to structure a site but it does happen. If your site does this, don’t include the parameter for those real pages. Otherwise Google Analytics will stop tracking the pages entirely.

Also don’t include any of the standard UTM parameters that are used to track marketing campaigns. Google Analytics already handles that data correctly.

Install Google Analytics via Google Tag Manager

In our post on setting up Google Analytics, I advocated for skipping Google Tag Manager when setting up Google Analytics for the first time. I still stand by that, especially for folks creating their site for the first time. When you skip Google Tag Manager as a new site owner, you skip a lot of emplexity without giving up much.

If you’re at a stage with your site where you’re looking at deeper customizations for Google Analytics, it’s worth taking the time to get Google Tag Manager set up.

Long term, using Google Tag Manager is a good habit to get into. It saves a bunch of headaches down the road that large sites run into. Keeping all of the JavaScript tags from all your marketing tools in a tag manager makes updates, maintenance, and audits super easy.

Again, if you’re running your site by yourself and hate the thought of learning one more tool, feel free to skip this.

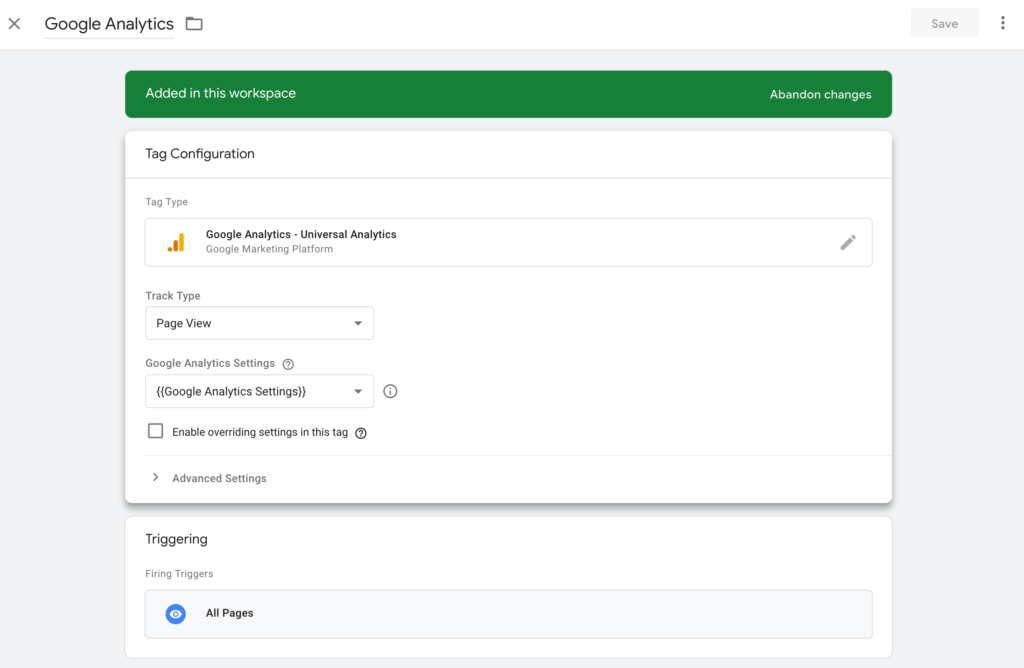
For everyone else, it’s time to remove your Google Analytics Global Site Tag from your site, install Google Tag Manager, and then add Google Analytics to your tag manager.

Once you’ve removed Google Analytics JavaScript from your site, follow these steps:

  1. Create a Google Tag Manager account and set up a workspace for your site.
  2. Install the Google Tag Manager Javascript in the same place on your site that you previously installed Google Analytics directly. The JavaScript is under the the Admin section of your Google Tag Manager account.
  3. Create a new tag under your workspace.
  4. For tag type, choose “Universal Analytics”
  5. Choose “Page View” for track type.
  6. Under Google Analytics Settings, choose “New Variable” and adding your Tracking ID.
  7. Add a trigger that fires the tag on all pages.
  8. Save your tag and publish your workspace. Don’t forget to publish the new workspace; you have to “push” to production otherwise your changes won’t go live.

Your tag will look like this when you’re done:

Universal Analytics Tag

To make sure that Google Analytics is working through Google Tag Manager, check your real-time reports in Google Analytics to see if it’s successfully recording data.

Create Custom Alerts

Sooner or later, you site will get hit. Here are a few scenarios that I’ve personally been through:

  • A site redesign was launched and Google Analytics was missing when it was pushed to production.
  • Another site redesign launched and cut our sign-up flow by 50%. Tracking was working, the new site just didn’t convert nearly as well as the old site.
  • Someone was making a few changes to the site and accidentally removed Google Analytics from the entire site. It was missing for about 24 hours before we caught it.
  • Google launched a bug in its search algorithm and we lost 40% of traffic in about 30 days.
  • On a different site, we lost 40% of our search traffic in 30 days after Google recrawled our site and lowered all our rankings.
  • New sign-up infrastructure launched and broke our sign-up tracking, the primary goal of the site.
  • I launched a new pricing page and cut our sales pipeline by 50%.

Most of these examples are pretty embarrassing.

Sooner or later, they happen on every site. I find that I run into 1–2 per year.

To help catch major problems like these, Google Analytics has Custom Alerts. You define a set of criteria and whenever that event happens, Google Analytics will send you an email. Even if your team isn’t checking Google Analytics daily, you’ll still catch major problems within 24 hours.

Here’s the alert I like to set up:

Data Alert

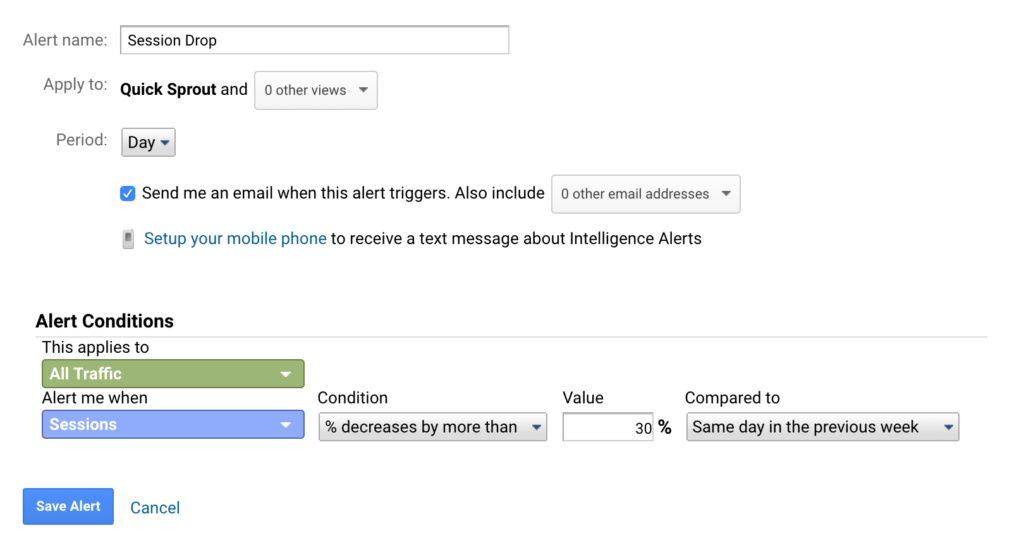
This alert sends me an email whenever sessions decrease by 30% or more compared to the same day the previous week. A few tricks that I’ve learned about custom alerts over the years:

  • Alerts by day are the most useful. This will catch catastrophic problems that tank your data immediately. It can take longer for those problems to show up in weekly or monthly data. I also find that normal reporting is good enough to catch the weekly or monthly changes.
  • I try to only set up a handful of custom alerts. One for total traffic and one for the primary conversion event on the site are usually enough (sign up, purchase, etc). If too many alerts fire, it becomes a bunch of noise.
  • Comparing to the previous week is helpful. Most sites have huge traffic differences between the week and the weekend which are totally normal. These normal fluctuations can trigger alerts if you compare day to day.
  • Increase the trigger percentage if you find that you’re getting too many false alarms.
  • Some folks set up alerts for positive increases too. I never found them that useful personally. Good news has a habit of taking care of itself. It’s bad news where every minute counts.

Add an Office IP Filter

In Google Analytics, filters give you complete and total power. You can remove and transform your data permanently.

And when I say permanently, I do mean permanently. Be careful with these things. Once a filter is live, it’ll change all the data that’s collected. There’s no way to undo it. If a bad filter is applied, the only fix is to remove it and clean up data that’s collected after. There’s nothing that can be done to fix the old corrupted data.

So proceed with caution on these things.

There’s one filter that many websites should apply: a filter to remove internal traffic.

If you’re running your own business out of your house or from a coffee shop, don’t worry about this at all. The data impact from a single person is so limited that it’s not worth the hassle of adding a filter and maintaining one more setting in Google Analytics. Whenever I start to see the impact of my own browsing habits on one of my websites, my first thought is: “I need to spend my time getting more traffic.” At that stage, I prefer to worry about big things like getting enough traffic and customers.

However, there is a situation where an office IP filter becomes a requirement. When you’re working on a larger website with an entire team of people employed, skewing your traffic data becomes a real possibility. If a couple hundred people all work on the same website, Google Analytics data will become biased.

If your company works out of an office (or several offices), it’s worth the effort to figure out the IP address of your office and apply a Google Analytics filter that excludes all data from that IP. That keeps your employees from skewing your Google Analytics reports during their day-to-day work.

Here’s what your Office IP filter will look like:

Office IP Filter

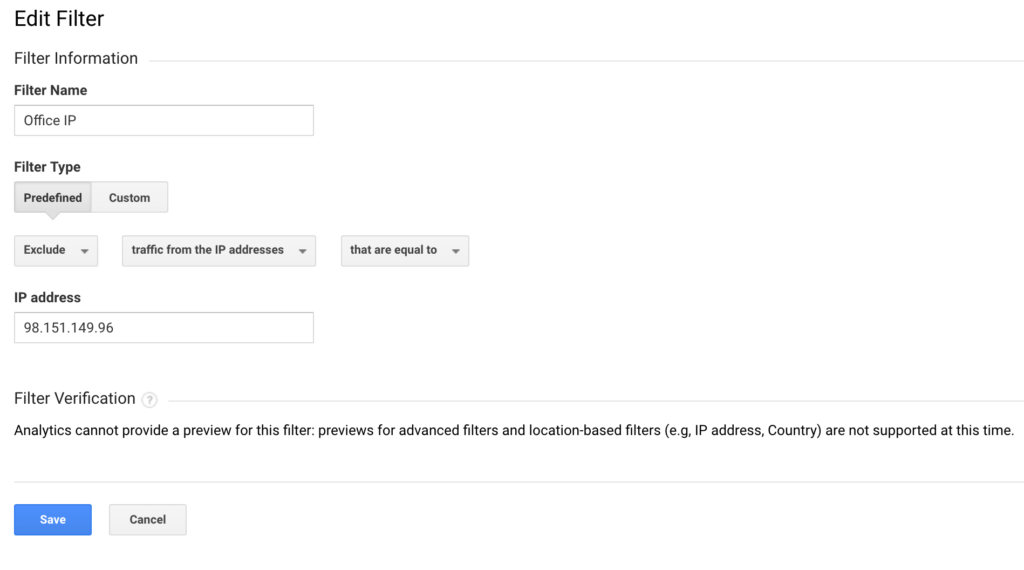
This filter tells Google Analytics to take all data from an IP address and completely ignore it.

Remember to use the new views that you set up earlier. First apply the filter to your Test view, give it a few days to make sure it’s working properly, then apply the filter to your Master view. Filters are so powerful that you always want to test them first. All it takes is accidentally selecting “Include” when you meant “Exclude” to permanently nuke your entire Google Analytics account until your discover the mistake.

Collective #496


C496_zeroserver

Zero Server

A zero configuration web framework that abstracts the usual project configuration for routing, bundling, and transpiling to make it easier to get started.

Check it out


C496_chrome

We Need Chrome No More

A very interesting article on how we should foster browser diversity and step away from using the browser of the world’s largest advertising company.

Read it


C496_dribbble

The Dribbble Experiment

Robert Williams analyzes the performance of a job post on Dribbble and compares it to using the advanced search tool.

Read it


C496_codevember

Codevember 2018

A fantastic compilation of loops for Codevember 2018 including source codes and breakdown gifs. By Jaume Sanchez Elias.

Check it out


C496_subsync

Subsync

Language-agnostic automatic synchronization of subtitles to video, so that subtitles are aligned to the correct starting point within the video.

Check it out


Collective #496 was written by Pedro Botelho and published on Codrops.

I Spun up a Scalable WordPress Server Environment with Trellis, and You Can, Too

A few years back, my fledgling website design agency was starting to take shape; however, we had one problem: managing clients' web servers and code deployments. We were unable to build a streamlined process of provisioning servers and maintaining operating system security patches. We had the development cycle down pat, but server management became the bane of our work. We also needed tight control over each server depending on a site’s specific needs. Also, no, shared hosting was not the long term solution.

I began looking for a prebuilt solution that could solve this problem but came up with no particular success. At first, I manually provisioned servers. This process quickly proved to be both monotonous and prone to errors. I eventually learned Ansible and created a homegrown conglomeration of custom Ansible roles, bash scripts and Ansible Galaxy roles that further simplified the process — but, again, there were still many manual steps needed to take before the server was 100%.

I’m not a server guy (nor do I pretend to be one), and at this point, it became apparent that going down this path was not going to end well in the long run. I was taking on new clients and needed a solution, or else I would risk our ability to be sustainable, let alone grow. I was spending gobs of time typing arbitrary sudo apt-get update commands into a shell when I should have been managing clients or writing code. That's not to mention I was also handling ongoing security updates for the underlying operating system and its applications.

Tell me if any of this sounds familiar.

Serendipitously, at this time, the team at Roots had released Trellis for server provisioning; after testing it out, things seemed to fall into place. A bonus is that Trellis also handles complex code deployments, which turned out to be something else I needed as most of the client sites and web applications that we built have a relatively sophisticated build process for WordPress using Composer, npm, webpack, and more. Better yet, it takes just minutes to jumpstart a new project. After spending hundreds of hours perfecting my provisioning process with Trellis, I hope to pass what I’ve learned onto you and save you all the hours of research, trials, and manual work that I wound up spending.

A note about Bedrock

We're going to assume that your WordPress project is using Bedrock as its foundation. Bedrock is maintained by the same folks who maintain Trellis and is a "WordPress boilerplate with modern development tools, easier configuration, and an improved folder structure." This post does not explicitly explain how to manage Bedrock, but it is pretty simple to set up, which you can read about in its documentation. Trellis is natively designed to deploy Bedrock projects.

A note about what should go into the repo of a WordPress site

One thing that this entire project has taught me is that WordPress applications are typically just the theme (or the child theme in the parent/child theme relationship). Everything else, including plugins, libraries, parent themes and even WordPress itself are just dependencies. That means that our version control systems should typically include the theme alone and that we can use Composer to manage all of the dependencies. In short, any code that is managed elsewhere should never be versioned. We should have a way for Composer to pull it in during the deployment process. Trellis gives us a simple and straightforward way to accomplish this.

Getting started

Here are some things I’m assuming going forward:

  • The code for the new site in the directory ~/Sites/newsite
  • The staging URL is going to be https://newsite.statenweb.com
  • The production URL is going to be https://newsite.com
  • Bedrock serves as the foundation for your WordPress application
  • Git is used for version control and GitHub is used for storing code. The repository for the site is: git@github.com:statenweb/newsite.git

I am a little old school in my local development environment, so I’m foregoing Vagrant for local development in favor of MAMP. We won’t go over setting up the local environment in this article.

I set up a quick start bash script for MacOS to automate this even further.

The two main projects we are going to need are Trellis and Bedrock. If you haven't done so already, create a directory for the site (mkdir ~/Sites/newsite) and clone both projects from there. I clone Trellis into a /trellis directory and Bedrock into the /site directory:

cd ~/Sites/newsite
git clone git@github.com:roots/trellis.git
git clone git@github.com:roots/bedrock.git site
cd trellis
rm -rf .git
cd ../site
rm -rf .git

The last four lines enable us to version everything correctly. When you version your project, the repo should contain everything in ~/Sites/newsite.

Now, go into trellis and make the following changes:

First, open ~/Sites/newsite/trellis/ansible.cfg and add these lines to the bottom of the [defaults] key:

vault_password_file = .vault_pass
host_key_checking = False

The first line allows us to use a .vault_pass file to encrypt all of our vault.yml files which are going to store our passwords, sensitive data, and salts.

The second host_key_checking = False can be omitted for security as it could be considered somewhat dangerous. That said, it’s still helpful in that we do not have to manage host key checking (i.e., typing yes when prompted).

Ansible vault password

Photo by Micah Williams on Unsplash

Next, let’s create the file ~/Sites/newsite/trellis/.vault_pass and enter a random hash of 64 characters in it. We can use a hash generator to create that (see here for example). This file is explicitly ignored in the default .gitignore, so it will (or should!) not make it up to the source control. I save this password somewhere extremely secure. Be sure to run chmod 600 .vault_pass to restrict access to this file.

The reason we do this is so we can store encrypted passwords in the version control system and not have to worry about exposing any of the server's secrets. The main thing to call out is that the .vault_pass file is (and should not be) not committed to the repo and that the vault.yml file is properly encrypted; more on this in the “Encrypting the Secret Variables" section below.

Setting up target hosts

Photo by N. on Unsplash

Next, we need to set up our target hosts. The target host is the web address where Trellis will deploy our code. For this tutorial, we are going to be configuring newsite.com as our production target host and newsite.statenweb.com as our staging target host. To do this, let’s first update the production servers address in the production host file, stored in ~/Sites/newsite/trellis/hosts/production to:

[production]
newsite.com

[web]
newsite.com

Next, we can update the staging server address in the staging host file, which is stored in ~/Sites/newsite/trellis/hosts/staging to:

[staging]
newsite.statenweb.com

[web]
newsite.statenweb.com

Setting up GitHub SSH Keys

For deployments to be successful, SSH keys need to be working. Trellis takes advantage of how GitHub' exposes all public (SSH) keys so that you do not need to add keys manually. To set this up go into the group_vars/all/users.yml and update both the web_user and the admin_user object's keys value to include your GitHub username. For example:

users:
  - name: '{{ web_user }}'
		groups:
		  - '{{ web_group }}'
		keys:
		  - https://github.com/matgargano.keys
  - name: '{{ admin_user }}'
		groups:
		  - sudo
		keys:
		  - https://github.com/matgargano.keys

Of course, all of this assumes that you have a GitHub account with all of your necessary public keys associated with it.

Site Meta

We store essential site information in:

  • ~/Sites/newsite/trellis/group_vars/production/wordpress_sites.yml for production
  • ~/Sites/newsite/trellis/group_vars/staging/wordpress_sites.yml for staging.

Let's update the following information for our staging wordpress_sites.yml:

wordpress_sites:
	newsite.statenweb.com:
		site_hosts:
		  - canonical: newsite.statenweb.com
		local_path: ../site 
		repo: git@github.com:statenweb/newsite.git
		repo_subtree_path: site 
		branch: staging
		multisite:
			enabled: false
		ssl:
			enabled: true
			provider: letsencrypt
		cache:
			enabled: false

This file is saying that we:

  • removed the site hosts redirects as they are not needed for staging
  • set the canonical site URL (newsite.statenweb.com) for the site key (newsite.statenweb.com)
  • defined the URL for the repository
  • the git repo branch that gets deployed to this target is staging, i.e., we are using a separate branch named staging for our staging site
  • enabled SSL (set to true), which will also install an SSL certificate when the box provisions

Let's update the following information for our production wordpress_sites.yml:

wordpress_sites:
	newsite.com:
		site_hosts:
		  - canonical: newsite.com
				redirects:
				  - www.newsite.com
		local_path: ../site # path targeting local Bedrock site directory (relative to Ansible root)
		repo: git@github.com:statenweb/newsite.git
		repo_subtree_path: site 
		branch: master
		multisite:
			enabled: false
		ssl:
			enabled: true
			provider: letsencrypt
		cache:
			enabled: false

Again, what this translates to is that we:

  • set the canonical site URL (newsite.com) for the site key (newsite.com)
  • set a redirect for www.newsite.com
  • defined the URL for the repository
  • the git repo branch that gets deployed to this target is master, i.e., we are using a separate branch named master for our production site
  • enabled SSL (set to true), which will install an SSL certificate when you provision the box

In the wordpress_sites.yml you can further configure your server with caching, which is beyond the scope of this guide. See Trellis' documentation on FastCGI Caching for more information.

Secret Variables

Photo by Kristina Flour on Unsplash

There are going to be several secret pieces of information for both our staging and production site including the root user password, MySQL root password, site salts, and more. As referenced previously, Ansible Vault and using .vault_pass file makes this a breeze.

We store this secret site information in:

  • ~/Sites/newsite/trellis/group_vars/production/vault.yml for production
  • ~/Sites/newsite/trellis/group_vars/staging/vault.yml for staging

Let's update the following information for our staging vault.yml:

vault_mysql_root_password: pK3ygadfPHcLCAVHWMX

vault_users:
	- name: "{{ admin_user }}"
		password: QvtZ7tdasdfzUmJxWr8DCs
		salt: "heFijJasdfQbN8bA3A"

vault_wordpress_sites:
	newsite.statenweb.com:
		env:
			auth_key: "Ab$YTlX%:Qt8ij/99LUadfl1:U]m0ds@N<3@x0LHawBsO$(gdrJQm]@alkr@/sUo.O"
			secure_auth_key: "+>Pbsd:|aiadf50;1Gz;.Z{nt%Qvx.5m0]4n:L:h9AaexLR{1B6.HeMH[w4$>H_"
			logged_in_key: "c3]7HixBkSC%}-fadsfK0yq{HF)D#1S@Rsa`i5aW^jW+W`8`e=&PABU(s&JH5oPE"
			nonce_key: "5$vig.yGqWl3G-.^yXD5.ddf/BsHx|i]>h=mSy;99ex*Saj<@lh;3)85D;#|RC="
			auth_salt: "Wv)[t.xcPsA}&/]rhxldafM;h(FSmvR]+D9gN9c6{*hFiZ{]{,#b%4Um.QzAW+aLz"
			secure_auth_salt: "e4dz}_x)DDg(si/8Ye&U.p@pB}NzHdfQccJSAh;?W)>JZ=8:,i?;j$bwSG)L!JIG"
			logged_in_salt: "DET>c?m1uMAt%hj3`8%_emsz}EDM7R@44c0HpAK(pSnRuzJ*WTQzWnCFTcp;,:44"
			nonce_salt: "oHB]MD%RBla*#x>[UhoE{hm{7j#0MaRA#fdQcdfKe]Y#M0kQ0F/0xe{cb|g,h.-m"

Now, let's update the following information for our production vault.yml:

vault_mysql_root_password: nzUMN4zBoMZXJDJis3WC
vault_users:
	- name: "{{ admin_user }}"
		password: tFxea6ULFM8CBejagwiU
		salt: "9LgzE8phVmNdrdtMDdvR"
vault_wordpress_sites:
	newsite.com:
		env:
			db_password: eFKYefM4hafxCFy3cash
			# Generate your keys here: https://roots.io/salts.html
			auth_key: "|4xA-:Pa=-rT]&!-(%*uKAcd</+m>ix_Uv,`/(7dk1+;b|ql]42gh&HPFdDZ@&of"
			secure_auth_key: "171KFFX1ztl+1I/P$bJrxi*s;}.>S:{^-=@*2LN9UfalAFX2Nx1/Q&i&LIrI(BQ["
			logged_in_key: "5)F+gFFe}}0;2G:k/S>CI2M*rjCD-mFX?Pw!1o.@>;?85JGu}#(0#)^l}&/W;K&D"
			nonce_key: "5/[Zf[yXFFgsc#`4r[kGgduxVfbn::<+F<$jw!WX,lAi41#D-Dsaho@PVUe=8@iH"
			auth_salt: "388p$c=GFFq&hw6zj+T(rJro|V@S2To&dD|Q9J`wqdWM&j8.KN]y?WZZj$T-PTBa"
			secure_auth_salt: "%Rp09[iM0.n[ozB(t;0vk55QDFuMp1-=+F=f%/Xv&7`_oPur1ma%TytFFy[RTI,j"
			logged_in_salt: "dOcGR-m:%4NpEeSj>?A8%x50(d0=[cvV!2x`.vB|^#G!_D-4Q>.+1K!6FFw8Da7G"
			nonce_salt: "rRIHVyNKD{LQb$uOhZLhz5QX}P)QUUo!Yw]+@!u7WB:INFFYI|Ta5@G,j(-]F.@4"

The essential lines for both are that:

  • The site key must match the key in wordpress_sites.yml we are using newsite.statenweb.com: for staging and newsite.com: for production
  • I randomly generated vault_mysql_root_password, password, salt, db_password, and db_password. I used Roots' helper to generate the salts.

I typically use Gmail's SMTP servers using the Post SMTP plugin, so there’s no need for me to edit the ~/Sites/newsite/group_vars/all/vault.yml.

Encrypting the Secret Variables

Photo by Markus Spiske on Unsplash

As previously mentioned we use Ansible Vault to encrypt our vault.yml files. Here’s how to encrypt the files and make them ready to be stored in our version control system:

cd ~/Sites/newsite/trellis
ansible-vault encrypt group_vars/staging/vault.yml group_vars/production/vault.yml

Now, if we open either ~/Sites/newsite/trellis/group_vars/staging/vault.yml or ~/Sites/newsite/trellis/group_vars/production/vault.yml, all we’ll get is garbled text. This is safe to be stored in a repository as the only way to decrypt it is to use the .vault_pass. It goes without saying to make extra sure that the .vault_pass itself does not get committed to the repository.

A note about compiling, transpiling, etc.

Another thing that’s out of scope is setting up Trellis deployments to handle a build process using build tools such as npm and webpack. This is example code to handle a custom build that could be included in ~/Sites/newsite/trellis/deploy-hooks/build-before.yml:

---

-
	args:
		chdir: "{{ project.local_path }}/web/app/themes/newsite"
	command: "npm install"
	connection: local
	name: "Run npm install"

-
	args:
		chdir: "{{ project.local_path }}/web/app/themes/newsite"
	command: "npm run build"
	connection: local
	name: "Compile assets for production"

-
	name: "Copy Assets"
	synchronize:
		dest: "{{ deploy_helper.new_release_path }}/web/app/themes/newsite/dist/"
		group: no
		owner: no
		rsync_opts: "--chmod=Du=rwx,--chmod=Dg=rx,--chmod=Do=rx,--chmod=Fu=rw,--chmod=Fg=r,--chmod=Fo=r"
		src: "{{ project.local_path }}/web/app/themes/newsite/dist/"

These are instructions that build assets and moves them into a directory that I explicitly decided not to version. I hope to write a follow-up guide that dives specifically into that.

Provision

Photo by Bill Jelen on Unsplash

I am not going to go in great detail about setting up the servers themselves, but I typically would go into DigitalOcean and spin up a new droplet. As of this writing, Trellis is written on Ubuntu 18.04 LTS (Bionic Beaver) which acts as the production server. In that droplet, I would add a public key that is also included in my GitHub account. For simplicity, I can use the same server as my staging server. This scenario is likely not what you would be using; maybe you use a single server for all of your staging sites. If that is the case, then you may want to pay attention to the passwords configured in ~/Sites/newsite/trellis/group_vars/staging/vault.yml.

At the DNS level, I would map the naked A record for newsite.com to the IP address of the newly created droplet. Then I’d map the CNAME www to @. Additionally, the A record for newsite.statenweb.com would be mapped to the IP address of the droplet (or, alternately, a CNAME record could be created for newsite.statenweb.com to newsite.com since they are both on the same box in this example).

After the DNS propagates, which can take some time, the staging box can be provisioned by running the following commands.

First off, it;’s possible you may need to run this before anything else:

ansible-galaxy install -r requirements.yml

Then, install the required Ansible Galaxy roles before proceeding:

cd ~/Sites/newsite/trellis
ansible-playbook server.yml -e env=staging

Next up, provision the production box:

cd ~/Sites/newsite/trellis
ansible-playbook server.yml -e env=production

Deploy

If all is set up correctly to deploy to staging, we can run these commands:

cd ~/Sites/newsite/trellis
ansible-playbook deploy.yml -e "site=newsite.statenweb.com env=staging" -i hosts/staging

And, once this is complete, hit https://newsite.statenweb.com. That should bring up the WordPress installation prompt that provides the next steps to complete the site setup.

If staging is good to go, then we can issue the following commands to deploy to production:

cd ~/Sites/newsite/trellis
ansible-playbook deploy.yml -e "site=newsite.com env=production" -i hosts/production

And, like staging, this should also prompt installation steps to complete when hitting https://newsite.com.

Go forth and deploy!

Hopefully, this gives you an answer to a question I had to wrestle with personally and saves you a ton of time and headache in the process. Having stable, secure and scalable server environments that take relatively little effort to spin up has made a world of difference in the way our team works and how we’re able to accommodate our clients’ needs.

While we’re technically done at this point, there are still further steps to take to wrap up your environment fully:

  • Add dependencies like plugins, libraries and parent themes to ~/Sites/newsite/composer.json and run composer update to grab the latest manifest versions.
  • Place the theme to ~/Sites/newsite/site/themes/. (Note that any WordPress theme can be used.)
  • Include any build processes you’d need (e.g. transpiling ES6, compiling SCSS, etc.) in one of the deployment hooks. (See the documentation for Trellis Hooks).

I have also been able to dive into enterprise-level continuous integration and continuous delivery, as well as how to handle premium plugins with Composer by running a custom Composer server, among other things, while incurring no additional cost. Hopefully, those are areas I can touch on in future posts.

Trellis provides a dead simple way to provision WordPress servers. Thanks to Trellis, long gone are the days of manually creating, patching and maintaining servers!

The post I Spun up a Scalable WordPress Server Environment with Trellis, and You Can, Too appeared first on CSS-Tricks.

Keen makes it a breeze to build and ship customer-facing metrics

(This is a sponsored post.)

Keen is an analytics tool that makes it wonderfully easy to collect data. But Keen is unique in that it is designed not just to help you look at that data, but to share that data with your own customers! Customer-facing metrics, as it were.

Keen works just the way you would hope: it's super easy to install, has great docs, makes it very easy to customize to collect exactly what you need, and crucially, it is just as easy to query it and get the data you want to build the visualizations you need. As I'm sure you well know: you only improve what you measure, and what you measure is unique to your business and your customers.

Doesn't it tickle your brain a little? What kind of metrics might your customers want to see in relation to your app? What kind of features might they pay for?

The idea of Customer-Facing Metrics is that you can deliver personalized data to your user right through the front-end of the app. It could be the fundamental offering of your app! Or it could be a bonus paid feature, a lot of people love looking at their numbers! Imagine a social platform where users are able to see their most popular content, check the sources of the traffic, and explore all that through time and other filters.

Customer facing data, powered by Keen

Have you ever seen an incredible data visualization and imagined how that could be useful in your own app? You can probably follow a tutorial to help you build the visual part, but those tutorials generally assume you already have the data and skip over that part. Keen helps you with the hard part: collecting, storing, and querying all that data. Not to mention scales as you do.

Charts from Quartz, powered by Keen

Part of the beauty of Keen is how easy it is to get started. It works in whatever stack you've got in any language. Just a few lines of code to get up and running and get a proof of concept going.

In fact, if you're using Keen for the web, you might be interested in the Auto-Collector, which means you don't have to configure and send events manually, it will collect all pageviews, clicks, and form submissions automatically. That's particularly nice as you can answer questions you might have instantly, because you've already collected the information, you don't need to configure new collections and then wait. This is particularly great to help you get a proof-of-concept up very quickly and start figuring out things that your customers are sure to be interested in.

Auto-Collector Dashboard

Start prototyping today with Auto-Collector:

Sign up for Keen

Direct Link to ArticlePermalink

The post Keen makes it a breeze to build and ship customer-facing metrics appeared first on CSS-Tricks.

A Bit of Performance

Here’s a great post by Roman Komarov on what he learned by improving the performance of his personal website. There’s a couple of neat things he does to tackle font loading in particular, such as adding the <link rel="preload"> tags for fonts. This will encourage those font files to download a tiny bit faster which prevents that odd flash of un-styled text we know all too well. Roman also subsets his font files based on language which I find super interesting – as only certain pages of his website use Cyrillic glyphs.

He writes:

I was digging into some of the performance issues during my work for a few weeks, and I thought that it can be interesting to see how those could be applied to my site. I was already quite happy with how it performed (being just a small static site) but managed to find a few areas to improve.

I had also never heard of Squoosh, which happens to be an incredible image optimization tool that looks like this when you’re editing an image:

With that slider in the middle, it shows the difference between the original image and the newly optimized one, which is both super neat and helpful.

Direct Link to ArticlePermalink

The post A Bit of Performance appeared first on CSS-Tricks.

10 Inspiring Websites with Gorgeous Animations

There’s nothing more awe-inspiring than a website with amazing animations. It’s like a webpage come to life inside your computer, and with animations, a designer can really show off their skills. If you’re planning on including movement in your own website, you’ll definitely want to see these amazing animations from talented web designers and developers.

Les Animals

Les Animals

Les Animals nails the transitional animations in this one, each fluid movement easing you into a new frame. Just click and drag to start exploring a little world, and see all the breathtaking 3D environments through a small lens.

The Hunt for the Cheshire Cat

The Hunt for the Cheshire Cat

This site is just marvelous. At first it uses only slight mouse panning animations, but as you go deeper, you’ll find yourself immersed in a 3D city that you can travel through and look around in. Scrolling advances you through the city and into various other environments.

60 FPS

60 FPS

The centerpiece of this animation is definitely the rippling gold and silver logo, always in the background. It’s subtle, but unique and beautiful. More than that, each UI element appears with a smooth effect. And here’s a cool effect you might not have noticed: the background logo on every page responds to your mouse cursor as you hover it!

Spire

Spire

This website is packed with all sorts of little animations. Interactive 3D objects, various hover animations, small animations that idly loop in the background – you’ll need to explore to find them all. The sliding text and elements offers a natural transition as you look through all of the pages here.

Nico Cherubin

Nico Cherubin

Animations with personality are the best, and you’ll know as soon as you enter this site that the creator loves web development and technology. One awesome feature from this site is, when you’re on a project page, the ability to hold the spacebar to see a video of the website in action.

Pelizzari Studio

Pelizzari Studio

Whoever designed these animations definitely knew what they were doing. If you’re going for a simple, but responsive and elegant effect, you’ll love this. Every single page pops with its use of animation, as images slide in or zoom out as you scroll. It’s simply a joy to navigate.

Active Theory

Active Theory

Navigating this site feels like walking through city streets. Flying down dark alleys lit by bright colors, looking through pages with backgrounds that look like they come from a late-night town, the atmosphere they’re going for here is clearly set up and exceptionally executed. And even clicking on a portfolio page displays a series of fluid transitions and text animations.

Teatr Lalka

Teatr Lalka

This one is a great inspiration for kids’ websites. Moving your mouse left and right triggers the puppets to swing with realistic physics. Move your mouse faster for a more dramatic effect. Click on them to get a cute animation and hover to learn more. Clicking through the pages also brings up lively loading screen animations and more characters to interact with.

Dean Bradshaw Photography

Dean Bradshaw Photography

Every page you visit on this site is filled with animations that bring the photography to life. The first thing you see is a slider that allows you to quickly scroll through some of the best pieces. Images and videos have a nice zoom hover effect, and text scrolls by in the background as you browse.

Next Level Fairs

Next Level Fairs

Scrolling down through this site never gets boring with all the little animations and dynamic movements of each piece. It’s interesting to learn a little more about the web designers’ thoughts as they created an online gallery, displayed on this page made with just as careful craftsmanship.

Crafting Awesome Animations

Animated websites certainly aren’t easy to make, but the results are more than worth it. With enough experience and skill at web design and development, you can create something truly inspiring that will dazzle anyone who comes across it.

Did these fantastic examples give you any ideas? Which ones did you love the most?

7 Principles of Highly Successful Email Marketing

You're reading 7 Principles of Highly Successful Email Marketing, originally posted on Designmodo. If you've enjoyed this post, be sure to follow on Twitter, Facebook, Google+!

7 Principles of Highly Successful Email Marketing

When it comes to email marketing, there are a few things that make a big difference. Email marketing can be an indispensable investment. However, that’s only when emails are well-designed, and campaigns are well thought out. Let’s see exactly what …

Common WordPress Errors & How to Fix Them

WordPress is an amazingly stable platform thanks to the dedication and talent of the hundreds of professionals contributing to it, and the strict code standards they follow. Even so, the huge variety of themes, plugins and server environments out there make it difficult to guarantee nothing will ever go wrong. This guide will help you […]


The post Common WordPress Errors & How to Fix Them appeared first on Web Designer Wall.