Do you know how slow your site loads? Just a one-second delay in loading time results in:
- 16% decrease in customer satisfaction which keeps your audience from coming back.
- 11% fewer page views which means less people will know about your brand.
- 7% loss in conversions which means less money for you.
Amazon says that one second of load lag time would cost them $1.6 billion in sales each year.
So, how fast should your website load? Both mobile and desktop users expect your site to load quickly (two seconds or less). However, the average loading times for various industries in the United States don’t meet those benchmarks. Take a look at this research from Google:
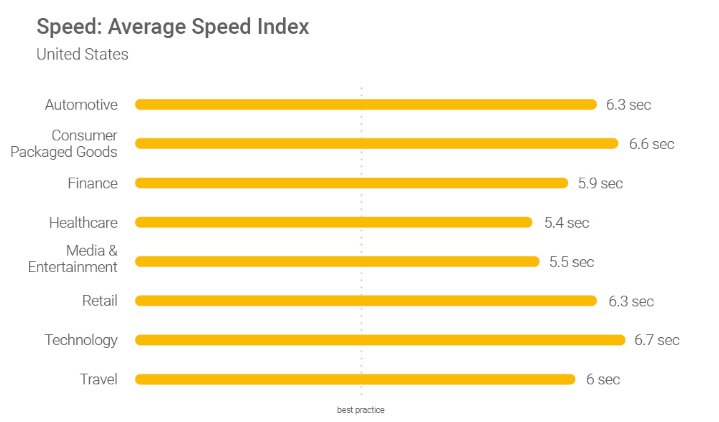
As you can see, the average website speed for all of these industries is significantly higher than the best practices line. But that doesn’t mean you should aim for 5-6 seconds. In fact, you have every reason to make your website as fast as possible.
13 Ways to Speed Up Your Website
If you can speed up your website, it will give you a huge advantage over your competitors with slower loading times. You’ll want to aim for your pages to load in three seconds or less. That’s because many visitors will abandon your site if it hasn’t loaded within three seconds. But obviously, the lower you can get that number, the better.
Understanding why website speed is so important, it’s time to do something about it. I created this guide of best practices that will help you speed up your website.
So read carefully and make any necessary changes to your site moving forward. Don’t be intimidated by any technical terms that you’re unfamiliar with — I’ve kept everything in plain English, so it’s easy for everyone to follow along.
Minimize Your HTTP Requests
HTTP requests are made for each element on your website. I’m referring to things like images, scripts, and stylesheets.
Much of a website’s loading time is related to downloading on-page elements. So for those of you who have lots of these components on your website, you have more HTTP requests.
Using your developer tools settings, you can figure out how many requests your website currently makes. Then, take steps lower that number. Reduce clutter on your website and simplify the design.
You should also eliminate unnecessary redirects. While these are often needed for fixing broken links, they create additional HTTP requests. This will slow down your website speed.
I’d recommend using a tool like Screaming Frog to help you identify all of your redirects. Once they’ve been identified, get rid of the ones that you can live without. Only keep the ones that are absolutely necessary.
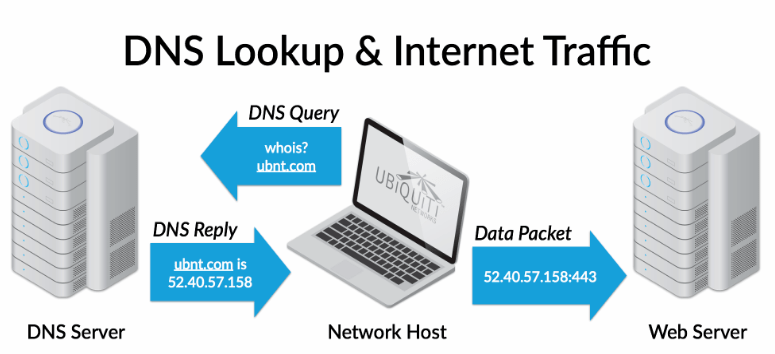
Reduce the Time to First Byte (TTFB)
TTFB refers to the time browsers need to wait before getting data from the server. Simply put, it’s basically how long it takes for a page to start loading.
Your TTFB is comprised of three elements:
- HTTP request time
- Process request time
- Response time
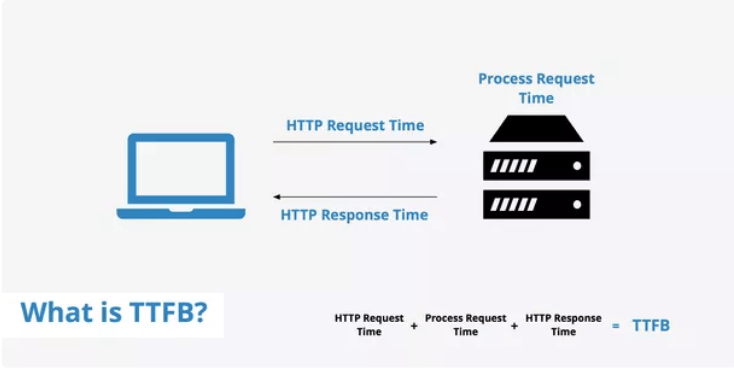
The whole process refers to when the web browser’s HTTP request occurs to the server’s HTTP response being received. Here’s a visual representation showing how the time to first byte works.
If your website has a fast TTFB, then requests can be delivered to the browser faster. Ultimately, this gets your content loaded for visitors faster.
You should be aiming for a TTFB that’s less than 200ms. Use WebPageTest as a resource to identify your time to first byte.

Just look at the “first byte” column to see where you stand. In this example, .617s is equal to 617ms. That’s more than three times slower than the 200ms benchmark!
For those of you who have a TTFB that exceeds 200ms, you’ll need to take steps to improve that number. Beyond reducing HTTP requests, some common issues associated with slow TTFB are network and website traffic issues.
One of the best ways to reduce your TTFB is by enabling browser caching. Make note of that — we’ll discuss how to execute on that concept in greater detail later in this guide.
Make Sure Browser Caching is Enabled
As mentioned above, whenever someone visits a new website, all of the elements need to be loaded. These elements get stored in a cache, which is a temporary storage on their hard drive. The next time they go to that website, their browser can load that page without sending an additional HTTP request to the server.
If you have caching enabled, then your website speed will be faster for returning visitors. Check out my list of the best WordPress cache plugins to get this set up on your website.
Upgrade Your Web Hosting Plan
Cheaper isn’t always better. When your website was new, you might have gone with a budget hosting plan to keep costs low. However, as your traffic increases, you’ll need to make sure that your hosting plan is upgraded.
There are four types of web hosting:
- Shared hosting
- VPS hosting
- Dedicated server
- Cloud hosting
The plan you choose and the company you use will impact your website speed. Rather than spending all day discussing the pros and cons of these hosting options, it’s in your best interest to review my guide on the best web hosting.
This will give you the information needed to choose the best web host that will ensure fast site loading more reliably.
Run Compression Audits
Website compression refers to HTTP data being compressed so the size of it is smaller before it’s sent to the server. Doing this improves loading speed and bandwidth.
To compress your data, Gzip is the industry standard tool for this practice. This software locates lines of similar code and then replaces them to make all of your files smaller. It’s ideal for HTML and CSS since those files tend to have lots of whitespace and repetitive code.
Studies from Yahoo say that Gzip compression can reduce response sizes by 70%.
I’d recommend running a compression audit with a tool like GIDNetwork to give you a better idea of how compressed files can speed up your website. Here’s what the audit looks like for Quick Sprout.
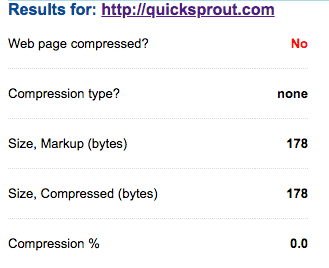
To test your website, all you need to do is enter the URL and click “check.” As you can see from this audit, Quick Sprout isn’t compressed. The tool also offers a “what if analysis” to show you the benefits of compressing your website.
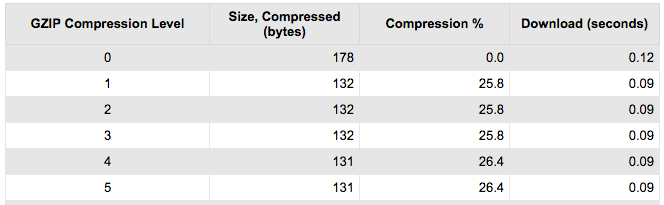
This chart shows what my website would look like at different compression levels. It tells me that at the fourth level of compression, the size can be compressed to 131 bytes compared to 178 with no compression. The download time would also improve from 0.12 seconds to .09 seconds.
These numbers are pretty marginal for my website, which is why I don’t currently have compression enabled. However, some of you might learn that your site can greatly benefit from compressed files after running this audit.
Let’s say your compression audit looked something like this.
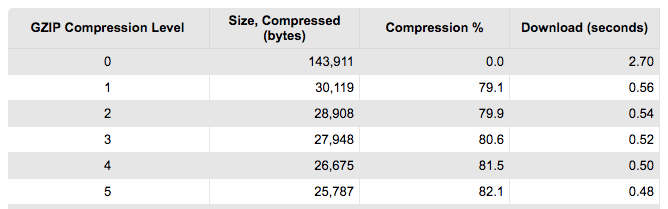
There is a huge difference between no compression and the first level. Those figures continue to improve as we reach level five.
In this scenario, you’d absolutely want to enable compression.
Reduce the Size of Images
As mentioned before, in order for your website to be as fast as possible, you need all of your files to be as small as they can possibly be. Just make sure that you’re not sacrificing quality, of course.
Smaller files load faster. It’s as simple as that. One area that you should reduce the size of are images. Visual elements are necessary on your website. Without images, your site will look boring, unprofessional, and probably untrustworthy.
But with that said, images can really slow down your loading times. That’s a big problem for some of you, especially for ecommerce businesses. Why? Well, consider this.
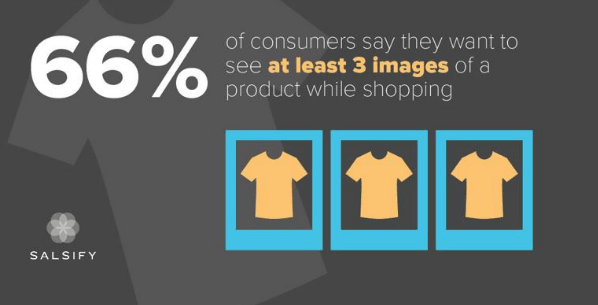
Some of you may have even more than three images per product. Now multiply that number by how many items are available on your website. The figures add up quickly.
Even websites that don’t sell anything need to reduce their image sizes. Go through your website then and assess every image. Is it doing the work it needs to do to justify it being there? Could you cut it and the content remains just as strong? Is it taking too much space on the web page? If the image doesn’t need to be there, cut it.
Compressing images is different from HTTP compression too. One has to do with the actual digital assets on your website’s front end, whereas the other has to do with compressing the commands sent to your web server.
Use a tool like Compressor.io to help you compress your images without sacrificing the quality of them. After the images are compressed, you’ll want to make sure that you’re saving them as the right file type.
For the most part, JPG will be your best option. You can use PNG files for graphics that need to have precise detail, like a logo.
Minify and Combine Files
We’ve already talked about some of the biggest ways you can leverage compression on your website. Now let’s talk about the last big way: minifying and combining files.
Minification removes unnecessary characters from your files, such as formatting and white space. Basically, it will get rid of anything that isn’t required for your code to function. This ultimately reduces your file sizes.
Combining files reduces the number of HTTP requests by concentrating them into smaller groups. For example, a browser can potentially download six smaller files faster than one giant file.
Think of this like sitting on a suitcase to get everything packed down nice and tight. You can do this for:
- HTML files
- CSS files
- JavaScript files
- Google Fonts
If you have a WordPress website, your best option is the WP Rocket plugin. If you have a different CMS, check to see if they offer plugins that minify and combine files for your website. This will definitely improve your website speed.
Use Asynchronous Loading
Now that your CSS and JavaScript files are minified and combined, it’s time for you to optimize the way they get loaded. There are two options:
- Synchronous loading
- Asynchronous loading
Files that load synchronously load one at a time, based on their location on the page. The problem with this is that if one file is taking longer to load, no other files will get loaded until that particular file is complete.
With asynchronous loading, files can load simultaneously. In the event of a file taking a while to load, other elements of your page can still load without any delay.
You can use the same WP Rocket plugin or the like to enable this as well.
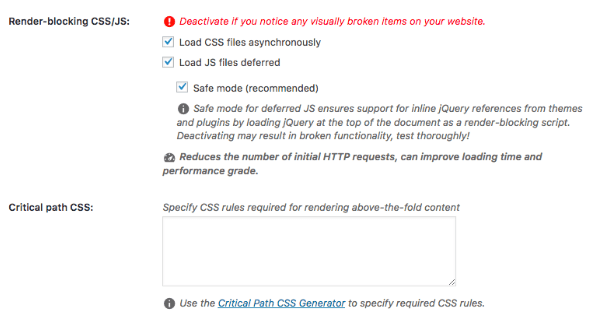
Just navigate to the Static Files tab and check the option for asynchronous loading, as shown above.
You’ll also see from this screenshot that “Load JS files deferred” is also checked. This brings me to another best practice for website speed.
Defer Loading for JavaScript Files
When you defer a file, it means that you stop it from loading until other elements on the page have loaded. By deferring a large file, it helps ensure that the rest of your files load quickly without any problems.
JavaScript files are large and can be deferred.
As I just showed above, it’s easy to accomplish this with just one click if you’re using a plugin like WP Rocket. Otherwise, you’ll have to insert some code into the