To gather insights on the current and future state of API management, we asked IT professionals from 18 companies to share their thoughts. We asked them, "What do developers need to keep in mind when managing APIs?" Here's what they told us:
UX
They need to think about the consumer of the API, what they are trying to get done with the API, why they would use the API, and details of their use cases. There have been a lot of APIs that were built, and nobody used the APIs for various reasons such as the API was too complex, did not easily (or at all) address their use case or were poorly documented. They need to remember that just like browser or desktop software with user interfaces, APIs have a user experience and that needs to fit the needs of the consumer and hopefully delight them.
Have a look at multiple APIs. There is no single right or wrong way to build APIs. Look at different implementations and put yourself in the shoes of using of consuming an API to understand what works and what doesn’t. It easy to take advantage of developer portals to discover APIs, see documentation, become familiar with a lot of APIs. That’s the best way to learn.
Respect the process and always look for a repeatable process. No matter what style you choose, GRPC, GraphQL, REST you need to maintain consistency across the board. Treat the developer experience of APIs with the same care, respect, effort, money as UX for your applications. Developers need to focus on creating the best possible developer experience for APIs. Every developer knows what a bad developer experience is. Make sure you don’t create a bad developer experience.
While APIs are built for machine-to-machine interaction, they are first manipulated by developers. Developers read them, try them, wrap their heads around them, before being able to efficiently leverage them. So APIs authors must do their best to balance between efficiency and human readability. We tackle the issue by providing our customers with high-quality API clients for most common programming languages — open-source API clients that we develop, document, support. On top of that, we also develop an open-source library leveraging these clients, providing customers with building blocks for the front-end that directly offers the best end-user experience and implements the best interaction patterns with our APIs.
1) APIs become a GA product once they are exposed outside of the company or even within the company. So API developers need to think in terms of a broad range of consumers and reusability when managing APIs. In doing so, best practices for development should be adopted, such as excellent documentation, understandable error messages, and predictable and consistent output and performance.
2) Since you could have a much broader set of developers using your APIs, it’s critical to think about the developers who will be using your API as consumers vs. technical users.
3) Because the API is reusable, backward compatibility becomes a critical consideration when updating that API. If you don’t know how, what, or when an API may be used, taking away capabilities or introducing breaking changes can create havoc for consumers. Some of the best APIs out there either enforce backward compatibility or give ample warning and time to make appropriate adjustments.
Decisions are easy to make and hard to reverse. The second someone other than you is consuming your API, you have a contract with that caller not to break their code. This means it can take literally years to unwind any mistakes you make in your interface definition.
So, measure twice and cut once. It’s also important to be mindful of the ecosystem in which you’re publishing your APIs. What are other teams doing? What do the existing APIs in your ecosystem look like? It’s important that everything you do feels consistent with the rest of your API ecosystem or customers will feel like they’re consuming a bunch of spare parts rather than a consistent collection of interfaces.
Developers need to acquire a client-first mindset. It’s easy to start gravitating away from the end-consumer if you don’t communicate with them, but it’s vital to put the customer’s convenience first. It’s frustrating when things get out of hand due to undocumented and unspoken changes on the API provider’s side.
Microservices
Developers need to consider API management of microservices. 86% of enterprises expect microservices to be the default application architecture in five years.
Security
Secure every API touchpoints which are usually an afterthought — they are not taken into consideration during the design phase. Security is a key element of API lifecycle management. Given that weak API security could result in exposure to critical vulnerabilities, API security must be built into the API architecture from the beginning – it cannot be relegated as that last design consideration.
Msg 2537, Level 16, State 0, Line 3 Table error: Object ID 18355554736, index ID 2, partition ID 78757594068474104, alloc unit ID 79037221108706816 (type In-row data), page (1:3269523), row 4. The record check (valid computed column) failed. The values are 7 and 1.
With the rapid development of the Flutter framework, more and more businesses begin to use Flutter to refactor or build new products. However, in practice, we have found that, on the one hand, Flutter has a high development efficiency, excellent performance, and good cross-platform performance. On the other hand, Flutter also faces problems, such as missing or imperfect plug-ins, basic capabilities, and the underlying framework.
For example, in the process of implementing an automated recording and playback, we have found that the code of the Flutter framework (Dart level) needs to be modified to meet the requirements during automatic recording playback. This leads to the risk of the framework becoming vulnerable to intrusion. To solve this problem and reduce the maintenance cost in the iteration process, the first solution we consider is Aspect-Oriented Programming.
One year ago, we released Slides 4 and now we’re almost ready for the much-anticipated Slides 5 release. This year we released many fixes and features and they all build into what will be our biggest Slides update yet.
Pivotal Tracker is an important component of any Agile project management environment. I know this from experience because I work as an Agile manager. In summation, if you are just getting your feet wet, this post will help you to avoid the common pitfalls associated with Pivotal Tracker software.
The program is great; it works fine and does the job as advertised. However, some features are lackluster. Given their price bracket, which is one of the major turn-offs for potential clients, this post suggests pivotal tracker alternatives.
Fast-paced companies or teams always have the same problem: they only have a finite amount of time with finite resources to get things done. No team can afford an inefficient workflow since it can break the whole organization system and result in severe damages. Many of the business owners spend massive payroll budget on expensive systems, team building sections, time management courses, etc. just to increase productivity among coworkers and ensure the timely delivery of the jobs.
But what if there are simple productivity tools that can keep a team on the clock and optimize the limited resources as efficiently as possible? 2019 is the work smart era, no one wants to be notified with sticky notes left on their desk or a never-ending email loop anymore. From giant enterprises to small businesses, deployment of a quality task management software has become an obligation to keep the business running smoothly.
Software development is not an exact science. There is no single way to build a successful product, just like there is no "right" approach to the process itself. Something that works for one team and one project won't necessarily work as well with another. Mostly due to the lack of understanding of the process itself or personal negative experience, software development has become surrounded by multiple stereotypes and myths.
That is why we have decided to demystify some of the most popular software development myths and help you slough off the related prejudices.
Hi Nate, tell us who you are and what lead you into microservices?
I’ve been described as “architect as a service” which pretty much describes my job these days (just don’t say the acronym out loud in a meeting). Having built and architected my fair share of enterprise web apps I’m quite familiar with the drawbacks of the monolith as well as the…challenges inherent in legacy infrastructure. Today every company is a tech company and we can no longer afford lengthy development cycles; smaller codebases, independent deployability, independent scalability, polytglot tech stacks combined with cloud platforms give us a powerful set of tools.
Microservices can have a positive impact on your enterprise. Therefore it is worth knowing how to handle Microservice Architecture (MSA) and some Design Patterns for Microservices, as well as, general goals or principles for a microservice architecture. Here are the four goals to consider in the Microservice Architecture approach [1].
Reduce Cost: MSA will reduce the overall cost of designing, implementing, and maintaining IT services.
Increase Release Speed: MSA will increase the speed from idea to deployment of services.
Improve Resilience: MSA will improve the resilience of our service network.
Enable Visibility: MSA support for better visibility on your service and network.
You need to understand what principles microservice architecture has been built
WooCommerce dropshipping is the easy way to make your business profitable from the earliest moments you open the online store. By creating partnerships necessary to avoid the cost of warehousing and inventory, your WooCommerce Dropshipping store avoids stress created by expenditures prior to orders being received. While WooCommerce dropshipping sounds like a great idea, the [...]
Designing And Building A Progressive Web Application Without A Framework (Part 3)
Designing And Building A Progressive Web Application Without A Framework (Part 3)
Ben Frain
Back in the first part of this series, we explained why this project came to be. Namely a desire to learn how a small web application could be made in vanilla JavaScript and to get a non-designing developer working his design chops a little.
In part two we took some basic initial designs and got things up and running with some tooling and technology choices. We covered how and why parts of the design changed and the ramifications of those changes.
In this final part, we will cover turning a basic web application into a Progressive Web Application (PWA) and ‘shipping’ the application before looking at the most valuable lessons learned by making the simple web application In/Out:
The enormous value of JavaScript array methods;
Debugging;
When you are the only developer, you are the other developer;
Design is development;
Ongoing maintenance and security issues;
Working on side projects without losing your mind, motivation or both;
Shipping some product beats shipping no product.
So, before looking at lessons learned, let’s look at how you turn a basic web application written in HTML, CSS, and JavaScript into a Progressive Web Application (PWA).
In terms of total time spent on making this little web-application, I’d guestimate it was likely around two to three weeks. However, as it was done in snatched 30-60 minute chunks in the evenings it actually took around a year from the first commit to when I uploaded what I consider the ‘1.0’ version in August 2018. As I’d got the app ‘feature complete’, or more simply speaking, at a stage I was happy with, I anticipated a large final push. You see, I had done nothing towards making the application into a Progressive Web Application. Turns out, this was actually the easiest part of the whole process.
Making A Progressive Web Application
The good news is that when it comes to turning a little JavaScript-powered app into a ‘Progressive Web App’ there are heaps of tools to make life easy. If you cast your mind back to part one of this series, you’ll remember that to be a Progressive Web App means meeting a set of criteria.
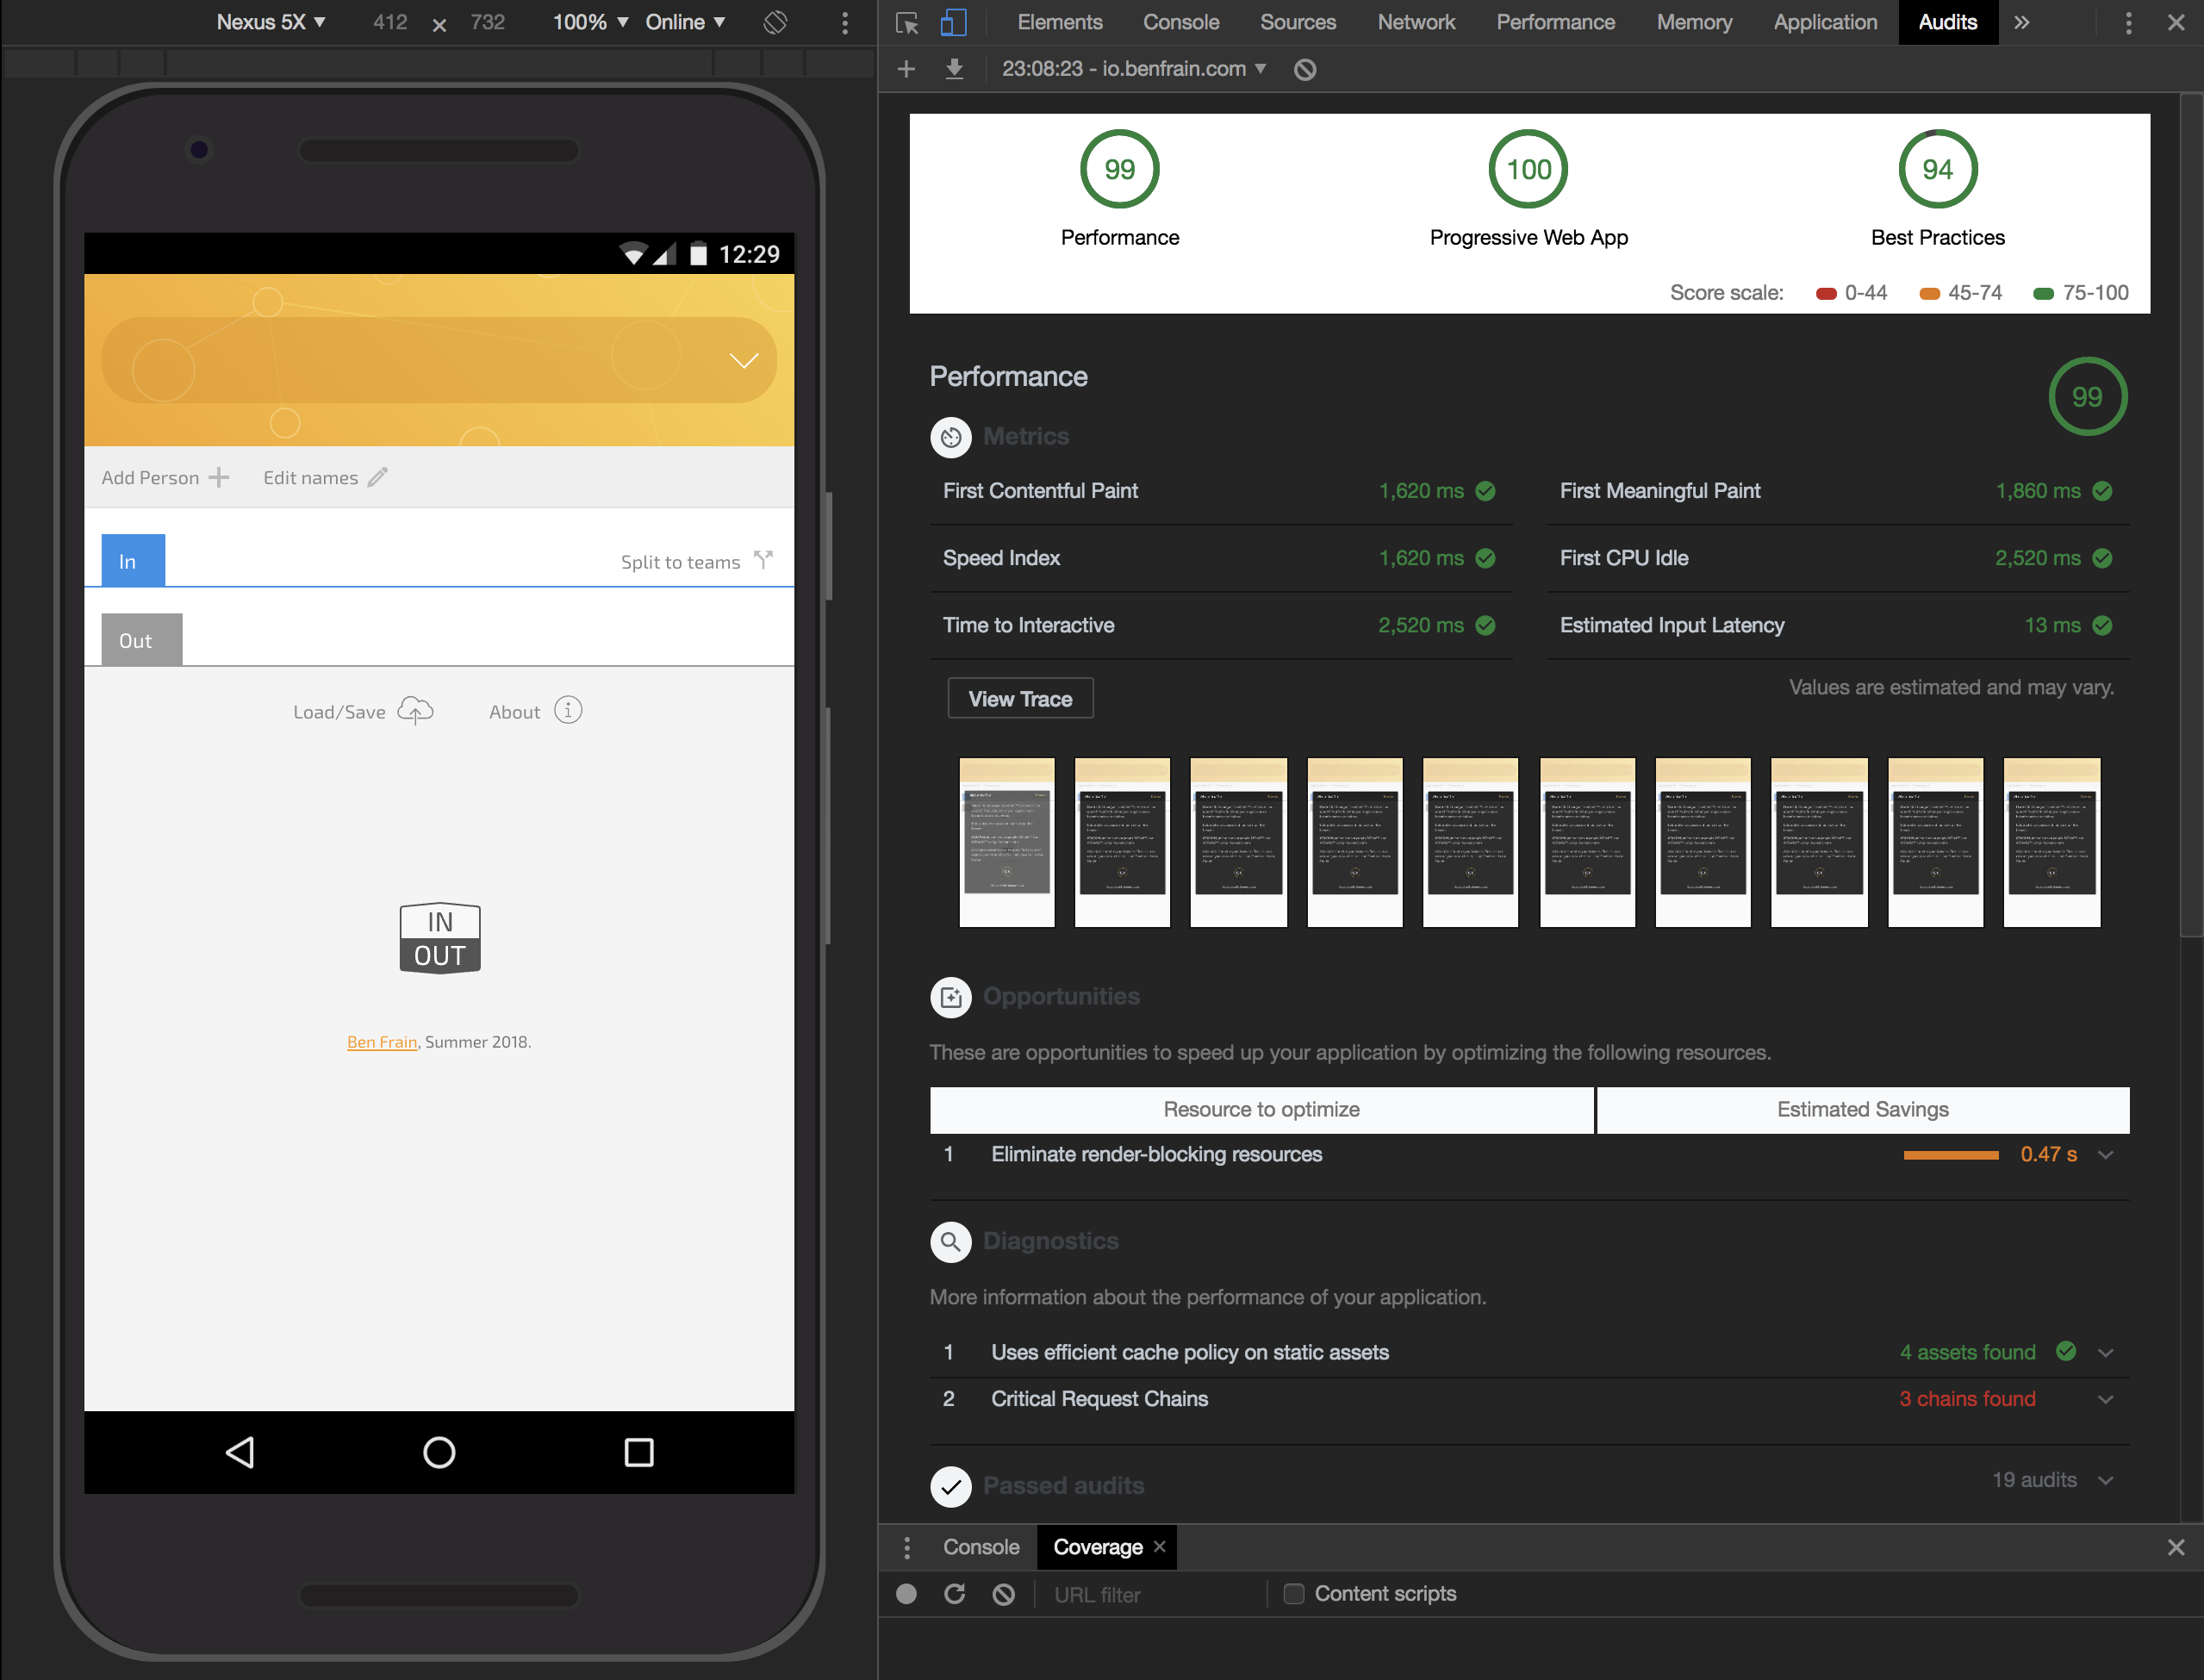
To get a handle on how your web-application measures up, your first stop should probably be the Lighthouse tools of Google Chrome. You can find the Progressive Web App audit under the ‘Audits’ tab.
This is what Lighthouse told me when I first ran In/Out through it.
Initial scores for Progressive Web App weren’t great. (Large preview)
At the outset In/Out was only getting a score of 55⁄100 for a Progressive Web App. However, I took it from there to 100⁄100 in well under an hour!
The expediency in improving that score was little to do with my ability. It was simply because Lighthouse told me exactly what was needed to be done!
Some examples of requisite steps: include a manifest.json file (essentially a JSON file providing metadata about the app), add a whole slew of meta tags in the head, switch out images that were inlined in the CSS for standard URL referenced images, and add a bunch of home screen images.
Making a number of home screen images, creating a manifest file and adding a bunch of meta tags might seem like a lot to do in under an hour but there are wonderful web applications to help you build web applications. How nice is that! I used https://app-manifest.firebaseapp.com. Feed it some data about your application and your logo, hit submit and it furnishes you with a zip file containing everything you need! From there on, it’s just copy-and-paste time.
Things I'd put off for some time due to lack of knowledge, like a Service Worker, were also added fairly easily thanks to numerous blog posts and sites dedicated to service workers like https://serviceworke.rs. With a service worker in place it meant the app could work offline, a requisite feature of a Progressive Web Application.
Whilst not strictly related to making the application a PWA, the 'coverage' tab of the Chrome Dev Tools were also very useful. After so much sporadic iteration on the design and code over months, it was useful to get a clear indication of where there was redundant code. I found a few old functions littering the codebase that I'd simply forgotten about!
In short order, having worked through the Lighthouse audit recommendations I felt like the teacher’s pet:
Lighthouse makes it easy to get good scores by telling you exactly what to change. (Large preview)
The reality is that taking the application and making it a Progressive Web Application was actually incredibly straightforward.
With that final piece of development concluded I uploaded the little application to a sub-domain of my website and that was it.
Retrospective
Months have passed since parking up development my little web application.
I’ve used the application casually in the months since. The reality is much of the team sports organization I do still happens via text message. The application is, however, definitely easier than writing down who is in and out than finding a scrap of paper every game night.
So, the truth is that it’s hardly an indispensable service. Nor does it set any bars for development or design. I couldn’t tell you I’m 100% happy with it either. I just got to a point I was happy to abandon it.
But that was never the point of the exercise. I took a lot from the experience. What follows are what I consider the most important takeaways.
Design Is Development
At the outset, I didn’t value design enough. I started this project believing that my time spent sketching with a pad and pen or in the Sketch application, was time that could be better spent with coding. However, it turns that when I went straight to code, I was often just being a busy fool. Exploring concepts first at the lowest possible fidelity, saved far more time in the long run.
There were numerous occasions at the beginning where hours were spent getting something working in code only to realize that it was fundamentally flawed from a user experience point of view.
My opinion now is that paper and pencil are the finest planning, design and coding tools. Every significant problem faced was principally solved with paper and a pencil; the text editor merely a means of executing the solution. Without something making sense on paper, it stands no chance of working in code.
The next thing I learned to appreciate, and I don’t know why it took so long to figure out, is that design is iterative. I’d sub-consciously bought into the myth of a Designer with a capital “D”. Someone flouncing around, holding their mechanical pencil up at straight edges, waxing lyrical about typefaces and sipping on a flat white (with soya milk, obviously) before casually birthing fully formed visual perfection into the world.
This, not unlike the notion of the ‘genius’ programmer, is a myth. If you’re new to design but trying your hand, I’d suggest you don’t get hung up on the first idea that piques your excitement. It’s so cheap to try variations so embrace that possibility. None of the things I like about the design of In/Out were there in the first designs.
I believe it was the novelist, Michael Crichton, who coined the maxim, “Books are not written — they’re rewritten”. Accept that every creative process is essentially the same. Be aware that trusting the process lessens the anxiety and practice will refine your aesthetic understanding and judgment.
You Are The Other Dev On Your Project
I’m not sure if this is particular to projects that only get worked on sporadically but I made the following foolhardy assumption:
“I don’t need to document any of this because it’s just me, and obviously I will understand it because I wrote it.”
Nothing could be further from the truth!
There were evenings when, for the 30 minutes I had to work on the project, I did nothing more than try to understand a function I had written six months ago. The main reasons code re-orientation took so long was a lack of quality comments and poorly named variables and function arguments.
I’m very diligent in commenting code in my day job, always conscientious that someone else might need to make sense of what I’m writing. However, in this instance, I was that someone else. Do you really think you will remember how the block of code works you wrote in six months time? You won’t. Trust me on this, take some time out and comment that thing up!
I’ve since read a blog post entitled, Your syntax highlighter is wrong on the subject of the importance of comments. The basic premise being that syntax highlighters shouldn’t fade out the comments, they should be the most important thing. I’m inclined to agree and if I don’t find a code editor theme soon that scratches that itch I may have to adapt one to that end myself!
Debugging
When you hit bugs and you have written all the code, it’s not unfair to suggest the error is likely originating between the keyboard and chair. However, before assuming that, I would suggest you test even your most basic assumptions. For example, I remember taking in excess of two hours to fix a problem I had assumed was due to my code; in iOS I just couldn’t get my input box to accept text entry. I don’t remember why it hadn’t stopped me before but I do remember my frustration with the issue.
Turns out it was due to a, still yet to be fixed, bug in Safari. Turns out that in Safari if you have:
* {
  user-select: none;
}
In your style sheet, input boxes won’t take any input. You can work around this with:
Which is the approach I take in my “App Reset” CSS reset. However, the really frustrating part of this was I had learned this already and subsequently forgotten it. When I finally got around to checking the WebKit bug tracking whilst troubleshooting the issue, I found I had written a workaround in the bug report thread more than a year ago complete with reduction!
Want To Build With Data? Learn JavaScript Array Methods
Perhaps the single biggest advance my JavaScript skills took by undergoing this app-building exercise was getting familiar with JavaScript Array methods. I now use them daily for all my iteration and data manipulation needs. I cannot emphasize enough how useful methods like map(), filter(), every(), findIndex(), find() and reduce() are. You can solve virtually any data problem with them. If you don’t already have them in your arsenal, bookmark https://developer.mozilla.org/en-US/docs/Web/JavaScript/Reference/Global_Objects/Array now and dig in as soon as you are able. My own run-down of my favored array methods is documented here.
ES6 has introduced other time savers for manipulating arrays, such as Set, Rest and Spread. Indulge me while I share one example; there used to be a bunch of faff if you wanted to remove duplicates from even a simple flat array. Not anymore.
Consider this simple example of an Array with the duplicate entry, “Mr Pink”:
Something that used to require hand-rolling a solution or reaching for a library is now baked into the language. Admittedly, on such as short Array that may not sound like such a big deal but imagine how much time that saves when looking at arrays with hundreds of entries and duplicates.
Maintenance And Security
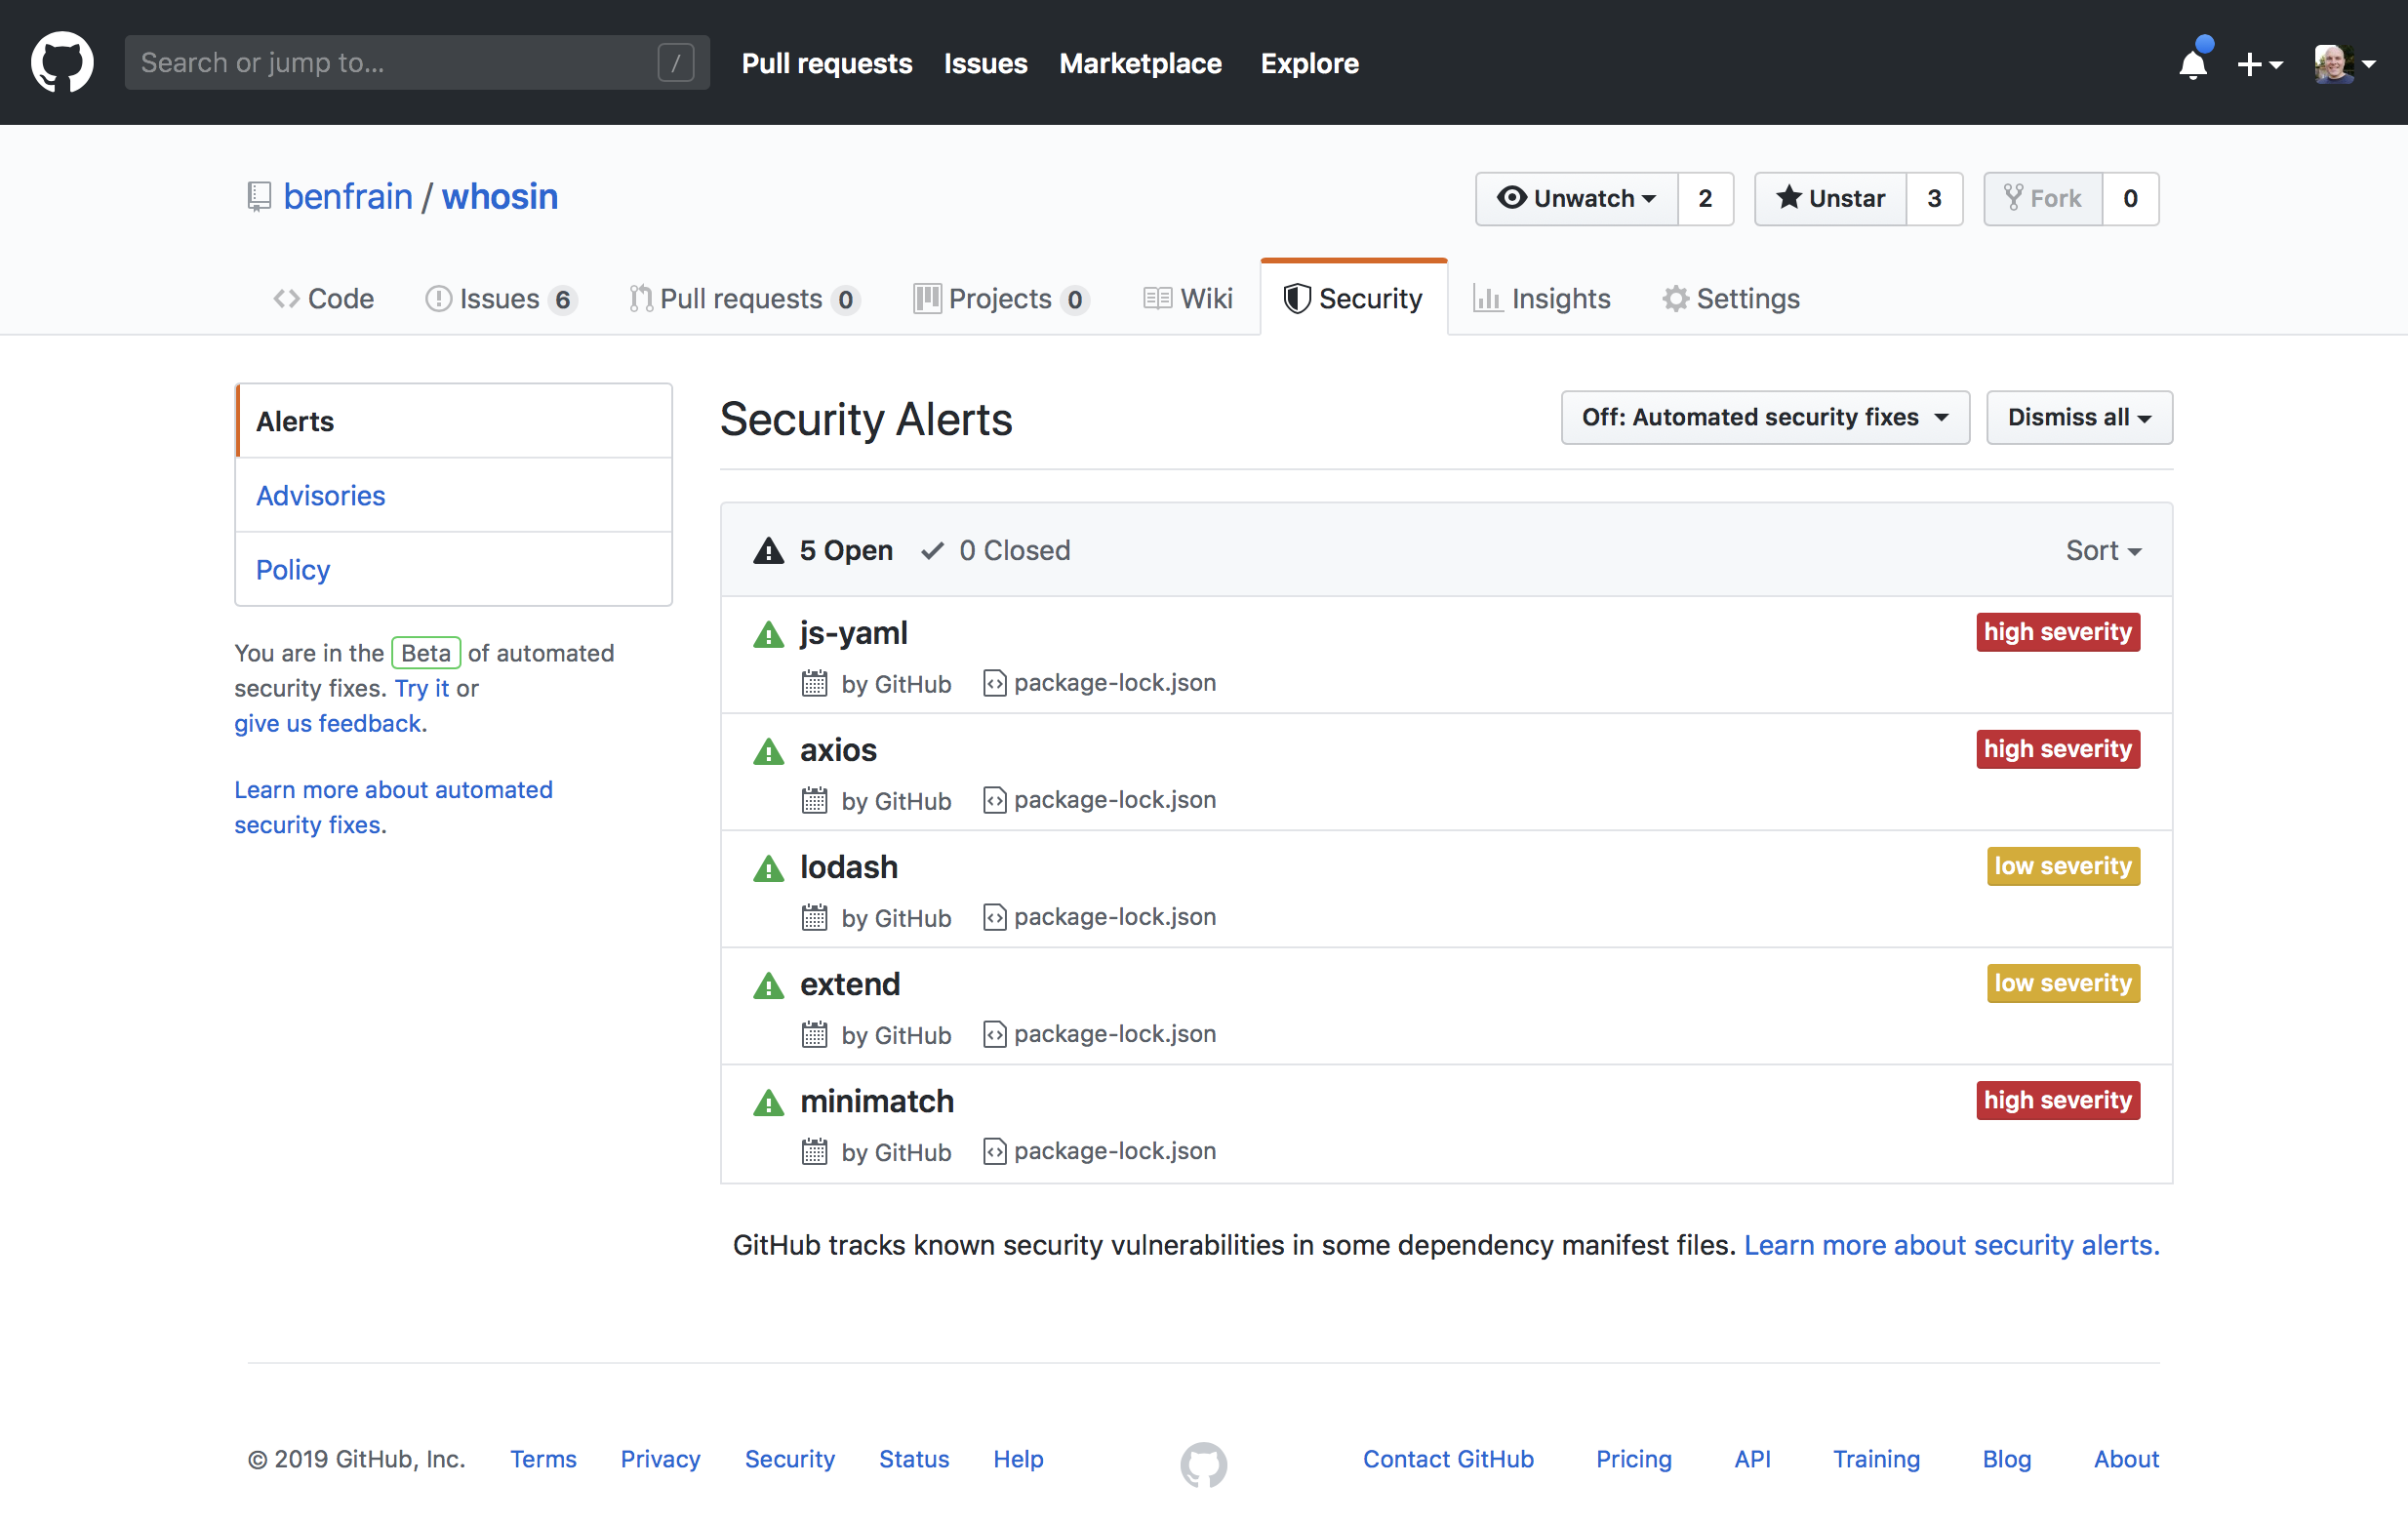
Anything you build that makes any use of NPM, even if just for build tools, carries the possibility of being vulnerable to security issues. GitHub does a good job of keeping you aware of potential problems but there is still some burden of maintenance.
For something that is a mere side-project, this can be a bit of a pain in the months and years that follow active development.
The reality is that every time you update dependencies to fix a security issue, you introduce the possibility of breaking your build.
And by June 2019, I was getting these warnings from GitHub:
Keeping dependencies listed on GitHub means infrequent security warnings. (Large preview)
None were related to plugins I was using directly, they were all sub-dependencies of the build tools I had used. Such is the double-edged sword of JavaScript packages. In terms of the app itself, there was no problem with In/Out; that wasn’t using any of the project dependencies. But as the code was on GitHub, I felt duty-bound to try and fix things up.
It’s possible to update packages manually, with a few choice changes to the package.json. However, both Yarn and NPM have their own update commands. I opted to run yarn upgrade-interactive which gives you a simple means to update things from the terminal.
Yarn makes upgrading project dependencies a little more predicatble. (Large preview)
Seems easy enough, there’s even a little colored key to tell you which updates are most important.
You can add the --latest flag to update to the very latest major version of the dependencies, rather than just the latest patched version. In for a penny…
Trouble is, things move fast in the JavaScript package world, so updating a few packages to the latest version and then attempting a build resulted in this:
As such, I rolled back my package.json file and tried again this time without the --latest flag. That solved my security issues. Not the most fun I’ve had on a Monday evening though I’ll be honest.
That touches on an important part of any side project. Being realistic with your expectations.
Side Projects
I don’t know if you are the same but I’ve found that a giddy optimism and excitement makes me start projects and if anything does, embarrassment and guilt makes me finish them.
It would be a lie to say the experience of making this tiny application in my spare time was fun-filled. There were occasions I wish I’d never opened my mouth about it to anyone. But now it is done I am 100% convinced it was worth the time invested.
That said, it’s possible to mitigate frustration with such a side project by being realistic about how long it will take to understand and solve the problems you face. Only have 30 mins a night, a few nights a week? You can still complete a side project; just don’t be disgruntled if your pace feels glacial. If things can’t enjoy your full attention be prepared for a slower and steadier pace than you are perhaps used to. That’s true, whether it’s coding, completing a course, learning to juggle or writing a series of articles of why it took so long to write a small web application!
Simple Goal Setting
You don’t need a fancy process for goal setting. But it might help to break things down into small/short tasks. Things as simple as ‘write CSS for drop-down menu’ are perfectly achievable in a limited space of time. Whereas ‘research and implement a design pattern for state management’ is probably not. Break things down. Then, just like Lego, the tiny pieces go together.
Thinking about this process as chipping away at the larger problem, I’m reminded of the famous Bill Gates quote:
“Most people overestimate what they can do in one year and underestimate what they can do in ten years.”
Shipping Something Is Better Than Shipping Nothing
Before ‘shipping’ this web application, I reviewed the code and was thoroughly disheartened.
Although I had set out on this journey from a point of complete naivety and inexperience, I had made some decent choices when it came to how I might architect (if you’ll forgive so grand a term) the code. I’d researched and implemented a design pattern and enjoyed everything that pattern had to offer. Sadly, as I got more desperate to conclude the project, I failed to maintain discipline. The code as it stands is a real hodge-bodge of approaches and rife with inefficiencies.
In the months since I’ve come to realize that those shortcomings don’t really matter. Not really.
I’m a fan of this quote from Helmuth von Moltke.
“No plan of operations extends with any certainty beyond the first contact with the main hostile force.”
That’s been paraphrased as:
“No plan survives first contact with the enemy”.
Perhaps we can boil it down further and simply go with “shit happens”?
I can surmise my coming to terms with what shipped via the following analogy.
If a friend announced they were going to try and run their first marathon, them getting over the finish line would be all that mattered — I wouldn’t be berating them on their finishing time.
I didn’t set out to write the best web application. The remit I set myself was simply to design and make one.
More specifically, from a development perspective, I wanted to learn the fundamentals of how a web application was constructed. From a design point of view, I wanted to try and work through some (albeit simple) design problems for myself. Making this little application met those challenges and then some. The JavaScript for the entire application was just 5KB (gzipped). A small file size I would struggle to get to with any framework. Except maybe Svelte.
If you are setting yourself a challenge of this nature, and expect at some point to ‘ship’ something, write down at the outset why you are doing it. Keep those reasons at the forefront of your mind and be guided by them. Everything is ultimately some sort of compromise. Don’t let lofty ideals paralyze you from finishing what you set out to do.
Summary
Overall, as it comes up to a year since I have worked on In/Out, my feelings fall broadly into three areas: things I regretted, things I would like to improve/fix and future possibilities.
Things I Regretted
As already alluded to, I was disappointed I hadn’t stuck to what I considered a more elegant method of changing state for the application and rendering it to the DOM. The observer pattern, as discussed in the second part of this series, which solved so many problems in a predictable manner was ultimately cast aside as ‘shipping’ the project became a priority.
I was embarrassed by my code at first but in the following months, I have grown more philosophical. If I hadn’t used more pedestrian techniques later on, there is a very real possibility the project would never have concluded. Getting something out into the world that needs improving still feels better than it never being birthed into the world at all.
Improving In/Out
Beyond choosing semantic markup, I’d made no affordances for accessibility. When I built In/Out I was confident with standard web page accessibility but not sufficiently knowledgeable to tackle an application. I’ve done far more work/research in that area now, so I’d enjoy taking the time to do a decent job of making this application more accessible.
The implementation of the revised design of ‘Add Person’ functionality was rushed. It’s not a disaster, just a bit rougher than I would like. It would be nice to make that slicker.
I also made no consideration for larger screens. It would be interesting to consider the design challenges of making it work at larger sizes, beyond simply making it a tube of content.
Possibilities
Using localStorage worked for my simplistic needs but it would be nice to have a ‘proper’ data store so it wasn’t necessary to worry about backing up the data. Adding log-in capability would also open up the possibility of sharing the game organization with another individual. Or maybe every player could just mark whether they were playing themselves? It’s amazing how many avenues to explore you can envisage from such simple and humble beginnings.
SwiftUI for iOS app development is also intriguing. For someone who has only ever worked with web languages, at first glance, SwiftUI looks like something I’m now emboldened to try. I’d likely try rebuilding In/Out with SwiftUI — just to have something specific to build and compare the development experience and results.
And so, it’s time to wrap things up and give you the TL;DR version of all this.
If you want to learn how something works on the web, I’d suggest skipping the abstractions. Ditch the frameworks, whether that’s CSS or JavaScript until you really understand what they are dong for you.
Design is iterative, embrace that process.
Solve problems in the lowest fidelity medium at your disposal. Don’t go to code if you can test the idea in Sketch. Don’t draw it in Sketch if you can use pen and paper. Write out logic first. Then write it in code.
Be realistic but never despondent. Developing a habit of chipping away at something for as little as 30 minutes a day can get results. That fact is true whatever form your quest takes.
Choosing the right eCommerce platform for selling WordPress plugins and themes can be a difficult decision. There are quite a few platforms available for WordPress businesses to sell their products, and each one has different features that can have a big impact on conversion rates and your bottom line. Making the right decision requires a fair amount of research and comparison of the different platforms available.
Do you want to embed PDF, spreadsheet, and other types of documents in your WordPress blog posts?
WordPress comes with a powerful content editor and allows you to easily embed videos, tweets, audio, and other media formats using the embed blocks.
You can also upload other type of files that users can download. However, it is not possible to embed files like PDF, spreadsheet, and other documents in your blog posts.
In this article, we’ll show you how to embed PDF, spreadsheet, powerpoint, and other documents in your WordPress blog posts.
To help you navigate this guide, we have created the table of contents here.
By default, WordPress doesn’t offer full embed option for PDF documents; however, you can add them as links in your blog posts.
This option is useful if you don’t want to add a plugin to your website.
Simply add the File block to your WordPress post or page and then upload your PDF file.
Once you have uploaded the PDF file, WordPress will display the file name with a download button. You can edit the file name and download button text.
You also have the option to show or hide the download button and choose whether it links to the file itself or the attachment page.
You can use this method to upload Microsoft Word documents, Excel spreadsheets, and PowerPoint presentations to your website.
While this method is easier and straight-forward, it does not embed the documents which means users have to download the file to view it, and this may not be very user friendly depending on the use-case.
Let’s take a look at some other ways to embed documents in WordPress.
Embedding PDF in WordPress Posts Using Embed PDF Viewer Plugin
As shown above, displaying the PDF files as links will lead your website visitors away from your site.
In this method, we will cover how to easily embed the document in your WordPress posts and pages.
Once the plugin is activated, simply create a new post or edit an existing one to embed a PDF document.
In the WordPress post edit screen, click on the Add New Block icon, and select the PDF block under Embeds section.
After that, you can upload a new PDF file to your post, select one from your media library or insert from URL.
Once you select the file, you can see the PDF file embedded in your blog post. You can also resize the embed area and add additional CSS from the block options on the left side.
Once you’re done with customization, simply save your post and preview it on your live website. Here’s how it appeared on our demo website.
Embedding Microsoft Word, Spreadsheet, and Other Documents in WordPress
The plugin mentioned above only lets you embed PDF files into your WordPress site.
If you want to embed more document types like Microsoft Word, Excel spreadsheet, PowerPoint presentation, etc, then you need to use another plugin.
First, you need to install and activate the Embed Any Document plugin on your website.
Next, create a new post or open an existing one to embed a document. Once done, add the Document block under the Embeds section.
After that, you need to click on the Add Document button.
Next, you can upload a document or add from a URL. The paid plugin users can also attach documents from Google Drive, Dropbox, and Box.
Once you choose the document to embed, you will see the options to customize the embed. You need to review them and click the Insert button.
Once done, you can see the document embedded in your post. You can also review the document display options again from the block options panel on the left side.
Save your post and preview it on your live website. Here’s how the embedded spreadsheet looked on our demo website.
Embedding SlideShare Presentations in WordPress Posts
Unlike PDF and other documents, WordPress allows you to easily embed content from third-party services into your website.
It has built-in embed options for YouTube videos, Tweets, Facebook updates, SlideShare presentations, and many more.
To embed a SlideShare presentation in your WordPress blog post, create a new post, or edit an existing one. Next, click on the Add New Block icon and add the SlideShare block in your post edit area.
Next, you need to visit the SlideShare website and copy the link of a SlideShare presentation that you want to embed.
Once done, paste the link in the embed SlideShare block and click on the Embed button.
After that, you can see the SlideShare presentation embedded in your blog post. You can review the block options on the left side, and save your post.
Once done, you can preview the embedded SlideShare presentation live on your website. Here’s how it looked on our demo website.
How to Embed Google Docs, Sheets, and Others in WordPress
In the above examples, we have covered how to add PDF and other documents from your local computer. However many users nowadays use Google Drive to create and store documents (specially small business owners).
Similar to Microsoft Word, Excel Sheets, and PowerPoint presentations, Google Drive also lets you create Docs, Sheets, Presentations, and other online documents.
If you have created documents in Google Drive, then you can easily embed these files in your WordPress posts by using the iFrame method.
To embed a Google doc in WordPress, you need to open the document in your browser first. After that, go to the File menu and click on the “Publish to the web” option.
After that, a new popup window will appear. You need to select the Embed option and then click on the Publish button.
Once done, it will provide you an iFrame embed code. Go ahead and copy the code.
Next, you need to create a new post or edit an existing one to embed the Google doc. In your post editor, add the Custom HTML block to insert the embed code.
Once the Custom HTML block is added in your post edit area, paste the embed code that you copied before.
You may need to add height and width parameters to the embed code. Simply add the parameters to the iframe code like this:


 Fast-paced companies or teams always have the same problem: they only have a finite amount of time with finite resources to get things done. No team can afford an inefficient workflow since it can break the whole organization system and result in severe damages. Many of the business owners spend massive payroll budget on expensive systems, team building sections, time management courses, etc. just to increase productivity among coworkers and ensure the timely delivery of the jobs.