You can find the source code in the companion
repository.
Welcome to a tutorial on Pyleri, a.k.a. the Python Left-Right Parser, a simple parsing tool used you need something more robust than a regular expression but less dense than a full-parser generator. In this tutorial, we are going to show you how to use the tool to quickly parse through your text files.
Why Learn Pyleri?
We chose Pyleri because of its ease of use and its overall effectiveness. It makes creating parsers easy. It can also quickly support features like auto-completion. In addition, the same grammar can also generate parsers for multiple languages: JavaScript, C, Python, Go and Java. It is also well-tested given that it was designed to be used with SiriDB, a highly-scalable and fast time-series database.
With new programming techniques come new problems and new patterns to solve them.
In functional programming, immutability is a must. As a consequence, whenever it is needed to modify the content of a data structure, a new instance with updated values is created. Depending on how complex the data structure is, creating a copy may be a verbose task.
In the video below, we take a closer look at how to change the default port number in Spring Boot applications using an application.properties file. Let's get started!
I initially set out to write this post because I was playing around with some reflection code and thought I found something interesting. Alas, that was definitely not the case. Instead, it was just a basic feature of Kotlin that I haven’t needed to use or focus on yet. Although this post didn’t turn out the way I wanted it to, I still think it is a nice little post to bring some clarity to this subject.
In Java, there is the concept of primitive types and their wrapped versions. Thanks to autoboxing and unboxing, types can be interchanged between their primitive and wrapped versions. In other words, in most situations, you can use a long instead of a Long or a Long instead of a long. If you didn’t notice where the capitals were in that last sentence, then I imagine it probably looked quite confusing. The wording in that sentence is also crucial. More specifically, the statement “in most situations.”
As a continuation of my previous article, I thought it would be nice to create a RESTful API into the information being maintained by the Quartz scheduler. This way, a client can make standard REST requests to handle the following functionality:
The Ultimate Guide To Building Scalable Web Scrapers With Scrapy
The Ultimate Guide To Building Scalable Web Scrapers With Scrapy
Daniel Ni
Web scraping is a way to grab data from websites without needing access to APIs or the website’s database. You only need access to the site’s data — as long as your browser can access the data, you will be able to scrape it.
Realistically, most of the time you could just go through a website manually and grab the data ‘by hand’ using copy and paste, but in a lot of cases that would take you many hours of manual work, which could end up costing you a lot more than the data is worth, especially if you’ve hired someone to do the task for you. Why hire someone to work at 1–2 minutes per query when you can get a program to perform a query automatically every few seconds?
For example, let’s say that you wish to compile a list of the Oscar winners for best picture, along with their director, starring actors, release date, and run time. Using Google, you can see there are several sites that will list these movies by name, and maybe some additional information, but generally you’ll have to follow through with links to capture all the information you want.
Obviously, it would be impractical and time-consuming to go through every link from 1927 through to today and manually try to find the information through each page. With web scraping, we just need to find a website with pages that have all this information, and then point our program in the right direction with the right instructions.
In this tutorial, we will use Wikipedia as our website as it contains all the information we need and then use Scrapy on Python as a tool to scrape our information.
A few caveats before we begin:
Data scraping involves increasing the server load for the site that you’re scraping, which means a higher cost for the companies hosting the site and a lower quality experience for other users of that site. The quality of the server that is running the website, the amount of data you’re trying to obtain, and the rate at which you’re sending requests to the server will moderate the effect you have on the server. Keeping this in mind, we need to make sure that we stick to a few rules.
Most sites also have a file called robots.txt in their main directory. This file sets out rules for what directories sites do not want scrapers to access. A website’s Terms & Conditions page will usually let you know what their policy on data scraping is. For example, IMDB’s conditions page has the following clause:
Robots and Screen Scraping: You may not use data mining, robots, screen scraping, or similar data gathering and extraction tools on this site, except with our express-written consent as noted below.
Before we try to obtain a website’s data we should always check out the website’s terms and robots.txt to make sure we are obtaining legal data. When building our scrapers, we also need to make sure that we do not overwhelm a server with requests that it can’t handle.
Luckily, many websites recognize the need for users to obtain data, and they make the data available through APIs. If these are available, it’s usually a much easier experience to obtain data through the API than through scraping.
Wikipedia allows data scraping, as long as the bots aren’t going ‘way too fast’, as specified in their robots.txt. They also provide downloadable datasets so people can process the data on their own machines. If we go too fast, the servers will automatically block our IP, so we’ll implement timers in order to keep within their rules.
Getting Started, Installing Relevant Libraries Using Pip
Overview Of Scrapy, How The Pieces Fit Together, Parsers, Spiders, Etc
You will be writing a script called a ‘Spider’ for Scrapy to run, but don’t worry, Scrapy spiders aren’t scary at all despite their name. The only similarity Scrapy spiders and real spiders have are that they like to crawl on the web.
Inside the spider is a class that you define that tells Scrapy what to do. For example, where to start crawling, the types of requests it makes, how to follow links on pages, and how it parses data. You can even add custom functions to process data as well, before outputting back into a file.
Writing Your First Spider, Write A Simple Spider To Allow For Hands-on Learning
To start our first spider, we need to first create a Scrapy project. To do this, enter this into your command line:
scrapy startproject oscars
This will create a folder with your project.
We’ll start with a basic spider. The following code is to be entered into a python script. Open a new python script in /oscars/spiders and name it oscars_spider.py
We’ll import Scrapy.
import scrapy
We then start defining our Spider class. First, we set the name and then the domains that the spider is allowed to scrape. Finally, we tell the spider where to start scraping from.
class OscarsSpider(scrapy.Spider):
   name = "oscars"
   allowed_domains = ["en.wikipedia.org"]
   start_urls = ['https://en.wikipedia.org/wiki/Academy_Award_for_Best_Picture']
Next, we need a function which will capture the information that we want. For now, we’ll just grab the page title. We use CSS to find the tag which carries the title text, and then we extract it. Finally, we return the information back to Scrapy to be logged or written to a file.
def parse(self, response):
   data = {}
   data['title'] = response.css('title::text').extract()
   yield data
Now save the code in /oscars/spiders/oscars_spider.py
To run this spider, simply go to your command line and type:
This will basically open the page that you’ve directed it to and it will let you run single lines of code. For example, you can view the raw HTML of the page by typing in:
print(response.text)
Or open the page in your default browser by typing in:
view(response)
Our goal here is to find the code that contains the information that we want. For now, let’s try to grab the movie title names only.
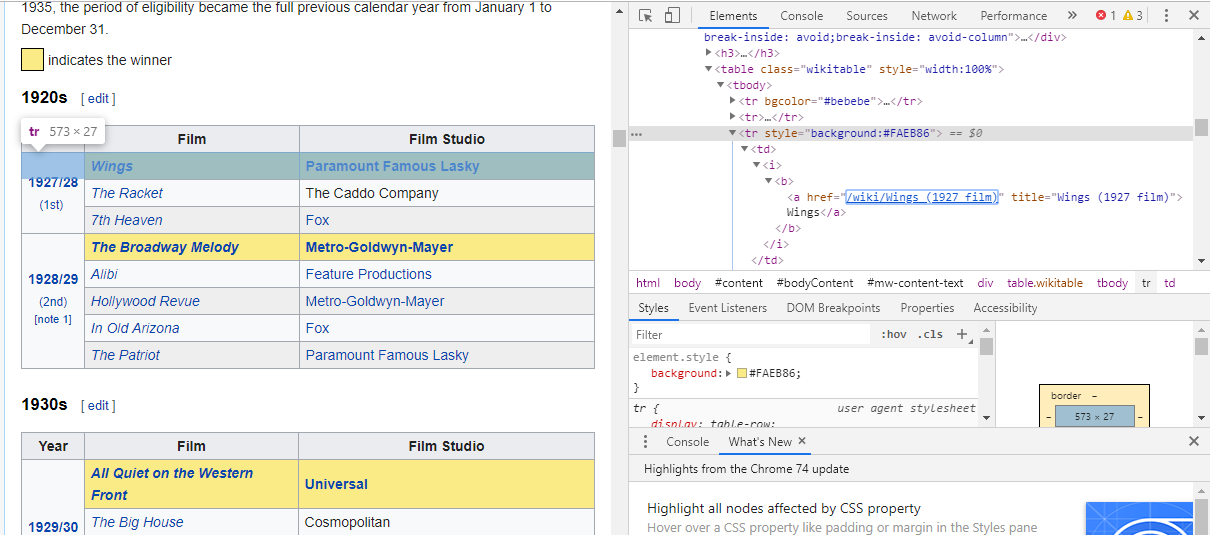
The easiest way to find the code we need is by opening the page in our browser and inspecting the code. In this example, I am using Chrome DevTools. Just right-click on any movie title and select ‘inspect’:
As you can see, the Oscar winners have a yellow background while the nominees have a plain background. There’s also a link to the article about the movie title, and the links for movies end in film). Now that we know this, we can use a CSS selector to grab the data. In the Scrapy shell, type in:
Going back to our main goal, we want a list of the Oscar winners for best picture, along with their director, starring actors, release date, and run time. To do this, we need Scrapy to grab data from each of those movie pages.
We’ll have to rewrite a few things and add a new function, but don’t worry, it’s pretty straightforward.
We’ll start by initiating the scraper the same way as before.
import scrapy, time

class OscarsSpider(scrapy.Spider):
   name = "oscars"
   allowed_domains = ["en.wikipedia.org"]
   start_urls = ["https://en.wikipedia.org/wiki/Academy_Award_for_Best_Picture"]
But this time, two things will change. First, we’ll import time along with scrapy because we want to create a timer to restrict how fast the bot scrapes. Also, when we parse the pages the first time, we want to only get a list of the links to each title, so we can grab information off those pages instead.
def parse(self, response):
   for href in response.css(r"tr[style='background:#FAEB86'] a[href*='film)']::attr(href)").extract():
       url = response.urljoin(href)
       print(url)
       req = scrapy.Request(url, callback=self.parse_titles)
       time.sleep(5)
       yield req
Here we make a loop to look for every link on the page that ends in film) with the yellow background in it and then we join those links together into a list of URLs, which we will send to the function parse_titles to pass further. We also slip in a timer for it to only request pages every 5 seconds. Remember, we can use the Scrapy shell to test our response.css fields to make sure we’re getting the correct data!
def parse_titles(self, response):
   for sel in response.css('html').extract():
       data = {}
       data['title'] = response.css(r"h1[id='firstHeading'] i::text").extract()
       data['director'] = response.css(r"tr:contains('Directed by') a[href*='/wiki/']::text").extract()
       data['starring'] = response.css(r"tr:contains('Starring') a[href*='/wiki/']::text").extract()
       data['releasedate'] = response.css(r"tr:contains('Release date') li::text").extract()
       data['runtime'] = response.css(r"tr:contains('Running time') td::text").extract()
   yield data
The real work gets done in our parse_data function, where we create a dictionary called data and then fill each key with the information we want. Again, all these selectors were found using Chrome DevTools as demonstrated before and then tested with the Scrapy shell.
The final line returns the data dictionary back to Scrapy to store.
Complete code:
import scrapy, time

class OscarsSpider(scrapy.Spider):
   name = "oscars"
   allowed_domains = ["en.wikipedia.org"]
   start_urls = ["https://en.wikipedia.org/wiki/Academy_Award_for_Best_Picture"]

   def parse(self, response):
       for href in response.css(r"tr[style='background:#FAEB86'] a[href*='film)']::attr(href)").extract():
           url = response.urljoin(href)
           print(url)
           req = scrapy.Request(url, callback=self.parse_titles)
           time.sleep(5)
           yield req

   def parse_titles(self, response):
       for sel in response.css('html').extract():
           data = {}
           data['title'] = response.css(r"h1[id='firstHeading'] i::text").extract()
           data['director'] = response.css(r"tr:contains('Directed by') a[href*='/wiki/']::text").extract()
           data['starring'] = response.css(r"tr:contains('Starring') a[href*='/wiki/']::text").extract()
           data['releasedate'] = response.css(r"tr:contains('Release date') li::text").extract()
           data['runtime'] = response.css(r"tr:contains('Running time') td::text").extract()
       yield data
Sometimes we will want to use proxies as websites will try to block our attempts at scraping.
To do this, we only need to change a few things. Using our example, in our def parse(), we need to change it to the following:
This will route the requests through your proxy server.
Deployment And Logging, Show How To Actually Manage A Spider In Production
Now it is time to run our spider. To make Scrapy start scraping and then output to a CSV file, enter the following into your command prompt:
scrapy crawl oscars -o oscars.csv
You will see a large output, and after a couple of minutes, it will complete and you will have a CSV file sitting in your project folder.
Compiling Results, Show How To Use The Results Compiled In The Previous Steps
When you open the CSV file, you will see all the information we wanted (sorted out by columns with headings). It’s really that simple.
Oscar winning movies list and information. (Large preview)
With data scraping, we can obtain almost any custom dataset that we want, as long as the information is publicly available. What you want to do with this data is up to you. This skill is extremely useful for doing market research, keeping information on a website updated, and many other things.
It’s fairly easy to set up your own web scraper to obtain custom datasets on your own, however, always remember that there might be other ways to obtain the data that you need. Businesses invest a lot into providing the data that you want, so it’s only fair that we respect their terms and conditions.
Additional Resources For Learning More About Scrapy And Web Scraping In General
Are you looking for the best WordPress popup plugin?
A good WordPress popup plugin helps you convert website visitors into email subscribers and paying customers.
There are dozens of WordPress popup plugins that can help you improve conversion rates. However, most of them will either slow down your website, offer inaccurate statistics, or worse.
In this article, we will compare the most popular WordPress popup plugins on the market so you can see which is the best option for your website.
Things to Watch Out For With WordPress Popup Plugins
The main purpose of using popup plugins for WordPress is to help you capture leads and boost your email list subscribers.
However, popups need to be used carefully. Poorly made WordPress popups can easily become annoying and ruin the user experience along with your brand’s reputation.
You need to pick a solution that offers proper behavior interaction, targeting, and personalization features so that you can offer the best user experience while ensuring maximum conversions.
Performance is another issue with most WordPress popup plugins. Since many popup plugins use WordPress to track analytics, this significantly increases the server load and slows down your website.
As you already know, a slow page speed negatively affects your SEO rankings.
This is why you need a WordPress popup plugin that offers powerful conversion features without slowing down your WordPress website.
Last but not least, you need to ensure that the WordPress popup plugin you choose actually works with your WordPress hosting environment.
Many popup plugins are poorly coded, so their advanced features, like A/B testing and reporting, will not work with the most advanced caching solutions that many hosting companies are now using.
Contenders for the Best WordPress Popup Plugins
Now that you know the common problems with most WordPress popup builders, you can use this information to evaluate all popular WordPress popup plugins.
Since there are dozens of popup plugins, this process can be rather time-consuming. That’s why we did the research for you.
Here are the best WordPress popup plugins that we will compare below:
OptinMonster is the most popular lead generation software on the market. It allows you to easily convert website visitors into subscribers and customers.
It comes with a powerful WordPress popup builder and the most comprehensive targeting and personalization features. Simply put, it allows you to maximize your conversion potential like a marketing pro.
Features
OptinMonster offers the most powerful set of targeting and personalization features in the market. They allow you to create different campaigns, including popups, fullscreen welcome mats, floating bars, scroll boxes, and so on.
Their targeting features allow you to target users by the page they are visiting, activity on your site, geo-location, and dozens more.
You can create your own rules to display a popup, making them more personalized and highly effective.
Below are some of OptinMonster’s most notable features:
Exit-intent popups that are displayed when a user is about to leave your site
Powerful targeting options with page level, geo-targeting, on-site retargeting, device-based targeting, and more.
Adblock detection to display targeted messages to users
Device targeting with mobile-friendly campaigns that look good on smaller devices
Trigger popups with exit intent, scrolling, inactivity sensors, time-based triggers, and more
Dozens of ready-made beautiful popup templates
Drag and drop popup maker to easily create popups with your own images, fonts, and style
Multiple campaign types include inline/after-post optins, a floating notification bar, countdown timers, a fullscreen welcome mat, coupon wheel popups, and more.
Monster-links popups which trigger a popup by clicking on a link
MonsterEffects™ technology to make your popups stand out with CSS animations and sound effects
Yes/No popups, two-step popups, and success message customization
Looking at all the features, we can confidently say that it is the most comprehensive WordPress popup builder on the market. It has all you will need to grow your email list and instantly boost conversions.
The biggest advantage of using OptinMonster is its performance. It is a SaaS application that does not use your WordPress hosting resources.
It loads asynchronously and does not slow down your perceived page load speed. This is crucial not just for user experience but also for SEO.
Lastly, since OptinMonster doesn’t use WordPress to store analytics, your stats will be the most accurate, and it will work with any hosting environment.
Ease of Use
OptinMonster comes with an intuitive drag-and-drop builder. You can simply design your own popups by adding a background, choosing colors, images, and fonts, with your text and sign-up form.
However, if you don’t want to do that, you will find beautiful, ready-made popup templates. Each template is fully customizable using a simple point-and-click editor.
Adding popups to your website is also very easy. You don’t need to edit any WordPress files or add code to your website. You can simply install their WordPress connector plugin.
Pricing: Starting from $9 per month (billed annually).
Disclosure: OptinMonster is the popup plugin that we use on WPBeginner. Many popular bloggers and businesses use OptinMonster, including Social Media Examiner, Michael Hyatt, NBA, and more.
WPBeginner’s founder, Syed Balkhi, is the co-founder of OptinMonster. He had this plugin built to help us get more email subscribers. Now, he serves as an advisor to the company.
TrustPulse is a WordPress popup plugin that uses social proof to help you boost conversions on your website.
It shows social-proof notifications on your website to help build user trust, trigger the FOMO (fear of missing out) effect, and encourage more users to sign up or make a purchase.
Features
TrustPulse helps you instantly win user trust by sharing social proof using less intrusive but highly effective popups.
Here are some of the features that make it unique among our list of best WordPress popup plugins.
It uses urgency and social proof to trigger the FOMO effect (fear of missing out). This encourages users to sign up or complete a purchase.
It has real-time tracking and popups to show purchases, activity, and signups.
TrustPulse uses smart targeting to show social proof popups to the right users at the right time.
Use the default design or make it your own with easy customization options.
Performance
If you run an eCommerce business, then speed is crucial for more sales on your website. TrustPulse does not affect your page load speed and improves the user experience at the same time.
It is a SaaS app and does not use your WordPress hosting resources. All the code used to display popups loads asynchronously from the cloud servers.
Ease of Use
TrustPulse comes with an insanely easy setup process. The default social proof popup works with very few modifications.
It has an easy-to-use interface, which allows you to customize popups, set up targeting, view stats, and run customized campaigns on your online store.
Pricing: Free 500 sessions per month, and then pricing starts from $5 per month (billed annually).
Thrive Leads is another popular popup plugin for WordPress, used by over 114,000+ website owners. It comes with beautiful popup templates and an easy-to-use popup builder.
There are also advanced targeting features that allow you to show more personalized offers to visitors based on posts, categories, tags, and more.
Features
Thrive Leads is designed to help you capture leads on your WordPress site and grow your email list. Here is a quick overview of its features:
Multiple optin types, including lightbox popup, inline forms, 2-step optin, slide-in forms, content lock, scroll mat, screen filler overlay, and more
Simple drag-and-drop editor to customize sign-up forms
Multiple trigger options for displaying popups, including exit, time, scroll, and click
Page-level targeting, including categories, tags, post types, and more
Hide popups or show different offers to your existing subscribers
Works with all popular email services
Mobile-friendly popups for small devices
Performance
Thrive Leads does try to balance out performance and features. However, it is still a bit slower than other solutions like OptinMonster.
It is a standalone WordPress plugin, which means all the code resides on your WordPress site and utilizes your hosting resources.
This means that features like reporting and A/B tests may not work properly on certain hosting companies or with popular caching plugins.
Ease of Use
Thrive Leads is pretty straightforward to use and comes with multiple templates. It also comes with a basic popup maker with drag-and-drop functionality to customize your popup form.
There is a slight learning curve involved in displaying optins on your website. Many beginners would struggle a bit when setting up a popup.
You’ll see different options for Lead Groups, Lead Shortcodes, Thrive Boxes, and other features without much explanation. This means users will have to explore them to learn what they do.
Pricing: Starting from $99 per year for a single site license.
Available as a standalone WordPress plugin, Bloom provides an easy-to-use WordPress popup maker for bloggers.
Features
Bloom comes with a decent set of features covering the basic requirements you would need from a good WordPress popup plugin. These include:
Automatic lightbox popup
Multiple optin types, including sidebar, slide-in, and below post signup forms.
Basic post or page-level targeting
Basic time delay, form submission, and scroll triggers
Pre-built popup templates with easy customization
Integrates with popular email service providers
Performance
Bloom comes as a stand-alone WordPress plugin, which means it loads all the code from your WordPress site. It uses your server resources and could affect your page load time.
It tries to mitigate this by optimizing the code and using WordPress best practices. However, if you have a busy site with limited server resources, then this will slow down website performance.
Based on your WordPress caching plugin settings, reporting stats and features like A/B testing might misbehave.
Ease of Use
Bloom is extremely easy to use with a simple drag-and-drop popup maker. Creating new email optins with Bloom is straightforward, and the user interface is quite easy to figure out.
The trouble comes in when you are configuring display settings. There are too many options to choose from, which makes the user interface a bit confusing.
Includes basic A/B testing and stats for your forms
The free version is limited in features and adds Sumo branding to your popups.
Performance
Sumo loads code asynchronously, which reduces the impact on performance. Depending on your campaign design, the effect on performance may vary.
Ease of Use
Sumo integrates with your WordPress site. However, you will need to manage your account from their website and use the Sumo dashboard to design your campaigns.
It comes with a bit of a learning curve. The campaign builder is not the easiest, but you’ll find your way around it. We found it a bit harder to use, particularly when it came to integrations and targeting.
Pricing: Sumo offers a forever-free plan. There’s also a premium plan that costs $39 per month.
Create unlimited popups and receive unlimited responses.
Performance
When a popup is triggered, UserFeedback loads a very small script asynchronously to ensure maximum speed. So, this plugin will not slow down your WordPress site.
Ease of Use
UserFeedback is very easy to set up and use. Simply install the plugin, and you’ll be up and running in minutes.
To create a popup feedback form, you can choose a pre-made template from the library or create your own popup from scratch. All you have to do is point-and-click to add questions and form fields to your popup.
You can also easily configure settings like display timing, device targeting, display length, survey run time, and more.
Pricing: UserFeedback starts at $49.50 per year. There’s also a free version of UserFeedback that you can get started with.
Performance Comparison of Top WordPress Popup Plugins
For this article, we decided to actually try each WordPress popup plugin and test the impact on a website’s performance and speed.
Basically, we created a demo website and used the default settings of each plugin to create a basic WordPress popup. After that, we used Pingdom to test the page load speed.
In our results, we found OptinMonster to be the fastest WordPress popup plugin with the least effect on performance.
Conclusion: Which Is the Best WordPress Popup Plugin?
Considering the criteria we set up, OptinMonster comes up as the best WordPress popup plugin. It is the fastest popup builder and comes with incredible tools to boost conversion rates.
It is also the easiest to use, with beautiful popup templates and a powerful drag-and-drop editor. It works with all popular CRMs, email marketing platforms, the best WordPress form plugins, custom HTML forms, and more.
Showing your popups at the right time to the right users is what makes them more effective. OptinMonster includes powerful page-level targeting options, personalization, and event-based triggers.
If you are running an eCommerce store, then we would recommend OptinMonster + TrustPulse. This allows you to maximize conversions with social proof and OptinMonster’s powerful cart abandonment features.
If you liked this article, then please subscribe to our YouTube Channel for WordPress video tutorials. You can also find us on Twitter and Facebook.
Disclaimer: We could have included many other WordPress popup plugins in this list, like the HubSpot form builder, Elementor popups, Icegram, Ninja popups, and others. But we decided only to include the ultimate best popup plugins to help you avoid choice paralysis.
Amazing code has been crafted this past month: from pixel works to astonishing CSS art, to magnificent fluids and musical window resize fun. Posing like a rockstar or firing lasers, there’s something creative for everyone in this collection of original experiments from around the web.
We hope you enjoy this collection as much as we do!