hi brothers ,
i work on a ASP.NET MVC Project,
please i try to get a cookie who created already using server side C# , and in a pure HTML page not .CSHTML i talk now about .HTML page , in this page i want to using javascript to read the value of the cookie that i created using C# .
i wish if anyone can help me and thanks so much in advance.
The Problem of String Concatenation and Format String Vulnerabilities
If JavaScript is your programming language of choice, you probably don't have to worry about string concatenation all that much. Instead, one of the recurring problems you might encounter is having to wait for JavaScript's npm package manager to install all of the required dependencies. If that sounds all too familiar, and you have some time on your hands until npm is done, you might as well spend it reading about how string concatenation works in other languages.

In this blog post, we examine why string concatenation is a complicated topic, why you can't concatenate two values of a different type in low-level programming languages without conversion, and how string concatenation can lead to vulnerabilities. We'll also explain how format strings that contain placeholders for certain types of data can cause serious trouble if they are controlled by an attacker. And, we'll conclude with a simple way to fix them.
How to Win Over New Kinds of Readers
Ever notice that your content tends to really resonate with some people, and others don’t have any interest at all?...
The post How to Win Over New Kinds of Readers appeared first on Copyblogger.
How to Update PHP to the Recommended Version for WordPress
Using an outdated version of WordPress core, plugins or themes isn’t ideal. PHP is no different.
While WordPress technically works with PHP 5.6 and above, you’re sacrificing performance and compatibility, plus you’re open to security vulnerabilities by using older PHP versions. You should always aim to use the latest version of PHP.
In this post, you’ll learn everything you need to check what version of PHP you are running and how to update your PHP to the recommended version for WordPress.
What is PHP
PHP can do things like calculations, process conditional logic and pull information from the database so you can take a dynamic approach to build your webpages.
Unlike JavaScript, which modifies the HTML in the browser after the page has been constructed, PHP happens on the server. Since PHP happens before the HTML is rendered, you have more control over the final layout of the page.
If you look in your WordPress site’s files, you’ll see a lot of PHP files. These are the instructions that your server uses to build not only the webpages your visitor sees but also the WordPress admin backend. PHP is a major part of WordPress. PHP is a major part of the whole web, actually. It powers 70% of all websites.
WordPress PHP Version
You may recall that somewhat recently there was a big push to get everyone to upgrade WordPress to PHP 7. While it may have felt recent, that was a while ago. PHP has to be updated on a regular basis, just like WordPress core, themes, and plugins.
With PHP, each version receives support for two years after its initial release, then there is a period of another year where critical security updates are released as they’re needed. After this three year period, that version of PHP is no longer updated.
As of June 2019, when I’m writing this post, the current recommended PHP version for WordPress is 7.3 or greater.
The majority of quality hosting providers will require you to use the latest version of PHP in order to use their servers and will help you modify your site to ensure that the latest version of PHP will not break your site.
WPMU DEV Hosting, for instance, has your back and uses the latest PHP version automatically.

Less reputable cheap hosts will not take the initiative to encourage you to upgrade your PHP because of the additional cost of support time and resources to help you transition. Since they don’t want to break your site by updating to the latest version of PHP automatically, they’ll often leave your site to use an outdated version of PHP and hope you don’t notice.
This practice is quite common and most WordPress sites aren’t using the most recent version of PHP as a result. Take a look at these WordPress statistics:
- 4.4% of WordPress sites are using PHP version 7.3
- 18.4% of WordPress sites are using PHP version 7.2
- 13.2% of WordPress sites are using PHP version 7.1
- 16.9% of WordPress sites are using PHP version 7.0
PHP 7.0 made it’s debut on December 2015 and using our three-year rule, then we know it reached the end of its lifecycle in December 2018. This means 64% of WordPress sites are running a version of PHP that is no longer being actively supported and that’s problematic for several reasons.
Why you need to update PHP
Speed
For one, there are tremendous performance benefits that come with using the latest version. PHP 7.3 requires less time and resources to deliver the same number of requests to site visitors. It can handle as much as 3x as many requests per second as PHP 5.6.
According to this infographic, PHP 5.6 executes one WordPress request in just under 100M CPU instructions, while PHP 7 does the same using 25M CPU instructions, and PHP 7.3 uses even fewer. That’s a huge improvement that also goes a long way toward reducing memory usage on your host as well.
Since using the latest version of PHP takes less time to serve the same number of requests, you can give your visitor’s a much better user experience.
Ensuring Compatibility is Costly
Maintaining code takes effort, and that effort is multiplied when you need to ensure backward compatibility for additional versions.
No wonder people (probably overworked theme and plugin developers) at WordCamp US 2018 cheered when Matt Mullenweg proposed a plan to make PHP 7.0 the minimum required version by “as early as” December 2019.
Sometimes new versions of PHP introduce new features, such as error handling or new operators, as was the case with PHP 7. Other times, functions are deprecated or changed.
Rather than spending time parsing through the code to ensure that any changes to PHP do not affect the code, developers can spend their time adding new features or improving security instead.
Vulnerabilities
Just like plugins, themes and WordPress core get updates to fix security vulnerabilities, so does PHP. This is also why using a PHP version that is still getting updates is so important, as it protects you from vulnerabilities such as SQL injection, XSS and Dos attacks.
According to security vulnerability datasource CVE Details, there were 18 known vulnerabilities found in PHP in 2018. Compare this to the 43 vulnerabilities discovered in 2017 and the 107 found in 2016 and you can see why updating can help protect you from a lot known security exploits.
As a matter of fact, some hackers look to see what version of PHP you’re running in order to know what kind of attack would be effective.
How to Check PHP Version in WordPress
So how do you find out what version of PHP your site is using? Easy. You can see this information right within WordPress.
Go to Tools > Site Health

If your site is not using the latest version of PHP, then it will be shown as a recommended improvement.
If it is, then open the passed tests section to verify. You’ll see that is says PHP is up to date plus what version you’re running.

How to Update PHP in WordPress
Once you check to see what version of PHP your hosting server is running, you’ll know if you need to upgrade to the latest version of PHP.
If you do, you’ll first need to see if your site will be compatible with the new version of PHP. You never want to test major changes like updating your PHP on your live site because if there are major incompatibilities, you’ll damage your site.
For this reason, you’ll need to create an alternate site to test your changes on first.
Step 1: Create a Copy of Your Site
You’ll first need to get a copy of your current site. You’ll need all of the files and a copy of the database. You can use SFTP for your files and export a copy of your database using MyPHP.
In some instances, you may be able to use your last backup, if your backups include both the files and the database.
Step 2: Create a Local or Staging Site
Once you have a copy of your site, you’ll need to set up a testing environment. You can either use a local environment or set up a staging environment if your host allows it.
See our post on how to set up XAMPP on your local computer if you need help setting up your local environment.
Once your testing environment is set up, you can add the files and database from the previous step to your testing environment, so you have an exact replica of your live site.
Then once you have a copy of your site in your testing environment set up, you’re ready to upgrade the PHP version of your testing site.
Check PHP Compatibility
Now comes the fun part, and by fun, I actually mean when the boring action happens.
You’ll need to go through your test site to make sure that nothing is broken. You’ll want to pay extra careful attention to the critical functionality of your site. Checkout processes, newsletter signups, web forms, navigation, and all of the other elements that contribute to the bottom line.
You want to catch these issues before they have a chance to wreak havoc on your live site and cause a bad user experience for your visitors.
Checking PHP Compatibility with Tools
There are some tools that can help you with this process.
PHP Compatibility Checker – This plugin is often recommended to help you scan your site for incompatibility issues. Unfortunately, it hasn’t been updated to be able to test PHP 7.3. It also is known to flag false positives, so be sure to double check incompatibilities manually.

Error Log Monitor – This plugin will display a list of PHP errors in your WordPress dashboard which will help you diagnose the issues if you’re a developer. If you’re not a developer then it will help you relay the issue to support.

WP_DEBUG – WP_DEBUG is a PHP constant (a permanent global variable) that can be used to trigger the “debug” mode throughout WordPress. To turn on debugging in WordPress, set the WP_DEBUG variable to true. You can find it in the wp-config.php file. Check out our other post on Debugging WordPress: How to Use WP_DEBUG.
Fix issues
If a plugin or your theme is causing issues, work out the issue on your test site. Find a suitable alternative that is compatible with the latest version of PHP. Once you’ve found a solution, be sure to also make the change to your live site.

When you’re looking for a suitable plugin in the WordPress repo, check to see what versions of PHP are supported.
How to Update PHP Version in WordPress
Once you’ve worked through all of the bugs and issues with compatibility, and have made the corresponding changes to your live site, then you can switch over your live site to the new version of PHP.
This process will vary from host to host, but will most likely involve changing a setting in your hosting cPanel. Ask your host for help on how to do this as some shared hosts will not let you access this setting.
Here’s a list with instructions to how to update the PHP version for 32 different hosts including popular hosts such as WP Engine, Pantheon, Kinsta, Pagely, Bluehost, Hostgator, GoDaddy and more.
If you never want to deal with having to update your PHP version, why not give WPMU DEV hosting a try and leave all the technical stuff to us.
Partnering with Your Host to Update PHP Version
Cheap shared hosting has convinced a lot of people that hosting websites is a simple and straightforward process, but the truth is, there is a lot that goes into maintaining your site files and database. Keeping all of your software up-to-date is one of the tasks that your host can and should help you with. If they’re unwilling to help you or hide your version to keep you in the dark, then that’s generally a sign that it’s time for you to switch hosts to something better.
At WPMU DEV, members get hosting for 3 free sites (even multisite) included with a monthly membership. Not only do we help you update your PHP version, we also backup your site daily, assist with caching configuration and monitor uptime. And if you ever need help fixing compatibility issues with your theme or plugins, our awesome support team is ready and willing to help. Sign up for a free 30-day membership to try everything out.
7 Best SMTP Service Providers with High Email Deliverability (2019)
Are you looking for the best SMTP service providers?
An SMTP service provider helps you reliably send emails from your website to your users.
SMTP servers are especially configured to ensure that your emails reach users’ inbox and don’t end up in the junk mail folder.
In this article, we will share the best SMTP service providers with high email deliverability. We will also show you how to send your WordPress emails using these SMTP services.

Why You Need an SMTP Service Provider for WordPress Emails?
All WordPress websites rely heavily on email to do various tasks. For example:
- Recovering lost password
- Registering a new account
- Notifications for comments, new articles, password changes, and more
- If its an online store, then sending customers order confirmation, invoices, and delivery information via email.
By default, WordPress is configured to send emails using the PHP mail() function. This is the primary reason why users complain about WordPress not sending email issue.
There are a number of problems with the default mail method, and why it doesn’t work.
Most hosting providers don’t have this function configured properly. Some even disable it completely to prevent their servers from abuse.
Misusing this function is a common problem as it does not require authentication and can be used to send spam emails.
Even if the mail function is working on your WordPress hosting, sometimes your WordPress emails may still end up in spam because most spam filters will verify sender email, location, domain name, and it would flag your site email as suspicious or spam.
The only way to fix this problem is by using an SMTP server to send WordPress emails.
What is SMTP?
SMTP or Simple Mail Transfer Protocol is the industry standard to send emails on the internet. It uses proper authentication which increases the chances that your emails will actually get delivered in users inbox.
There are both paid and free SMTP service providers. In fact, you can get a free SMTP account with a business email address from Google or Outlook.
However, there is a limit on how many emails you can send using the traditional email services. Usually, these free email providers like Gmail or Outlook don’t want you to use their SMTP servers for automatic emails like those sent by a WordPress website.
This is why you need to sign up with one of the well-known SMTP service providers to ensure that your emails are properly delivered. Don’t worry, a lot of the top SMTP companies offer very generous free SMTP plans that are good enough for most websites.
Let’s take a look at the best SMTP service providers with high deliverability.
Best SMTP Service Providers
There are many SMTP service providers that allow you to send mass emails, WordPress emails, transactional emails, and more.
However, each one of them is different in terms of features, pricing, ease of use, number of emails allowed on free plan, and most importantly their track record on deliverability.
Following are the best SMTP service providers that offer higher deliverability and best set of features.
1. Mailjet
Mailjet is the best SMTP service provider on the market. They offer a beginner friendly email marketing and transactional SMTP email service.
You can easily integrate Mailjet with your website and use it to send WordPress emails using SMTP. They offer a highly robust API with SMTP relay service to ensure that your emails don’t end up in spam.
Other notable features include drag and drop editor with email templates, built-in email marketing features, transactional SMS, marketing automation, and more. They also offer A/B testing and advanced statics to monitor your open rate, delivery rates, clicks, and more.
Pricing: Mailjet offers a free plan with up to 6000 emails every month (200 emails per day). Their paid plans start from $8.69 per month (billed annually) with 30,000 emails per month (no daily limit).
2. SendinBlue
SendinBlue is another top SMTP email service provider on the market. They offer a powerful marketing platform with transactional emails, email marketing, SMS marketing, and live chat.
It works beautifully with WordPress and other third-party platforms like OptinMonster, Salesforce, Google Analytics and many more. They also offer powerful personalization and marketing automation features to help with your marketing campaigns.
SendinBlue has a highly extensible API and SMTP relay service which instantly improves your email delivery for transactional emails.
Pricing: SendinBlue has a forever free plan with 300 emails per day. Their paid plans start from $25 per month with 40,000 emails per month and no daily sending limits.
3. Mailgun
Mailgun is a popular SMTP service provider for developers and businesses. They offer powerful APIs to send transactional emails.
It is easy to integrate into your WordPress website. Whether you are an eCommerce store, a membership website, or a small business, Mailgun offers an easy to scale SMTP service to send your marketing and transactional emails.
It is designed for developers and lacks some of the beginner-friendly features of other SMTP providers on the list.
Pricing: Mailgun offers a ‘pay as you go’ plan with first 10,000 emails free. The free plan is more than enough for small websites. Their paid plans are fairly competitive in the market. However if you want a dedicated IP and improved deliverability, then it starts at $79 per month with 1 dedicated IP address.
4. SendGrid
SendGrid is a powerful cloud-based SMTP email service provider that allows you to send mass emails without managing an SMTP server. It offers higher scalability with a powerful set of features.
Their SMTP relay is easy to setup and works with any WordPress site. It includes delivery optimization tools, email analytics, email templates with a simple email editor, and integrations with third-party apps and services.
If deliverability is your main concern, then SendGrid offers great tools to further improve email delivery including dedicated IP addresses and domain name authentication tools.
Pricing: They offer a free plan with first 40,000 emails free and then 100 emails per day. Their paid plans start at $14.95 per month.
5. Amazon SES
AWS or Amazon Web Services is the industry leader in cloud computing infrastructure. They also offer Amazon SES or Amazon Simple Email Service as an add-on to their web services.
It is a powerful cloud-based SMTP service for marketers and developers to easily send marketing, notification, and transactional email campaigns.
It offers higher deliverability with cost efficiency of AWS. You get a lot of powerful features, but most of them are suitable for advanced users and developers.
Amazon SES can be easily integrated into your WordPress site with the help of plugins (more on this later in the article). Depending on your usage, Amazon SES can be the cheapest SMTP service in the market.
Pricing: If your website is hosted on AWS, then you can use their free tier to send 62,000 emails each month. For other websites, pricing starts at $0.10 for every 1,000 emails you send.
6. G Suite
G Suite is Google’s productivity suite for businesses. It allows you to use calendar, Google Drive, Docs, Photos, and Gmail with your own domain name.
This allows you to get a professional business email address while still using the familiar interface of Google. G Suite allows you to use Google SMTP servers to send out emails which means you can set up an email account for your WordPress site and then use it to send WordPress emails.
However, it is only suitable for small business websites and blogs because it can only send 2,000 messages a day. For details see our article on how to set up a professional email address with G Suite
Pricing: Starts from $6 per user per month.
7. Postmark
Postmark is another easy to use SMTP service provider for websites, marketers, and businesses. It offers lightening fast email delivery with simpler pricing and easy integration.
Sending transactional emails is their expertise, which means they are focused on deliverability and speed. They offer easy to follow email analytics, account security, mobile-friendly responsive templates, message events triggered with simple webhooks, and more.
Pricing: Starting from $10 per month for 10,000 emails then $1.25 per 1,000 emails.
Which is the Best SMTP Service Provider?
Aside from the top SMTP providers that we mentioned above, there are literally dozens of others like Mandrill, Moosend, Pepipost, etc.
The large number of choices make it difficult for users to select the best SMTP service provider for their needs.
When choosing an SMTP service, you need to look at three main factors: email deliverability, scalability, and pricing.
Since every platform in our list offers high email deliverability and with exception of G Suite, all platforms can scale to send millions of emails per day, we will focus on pricing since it’s often a big deciding factor.
At first glance, the free plans look very competitive across all platforms. If you have a small website, then you really can’t go wrong with any of our top three SMTP recommendation: Mailjet, SendinBlue, and Mailgun.
However as your website grows, pricing becomes a pretty big factor. Mailjet offers the most competitive pricing with scalability and most importantly reliable technical support.
For example, if you’re sending 150,000 emails per month, you will pay $68.95 per month, and you will have a dedicated IP. Whereas for the same amount of sending requirement and dedicated IP, SendGrid will cost $79.95 per month and MailGun will cost $109 per month.
Now if you have a technical team in house, then nothing will beat the pricing of Amazon SES because its $0.10 per 1000 emails. This means 150,000 emails per month will only cost $15 on Amazon SES. The big catch is that their technical support is quite limited. For dedicated IP, you just have to pay $24.95 per month.
For large sites, there really isn’t a more cost efficient SMTP solution than Amazon.
Our pick for best SMTP providers for small business: Mailjet and SendinBlue.
Our pick for best SMTP providers for large business and eCommerce websites: Amazon SES.
How to Easily Connect Your SMTP Service to WordPress
Once you sign up with an SMTP service provider, the next step is to integrate it with your WordPress site. This would replace the default WordPress mail function with your SMTP service, so your email actually gets delivered.
WP Mail SMTP is the best WordPress SMTP plugin which allows you to easily send WordPress emails using any SMTP service provider.
It is available as both a free SMTP plugin and the premium version with more features. The paid version gives you access to email controls to choose which WordPress notification emails to send using your SMTP service provider.
You also get email logs and easier setup for popular SMTP providers like Mailgun, SendGrid, Amazon SES, Gmail, Outlook, G Suite, and more. The Elite plan gives you access to their White Glove Setup where an expert from their team will set up your SMTP service.
First thing you need to do is install and activate the WP Mail SMTP plugin. For more details, see our step by step guide on how to install a WordPress plugin.
Upon activation, you need to visit WP Mail SMTP » Settings page and enter your license key. You can find this information from your account on WP Mail SMTP website.
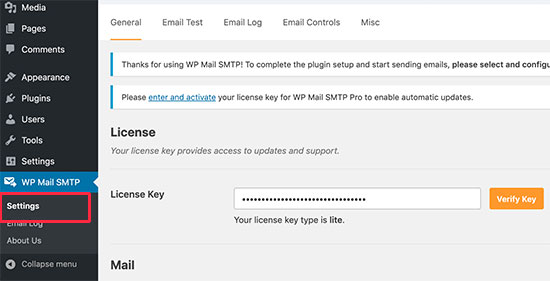
After entering your license key, the next step is to configure your mailing service.
Scroll down to the Mail section and enter the from email address. This is the email address you have added to use with your SMTP service provider.
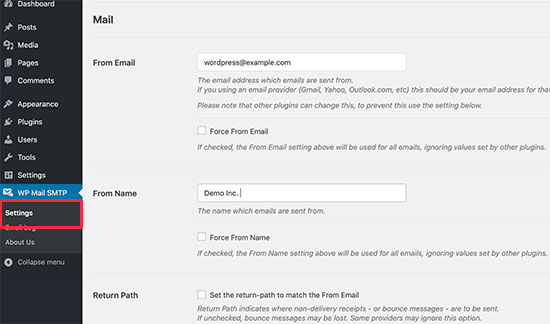
After that, you need to enter a from name. Ideally, this should be your website title, so that your users know where the email is coming from.
Scroll down to the Mailer section. If your SMTP service provider is listed there, then you can select it here.
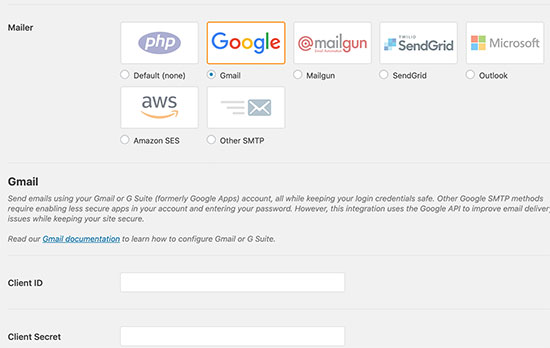
Choosing an SMTP provider will show you settings specific to that service provider with a link to detailed instructions on how to enter the required information.
However, if your SMTP server is not listed there, then select ‘Other SMTP’ option. WP Mail SMTP works with all SMTP providers.
Below that you will now see the information you need to enter. You can find this information on your SMTP service provider’s website under your account.
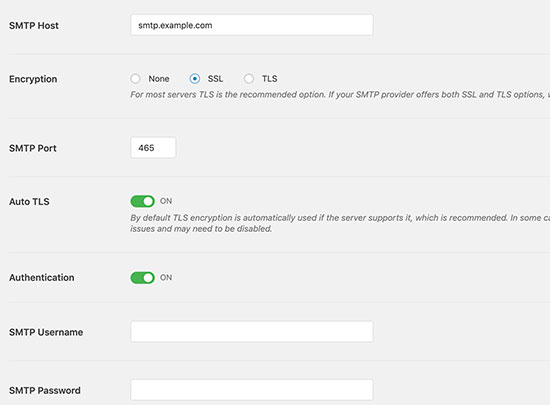
You will need the following information.
- SMTP Host: You smtp host address which usually looks like this smtp.yoursmtpserver.com
- Encryption: Usually it is either SSL or TLS
- SMTP Port: Usually it is 465
- Authentication: Turn on authentication
- Username: Username provided by your SMTP service usually it is your email address.
- Password: Password for your SMTP service
Now, the plugin recommends that instead of saving your username and password in plain text, you add it to your wp-config.php file. See our guide on how to edit wp-config.php file.
After entering all the required information, don’t forget to click on the ‘Save Settings’ button to store your changes.
You can now send a test email to see if everything is working fine. Switch to the Email Test tab and enter an email address to send a test email.
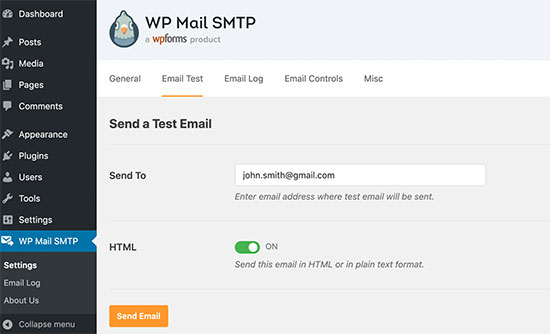
WP Mail SMTP will now send a test email to the address you entered. Check your inbox to make sure that you got the test email.
Congratulations, you have successfully set up your WordPress site to use your SMTP service provider.
We hope this article helped you find the best SMTP service provider to send WordPress emails. You may also want to see our guide on easy ways to grow your email list faster.
If you liked this article, then please subscribe to our YouTube Channel for WordPress video tutorials. You can also find us on Twitter and Facebook.
The post 7 Best SMTP Service Providers with High Email Deliverability (2019) appeared first on WPBeginner.
40+ Shopping Cart Abandonment Rate Statistics for 2019 (Plus How to Recover Carts)
How to Add Smooth Scrolling with Inner Image Animations to a Web Page
Today we want to show you how to add smooth scrolling in HTML with some additional subtle animations on images. With “smooth scrolling” we don’t mean smoothly scrolling to an element, but rather a smoothly animated kind of scrolling behavior. There are many beautiful examples of such smooth scrolling behavior on some recent websites, like Elena Iv-skaya, or Ada Sokół and the stunning site of Rafal Bojar, and many many others. The latter also has a very nice image animation that is synced with the scrolling. This kind of “inner” image animation adds another interesting layer to the whole scroll movement.
Why is this kind of smooth scrolling something you’d like to add to a web page? If you have ever animated something on scroll, you might have experienced that browsers have difficulties in displaying the incoming content jank-free; especially images may show tiny abrupt jumps on scroll. It just feel easy on the eye. To avoid that, we can use the trick of animating the content itself by translating it up or down instead of using the “native” scroll.
Smooth Scrolling
Jesper Landberg created some really great Codepen demos showcasing how smooth scrolling can be applied to different scenarios. The Smooth scroll with skew effect demo shows how to add a skew effect to images while (smooth) scrolling. Here you can also see how smooth scrolling with translating the content works: a content wrapper is set to position fixed with the overflow set to hidden so that its child can be moved. The body will get the height of the content set to it, so that we preserve the scroll bar. When we scroll, the fixed wrapper will stay in place while we animate the inner content. This trick makes a simple yet effective smooth scrolling behavior possible.
In our example we’ll use the following structure:
<body class="loading">
	<main>
		<div data-scroll>
			<!-- ... --->
		</div>
	</main>
</body>
The main element will serve as fixed, or “sticky”, container while the [data-scroll] div will get translated.
Inner Image Animation
For the inner image animation we need an image and a parent container that has its overflow set to “hidden”. The idea is to move the image up or down while we scroll. We will work with a background image on a div so that we can control the overflow size better. Mainly, we need to make sure that the image div is bigger than its parent. This is our markup:
<div class="item">
	<div class="item__img-wrap"><div class="item__img"></div></div>
	<!-- ... --->
</div>
Let’s set the styles for these elements. We will use a padding instead of a height so that we can set the right aspect ratio for the inner div which will have the image as background. For this, we use an aspect ratio variable so that we simply need to set the image width and height and leave the calculation to our stylesheet. Read more about this and other brilliant techniques in Apect Ratio Boxes on CSS-Tricks.
We set an image variable for the background image in the item__img-wrap class so that we don’t have to write too many rules. This does not need to be done like that, of course, especially if you’d like support for older browsers that don’t know what variables are. Set it to the item__img directly as background-image instead, if that’s the case.
.item__img-wrap {
	--aspect-ratio: 1/1.5;
	overflow: hidden;
	width: 500px;
	max-width: 100%;
	padding-bottom: calc(100% / (var(--aspect-ratio)));
	will-change: transform;
}

.item:first-child .item__img-wrap {
	--aspect-ratio: 8/10;
	--image: url(https://tympanus.net/Tutorials/SmoothScrollAnimations/img/1.jpg);
}

.item:nth-child(2) .item__img-wrap {
	width: 1000px;
	--aspect-ratio: 120/76;
	--image: url(https://tympanus.net/Tutorials/SmoothScrollAnimations/img/2.jpg);
}

...
The div with the background image is the one we want to move up or down on scroll, so we need to make sure that it’s taller than its parent. For that, we define an “overflow” variable that we’ll use in a calculation for the height and the top. We set this variable because we want to be able to easily change it in some modified classes. This allows us to set a different overflow to each image which changes the visual effect subtly.
.item__img {
	--overflow: 40px;
	height: calc(100% + (2 * var(--overflow)));
	top: calc( -1 * var(--overflow));
	width: 100%;
	position: absolute;
	background-image: var(--image);
	background-size: cover;
	background-position: 50% 0%;
	will-change: transform;
}

.item__img--t1 {
	--overflow: 60px;
}

.item__img--t2 {
	--overflow: 80px;
}

.item__img--t3 {
	--overflow: 120px;
}
Now, let’s do the JavaScript part. Let’s start with some helper methods and variables.
const MathUtils = {
    // map number x from range [a, b] to [c, d]
    map: (x, a, b, c, d) => (x - a) * (d - c) / (b - a) + c,
    // linear interpolation
    lerp: (a, b, n) => (1 - n) * a + n * b
};

const body = document.body;
We will need to get the window’s size, specifically it’s height, for later calculations.
let winsize;
const calcWinsize = () => winsize = {width: window.innerWidth, height: window.innerHeight};
calcWinsize();
We will also need to recalculate this value on resize.
window.addEventListener('resize', calcWinsize);Also, we need to keep track of how much we scroll the page.
let docScroll;
const getPageYScroll = () => docScroll = window.pageYOffset || document.documentElement.scrollTop;
window.addEventListener('scroll', getPageYScroll);
Now that we have these helper functions ready, let’s get to the main functionality.
Let’s create a class for the smooth scrolling functionality.
class SmoothScroll {
    constructor() {
        this.DOM = {main: document.querySelector('main')};
        this.DOM.scrollable = this.DOM.main.querySelector('div[data-scroll]');
        this.items = [];
        [...this.DOM.main.querySelectorAll('.content > .item')].forEach(item => this.items.push(new Item(item)));

        ...
    }
}

new SmoothScroll();
So far we have a reference to the main element (the container that needs to become “sticky”) and the scrollable element (the one we will be translating to simulate the scroll).
Also, we create an array of our item’s instances. We will get to that in a moment.
Now, we want to update the translateY value as we scroll but we might as well want to update other properties like the scale or rotation. Let’s create an object that stores this configuration. For now let’s just set up the translationY.
constructor() {
    ...

    this.renderedStyles = {
        translationY: {
            previous: 0,
            current: 0,
            ease: 0.1,
            setValue: () => docScroll
        }
    };
}
We will be using interpolation to achieve the smooth scrolling effect. The “previous” and “current” values are the values to interpolate. The current translationY will be a value between these two values at a specific increment. The “ease” is the amount to interpolate. The following formula calculates our current translation value:
previous = MathUtils.lerp(previous, current, ease)The setValue function sets the current value, which in this case will be the current scroll position.
Let’s go ahead and execute this initially on page load to set up the right translationY value.
constructor() {
    ...

    this.update();
}

update() {
    for (const key in this.renderedStyles ) {
        this.renderedStyles[key].current = this.renderedStyles[key].previous = this.renderedStyles[key].setValue();
    }
    this.layout();
}

layout() {
    this.DOM.scrollable.style.transform = `translate3d(0,${-1*this.renderedStyles.translationY.previous}px,0)`;
}
We set both interpolation values to be the same, in this case the scroll value, so that the translation gets set immediately without the being animated. We just want the animation happening when we scroll the page. After that, we call the layout function which will apply the transformation to our element. Note that the value will be negative since the element moves upwards.
As for the layout changes, we need to:
- set the position of the
mainelement to fixed and the overflow to hidden so it sticks to the screen and doesn’t scroll. - set the height of the body in order to keep the scrollbar on the page. It will be the same as the scrollable element’s height.
constructor() {
    ...

    this.setSize();
    this.style();
}

setSize() {
    body.style.height = this.DOM.scrollable.scrollHeight + 'px';
}

style() {
    this.DOM.main.style.position = 'fixed';
    this.DOM.main.style.width = this.DOM.main.style.height = '100%';
    this.DOM.main.style.top = this.DOM.main.style.left = 0;
    this.DOM.main.style.overflow = 'hidden';
}
We also need to reset the body’s height on resize:
constructor() {
    ...

    this.initEvents();
}

initEvents() {
    window.addEventListener('resize', () => this.setSize());
}
Now we start our loop function that updates the values as we scroll.
constructor() {
    ...

    requestAnimationFrame(() => this.render());
}

render() {
    for (const key in this.renderedStyles ) {
        this.renderedStyles[key].current = this.renderedStyles[key].setValue();
        this.renderedStyles[key].previous = MathUtils.lerp(this.renderedStyles[key].previous, this.renderedStyles[key].current, this.renderedStyles[key].ease);
    }
    this.layout();

    // for every item
    for (const item of this.items) {
        // if the item is inside the viewport call it's render function
        // this will update the item's inner image translation, based on the document scroll value and the item's position on the viewport
        if ( item.isVisible ) {
            item.render();
        }
    }

    // loop..
    requestAnimationFrame(() => this.render());
}
The only new thing here is the call to the item’s render function which is called for every item that is inside the viewport. This will update the translation of the item’s inner image as we will see ahead.
Since we rely on the scrollable element’s height, we need to preload the images so they get rendered and we get to calculate the right value for the height. We are using the imagesLoaded to achieve this:
const preloadImages = () => {
    return new Promise((resolve, reject) => {
        imagesLoaded(document.querySelectorAll('.item__img'), {background: true}, resolve);
    });
};
After the images are loaded we remove our page loader, get the scroll position (this might not be zero if we scrolled the page before the last refresh) and initialize our SmoothScroll instance.
preloadImages().then(() => {
    document.body.classList.remove('loading');
    // Get the scroll position
    getPageYScroll();
    // Initialize the Smooth Scrolling
    new SmoothScroll(document.querySelector('main'));
});
So now that the SmoothScroll is covered let’s create an Item class to represent each of the page items (the images).
class Item {
    constructor(el) {
        this.DOM = {el: el};
        this.DOM.image = this.DOM.el.querySelector('.item__img');

        this.renderedStyles = {
            innerTranslationY: {
                previous: 0,
                current: 0,
                ease: 0.1,
                maxValue: parseInt(getComputedStyle(this.DOM.image).getPropertyValue('--overflow'), 10),
                setValue: () => {
                    const maxValue = this.renderedStyles.innerTranslationY.maxValue;
                    const minValue = -1 * maxValue;
                    return Math.max(Math.min(MathUtils.map(this.props.top - docScroll, winsize.height, -1 * this.props.height, minValue, maxValue), maxValue), minValue)
                }
            }
        };
    }
    ...
}
The logic here is identical to the SmoothScroll class. We create a renderedStyles object that contains the properties we want to update. In this case we will be translating the item’s inner image (this.DOM.image) on the y-axis. The only extra here is that we are defining a maximum value for the translation (maxValue). This value we’ve previously set in our CSS variable –overflow. Also, we assume the minimum value for the translation will be -1*maxVal.
The setValue function works as follows:
- When the item’s top value (relative to the viewport) equals the window’s height (item just came into the viewport) the translation is set to the minimum value.
- When the item’s top value (relative to the viewport) equals “-item’s height” (item just exited the viewport) the translation is set to the maximum value.
So basically we are mapping the item’s top value (relative to the viewport) from the range [window’s height, -item’s height] to [minVal, maxVal].
Next thing to do is setting the initial values on load. We also calculate the item’s height and top since we’ll need those to apply the function described before.
constructor(el) {
    ...

    this.update();
}

update() {
    this.getSize();
    for (const key in this.renderedStyles ) {
        this.renderedStyles[key].current = this.renderedStyles[key].previous = this.renderedStyles[key].setValue();
    }
    this.layout();
}

layout() {
    this.DOM.image.style.transform = `translate3d(0,${this.renderedStyles.innerTranslationY.previous}px,0)`;
}

getSize() {
    const rect = this.DOM.el.getBoundingClientRect();
    this.props = {
        height: rect.height,
        top: docScroll + rect.top
    }
}
We need the same for when the window gets resized:
initEvents() {
    window.addEventListener('resize', () => this.resize());
}
resize() {
    this.update();
}
Now we need to define the render function called inside the SmoothScroll render loop function (requestAnimationFrame):
render() {
    for (const key in this.renderedStyles ) {
        this.renderedStyles[key].current = this.renderedStyles[key].setValue();
        this.renderedStyles[key].previous = MathUtils.lerp(this.renderedStyles[key].previous, this.renderedStyles[key].current, this.renderedStyles[key].ease);
    }
    this.layout();
}
This, as mentioned before, is only executed for items that are inside of the viewport. We can achieve this by using the IntersectionObserver API:
constructor(el) {
    ...

    this.observer = new IntersectionObserver((entries) => {
        entries.forEach(entry => this.isVisible = entry.intersectionRatio > 0);
    });
    this.observer.observe(this.DOM.el);

    ...
}
And that’s it!
We hope you enjoyed this tutorial and find it useful!
How to Add Smooth Scrolling with Inner Image Animations to a Web Page was written by Mary Lou and published on Codrops.
Introducing Netlify Analytics
You work a while on a side project. You think it's pretty cool! You decide to release it into the world. And then… it goes well. Or it doesn’t go well. Wait, is that right? You forgot to add analytics — it just didn’t cross your mind at the time. Now you’re pretty curious how many people have been visiting the site, but… you’re not sure. Enter Netlify Analytics.
There are so many times where I:
- Forget to add analytics
- Don’t want to incur the extra page weight, or
- I'm concerned with privacy issues
I released a CSS Grid Generator last month and I forgot to add analytics. The release went well, but now it's a bit of a black box for me as far what happened there or if I need to adjust a release in the future. Now, however, I can enable Netlify Analytics and see into the past without having lost any information. Sweet.
Netlify Analytics doesn’t have a ton of bells and whistles — it’s not meant to be a replacement for super comprehensive marketing tools. But if you want to get some data about your site without adding a lot of scripts, it can be a handy tool.
One really nice thing about it is the accuracy. Since the data is coming from the server, you can have a clear picture of what the server actually served, rather than relying on a third party which might have varied reporting due to things like add blockers that can skew client-side reporting (15% of users are estimated to use tools like Ghostery, for instance), caching, and other factors.
The Analytics Dashboard
The dashboard for each site shows some “at a glance” information:

Then you can dive into more detailed information by specific date:
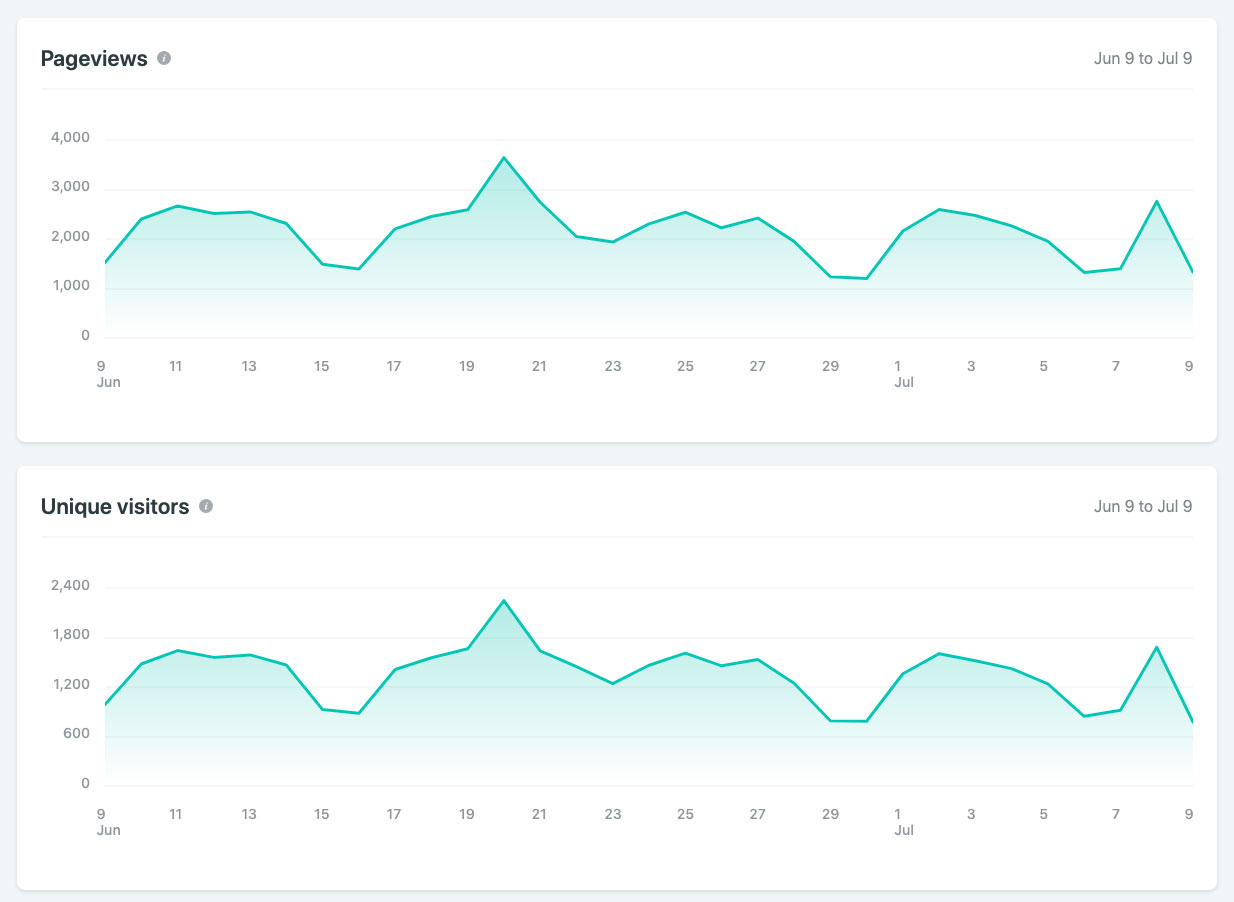
There’s a bit of information from top sources and top pages:
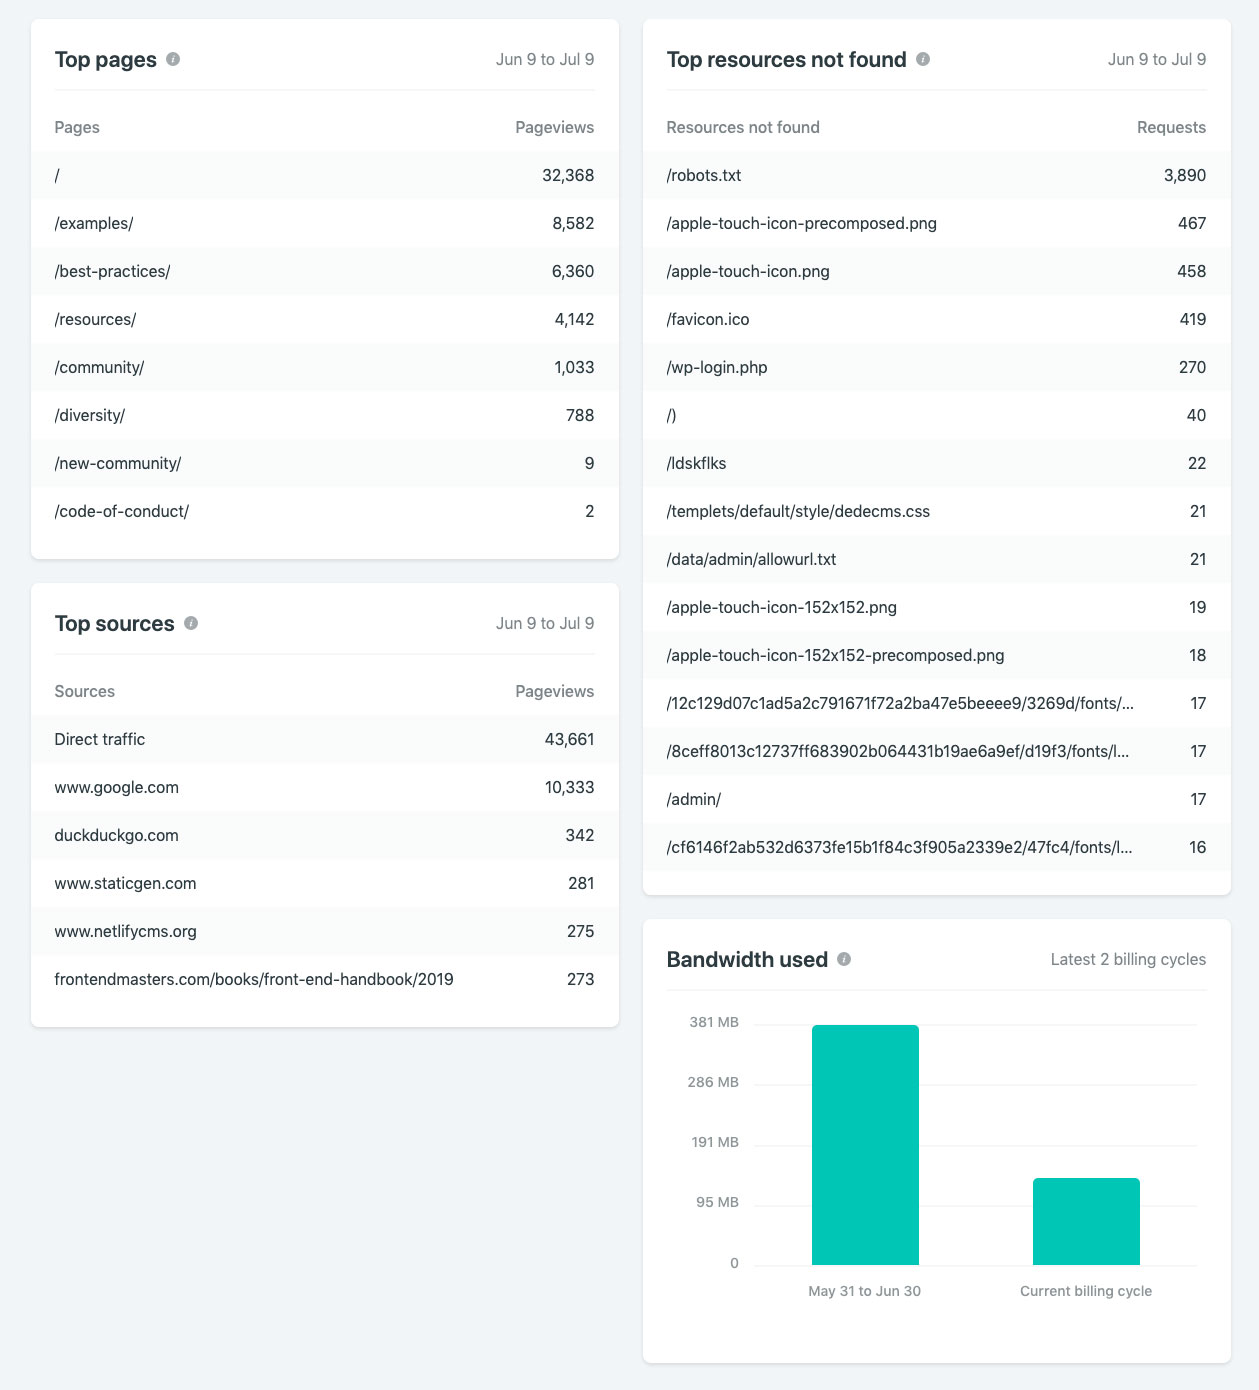
There's an area for "Top Resources Not Found", which shows any pages, images, anything that your visitors are trying and failing to retrieve from your site. When I enabled it on mine, I was able to fix a broken resource that I had long forgotten about.
It’s going to be awesome being able to check how some of my dev projects are doing. But I'm also really excited to take that extra implementation step out of my work. The caveats to keep in mind is that your site needs to be hosted by Netlify in order to use the Analytics tools, and it's a paid feature. Any site you enable will show up to 90 days (3 billing cycles) in the “Bandwidth used” chart, and up to 30 days in all other charts if it’s old enough, however it could take up to 2 days between when you enable analytics and when your dashboard is calculated and populated.
Under the hood
The analytics dashboard itself is built with React and Highcharts. Highcharts is a JavaScript charting library that includes responsive options and an accessibility module. All of the components consume data from our internal analytics API.
Before development began, we conducted an internal comparison survey of data visualization libraries in order to choose the best one for our needs. We landed on Highcharts over other popular options like d3.js, primarily because it means any engineer at Netlify with JavaScript experience can jump in and contribute, whether they have deep SVG and D3-specific knowledge or not.
While the charts themselves are rendered as SVG elements, Highcharts allows you to render any text inside the graph using HTML, simplifying and speeding our development time and allowing us to use CSS for advanced styling. The Highcharts docs are also top notch and offer a ton of customization options through their declarative API.
We used the Highcharts wrapper for React in order to create reusable React components for each type of graph. The "Top sources," "Top pages," and "Top resources not found" cards use a different component that displays a <table> using the data passed in as props.
One of the trickier challenges we encountered on the UI side while building these graphs was displaying dates along the X axis of the area charts in a way that wouldn't look overwhelming.
Highcharts offers an option to customize the format of an axis label using a JavaScript callback function, so we hooked into that to display every other date as a label. From there, we wrote an algorithm to capture the first date of each month that was being displayed and add the month name into the markup for the label, making the UI a bit cleaner and easier to digest.
Other Analytics Alternatives, with Snippets
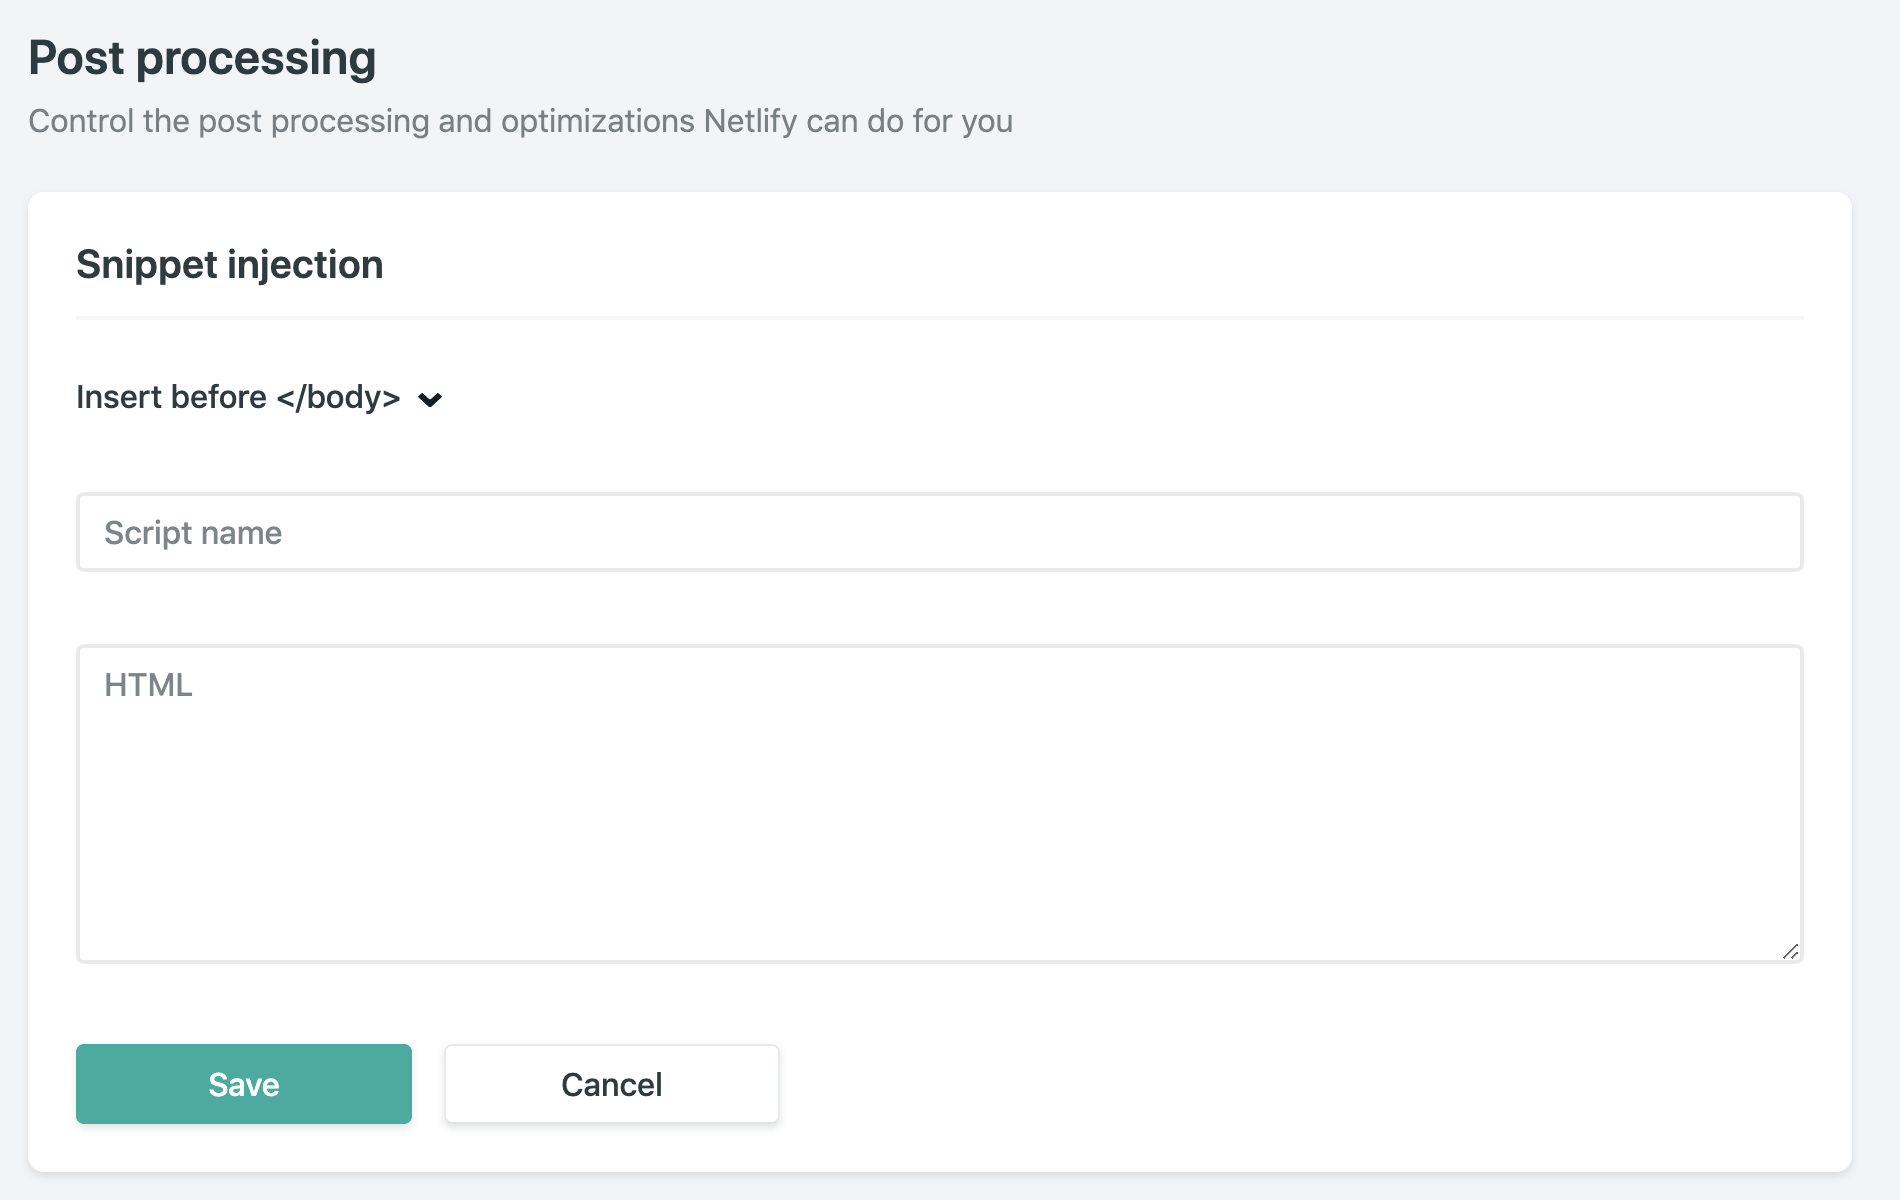
If you’d still like to run third-party scripts and other kind of analytics, Netlify has capabilities to add something globally to <head> or <body> tags. This is useful because, depending on how your site is set up, it can be a bit of a pain to add third-party scripts to every page. Plus, sometimes you want to give the ability to change these scripts to someone who doesn't have access to the repo. Go to the particular site in the dashboard, then Settings → Build & Deploy → Post processing.
That's where you will find Snippet Injection:
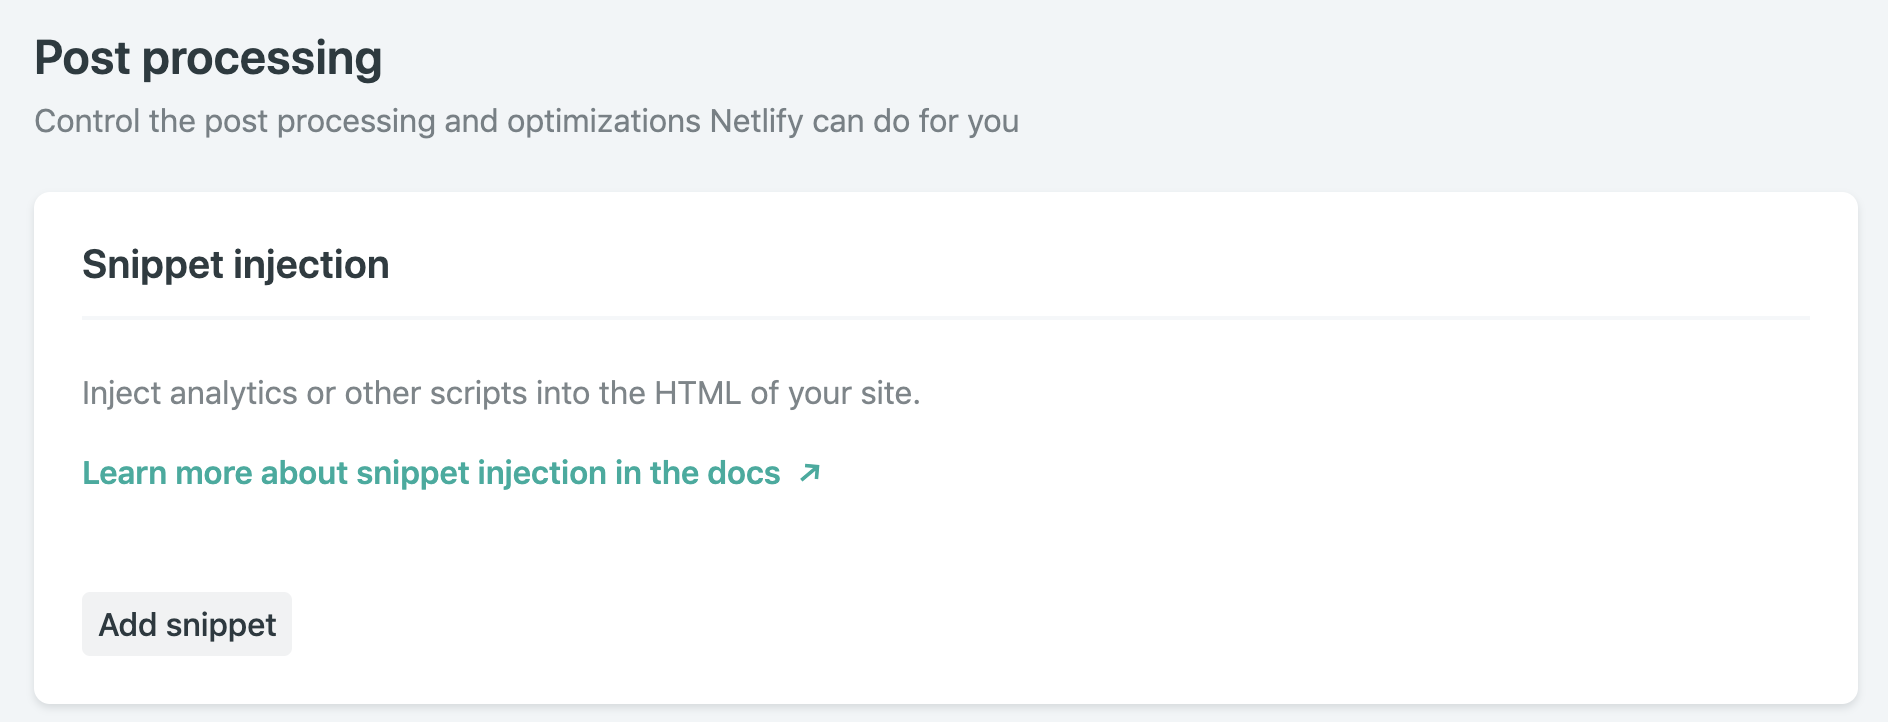
Click "Add snippet" and you’ll be able to select whether you want to add the third-party snippet to the <body> or the <head> tag, and you’ll have a change to post your code in HTML. For example, if you need to add Google Analytics, you’d wrap it in a script tag like this:
<script async src="https://www.googletagmanager.com/gtag/js?id=UA-68528-29"></script>
<script>
  window.dataLayer = window.dataLayer || [];
  function gtag(){dataLayer.push(arguments);}
  gtag('js', new Date());

  gtag('config', 'UA-XXXXX-XX');
</script>
You’ll also name it so that you can keep track of it. If you need to add more later, this is helpful.
That’s it!
You’re off and running with either the new Netlify Analytics offering that’s built-in or a more robust tool.
The post Introducing Netlify Analytics appeared first on CSS-Tricks.
Startup – 40 New Ecommerce Designs
You're reading Startup – 40 New Ecommerce Designs, originally posted on Designmodo. If you've enjoyed this post, be sure to follow on Twitter, Facebook!

One of the most asked-for feature requests is e-commerce predesigned blocks, so we immediately started work. Here we have 40 absolutely new designed blocks that are ready to use in the Startup app! We tried to create every type of …


