Better vanilla JS syntax, awesome CSS snippets and more cool libraries in our compilation for July 2019.
Continue reading on Tutorialzine.Chaos Engineering and Monitoring, Part 1: Sensu + Gremlin
One of my earliest jobs was as an admin for an MSP. We'd routinely generate alerts that weren't actionable, lacked context, and for most of our customers, were considered noise. From a monitoring perspective, it was bad. Customers didn't trust in the alerts they received and often resorted to having some additional monitoring product installed on their systems. It's safe to say that our auto-generated tickets and emails were largely ignored.
In an effort to avoid repeating the mistakes of the past, I want to ensure that I have actionable alerts that are context heavy. Thankfully, there are a couple of tools that I've found go a long way in helping me with that effort: Sensu and Gremlin. I'll do an intro to those tools today, and we'll pick up on how these tools work together in the next post. It's worth mentioning that I am a Sensu employee.
Adding More Sharing Permissions to ONLYOFFICE Doc Editors
ONLYOFFICE is an open source office suite that contains docx, xlsx, pptx editors for integration with other apps. Previously, we wrote some articles on how to integrate the editors with document management systems in PHP, Node.js, Python, etc. In this article, we will show you how to add more sharing permissions to DMS + editors combos.
That means more flexible access rights management: apart from basic reading and editing rights, you will be able to bring about commenting, reviewing, filling form rights, and also restrict downloading files.
The 5 Types of Online Prospects, and How to Sell to Each of Them
If you’re producing content to promote your services, physical products, or digital offerings, obviously you want a return on investment...
The post The 5 Types of Online Prospects, and How to Sell to Each of Them appeared first on Copyblogger.
UseStringDeduplication: Pros and Cons
Let me start this article with an interesting statistic (based on the research conducted by the JDK development team):
- 25 percent of Java applications memory is filled up with strings.
- 13.5 percent are duplicate strings in Java applications.
- Average string length is 45 characters.
Yes, you are right — 13.5 percent of memory is wasted due to duplicate strings. 13.5 percent is the average amount of duplicate strings present in Java application. To figure out how much memory your application is wasting because of duplicate strings, you may use tools like HeapHero, which can report how much memory is wasted because of duplicate strings and other inefficient programming practices.
How To Build A Sketch Plugin With JavaScript, HTML And CSS (Part 2)
How To Build A Sketch Plugin With JavaScript, HTML And CSS (Part 2)
Matt CurtisAs mentioned in part 1, this tutorial is intended for people who know and use the Sketch app and are not afraid of dabbling with code as well. To profit from it the most, you will need to have at least some basic experience writing JavaScript (and, optionally, HTML/CSS).
In the previous part of this tutorial, we learned about the basic files that make up a plugin, and how to create the plugin’s user interface. In this second and final part, we’ll learn how to connect the user interface to the core plugin code and how to implement the plugin’s main features. Last but not least, we’ll also learn how to optimize the code and the way the plugin works.
Building The Plugin’s User Interface: Making Our Web Interface And The Sketch Plugin Code “Talk” To Each Other
The next thing we need to do is to set up communication between our web interface and the Sketch plugin.
We need to be able to send a message from our web interface to the Sketch plugin when the “Apply” button in our web interface is clicked. This message needs to tell us about what settings the user has input — like the number of steps, rotation amount, the number of duplicates to create, and so on.
WKWebView makes this task a little bit easier for us: we can send messages to our Sketch plugin from our web interface’s JavaScript code by using the window.webkit.messageHandlers API.
On our Sketch code’s side, we can use another method, addScriptMessageHandler:name: (or addScriptMessageHandler_name) to register a message handler that will be called whenever it receives a message sent from our plugin web interface.
Let’s start by making sure we can receive messages from our web UI. Head over to our ui.js file’s createWebView function, and add the following:
function createWebView(pageURL){
        const webView = WKWebView.alloc().init();

        //        Set handler for messages from script

        const userContentController = webView.configuration().userContentController();

        const ourMessageHandler = ...

        userContentController.addScriptMessageHandler_name(
                ourMessageHandler, "sketchPlugin"
        );

        //        Load page into web view

        webView.loadFileURL_allowingReadAccessToURL(pageURL, pageURL.URLByDeletingLastPathComponent());

        return webView;
};
Here we use the web view’s userContentController property to add a message handler we’ve named “sketchPlugin”. This “user content controller” is the bridge that ensures messages get across from our web view.
You might have noticed something odd about the above code: the object we’re adding as the message handler, ourMessageHandler, doesn’t exist yet! Unfortunately, we can’t just use a regular JavaScript object or function as the handler, as this method expects a certain kind of native object.
Luckily for us, we can get around this limitation by using MochaJSDelegate, a mini-library I wrote that makes it possible to create the kind of native object we need using regular ol’ JavaScript. You’ll need to manually download and save it in your plugin bundle under Sketch/MochaJSDelegate.js.
In order to use it, we’ll need to first import it into ui.js. Add the following at the top of the file:
const MochaJSDelegate = require("./MochaJSDelegate");
Now we can use MochaJSDelegate to create the type of message handler addScriptMessageHandler:name: is expecting:
function createWebView(pageURL){
        const webView = WKWebView.alloc().init();

        //        Set handler for messages from script

        const userContentController = webView.configuration().userContentController();

        const scriptMessageHandler = new MochaJSDelegate({
                "userContentController:didReceiveScriptMessage:": (_, wkMessage) => {
                        /* handle message here */
                }
        }).getClassInstance();

        userContentController.addScriptMessageHandler_name(
                scriptMessageHandler, "sketchPlugin"
        );

        //        Load page into web view

        webView.loadFileURL_allowingReadAccessToURL(pageURL, pageURL.URLByDeletingLastPathComponent());

        return webView;
};
The code we just added creates the native object we need. It also defines a method on that object named userContentController:didReceiveScriptMessage: — this method is then called with the message we want as the second argument. Since we’re not actually sending any messages yet, we’ll have to come back here at a later time and add some code to actually parse and handle the messages we receive.
Next, we need to add some code to our web interface to send us those messages. Head over to /Resources/web-ui/script.js. You’ll find I’ve already written most of the code that handles retrieving the values of the HTML <inputs /> the user will enter their options into.
What’s still left for us to do is to add the code that actually sends the values over to our Sketch code:
Find the apply function and add the following to the end of it:
//        Send user inputs to sketch plugin

window.webkit.messageHandlers.sketchPlugin.postMessage(JSON.stringify({
        stepCount, startingOptions, stepOptions
}));
Here we use window.webkit.messageHandlers API we mentioned earlier to access the message handler we registered above as sketchPlugin. Then send a message to it with a JSON string containing the user’s inputs.
Let’s make sure everything is set up properly. Head back to /Sketch/ui.js. In order to make sure we’re getting messages as we expect, we’ll modify the method we defined earlier so that it displays a dialog when we get a message:
function createWebView(pageURL){
        // ...

        const scriptMessageHandler = new MochaJSDelegate({
                "userContentController:didReceiveScriptMessage:": (_, wkMessage) => {
                        const UI = require("sketch/ui");

                        UI.alert("Hey, a message!", wkMessage.body());
                }
        }).getClassInstance();

        userContentController.addScriptMessageHandler_name(
                scriptMessageHandler, "sketchPlugin"
        );

        // ...
};
Now run the plugin (you may need to first close any existing Mosaic window you have opened), enter some values, then click “Apply”. You should see an alert like the one below — this means everything is wired up correctly and our message went through successfully! If not, go back over the previous steps and ensure that everything was done as described.
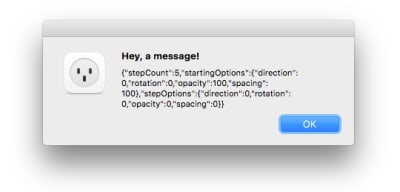
Now that we’re able to send messages from our interface to our plugin, we can move on to writing the code that actually does something useful with that information: generating our layer mosaics.
Generating The Layer Mosaics
Let’s take stock of what’s necessary in order to make this happen. Simplifying things a bit, what our code needs to do is:
- Find the current document.
- Find the current document’s selected layer.
- Duplicate the selected layer (we’ll call it the template layer) x number of times.
- For each duplicate, tweak its position, rotation, opacity, etc., by the specific values (amounts) set by the user.
Now that we’ve got a reasonable plan, let’s continue writing. Sticking with our pattern of modularizing our code, let’s create a new file, mosaic.js in the Sketch/ folder, and add to it the following code:
function mosaic(options){

};

module.export = mosaic;
We’ll use this function as the only export of this module since it makes for a simpler API to use once we import it — we can just call mosaic() with whatever options we get from the web interface.
The first two steps we need to take are getting the current document, and then its selected layer. The Sketch API has a built-in library for document manipulation which we can get access to by importing the sketch/dom module. We only need the Document object right now, so we’ll pull it out explicitly. At the top of the file, add:
const { Document } = require("sketch/dom");
The Document object has a method specifically for accessing the current document we can use, called getSelectedDocument(). Once we have the current document instance, we can access whatever layers the user has selected via the document’s selectedLayers property. In our case, though, we only care about single-layer selections, so we’ll only grab the first layer the user has selected:
function mosaic(options){
        const document = Document.getSelectedDocument();
        const selectedLayer = document.selectedLayers.layers[0];
};

module.export = mosaic;
Note: You might have been expecting selectedLayers itself to be an array, but it’s not. Instead, it’s an instance of the Selection class. There’s a reason for this: the Selection class contains a bunch of useful helper methods for manipulating the selection like clear, map, reduce, and forEach. It exposes the actual layer array via the layer property.
Let’s also add some warning feedback in case the user forgets to open a document or to select something:
const UI = require("sketch/ui");

function mosaic(options){
        const document = Document.getSelectedDocument();

        //        Safety check:

        if(!document){
                UI.alert("Mosaic", "⚠️ Please select/focus a document.");

                return;
        }

        //        Safety check:

        const selectedLayer = document.selectedLayers.layers[0];

        if(!selectedLayer){
                UI.alert("Mosaic", "⚠️ Please select a layer to duplicate.");

                return;
        }
};

module.export = mosaic;
Now that we’ve written the code for steps 1 and 2 (finding the current document and selected layer), we need to address steps 3 and 4:
- Duplicate the template layer x number of times.
- For each duplicate, tweak its position, rotation, opacity, etc., by the specific values set by the user.
Let’s start by pulling all the relevant information we need out of options: the number of times to duplicate, starting options, and step options. We can once again use destructuring (like we did earlier with Document) to pull those properties out of options:
function mosaic(options) {
        //        ...

        //        Destructure options:

        var { stepCount, startingOptions, stepOptions } = options;
}
Next, let’s sanitize our inputs and ensure that step count is always at least 1:
function mosaic(options) {
        //        ...

        //        Destructure options:

        var { stepCount, startingOptions, stepOptions } = options;

        stepCount = Math.max(1, stepCount);
}
Now we need to make sure that the template layer’s opacity, rotation, etc., all match up with the user’s desired starting values. Since applying the user’s options to a layer is going to be something we’ll do a lot of, we’ll move this work into its own method:
function configureLayer(layer, options, shouldAdjustSpacing){
        const { opacity, rotation, direction, spacing } = options;

        layer.style.opacity = opacity / 100;
        layer.transform.rotation = rotation;

        if(shouldAdjustSpacing){
                const directionAsRadians = direction * (Math.PI / 180);
                const vector = {
                        x: Math.cos(directionAsRadians),
                        y: Math.sin(directionAsRadians)
                };

                layer.frame.x += vector.x * spacing;
                layer.frame.y += vector.y * spacing;
        }
};
And because spacing only needs to be applied in-between the duplicates and not the template layer, we’ve added a specific flag, shouldAdjustSpacing, that we can set to true or false depending on whether we’re applying options to a template layer or not. That way we can ensure that rotation and opacity will be applied to the template, but not spacing.
Back in the mosaic method, let’s now ensure that the starting options are applied to the template layer:
function mosaic(options){
        //        ...

        //        Configure template layer

        var layer = group.layers[0];

        configureLayer(layer, startingOptions, false);
}
Next, we need to create our duplicates. First, let’s create a variable that we can use to track what the options for the current duplicate are:
function mosaic(options){
        //        ...

        var currentOptions; // ...
}
Since we already applied the starting options to the template layer, we need to take those options we just applied and add the relative values of stepOptions in order to get the options to apply to the next layer. Since we’ll also be doing this several more times in our loop, we’ll also move this work into a specific method, stepOptionsBy:
function stepOptionsBy(start, step){
        const newOptions = {};

        for(let key in start){
                newOptions[key] = start[key] + step[key];
        }

        return newOptions;
};
After that, we need to write a loop that duplicates the previous layer, applies the current options to it, then offsets (or “steps”) the current options in order to get the options for the next duplicate:
function mosaic(options) {
        //        ...

        var currentOptions = stepOptionsBy(startingOptions, stepOptions);

        for(let i = 0; i < (stepCount - 1); i++){
                let duplicateLayer = layer.duplicate();

                configureLayer(duplicateLayer, currentOptions, true);

                currentOptions = stepOptionsBy(currentOptions, stepOptions);
                layer = duplicateLayer;
        }
}
All done — we’ve successfully written the core of what our plugin is supposed to do! Now, we need to wire things up so that when the user actually clicks the “Apply” button our mosaic code is invoked.
Let’s head back to ui.js and adjust our message handling code. What we’ll need to do is parse the JSON string of options we’re getting so that they’re turned into an object we can actually use. Once we have these options, we can then call the mosaic function with them.
First, parsing. We’ll need to update our message handling function to parse the JSON message we get:
function createWebView(pageURL){
        //        ...

        const scriptMessageHandler = new MochaJSDelegate({
                "userContentController:didReceiveScriptMessage:": (_, wkMessage) => {
                        const message = JSON.parse(wkMessage.body());
                }
        });
}
Next, we’ll need to pass this over to our mosaic function. However, this isn’t really something our code in ui.js should be doing — it’s supposed to be primarily concerned with what’s necessary to display interface-related things on screen — not creating mosaics itself. To keep these responsibilities separate, we’ll add a second argument to createWebView that takes a function, and we’ll call that function whenever we receive options from the web interface.
Let’s name this argument onApplyMessage:
function createWebView(pageURL, onApplyMessage){
        // ...

        const scriptMessageHandler = new MochaJSDelegate({
                "userContentController:didReceiveScriptMessage:": (_, wkMessage) => {
                        const message = JSON.parse(wkMessage.body());

                        onApplyMessage(message);
                }
        });
}
We’ll also need to modify our exported method, loadAndShow, to take this onApplyMessage argument as well and pass it off to createWebView:
function loadAndShow(baseURL, onApplyMessage){
        //        ...

        const webView = createWebView(pageURL, onApplyMessage);
}
Finally, head over to main.js. We now need to import our mosaic function, and call it with the options we receive from the plugin’s user interface:
const mosaic = require("./mosaic");

function onRun(context){
        UI.loadAndShow(context.scriptURL, options => {
                mosaic(options);
        });
};
We’re almost done!
However, if we ran our code now and clicked the “Apply” button in the plugin interface, nothing would happen. Why? The reason is due to how Sketch scripts are run: by default, they “live” only until the bottom of your script is reached, after which Sketch destroys it and frees up whatever resources it was using.
This is a problem for us since it means that anything we need to have asynchronously happen (in this case, that’s after the bottom of our code is reached), like receiving messages, cannot, because our script has been destroyed. This means we wouldn’t get any of our messages from the web interface since we’re not around to receive and respond to them!
There’s a way to signal to Sketch that we need our script to stay alive beyond this point, using Fibers. By creating a Fiber, we tell Sketch that something asynchronous is happening and that it needs to keep our script around. Sketch will then only destroy our script when absolutely necessary (like the user closing Sketch, or when the Mosaic plugin needs to be updated):
//        ...

const Async = require("sketch/async");

var fiber;

function onRun(context){
    if(!fiber){
        fiber = Async.createFiber();
        fiber.onCleanup(() => {
            UI.cleanup();
        });
    }

    UI.loadAndShow(context.scriptURL, options => {
        mosaic(options);
    });
};
Voilà! Let’s try out our plugin now. With a layer selected in Sketch, enter some settings, then click apply:
Final Improvements
Now that we’ve got the majority of our plugin’s functionality implemented, we can try to “zoom out” a bit and take a look at the big picture.
Improving The User’s Experience
If you’ve played around with the plugin in its current state, you might’ve noticed that one of the biggest points of friction appears when you try to edit a Mosaic. Once you create one, you have to hit undo, adjust the options, then click ‘Apply’ (or press Enter). It also makes it harder to edit a Mosaic after you’ve left your document and returned to it later, since your undo/redo history will have been wiped out, leaving you to manually delete the duplicate layers yourself.
In a more ideal flow, the user could just select a Mosaic group, adjust options and watch the Mosaic update until they get the exact arrangement they’re looking for. To implement this, we have two problems to solve:
- First, we’ll need a way to group the duplicates that make up a Mosaic together. Sketch provides the concept of Groups, which we can use to solve this problem.
- Second, we’ll need a way to tell the difference between a normal, user-created group and a Mosaic group. Sketch’s API also gives us a way to store information on any given layer, which we can use as a way tag and later identify a group as one of our ‘special’ Mosaic groups.
Let’s revisit the logic we wrote in the previous section to address this. Our original code follows the following steps:
- Find the current document.
- Find the current document’s selected layer.
- Duplicate the selected layer (we’ll call it the template layer) x number of times.
- For each duplicate, tweak its position, rotation, opacity, etc., by the specific values (amounts) set by the user.
In order to make our new user flow possible, we need to change these steps to:
- Grab the current document.
- Grab the current document’s selected layer.
- Determine whether the selected layer is a Mosaic group or not.
- If it’s some other layer, use it as the template layer and go to step 4.
- If it is a Mosaic group, consider the first layer in it as the template layer, and go to step 5.
- Wrap the template layer inside a group, and mark that group as a Mosaic group.
- Remove all layers from inside the group except the template layer.
- Duplicate the template layer x number of times.
- For each duplicate, tweak its position, rotation, opacity, etc., by the specific values set by the user.
We’ve got three new steps. For the first new step, step 3, we’ll create a function named findOrMakeSpecialGroupIfNeeded that will look at the layer passed to it to determine whether or not it’s a Mosaic group. If it is, we’ll just return it. Since the user could potentially select a sublayer nested deep in a Mosaic group, we’ll also need to check the parents of the selected layer to tell if they’re one of our Mosaic groups as well:
function findOrMakeSpecialGroupIfNeeded(layer){
        //        Loop up through the parent hierarchy, looking for a special group

        var layerToCheck = layer;

        while(layerToCheck){
                if(/* TODO: is mosaic layer? */){
                        return layerToCheck;
                }

                layerToCheck = layerToCheck.parent;
        }
};
If we weren’t able to find a Mosaic group we’ll simply wrap the layer we were passed inside a Group, then tag it as a Mosaic group.
Back at the top of the file, we’ll need to pull out the Group class now too:
const { Document, Group } = require("sketch/dom");
function findOrMakeSpecialGroupIfNeeded(layer){
        //        Loop up through the parent hierarchy, looking for a special group

        var layerToCheck = layer;

        while(layerToCheck){
                if(/* TODO: is mosaic layer? */){
                        return layerToCheck;
                }

                layerToCheck = layerToCheck.parent;
        }

        //        Group

        const destinationParent = layer.parent;
        const group = new Group({
                name: "Mosaic Group",
                layers: [ layer ],
                parent: destinationParent
        });

        /* TODO: mark group as mosaic layer */

        return group;
};
Now we need to fill in the gaps (todo’s). To begin with, we need a means of identifying whether or not a group is one of the special groups belonging to us or not. Here, the Settings module of the Sketch library comes to our rescue. We can use it to store custom information on a particular layer, and also to read it back.
Once we import the module at the top of the file:
const Settings = require("sketch/settings");
We can then use two key methods it provides, setLayerSettingForKey and layerSettingForKey, to set and read data off a layer:
function findOrMakeSpecialGroupIfNeeded(layer){
        const isSpecialGroupKey = "is-mosaic-group";

        //        Loop up through the parent hierarchy, looking for a special group

        var layerToCheck = layer;

        while(layerToCheck){
                let isSpecialGroup = Settings.layerSettingForKey(layerToCheck, isSpecialGroupKey);

                if(isSpecialGroup) return layerToCheck;

                layerToCheck = layerToCheck.parent;
        }

        //        Group

        const destinationParent = layer.parent;

       layer.remove(); // explicitly remove layer from it’s existing parent before adding it to group

        const group = new Group({
                name: "Mosaic Group",
                layers: [ layer ],
                parent: destinationParent
        });

        Settings.setLayerSettingForKey(group, isSpecialGroupKey, true);

        return group;
};
Now that we’ve got a method that handles wrapping a layer in a mosaic group (or, if already a mosaic group, just returns it) we can now plug it into our main mosaic method just after our safety checks:
function mosaic(options){
        //       ... safety checks ...

        //        Group selection if needed:

        const group = findOrMakeSpecialGroupIfNeeded(selectedLayer);
}
Next we’ll add a loop to remove all layers from the group except the template layer (which is the first):
function mosaic(options) {
        //        ...

        //        Remove all layers except the first:

        while(group.layers.length > 1){
                group.layers[group.layers.length - 1].remove();
        }
}
Lastly, we’ll make sure that the group’s size is fitted to its new contents since the user might have originally selected a layer nested within the old group (a layer that we might have removed).
We’ll also need to make sure to set the current selection to our mosaic group itself. This will ensure that if the user is making a bunch of rapid changes to the same mosaic group it won’t become deselected. After the code we already wrote to duplicate a layer, add:
function mosaic(options) {
        //        ...

        //        Fit group to duplicates

        group.adjustToFit();

        //        Set selection to the group

        document.selectedLayers.clear();
        group.selected = true;
}
Try out the plugin again. You should find that editing a mosaic is much smoother now!
Improving The Interface
One other thing you might notice is the lack of synchronization between the display window and the interface inside it, in terms of them both becoming visible at the same time. This is due to the fact that when we display the window, the web interface isn’t guaranteed to have finished loading, so sometimes it’ll “pop” or “flash in” afterwards.
One way to fix this is by listening for when the web interface has finished loading, and only then show our window. There is a method, webView:didFinishNavigation:, that WKWebView will call when the current page has finished loading. We can use it to get exactly the notification we’re looking for.
Back in ui.js, we’ll extend the MochaJSDelegate instance we created to implement this method, which will in turn call the onLoadFinish argument we’ll pass to createWebView:
function createWebView(pageURL, onApplyMessage, onLoadFinish){
        const webView = WKWebView.alloc().init();

        //        Create delegate

        const delegate = new MochaJSDelegate({
                "webView:didFinishNavigation:": (webView, navigation) => {
                        onLoadFinish();
                },
                "userContentController:didReceiveScriptMessage:": (_, wkMessage) => {
                        const message = JSON.parse(wkMessage.body());

                        onApplyMessage(message);
                }
        }).getClassInstance();

        //        Set load complete handler

        webView.navigationDelegate = delegate;

        //        Set handler for messages from script

        const userContentController = webView.configuration().userContentController();

        userContentController.addScriptMessageHandler_name(delegate, "sketchPlugin");

        //        Load page into web view

        webView.loadFileURL_allowingReadAccessToURL(pageURL, pageURL.URLByDeletingLastPathComponent());

        return webView;
};
And back in the loadAndShow method, we’ll adjust it so that it only shows the window once the web view has loaded:
function loadAndShow(baseURL, onApplyMessage){
        //        ...

        const window = createWindow();
        const webView = createWebView(pageURL, onApplyMessage, () => {
                showWindow(window);
        });

        window.contentView = webView;

        _window = window;
};
Bingo! Now our window displays only when the web view has finished loading, avoiding that annoying visual flicker.
Conclusion
Congratulations, you’ve built your first Sketch plugin! 🎉
If you’d like to install and play around with Mosaic, you can download the complete plugin from GitHub. And before you go, here are a few resources that might be handy during the rest of your journey:
- developer.sketchapp.com
The official resource regarding Sketch plugin development. Contains several useful guides, as well as an API reference for the Sketch JavaScript library. - sketchplugins.com
A fantastic and helpful community of Sketch plugin developers. Great for getting all your burning questions answered. - github.com/sketchplugins/plugin-directory
Official, central GitHub repository of Sketch plugins. You can submit your plugins here and share them with the rest of the Sketch community!
 (mb, yk, il)
Dropshipping Made Simple: A Step by Step Guide for WordPress
Dropshipping has become a popular online business idea because it’s easy to setup, requires very little investment, and the market is huge.
Unlike traditional eCommerce business that requires you to manage product inventory and handle shipping logistics, dropshipping allows you to start an online store without managing inventory or dealing with shipping.
In this beginner’s guide, we will walk you through the entire process of setting up a dropshipping business with WordPress. We will also share tips on how to find the best products for dropshipping and how to grow your dropshipping business.
Since this is a long and detailed dropshipping guide, we have broken it down into different sections that you can navigate to by using the navigation below:
- What is Dropshipping?
- How to start a dropshipping business
- What you’ll need to start a dropshipping business
- Choosing a design for your dropshipping store
- Finding dropshipping products for your website
- Where to find dropshipping suppliers and vendors
- Adding dropshipping products in WooCommerce
- Managing dropshipping orders in WooCommerce
- Resources and tools to grow your dropshipping business
- FAQs about dropshipping with WordPress
What is Dropshipping?
Dropshipping is an online business where an eCommerce store doesn’t keep the products in stock, meaning no inventory cost. Instead, when customer purchases a product, the store owner places the order with the original vendor and have them ship the item directly to the customer.
The main difference between a dropshipping business vs traditional eCommerce business is that dropshipping doesn’t require you to stock or own any inventory. You also don’t have to deal with any shipping or handling logistics.
When a product is sold through your online store, you simply forward the purchase order to a wholesaler or manufacturer who fulfills it.
Due to the low operating cost and easier setup, dropshipping has become a global eCommerce trend.
The dropshipping business model has a few pros and cons that you need to keep in mind before getting started.
Pros of starting a dropshipping store
- Setting up a dropshipping business requires much lower investment than a typical online store
- You don’t need to purchase products or manage an inventory
- You don’t need to ship the product by yourself
- You can sell variety of products from different vendors and manufacturers
Cons of starting a dropshipping store
- You are not in control of product quality and availability
- Managing customer expectations can be challenging when you don’t have control over quality or shipping of the products
- Providing customer support can be challenging
- You’ll be making less profit because instead of bulk buying products, you’ll be selling one item at a time
With that said, dropshipping is a proven way to make money online. You can use dropshipping to make extra money on the side or build a large profitable online business.
Let’s take a look at how to properly start a dropshipping business.
How to Start a Dropshipping Business
Starting a dropshipping business is not as difficult as you’d think. There are plenty of eCommerce platforms that allow you to easily set up a dropshipping store without any technical skills.
We recommend using WooCommerce because of its low setup costs, ability to use multiple payment gateways, and flexibility to customize your online store.
According to Builtwith, WooCommerce is the #1 software used to build eCommerce stores.
It is also the most popular choice among dropshipping stores mainly because it runs on top of WordPress, the popular website builder. Using WooCommerce gives you access to thousands of WordPress extensions, third-party integrations, and beautiful store designs.
What You’ll Need to Start Dropshipping with WooCommerce
WooCommerce is available as a free plugin for WordPress. You’ll need a self-hosted WordPress.org website to start your dropshipping store. For details, see our guide on the difference between WordPress.com vs WordPress.org.
To get started with WordPress and WooCommerce, you’ll need the following items:
- A domain name (This will be your store’s online address e.g. wpbeginner.com)
- Web hosting account (This is where your website’s files will be stored)
- SSL certificate (You’ll need it to accept online payments)
Normally, a domain name costs $14.99 / year, SSL Certificate $69.99 / year, and web hosting starts from $7.99/month.
Now, this is not a small investment if you are just starting out.
Luckily, Bluehost, our hosting partner, has agreed to offer WPBeginner users a discount on hosting with free domain name + SSL certificate. Basically, you’d be able to get started for $2.75 per month.
→ Click Here to Claim This Exclusive Bluehost Offer ←
Bluehost is one of the largest hosting companies in the world, and they are an officially recommended hosting provider by both WordPress and WooCommerce.
Once you sign up, Bluehost will send your login details to your email address. It will also automatically install WordPress for you, so you can easily login to WordPress dashboard from your hosting control panel.
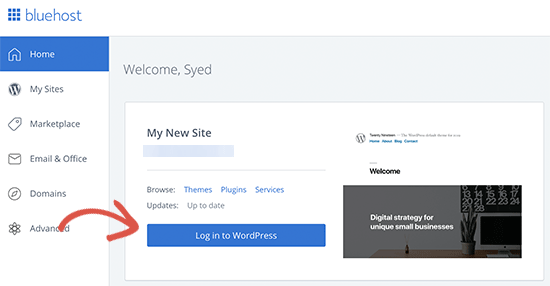
Next, you need to install and activate the WooCommerce plugin. See our guide on how to install a plugin in WordPress for detailed instructions.
Upon activation, you WooCommerce will show you a guided a set up to select currency and other basic settings.
For more detailed instructions, see our tutorial on how to start an online store.
Choosing a Design for Your Dropshipping Store

The first thing you would want to do is to change the appearance of your dropshipping store. Luckily, one of the best thing about using WordPress is that you can select from thousands of WooCommerce themes.
Here are our top picks for a dropshipping WooCommerce theme.
- Astra WooCommerce Theme – A powerful WooCommerce theme built specifically to boost sales and increase conversions.
- Divi – Another highly customizable WooCommerce theme that comes with built-in drag & drop page builder support.
- OceanWP – OceanWP is a multi-purpose WooCommerce ready theme with flexible customization options.
- Ultra – A multi-purpose WordPress theme with several ready-made layouts and a built-in drag and drop page builder.
Once you have found a theme you like, follow our guide on how to install a WordPress theme for step by step instructions.
Finding Dropshipping Products to Sell on Your Website
The next step is to find the products you want to sell on your dropshipping store. Before you start picking products, first you need to decide what kind of products you want to sell.
We recommend choosing a niche for your store. This will make it easier for you to find products as well as customers.
For example: if you want to sell clothing and accessories, then you can narrow it down to by style, theme, or a target audience.
It’s generally a good idea to pick a niche that you are familiar with and passionate about. Making a store about products or topics that you are unfamiliar with will require a lot more effort.
After choosing a niche for your store, you can look for products in that particular category.
In your product research, you want to look for products with low competition and high demand.
To find out which products are trending, you can browse Amazon to collect data and do your own research. Amazon shows best selling, most wished for, and top rated products for many categories.
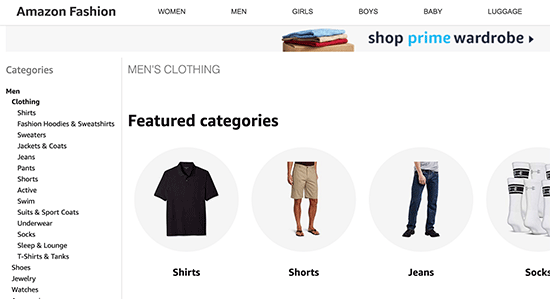
You can also use keyword research to find which product categories people are actually searching for. See our guide on how to properly do keyword research for detailed instructions.
For more on this topic, see our detailed guide on how to find the best products to sell online.
Where to Find Dropshipping Suppliers and Vendors
Once you have decided what products you are going to sell on your store, the next step is to find dropshipping suppliers offering those products.
There are many online marketplaces where you can find dropshipping suppliers and vendors from all over the world. Here is a quick list of the best dropshipping marketplaces to look for suppliers.
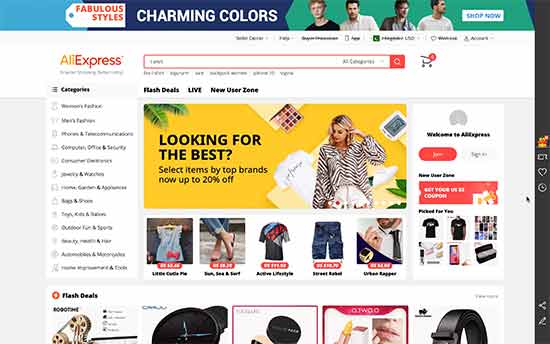
- AliExpress – It is the largest online marketplace of suppliers offering millions of products. You can easily integrate it into your WordPress site to import products directly from AliExpress website.
- SaleHoo – A powerful online marketplace for dropshippers, suppliers, and eCommerce stores. It is a paid platform and subscription costs $67 per year.
- Doba – A large marketplace to find dropshipping suppliers. It allows you to manage lists, find products, and connect with suppliers. Subscription starts from $29 per month
- Etsy – Etsy is an eCommerce platform for unique and hand-made products. Many of these manufacturers would gladly dropship products directly to your customers.
We recommend starting with AliExpress for multiple reasons. First, there are easy to use WordPress plugins that will make it easy to import products directly from AliExpress to your store (and keep it in sync).
AliExpress also makes order fulfillment quite easy for eCommerce stores. As the largest marketplace for dropshipping suppliers, you can find reliable vendors with great ratings and reviews.
Along with dropshipping products, you can also sell third-party products for affiliate commission on your store. This would allow you to offer a large range of products while diversifying your income stream.
Amazon.com is the best source to find affiliate products. Your affiliate earnings will be lower, and you’ll not be able to set custom pricing. However, you can find unique products and use it to provide more shopping choices on your store.
For details see our guide on how to create an Amazon affiliate store with WooCommerce.
Adding Dropshipping Products to Your WooCommerce Store
By default, WooCommerce does not come with seamless dropshipping functionality. Luckily, there are several excellent WooCommerce dropshipping that allow you to do that.
Using a dropshipping extension, you’d be able to easily add dropshipping products, set custom prices with desired profit margin, collect orders, send them to your supplier, and more.
The functionality of your dropshipping extensions would entirely depend on the supplier or marketplace you choose.
If you are selling products from multiple suppliers from different marketplaces, then you may need multiple dropshipping extensions to automate the checkout process.
Here is our pick of the top dropshipping addons for WordPress.
- AliDropship – Makes it easy to import from thousands of products on AliExpress, offer seamless checkout experience, and 1-click order fulfillment.
- WooDropship – Another popular plugin that makes it easy to import products from AliExpress, automatically add product images and sync pricing.
- WooCommerce Dropshipping – Allows you to add other third-party suppliers or vendors to your WooCommerce store, and send them order details in PDF format for fulfillment.
The way you add products to your WooCommerce store will depend on which extension, marketplace, or supplier you go with. If the extension you choose allows you to automatically import products, then you can just do that (hint: the first two in our list make it super easy to import products from AliExpress).
On the other hand, if you need to manually add products to your store, then here is how you would do it.
Manually Adding Dropshipping Products in WooCommerce
Adding products to your WooCommerce store is quite simple. First, you need to visit Products » Add New page inside your WordPress admin area.
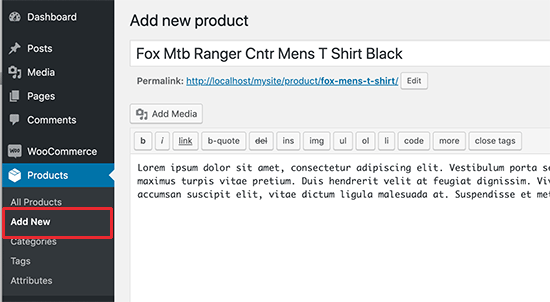
Start by providing a product title and a detailed product description. After that, you need to select product category and start uploading product photo and product gallery images.
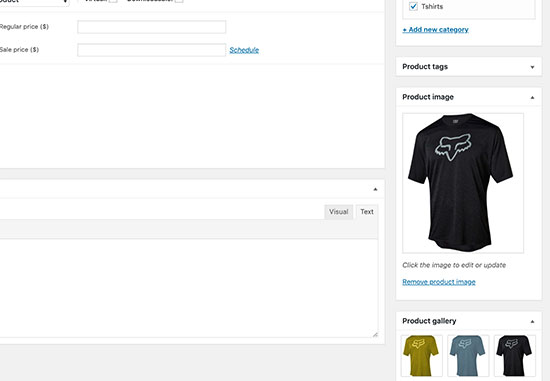
You can find product images from the supplier’s website. However, you need to ask their permission to use those images. They may also be able to provide you additional product images that you can use.
Next, you need to add product details under the Product data section. From here, you can set product price, attributes, and other options.
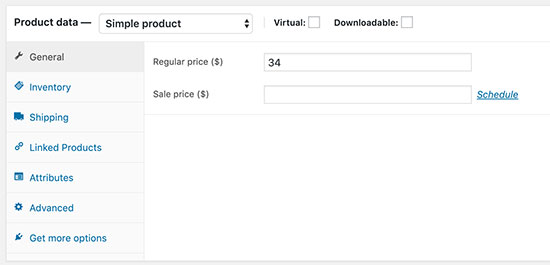
Below that, you can provide a short description for the product. This short description will appear on the shop front, product category, and product search pages.
Go ahead and publish your product to make it appear live on your store.
Repeat the process to add more products.
Managing Dropshipping Orders in WooCommerce
After you have added products in your store, customers will be able to buy them from your website. You’d be able to review the customer orders by visiting WooCommerce » Orders page.
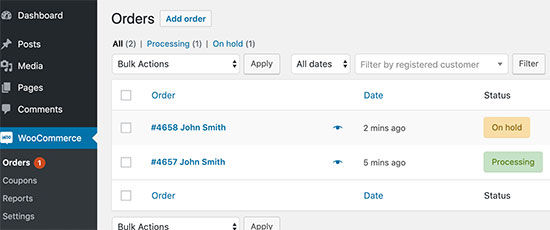
Depending on your dropshipping extension, you may see an option to fulfill orders from here. This would basically send the customer’s order details to the supplier associated with the product.
WooCommerce plugins like AliDropship makes it super easy to send orders to the supplier with a single click.
If your extension does not support that feature, then you’ll need to manually place the order with your supplier by providing them the customer’s order details and shipping information.
You can review each order by clicking on it.
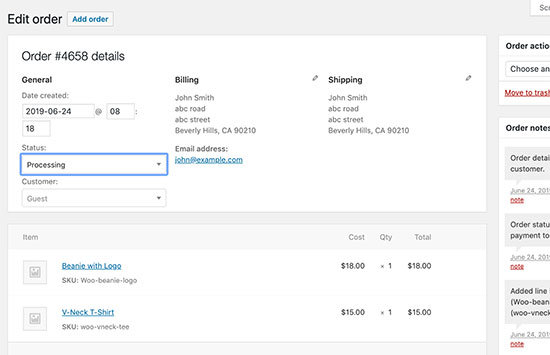
On the order detail page, you can view products ordered, customer payment information, and edit the order status. Once the order is shipped by the supplier, you can change its status to completed.
Resources and Tools to Grow Your Dropshipping Business

Setting up a dropshipping store with WooCommerce is quite easy. However, the real work starts once your store is up and running.
You would need to promote your business, bring traffic to your website, convert traffic into customers, and keep improving your marketing strategy over time.
Luckily, there are tons of great tools and extensions that you can use to help you achieve these goals. Let’s start with the basics first.
1. Ecommerce SEO
SEO or Search Engine Optimization helps you to get more traffic from search engines to your store. You can follow the instructions in our complete WooCommerce SEO guide to get more visitors to your website.
2. Optimize Conversions
Once you have a steady stream of visitors, you would want them to make a purchase. In marketing terms, this is called a conversion (converting a visitor into performing a desired action).
Conversion optimization helps you boost sales, which makes it incredibly important for your online success.
We recommend using OptinMonster, the #1 conversion optimization toolkit on the web. We have a detailed WooCommerce conversion optimization guide that helps you learn how to do that using the latest techniques.
3. Recover Abandoned Carts
Using conversion and SEO, you would be able to bring visitors to your site and help them discover more products. However, a lot of those visitors may not complete a purchase.
They may leave create an account, add products to the cart, but leave before purchasing. You’ll need to learn how to bring back those customers and recover your abandoned cart sales.
4. Ecommerce Analytics
Obviously, you would want to see how all your efforts are paying off. For this, you’ll need MonsterInsights, which helps you install Google Analytics and comes with enhanced eCommerce tracking feature.
Using MonsterInsights you can track WooCommerce customers, see which products are popular, which product pages are not performing so well, and more.
5. Misc. Plugins
WooCommerce gives you access to more than 55,000+ WordPress plugins and many of them are made specifically for eCommerce websites.
These plugins allow you to add features like contact forms, product comparisons, currency switchers, and more. See our list of the best WooCommerce plugins to find more plugins for your store.
FAQs about Dropshipping with WordPress
You may come across new questions as you start working on your new dropshipping store. Following are the answers to some of the most commonly asked questions about dropshipping with WooCommerce.
1. Why not start my dropshipping business with Shopify?
You can totally start your dropshipping business with Shopify. However, Shopify charges you for each transaction, which affects your profits as a dropshipping store.
Another downside of using Shopify is the limited number of extensions and apps that you can use. As a dropshipping business, WooCommerce gives you more extensions and the flexibility to sell whatever you want on your website.
See our comparison of Shopify vs WooCommerce for more information.
2. Can I start my dropshipping business with BigCommerce?
Yes, you can. BigCommerce is a popular eCommerce platform and it even integrates with WordPress. BigCommerce also offers more payment gateways, and it does not charge transaction fees.
It lacks in extensions and the flexibility of WooCommerce, but it offers better scalability. See our comparison of WooCommerce vs BigCommerce for more details.
3. Which hosting company to choose for my WooCommerce store?
We recommend using Bluehost for a new dropshipping business. Their shared hosting plan is perfect to get started, and they are an officially recommended WooCommerce hosting provider.
If you are looking for an alternative, then we would recommend SiteGround. They are well-known for their heroic support and fast servers.
If you can spend a little more, then you can go WP Engine. They are a managed WordPress hosting provider, which is like a concierge service for your eCommerce store.
4. Can I install WooCommerce on my existing WordPress site?
Yes, you can. WooCommerce is available as a WordPress plugin and you can install it on any WordPress site.
5. How do I make sure that dropshipping suppliers deliver products on time?
Most dropshipping suppliers are located in China. This means slower delivery than choosing a vendors located in your own country. However, many dropshipping suppliers use ePacket for faster deliveries.
ePacket is basically a faster shipping method used by suppliers in China in partnership with USPS and other mail services. Ask your suppliers if they deliver products via ePacket for faster deliveries.
6. What to look for when finding a dropshipping supplier?
AliExpress and other marketplaces allow you to view supplier ratings, reviews, number of products they have delivered, and other useful information. This data tells you how reliable a supplier has been in the past. You can also read reviews to learn more about the quality of products delivered.
Since you don’t have control over the quality and delivery of products, you need to spend time on finding reliable dropshipping partners for your store.
7. Is dropshipping legal?
Because starting a dropshipping business is extremely easy, many beginners wonder if dropshipping is legal. The answer is YES. It is completely legal across the world.
In the simplest terms, dropshipping is just a form of order fulfillment where the supplier or manufacturer handles shipping. Nothing is illegal about that.
Of course like any other business, you have to pay proper business taxes depending on the country you’re based in.
We hope this guide helped you learn how to start dropshipping business with WordPress. You may also want to see our guide on how to add live chat support to your WooCommerce store.
If you liked this article, then please subscribe to our YouTube Channel for WordPress video tutorials. You can also find us on Twitter and Facebook.
The post Dropshipping Made Simple: A Step by Step Guide for WordPress appeared first on WPBeginner.
Beginners Guide to Building an Online Retail Web Shop Workshop (Domain Model)
With the release of Red Hat Decision Manager 7.3, I've started updating my free online workshop, a beginners guide to building an online retail web shop.
The previous article covered installing the tooling and setting up a project. This update is the for the third lab in this workshop, with more to follow. Learn how to create a domain model with Red Hat Decision Manager.
Save csv File in database using classic asp
Hlo Plz anyone give a coading of classic asp i want to save my csv and excel file in databse


