In case you can't tell from some of my blog posts, I'm a bit of an advocate for DevOps. I'm extremely fortunate in my employer, Redgate Software, that they are also huge advocates for DevOps. We not only teach it and promote it, and, oh yeah, make AWESOME tools for it, we practice DevOps in what we do.
However, this post is not about DevOps. Instead, I'm trying to leverage some of the concepts of DevOps, Continuous Integration and Continuous Deployment, to arrive at some ideas around learning that I want to share.
Companies rely upon various DevOps solutions to improve productivity, scalability, and resiliency. Such cloud computing services as AWS (Amazon Web Services) may provide organizations with the right combination of services to meet their goals and allow them to enjoy the built-in efficiencies of a public cloud infrastructure. On the other hand, these solutions won't suit all companies or even all apps within one organization. Can Amazon's cloud infrastructure and services benefit you? To learn about possible benefits and limitations, read these highlights from our Cprime webinar about optimizing DevOps with cloud computing.
How Can AWS Support DevOps?
With Amazon AWS, setting up your services is almost as simple as getting an account. Amazon partners with hundreds of providers to offer you quick access to a number of leading tools. Just a few examples include GitHub for version management, Slack for collaboration, and Splunk for data visualization. Besides developed, tested, and maintained applications and data storage, you also start with a fully developed infrastructure. The combination of hardware, software applications, storage, and a pay-as-you-go fee structure provides you with a very low entry barrier.
Hello, readers, and welcome to yet another blog in the Java Concurrencyseries. Today, we are going to look at the CountDownLatch class in Java, what it is, and how to use it. So, let's dive straight into it.
CountDownLatch in Java
Sometimes, we have a need to start our application only when a particular set of tasks are complete. These tasks might be running in parallel and getting completed together or at different times. Then, how do we tell our other threads that all the tasks are completed? How do we keep track of which tasks are complete and which are not? CountDownLatch is a class just for that.
Last time, we got a general overview of DynamoDB. This time, let's look at some advanced features.
Advanced Features
All the features described so far are core DynamoDB features. But DynamoDB also has some additional, more advanced features that you can use to build complex applications. In this section, I’ll provide a short list of what these features are and what you can use them for.
Selecting a proper technology for a new project is always a stressful event. We need to find something that will fit all existing requirements, does not restrict further growth, allows us to achieve necessary performance, does not put a heavy operational burden, etc. It’s only natural that selecting a database can be tricky.
In this article, I would like to describe the DynamoDB database created by AWS. My goal is to give you enough knowledge so you would be able to answer a simple question: “Should I use DynamoDB in my next project?” I will describe in what cases DynamoDB can be used efficiently and what pitfalls to avoid. I hope this will help you to make your life easier.
Font Awesome 5.9 was released last month with 421 new and updated icons. The popular icon font library has grown to include more than 5,000 vector icons and is used on 34% of the top million websites. It’s also one of the top open source projects on GitHub and a popular choice for WordPress theme and plugin developers using icons in their work.
Just a month after 5.8 brought in another batch of top requested brand icons, including Airbnb, Salesforce, and Evernote, the latest release adds more Editor icons to help those who are building text and WYSIWYG editor UIs.
Another notable update in 5.9 is the introduction of icon duos, where Font Awesome has taken some icons and put them together with other icons. For example, the update includes combinations like car-bus and burger-soda.
Font Awesome also recently announced that it will soon be introducing duotone colors to the library, which users will be able to customize.
Documentation on the using the duotones is not yet available, but Font Awesome confirmed that users will be able to change the tones of each icon within their own CSS to any combination. The feature will work out-of-the-box by inheriting the current color but users will be able to change the master color or each layer individually. The icons can then be further customized by targeting each layer in CSS. Follow Font Awesome on Twitter for all the latest news on icon updates and the upcoming duotone color feature release.
Hey, let's create a functional calendar app with the JAMstack
I’ve always wondered how dynamic scheduling worked so I decided to do extensive research, learn new things, and write about the technical part of the journey. It’s only fair to warn you: everything I cover here is three weeks of research condensed into a single article. Even though it’s beginner-friendly, it’s a healthy amount of reading. So, please, pull up a chair, sit down and let’s have an adventure.
My plan was to build something that looked like Google Calendar but only demonstrate three core features:
List all existing events on a calendar
Create new events
Schedule and email notification based on the date chosen during creation. The schedule should run some code to email the user when the time is right.
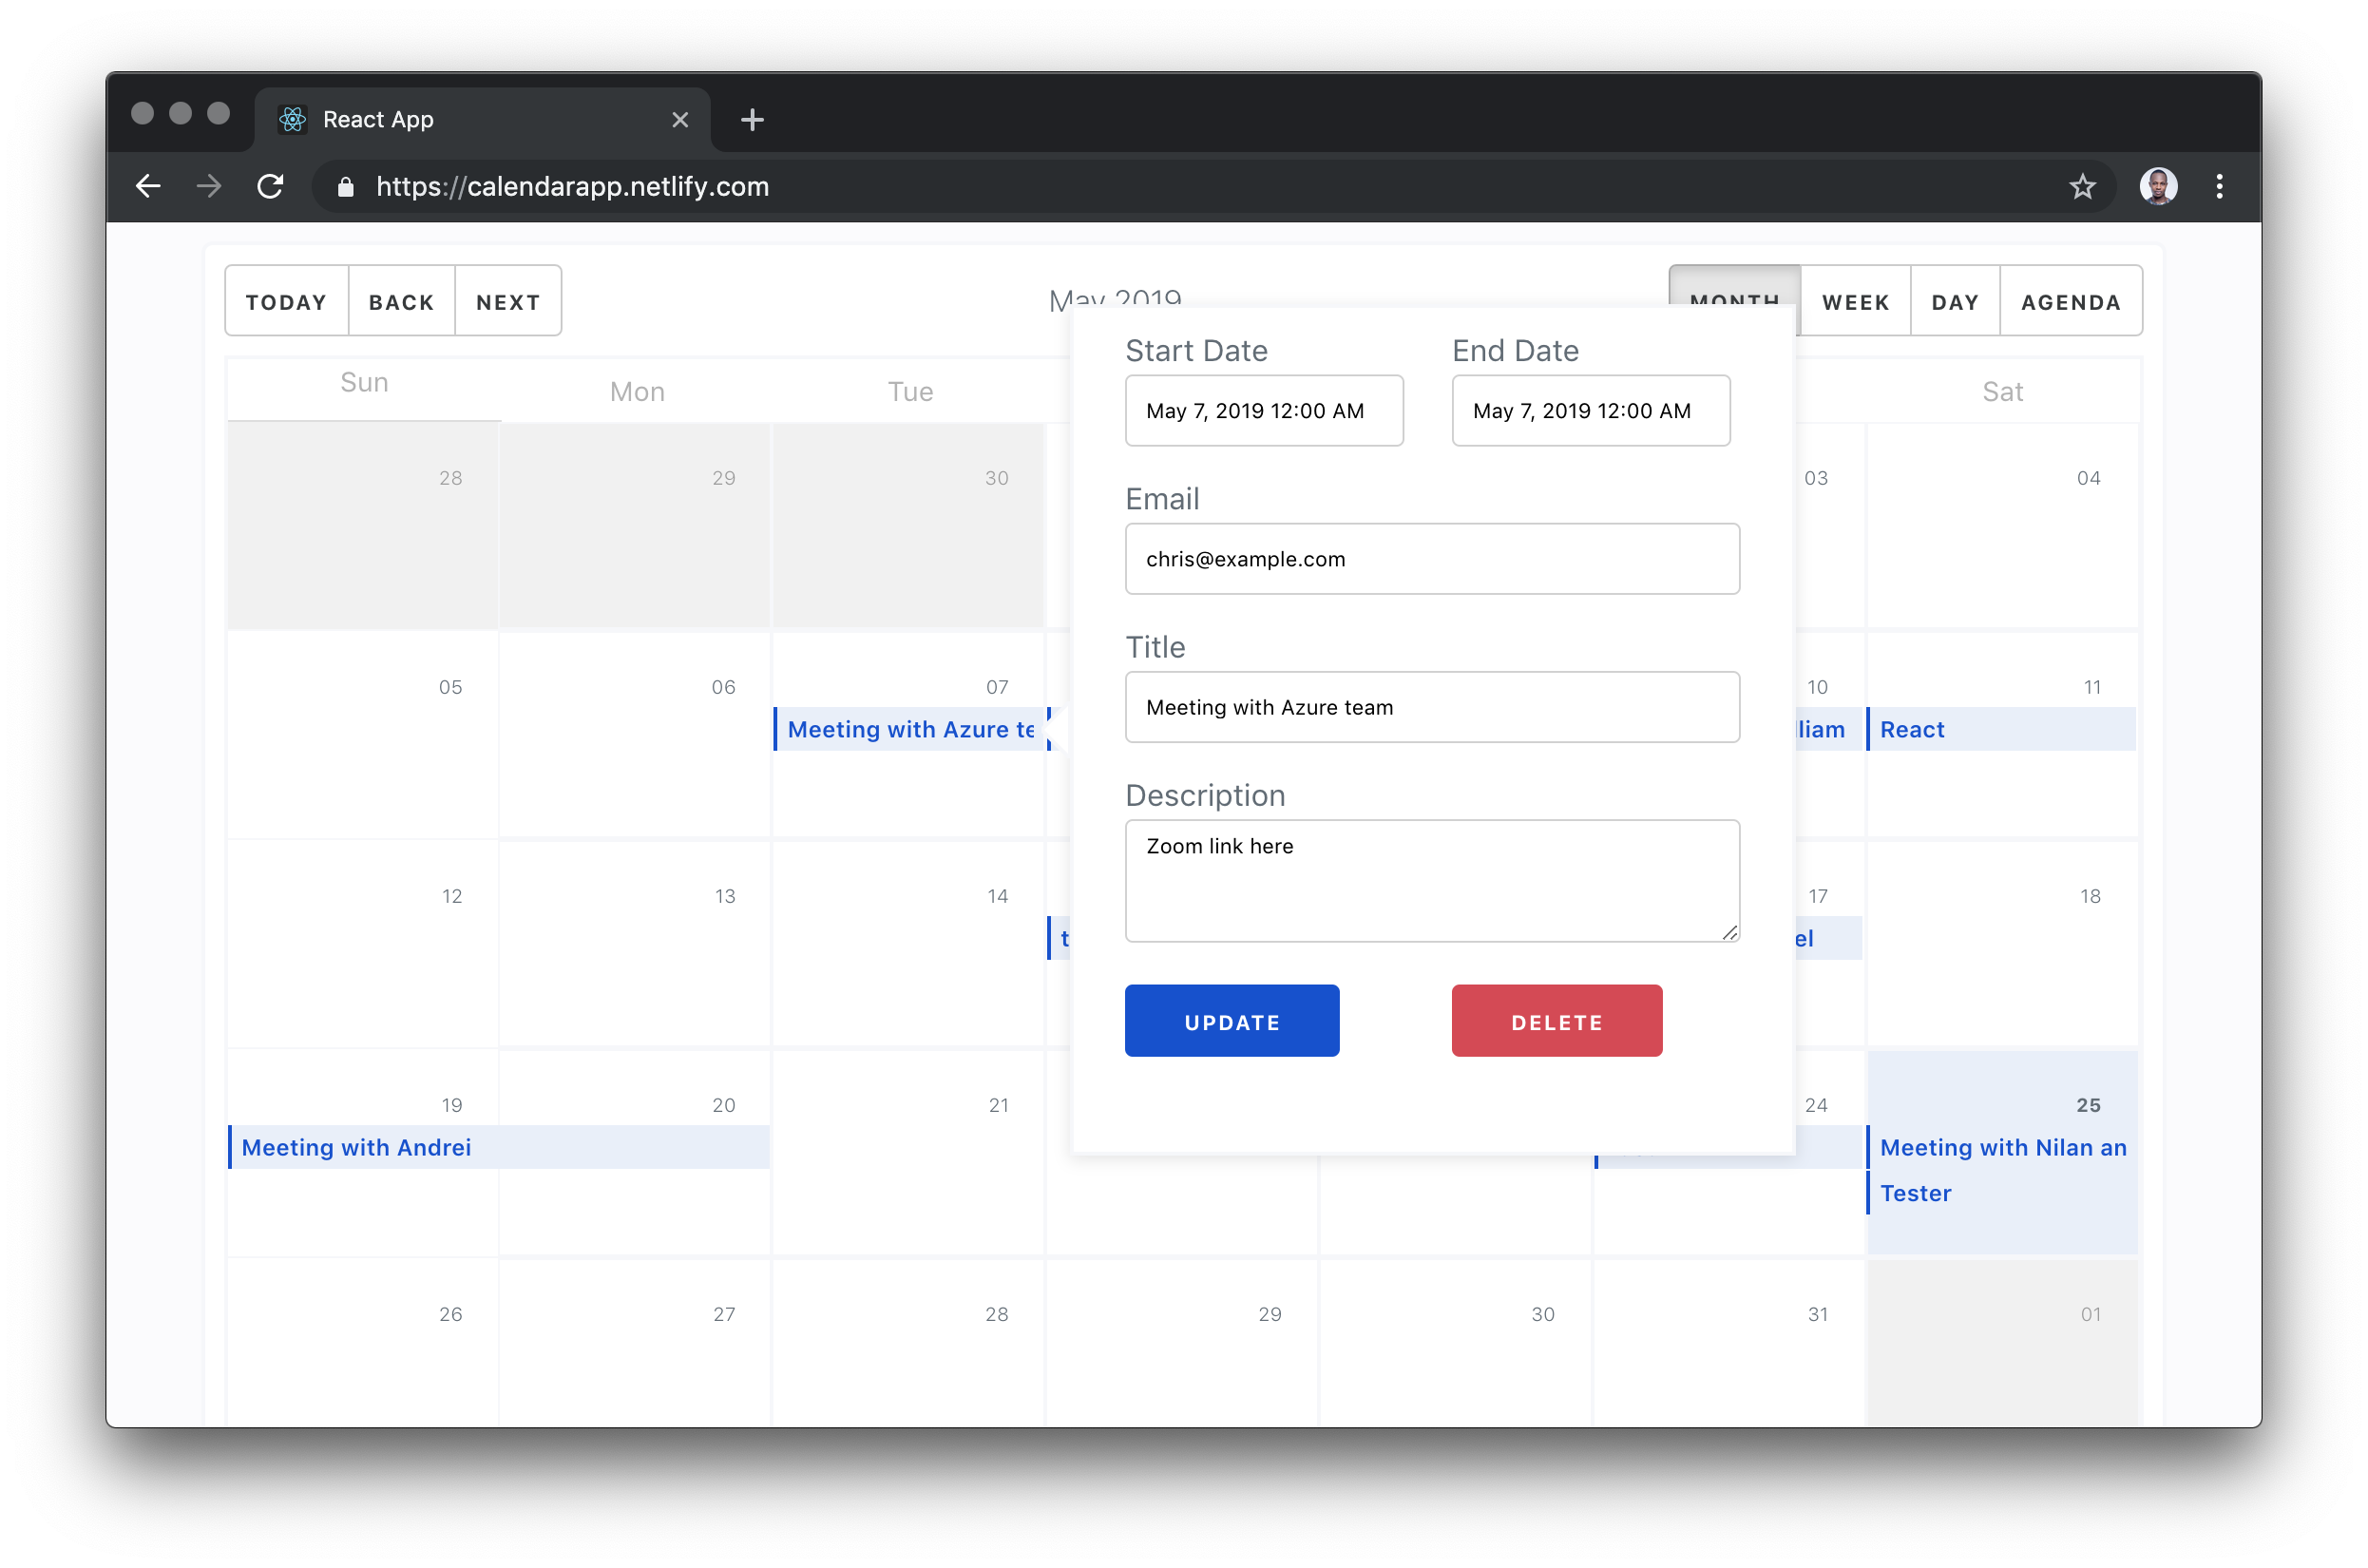
Pretty, right? Make it to the end of the article, because this is what we’ll make.
The only knowledge I had about asking my code to run at a later or deferred time was CRON jobs. The easiest way to use a CRON job is to statically define a job in your code. This is ad hoc — statically means that I cannot simply schedule an event like Google Calendar and easily have it update my CRON code. If you are experienced with writing CRON triggers, you feel my pain. If you’re not, you are lucky you might never have to use CRON this way.
To elaborate more on my frustration, I needed to trigger a schedule based on a payload of HTTP requests. The dates and information about this schedule would be passed in through the HTTP request. This means there’s no way to know things like the scheduled date beforehand.
We (my colleagues and I) figured out a way to make this work and — with the help of Sarah Drasner’s article on Durable Functions — I understood what I needed learn (and unlearn for that matter). You will learn about everything I worked in this article, from event creation to email scheduling to calendar listings. Here is a video of the app in action:
You might notice the subtle delay. This has nothing to do with the execution timing of the schedule or running the code. I am testing with a free SendGrid account which I suspect have some form of latency. You can confirm this by testing the serverless function responsible without sending emails. You would notice that the code runs at exactly the scheduled time.
Tools and architecture
Here are the three fundamental units of this project:
React Frontend: Calendar UI, including the UI to create, update or delete events.
8Base GraphQL: A back-end database layer for the app. This is where we will store, read and update our date from. The fun part is you won’t write any code for this back end.
Durable Functions: Durable functions are kind of Serverless Functions that have the power of remembering their state from previous executions. This is what replaces CRON jobs and solves the ad hoc problem we described earlier.
The rest of this post will have three major sections based on the three units we saw above. We will take them one after the other, build them out, test them, and even deploy the work. Before we get on with that, let’s setup using a starter project I made to get us started.
You can set up this project in different ways — either as a full-stack project with the three units in one project or as a standalone project with each unit living in it's own root. Well, I went with the first because it’s more concise, easier to teach, and manageable since it’s one project.
The app will be a create-react-app project and I made a starter for us to lower the barrier to set up. It comes with supplementary code and logic that we don’t need to explain since they are out of the scope of the article. The following are set up for us:
Calendar component
Modal and popover components for presenting event forms
Event form component
Some GraphQL logic to query and mutate data
A Durable Serverless Function scaffold where we will write the schedulers
Tip: Each existing file that we care about has a comment block at the top of the document. The comment block tells you what is currently happening in the code file and a to-do section that describes what we are required to do next.
Install the npm dependencies described in the root package.json file as well as the serverless package.json:
npm install
Orchestrated Durable Functions for scheduling
There are two words we need to get out of the way first before we can understand what this term is — orchestration and durable.
Orchestration was originally used to describe an assembly of well-coordinated events, actions, etc. It is heavily borrowed in computing to describe a smooth coordination of computer systems. The key word is coordinate. We need to put two or more units of a system together in a coordinated way.
Durable is used to describe anything that has the outstanding feature of lasting longer.
Put system coordination and long lasting together, and you get Durable Functions. This is the most powerful feature if Azure’s Serverless Function. Durable Functions based in what we now know have these two features:
They can be used to assemble the execution of two or more functions and coordinate them so race conditions do not occur (orchestration).
Durable Functions remember things. This is what makes it so powerful. It breaks the number one rule of HTTP: stateless. Durable functions keep their state intact no matter how long they have to wait. Create a schedule for 1,000,000 years into the future and a durable function will execute after one million years while remembering the parameters that were passed to it on the day of trigger. That means Durable Functions are stateful.
These durability features unlock a new realm of opportunities for serverless functions and that is why we are exploring one of those features today. I highly recommend Sarah’s article one more time for a visualized version of some of the possible use cases of Durable Functions.
I also made a visual representation of the behavior of the Durable Functions we will be writing today. Take this as an animated architectural diagram:
A data mutation from an external system (8Base) triggers the orchestration by calling the HTTP Trigger. The trigger then calls the orchestration function which schedules an event. When the time for execution is due, the orchestration function is called again but this time skips the orchestration and calls the activity function. The activity function is the action performer. This is the actual thing that happens e.g. "send email notification".
Create orchestrated Durable Functions
Let me walk you through creating functions using VS Code. You need two things:
Once you have both setup, you need to tie them together. You can do this using a VS Code extension and a Node CLI tool. Start with installing the CLItool:
npm install -g azure-functions-core-tools

# OR

brew tap azure/functions
brew install azure-functions-core-tools
Now that you have all the setup done, let’s get into creating these functions. The functions we will be creating will map to the following folders.
Folder
Function
schedule
Durable HTTP Trigger
scheduleOrchestrator
Durable Orchestration
sendEmail
Durable Activity
Start with the trigger.
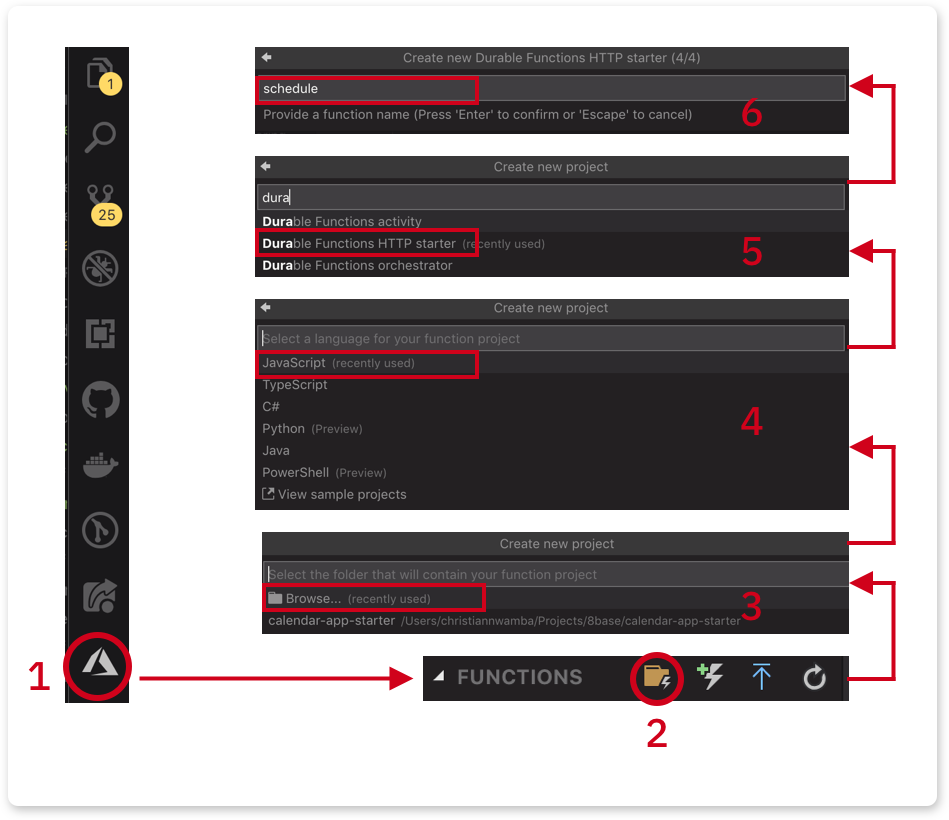
Click on the Azure extension icon and follow the image below to create the schedule function
Since this is the first function, we chose the folder icon to create a function project. The icon after that creates a single function (not a project).
Click Browse and create a serverless folder inside the project. Select the new serverless folder.
Select JavaScript as the language. If TypeScript (or any other language) is your jam, please feel free.
Select Durable Functions HTTP starter. This is the trigger.
Name the first function as schedule
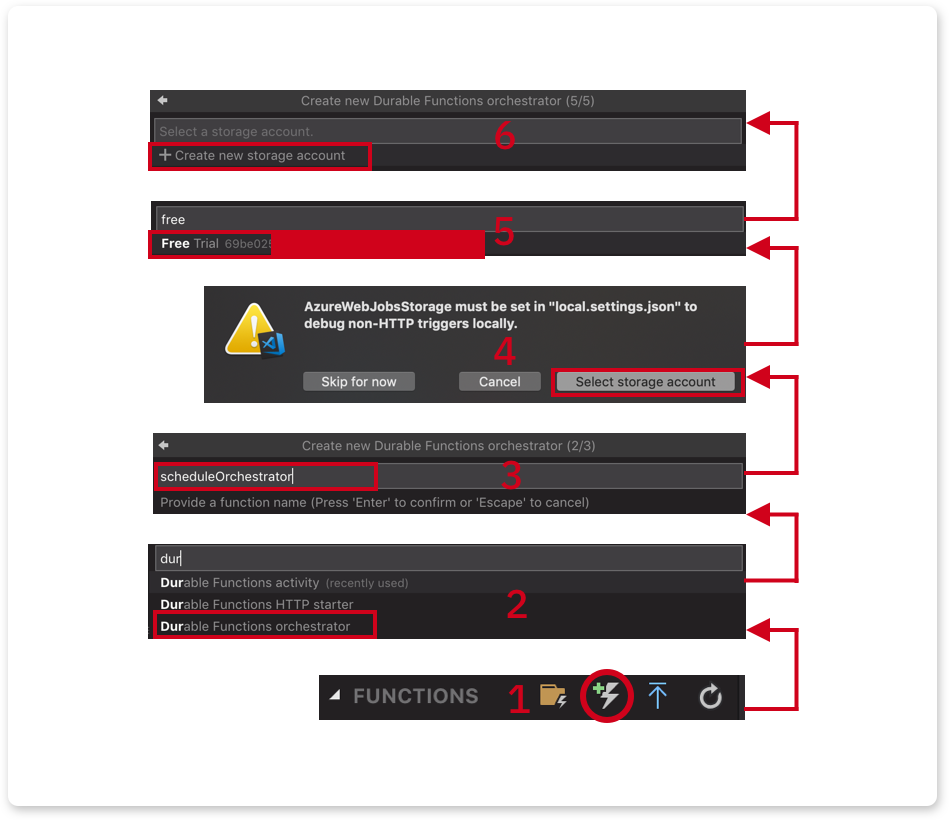
Next, create the orchestrator. Instead of creating a function project, create a function instead.
Click on the function icon:
Select Durable Functions orchestrator.
Give it a name, scheduleOrchestrator and hit Enter.
You will be asked to select a storage account. Orchestrator uses storage to preserve the state of a function-in-process.
Select a subscription in your Azure account. In my case, I chose the free trial subscription.
Follow the few remaining steps to create a storage account.
Finally, repeat the previous step to create an Activity. This time, the following should be different:
Select Durable Functions activity.
Name it sendEmail.
No storage account will be needed.
Scheduling with a durable HTTP trigger
The code in serverless/schedule/index.js does not need to be touched. This is what it looks like originally when the function is scaffolded using VS Code or the CLI tool.
We’re creating a durable function on the client side that is based on the context of the request.
We’re calling the orchestrator using the client's startNew() function. The orchestrator function name is passed as the first argument to startNew() via the params object. A req.body is also passed to startNew() as third argument which is forwarded to the orchestrator.
Finally, we return a set of data that can be used to check the status of the orchestrator function, or even cancel the process before it's complete.
The URL to call the above function would look like this:
It’s also good to know that you can change how this URL looks.
Orchestrating with a Durable Orchestrator
The HTTP trigger startNew call calls a function based on the name we pass to it. That name corresponds to the name of the function and folder that holds the orchestration logic. The serverless/scheduleOrchestrator/index.js file exports a Durable Function. Replace the content with the following:
What this line does use the Durable Function to create a timer based on the date passed in from the request body via the HTTP trigger.
When this function executes and gets here, it will trigger the timer and bail temporarily. When the schedule is due, it will come back, skip this line and call the following line which you should use in place of TODO -- 2.
When a schedule is due, the orchestrator comes back to call the activity. The activity file lives in serverless/sendEmail/index.js. Replace what’s in there with the following:
It currently imports SendGrid’s mailer and sets the API key. You can get an API Key by following these instructions.
I am setting the key in an environmental variable to keep my credentials safe. You can safely store yours the same way by creating a SENDGRID_API_KEY key in serverless/local.settings.json with your SendGrid key as the value:
This pulls out the event information from the input from the orchestrator function. The input is attached to context.bindings. payload can be anything you name it so go to serverless/sendEmail/function.json and change the name value to payload:
Deploying functions to Azure is easy. It’s merely a click away from the VS Code editor. Click on the circled icon to deploy and get a deploy URL:
Still with me this far in? You’re making great progress! It’s totally OK to take a break here, nap, stretch or get some rest. I definitely did while writing this post.
Data and GraphQL layer with 8Base
My easiest description and understanding of 8Base is "Firebase for GraphQL." 8Base is a database layer for any kind of app you can think of and the most interesting aspect of it is that it’s based on GraphQL.
The best way to describe where 8Base fits in your stack is to paint a picture of a scenario.
Imagine you are a freelance developer with a small-to-medium scale contract to build an e-commerce store for a client. Your core skills are on the web so you are not very comfortable on the back end. though you can write a bit of Node.
Unfortunately, e-commerce requires managing inventories, order management, managing purchases, managing authentication and identity, etc. "Manage" at a fundamental level just means data CRUD and data access.
Instead of the redundant and boring process of creating, reading, updating, deleting, and managing access for entities in our backend code, what if we could describe these business requirements in a UI? What if we can create tables that allow us to configure CRUD operations, auth and access? What if we had such help and only focus on building frontend code and writing queries? Everything we just described is tackled by 8Base
Here is an architecture of a back-end-less app that relies on 8Base as it’s data layer:
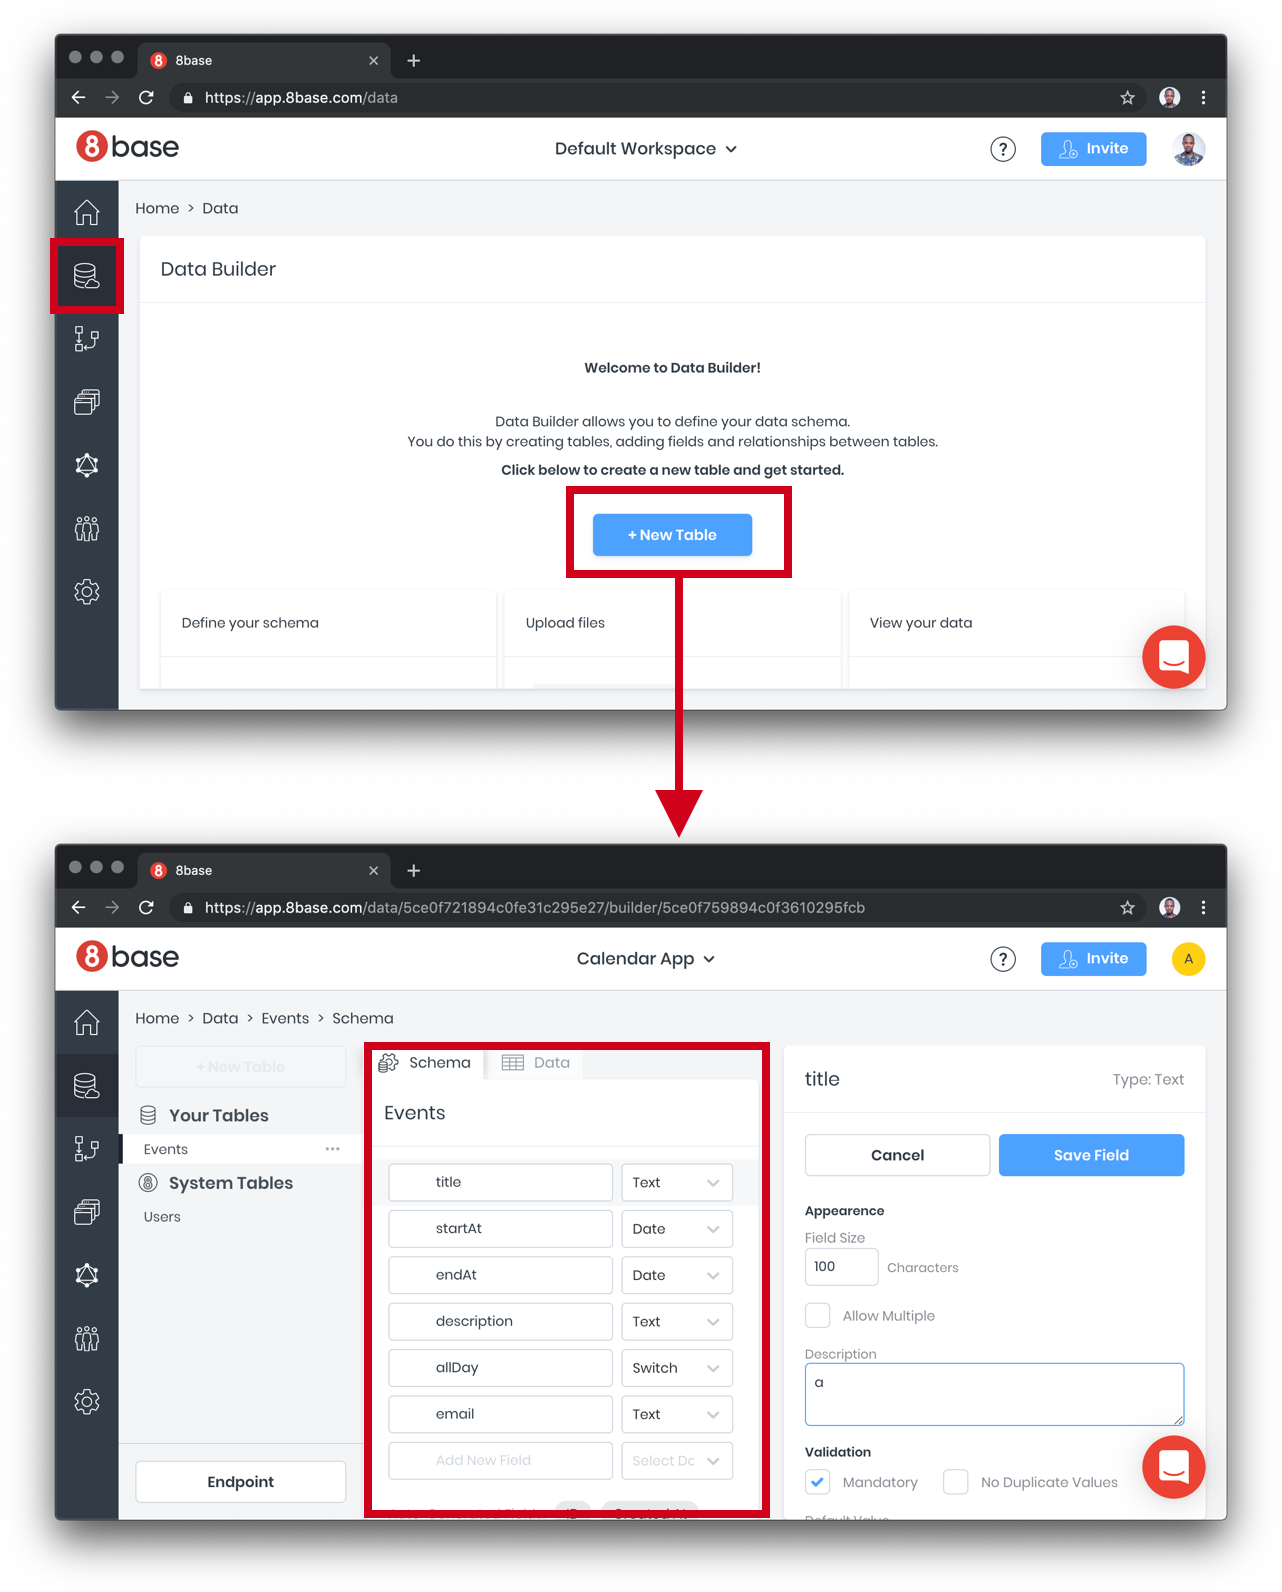
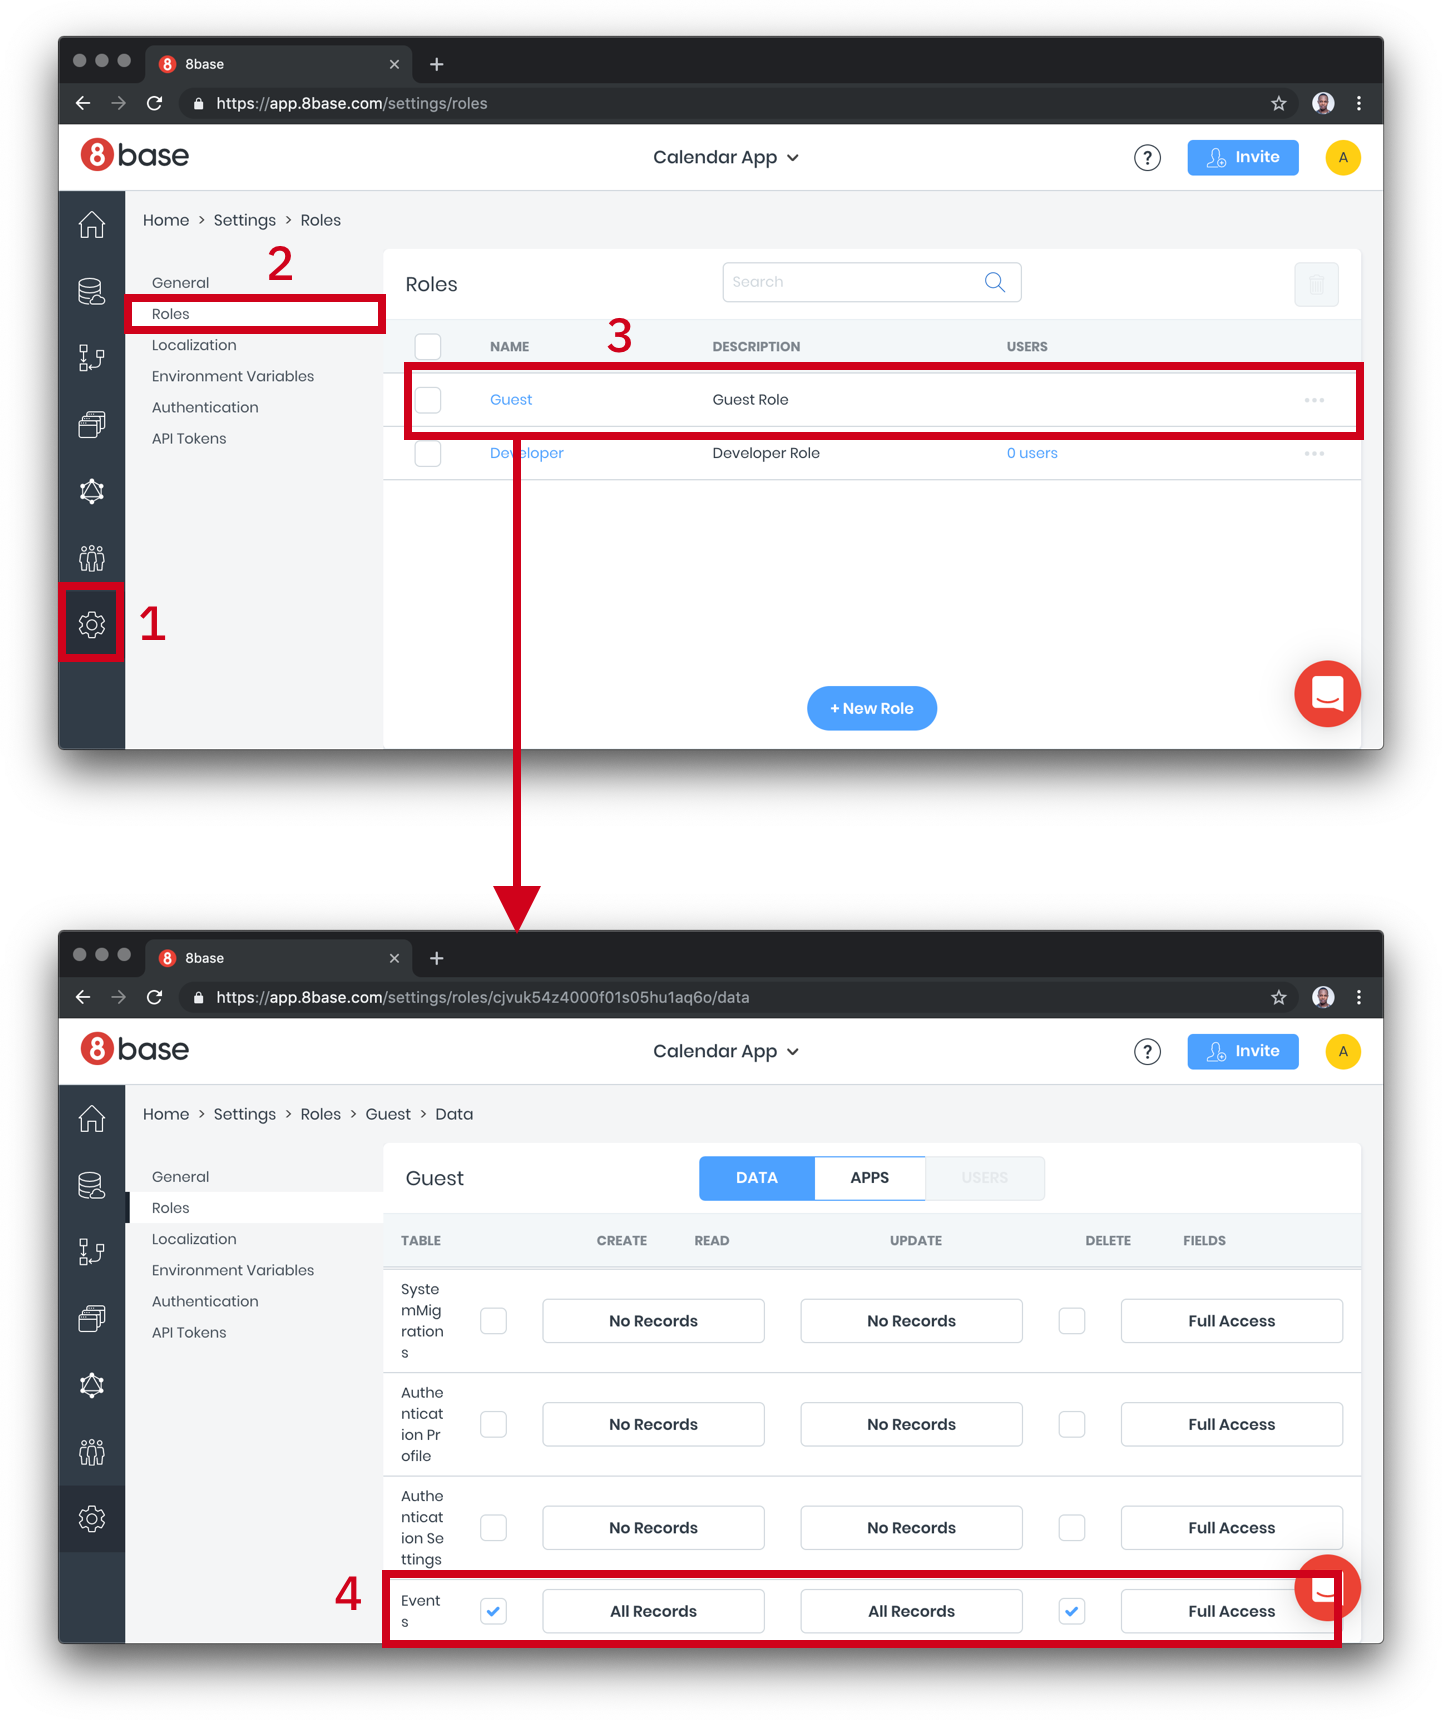
Create an 8Base table for events storage and retrieval
The first thing we need to do before creating a table is to create an account. Once you have an account, create a workspace that holds all the tables and logic for a given project.
Next, create a table, name the table Events and fill out the table fields.
We need to configure access levels. Right now, there’s nothing to hide from each user, so we can just turn on all access to the Events table we created:
Setting up Auth is super simple with 8base because it integrates with Auth0. If you have entities that need to be protected or want to extend our example to use auth, please go wild.
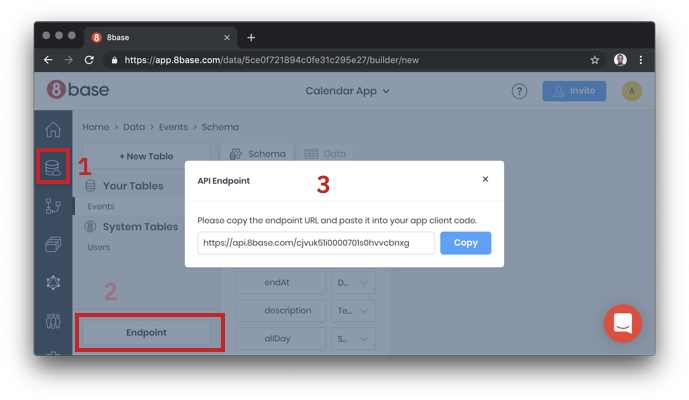
Finally, grab your endpoint URL for use in the React app:
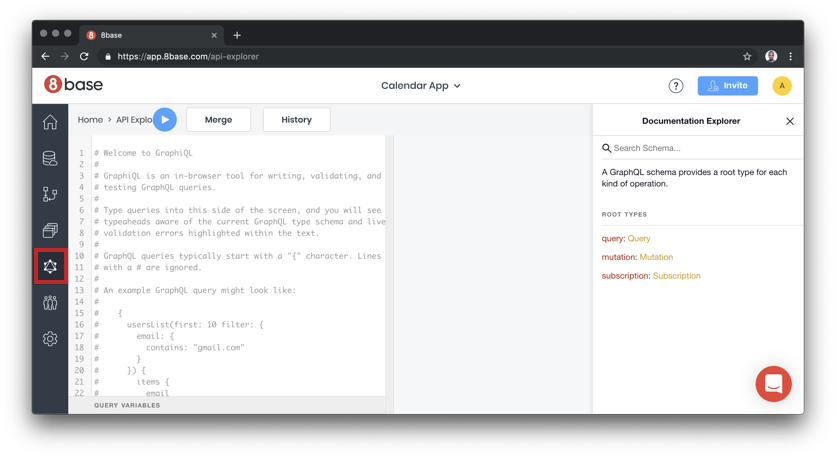
Testing GraphQL Queries and mutation in the playground
Just to be sure that we are ready to take the URL to the wild and start building the client, let’s first test the API with a GraphQL playground and see if the setup is fine. Click on the explorer.
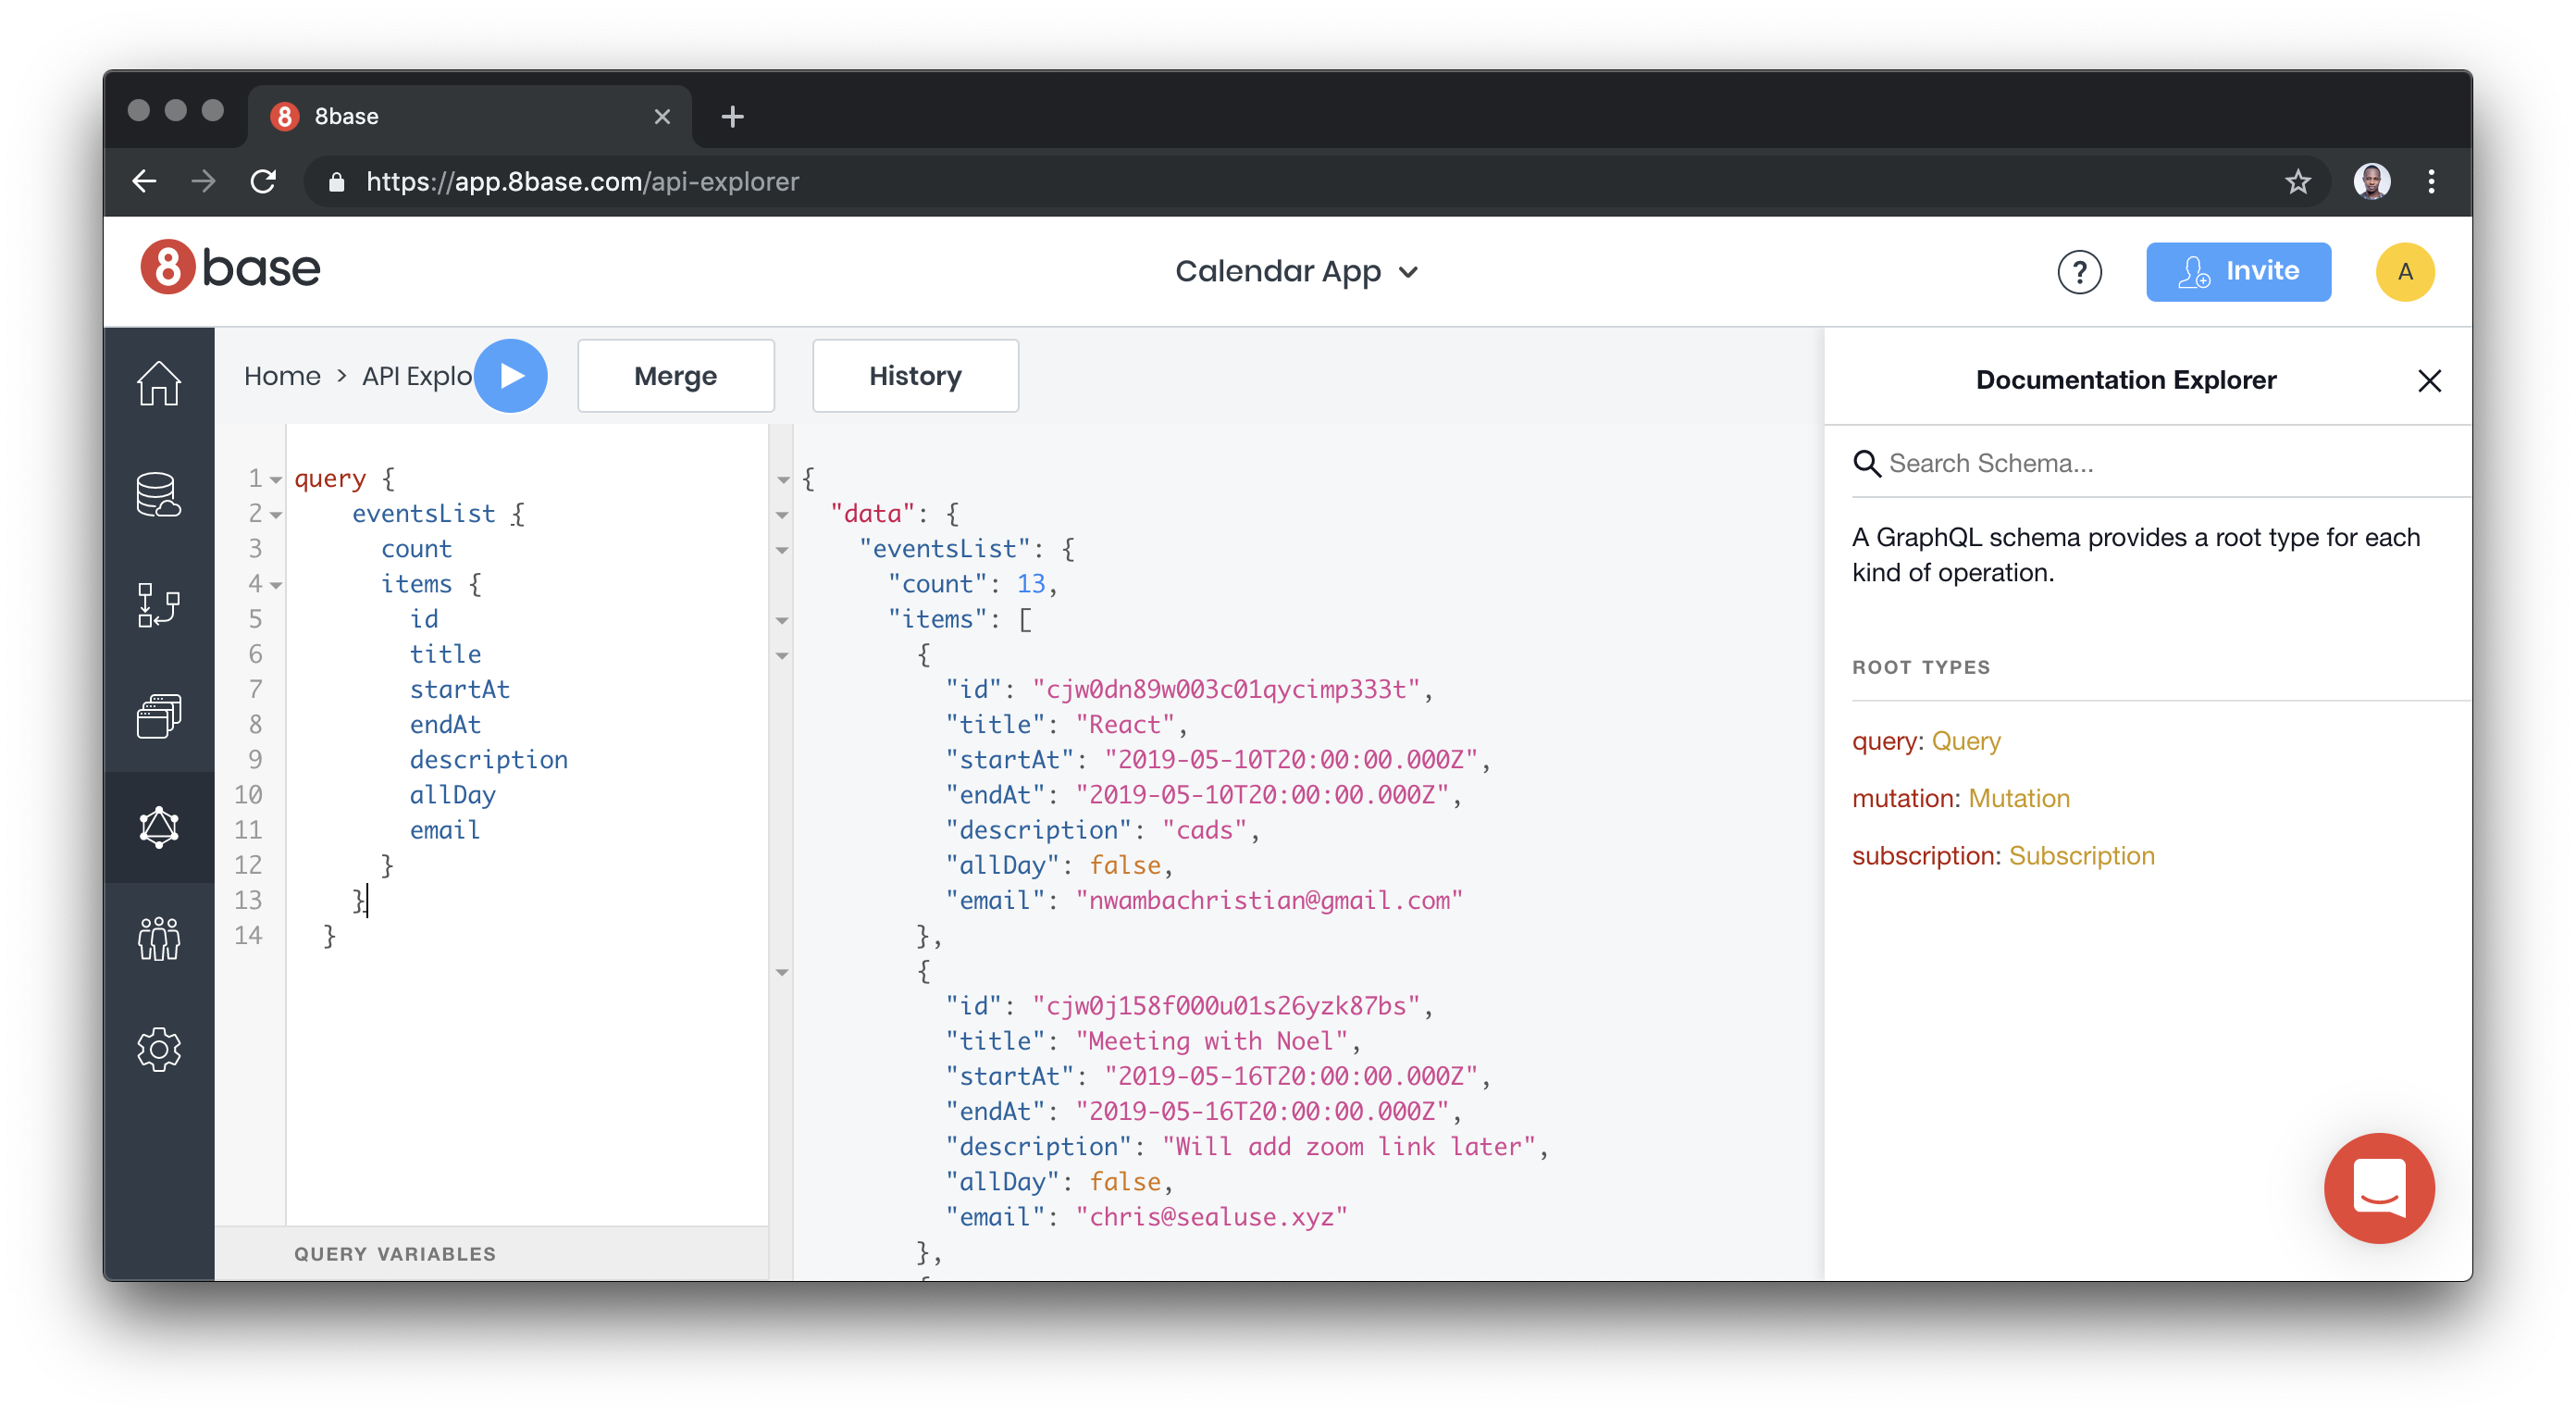
Paste the following query in the editor.
query {
  eventsList {
    count
    items {
      id
      title
      startAt
      endAt
      description
      allDay
      email
    }
  }
}
I created some test data through the 8base UI and I get the result back when I run they query:
You can explore the entire database using the schema document on the right end of the explore page.
Calendar and event form interface
The third (and last) unit of our project is the React App which builds the user interfaces. There are four major components making up the UI and they include:
Calendar: A calendar UI that lists all the existing events
Event Modal: A React modal that renders EventForm component to create a component
Event Popover: Popover UI to read a single event, update event using EventForm or delete event
Event Form: HTML form for creating new event
Before we dive right into the calendar component, we need to setup React Apollo client. The React Apollo provider empowers you with tools to query a GraphQL data source using React patterns. The original provider allows you to use higher order components or render props to query and mutate data. We will be using a wrapper to the original provider that allows you query and mutate using React Hooks.
In src/index.js, import the React Apollo Hooks and the 8base client in TODO -- 1:
import { ApolloProvider } from 'react-apollo-hooks';
import { EightBaseApolloClient } from '@8base/apollo-client';
At TODO -- 2, configure the client with the endpoint URL we got in the 8base setup stage:
const URI = 'https://api.8base.com/cjvuk51i0000701s0hvvcbnxg';

const apolloClient = new EightBaseApolloClient({
  uri: URI,
  withAuth: false
});
Use this client to wrap the entire App tree with the provider on TODO -- 3:
Let’s add a simple error and loading handler on TODO -- 2:
if (error) return console.log(error);
  if (loading)
    return (
      <div className="calendar">
        <p>Loading...</p>
      </div>
    );
Notice that the Calendar component uses the EventPopover component to render a custom event. You can also observe that the Calendar component file renders EventModal as well. Both components have been setup for you, and their only responsibility is to render EventForm.
Create, update and delete events with the event form component
The component in src/components/Event/EventForm.js renders a form. The form is used to create, edit or delete an event. At TODO -- 1, import useCreateUpdateMutation and useDeleteMutation:
import {useCreateUpdateMutation, useDeleteMutation} from './eventMutationHooks'
useCreateUpdateMutation: This mutation either creates or updates an event depending on whether the event already existed.
useDeleteMutation: This mutation deletes an existing event.
A call to any of these functions returns another function. The function returned can then serve as an even handler.
Now, go ahead and replace TODO -- 2 with a call to both functions:
These are custom hooks I wrote to wrap the useMutation exposed by React Apollo Hooks. Each hook creates a mutation and passes mutation variable to the useMutation query. The blocks that look like the following in src/components/Event/eventMutationHooks.js are the most important parts:
We have spent quite some time in building the serverless structure, data storage and UI layers of our calendar app. To recap, the UI sends data to 8base for storage, 8base saves data and triggers the Durable Function HTTP trigger, the HTTP trigger kicks in orchestration and the rest is history. Currently, we are saving data with mutation but we are not calling the serverless function anywhere in 8base.
8base allows you to write custom logic which is what makes it very powerful and extensible. Custom logic are simple functions that are called based on actions performed on the 8base database. For example, we can set up a logic to be called every time a mutation occurs on a table. Let’s create one that is called when an event is created.
Start by installing the 8base CLI:
npm install -g 8base
On the calendar app project run the following command to create a starter logic:
8base init 8base
8base init command creates a new 8base logic project. You can pass it a directory name which in this case we are naming the 8base logic folder, 8base — don’t get it twisted.
Trigger scheduling logic
Delete everything in 8base/src and create a triggerSchedule.js file in the src folder. Once you have done that, drop in the following into the file:
The information about the GraphQL mutation is available on the event object as data.
Replace <HTTP Trigger URL> with the URL you got after deploying your function. You can get the URL by going to the function in your Azure URL and click "Copy URL."
You also need to install the node-fetch module, which will grab the data from the API:
npm install --save node-fetch
8base logic configuration
The next thing to do is tell 8base what exact mutation or query that needs to trigger this logic. In our case, a create mutation on the Events table. You can describe this information in the 8base.yml file:
In a sense, this is saying, when a create mutation happens on the Events table, please call src/triggerSchedule.js after the mutation has occurred.
We want to deploy all the things
Before anything can be deployed, we need to login into the 8Base account, which we can do via command line:
8base login
Then, let’s run the deploy command to send and set up the app logic in your workspace instance.
8base deploy
Testing the entire flow
To see the app in all its glory, click on one of the days of the calendar. You should get the event modal containing the form. Fill that out and put a future start date so we trigger a notification. Try a date more than 2-5 mins from the current time because I haven’t been able to trigger a notification any faster than that.
Yay, go check your email! The email should have arrived thanks to SendGrid. Now we have an app that allows us to create events and get notified with the details of the event submission.
I was just chatting with Dave and he told me about Haunted. It's hooks, but for native web components! Pretty cool. I think the existence of stuff like this makes using web components more and more palatable — particularly in that totally-native no-build-step-needed-at-all kinda way.
I get that there are all sorts of issues with web components, but the things that typically turn me away from them are a lack of nice templating and rerendering and no state management.
But we can knock those two out right quick these days...
import { html } from "https://unpkg.com/lit-html/lit-html.js";
import { component, useState} from "https://unpkg.com/haunted/haunted.js";

function App() {
  const [name, setName] = useState("Chris");
  return html`
    <div class="module">
      Hello, ${name}!
    </div>
  `;
}

customElements.define("my-app", component(App));
The CodePen Challenge this week is using the Star Wars API, so let's make a fetch request and use that to fill state. That's a great use case for useEffect.
Corvid accelerates the way you build production-grade web applications. It’s an open development platform that combines an intuitive visual builder with a built-in IDE, serverless Node.js, integrated databases and more — all backed by the secure Wix Cloud and without the hassle of setting up or managing infrastructure. Invest in your business, product, and services and join the thriving community of developers who use Corvid.
With Corvid you’ll be able to truly maximize your workflow — get zero setup, one-click deployment, gradual rollout of release versions and application telemetry.
There’s a whole lot of valuable and useful information out there for just about anyone who wants to start a business or to simply improve their existing business. Many of these websites, blog posts, and articles that are available online are excellent and can really help any business owner. Most of the advice that they [...]
Are you looking to choose a business VoIP provider but not sure which one is right for your needs?
VoIP is a term used for business phone service which allows you to use advanced call management features on your computer or mobile device.
Unlike the old school bulky phone setup, business VOIP is a perfect phone solution for small businesses. You can cut down phone costs while enjoying all the powerful tools to grow your business.
In this article, we will explain what is business VoIP, and how to choose the best business VoIP provider for your company. Since we had to choose a VoIP provider for our own business, we will also share our best VoIP phone providers for small and growing businesses.
What is VoIP?
VoIP or Voice over IP is a term used to describe internet phone service. Unlike a traditional phone service which uses the landline, VoIP services use the internet to receive and make calls.
Benefits of using VoIP
Following are just some of the benefits of using a business VoIP phone system:
You can receive calls using computers, VoIP phonesets, and even cell phone.
You can share one number with several employees.
You can easily track call duration, hold times, wait times, and overall usage.
Most business VoIP services come with call forwarding, caller ID, call waiting, call routing, and more.
You can use the same number anywhere you want.
It gives you a business phone number, so you don’t have to share your personal cellphone number with clients.
Business VoIP offers cheaper local and international calls.
The business VoIP technology offers a lot of flexibility and freedom, and it has made it easy for businesses of all sizes to have a business phone number. Whether you’re a small 1 person company, a growing 10 people team, or established business with over 100+ people, you can use business VoIP.
However if you don’t choose the best business VoIP provider, then you can run into some serious challenges.
For example, the voice quality on VoIP calls varies depending on the internet connection and the service provider you’re using. Unlike landlines, you’ll loose VoIP connection during a power outage or internet disruption, but this shouldn’t impact most small businesses if you’re well prepared.
Having said that, let’s discuss when is the right time to start thinking about a business VoIP solution.
Does Your Business Need VoIP Business Phone Solution?
In any business, giving people a way to contact you is helpful in building trust and boost your sales.
When starting a website, most business owners add a contact form, which makes it easy for users to contact you via email.
However depending on the industry, sometimes customers may prefer more instant communication.
This is why many businesses offer live chat or phone number on their websites. Giving users more than one way to communicate with your business can improve customer support and result in more sales.
Whether you run an online store to sell products or a business website to sell services, a VoIP based business phone service can help you grow your business without the high costs.
Your website visitors can easily call you to request a quote, ask a pre-sale question, or even request support.
In short, business VoIP phone enables you to better manage and track your calls, collect customer information, and build stronger relationships with your customers.
How to Choose The Best VoIP Service Your Business
There are a lot of large companies offering business VoIP services, and it’s a very competitive space. The abundance of choices and highly competitive nature of advertising makes it difficult for business owners to choose the best VoIP provider for their business.
If you are just starting out, then you may be looking for the cheapest VoIP business phone service. However, you need to be careful when going down this route because they may lack certain features, which you’d later discover to be essential for your business.
Then there are some business VoIP services that are not easy to implement, transfer, or simply too expensive.
When comparing business VoIP providers for our business, we looked for a balance of features and reasonable cost. Here’s a quick checklist that we used:
Cost of local vs international calls. Most business VoIP services offer different plans for international calls. You need to choose a provider based on the geographic location of your customers.
Features available in the VoIP plans. Many companies offer different features while some sell them as separate add-ons which would increase your costs.
Mobile apps and features that you can share among multiple users.
Third-party integrations that you can use to connect your VoIP service to other tools like your CRM software, email marketing service, and more.
That being said, let’s take a look at our pick of the best business VoIP providers.
Nextiva is the best business VoIP service on the market. We can say this confidently because while researching for a VoIP service for our own business, we ended up choosing Nextiva.
Their business VoIP service offers all the essential features needed by a growing business including call routing, free domestic calling, voicemail to email and text, online fax, and more.
Other standard features include free number porting, caller ID, call forwarding, custom greetings, hold music, and more.
They also offer a free local or toll-free number with their plans.
We were able to quickly setup professional sounding welcome message with directory and phone routing which helps make our small business compete with the big guys.
What we really liked about Nextiva was their support team was extremely helpful from pre-sales all the way to onboarding and setup.
Even though we didn’t need any fancy desk phone sets, they gave us a full demo and showed us how we can easily use Nextiva with traditional desk phones or conference phones as our business grows.
The best part was they went above and beyond even though we’re a relatively small customer for them considering they help large businesses like Taco Bell, Ashleys Furniture, Conan, and others.
Pricing: Starts from $20 / per user / per month. Unlike other business VoIP providers, they don’t require annual contracts. However you can get discounts on buying pre-paid packages, and you can also get lower rates when you add more users to your plan.
RingCentral is another excellent business VoIP provider. With RingCentral, you get all the standard feature you would expect from a reliable business VoIP provider like call forwarding, advanced routing, call waiting, caller ID, hold music, and more.
They offer easy integrations with third-party services like Dropbox, G Suite, Salesforce, and more.
Other notable features include online meetings, video calls, screen sharing, conferencing, and an easy to use web-based administration panel.
We first discovered RingCentral organically because they are very well known and a fairly large company in the business VoIP space. While their feature offering is great, their pricing is a bit on the higher end unless you sign the annual contract.
Pricing: Starting from $34.99 / per user every month for the first user. Their monthly pricing drops significantly when you add the second user to $24.99 per user every month. You can also save 40% by switching to the annual plan.
GrassHopper is a popular business VoIP service suitable for startups and growing businesses.
They offer virtual phone numbers over VoIP platform, allowing call forwarding to any numbers or devices. The downside is that you’ll need a landline for outgoing calls.
They offer all the features you will expect like call waiting, forwarding, hold music, advanced routing, voicemail to email, and more. You can manage it from a computer using your web browser or mobile phone apps.
It works with local, toll-free, vanity numbers, and you can choose from the US, Canada, or UK based numbers.
Pricing: Starting from $29 per month with 1 number and up to 3 extensions. They offer a 10% discount if you sign an annual contract.
Phone.com is another popular choice among small business VoIP service providers. They include many European countries and Canada in their local call minutes. If you are operating in those locations, then it could be a cheap business VoIP service for your needs.
Their service includes call forwarding, routing, waiting, custom greetings and music, conferencing, and more. You can also integrate your VoIP plan to popular CRM software like Salesforce or Zoho.
Pricing: Starting from $12.99 per month with 300 monthly minutes. Their unlimited plan starts at $29.99 per month per user extension.
Vonage is famous for offering residential VoIP however they also offer business VoIP services for small to medium-sized businesses as well as enterprise clients. They offer a wide range of business communication tools including VoIP.
It includes all the usual features such as call forwarding and routing, caller ID, waiting, and more. Apart from that, they also offer team messaging and chat, conference calling, CRM integration, automatic call attendant, call recording, and more.
They offer different plans each with different features and limitations.
Pricing: Their base plan starts from $19.99 per month per line.
Which is the Business VoIP Provider for You?
Above we have shared the best business VoIP providers in the market today. Each of them offer a slightly different product and service at different prices.
When looking for a business VoIP solution for our company, we did extensive research to compare each of these companies, their ratings on top user review websites, and even what their employees were saying about them.
At the end, we ended up choosing Nextiva for our business.
We recommend using Nextiva as the best business VoIP provider. Their plans are suitable for businesses of all sizes with an impressive set of features and great customer service.
They offer fair pricing, do not require annual contracts, and their customer service is top-notch.
RingCentral came as a close second. They offered a lot of the same features, but at the end it came down to pricing where Nextiva clearly won.
One of the principles of BDD is to have a single source of truth for both the requirements that describe a feature and the automated tests that verify them. And it is a natural step to want to include both automated and manual tests in this single source of truth.
Cucumber is primarily and traditionally used for automating executable specifications. But with Serenity BDD, you can add special tags to indicate that a scenario represents a manual test case.
Today there are many tools for the provisioning of infrastructure: Vagrant, CloudFormation, OpenStack Heat, and many others. This article speaks about Terraform: the best software tool for provisioning in the cloud under various important aspects.
Terraform is an open source infrastructure as code tool created by Hashicorp and written in Go. With Terraform, you can describe your infrastructure as code, define the provider, and deploy and update your app. It is important to mention that the Terraform is not a configuration management tool.
In this post, we will take a look at how we can use Google Cloud Vision from a Spring Boot application. With Google Cloud Vision it is possible to derive all kinds of things from images, like labels, face and text recognition, etc. As a bonus, some examples with Python are provided too.
1. Introduction
A good point to start experimenting with Cloud Vision is the Cloud Vision API Documentation. The documentation is comprehensive and the examples actually do work ;-) . In the next paragraphs, we will explore some of the image processing capabilities. We will do the following:
When we work with Docker, it is important to have basic knowledge of docker images and containers. Docker containers are created using docker images. We are going to look into basic commands to create docker containers using images.
Docker Image
An image is a read-only template with instructions for creating a Docker container. It is a combination of file system and parameters. Often, an image is based on another image with some additional customization. We can use existing images or create our own images.
With the recent release of Vue 2.6, the syntax for using slots has been made more succinct. This change to slots has gotten me re-interested in discovering the potential power of slots to provide reusability, new features, and clearer readability to our Vue-based projects. What are slots truly capable of?
If you’re new to Vue or haven’t seen the changes from version 2.6, read on. Probably the best resource for learning about slots is Vue’s own documentation, but I’ll try to give a rundown here.
What Are Slots?
Slots are a mechanism for Vue components that allows you to compose your components in a way other than the strict parent-child relationship. Slots give you an outlet to place content in new places or make components more generic. The best way to understand them is to see them in action. Let’s start with a simple example:
This component has a wrapper div. Let’s pretend that div is there to create a stylistic frame around its content. This component is able to be used generically to wrap a frame around any content you want. Let’s see what it looks like to use it. The frame component here refers to the component we just made above.
The content that is between the opening and closing frame tags will get inserted into the frame component where the slot is, replacing the slot tags. This is the most basic way of doing it. You can also specify default content to go into a slot simply by filling it in:
// frame.vue
<template>
  <div class="frame">
    <slot>This is the default content if nothing gets specified to go here</slot>
  </div>
</template>
So now if we use it like this instead:
// app.vue
<template>
  <frame />
</template>
The default text of “This is the default content if nothing gets specified to go here” will show up, but if we use it as we did before, the default text will be overridden by the img tag.
Multiple/Named Slots
You can add multiple slots to a component, but if you do, all but one of them is required to have a name. If there is one without a name, it is the default slot. Here’s how you create multiple slots:
// titled-frame.vue
<template>
  <div class="frame">
    <header><h2><slot name="header">Title</slot></h2></header>
    <slot>This is the default content if nothing gets specified to go here</slot>
  </div>
</template>
We kept the same default slot, but this time we added a slot named header where you can enter a title. You use it like this:
// app.vue
<template>
  <titled-frame>
    <template v-slot:header>
      <!-- The code below goes into the header slot -->
      My Image’s Title
    </template>
    <!-- The code below goes into the default slot -->
    <img src="an-image.jpg">
  </titled-frame>
</template>
Just like before, if we want to add content to the default slot, just put it directly inside the titled-frame component. To add content to a named slot, though, we needed to wrap the code in a template tag with a v-slot directive. You add a colon (:) after v-slot and then write the name of the slot you want the content to be passed to. Note that v-slot is new to Vue 2.6, so if you’re using an older version, you’ll need to read the docs about the deprecated slot syntax.
Scoped Slots
One more thing you’ll need to know is that slots can pass data/functions down to their children. To demonstrate this, we’ll need a completely different example component with slots, one that’s even more contrived than the previous one: let’s sorta copy the example from the docs by creating a component that supplies the data about the current user to its slots:
This component has a property called user with details about the user. By default, the component shows the user’s last name, but note that it is using v-bind to bind the user data to the slot. With that, we can use this component to provide the user data to its descendant:
To get access to the data passed to the slot, we specify the name of the scope variable with the value of the v-slot directive.
There are a few notes to take here:
We specified the name of default, though we don’t need to for the default slot. Instead we could just use v-slot="slotProps".
You don’t need to use slotProps as the name. You can call it whatever you want.
If you’re only using a default slot, you can skip that inner template tag and put the v-slot directive directly onto the current-user tag.
You can use object destructuring to create direct references to the scoped slot data rather than using a single variable name. In other words, you can use v-slot="{user}" instead of v-slot="slotProps" and then you can use user directly instead of slotProps.user.
Taking those notes into account, the above example can be rewritten like this:
You can bind more than one value with v-bind directives. So in the example, I could have done more than just user.
You can pass functions to scoped slots too. Many libraries use this to provide reusable functional components as you’ll see later.
v-slot has an alias of #. So instead of writing v-slot:header="data", you can write #header="data". You can also just specify #header instead of v-slot:header when you’re not using scoped slots. As for default slots, you’ll need to specify the name of default when you use the alias. In other words, you’ll need to write #default="data" instead of #="data".
There are a few more minor points you can learn about from the docs, but that should be enough to help you understand what we’re talking about in the rest of this article.
What Can You Do With Slots?
Slots weren’t built for a single purpose, or at least if they were, they’ve evolved way beyond that original intention to be a powerhouse tool for doing many different things.
Reusable Patterns
Components were always designed to be able to be reused, but some patterns aren’t practical to enforce with a single “normal” component because the number of props you’ll need in order to customize it can be excessive or you’d need to pass large sections of content and potentially other components through the props. Slots can be used to encompass the “outside” part of the pattern and allow other HTML and/or components to placed inside of them to customize the “inside” part, allowing the component with slots to define the pattern and the components injected into the slots to be unique.
For our first example, let’s start with something simple: a button. Imagine you and your team are using Bootstrap*. With Bootstrap, your buttons are often strapped with the base `btn` class and a class specifying the color, such as `btn-primary`. You can also add a size class, such as `btn-lg`.
* I neither encourage nor discourage you from doing this, I just needed something for my example and it’s pretty well known.
Let’s now assume, for simplicity’s sake that your app/site always uses btn-primary and btn-lg. You don’t want to always have to write all three classes on your buttons, or maybe you don’t trust a rookie to remember to do all three. In that case, you can create a component that automatically has all three of those classes, but how do you allow customization of the content? A prop isn’t practical because a button tag is allowed to have all kinds of HTML in it, so we should use a slot.
Now we can use it everywhere with whatever content you want:
<!-- somewhere else, using my-button.vue -->
<template>
  <my-button>
    <img src="/img/awesome-icon.jpg"> SMASH THIS BUTTON TO BECOME AWESOME FOR ONLY $500!!!
  </my-button>
</template>
Of course, you can go with something much bigger than a button. Sticking with Bootstrap, let’s look at a modal, or least the HTML part; I won’t be going into functionality… yet.
<!-- somewhere else, using my-modal.vue -->
<template>
  <my-modal>
    <template #header><!-- using the shorthand for `v-slot` -->
      <h5>Awesome Interruption!</h5>
    </template>
    <template #body>
      <p>We interrupt your use of our application to
      let you know that this application is awesome
      and you should continue using it every day for
      the rest of your life!</p>
    </template>
    <template #footer>
      <em>Now back to your regularly scheduled app usage</em>
    </template>
  </my-modal>
</template>
The above type of use case for slots is obviously very useful, but it can do even more.
Reusing Functionality
Vue components aren’t all about the HTML and CSS. They’re built with JavaScript, so they’re also about functionality. Slots can be useful for creating functionality once and using it in multiple places. Let’s go back to our modal example and add a function that closes the modal:
<!-- my-modal.vue -->
<template>
<div class="modal" tabindex="-1" role="dialog">
  <div class="modal-dialog" role="document">
    <div class="modal-content">
      <div class="modal-header">
        <slot name="header"></slot>
        <button type="button" class="close" data-dismiss="modal" aria-label="Close">
          <span aria-hidden="true">×</span>
        </button>
      </div>
      <div class="modal-body">
        <slot name="body"></slot>
      </div>
      <div class="modal-footer">
        <!--
          using `v-bind` shorthand to pass the `closeModal` method
          to the component that will be in this slot
        -->
        <slot name="footer" :closeModal="closeModal"></slot>
      </div>
    </div>
  </div>
</div>
</template>

<script>
export default {
  //...
  methods: {
    closeModal () {
      // Do what needs to be done to close the modal... and maybe remove it from the DOM
    }
  }
}
</script>
Now when you use this component, you can add a button to the footer that can close the modal. Normally, in the case of a Bootstrap modal, you could just add data-dismiss="modal" to a button, but we want to hide Bootstrap specific things away from the components that will be slotting into this modal component. So we pass them a function they can call and they are none the wiser about Bootstrap’s involvement:
<!-- somewhere else, using my-modal.vue -->
<template>
  <my-modal>
    <template #header><!-- using the shorthand for `v-slot` -->
      <h5>Awesome Interruption!</h5>
    </template>
    <template #body>
      <p>We interrupt your use of our application to
      let you know that this application is awesome
      and you should continue using it every day for
      the rest of your life!</p>
    </template>
    <!-- pull in `closeModal` and use it in a button’s click handler -->
    <template #footer="{closeModal}">
      <button @click="closeModal">
        Take me back to the app so I can be awesome
      </button>
    </template>
  </my-modal>
</template>
Renderless Components
And finally, you can take what you know about using slots to pass around reusable functionality and strip practically all of the HTML and just use the slots. That’s essentially what a renderless component is: a component that provides only functionality without any HTML.
Making components truly renderless can be a little tricky because you’ll need to write render functions rather than using a template in order to remove the need for a root element, but it may not always be necessary. Let’s take a look at a simple example that does let us use a template first, though:
This is an odd example of a renderless component because it doesn’t even have any JavaScript in it. That’s mostly because we’re just creating a pre-configured reusable version of a built-in renderless function: transition.
Yup, Vue has built-in renderless components. This particular example is taken from an article on reusable transitions by Cristi Jora and shows a simple way to create a renderless component that can standardize the transitions used throughout your application. Cristi’s article goes into a lot more depth and shows some more advanced variations of reusable transitions, so I recommend checking it out.
For our other example, we’ll create a component that handles switching what is shown during the different states of a Promise: pending, successfully resolved, and failed. It’s a common pattern and while it doesn’t require a lot of code, it can muddy up a lot of your components if the logic isn’t pulled out for reusability.
So what is going on here? First, note that we are receiving a prop called promise that is a Promise. In the watch section we watch for changes to the promise and when it changes (or immediately on component creation thanks to the immediate property) we clear the state, and call then and catch on the promise, updating the state when it either finishes successfully or fails.
Then, in the template, we show a different slot based on the state. Note that we failed to keep it truly renderless because we needed a root element in order to use a template. We’re passing data and error to the relevant slot scopes as well.
And here’s an example of it being used:
<template>
  <div>
    <promised :promise="somePromise">
      <template #resolved="{ data }">
        Resolved: {{ data }}
      </template>
      <template #rejected="{ error }">
        Rejected: {{ error }}
      </template>
      <template #pending>
        Working on it...
      </template>
    </promised>
  </div>
</template>
...
We pass in somePromise to the renderless component. While we’re waiting for it to finish, we’re displaying “Working on it…” thanks to the pending slot. If it succeeds we display “Resolved:” and the resolution value. If it fails we display “Rejected:” and the error that caused the rejection. Now we no longer need to track the state of the promise within this component because that part is pulled out into its own reusable component.
So, what can we do about that span wrapping around the slots in promised.vue? To remove it, we’ll need to remove the template portion and add a render function to our component:
render () {
  if (this.error) {
    return this.$scopedSlots['rejected']({error: this.error})
  }

  if (this.resolved) {
    return this.$scopedSlots['resolved']({data: this.data})
  }

  return this.$scopedSlots['pending']()
}
There isn’t anything too tricky going on here. We’re just using some if blocks to find the state and then returning the correct scoped slot (via this.$scopedSlots['SLOTNAME'](...)) and passing the relevant data to the slot scope. When you’re not using a template, you can skip using the .vue file extension by pulling the JavaScript out of the script tag and just plunking it into a .js file. This should give you a very slight performance bump when compiling those Vue files.
This example is a stripped-down and slightly tweaked version of vue-promised, which I would recommend over using the above example because they cover over some potential pitfalls. There are plenty of other great examples of renderless components out there too. Baleada is an entire library full of renderless components that provide useful functionality like this. There’s also vue-virtual-scroller for controlling the rendering of list item based on what is visible on the screen or PortalVue for “teleporting” content to completely different parts of the DOM.
I’m Out
Vue’s slots take component-based development to a whole new level, and while I’ve demonstrated a lot of great ways slots can be used, there are countless more out there. What great idea can you think of? What ways do you think slots could get an upgrade? If you have any, make sure to bring your ideas to the Vue team. God bless and happy coding.