The Definitive Free WordPress Plugins List (2019)

Ever wondered if you can make your car fly? Perhaps, all you need is a set of wings, a new engine, a control stick, and air safety features. While I can’t guarantee that your car will fly after those upgrades, the right set of plugins can definitely skyrocket your WordPress site to new heights.

There are 54,000+ plugins available on WordPress.org repo alone. And they’re all either free or follow a freemium model. Either way, they’re free for you to use.

If you’re new to WordPress, this makes it extremely tough for you to find the perfect plugins for your website. Heck, I’m an experienced WordPress developer and even I struggle to find the right one sometimes!

To help with this, I’ve scoured the depths of WP.org’s repository to find these golden set of free WordPress plugins. And I’ve tested them all to make sure that they work as advertised and are updated constantly.

These plugins are arranged by category (rather than listed randomly) so that it’s easier for you to go through them. Some plugins may have overlapping features, but that’s fine. I trust you to use better judgement.

Your goal should be to install as few plugins on your website as possible. This ensures that your site’s performance isn’t affected by too many plugins. With that being said, let’s begin.

Form Plugins

Forminator

Forminator is the only free form maker plugin that allows you to create forms AND polls, submissions, quizzes, and order forms. Its drag-and-drop interface is a breeze to build the form exactly as you envision it. You can also submit blog posts from a form if you want.

Its powerful API can also be accessed for free to build your own custom extensions.

Forminator supports integrations with third-party apps such as Zapier, Google Sheets, Mailchimp, and many other email marketing apps. You can even collect payments with Stripe or PayPal through it.

There’s no free form plugin for WordPress that has these many features available for free. You really need to try it to believe it.

Get Forminator Here

SEO Plugins

SmartCrawl SEO

SmartCrawl boosts your site’s search engine optimization (SEO) with its one-click setup, automatic sitemaps, improved social sharing, a real-time keyword and content analyzer, scans, reports, and much more.

It is designed to increase your site’s traffic without making it hard for you. This gives you more time for concentrating on other areas of your website. As your website grows, SmartCrawl’s autopilot features help it grow along with you, making sure that it always has your back.

Get SmartCrawl SEO Here

Yoast SEO

The OG WordPress SEO plugin since 2008. It’s still going strong after a decade, having 5+ million active installations as of this writing. Though many worthy competitors have emerged recently, it’s still the go-to choice of many WordPress developers and designers.

Yoast SEO tries hard to do everything, and it succeeds in many ways to please both search engine spiders (bots) and visitors. As of now, it’s the #1 rated SEO plugin on WordPress.org’s repository.

It’s huge popularity has a downside though. With so many users out there, it’s hard for their team to give dedicated 24/7 support to all of them.

Get Yoast SEO Here

Speed & Optimization Plugins

Hummingbird

Google recommends that your site should load within about two seconds. Hummingbird makes sure that it does. Hummingbird scans your site and provides one-click fixes to speed it up. It does this through various performance-boosting techniques such as caching, minification, compression and merging.

With Hummingbird, you can see the overall score for your site’s speed, and if it’s lacking in some areas, it suggests you the most appropriate fixes for them. In no time your site will be running as fast as a Hummingbird flaps its wings. Faster load times mean higher search rankings and happier visitors, which further means even higher search rankings, and so on.

Get Hummingbird Here 

WP-Optimize

WP-Optimize is an all-in-one site optimization plugin that cleans your database, compresses your images, and caches your site. It’s simple, popular and highly effective to keep your website fast and thoroughly optimized.

Its minimal setup is easy for beginners to get used to, but if you’re looking for more features down the line, it’ll be a hassle to install a new plugin and set it up. Overall, WP-Optimize brings most optimization features together in a single lean and efficient plugin.

Get WP-Optimize Here

W3 Total Cache

Trusted by over 1+ million websites, W3 Total Cache improves the performance and user experience of your site by reducing load times. It uses features like caching, minification, CDN integration, and the latest best practices to get it done. And it does it all without you having to change your core files, theme, plugins, or how you produce your content.

W3 Total Cache is a web host agnostic Web Performance Optimization (WPO) framework for WordPress, which means that it works on all types of WordPress hosting setups. It’s no wonder that it’s trusted by millions of website owners and developers worldwide.

Get W3 Total Cache Here

WP Super Cache

WP Super Cache generates static HTML files from your dynamic WordPress site. After an HTML file is created, your web host will serve that file instead of processing the comparatively heavier WordPress PHP scripts.

As most of your visitors will be served static HTML files, this will decrease the load on your server. Thus, your users get to experience faster load times and performance. Its simple mode is easy to set up and makes your website load pretty fast. However, if you’re looking for more, there’s also an expert mode which gives you more options at the cost of complexity.

Get WP Super Cache Here

Media, Gallery & Slider Plugins

Smush

Smush is an award-winning image compression plugin. It has been benchmarked and tested to be the leader for speed and quality. Smush is the most popular image optimization plugin for WordPress, and also the most popular WPMU DEV plugin. I’m not exaggerating when I say that you need to add this to your must-have WordPress plugins list!

It not only compresses your images, but also meticulously scans every image you upload – and the ones you’ve already added to your library. Thus, all the unnecessary data is eliminated even before you even see it on your site. Your user’s data plan will also thank you for its exemplary service.

Get Smush Here

Photo Gallery by 10Web

Photo Gallery is a popular plugin for building beautiful, mobile-friendly galleries. Its simple interface makes it possible to create them in just a few minutes. Photo Gallery comes packed with amazing layout options, gallery and album views, multiple widgets, and a bunch of other extensions that.

It’s a great choice for photography and media-heavy blogs. If you have a site that needs robust image galleries with easy navigation, give Photo Gallery a try.

Get Photo Gallery by 10Web Here

Smart Slider 3

“Smart Slider 3 is a gift from the gods.” I heard one of our developers remark that in the chat recently, and they couldn’t be further from the truth. It’s the most powerful and intuitive slider plugin for WordPress. Its intuitive live slide editor makes creating slides fast, easy and efficient.

The sliders you create with it are fully responsive, SEO optimized, and work with almost any WordPress theme. Creating beautiful slides to tell your stories has never been this easier.

Get Smart Slider 3 Here

SVG Support

SVGs are the bomb! Scalable Vector Graphics (SVG) are becoming a rage in modern web design, but WordPress doesn’t support this file format out of the box yet. That’s where this plugin comes in.

SVGs allow you to embed vector images with small file sizes that are scalable to any size. And without losing quality. Apart from enabling SVG support, this plugin also adds features that allow you to add styling and animation to your SVG elements.

Get SVG Support Here

Security Plugins

Defender

Defender is layered security for WordPress. And it’s amazingly easy to setup. Defender scans your server and files, and then it adds all the hardening and security tweaks your site needs in just a matter of minutes, if not less. It’s highly efficient at blocking brute-force attacks without any noticeable impact on your website

It’s also one of the few free security plugins that support 2-Factor Authentication. The 2FA is also very simple to set up. Defender’s 2FA keeps you and your sites better protected than any simple IP blacklisting security plugin.

Get Defender Here

WordFence

With over 3 million active installs, WordFence is the most popular firewall and security scanner plugin for WordPress. Its firewall and malware scanner is built from the ground up to protect WordPress.

Wordfence constantly updates itself with the newest firewall rules, malware signatures, and malicious IP addresses. This keeps your website safe at all times. It’s perhaps the most comprehensive free WordPress security solution available.

Get Defender Here

iThemes Security

iThemes Security gives you 30+ ways to secure and protect your WordPress site. It works round the clock to lock down attacks on your WordPress site, fix common holes, stop automated attacks, and strengthen user credentials.

Experienced users also have access to advanced features which  they can use to harden their WordPress sites even better.

Get iThemes Security Here

Marketing Plugins

(Newsletter Signups, Popups, CRM, etc.)

HubSpot All-in-One Marketing

HubSpot’s All-in-One Marketing plugin is essentially a form and pop-up builder with an intuitive drag-and-drop interface. It also includes live chat and an integrated free contact database (CRM). This helps you can capture your visitors’ information easily.

HubSpot will collect submissions off any form you have on your WordPress website (even if it’s built with our free Forminator or Hustle plugins). It then automatically adds those new leads into your CRM.

You can also segment your contact database into lists and personalize your emails using any CRM property. And all of this for free! It then generates a report on your email’s overall success and let’s you see how each contact interacted with your email campaigns, all thanks to its built-in analytics.

Get HubSpot All-in-One Marketing Here

Hustle

Hustle is the ultimate marketing plugin to grow your business. It lets you easily grow your mailing list or display targeted ads across your site with pop-ups, slide-ins, lead generation forms, social media share bars, widgets, and shortcodes.

Since it’s made by the same awesome developers here at WPMU DEV, it integrates perfectly with the equally amazing form builder plugin Forminator. Thus, you can embed your forms, polls, and quizzes into popups and slide-ins for interactive lead generation. Grow your following faster and capture more leads with Hustle.

Get Hustle Here

Mailchimp for WordPress

This plugin does one thing better, and that’s it. It helps you grow your Mailchimp lists and write better newsletters. MailChimp for WordPress also allows you to create good looking opt-in forms easily.

It integrates with any existing forms on your site, including those created by Forminator. The developer has also made it easy to modify and extend its default features with various filter & action hooks.

Get Mailchimp for WordPress Here

Analytics Plugins

Google Tag Manager for WordPress

Google Tag Manager (GTM) is Google’s free tool for everyone to manage and deploy analytics and marketing tags. Currently, GTM is Google’s recommended method to add Google Analytics tag to your websites. This plugin helps you place the GTM container code snippets onto your wordpress website easily.

You can also insert multiple GTM containers with this plugin. It complements your GTM setup by pushing page meta data and user information to your DOM’s data layer. It also lets you add your Google Optimize container with the recommended code.

Get Google Tag Manager for WordPress Here

Google Analytics Dashboard by MonsterInsights

With 2+ million active installs, MonsterInsights is without a doubt the most popular Google Analytics plugin for WordPress. It’s the simplest way to properly connect your WordPress site with Google Analytics. MonsterInsights also allow you to enable all advanced Google analytics tracking features.

But the best part of MonsterInsights is its Google Analytics Dashboard widget for WordPress. It shows you actionable analytics reports right inside your dashboard. Thus, you can see exactly what’s working, what’s not, and take immediate action. No more juggling around!

Get Google Analytics Dashboard Here

Social Media Plugins

Social Media Share Buttons & Social Sharing Icons

This plugin lets you add share buttons and icons for over 200+ social media platforms. Some of the popular ones include RSS, Email, Facebook, Twitter, LinkedIn, Pinterest, Instagram, Youtube, and ‘Share. You can even upload custom share icons of your choice.

You can pick from several design options and make your icons ‘float’ or ‘sticky’. The plugin also scours the respective social media platform’s APIs to display the proper like/share numbers beside your social media buttons.

Get Social Media Share Buttons and Social Sharing Icons Here

Comment & Spam Reduction Plugins

Akismet Anti-Spam

I have just two words for you: get this! Akismet comes standard with most WordPress installations, and it’s for a reason. It checks your comments and contact form submissions against a global database of spam to prevent your site from publishing malicious content.

If any spam is detected, it’s sent to the review section under Comments in your dashboard. The more you help clear spam or identify false positives, the better Akismet gets at what it does best. Say no to spam!

Get Akismet Anti-Spam here

Disqus Conditional Load

Disqus is a great commenting system platform, but there’s one major drawback with it: it’s super bloated, especially so on WordPress.

Disqus Conditional Load is an advanced version of Disqus Commenting System, which boosts your page loading speed. This free plugin adds advanced features like lazy loading, shortcodes, comment widgets, script disabling, and more to your Disqus-powered website. And the best part, it uses pure JavaScript.

Get Disqus Conditional Load Here

Backup & Migration Plugins

UpDraftPlus

I can’t stress enough the importance of setting up automated backups of your website. Thankfully, we have free plugins like UpdraftPlus that make automatic site backups and restoration a child’s play. With 2+ million active installs, it’s the most popular scheduled backup plugin for WordPress.

With UpdraftPlus, you can backup your files and database into the cloud. You can also restore the backups with a single click. It supports backing up to popular cloud storage solutions like Dropbox, Google Drive, and Amazon S3.

Get UpdraftPlus Here

Duplicator

Duplicator enables you to move, migrate or clone your WordPress site between domains or hosts. And with zero downtime. It can also clone a live site to your localhost setup for development.

The most useful feature of Duplicator is to transfer a WordPress site from one host to another. You can perform a full WordPress migration without any messy import/export sql scripts.

If you’re planning to bundle up an entire WordPress site for easy reuse/distribution/backup, Duplicator also supports that.

Get Duplicator Here

All-in-One WP Migration

All-in-One WP Migration does what it suggests. It exports all the things in your WordPress website, including the plugins, database, media files, themes, and everything else.

Once exported, you can then upload it to a different WordPress installation. Do note that there’s a limit on the file size in the free version. If your site is more than 512MB, you need to look elsewhere. For smaller WP sites though, this plugin is perfect!

Get All-in-One WP Migration Here

Admin Management Plugins

User Role Editor

User Role Editor allows you to change user roles and their capabilities easily. Just select a user role and turn on/off the capabilities you wish to, and then update to save your changes. That’s it, no need to mess around with complex PHP scripts anymore!

You can also add new roles and customize its permissions according to your needs. Unnecessary roles with no users assigned can be deleted to keep things simple. The best part, Multi-site support is provided for free with this plugin.

Get User Role Editor Here

WP Reset

Ever messed around with your WordPress site so much that you wished you could reset it all and start over? That’s exactly what WP Reset does. It quickly resets your site’s database to the default installation values, without modifying any files.

If you’re testing out different plugins and themes, WP Reset is extremely helpful. It speeds up your testing and debugging greatly. WordPress developers will appreciate this plugin very much.

Get WP Reset Here

Duplicate Post

There are some plugins which you think you don’t need until you’ve used them. Duplicate Post is one of them.

It allows you to clone posts of any type quickly, or copy them to new drafts for further editing. That’s pretty much it. Give it a try, I’m sure you’ll love it!

Get Duplicate Post Here

Regenerate Thumbnails

This plugin helps you regenerate all thumbnail sizes for images in your Media Library. This is extremely useful if you’ve changed your theme or have added a new feature on your website which uses a different image size.

Regenerate Thumbnails also allows you to delete old, unused thumbnails to free up server space.

Get Regenerate Thumbnails Here

DIY Page Builder Plugins

Elementor

Elementor is the most popular free page builder for WordPress. As of now, it has 3+ million active installations and mostly 5-star reviews.

So, what makes it unique? It’s a live page builder that lets you create high-end page designs and advanced capabilities like never before, without touching a single line of code. You had to be a web developer or designer before to get these effects on your website: Box Shadows, Background Overlays, Hover Effects, Animations, Gradient Backgrounds, etc.

Not anymore. Elementor makes it easy for everyone to build websites. Yes, for everyone!

Get Elementor Here

Beaver Builder

Beaver Builder is like a mature, elder brother (or sister?) of Elementor. Likewise, it’s a flexible drag-and-drop page builder that works on your WordPress site’s front end. Beaver Builder grants you complete design freedom with no coding involved, and it is all fully responsive as well.

The best part of Beaver Builder is that it doesn’t output any confusing shortcodes or bloated HTML. With Beaver Builder, building beautiful, professional WordPress pages is as easy as connecting LEGOs. However, you should note that its free version isn’t as feature-rich as Elementor’s.

Get Beaver Builder Here

Bonus: Here’s a detailed list of the top page builders for WordPress.

Theme Customization Plugins

Custom Sidebars – Dynamic Widget Area Manager

Custom Sidebars plugin is a flexible widget area manager for WordPress. It allows you to dynamically display custom widgets on any page, post, post type, category, or archive page.

It is light and integrates well with any WordPress theme. Thus, Custom Sidebars plugin grants you tons of possibilities to customize your website even futher.

Get Custom Sidebars Here

Simple Custom CSS and JS

Adding custom CSS and JS code to your WordPress site is no more hassle with this plugin. These changes stay even if you update or change your theme.

Simple Custom CSS and JS features a text editor with syntax highlighting. Also, you can add your custom CSS or JS code to the frontend or the admin side, and you can add as many codes as you want.

Get Simple Custom CSS and JS Here

Ecommerce Plugins

WooCommerce

WooCommerce is a flexible, open-source eCommerce plugin for WordPress. If you want an eCommerce store on your WordPress website, look no further. It’s made by the same good folks who make WordPress.

Whether you’re launching a business, taking an old retail store online, or designing a site for your client, WooCommerce can help you build exactly the store you want.

Get WooCommerce Here

Booster for WooCommerce

WooCommerce is an amazing eCommerce plugin for WordPress and there’s no denying that. You can get most of the features you want in your online store with it.  However, it still misses the mark when it comes to some essential features. That’s what Booster for WooCommerce rectifies.

It supercharges your WooCommerce store with awesome powerful features (100+ modules) like PDF Invoicing, Bulk Price Converter, Wholesale Price, Crowdfunding, Upsells, Custom Payment Gateways, and a lot more.

Get Booster for WooCommerce Here

Easy Digital Downloads

If you’re looking to sell only digital goods on your WordPress site, Easy Digital Downloads is a better eCommerce solution for you. It provides a complete system for effortlessly selling your digital products.

Selling software, photos, ebooks, songs, videos, graphics, or any other digital file for that matter, is a breeze with this plugin. The core plugin supports PayPal Standard and Amazon Payments gateways, but almost all major payment gateways are supported through 3rd-party developers or premium extensions.

Get Easy Digital Downloads Here

Live Chat Plugins

LiveChat

Want to add live chat support to your WordPress website quickly and easily? LiveChat is the solution you’re looking for. It allows for instant communication with your site’s visitors and enables swift resolution to their questions and/or concerns.

You can use its built-in ticketing system to provide 24/7 customer service to your customers. Increase your sales and build better relationships with your customers with this fully functional live chat plugin.

Get LiveChat Here

Tawk.To

Tawk.To is a free live chat app for WordPress used by 250,000+ companies worldwide. You can use it to provide real time support and service to your customers.

With tawk.to, you never have to lose another lead or sale again. It lets you monitor and chat with your site’s visitors from anywhere, even your mobile. The best part is that its developer promises that “it’s truly free and always will be.”

Get Tawk.To Here

Membership & Forums Plugins

Go here for an extensive in-depth analysis of all the popular (and free) membership plugins.

bbPress

bbPress is a lean, mean, and feature-rich forum or bulletin board plugin for WordPress. It is focused on easy integration, simplicity, strict adherence to web standards, and speed.

It’s one of the first plugins which showcased the versatility of WordPress, and it’s still going strong! That’s quite an achievement. With bbPress installed, you can use WordPress to run an efficient and professional forum.

Get bbPress Here

BuddyPres

BuddyPress helps you set up a modern, robust, and sophisticated social network on your WordPress site. What WooCommerce did to setting up an eCommerce store on WordPress, BuddyPress does the same with setting up a social network or community-based forum.

Members can register and create user profiles, have private conversations with each other, create and participate in groups, and much more. It also works perfectly along with Akismet and bbPress. If you’re looking to build an online home for your school, company, a sports team, or any other niche community, BuddyPress is perfect for you.

Get BuddyPress Here

Jetpack

Sometimes, I ask myself, What exactly is Jetpack? It’s a security, performance, and site management plugin, all rolled into one. And it’s maintained by the same folks who lead WordPress.org’s development. They also happen to be the owners of WordPress.com platform, from where it picks up most of its features.

It has a lot of impressive functionality built in, like site stats, a high-speed CDN for images, showing related posts, downtime monitoring, brute-force attack protection, automated sharing to social media, sidebar customization, and so much more.

Jetpack has so many things going on that many consider it to be bloated, and for a good reason. If you could give up almost every plugin listed here and only make do with Jetpack, perhaps that would justify its use. It does however let you turn on or off its modules as per your requirements.

Get Jetpack Here

Free as in Freedom

WordPress’ main goal is to give you the freedom to build anything you want, and these free plugins are an extension of that goal. From hobby blogs to some of the biggest brands in the world, WordPress and its free plugins are used by everyone.

At WPMU DEV, we’re driven by the same philosophy. We build beautifully coded free and premium WordPress plugins that’ll make your WordPress sites fly.

Fasten your seatbelts. It’s now time for your site to take off!

Is WordPress An Actual Content Management System (CMS)?

Have you ever been at a party and heard someone (who’s probably had a few too many) blurt out that WordPress isn’t an actual CMS, and you then get incensed (probably because you’ve had a few too many too!) and an overwhelming need to step in and defend WordPress kicks in and other partygoers have to restrain you from taking on this ignorant stranger?

Well, I have … too many times to remember!
So, in case you ever get challenged privately, publicly (or even socially on Instagram or Snapchat) about WordPress being an “actual” CMS, here are some facts to arm yourself with for such an occasion.

Can WP manage all this? Read on to find out!
Can WordPress manage all this? Read on to find out!

What Is A CMS?

Rather than use the definition of CMS that my elderly mother thought she heard me say once during a family dinner (“Can’t Manage My Sister”), let’s turn to the stalwart of the online community for seeking actual and factual enlightenment, Wikipedia:

“A content management system (CMS) manages the creation and modification of digital content. These systems typically support multiple users in a collaborative environment, allowing to perform document management with different styles of governance and workflows.”

(Source: https://en.wikipedia.org/wiki/Web_content_management_system)

Now, I could quote Wikipedia all day long, and so I will once more. The above quote continues thusly …

“Usually the content is a website … and the term commonly refers to web content management systems. Web content may include text and embedded graphics, photos, video, audio, maps, and program code … that displays content or interacts with the user. By their nature, CMSs support the separation of content and presentation.”

Read the above definition in its totality and take a moment to contemplate the plurality of “CMSs” and to breathe in the combination of fricative sibilance, alliteration, and rhyming consonance in the final sentence “CMSs support the separation of content and presentation.

Before we dissect this definition further, here’s what Wikipedia also has to say about the structure of a CMS, or a Content Management System:

“A content management system (CMS) typically has two major components: a content management application (CMA), as the front-end user interface that allows a user, even with limited expertise, to add, modify, and remove content from a website without the intervention of a webmaster; and a content delivery application (CDA), that compiles the content and updates the website.”

You could defend WordPress’ (not WordPresss) honor as an actual CMS armed with just the above information, regardless of whether you’re engaged in a text message war with an ignorant luddite or facing a mob of drunken social influencers at a party in Ibiza.

But, let’s not stop there. Let’s bring in the ultimate show stopper of factual honest to goodness truth … charts!

CMS usage distribution for websites using CMS technologies.

According to trends, intelligence, and internet research company BuiltWith, WordPress is the world’s leading platform of choice for  websites using CMS technologies. WordPress powers over a third of the web’s CMS websites and blogs.

In fact, as the chart below from W3Techs.com – a company driven by a vision to provide the most reliable and most extensive source of information on web technology usage shows (and they spare no expense when it comes to graph and chart design), no other CMS platform even comes close to WordPress in terms of market dominance.

This diagram shows the market position of WordPress in terms of popularity and traffic compared to the other most popular content management systems …

WordPress market position.

W3Techs.com even anticipated the fact that doubters may disregard charts as “alternative facts”, and so they committed their results to print …

Usage statistics and market share of WordPress.

Just to restate the above …

“WordPress is used by 61.2% of all the websites whose content management system we know. This is 34.5% of all websites.”

There it is, those three sweet words again … “content management system.”

If around two-thirds of all the websites whose content management system “we know” use WordPress and WordPress is used to power over a third of all websites, then please try the following right now:

  1. Look at your website.
  2. Look at the website on your left,’
  3. Look at the website on your right.

One of these is a CMS website running on WordPress.

And it’s happening right now as you are reading this with your mouth hanging open in astonishment. Folks are downloading and installing the free self-hosted version of WordPress like they found an ATM that’s spitting out free money …

WordPress Downloads
WordPress Downloads. (Source: https://wordpress.org/download/counter)

Can You Actually Spot An Actual CMS Website?

Before we attempt to prove conclusively and once and for all if WordPress is an actual content management system, try and see if you can actually spot an actual CMS website built with WordPress.

You see, WordPress has long been stuck with the “oh yes, that blogging platform” status.

Although WordPress did start out as a “blogging” platform, it has evolved way beyond a technology for publishing blogs.

Businesses of all sizes use the WordPress CMS platform to power their sites, even big businesses …

Glassdooor.com website.

You can check which web technologies are being used to power websites using various online tools. For example, here is what W3Techs.com has to say about Glassdoor.com …

Glassdooor.com website - Powered by WordPress CMS.
Glassdooor.com website – Powered by WordPress CMS.

But it’s not just businesses that are using the WordPress CMS to power their sites. Governments are in on it too …

State.gov website.
State.gov website.

Once again, this is confirmed by checking a technology identifying tool like W3Techs.com …

State.gov website - Powered by WordPress CMS.
State.gov website – Powered by WordPress CMS.

In a previous article, we looked at just how many university and college websites depend on the WordPress CMS …

Boston University website - powered by WordPress CMS
Boston University website – powered by WordPress CMS

It’s not just business, government, university and college websites, however, that are using the WordPress CMS to power their online presence. If you want true validation of WordPress as an actual CMS, then check out the websites of those who have dared to boldly go where no one has gone before … celebrity and fashion websites!

May WordPress live long and prosper as a CMS!
May WordPress live long and prosper as a CMS! (Source: https://williamshatner.com/ws)

Whenever those we respect, idolize, and venerate take up a cause they believe in or promote something to make bucketloads of money, it becomes de rigueur for the rest of us all to follow suit. Planetary and interplanetary leaders are using WordPress as a CMS. If this is not validation of WordPress as an actual CMS, then what is? If not them, who? If not now, when?

WordPress.org Showcase
WordPress.org Showcase (http://wordpress.org/showcase)

To see many other examples of websites and blogs being powered by a WordPress CMS to serve all kinds of purposes for all kinds of people and institutions in all kinds of industries and walks of life, just visit the WordPress Showcase section.

WordPress is an actual CMS ... believe it!
WordPress is an actual CMS … believe it!

WordPress As A CMS (More Than A Gut Feeling)

Now that the Word’s on the street and everybody’s talkin’ ’bout it (and bloggin’ and publishin’ with it too!), it’s time to turn our attention inwards and take a gutsy look at the guts of the WordPress platform.

If we transform Wikipedia’s definition of a CMS into a really cool infographic, it would look like this …

CMS
A really cool infographic depicting a CMS

Anatomically speaking, WordPress has an almost identical (yep!) structure to the CMS defined by Wikipedia, with advanced website features for managing web design (i.e. themes) and site functionality (e.g. plugins, widgets, blocks, etc.)

In fact, we could rewrite Wikipedia’s definition of a content management system to describe WordPress …

“WordPress manages the creation and modification of digital content. WordPress supports multiple users in a collaborative environment, allowing to perform document management with different styles of governance and workflows. Usually the content is a website (or blog) and the term commonly refers to web content management systems. WordPress sites may include text and embedded graphics, photos, video, audio, maps, and program code (such as for applications) that displays content or interacts with the user through posts, pages, and custom post types. By their nature, WordPresss support the separation of content and presentation.”

(Source: A wise guy)

Under the “Common Features” section of its CMS page, Wikipedia lists a bunch of features that content management systems typically provide. Let’s go through and compare these features with what WordPress offers:

  • Search engine optimization: This can be easily achieved using permalinks, categories, tags, SEO plugins, anchor text hyperlinks in content, internal linking, etc.
  • Integrated and online documentation: WordPress provides official documentation (Codex), including support forums, and many sites include video-based and online WordPress tutorials.
  • Modularity and extensibility: We call’em ‘plugins‘.
  • User and group functionality: WordPress has built-in user roles and capabilities, collaborative features, comments and discussions, and can enhance user and group functionality through all kinds of plugins.
  • Templating support for changing designs: Yup, we call’em themes.
  • Installation and upgrade wizards: Easy peasy cee-em-ess-eze! WordPress can be installed in just a few clicks and the same goes for upgrading its core software, plus any installed themes and plugins. Many plugins even come with setup wizards.
  • Integrated audit logs: Yup, got those too! From system and debugging reports, to stats in the dashboard that stare right back at you as soon as you log into the admin section.
  • Compliance with various accessibility frameworks and standards, such as WAI-ARIA: Pretty sure WordPress’ got this!
  • Reduced need to code from scratch: Who needs to code with WordPress when you got plugins, widgets, blocks, and shortcodes?
  • Unified user experience: United we stand … hooks, lines, and filters. We don’t <div>
  • Version control: WordPress has no aversions to versions. In fact, WordPress releases a new version approximately every 3 months (it’s like version control is out of control!). Check ’em out here: WordPress History
  • Edit permission management: With WordPress user roles and capabilities, admins can assign default permissions to different user groups and customize these using various plugins and modifications.
  • Indexing and search: WordPress has its own built-in search functionality, and all content, posts, pages, etc. are indexed and archived in the database and can be easily retrieved, filtered, and sorted internally (e.g. Table of Posts) and externally (e.g. tags, categories, calendar widgets, etc.)
  • Format or style management through themes: You haven’t lived until you’ve installed and activated a new WordPress theme.
  • Web-based publishing: WordPress doesn’t just publish, it can also get your site automatically indexed in search engines and your content syndicated to social networks and other sites and directories using built-in features like pinging services and RSS feeds, and various plugins and integrations with 3rd party services.

Given all of the above, it’s hard to dispute that WordPress is an actual content management system.

So, next time you’re at a party and everyone’s had a few too many and some old timer is reminiscing about reviving Frontpage or harping about the merits of some other CMS, you can deliver the kicker … WordPress is not only an actual content management system, it’s so much more!

WordPress is becoming more than a CMS, or even a web publishing platform! With the ability to use REST APIs to create a Headless WordPress CMS and developments like ‘blocks’ introduced with the release of WordPress 5.0 (aka WordPress Gutenberg), the entire platform is shapeshifting to something that even William Shatner would be proud to blog about on his WordPress site.

To quote Einstein had he been smart enough to blog before blogging and content management systems became relatively popular, WordPress = CMS2.

WP=CMS2
WP=CMS2

Top Fifty WP: New Website Ranks Plugins by Downloads per Day

The team behind Pootlepress has launched a new website that displays the top 50 WordPress plugins by downloads per day. It uses the WordPress.org Plugin API to pull the previous day’s download stats from plugins hosted in the directory. The site also shows the average rating as a percent in the right-hand column.

Top 50 Plugins by Downloads per Day

As one might expect, the most popular plugins with more than a million active installs dominate the top 50 spots. There are a few surprising plugins in the mix, with 500,000 installs or less, where these daily download stats might be an indication of their potential growth: Ocean Extra, WPS Hide Login, AMP, File Manager, and WP Statistics. It’s something to monitor over time, as there may be quite a bit of turnover in the top 50.

It’s also interesting to see a few plugins among the top 50 that provide utilities frequently used when working with WordPress but not necessary to have installed all the time. It looks like users are installing plugins like WordPress Importer, Maintenance, All-in-One WP Migration, and Coming Soon Page, and then leaving them active on their sites.

Top Fifty WP Is Now Available as a Plugin with Gutenberg Blocks for Top Plugins and Themes

Pootlepress has packaged up Top 50 WP as a plugin so that other publishers can use it to display the same data on their own websites. It includes two Gutenberg blocks – one for plugins and the other for themes. They are listed under Layout Elements.

Pootlepress founder Jamie Marsland said the plugin is coming soon to WordPress.org but for now it can be downloaded from his website. It requires the Caxton plugin to be installed, which provides Pootlepress’ base framework for new blocks. Marsland’s team is working on adding more blocks with plugin and theme data, as well as customization options for each block.

Three Approaches to API Design Your Digital Transformation Team Needs to Master

After years of steady growth, the API economy has hit new highs this year. ProgrammableWeb now hosts over 22,000 public API's as of July 2019, having grown ten-fold since 2010 [1]. Navigating the API economy has become a central tenet of the digital strategy of organizations worldwide. In one study, digital leaders API-enabled 44% of their core capabilities so that external partners can connect to them, compared to only 19% for digital laggards [2].

How to Use Template {{Markers}} in Document Studio

Your Document Studio templates can include any variable field that is available as a column title in the Google Sheet. In case of Google Forms, you can use any question title as your marker and the marker should be exactly as your question title enclosed in double curly braces.

For instance, if a question in your Google Form says “What is your name”, the marker you’ll use in your document template will be {{What is your name}}.

You can also create additional columns in the source Google Spreadsheet with formulas and use them as dynamic markers in your Google template. Let me show you an example.

Create a new column and call it Row Number. Now go to the first empty cell of that column and put this ArrayFormula function:

=ArrayFormula(if(LEN(A2:A); row(A2:A) -1;))

What we have added a column that displays the row number of the rows and we can now put {{Row Number}} in your document templates, merged file names and Drive folder path. For instance, if you put Invoice #{{Row Number}} in the file name, the files name would be named Invoice #1, Invoice #2 and so on automatically.

Formatting Date and Time

The same technique can be used to format date and time information for including in your templates.

Say the first column in your Google Sheet in called Timestamp and it includes the date and time when a Google Form response was submitted. Add a new column called Submission Time and add this formula in the first empty cell.

=ArrayFormula(if(NOT(ISBLANK(A2:A)),HOUR(A2:A)&":"&MINUTE(A2:A),))

You can now include the submission time in your email and document template using the {{Submission Time}} variable field.

Standard Markers for Google Forms

In addition to standard form questions and column headers, Google Forms also support a few standard markers like:

  • {{Response Number}} - Form Response number
  • {{Form Name}} - The name of the Google Form
  • {{Form Url}} - A link to the associated Google Form
  • {{Response Id}} - Unique response ID generated by Google Form
  • {{Response Url}} - Directly link to view / edit the current form submission
  • {{Response Date}} - The full timestamp when a form was submitted
  • {{Respondent Email}} - If your Google Form is capturing email addresses, this will include the email address of the form respondent.
  • {{All Markers}} - An HTML table containing all the form responses in a neat tabular format.

You should put {{All Answers}} in your email body to receive a copy of the form answers in an email notification.

Going Buildless

I'm in a long distance relationship. That means I’m on a plane to England every few weeks, and every time I'm on that plane, I think about how nice it would be to read some Reddit posts. What I could do is find a Reddit app that lets me cache posts for offline (I’m sure there is one out there), or I could take the opportunity to write something myself and have fun using the latest and greatest technologies and web standards out there!

On top of that, there has been a lot of discussion around what I like to call going buildless, which I think is really fascinating development in which production projects are created without using a build process (like a bundler).

This post is also a homage to a couple of awesome people in the web community who are making some great things possible. I'll be linking to all that stuff as we move along. Do note that this won't be a step-by-step tutorial, but if you want to check out the code, you can find the finished project on GitHub.

Our end result should look something like this:

Let's dive in and install a few dependencies

npm i @babel/core babel-loader @babel/preset-env @babel/preset-react webpack webpack-cli react react-dom redux react-redux html-webpack-plugin are-you-tired-yet html-loader webpack-dev-server

I'm kidding.

We're not gonna use any of that.

We're going to try and avoid as much tooling and dependencies as we can to keep the entry barrier low. What we will be using is:

  • LitElement - LitElement is our component model. It's easy to use, lightweight, close to the metal, and leverages web components.
  • @vaadin/router - This is a really small (< 7kb) router that has an awesome developer experience that I cannot recommend enough.
  • @pika/web - This will help us get our modules together for easy development.
  • es-dev-server - This is a simple dev server for modern web development workflows, made by us at open-wc. Although any HTTP server will doc, feel free to bring your own.

That's it! We'll also be using a few browser standards, namely: es modules, web components, import-maps, kv-storage and service-worker.

Let's go ahead and install our dependencies:

npm i -S lit-element @vaadin/router
npm i -D @pika/web es-dev-server

We'll also add a postinstall hook to our package.json that's going to run Pika for us:

"scripts": {
  "start": "es-dev-server",
  "postinstall": "pika-web"
}

🐭 Pika

Pika is a project by Fred K. Schott that aims to bring that nostalgic 2014 simplicity to 2019 web development. Fred is up to all sorts of awesome stuff. For one, he made pika.dev, which lets you easily search for modern JavaScript packages on npm. He also recently gave his talk Reimagining the Registry at DinosaurJS 2019, which I highly recommend you watch.

Pika takes things even one step further. If we run pika-web, it'll install our dependencies as single JavaScript files to a new web_modules/ directory. If your dependency exports an ES "module" entrypoint in its package.json manifest, Pika supports it. If you have any transitive dependencies, Pika will create separate chunks for any shared code among your dependencies.

What this means, is that in our case our output will look something like:

└─ web_modules/
    ├─ lit-element.js
    └─ @vaadin
        └─ router.js

Sweet! That's it. We have our dependencies ready to go as single JavaScript module files, and this is going to make things really convenient for us later on in this post, so stay tuned!

📥 Import maps

Alright! Now that we've got our dependencies sorted out, let's get to work. We'll make an index.html that'll look something like this:

<html>
  <!-- head, etc. -->
  <body>
    <reddit-pwa-app></reddit-pwa-app>
    <script src="./src/reddit-pwa-app.js" type="module"></script>
  </body>
</html>

And reddit-pwa-app.js:

import { LitElement, html } from 'lit-element';

class RedditPwaApp extends LitElement {

  // ...

  render() {
    return html`
      <h1>Hello world!</h1>
    `;
  }
}

customElements.define('reddit-pwa-app', RedditPwaApp);

We're off to a great start. Let's try and see how this looks in the browser so far, so lets start our server, open the browser and... What's this? An error?

Oh boy.

And we've barely even started. Alright, let's take a look. The problem here is that our module specifiers are bare. They are bare module specifiers. What this means is that there are no paths specified, no file extensions, they're just... pretty bare. Our browser has no idea on what to do with this, so it'll throw an error.

import { LitElement, html } from 'lit-element'; // <-- bare module specifier
import { Router } from '@vaadin/router'; // <-- bare module specifier

import { foo } from './bar.js'; // <-- not bare!
import { html } from 'https://unpkg.com/lit-html'; // <-- not bare!

Naturally, we could use some tools for this, like webpack, or rollup, or a dev server that rewrites the bare module specifiers to something meaningful to browsers, so we can load our imports. But that means we have to bring in a bunch of tooling, dive into configuration, and we're trying to stay minimal here. We just want to write code! In order to solve this, we're going to take a look at import maps.

Import maps is a new proposal that lets you control the behavior of JavaScript imports. Using an import map, we can control what URLs get fetched by JavaScript import statements and import() expressions, and allows this mapping to be reused in non-import contexts. This is great for several reasons:

  • It allows our bare module specifiers to work.
  • It provides a fallback resolution so that import $ from "jquery"; can try to go to a CDN first, but fall back to a local version if the CDN server is down.
  • It enables polyfilling of (or other control over) built-in modules. (More on that later, hang on tight!)
  • Solves the nested dependency problem. (Go read that blog!)

Sounds pretty sweet, no? Import maps are currently available in Chrome 75+ behind a flag, and with that knowledge in mind, let's go to our index.html, and add an import map to our <head>:

<head>
  <script type="importmap">
    {
      "imports": {
        "@vaadin/router": "/web_modules/@vaadin/router.js",
        "lit-element": "/web_modules/lit-element.js"
      }
    }
  </script>
</head>

If we go back to our browser, and refresh our page, we'll have no more errors, and we should see our <h1>Hello world!</h1> on our screen.

Import maps is an incredibly interesting new standard, and definitely something you should be keeping your eyes on. If you're interested in experimenting with them, and generate your own import map based on a yarn.lock file, you can try our open-wc import-maps-generate package and play around. Im really excited to see what people will develop in combination with import maps.

📡 Service Worker

Alright, we're going to skip ahead in time a little bit. We've got our dependencies working, we have our router set up, and we've done some API calls to get the data from Reddit and display it on our screen. Going over all of the code is a bit out of scope for this post, but remember that you can find all the code in the GitHub repo if you want to read the implementation details.

Since we're making this app so we can read reddit threads on the airplane it would be great if our application worked offline, and if we could somehow save some posts to read.

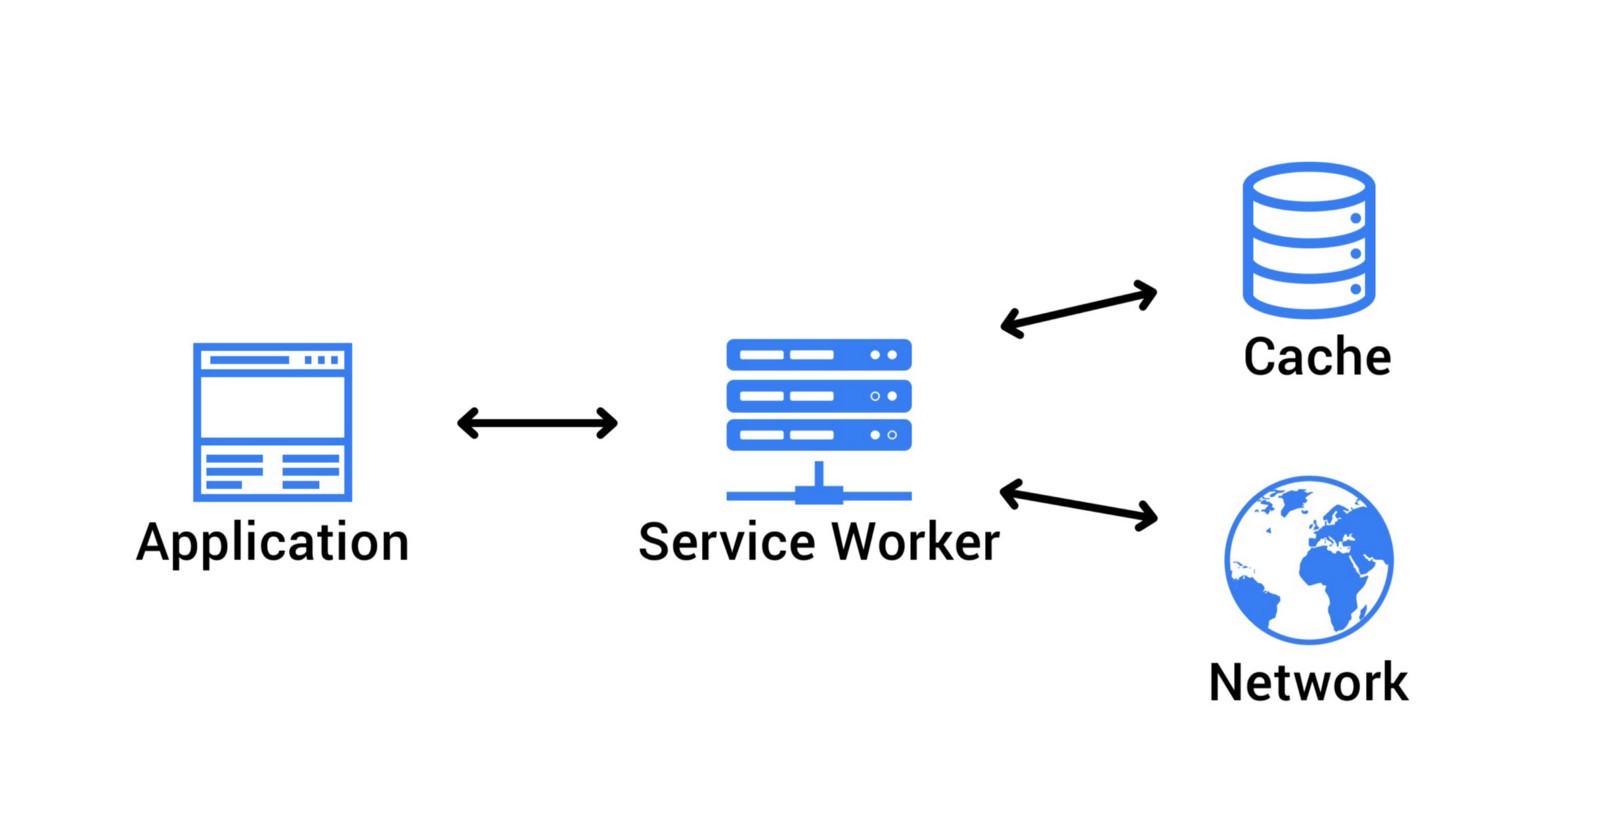
Service workers are a kind of JavaScript Worker that runs in the background. You can visualize it as sitting in between the web page, and the network. Whenever your web page makes a request, it goes through the service worker first. This means that we can intercept the request, and do stuff with it! For example, we can let the request go through to the network to get a response, and cache it when it returns so we can use that cached data later when we might be offline. We can also use a service worker to precache our assets. What this means is that we can precache any critical assets our application may need in order to work offline. If we have no network connection, we can simply fall back to the assets we cached, and still have a working (albeit offline) application.

If you're interested in learning more about Progressive Web Apps and service worker, I highly recommend you read The Offline Cookbook, by Jake Archibald, as well as this video tutorial series by Jad Joubran.

Let's go ahead and implement a service worker. In our index.html, we'll add the following snippet:

<script>
  if ('serviceWorker' in navigator) {
    window.addEventListener('load', () => {
      navigator.serviceWorker.register('./sw.js').then(() => {
        console.log('ServiceWorker registered!');
      }, (err) => {
        console.log('ServiceWorker registration failed: ', err);
      });
    });
  }
</script>

We'll also add a sw.js file to the root of our project. So we're about to precache the assets of our app, and this is where Pika just made life really easy for us. If you'll take a look at the install handler in the service worker file:

self.addEventListener('install', (event) => {
  event.waitUntil(
    caches.open(CACHENAME).then((cache) => {
      return cache.addAll([
        '/',
        './web_modules/lit-element.js',
        './web_modules/@vaadin/router.js',
        './src/reddit-pwa-app.js',
        './src/reddit-pwa-comment.js',
        './src/reddit-pwa-search.js',
        './src/reddit-pwa-subreddit.js',
        './src/reddit-pwa-thread.js',
        './src/utils.js',
      ]);
    })
  );
});

You'll find that we're totally in control of our assets, and we have a nice, clean list of files we need in order to work offline.

📴 Going offline

Right. Now that we've cached our assets to work offline, it would be excellent if we could actually save some posts that we can read while offline. There are many ways that lead to Rome, but since we're living on the edge a little bit, we're going to go with: Kv-storage!

📦 Built-in Modules

There are a few things to talk about here. Kv-storage is a built-in module. Built-in modules are very similar to regular JavaScript modules, except they ship with the browser. It's good to note that while built-in modules ship with the browser, they are not exposed on the global scope, and are namespaced with std: (Yes, really.). This has a few advantages: they won't add any overhead to starting up a new JavaScript runtime context (e.g. a new tab, worker, or service worker), and they won't consume any memory or CPU unless they're actually imported, as well as avoid naming collisions with existing code.

Another interesting, if not somewhat controversial, proposal as a built-in module is the std-toast element, and the std-switch element.

🗃 Kv-storage

Alright, with that out of the way, lets talk about kv-storage. Kv-storage (or "key value storage") is layered on top of IndexedDB and fairly similar to localStorage, except for only a few major differences.

The motivation for kv-storage is that localStorage is synchronous, which can lead to bad performance and syncing issues. It's also limited exclusively to String key/value pairs. The alternative, IndexedDB, is... hard to use. The reason it's so hard to use is that it predates promises, and this leads to a, well, pretty bad developer experience. Not fun. Kv-storage, however, is a lot of fun, asynchronous, and easy to use! Consider the following example:

import { storage, /* StorageArea */ } from "std:kv-storage";

(async () => {
  await storage.set("mycat", "Tom");
  console.log(await storage.get("mycat")); // Tom
})();

Notice how we're importing from std:kv-storage? This import specifier is bare as well, but in this case it's okay because it actually ships with the browser.

Pretty neat. We can perfectly use this for adding a 'save for offline' button, and simply store the JSON data for a Reddit thread, and get it when we need it.

// reddit-pwa-thread.js:52:
const savedPosts = new StorageArea("saved-posts");

// ...

async saveForOffline() {
  await savedPosts.set(this.location.params.id, this.thread); // id of the post + thread as json
  this.isPostSaved = true;
}

So now if we click the “save for offline" button, and we go to the DevTools “Application" tab, we can see a kv-storage:saved-posts that holds the JSON data for this post:

And if we go back to our search page, we'll have a list of saved posts with the post we just saved:

🔮 Polyfilling

Excellent. However, we're about to run into another problem here. Living on the edge is fun, but also dangerous. The problem that we're hitting here is that, at the time of writing, kv-storage is only implemented in Chrome behind a flag. That's not great. Fortunately, there's a polyfill available, and at the same time we get to show off yet another really useful feature of import-maps; polyfilling!

First things first, lets install the kv-storage-polyfill:

npm i -S kv-storage-polyfill

Note that our postinstall hook will run Pika for us again.

Let’s also add the following to our import map in our index.html:

<script type="importmap">
  {
    "imports": {
      "@vaadin/router": "/web_modules/@vaadin/router.js",
      "lit-element": "/web_modules/lit-element.js",
      "/web_modules/kv-storage-polyfill.js": [
        "std:kv-storage",
        "/web_modules/kv-storage-polyfill.js"
      ]
    }
  }
</script>

What happens here is that whenever /web_modules/kv-storage-polyfill.js is requested or imported, the browser will first try to see if std:kv-storage is available; however, if that fails, it'll load /web_modules/kv-storage-polyfill.js instead.

So in code, if we import:

import { StorageArea } from '/web_modules/kv-storage-polyfill.js';

This is what will happen:

"/web_modules/kv-storage-polyfill.js": [                 // when I'm requested
    "std:kv-storage",                      // try me first!
  "/web_modules/kv-storage-polyfill.js"    // or fallback to me
]

🎉 Conclusion

And we should now have a simple, functioning PWA with minimal dependencies. There are a few nitpicks to this project that we could complain about, and they'd all likely be fair. For example, we probably could've gone without using Pika, but it does make life really easy for us. You could have made the same argument about adding a webpack configuration, but you'd have missed the point. The point here is to make a fun application, while using some of the latest features, drop some buzzwords, and have a low barrier for entry. As Fred Schott would say: "In 2019, you should use a bundler because you want to, not because you need to."

If you're interested in nitpicking, however, you can read this great discussion about using webpack vs. Pika vs. buildless, and you'll get some great insights from Sean Larkinn of the webpack core team himself, as well as Fred K. Schott, creator of Pika.

I hope you enjoyed this blog post, and I hope you learned something, or discovered some new interesting people to follow. There are lots of exciting developments happening in this space right now, and I hope I got you as excited about them as I am. If you have any questions, comments, feedback, or nitpicks, feel free to reach out to me on twitter at @passle_ or @openwc and don't forget to check out open-wc.org 😉.

Honorable Mentions

I'd like to give a few shout-outs to some very interesting people that are doing some great stuff, and you may want to keep an eye on.

The post Going Buildless appeared first on CSS-Tricks.

More Flexible Online Stores WooCommerce and Gutenberg Blocks

Blocks have become an indispensable component for managing content in WordPress since the Gutenberg editor was officially released earlier this year. Not only does WordPress include some nifty blocks right out of the box, but we're starting to see plugin developers take advantage of them and provide some interesting ones as well.

One of those plugins is WooCommerce. That makes a lot of sense seeing since WooCommerce is part of the Automattic family of products.

WooCommerce Blocks

Blocks are not exactly new to WooCommerce. Well, blocks themselves are a relatively new concept, but WooCommerce was early on the bandwagon to leverage them as a plugin.

For example, the Newest Products block makes it trivial to showcase the most recently added products to a WooCommerce store catalog. In the past, that would have required manually entering and linking up each product. Now, all it takes is dropping a block into place and then on to the next task.

There are a whole slew of blocks like this in WooCommerce. So many, in fact, that making an online store itself has also become somewhat trivial. Sure, sure, e-commerce isn't easy. But at least the part about building a fully functional store that offers a great user experience is less of a worry.

Here are all of the block currently offered by WooCommerce:

  • Newest Products: Show off the most recently added products.
  • Best-Selling Products: Display top-sellers.
  • Product Categories List: Embeds an unordered list of all available product categories that link to category pages.
  • Products by Category: Create a custom list of products by searching product categories.
  • Featured Product: You guessed it! Same as a featured category, but linked to a specific product page.
  • Hand-Picked Products: Create a custom matrix of products from the catalog.
  • On Sale Products: Highlights only products that are currently marked as on sale from the full retail price.
  • Products by Attribute: This lets you put items together by product characteristics. For example, you could make a page just showing large clothing sizes.
  • Top Rated Products: This one puts all of your products with the best reviews.

Phew, that's a lot considering this all comes with a standard WooCommerce installation! Seriously, this opens up a huge range of possibilities for building store pages and driving sales.

New WooCommerce Blocks

If 11 blocks were not enough for you to do some pretty awesome things already, WooCommerce is actively developing more and has recently shipped two new ones.

The first one is which is an offshoot of Featured Product. Let's say you have introduced a collection of products filed under the same category. This block is a perfect way to spotlight that new tag by dropping in a hero component. It takes the description and featured image of the category and places them into an attractive layout that would otherwise require time and development.

The second new block is Products by Tag which is another useful way to group products together on a page or post, just like the Products by Category block. Choose one or multiple tags and those products will display together in a grid.


WooCommerce has really opened the floodgates, giving both developers and store owners new and interesting ways to build an online shopping experience. These are the types of features you might expect to see in some proprietary enterprise-level e-commerce software, but they are freely available in WooCommerce, which is freely available to install into WordPress, which is freely available to anyone who wants a website.

Give WooCommerce a try and see how it can up upgrade your online store.

The post More Flexible Online Stores WooCommerce and Gutenberg Blocks appeared first on CSS-Tricks.

How to Add Infinite Scroll to your WordPress Site (Step by Step)

Do you want to add infinite scroll to your WordPress blog?

Infinite scroll is a web design technique which automatically loads your next page content when users reach the bottom of a page. It allows users to see more content on your blog without clicking on the pagination or ‘Load More’ button.

In this article, we will show you how to easily add infinite scroll on your WordPress blog (step by step).

Adding Infinite Scroll to Your WordPress Blog Easily

What is Infinite Scroll?

Infinite scroll is a web design trend which uses AJAX page load instead of numeric page navigation to automatically load your next page content and display it at the end of current page. Infinite scrolling makes it easier to browse more content by simply scrolling down. It loads content continuously and infinitely as users keep scrolling.

Traditionally, users would have to click on ‘next,’ ‘previous’ buttons or page numbers to see older blog articles.

When using AJAX short for Asynchronous Javascript and XML, webpages can communicate with the server without reloading the entire page. It enables web apps to process user requests and deliver data without refresh.

The best examples of infinite scroll design are the popular social media sites such as Facebook, Twitter, Instagram, Pinterest, and more. If you are using any of them, then you know how content loads endlessly on your social media timeline.

Is Infinite Scrolling Suitable for Every Website?

Many content websites on the internet are using infinite scroll technique to improve the browsing experience and increase engagement. This leads many beginners to ask the questions like is it suitable for every website, or is it good for my site?

Infinite scrolling is excellent for sites that present content in a timeline or feed, like the social media apps. It offers a fantastic browsing experience to the users looking for time-based content.

Next, infinite scroll design is perfect for mobile and touch devices. For mobile users, scrolling is more user-friendly than taping on tiny page links.

Touchscreen Web Interaction

The most significant advantage of infinite scroll technique is a smooth browsing experience. Users don’t need to click on the pagination links manually. Content loads quickly with scrolling and keeps users engaged.

But on the other side, it can also make your site navigation harder. With continuous loading, it is hard to figure out where (on which page) a blog article is. Some users even find it overwhelming to see many articles all at once.

Another disadvantage of infinite scroll design is that you cannot have a footer. Even if you have it, it will be hidden under endless articles continuously loading. Many sites add essential links on the footer, so not having it can disappoint some users.

Perhaps the most concerning issue with infinite scrolling is that it can slow down your website or even crash the server. When we added infinite scroll to one of our smaller blogs, we experienced server crash after users scrolled unnecessarily causing memory exhaustion on a small WordPress hosting account. We recommend that you use managed WordPress hosting if you’re looking to try infinite scrolling.

Now that you know the pros and cons of infinite scroll design, you can decide whether you need to add it to your blog or not.

If you have decided to add infinite scrolling to your WordPress blog, then you can do it easily. We will be showing you multiple plugins that you can use, so you can choose the one that best suits your needs.

Adding Infinite Scroll to Your WordPress Blog with Catch Infinite Scroll

First thing you need to do is install and activate the Catch Infinite Scroll plugin. For more details, see our step by step guide on how to install a WordPress plugin.

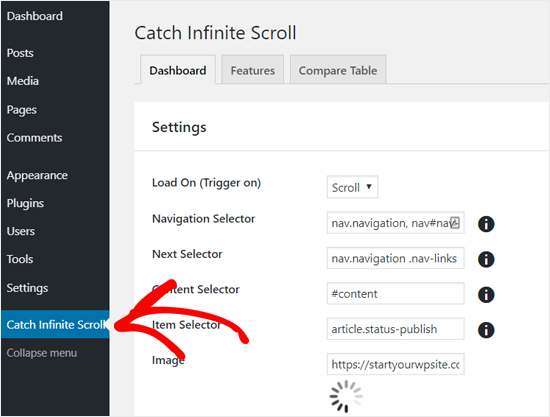
Upon activation, WordPress will add a new menu item labeled ‘Catch Infinite Scroll’ to your WordPress admin panel. You need to click on it to configure the plugin settings.

Catch Infinite Scroll Settings

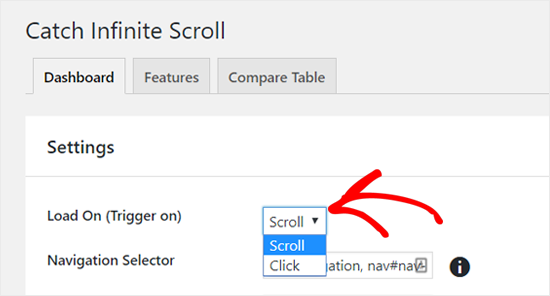
First, you can choose a trigger option for loading articles. The plugin lets you load content automatically as users scroll down the page or add a ‘Load More’ button.

Load on Scroll or Click - Catch Infinite Scroll Plugin Settings

You should select the ‘Scroll’ option to trigger autoload with scrolling. Alternatively, you can select the ‘Click’ option if you want to add a load more button.

Next, you can see the navigation selector, next selector, content selector, and item selector. You don’t need to change anything on these options because default options work quite well.

After that, there is an Image option where you can add content loader icon. By default, it has a loader GIF image. If you have a better picture, then you can change it.

Upload a New Loading Image for WordPress Infinite Scroll

‘Finish Text’ option includes the message which will be shown once a user completes viewing your articles. By default, the text says ‘No more items to display.’ You can easily edit this text as needed.

Articles Loading Finished - Finish Text Option Catch Infinite Scroll

Once done, click on the Save Changes button.

That’s it! The infinite scrolling is now active on your blog. You can visit your blog and see the infinite scrolling in action.

WordPress Infinite Scroll Preview

Alternative WordPress Plugins to Add Infinite Scroll in WordPress

Catch Infinite Scroll works well with most of the WordPress themes; however, it can fail with some themes. In such a scenario, you can use any of the following infinite scroll WordPress plugins.

1. Ajax Load More

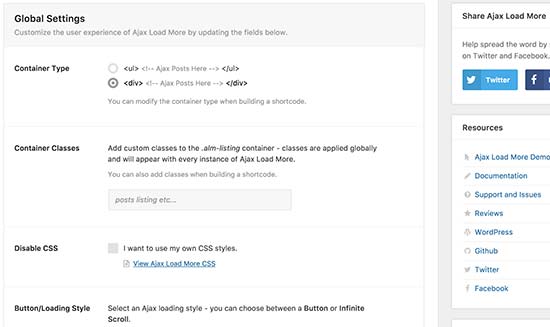
Ajax Load More settings

Similar to Catch infinite Scroll, Ajax Load More plugin also lets you add endless scroll and clickable Load More buttons to your WordPress site.

The plugin offers more customization options, including many page loading icon styles, button styles, etc. For a detailed guide, you can see our tutorial on creating a load more posts button in WordPress using Ajax Load More plugin.

However, the plugin has some learning curve for beginners. It has an advanced interface with many options, including repeater template, shortcode builder, WordPress queries, and more.

It will require some coding skills to apply infinite scrolling with this plugin.

2. YITH Infinite Scrolling

YITH Infinite Scrolling is a simple alternative to Ajax Load More or Catch Infinite Scroll plugin.

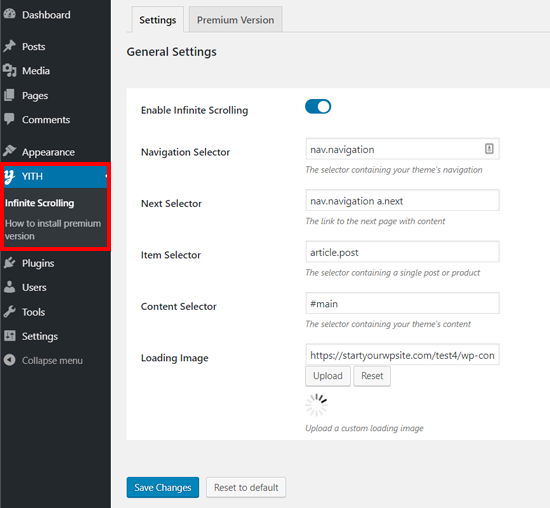
Similar to Catch Infinite Scroll plugin, it has minimal options to set up scroll-based web interaction on your site. You just need to install and activate the plugin and enable infinite scrolling.

YITH Infinite Scrolling Plugin Settings

Anyone, including beginners, can easily set up infinite scrolling using this plugin. However, it doesn’t have a ‘Load More’ button option, which is included in the other two plugins mentioned above.

We hope this article helped you to learn how to add infinite scroll design to your WordPress blog. You may also want to see our guide on how to add scroll-depth tracking in WordPress.

If you liked this article, then please subscribe to our YouTube Channel for WordPress video tutorials. You can also find us on Twitter and Facebook.

The post How to Add Infinite Scroll to your WordPress Site (Step by Step) appeared first on WPBeginner.

Figma Tips To Kick-Start Your Design Workflow

Figma Tips To Kick-Start Your Design Workflow

Figma Tips To Kick-Start Your Design Workflow

Philippe Hong

I have made the switch to Figma almost two years ago and I have no regrets so far. In one of my previous blog posts on the topic, I made an in-depth review of Figma, and I’m glad I could help other designers make the switch. After two years of working with this tool, I got really familiar with it and now I’d like to share with you twenty tips that I use every day and which help me work a bit faster and be more effective.

Note About Shortcuts

Most shortcuts are written for both Windows and Mac, where the Ctrl key on Windows corresponds to the Cmd key on the Mac, and Alt is used for both Alt (Windows) and Option/Alt (Mac).

For example, Ctrl/Cmd + Alt + C is Ctrl + Alt + C on Windows and Cmd + Alt/Option + C on the Mac.

Note: This article is for designers who want to try Figma or already are exploring some of its features. To get the most from the article, some experience with Figma Design would be nice to have, but not required.

1. How To Import Multiple Images At The Same Time

We use pictures and images in our designs all the time, and it would be very useful if we could make the process of changing single and multiple images more easy and straightforward.

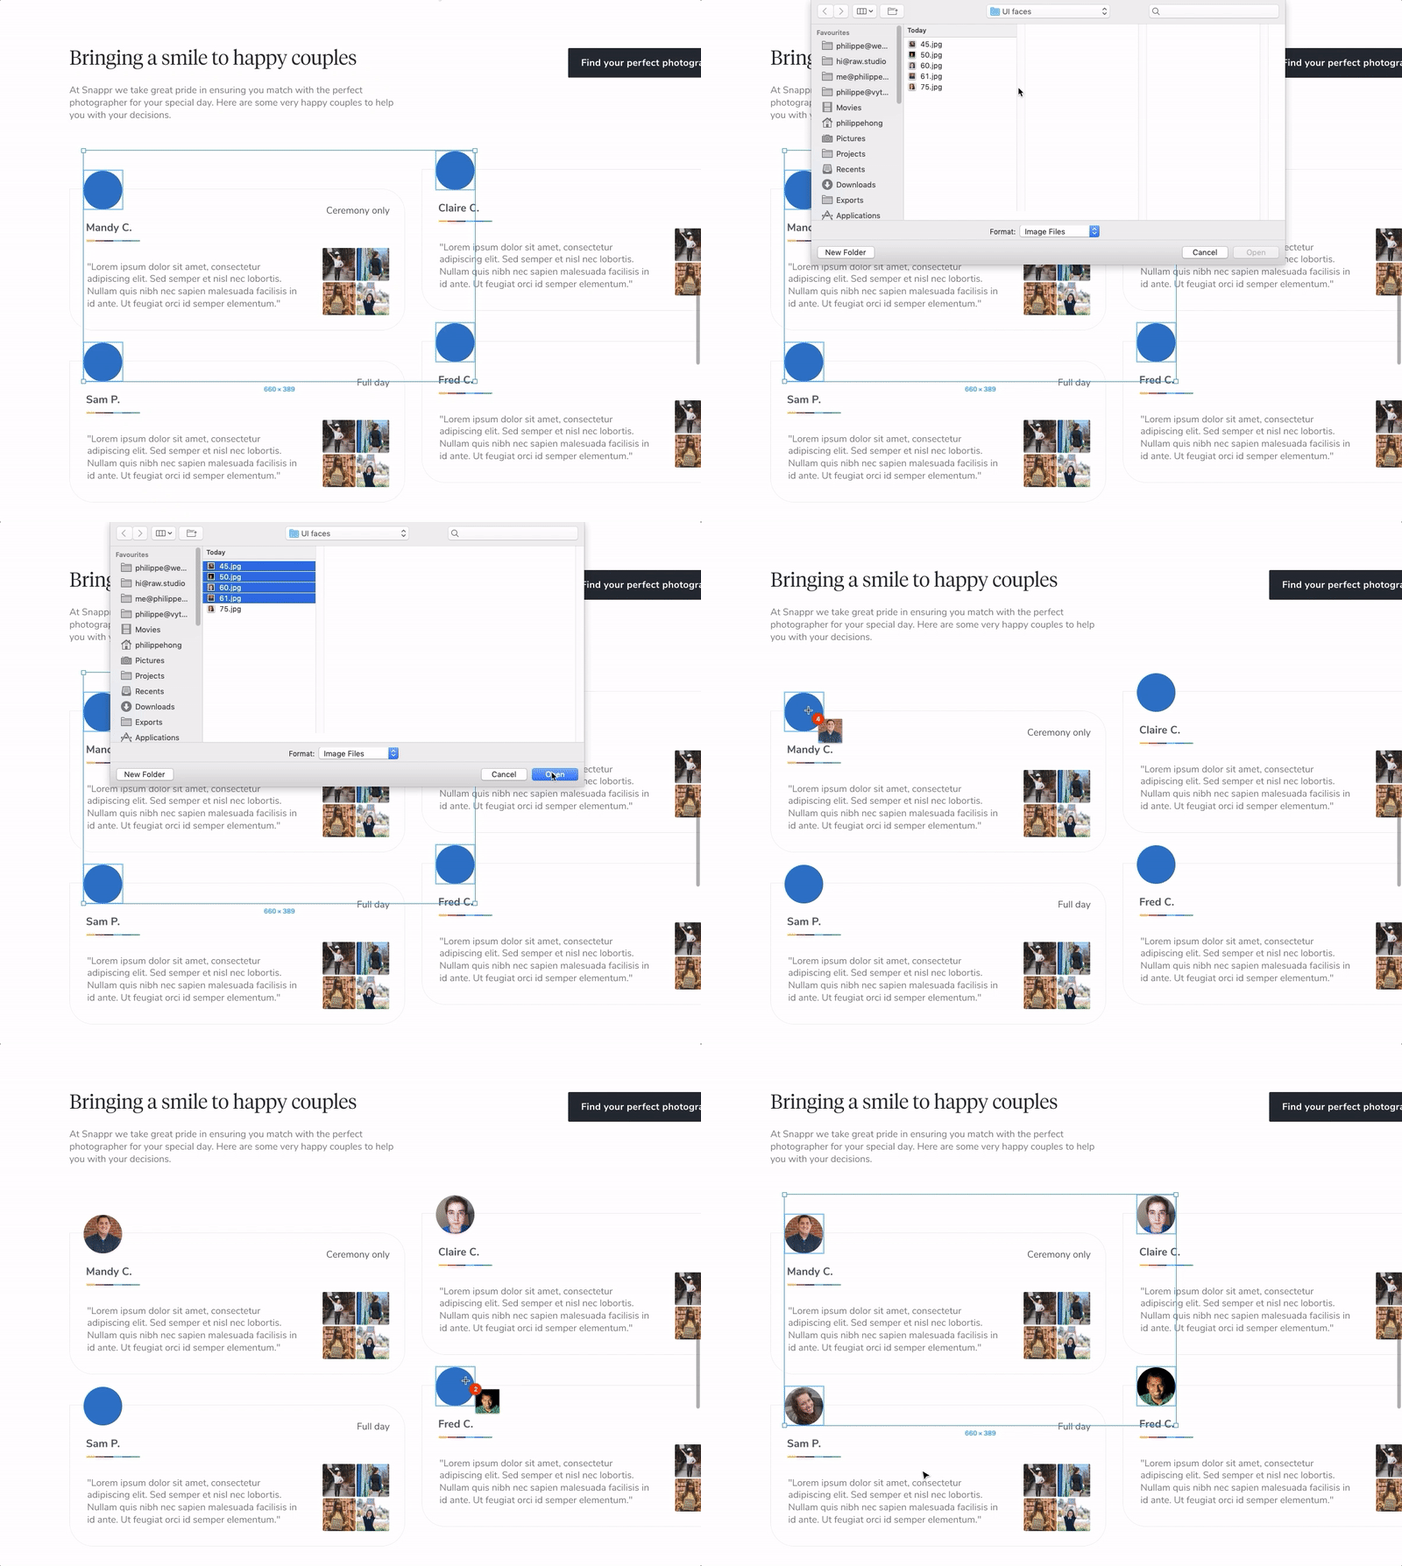
In Figma, you have the ability to import multiple images (using the shortcut Ctrl/Cmd + Shift + K) and then place them one by one in the layers (objects) in which you want them to appear. This is quite handy because you can see the images being imported and then placed in realtime.

import multilple images in Figma
A quick look of how to import multiple images in Figma (Large preview)

2. Better Renaming Options By Using The Layers Batch Rename Feature

Sometimes (and I really mean many times!), we need to rename a group of layers when we need to prepare our design for export (export as icons, or as a set of images), or just when we need to perform a “deep clean” process inside a design file.

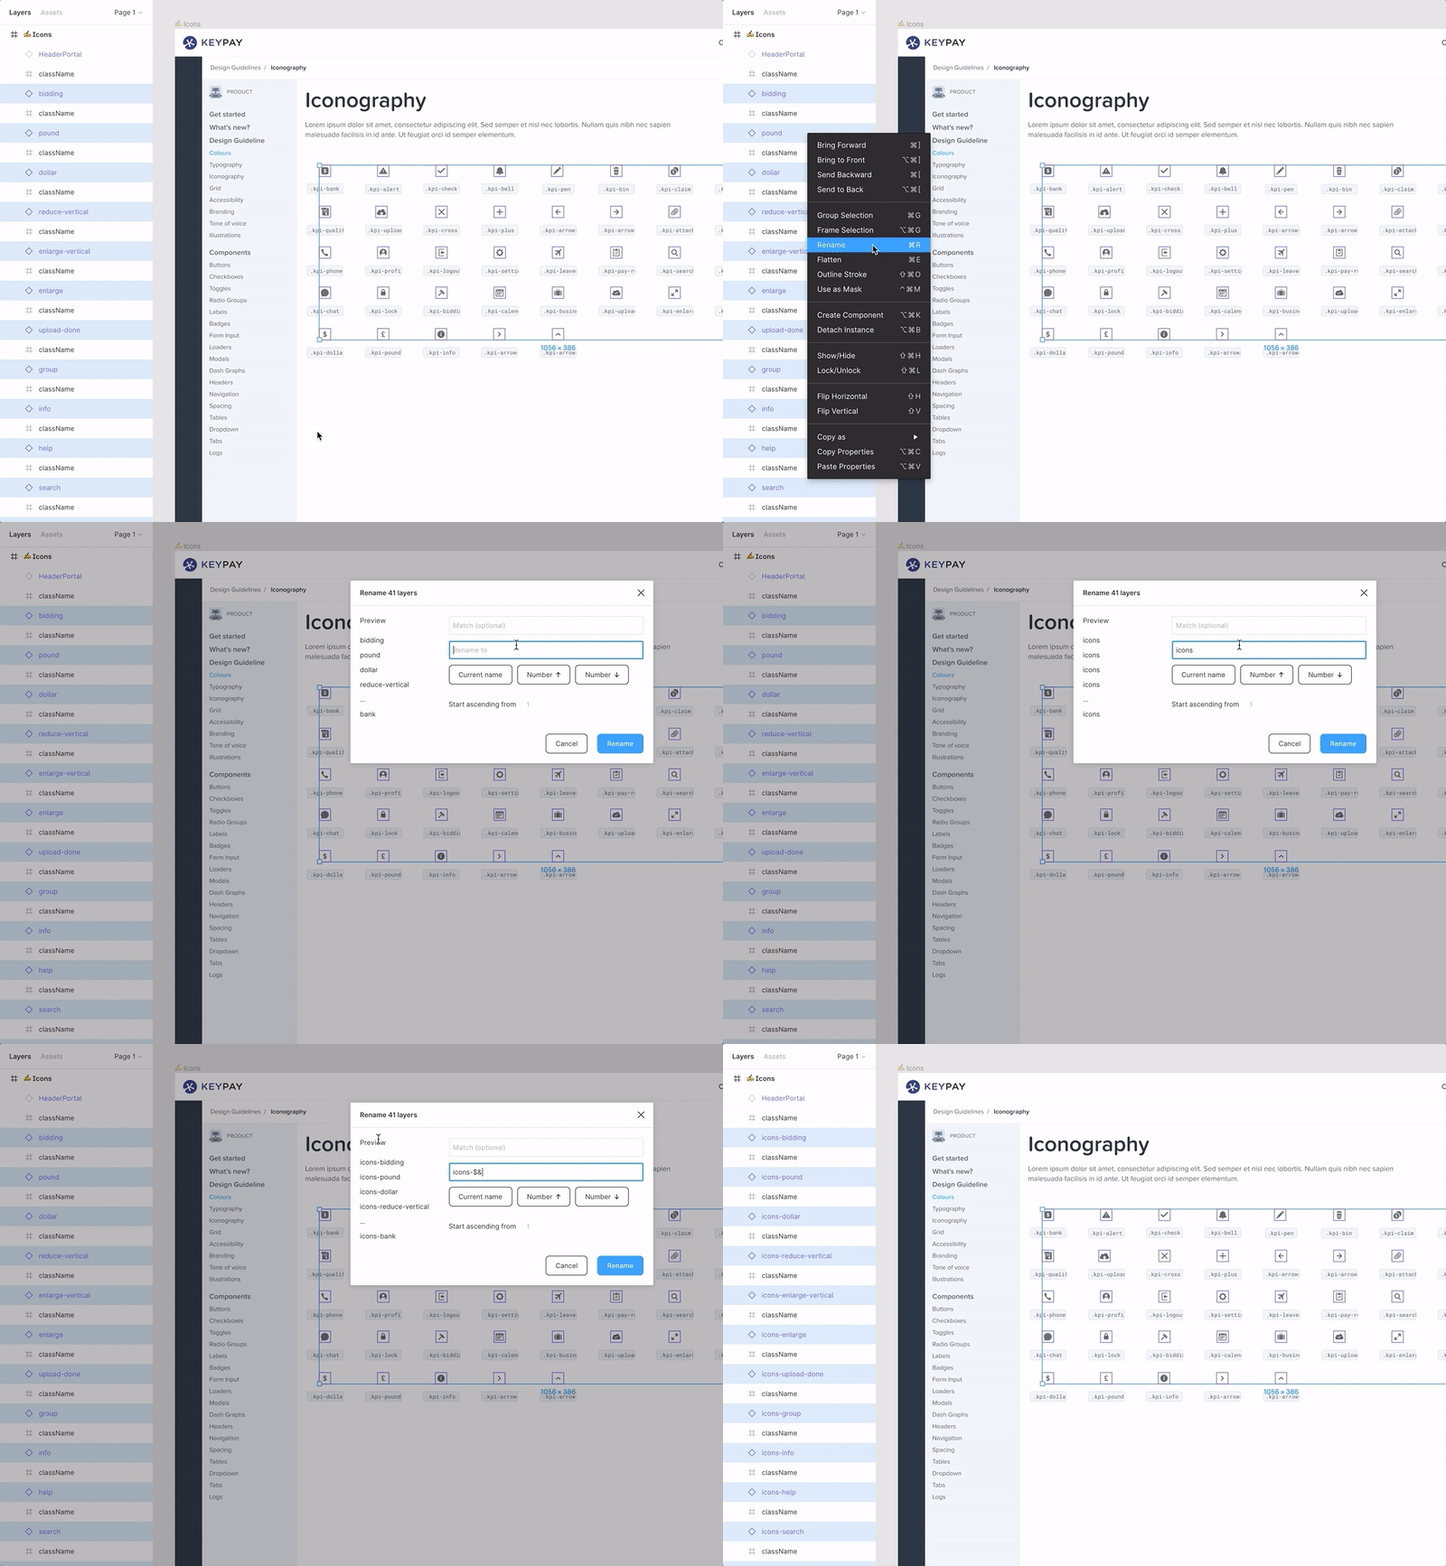
In Figma, you have the ability to batch rename layers (and frames) which is a really handy feature. You can rename the entire layer name or just a portion of it. You can also find and rename a specific character in a layer name, and you can add a different number to each layer that will be later exported as a separate file. You can also do a search and replace by just typing in the “Match” field.

I find this feature extremely useful.

rename multilple layers in Figma
A quick look on how to batch rename layers in Figma (Large preview)

Note about layers: If you’re relatively new to Figma, the following Figma help page will shed some light on layers, frames, objects, groups of objects, and more.

3. Using An Emoji In The Frame Name To Display Its Current Work State

Since we started using Figma in our design team, our workflow has been more collaborative, as we usually work on the same design files, and sometimes we even work on them simultaneously.

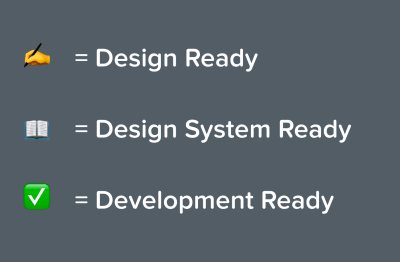
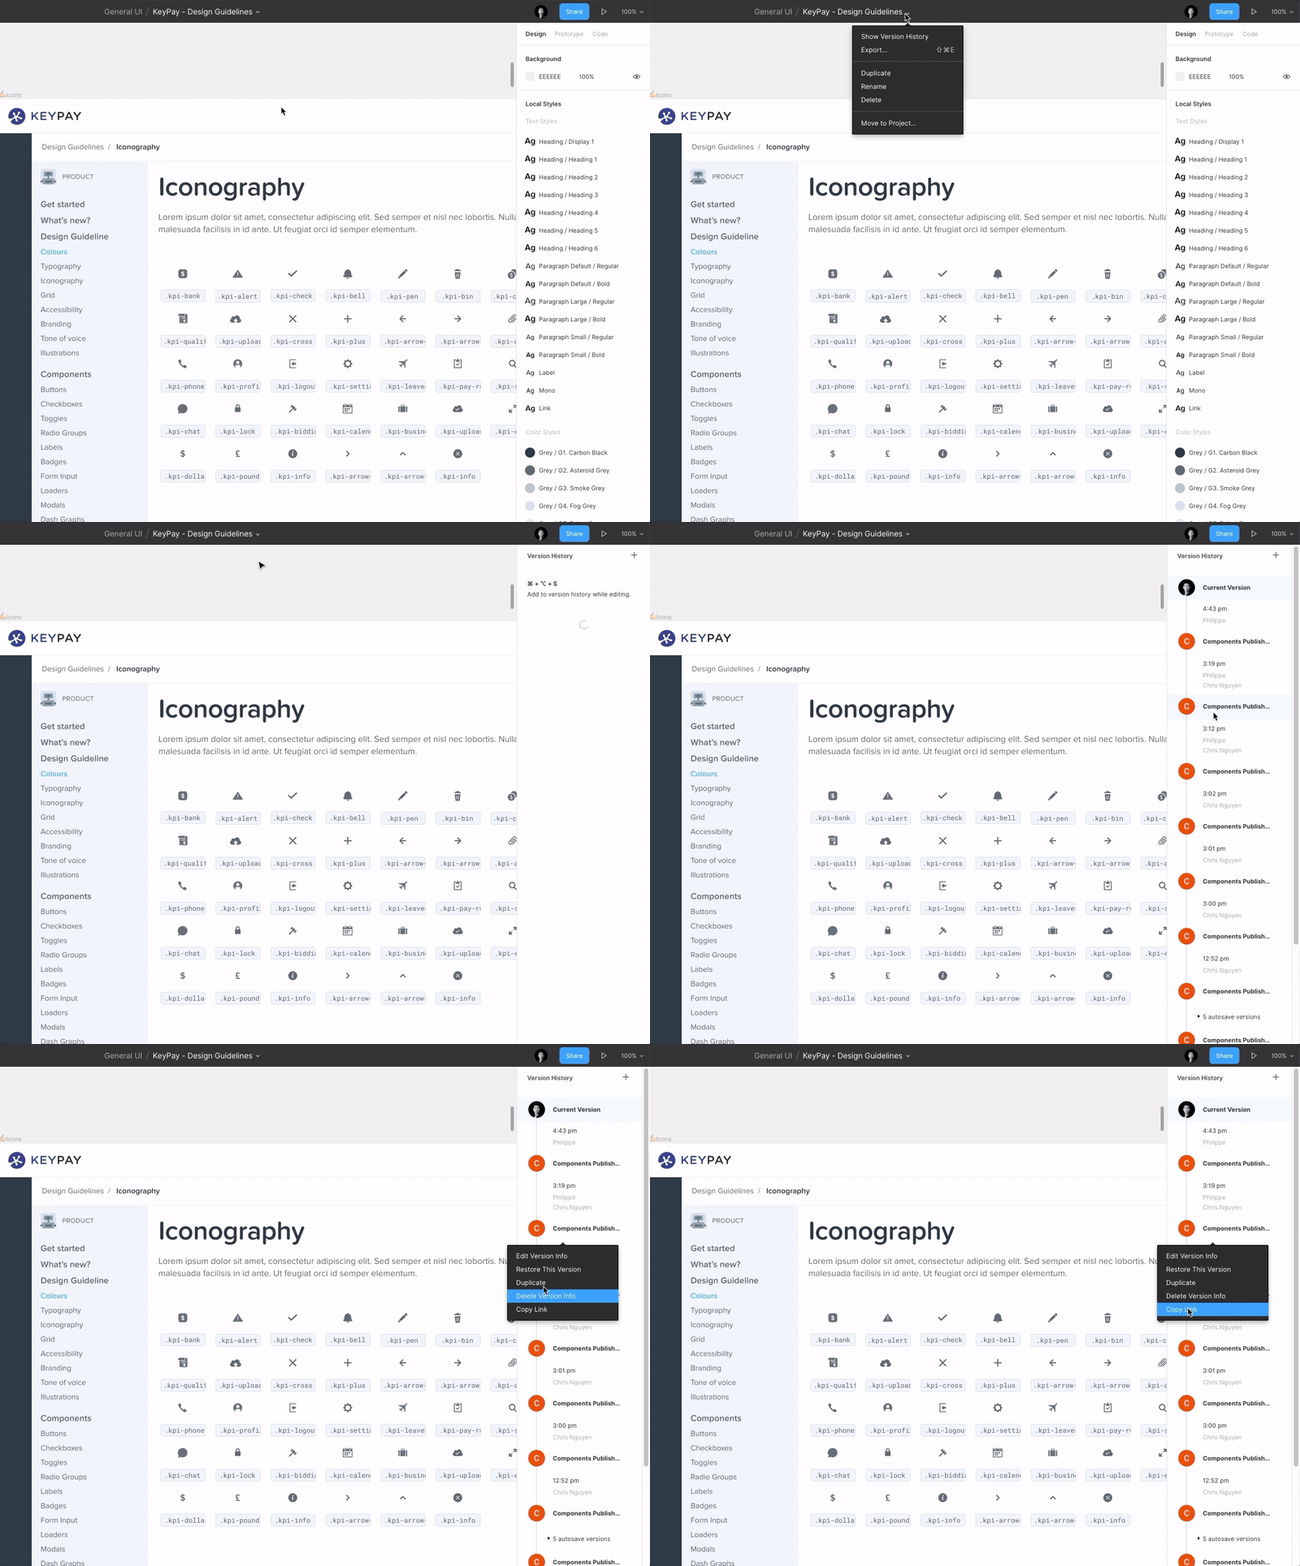
To know which Frame or screen is still work in progress, and which one is ready (final variant completed), we add an emoji (Windows shortcut: Win key + . or Win key + ; / Mac shortcut: Cmd + Ctrl + space) before the frame name so everyone can see at a glance the frame’s current state.

current state emoji in Figma
An example of current state emoji I use in my projects (Large preview)

4. Re-Organizing Items

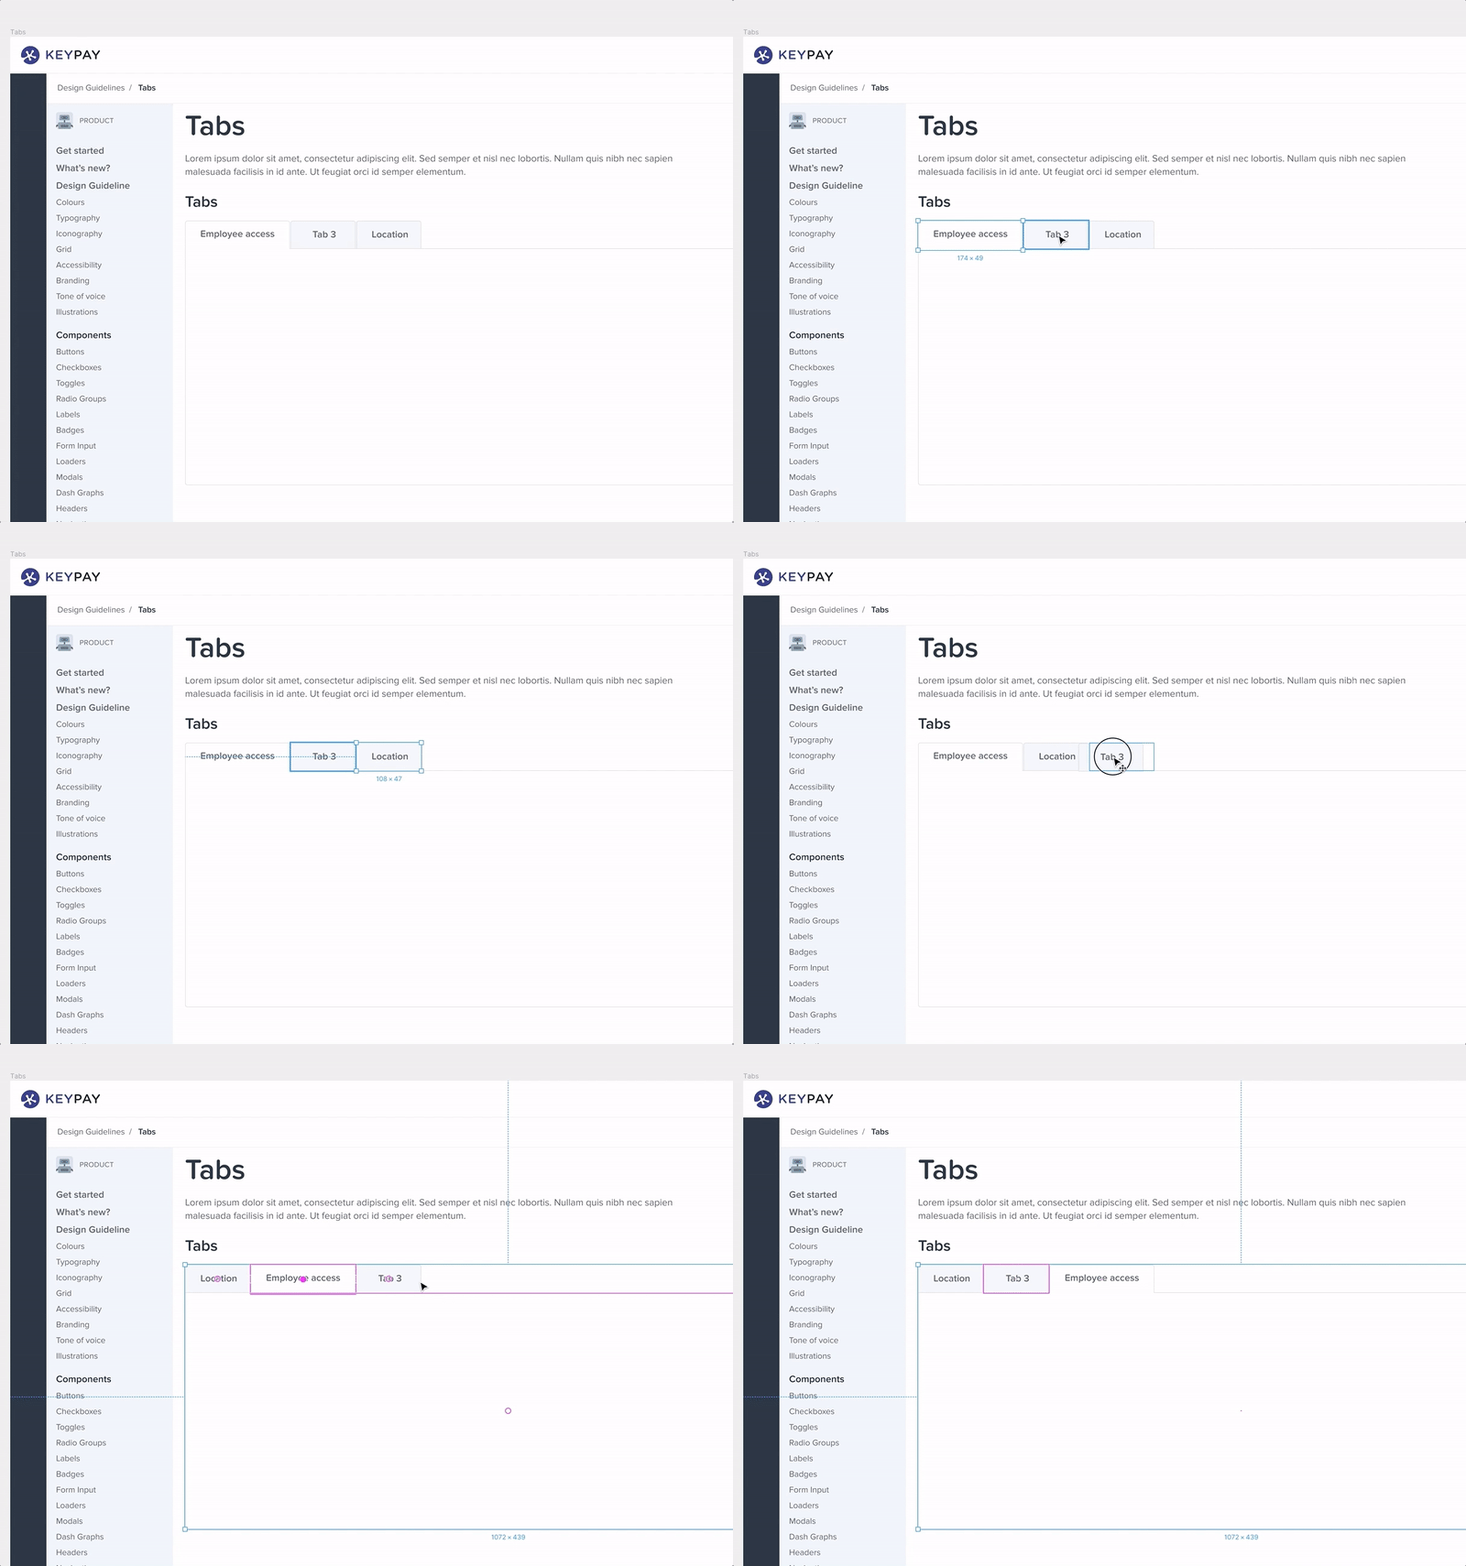
One of Figma’s great features is the ability to re-organize items inside a Frame. It’s very handy when used on icons, lists or tabs as shown below:

Reorganise items in Figma
A quick look on how to re-organize your items in Figma (Large preview)

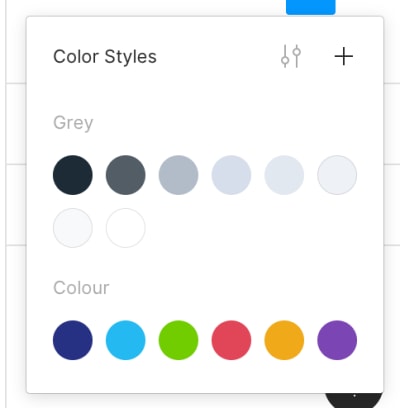
Use Proper Naming To Organize Your Styles (Texts, Colors, Effects)

Local Styles is one of the best features in Figma. It allows you to create a design system or guideline for all components so you can reuse them easily. And if you change the Master Style, it changes all the components linked to it. Super powerful! However, you can get lost with all your styles if you don’t name and categorize them the right way. I’ll share with you how I structured my styles in Figma — read on!

5. Text Styles Naming

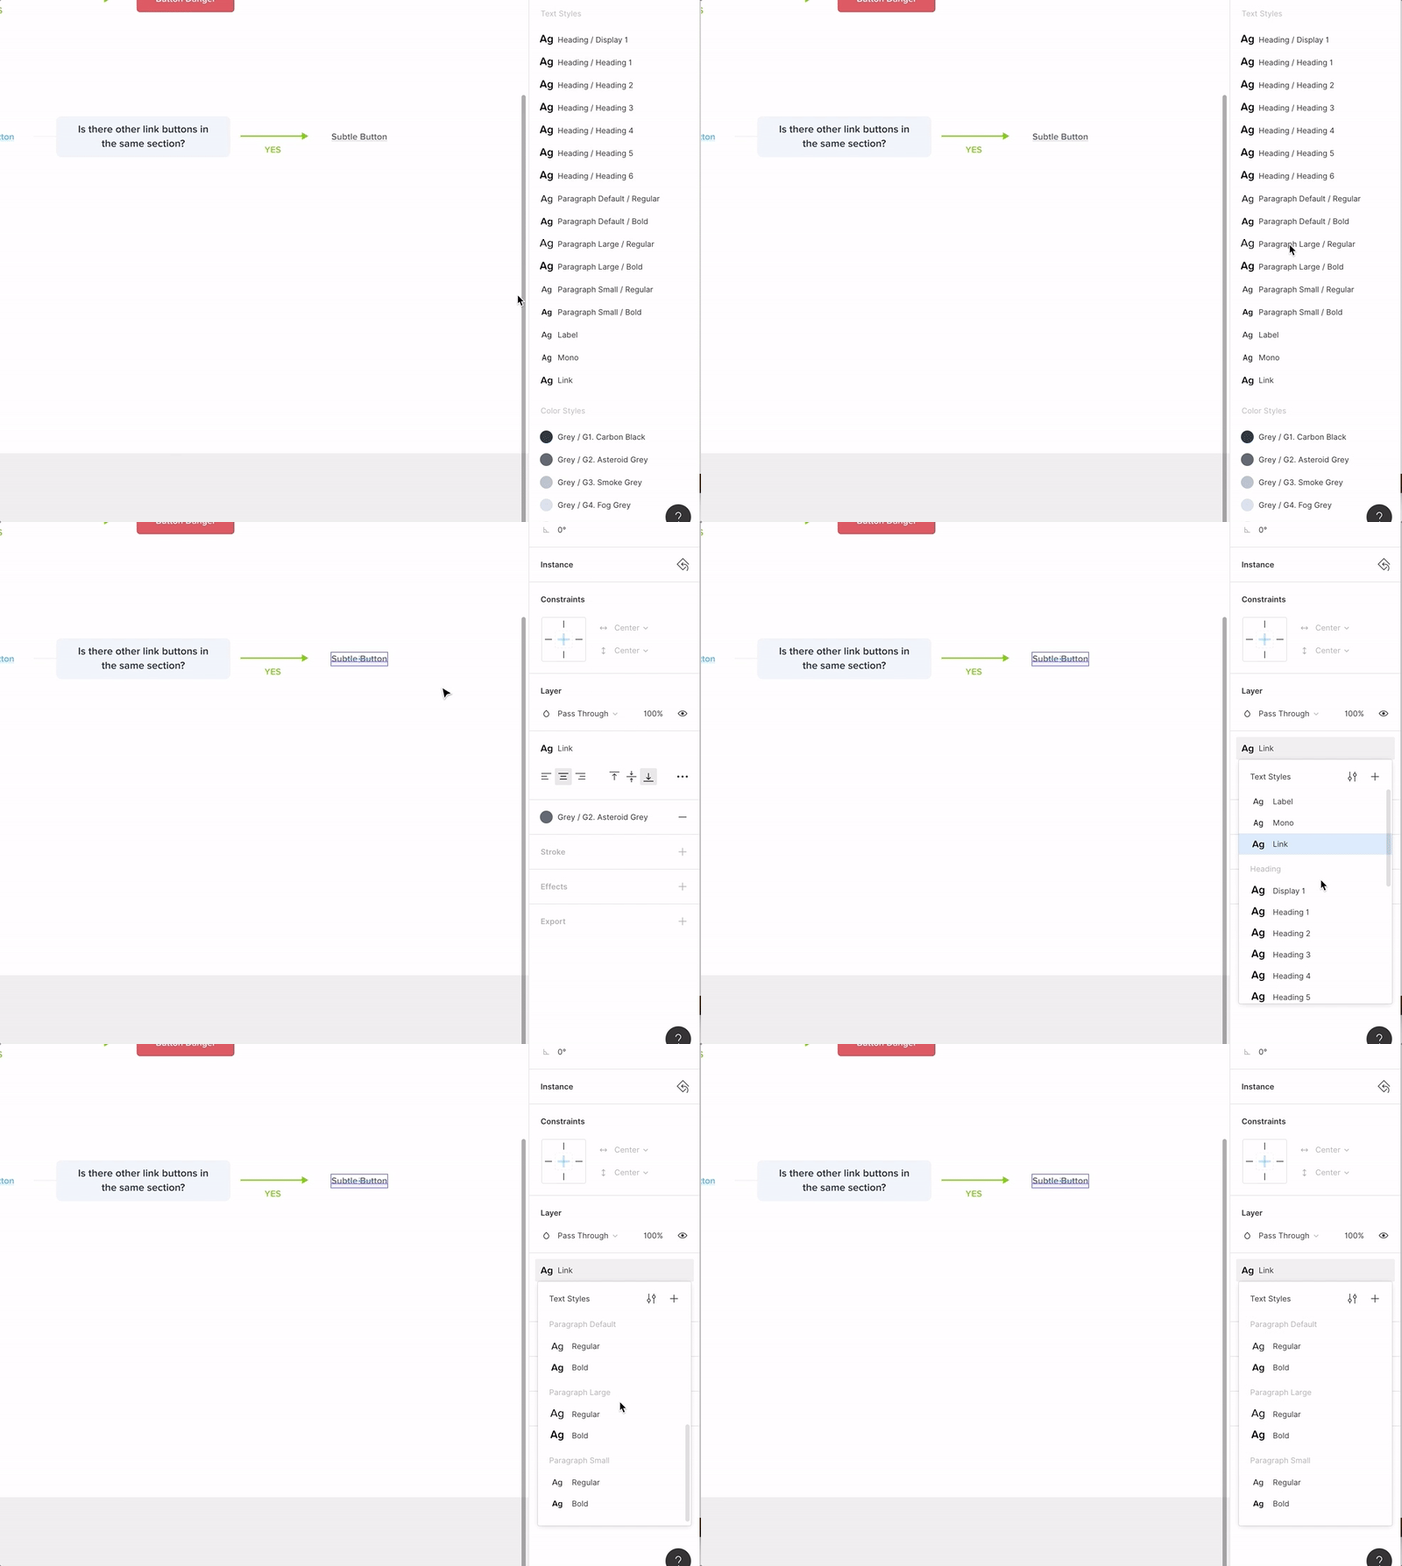
You can organize your text styles in subcategories by adding a “/”. For example, I would add a “Heading” and “/” so I’ll have all my headings inside the category “Heading.” Sounds fancy but it’s easier to navigate when you have a lot of different font sizes. Works for Texts and also Colors.

List of Text styles naming in Figma
My List of Text styles naming convention (Large preview)
List of Text styles naming in Figma
My List of Text styles naming convention (Large preview)

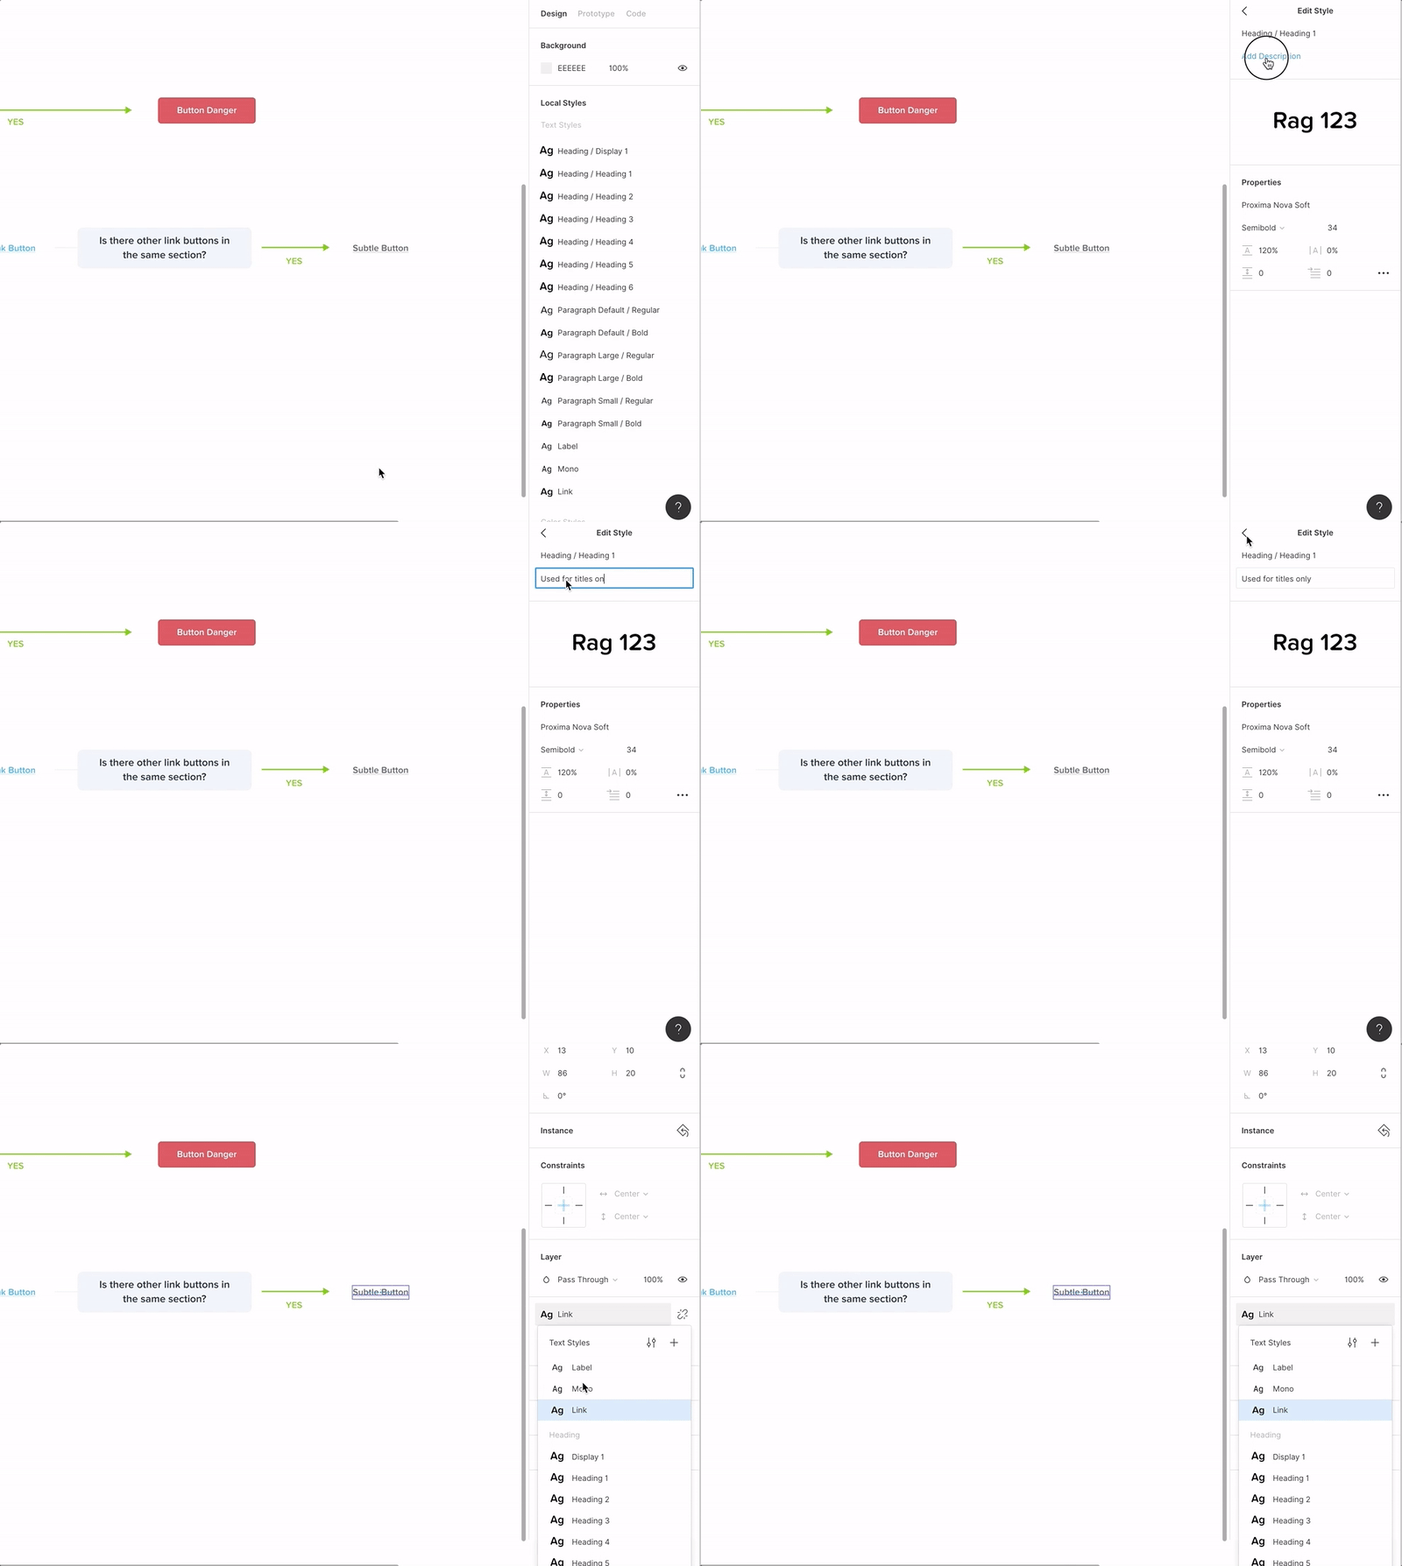
6. Adding A Description For Each Style As A Guide

It can be handy to know where to use different components by adding a quick description of how to use the style and where, especially when you have a team of designers. You can add a description when editing the text style, color style or any components.

Style description in Figma
How to add a description for each style (Large preview)

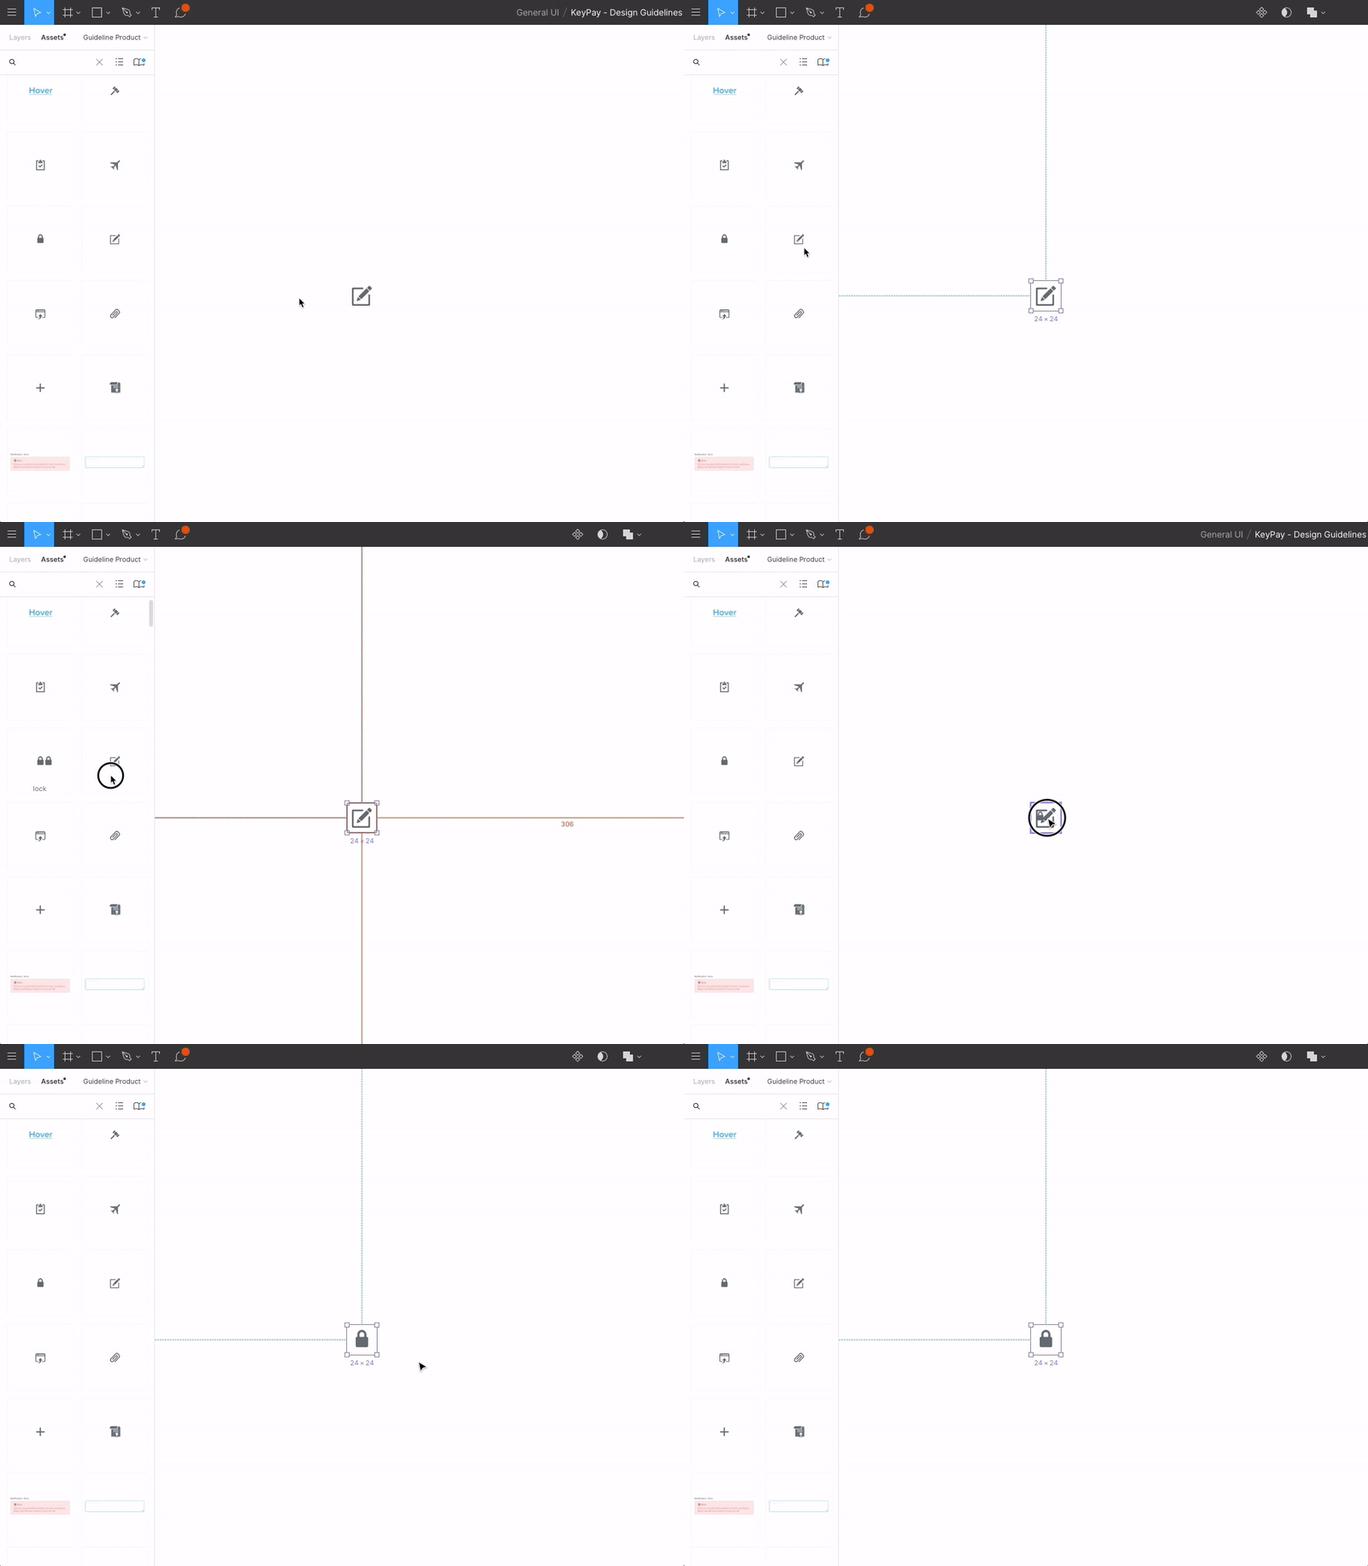
7. How To Switch Instance From The Sidebar

A lot of times, we end up with a lot of components, icons, etc., so the dropdown menu to switch instance is probably not the best way to do this. The little trick is that you can, from the sidebar, drag the component by holding Alt + Ctrl/Cmd to the component you want to switch. Easier and faster!

Switch instance from the sidebar in Figma
How to switch instance from the sidebar (Large preview)

8. How To Copy/Paste All Properties

When duplicating an element or when I just want to copy the style of an element, I can quickly copy the element’s properties (Ctrl/Cmd + Alt + C) and paste them (Ctrl/Cmd + V) on a new element. It’s quite handy for images and styling elements with multiple properties, e.g., fill and stroke, etc.

Copy/paste all properties feature in Figma
A quick view of the copy/paste property feature (Large preview)

9. How To Copy/Paste A Single Property

Another shortcut that I found very useful is the ability to copy a single property — and you can select which property to copy! Select the property from the right panel (like shown in the video) and with a simple Ctrl/Cmd + C and then Ctrl/Cmd + V paste it on another object. I found this to be very useful for images.

Copy/paste property feature in Figma
You can select a single property to copy like shown in this video. (Large preview)

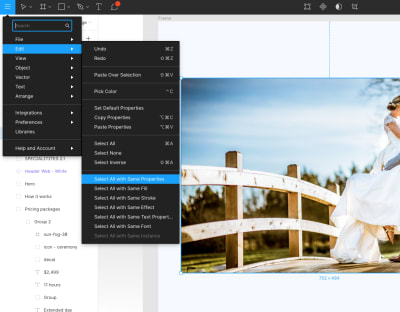
10. Search For Elements With The Same Properties, Instance, Style, And So On

When you have a complex design file, or you just want to tidy up your design system, it’s quite handy to be able to search for elements with the same property (a specific color, for example), and then change the color to a Color Style. Super-useful after you’re settled with the design system and need to better organize all the components!

Select all with the Same Properties menu
The ‘Same Properties’ menu in Figma helps you to select all. (Large preview)

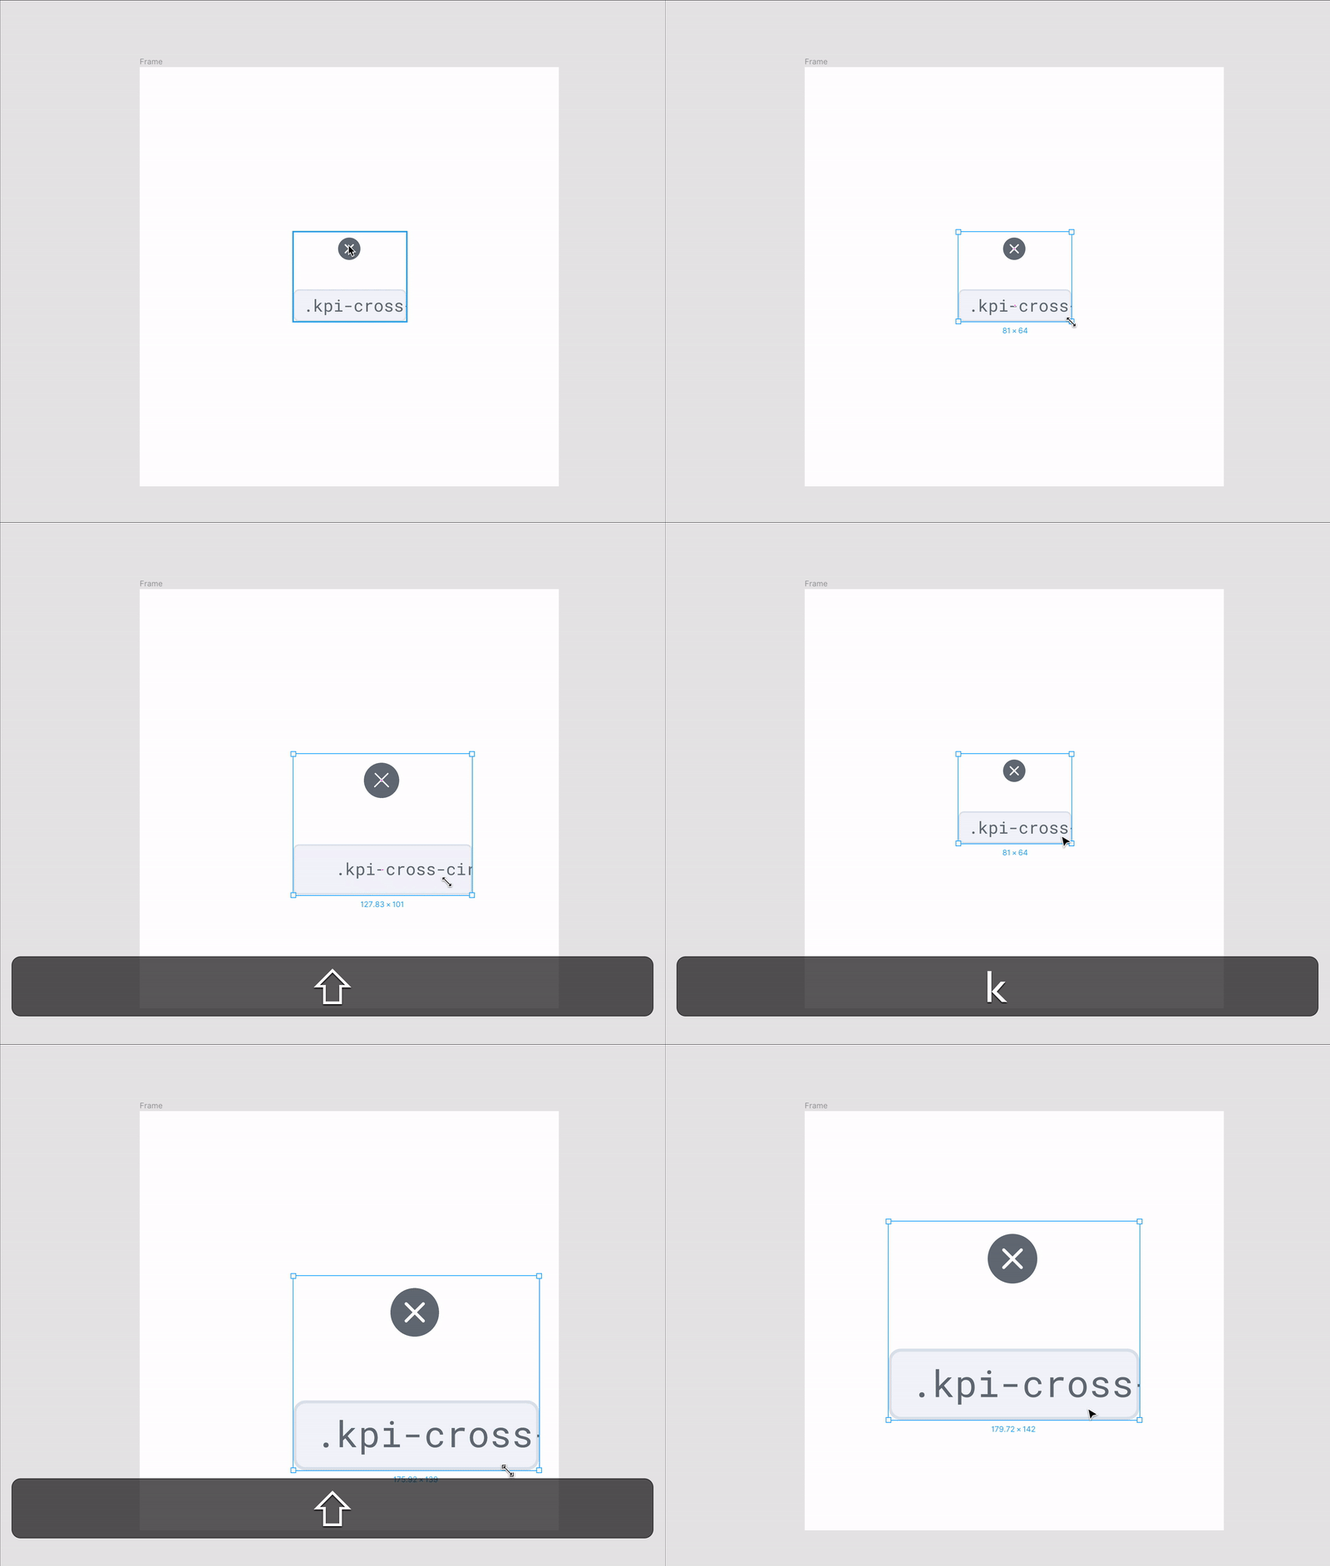
11. Use The Scale Tool To Resize Objects And Their Properties

I found it useful to be able to scale an element and its properties (stroke, effects applied to the object, etc.) all at the same time with the Scale tool (K). I found Figma a bit easier than Sketch in this regard, as you don’t have to select the size of the object. When you scale the object, both the object’s dimensions and its properties will resize proportionally. And by holding Shift, you’ll also keep the ratio while expanding or downsizing the object.

Note: If you need to change the size of an object without changing its properties (stroke, effects, etc.), use the Select tool to select the object, then resize it by using the Properties panel. If you use the Scale tool and resize the object, then both the object’s size and its properties will resize.

Resize tool in Figma
The difference between the normal resize and the scale tool (Large preview)

12. Resize A Frame Without Resizing The Layers Inside It

When designing for different screen resolutions, you want to be able to resize the screen frame without having to resize all the elements inside the frame. In order to do that, hold Ctrl/Cmd while you perform the resize operation. Magic!

Resize frame in Figma
A quick view of resizing frame without resizing the layers inside (Large preview)

13. Create Graphs/Arc In Seconds

With Figma, you can create graphs/arc in literally seconds! No more cutting paths on a circle to create a custom graph. Here’s how you create a loading arc — and all those values can be precisely controlled from the Properties panel on the right.

Graph tool in Figma
A quick look on how to create graphs in seconds (Large preview)

14. Change Spacing On The Go

I love Figma’s feature that allows you to change the spacing for a group of elements. It makes it super easy to lay out a group of elements around your screen. I use this feature for multiple elements but also for single elements as well.

Change spacing in Figma
A quick look on how to change the spacing between objects (Large preview)

15. Component Keywords For Easy Search

When you’re starting to have lots of components, it becomes difficult sometimes to find a specific component in your library. That’s when the component keywords come in handy. You can add keywords to any component so even though the component’s name is different, you’ll have the keywords which will allow to find it more easily. You’ll find an example below:

Keywords in components in Figma
Add keywords in components for easy searching (Large preview)

16. Restore An Earlier Version Of A Design File Or Share The Link To An Earlier Version

I love the feature to be able to go back to a previous version of the file I am currently working on.

No matter the reason (you made a mistake, or a client asks you to switch to an earlier version, etc.), it is really handy to be able to go back in time to a previous version. And not only that, but Figma also lets you copy the link to the previous version so you don’t have to delete the most recent version of the file. Smart!

History version in Figma
Going back in time in your history version (Large preview)

17. UI Kit Libraries To Kick-Start Your Projects

I often use the UI kit libraries to kick-start my projects. For example, I use the Wireframy Kit whenever I need to design some wireframes. I just need to activate the library, and I’m ready to go! I also often use Bootstrap Grid and Figma Redlines. (There’s a ton of free assets available — check them out and pick the ones you need.)

UI Kits in Figma
One of the UI Kit “Wireframy” which I use. (Large preview)

18. Use GIFs In Prototypes

Figma just added the ability to add GIF files to your prototypes, thus adding the possibility to add user interaction animations within your prototypes. Here’s a preview of it from Aris Acoba:

19. Figma, Tidy Up!

Figma’s Tidy Up feature is really when you want to quickly rearrange elements in a grid or just to make everything aligned. Together with the features which I mentioned in point 4 and point 14 — it’s super powerful! Also, another way to tidy up is by hovering over the bottom-right corner of a selection and clicking the blue icon.

Tidy up in Figma
A quick look on the ‘Tidy Up’ feature in Figma (Large preview)

20. View Settings

It took me a bit of time to find those settings but they are quite handy when you know where they are located. You can configure how you see your workplace in the “Settings” dropdown menu in the top right corner of the window. Allowing you to show Rulers, the Grid, enable/disable “Snap to Pixel Grid” (which sometimes is a bit annoying), but also hide the other players’ (designers) cursors when you want a bit of focus and don’t want to be distracted by others.

View settings panel in Figma
The ‘View’ settings panel in Figma (Large preview)

21. Bonus Tip: Figma Plugins

Figma just recently introduced their new plugins feature which will allow people to build custom plugins tailored for their own workflows.

I think plugins will add a lot of value to the entire Figma ecosystem and will enhance our design workflows. Some of the best plugins I have tried so far include:

  • Content Reel
  • Unsplash
  • Stark
  • Image Palette
  • Google Sheet sync
Plugins in Figma
A list of Plugins in Figma (Large preview)

Have a try yourself and maybe you could even build your own plugin to suit your needs!

Further Reading on SmashingMag:

Smashing Editorial (mb, yk, il)

Micro-Interactions Tutorial for Beginner Developers: How to Create an Interactive “Like” Button With CSS and JavaScript

I think it’s safe to say that micro-interactions are cool. We – web people – universally all enjoy them. And no matter if you’re noticing them or not, they provide a significant user experience improvement. By making your website or web tool come to life subtly and in a friendly way, they simply make the user enjoy the whole interaction a tiny bit more.