The University of Helsinki is offering its “Deep Dive Into Modern Web Development” course online for free. It provides an introduction to JavaScript-based web development with React, Redux, Node.js, MongoDB, and GraphQL. Participants will learn the basics of building single page applications with ReactJS. This course is the same as the Full Stack course that was offered at the university’s Department of Computer Science in Spring 2019.
The material is available in both Finnish and English and is licensed under the Creative Commons BY-NC-SA 3.0. It is structured into nine parts:
Fundamentals of Web apps
Introduction to React
Communicating with the server
Programming a server with NodeJS and Express
Testing Express servers, user administration
Testing React apps, custom hooks
State management with Redux
React router, styling app with CSS and webpack
GraphQL
The University partnered with seven companies to provide participants with an “interview promise” if they complete the course with full credits and the practical work. This offer, which is only available to those with a Finnish social security number, is similar to coding bootcamps that offer job interviews after completion.
The university issued a call for companies to join the “Full Stack Challenge,” encouraging their employees to take the course and build upon their expertise:
Our objective is to encourage learning. We offer a fully-assembled and purposefully-scoped Full Stack course that lowers the barrier of entry for learning about new state-of-the-art and production grade technologies. The course is free of charge and you can participate from anywhere at anytime, at your leisure.
The course is built by coders for coders, and offers something for both newcomers and seasoned industry veterans alike.
All participants who finish the course can download a certificate of completion. Those with a Finnish social security number can take an exam and get official credits from the University.
WordPress developers who have yet to jump into the world of React-based JavaScript development may find this course to be a useful, structured introduction. Participants should have a a basic understanding of programming and databases, as well as decent grasp of working with Git.
I just did this the other day so I figured I'd blog it up. There is a thing called Git Large File Storage (Git LFS). Here's the entire point of it: it keeps large files out of your repo directly. Say you have 500MB of images on your site and they kinda need to be in the repo so you can work with it locally. But that sucks because someone cloning the repo needs to download a ton of data. Git LFS is the answer.
Netlify has a product on top of Git LFS called Large Media. Here's the entire point of it: In addition to making it all easier to set up and providing a place to put those large files, once you have your files in there, you can URL query param based resizing on them, which is very useful. I'm all about letting computers do my image sizing for me.
You should probably just read the docs if you're getting started with this. But I ran into a few snags so I'm jotting them down here in case this ends up useful.
You gotta install stuff
I'm on a Mac, so these are the things I did. You'll need:
Git LFS itself: brew install git-lfs
Netlify CLI: npm install netlify-cli -g
Netlify Large Media add-on for the CLI: netlify plugins:install netlify-lm-plugin and then netlify lm:install
"Link" the site
You literally have to auth on Netlify and that connects Netlify CLI to the site you're working on.
netlify link
It will create a .netlify/state.json file in your project like this:
{
	"siteId": "xxx"
}
Run setup
netlify lm:setup
This creates another file in your project at .lsfconfig:
You'll need to run more terminal commands to tell Netlify Large Media exactly which images should be on Git LFS. Say you have a bunch of PNGs and JPGs, you could run:
git lfs track "*.jpg" "*.png"
This was a minor gotcha for me. My project had mostly .jpeg files and I got confused why this wasn't picking them up. Notice the slightly different file extension (ughadgk).
This will make yet another file on your project called .gitattributes. In my case:
This time, when you push, all the images will upload to the Netlify Large Media storage service. It might be an extra-slow seeming push depending on how much you're uploading.
My main gotcha was at this point. This last push would just spin and spin for me and my Git client and eventually fail. Turns out I needed to install the netlify-credential-helper. It worked fine after I did that.
And for the record, it's not just images that can be handled this way, it's any large file. I believe they are called "binary" files and are what Git isn't particularly good at handling.
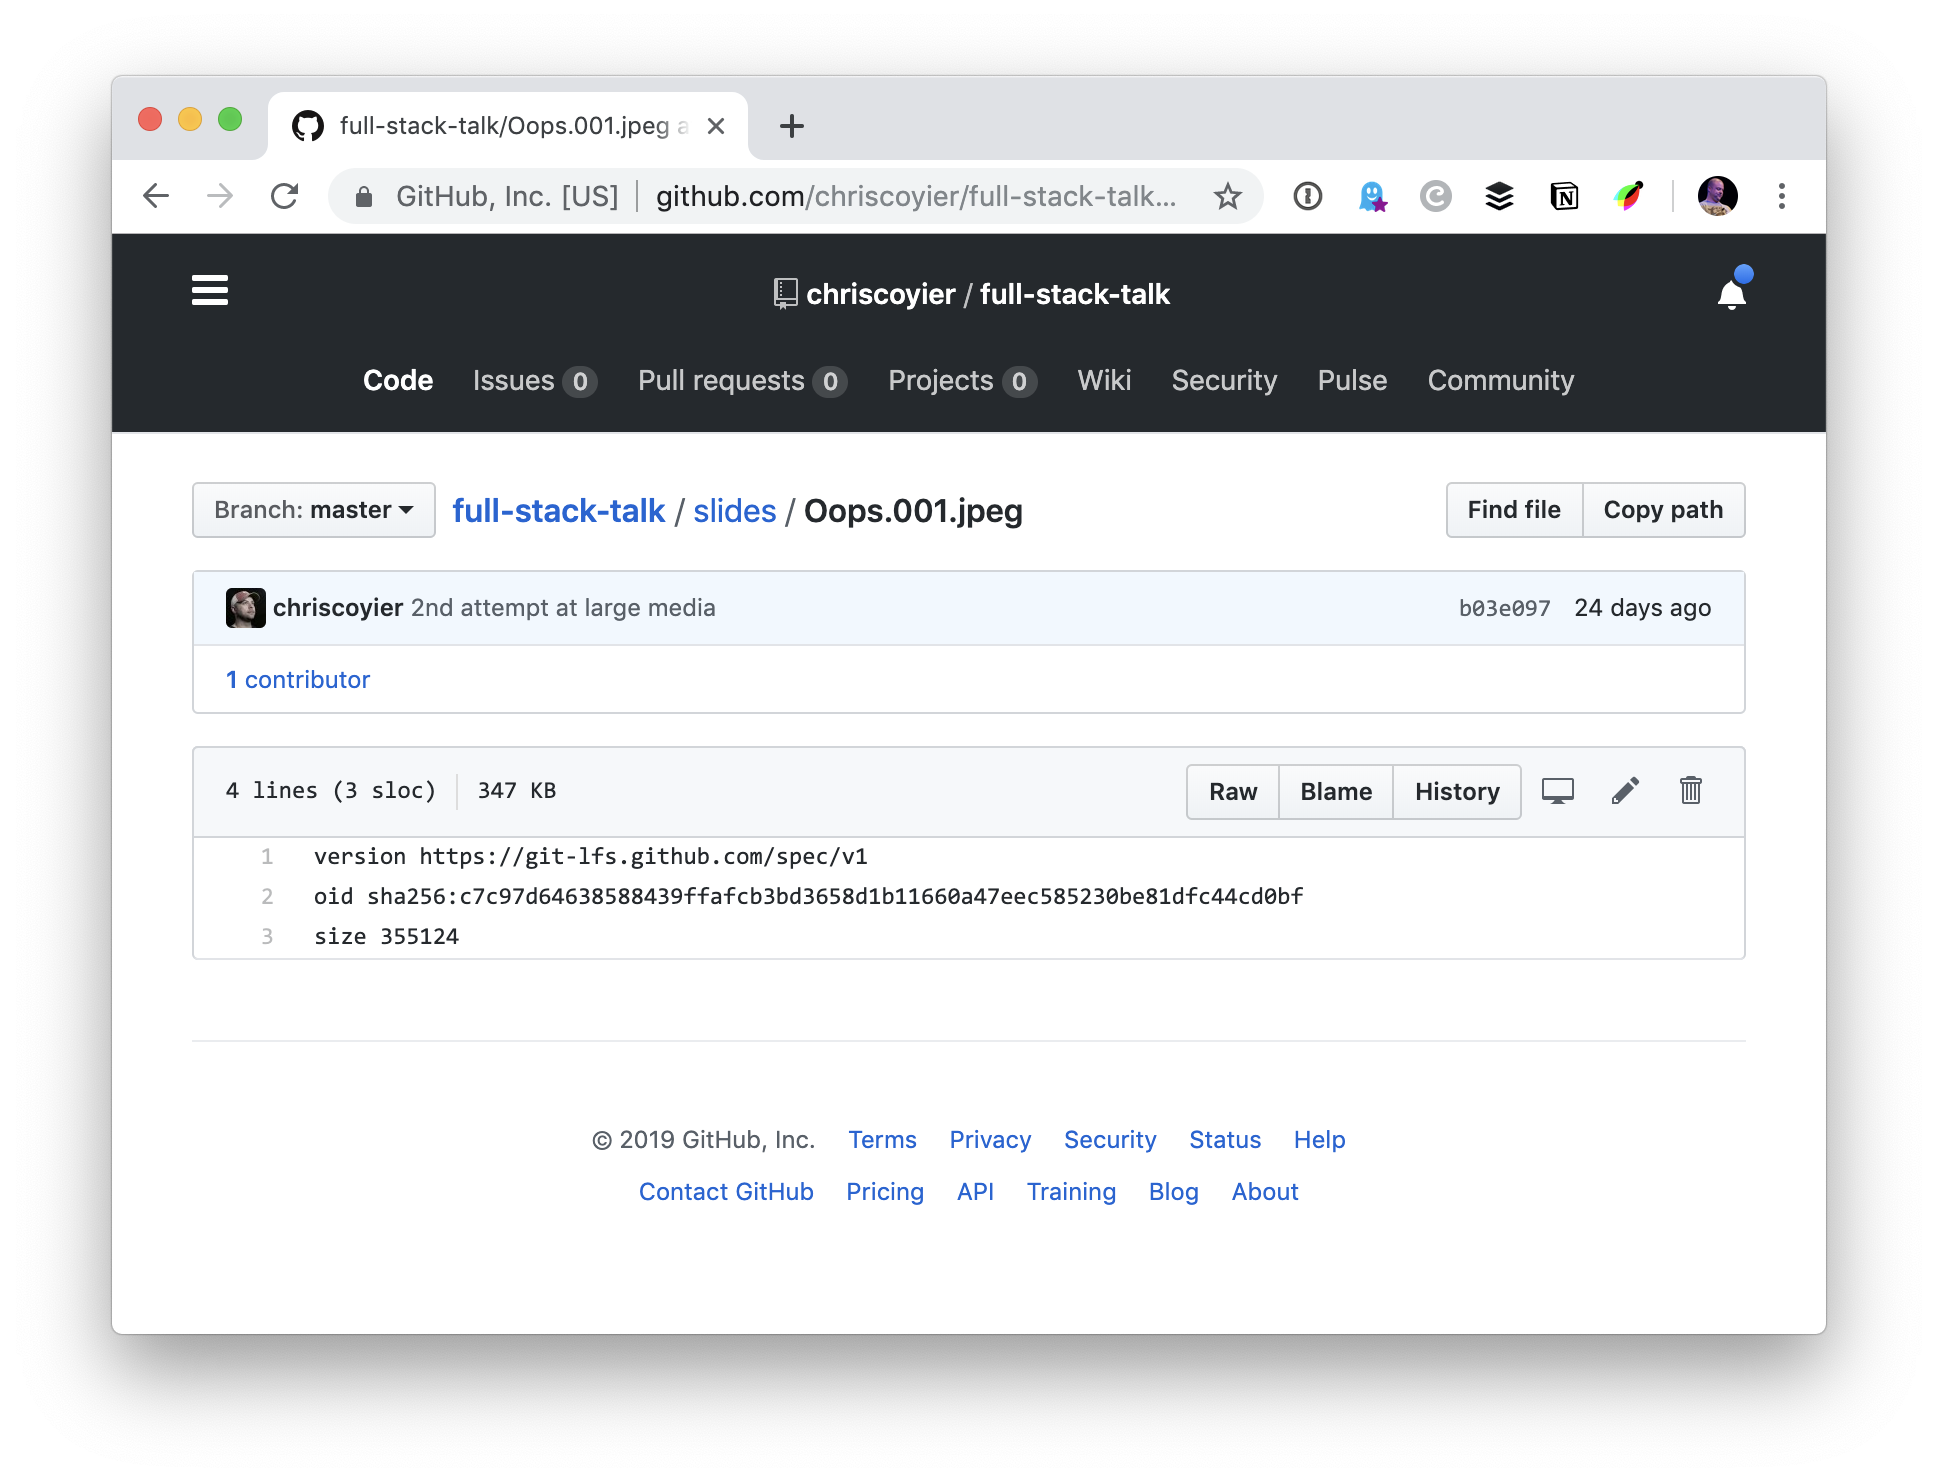
Check out your repo, the images are just pointers now
Git repo where a JPG file isn't actually an image, but a small text pointer.
And the best part
To resize the image on-the-fly to the size I want, I can do it through URL params:
<img
  src="slides/Oops.003.jpeg?nf_resize=fit&w=1000"
  alt="Screenshots of CSS-Tricks and CodePen homepages"
/>
Gutenberg users are requesting an easy way to add a nofollow attribute to links in the block editor. Users can currently toggle a setting to designate a link to open in a new tab, but a similarly user-friendly option for adding a nofollow attribute is not yet available.
Requests have come in across multiple issues on GitHub, as well as in the WordPress Gutenberg Editor group on Facebook. For example, one blogger asked for advice today after not finding any Gutenberg-compatible nofollow plugins:
Has anyone found an easy way to add a nofollow attribute to links using Gutenberg other than editing the HTML for every single link?
I used to have a checkbox for nofollow plugin but it seems that none of the plugins I’ve found are compatible with Gutenberg.
As a blogger, I need to add nofollows often to remain compliant with FTC requirements for sponsored/affiliate links.
Others requesting the feature in issues filed on the Gutenberg repository are looking for an easier way to make their links compliant with Google and other major search engines’ requests that marketers add nofollow to links that are part of an endorsement or commercial relationship.
“On behalf of the hundreds of thousands, if not millions, of people who make money with their website with affiliate programs and sponsored content: please, make it easy for us to add the nofollow rel attribute to a link,” Renee Dobbs requested in her first ever issue opened on Github.
“I honestly don’t know why it isn’t a part of WordPress core. Every WordPress commercial I see lately is about having your business on WordPress, yet WP is making it difficult for business owners to be compliant with Google’s guidelines on paid/affiliate links. We shouldn’t have to add yet another plugin to handle something so basic and widely used. Just have a checkbox or similar (like open to new window) to add the nofollow rel attribute for a link.”
Gutenberg contributors have worked on a couple different solutions for getting this feature added to the editor. Alexander Botteram, a developer at Yoast, opened a PR that adds a new “nofollow” toggle setting to the core link modal. Gutenberg phase 2 lead Riad Benguella recommended this as a first step towards making links more extensible.
The PR is still undergoing review but it looks like a promising solution with the UI that users are requesting.
You might think APIs and automation are almost synonymous. It’s true that when using an API, you’re building software to automate something. However, while engineers build APIs to enable automation, they don’t always get the same benefits themselves during API development. Building APIs is often a manual process prone to costly errors. Though APIs are no longer new (ProgrammableWeb is going on 15 years!), the toolset inside the enterprises that build APIs is still rapidly evolving.
TomTom has introduced two new APIs specifically in response to the growth in the electronic vehicle market. The TomTom Long Distance EV Routing API enables users to determine a route from one location to another that includes more than one vehicle charge. The EV Charging Stations Availability API provides users with information about charging stations.
Stoplight, a provider of API design management solutions, has announced the release of Stoplight Studio, a new visual API editor that aims to simplify OpenAPI development. The new interface includes tools designed to enable real-time API testing and to streamline collaboration.
The company claims that the new editor will provide users with a no-code solution that could enable less experienced customers to get started designing and deploying APIs quickly.
Symfony is an open-source PHP framework that allows developers to bootstrap applications quickly. The framework consists of reusable components, which you can add on to build virtually any type of application.
Note: This article is the first in a series of three pieces that will cover a static analysis of .NET Core Libraries' source code.
I've been making my way toward this article for over a year and a half. At some point, I had an idea settled in my head that the .NET Core libraries had great promise. I was checking the project several times, and the analyzer I used kept finding more and more interesting code fragments, but it didn't go further than just scrolling through the list of warnings. And here it is — it finally happened! The project is checked, and the article is right in front of you.
Some programmers still claim that there is no point in discussing the differences between PHP and JavaScript, as both cater to a different purpose in website development. When it comes to PHP vs. JavaScript for website development, the answer is incredibly straightforward — PHP is a server-side scripting language and JavaScript is a client-side scripting language. PHP and JavaScript together make dynamic websites. However, the advent of Node.js, Angular.js, and React.js enabled JavaScript to be applied to server-side scripting as well. As a result, PHP vs JavaScript has become a viable topic for discussion. Let us proceed with the similarities and differences between PHP and JavaScript.
PHP
PHP is a server-side scripting language that empowers developers to build dynamically executed websites. PHP includes several precise functions and outstanding features that allow developers to create feature-rich web pages and database-driven sites. It helps in building high-level interactive web pages like picture galleries, login pages, etc. As PHP is open source, it can run on most of the operating systems available today, such as Windows, Mac OS, Linux or UNIX, etc.
If you're a developer used to working with ASP.NET Core, you should be familiar with the nightmare that is startup file organization. Every ASP Core application startup file can include configurations, middleware declaration, dependency injection definition, authentication configs, and policies amongst. Long story short, heavy applications can have large, messy, unreadable startup files with hundreds of lines of hard-to-scroll-through code.
Gordon on ASP.NET's startup file organization
So, as you might have guessed, here is where extension methods come to the rescue. Learning to organize your Startup.cs is part of being a good C# programmer; having extension methods in your arsenal is a must. By the end of this article, you will learn a neat and simple trick to improve the organization of your startup files and spare yourself the pain of endless startup file scrolling in your future projects.
To understand the current and future state of application security, we obtained insights from five IT executives. We asked them, “What’s the future for application security from your point of view?” Here’s what they told us:
In the IT ecosystem, we have software-defined networks, software-defined infrastructure, software-defined virtual machines, and even software-defined radios. The future is in software-defined security —letting applications secure themselves through an integrated and automated software-security layer.
CISO’s fear of the data breach. The biggest opportunity for improvement is with API breaches, where multimillion records are breached because compromised access to your backend. How do we get better?1) embrace automation and 2) shift in your architectural thought process and realize that we can’t depend on firewalls or agents on operating systems or a serverless app. It’s much better with identity management (2FA, MFA). Analyzer engines will be analyzing apps all the time. When vulnerabilities are found, they are codified into an actionable unit of work.
There is no silver bullet for application security in my opinion. The greatest opportunities lie in not looking for a single solution but focusing on visibility into what you’re doing and spreading your efforts to find vulnerabilities from various perspectives.
As connected devices continue to expand their footprint, we see opportunities to apply best practices in security to the Internet of Things.
It’s not an issue of technology; there’s plenty of great technology, and it’s not being used. We can do 8,000 enterprises if enterprises reach out to us. Business is doing what adds to their bottom line. Only visionary business leaders make security as important as quality. Loss of reputation, penalties for not protecting data will increase. Vendors have the capability to meet the needs of the enterprise, but the enterprise must want to secure their apps.
People hide keys under their welcome mats, under the potted plant next to the front door, above the door jam, or maybe under that fake-looking rock next to the front walk. But why would they hide their front door key in such obvious places? If I were a burglar, these are the first places that I would check (well, I would first check to see if the front door was even locked).
But some people are smarter than this. Instead of putting the spare key in an obvious hiding place, they make a few copies and hand them out to the dog sitter, the next-door neighbor, their boyfriend/girlfriend, or the handyman fixing the washing machine. Before they know it, they’ve lost track of who they have given keys to and their house is vulnerable once again.
For the past ten years, the open-source movement has been one of the key drivers of the IT industry's development. The role of open source projects is becoming more and more prominent, not only in terms of quantity but also in terms of quality. This changes the very concept of how open source software is positioned on the IT market in general. Today, we are going to talk about Apache Hive.
Hadoop and Apache Hive
About Apache Hive
Apache Hadoop is currently thought to be one of the pioneering Big Data technologies. Its primary tasks are storing, processing, and managing large amounts of data. The main components comprising the framework are Hadoop Common, HDFS, Hadoop MapReduce, and Hadoop YARN. Over time, a large ecosystem of related projects and technologies has developed around Hadoop — many of which originally started as part of the project and then budded off to become independent. Apache Hive is one of them.
Messaging is a fairly simple paradigm for the transfer of data between applications and data stores. However, there are multiple challenges that are associated with it:
Limited scalability due to a broker becoming a bottleneck.
Strained message brokers due to bigger message size.
Consumers being in a position to consume the messages at a reasonable rate.
Consumers exhibiting non-fault tolerance by making sure that messages consumed are not gone forever.
Messaging Limitations Due to:
High Volume
Messaging applications are hosted on a single host or a node. As a result, there is a possibility of the broker becoming the bottleneck due to a single host or local storage.
There seems to be a lot of confusion around the topic of constants in Java. Some people make use of integers or Strings to define constants, while others make use of enums.
I’ve also come across constants defined in their own interface – where classes that make use of the constants have to implement the interface. This strategy is often referred to as the interface constant design pattern.
According to a household survey by the Bureau of Labor Statistics, the rapidly-growing economy in the US has benefitted different demographics.
This includes disabled individuals, a group whose unemployment rate fell to 6.3 percent in April 2019, the lowest since 2008. But unemployment among people with disabilities still remains almost twice as high as the rest of the population.
In this article, we are going to learn basic commands in Kafka. With these commands, we will be able to gain basic knowledge of how to run Kafka Broker and produce and consume messages, topic details, and offset details.
Just note that this is a standalone setup in order to get an overview of basic setup and functionality using the command-line interface.
A lot of people are confused about what JAMstack is. The acronym stands for JavaScript, APIs, and Markup, but truly, JAMstack doesn’t have to include all three. What defines JAMstack is that it’s served without web servers. If you consider the history of computing, this type of abstraction isn’t unnatural; rather it’s the inevitable progression this industry has been moving towards.
So, if JAMstack tends to be static by definition, it can’t have dynamic functionality, server-side events, or use a JavaScript framework, right? Thankfully, not so. In this tutorial, we’ll set up a JAMstack e-commerce app and add some serverless functionality with Netlify Functions (which abstract AWS Lambda, and are super dope in my opinion).
I'll show more directly how the Nuxt/Vue part was set up in a follow-up post, but for now we're going to focus on the Stripe serverless function. I'll show you how I set this one up, and we'll even talk about how to connect to other static site generators such as Gatsby.
This site and repo should get you started if you’d like to set something like this up yourself:
The very first step is to set up our app. This one is built with Nuxt to create a Vue app, but you can replace these commands with your tech stack of choice:
I am using yarn, hub (which allows me to create repos from the command line) and Nuxt. You may need to install these tools locally or globally before proceeding.
With these few commands, following the prompts, we can set up an entirely new Nuxt project as well as the repo.
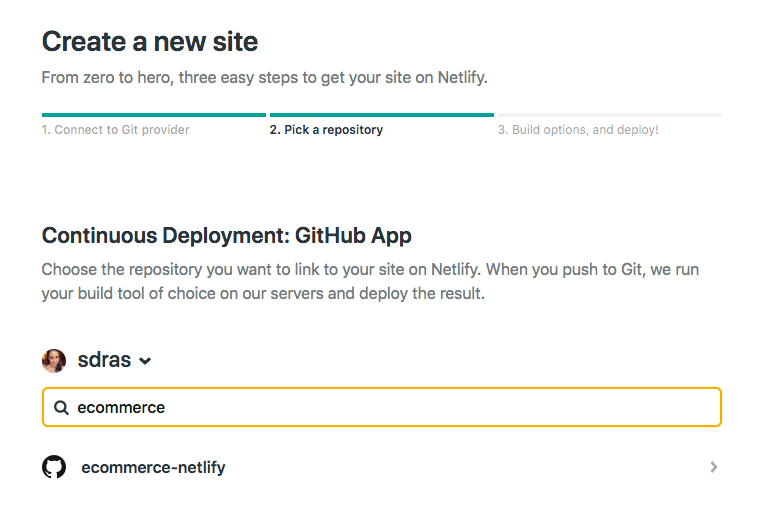
If we log into Netlify and authenticate, it will ask us to pick a repo:
I'll use yarn generate to create the project. With that, I can add in the site settings for Nuxt in the dist directory and hit feploy! That's all it takes to set up CI/CD and deploy the site! Now every time I push to the master branch, not only will I deploy, but I'll be given a unique link for that particular deploy as well. So awesome.
A basic serverless function with Netlify
So here's the exciting part, because the setup for this kind of functionality is so quick! If you’re unfamiliar with Serverless, you can think of it like the same JavaScript functions you know and love, but executed on the server. Serverless functions are event-driven logic and their pricing is extremely low (not just on Netlify, but industry-wide) and scales with your usage. And yes, we have to add the qualifier here: serverless still uses servers, but babysitting them is no longer your job. Let’s get started.
Our very basic function looks like this. I stored mine in a folder named functions, and just called it index.js. You can truly call the folder and function what you want.
We’ll also need to create a netlify.toml file at the root of the project and let it know which directory to find the function in, which in this case, is "functions."
// netlify.toml
[build]
  functions = "functions"
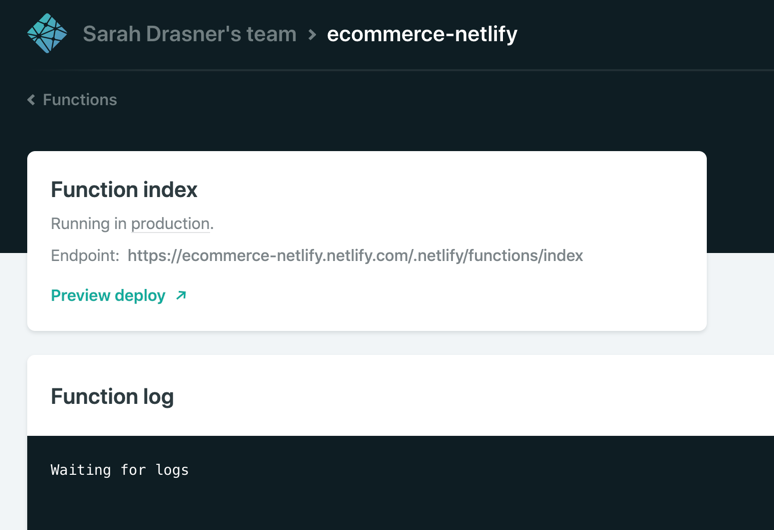
If we push to master and go into the dashboard, you can see it pick up the function!
If you look at the endpoint listed above it’s stored here: https://ecommerce-netlify.netlify.com/.netlify/functions/index
Really, for any site you give it, the URL will follow this pattern: https:/<yoursiteurlhere>/.netlify/functions/<functionname>
When we hit that endpoint, it provides us with the message we passed in, as well as all the event data we logged as well:
I love how few steps that is! This small bit of code gives us infinite power and capabilities for rich, dynamic functionality on our sites.
Hook up Stripe
Pairing with Stripe is extremely fun because it's easy to use, sophisticated, has great docs, and works well with serverless functions. I have other tutorials where I used Stripe because I enjoy using their service so much.
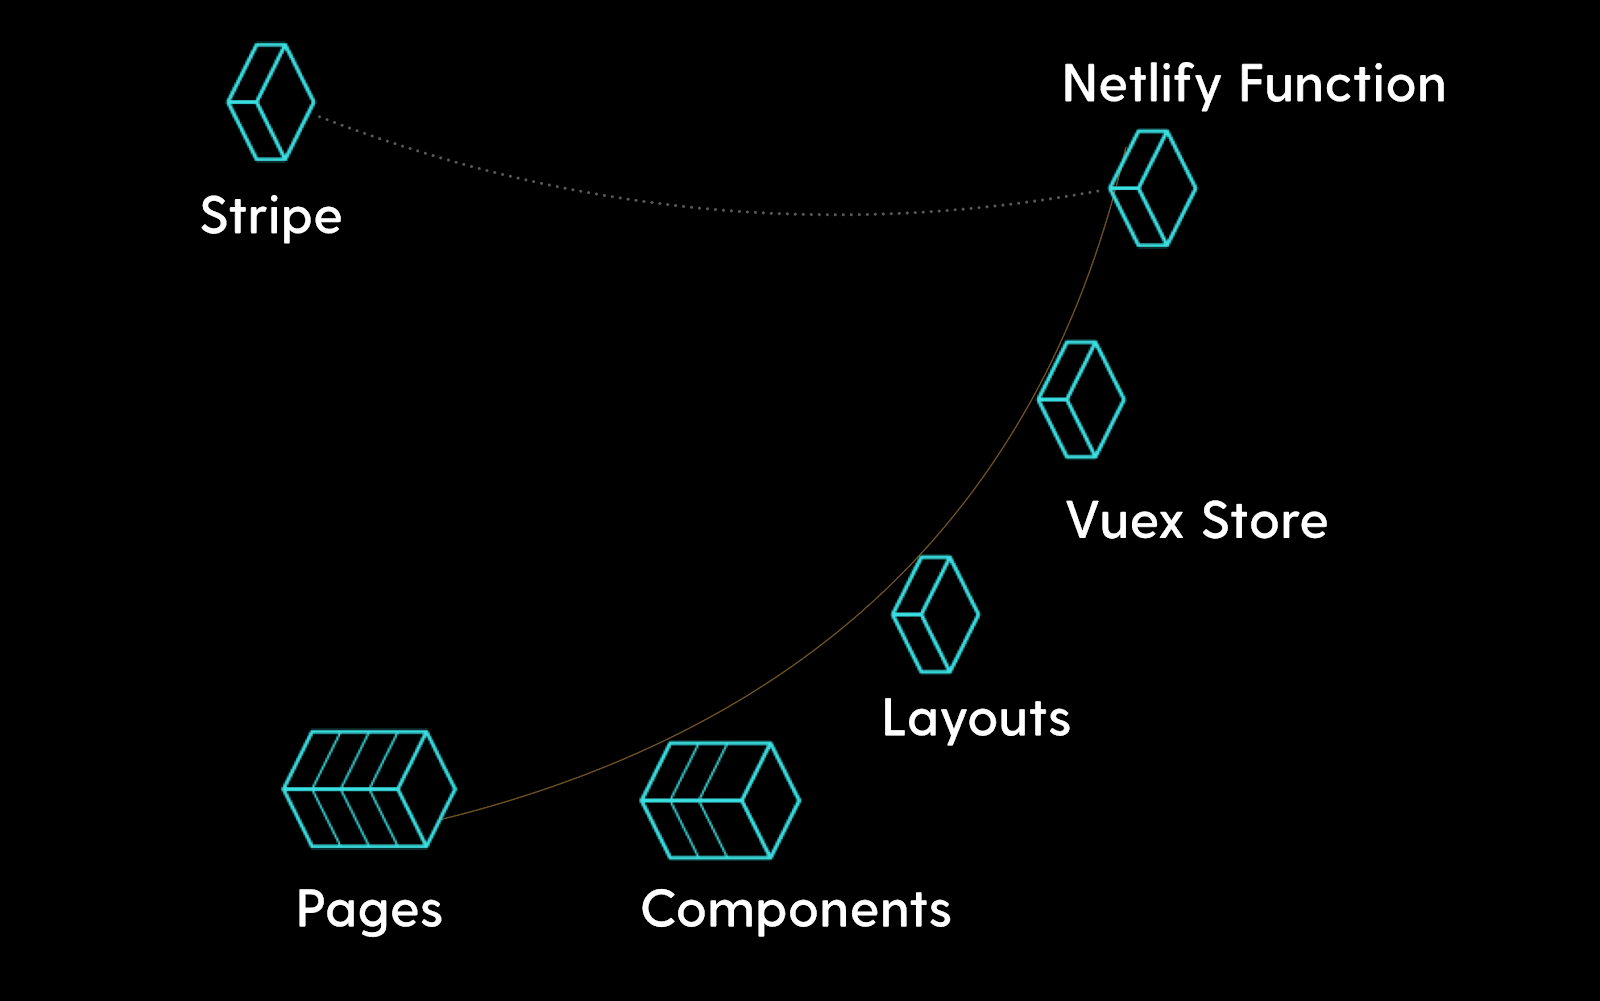
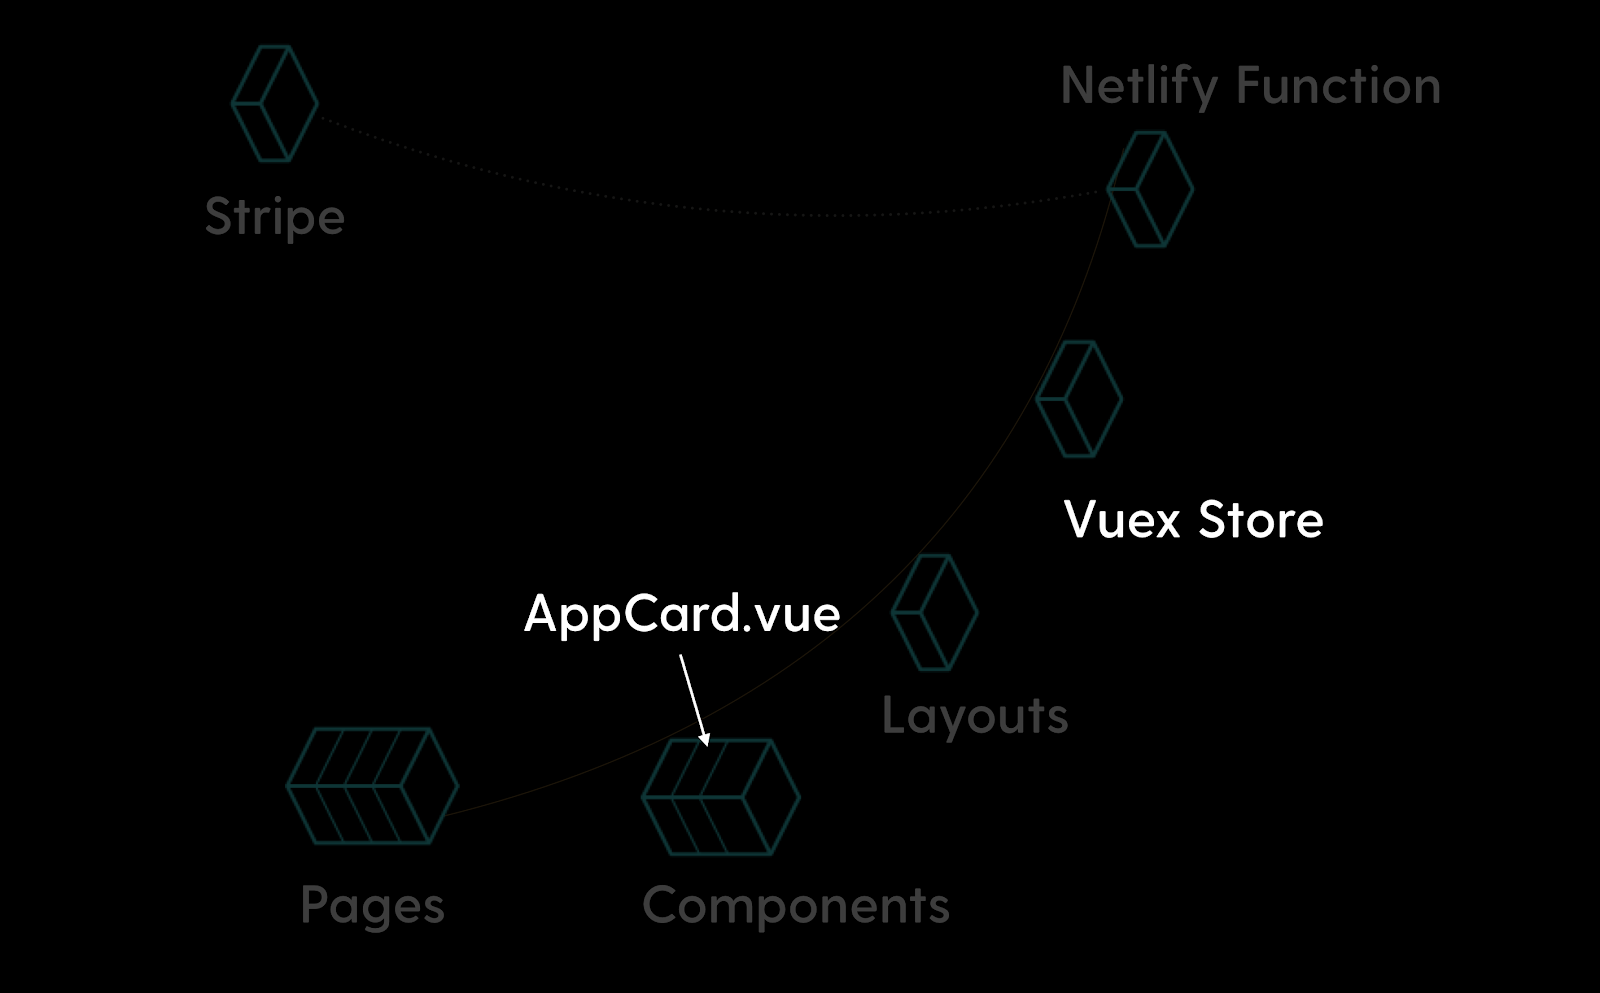
Here’s a bird’s eye view of the app we’ll be building:
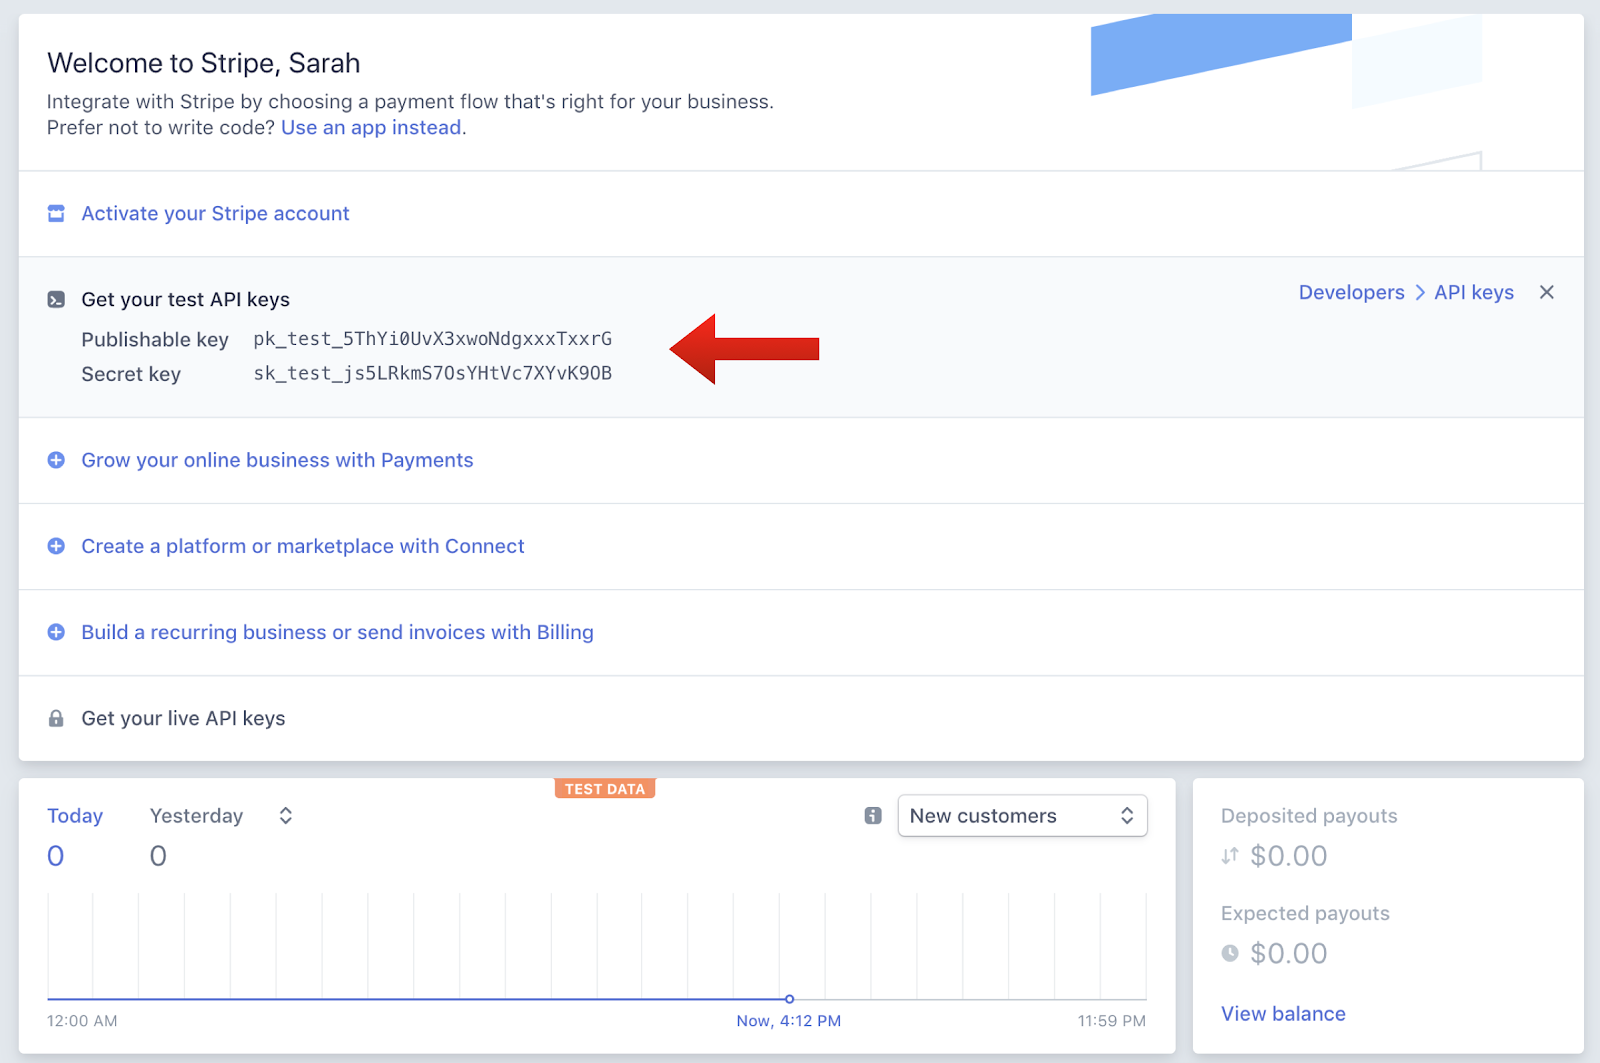
First we’ll go to the Stripe dashboard and get our keys. For anyone totally scandalized right now, it's OK, these are testing keys. You can use them, too, but you’ll learn more if you set them up on your own. (It’s two clicks and I promise it’s not hard to follow along from here.)
We’ll install a package called dotenv which will help us store our key and test it locally. Then, we’ll store our Stripe secret key to a Stripe variable. (You can call it anything, but here I’ve called it STRIPE_SECRET_KEY, and that’s pretty much industry standard.)
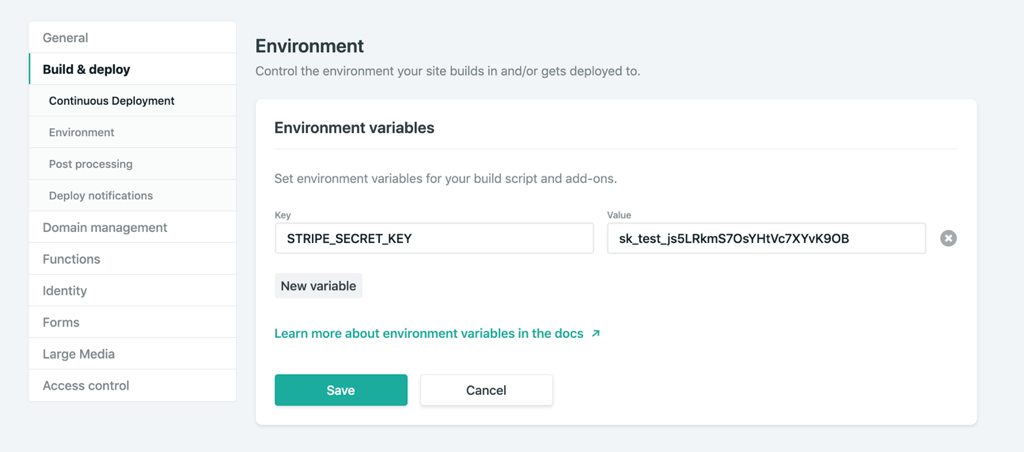
In the Netlify dashboard, we’ll go to "Build & deploy," then "Environment" to add in Environment variables, where the STRIPE_SECRET_KEY is key, and the value will be the key that starts with sk.
We’ll also add in some headers so we don’t run into CORS issues. We’ll use these headers throughout the function we’re going to build.
So, now we’ll create the functionality for talking to Stripe. We’ll make sure we’ll handle the cases that it’s not the HTTP method we’re expecting, and also that we’re getting the information we expect.
You can already see here, what data we’re going to be needing to send to stripe by what we check for. We’ll need the token, the total amount, and an idempotency key.
If you're unfamiliar with idempotency keys, they are unique values that are generated by a client and sent to an API along with a request in case the connection is disrupted. If the server receives a call that it realizes is a duplicate, it ignores the request and responds with a successful status code. Oh, and it's an impossible word to pronounce.
Now, we’ll kick off the Stripe payment processing! We’ll create a Stripe customer using the email and token, do a little logging, and then create the Stripe charge. We’ll specify the currency, amount, email, customer ID, and give a description while we're at it. Finally, we’ll provide the idempotency key (pronounced eye-dem-po-ten-see), and log that it was successful.
(While it's not shown here, we’ll also do some error handling.)
If we look back at our application, you can see we have pages and components that live inside the pages. The Vuex store is like the brain of our application. It will hold the state of the app, and that's what will communicate with Stripe. However, we still need to communicate with our user via the client. We'll collect the credit card data in a component called AppCard.vue that will live on the cart page.
First, we'll install a package called vue-stripe-elements-plus, that gives us some Stripe form elements that allow us to collect credit card data, and even sets us up with a pay method that allows us to create tokens for stripe payment processing. We'll also add a library called uuid that will allow us to generate unique keys, which we'll use for the idempotency key.
yarn add vue-stripe-elements-plus uuid
The default setup they give us to work with vue-stripe-elements-plus looks like this:
<template>
  <div id='app'>
    <h1>Please give us your payment details:</h1>
    <card class='stripe-card'
      :class='{ complete }'
      stripe='pk_test_XXXXXXXXXXXXXXXXXXXXXXXX'
      :options='stripeOptions'
      @change='complete = $event.complete'
    />
    <button class='pay-with-stripe' @click='pay' :disabled='!complete'>Pay with credit card</button>
  </div>
</template>
<script>
import { stripeKey, stripeOptions } from './stripeConfig.json'
import { Card, createToken } from 'vue-stripe-elements-plus'

export default {
  data () {
    return {
      complete: false,
      stripeOptions: {
        // see https://stripe.com/docs/stripe.js#element-options for details
      }
    }
  },

  components: { Card },

  methods: {
    pay () {
      // createToken returns a Promise which resolves in a result object with
      // either a token or an error key.
      // See https://stripe.com/docs/api#tokens for the token object.
      // See https://stripe.com/docs/api#errors for the error object.
      // More general https://stripe.com/docs/stripe.js#stripe-create-token.
      createToken().then(data => console.log(data.token))
    }
  }
}
</script>
So here's what we're going to do. We're going to update the form to store the customer email, and update the pay method to send that and the token or error key to the Vuex store. We'll dispatch an action to do so.
That postStripeFunction action we dispatched looks like this:
// Vuex store
export const actions = {
  async postStripeFunction({ getters, commit }, payload) {
    commit("updateCartUI", "loading")

    try {
      await axios
        .post(
          "https://ecommerce-netlify.netlify.com/.netlify/functions/index",
          {
            stripeEmail: payload.stripeEmail,
            stripeAmt: Math.floor(getters.cartTotal * 100), //it expects the price in cents
            stripeToken: "tok_visa", //testing token, later we would use payload.data.token
            stripeIdempotency: uuidv1() //we use this library to create a unique id
          },
          {
            headers: {
              "Content-Type": "application/json"
            }
          }
        )
        .then(res => {
          if (res.status === 200) {
            commit("updateCartUI", "success")
            setTimeout(() => commit("clearCart"), 3000)
            …
We're going to update the UI state to loading while we're processing. Then we'll use axios to post to our function endpoint (the URL you saw earlier in the post when we set up our function). We'll send over the email, the amt, the token and the unique key that we built the function to expect.
Then if it was successful, we'll update the UI state to reflect that.
One last note I'll give is that I store the UI state in a string, rather than a boolean. I usually start it with something like "idle" and, in this case, I'll also have "loading," "success," and "failure." I don't use boolean states because I've rarely encountered a situation where UI state only has two states. When you work with booleans for this purpose, you tend to need to break it out into more and more states, and checking for all of them can get increasingly complicated.
As it stands, I can reflect changes in the UI on the cart page with legible conditionals, like this:
<section v-if="cartUIStatus === 'idle'">
  <app-cart-display />
</section>

<section v-else-if="cartUIStatus === 'loading'" class="loader">
  <app-loader />
</section>

<section v-else-if="cartUIStatus === 'success'" class="success">
  <h2>Success!</h2>
  <p>Thank you for your purchase. You'll be receiving your items in 4 business days.</p>
  <p>Forgot something?</p>

  <button class="pay-with-stripe">
    <nuxt-link exact to="/">Back to Home</nuxt-link>
  </button>
</section>

<section v-else-if="cartUIStatus === 'failure'">
  <p>Oops, something went wrong. Redirecting you to your cart to try again.</p>
</section>
And there you have it! We’re all set up and running to accept payments with stripe on a Nuxt, Vue site with a Netlify function, and it wasn’t even that complicated to set up!
Gatsby Applications
We used Nuxt in this instance but if you wanted to set up the same kind of functionality with something that uses React such as Gatsby, there's a plugin for that. (Everything is plugin in Gatsby. ☺️)
You would install it with this command:
yarn add gatsby-plugin-netlify-functions
...and add the plugin to your application like this:
The serverless function used in this demo is straight up JavaScript, so it's also portable to React applications. There's a plugin to add the Stripe script to your Gatsby app (again, everything is a plugin). Fair warning: this adds the script to every page on the site. To collect the credit card information on the client, you would use React Stripe Elements, which is similar to the Vue one we used above.
Just make sure that you're collecting from the client and passing all the information the function is expecting:
With such a low barrier to entry, you can see how you can make really dynamic experiences with JAMstack applications. It's amazing how much you can accomplish without any maintenance costs from servers. Stripe and Netlify Functions make setting up payment processing in a static application such a smooth developer experience!