Today marks the 31st anniversary of the Americans with Disabilities Act (ADA), a civil rights law passed in 1990 that prohibits discrimination against people with physical or mental impairments that substantially limit a major life activity. The legislation continues to help disabled people gain equal access to employment, schools, transportation, government services, and public accommodations.
In a speech at the Rose Garden today, President Joe Biden announced guidance that would extend the ADA protections to COVID-19 long haulers who experience lingering symptoms that qualify as a disability.
“We’re bringing agencies together to make sure Americans with long COVID who have a disability have access to the rights and resources that are due under the disability law,” he said. “Which includes accommodations and services in the workplace and school, and our health care system, so they can live their lives in dignity and get the support they need as they continue to navigate these challenges.”
The Biden administration is continuing its commitment to accessibility which was first declared publicly on WhiteHouse.gov. When Biden took office, the site relaunched on WordPress with an accessibility statement, highlighting its ongoing accessibility efforts towards conforming to the Web Content Accessibility Guidelines (WCAG) version 2.1, level AA criteria.
Last week, Colorado became the first US state to require state and local government websites to meet accessibility standards as established by the state’s Chief Information Officer. The bill states that the accessibility standards are to be identified using “the most recent web content accessibility guidelines promulgated and published by the world wide web consortium web accessibility initiative or the international accessibility guidelines working group.”
Each state agency in Colorado is required to submit an accessibility plan to the office before July 1, 2022. The office will review the plan and work collaboratively to set an implementation methodology. State agencies are required to fully implement the plan before July 1, 2024. Any agency not in full compliance will be considered in violation of laws that prevent discrimination against individuals with a disability. The bill also makes it easier for an individual with a disability to bring a civil suit against noncompliant agencies and the agency’s $3,500 statutory fine would be payable to the plaintiff.
“This bill will give our local governments the resources to make sure they’re complying with the ADA,” Julie Reiskin, Executive Director of the Colorado Cross-Disability Coalition, told Colorado Public Radio. “Particularly after the year we just had. People who were blind couldn’t sign up for vaccines, get information online, sign language interpreters weren’t widely available. Failing to fund this says people with disabilities don’t matter.”
WordPress web developers responsible for Colorado state or local websites should be ready to deliver accessible websites on the timeline laid out in the bill. It applies to any department, agency, special district, or other instrumentality. All of the state agency websites are currently running on Drupal 7, but the state has more than 4,268 active local governments. Many of them use WordPress and those responsible for these local sites will need to begin the process of creating a plan to ensure they are accessible before July 1, 2024.
Joshua Comeau digs into how styled-components works by re-building the basics. A fun and useful journey.
styled-components seems like the biggest player in the CSS-in-React market. Despite being in that world, I haven’t yet been fully compelled by it. I’m a big fan of the basics: scoped styles by way of unique class names. I also like that it works with hot module reloading as it all happens in JavaScript. But I get those through css-modules, and I like the file-separation and Sass support I get through css-modules. There are a few things I’m starting to come around on though (a little):
Even with css-modules, you still have to think of names. Even if it’s just like .root or whatever. With styled-components you attach the styles right to the component and don’t really name anything.
With css-modules, you’re applying the styles directly to an HTML element only. With styled-components you can apply the styles to custom components and it will slap the styles on by way of spreading props later.
Because the styles are literally in the JavaScript files, you get JavaScript stuff you can use—ternaries, prop access, fancy math, etc.
In 2019 Google announced the beta release of a new Cloud Healthcare API, which was intended to bridge the gap between on-site healthcare systems and applications hosted on Google Cloud. The company is now expanding the analytical power of this offering through the release of Google Cloud Healthcare Data Engine.
Finding a cost-effective way to grow your ecommerce audience through word-of-mouth (that actually works!) isn’t easy.
Fortunately, that’s the exact problem ReferralCandy sets out to solve.
The number one thing that sets it apart from other referral tools floating around is that it’s a turnkey tool that guides you through the referral process without needing to have any developer know-how.
It’s there to help you customize how you want to award referral rewards, protect yourself against referral fraud, and grow your referral base.
Below we dive deep into the pros and cons of ReferralCandy as well as its overall reputation and its most useful features.
ReferralCandy Pros and Cons
Pros
Easy no-code setup
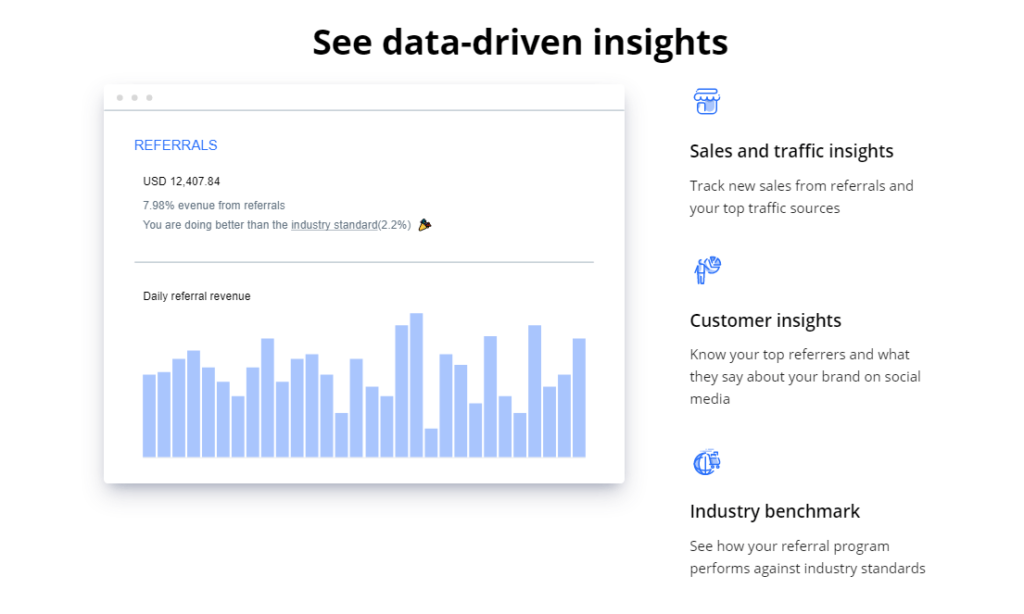
Offers referral analytics so you always know how your campaigns perform
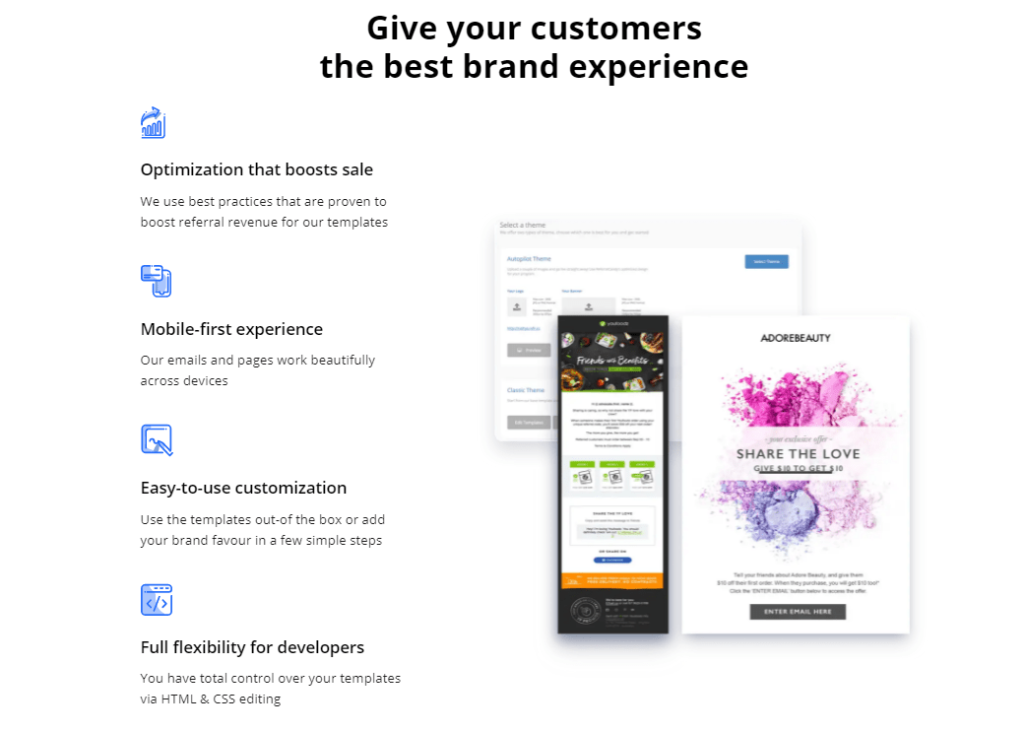
Easy-to-use templates you can customize to your liking
Mobile-first customer experience
Developer-friendly tools for greater customization through HTML and CSS
Prevents referral fraud by automatically banning fishy referral activity
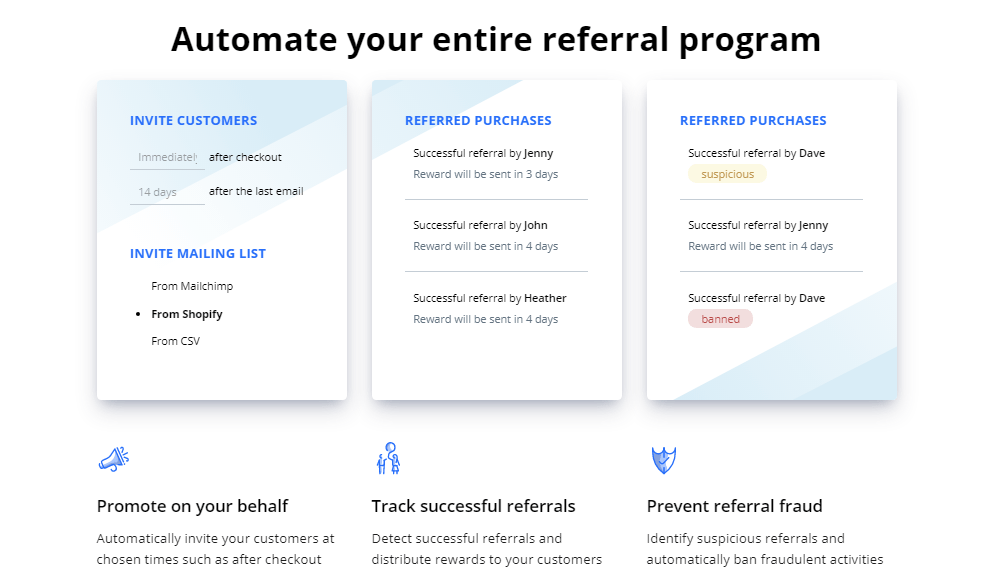
Automations allow you to promote referral programs on autopilot
Lets you create referral landing pages
Makes it easy to add trackable referral links to newsletters
Integrates with the biggest ecommerce platforms
Cons
Some find ReferralCandy difficult to customize
Can be a costly investment for up-and-coming businesses
Customer success support could be better
ReferralCandy Features
ReferralCandy is a pretty straightforward referral tool that does what it says it does. Likewise, its features reflect that. Here’s an in-depth look at some of its best ones:
Referral Templates
You’ve got to love templates when you’re building sales tools. And with a referral program, it’s no different. ReferralCandy offers plenty of templates that can help you get started building a referral workflow that’ll bear results.
Its out-of-the-box templates help you navigate setting up your first referral offers.
They’re a great jumping-off point if you aren’t experienced with referral offers and want a solid starting point. It can take as little as 10 minutes to get everything set up. You’re able to choose your preferred reward, whether that’s a store discount you give as a thank you for referring a friend or a cash payout.
Thankfully, you aren’t just limited to store discounts or cash payouts. ReferralCandy makes it easy to create custom rewards, whether you’re using a template or starting from scratch.
Fraud Prevention
While fraud might not be the first thing that comes to mind when you think about a referral program, it’s definitely something you want to watch out for. As safe and foolproof as your referral offer can be, there are always users out there that’ll try to play the system to receive more rewards than they’re really due.
ReferralCandy recently integrated new features where you can detect fraudulent referral activity. These features allow you to monitor referral spikes from specific users, and make sure users don’t create self-referrals. These fraud detection features are definitely must-haves.
Referral Analytics
What would a referral system be without any analytics that clue you in on how your referral system is actually doing? ReferralCandy lets you know about any new sales you make from referrals as well as what your top traffic sources are.
Better yet, you can also see who your top referrers are and what they’re saying about your brand on social platforms. It’s easy to see how this can be a helpful insight for any business, big or small. It’s data like this that can help you make more informed decisions that don’t kill your budget and help you grow.
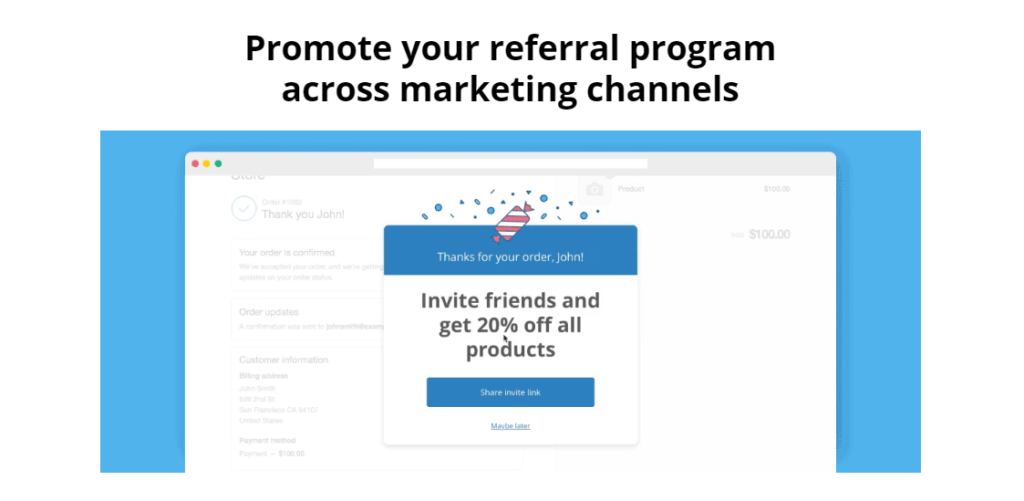
Cross-Promotion Tools
A big part of successfully managing a referral program is letting people know it exists. There are a ton of different places you can let customers know about your referral offer to increase the number of referrals you receive.
These are places like:
Your landing pages
Customer checkout pages
Your business newsletter
Your signup forms
Your store pop-ups
ReferralCandy lets you embed your referral offer in any of these places. For example, once your customers are finished checking out, you can set up ReferralCandy so that it automatically integrates a popup letting each of your customers know about your referral offer.
From there they can either join your referral program or opt in at a later time. In emails, ReferralCandy lets you include referral links that’ll entice your customers to refer you to their friends and family. You can imagine how trying to do this from scratch can be hard if you aren’t a developer. It can be especially hard to keep track of it all with a larger customer base as it has the potential to get tedious and too time-consuming rather quickly.
This is what makes ReferralCandy such a valuable tool for any ecommerce business regardless of the niche or industry it operates in. It streamlines the process of creating referral campaigns that are tracked, managed, and accounted for in one place. It also removes the need to have any advanced developer knowledge.
Workflow Automation
Automation is the glue that holds ReferralCandy’s referral workflow together. Once you’ve onboarded ReferralCandy and you’ve built your referral program exactly how you want it, you can set the automation guidelines and then let ReferralCandy do its thing in the background.
While it’s winning you sales and a new customer base from your existing one, you can focus on running other, more urgent parts of your business.
ReferralCandy’s automation options help you with time-consuming tasks like:
Police and prevent referral fraud when it happens
Track your most prolific referrers
Know exactly where most of your referral traffic comes from
Promote your referral program to any and all your customers
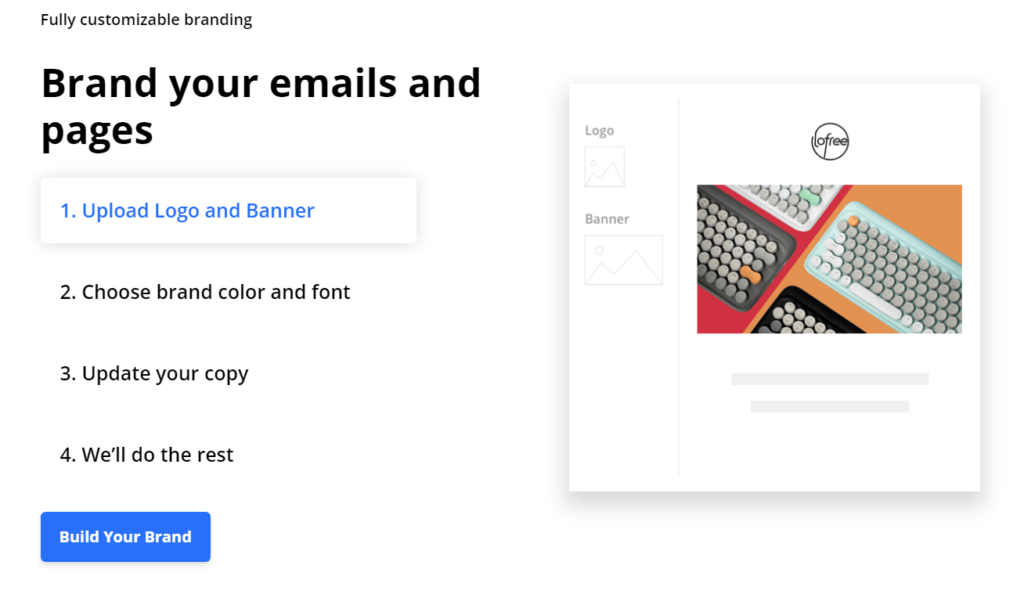
Personalized Referral Emails
With ReferralCandy you can personalize the email process. Uploading your brand’s logo and banners to emails and pages makes brand recognition easier. You can also choose your own brand colors and fonts for additional personalization. Once you add some copy of your own that speaks to your customers, you’ll be ready to send your email blasts.
As far as sending emails goes, ReferralCandy integrates with email marketing apps that help you get the job done. Email is an integral part of any ecommerce store’s marketing plan. With ReferralCandy, you can be sure you’re covered on that front.
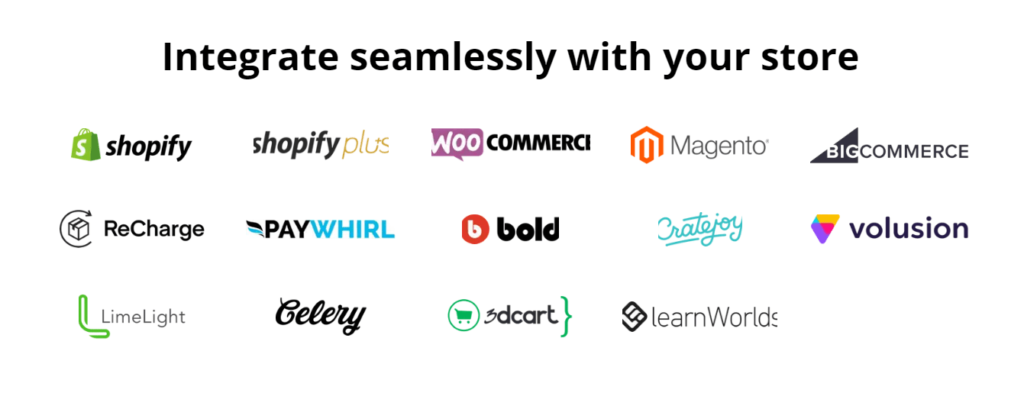
App Integrations
If your store’s platform doesn’t integrate with ReferralCandy, it’s pretty much a no-go. However, ReferralCandy integrates with some of the biggest ecommerce platforms around, including:
Shopify
Shopify Plus
WooCommerce
Magento
BigCommerce
ReCharge
PayWhirl
Bold
Cratejoy
Volusion
LimeLight
Celery
3DCart
LearnWorlds
ReferralCandy also offers JS integration and API integrations for developers to create custom integrations.
One downside? It doesn’t yet seem to integrate with Zapier. As Zapier is such a handy tool for any businesses’ tech stack that wants more control over integrations, hopefully, it’s just a matter of time before this happens. ReferralCandy is pretty good about adding new features as it listens to customer feedback.
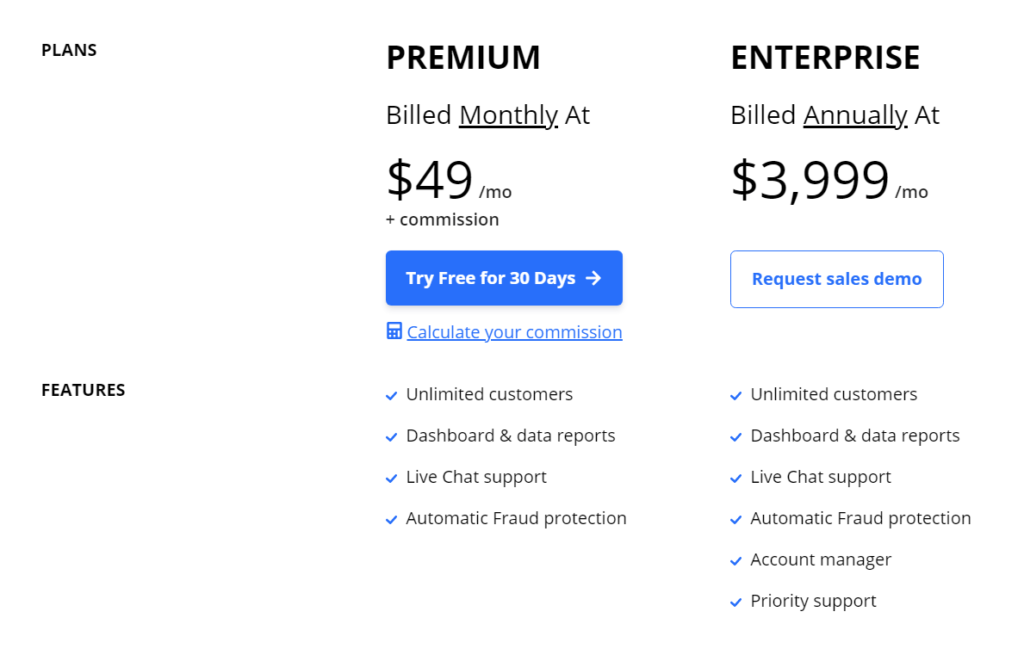
ReferralCandy Pricing and Package Options
ReferralCandy’s two pricing tiers are pretty clear cut. Most small businesses can gain from its $49 a month plus commission tier.
However, you don’t have to plunge into a paid ReferralCandy plan right away. You have the chance to try it free for the first 30 days to really get a feel for how well it can work for you.
Premium – Billed monthly at $49 a month plus commission
Enterprise – Billed annually at $3,999 a month
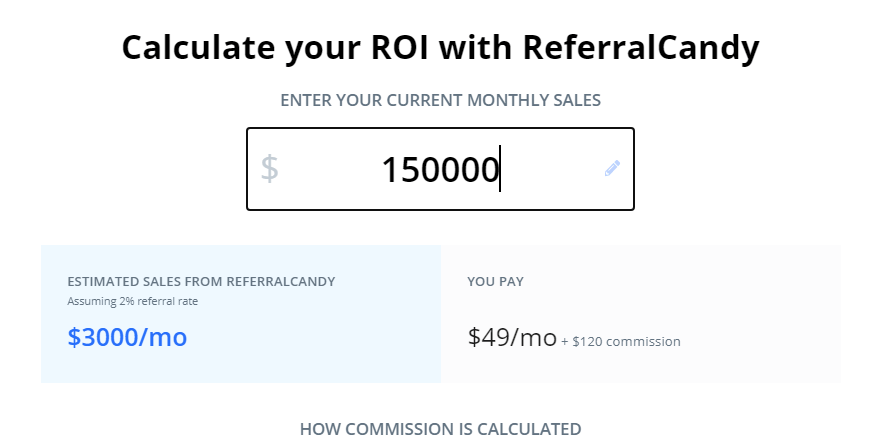
To help with estimating the referral cost process, especially since it’s a base monthly charge of $49 plus any commission, ReferralCandy offers you a handy referral calculator that helps you look at how much you’d possibly spend and gain if you use it.
Our recommendation? You should totally take advantage of the calculator to get a better idea of the tradeoff you’d be making by signing up and using it. From there, it becomes easier to have peace of mind in knowing you’re making a sound investment. Check out its referral calculator here.
ReferralCandy Reputation
Like virtually every other business tool out there, ReferralCandy comes with plenty of its own tradeoffs. Though generally, user sentiment is positive. Users love how ReferralCandy makes it easy to generate an additional customer base through existing customers at a cost-effective rate.
However, the number one complaint users do have is how customizable ReferralCandy can be. It seems to be limited in that department, despite claiming the opposite. In the end, it seems like you really have to do some digging to go through the process of customizing your pages and pop-ups beyond the basics.
Beyond that, it can be a little hard to test how well your referral setup works internally. Some users do lament the fact that you can’t quite create simultaneous referral campaigns in different currencies. It’s a feature that would come in handy for international ecommerce brands trying to grow their customer base.
Also, keep in mind that ReferralCandy’s payout options, if that’s one of the ways you decide to reward customers, can be limited to PayPal. If your business is looking for additional payout alternatives as part of the automated process, this might be something to keep in mind when you’re trying to decide whether to go with a tool like ReferralCandy or a competitor.
You also don’t have the ability to batch remove a set of customers or export large amounts of data easily. Overall, ReferralCandy has a solid loyal customer base that loves the features it offers. Though that doesn’t come without pointing out some of the areas it falls short in.
Features like being able to create brand ambassadors or working with an automated points system aren’t its strong suits. However, there are other referral tools that are better equipped to cater to those types of referral systems.
Summary
As a referral tool that takes care of the basics, especially for storefronts with more than 100 monthly transactions, ReferralCandy can be the tool that gets the job done. It’s not too complex to where it’s overwhelming for small to midsize ecommerce stores, and for the most part it’s relatively intuitive to use.
However, if you’re looking for a more varied array of tools, or referral systems with a bit more flexibility, below are three alternatives worth looking into.
Smile.io is a referral tool built around the idea of increasing brand loyalty. How? By enabling you to award customer points, allowing you to offer customer VIP status, and helping you increase your referral rates. It’s built to be intuitive to use for both you and your customers and comes with more pricing options. You can start using it for free and have access to its customer points and reward email features here.
A B2B referral program is no doubt different from a referral program you’d use in a B2C setting (which is what ReferralCandy is built for). So if you’re looking for a powerful B2B option that helps you build product awareness through your existing customer base, you might want to take a closer look at Influitive. You can easily request a demo to learn more about Influitive here.
Talkable is all about creating sustainable growth through referral programs your customers can truly appreciate. This means you can create brand ambassadorships as you target and reward your most loyal customers. It also easily integrates with some of the most popular ecommerce platforms including Shopify, Magento, and WooCommerce. To learn more about Talkable’s pricing, you’ll have to book a demo here.
WordPress 5.8 was one of the most feature-packed updates that the community has seen in ages. There was just about a little something for everyone. And, there were plenty of things that some users would rather live without.
Big releases on the CMS that powers 40% of the web mean that some users will want or need to disable new features. Whether it is turning on classic widgets, bringing back infinite scrolling in the media library, or enabling the template editor, there is bound to be a solution. Some say there is a plugin for everything, so we are about to test that theory against the WordPress 5.8 features list.
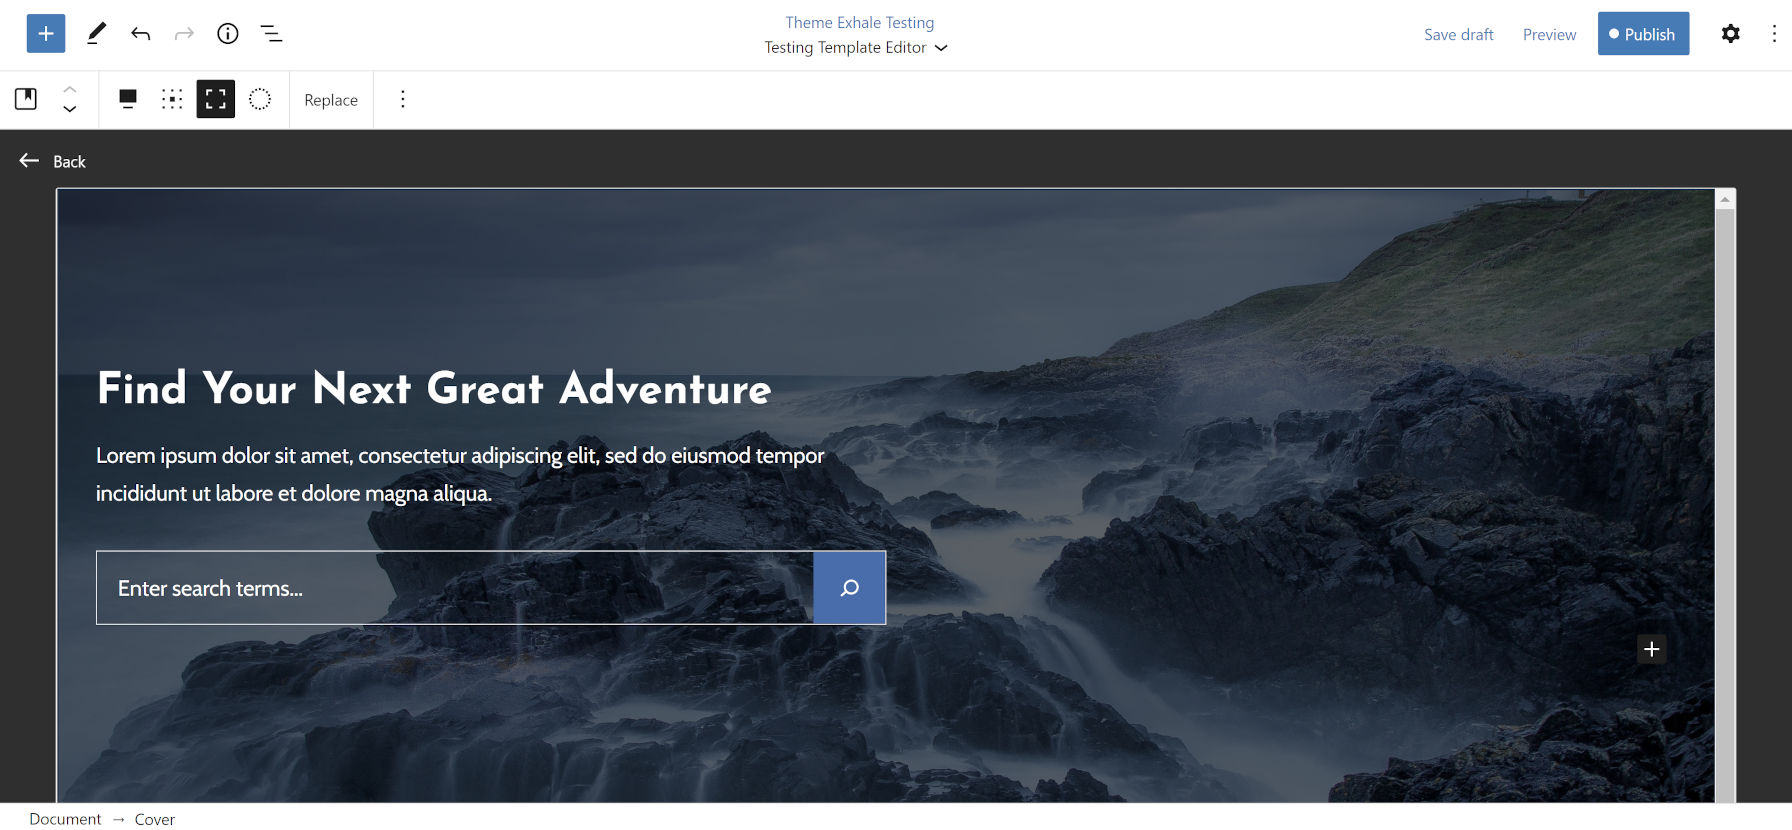
Enable the Template Editor
Creating a landing page in the template editor.
The template editor is one of the highlights of WordPress 5.8, but the majority of users cannot use it right now. Weeks before the latest update, the release team decided to make this an opt-in feature. This put the responsibility on theme authors to test their themes and enable it. However, users could be waiting for weeks, months, or even longer to see if their theme author switches the feature on.
Not every theme will work well with the template editor. Much of this comes down to how each was designed. However, many will work just fine with the new feature even if the theme author has not yet sent out an update that enables it. The only way most users can know is to turn it on and test it themselves.
The Template Editor plugin by Webd Ltd does just this. There are no settings; just activate and give it a test run.
Keep in mind that results may vary. If template editing does not work out, just disable the plugin.
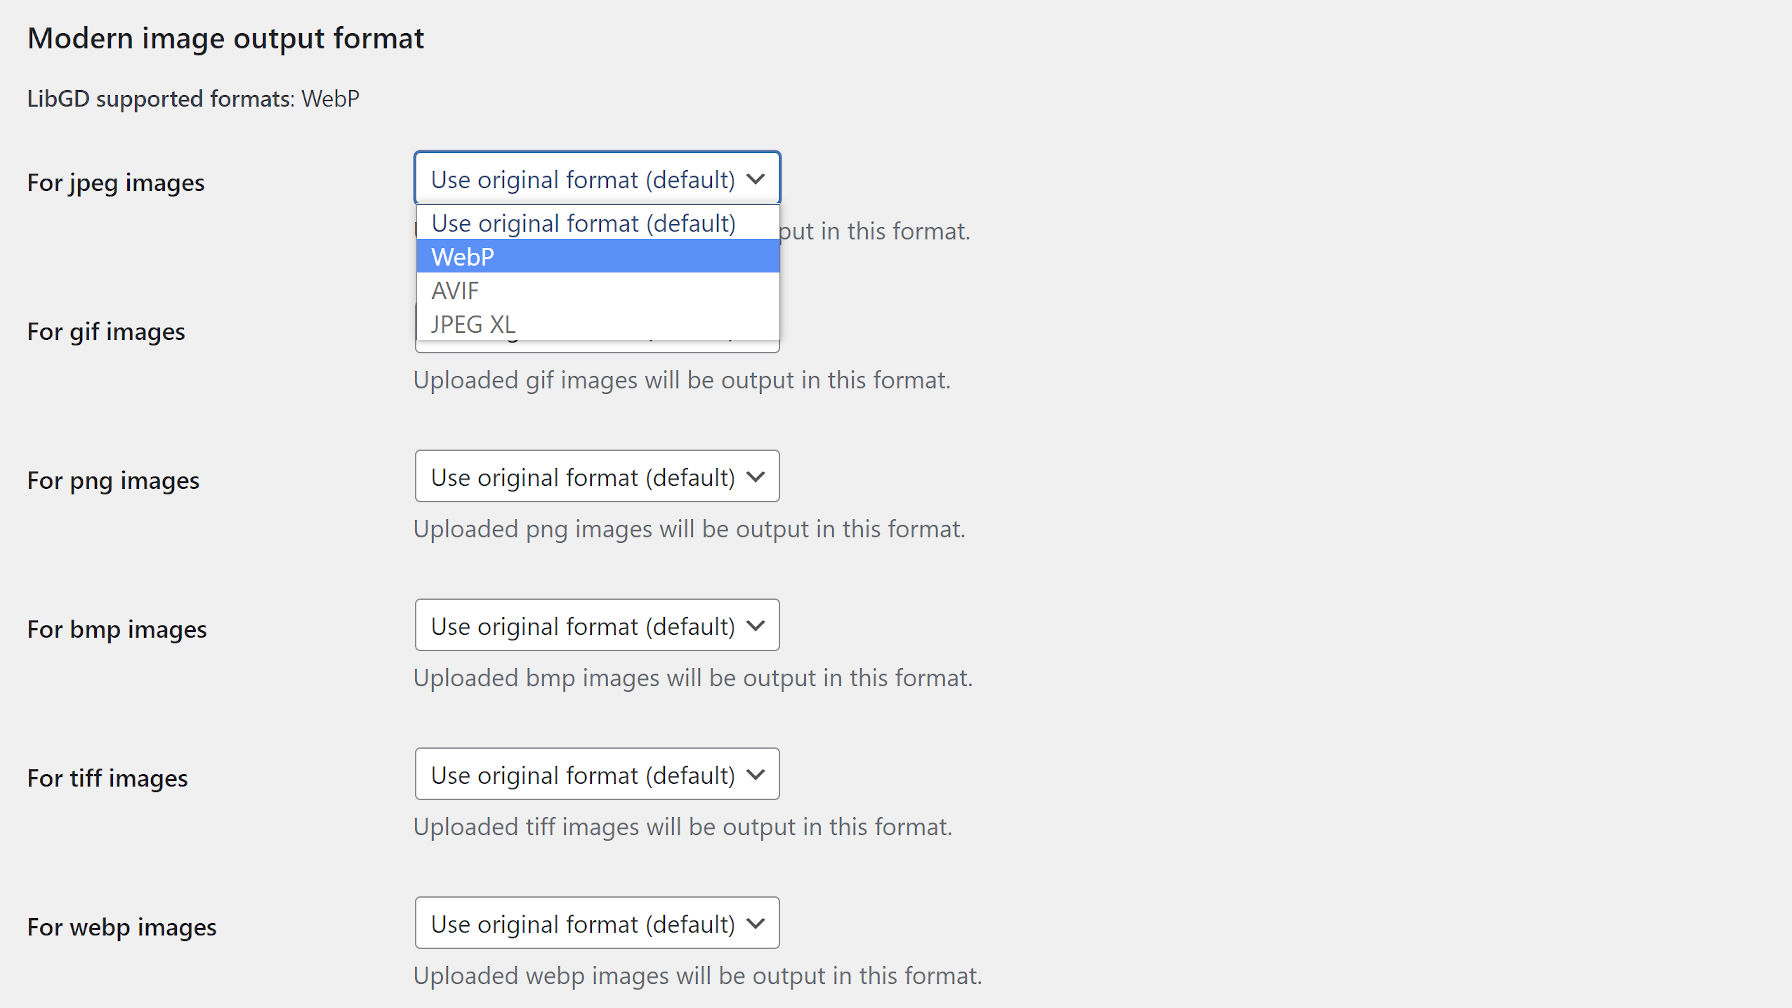
WebP and Controlling Image Formats
Modern Images WP settings.
WordPress 5.8 introduced support for WebP images. This image type could reduce file sizes by 25-34%, depending on the original format. While WordPress supports WebP, it does not automatically change it upon upload. However, it now has the image_editor_output_format hook that plugin authors can filter.
The Modern Images WP plugin by Adam Silverstein builds on top of that hook. It allows users to decide how their uploaded images are formatted on a case-by-case basis via the Media Settings screen. For example, users can transform their JPEG images to WebP or leave it as the default format.
Classic Widgets
Block widgets screen in WordPress 5.8.
Square peg, meet round hole. That is how I have often described the block-based widgets system introduced in WordPress 5.8. It is meant as a temporary transitional phase between classic and block themes. For many, myself included, it is one best avoided.
Block widgets simply do not work with all themes, and some people just want the traditional widgets experience. Whatever the case, there is no shortage of options:
For users who would still rather simply avoid all things related to blocks, the Disable Gutenberg plugin by Jeff Starr is your best bet. It is the most robust solution available, allowing site owners to fine-tune the experience.
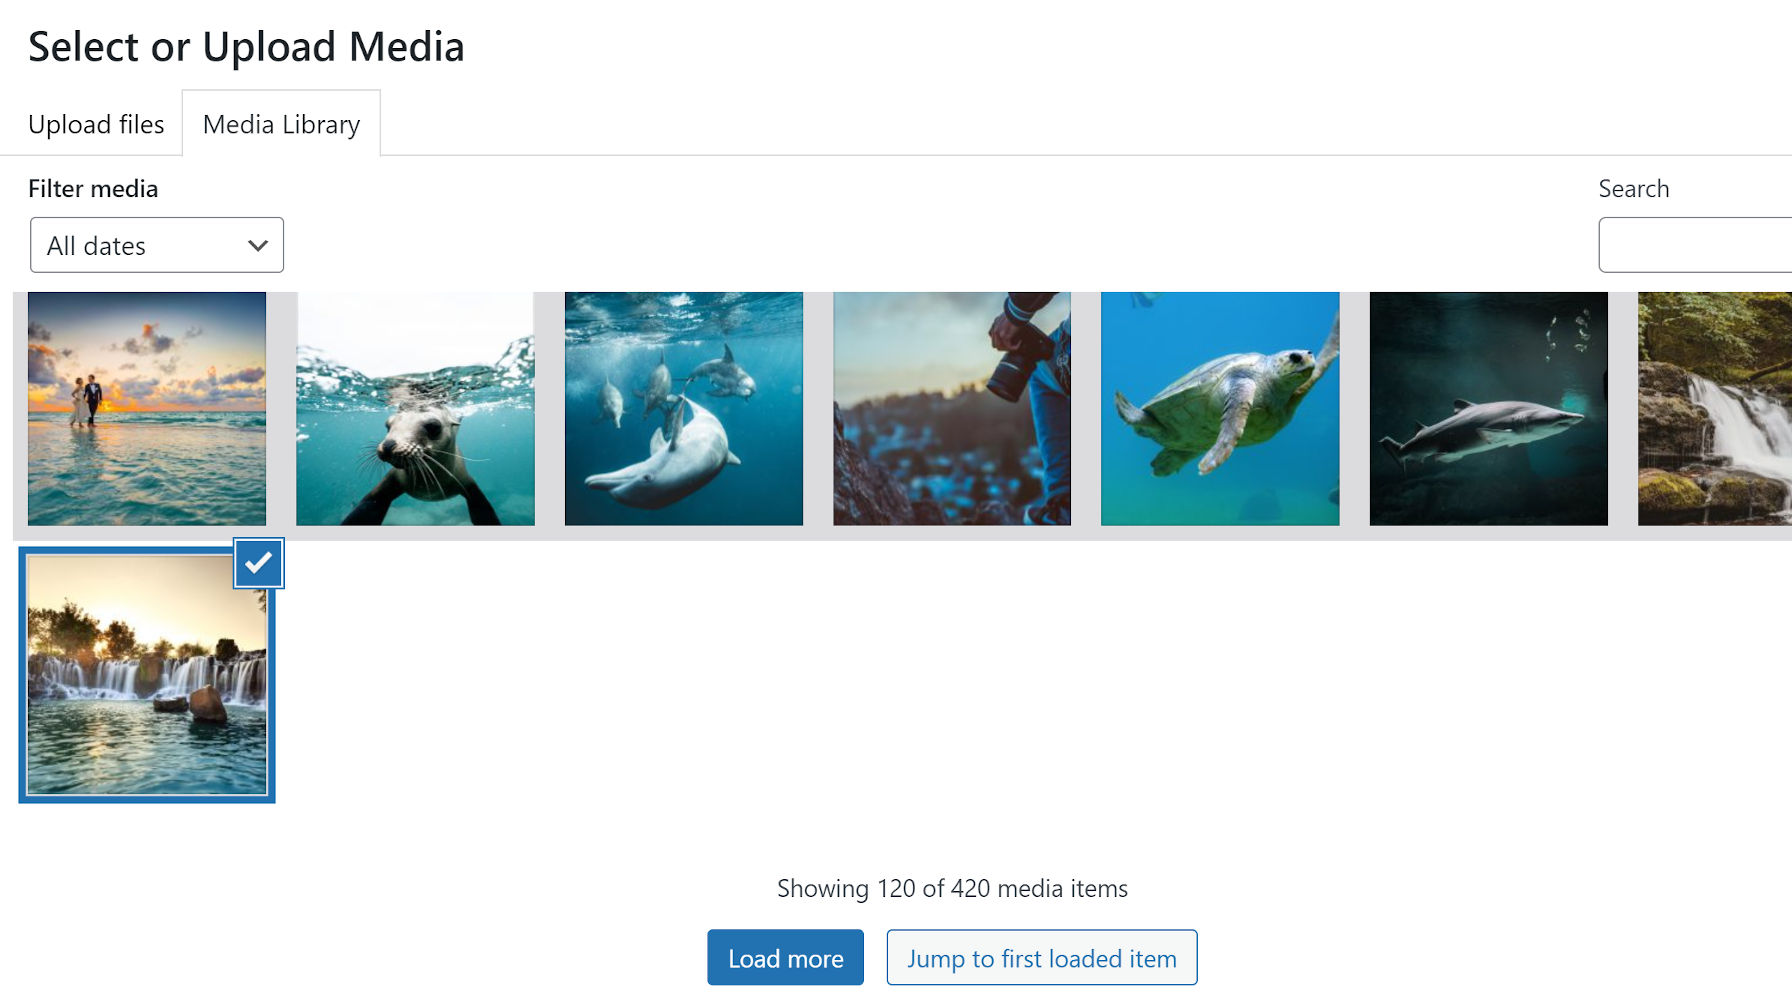
Enable Infinite Scrolling for the Media Library
Media library with load more button.
WordPress 5.8 replaced infinite scrolling in the media library in favor of an Ajax-powered load more button. This change limited each “page” of images and other media to 40 items. This was a necessary change for keyboard users attempting to reach content appended to the screen and those who rely on audible feedback for navigation. Infinite loading was also a performance issue for those on slower connections.
Accessibility and performance should always trump bells and whistles, but the WordPress development team provided a filter hook for plugin authors to tap into and reenable the feature.
The change was slated for the WordPress 5.7 release but did not quite make the cut. David Baumwald released the Media Library Enable Infinite Scrolling plugin months ago in anticipation of it. The plugin still works great with WordPress 5.8 and is the solution for those who want to load images in the media library without clicking a button.
The one missing plugin would let users control the number of media items displayed. For some, they are OK dropping infinite scrolling but want to bump up that 40-item limit. There is currently no way for plugin developers to hook in and change this, at least until an open ticket works its way through the system.
Maybe there is not a plugin for everything yet, but it is close enough.
Do you run a WordPress community site on BuddyPress? Are you looking to create the best social network on BuddyPress? If so, you’re in the right place. BuddyPress is one of the best community plugins for WordPress. It’s a great solution for social networks, intranets, online communities, teams, and groups. The platform is powerful but […]
I am trying to output data for selected dates and think I have managed to do the sql query but it's currently not outputting the total amount, below is what it is currently outputting
I am looking for the following
From To Expense Category Expenses Total
01/01/2018 31/12/2018 Accounting Costs 0.00
01/01/2018 31/12/2018 Marketing 0.00
Below is the current code I have
<?php
if (isset($_POST['submit'])){
include('dbconnection.php');
$from=date('Y-m-d',strtotime($_POST['from']));
$to=date('Y-m-d',strtotime($_POST['to']));
$oquery=$mysqli->query("SELECT ec.expense_category_id, ec.expense_category_name,sum(e.expenseamount), date_format('$from','%d/%m/%Y') as `from`, date_format('$to','%d/%m/%Y') as `to` FROM expenses e join expense_category ec ON e.expense_category_id = ec.expense_category_id WHERE e.expddate between '$from' and '$to' group by ec.expense_category_name");
if ($oquery->num_rows > 0) {
while($orow = $oquery->fetch_array()){
?>
<tr>
<td><?php echo $orow['from'] ?></td>
<td><?php echo $orow['to'] ?></td>
<td><?php echo $orow['expense_category_name'] ?></td>
<td><?php echo "" . '£' . number_format($orow['expenseamount'], 2) . "";?></td>
</tr>
<?php
}
} else {
echo "0 Results";
}
}
?>
Can someone help please as I'm not 100% on PHP, I'm not sure if is to do with my sql query or is something else?
At Cloudflare, we have a great product called Workers KV which is a key-value storage layer that replicates globally. It can handle millions of keys, each of which is accessible from within a Worker script at exceptionally low latencies, no matter where in the world a request is received. Workers KV is amazing — and so is its pricing, which includes a generous free tier.
However, as a long-time user of the Cloudflare lineup, I have found one thing missing: local introspection. With thousands, and sometimes hundreds of thousands of keys in my applications, I’d often wish there was a way to query all my data, sort it, or just take a look to see what’s actually there.
Well, recently, I was lucky enough to join Cloudflare! Even more so, I joined just before the quarter’s “Quick Wins Week” — aka, their week-long hackathon. And given that I hadn’t been around long enough to accumulate a backlog (yet), you best believe I jumped on the opportunity to fulfill my own wish.
So, with the intro out of the way, let me tell you how I built Workers KV GUI, a cross-platform desktop application using Svelte, Redis, and Rust.
The front-end application
As a web developer, this was the familiar part. I’m tempted to call this the “easy part” but, given that you can use any and all HTML, CSS, and JavaScript frameworks, libraries, or patterns, choice paralysis can easily set in… which might be familiar, too. If you have a favorite front-end stack, great, use that! For this application, I chose to use Svelte because, for me, it certainly makes and keeps things easy.
Also, as web developers, we expect to bring all our tooling with us. You certainly can! Again, this phase of the project is no different than your typical web application development cycle. You can expect to run yarn dev (or some variant) as your main command and feel at home. Keeping with an “easy” theme, I’ve elected to use SvelteKit, which is Svelte’s official framework and toolkit for building applications. It includes an optimized build system, a great developer experience (including HMR!), a filesystem-based router, and all that Svelte itself has to offer.
As a framework, especially one that takes care of its own tooling, SvelteKit allowed me to purely think about my application and its requirements. In fact, as far as configuration is concerned, the only thing I had to do was tell SvelteKit that I wanted to build a single-page application (SPA) that only runs in the client. In other words, I had to explicitly opt out of SvelteKit’s assumption that I wanted a server, which is actually a fair assumption to make since most applications can benefit from server-side rendering. This was as easy as attaching the @sveltejs/adapter-static package, which is a configuration preset made exactly for this purpose. After installing, this was my entire configuration file:
The index.html changes are a personal preference. SvelteKit uses app.html as a default base template, but old habits die hard.
It’s only been a few minutes, and my toolchain already knows it’s building a SPA, that there’s a router in place, and a development server is at the ready. Plus, TypeScript, PostCSS, and/or Sass support is there if I want it (and I do), thanks to svelte-preprocess. Ready to rumble!
The application needed two views:
a screen to enter connection details (the default/welcome/home page)
a screen to actually view your data
In the SvelteKit world, this translates to two “routes” and SvelteKit dictates that these should exist as src/routes/index.svelte for the home page and src/routes/viewer.svelte for the data viewer page. In a true web application, this second route would map to the /viewer URL. While this is still the case, I know that my desktop application won’t have a navigation bar, which means that the URL won’t be visible… which means that it doesn’t matter what I call this route, as long as it makes sense to me.
The contents of these files are mostly irrelevant, at least for this article. For those curious, the entire project is open source and if you’re looking for a Svelte or SvelteKit example, I welcome you to take a look. At the risk of sounding like a broken record, the point here is that I’m building a regular web app.
At this time, I’m just designing my views and throwing around fake, hard-coded data until I have something that seems to work. I hung out here for about two days, until everything looked nice and all interactivity (button clicks, form submissions, etc.) got fleshed out. I’d call this a “working” app, or a mockup.
Desktop application tooling
At this point, a fully functional SPA exists. It operates — and was developed — in a web browser. Perhaps counterintuitively, this makes it the perfect candidate to become a desktop application! But how?
You may have heard of Electron. It’s the most well-known tool for building cross-platform desktop applications with web technologies. There are a number of massively popular and successful applications built with it: Visual Studio Code, WhatsApp, Atom, and Slack, to name a few. It works by bundling your web assets with its own Chromium installation and its own Node.js runtime. In other words, when you’re installing an Electron-based application, it’s coming with an extra Chrome browser and an entire programming language (Node.js). These are embedded within the application contents and there’s no avoiding them, as these are dependencies for the application, guaranteeing that it runs consistently everywhere. As you might imagine, there’s a bit of a trade-off with this approach — applications are fairly massive (i.e. more than 100MB) and use lots of system resources to operate. In order to use the application, an entirely new/separate Chrome is running in the background — not quite the same as opening a new tab.
Luckily, there are a few alternatives — I evaluated Svelte NodeGui and Tauri. Both choices offered significant application size and utilization savings by relying on native renderers the operating system offers, instead of embedding a copy of Chrome to do the same work. NodeGui does this by relying on Qt, which is another Desktop/GUI application framework that compiles to native views. However, in order to do this, NodeGui requires some adjustments to your application code in order for it to translate your components into Qt components. While I’m sure this certainly would have worked, I wasn’t interested in this solution because I wanted to use exactly what I already knew, without requiring any adjustments to my Svelte files. By contrast, Tauri achieves its savings by wrapping the operating system’s native webviewer — for example, Cocoa/WebKit on macOS, gtk-webkit2 on Linux, and Webkit via Edge on Windows. Webviewers are effectively browsers, which Tauri uses because they already exist on your system, and this means that our applications can remain pure web development products.
With these savings, the bare minimum Tauri application is less than 4MB, with average applications weighing less than 20MB. In my testing, the bare minimum NodeGui application weighed about 16MB. A bare minimum Electron app is easily 120MB.
Needless to say, I went with Tauri. By following the Tauri Integration guide, I added the @tauri-apps/cli package to my devDependencies and initialized the project:
yarn add --dev @tauri-apps/cli
yarn tauri init
This creates a src-tauri directory alongside the src directory (where the Svelte application lives). This is where all Tauri-specific files live, which is nice for organization.
I had never built a Tauri application before, but after looking at its configuration documentation, I was able to keep most of the defaults — aside from items like the package.productName and windows.title values, of course. Really, the only changes I needed to make were to the build config, which had to align with SvelteKit for development and output information:
The distDir relates to where the built production-ready assets are located. This value is resolved from the tauri.conf.json file location, hence the ../ prefix.
The devPath is the URL to proxy during development. By default, SvelteKit spawns a devserver on port 3000 (configurable, of course). I had been visiting the localhost:3000 address in my browser during the first phase, so this is no different.
Finally, Tauri has its owndev and build commands. In order to avoid the hassle of juggling multiple commands or build scripts, Tauri provides the beforeDevCommand and beforeBuildCommand hooks which allow you to run any command before the tauri command runs. This is a subtle but strong convenience!
The SvelteKit CLI is accessed through the svelte-kit binary name. Writing yarn svelte-kit build, for example, tells yarn to fetch its local svelte-kit binary, which was installed via a devDependency, and then tells SvelteKit to run its build command.
With this in place, my root-level package.json contained the following scripts:
After integration, my production command was still yarn build, which invokes tauri build to actually bundle the desktop application, but only after yarn svelte-kit build has completed successfully (via the beforeBuildCommand option). And my development command remained yarn dev which spawns the tauri dev and yarn svelte-kit dev commands to run in parallel. The development workflow is entirely within the Tauri application, which is now proxying localhost:3000, allowing me to still reap the benefits of a HMR development server.
Important: Tauri is still in beta at the time of this writing. That said, it feels very stable and well-planned. I have no affiliation with the project, but it seems like Tauri 1.0 may enter a stable release sooner rather than later. I found the Tauri Discord to be very active and helpful, including replies from the Tauri maintainers! They even entertained some of my noob Rust questions throughout the process. :)
Connecting to Redis
At this point, it’s Wednesday afternoon of Quick Wins week, and — to be honest — I’m starting to get nervous about finishing before the team presentation on Friday. Why? Because I’m already halfway through the week, and even though I have a good-looking SPA inside a working desktop application, it still doesn’t do anything. I’ve been looking at the same fake data all week.
You may be thinking that because I have access to a webview, I can use fetch() to make some authenticated REST API calls for the Workers KV data I want and dump it all into localStorage or an IndexedDB table… You’re 100% right! However, that’s not exactly what I had in mind for my desktop application’s use case.
Saving all the data into some kind of in-browser storage is totally viable, but it saves it locally to your machine. This means that if you have team members trying to do the same thing, everyone will have to fetch and save all the data on their own machines, too. Ideally, this Workers KV application should have the option to connect to and sync with an external database. That way, when working in team settings, everyone can tune into the same data cache to save time — and a couple bucks. This starts to matter when dealing with millions of keys which, as mentioned, is not uncommon with Workers KV.
Having thought about it for a bit, I decided to use Redis as my backing store because it also is a key-value store. This was great because Redis already treats keys as a first-class citizen and offers the sorting and filtering behaviors I wanted (aka, I can pass along the work instead of implementing it myself!). And then, of course, Redis is easy to install and run either locally or in a container, and there are many hosted-Redis-as-service providers out there if someone chooses to go that route.
But, how do I connect to it? My app is basically a browser tab running Svelte, right? Yes — but also so much more than that.
You see, part of Electron’s success is that, yes, it guarantees a web app is presented well on every operating system, but it also brings along a Node.js runtime. As a web developer, this was a lot like including a back-end API directly inside my client. Basically the “…but it works on my machine” problem went away because all of the users were (unknowingly) running the exact same localhost setup. Through the Node.js layer, you could interact with the filesystem, run servers on multiple ports, or include a bunch of node_modules to — and I’m just spit-balling here — connect to a Redis instance. Powerful stuff.
We don’t lose this superpower because we’re using Tauri! It’s the same, but slightly different.
Instead of including a Node.js runtime, Tauri applications are built with Rust, a low-level systems language. This is how Tauri itself interacts with the operating system and “borrows” its native webviewer. All of the Tauri toolkit is compiled (via Rust), which allows the built application to remain small and efficient. However, this also means that we, the application developers, can include any additional crates — the “npm module” equivalent — into the built application. And, of course, there’s an aptly named redis crate that, as a Redis client driver, allows the Workers KV GUI to connect to any Redis instance.
In Rust, the Cargo.toml file is similar to our package.json file. This is where dependencies and metadata are defined. In a Tauri setting, this is located at src-tauri/Cargo.toml because, again, everything related to Tauri is found in this directory. Cargo also has a concept of “feature flags” defined at the dependency level. (The closest analogy I can come up with is using npm to access a module’s internals or import a named submodule, though it’s not quite the same still since, in Rust, feature flags affect how the package is built.)
# src-tauri/Cargo.toml
[dependencies]
serde_json = "1.0"
serde = { version = "1.0", features = ["derive"] }
tauri = { version = "1.0.0-beta.1", features = ["api-all", "menu"] }
redis = { version = "0.20", features = ["tokio-native-tls-comp"] }
The above defines the redis crate as a dependency and opts into the "tokio-native-tls-comp" feature, which the documentation says is required for TLS support.
Okay, so I finally had everything I needed. Before Wednesday ended, I had to get my Svelte to talk to my Redis. After poking around a bit, I noticed that all the important stuff seemed to be happening inside the src-tauri/main.rs file. I took note of the #[command] macro, which I knew I had seen before in a Tauri example earlier in the day, so I studied copied the example file in sections, seeing which errors came and went according to the Rust compiler.
Eventually, the Tauri application was able to run again, and I learned that the #[command] macro is wrapping the underlying function in a way so that it can receive “context” values, if you choose to use them, and receive pre-parsed argument values. Also, as a language, Rust does a lot of type casting. For example:
This creates a greet command which, when run,expects two arguments: name and age. When defined, the name value is a string value and age is a u8 data type — aka, an integer. However, if either are missing, Tauri throws an error because the command definition doesnot say anything is allowed to be optional.
To actually connect a Tauri command to the application, it has to be defined as part of the tauri::Builder composition, found within the main function.
use tauri::{command};

#[command]
fn greet(name: String, age: u8) {
  println!("Hello {}, {} year-old human!", name, age);
}
fn main() {
// start composing a new Builder chain
tauri::Builder::default()
// assign our generated "handler" to the chain
.invoke_handler(
// piece together application logic
tauri::generate_handler![
greet, // attach the command
]
)
// start/initialize the application
.run(
// put it all together
tauri::generate_context!()
)
// print <message> if error while running
.expect("error while running tauri application");
}
The Tauri application compiles and is aware of the fact that it owns a “greet” command. It’s also already controlling a webview (which we’ve discussed) but in doing so, it acts as a bridge between the front end (the webview contents) and the back end, which consists of the Tauri APIs and any additional code we’ve written, like the greet command. Tauri allows us to send messages across this bridge so that the two worlds can communicate with one another.
The developer is responsible for webview contents and may optionally include custom Rust modules and/or define custom commands. Tauri controls the webviewer and the event bridge, including all message serialization and deserialization.
This “bridge” can be accessed by the front end by importing functionality from any of the (already included) @tauri-apps packages, or by relying on the window.__TAURI__ global, which is available to the entire client-side application. Specifically, we’re interested in the invoke command, which takes a command name and a set of arguments. If there are any arguments, they must be defined as an object where the keys match the parameter names our Rust function expects.
In the Svelte layer, this means that we can do something like this in order to call the greet command, defined in the Rust layer:
When this button is clicked, our terminal window (wherever the tauri dev command is running) prints:
Hello Alice, 32 year-old human!
Again, this happens because of the println! function, which is effectively console.log for Rust, that the greet command used. It appears in the terminal’s console window — not the browser console — because this code still runs on the Rust/system side of things.
It’s also possible to send something back to the client from a Tauri command, so let’s change greet quickly:
use tauri::{command};

#[command]
fn greet(name: String, age: u8) {
  // implicit return, because no semicolon!
  format!("Hello {}, {} year-old human!", name, age)
}

// OR

#[command]
fn greet(name: String, age: u8) {
  // explicit `return` statement, must have semicolon
  return format!("Hello {}, {} year-old human!", name, age);
}
Realizing that I’d be calling invoke many times, and being a bit lazy, I extracted a light client-side helper to consolidate things:
Great! So now it’s Thursday and I still haven’t written any Redis code, but at least I know how to connect the two halves of my application’s brain together. It was time to comb back through the client-side code and replace all TODOs inside event handlers and connect them to the real deal.
I will spare you the nitty gritty here, as it’s very application-specific from here on out — and is mostly a story of the Rust compiler giving me a beat down. Plus, spelunking for nitty gritty is exactly why the project is open source!
At a high-level, once a Redis connection is established using the given details, a SYNC button is accessible in the /viewer route. When this button is clicked (and only then — because of costs) a JavaScript function is called, which is responsible for connecting to the Cloudflare REST API and dispatching a "redis_set" command for each key. This redis_set command is defined in the Rust layer — as are all Redis-based commands — and is responsible for actually writing the key-value pair to Redis.
Reading data out of Redis is a very similar process, just inverted. For example, when the /viewer started up, all the keys should be listed and ready to go. In Svelte terms, that means I need to dispatch a Tauri command when the /viewer component mounts. That happens here, almost verbatim. Additionally, clicking on a key name in the sidebar reveals additional “details” about the key, including its expiration (if any), its metadata (if any), and its actual value (if known). Optimizing for cost and network load, we decided that a key’s value should only be fetched on command. This introduces a REFRESH button that, when clicked, interacts with the REST API once again, then dispatches a command so that the Redis client can update that key individually.
I don’t mean to bring things to a rushed ending, but once you’ve seen one successful interaction between your JavaScript and Rust code, you’ve seen them all! The rest of my Thursday and Friday morning was just defining new request-reply pairs, which felt a lot like sending PING and PONG messages to myself.
Conclusion
For me — and I imagine many other JavaScript developers — the challenge this past week was learning Rust. I’m sure you’ve heard this before and you’ll undoubtedly hear it again. Ownership rules, borrow-checking, and the meanings of single-character syntax markers (which are not easy to search for, by the way) are just a few of the roadblocks that I bumped into. Again, a massive thank-you to the Tauri Discord for their help and kindness!
This is also to say that using Tauri was not a challenge — it was a massive relief. I definitely plan to use Tauri again in the future, especially knowing that I can use just the webviewer if I want to. Digging into and/or adding Rust parts was “bonus material” and is only required if my app requires it.
For those wondering, because I couldn’t find another place to mention it: on macOS, the Workers KV GUI application weighs in at less than 13 MB. I am so thrilled with that!
And, of course, SvelteKit certainly made this timeline possible. Not only did it save me a half-day-slog configuring my toolbelt, but the instant, HMR development server probably saved me a few hours of manually refreshing the browser — and then the Tauri viewer.
If you’ve made it this far — that’s impressive! Thank you so much for your time and attention. A reminder that the project is available on GitHub and the latest, pre-compiled binaries are always available through its releases page.
Gatsby recently announced the launch of Functions which opens up a new dimension of possibilities — and I for one couldn’t be more excited! With Gatsby now providing Serverless Functions on Gatsby Cloud (and Netlify also providing support via @netlify/plugin-gatsby), the framework that was once misunderstood to be “just for blogs” is now more than ever, (in my opinion) the most exciting technology provider in the Jamstack space.
The demo in this article is the result of a recent project I worked on where I needed to plot geographical locations around a 3D globe and I thought it might be fun to see if it were possible to use the same technique using off-planet locations. Spoiler alert: It’s possible! Here’s a sneak peek of what I’ll be talking about in this post, or if you prefer to jump ahead, the finished code can be found here.
Getting Started
With Gatsby Functions, you can create more dynamic applications using techniques typically associated with client-side applications by adding an api directory to your project and exporting a function, e.g.
The above sets up a new <Canvas /> element and can be configured using props exposed by React Three Fibre.
Elements that are returned as children of the canvas component will be displayed as part of the 3D scene. You’ll see above that I’ve included <OrbitControls /> which adds touch/mouse interactivity allowing users to rotate the scene in 3D space
Ensure ThreeScene is imported and rendered on a page somewhere in your site. In my example repo I’ve added ThreeScene to index.js:
If the syntax above looks a little different to that of the Three.js docs it’s because React Three Fibre uses a declarative approach to using Three.js in React.
A good explanation of how constructor arguments work in React Three Fibre can be seen in the docs here: Constructor arguments
I’ll be using admin 0 countries. I chose this option because it provides enough geometry detail to see each country, but not so much that it will add unnecessary strain on your computer’s GPU.
Now, create a file in src/components called three-geo.js:
There’s quite a lot going on in this file so I’ll walk you through it.
Create an isLoading state instance using React hooks and set it to true. This prevents React from attempting to return data I don’t yet have.
Using a useEffect I request the geojson from the CloudFront CDN.
Upon successful retrieval I set the response in React state using setGeoJson(...) and set isLoading to false
Using an Array.prototype.map I iterate over the “features” contained within the geojson response and return lineSegments with lineBasicMaterial for each geometry
I set the lineSegmentsgeometry to the return value provided by GeoJsonGeomtry which is passed the “features” geometry along with a radius of 100.
(You may have noticed I’ve used the same radius of 100 here as I’ve used in the sphereGeometryargs in three-sphere.js. You don’t have to set the radius to the same value but it makes sense to use the same radii for ThreeSphere and ThreeGeo.
If you’re interested to know more about how GeoJsonGeometry works, here’s the open-source repository for reference: https://github.com/vasturiano/three-geojson-geometry. The repository has an example directory however, the syntax is slightly different from what you see here because the examples are written in vanilla JavaScript not React.
Combine The Sphere And Geometry
Now it’s time to overlay the geometry on top of the blank sphere: Add ThreeGeo to ThreeScene
You should now be looking at something similar to the image below.
Now that’s slightly more exciting!
Step 2: Building A Serverless Function
Create A Function
This next step is where I use a Gatsby Function to request data from Where is ISS at, which returns the current location of the International Space Station.
This function is responsible for fetching data from api.whereistheiss.at and upon success will return the data and a 200 status code back to the browser.
The Gatsby engineers have done such an amazing job at simplifying serverless functions that the above is all you really need to get going, but here’s a little more detail about what’s going on.
The function is a default export from a file named get-iss-location.js;
With Gatsby Functions the filename becomes the file path used in a client-side get request prefixed with api, e.g. /api/get-iss-location;
If the request to “Where is ISS at” is successful I return an iss_now object containing data from the Where is ISS at API and a status code of 200 back to the client;
If the request errors I send the error back to the client.
Step 3: Build The International Space Station
Creating The ISS Sphere
In this next step, I use Gatsby Functions to position a sphere that represents the International Space Station as it orbits the globe. I do this by repeatedly calling an axios.get request from a poll function and setting the response in React state.
Create a file in src/components called three-iss.js
There’s quite a lot going on in this file so I’ll walk you through it.
Create an issNow state instance using React hooks and set it to null. This prevents React from attempting to return data I don’t yet have;
Using a useEffect I create a JavaScript interval that calls the poll function every 5 seconds;
The poll function is where I request the ISS location from the Gatsby Function endpoint (/api/get-iss-location);
Upon successful retrieval, I set the response in React state using setIssNow(...);
I pass the latitude and longitude onto a custom function called getVertex, along with a radius.
You may have noticed that here I’m using a radius of 120. This does differ from the 100 radius value used in ThreeSphere and ThreeGeo. The effect of the larger radius is to position the ISS higher up in the 3D scene, rather than at ground level — because that’s logically where the ISS would be, right? 100 has the effect of the sphere and geometry overlapping to represent Earth, and 120 for the ISS has the effect of the space station “orbiting” the globe I’ve created.
One thing that took a bit of figuring out, at least for me, was how to use spherical two dimensional coordinates (latitude and longitude) in three dimensions, e.g. x,y,z. The concept has been explained rather well in this post by Mike Bostock.
The key to plotting lat / lng in 3D space lies within this formula… which makes absolutely no sense to me!
Et voilà! You should now be looking at something similar to the image below.
The poll function will repeatedly call the Gatsby Function, which in turn requests the current location of the ISS and re-renders the React component each time a response is successful. You’ll have to watch carefully but the ISS will change position ever so slightly every 5 seconds.
The ISS is traveling at roughly 28,000 km/h and polling the Gatsby Function less often would reveal larger jumps in position. I’ve used 5 seconds here because that’s the most frequent request time as allowed by the Where is ISS at API
You might have also noticed that there’s no authentication required to request data from the Where is ISS at API. Meaning that yes, technically, I could have called the API straight from the browser, however, I’ve decided to make this API call server side using Gatsby Functions for two reasons:
It wouldn’t have made a very good blog post about Gatsby Functions if i didn’t use them.
Who knows what the future holds for Where is ISS at, it might at some point require authentication and adding API keys to server side API requests is pretty straightforward, moreover this change wouldn’t require any updates to the client side code.
In this site I’ve visualized the time delay from the poll function by implementing an Svg <circle /> countdown animation and added an extra <circle /> with a stroke-dashoffset to create the dashed lines surrounding it.
Step 5: Apply Your New Geo Rendering Skills In Other Fun Ways!
I recently used this approach for plotting geographical locations for the competition winners of 500 Bottles: https://500bottles.gatsbyjs.io. A limited edition FREE swag giveaway I worked on with Gatsby’s marketing team.
In the 500 Bottles site I plot the geographical locations of each of the competition winners using the same method as described in ThreeIss, which allows anyone visiting the site to see where in the world the winners are.
Closing Thoughts
Gatsby Functions really open up a lot of possibilities for Jamstack developers and never having to worry about spinning up or scaling a server removes so many problems leaving us free to think about new ways they can be used.
I have a number of ideas I’d like to explore using the V4 Space X API’s so give me a follow if that’s your cup of tea: @PaulieScanlon
Further Reading
If you’re interested in learning more about Gatsby Functions, I highly recommend Summer Functions, a five week course run by my good chum Benedicte Raae.
In a recent FREE Friday night Summer Functions webinar we created an emoji slot machine which was super fun:
You might also be interested in the following episode from our pokey internet show Gatsby Deep Dives where Kyle Mathews (creator of Gatsby) talks us through how Gatsby Functions work:
If you’re interested in learning more about Gatsby I have a number of articles and tutorials on my blog: https://paulie.dev, and please do come find me on Twitter if you fancy a chat: @PaulieScanlon
Are you looking for an easy way to edit HTML on your WordPress website?
HyperText Markup Language or HTML is a code that tells a web browser how to display the content on your web pages. Editing HTML comes in handy for advanced customization and troubleshooting issues.
In this article, we’ll show you how to edit HTML in the WordPress code editor using different methods.
Why Should You Edit HTML in WordPress?
WordPress offers thousands of themes and plugins to change the appearance of your website and customize different elements without touching a single line of code.
However, plugins and themes have their limitations and might not offer the exact features you’re looking for. As a result, you might be unable to style your website the way you want it to look.
This is where editing HTML is really useful. You can easily perform advanced customization using HTML code. It provides a lot of flexibility and control over how your site will look and function.
In addition, learning how to edit HTML can also help you identify and fix errors on your WordPress website when you don’t have access to the dashboard.
Note: If you don’t want to edit HTML, but still want full customization options, then we recommend using a drag and drop WordPress page builder like SeedProd.
That being said, let’s look at different ways to edit HTML in a WordPress website.
We’ll cover how to edit HTML using the block editor and classic editor, and we’ll also show you an easy way to add code to your site. You can click the links below to jump ahead to your preferred section.
In the WordPress block editor, there are multiple ways to edit the HTML of your post or page.
First, you can use a Custom HTML block in your content to add HTML code.
To start, head over to your WordPress dashboard and then add a new post/page or edit an existing article. After that, click the plus (+) sign at the top left corner and add a ‘Custom HTML’ block.
Next, go ahead and enter your custom HTML code in the block. You can also click on the ‘Preview’ option to check if the HTML code is working properly and how your content will look on your live website.
Another way to add or change HTML code in the WordPress block editor is by editing the HTML of a particular block.
To do that, simply select an existing block in your content and then click the three-dot menu. Next, go ahead and click the ‘Edit as HTML’ option.
You’ll now see the HTML of an individual block. Go ahead and edit the HTML of your content. For example, you can add a nofollow link, change the style of your text, or add other code.
If you want to edit the HTML of your entire post, then you can use the ‘Code Editor’ in the WordPress block editor.
You can access the code editor by clicking the three-dots option in the top right corner. Then select ‘Code Editor’ from the drop-down options.
How to Edit HTML in WordPress Classic Editor
If you’re using the WordPress classic editor, then you can easily edit the HTML in the Text view.
To access the Text view, simply edit a blog post or add a new one. When you’re in the classic editor, click the ‘Text’ tab to see the HTML of your article.
After that, you can edit the HTML of your content. For example, you can bold different words to make them prominent, use the italic style in the text, create lists, add a table of contents, and more.
How to Edit HTML in WordPress Widgets
Did you know that you can add and edit HTML code in your site’s widget area?
In WordPress, using a Custom HTML widget can help you customize your sidebar, footer, and other widget areas. For instance, you can embed contact forms, Google Maps, call to action (CTA) buttons, and other content.
You can start by heading over to your WordPress admin panel and then go to Appearance » Widgets. After that, go ahead and add a Custom HTML widget by clicking the ‘Add’ button.
Next, you’ll need to select where you’d like to add the Custom HTML widget and choose a position. The widget area will depend on the WordPress theme you’re using. For example, you may be able to add it to your footer, header, or other areas.
Once you’ve selected the widget area and position, go ahead and click the ‘Save Widget’ button.
After that, you can click on your Custom HTML widget, enter the HTML code, and then click the ‘Save’ button.
You can now visit your website to see the Custom HTML widget in action.
How to Edit HTML in WordPress Theme Editor
Another way to edit the HTML of your website is through the WordPress Theme Editor (Code Editor).
However, we don’t recommend that you directly edit the code in the Theme Editor. The slightest mistake when entering code can break your website and block you from accessing the WordPress dashboard.
Also, if you update your theme, then all your changes would be lost.
That said, if you are considering editing HTML using the Theme editor, then it’s a good idea to backup your website before making any changes.
Next, head over to Appearance » Theme Editor from your WordPress dashboard. You’ll now see a warning message about directly editing theme files.
Once you click the ‘I Understand’ button, you’ll see your theme files and code. From here, you can choose which file you’d like to edit and make your changes.
How to Edit HTML in WordPress Using FTP
Another alternative method to editing HTML in the WordPress theme files is by using FTP also known as file transfer protocol service.
This is a standard feature that comes with all WordPress hosting accounts.
The benefit of using FTP instead of the code editor is that you can easily fix issues using the FTP client. This way, you won’t be locked out of your WordPress dashboard if something breaks when editing HTML.
To start, you’ll first need to select an FTP software. We’ll be using FileZilla in this tutorial, as it’s a free and user-friendly FTP client for Windows, Mac, and Linux.
After selecting your FTP client, you’ll now need to log in to your site’s FTP server. You can find the login details in your hosting provider’s control panel dashboard.
Once you’re logged in, you will see different folders and files of your website under the ‘Remote site’ column. Go ahead and navigate to your theme files by going to wp-content » theme.
You’ll now see different themes on your website. Go ahead and select the theme that you want to edit.
Next, you can right-click on a theme file to edit the HTML. For example, if you want to make changes in the footer, then right-click the footer.php file.
Many FTP clients allow you to view and edit the file and automatically upload them once you’ve made the changes. In FileZilla, you can do this by clicking the ‘View/Edit’ option.
However, we suggest that you download the file that you want to edit to your desktop before making any changes.
Once the plugin is active, you can head over to Setting » Insert Headers and Footers from your admin panel.
Next, you can add the HTML code to your website in the header, body, and footer boxes.
For example, let’s say you want to display an alert bar on your website. You can simply enter the HTML code in the ‘Scripts in Body’ box and click the Save button.
Besides that, you can add a Google Analytics tracking code and Facebook pixel in the header or add a Pinterest button in the footer of your website using the plugin.
i really dont know why it does this, it only started doing it when i added the [i] for more than one player. from the very small window at the end i can see that my code works and it has implemented the "aliens" but its still blank. i thought it was a problem with the updating feature but i didnt make any changes to it since i added it the first time and it worked them. its possible a problem with the indedntations. pls help
 for i in range(num_of_enemies):
        enemyX[i] += enemyX_change[i]
        if enemyX[i] <= 0:
            enemyX_change[i] = 4
            enemyY[i] += enemyY_change[i]
        elif enemyX[i] >= 686:
             enemyX_change[i] = -4
             enemyY[i] += enemyY_change[i]
this could be a problem
collision = isCollision(enemyX[i], enemyY[i], bulletX, bulletY)
        if collision:
            bulletY = 480
            bullet_state = "ready"
            score += 1
            print(score)
            enemyX[i] = random.randint(0, 687)
            enemyY[i] = random.randint(50, 150)

    enemy(enemyX[i], enemyY[i], i)


or this (btw its right underneath my first one)
Every day, the ProgrammableWeb team is busy, updating its three primary directories for APIs, clients (language-specific libraries or SDKs for consuming or providing APIs), and source code samples.


 Do you run a WordPress community site on BuddyPress? Are you looking to create the best social network on BuddyPress? If so, you’re in the right place. BuddyPress is one of the best community plugins for WordPress. It’s a great solution for social networks, intranets, online communities, teams, and groups. The platform is powerful but […]