

CSS is a simple stylesheet language for defining a website or document’s presentation. However, this simplicity leaves the door open for many potential issues and technical debt — bloated code, specificity hell, duplicated code blocks with very little to no difference, leftover unused selectors, unnecessary hacks, and workarounds, to name a few.
That kind of technical debt, if not paid on time, can accumulate and lead to severe issues down the line. Most commonly, it can lead to unexpected side-effects when adding new UI components and making the codebase difficult to maintain. You’ve probably worked on a project with a poor CSS codebase before and thought how you’d written the code differently, given the opportunity to refactor or rewrite everything from scratch.
Refactoring large parts of CSS code is not an easy task by any measure. At times, it may seem that it’s just a case of “deleting the poor quality code, writing better CSS, and deploying the shiny improved code”. However, there are many other factors to consider, like the difficulty of refactoring a live codebase, expected duration and team utilization, establishing refactoring goals, tracking refactor effectiveness and progress, etc. There is also the matter of convincing the management or project stakeholders to invest the time and resources into the refactoring process.
In this three-part series, we are going to go through the CSS refactor process from the beginning to the end, starting with knowledge on how to approach it and some general pros and cons of refactoring, then moving onto the refactoring strategies themselves and ending with some general best practices on CSS file size and performance.
Side-Effects Of Poor-Quality CSSFor all its flexibility and simplicity, CSS itself has some fundamental issues that allow developers to write poor-quality code in the first place. These issues originate from its specificity and inheritance mechanisms, operating in global scope, source order dependency, etc.
On a team-level level, most of the CSS codebase issues usually originate from the varying skill levels and CSS knowledge, different preferences and code styles, lack of understanding of the project structure and existing code and components, absence of project-level or team-level standards and guidelines, and so on.
As a result, poor-quality CSS can cause issues that go beyond the simple visual bugs and can produce various severe side-effects that can affect the project as a whole. Some such examples include:
- Decreasing code quality as more features are added due to the varying CSS skill levels within a development team and lacking internal rules, conventions, and best practices.
- Adding new features or extending existing selectors causes bugs and unexpected side-effects in other parts of the code (also known as a regression).
- Multiple different CSS selectors with duplicated code blocks or chunks of CSS code can be separated into a new selector and extended by variation.
- Leftover, unused chunks of code from deleted features. The development team has lost track of which CSS code is used and which can be safely removed.
- Inconsistency in the file structure, CSS class naming, overall quality of CSS, etc.
- “Specificity hell” where new features are added by overriding instead of existing the CSS codebase.
- Undoing CSS where higher-specificity selectors “reset” the lower-specificity selector style. Developers are writing more code to have less styling. This results in redundancy and a lot of waste in code.

In worst-case scenarios, all aforementioned issues combined can result in a large CSS file size, even with the CSS minification applied. This CSS is usually render-blocking, so the browser won’t even render the website content until it has finished downloading and parsing the CSS file, resulting in a poor UX and performance on slower or unreliable networks.
These issues not only affect the end-user but also the development team and project stakeholders by making the maintenance and feature development difficult, time-consuming and costly. This is one of the more useful arguments to bring up when arguing for CSS refactor or rewrite.

The team at Netlify noted that the reason behind their large-scale CSS refactoring project was the decreasing code quality and maintainability as the project grew in complexity with more and more UI components added. They’ve also noticed that the lack of internal CSS standards and documentation led to the decreasing code quality as more and more people were working on the CSS codebase.
“(…) what started with organized PostCSS gradually grew to become a complex and entangled global CSS architecture with a lot of specificities and overrides. As you might expect, there’s a point where the added tech debt it introduces makes it difficult to keep shipping fast without adding any regressions. Besides, as the number of frontend developers contributing to the codebase also grows, this kind of CSS architecture becomes even more difficult to work with.”Refactor Or Rewrite?
Refactoring allows developers to gradually and strategically improve to the existing codebase, without changing its presentation or core functionality. These improvements are usually small in scope and limited, and don’t introduce breaking, wide-ranging architectural changes or add new behavior, features, or functionality to the existing codebase.
For example, the current codebase features two variations of a card component — the first one was implemented early in project development by an experienced developer and the second one was added sometime after the project was launched by a less experienced developer on a short deadline, so it features duplicated code and wide-ranging selectors with high-specificity.
A third card variation needs to be added, which shares some styles from the other two card variations. So in order to avoid bugs, duplicated code and complex CSS classes, and HTML markup down the line, the team decides to refactor the card component CSS before implementing a new variation.
Rewriting allows developers to make substantial changes to the codebase and assumes that most if not all code from the current codebase will be changed or replaced. Rewrite allows developers to build the new codebase from scratch, tackle core issues from the current codebase that were impossible or expensive to fix, improve the tech stack and architecture and establish new internal rules and best practices for the new codebase.
For example, the client is in process of rebranding and the website needs to be updated with a new design and revamped content. Since this is a site-wide change out of the box, developers decide to start from scratch, rewrite the project, and take this opportunity to address the core issues current CSS codebase has but cannot be solved with code refactor, update the CSS tech stack, use the newest tools and features, establish new internal rules and best practices for styling, etc.
Let’s summarize the pros and cons of each approach.
| Refactor | Rewrite | |
|---|---|---|
| Pros |
|
|
| Cons |
|
|
When To Refactor CSS?
Refactoring is a recommended approach for incrementally improving the CSS codebase while maintaining the current look and feel (design). Team members can work on addressing these codebase issues when there aren’t any higher priority tasks. By incrementally improving the current codebase user experience will not be affected directly in most cases, however, a cleaner and more maintainable codebase will result in easier feature implementation and fewer unexpected bugs and side-effects.
Project stakeholders will probably agree to invest limited time and resources into refactoring, but they’ll expect these tasks to be done quickly and will expect the team to be available for the primary tasks.
Refactoring CSS should be done at regular intervals when no wide-ranging design or content changes aren’t planned for the near future. Teams should proactively seek the previously mentioned weak points in the current CSS codebase and work on addressing them whenever there aren’t higher priority tasks available.
Lead frontend developer or the developer with the most experience with CSS should raise issues and create refactor tasks to enforce CSS code quality standards in the codebase.
When To Rewrite The CSS?
Rewriting the complete CSS codebase should be done when the CSS codebase has core issues that cannot be addressed with refactoring or when refactoring is a more expensive option. Speaking from personal experience, when I’ve started working for clients that moved from another company and the aforementioned CSS issues and it was obvious that it’ll be a difficult job to refactor, I’d start by recommending a full rewrite and see what the client thinks. In most cases, those clients were dissatisfied with the state of the codebase and were happy to proceed with the rewrite.
Another reason for full CSS rewrite is when a substantial change is planned for the website — rebranding, redesign, or any other significant change that affects most of the website. It’s safe to assume that the project stakeholders are aware that this is a significant investment and it will take some time for the rewrite to be complete.
Auditing CSS Codebase HealthWhen the development team has agreed on the fact that CSS code needs to be refactored to either streamline the feature development workflow or eliminate unexpected CSS side-effects and bugs, the team needs to bring this suggestion up to the project stakeholders or a project manager.
It’s a good idea to provide some hard data alongside the subjective thoughts on the codebase and the general code review. This will also give the team a measurable goal that they can be aware of while working on the refactor — target file size, selector specificity, CSS code complexity, number of media queries…
When doing a CSS audit or preparing for a CSS refactor, I rely on several of many useful tools to get a general overview and useful stats about the CSS codebase.
My personal go-to tool is CSS Stats, s a free tool that provides a useful overview of the CSS codebase quality with lots of useful metrics that can help developers catch some hard-to-spot issues.

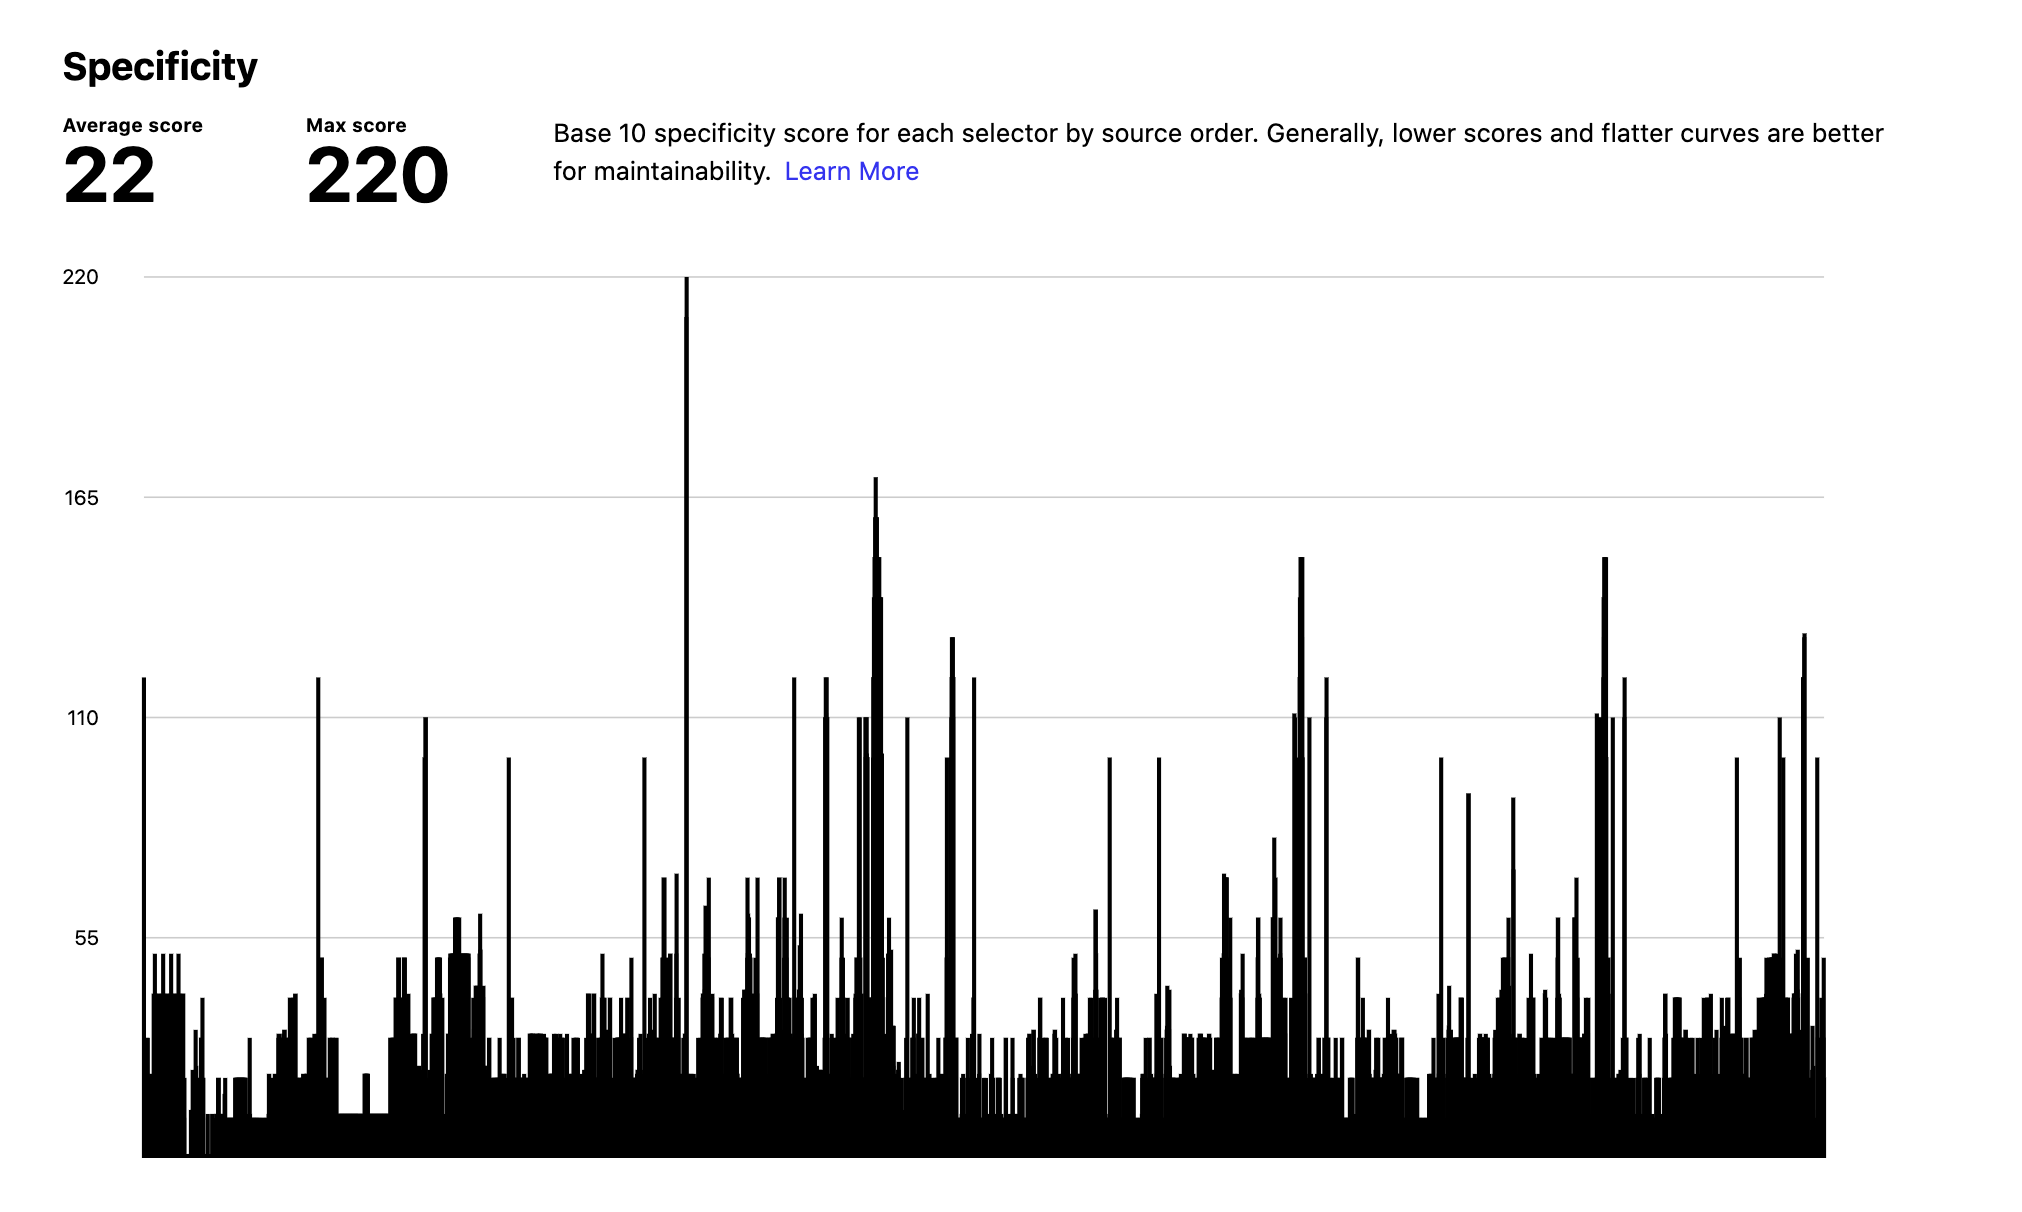
Back in 2016, trivago has done a large-scale refactor for their CSS codebase and used the metrics from CSS Stats to set some concrete, measurable goals like reducing specificity and reducing the number of color variations. In just three weeks, they’ve managed to improve the overall health of the CSS codebase, reduce the CSS file size, improve render performance on mobile, etc.
“A tool like CSS Stats can easily help you figure out consistency issues within your codebase. Indicating what can happen when everybody has different opinions on how a grey tone should look like, you will end up with 50 shades of grey. Moreover, Specificity Graph gives you a good overall indication of your CSS base’s health.”
As for CLI tools, Wallace is a handy tool that provides somewhat basic, but useful CSS stats and overview which can be used to identify issues related to file size, number of rules and selectors, selector types and complexity, etc.
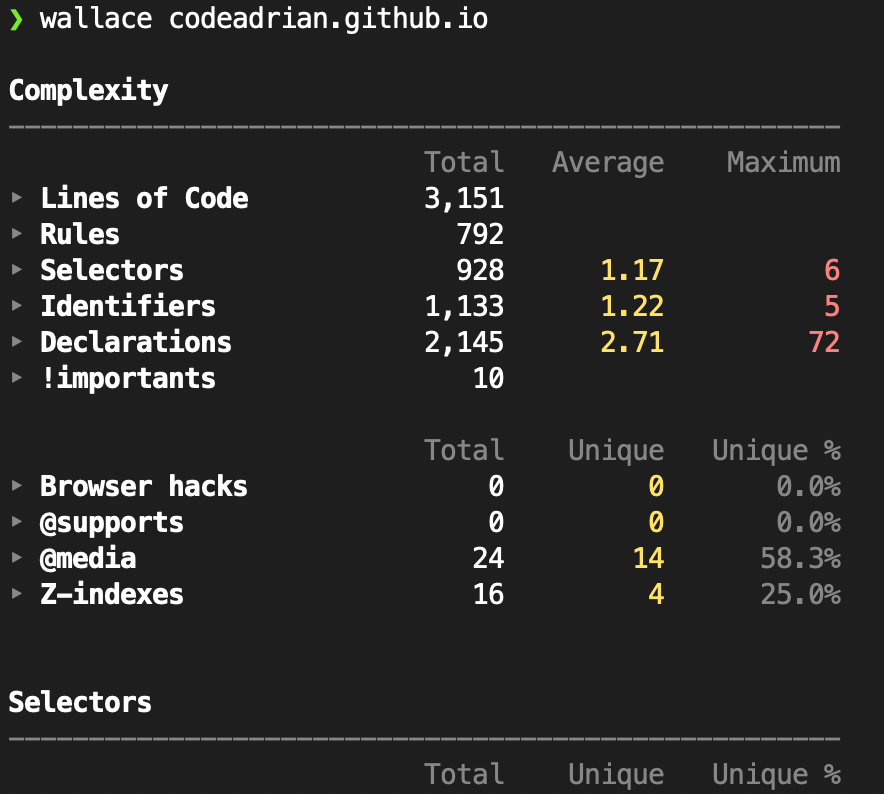
Wallace also offers a free analyzer tool on the Project Wallace Website which uses a seemingly more advanced version of Wallace in the backend to provide some useful data visualizations and few more metrics that are not available in the Wallace CLI.
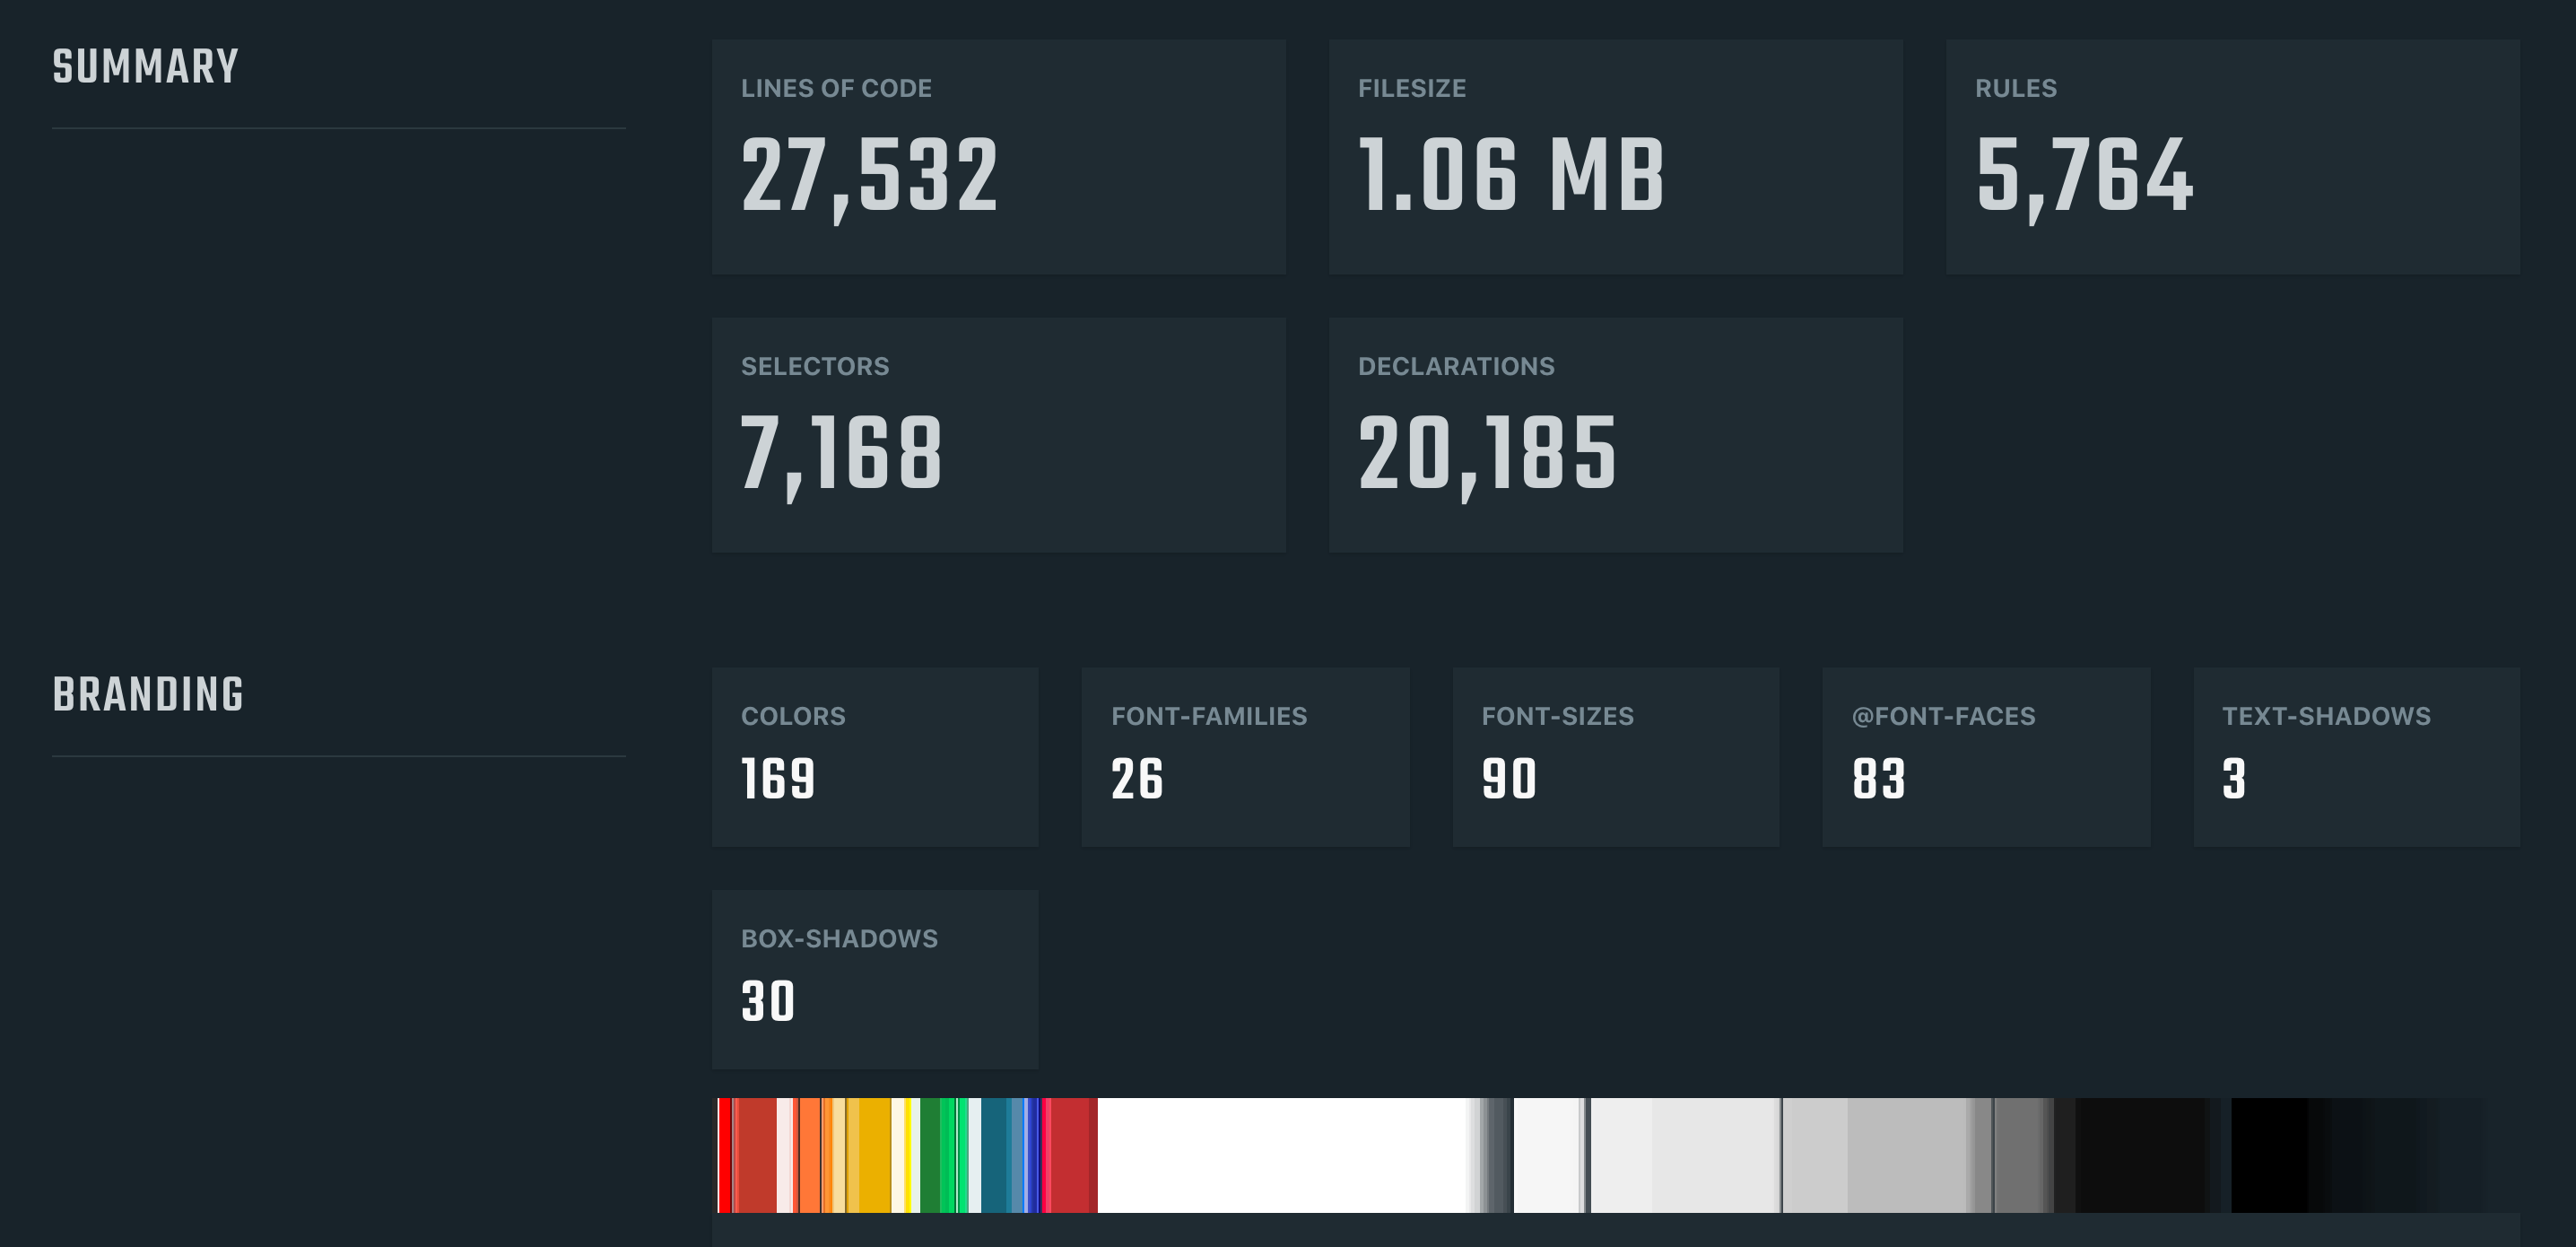
Project Wallace also offers a complete paid solution for CSS codebase analytics. It features even more useful features and metrics that can help developers catch some hard-to-spot issues and keep track of CSS stats changes on a per-commit basis. Although the paid plan includes more features, the free plan, and the basic CSS analyzer tool are more than enough for auditing the CSS codebase quality and getting a general overview to make plans for refactoring.
Writing High-Quality CSSWe’ve seen how the simplicity and flexibility of the CSS codebase can cause a lot of issues with code quality, performance, and visual bugs. There is no silver-bullet automatic tool that will make sure that we write CSS in the best possible way and avoid all possible architectural pitfalls along the way.
The best tools that will ensure that we write high-quality CSS code are discipline, attention to detail, and general CSS knowledge and skillset. Developer needs to be constantly aware of the bigger picture and understand what role their CSS plays in that bigger picture.
For example, by overspecifying selectors, a single developer can severely limit the usability, leading to other developers having to duplicate the code in order to use it for other, similar components with different markup. These issues often occur when developers lack understanding and not leveraging the underlying mechanisms behind CSS (cascade, inheritance, browser performance, and selector specificity). These early decisions can lead to major repercussions in the future, so the CSS codebase's health and maintainability rest on the developer’s knowledge, skills, and understanding of the CSS fundamentals.
Automated tools are not aware of the bigger picture or how the selector is used, so they cannot make these crucial architectural decisions, besides enforcing some basic, predictable, and rigid rules.
Speaking from personal experience, I’ve found the following helped me to significantly improve how I worked with CSS:
- Learning the architectural patterns.
CSS Guidelines provide a great knowledge base and best practices for writing high-quality CSS based on general programming patterns and architectural principles. - Practice and improve.
Work on personal projects or tackle a challenge from Frontend Mentor to improve your skills. Start with simple projects (a single component or a section) and focus on writing the best CSS you can, try out various approaches, apply various architectural patterns, gradually improve the code, and learn how to write high-quality CSS efficiently. - Learning from mistakes.
Trust me, you’ll write some really poor-quality CSS when you are starting out. It will take you a few tries to get it right. Take a moment and think about what went wrong, analyze the weak spots, think about what you could have done differently and how, and try to avoid the same mistakes in the future.
It’s also important to establish rules and internal CSS standards within a team or even for the whole company. Clearly defined company-wide standards, code style, and principles can yield many benefits such as:
- Unified and consistent code style and quality
- Easier to understand, robust codebase
- Streamlined project onboarding
- Standardized code reviews that can be done by any team member, not just the lead frontend developer or the more experienced developers
Kirby Yardley has worked on refactoring the Sundance Institute design system and CSS and has pointed out the importance of establishing internal rules and best practices.
“Without proper rules and strategy, CSS is a language that lends itself to misuse. Often developers will write styles specific to one component without thinking critically about how that code could be reused across other elements (…) After lots of research and deliberation about how we wanted to approach architecting our CSS, we decided to use a methodology called ITCSS.“
Going back to the previous example from the team at trivago, establishing internal rules and guidelines proved to be an important step for their refactoring process.
“We introduced a pattern library, started utilizing atomic design in our workflow, created new coding guidelines, and adapted several methodologies like BEM and ITCSS in order to support us in maintaining and developing our CSS/UI on a large scale.”
Not all rules and standards need to be manually checked and enforced. CSS linting tools like Stylelint provide some useful rules that will help you check for errors and enforce internal standards and common CSS best practices like disallowing empty CSS code blocks and comments, disallowing duplicate selectors, limiting units, setting selector maximum specificity and nesting depth, establishing selector name pattern, etc.
ConclusionBefore deciding to propose a granular codebase refactor or a full CSS rewrite, we need to understand the issues with the current codebase so we can avoid them in the future and have measurable data for the process. CSS codebase may contain lots of complex high-specificity selectors which cause unexpected side-effects and bugs when adding new features, maybe the codebase is suffering from lots of repeated code chunks that can be moved into a separate utility class, or maybe the mix of various media queries are causing some unexpected conflicts.
Useful tools like CSS Stats and Wallace can provide a general high-level overview of the CSS codebase and give a detailed insight into codebase state and health. These tools also provide measurable stats that can be used for setting the goals for the refactoring process and keep track of the refactoring progress.
After determining refactoring goals and scope, it’s important to set internal guidelines and best practices for CSS codebase — naming convention, architectural principles, file, and folder structure, etc. This ensures code consistency, establishes a core foundation within the project which can be documented and which can be used for onboarding and CSS code review. Using linting tools like Stylelint can help to enforce some common CSS best practices to partially automate the code review process.
In the next article from this three-part series, we’re going to dive into a bulletproof CSS refactoring strategy which ensures a seamless transition between the current codebase and refactored codebase.
References- “Managing CSS Projects With ITCSS,” Harry Roberts
- “Large Scale CSS Refactoring At Trivago,” Christoph Reinartz
- “Sundance.org Design System And CSS Refactor,” Kirby Yardley
- “From Semantic CSS To Tailwind: Refactoring The Netlify UI Codebase,” Charlie Gerard & Leslie Cohn-Wein
- “CSS Auditing Tools,” Iris Lješnjanin


