The Gutenberg module for Drupal, created by Frontkom, reached the 1.0 milestone earlier this month. It is the first stable release recommended for use in production with Drupal 8.x.
The 1.0 release removes the Gutenberg-JS dependency and uses Gutenberg core files directly. It is based on Gutenberg version 5.6.1, which was released in early May. The module boasts better handling for media files, adding support for title, caption, and alternative text. It also adds an “Allowed Blocks UI” to the content type admin UI, so administrators can restrict which blocks show up in the block selector.
“We’re now ready for production sites in the sense that we’ll be more careful with structure changes, will try to do update paths when possible, and will create automated tests for crucial functionality,” Frontkom project manager Thor Andre Gretland said. “We’ve solved the blockers for a stable release.”
Upgrading the module from RC-1 may require some extra steps, because it is a big jump, taking the Gutenberg library from 4.8.0 to 5.6.1. Users will need to update the database. It is also necessary to navigate to content types and click save to enable Gutenberg again so that it will begin storing the Allowed blocks in the database. If users get notices about invalid blocks, they are advised to try the Attempt Block Recovery option:
“It’s actually a rather large update,” Gretland said. “We were planning to add a couple of last needed features to release our 1.0 version, but ended up using the latest Gutenberg version with several new great features. We’re also using more of the Gutenberg Core, that we’ve been able to use before.”
The module still has one critical issue that Frontkom is working on. Reusable blocks are not working with the latest release. Users are getting a “this block is unavailable or deleted” message when attempting to insert a reusable block. In the meantime, those who require this feature can roll back to RC1 to get it working again.
So far the Gutenberg module has been well-received. It has been downloaded more than 12,000 times and 494 sites are reported to be using it.
Setup @drupalgutenberg on D8 yesterday (following meeting one of @frontkom at the recent Dutch #CiviCRM sprint) and was pretty blown away. Bringing Medium-style editing to all the CMSs & then some. If #Joomla doesn’t implement a Gutenberg.js integration we/they’ll be left behind. https://t.co/SfieuGfOlf
Drupal’s Gutenberg module includes access to the Gutenberg Cloud library of free blocks. Although the library has been slow to gain contributors, it does contain several blocks that are helpful for creating page layouts, such as Content in Columns, Hero Section, Section Wrapper, Section Row, and a Feature Box block. Site administrators can also use the Gutenberg module in combination with Drupal’s new Layout Builder, which was introduced as a stable module to Drupal 8.7 core.
“We see a valid use case for mixing Drupal Gutenberg with the Drupal layout builder when you might want to create layout templates with the layout builder, and keep the actual content editing in Gutenberg,” Gretland said. “For example you could use the layout builder to define fixed byline elements for author and create date, but leave the actual content creation experience to Gutenberg.”
WebWash has a good video tutorial for Drupal users who want to learn how to configure the Gutenberg module and use it on the Page content type. It includes a walkthrough for common actions like uploading images, creating reusable blocks, and using the Gutenberg Cloud. If you want to see how Gutenberg can improve Drupal’s authoring experience without installing the module, check out the frontend demo of Drupal Gutenberg created by the team at Frontkom.
Continuous Integration and Deployment (CI/CD) speeds up bug fixes and shortens time to production by preventing human error and streamlining testing. Not surprisingly, CI/CD is growing in popularity as a software workflow. Teams practicing DevOps want more insight into every part of their application, which usually involves one or more internal APIs.
Every day, the ProgrammableWeb team is busy, updating its three primary directories for APIs, clients (language-specific libraries or SDKs for consuming or providing APIs), and source code samples.
Those who host or manage sites on WP Engine now have a new tool at their disposal. It’s called DevKit, developed by Chris Wiegman and Jason Stallings.
DevKit is a WordPress local development environment that includes SSH Gateway access, push and pull deployments to WP Engine, Command Line Interface commands for the Genesis theme framework and other tools.
Although DevKit has tight integration with WP Engine the software can be used independently of the host. With Local by Flywheel, Vagrant, XAMPP, and other tools available, Wiegman explains what motivated him to create a new solution.
“I’ve been working on the perfect WordPress developer environment since I learned about Vagrant in 2013,” he said. “As it was never my full-time job, I could never take it to the next level. DevKit gives me the power to do that.”
Stallings added, “We wanted to build a kick ass set of tools for developers building on WP Engine. That’s been our mission from the start, build something that all developers want to use (including us)!”
As what for what sets DevKit apart from the others, “I think our architecture is very different from both tools,” Stallings said.
“Similar to Docker Engine, DevKit CLI is the interface to DevKit. So when we build the GUI it will 100% complement the CLI, and the two can be used interchangeably. This will enable us to build other interfaces in the future too.”
DevKit provides the following features:
Container-based local development environment
SSH Gateway access
Push and pull deployments to WP Engine
Preview your local site with others via ngrok
PHP version selector
Email testing client
MySQL
Local SSH & WP-CLI
Genesis Framework WP-CLI commands
phpmyadmin
webgrind
Varnish
HTTPS Proxy
xdebug
Currently, DevKit’s user interface is command line only with plans to add a GUI later this year. It’s available for free and is in open beta for Mac and Linux. Those interested in participating in the open beta can sign up on the DevKit landing page.
AWS Amazon Personalize was originally introduced late last year. Until now, the machine learning personalization service, that was originally developed for Amazon's internal use, was available in a preview release. This week, Amazon announced that Amazon Personalize is now generally available.
Date is weird in JavaScript. It gets on our nerves so much that we reach for libraries (like Date-fns and Moment) the moment (ha!) we need to work with date and time.
But we don't always need to use libraries. Date can actually be quite simple if you know what to watch out for. In this article, I'll walk you through everything you need to know about the Date object.
First, let's acknowledge the existence of timezones.
Timezones
There are hundreds of timezones in our world. In JavaScript, we only care about two—Local Time and Coordinated Universal Time (UTC).
Local time refers to the timezone your computer is in.
UTC is synonymous with Greenwich Mean Time (GMT) in practice.
By default, almost every date method in JavaScript (except one) gives you a date/time in local time. You only get UTC if you specify UTC.
With this, we can talk about creating dates.
Creating a date
You can create a date with new Date(). There are four possible ways to use new Date():
With a date-string
With date arguments
With a timestamp
With no arguments
The date-string method
In the date-string method, you create a date by passing a date-string into new Date.
new Date('1988-03-21')
We tend towards the date-string method when we write dates. This is natural because we've been using date strings all our lives.
If I write 21-03-1988, you have no problems deducing it's 21st of March, 1988. Yeah? But if you write 21-03-1988 in JavaScript, you get Invalid Date.
new Date('21-03-1988') returns Invalid Date.
There's a good reason for this.
We interpret date strings differently in different parts of the world. For example 11-06-2019 is either 11th June, 2019 or 6th November 2019. But you can't be sure which one I'm referring to, unless you know the date system I'm using.
In JavaScript, if you want to use a date string, you need to use a format that's accepted worldwide. One of these formats is the ISO 8601 Extended format.
// ISO 8601 Extended format
`YYYY-MM-DDTHH:mm:ss:sssZ`
Here's what the values mean:
YYYY: 4-digit year
MM: 2-digit month (where January is 01 and December is 12)
DD: 2-digit date (0 to 31)
-: Date delimiters
T: Indicates the start of time
HH: 24-digit hour (0 to 23)
mm: Minutes (0 to 59)
ss: Seconds (0 to 59)
sss: Milliseconds (0 to 999)
:: Time delimiters
Z: If Z is present, date will be set to UTC. If Z is not present, it'll be Local Time. (This only applies if time is provided.)
Hours, minutes, seconds and milliseconds are optional if you're creating a date. So, if you want to create a date for , you can write this:
new Date('2019-06-11')
Pay special attention here. There's a huge problem with creating dates with date strings. You can spot the problem if you console.log this date.
If you live in an area that's behind GMT, you'll get a date that says 10th June.
new Date('2019-06-11') produces 10th June if you're in a place behind GMT.
If you live in an area that's ahead of GMT, you'll get a date that says 11th June.
new Date('2019-06-11') produces 11th June if you're in a place after GMT.
This happens because the date-string method has a peculiar behavior: If you create a date (without specifying time), you get a date set in UTC.
In the above scenario, when you write new Date('2019-06-11'), you actually create a date that says 11th June, 2019, 12am UTC. This is why people who live in areas behind GMT get a 10th June instead of 11th June.
If you want to create a date in Local Time with the date-string method, you need to include the time. When you include time, you need to write the HH and mm at a minimum (or Google Chrome returns an invalid date).
new Date('2019-06-11T00:00')
Date created in Local Time vsl. Date created in UTC.
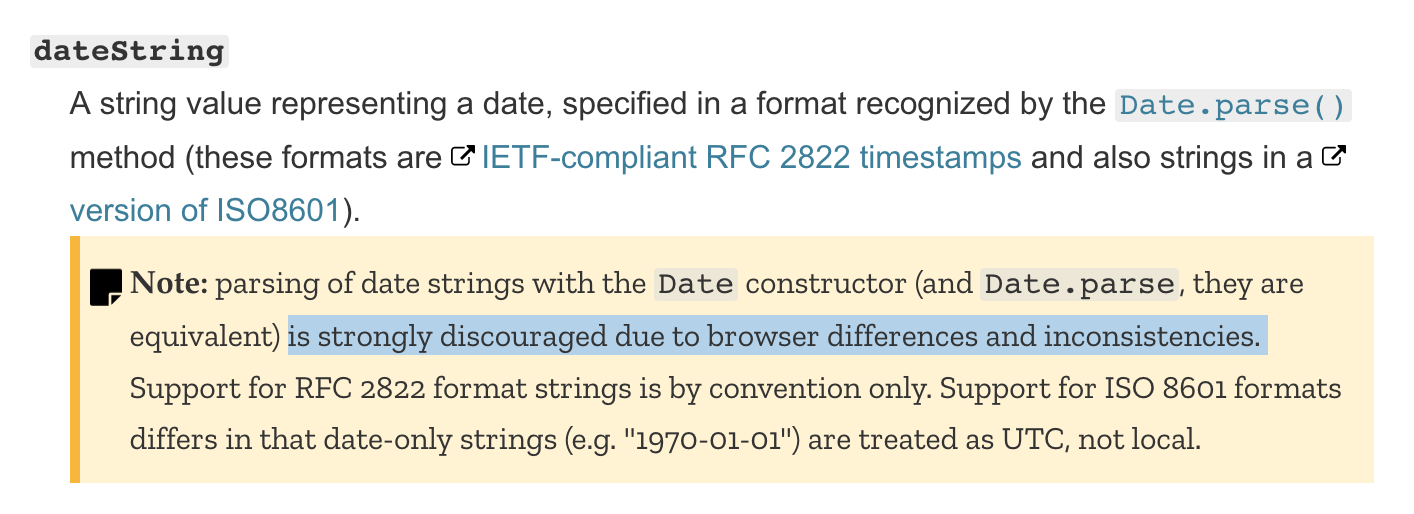
The whole Local Time vs. UTC thing with date-strings can be a possible source of error that's hard to catch. So, I recommend you don't create dates with date strings.
(By the way, MDN warns against the date-string approach since browsers may parse date strings differently).
MDN recommends against creating date with date strings.
If you want to create dates, use arguments or timestamps.
Creating dates with arguments
You can pass in up to seven arguments to create a date/time.
Year: 4-digit year.
Month: Month of the year (0-11). Month is zero-indexed. Defaults to 0 if omitted.
Day: Day of the month (1-31). Defaults to 1 if omitted.
Hour: Hour of the day (0-23). Defaults to 0 if omitted.
Minutes: Minutes (0-59). Defaults to 0 if omitted.
Seconds: Seconds (0-59). Defaults to 0 if omitted.
Milliseconds: Milliseconds (0-999). Defaults to 0 if omitted.
// 11th June 2019, 5:23:59am, Local Time
new Date(2019, 5, 11, 5, 23, 59)
Many developers (myself included) avoid the the arguments approach because it looks complicated. But it's actually quite simple.
Try reading numbers from left to right. As you go left to right, you insert values in decreasing magnitude: year, month, day, hours, minutes, seconds, and milliseconds.
new Date(2017, 3, 22, 5, 23, 50)

// This date can be easily read if you follow the left-right formula.
// Year: 2017,
// Month: April (because month is zero-indexed)
// Date: 22
// Hours: 05
// Minutes: 23
// Seconds: 50
The most problematic part with Date is that the Month value is zero-indexed, as in, January === 0, February === 1, March === 2 and so on.
We have no idea why month in JavaScript is zero-indexed, but it is. Rather than argue about why January should be 1 (and not 0), it's better to accept that month is zero-indexed in JavaScript. Once you accept this fact, dates become much easier to work with.
Here are some more examples for you to familiarize yourself:
// 21st March 1988, 12am, Local Time.
new Date(1988, 2, 21)

// 25th December 2019, 8am, Local Time.
new Date(2019, 11, 25, 8)

// 6th November 2023, 2:20am, Local Time
new Date(2023, 10, 6, 2, 20)

// 11th June 2019, 5:23:59am, Local Time
new Date(2019, 5, 11, 5, 23, 59)
Notice dates created with arguments are all in Local Time?
That's one of the perks of using arguments—you won't get confused between Local Time and UTC. If you ever need UTC, you create a date in UTC this way:
// 11th June 2019, 12am, UTC.
new Date(Date.UTC(2019, 5, 11))
Creating dates with timestamps
In JavaScript, a timestamp is the amount of milliseconds elapsed since 1 January 1970 (1 January 1970 is also known as Unix epoch time). From my experience, you rarely use timestamps to create dates. You only use timestamps to compare between different dates (more on this later).
// 11th June 2019, 8am (in my Local Time, Singapore)
new Date(1560211200000)
With no arguments
If you create a date without any arguments, you get a date set to the current time (in Local Time).
new Date()
The time now.
You can tell from the image that it's in Singapore when I wrote this article.
Summary about creating dates
You can create date with new Date().
There are four possible syntaxes:
With a date string
With arguments
With timestamp
With no arguments
Never create a date with the date string method.
It's best to create dates with the arguments method.
Remember (and accept) that month is zero-indexed in JavaScript.
Next, let's talk about converting a date into a readable string.
Formatting a date
Most programming languages give you a formatting tool to create any Date format you want. For example, in PHP, you can write date("d M Y") to a date like 23 Jan 2019.
But there's no easy way to format a date in JavaScript.
The native Date object comes with seven formatting methods. Each of these seven methods give you a specific value (and they're quite useless).
const date = new Date(2019, 0, 23, 17, 23, 42)
toString gives you Wed Jan 23 2019 17:23:42 GMT+0800 (Singapore Standard Time)
toDateString gives you Wed Jan 23 2019
toLocaleString gives you 23/01/2019, 17:23:42
toLocaleDateString gives you 23/01/2019
toGMTString gives you Wed, 23 Jan 2019 09:23:42 GMT
toUTCString gives you Wed, 23 Jan 2019 09:23:42 GMT
toISOString gives you 2019-01-23T09:23:42.079Z
If you need a custom format, you need to create it yourself.
Writing a custom date format
Let's say you want something like Thu, 23 January 2019. To create this value, you need to know (and use) the date methods that comes with the Date object.
To get dates, you can use these four methods:
getFullYear: Gets 4-digit year according to local time
getMonth: Gets month of the year (0-11) according to local time. Month is zero-indexed.
getDate: Gets day of the month (1-31) according to local time.
getDay: Gets day of the week (0-6) according to local time. Day of the week begins with Sunday (0) and ends with Saturday (6).
It's simple to create 23 and 2019 for Thu, 23 January 2019. We can use getFullYear and getDate to get them.
const d = new Date(2019, 0, 23)
const year = d.getFullYear() // 2019
const date = d.getDate() // 23
It's harder to get Thu and January.
To get January, you need to create an object that maps the value of all twelve months to their respective names.
Yes, it tedious. But it's not impossible once you get the hang of it.
If you ever need to create a custom-formatted time, you can use the following methods:
getHours: Gets hours (0-23) according to local time.
getMinutes: Gets minutes (0-59) according to local time.
getSeconds: Gets seconds (0-59) according to local time.
getMilliseconds: Gets milliseconds (0-999) according to local time.
Next, let's talk about comparing dates.
Comparing dates
If you want to know whether a date comes before or after another date, you can compare them directly with >, <, >= and <=.
const earlier = new Date(2019, 0, 26)
const later = new Date(2019, 0, 27)

console.log(earlier < later) // true
It's more difficult if you want to check if two dates fall exactly at the same time. You can't compared them with == or ===.
const a = new Date(2019, 0, 26)
const b = new Date(2019, 0, 26)

console.log(a == b) // false
console.log(a === b) // false
To check whether two dates fall exactly at the same time, you can check their timestamps with getTime.
const isSameTime = (a, b) => {
  return a.getTime() === b.getTime()
}

const a = new Date(2019, 0, 26)
const b = new Date(2019, 0, 26)
console.log(isSameTime(a, b)) // true
If you want to check whether two dates fall on the same day, you can check their getFullYear, getMonth and getDate values.
const isSameDay = (a, b) => {
  return a.getFullYear() === b.getFullYear() &&
    a.getMonth() === b.getMonth() &&
    a.getDate()=== b.getDate()
}

const a = new Date(2019, 0, 26, 10) // 26 Jan 2019, 10am
const b = new Date(2019, 0, 26, 12) // 26 Jan 2019, 12pm
console.log(isSameDay(a, b)) // true
There's one final thing we have to cover.
Getting a date from another date
There are two possible scenarios where you want to get a date from another date.
Set a specific date/time value from another date.
Add/subtract a delta from another date.
Setting a specific date/time
You can use these methods to set a date/time from another date:
setFullYear: Set 4-digit year in Local Time.
setMonth: Set month of the year in Local Time.
setDate: Set day of the month in Local Time.
setHours: Set hours in Local Time.
setMinutes: Set minutes in Local Time.
setSeconds: Set seconds in Local Time.
setMilliseconds: Set milliseconds in Local Time.
For example, if you want to set a date to the 15th of the month, you can use setDate(15).
const d = new Date(2019, 0, 10)
d.setDate(15)

console.log(d) // 15 January 2019
If you want to set the month to June, you can use setMonth. (Remember, month in JavaScript is zero-indexed!)
const d = new Date(2019, 0, 10)
d.setMonth(5)

console.log(d) // 10 June 2019
Note: The setter methods above mutate the original date object. In practice, we should not mutate objects (more on why here). We should perform these operations on a new date object instead.
const d = new Date(2019, 0, 10)
const newDate = new Date(d)
newDate.setMonth(5)

console.log(d) // 10 January 2019
console.log(newDate) // 10 June 2019
Adding/Subtracting delta from another date
A delta is a change. By adding/subtracting delta from another date, I mean this: You want to get a date that's X from another date. It can be X year, X month, X day, etc.
To get a delta, you need to know the current date's value. You can get it using these methods:
getFullYear: Gets 4-digit year according to local time
getMonth: Gets month of the year (0-11) according to local time.
getDate: Gets day of the month (1-31) according to local time.
getHours: Gets hours (0-23) according to local time.
getMinutes: Gets minutes (0-59) according to local time.
getSeconds: Gets seconds (0-59) according to local time.
getMilliseconds: Gets milliseconds (0-999) according to local time.
There are two general approaches to add/subtract a delta. The first approach is more popular on Stack Overflow. It's concise, but harder to grasp. The second approach is more verbose, but easier to understand.
Let's go through both approaches.
Say you want to get a date that's three days from today. For this example, let's also assume today is . (It's easier to explain when we're working with a fixed date).
The first approach (the set approach)
// Assumes today is 28 March 2019
const today = new Date(2019, 2, 28)
First, we create a new Date object (so we don't mutate the original date)
const finalDate = new Date(today)
Next, we need to know the value we want to change. Since we're changing days, we can get the day with getDate.
const currentDate = today.getDate()
We want a date that's three days from today. We'll use add the delta (3) to the current date.
finalDate.setDate(currentDate + 3)
Full code for the set approach:
const today = new Date(2019, 2, 28)
const finalDate = new Date(today)
finalDate.setDate(today.getDate() + 3)

console.log(finalDate) // 31 March 2019
The second approach (the new Date approach)
Here, we use getFullYear, getMonth, getDate and other getter methods until we hit the type of value we want to change. Then, we use create the final date with new Date.
const today = new Date(2019, 2, 28)

// Getting required values
const year = today.getFullYear()
const month = today.getMonh()
const day = today.getDate()

// Creating a new Date (with the delta)
const finalDate = new Date(year, month, day + 3)

console.log(finalDate) // 31 March 2019
Both approaches work. Choose one and stick with it.
Automatic date correction
If you provide Date with a value that's outside of its acceptable range, JavaScript recalculates the date for you automatically.
Here's an example. Let's say we set date to . (There's no 33rd March on the calendar). In this case, JavaScript adjusts 33rd March to 2nd April automatically.
// 33rd March => 2nd April
new Date(2019, 2, 33)
33rd March gets converted to 2nd April automatically.
This means you don't need to worry about calculating minutes, hours, days, months, etc. when creating a delta. JavaScript handles it for you automatically.
// 33rd March => 2nd April
new Date(2019, 2, 30 + 3)
30 + 3 = 33. 33rd March gets converted to 2nd April automatically.
And that's everything you need to know about JavaScript's native Date object.
Interested to learn more JavaScript?
If you found this intro to Date useful, you might love Learn JavaScript, a course I created to teach people everything they need to know about JavaScript.
In the course, I cover the basic concepts of what you need to know, then I show you how to use the concepts you learned to build real-world components.
Do I recommend it? Yes! SiteGround is a great web host for websites of all sizes.
SiteGroundis one of the most popular web hosting services out there—and for good reason.
They offer hosting options and plans suitable for a wide range of websites and businesses. Small personal websites, business websites, and large ecommerce sites alike can all use SiteGround.
That’s why more than 2 million websites trust SiteGround for their hosting needs.
If you’re just starting out, I can’t recommend SiteGround enough.
It’s also a great choice for anyone who wants to switch hosting providers. They offer a great WP Migrator plugin. This is a free plugin that makes the transfer of WordPress sites very easy.
Let’s dive into the plans, types of hosting, and top benefits offered by SiteGround. Use this guide to make an informed decision to determine if SiteGround is the best web hosting plan for your needs.
Benefits of Using SiteGround Web Hosting
There is plenty of upside to using SiteGround as a web hosting service. Below are the biggest benefits I think you’ll find from SiteGround.
High uptimes
When it comes to measuring how good a web host is, uptime is the ultimate metric. This is the amount of time that a server stays up and running.
Every second your site is down spells problems for your company. Customers can’t reach you, and employees can’t get what they need.
SiteGround runs on Google Cloud, which is one of the most secure and resilient networks in the world. How many times has Google been down for you?
High uptimes ensure that your site will nearly always be up and running around the clock. That’s why you’ll want a good host like SiteGround that’ll help ensure your site stays up — and making you money.
Fast load times
Just because your site is up, doesn’t mean it will be fast. Luckily, that’s not an issue with SiteGround.
Their hosting plans come with a free content deliver network (CDN). This is simple to enable, and delivers your site faster to your visitors screen.
Everywhere possible, SiteGround is using the latest technology to deliver their customers the fastest speeds. Their servers use SSD drives, which cut down on load time over HDD drives. They use a variety of caching tools to boost speed even further.
At the end of the day, what you do on your site is going to impact speed. In addition to using a good web host, you should also know the other top principles that boost website loading times.
Great customer support
In the event that you run into a problem, have a question, or need some assistance, it’s nice to know that they provide excellent customer support.
You can access phone support as well as live chat 24/7. As I mentioned earlier, you’ll have priority support if you have a GoGeek plan. This means that you’ll be connected with the most experienced SiteGround technicians whenever you need help.
Free features
Web hosts like to hit you with upcharges when you go to check out. SiteGround throws in some great features but at no extra charge.
Your membership comes with one free site migration. This can be done with their migrator plugin, which we talked about earlier.
SiteGround plans also come with a free CDN and free SSL certificate.
Cloudflare CDN keeps images, videos, and other large files off of your server. As a result, your server is always fast. Since SiteGround users servers all over the globe, the CDN makes sure that files are stored closer to website visitors for fast delivery.
The SSL certificate is required for all websites. It protects private information being transmitted between devices and websites. SiteGround throwing this in for free is a nice touch since you’d need to get one regardless.
Flexible
SiteGround is great whether you’re a beginner or a seasoned pro.
You don’t need to be tech-savvy to understand how the platform works and get your site hosted. But if you like to be more hands-on with the server and take advantage of certain features, SiteGround has plans with you in mind.
There are also enough options on SiteGround to accommodate different web hosting needs, such as shared hosting and cloud hosting.
They have plans suitable for a wide range of average site traffic as well. So as your website scales, you can always upgrade to a plan that will meet your needs.
Money-back guarantee
SiteGround offers a 30-day money back guarantee for their shared hosting plans. That means they stand behind their offer.
Dedicated servers and cloud hosting plans have a 14-day money back guarantee, which is still enough time to tell if you’re happy with your service.
SiteGround will also refund you if they fail to meet a 99.9% uptime rate. This is clearly written in their terms of service.
This relates back to what we talked about earlier, in terms of their high uptime rates. There’s a reason why it’s so high: SiteGround has a promise to stand behind.
Other considerations
While SiteGround is great, there are a few downsides that you should be made aware of before you proceed.
Note: We don’t believe that they’re dealbreakers by any means — but they should definitely be kept in mind when making a decision.
Renewal rates
SiteGround’s promotional pricing is a heck of a deal.
However, you need to keep in mind that those are only promotional rates. When you renew, your rates will jump… a lot.
The cost essentially triples across the board.
I’d recommend locking in the longest contract possible when you first sign up, which is 36 months. This will guarantee you a low rate for a while before you’re forced to renew.
Limited budget plan
For those of looking for the best cheap web hosting service, SiteGround’s StartUp plan for $2.99 per month is definitely attention-grabbing.
It’s a great choice for those of you with smaller websites, but it’s fairly limited for anyone who plans on getting more than 10,000 visitors per month. You may have to upgrade faster than you anticipated if you start with their lowest priced web hosting plan.
Compare SiteGround Web Hosting Plans
SiteGround offers three tiers for their hosting sites:
StartUp
GrowBig
GoGeek
The prices of these three plans remain the same across the board for shared hosting, WordPress hosting, and Woocommerce hosting. Cloud hosting is the only one that differs.
We’ll dive deeper into those plans later in this guide. For now, I’ll focus on the pricing and features of the three most popular plan options offered by SiteGround.
StartUp
As the name implies, the SiteGround StartUp plan is ideal for new or smaller websites (less than 10,000 monthly visits). Rates start at $2.99 per month.
You can only host one website with the StartUp plan, and it comes with 10 GB of web space. Other top features include:
Free site builder
Free SSL and HTTPS
Free email accounts
Free CDN
It’s a basic plan, but definitely appropriate for new websites that are starting from scratch. For those of you who want more features and better performance, you’ll need to upgrade. You’ll also outgrow the StartUp plan as your traffic increases (which is a good thing).
GrowBig
The GrowBig plan starts at $4.99 per month. This is ideal for medium-sized websites averaging up to 25,000 monthly visits. GrowBig has 20 GB of web space and can host an unlimited number of sites.
Unlike the StartUp plan, GrowBig has enhanced caching ability. The SiteGround Supercacher has three levels.
Level 1 — Static content caching
Level 2 — Dynamic data caching
Level 3 — Database queries caching
StartUp only caches at the first level, but GrowBig caches on all three levels.
If you sign up for the middle-tier plan offered by SiteGround, you’ll also get free on-demand backups, as well as a staging feature for WordPress and Joomla sites. I’d say that the GrowBig plan will be suitable for most of you who are reading this guide.
GoGeek
GoGeek can accommodate up to 100,000 monthly visits and has 40 GB of web space. Obviously, this plan is made for bigger websites with high volumes of traffic.
Rates for GoGeek start at $7.99 per month, but the plan comes with all of the bells and whistles. In addition to everything that’s available in the GrowBig plan, GoGeek offers:
Advanced priority support (expedited customer service to the most experienced agents)
White label hosting feature (also known as reseller hosting)
Git pre-installed (for creating repositories on your site)
The name for this plan was inspired by technology geeks. So it’s made for those of you who want more control of your site. If you don’t understand some of the tech lingo that’s being mentioned in the GoGeek plan, it’s probably not for you. The only other reason why you’d need to upgrade to GoGeek is if you’re getting tons of monthly site traffic.
WordPress hosting
SiteGround offers hosting options specifically designed for WordPress users. This will save you time since you won’t need to manually download, install, and configure WordPress.
With SiteGround, you can take advantage of their automated process that’s as simple as clicking a button. This plan also makes it easier for you to customize your WordPress site by choosing a theme, picking your site functionalities, and installing marketing tools.
The WordPress Starter Kit from SiteGround is a great added feature for new WordPress sites. You don’t need any technical knowledge or experience to set this up.
If you have an existing WordPress site, SiteGround offers a free WordPress transfer. The SiteGround Migrator plugin takes care of everything for you. This is a secure way to transfer your site.
Alternatively, you can get your WordPress site migrated by one of the experts at SiteGround. This is a paid feature but could be worth the price if it’s in your budget.
WooCommerce hosting
SiteGround also has hosting options for ecommerce shops using WooCommerce.
The quick install and integration with WooCommerce is an easy way for you to create a professional theme for your online store. You can get the site up and running in minutes.
Just migrate your WooCommerce site using the migrator plugin. Just like WordPress hosting, WooCommerce migrations done by a SiteGround expert is free for one website if you’re on the GrowBig or GoGeek plan. Then you’ll have to pay $30 per each additional site.
Cloud hosting
Cloud hosting is a new way to host websites. The process uses multiple remote servers and is a great option for those of you who have websites that have outgrown the shared hosting plans.
With cloud hosting, SiteGround gives you guaranteed resources to meet your needs. Your own RAM and CPU won’t be shared with any other websites.
It’s also easy for you to scale your website with this type of web hosting.
You can upgrade your RAM, CPU, and disk space on-demand at any time. You don’t need to get approval to do this, and it happens without any website downtime.
Rather than always doing this manually, you can set up automatic scaling with SiteGround. It will adjust your CPU and RAM to meet the needs of unexpected traffic surges, but you still have control of all the parameters.
There are four plans for SiteGround Cloud hosting. As you can see from the image above, the plans range from $100 to $400 per month. So there’s definitely plenty of options to choose from.
I’d say that the business plan will likely be a suitable choice for most of you who are using a cloud hosting service for the first time.
Conclusion
Bottom line: I definitely recommend SiteGround for web hosting.
They have hosting plans for any size business. It doesn’t matter if you’re a startup or if you’re an established company. SiteGround stacks up well compared to its competitors in terms of features and performance.
While the hosting service it’s perfect, it still gets the nod from us here at Quick Sprout. I’m confident that it will fulfill your web hosting needs.
UX Optimizations For Keyboard-Only And Assistive Technology Users
UX Optimizations For Keyboard-Only And Assistive Technology Users
Aaron Pearlman
(This is a sponsored article.) One of the cool things about accessibility is that it forces you to see and think about your application beyond the typical sighted, mouse-based user experience. Users who navigate via keyboard only (KO) and/or assistive technology (AT) are heavily dependent not only on your application’s information architecture being thoughtful, but the affordances your application makes for keeping the experience as straightforward as possible for all types of users.
In this article, we’re going to go over a few of those affordances that can make your KO/AT user experiences better without really changing the experience for anyone else.
Additions To Your Application’s UX
These are features that you can add to your application to improve the UX for KO/AT users.
Skip Links
A skip link is a navigation feature that invisibly sits at the top of websites or applications. When it is present, it is evoked and becomes visible on your application’s first tab stop.
A skip link allows your user to “skip” to various sections of interest within the application without having to tab-cycle to it. The skip link can have multiple links to it if your application has multiple areas of interest you feel your users should have quick access to your application’s point of entry.
For KO/AT users, this is a helpful tool to both allow them to rapidly traverse your app and can help orient them to your application’s information architecture. For all other users, they likely will never even know this feature exists.
Here’s an example with how we handle skip links. After you click the link, hit Tab ⇥ and look in the upper-left corner. The skip link has two links: Main Content and Code Samples. You can use Tab ⇥ to move between them, hit Enter to navigate to the link.
Shortcuts/Hotkey Menus
This is a feature that I think everyone is familiar with: shortcuts and hotkeys. You’ve likely used them from time to time, they are very popular amongst power users of an application, and come in a variety of incarnations.
For KO/AT users, shortcuts/hotkeys are invaluable. They allow them to use the applications, as intended, without having to visually target anything or tab through the application to get to an element or content. While frequent actions and content are always appreciated when represented in a shortcut/hotkey menu, you may also want to consider some slightly less frequent actions that may be buried in your UI (for good reason) but are still something that a user would want to be able to access.
Making shortcuts for those functions will be extremely helpful to KO/AT users. You can make the command a bit more involved, such as using (3) keystrokes to evoke it, to imply it’s a less frequently used piece of functionality. If you have a shortcut/hotkey menu make sure to find a way to promote it in your applications so your users, especially your KO/AT users, can find it and use it effectively.
User Education
User education refers to a piece of functionality that directs the users on what to do, where to go, or what to expect. Tooltips, point outs, info bubbles, etc. are all examples of user education.
One thing you should ask yourself when designing, placing, and/or writing copy for your user education is:
“If I couldn't see this, would it still be valuable to understand ______?”
Many times it’s just reorienting the user education through that lens that can lead to a much better experience for everyone. For example, rather than saying “Next, click on the button below,” you may want to write, “To get started, click the START button.” The second method removes the visual orientation and instead focus on the common information both a sighted and KO/AT user would have at their disposal.
Note: I should mention it’s perfectly OK to use user education features, like point outs, to visually point out things on the application just make sure the companion text lets your KO/AT users understand the same things which are referred to visually.
There are changes or tweaks you can make to common components/features to improve the UX for KO/AT users.
Modal Focusing
Now we’re getting into the nitty-gritty. One of the great things about accessibility is how it opens the doorway to novel ways to solve problems you may have not considered before. You can make something fully WCAG 2.0 AA accessible and solve the problem with very different approaches. For modals, we at Deque came up with an interesting approach that would be totally invisible to most sighted-users but would be noticed by KO/AT users almost immediately.
For a modal to be accessible it needs to announce itself when evoked. Two common ways to do this are: focus the modal’s body after the modal is open or focus the modal’s header (if it has one) after the modal is open. You do this so the user’s AT can read out the modal’s intent like “Edit profile” or “Create new subscription”.
After you focus the body or header, hitting Tab ⇥ will send focus to the next focusable element in the modal — commonly a field or, if it’s in the header, sometimes it’s the close button (X). Continuing to tab will move you through all the focusable elements in the modal, typically finishing with terminal buttons like SAVE and/or CANCEL.
Now we get to the interesting part. After you focus the final element in the modal, hitting Tab ⇥ again will “cycle” you back to the first tab stop, which in the case of the modal will be either the body or the header because that’s where we started. However, in our modals we “skip” that initial tab stop and take you to the second stop (which in our modals is the close (X) in the upper corner. We do this because the modal doesn’t need to keep announcing itself over and over each cycle. It only needs to do it on the initial evocation not on any subsequent trips through, so we have a special programmatic stop which skips itself after the first time.
This is a small (but appreciated) usability improvement we came up with exclusively for KO/AT users which would be completely unknown to everyone else.
Navigation Menus Traversing And Focus/Selected Management
Navigation menus are tricky. They can be structured in a multitude of ways, tiered, nested, and have countless mechanisms of evocation, disclosure, and traversing. This makes it important to consider how they are interacted with and represented for KO/AT users during the design phase. Good menus should be “entered” and “exited”, meaning you tab into a menu to use it and tab out of it to exit it (if you don’t use it).
This idea is best illustrated with a literal example, so let’s take a look at our 2-tier, vertical navigation from Cauldron.
Hit Tab ⇥ three times. The first tab stop is the skip link (which we went over previously), the second is the logo which acts as “return to home” link, and the third tab enters the menu;
Now that you are in the menu, use the arrow keys (→ and ↓) to move and open sections of the menu;
Hitting Tab ⇥ at any point will exit you from the menu and send you to the content of the page.
Navigation menus can also work in conjunction with some of the previous topics such as shortcut/hotkey menus to make using the menu even more efficient.
Logical Focus Retention (I.E. Deleting Row, Returning Back To A Page)
Focus retention is very important. Most people are familiar, at least in concept, with focusing elements in their logical intended order on the page; however, it can get murky when an element or content changes/appears/disappears.
Where does focus go when then field you are on is deleted?
What about when you’re sent to another tab where the application has a new context?
What about after a modal is closed due to a terminal action like SAVE?
For a sighted user there are visual cues which can inform them of what happened.
Here’s an example: You have an Edit Recipe modal which lets your user add and remove any ingredients. There is one ingredient field with an “Add another ingredient” button below it. (Yes, it’s styled as a link but that’s a topic for another day.) Your focus is on the button. You click the button and a new field appears between the button and the first field. Where should the focus go? Most likely your user added another ingredient to engage with it so the focus should shift from the button into the newly added field.
The big takeaway from all this isn’t so much the specific examples but the mentality which supports them — consider the UX for your application through the lens of the KO/AT user as well sighted, mouse-only user. Some of the best and most clever ideas come from the most interesting and important challenges.
If you need help ensuring that your features are accessible, all of the examples above plus countless more can be tested using Deque’s free web accessibility testing application: axe pro. It’s free and you can sign up here.
Today we’d like to share a little draggable experiment with you. The idea is to show a strip of differently sized images that can be dragged. When clicking and holding to drag, a title element appears and the images get scaled. This separates the images and gives the whole thing an interesting look. When a number gets clicked, the same separation happens and then the images fly up. Another larger version of the images slides in from the bottom.
The animations are powered by TweenMax and we use Dave DeSandro’s Draggabilly.
Attention: Note that the demo is experimental and that we use modern CSS properties that might not be supported in older browsers.
The initial view looks as follows:
When we click to drag the image strip, we show the title:
When clicking on a number, we slide the images up and show a larger view with some content:
Here’s a preview of the whole thing in motion:
We hope you enjoy this experiment and find it useful!
Do you want to know what is an email blast and how to do it “the right way”?
An email blast or broadcast sends a single email message to many subscribers in your mailing list. This can be highly effective strategy to get more sales, and bloggers use these blasts to get more website traffic.
In this article, we will explain how to do an email blast the proper way and share some examples.
What Is an Email Blast?
An email blast is a single email message that is sent to an entire email list, a large segment of that list, or many email lists at the same time.
These emails target most or all contacts in your mailing list, making an email blast a broad reach-out campaign.
Email blasts are also known as broadcast emails, mass emails, bulk emails, e-blasts, and email campaigns. Most people use the term ’email campaigns’ to avoid the aggressive feeling associated with the term ’email blast’.
Email blasts are mainly used for sending promotional content and newsletters. At WPBeginner, we use email blasts to promote our premium WordPress plugins and share our helpful tutorials.
If you want to let all your subscribers know about special offers, then email blasts are the most reliable and efficient form of communication.
Are Email Blasts Outdated?
Although email blasts are great for delivering any message to a large number of people, some consider them an outdated communication method.
That’s because email blasts are bulk emails sent to everyone regardless of their choice, priorities, and needs. At times, blast emails can feel irrelevant and useless to the recipients.
Due to this, the email recipients may ignore the message, mark the email as spam, or even unsubscribe from your email list.
Here are the top reasons why users don’t like email blasts:
1. Unsegmented: Email blasts often use the entire mailing list without segmentation. Your email subscribers are usually very different, and they may be interested in different products or services.
2. Untargeted: The email blasts send the same message to everyone without considering their interests, past interactions, or needs. Users often unsubscribe from your mailing list after receiving these unwanted emails.
3. Not personalized: We all love reading a message that addresses us personally. Email blasts that don’t personalize the emails are often marked as spam.
4. Unexpected: Broadcast emails are usually unexpected, so there can be a natural feeling of resistance from the recipients.
Unlike 10 or 15 years ago, many new marketing methods are available, like social media, pay-per-click advertising, and more. However, none are as effective as email.
So, you might be wondering: is email blast dead? The answer is NO.
Email is still the most reliable form of communication in the world. With new technology, there are better ways to do an email blast to get higher results.
We will explain how to do an email blast the RIGHT way in the following section.
How to Do an Email Blast “the Right Way” – Step by Step
Marketers from big and small companies alike are still using email blasts to promote their product launches, discount offers, and more.
And the results are brilliant. That’s because they are using email blasts the right way.
If you are not a professional marketer, you can follow the steps below to run an email blast successfully:
First, you need a robust email marketing service to create an email blast. An email marketing service lets you create a mailing list, segment that list, and send bulk emails.
There are dozens of email marketing services in the market. Among them, Constant Contact, Brevo, Drip, and ConvertKit are the most popular companies.
We have tried and tested all of the above email marketing services, and we believe they are great at what they offer. However, we recommend Constant Contact because they provide the best deal.
Constant Contact is the most beginner-friendly email blast software. It has dozens of pre-made email templates to help you quickly get started. You can choose a template and easily customize that using their drag and drop editor.
It has simple options for collecting emails, automation features to send/trigger emails based on user actions, and more. Plus, it lets you segment your subscribers and send targeted email campaigns.
You can quickly create a Constant Contact account as they offer a free trial account (no credit card required).
Once done, you will see your Constant Contact dashboard, where you can manage your email lists, see subscribers, and send email blasts.
Alternatively, you can also use Brevo, which offers a free email marketing plan.
Step 2. Create Your Email List
An email list is simply a list of email addresses you can send messages to. It is like your contact book containing the email addresses of your subscribers and prospective customers.
To create an email list in Constant Contact, just go to the ‘Contacts’ menu at the top and click on the ‘Create List’ button.
An email list is where you store all your email contacts.
Clicking on the button will bring up a popup where you need to enter a name for your email list and click the ‘Save’ button.
Constant Contact will now create your email list.
The next step is to add contacts to your list. Just open your new email list, and click the ‘Add Contacts’ button.
Constant Contact lets you add contacts in multiple ways. You can type in a contact, upload from a file, or import from Gmail, Outlook, and other apps.
To create segments in Constant Contact, you need to go to the ‘Contacts’ menu and click on the ‘Segments’ tab. After that, click on the ‘Create Segment’ button.
Constant Contact offers a bunch of criteria you can choose from.
In the next screen, you can create a segment by choosing the criteria you want.
You can create a segment by contact activity like emails sent, opened, clicked, or did not open. You can also include email subscribers by contact details, including job title, city, country, etc.
Once you are finished, simply click on the ‘Save and Preview’ button.
Then, you can repeat the process if you need to create more segments.
Step 4: Create a Targeted Email Campaign
After creating segments, the next task is to create a targeted email campaign or an email blast.
You can create an email campaign in different ways depending on the email marketing software you use.
To design an email campaign in Constant Contact, you must go to the ‘Campaigns’ menu and then click the ‘Create’ button.
This will bring up a popup showing a bunch of campaigns you can make with Constant Contact.
You need to choose the Email option to continue.
After that, you will see dozens of pre-made email templates ready for use.
You can preview the templates individually or simply type keywords to search for a template.
Simply click to choose a template as a starting point.
After that, the email campaign builder page will open. First, you need to name your campaign.
Next, click the ‘Email Settings’ link to edit the email subject line, sender name, and more.
Then, you need to click on the ‘Personalize’ option.
Here, you can choose the first name or any other contact details to insert in your subject line.
You can also enter a generic name like Customer, User, or Friend to address users whose names are unavailable. Once done, simply click on the ‘Insert’ button.
You will see some text with large brackets added in your subject line.
For example, you can see [[FIRSTNAME OR “customer”]] in the screenshot below.
After that, you can edit your email preheader From Name (company or organization name) and From Address.
Don’t forget to click on the ‘Save’ button to store your changes.
The next step is to customize the email body.
You can simply point and click on any element in the email to edit or delete it.
You can also drag and drop elements and layouts from the left sidebar.
Once your email design is complete, you can preview your email. If it looks good, just click on the ‘Continue’ button in the top right corner.
Next, you will see email send (blasting) options on the screen.
From here, you can select recipients from email lists or segments. For example, we will choose the segment that we created earlier.
In the right sidebar, you will see options to send your email campaign now or schedule it for later.
Step 5: Measure Results and Improve Email Deliverability
Sending an email campaign doesn’t mean that your work is done. After posting your email blast, you will need to measure your results and see how the recipients interact with your messages.
Top email marketing services like Constant Contact have built-in email stats features.
To view your email campaign stats, just click on the ‘Reporting’ menu item at the top.
You can also see the performance of your email campaigns individually by clicking on them.
You will see the email open rate, the total sent emails, bounces, and successful deliveries. The reports will also reveal click rate, did not open, unsubscribes, and marked spam stats.
The biggest challenge of email blasting is email deliverability. A lot of the time, your emails don’t get delivered at all or are sent to the spam box directly.
Here are some proven techniques to improve email deliverability:
Update your email list occasionally to remove fake email addresses, deleted emails, and more.
Maintain the frequency of your emails (no spikes).
Avoid misleading subject lines.
Make your emails useful with valuable and engaging content.
Best Email Blast Examples
There are two main types of emails used for marketing: Broadcast Emails (Email blasts) and Triggered Emails.
Triggered emails are automated emails that are sent to your users following their actions. For example, you can send a welcome email after a user subscribes to your list.
Email blasts are different because you will manually create campaigns and send them to a large segment at once. Email blasting is done with the belief that the single message will be helpful to every subscriber in a list or segment.
You can’t broadcast a welcome email to your entire email list, which may also include old customers. So, email blasts can be used only for specific purposes.
Here are the best email blast examples:
1. Flash Sale
If you are offering a flash sale, you can send mass emails in bulk to inform all of your subscribers.
Here are a couple of subject line examples for a flash sale email blast:
[FLASH SALE] Fashion Shoes 40%-60% off!
[LAST CHANCE] 40%-60% off sale ends today!
2. Event Information like Webinars
You can send mass emails if you run online courses and webinars for your users.
Here are a couple of email subject lines for an event information email blast:
LIVE Training: 10 steps to create a winning email campaign
Join us LIVE tomorrow at 5 PM for a FREE marketing class
3. New Products
You can send an email blast when you launch a new product. It’s best to segment your list into already purchased customers and new subscribers so that you can send different campaigns to them.
4. Newsletters
Newsletters are the most common type of broadcast email. News, magazine websites, blogs, as well as business or non-profit organizations send newsletters to inform their subscribers about the latest news.
You can see our tutorial on starting an email newsletter to learn more about best practices to make it more successful.
Healthcare and life sciences industry is metamorphosizing into an evolved, digitally-advanced, technology-driven, consumer-centric sector. As against the existing uptightness toward digital adoption, the industry is burgeoning with innovative solutions for delivering enhanced care to the patients. Coming out of its shell and dissolving the silos, the healthcare sector is openly and widely embracing the digitally disruptive processes. This is evident from the favorable statistics showcasing that over 1800 hospitals in the U.S. utilize mobile applications, while 92 percent of the hospitals have a patient portal solution in place.
As the consumerism attitude is settling in amongst the patients, they seek convenient healthcare. The modern, tech-savvy, price-sensitive patients expect first-class care delivery at minimal efforts and affordable rates. A recent study by Definitive Healthcare revealed that 70 percent of consumers would rather use video consulting than visit their primary care provider in person. With the rising popularity of telehealth, mHealth or digital health, hospitals are also equipping themselves with the required solutions. 50 percent of the U.S. hospitals offer the telehealth facility to their patients. The remote patient monitoring market is driven to become a $31.3 billion industry. This surge is proportionally resulting in the proliferation of the wearables market, which is projected to grow 15.3 percent over the previous year to 198.5 million units by the end of 2019.
In the video below, we take a closer look at how to send or receive text messages to or from the queue. We look at a Spring, JMS, and RabbitMQ example with annotations. So, let's get started!
Check out the links below to download the code and PPT:
OWASP ZAP (Zed Attack Proxy) is an open-source and easy-to-use penetration testing tool for finding security vulnerabilities in the web applications and APIs. As a cross-platform tool with just a basic Java installation pre-requisite, it provides vulnerability scanning for beginners and penetration testing for professionals. It can be downloaded and installed as a standalone application or Docker image.
Additionally, the OWASP community has exposed ZAP APIs, which allows ZAPs to integrate with other tools/frameworks.
I was recently in Shanghai. Great city! Enjoyed the trip, the city, and the people. When I travel, I usually use cash, not credit. There's plenty of ATMs around, and Shanghai was no exception. One of the things that really struck me while I was there was the overwhelming presence of mobile computing. I mean, when I was on the subway in Shanghai, all I could see were the tops of people's heads. Everybody was on a cell phone.
Now I've been around. I've been on the London underground, Paris and Vienna metros, New York's subway, and Washington DC's transportation system. Sure, we all use our phones, but we usually look up every once in a while, and we don't stay on them that long. But in Shanghai, it was completely different. Mobile computing is completely integrated with modern Chinese life — in Shanghai at least. And I expect Beijing is no different.
In this tutorial, I’m going to show you how simple and easy it can be to code a fully responsive and fluid email template. This isn’t complicated or intimidating at all. All it takes is understanding the designs for the …
Java::Geci is a code generator that runs during unit test time. If the generated code fits the actual version of the source code, then the test does not fail. If there is a need for any modification, then the tests modify the source code and fail. For example, there is a new field that needs a setter and getter. Then, the accessor generator will generate the new setter and getter and then it fails. If there is no new field, then the generated code is just the one that is already there — no reason to touch the source code: The test that started the generator finishes successfully.
Because Java::Geci generators run as tests, which is at run-time, and because they need access to the Java code structures for which they generate code, Java reflection is key for these generators.
Web designers: There’s some good news and some bad news. The good news is this. There’s an ongoing and growing need for app presentation websites. The more the merrier, which means more for you to work on. Not to rain …


![How to Code a Mobile-First Responsive Email Template [Tutorial]](https://designmodo.com/wp-content/uploads/2019/06/responsive-email-template-747x420.jpg)