Are you looking at your organization's efforts to enter or expand into the cloud-native landscape and feeling a bit daunted by the vast expanse of information surrounding cloud-native observability? When you're moving so fast with agile practices across your DevOps, SREs, and platform engineering teams, it's no wonder this can seem a bit confusing.
Unfortunately, the choices being made have a great impact on both your business, your budgets, and the ultimate success of your cloud-native initiatives that hasty decisions upfront lead to big headaches very quickly down the road.
Python Structural Pattern Matching has changed the way we work with complex data structures. It was first introduced in PEP 634 and is now available in Python 3.10 and later versions. While it opens up additional opportunities, troubleshooting becomes vital while exploring the complexities of pattern matching. To unlock the full potential of Python Structural Pattern Matching, we examine essential debugging strategies in this article.
How To Use Structural Pattern Matching in Python
The Basics: A Quick Recap
Before delving into the intricacies of troubleshooting, let's refresh the basics of pattern matching in Python.
Debugging effectively requires a nuanced approach, similar to using tongs that tightly grip the problem from both sides. While low-level tools have their place in system-level service debugging, today's focus shifts towards a more sophisticated segment of the development stack: advanced management tools. Understanding these tools is crucial for developers, as it bridges the gap between code creation and operational deployment, enhancing both efficiency and effectiveness in managing applications across extensive infrastructures.
The Need for Advanced Management Tools in Development
Development and DevOps teams utilize an array of tools, often perceived as complex or alien by developers. These tools, designed for scalability, enable the management of thousands of servers simultaneously. Such capabilities, although not always necessary for smaller scales, offer significant advantages in application management. Advanced management tools facilitate the navigation and control over multiple machines, making them indispensable for developers seeking to optimize application performance and reliability.
This documentation provides a comprehensive guide to setting up a Virtual Private Network (VPN) server using Pritunl, a popular open-source VPN server management platform. By following these steps, users can establish a secure and private network infrastructure suitable for various applications, such as remote access, secure communication, and data privacy.
Prerequisites
AWS account: Users must have an active AWS (Amazon Web Services) account to create and manage instances on the cloud platform.
Instance creation: An EC2 instance needs to be created in the desired region (e.g., Mumbai) using the Ubuntu 22.04 AMI. Users should ensure that ports 80, 443, and 22 are allowed in the security group settings.
Access to the instance: Users need SSH access to the instance created on AWS. They should possess the private key associated with the EC2 instance to establish a secure connection.
Web browser: A web browser, preferably Google Chrome, is required to access the Pritunl dashboard and configure the VPN server settings.
Pritunl client: To connect to the VPN server from client machines, users must install the Pritunl client application. The client can be installed on various operating systems, including Windows, macOS, and Linux distributions.
Network configuration: Users should ensure proper network configuration, including DNS settings, virtual network details, and firewall rules, to establish seamless communication between the VPN server and client machines.
Setting up a VPN Server
Step 1: Setup Instance
Launch an instance in the Mumbai region using the Ubuntu 22.04 AMI.
Ensure ports 80, 443, and 22 are allowed in the security group.
Steps for Launching Instance
Select the Mumbai region.
Launch an instance, providing a name.
Choose the specified AMI.
Select t2.micro instance type
Choose or create a key pair
Select the default VPC and adjust network settings if necessary
Allow SSH, HTTP, and HTTPS ports in the security group
Launch the instance
Step 2: Access the Instance and Setup VPN
SSH into the instance: ssh ubuntu@yourip -i "key"
Switch to root: sudo -i
Execute the following commands
Shell
sudo tee /etc/apt/sources.list.d/pritunl.list << EOF

deb http://repo.pritunl.com/stable/apt jammy main

EOF


# Import signing key from keyserver

sudo apt-key adv --keyserver hkp://keyserver.ubuntu.com --recv 7568D9BB55FF9E5287D586017AE645C0CF8E292A

# Alternative import from download if keyserver offline

curl https://raw.githubusercontent.com/pritunl/pgp/master/pritunl_repo_pub.asc | sudo apt-key add -


sudo tee /etc/apt/sources.list.d/mongodb-org-6.0.list << EOF

deb https://repo.mongodb.org/apt/ubuntu jammy/mongodb-org/6.0 multiverse

EOF


wget -qO - https://www.mongodb.org/static/pgp/server-6.0.asc | sudo apt-key add -


sudo apt update

sudo apt --assume-yes upgrade


# WireGuard server support

sudo apt -y install wireguard wireguard-tools


sudo ufw disable


sudo apt -y install pritunl mongodb-org

sudo systemctl enable mongod pritunl

sudo systemctl start mongod pritunl
Do you know what the global edtech and smart classroom market size was in 2022? No idea? Then, we must inform you that it was somewhere around USD 115.80 billion, which is estimated to grow from USD 133.55 billion in 2023 to USD 433.17 billion in 2030. Yes, you read that right! And among all the contributors to these numbers, Physics Wallah has been a well-known name. But did you know that there was a time when this edtech brand launched its app for the first time, and it crashed because a myriad of authorized users logged into the application simultaneously? In short, the concerned app failed to meet the growing demand of users due to its poor performance, scalability, and resilience, resulting in a huge loss to the business. Now, if you don’t want to experience the same by hook or by crook, you must rely on scalable digital products.
Yes, only when you do that will you be able to develop a powerful digital product that can survive and thrive in the market easily. But the query pops up: what are scalable products, and why should you use them? Well, to get a good sense of that, you will have to browse through the next text stack.
There’s nothing worse than a spam call interrupting your day. Fortunately, there are a few easy ways to prevent them entirely. Each method is completely free and takes only a few minutes to set up. Although you may still get the occasional cold call from organizations in the non-profit or […]
In the ever-evolving landscape of technology, becoming a professional coder is more than just mastering programming languages — it's a journey marked by dedication, perseverance, and a commitment to lifelong learning. While the path may seem daunting, aspiring coders can navigate it with confidence by embracing two fundamental principles: consistency and continuity. In this article, we'll explore how these pillars form the bedrock of a successful coding career and offer practical insights into incorporating them into your journey toward mastery.
The Power of Consistency
Consistency is the hallmark of excellence in any endeavor, and coding is no exception. It involves showing up day in and day out, honing your skills, and pushing the boundaries of your knowledge. Here's how consistency can propel you towards becoming a professional coder:
Are you ready to step into the world of React development? Our updated “Learn React” track is here to equip you with the latest tools and techniques to build impressive, functional applications. Whether you’re a beginner looking to dive into...
RAML, which stands for "RESTful API Modeling Language," is a YAML-based language for describing RESTful APIs. It is a blueprint before developing an API that makes it easier for both developers and stakeholders to understand the API's structure and behavior.
What Are Data Types?
Data types are used to specify the structure or type of data exchanged between the client and server. This allows to validate the request and response payloads and maintain payload standards.
MongoDB is a distributed database that is built for modern transactional and analytical applications and may be used for rapidly changing, multi-structured data. On the other hand, PostgreSQL is an SQL database that has all of the features that you require from a relational database. If you are unsure of the differences between these systems, on the MongoDB website, you can find an article that compares PostgreSQL and MongoDB.
Choosing one or the other between MongoDB and PostgreSQL may not be your only option – in fact, because each database has different strengths, you may wish to use them side-by-side. If this is your case, then you may need to sync data between them.
In the world of high-performance computing, utilizing SIMD (Single Instruction, Multiple Data) instructions can significantly boost the performance of certain types of computations. SIMD enables processors to perform the same operation on multiple data points simultaneously, making it ideal for tasks like numerical computations, image processing, and multimedia operations. With Java 17, developers now have access to the Vector API, a feature that allows them to harness the power of SIMD directly within their Java applications.
In this article, we'll explore what the Vector API is, how it works, and provide examples demonstrating its usage.
Artificial intelligence (AI) offers transformative potential across industries, yet its vulnerability to adversarial attacks poses significant risks. Adversarial attacks, in which meticulously crafted inputs deceive AI models, can undermine system reliability, safety, and security. This article explores key strategies for mitigating adversarial manipulation and ensuring robust operations in real-world applications.
Understanding the Threat
Adversarial attacks target inherent sensitivities within machine learning models. By subtly altering input data in ways imperceptible to humans, attackers can:
A chatbot is software that can start talking with your website visitors. Adding a chatbot to your website can help you provide instant customer support, generate leads, and improve the user experience.
In this article, we will show you how to easily add a chatbot in WordPress, step by step.
What Is a Chatbot?
A chatbot is a computer program that uses a chat interface to talk with your website visitors. It acts just like your customer support team does when they use a live chat plugin.
However, while live chat is a real-time conversation between a customer and your support staff, chatbots are automated.
This means that they can only provide answers that you have programmed them for.
For example, a customer service chatbot can answer questions about products or services, troubleshoot problems, and make recommendations.
Similarly, a healthcare chatbot might answer questions about health conditions, provide reminders for appointments, and connect patients with doctors.
Why Should You Use a Chatbot in WordPress?
Adding a chatbot to your WordPress website will allow you to provide 24/7 customer support to your visitors, even when your support team isn’t available.
This will reduce the number of support tickets on your website and improve user experience.
Chatbots can also be used to automate other customer support tasks like answering frequently asked questions, providing product support, and fixing smaller issues.
This will save a lot of time and let your team focus on more complex issues.
If you have an online store, then you can also use a chatbot to find out about a customer’s interests and ask them about their needs. The chatbot can then answer the customer’s queries and close the deal.
Having said that, let’s see how to easily add a chatbot in WordPress, step by step. We’ll cover three different methods, and you can use the quick links below to jump to the one you want to use:
It also comes with a powerful Heroic AI Assistant that lets you easily add a chatbot to your knowledge base page. The AI chatbot is trained directly from your knowledge base articles so it can provide accurate responses to visitor questions.
Note: You’ll need the Heroic KB Pro plan to access the Heroic AI Assistant.
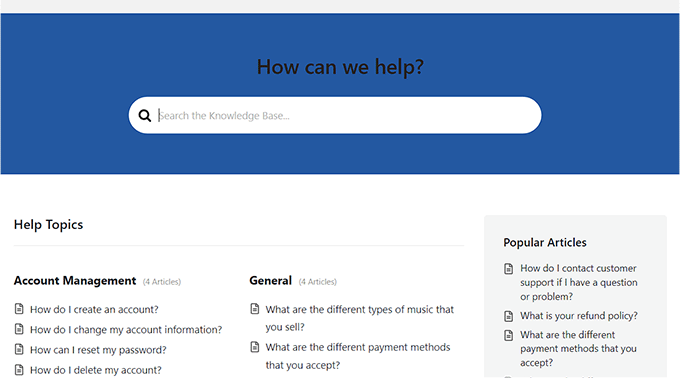
Once the plugin is activated, you need to create a knowledge base so that you can train your AI chatbot on it. Make sure that your knowledge base includes detailed, high-quality articles that will help your audience learn how to use your products/services.
After you’ve created your knowledge base, you can set up the Heroic AI Assistant.
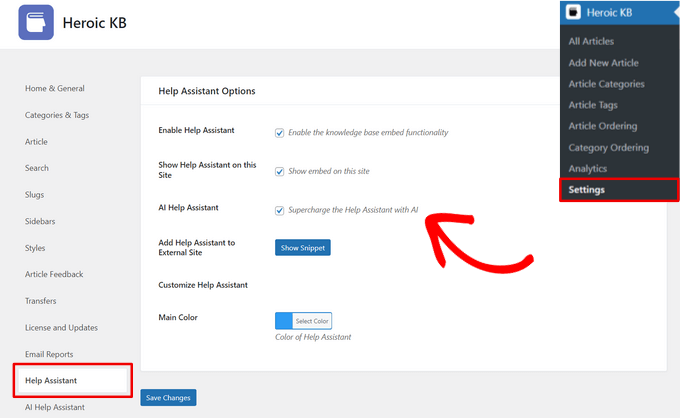
To do that, go to Heroic KB »Settings from the WordPress dashboard and click on the ‘Help Assistant’ tab.
From there, you need to place a checkmark next to the Enable Help Assistant, Show Help Assistant on this Site, and AI Help Assistant options.
You can also select the main color of your Help Assistant chatbot on this page.
When you’re done, click on the ‘Save Changes’ button.
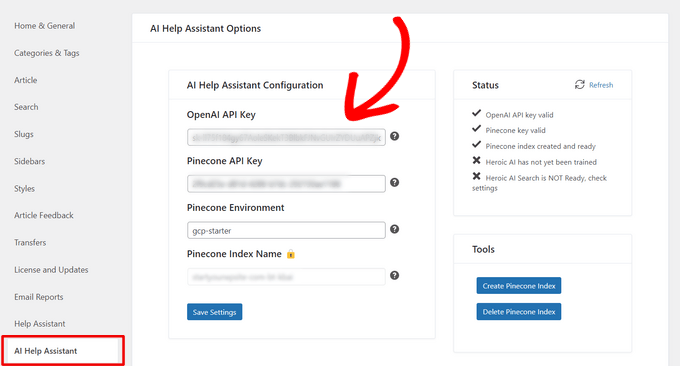
Next, you need to click on the ‘AI Help Assistant’ tab from the Heroic KB Settings page. Here, you need to add API keys for OpenAI and Pinecone.
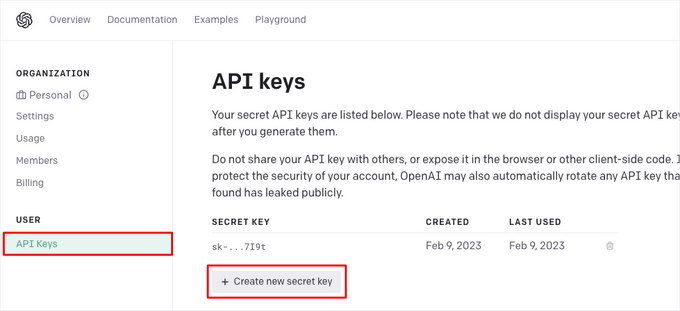
You can generate an OpenAI API key on the OpenAI website by visiting the API Keys page from your paid account.
Simply generate a new secret key and copy and paste it into the Heroic KB AI Help Assistant Configuration settings.
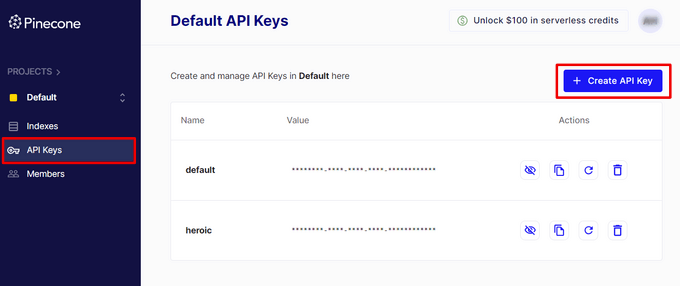
You can generate a Pinecone API key on the Pinecone website with a free or paid account.
Just go to the ‘API Keys’ page and click on the ‘Create API Key’ button. Then, copy and paste it into the Heroic KB settings.
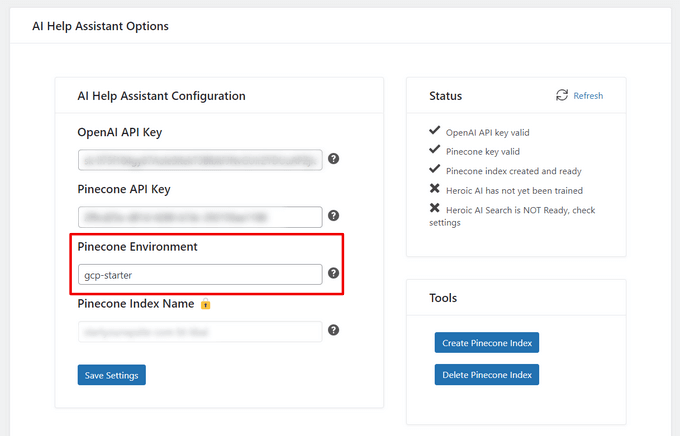
After copying and pasting your API keys, you also need to fill out the ‘Pinecone Environment’ field.
For free Pinecone accounts, you can use gcp-starter as the Pinecone Environment. For paid accounts, you can use any GCP Region supported by Pinecone like eu-west4-gcp or us-central1-gcp, for example.
Don’t forget to hit the ‘Save Settings’ button.
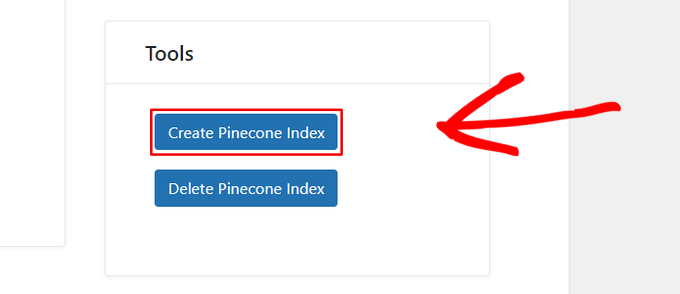
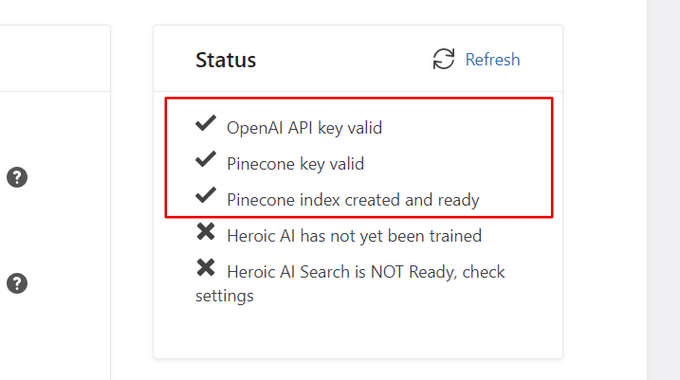
Next, click on the ‘Create Pinecone Index’ button to automatically create a new Pinecone index.
You can check the ‘Status’ box to see if your API keys have been validated and the Pinecone index has been created.
Once those are ready, you can start to train the AI assistant chatbot on your knowledge base.
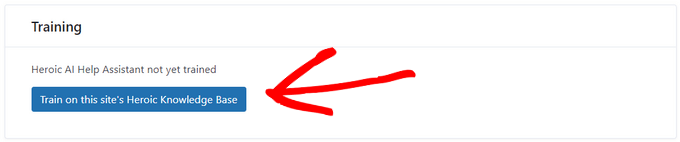
To do that, simply click on the ‘Train on this site’s Heroic Knowledge Base’ button.
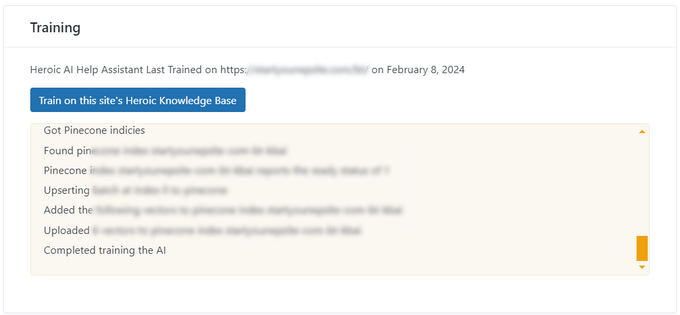
The AI assistant will then begin training, this may take a few minutes depending on the size of your knowledge base. The progress will be displayed in the Training panel.
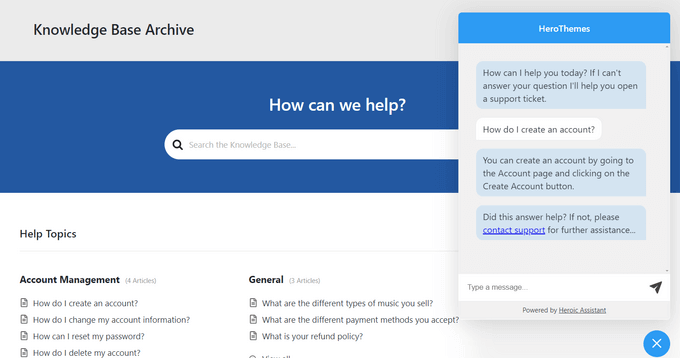
When the training is complete, you can visit your Knowledge Base page to see your Heroic AI Assistant chatbot in action.
Visitors can ask a question and the chatbot will provide an accurate response based on your knowledge base documentation.
Add a Chatbot in WordPress Using ChatBot (Best for Sales & Customer Service)
If you are looking for an all-in-one chatbot for lead generation, sales, customer service, and more, then this method is for you.
You can easily add a chatbot to your WordPress site using ChatBot. It is the best AI chatbot software that allows you to make chatbots using a drag-and-drop builder. It also offers more chatbot customization options and multilingual features.
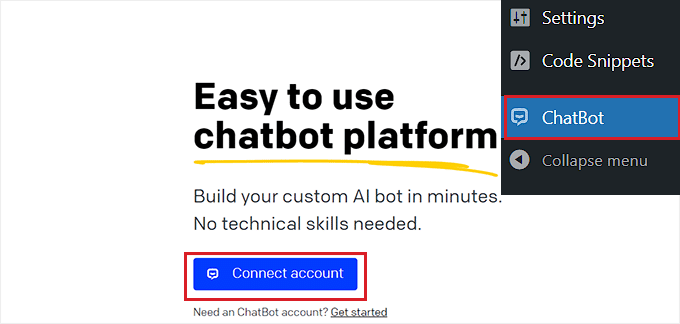
Upon activation, visit the ChatBot menu tab from the WordPress admin sidebar and click the ‘Connect Account’ button.
This will open the ChatBot website in a new window, where you have to enter your login credentials and click the ‘Login’ button.
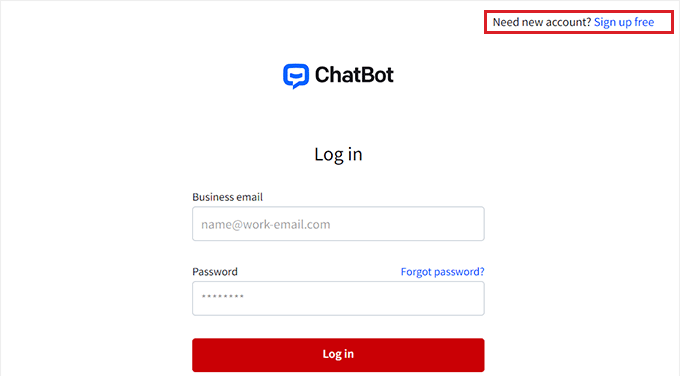
However, if you don’t have an account on ChatBot yet, then just click the ‘Sign up free’ link at the top.
This will take you to a new page where you will need to provide your email address and enter an account name and password.
Once you are done, just click the ‘Create account’ button.
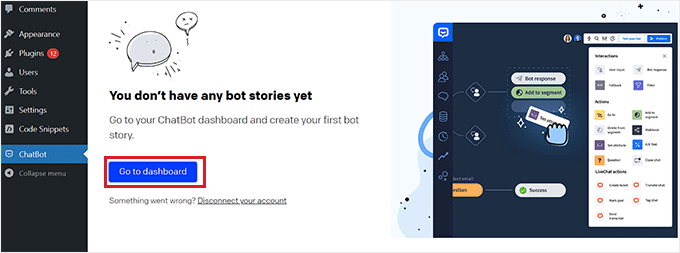
Upon account creation, you will be redirected to your WordPress dashboard. You have now successfully connected your WordPress site with ChatBot.com.
Now, to start creating a chatbot, just click the ‘Go to dashboard’ button.
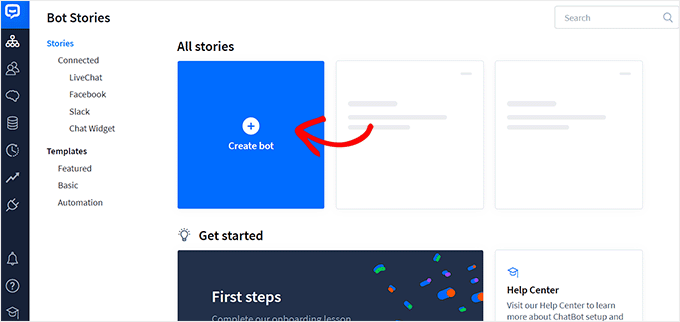
You will then be directed to your ChatBot account dashboard.
From here, click the ‘Create bot’ button at the top to start the process.
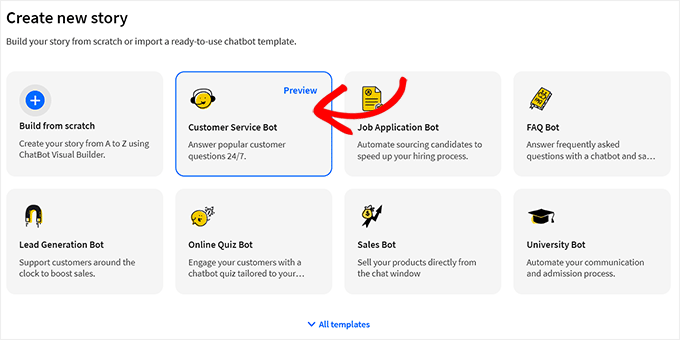
This will take you to the ‘Create new story’ page, where you need to choose the type of chatbot that you want to make.
By default, ChatBot allows you to create a customer service bot, job application bot, lead generation bot, FAQ bot, sales bot, and more.
However, you can also pick the ‘Build from Scratch’ option to make a bot yourself. For this tutorial, we will be creating a customer service bot.
This will open the premade customer service bot template on your screen.
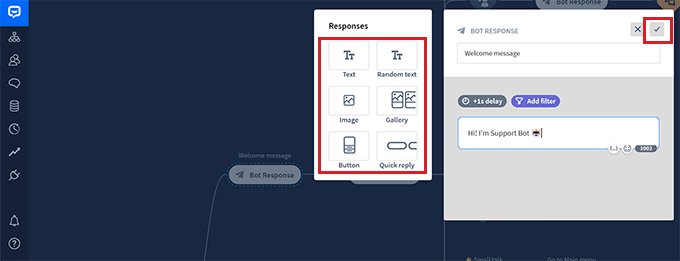
From here, you can easily create a conversation flow for your chatbot by clicking on the ‘Bot Response’ tabs in the chatflow.
This will open a prompt on the screen, where you can add chat responses and quick replies like text, images, and buttons by dragging and dropping the blocks into the prompt.
Once you have done that, just add the bot response and click the ‘Save and Close’ button at the top.
If you want, you can also add custom filters with the chatbot response by clicking on the ‘Add Filter’ button in the prompt.
This will open a dropdown menu where you can pick a filter that will be added to your chatbot’s response, including:
Message: Personalize the conversation by tailoring the responses to the user’s message.
Score: Prevent irrelevant conversations by filtering out messages that have a low score.
Failures: Improve chatbot accuracy by filtering out messages that are likely to result in failure. This can prevent the chatbot from giving incorrect or misleading information.
Name: Create a personalized experience for the user or block messages that contain certain names.
Username: Filter out messages that contain certain usernames.
Integration: Create specific messages for users who use a particular tool.
Language: Write messages in specific languages for multilingual websites.
Timezone: Filter messages according to the relevant time zone.
Additionally, you can create specific messages for users in different regions and countries. This can be helpful if you have a large international audience.
After that, you can also select conditional logic for the now-filtered response. The response that you are creating will only be used by the chatbot if the customer that it is interacting with fits the filter.
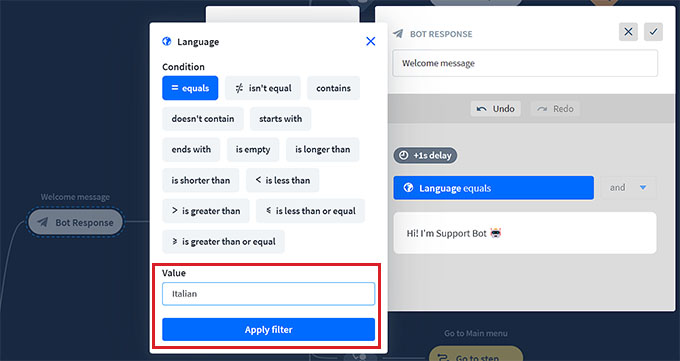
For example, if you have a multilingual website and want to create a chatbot for different languages, then you can use the ‘Language’ filter.
Once you do that, select the ‘= equals’ option as the condition and then type in the language name.
After that, you can add the response in the language that you chose. In our example, when a user types a query in the chatbot in Italian, the chatbot will show them the Italian response that we created with this filter.
When you have finished adding your filter, just click on ‘Apply filter’.
After that, you can also use the ‘+’ button to add different blocks to your chat flow. This will open a prompt where you can select any block of your choice, including:
User Input: Add user messages that will trigger the bot’s response.
FAQ: Add frequently asked questions and their answers in this block.
Attachment Input: Let users attach files in an ongoing conversation with the chatbot.
Bot Response: Add a chatbot’s response to a question.
Backtracking: Prevent users from viewing previously matched interactions with the bot.
Fallback: Display a general message or trigger an action anytime your chatbot can’t match the user query with any chatbot response.
Flow: Visually organize complex chatbot response scenarios.
Add to segment: Segment all the users into different groups based on user data.
Delete from segment: Delete users from a specific segment.
Set attribute: Save information about users.
Mark Goal: Mark a conversation as having reached its goal.
You also have the option to send a transcript of a conversation to an email address or tag different chatbot conversations with keywords and phrases.
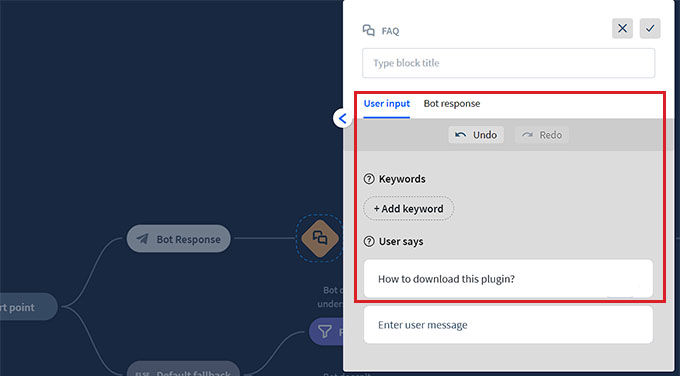
For example, if you choose the FAQ block, it will open on your screen, where you can now add common customer support questions and their answers.
Your chatbot will then use these responses to answer customer queries on your website.
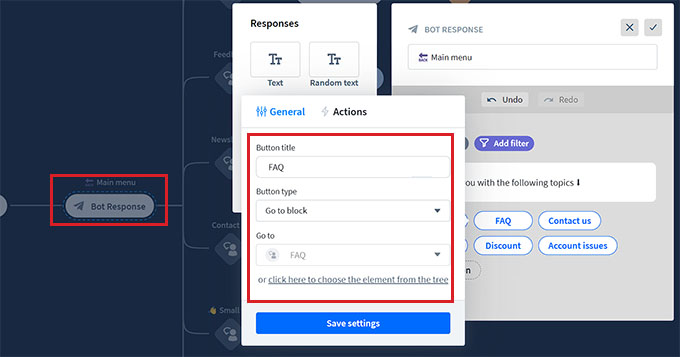
Next, click on the ‘Main Menu’ bot response tab to open the block prompt. Here, you can add buttons for all the services that your chatbot can offer using the Button block.
After that, click on each Button block to open its settings and configure where you want the button to direct the users.
For example, you can allow users to be directed to the FAQs chatbot response that you created by selecting the button type as ‘Go to block’.
Next, select the ‘FAQ’ block from the ‘Go to’ dropdown menu and click the ‘Save Settings’ button.
Other than FAQs, you can also create buttons for directing users to your newsletter signup, contact us page, discount offers, and more.
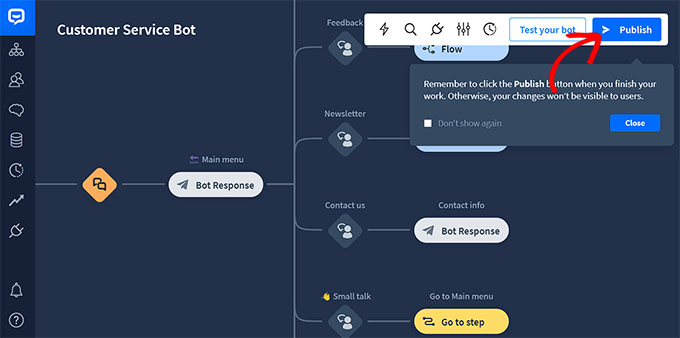
Once you are done, don’t forget to click the ‘Publish’ button at the top to store your settings.
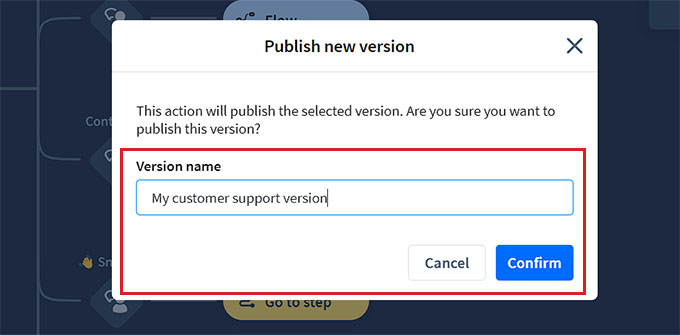
A prompt will now open on your screen, asking you to provide a name for your chatbot.
After entering the details, simply click the ‘Confirm’ button to publish your chatbot.
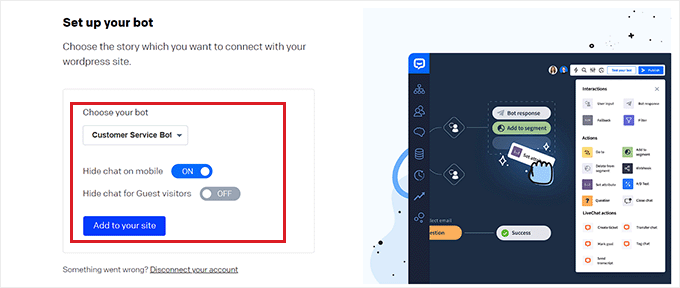
Next, visit your WordPress dashboard and head over to the ChatBot tab, where you will now notice that the ‘Choose your bot’ section will be visible on the screen.
Note: Keep in mind that it might take 3-4 hours between creating your chatbot and it being visible in your WordPress dashboard.
Now, simply choose the bot that you just created from the dropdown menu.
After that, toggle the ‘Hide chat on mobile’ switch to ‘On’ if you don’t want people visiting your website from their phones to be able to see the chatbot.
You can also toggle the ‘Hide chat for Guest visitors’ to ‘On’ if you want the chatbot to be exclusive for your members only.
Finally, click the ‘Add to Site’ button. Now, you can visit your website to view the chatbot in action.
Add a Chatbot in WordPress Using HubSpot (Free & Easy)
If you are looking for a free and easy way to build a chatbot, then you can use this method.
HubSpot is an amazing customer relationship management (CRM) system that comes with a suite of tools for sales, customer service, marketing, and content management.
It even lets you create automated conversations with your website visitors with its free chatbot builder.
First, you will need to install and activate the HubSpot plugin on your website. For detailed instructions, you may want to see our beginner’s guide on how to install a WordPress plugin.
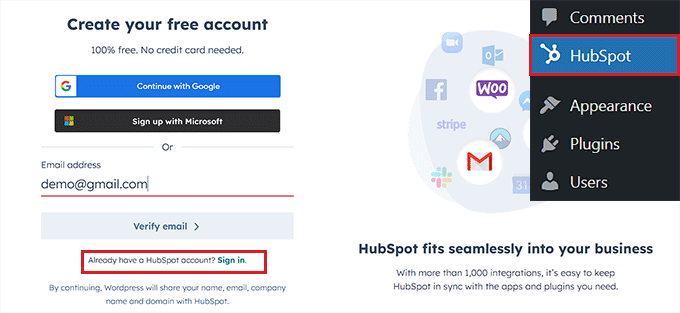
Upon activation, you need to visit the HubSpot menu tab from the WordPress admin sidebar and enter your email address to create a HubSpot account.
If you already have one, then just click the ‘Sign In’ link at the bottom.
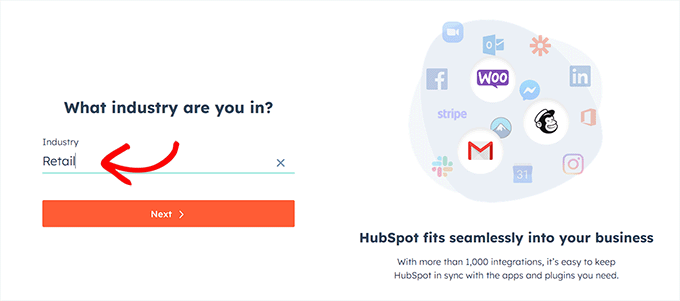
Once you’ve provided your details and set a password for your new account, HubSpot will ask you about the industry that you work in.
Simply select an industry of your choice from the dropdown menu and click the ‘Next’ button.
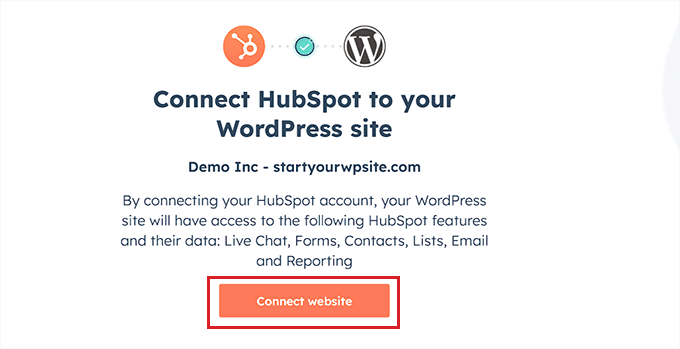
After that, HubSpot will create a new account for you and then ask you to connect it with your WordPress site.
From here, simply click the ‘Connect Website’ button.
Now, it’s time for you to start creating your chatbot.
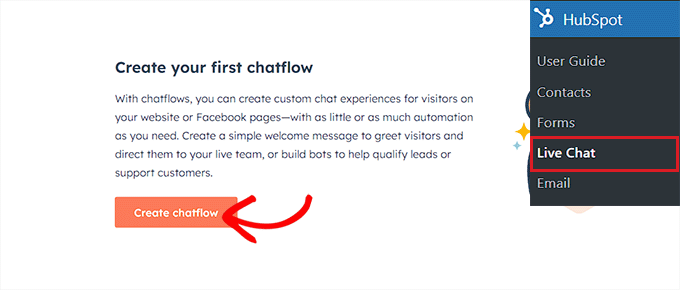
To do this, visit the HubSpot » Live Chat page from the WordPress dashboard and click the ‘Create chatflow’ button.
This will take you to the next page, where you can select any of the premade chatbot templates.
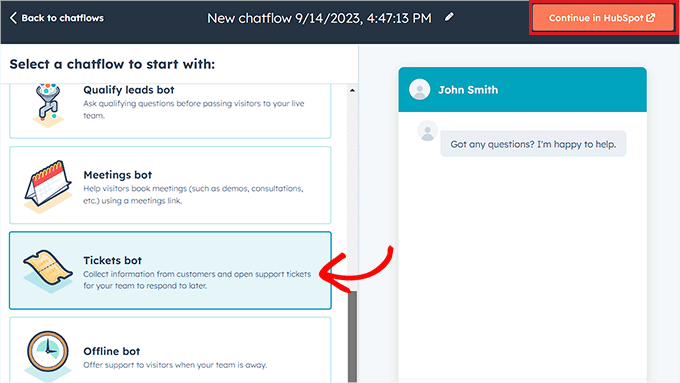
By default, HubSpot allows you to create a concierge bot, qualify leads bot, meetings bot, ticket bot, offline bot, or even a chatbot from scratch.
For this tutorial, we will be creating a ‘Tickets bot’.
Just select the chatflow you want to use and then click the ‘Continue in HubSpot’ button to move forward.
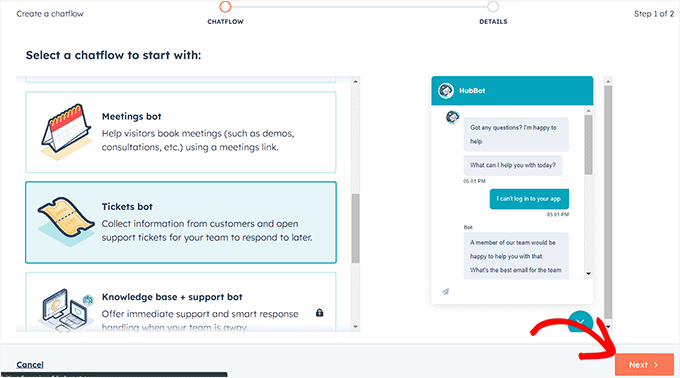
You will then be directed to your HubSpot account, where you will be creating the rest of your chatbot.
From here, click the ‘Next’ button to move ahead.
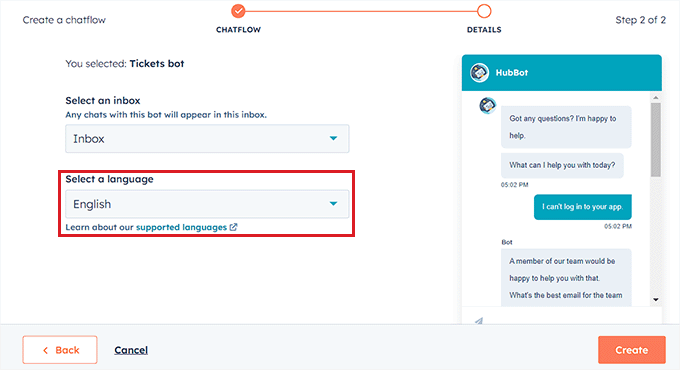
In the next step, you need to select the language for your chatbot from the dropdown menu.
You can leave the other settings as they are and click the ‘Create’ button.
Your template will now open in the chatbot builder, where you can edit the chatflow.
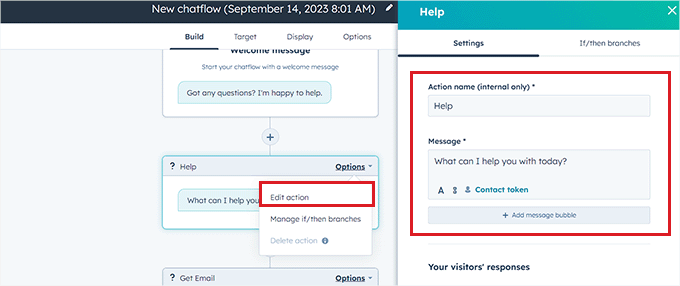
Simply click on the ‘Options’ tab in the bot response and select the ‘Edit’ link.
This will open the action settings in the left column, where you can change the action name and text.
In HubSpot, an action is a step in the chatbot conversation that performs a specific task, like asking questions or sending responses. The first action for your chatbot will be the first question that is sent to the website visitor.
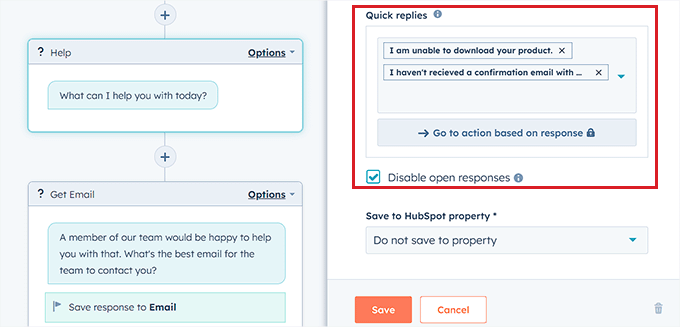
After that, scroll down to the ‘Your visitors’ responses’ section and type all the quick replies that a visitor may potentially give to this question.
For example, a visitor may ask you how to purchase your product, or they might want to report an error that they are facing on your website.
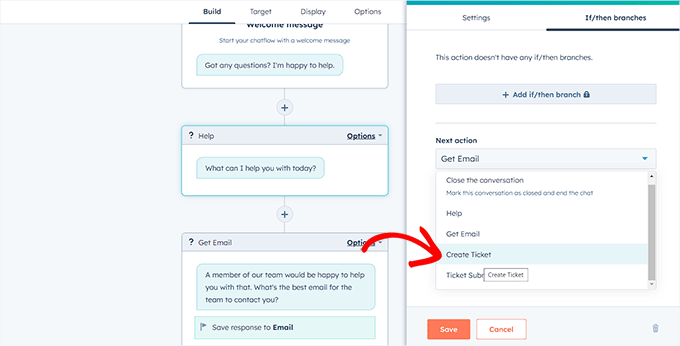
After that, scroll back to the top and switch to the ‘If/then branches’ tab.
From here, you have to select the action the chatbot will take if the customer replies with one of the quick responses that you just added.
For example, if you want the chatbot to open support tickets every time a user is unable to receive a confirmation email with credentials, then select the ‘Create Ticket’ option from the dropdown menu.
After that, just click the ‘Save’ button to store the action settings.
After that, you can leave the rest of the chatflow settings as they are or keep editing the different actions for your chatbot.
Chatbot will now create a support ticket for all the quick responses that you’ve added to the action prompt.
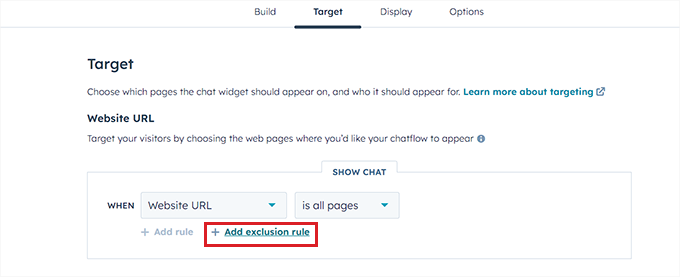
Next, switch to the ‘Target’ tab from the top. Here, you have to choose where the chatbot widget will appear on your website.
You can leave these settings as they are if you want the chatbot to appear on every page of your website.
However, if you want to hide the chatbot on specific pages, then you will have to click the ‘Add exclusion rule’ link. This will open another rule where you can simply add the URL of the page where you want to hide the chatbot in the field on the right.
Once you are done, scroll down to the ‘Visitor information and behavior’ section. Here, you can choose the visitors that you want the chatbot to be shown to.
For example, if you only want visitors who are part of your contact list to be able to see the chatbot, then you can choose the ‘Visitor’ option from the left dropdown menu and the ‘Is a contact’ option in the right field.
After that, click the ‘Save’ button and switch to the ‘Display’ tab.
From here, you can upload an avatar image for your chatbot and change its name.
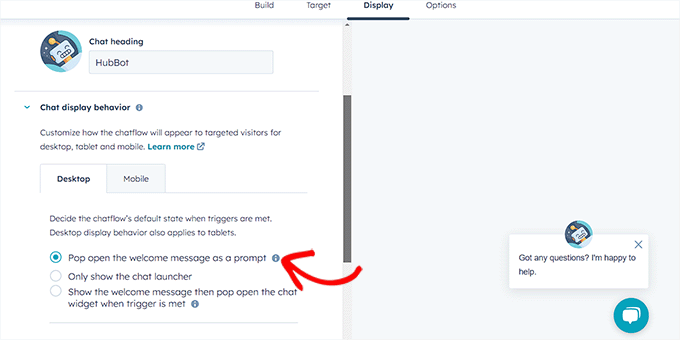
Next, expand the ‘Chat display behavior’ section and choose the chatbot’s default state when the triggers are met.
For example, if you want the bot’s welcome message to appear immediately once someone visits your website, then you can choose the ‘Pop open the welcome message as a prompt’ option.
If you pick ‘Only show the chat launcher’, then visitors will have to click on your chatbot to see its prompts.
However, if you want the chatbot to appear only when a trigger is met, then you can select the third option.
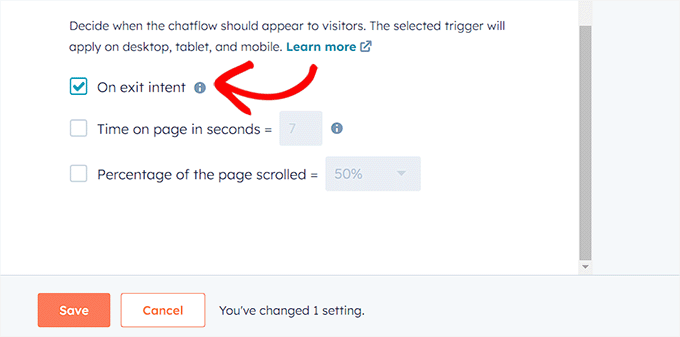
After that, scroll down and choose the trigger for the chatbot appearance.
For instance, if you want the chatbot to be displayed once the visitor is leaving your site, then select the ‘On exit intent’ option.
However, you can also choose the percentage of pages scrolled or minutes spent on your website as triggers.
Next, you can also switch to the ‘Mobile’ tab to configure chat display settings for mobile phones.
Once you have done that, simply click the ‘Save’ button to store your changes.
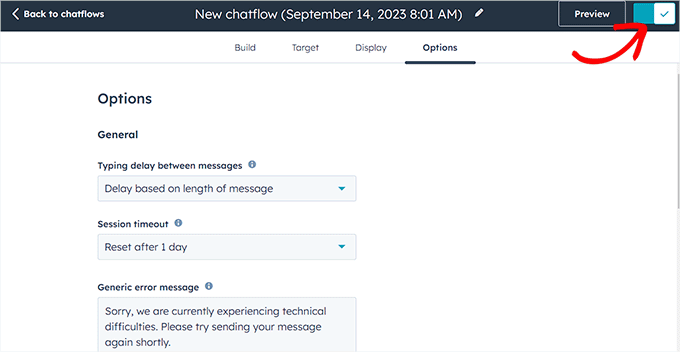
Now, switch to the ‘Options’ tab from the top to configure general settings like delay message text, session timeout, generic error message, bot language, availability, and more.
After that, click the ‘Save’ button to store your settings. Finally, toggle the switch at the top to activate your chatbot on your website.
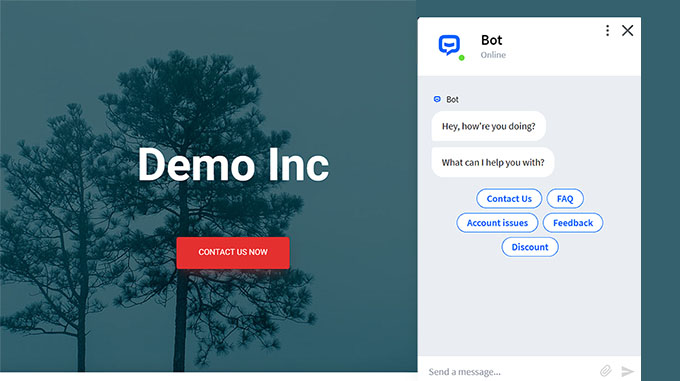
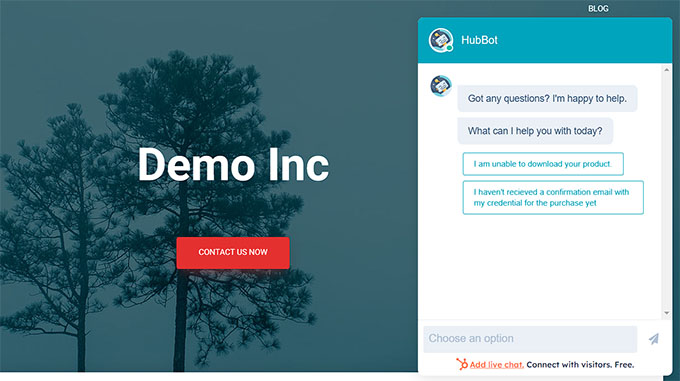
Now, you can visit your WordPress site to see your chatbot in action.
This is what it looked like on our demo website.
Bonus: Add Live Chat to Your WordPress Site
Live chat is a communication tool that allows visitors to chat with a member of your customer support team through a chat window on your website.
It is a super popular way to connect with customers and has a satisfaction level of 73%, which is much higher than email, phone, and SMS support.
It comes with pre-made live chat templates, real-time chat, multiple support channels, canned responses, chat transcripts, chat analytics, and so much more.
Thread dump analysis is a traditional approach followed to analyze the performance bottlenecks in Java-based applications. In the modern era, we have APM tools that provide various metrics and screens to drill down and identify performance issues, even at the code level. But for some of the performance issues or occasions, thread dump analysis still stands as the best way to identify the bottlenecks.
When To Use a Thread Dump
To analyze any performance issue, it is good to take a series of thread dumps with a 1 to 2-second time gap. Taking 10-15 thread dumps each with 1-2 second intervals helps to analyze the threads that got stuck or execute the same code across thread dumps.
Incident management is the process of identifying, responding, resolving, and learning from incidents that disrupt the normal operation of a service or system. An incident can be anything from a server outage, a security breach, a performance degradation, or a customer complaint. Incident management aims to restore the service as quickly as possible, minimize the impact on users and the business, and prevent the recurrence of similar incidents.
Incident Management Checklist
Incident management can be a complex and stressful process, especially when dealing with high-severity incidents that affect a large number of users or have a significant business impact. To help you navigate the incident management process, here is a checklist of the main steps and best practices to follow:
AI automation harnesses advanced AI techniques, including machine learning (ML) algorithms, natural language processing (NLP), and computer vision, to analyze extensive datasets. Through this process, AI applications not only process information but also construct intelligent models capable of making informed decisions based on acquired knowledge. This Refcard aims to equip practitioners with the necessary insights to navigate the complex process of building and implementing AI automations.
While the current Agile job crisis is apparent, there is also hope for practitioners willing to refine their skills, share knowledge, and network with peers.
This article outlines actionable strategies for thriving in challenging times, emphasizing that growth and success are achievable by leveraging community strength and readily accessible resources. Check out also how I can support you on your journey below.
AWS has a Lambda function that can be leveraged to take automatic snapshots of the KDA (Kinesis Data Analytics) applications that are running in a specific region. Refer the Lambda function source code here. Users can modify the Lambda function to their needs.