New in Chrome 88: aspect-ratio

And it was released yesterday! The big news for us in CSS Land is that the new release supports the aspect-ratio property. This comes right on the heels of Safari announcing support for it in Safari Technology Preview 118, which released January 6. That gives us something to look forward to as it rolls out to Edge, Firefox and other browsers.

Here’s the release video skipped ahead to the aspect-ratio support:

For those catching up:

  • An aspect ratio defines the proportion of an element’s dimensions. For example, a box with an aspect ratio of 1/1 is a perfect square. An aspect ratio of 3/1 is a wide rectangle. Many videos aim for a 16/9 aspect ratio.
  • Some elements, like images and iframes, have an intrinsic aspect ratio. That means if either the width or the height is declared, the other is automatically calculated in a way that maintains its proportion.
  • Non-replaced elements, like divs, don’t have an intrinsic aspect ratio. We’ve resorted to a padding hack to get the same sort of effect.
  • Support for an aspect-ratio property in CSS allows us to maintain the aspect ratio of non-replaced elements.
  • There are some tricks for using it. For example, defining width on an element with aspect-ratio will result in the property using that width value to calculate the element’s height. Same goes for defining the height instead. And if we define both the width and height of an element? The aspect-ratio is completely ignored.

Seems like now is a good time to start brushing up on it!

Direct Link to ArticlePermalink


The post New in Chrome 88: aspect-ratio appeared first on CSS-Tricks.

You can support CSS-Tricks by being an MVP Supporter.

I need a script that constantly scans a token on etherscan and notifies me

Ahun ni mi Eni ba temi je I need a script that constantly scans a token on etherscan and notifies me when a large order goes through. I should be able to set the following parameters 1. the token eg Celsius, DAI 2. large order size eg 50,000 I can provide a cloud server service for you to deploy it on like Vulture or I could run it off my own windows machine or on a cloud server. I would like to be notified when a large transaction occurs, if it could be tweeted that would be great or e-mail or sms notification is fine also

The Value of Internal APIs

Internal APIs are designed primarily to streamline software development and simplify systems and operational processes. These currently represent the vast majority of use cases.

Internal APIs are often overlooked since they are aimed at in-house developers. These types of APIs generally work with proprietary data specific to a company and its departments. Although this data must be protected, it must also be accessible to those who work with it. Internal APIs allow for exactly this kind of secure access, creating more efficient development cycles for their products.

Did APIs Play a Role in the Exfiltration of Personal Data From Parler.com After the Riot in Washington, DC?

In the aftermath of the riots in Washington, DC and the attack on the US Capitol Building on January 6, 2020, several public posts went viral across multimedia alleging that APIs played a role in the tens of terabytes of potentially private content including text, images, and video that were exfiltrated from Parler.com by tech vigilantes and even law enforcement authorities.

Best Ruby Practices Beginners Should Know

Python’s dominance is never really questioned when it comes to the best for programming novices because it checks almost every box that defines a simple language. It’s remarkably easy to pick up and can rise to any challenge. But what about Ruby?

Although it does not get enough credit for being one, Ruby is an awesome language for beginners. It provides powerful constructs (like blocks) and versatile concepts (like message passing à la Smalltalk) but retains Python’s fluid and elegant English-like syntax. In fact, in many cases, one might argue that the unique design choices that went into the Ruby syntax beat even Python in terms of readability and expressiveness. If you’re getting into programming, it’s very easy to recommend that you start with Ruby.

Best Network Security Software

Is your malware protection service not cutting it? Do you want more than basic protection for your network?

Poor security for your devices can lead to disaster. You need network security software that defends against all kinds of attacks.

Network security software gives you way more than just virus protection. It comes with features from ransomware protection to VPN access to ensure you don’t get caught with your guard down.

Different providers offer different features, and not all of them will benefit you. But you can still get software within your budget that has everything you need.

To help you choose, check out the best network security software of 2020.

The Top 7 Best Network Security Software Solutions

  1. Kaspersky Total Security-Best for Adaptive Security
  2. Bitdefender Total Security-Best for Comprehensive Features
  3. Webroot Internet Security Plus-Best for Fast Performance
  4. Norton 360 Deluxe-Best for Protecting Multiple Devices
  5. ESET Smart Security Premium-Best for Configurable Settings
  6. McAfee Total Protection-Best for Identity Theft Monitoring
  7. Trend Micro Maximum Security-Best for User-Friendly Security

Finding the right network security system for you means knowing what each one does best. Check out our reviews of these solutions to help you make a decision that protects you.

#1 Kaspersky Total Security—Best for Adaptive Security

  • Stop attacks in real time
  • Keylogger protection for Windows
  • GPS child locator
  • Starts at $44.99
Try it today!

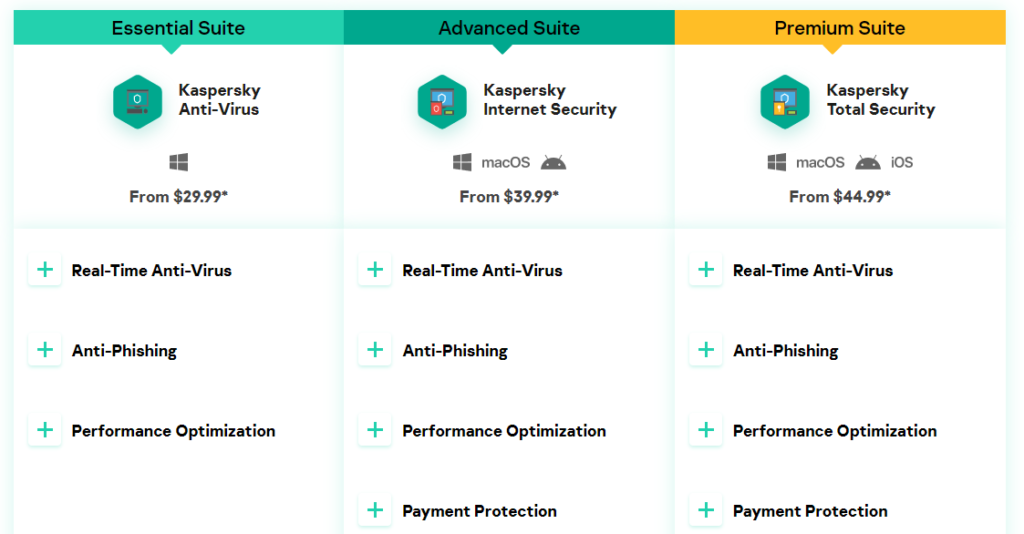
Kaspersky is one of the biggest names in network security, and for a good reason. It has adaptive protection that can tell you when you have a weak password and stops network attacks in real-time.

Kaspersky’s keylogger protection for Windows helps you guard your sensitive data, like banking and financial information. With a VPN to encrypt data using a 128-bit AES cipher, it hides your IP address so that no one can track your browsing habits. Plus, the anti-hacking feature prevents ransomware from getting into your network.

Kaspersky Total Security updates your software, protects you from unauthorized webcam use, and backs up your files. The software comes with a firewall, but it won’t bother you with popups. You can even use the Safe Kids module to set up parental controls if you need them.

With proactive detection as part of a three-layer defense, Kaspersky identifies and locates your device’s vulnerabilities and potential threats, then blocks cyber threats and removes immediate dangers.

Kaspersky Total Security is their best protection, starting at $44.99 with features like:

  • GPS child locator
  • File protection
  • Password manager

You can use this package for up to five devices with Mac, Windows, iOS, and Android operating systems.

The Total Security package doesn’t cost much more than Kaspersky’s regular anti-virus package, and it lets you configure your protection. The small bump in price makes it worth the premium protection.

#2 Bitdefender Total Security—Best for Comprehensive Features

  • Up to 56% off
  • Firewall + virus & ransomware protection
  • Uses AI to detect threats
  • Starts at $39.98
Try it today!

If you’re looking for tons of features, you can stop here.

Bitdefender Total Security gives you a more comprehensive range of them than any other network security system available, including:

  • Antivirus
  • Ransomware protection
  • Firewall
  • Wi-Fi security advisor
  • Safepay for online banking
  • File shredder
  • Password manager
  • Vulnerability scanner
  • Webcam and microphone protection
  • Parental controls

If you’re not impressed yet, Bitdefender uses AI to anticipate and detect threats, and then it blocks them before you even know they exist. It even keeps its resource use low, so you won’t notice any lag when using your device.

Bitdefender’s VPN encrypts internet traffic, so you can browse anonymously and keep your data away from prying eyes. Its anti-phishing software also makes sure no one can steal your information in disguise.

You can cover up to five devices with Windows, Mac, iOS, and Android for $39.98. And if you don’t want any interruptions, just set it to work, gaming, or movie mode. Bitdefender will talk to you when you’re ready.

#3 Webroot Internet Security Plus—Best for Fast Performance

  • Simple software
  • Master password encryption
  • Firewall and anti-ransomware
  • Starts at $44.99/year
Try it today!

Webroot Internet Security Plus with antivirus gives you super lightweight software for your devices. It barely affects performance and may even speed up your device when security threats don’t weigh it down. Its speedy scan times protect you without the wait.

With real-time anti-phishing, Webroot’s software blocks threats online instantly. Combine that with its firewall and anti-ransomware, and you have comprehensive protection for your device. With the LastPass password manager and constant identity theft protection, your personal information stays secure in your network.

Webroot operates with Windows, Mac, Android, and iOS, but check the features that come with each operating system. The iOS app is a little more limited than the rest in that it doesn’t come with malware scanning.

You get protection for three devices with Internet Security Plus for $44.99 per year, or you can upgrade to Internet Security Complete for 5 devices for $59.99 per year. The Complete package includes a few additional features, such as eliminating traces of your online activities and giving you 25GB of secure online storage.

If you’re not satisfied, the company offers a 70-day money-back guarantee.

#4 Norton 360 Deluxe—Best for Protecting Multiple Devices

  • Protect up to 5 devices
  • Integrated VPN
  • School Time setting
  • Starts at $39.99/year
Try it today!

Norton 360 Deluxe comes with many of the features you’d expect of a high-quality network security system. But it gives them an upgrade.

While its protection for up to five devices isn’t unique on its own, its integrated VPN is. You keep everyone on your network safe while saving money when you don’t have to buy a separate VPN. This protection works for all your devices, including Windows, Mac, Android, and iOS.

Norton 360 Deluxe has SafeCam webcam monitoring, dark web protection for US users, and some of the best parental controls on the market. You can track your kids’ device usage with in-depth monitoring and mobile device GPS tracking. The parental controls even include a School Time setting, which minimizes distractions so that your child can study in peace.

With a 50GB cloud backup, you can make sure none of your data gets lost. The smart firewall detects and predicts threats, so you don’t have to worry about anyone invading your network. Norton 360 Deluxe comes with online threat protection, including Wi-Fi, to fill in any holes in your network.

You can get Norton 360 Deluxe for $39.99 per year. Norton does have more advanced packages with credit monitoring, fictitious identity protection, and court records scanning. But unless you’re exceptionally concerned about your protection, Deluxe gives you more than enough.

#5 ESET Smart Security Premium—Best for Configurable Settings

  • Password manager
  • Protect from phishing
  • Anti-theft on laptop
  • Starts at $59.99
Try it today!

ESET looks out for you even when you’re not using your device. With exceptionally secure data protection and password management, you have everything you need to keep your information safe.

ESET Smart Security Premium has antivirus software that protects you from phishing and ransomware to secure your confidential information. It encrypts your files and removable media, and it comes with an anti-theft system for your laptop.

If you’re a network security software geek, you’ll like ESET’s flexible configurations. You can choose what you want to protect and how. Set it up to tell you what you want to know and leave out what you don’t.

Though the Advanced Protection is the most popular (and a little cheaper), the Smart Security package goes the extra mile to keep you safe with features like:

  • Password safety
  • Storage features
  • Photo encryption

If you have kids and need parental controls, ESET might not be your top choice. The controls are there, but they’re pretty basic.

With 110 million users worldwide, ESET is a trusted name in the network security system industry. Its Smart Security Premium works on Windows, Mac, Android, and Linux.

You can get this package for $59.99 per year for one device, though you’ll have to pay an extra $10 for every additional device you plan to cover. If you want to see whether it’s worth it, you can try the software free for 30 days.

#6 McAfee Total Protection—Best for Identity Theft Monitoring

  • Creat private connections
  • Identity theft monitoring
  • Wi-Fi protection
  • Browse safely
Try it today!

With no VPN usage limit, McAfee Total Protection turns any unsecured network into a private connection. It offers some of the most high-class anti-virus software on the market. With over 500 million customers, McAfee is one of the oldest and most trusted names in the network security business.

This Individual & Couples package comes with identity theft monitoring, which many other reasonably priced network security systems don’t. This multi-layered protection tells you if your information gets leaked on the internet and stores your passwords to make sure you and your personal data aren’t vulnerable to fraud.

McAfee keeps cookies and temporary files out with award-winning performance and even pauses annoying auto-play videos for you. You can configure its firewall to keep out the right stuff and only alert you when you want it to.

This software has tools designed to boost your device’s performance and prevent any slow-down that comes with extra protection. It even makes it easy to see potentially dangerous sites by color-coding links.

You can get protection for up to five devices for $24.99 per year with a two-year subscription on the Individual & Couples plan. Don’t limit yourself to the single-device version, as this one is only $5 more per year, and you get more devices and features. However, for just $29.95 per year, you could also go with the Family plan for 10 devices, and includes their Safe Family feature for mass protection.

#7 Trend Micro Maximum Security—Best for User-Friendly Security

  • User-friendly interface
  • Protect up to 5 devices
  • 50% discount
  • Starting at $39.95
Try it today!

Trend Micro Maximum Security’s user-friendly interface makes it easy for anyone without deep tech knowledge to get the protection they need. It’s streamlined and easy to configure, so it works well for beginners who want to tailor their security without complication.

With multi-layer anti-ransomware and above-average URL filtering, this software makes you feel safe while you browse. And social network protection lets you interact online without worrying about someone stealing your information.

Trend has countermeasures to guard against data theft and a vault that lets you safely store confidential or personal files. Its integrated password manager means it remembers your passwords, so you don’t put your information at risk. It even gives you parental controls, so your kids stay safe, too.

If you’re looking for something more advanced, Trend Micro Maximum Security might not be your thing. While you can configure its features to work for you, it doesn’t have the low-level flexibility that some tech gurus want. That’s the trade-off for beginner-friendly software.

You can cover up to five devices for $39.95 per year. If you want to try it before you buy, you can test it out with a 30-day free trial.

How to Find the Best Network Security Software for You

When you need network security software, it helps to know what makes it perform better. Protection varies between packages and companies, so make sure you do your research before you buy. Consider these security features when you look.

Access Control

Access control lets only authorized users you choose into your network. It also gives you the ability to limit access for other users as much as necessary.

This feature ensures that even people you want to access your network can’t become potential security threats. With it, you can allow certain users access only to specific parts of the network to avoid any disasters.

Anti-Malware Protection

Anti-malware protection guards against viruses, trojans, spyware, and other threats trying to infect your system. Anti-malware software identifies the threats before they get into your device and corrupt files or steal your information.

Malware infections can render your device useless over time, making it all the more important to have a high-quality anti-malware feature.

Data Loss Prevention

Data loss prevention helps guard against human error—yes, even yours. It makes sure that your data stays protected so that you don’t lose it by mistake. It also keeps a watchful eye to ensure no external threats compromise your personal information.

Firewalls

Firewalls manage traffic so that authorized traffic has the access it needs, and unauthorized traffic can’t get through. In other words, it protects the border between your network and the internet.

Firewalls ensure you don’t experience any unwanted network traffic and block threats from unsecured websites early, so your device keeps running the way it should.

Virtual Private Network

A virtual private network (VPN) is one of the most essential features when upgrading your security from a basic package. It authenticates all devices within the network, as well as the people accessing them.

VPNs make sure no one else can see what happens within your network without permission. That also prevents you from becoming a target of online threats.

Web and Wireless Security

You need access to the internet, but you want to make sure your device is safe while you’re online. Web and wireless security ensure that you can access the internet without risk through your network.

This type of protection prevents threats from using your browser to target you. And since wireless networks are generally less secure than others, a network security system should give you extra protection.

Summary

Whether you need a network security system package that keeps your PC running at top speed or your smartphone on its toes, each of the tools on this list has something to offer. Your software should give you the most comprehensive protection possible. Plus, you want great value for your money.

Consider how the options stack up against the basic and more advanced features you want. Before you buy, test the software and research its strengths and weaknesses.

Then, choose one based on the protection you get for the number of devices you need.

The best network security software should guard your devices at their most vulnerable, no matter where that is.

Real-Time Locating System (RTLS) With Apache Kafka

Real-Time Locating System (RTLS) with Apache Kafka for Transportation and Logistics

Real-Time Locating System (RTLS) enables identifying and tracking the location of objects or people in real-time. It is used everywhere in transportation and logistics across industries. A postmodern RTLS requires open architecture and high scalability. This blog post explores the use cases for RTLS, the challenges of existing implementations, and why more and more RTLS implementations rely on Apache Kafka as an open, scalable, and reliable event streaming platform.

Real-Time Locating / Tracking System (RTLS) in Supply Chain and Logistics

RTLS is a key part of many use cases across verticals. Many manufacturing processes and supply chains rely on good real-time information of assets and people. But also, other innovative scenarios could not exist without RTLS. For instance, think about ride-sharing, car-sharing, or food delivery.

#299: Meet CPHub

CPHub is just the name of an internal project (“CodePen Hub”) that we’ve released in the last couple of weeks. You (as a user) won’t notice a thing (except, perhaps, that some of our processors have been upgraded, like RubySass to DartSass). But for us, we notice, because not only does it do everything we hoped it would, it’s had side effects that have all been positive.

This show is Alex and Chris chatting about all the technical in-and-outs of the project. Short story: we have a new internally-facing relative URL, which is responsible for the vast majority of anything that would otherwise go out to a third-party URL. So for example, all our code processing services in the past would have been routed to an AWS Gateway and then to an AWS Lambda orchestrator and then to an individual AWS Lambda and back. Now they go to CPHub, to the individual Lambda, and back. But it’s not just AWS stuff, it’s really any third party HTTP request.

Among other things, CPHub is:

  1. Faster — a handful of Go-powered web servers that are literally faster, never break a sweat, and require less hops
  2. Less expensive — we have to manage those servers, but they are simple and cheap
  3. Are not subject to CORS concerns — because the HTTP requests are to our own domain

The thing I’m most excited about though is the consolidation. Every service we have is consolidated into the CPHub area of our repo and we’ve improved the deployment story for all of it.

Episode Timestamps

  • 01:14 Serverless functions on CodePen
  • 06:43 Advantages of CP Hub
  • 11:22 Sponsor: FeaturePeek
  • 14:17 Benefits of CP Hub continued
  • 19:16 Boom Boom
  • 25:02 Writing a node function
  • 32:15 A good idea all around
  • 34:36 Squashing bugs

Sponsor: FeaturePeek

Turn front-end deployment previews into your hub for continuous product review. FeaturePeek is the easiest way for web development teams to collaborate on frontend work.

  • Take and annotate screenshots
  • Record session video
  • Tag coworkers and leave comments

FeaturePeek works with all frameworks and hosting providers and integrates with Linear, Clubhouse, Trello, and more.

Get started today at featurepeek.com and use code FP2021 for 30% off upgrades to FeaturePeek for business teams.

The post #299: Meet CPHub appeared first on CodePen Blog.

Lightweight Form Validation with Alpine.js and Iodine.js

Many users these days expect instant feedback in form validation. How do you achieve this level of interactivity when you’re building a small static site or a server-rendered Rails or Laravel app? Alpine.js and Iodine.js are two minimal JavaScript libraries we can use to create highly interactive forms with little technical debt and a negligible hit to our page-load time. Libraries like these prevent you from having to pull in build-step heavy JavaScript tooling which can complicate your architecture.

I‘m going to iterate through a few versions of form validation to explain the APIs of these two libraries. If you want to copy and paste the finished product here‘s what we’re going to build. Try playing around with missing or invalid inputs and see how the form reacts:

A quick look at the libraries

Before we really dig in, it’s a good idea to get acquainted with the tooling we’re using.

Alpine is designed to be pulled into your project from a CDN. No build step, no bundler config, and no dependencies. It only needs a short GitHub README for its documentation. At only 8.36 kilobytes minfied and gzipped, it’s about a fifth of the size of a create-react-app hello world. Hugo Di Fracesco offers a complete and thorough overview of what it is an how it works. His initial description of it is pretty great:

Alpine.js is a Vue template-flavored replacement for jQuery and vanilla JavaScript rather than a React/Vue/Svelte/WhateverFramework competitor.

Iodine, on the other hand, is a micro form validation library, created by Matt Kingshott who works in the Laravel/Vue/Tailwind world. Iodine can be used with any front-end-framework as a form validation helper. It allows us to validate a single piece of data with multiple rules. Iodine also returns sensible error messages when validation fails. You can read more in Matt’s blog post explaining the reasoning behind Iodine.

A quick look at how Iodine works

Here’s a very basic client side form validation using Iodine. We‘ll write some vanilla JavaScript to listen for when the form is submitted, then use DOM methods to map through the inputs to check each of the input values. If it‘s incorrect, we’ll add an “invalid” class to the invalid inputs and prevent the form from submitting.

We’ll pull in Iodine from this CDN link for this example:

<script src="https://cdn.jsdelivr.net/gh/mattkingshott/iodine@3/dist/iodine.min.js" defer></script>

Or we can import it into a project with Skypack:

import kingshottIodine from "https://cdn.skypack.dev/@kingshott/iodine";

We need to import kingshottIodine when importing Iodine from Skypack. This still adds Iodine to our global/window scope. In your user code, you can continue to refer to the library as Iodine, but make sure to import kingshottIodine if you’re grabbing it from Skypack.

To check each input, we call the is method on Iodine. We pass the value of the input as the first parameter, and an array of strings as the second parameter. These strings are the rules the input needs to follow to be valid. A list of built-in rules can be found in the Iodine documentation.

Iodine’s is method either returns true if the value is valid, or a string that indicates the failed rule if the check fails. This means we‘ll need to use a strict comparison when reacting to the output of the function; otherwise, JavaScript assesses the string as true. What we can do is store an array of strings for the rules for each input as JSON in HTML data attributes. This isn’t built into either Alpine or Iodine, but I find it a nice way to co-locate inputs with their constraints. Note that if you do this you’ll need to surround the JSON with single quotes and use double quotes inside the attribute to follow the JSON spec.

Here’s how this looks in our HTML:

<input name="email" type="email" id="email" data-rules='["required","email"]'>

When we‘re mapping through the DOM to check the validity of each input, we call the Iodine function with the element‘s input value, then the JSON.encode() result of the input’s dataset.rules. This is what this looks like using vanilla JavaScript DOM methods:

let form = document.getElementById("form");

// This is a nice way of getting a list of checkable input elements
// And converting them into an array so we can use map/filter/reduce functions:
let inputs = [...form.querySelectorAll("input[data-rules]")];

function onSubmit(event) {
  inputs.map((input) => {
    if (Iodine.is(input.value, JSON.parse(input.dataset.rules)) !== true) {
      event.preventDefault();
      input.classList.add("invalid");
    }
  });
}
form.addEventListener("submit", onSubmit);

Here’s what this very basic implementation looks like:

As you can tell this is not a great user experience. Most importantly, we aren’t telling the user what is wrong with the submission. The user also has to wait until the form is submitted before finding out anything is wrong. And frustratingly, all of the inputs keep the “invalid” class even after the user has corrected them to follow our validation rules.

This is where Alpine comes into play

Let’s pull it in and use it to provide nice user feedback while interacting with the form.

A good option for form validation is to validate an input when it’s blurred or on any changes after it has been blurred. This makes sure we‘re not yelling at the user before they’ve finished writing, but still give them instant feedback if they leave an invalid input or go back and correct an input value.

We’ll pull Alpine in from the CDN:

<script src="https://cdn.jsdelivr.net/gh/alpinejs/alpine@v2.7.3/dist/alpine.min.js" defer></script>

Or we can import it into a project with Skypack:

import alpinejs from "https://cdn.skypack.dev/alpinejs";

Now there’s only two pieces of state we need to hold for each input:

  • Whether the input has been blurred
  • The error message (the absence of this will mean we have a valid input)

The validation that we show in the form is going to be a function of these two pieces of state.

Alpine lets us hold this state in a component by declaring a plain JavaScript object in an x-data attribute on a parent element. This state can be accessed and mutated by its children elements to create interactivity. To keep our HTML clean, we can declare a JavaScript function that returns all the data and/or functions the form would need. Alpine will look for the this function in the global/window scope of our JavaScript code if we add this function to the x-data attribute. This also provides a reusable way to share logic as we can use the same function in multiple components or even multiple projects.

Let’s initialize the form data to hold objects for each input field with two properties: an empty string for the errorMessage and a boolean called blurred. We’ll use the name attribute of each element as their keys.


<form id="form" x-data="form()" action="">
  <h1>Log In</h1>

  <label for="username">Username</label>
  <input name="username" id="username" type="text" data-rules='["required"]'>

  <label for="email">Email</label>
  <input name="email" type="email" id="email" data-rules='["required","email"]'>

  <label for="password">Password</label>
  <input name="password" type="password" id="password" data-rules='["required","minimum:8"]'>

  <label for="passwordConf">Confirm Password</label>
  <input name="passwordConf" type="password" id="passwordConf" data-rules='["required","minimum:8"]'>

  <input type="submit">
</form>

And here’s our function to set up the data. Note that the keys match the name attribute of our inputs:

window.form = () => { 
  return {
    username: {errorMessage:'', blurred:false},
    email: {errorMessage:'', blurred:false},
    password: {errorMessage:'', blurred:false},
    passwordConf: {errorMessage:'', blurred:false},
  }
}

Now we can use Alpine’s x-bind:class attribute on our inputs to add the “invalid” class if the input has blurred and a message exists for the element in our component data. Here’s how this looks in our username input:

<input name="username" id="username" type="text" 
x-bind:class="{'invalid':username.errorMessage && username.blurred}" data-rules='["required"]'>

Responding to input changes

Now we need our form to respond to input changes and on blurring input states. We can do this by adding event listeners. Alpine gives a concise API to do this either using x-on or, similar to Vue, we can use an @ symbol. Both ways of declaring these act the same way.

On the input event we need to change the errorMessage in the component data to an error message if the value is invalid; otherwise, we’ll make it an empty string.

On the blur event we need to set the blurred property as true on the object with a key matching the name of the blurred element. We also need to recalculate the error message to make sure it doesn’t use the blank string we initialized as the error message.

So we’re going to add two more functions to our form to react to blurring and input changes, and use the name value of the event target to find what part of our component data to change. We can declare these functions as properties in the object returned by the form() function.

Here’s our HTML for the username input with the event listeners attached:

<input 
  name="username" id="username" type="text"
  x-bind:class="{'invalid':username.errorMessage && username.blurred}" 
  @blur="blur" @input="input"
  data-rules='["required"]'
>

And our JavaScript with the functions responding to the event listeners:

window.form = () => {
  return {
    username: {errorMessage:'', blurred:false},
    email: {errorMessage:'', blurred:false},
    password:{ errorMessage:'', blurred:false},
    passwordConf: {errorMessage:'', blurred:false},
    blur: function(event) {
      let ele = event.target;
      this[ele.name].blurred = true;
      let rules = JSON.parse(ele.dataset.rules)
      this[ele.name].errorMessage = this.getErrorMessage(ele.value, rules);
    },
    input: function(event) {
      let ele = event.target;
      let rules = JSON.parse(ele.dataset.rules)
      this[ele.name].errorMessage = this.getErrorMessage(ele.value, rules);
    },
    getErrorMessage: function() {
    // to be completed
    }
  }
}

Getting and showing errors

Next up, we need to write our getErrorMessage function.

If the Iodine check returns true, we‘ll set the errorMessage property to an empty string. Otherwise, we’ll pass the rule that has broken to another Iodine method: getErrorMessage. This will return a human-readable message. Here’s what this looks like:

getErrorMessage:function(value, rules){
  let isValid = Iodine.is(value, rules);
  if (isValid !== true) {
    return Iodine.getErrorMessage(isValid);
  }
  return '';
}

Now we also need to show our error messages to the user.

Let’s add <p> tags with an error-message class below each input. We can use another Alpine attribute called x-show on these elements to only show them when their error message exists. The x-show attribute causes Alpine to toggle display: none; on the element based on whether a JavaScript expression resolves to true. We can use the same expression we used in the show-invalid class on the input.

To display the text, we can connect our error message with x-text. This will automatically bind the innertext to a JavaScript expression where we can use our component state. Here’s what this looks like:

<p x-show="username.errorMessage && username.blurred" x-text="username.errorMessage" class="error-message"></p>

One last thing we can do is re-use the onsubmit code from before we pulled in Alpine, but this time we can add the event listener to the form element with @submit and use a submit function in our component data. Alpine lets us use $el to refer to the parent element holding our component state. This means we don’t have to write lengthier DOM methods:

<form id="form" x-data="form()" @submit="submit" action="">
  <!-- inputs...  -->
</form>
submit: function (event) {
  let inputs = [...this.$el.querySelectorAll("input[data-rules]")];
  inputs.map((input) => {
    if (Iodine.is(input.value, JSON.parse(input.dataset.rules)) !== true) {
      event.preventDefault();
    }
  });
}

This is getting there:

  • We have real-time feedback when the input is corrected.
  • Our form tells the user about any issues before they submit the form, and only after they’ve blurred the inputs.
  • Our form does not submit when there are invalid properties.

Validating on the client side of a server-side rendered app

There are still some problems with this version, though some won‘t be immediately obvious in the Pen as they‘re related to the server. For example, it‘s difficult to validate all errors on the client side in a server-side rendered app. What if the email address is already in use? Or a complicated database record needs to be checked? Our form needs to have a way to show errors found on the server. There are ways to do this with AJAX, but we’ll look at a more lightweight solution.

We can store the server side errors in another JSON array data attribute on each input. Most back-end frameworks will provide a reasonably easy way to do this. We can use another Alpine attribute called x-init to run a function when the component initializes. In this function we can pull the server-side errors from the DOM into each input’s component data. Then we can update the getErrorMessage function to check whether there are server errors and return these first. If none exist, then we can check for client-side errors.

<input name="username" id="username" type="text" 
x-bind:class="{'invalid':username.errorMessage && username.blurred}" 
@blur="blur" @input="input" data-rules='["required"]' 
data-server-errors='["Username already in use"]'>

And to make sure the server side errors don’t show the whole time, even after the user starts correcting them, we’ll replace them with an empty array whenever their input gets changed.

Here’s what our init function looks like now:

init: function () {
  this.inputElements = [...this.$el.querySelectorAll("input[data-rules]")];
  this.initDomData();
},
initDomData: function () {
  this.inputElements.map((ele) => {
  this[ele.name] = {
    serverErrors: JSON.parse(ele.dataset.serverErrors),
    blurred: false
    };
  });
}

Handling interdependent inputs

Some of the form inputs may depend on others for their validity. For example, a password confirmation input would depend on the password it is confirming. Or a date you started a job field would need to hold a value later than your date-of-birth field. This means it’s a good idea to check all the inputs of the form every time an input gets changed.

We can map through all of the input elements and set their state on every input and blur event. This way, we know that inputs that rely on each other will not be using stale data.

To test this out, let’s add a matchingPassword rule for our password confirmation. Iodine lets us add new custom rules with an addRule method.

Iodine.addRule(
  "matchingPassword",
  value => value === document.getElementById("password").value
);

Now we can set a custom error message by adding a key to the messages property in Iodine:

Iodine.messages.matchingPassword="Password confirmation needs to match password";

We can add both of these calls in our init function to set up this rule.

In our previous implementation, we could have changed the “password” field and it wouldn’t have made the “password confirmation” field invalid. But now that we’re mapping through all the inputs on every change, our form will always make sure the password and the password confirmation match.

Some finishing touches

One little refactor we can do is to make the getErrorMessage function only return a message if the input has been blurred — this can make our HTML slightly shorter by only needing to check one value before deciding whether to invalidate an input. This means our x-bind attribute can be as short as this:

x-bind:class="{'invalid':username.errorMessage}"

Here’s what our functions look like to map through the inputs and set the errorMessage data now:

updateErrorMessages: function () {
  // Map through the input elements and set the 'errorMessage'
  this.inputElements.map((ele) => {
    this[ele.name].errorMessage = this.getErrorMessage(ele);
  });
},
getErrorMessage: function (ele) {
  // Return any server errors if they're present
  if (this[ele.name].serverErrors.length > 0) {
    return input.serverErrors[0];
  }
  // Check using Iodine and return the error message only if the element has not been blurred
  const error = Iodine.is(ele.value, JSON.parse(ele.dataset.rules));
  if (error !== true && this[ele.name].blurred) {
    return Iodine.getErrorMessage(error);
  }
  // Return empty string if there are no errors
  return "";
},

We can also remove the @blur and @input events from all of our inputs by listening for these events in the parent form element. However, there is a problem with this: the blur event does not bubble (parent elements listening for this event will not be passed it when it fires on their children). Luckily, we can replace blur with the focusout event, which is basically the same event, but this one bubbles, so we can listen for it in our form parent element.

Finally, our code is growing a lot of boilerplate. If we were to change any input names we would have to rewrite the data in our function every time and add new event listeners. To prevent rewriting the component data every time, we can map through the form’s inputs that have a data-rules attribute to generate our initial component data in the init function. This makes the code more reusable for additional forms. All we’d need to do is include the JavaScript and add the rules as a data attribute and we’re good to go.

Oh, and hey, just because it’s so easy to do with Alpine, let’s add a fade-in transition that brings attention to the error messaging:

<p class="error-message" x-show.transition.in="username.errorMessage" x-text="username.errorMessage"></p>

And here’s the end result. Reactive, reusable form validation at a minimal page-load cost.

If you want to use this in your own application, you can copy the form function to reuse all the logic we’ve written. All you’d need to do is configure your HTML attributes and you’d be ready to go.


The post Lightweight Form Validation with Alpine.js and Iodine.js appeared first on CSS-Tricks.

You can support CSS-Tricks by being an MVP Supporter.

Develop Your Global eCommerce Website Using Magento

Magento is a leading eCommerce Development Platform. We believe that the most potent, influential, and obligatory eCommerce development platform around the globe is Magento. Many businesses or online stores are achieving their goals and are expanding by using Magento.

Since Magento was launched in 2008 it has reached the next level of high value in the market. They provide extreme flexibility to their stores with attractive features and designs; these are the most important factors to attract more customers to the stores. 

DevOps Security: What Is DevSecOps?

What Is DevOps?

Firstly, DevOps is an acronym, short for development (Dev) and operations (Ops). It is mainly the union of people, processes and technology to continually provide value to the business and their customers. It can also be its own department of engineers who posses hybrid skills that developers, network administrators and operations have. 

Their main focus is to take the former siloed departments like development, IT operations, and quality engineering to collaborate and coordinate them into one. Their outcome should lead to a faster time to market, readily available systems, and more reliable products.

On-Scroll Letter Animations

Today I’d like to share some on-scroll animations for typography with you. There’s a lot of artsy stuff that can be done when we scroll a page and moving letters is one of the things that can set an interesting “motion mood” to a design. Be it just a simple title or a menu or a card-like component, we can play with moving letters depending on the scroll (direction and speed).

This set is very experimental using Locomotive Scroll, and there are certainly better ways to calculate the translate value of each letter, depending on the length of the words, for example. I’ve made this quick and dirty but I hope it gives you some idea of what can be done.

In combination with images, we can add another layer of visual motion which makes possibilities really endless.

I hope you enjoy this little set and find it useful! Thank you for checking by and hit me up on Twitter @crnacura or @codrops, I’d love to hear your feedback!

The post On-Scroll Letter Animations appeared first on Codrops.

How to Get Email Notification for Post Changes in WordPress

Do you want to get email notifications for post changes in WordPress?

By default, WordPress does not send any notifications when posts are changed by any user. If you run a multi-author WordPress site, then you may want to stay informed about post changes on your website.

In this article, we will show how to get email notifications for post changes in WordPress.

Setting up email notifications for post changes in WordPress

Why Set up Email Notifications for Post Changes in WordPress?

If you are the only one working on your own WordPress website, then it is easier to keep an eye on everything that is happening on your website.

However, if you have other authors writing blog posts, or SEO specialists optimizing blog posts for SEO, then you may want to keep an eye on the changes they make.

For instance, you may want to be alerted when a new post is published or if changes were made to an older article.

This also helps all team members accountable. If they make a mistake, then it can be easily caught and remedied quickly.

That being said, let’s take a look at how to easily set up email notifications for post changes in WordPress.

We’ll be showing you two methods to do that, you can choose one that works best for you. We’ll also show you how to undo changes and improve the deliverability of WordPress notification emails.

Method 1. Set up Post Changes Notifications in WordPress using WP Activity Log

This method is recommended for all users as it is easier, powerful, and flexible.

First thing you need to do is install and activate the WP Activity Log plugin. For more details, see our step by step guide on how to install a WordPress plugin.

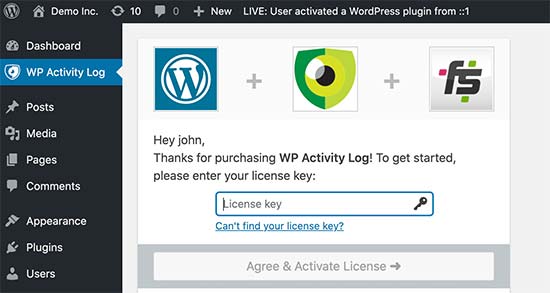
Upon activation, you’ll be asked to enter your license key. You can find this information under your account on the WP Activity Log website.

Add license key for WP Activity Log

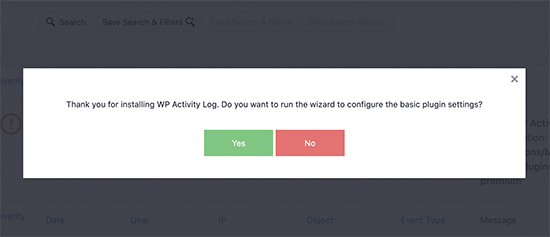
Next, you’ll be given the option to run the set up wizard . You can answer a few quick questions to set up important monitoring and logging features. All these things can be changed later in plugin settings too.

WP Activity Log set up wizard

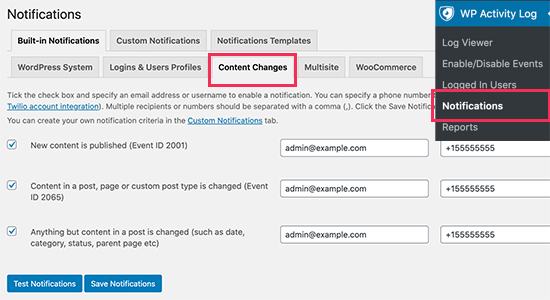
After that, you need to visit WP Activity Log » Notifications page and switch to the Content Changes tab.

Setting up content change notifications in WP Activity Log

From here, you need to select the events that will trigger notifications. The plugin comes with three default notifications covering most content changes.

Next to each event, you need to enter the email address you want to send notifications to. Optionally, you can also add a mobile phone number to get SMS notifications for post changes (we will show you how to set it up later in this article).

Finally, click on the Save notifications button to store your changes.

Setting up SMS Notifications for Post Changes in WordPress

WP Activity Log allows you to easily receive SMS notifications for post changes and other WordPress activities. To do that, you’ll need a Twilio account and a phone number.

Twillio is a paid service with a pay as you go pricing model for SMS starting at $0.0075 per SMS. You’ll also need to purchase a virtual phone number which will be used to send messages.

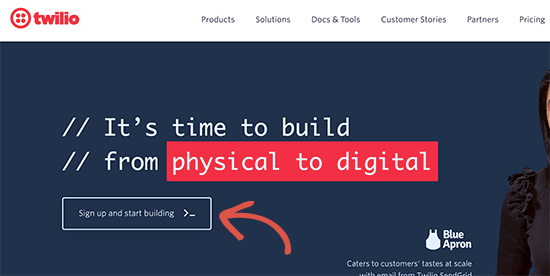
Simply go to the Twillio website and signup for a free trial account.

Sign up for a Twilio account

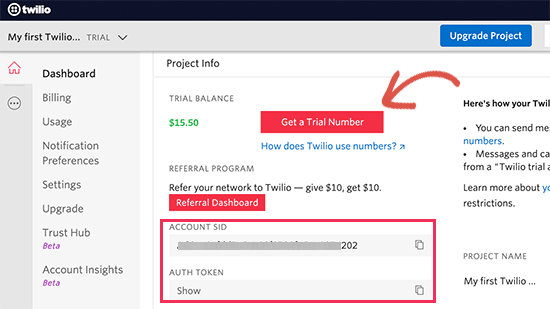
After setting up your account, you’ll reach the Twillio dashboard where you can copy your Account SID, Auth Token, and get a trial phone number.

Getting your Twilio credentials

Copy and paste these values to a text editor or leave this browser tab open.

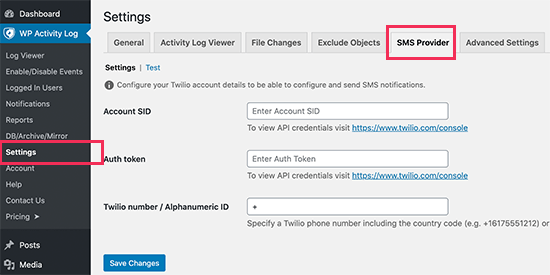
Next, switch back to your WordPress website admin area and visit the WP Activitiy Log » Settings page. From here, switch to the SMS Provider tab and enter your Twilio credentials.

Entering your Twilio credentials

Don’t forget to click on the save changes button to store your settings.

Testing Your Post Changes Notifications with WP Activity Log

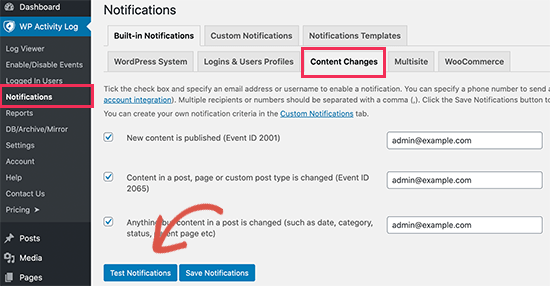
WP Activity Log allows you to easily test your post change notifications. Simply go back to the WP Activity Log » Notifications page and switch to the ‘Content Changes’ tab.

Test notifications in WordPress Activity Log

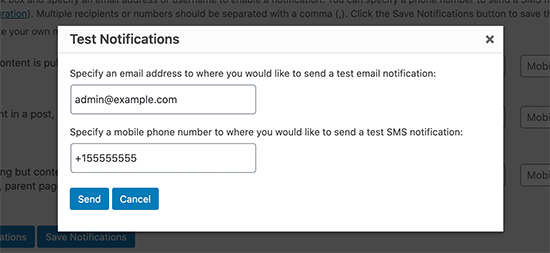
Scroll down and click on the ‘Test Notifications’ button. This will bring up a popup window where you can enter an email address and a mobile phone number to send notifications.

Send test notifications

WP Activity Log will then send test notifications. If you do not receive an email notification right away, then you can jump to the fixing email notifications in the WordPress section.

If you fail to receive SMS notifications, then check your Twilio credentials to make sure they are correct.

Method 2. Sending Email Notifications for Post Changes with Better WordPress Notifications

This method is easy to use, but it doesn’t come with ready-made template. While this method allows you to send an email notification when a post is changed, you would have to write the email yourself and investigate the activity on your own.

First, you need to install and activate the Better Notifications for WordPress plugin. For more details, see our step by step guide on how to install a WordPress plugin.

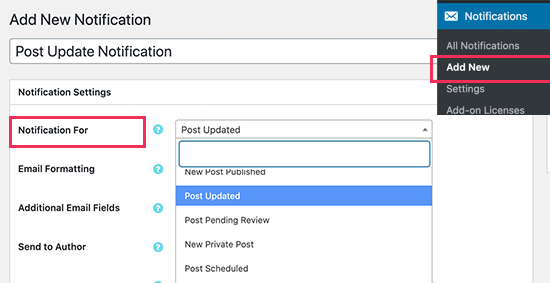
Upon activation, you need to visit Notifications » Add New page to create your first custom notification.

Creating a post change notification

First, you need to provide a title for the notification. After that, choose the ‘Notification for’ option, which is the event that will trigger this notification.

For instance, we have chosen ‘Post Updated’ as the event for this notification.

Next, you can set email options like from, cc, sender email. You can skip them and the plugin will use your default WordPress email settings.

Setting up email settings

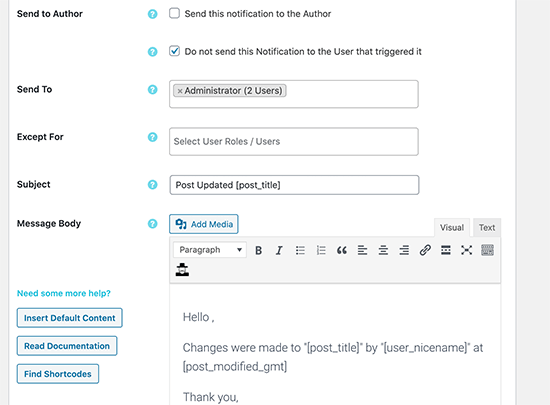
Next, you need to select the users or user roles that will receive this notification under the ‘Send to’ option. Below that you can write the email subject and the message itself.

Better Notifications for WP doesn’t come with a template for post changes. This means you’ll need to write your own email message.

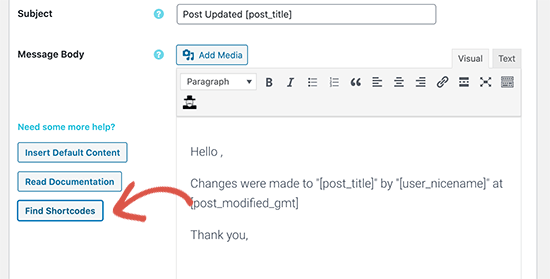
The plugin comes with a bunch of shortcodes that you can use. You can view all of them by clicking on the ‘Find shortcodes’ button.

Find shortcodes to include in your email notification

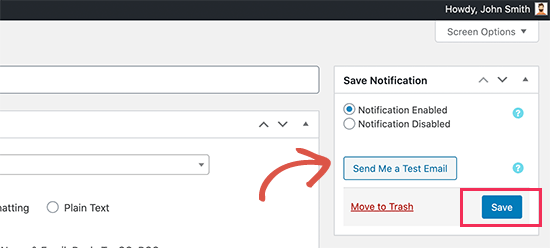
Lastly, you need to click on the Save button to store your email notification. After that, you’ll be able to click on the ‘Send Me a Test Email’ button to see if it is working.

Save and test your email notification

Better Notification for WordPress is not an activity monitoring plugin. This means you’ll need to set up multiple notifications to cover different types of content changes in WordPress.

For instance, you may want to set up a ‘Notification for’ when a new ‘Post Published’ or another one for when a category or tag is changed, and more.

It also allows you to create custom notifications or modify default WordPress notifications as well. For more details, see our article on how to create better custom notifications in WordPress.

Revise and Undo Post Changes in WordPress

Once you have received an email notification for post changes, you may want to see what changes were made, who made them, and when.

WordPress comes with a built-in revision management system that keeps track of all changes made to an article.

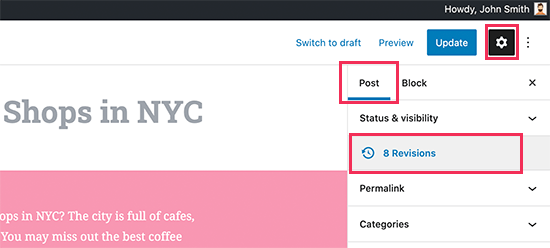
Simply edit the post or page that you want to review and then click on the ‘Revisions’ tab under the ‘Post’ settings from the right-column.

Open revisions for a post or page in WordPress

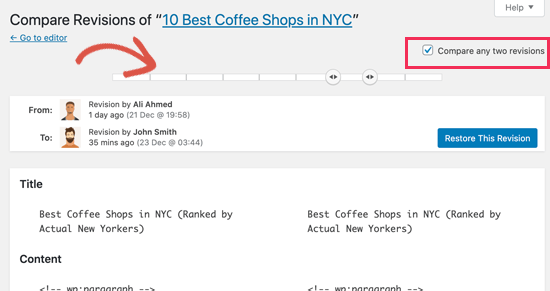
This will bring you to the post revisions screen where you can check the ‘Compare two revisions’ box and then move the slider below to compare the changes.

Comparing revisions in WordPress

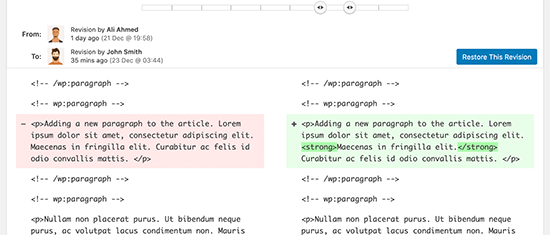
Scroll down and you will see the changes between the two revisions highlighted in red and green colors.

Changes highlighted in revision history

If you don’t like the changes, then you can simply click on the ‘Restore revision’ button to undo them and return to the previous version.

Troubleshooting Email Notifications in WordPress

By default, WordPress uses the PHP mail() function to send emails.

This method does not use proper authentication (login or password) which means it can be easily misused. This is why most spam filters mark such emails as spam or block them altogether.

To fix this, you need to use a proper SMTP service provider to send out WordPress emails. There are even free SMTP servers like Gmail, Sendinblue, Sendgrid, and more that you can use with WordPress.

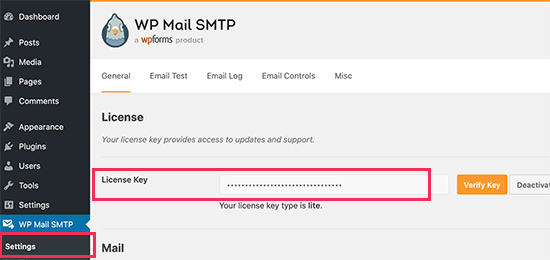
To set up SMTP, you need to install and activate the WP Mail SMTP plugin. For more details, see our step by step guide on how to install a WordPress plugin.

WP Mail SMTP allows you to connect your WordPress site to your SMTP service provider and send all your WordPress emails with much higher deliverability.

Upon activation, you need to go to the WP Mail SMTP » Settings page in your WordPress admin area to set up the plugin.

WP Mail SMTP license

First, you need to enter your license key. You can find this information under your account on the WP Mail SMTP website.

After that, scroll down to the ‘Mailer’ section to select your SMTP service provider. WP Mail SMTP will show all top SMTP service providers. You can click on your provider and then enter the required information below (usually an API key).

SMTP mailers in WP Mail SMTP

If your mailer is not listed, then you can simply choose ‘Other SMTP’ option and enter the required information.

For more detailed instructions, see our tutorial on how to fix WordPress not sending email issue.

We hope this article helped you set up email notifications for post changes in WordPress. You may also want to see our tips on getting more traffic to your blog and the best WordPress SEO plugins and tools to grow your website.

If you liked this article, then please subscribe to our YouTube Channel for WordPress video tutorials. You can also find us on Twitter and Facebook.

The post How to Get Email Notification for Post Changes in WordPress appeared first on WPBeginner.

The Best Websites to Learn Coding Online

The Learn to Code movement has picked up momentum worldwide and that is actually a good thing as even basic programming skills can have a major impact. If you can teach yourself how to write code, you gain a competitive edge over your peers, you can think more algorithmically and thus can tackle problems more efficiently.

Learn Programming

Don’t just download the latest app, help redesign it. Don’t just play on your phone, program it. — Obama.

There’s no reason why shouldn’t know the basics of coding. You can automate tasks, you can program your Excel sheets, improve workflows, you can extract data from websites and accomplish so much more with code. You may not be in the business of writing software programs but knowing the basics of coding will help you communicate more effectively with developers.

Gone are the days when you had to enroll in expensive computer training classes as now exist a plethora of web-based courses that will help you learn programming at your own pace in the comfort of your web browser.

The Best Sites to Learn Programming

If you are ready to take the plunge, here are some of the best websites that offer courses in a variety of programming languages for free. I have also added a list of companion ebooks that will give you a more in-depth understanding of the language and they don’t cost anything either.

Programming LanguageOnline Courses and Video ScreencastsDownload PDF Books (Read online for free)
JavaScriptCode Academy, Learn Street, Code Combat, Code AvengersEloquent JavaScript, JavaScript Guide, Speaking JS, JS The Right Way, Oh My JS, Canvassing
HTML & CSSCode Academy, Don’t Fear The Internet, Tutsplus, Learn Layout, A to Z CSS, Dash, Web Accessibility, The Hello World, Khan Academy, HTML5 from ScratchMozilla, Dive into HTML5, 20 Things I Learned, HTML Dog, HTML & CSS, HTML5 for Designers, DOM Enlightenment, HTML Canvas
jQueryCode Academy, Tutsplus, Code SchooljQuery Fundamentals, Learn jQuery
PythonCode Academy, Google, Learn Street, Python Tutor, IHeartPYPython for You and Me,  Dive into Python, Learn Python the Hard Way, Think Python, Python for Fun, Tango with Django, Django
Ruby & Ruby on RailsCode Academy, TryRubyCode Learn, Railscasts, Rubymonk, Learn StreetWhy’s (Poignant) Guide to Ruby, Learn Ruby the Hard Way, Learn to Program, Learn Rails by Example
PHPCode AcademyPHP Programming, Practical PHP
Also see: How to Learn Regular Expressions (RegEx)
Google Apps ScriptGetting Started, Office Hours, Google Scripts Examples, Learning Apps Script
WordPressTreehouse, WordPress TV
Linux & Shell ScriptingStanford.edu, Explain ShellConquer the Command Line
Node.jsNodetuts, Node SchoolThe Node Beginner Book, Mixu’s Node book, Node Up and Running, Mastering Node.js
Angular JSCode School, Egg Head, Learn AngularAngular JS Tutorial, Thinking Angular, Angular Tutorial, Getting Started (Adobe)
Also see:Learn Touch Typing & Code Faster
Git (version control)Code School, Git Immersion, GitHub Training, UdacityPro Git, Learn Git, Gists in Github
Objective-C (iOS & Mac)Code School, Stanford, iTunesU
Chrome Dev ToolsCode School, Dev Tools Secret, Chrome Dev Tools Tutorial, Udacity, Building Browser Apps
Go LanguageGolang.org, GopherCastsProgramming in Go, Go by Example, Learning Go, Building Web Apps with Go, Learning Go
JavaLearn Java, Coding Bat, Java Udemy, LearnerooProgramming in Java, Thinking in Java, O’Reilly Learning Java, Think Java, Java & CS, Java for Python Devs
Android App DevelopmentUdacity (Google Developers), Coursera, The New Boston, Google University, App Development Essentials, Code Learn, App Inventor (Visual)
D3 (data visualization)Data Visualization for the Web, Dashing D3, D3 Tips & Tricks
Also see:Learn VIM, the text editor for programmers
SQL (Databases)SQL Zoo, SQL @Stanford, Essential SQL, SQL for Nerds, Intro to SQL, SQL Bolt, PHP & MySQL
Everything ElseUdacity, edX.org, Coursera, Udemy$, Lynda$, Pluralsight$, Treehouse$, Open Consortium, One Month Rails$

Teaching Kids to Code

If there are kids in the family, you should download either Tynker (Android/iOS) or the Hopscotch app for iPad and they can learn the basics of programming through games and puzzles.

There’s also Scratch, an MIT project that allows kids to program their own stories and games visually. Scratch is available as a web app or you can download it on your Mac/Windows/Linux computer for offline use. Microsoft TouchDevelop, Blockly and Alice are some other web apps that will introduce the concepts of computer progamming to your children.

On a related note, the following chart from Google Trends shows the relative search popularity of various programming languages over the last 5 years. The interest in PHP has dipped over the years, JavaScript has more or less maintained its position while the popularity of Python & Node.js is on the rise.

Popularity of Programming Languages