Authentication and Authorization: Mastering Security

Don't be this paranoid... but maybe be a little paranoid

In this edition of "Best of DZone," we dive into a topic that's forgotten all too often during software development: security. So, strap in, close the blinds, and, as our CTO likes to say, "Put on your tin foil hats," as we dive into all things authentication and authorization.

Whether it be auth basics, adding auth to your web apps, microservices, or APIs, or getting started with JSON Web Tokens (JWTs), we (meaning our amazing community of contributors) have your back to make sure your next project is completely secure, no matter the situation. 

Java String Tutorials: Become a Java Strings Virtuoso

Intro to Java Strings

Java String
Get Ready to Learn About Java Strings!
  1. String Memory Internals by Tomasz Murkiewicz. The main point to understand here is the distinction between String Java object and its contents - char[] under private value field. String is basically a wrapper around char[] array, encapsulating it and making it impossible to modify so the String can remain immutable. Also the String class remembers which parts of this array is actually used. This all means that you can have two different String objects (quite lightweight) pointing to the same char[].

  2. Top 10 Questions of Java Strings by Ryan Wang. A discussion of ten common questions Java developers face when working with Strings. Though this is a bit of an old post (published in 2013), we hope you'll still find some value in these lessons. 

Automating Performance Audit Using Lighthouse

Using Lighthouse.


A public-facing website needs to run performance audits regularly to check all the metrics are meeting the requirements. Metrics differ from team to team or project to project. Here the metrics are the performance, accessibility, SEO, best-practices, and paw.

Implementing the Outbox Pattern

Looking outside the box.


You may also like: Design Patterns for Microservices

The Problem Statement

Microservices often publish events after performing a database transaction. Writing to the database and publishing an event are two different transactions and they have to be atomic. A failure to publish an event can mean critical failure to the business process.

Ready to Solve the Drag of Technical Debt? Kickstart Your Stability.

Drag yourself out of technical debt!


Everyone has technical debt. Developers understand this fact of software life better than most and are acutely aware of how their daily efforts contribute to the issue. For example, any time a product team rushes new features to market or wants an incremental code change to make a customer happy, technical debt increases. The same holds when software frameworks and languages aren’t upgraded in a timely fashion because executives don’t want to slow down development.

Agile Development for ”Non-Products”

Constant change helps keep Agile fresh!


Software development is the core focus of any digitally transforming organization. A lot of time and effort in these organizations is spent thinking about and communicating the concept of product development. Customer-centricity, continuous delivery, and automated QA are just a few of the things that are necessary for product development. For many IT teams, developing products can be fun, invigorating, and meaningful. Why settle for just a project or deliverable, when you can do product development and play with all the shiny toys available to you?

Business Impact: Before and After Microservice-Based APIs

IBM, UNISYS, HP, Digital, Siemens, Honeywell — Big global brands still depend on their legacy systems.
You may also like: The Role of APIs in a Microservices Architecture

Using data storage and access methods — like VSAM, IDMS, IMS, DB2, Oracle, and ADABAS — to store and rapidly access data through mission and business-critical applications are written in COBOL, Assembler, Fortran, ADS, RPG, and Natural, these business giants now find themselves unable to stay on the cutting edge in terms of speeding delivery of innovative digital channels and applications.

When you have legacy systems and must cater to customers and prospects that are heavily reliant on digital services delivered via mobile or Web, you need to find a way to close that gap between old technology and modern demands. The answer is microservices.

Commits and Pull Requests in Travis CI, Buddy, and AppVeyor Using PVS-Studio

Learn more about commits and pull requests with PVS-Studio.

Starting from version 7.04, the PVS-Studio analyzer for C and C++ languages on Linux and macOS provides a test feature that can check the list of specified files. Using this new mode, you can configure the analyzer to check commits and pull requests.

This article covers setting up the check of certain modified files from a GitHub project in popular CI systems, such as Travis CI, Buddy, and AppVeyor.

Why MQTT Has Become the De-Facto IoT Standard

Happy birthday, MQTT!

This week, Andy Standford-Clark announced in a tweet the 20th anniversary of the first MQTT release. In those 20 years, it is clear that MQTT has become the de-facto standard for IoT. All major IoT cloud providers support MQTT, many popular IoT Platform vendors support MQTT, and survey results show MQTT is widely used for building IoT applications.

An interesting question to ask is “Why has MQTT has been successful?” What were the factors that led to the MQTT domination of IoT?

Writing Asynchronous Tasks In Modern JavaScript

Writing Asynchronous Tasks In Modern JavaScript

Writing Asynchronous Tasks In Modern JavaScript

Jeremias Menichelli

JavaScript has two main characteristics as a programming language, both important to understand how our code will work. First is its synchronous nature, which means the code will run line after line, almost as you read it, and secondly that it is single-threaded, only one command is being executed at any time.

As the language evolved, new artifacts appeared in the scene to allow asynchronous execution; developers tried different approaches while solving more complicated algorithms and data flows, which led to the emergence of new interfaces and patterns around them.

Synchronous Execution And The Observer Pattern

As mentioned in the introduction, JavaScript runs the code you write line by line, most of the time. Even in its first years, the language had exceptions to this rule, though they were a few and you might know them already: HTTP Requests, DOM events and time intervals.

If we add an event listener to respond to the click of an element from the user, it doesn’t matter what the language interpreter is running it will stop, run the code we wrote in the listener callback and then go back to its normal flow.

Same with an interval or a network request, addEventListener, setTimeout, and XMLHttpRequest were the first artifacts to access to asynchronous execution for web developers.

Though these were exceptions of synchronous execution in JavaScript, it’s crucial to understand that the language is still single-threaded. We can break this synchronicity but the interpreter still will run one line of code at a time.

For example, let’s check out a network request.

var request = new XMLHttpRequest();
request.open('GET', '//some.api.at/server', true);

// observe for server response
request.onreadystatechange = function() {
  if (request.readyState === 4 && xhr.status === 200) {
    console.log(request.responseText);
  }
}

request.send();

No matter what is happening, by the time the server comes back, the method assigned to onreadystatechange gets called before taking back the program’s code sequence.

Something similar happens when reacting to user interaction.

const button = document.querySelector('button');

// observe for user interaction
button.addEventListener('click', function(e) {
  console.log('user click just happened!');
})

You might notice that we are hooking up to an external event and passing a callback, telling the code what to do when it takes place. Over a decade ago, “What is a callback?” was a pretty much-expected interview question because this pattern was everywhere in most codebases.

In each case mentioned, we are responding to an external event. A certain interval of time reached, a user action or a server response. We weren’t able to create an asynchronous task per se, we always observed occurrences happening outside of our reach.

This is why code shaped this way is called the Observer Pattern, which is better represented by the addEventListener interface in this case. Soon event emitters libraries or frameworks exposing this pattern flourished.

Node.js And Event Emitters

A good example is Node.js which page describes itself as “an asynchronous event-driven JavaScript runtime”, so event emitters and callback were first-class citizens. It even had an EventEmitter constructor already implemented.

const EventEmitter = require('events');
const emitter = new EventEmitter();

// respond to events
emitter.on('gretting', (message) => console.log(message));

// send events
emitter.emit('gretting', 'Hi there!');

This was not only the to-go approach for asynchronous execution but a core pattern and convention of its ecosystem. Node.js opened a new era of writing JavaScript in a different environment — even outside the web. As a consequence, other asynchronous situations were possible, like creating new directories or writing files.

const { mkdir, writeFile } = require('fs');

const styles = 'body { background: #ffdead; }';

mkdir('./assets/', (error) => {
  if (!error) {
    writeFile('assets/main.css', styles, 'utf-8', (error) => {
      if (!error) console.log('stylesheet created');
    })
  }
})

You might notice that callbacks receive an error as a first argument, if a response data is expected, it goes as a second argument. This was called Error-first Callback Pattern, which became a convention that authors and contributors adopted for their own packages and libraries.

Promises And The Endless Callback Chain

As web development faced more complex problems to solve, the need for better asynchronous artifacts appeared. If we look at the last code snippet, we can see a repeated callback chaining which doesn’t scale well as the number tasks increase.

For example, let’s add only two more steps, file reading and styles preprocessing.

const { mkdir, writeFile, readFile } = require('fs');
const less = require('less')

readFile('./main.less', 'utf-8', (error, data) => {
  if (error) throw error
  less.render(data, (lessError, output) => {
    if (lessError) throw lessError
    mkdir('./assets/', (dirError) => {
      if (dirError) throw dirError
      writeFile('assets/main.css', output.css, 'utf-8', (writeError) => {
        if (writeError) throw writeError
        console.log('stylesheet created');
      })
    })
  })
})

We can see how as the program we are writing gets more complex the code becomes harder to follow for the human eye due to multiple callback chaining and repeated error handling.

Promises, Wrappers And Chain Patterns

Promises didn’t receive much attention when they were first announced as the new addition to the JavaScript language, they aren’t a new concept as other languages had similar implementations decades before. Truth is, they turned out to change a lot the semantics and structure of most of the projects I worked on since its appearance.

Promises not only introduced a built-in solution for developers to write asynchronous code but also opened a new stage in web development serving as the construction base of later new features of the web spec like fetch.

Migrating a method from a callback approach to a promise-based one became more and more usual in projects (such as libraries and browsers), and even Node.js started slowly migrating to them.

Let’s, for example, wrap Node’s readFile method:

const { readFile } = require('fs');

const asyncReadFile = (path, options) => {
  return new Promise((resolve, reject) => {
    readFile(path, options, (error, data) => {
      if (error) reject(error);
      else resolve(data);
    })
  });
}

Here we obscure the callback by executing inside a Promise constructor, calling resolve when the method result is successful, and reject when the error object is defined.

When a method returns a Promise object we can follow its successful resolution by passing a function to then, its argument is the value which the promise was resolved, in this case, data.

If an error was thrown during the method the catch function will be called, if present.

Note: If you need to understand more in-depth how Promises work, I recommend Jake Archibald’s “JavaScript Promises: An Introduction” article which he wrote on Google’s web development blog.

Now we can use these new methods and avoid callback chains.

asyncRead('./main.less', 'utf-8')
  .then(data => console.log('file content', data))
  .catch(error => console.error('something went wrong', error))

Having a native way to create asynchronous tasks and a clear interface to follow up its possible results enabled the industry to move out of the Observer Pattern. Promise-based ones seemed to solve the unreadable and prone-to-error code.

As a better syntax highlighting or clearer error messages help while coding, a code that is easier to reason becomes more predictable for the developer reading it, with a better picture of the execution path the easier to catch a possible pitfall.

Promises adoption was so global in the community that Node.js rapidly release built-in versions of its I/O methods to return Promise objects like importing them file operations from fs.promises.

It even provided a promisify util to wrap any function which followed the Error-first Callback Pattern and transform it into a Promise-based one.

But do Promises help in all cases?

Let’s re-imagine our style preprocessing task written with Promises.

const { mkdir, writeFile, readFile } = require('fs').promises;
const less = require('less')

readFile('./main.less', 'utf-8')
  .then(less.render)
  .then(result =>
    mkdir('./assets')
      .then(writeFile('assets/main.css', result.css, 'utf-8'))
  )
  .catch(error => console.error(error))

There is a clear reduction of redundancy in the code, especially around the error handling as we now rely on catch, but Promises somehow failed to deliver a clear code indentation that directly relates to the concatenation of actions.

This is actually achieved on the first then statement after readFile is called. What happens after these lines is the need to create a new scope where we can first make the directory, to later write the result in a file. This causes a break into the indentation rhythm, not making it easy to determinate the instructions sequence at first glance.

A way to solve this is to pre-baked a custom method that handles this and allows the correct concatenation of the method, but we would be introducing one more depth of complexity to a code that already seems to have what it needs to achieve the task we want.

Note: Take in count this is an example program, and we are in control around some of the methods and they all follow an industry convention, but that’s not always the case. With more complex concatenations or the introduction of a library with a different shape, our code style can easily break.

Gladly, the JavaScript community learned again from other language syntaxes and added a notation that helps a lot around these cases where asynchronous tasks concatenation is not as pleasant or straight-forward to read as synchronous code is.

Async And Await

A Promise is defined as an unresolved value at execution time, and creating an instance of a Promise is an explicit call of this artifact.

const { mkdir, writeFile, readFile } = require('fs').promises;
const less = require('less')

readFile('./main.less', 'utf-8')
  .then(less.render)
  .then(result =>
    mkdir('./assets')
      .then(writeFile('assets/main.css', result.css, 'utf-8'))
  )
  .catch(error => console.error(error))

Inside an async method, we can use the await reserved word to determinate the resolution of a Promise before continuing its execution.

Let’s revisit or code snippet using this syntax.

const { mkdir, writeFile, readFile } = require('fs').promises;
const less = require('less')

async function processLess() {
  const content = await readFile('./main.less', 'utf-8')
  const result = await less.render(content)
  await mkdir('./assets')
  await writeFile('assets/main.css', result.css, 'utf-8')
}

processLess()

Note: Notice that we needed to move all our code to a method because we can’t use await outside the scope of an async function today.

Every time an async method finds an await statement, it will stop executing until the proceeding value or promise gets resolved.

There’s a clear consequence of using async/await notation, despite its asynchronous execution, the code looks as if it was synchronous, which is something we developers are more used to see and reason around.

What about error handling? For it, we use statements that have been present for a long time in the language, try and catch.

const { mkdir, writeFile, readFile } = require('fs').promises;
const less = require('less')

async function processLess() {
  const content = await readFile('./main.less', 'utf-8')
  const result = await less.render(content)
  await mkdir('./assets')
  await writeFile('assets/main.css', result.css, 'utf-8')
}

try {
  processLess()
} catch (e) {
  console.error(e)
}

We rest assured any error thrown in the process will be handled by the code inside the catch statement. We have a centric place that takes care of error handling, but now we have a code that is easier to read and follow.

Having consequent actions that returned value doesn’t need to be stored in variables like mkdir that don’t break the code rhythm; there’s also no need to create a new scope to access the value of result in a later step.

It’s safe to say Promises were a fundamental artifact introduced in the language, necessary to enable async/await notation in JavaScript, which you can use on both modern browsers and latest versions of Node.js.

Note: Recently in JSConf, Ryan Dahl, creator and first contributor of Node, regretted not sticking to Promises on its early development mostly because the goal of Node was to create event-driven servers and file management which the Observer pattern served better for.

Conclusion

The introduction of Promises into the web development world came to change the way we queue actions in our code and changed how we reason about our code execution and how we author libraries and packages.

But moving away from chains of callback is harder to solve, I think that having to pass a method to then didn’t help us to move away from the train of thought after years of being accustomed to the Observer Pattern and approaches adopted by major vendors in the community like Node.js.

As Nolan Lawson says in his excellent article about wrong uses in Promise concatenations, old callback habits die hard! He later explains how to escape some of these pitfalls.

I believe Promises were needed as a middle step to allow a natural way to generate asynchronous tasks but didn’t help us much to move forward on better code patterns, sometimes you actually need a more adaptable and improved language syntax.

As we try to solve more complex puzzles using JavaScript, we see the need for a more mature language and we experiment with architectures and patterns we weren’t used to seeing on the web before.

We still don’t know how the ECMAScript spec will look in years as we are always extending the JavaScript governance outside the web and try to solve more complicated puzzles.

It’s hard to say now what exactly we will need from the language for some of these puzzles to turn into simpler programs, but I’m happy with how the web and JavaScript itself are moving things, trying to adapt to challenges and new environments. I feel right now JavaScript is a more asynchronous friendly place than when I started writing code in a browser over a decade ago.

Further Reading

Smashing Editorial (dm, il)

What is an XML Sitemap? How to Create a Sitemap in WordPress?

Are you wondering what is an XML sitemap, and how to add it to your WordPress website?

An XML sitemap helps search engines easily navigate through your website content. It gives them a list of all your content in a machine-readable format.

In this article, we will explain what is an XML sitemap, and how to easily create a sitemap in WordPress.

What is an XML Sitemap and how to create one for your WordPress site

What is an XML Sitemap?

An XML sitemap is a file that lists all your website content in an XML format, so search engines like Google can easily discover and index your content.

Back in the early 2000s, government websites used to have a link on their main pages, titled “Sitemap”. This page usually contained a list of all the pages on that website.

While some websites still have HTML sitemaps today, the overall usage of sitemaps have evolved.

Today sitemaps are published in an XML format instead of HTML, and their target audience is search engines and not people.

Basically, an XML sitemap is a way for website owners to tell search engines about all the pages that exist on their website.

It also tells search engines which links on your website are more important than others, and how frequently you update your website.

While XML sitemaps will not boost your search engine rankings, they allow search engines to better crawl your website. This means they can find more content and start showing it in search results thus resulting in more search traffic, and improved SEO rankings.

Why You Need an XML Sitemap?

Sitemaps are extremely important from a search engine optimization (SEO) point of view.

Simply adding a sitemap does not affect search rankings. However, if there is a page on your site that is not indexed, then sitemap provides you a way to let search engines know about that page.

Sitemaps are extremely useful for when you first start a blog or create a new website because most new websites don’t have any backlinks. This makes it harder for search engines to discover all of their content.

This is why search engines like Google and Bing allow new website owners to submit a sitemap in their webmaster tools. This allows their search engine bots to easily discover and index your content (more on this later).

Sitemaps are equally as important for established popular websites as well. They allow you to highlight which part of your websites are more important, which parts are more frequently updated, etc, so search engines can visit and index your content accordingly.

That being said, let’s take a look at how to create XML sitemap in WordPress.

How to create a Sitemap in WordPress?

There are several ways to create an XML sitemap in WordPress. We will show you three popular methods to create an XML sitemap in WordPress, and you can choose one that works best for you.

Method 1. How to Create an XML Sitemap in WordPress without a Plugin

This method is very basic and limited in terms of features.

Until August 2020, WordPress didn’t have built-in sitemaps. However in WordPress 5.5, they released a basic XML sitemap feature.

This allows you to automatically create an XML sitemap in WordPress without using a plugin. You can simply add wp-sitemap.xml at the end of your domain name, and WordPress will show you the default XML sitemap.
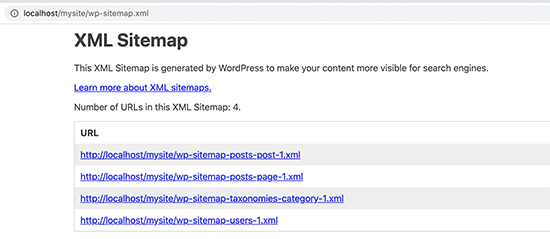
Default WordPress XML sitemap

This XML sitemap feature was added to WordPress to make sure that any new WordPress website does not miss out on the SEO benefits of an XML sitemap.

However, it is not very flexible, and you cannot easily control what to add or remove from your XML sitemaps.

Luckily, almost all top WordPress SEO plugins come with their own sitemap functionality. These sitemaps are better, and you can control which content to remove or exclude from your WordPress XML sitemaps.

Method 2. Creating an XML Sitemap in WordPress using All in One SEO

The easiest way to create an XML sitemap in WordPress is by using the All in One SEO plugin for WordPress.

It is the best WordPress SEO plugin on the market offering you a comprehensive set of tools to optimize your blog posts for SEO.

First, you need to install and activate the All in One SEO plugin. For more details, see our step by step guide on how to install a WordPress plugin.

Note: Sitemap feature is also available in AIOSEO Free version. However to get advanced news sitemap and video sitemaps, you’ll need the Pro version.

Upon activation, go to the All in One SEO » Sitemaps page to review sitemap settings.
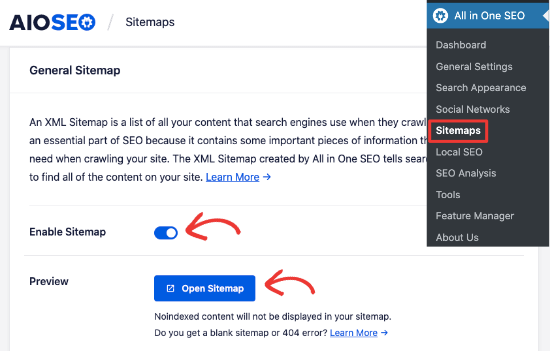
Enable sitemap in All in One SEO

By default, All in One SEO will enable the Sitemap feature for you and replace the basic WordPress sitemaps.

You can click on the ‘Open Sitemap’ button to preview it to see what it looks like. You can also view your sitemap by adding ‘sitemap.xml’ to the URL such as www.example.com/sitemap.xml.
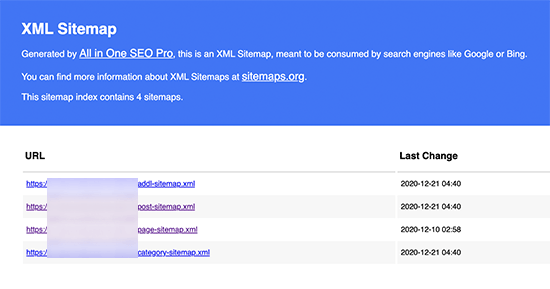
All in One SEO XML sitemap preview

As a beginner, you don’t need to do anything as the default settings would work for all kinds of websites, blogs, and online stores.

However, you can customize the sitemap settings to control what you want to include in your XML sitemap.

Simply scroll down to the Sitemap settings section.
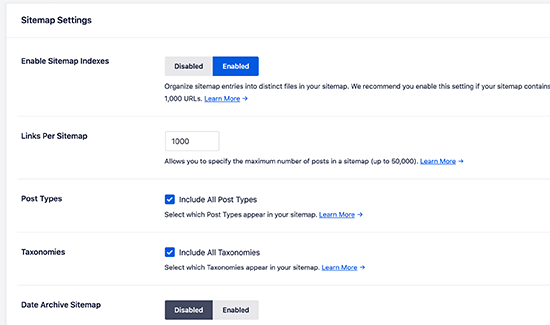
AIOSEO Sitemap settings

This section gives you options to manage sitemap indexes, include or exclude post types, taxonomies (categories and tags). You can also enable XML sitemaps for date-based archives and author archives.

All in One SEO automatically includes all your WordPress content in XML sitemaps. However, what if you have stand-alone pages like a contact form, a landing page, or Shopify store pages that are not part of WordPress?

Well, AIOSEO is the only plugin that lets you add external pages in your WordPress sitemap. Simply scroll to the Additional Pages section and turn it on. This will show you a form where you can add any custom pages that you want to include.
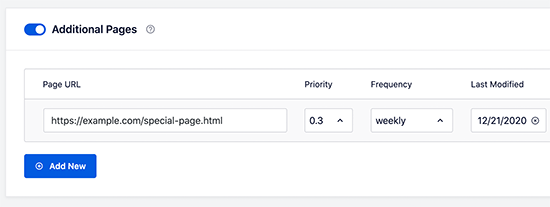
Adding additional pages to your WordPress XML sitemap

You simply need to add the URL of the page that you want to include and then set a priority where 0.0 is the lowest and 1.0 is the highest, if you are unsure then we recommend using 0.3.

Next, choose the frequency of updates and the last modified date for the page.

You can click on the ‘Add New’ button if you need to add more pages.

Don’t forget to click on the ‘Save Changes’ button to store your settings.

Excluding Specific Posts / Pages from your XML Sitemap

All in One SEO allows you to exclude any post or page from your XML Sitemaps. You can do this by clicking on the Advanced Settings section under the All in One SEO » Sitemaps page.
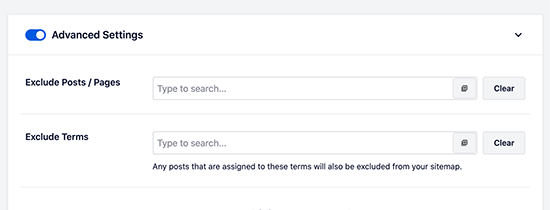
Excluding items from your WordPress XML sitemap

You can also remove a post or page from your XML sitemaps by making it no-index and no-follow. This will block search engines from showing that content in search results.

Simply edit the post or page that you want to exclude and scroll down to the AIOSEO Settings box below the editor.
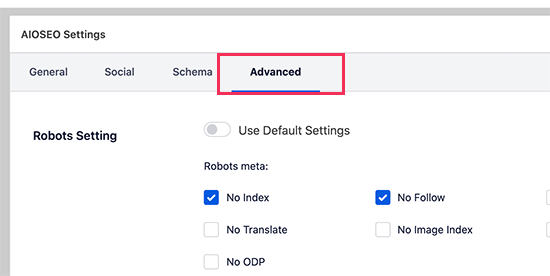
Removing a post or page from XML sitemap using robots.txt

From here you need to switch to the Advanced tab and check the boxes next to ‘No Index’ and ‘No Follow’ options.

Creating Additional Sitemaps

All in One SEO allows you to create additional sitemaps like a video sitemap or a news sitemap.

You can create a video sitemap if you regularly embed videos in your blog posts or pages. It allows search engines to display posts in search and video search results along with a video thumbnail.
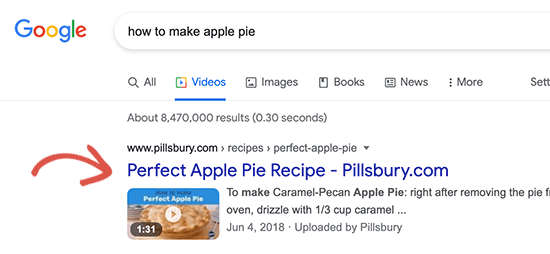
Video search results showing video thumbnail

You can also create a News sitemap if you run a news website and want to appear in Google News search results.

Simply go to All in One SEO » Sitemaps and switch to the Video Sitemap or News Sitemap tabs to generate these sitemaps.
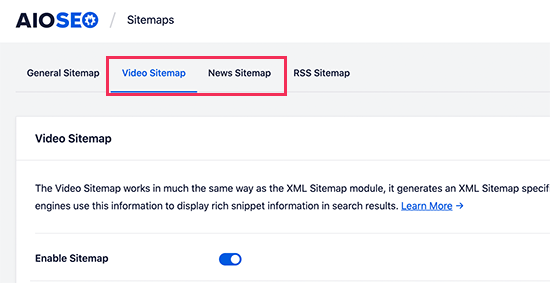
Generating video and news sitemaps in All in One SEO

Overall, AIOSEO is the best WordPress plugin because it gives you all the flexibility and powerful features at a very affordable price.

Method 3. Creating an XML Sitemap in WordPress using Yoast SEO

If you are using Yoast SEO as your WordPress SEO plugin, then it also automatically turns on XML sitemaps for you.

First, you need to install and activate the Yoast SEO plugin. For more details, see our step by step guide on how to install a WordPress plugin.

Upon activation, go to SEO » General page and switch to the ‘Features’ tab. From here, you need to scroll down to the ‘XML Sitemap’ option and make sure that it is turned on.
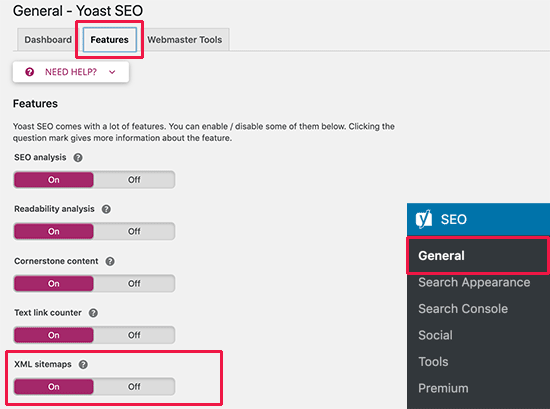
Yoast SEO XML Sitemap option

Next, click on the save changes button to store your changes.

To verify that Yoast SEO has created an XML Sitemap, you can click on the question mark icon next to the XML Sitemap option on the page.
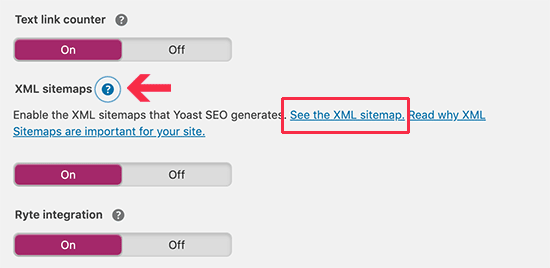
View XML Sitemap created by Yoast SEO plugin

After that, click on the ‘See the XML Sitemap’ link to view your live XML sitemap generated by Yoast SEO.

You can also find your XML sitemap by simply adding sitemap_index.xml at the end of your website address. For example:

https://www.example.com/sitemap_index.xml
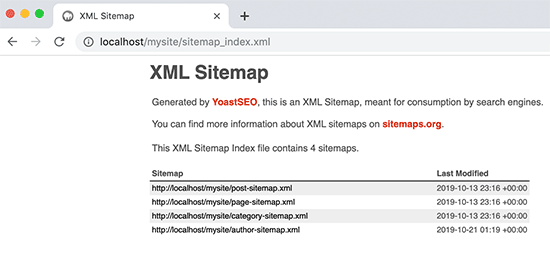
Yoast SEO sitemap

Yoast SEO creates multiple sitemaps for different types of content. By default, it will generate sitemaps for posts, pages, author, and categories.

How to Submit Your XML Sitemap to Search Engines

Search engines are quite smart in finding a sitemap. Whenever you publish new content, a ping is sent to Google and Bing to inform them about changes in your sitemap.

However, we recommend that you submit the sitemap manually to ensure that search engines can find it.

Submitting Your XML Sitemap to Google

Google Search Console is a free tool offered by Google to help website owners monitor and maintain their site’s presence in Google search results.

Adding your sitemap to Google Search Console helps it quickly discover your content even if your website is brand new.

First, you need to visit the Google Search Console website and sign up for an account.

After that, you will be asked to select a property type. You can choose a domain or a URL prefix. We recommend choosing URL prefix as it is easier to setup.
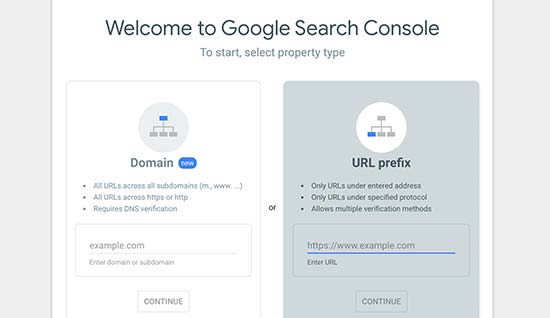
Select property type

Enter your website’s URL and then click on the continue button.

Next, you will be asked to verify ownership of the website. You will see multiple methods to do that, we recommend using the HTML tag method.
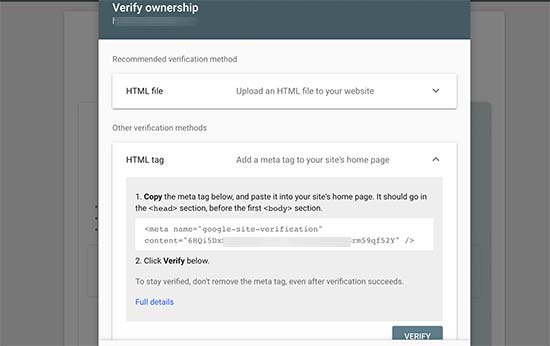
Google Search Console verify site ownership

Simply copy the code on the screen and then go to the admin area of your WordPress website.

If you’re using AIOSEO, then it comes with easy webmaster tools verification. Simply go to All in One SEO » General Settings and then click the Webmaster Tools tab. After that, you can enter the code from Google there.
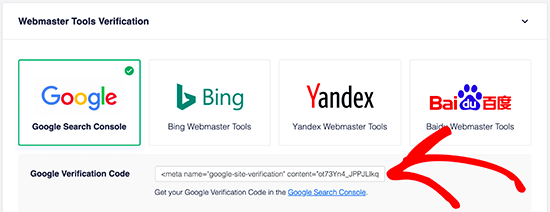
AIOSEO Site Verification

If you’re not using AIOSEO, then you need to install and activate the Insert Headers and Footers plugin. For more details, see our step by step guide on how to install a WordPress plugin.

Upon activation, you need to visit Settings » Insert Headers and Footers page and add the code you copied earlier in the ‘Scripts in Header’ box.
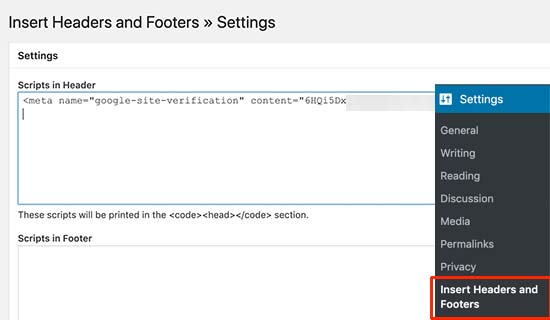
Add your verification code in the header section

Don’t forget to click on the save button to store your changes.

Now, switch back to the Google Search Console tab and click on the ‘Verify’ button.

Google will check for verification code on your site and then add it to your Google Search Console account.

Note: If the verification is unsuccessful, then please make sure to clear your cache and then try again.

Now that you have added your website, let’s add your XML sitemap as well.

From your account dashboard, you need to click on ‘Sitemaps’ from the left column.
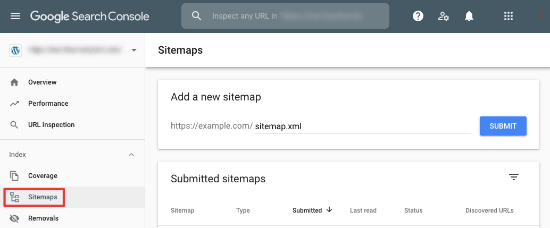
Add sitemap to Google Search Console

After that, you need to add the last part of your sitemap URL under the ‘Add new sitemap’ section and click the Submit button.

Google will now add your sitemap URL to your Google Search Console.

It will take Google some time to crawl your website. After a while, you would be able to see basic sitemap stats.

This information includes the number of links Google found in your sitemap, how many of them got indexed, a ratio of images to web pages, and more.
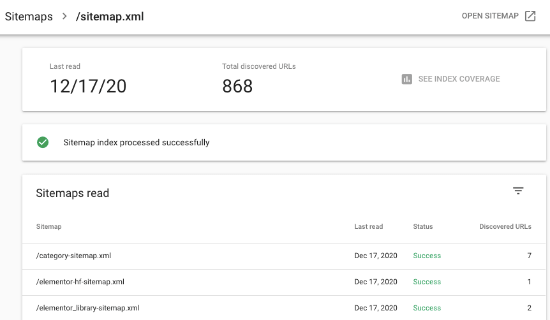
Sitemap stats in Google Search Console

Submitting Your XML Sitemap to Bing

Similar to Google Search Console, Bing also offers Bing Webmaster Tools to help website owners monitor their website in the Bing search engine.

To add your sitemap to Bing, you need to visit the Bing Webmaster Tools website. Here, you’ll see two options to add your site. You can either import your site from Google Search Console or add it manually.
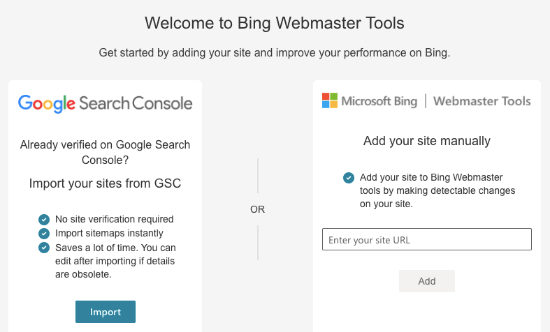
Create account in Bing Webmaster Tools

If you’ve already added your site to Google Search Console, we suggest importing your site. It saves time as your sitemap will automatically be imported for you.

If you choose to add your site manually, you need to enter your site’s URL and then verify the site.

Bing will now ask you to verify the ownership of your website and will show you several methods to do that.

We recommend using the Meta tag method. Simply copy the meta tag line from the page and head over to your WordPress admin area.
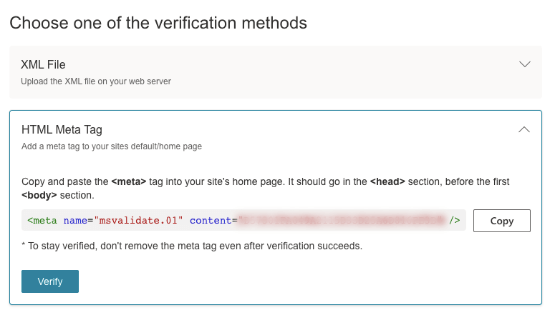
Copy meta tag to verify site in Bing Webmasters Tool

Now, install and activate the Insert Headers and Footers plugin on your website.

Upon activation, you need to visit Settings » Insert Headers and Footers page and add the code you copied earlier in the ‘Scripts in header’ box.
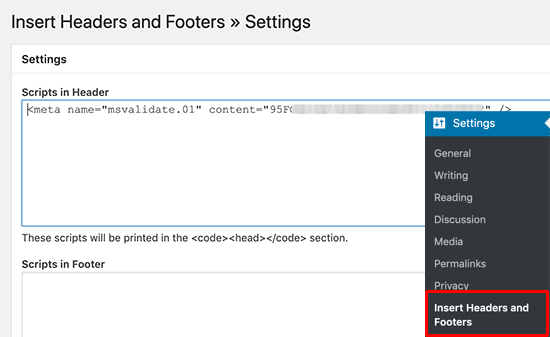
Add Bing verification code

Don’t forget to click on the Save button to store your changes.

How to Utilize XML Sitemaps to Grow Your Website?

Now that you have submitted the XML sitemap to Google, let’s take a look at how to utilize it for your website.

First, you need to keep in mind that the XML sitemap does not improve your search rankings. However, it does help search engines find content, adjust crawl rate, and improve your website’s visibility in search engines.

You need to keep an eye on your sitemap stats in Google Search Console. It can show you crawl errors and the pages excluded from search coverage.
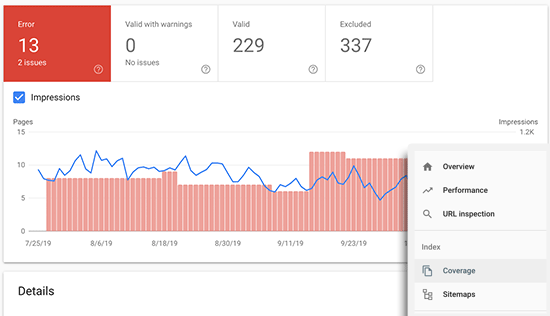
Sitemap coverage

Below the charts, you can click on the tables to view actual URLs excluded or not indexed by Google.
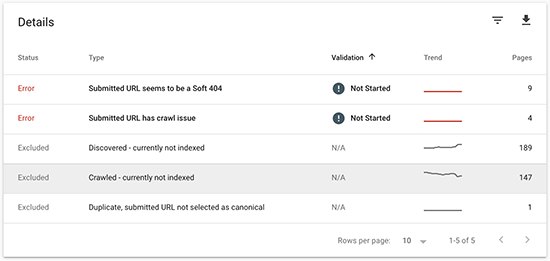
Sitemap URLs reports

Normally, Google may decide to skip duplicate content, pages with no content or very little content, and pages excluded by your website’s robots.txt file or meta tags.

However, if you have an unusually high number of excluded pages, then you may want to check your SEO plugin settings to make sure that you are not blocking any content.

For more details, see our complete Google Search Console guide for beginners.

We hope this article helped answer all your questions about XML sitemaps and how to create an XML sitemap for your WordPress site. You may also want to see our guide on how to quickly increase your website traffic with step by step tips, and our comparison of the best keyword research tools to write better content.

If you liked this article, then please subscribe to our YouTube Channel for WordPress video tutorials. You can also find us on Twitter and Facebook.

The post What is an XML Sitemap? How to Create a Sitemap in WordPress? appeared first on WPBeginner.