Beaver Builder Review – Is It Really Worth The Hype

The natural beauty of WordPress is its flexibility and ease to use. However, recently, a more robust way of building WordPress websites has landed in the market and is crowded…


Tips, Expertise, Articles and Advice from the Pro's for Your Website or Blog to Succeed
Andy covers a technique where a semantic <button> is used within a card component, but really, the whole card is clickable. The trick is to put a pseudo-element that goes beyond the button, covering the entire card. The tradeoff is that the pseudo-element sits on top of the text, so text selection is hampered a bit. I believe this is better than making the whole dang area a <button> because that would sacrifice semantics and likely cause extreme weirdness for assistive technology.
See the Pen
Semantic, progressively enhanced “break-out” button by Andy Bell (@andybelldesign)
on CodePen.
You could do the same thing if your situation requires an <a> link instead of a <button>, but if that's the case, you actually can wrap the whole area in the link without much grief then wrap the part that appears to be a button in a span or something to make it look like a button.
This reminds me of the nested link problem: a large linked block that contains other different linked areas in it. Definitely can't nest anchor links. Sara Soueidan had the best answer where the "covering" link is placed within the card and absolutely positioned to cover the area while other links inside could be be layered on top with z-index.
I've moved her solution to a Pen for reference:
See the Pen
Nested Links Solution by Chris Coyier (@chriscoyier)
on CodePen.
The post Breakout Buttons appeared first on CSS-Tricks.
Foursquare has launched a free tier for its Pilgrim SDK. The Pilgrim SDK allows developers to build location-aware apps and features. Prior to this release, Pilgrim was only available for a fee to enterprise customers. Now, independent developers, who develop apps with 100,000 monthly active users or less, can use the technology for free.
WooSesh is happening next week on October 9 and 10, and registration is now open. This is the second edition of the virtual WooCommerce event hosted by WPSessions. In addition to presentations focused entirely on e-commerce, the event will include a “Hallway Track” that offers opportunities for attendees to connect with each other, along with virtual swag donated by various WordPress companies.
Day 1 will cover a wide range of topics for WooCommerce professionals with a focus on store builders, including sessions on designing with blocks, sales tax, optimizing the checkout experience, and store emails. The first day will also feature a two-hour “State of the Woo” keynote address from the WooCommerce team. They plan to discuss case studies, lessons learned, and priorities for the year ahead.
Day 2 will focus on more technical topics for WooCommerce developers, such as “Custom Tables and the Checkout Bottleneck,” solving store UX problems, and productizing development work.
The event is being organized by Brian Richards and Patrick Rauland. For the past two years it has been the official successor to the previously held in-person WooConf events. Given how successful WooSesh has been in connecting the WooCommerce community, it’s easy to see why WooConf has not yet been reinstated.
“One thing I can say, having helped three WooConfs and both WooSesh’s, is that a virtual event is a fraction of the cost,” Rauland said. “And we had twice as many people show up live for WooSesh compared to an in person event.”
In 2018, WooSesh had 2,800 registrants and more than 1,400 who participated live during the event. Rauland reported that 900 people watched the keynote address. After the conclusion, 94% of respondents to an attendee survey said they would like to attend again the next year.
Last year attendees could watch all sessions for free as long as they attended at least one presentation during the live event. This year sessions will be free during the event to encourage maximum engagement, and the recordings will be available on WPSessions.com for a fee after its conclusion.
Tickets are free, thanks to sponsors that include WooCommerce, Jilt, and Avalara. Attendees can register on the website and preview the schedule in their own timezones.
Hey all long time no see!! As i started Internet Marketing i quited to code but somehow everything is about coding... :D
So i am trying to come up with new method but i will talk about that in the next thread :)
so I am trying to create push notification and when i click on it to open an URL in a browser, i am using PendingIntent but i have truble doing that.
Here is the code i have
class MainActivity : AppCompatActivity() {

    override fun onCreate(savedInstanceState: Bundle?) {
        super.onCreate(savedInstanceState)
        setContentView(R.layout.activity_main)

        lateinit var notificationManager : NotificationManager
        lateinit var notificationChannel : NotificationChannel
        lateinit var builder : Notification.Builder
        val channelId = "com.example.myapplication"
        val desc = "Test Notification"

        notificationManager = getSystemService(Context.NOTIFICATION_SERVICE) as NotificationManager

        val intent = Intent(this, MainActivity::class.java)
        val pendingIntent = PendingIntent.getActivity(this, 0, intent, PendingIntent.FLAG_UPDATE_CURRENT)

        place_order.setOnClickListener {
            //startActivity(Intent(this, AboutMe::class.java))
            if (Build.VERSION.SDK_INT >= Build.VERSION_CODES.O) {
                notificationChannel = NotificationChannel(channelId,desc,NotificationManager.IMPORTANCE_HIGH)
                notificationChannel.enableLights(true)
                notificationChannel.lightColor = Color.GREEN
                notificationChannel.enableVibration(true)
                notificationManager.createNotificationChannel(notificationChannel)

                builder = Notification.Builder(this, channelId)
                    .setContentTitle("Test Notification")
                    .setContentText("Testing Notification Text!")
                    .setSmallIcon(R.drawable.ic_launcher_round)
                    .setLargeIcon(BitmapFactory.decodeResource(this.resources, R.drawable.ic_launcher))
                    .setContentIntent(pendingIntent)

            } else {
                builder = Notification.Builder(this)
                    .setContentTitle("Notification")
                    .setContentText("Test description")
                    .setSmallIcon(R.drawable.ic_launcher_round)
                    .setLargeIcon(BitmapFactory.decodeResource(this.resources, R.drawable.ic_launcher))
                    .setContentIntent(pendingIntent)
            }
            notificationManager.notify(1234, builder.build())
        }
    }
}
How do i make when i receive the notification in the notification bar and click it to open browser with custom link?
Thanks, really appreciate it
The WordPress.org SVN system received a version bump to 7.2 on October 3. This change means that plugin authors can now use newer PHP syntax in plugins they submit to the official plugin directory. In the future, the version maximum will match what’s running on WordPress.org.
This should be good news for any plugin developers who are using newer PHP syntax. Previously, authors were able to submit code using newer PHP functions if they had a compatibility check in the same file. However, newer syntax wasn’t allowed.
“The issue was that the Linter (being stuck on 7.0) prevented anyone from checking in code via SVN that used 7.1+ standards,” said Mika Epstein from the plugin review team. “So things like the Spaceship operator would fail on commit and you’d be told the syntax was invalid. This was holding back certain plugins from committing code into the directory.”
Epstein first opened a ticket to address the issue 13 months ago but said she’d been quietly asking for a fix for a while longer.
The max PHP version isn’t listed anywhere in the plugin guidelines. Technically, it’s an SVN limitation on WordPress.org and not something the plugin team chose. However, for plugin authors, they may not have known about the issue until their plugin was rejected by the system. They would then message the plugin team about the problem. “I may end up putting something in the docs, but it’s a somewhat uncommon occurrence,” said Epstein.
This has been an issue for some plugin authors since PHP 7.1 was released, which was December 1, 2016. “It was a once a year issue, then twice, and then it inched up to every couple months,” said Epstein. “As of September, at least once a month someone would hit this and complain to plugins.”
One potential problem with blocking newer PHP code is with plugins that rely on third-party libraries, which may only have security patches in more recent versions. However, Epstein said that she was not aware of any security issues that resulted from the version limitation.
Andrey “Rarst” Savchenko pointed out in the ticket that “7.2 was released almost two years ago.” While he says it’s an improvement over the previous 7.0 limitation, version 7.2 should not be a hard ceiling for plugins in the repository.
PHP 7.3 was released on December 16, 2018, and PHP 7.4 will be released on November 28, 2019.
“Given PHP’s poor adoption curves,” responded Dion Hulse, “all that this means is that you can’t release a plugin through WordPress.org that only works on 15% of WordPress sites. “You can even use newer functions in PHP if including compat code, just not newer syntax.”
Plugin author Josh Pollock called awareness to the issue on Twitter in February. “Hours later, I’m downgrading a dependency, because it requires another dependency, which requires PHP 7.1.”
“I think we got lucky and there were no bugs,” Pollock said of downgrading to an earlier version of the dependency. “I don’t think I’ve used SVN since. I’m really fortunate that’s not a part of my life anymore.”
“I agree with Rarst,” said Pollock. “We should be allowing for PHP 7 and making it easier for plugins not to support sites on out of date versions of PHP.” This echoes the sentiment of other developers who are pushing for WordPress to adopt newer standards or at least allow them to do so in their own plugins in the official directory.
For the majority of plugin authors, this should be a non-issue as long as the SVN system remains updated to match the version of PHP used on WordPress.og.
PHP 7.2 will lose active support on November 30, 2019, and security support on November 30, 2020.
With the vast amount of internet fraud, security breaches, and digital crime, the call to fortify your key business data has never been louder!
Well, the world wide web is not what it used to be. As businesses grow globally, and more business infrastructures are connected, cybercriminals have come to realize the importance of the data that organizations are protecting. Also, the recent surge in technological advancement has made everyone from solopreneurs to large scale firms more vulnerable to attacks now more than ever.
With the significant rise of cryptocurrencies and the increasing glamor associated with it, the demand for a service where users can buy or sell cryptocurrency from any trading exchange, without having an account is extremely high. By fundamentally partnering with multiple exchanges to offer users an integrated and simplified experience, an exchange aggregator platform brings the much-needed ease and value of carrying out transactions for users.
Without having to wade through multiple log-in procedures across multiple exchanges, users can receive all the information that they need on a single unified interface. What’s more, with the current regulatory environment becoming more and more stringent by the day, an aggregator is immune to the constant fluctuation of rules and regulations, since they technically function as a global exchange, not bound by major legal stipulations.
During all my years as a Solution Architect, I have built many streaming architectures, such as real-time data ETL, reactive microservices, log collection, and even AI-driven services, all using Kafka as a core part of their architecture. Kafka is a proven stream-processing platform used for many years at companies like LinkedIn, Microsoft, and Netflix. In many cases Kafka works very well, supports large amounts of data, and has a good community. Because of that, Kafka is used for many streaming scenarios.
However, due to the design of Kafka, all of my projects using Kafka have been suffering similar problems:
I've already covered building a static dashboard with Cube.js and Chart.js in this tutorial. Now, I’m going to show you how to dynamically change the underlying chart’s data based on the user’s input. We’ll let the user pick a date range and, based on that, reload the chart. When a user picks a new set of dates, a new request will be sent to the Cube.js server. The Cube.js server will generate new SQL code, execute it against the database, and send the result back to the client. And finally, the client re-renders a chart with the new data.
Here is a Codesandbox demo of what we are going to build. You can click Open in Editor to check the source code.
In the first part of this blog two-part series, we took a deep dive on Data Shuffling techniques aiming to mix up data, while optionally retaining logical relationships between columns. In this second part, we will now focus on Data Masking techniques as one of the main approaches to guarantee Data Privacy.
Simply put, masking techniques allows to block visibility of specifics fields or pieces of data. It hides data while preserving the overall format and semantic. It actually creates a structurally similar but inauthentic version of the data after having applied specific functions on data fields.
Site speed is talked about a lot, especially when it comes to affordable web hosting providers. The reality is that …
A2 Hosting Review – Pros, Cons, and Pricing – 2023 Read More »
The post A2 Hosting Review – Pros, Cons, and Pricing – 2023 appeared first on .
PL/SQL is a procedural language — mostly. But it can also be used to implement object-oriented features in Oracle Database. In "from the ground up" object-oriented languages like Java, everything is defined in classes. In Oracle Database, we have object types.
In this post, I introduce you to the basics of object types and kick off a series exploring many of the features of these programming elements.
AI has become something of a dirty acronym. The notion that robots will rise up and take our jobs is a popular one today, and Forbes’ Blake Morgan believes that up to 45% of current job roles are ripe for automation.
So the machines are bad news for workers? There are lots of questions surrounding the ethics of automation, but the answers are encouraging. Will artificial intelligence take over a portion of the jobs that humans do today? Yes, but AI will open up plenty of opportunities for work through highly intuitive education and re-training programs.
There are more than a thousand programming languages out there. Why do you need another programming language? Ballerina language intended to simplify the particular programming domain known as integration. You may be a developer who develops different kinds of web services and intends to interconnect those services. Then the Ballerina language will be your next programming companion.
You may also like: Developing Ballerina Project With Ballerina CLI Tool
This post is intended to give you an introduction to Ballerina, a flexible, powerful and beautiful programming language that helps you implement any sort of integration requirements. You can download and install Ballerina from the official Ballerinalang website.
In this article, I am going to make a basic example of how to connect to a “Redis Sentinel” configuration in a Spring application.
To learn about the current and future state of machine learning (ML) in software development, we gathered insights from IT professionals from 16 solution providers. We asked, "What do developers need to keep in mind when using machine learning in the SDLC?" Here's what we learned:
You might also like: How Machine Learning Will Affect Software Development
The biggest issue for ML is viewing it as an omnipotent savior of the SDLC, thereby negating the need to adhere to traditional SDLC design and protocol. ML can greatly improve efficiency and allow developers to better allocate their time to actions that require human input. It cannot, however, completely take the place of conscientious, diligent and thoughtful software planning, design, development, and version control.
If you’re getting started with static site generators, did you know you can use GitHub template repositories to quickly start new projects and reduce your setup time?
Most static site generators make installation easy, but each project still requires configuration after installation. When you build a lot of similar projects, you may duplicate effort during the setup phase. GitHub template repositories may save you a lot of time if you find yourself:
Unlike forking a repository, which allows you to use someone else’s code as a starting point, template repositories allow you to use your own code as a starting point, where each new project gets its own, independent Git history. Check it out!
Let’s take a look at how we can set up a convenient workflow. We’ll set up a boilerplate Eleventy project, turn it into a Git repository, host the repository on GitHub, and then configure that repository to be a template. Then, next time you have a static site project, you’ll be able to come back to the repository, click a button, and start working from an exact copy of your boilerplate.
Are you ready to try it out? Let’s set up our own static site using GitHub templates to see just how much templates can help streamline a static site project.
I’m using Eleventy as an example of a static site generator because it’s my personal go-to, but this process will work for Hugo, Jekyll, Nuxt, or any other flavor of static site generator you prefer.
If you want to see the finished product, check out my static site template repository.
We're going to kick things off by running each of these in the command line:
cd ~
mkdir static-site-template
cd static-site-template
These three commands change directory into your home directory (~ in Unix-based systems), make a new directory called static-site-template, and then change directory into the static-site-template directory.
In order to work with Eleventy, we need to install Node.js which allows your computer to run JavaScript code outside of a web browser.
Node.js comes with node package manager, or npm, which downloads node packages to your computer. Eleventy is a node package, so we can use npm to fetch it.
Assuming Node.js is installed, let’s head back to the command line and run:
npm initThis creates a file called package.json in the directory. npm will prompt you for a series of questions to fill out the metadata in your package.json. After answering the questions, the Node.js project is initialized.
Initializing the project gave us a package.json file which lets npm install packages, run scripts, and do other tasks for us inside that project. npm uses package.json as an entry point in the project to figure out precisely how and what it should do when we give it commands.
We can tell npm to install Eleventy as a development dependency by running:
npm install -D @11ty/eleventyThis will add a devDependency entry to the package.json file and install the Eleventy package to a node_modules folder in the project.
The cool thing about the package.json file is that any other computer with Node.js and npm can read it and know to install Eleventy in the project node_modules directory without having to install it manually. See, we're already streamlining things!
There are tons of ways to configure an Eleventy project. Flexibility is Eleventy’s strength. For the purposes of this tutorial, I’m going to demonstrate a configuration that provides:
Hop back in the command line. Inside the static-site-template folder, run these commands one by one (excluding the comments that appear after each # symbol):
mkdir src           # creates a directory for your website source code
mkdir src/css       # creates a directory for the website styles
mkdir src/js        # creates a directory for the website JavaScript
touch index.html    # creates the website HTML document
touch css/style.css # creates the website styles
touch js/main.js    # creates the website JavaScript
This creates the basic file structure that will inform the Eleventy build. However, if we run Eleventy right now, it won’t generate the website we want. We still have to configure Eleventy to understand that it should only use files in the src folder for building, and that the css and js folders should be processed with passthrough file copy.
You can give this information to Eleventy through a file called .eleventy.js in the root of the static-site-template folder. You can create that file by running this command inside the static-site-template folder:
touch .eleventy.jsEdit the file in your favorite text editor so that it contains this:
module.exports = function(eleventyConfig) {
  eleventyConfig.addPassthroughCopy("src/css");
  eleventyConfig.addPassthroughCopy("src/js");
  return {
    dir: {
      input: "src"
    }
  };
};
Lines 2 and 3 tell Eleventy to use passthrough file copy for CSS and JavaScript. Line 6 tells Eleventy to use only the src directory to build its output.
Eleventy will now give us the expected output we want. Let’s put that to the test by putting this In the command line:
npx @11ty/eleventyThe npx command allows npm to execute code from the project node_module directory without touching the global environment. You’ll see output like this:
Writing _site/index.html from ./src/index.html.
Copied 2 items and Processed 1 file in 0.04 seconds (v0.9.0)
The static-site-template folder should now have a new directory in it called _site. If you dig into that folder, you’ll find the css and js directories, along with the index.html file.
This _site folder is the final output from Eleventy. It is the entirety of the website, and you can host it on any static web host.
Without any content, styles, or scripts, the generated site isn’t very interesting:

Next up, we’re going to put together the baseline for a super simple website we can use as the starting point for all projects moving forward.
It’s worth mentioning that Eleventy has a ton of boilerplate files for different types of projects. It’s totally fine to go with one of these though I often find I wind up needing to roll my own. So that’s what we’re doing here.
<!DOCTYPE html>
<html lang="en">
  <head>
    <meta charset="utf-8">
    <meta http-equiv="X-UA-Compatible" content="IE=edge">
    <title>Static site template</title>
    <meta name="description" content="A static website">
    <meta name="viewport" content="width=device-width, initial-scale=1">
    <link rel="stylesheet" href="css/style.css">
  </head>
  <body>
  <h1>Great job making your website template!</h1>
  <script src="js/main.js"></script>
  </body>
</html>
We may as well style things a tiny bit, so let’s add this to src/css/style.css:
body {
  font-family: sans-serif;
}
And we can confirm JavaScript is hooked up by adding this to src/js/main.js:
(function() {
  console.log('Invoke the static site template JavaScript!');
})();
Want to see what we’ve got? Run npx @11ty/eleventy --serve in the command line. Eleventy will spin up a server with Browsersync and provide the local URL, which is probably something like localhost:8080.

Git is the most commonly used version control system in software development. Most Unix-based computers come with it installed, and you can turn any directory into a Git repository by running this command:
git initWe should get a message like this:
Initialized empty Git repository in /path/to/static-site-template/.git/That means a hidden .git folder was added inside the project directory, which allows the Git program to run commands against the project.
Before we start running a bunch of Git commands on the project, we need to tell Git about files we don’t want it to touch.
Inside the static-site-template directory, run:
touch .gitignoreThen open up that file in your favorite text editor. Add this content to the file:
_site/
node_modules/
This tells Git to ignore the node_modules directory and the _site directory. Committing every single Node.js module to the repo could make things really messy and tough to manage. All that information is already in package.json anyway.
Similarly, there’s no need to version control _site. Eleventy can generate it from the files in src, so no need to take up space in GitHub. It’s also possible that if we were to:
_site,src, orthen _site will reflect an older build of the website, and future developers (or a future version of yourself) may accidentally use an outdated version of the site.
Git is version control software, and GitHub is a Git repository host. There are other Git host providers like BitBucket or GitLab, but since we’re talking about a GitHub-specific feature (template repositories), we’ll push our work up to GitHub. If you don’t already have an account, go ahead and join GitHub. Once you have an account, create a GitHub repository and name it static-site-template.
GitHub will ask a few questions when setting up a new repository. One of those is whether we want to create a new repository on the command line or push an existing repository from the command line. Neither of these choices are exactly what we need. They assume we either don’t have anything at all, or we have been using Git locally already. The static-site-template project already exists, has a Git repository initialized, but doesn’t yet have any commits on it.
So let’s ignore the prompts and instead run the following commands in the command line. Make sure to have the URL GitHub provides in the command from line 3 handy:
git add .
git commit -m "first commit"
git remote add origin https://github.com/your-username/static-site-template.git
git push -u origin master
This adds the entire static-site-template folder to the Git staging area. It commits it with the message "first commit," adds a remote repository (the GitHub repository), and then pushes up the master branch to that repository.
OK, this is the crux of what we have been working toward. GitHub templates allows us to use the repository we’ve just created as the foundation for other projects in the future — without having to do all the work we’ve done to get here!
Click Settings on the GitHub landing page of the repository to get started. On the settings page, check the button for Template repository.
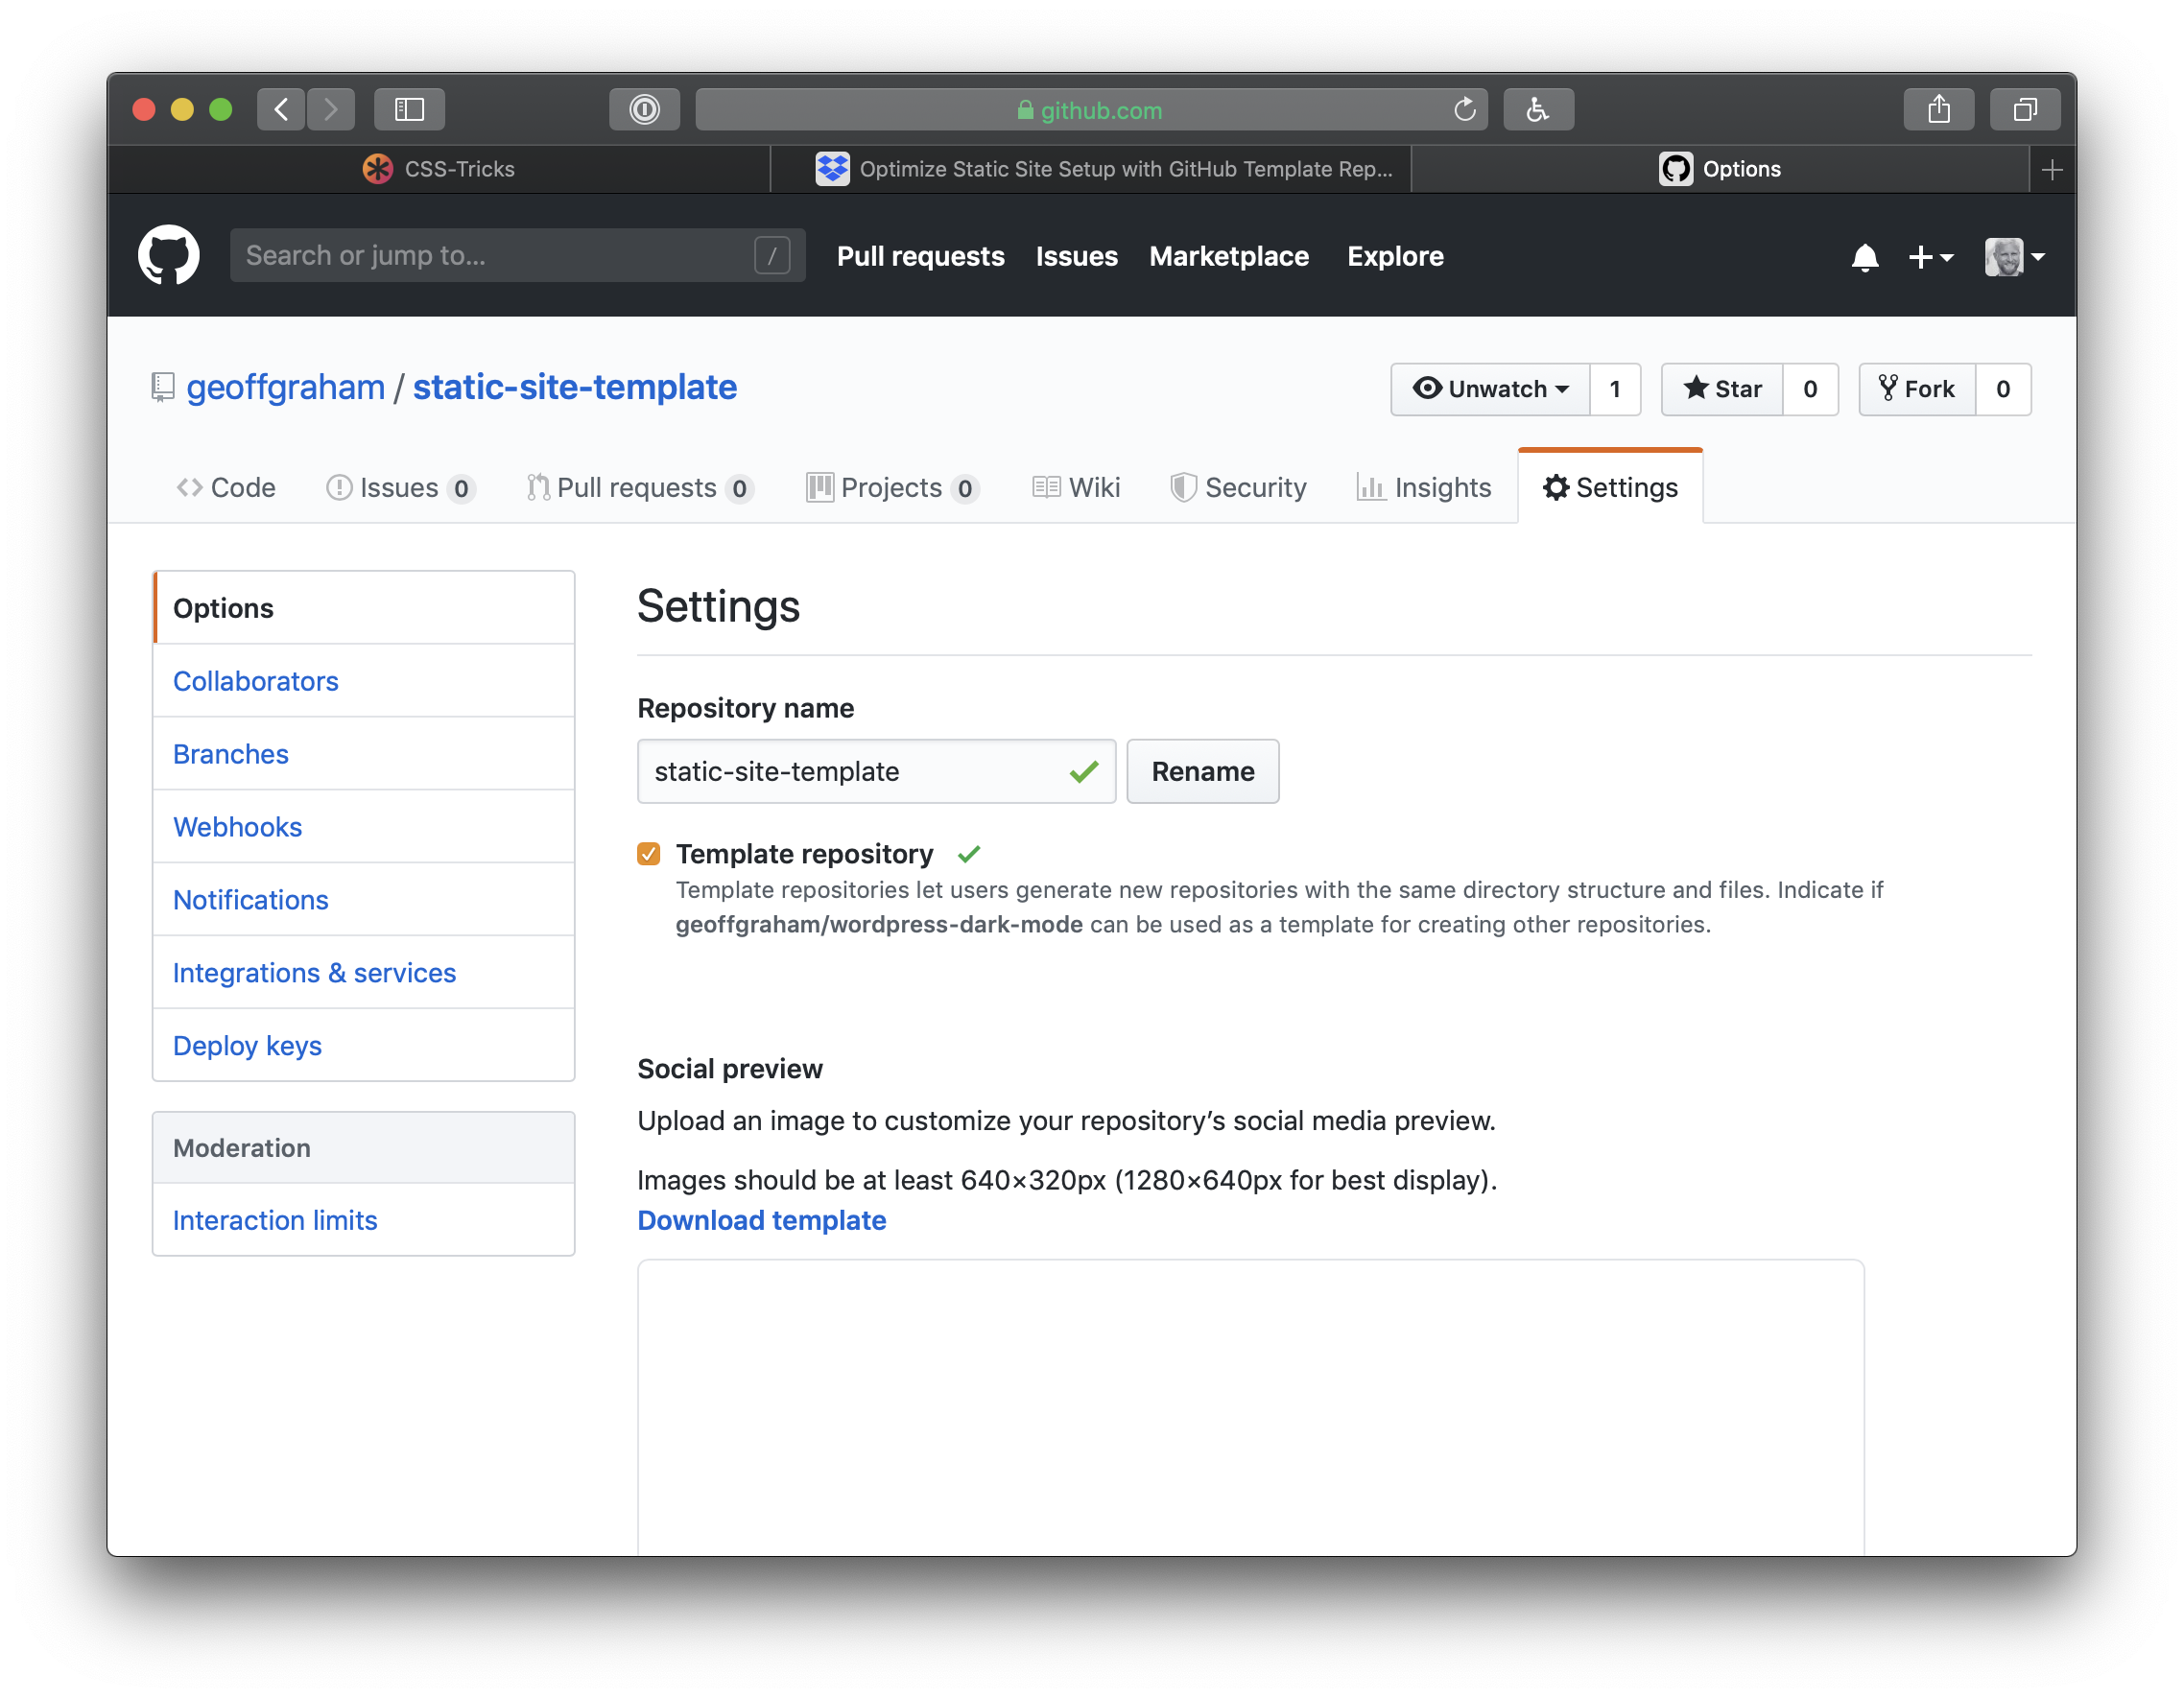
Now when we go back to the repository page, we’ll get a big green button that says Use this template. Click it and GitHub will create a new repository that’s a mirror of our new template. The new repository will start with the same files and folders as static-site-template. From there, download or clone that new repository to start a new project with all the base files and configuration we set up in the template project.
Now that we have a template repository, we can use it for any new static site project that comes up. However, You may find that a new project has additional needs than what’s been set up in the template. For example, let’s say you need to tap into Eleventy’s templating engine or data processing power.
Go ahead and build on top of the template as you work on the new project. When you finish that project, identify pieces you want to reuse in future projects. Perhaps you figured out a cool hover effect on buttons. Or you built your own JavaScript carousel element. Or maybe you’re really proud of the document design and hierarchy of information.
If you think anything you did on a project might come up again on your next run, remove the project-specific details and add the new stuff to your template project. Push those changes up to GitHub, and the next time you use static-site-template to kick off a project, your reusable code will be available to you.
GitHub template repositories are a useful tool for avoiding repetitive setup on new web development projects. I find this especially useful for static site projects. These template repositories might not be as appropriate for more complex projects that require external services like databases with configuration that cannot be version-controlled in a single directory.
Template repositories allow you to ship reusable code you have written so you can solve a problem once and use that solution over and over again. But while your new solutions will carry over to future projects, they won’t be ported backwards to old projects.
This is a useful process for sites with very similar structure, styles, and functionality. Projects with wildly varied requirements may not benefit from this code-sharing, and you could end up bloating your project with unnecessary code.
There you have it! You now have everything you need to not only start a static site project using Eleventy, but the power to re-purpose it on future projects. GitHub templates are so handy for kicking off projects quickly where we otherwise would have to re-build the same wheel over and over. Use them to your advantage and enjoy a jump start on your projects moving forward!
The post Using GitHub Template Repos to Jump-Start Static Site Projects appeared first on CSS-Tricks.