CRM Analytics Data Flow and Recipe, Ultimate Guide to Data Transformation

Salesforce CRM Analytics is a cloud-based Business Intelligence (BI) and visualization framework seamlessly integrated into the Salesforce platform, designed to enable business insights, predictive analytics, and recommendations by integrating the Salesforce data with external big data sources.

CRM Dataflows and recipes are effective Data Transformation tools providing extensive ETL (Extract, Transform, and Load) capabilities. Dataflows can be used to Extract Data from Salesforce Local objects or External Big Data sources, Transform the Input data by performing data operations like Filter, Modify, Group, Cleanse, Append, Slice, and Transform, and Load the transformed Data into the datasets and make it available for deriving the Business Insights in the CRM Analytics Dashboards and Lens.

Ultimate Guide to Smart Agriculture Systems Using IoT

The market for developing smart agriculture systems using IoT is rapidly revolutionizing traditional farming practices. From real-time data insights to resource optimization and sustainability, the benefits are vast. Real-life companies like FarmBeats and Connecterra are already demonstrating the impact of this smart technology.

What Is Smart Agriculture? Why Is It Significant? 

Smart agriculture is the modern practice of using technology like IoT to enhance farming. It entails the mixing of smart sensors and analytics to gather and examine data. Farmers are empowered to make selections, optimize resources, and improve efficiency. Also, smart agriculture contributes to sustainable and productive farming practices.

Ultimate Guide to Kubernetes StatefulSets With a MongoDB Example

StatefulSet is a Kubernetes workload API specifically used for managing stateful applications. This is a comprehensive guide to setting up and using StatefulSets, where we look at the following topics:

  1. What is a StatefulSet, and when should you use it?
  2. Example: Setting up and running MongoDB as a StatefulSet
  3. Limitations of StatefulSets and what to watch out for
  4. Best practices while implementing StatefulSets

Stateless and Stateful Applications

Let's start with distinguishing stateless and stateful applications. A stateless application is one in which every request is treated as a new, isolated transaction independent of any previous transactions. It does not store session-specific data between requests, either on the client side or the server side.

The Dos and Don’ts of Domain Registration

When it comes to domain registration, there are some dos and don’ts of how to go about it properly. This article shows you what you need to know to lead you to a good domain name.

It goes without saying, choosing a domain name is a crucial decision. After all, it’s your website’s calling card that you want to be attractive, relevant, and effective. It can boost SEO, increase your brand awareness, and raise the number of site visitors when created well.

A good domain establishes authority and credibility, reinforces brand identity, and promotes your business. On top of that, you want to ensure it’s safe!

This article covers the Dos and Don’ts of domain registration to help ensure your domain name is top-notch and sets up your site for success.

We’ll cover:

After reading this article, you should know… wait for it… what to do.

Dos

Pick Correct Domain Extension

Deciding upon the perfect Domain Extensions, aka TLDs (top-level domains), will affect your online presence and overall business.

Beyond .com, there are numerous other domain extensions available. Everything from .edu, .gov, .blog – and plenty more. Each extension can be used to associate with your brand (e.g. .org is great for organizations).

Pick a domain extension related to your business, organization, or personal site – whatever it may be. This lets readers know what your website is about from the very beginning.

A safe bet is typically .com if you can’t decide on other extensions that might be more beneficial. It’s the most popular extension and is recognized universally.

However, go with your niche if you want to be more specific.

Make It Easy and Foolproof

Don’t go crazy and make a domain that’s hard to type or not easy to remember. Be sure to make it foolproof because, well, typos happen to the best of us.

If you choose a domain that’s different or painful to type, it will hurt your business and brand.

Misspelled domains lead visitors to the wrong site, 404 errors, and frustration. If you’re lucky, they may try again to find your website. But, chances are, they’ll give up and you lose a visitor.

Avoid slang (“4” instead of “for”), and don’t use words with numerous spelling options. Don’t mix numbers with words, avoid abbreviations, and don’t use homonyms (e.g. “write” and “right”).

In a nutshell, use common vocabulary, and make it easy to spell and type – without the user having to think about it too much.

Make Sure It’s Registered In Your Name or Business

When registering domain names, you often don’t second guess the registration process and may overthink what name to put it under. However, it’s essential to put it under your name or business — depending on your purpose.

This ensures that you’ll have control over it for the long term. You can keep or sell it as long as you want.

If it’s under someone else, you may have to buy it from an individual or company. It’s best to ensure you’re in control right from the start.

Make a Memorable Impression

Making a good first impression is important and easy to do with a good domain. There are just a few things you should do. After all, your domain will be out there in the ether with millions of others, so it’s important to be seen amongst the competition.

One is to make it unique – so it stands out. Whatever your domain is, having it be unique and memorable is a key factor. Something catchy is especially important (e.g. boredpanda, JoeKnowsCoffee).

Think of one of your favorite websites. Does it have a catchy title? Chances are, it does.

Also, it’s best to keep a domain as short as possible; however, if a longer domain makes yours stick out and “pop”, it may be worth doing.

Use Keywords

Like domain extensions, Keywords in your domain name help tell visitors what your website is about.

An example might be if you run a WordPress development agency, insert ‘agency’ and ‘WordPress’ (or ‘wp’) somewhere in the name.

If you need assistance with coming up with a domain name, there are tools like Zyro or NameStudio to help generate a name for you. They work by simply inputting keywords and then coming up with names.

Also, a lot of domain providers offer ideas for a new domain. For example, when you enter a new domain with us, we give you some suggestions for what you might want to use.

Domain suggestions
These are just a few examples.

Whatever name you choose, keep in mind that keywords can help show what type of website you are, making it more likely that a visitor will be interested in stopping by.

Make It Long-Term

Considering your website and domain are for the long-term, it’s important to contemplate a domain name and not rush it.

After all, you’ll use this for your brand and SEO for years! So, choose something relevant to your business that will continue to work down the road.

A good example of what NOT to do would be to name your company BobsFurniture2023.com or something with a specific time stamp.

Your domain should define your business, so ensure your domain has lasting appeal.

Know Your Market

If you know your target market, coming up with a domain name is easier.

This is another example of keywords – choose words that relate to your audience. For example, do you have a pet shop in Palm Springs? Maybe PalmSpringsPets.com. It’s relatable for the audience you’re after, memorable, and simple.

And the more specific, the better.

Be Creative

Get creative when choosing a domain. Why? Because you’ll be more memorable and attract visitors.

Wordplay, synonyms, and catchy combinations can do a lot to make your website stand out. Think of some of the most popular websites – like YouTube, TikTok, or DuckDuckGo. Each one has a creative edge to it that is memorable.

So, get creative and create unique words, phrases, and ideas when deciding on your catchy domain.

Keep It Safe

Finally, in our Dos — when registering a domain, use a reliable domain provider, lock your domain name, and activate domain privacy. Be safe.

You can do much to keep your domain protected from being hijacked and taken over. Read our Ultimate Guide to Domain Name Security for more information.

Now that you know what to do, it’s time for the…

Don’ts

Use Certain Characters

Using unnecessary characters, such as hyphens, symbols, and numbers is a death knell for some websites.

These often make for a sloppy longer address that doesn’t come across as professional. Also, they’re hard to type and pronounce. So, don’t use certain characters (like the ones mentioned).

That said, IF you need to use a special character, try to limit it (one would be best).

If you’re using numbers, try to make them sequential (e.g. 123) or recognizable so that it’s easy on the eyes of visitors.

Special characters, complicated numbers, and symbols can frustrate a user trying to type it in, and they may bail on getting to your website sooner rather than later.

Be Complex, Long, Bland, or Hard to Type

We mentioned long domain names could be okay if they’re relevant but don’t make them complex, bland, or hard to type (which we also touched on).

A good example is if you’re, let’s say, a physicist. “Physicist” isn’t exactly an easy word to spell if you’re not used to doing so, so you’d probably want to avoid a domain name like “localphysicist.com” or something like that.

If it’s not clear by now – the easier, the better. Long domains can work but have a good reason if going that route.

Be Trendy

It might be tempting to use buzzwords, but they often don’t have staying power. Things can rapidly go from the hottest trend to nothing tomorrow. Just think about viral videos, songs, shows, etc. One minute they’re hot – the next, they’re not.

So, don’t be too trendy with your domain, even though it might seem cool and mainstream at the time.

Try to Be Like Someone Else

Once in a while, someone tries to make their domain similar to a popular one to ride on their success.

This tactic is usually pretty obvious (e.g. if you name your site Bamazon.com – or something like this) and it will ultimately hurt your reputation and brand. Plus, it gets old – fast.

This is your time to shine with your unique domain, so don’t try to ride someone else’s coattails.

Buy All of the Extensions

Owners of businesses want to protect their brand, and buying up almost any combination of extensions for a domain can be tempting. It helps ensure no one else will grab them.

But don’t buy all the extensions. As enticing as that is, it’s not necessary.

This can cost you thousands of dollars, and the benefits are few. There is practically no way you can buy up all the extensions, so you might as well not even attempt it.

Your brand will be fine with your chosen domain, and, more than likely, no schmuck will steal your thunder by choosing another TLD with your name attached.

If you’re buying a new domain name or one used before, you should check out the backlink history completely. The backlink history of a domain is important because it can affect how it will rank.

If there are hesitant backlinks in the past, search engines might remember them and negatively impact rankings. The backlinks could’ve been blocklisted for spam or other bad activity.

There are backlink checkers, like Majestic, that can ensure you have a solid domain with no unsavory history.

Doing the Dos and Don’ts for Domains

When it comes to domain registration, these Dos and Don’ts can help ensure you have success. Whether picking the right TLD, excluding special characters, or security, there’s a lot to consider. After all, this domain is in it for the long haul.

Consider registering a domain with us for security, selection, and wholesale price. You have domain management in The Hub, 24/7 support, client billing options, resell capabilities, and more!

Be aware of what to do when deciding on a domain, and you’ll be domain-ate online.

Ultimate Guide to FaceIO

Facial recognition technology called FaceIO is employed for online user identification. For increased security during online transactions and access to sensitive information, it can be linked to websites and apps to verify a person's identity using their distinctive facial features. It can be used in addition to more established authentication techniques, such as passwords, for increased security. It's crucial to consider any potential drawbacks, such as bias, errors, and privacy issues. 

Key Features of FaceIO

FaceIO may include the following features that could make it a viable tool for online authentication: 

Ultimate Guide to Using Mailchimp and WordPress (2021)

Are you looking for a guide to using Mailchimp with WordPress?

Mailchimp is one of the most popular email marketing services, and it can be easily used with your WordPress website.

In this guide, we’ll show you how to easily integrate Mailchimp in WordPress and start building your email list.

Using Mailchimp with WordPress
Following is a quick overview of the topics we’ll cover in this guide.

Why Build an Email List?

More than 70% of users who abandon your website will probably never come back, unless you successfully get them to subscribe to your email list.

Email is private, personal, and by far the most direct form of communication on the internet. Many people check their inbox more than their social media feed.

Plus, an email will stay in the inbox unless a user takes action on it. On social media, your message will soon get buried in an endless timeline.

For more details on how email marketing can grow your business, see our guide on why you should start building your email list right away.

Why Use Mailchimp with Your WordPress Site?

Mailchimp is one of the most popular email marketing services. Why? Because they offer a free forever plan where you can send up to 10,000 emails per month to no more than 2000 subscribers.

Now as your subscribers grow to more than 2000 or you need to send more emails, then you’ll need a paid plan which can get quite expensive.

Apart from email marketing, Mailchimp also offers basic automation tools that come in handy in growing your business online.

However, Mailchimp is far from perfect. They are no longer the easiest or the most cost-effective email marketing service on the market.

Some Mailchimp alternatives like Constant Contact, Drip, and HubSpot offer more advanced marketing automation tools that are easier to use.

Other companies like Sendinblue and ConvertKit also offer a forever-free plan.

That being said, let’s see how to use Mailchimp with WordPress to grow your business and start building your email list.

Getting Started with Mailchimp

To connect Mailchimp to your WordPress site, the first thing you will need is a Mailchimp account.

To get started, visit the Mailchimp website and click on the ‘Sign Up Free’ button at the top right.

Mailchimp sign up

Simply fill in your email and create a username and password for your account, and continue following the on-screen instructions to finish the account set up.

Once you have created your account, you’ll reach your Mailchimp dashboard which looks like this:

Mailchimp dashboard

Adding Mailchimp Email Signup Forms in WordPress

Mailchimp comes with built-in subscription forms that you can embed on your WordPress website.

Simply click on the create button from the toolbar on the left and then select the Signup Form » Embedded Form option.

Launch sign up form builder

This will bring you to the form configuration page.

From here, you can choose which form fields to display, and select other options for your sign up form.

Mailchimp form generation code

Once you are satisfied with the form, you need to copy the embed code shown on the screen.

Next, you need to switch to the admin area of your WordPress website and go to the Appearance » Widgets page. From here you need to add the Custom HTML widget block to your widget area.

Widget custom HTML

Inside the widget settings, you need to paste the code you copied from Mailchimp website.

Paste embed code

Don’t forget to click on the Update button to save your widget settings.

You can now visit your website to see your Mailchimp signup form in action.

Signup form preview

You can also add the embed code to posts or pages using the HTML block. See our guide on how to edit HTML in WordPress for more details.

Adding Beautiful Signup Forms Using OptinMonster

Mailchimp allows you to create basic email sign up forms. However, these forms are hard to customize and don’t come with many targeting and personalization options.

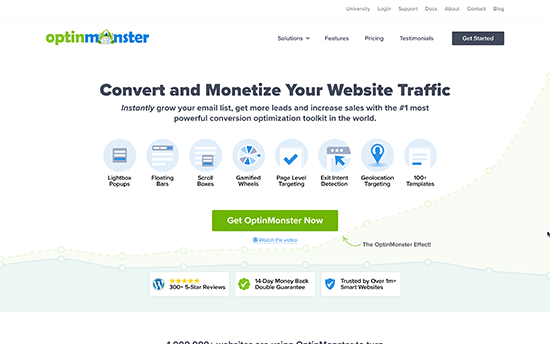
This is where OptinMonster comes in. It is the best conversion optimization software on the market and helps you easily convert website visitors into subscribers.

OptinMonster integrates with your Mailchimp account and comes with dozens of beautiful templates and a powerful campaign builder.

Plus, it has incredible targeting and display rules which allow you to display your signup forms at the right time. For instance, you can show a popup to users who are about to leave your site, or show a different campaign to users in specific regions, and more.

First, you need to sign up for an OptinMonster account.

OptinMonster website

After that, you need to install and activate the OptinMonster plugin on your WordPress website. For more details, see our step by step guide on how to install a WordPress plugin.

This plugin acts as a connector between WordPress and your OptinMonster account.

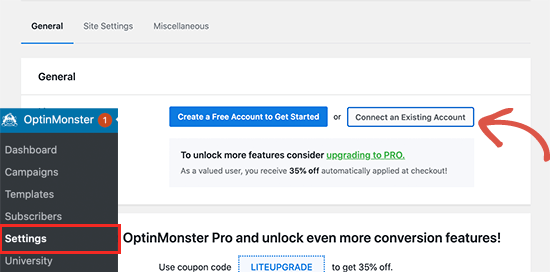
Upon activation, you need to visit the OptinMonster » Settings page. From here, simply click on the ‘Connect on existing account’ button to integrate OptinMonster to your website.

Connect OptinMonster account

Now you are ready to create your first Mailchimp newsletter signup form.

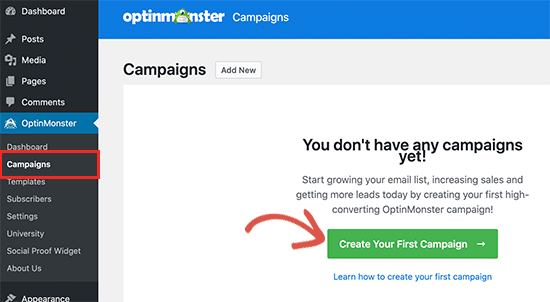
To get started, go to the OptinMonster » Campaigns page and click on the Add New button at the top.

Create new campaign

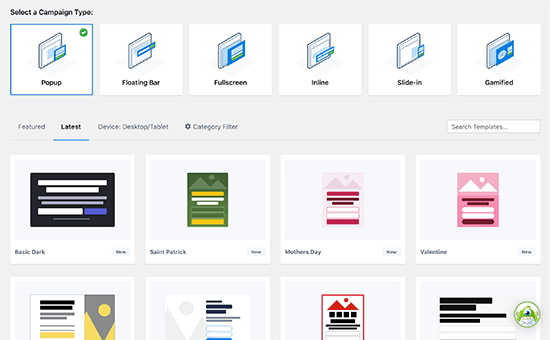
Next, you need to choose a campaign type.

OptinMonster allows you to create several types of campaigns including lightbox popups, floating bars, inline campaigns, slide-in, fullscreen, and gamified spin-a-wheel popups.

OptinMonster campaign type

Below that, you need to choose a template for your campaign. There are several beautiful designs to choose from, and you can modify them as much as you like.

After choosing the template, you’ll need to enter a name for your campaign and launch the campaign builder.

OptinMonster campaign builder

OptinMonster has an intuitive drag and drop interface where you can simply point and click to edit any item. You can also add new design elements called blocks to add your own images, text, buttons, and more.

Once you are satisfied with the campaign design, you need to connect it to your Mailchimp account. Simply switch to the Integrations tab and click on the Add New Integration button.

Add new integration

Next, you need to choose Mailchimp as your email service provider and give this connection a name.

After that, you need to enter your Mailchimp API key.

Add your Mailchimp API key

You can generate or locate your Mailchimp API key under your account on Mailchimp website.

From your Mailchimp dashboard, simply click on your profile icon on the bottom left of the screen. Then click on Extras » API keys from the top menu.

Getting Mailchimp API keys

After entering your API keys in the OptinMonster builder, click on the ‘Connect to Mailchimp’ button.

Next, you need to select your Mailchimp account and your email list.

Select email list

You can now save and publish your OptinMonster campaign and close the form builder.

Publish your campaign

This will bring you to the campaign output page on your WordPress website. From here you need to choose where you want to display the campaign and publish it.

Choose campaign output

You can now visit your website to see your email newsletter form in action.

Newsletter signup form in popup

Creating a Custom Mailchimp Signup Form with WPForms

WPForms is the best WordPress form builder plugin on the market. It allows you to easily create any type of form, including newsletter sign up forms.

WPForms also integrates with your Mailchimp account so that you can save your form entries to your email list.

First, you need to install and activate the WPForms plugin. For more details, see our step by step guide on how to install a WordPress plugin.

Upon activation, you need to visit the WPForms » Settings page to enter your license key. You can find it under your account on the WPForms website.

Enter WPForms license key

Next, you need to visit the WPForms » Addons page and install the Mailchimp addon.

Install WPForms Mailchimp addon

Now you are ready to create your first newsletter signup form.

Simply head over to WPForms » Add New page and enter a title for your form, and then choose the Newsletter signup form template.

Newsletter signup form template

This will launch the form builder with all the required fields for your email list sign up form.

You can edit or remove the fields from the form by simply clicking on them.

Email list form builder

Once you are satisfied with the form, you need to switch to the marketing tab and click on the Mailchimp section.

From here you need to click on the Add New Connection button.

Add new connection

Next, you’ll be asked to name the connection and enter your Mailchimp account API key.

You can find the API key under your account on the Mailchimp website.

WPForms mailchimp API key

Next, you need to choose your Mailchimp account and audience and then choose which form field corresponds to the email field.

Mailchimp connection settings

You can now save your form settings and and exit the form builder.

WPForms makes it very easy to add your form anywhere on your website.

If you want to display the form in your site’s sidebar, then you can go to the Appearance » Widgets page and add the WPForms widget block to your sidebar or any widget area.

WPForms widget block

Don’t forget to click on the Update button to save your widget settings.

Similarly, if you wanted to add the newsletter sign up form to a post or page, then you can edit the post or page and add the WPForms block.

WPForms block

Don’t forget to publish or save changes to update your post or page.

You can now visit your website to see your Mailchimp custom newsletter sign up form in action.

WPForms email newsletter form preview

Automate Anything in WordPress and Mailchimp

Email is extremely powerful, especially when it is personalized and timely. With the right tools, you can easily create high-converting email automations that are targeted to each subscriber.

For instance, you could send an automatic email to showcase products similar to what your customer has already bought, or automatically send users an email when you publish a new article on your website.

This is where you need Uncanny Automator. It is the best WordPress automation plugin that allows you to create automated workflows for your WordPress site.

Uncanny Automator

Uncanny Automator works with all top WordPress plugins, eCommerce platforms, membership plugins, and 3000+ apps through Zapier. It also connects with Mailchimp, which means you can create smarter email campaigns with just a few clicks.

First thing you need to do is install and activate the Uncanny Automator plugin. For more details, see our step by step guide on how to install a WordPress plugin.

Upon activation, you need to visit Automator » Add New page to create your first recipe. You’ll be asked to select which type of recipe you want to create.

For the sake of this tutorial, we’ll send an automated email to subscribers whenever we publish a new post. To get started, select logged-in users.

Recipe type

Next, you need to choose WordPress as your integration triggering the action.

For the trigger, you can choose when a user publishes a post.

Select trigger for automation

Next comes the action part, where you choose what action will be triggered.

Simply click on the Mailchimp icon to connect it to your website.

Connect Mailchimp

This will bring up a popup where you need to follow the on-screen instructions to finish the connection.

Once connected, you will be able to choose what action you want to perform on your Mailchimp account.

Configure your Mailchimp email campaign

For instance, here we have set it up to send a new email to our audience with the blog post title and a custom message.

Once you are finished, you can switch the recipe from Draft to Live.

Publish recipe

From now on, when you publish a new article on your website, Mailchimp will automatically send an email to your subscribers.

Uncanny Automator is a powerful tool to connect Mailchimp and WordPress so you can automate your marketing and boost sales and conversions.

Bonus: Tips to Grow Your Mailchimp Email List Fast

If you’re not promoting your email list to your website visitors, then you are losing potential subscribers, customers, and sales.

Following are some of the best proven tips that will help you grow your Mailchimp newsletter faster.

1. Multiple Sign up Forms

Use multiple sign up forms

Don’t just add one sign up form in the sidebar. Instead, give your users plenty of opportunities to sign up with multiple email subscription forms.

2. Use Gamification to Win Subscribers

spin to win coupon preview

Gamification brings fun interaction to your email forms. People are more likely to enter their email address if they have a chance to win something in exchange.

See our tutorial on how to add spin to win popups in WordPress.

3. Create Lead Magnets

Lead magnet example

Lead magnets are incentives that you can offer to your users in exchange for signing up to your email list. For instance, you can send them an ebook, a sample chapter, a discount code, and more.

Learn more in our tutorial on how to require an email address to download a file in WordPress.

4. Use Targeted Campaigns and Personalization

GeoTargetted Popups in WooCommerce

Your email signup forms will get more subscribers if they display at the right time to the right users.

For instance, you can show a welcome message to visitors from social media, or display a discount offer to shoppers who are about to abandon their carts.

For detailed instructions, see our guide on how to show personalized content to users in WordPress.

5. Track Your Conversions

Form conversion settings

Want to know which forms bring you more subscribers? For that, you’ll need MonsterInsights, which is the best Google Analytics plugin on the market.

MonsterInsights helps you understand which forms are more effective in growing your email list. For more details, see our complete guide on how to track conversions in WordPress like a pro.

For more on this topic, see our guide on how to grow your email list quickly with more actionable tips.

We hope this article helped you learn how to use Mailchimp with WordPress to build your email list. You may also want to see our guide on best SMTP services to securely send WordPress emails with higher deliverability, and our expert pick of the best business phone services for small business.

If you liked this article, then please subscribe to our YouTube Channel for WordPress video tutorials. You can also find us on Twitter and Facebook.

The post Ultimate Guide to Using Mailchimp and WordPress (2021) appeared first on WPBeginner.

Ultimate Guide to Geotargeting in WordPress – Step by Step

Do you want to use Geotargeting in WordPress to enhance the customer experience?

Geotargeting allows website owners to show personalized content to users based on their geographic location. It helps improve user experience and conversion rates for businesses.

In this ultimate guide, we’ll show you how to use Geotargeting in WordPress to boost sales and customer satisfaction.

Using geotargeting in WordPress and WooCommerce

Why Use GeoTargeting in WordPress?

Geotargeting or Geo-Location targeting is a marketing technique that allows businesses to offer custom user experiences based on a customer’s geographic location.

You can use geotargeting to make your content, products, and website more relevant to the customer. Research shows that it helps build user interest, boosts engagement, results in higher conversions, and generate more sales.

A Google study found that 61% of smartphone owners prefer to buy from sites that customize information for their location.

For instance, a real estate website can use geotargeting to show specific real estate listings in a user’s region. Similarly, an online store can offer customers free shipping by detecting their geolocation first.

Having that said, now let’s take a look at some of the easiest ways to use geotargeting effectively in WordPress. Here is a quick overview of what we’ll cover in this guide.

Tracking User Geographic Locations in WordPress

Before you learn how to target users in different geographic locations, you need to gather the data about where your users are coming from.

The easiest way to track user’s geographic locations is by using MonsterInsights. It is the best Google Analytics plugin for WordPress and allows you to easily track website visitors.

MonsterInsights

First thing you need to do is install and activate the MonsterInsights plugin. For more details, see our step by step guide on how to install a WordPress plugin.

Upon activation, the plugin will automatically guide you to connect your WordPress website to your Google Analytics account. If you need help, then see our step-by-step guide on how to install Google Analytics in WordPress.

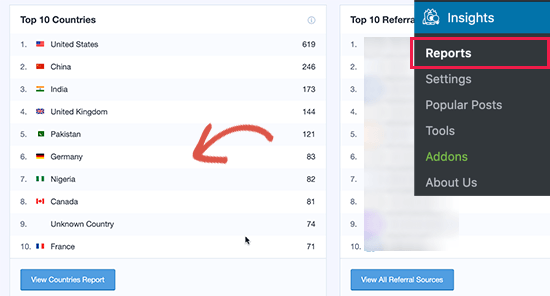
After that, you can view your website traffic reports by visiting the Insights » Reports page.

View countries report in MonsterInsights

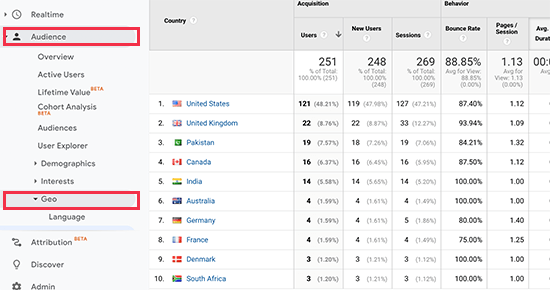
It will show you a section of the top 10 countries, and you can view more data by clicking on the ‘View Countries Report’ button. This will take you to the Google Analytics website where you will see a full list of countries.

Google Analytics Geolocation report

You can click on each country to see how users from that country used your website, how many pages they viewed, how much time they spent, did they convert, and more.

You can then adjust your strategies to target regions that are not performing so well and find more ways to increase revenues from locations that are doing well.

Using Geotargeting in WordPress and WooCommerce with OptinMonster

The most common use of geotargeting is to show personalized content to your users based on their location.

This is where OptinMonster comes in.

It is the best conversion optimization software in the world because it helps you convert abandoning website visitors into customers and subscribers.

It also comes equipped with incredibly powerful display rules including geotargeting to show targeted messages on your website.

First, you’ll need to sign up for an OptinMonster account.

Note: You’ll need at least their Growth plan to access Goetargeting features.

OptinMonster

After signing up, switch to your WordPress website to install and activate the OptinMonster plugin. For more details, see our step by step guide on how to install a WordPress plugin.

This plugin acts as a connector between your WordPress website and your OptinMonster account.

Upon activation, you need to visit OptinMonster » Settings page and click on the ‘Connect existing account’ button.

Connect OptinMonster account to WordPress

This will bring up a popup where you can log in and connect your WordPress site to your OptinMonster account.

Now that your WordPress site is connected, you are ready to create your first geotargeted campaign. Go to the OptinMonster » Campaigns page and click on the ‘Add New’ button.

Create campaign

First, you’ll need to choose your campaign type. OptinMonster supports lightbox popups, floating bars, inline optins, fullscreen, slide-in, and gamified campaigns.

For the sake of this tutorial, we’ll choose a lightbox popup campaign. Below that, you can select a campaign template by clicking on it.

Select campaign type and template

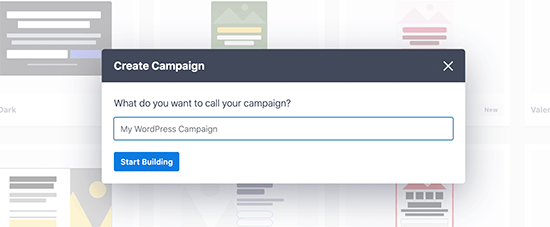
Next, you need to enter a name for your campaign. You can enter any name here, and then click on the ‘Start building’ button.

Enter campaign name

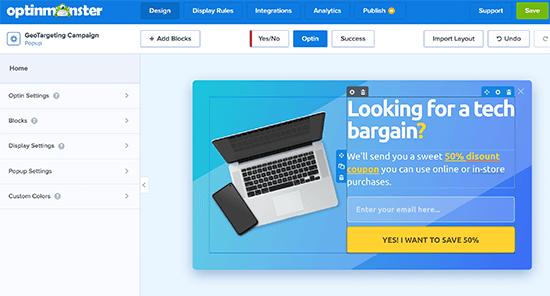
This will launch OptinMonster’s campaign builder interface with a live preview of your campaign in the right panel.

Editing OptinMonster campaign

You can simply point and click on any item in the preview to edit, move, or delete it. You can also add new elements from the left column.

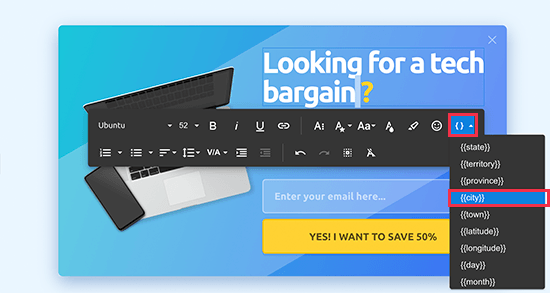
Let’s add some personalized geotargeted messaging to this campaign. To do that, we will be using an OptinMonster feature called Smart Tag.

Simply click on a text area or add a new text block and then in the text toolbar click on the Smart Tag button.

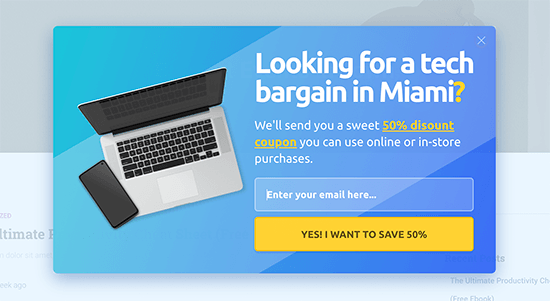
Detect and show user's location in OptinMonster using Smart Tag

It will show you a list of smart dynamic texts that you can add to your content.

We’ll add {{city}} smart tag to our campaign. This tag will automatically detect user’s city and display it in the campaign content.

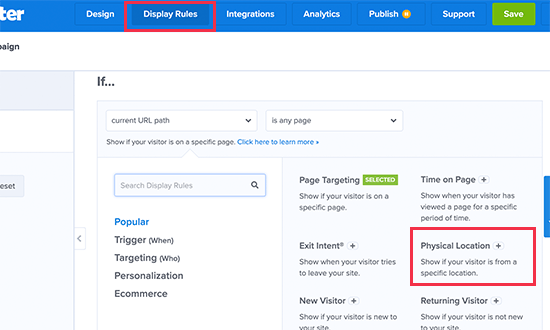
Once you are finished editing your campaign, you can switch to the ‘Display Rules’ tab. This is where you can configure when to show your campaign.

Display rules to set up geotargeting campaigns

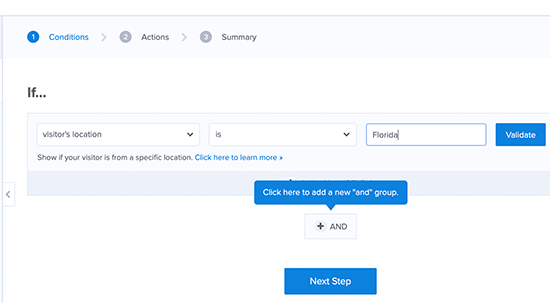
Next, you need to create a new Ruleset and use Physical location as the condition to check.

After that, you will be asked to select the criteria you want to match. For instance, we want to show this campaign if the visitors’ location is in Florida.

Display criteria for geotargeting

Click on the Validate button to make sure that your condition is setup correctly. After that, click on the Next Step button to continue.

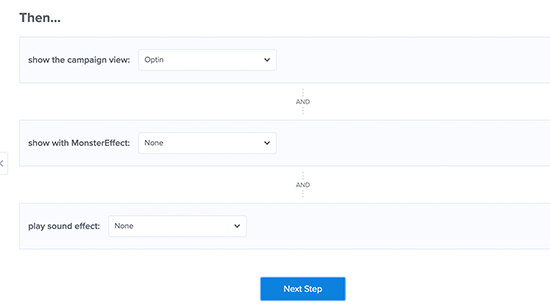
Next, you’ll be asked which campaign view you want to show and if you want to use special effects.

Campaign display settings

Click on the Next Step button to continue and save your ruleset.

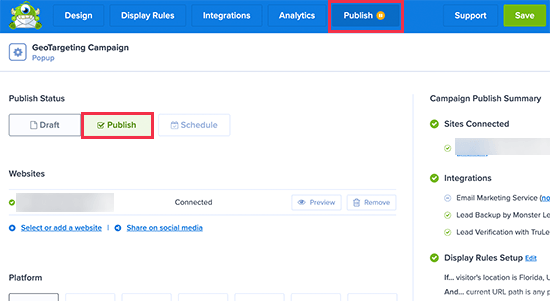
Now that everything is set up, you can switch to the Publish tab to make your campaign go to live. Simply switch to the ‘Publish Status’ from Draft to Publish by clicking on it.

Publish your geotargeting campaign in WordPress

Don’t forget to click on the Save changes button to save your campaign settings and then click on the close button to exit the builder.

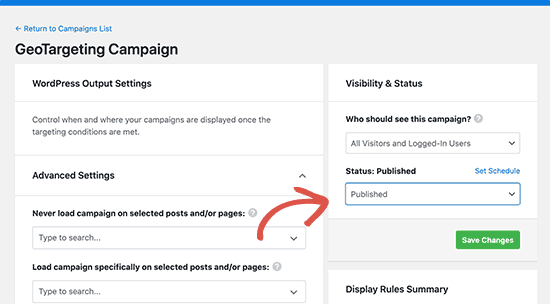
After that, you’ll be redirected back to your WordPress site, where you can configure where and when you want to display the campaign.

Publishing your campaign in WordPress

Simply set the status from pending to published and click on the ‘Save Changes’ button to launch your campaign.

You can now visit your WordPress website in incognito mode to view your campaign. You’ll need to be in the location that you are targeting to view the campaign.

Geotargeted popup in WordPress showing a custom message

Note: If you are not located in that region, then you can check out a VPN service that has servers located in that region. This will allow you to mimic the location you want to target with your geotargeting campaigns.

Other Geotargeting Campaign Ideas for WordPress using OptinMonster

A header bar announcing free shipping with a countdown timer to trigger the FOMO effect.

A floating banner with countdown timer triggered by geo-location targeting

A slide-in message targeting local users to request a callback from your sales team.

A geo targeted slidein message

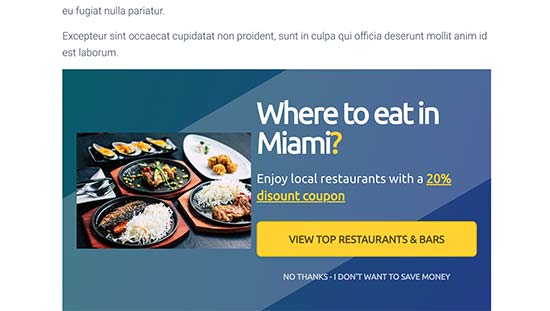
Here is an example of an inline campaign to help users discover content relevant to their location.

Inline campaign showing users locally relevant information

Using Geolocation Data in WordPress Forms

Forms help you generate leads, engage with customers and website visitors, and grow your business. Using geolocation data, you can learn more about your customers and offer them more local content.

For this, you’ll need WPForms. It is the best WordPress form builder plugin on the market and allows you to create any kind of form you need.

It also comes with a Geolocation addon that helps you collect users’ geolocation information with form submissions.

First, you need to install and activate the WPForms plugin. For more details, see our step by step guide on how to install a WordPress plugin.

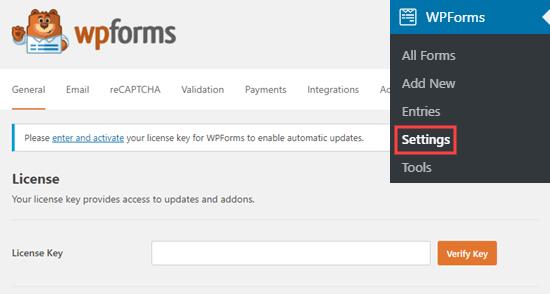
Upon activation, you need to visit the WPForms » Settings page to enter your license key. You can find this information under your account on the WPForms website.

Enter WPForms license key

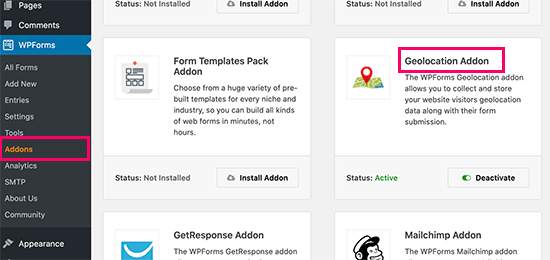
Next, you need to visit WPForms » Addons page. From here, you need to click on the ‘Install Addon’ button next to the GeoLocation Addon.

Geolocation addon

WPForms will now fetch, install, and activate the addon for you.

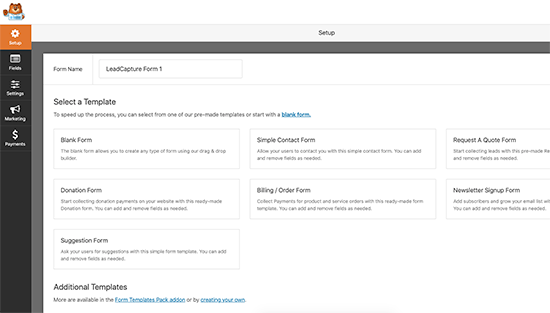
You can now go ahead and create your first form by visiting WPForms » Add New page. You’ll start by entering a name for your form and choose a template.

Creating a new form

A template is a starting point that you can use to quickly make forms. You can start with a blank form too, if you want.

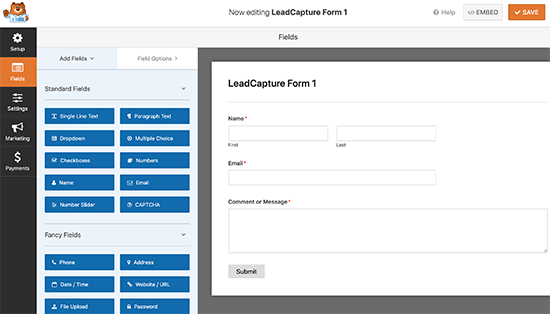
Clicking on a template will launch the form builder interface. On the right, you’ll see pre-loaded form fields based on the template you choose. You can add new fields from the column on your left side.

Form builder

You can also just click on any field to edit it, drag and drop to move it, or delete any form field.

Once you are finished, don’t forget to click on the Save button to publish your form.

Your form is now ready. In order to collect Geolocation data, you need to add the form to your website.

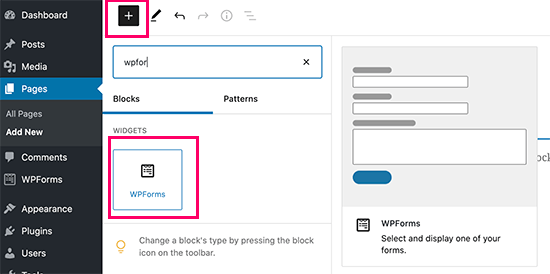
WPForms makes it super easy to add your forms anywhere on your website. Simply edit the post or page where you want to add the form and click on the (+) add new block button.

Locate the WPForms block and add it to your post.

WPForms block

From block settings, simply select the form you created earlier. WPForms will load a live preview of your form in the content editor. You can now save your post or page and view your form in action.

Viewing Geolocation Data for Your Form Entries

After you have added the form to your website, wait for it to collect a few form entries or go ahead and add a few test entries on your own.

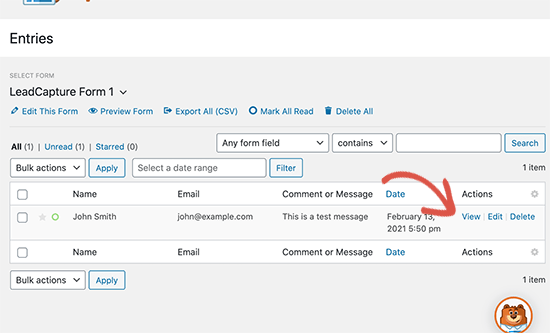
After that, you can go to WPForms » Entries page and click on your form name to view entries. On the Entries page, click on the View link next to any entry to view the details.

Viewing form entries in WPForms

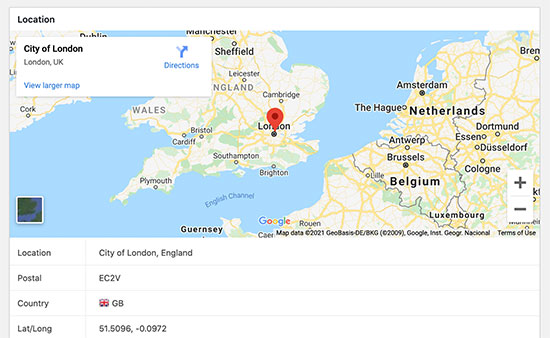
On the entry details page, you will see a box with user’s Geographic location marked on the map.

Geolocation pointed on a map

Using Geolocation Data for Your WordPress Forms

Geolocation data can be used to grow your business. You can figure out which regions are showing more interest in your products, services, or website.

You can match this data with your Google Analytics reports to see which regions are not performing well. If your business serves a global audience, then you may consider offering forms in local languages.

Using GeoTargeting in WooCommerce

WooCommerce is the biggest eCommerce platform in the world that runs on top of WordPress. It comes with built-in geolocation feature that allows you to detect user’s location and use it to display taxes and shipping information.

For this section, we assume that you have already set up your online store. If you haven’t, then follow our guide on how to create an online store for step by step instructions.

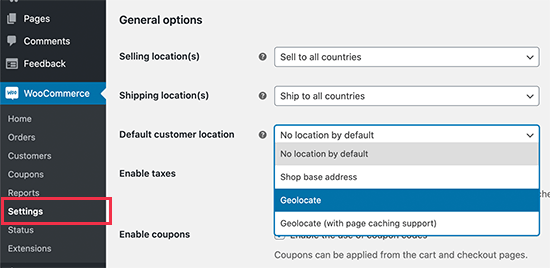
After that, you need to visit WooCommerce » Settings page and scroll down to the ‘General Options’ section.

Geolocation settings in WooCommerce

From here you can select the countries or regions where you sell or ship to. You can also modify the ‘Default customer location’ option.

By default, WooCommerce assumes customer’s location to ‘no location’. You can change that to use your store address or use Geolocate to find the customer’s country.

Note: Geolocate feature will only lookup user’s country using their IP address and WooCommerce uses a third-party integration to fetch this information.

You can also use Geolocate with page cache support. The downside of choosing this is that your product URLs will show a v=XXXX string.

Don’t forget to click on the ‘Save Changes’ button to store your settings.

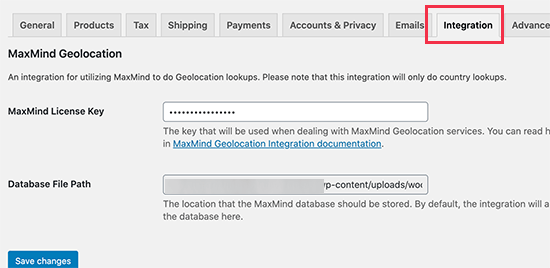
Next, you need to switch to the Integrations tab and you’ll see an option where you’ll be asked to provide a MaxMind API key.

MaxMind API key

This third-party service will lookup for GeoLocation information for your WooCommerce store.

Now, you need to sign up for a MaxMind free account. Once you have completed the sign up, go ahead and login to your account dashboard.

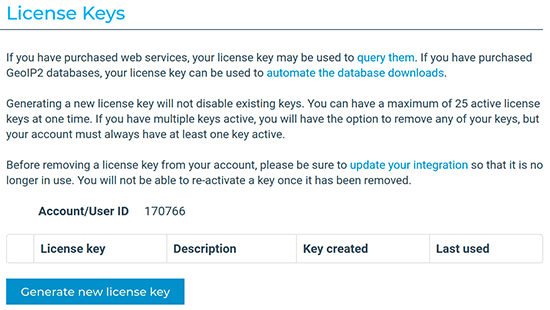
From here you need to click on Services » Manage License Keys menu. On the next page, click on the Generate New License Key button.

Generate license key

After that, simply copy the generated API key and paste it into your WooCommerce settings.

Don’t forget to click on the ‘Save Changes’ button to store your settings.

WooCommerce will now start using Geolocate data to calculate taxes and shipping costs. However, you’ll still need to configure shipping zones, shipping costs, and taxes.

We hope this article helped you learn how to use GeoTargeting in WordPress boost sales and improve user experience. You may also want to see our proven tips to increase website traffic, and our comparison of the best business phone services for small businesses.

If you liked this article, then please subscribe to our YouTube Channel for WordPress video tutorials. You can also find us on Twitter and Facebook.

The post Ultimate Guide to Geotargeting in WordPress – Step by Step appeared first on WPBeginner.

Ultimate Guide for Using Redux With React Native

Redux is a popular React and React Native state management library, meant to be used in complex React and React Native apps where sharing state between multi-level components can get extremely difficult to manage. In this article we are going to learn how to use Redux with React Hooks by building a real React Native app.

This is how the final app will look like:

Ultimate Guide to Integrating Zapier with WordPress Form Plugins

You’ve just designed the perfect form that’s going to hook your leads like fish at the end of a line, and you’re ready to reel them in.

But what happens when the responses come flooding in? Who’s going to end up with the task of copying and pasting all those leads from your forms to your Salesforce, e-mail list, or even Trello?

With Zapier and a quality WordPress form plugin you can automagically categorize the data captured by your site and share it with over 1200 other applications.

Zapier web app integrations
Zapier makes it easy to integrate your WordPress forms with over a thousand web apps.

Sounds difficult and super technical, right? Zapier provides this level of integration to users with almost no skill. And in this post we’ll look at what Zapier is, how to setup and test your first zap, and how to integrate your WordPress form with Salesforce or any of the +1200 web apps built to work with Zapier. So let’s dive in!

What is Zapier?

Zapier is basically a web application that helps you automate the process of moving information from one app to another, by creating a bridge so that both apps can “talk” to each other. For example, you can send information collected from Forminator or Hustle directly to your Salesforce account.

Zapier’s strength lies in its ability to not just send unordered information from your WordPress form plugin, it is also able to automatically categorize the information it receives, and send it exactly where you decide.

Using Zapier, you can send data from both Forminator and Hustle to:

  • Your Salesforce account and Google calendar
  • One Google sheet or several
  • A Trello board
  • Your Dropbox account
  • Acuity Scheduling
  • Manychat
  • …and hundreds more

Some forms are able to seamlessly integrate with a  number of popular web services without the help of Zapier. For example, Forminator allows you to seamlessly share your WordPress-acquired data with Mailchimp, Google Sheets, Trello, Active Campaign, Campaign Monitor, Aweber, and Slack. For other applications,  Zapier is available as the most networked guest at the party, to help you connect your WordPress plugin form to around 1200+ more services.

What can you do with your WordPress form?

If you’re wondering about what sort of Zapier integrations you can achieve with that WordPress form that’s on fire, here are some automations your list can handle using Zapier:

  • Create a new customer in Stripe
  • Create a new lead in Salesforce
  • Add a lead to a campaign in Salesforce
  • Send an email from your Outlook account
  • Create a new task or project in Asana
  • Update a row in a Google spreadsheet
  • Find a contact profile by exact match email in ClickFunnels. Optionally add a new one if no exact match is found.
  • Add a reminder for yourself or a teammate in Slack
  • … and lots more.

So as you can see, the possibilities of what you can do with your WordPress form are endless. Now let’s check out the setup process.

In this example, we’ll explore how to create a new lead in your Salesforce account with the information submitted via your WordPress form using Zapier.

For the purpose of this tutorial, we’ll be using Forminator, our free form plugin, to collect your leads. However, this tutorial is beneficial for any Zapier-integrated WordPress form plugin… so keep reading! You can get Forminator free on WordPress.org or become a WPMU DEV member to get Forminator and our entire suite of marketing, performance, security, hosting, backup, and services free for the next 30-days.

How to connect your WordPress form to your Salesforce account using Zapier

#Step 1. Activate the Zapier webhook to connect your form

This section will guide you through the steps required to correctly link your WordPress form to your Zapier account. Once you have set up your WordPress form correctly, you should end up on a page asking you to enter your webhook URL.

Set up your form in Forminator

  • Go to your Forminator form on WordPress, and click on Edit > Integrations.
  • On the Integration page, scroll down and click on the “+” sign on the right to integrate Zapier.
  • You will get a pop-up asking you to “Setup Webhook”. Keep this open and go to the “Set up your Zapier webhook” section.

#Step 2. Set up a Zapier webhook

    Now let’s look at how to set up your Zapier webhook.

  • In a separate window, log into your Zapier account. In the top right corner of your account dashboard, click on “Make a Zap”
How to create a Zap
  • You will be directed to a page asking you to Choose a Trigger App. Type in “webhooks by Zapier” and click on the application. Webhooks are basically pathways through which automated messages are sent from one application to another.
WordPress Zapier integration webhook
  • Select Catch Hook > Save and Continue.
Zapier WordPress integration – select trigger
  • You should now have a webhook URL. Copy this,  go back to your WordPress form page and paste it in the webhook URL box.
Zapier integration pick a sample to set up your zap
  • Click on “Okay, I did this”.

#Step 3: Create an action in Zapier

Now, it’s time to set up the action that you want the Trigger to lead to.

  • In the bottom left column of the Zapier page, click on Action/Search
  • Search for Salesforce using the Search field.
  • You should see a dropdown list offering a variety of options regarding what to do with your data. You can Create a new lead, Add a lead to an existing campaign, Create a custom object, Add a contact to a Campaign, or Create a new contact. You also have the option to search for existing accounts using a field and any value you choose.
  • Select the action you desire. For the purpose of this example, we want to create a new lead in Salesforce using the information provided in the forms, so we select Create Lead > Save & Continue
  • In the next step, you will need to add your Salesforce account by logging into it, then clicking “Continue”
  • You will now have the option to match the fields in the Salesforce form with the fields in your Forminator form by selecting corresponding fields using the “+” sign. Add as many fields as are available on your form, and when finished, click “Continue”.
Zapier integration with Salesforce

#Step 4. Test your Zap

  • On the action tab (bottom left), click on “Test this step”. Ensure you have filled out all the information that is required on this page. For this step, you will need to actually type the information required in the fields as you may not be able to “pull” information from your lists at this point.
  • Scroll to the bottom and click “Continue”.
    You should get confirmation that the test was successful. If this step is not successful, look through your list again and ensure that you have valid information inside the fields – for example, you have an actual e-mail address inside the e-mail fields, etc.
  • If all works well, don’t forget to turn the Zap on to start sending leads automatically to your Salesforce account (top right corner of the same page)

This guide shows you how to easily integrate one form with the Salesforce app, using a free, basic Zapier account. The possibilities of what can be done with Zapier are endless, especially with a premium account.  You can maximize your productivity by automating multiple integrations with one trigger. For example, once a form is filled on your website, you can add a lead to your Salesforce account, send the same lead to your email list, and send your team a Slack notification. All you need to do is click the “+” button between the steps in your  Zap.

Your powers have been granted!

So easy! If you’ve read this far and still haven’t downloaded Forminator or Hustle, what are you waiting for? Get started for free with Hustle and Forminator on WordPress.org or start your WPMU DEV membership.

Congratulations on your newly-acquired super-zap-powers. I hope you have found this tutorial helpful for learning how to use Zapier to integrate your WordPress forms with your favorite web applications.