API Security Weekly: Issue #131

This week, we check out the recent API vulnerability in John Deere farming machinery, the best practices in using Springfox annotations for API security, a new JWT penetration testing lab, and AutoGraphQL — a tool for GraphQL authorization testing.

Vulnerability: John Deere

John Deere is one of the leading manufacturers of expensive farming equipment, such as tractors and combine harvesters. Many of these are automated to the highest degree and cost millions of dollars.

How To Bake Layers Of Accessibility Testing Into Your Process

When building websites or apps, accessibility testing is critical to ensure that what you build will work for all your users. This includes users with disabilities and also people with temporary and situational limitations (like that coworker who broke their arm skiing or the customer who is outdoors on their phone with glare on the screen).

We’re going to share how to "layer" accessibility testing by using a variety of tools and approaches at different stages in the digital product lifecycle to catch accessibility issues early — when it’s easier and cheaper to fix them. Taking a layered approach to testing your site for accessibility also improves the usability of your site — which in turn increases your customer base and reduces customer service inquiries. It can both make and save you money.

We’ll use a layered cake analogy to talk about the different layers of accessibility testing and when to use them. Food analogies have become quite popular in the accessibility world!

This approach has worked well for both of us. Mike is a seasoned accessibility advocate and senior strategist at a government technology firm (CivicActions), and Kate is the Head of Services at an accessibility testing platform (Fable).

While Mike looks at accessibility testing from a more technical angle early in the development phase and scanning for compliance on live sites, Kate focuses on the user experience. Both of us realized that combining many types of accessibility testing throughout the product development life cycle is a powerful way to improve overall product accessibility. In this article, we’ll share some of the things we’ve learned.

Most organizations approach accessibility in three main ways:

  1. Running tools to check your code and/or user interface.
    This is often referred to as “automated testing” because you use software to automatically test many accessibility issues at once.
  2. Using your computer in a way that is different than you normally do.
    For example, by not using a mouse, zooming your browser to 200%), or switching to Windows high contrast mode.
  3. Using assistive technology and users with disabilities to check for usability issues.
    This is often referred to as “manual testing” because it requires a person to evaluate accessibility issues.

Far too many organizations rely exclusively on a single accessibility solution to validate their site. No one tool or process can give an organization the confidence that they are actually meeting the needs of the greatest possible number of people.

How To Secure Buy-In For Accessibility

In many organizations, in order to do accessibility testing, you’ll need executives to prioritize and support the work. Here are tips on how to make that happen if you don’t already have buy-in for accessibility:

  • Check if there is a legal requirement for your organization to be accessible.
    “Accessibility Act” and “Disability Act” are search terms that should pull up relevant laws in most countries. Sharing the legal risk can be the right incentive for some organizations.
  • Find out what your competitors are doing.
    Check for an accessibility statement on their websites. Most organizations are keen to stay ahead of the competition and knowing that others are prioritizing accessibility could do the trick.
  • Connect with customer service to find out if there are accessibility complaints.
    If possible, reach out to customers directly to hear about their experiences and share those stories with company leaders. Hearing about dissatisfied customers can be a huge motivator. If you can get permission from the customers, record a demo of them facing challenges with your products. A video like that can be very compelling.
  • Explain the financial costs and rewards.
    Many companies think they can’t afford to do accessibility, but it’s much more affordable when it’s integrated into the day-to-day work and not an afterthought. There’s also the potential revenue from people with disabilities — globally they represent more than 3 trillion dollars in disposable income.

  • Find the right champion.
    Chances are there’s already someone at the highest levels of the organization who cares about people and doing the right thing. This may be a Diversity and Inclusion lead, someone fighting for environmental sustainability, or other issues. Perhaps it’s someone with a disabled friend or family member. Making them aware of accessibility may be all that’s needed to add a new focus to their efforts.

Gathering Your Ingredients

Accessibility should be baked into your process as early as possible. One place to start is with the procurement process. You can incorporate accessibility as part of the review process for any technology systems you are buying or building. DisabilityIN has some excellent resources on accessible IT procurement.

Looking for vendor accessibility statements or VPATs for products can help, but so can doing a quick review with some of the tools mentioned in the recipe below. Not all software is created equally, so you want to be sure you’re working with vendors who are actively contributing to tools and processes that help you prioritize accessibility from the start.

Another way to bake in accessibility early, if you’re creating or updating a design system, is to choose a component library that has been built with accessibility in mind. Look for libraries with a clear accessibility statement and an open issue queue that allows you to review problems.

Examples:

  • The Angular Components team has built accessibility into the Material UI library. For example, the radio button component uses a radio group with an aria-label. Each radio button reads as checked or not checked to a screen reader user, the buttons can be selected using the arrow keys like standard HTML radio buttons, and the focused state is clearly visible.
  • Reakit for React describes an accessibility warning feature on their accessibility page that will tell developers when an aria-label is needed.
  • The Lion accessible web components library uses an a11y label to tag accessibility issues in GitHub so you can see what’s being improved and open your own issue if needed.

Another way to embed accessibility into your process is to update one of the personas your team uses to include disabilities. Many people have more than one disability, so creating at least one persona with several disabilities will ensure you keep that audience top-of-mind in all your early design work.

To flesh out that persona, talk to people with real disabilities — including temporary and situational limitations — to help you understand how they use technology, sites, and apps in the real world. One in five people have a permanent disability, but 100% of the population will be faced with vision, hearing, motion, or cognitive disabilities at some point in their lives. Our personas can reflect:

  • people with allergies, insomnia, or broken bones;
  • people using outdated technology or using their computers outside; or even
  • people who change their technology use according to their location (for example, disabling images when they need to save internet bandwidth).

Little changes like these can have a big impact on how your team thinks. One way to pitch this change to leadership and teams is to talk about how it will make your personas more reflective of your actual users — which is the whole point of personas. They must be realistic.

One of the most impactful ways to involve people with disabilities is to have them help co-design services and products. Australia has a free training toolkit on how to do co-design with people with disabilities. There’s also a great case study on how one company ran co-design sessions with people with learning disabilities on behalf of the UK government.

Legacy IT

Whether we like it or not, most of the decisions about organizational IT were made months (if not years) ago. Even when you are in the heat of a procurement process, accessibility is typically just one of many considerations. This is to be expected — even in organizations that are passionate about accessibility.

With legacy technology, the first step is simply to raise awareness with the vendor or team about the importance of accessibility. If you can detail accessibility issues that you want to be fixed using automated tools, it can help adjust how a vendor ranks their issue queue. There isn’t always a community portal to post concerns like this, but there might be a community on Twitter or Reddit where you could bring issues to light.

Additionally, there might be a customizable theme that could be adjusted to address some of the concerns. Some solutions may offer an Application Programming Interface (API) that would allow a developer to build an accessible user interface around it.

If a vendor has competitors, it can be useful to highlight the accessibility features that are included in that product. It can be beneficial to remind vendors that you do have options.

If legacy IT is an internally built product, a good way to quickly evaluate it is using the keyboard only. If you can’t use the product with a keyboard (for example, there’s no visible focus or the UI is only mouse clickable), it’s likely going to be a lot of effort to improve the accessibility of the product.

Consider offering alternative ways to access the service (e.g. phone support, in-person service, or email) so that people who can’t access the product digitally because of accessibility barriers can still get what they need.

Think about the organizational roadmap and when it might be feasible to upgrade or retire the product and weigh the cost and effort of accessibility against that. If you have other, newer products that aren’t accessible, it might be more productive to focus your efforts on those products if a legacy tool is nearing the end of life.

The Recipe

Here is an example of a comprehensive accessibility testing approach, with five layers for a really delicious accessibility testing cake. Figure out what your budget is going to be and then price out all the various testing approaches. Some are free, others will cost money. In the next section, we provide advice on where to start if all these layers of testing won’t fit in your budget.

  1. Research User Needs
    Ensure the questionnaire that you use to screen potential research participants asks about assistive technology use. This will make it easy to integrate people with disabilities into your existing research process at no extra cost. If you don’t have luck finding participants this way, try reaching out to disability organizations.

    You can also modify your existing user personas to include users with disabilities. You can borrow aspects of user profiles from Gov.UK if you need to do this quickly and cheaply. If you have the budget for it, add people with disabilities into prototype and design reviews. This may be easiest to do if you engage a vendor that offers this type of service, hence the need for a budget. Alternatively, you can pay participants directly.

  2. Refine Your Process
    Encourage developers, designers, and content authors to include accessibility checks as part of their process. Here are ways to do that using free automated testing tools:
    • Download free browser extensions/plug-ins to do page specific testing for design reviews (WAVE or Accessibility Insights)
    • If you use continuous integration testing as part of the build pipeline for developers, make sure you are evaluating accessibility (there are free open-source tools for this like Axe Core and Pa11y)
    • Give content authors tools in the WYSIWYG interface to identify barriers that they have added (HTML Code Sniffer)
    • Ensure you are crawling your site regularly to catch accessibility issues. If possible, run crawlers in both staging and production environments (Purple Hats is a free open source option)
  3. Manual QA
    You don’t have to add extra people to do QA, just integrate it into your existing process. If you only do one thing, then stop using the mouse during your regular QA. You’ll catch accessibility bugs along with other functional bugs. If you want to do more, test with screen readers, and magnifiers too.

    Here are various ways you can do manual accessibility QA without purchasing any tools:

    • Can you access your site without your mouse? Use simple keyboard-only manual testing to evaluate new components and content.
    • Browse your site with magnification set to 200% or greater using the built-in magnification tools in your browser (Ctrl + +).
    • Flip your browser or OS to dark mode and see if your site works well for people with light sensitivity.
    • Perform sprint-level testing with developers and designers using assistive technology (VoiceOver, Microsoft Narrator, and NVDA are free options).
  4. User Testing
    In large corporate environments with a dedicated budget for accessibility, you can pay assistive technology users to test functionality on your staging environment before launch.

    Nothing gives you greater certainty that your product will work for people with disabilities than validating with users. Not even a perfect WCAG compliance score can give you that assurance the way a real person using the product can.

    People with disabilities are often asked to do work for free, which is problematic as many with disabilities are already at an economic disadvantage. If you’re working on a personal project and there’s no budget, look at your network and see if there are people who would be interested in helping in exchange for an equivalent favor.

  5. Specialist Review
    If your organization has an accessibility team, have them do User Acceptance Testing pre-release. This is where you can get detailed feedback on WCAG compliance that you may have missed in earlier steps.

    Think of it as a final check; your accessibility team isn’t doing all of the work on accessibility, everyone has a role to play. Accessibility teams are most effective when they set standards, provide training, give guidance and evaluate compliance. They support accessibility efforts but aren’t the only ones doing accessibility work. That way no one person or team becomes a bottleneck.

    If you don’t have a team, you can hire accessibility professionals to do the reviews prior to release.

Where To Start

Start where you are. The goal isn’t perfection, but ongoing improvement. Implementing all layers at once doesn’t have to be the goal. Rather, it’s about starting with one or two layers and then gradually adding more layers as your team gets better at accessibility testing. A small slice of cake is better than no cake.

Individuals

  • If you are new to accessibility, start by adding a free browser extension to find accessibility issues and start by learning how to fix the errors that are displayed. WebAIM’s WAVE Toolbar is great for this.
  • Start sharing accessibility information that you have found useful. This could be just on Twitter or Reddit, but you could also start a newsletter to help raise awareness.
  • Sign up for webinars or events focused on accessibility so that you can learn more.

Teams

  • A team with a strong user-centered design approach might want to start with layer one: interviewing people with disabilities as part of user research.
  • A team with a strong IT compliance process might invest in tighter integration of automated testing in their continuous integration process or a site-wide crawler first.
  • Find ways to incorporate accessibility earlier in the design/development process.

Organizations

  • Make sure you have meaningful accessibility statements which reflect your organization’s commitment to remove barriers to people with disabilities.
  • Build a champions network that allows a community of practice to grow and learn from each other.

Limitations Of Automated Tools

Every baker needs to have an arsenal of tools they can rely on. There are proprietary accessibility tools worth considering, but there are also excellent open-source tools including the ones we mentioned in the “recipe” above that are available for free.

In modern dynamic sites, it is important to use automated tools to catch accessibility errors early before they are published to the live site. It’s also important to crawl the site to see that all the pages still comply after they’ve been published and continuously updated.

The challenge is that designers and developers often assume that if the tests don’t report any errors, a site is good. When you give people a test, people tend to write towards it. Unfortunately, many designers and developers stop when they eliminate the errors that they see with WAVE or Axe.

To be clear, it is a small fraction of teams that even do this, but if we want to make sites that are perceivable, operable, and understandable for more people using different types of technology, we have to do better.

Automated tools are great but limited. Even the best available automated tools only catch about 30 to 40% of WCAG compliance accessibility errors. An automated tool can tell you if an image is missing an alternative description, but what it can’t tell you is if the description is entirely inaccurate or used in the wrong context and therefore useless. That still requires a person to evaluate.

To get past these limits, it’s important to recognize that accessibility doesn’t automatically mean usability for people with disabilities. Think of accessibility as the lowest bar; it works with assistive technology, but to go beyond “it works” to “it’s enjoyable and easy to use” you’ll need to test with real users.

Many organizations already do usability testing, but most don’t include people with disabilities. If you’re having trouble recruiting more diverse participants, consider working with an organization that has a community of assistive technology users and a platform to make testing quick and easy.

Let’s Get Baking!

Use a layered accessibility testing approach when you are working to build an inclusive website. Don’t rely on just one type of testing to find barriers for people with disabilities.

  • Test your ideas with assistive technology users early in the process
  • Integrate regular automated code checks into the process of building the site
  • Do manual testing using assistive technology as part of QA
  • Test with people with disabilities prior to launch
  • Perform comprehensive accessibility reviews on staging

Remember the goal isn’t to score high in a testing tool, or even to meet a WCAG guideline, but rather to make your content more widely available, including to assistive technology users.

Ultimately, accessibility statements are the icing on the cake. Include an accessibility statement with contact information on your site to provide a feedback loop. Your users are the experts and everyone should be part of making a site better over time.

API Security Weekly: Issue #129

This week, we obviously have to discuss the hundreds of millions of Facebook and Clubhouse user profiles that were scraped using APIs. In other news, Forrester has published their fresh and insightful report “The State of Application Security”, and there’s a new online training “Building an Identity Architecture for APIs”.

Data Leak: Facebook

The biggest recent data leak news is the huge database of 530 million Facebook users that was made available. Facebook has made an official statement on the incident, downplaying it because the data was “scraped” already back in 2019 using Facebook’s APIs, rather than obtained through some sort of database access or another “direct” hack.

How To Get Web Design Clients Fast (Part 2)

In part 1, we explained how to use a monthly recurring revenue (MRR) model to grow your web design business. In this second part, we’ll explain how to use proven sales techniques to keep scaling your business profitably.

If you’re an agency owner, you know that you need customers to grow. No matter how big your dreams are, customers are the lifeblood of your business. But you’re probably wondering — how do you attract quality, high-paying clients?

We started our design agency from zero. Two and a half years later, that same business generated $50,000 USD in monthly revenue, and today, it’s many times that size and still growing — all thanks to the sales techniques you’re about to read.

The secret to any successful company is sales, and that applies to design businesses too. Some people are worried about their lack of experience, especially since real-world sales techniques aren’t taught in school. But don’t worry. Sales savvy is like anything else — a skill that you can learn. If you’re ready to learn how to get web design clients fast, keep reading.

How To Set (and Reach) Ambitious Sales Goals

To set a sales objective, choose a target monthly recurring revenue number and deadline. You can base this on your ideal income or what you currently make with one-off clients. For example, your goal could be earning $7,000 USD per month within 24 months after you kick-off. Then divide that figure by your average price. So if you charge $100 per month, you’ll need 70 customers.

When you start, you’ll probably convert about 2–3% of your leads, so you’ll need to contact 33 people for each new customer. So a goal of 70 customers for $7,000 USD per month means reaching 2,300–4,600 leads. (This number may be higher or lower depending on your sales skills and lead quality.)

Thousands of leads probably sounds like a lot! But it’s manageable if you break it down. Each month, you’ll need to contact about 100–200 leads. If you work Monday–Friday, that’s just 5–10 leads a day. Stick with that goal and have an accountability system to track how well you’re doing.

Focus on hitting those lead goals every day or week, even if you don’t see immediate results. Sometimes you’ll close a prospect the same day, but it will more likely take a few days or even weeks of follow-up, explanations, and demos before you finally win them over.

If you don’t work consistently on your goals, it will be frustrating down the line. If you pitch 40 prospects the first week, then 5 the next week, then 15, then 40 again, you’ll have a patchy funnel and inconsistent growth. Put in consistent work, and you’ll see continual progress that will snowball over time.

Once you have your goal set, where should you look for those MRR clients? Here are the best strategies we’ve learned.

Nine Places To Find Web Design Clients

When you’re just starting, you should try different methods to get clients. As you gain more experience, you’ll learn where to focus your efforts, and you’ll get better at converting those clients. Cold pitching a potential client might work best for you, while digital marketing does well for someone else.

1. Use Personal Connections

Chances are, you already know someone who could become a new web design client—or you know someone who knows someone. Share what you’re doing with friends, family, neighbors, and especially any local business owners you know.

You never know which referral might get you another client.

2. Sell With Your Website

Do you want a salesperson that is always working, never gets tired, and can sell to thousands of clients at once? Then you’ll want to make sure your current website is at its very best. If you’re using a basic theme, switch to a modern custom design. Web design clients will judge your design skills by the quality of your own site, so make sure it’s always looking good.

For our agency, we’re continually improving our website to keep it up-to-date and modern. We also include a portfolio of sites we’ve designed so that prospects can see the kind of quality we offer.

3. Ask For Referrals

You’ve worked insanely hard to get the customers you have. Why not leverage your trust with them for even more profit and sales? Ask a happy client to tell their hairdresser, favorite restaurant, plumber, dentist, lawyer, and other local businesses. Then check up on those leads and convince them to hire you as a web designer.

Remember, referring a friend is the best way past clients can thank you. To get referrals, you’ll need to ask! As a bonus, thank your customers or friends for a referral. A surprise gift for a referral goes a long way.

Some referral gifts we recommend are:

  • 10% off your next site update,
  • Free website health check,
  • One month free of charge,
  • $100 Amazon voucher.

4. Partner With Other Businesses

Another strategy to grow your client list is to partner with related businesses, like SEO firms or ad agencies. When you can find a great company in a related but non-competitive niche, reach out and form a partnership. You recommend clients to them, and they’ll recommend clients to you.

Everyone wins. Your customers get helpful services, and both of you will benefit from the referrals you share.

5. Use Content Marketing

You can also use inbound marketing to attract customers to you with content instead of going to them. Blogging on your own site gives you credibility, especially if you focus on writing about solutions for the biggest problems your clients have. New customers already see you as the expert because they’ve read a blog post. Write articles that cover the basic principles of building an online presence and growing a customer base.

The second strategy is guest posting. For example, you can write about best practices for a restaurant website and post them on a blog where restaurant owners get the latest news for their business. Educational content establishes you as an authority and opens you up to a new audience eager to learn about their industry. Writing for other sites has helped us a lot — you’re reading one of those articles now!

Note: We go into more detail on using content marketing in our free guide to finding web design clients.

6. Post On Social Media

We’ve seen success promoting our content on social media. The two that have worked the best for us have been Facebook and LinkedIn, but feel free to experiment with others. Various industries will have a preferred social media platform, so learn about this for your niche and target accordingly.

Organic social media works best as a part of your strategy alongside other methods. It might not bring in leads itself, but a strong social media presence helps convert potential clients who need a good reason to choose you. If you’re doing well on social networks, it can help with that decision-making process and close the deal.

The most important content you can share solves your customer’s problems. And it isn’t just about selling — think of how to teach your customers to take advantage of new digital technologies. For example, you can teach restaurants how to set up a QR code for a digital menu. In addition to helpful content, we recommend sharing sites you’ve designed and using hashtags your target customer will recognize. But make sure to keep your feed professional — don’t post pictures of what you ate for breakfast!

7. Test Paid Ads

The reality is that you won’t keep growing with free methods after a certain point. That’s why we recommend using paid ads as you grow. We’ve used various platforms, from Google Ads to job boards. We’ve also seen a lot of success in offering an email newsletter with multiple opt-ins.

You can also try Facebook Ads and a more complex sales funnel system, complete with a landing page to collect web design leads. Paid ads have brought in lots of new customers for us.

8. Build A Network

An effective way of getting new clients is by building your professional network. First, connect with other founders in person. If you’re not already involved in your local community of business leaders, start as soon as possible. You’ll get valuable advice and business contacts that can lead to more sales in the future.

One of the best places to do this is networking events, like local community business leader meetups. You’ll meet lots of potential clients and get leads for many more. Don’t pitch these contacts, just build relationships. Care about their business and learn what they’re looking for. When they need a website, they’ll know who to turn to.

As the world has gone remote, look for virtual events as well. Check out local business leader Facebook groups, digital summits, and other opportunities to connect remotely.

9. Do Cold Outreach

Last but not least is cold outreach. You’ll need to research a target audience, find a potential client, and reach out with a phone call introducing yourself. Cold outreach has been the main way we’ve built our agency. It’s a lot of hard work, but the results speak for themselves!

The best way to make a sale is by positioning a business website as the solution to a challenge your prospect faces, like restaurants wanting new customers or losing foot traffic to national chain competitors.

We’ll go into cold outreach more in the next section, but these three principles are a great starting point:

  • Build rapport with your prospect.
    Know their name and understand their business, and always look for a personal connection. Honestly care about their success.
  • Be an expert.
    Asking insightful questions is a great way to be knowledgeable without showing off. Help your prospect consider new opportunities in their business they wouldn’t have thought of if it wasn’t for you.
  • Get a commitment.
    Before you hang up the phone, try your best to get the prospect to close or else agree to talk later.

With these points in mind, you can use the following script to make the sale.

Our Most Effective Sales Strategy

We’ll walk through the template we’ve used to convert hundreds of cold leads into happy customers. This successful sales technique boils down to five key steps.

Step 1: Build Rapport And Understanding

Before you jump into a sales pitch, show you care about the business owner and want them to succeed. Start by introducing yourself with your name. Make sure you’re talking to the owner or decision-maker before moving on.

Next, draw a connection to their business—the more personal, the better. Maybe you ate at the client’s restaurant recently, saw one of their delivery vans, or found them on the internet (this neutral intro always works if you don’t have anything specific to point out).

Here’s a version of the script we might use:

Hi, it’s Dave Smith speaking!

Am I speaking to Lisa Samuelson? Great!

Some friends had dinner at Lisa’s Diner a few weeks ago and gave you very high praise.

Step 2: Create Demand By Showing How You Can Help

Your goal here is to offer a way to bring in new paying customers without extra work. Who wouldn’t take you up on that deal? Most of the time, business owners don’t want a website—they want the results a website will bring, like better visibility, high search rankings, more customers, more job applicants, and so on.

You can develop your versions of the following and include a relevant case study from a previous client. For example, a painter specializing in complete house exteriors might tire of requests for small interior jobs. A specialized website can filter their prospects and bring them better business.

Here’s a basic script our team has developed:

Well, Lisa, I run a firm here in CITY that helps business owners become more successful in the digital world with high-quality, full-service websites.

We realized most business owners don’t have the time or tech skills to build and maintain their own website. As a result, they have an outdated site or no site and lose potential customers every day.

We believe business owners should focus on their business. We handle every part of your site, from updates to domain, hosting, email, and even search engine optimization if you want.

Step 3: Show Why You’re The Best Option

Up next, you’ll need to show why the prospect must choose you. Cover the advantages of the recurring revenue model here and explain your fees. Explain that you deliver top-quality modern websites combined with outstanding service, all at affordable prices.

Here are the best talking points you can use:

We run a technology that allows us to deliver top-quality modern websites combined with outstanding service, all at affordable prices.

Unlike traditional agencies or web designers, you don’t pay us thousands upfront, only to get a website to maintain on your own that will be technically outdated in two years.

For a one-time setup fee of $499 USD and a monthly charge of just $99 USD, we’ll create a professional site, update the content, do technical maintenance, keep your domain name current, host the site, and keep your email accounts running.

We have a 20% discount on the monthly fee when billed annually.

Step 4: Tailor Your Pitch To Their Business

The next step is to understand their business and show you care about it. The more you find out about the client’s business and problems, the better you’ll be able to tailor your sales pitch!

Here are the best types of questions to use and how to show how a website will help:

  • What is the greatest challenge in your industry/for your business?
    However they respond, explain how a website will help! You can help them find employees, acquire customers, and stand apart from the competition.
  • Who is currently responsible for your website/web presence?
    Most of the time, it’s not in the hands of a professional. Ask questions to show why this is a problem, like asking what their backup plan is in case of a server crash or how they’re keeping the site updated for more recent devices, standards, and best practices. Explain how your team has experience handling website problems and will always treat them like professionals.
  • Do you know how many visits your current website has?
    If they do, show what you can do to increase this. If not, explain how your site will provide them with valuable data to find more customers and grow their business.
  • Do you know what percentage of customers in your industry are on mobile devices?
    Find out this number in advance. If the prospect’s website isn’t mobile responsive, point out that they’re missing out on a considerable number of customers.

Gathering data upfront from your customer and asking the right questions will show that you are a pro. You’ll demonstrate that you really care and thus build trust.

Step 5: Close The Sale

The most important part of the sales process is closing. Move the prospect to make a firm commitment to start working with you. If they aren’t ready to start immediately, offer a smaller next step, like scheduling a later meeting or sharing testimonials. Always make sure a decision-maker is participating in the next meeting!

Up next, we’ll look at some closing strategies that can help you seal the deal with clients.

Proven Closing Strategies To Finalize The Sale

When you reach the end of a call with a potential client, your job is simple—get them to pay for your web design services. But while the idea is simple, getting a prospect to sign up can be very difficult in practice. To help, here are some techniques we’ve used to close more deals faster.

Share References And Portfolio Pieces

One of the best ways to convince a prospect is by showing them a previous site you’ve designed for a similar client or letting them talk to a current client of yours. Keep portfolio sites for the various verticals you target, like salons, restaurants, dentist offices, and the like. With permission, you can also share the contact information of a current happy customer.

Design First, Charge Later

One technique that worked well for us at the beginning was doing web design first, then charging later. Charging later works best if you don’t have an extensive portfolio or are branching into a new web design niche without relevant work samples. (For example, if you have a dozen restaurant websites but want to land a new hairdresser client.)

To use this strategy, you’ll first design a draft of the new website. Then if the client likes it, they’ll pay the upfront design fee and move forward. This strategy involves more work for you upfront, but it proves to the client that you can build great sites and understand their business. And if they don’t like the website? Not to worry—you’ve created a portfolio piece you can use for another customer down the road.

Waive The Setup Fee

Another strategy you can use is waiving the setup fee. This fee can be a significant barrier for many new clients since they have to pay $500 USD (or whatever your setup fee is) before seeing results. Instead, just charge your monthly recurring payment. You’ll make less money in the short term, but you’ll be more likely to win over an ideal client to stay with you for a while.

If you don’t want to design a site for free like the previous suggestion, this is a great middle option that gives the client a great site with less risk but still lets you get paid for your work.

Show Your Process

You can also build trust by showing your web design process, from draft to design to publication. Doing this as the final stage before you ask for a sale can help create confidence in the prospect’s mind about what you have to offer. People don’t trust what they don’t understand, so show the steps and build trust.

Automatic Payments

This tip applies once you close a sale and want to make sure you still get paid every month: use automatic billing. If you have to ask for payment every month, it’s a constant reminder of what they’re paying. But if you have a credit card on file or use a payment processor that charges your clients automatically each month, you can count on steady, regular cashflow.

It’s also a timesaver for everyone—your client doesn’t have to spend time paying yet another bill, and you can rest easy knowing you don’t have to follow up for a missed payment.

Teach And Build A Relationship

If all else fails and the perfect prospect doesn’t want to sign up at the last minute, never burn the bridge. Don’t let the rejection get to you, and remember you’re a website expert, but also friendly and accessible and willing to help your clients understand what’s going on.

Take the chance to explain what a client might want to look for if they decide to launch a website later. Explain what features are most important based on your knowledge. If a client doesn’t want a website now, there still may be opportunities in the future. Build trust, strengthen the relationship, and play the long game.

Now It’s Your Turn To Find Web Design Clients

Over the last few years, we’ve been privileged to work with so many incredible clients—all following the ideas and suggestions outlined above. The real secret was, of course, putting in hard work and focusing on growth goals. The sales techniques mentioned above helped us then convert those prospects into paying customers.

We also used internal software that we recently released Sitejet to speed up the process and become more profitable. We designed Sitejet to help agencies grow with MRR clients by cutting site creation time by as much as 70% and streamlining client interactions. It’s created to help designers grow their business and give back time for what you love: being creative.

Anyone can successfully grow their design agency. As we explained in the first part of this series, starting takes motivation and an effective pricing model and mindset. And as we shared in this second part, growth comes once you combine proven techniques with lots of hard work! Good luck—and we can’t wait to hear your stories in the comments to this article!

API Security Weekly: Issue #128

This week, we check out the recent API vulnerabilities at VMware and GitLab, how URL parameters can lead to server-side request forgery (SSRF) vulnerabilities, and the upcoming webinar on some of the recent real-life API security flaws.

Vulnerability: VMware vRealize Operations API

VMware has just patched two critical security issues in their vRealize Operations API. The patched vulnerabilities are CVE-2021-21975 and CVE-2021-21983, and affect the products Cloud Foundation and vRealize Suite Lifecycle Manager.

How to Highlight Author’s Comments in WordPress

Do you want to highlight the author’s comments in WordPress posts on your website?

Highlighting the author’s comments in your WordPress blog can help you build engagement. Users are more likely to leave a comment when they see the author is actively participating in the discussion.

In this article, we’ll show you how to easily highlight the author’s comments in WordPress to boost engagement.

Highting comments by an author in WordPress blog posts

Why Highlight Author’s Comments in WordPress?

Comments are a great way to build user engagement on your website. If you want to get more comments on your articles, then you can encourage that by actively participating in the discussions.

For a new WordPress blog, you can easily reply comments during comment moderation. If you run a multi-author blog, then you can encourage authors to take part in the discussion as well.

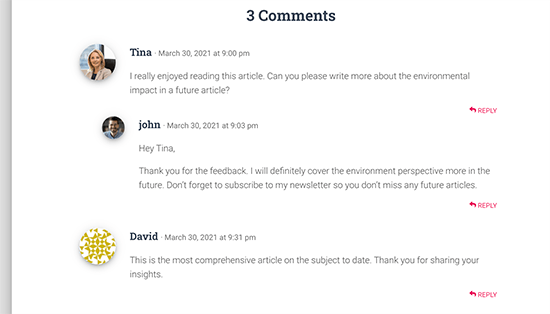
However, most WordPress themes don’t distinguish between comments and list them using the same style.

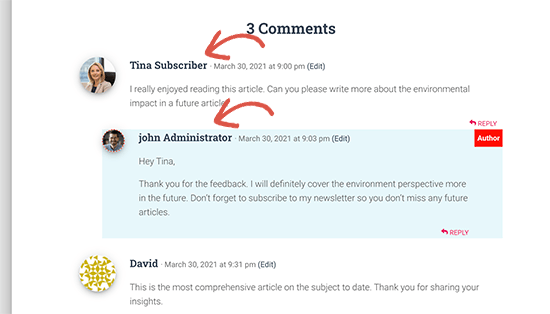
Regular comments layout with no author highlighting

A casual reader may scroll through the comments, not realizing the additional content contributed by the author in the discussion.

Highlighting author’s comments helps you remedy that and makes the author’s comments stand out and be more noticeable.

The ultimate goal here is to encourage new users to join in the comments and ultimately subscribe to your newsletter or become a customer.

That being said, let’s take a look at how to easily highlight author comments in WordPress.

Highlighting Comment Author in WordPress

The easiest way to highlight comments by post author is by adding custom CSS to your WordPress theme. This allows you to easily add the code needed and see a live preview of how it would look on your website without saving it.

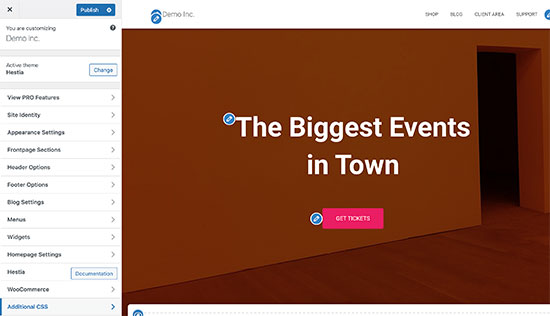
First, you need to visit Appearance » Customize in WordPress admin area. This will launch the WordPress theme customizer interface. You’ll notice a bunch of options in a column on your left and a live preview of your website.

Theme customizer in WordPress

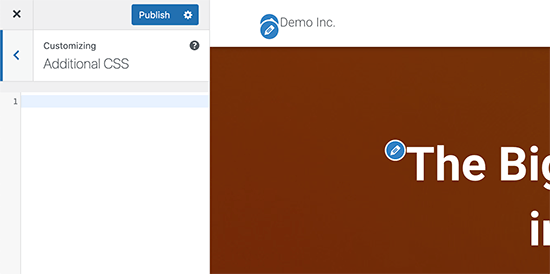
From here, you need to click on the Additional CSS tab. This will open a text area where you’ll be adding the Custom CSS.

Additional CSS tab

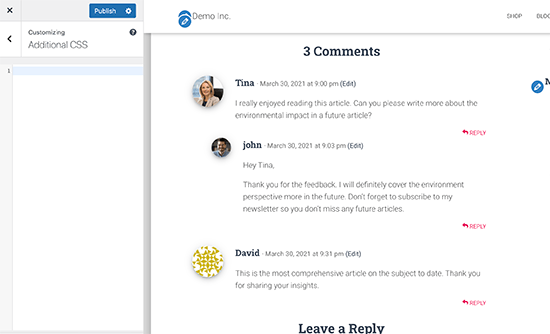
However, you would want to see how the custom CSS will look when applied. To do that, you need to navigate to a blog post that contains comments by a post author.

Viewing comments in Theme Customizer

Scroll down to the comments section and then add the following custom CSS in the Custom CSS box on the left.

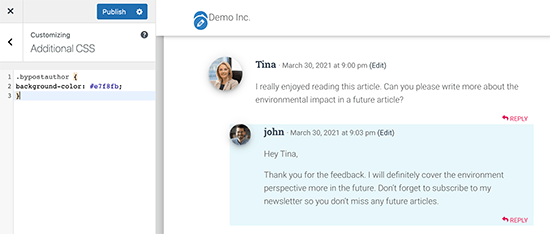
.bypostauthor { 
background-color: #e7f8fb;
}

You’ll immediately notice the author comment change matching the Custom CSS you entered.

Author's comment highlighted with a different background color

So how does this all work?

You see WordPress adds some default CSS classes to different areas of your website. These CSS classes are there regardless of which WordPress theme you are using.

In this sample code, we have used the .bypostauthor CSS class which is added to all comments added by a post author.

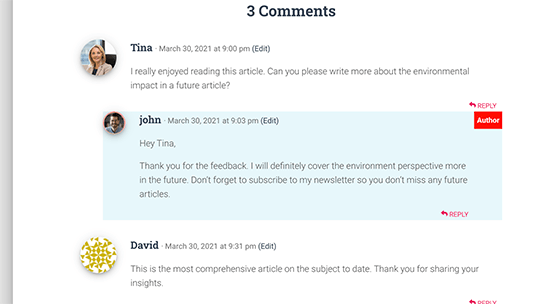
Let’s add some more CSS styles to make it even more prominent. Here is a sample code that adds a small ‘Author’ label to the comments by the post author and a border around the author’s avatar image.

.bypostauthor:before { 
content:"Author";
float:right;
background-color:#FF1100;
padding:5px;
font-size:small;
font-weight:bold;
color:#FFFFFF;
}
.bypostauthor .avatar {
border:1px dotted #FF1100;
}

This is how it looked on our test website.

Comment author highlighted with the Author label

Highlighting Comments by User Role in WordPress

Now, many WordPress blogs have team members responsible for answering comments. Popular websites may have post author, administrator, and moderators all answering comments to boost user engagement.

How do you highlight a comment added by a staff member that is not the actual author of the post?

There is an easy hack to achieve that. However, it requires you to add custom code to your WordPress website. If you haven’t done this before, then see our article on how to easily add custom code in WordPress.

First, you need to add the following code to the code snippets plugin or your theme’s functions.php file.

if ( ! class_exists( 'WPB_Comment_Author_Role_Label' ) ) :
class WPB_Comment_Author_Role_Label {
public function __construct() {
add_filter( 'get_comment_author', array( $this, 'wpb_get_comment_author_role' ), 10, 3 );
add_filter( 'get_comment_author_link', array( $this, 'wpb_comment_author_role' ) );
}
 
// Get comment author role 
function wpb_get_comment_author_role($author, $comment_id, $comment) { 
$authoremail = get_comment_author_email( $comment); 
// Check if user is registered
if (email_exists($authoremail)) {
$commet_user_role = get_user_by( 'email', $authoremail );
$comment_user_role = $commet_user_role->roles[0];
// HTML output to add next to comment author name
$this->comment_user_role = ' <span class="comment-author-label comment-author-label-'.$comment_user_role.'">' . ucfirst($comment_user_role) . '</span>';
} else { 
$this->comment_user_role = '';
} 
return $author;
} 
 
// Display comment author                   
function wpb_comment_author_role($author) { 
return $author .= $this->comment_user_role; 
} 
}
new WPB_Comment_Author_Role_Label;
endif;

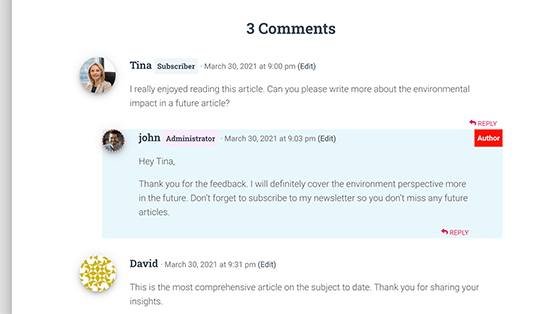
This code simply adds the user role label next to the comment author’s name. This is how it would look without any custom styling.

User role labels added to comments

Let’s make it a little prettier by adding some custom CSS. Go to Appearance » Customize page and switch to the Additional CSS tab.

After that, you can use the following CSS to style the user role label in the comments.

.comment-author-label {
    padding: 5px;
    font-size: 14px;
    border-radius: 3px;
}
 
.comment-author-label-editor {  
background-color:#efefef;
}
.comment-author-label-author {
background-color:#faeeee;
}
 
.comment-author-label-contributor {
background-color:#f0faee;   
}
.comment-author-label-subscriber {
background-color:#eef5fa;   
}
 
.comment-author-label-administrator { 
background-color:#fde9ff;
}

This is how it looked on our test site. Feel free to modify the code to match your theme’s colors and style.

User role highlighted

For more details, you may want to read our article on how to add user role labels to WordPress comments.

We hope this article helped you learn how to highlight author comments in WordPress. Want to see how users interact with your website? See our tutorial on how to track user engagement in WordPress, and how to add web push notification on your WordPress site to grow your traffic.

If you liked this article, then please subscribe to our YouTube Channel for WordPress video tutorials. You can also find us on Twitter and Facebook.

The post How to Highlight Author’s Comments in WordPress appeared first on WPBeginner.

API Security Weekly: Issue #124

This week, we take a look at the recent API vulnerabilities reported at Microsoft and Truecaller Guardians, the new penetration testing labs for API security, and an upcoming webinar on the API security process at Ford Motors.

Vulnerability: Microsoft Online Accounts

API endpoints for resetting account passwords are a frequent attack vector. Attackers brute-force these by supplying as many possible combinations of password reset codes as they can within the time window available to them.

Improving Your Team’s Communication In The Age Of Remote Work

Products are not built in isolation. A big part of our professional lives is spent discussing, brainstorming, and deciding alongside others. No matter our field of expertise we need our team’s knowledge to amplify our own.

With the rise of remote work, we’re communicating more and more in written instead of spoken form and teams need to adapt. If communication fails, everything else fails too.

Why Is In-Person Communication So Effective But Also So Messy?

When we talk with others in person we receive a lot of information. We can read the room to acknowledge unspoken agreements, alliances, tensions, and the overall mood of everyone, and react accordingly. We do this almost unconsciously, making face-to-face communication more effective.

However, the same reason also makes it messy. If someone is having a bad day, we might see it as a sign of tension or lack of investment in the project. For outsiders, lacking an understanding of the complex dynamics of a team can lead to the wrong conclusions.

A downside of office work is how easily information silos are created. Having colleagues next to us makes it easier to ask for help by tapping on their shoulder than to create documentation and rely on it. This creates information disparity, where a few individuals hold critical knowledge. Is everyone in your team relying on a single person’s knowledge? Or is knowledge safely stored in software instead?

I’ve been there before. I used to work on an over-engineered product where only one person fully understood it. We relied on him to get tricky tasks done. We were “too busy to document it” and instead spent the better part of a year slowly refactoring it. Instead, we should’ve taken the time to document how it worked and then done a workshop for everyone to catch up. It would’ve made us more productive, eased the refactoring and our time working with the product.

Changing Our Mindset: Remote Work Is Not An Online Office

Becoming a productive remote team requires a change of mindset: defaulting to asynchronous instead of synchronous collaboration. This allows people to focus on what matters by decreasing distractions and prevents a culture of “always online” which is an adaptation of tap-on-the-shoulder communication to chat and email.

Allow Yourself Some Deep Work

Research has shown that we need from 15 to 30 minutes of focusing on a task before we’re fully immersed in it and are able to do meaningful work. The worst part is that every time we’re interrupted we’ll need to start over. A tap on the shoulder, call, or notification can break our focus. Being “in the zone” makes us more productive by letting our minds solve one hard problem at a time, instead of multitasking, which we’re terrible at. This has been dubbed “Deep Work”.

Achieving deep work should be our goal in any team, but doing it in an office setting can be challenging because of so many distractions. Asynchronous communication in a remote setting is perfect for it.

Once you’re not required to be always-online, the opportunity to do meaningful work will drastically increase, but your ability to get help will get slower, so how can we get the best of both worlds?

Documentation As A First-Class Citizen

Working groups form a network of knowledge, where each individual will have unique information that is accessible by everyone. As we share information among us, we form an institutional memory that makes the team more productive, but can also hinder us.

If you find a solution to a hard problem, others can ask for your help when facing it. But what happens if someone needs your knowledge in two weeks when you’re on holiday? The solution is to offload it onto software that is always accessible, and to foster an environment where everyone sees the value of documentation as a first-class citizen. However, it’s easier said than done.

Asking someone at the office to create documentation, although logical, might be ignored since everyone is nearby and ready to help. But remote teams appreciate being self-reliant when facing issues.

The bigger the team, the harder communication gets, and having a central repository of knowledge helps to tame complexity. By making documentation the default instead of an afterthought, you’re improving your institutional memory, which makes critical information accessible by anyone, anytime, anywhere.

What should you document? Solutions to thorny problems, outages and their causes, onboarding, new tech or tools introduced, fruitful and unfruitful discoveries. It’s all valuable information that should be accessible.

For example, when I joined a remote-first company my manager assigned me a Notion document with goals for the first two weeks. The first week was about reading our “Engineering Documentation”, which explains most of our tech stack and how to set it up locally. The second week I had to do my first task, which also had everything documented: requirements, deliverables, stakeholders. It was by far the best onboarding I’ve had.

Defaulting To Public Communication

Private communication hurts remote teams. Because of it, knowledge and information are not shared equally, and no matter how trivial a discussion is, others might benefit from it. For your remote team to communicate effectively, doing it in public is an important step.

Keeping communication private is similar to not having documentation. You’re storing information in your head and nowhere else. This fosters information silos, decreasing productivity as a result.

Some topics will be sensitive enough to warrant private communication though, such as health or workplace issues, but if you’re collaborating privately consider your motivations and try to switch to public instead.

Public communication in an office is difficult because you can’t interrupt everyone all the time to share something, and it’s a good reason why agile processes such as daily stand-ups exist. But with asynchronous collaboration, everyone will read through the announcements in the team channel whenever they can. Daily standups can either be ditched or become a time to socialize instead.

In companies where communication happens in private, changing to a public mindset can be challenging, but the benefits are worth it. Some tips to facilitate the move is to have clearly defined channels for different topics in your chat app. That way everyone knows where to ask questions and have discussions. Making everyone aware that the team should communicate in public is important too.

But beware, too many channels (private or public) can hurt productivity since everyone spends more time deciding where to communicate rather than how. Only have as many channels as you really need, only invite the necessary people to them, and understand that it’s OK to mute unimportant channels.

When everything happens in public your team is more interconnected and it facilitates leading by example since everyone rises to the challenge of being better.

The Rules For Effective Communication

Expressing one’s ideas effectively is hard, but by following some rules we can dramatically improve how useful each message we send is.

Every Message Is Actionable, Asks A Question, Or Informs, And Has Context

From the perennial “let’s go for a tea/coffee” to the famous water cooler brainstorming session, in-person communication is riddled with traditions. We use these traditions to simplify complex collaboration.

We’re still figuring out the best habits to help us communicate online, but some great rules to follow is to make every message we send actionable, a question, or informative, and to include its context.

Now, let’s break down the rules.

Actionable Messages

With actionable messages, there’s something to be done. A ticket can be created, a solution provided, or a discussion had.

Compare a non-actionable message with little context:

“I clicked the subscribe button and a modal showed up.”

With an actionable one:

“On the products page, I clicked the ‘Subscribe’ button and a modal opened. But I should’ve been redirected to the subscribe page instead. Are we aware of it?”

In this case, either the behavior is wrong, or the specification is out of date and there’s a clear action: A ticket can be created or the documentation updated.

Your Message Asks A Question

A good question explains the why behind the question and provides context. The trick is to maximize the chances of someone understanding your problem right away by explaining it as clearly as possible. If you’re asking for help with a problem, highlight what you’ve tried so far and If you haven’t tried to solve it yet, try first.

Compare an unclear question with no context, reason, or attempts:

“Does anyone know how to render a modal with React Router?”

With a clear one:

“I need to show a modal with our newsletter when a button is clicked, but I’m not managing to do it with React Router. I tried using a <Link to="/modal" /> but it redirects to a page instead of opening the modal in-place. Can someone help?”
Informative Messages

A good informative message is self-contained. You don’t need a lot of prior knowledge to understand it and its value.

Here’s an informative but unclear message:

“We reached an all-time high of users today!”

And here’s a self-contained one that has context:

“We reached 10k concurrent users today on the site, an all-time high! That’s a 25% increase from last month.”
Add Context To Your Message

If you noticed, all rules mentioned context. Adding a message’s context has an anchoring effect, helping the reader better understand the rest of the information.

Here are the same messages as above but with context struckthrough. Notice how much better they are if they contain it:

“On the products page, I clicked the ‘Subscribe’ button, and a modal opened. But I should’ve been redirected to the subscribe page instead. Are we aware of it?”
“I need to show a modal with our newsletter when a button is clicked, but I’m not managing to do it with React Router. I tried using a <Link to="/modal" /> but it redirects to a page instead of opening the modal in-place. Can someone help?”
“We reached 10k concurrent users today on the site, an all-time high! That’s a 25% increase from last month”.

Chat, Documentation, Video, Product Management: Where Does It All Fit?

Would you send an email to a colleague sitting next to you, asking if they’d like to go for a coffee? Probably not. You can be more productive by using your tools as they were intended to be used, and a remote team needs many of them to collaborate effectively. Let’s see how to best use each type.

Media: An Image Is Worth A Thousand Words

Adding an image to a bug report, a video to a feature announcement, or an emoji to a celebratory message can make all the difference between understanding and confusion. Using media helps to explain visually what is hard to describe.

There are great tools for creating editable screenshots or videos to enhance your messages: CloudApp, Gyazo, and the default OS screenshot app are some options I’ve been happy with.

Many services allow you to use emojis for collaboration such as Jira or GitHub. For example, a thumbs up 👍 usually means “good” or “acknowledged“ and is widely understood, but make sure your team is aligned on what less common emojis mean. In our team, we use the tulip emoji 🌷 in code reviews to express an “Improvement, but not required” comment. We have that usage documented under “how to do code reviews”.

Chat: Short Form Discussion, Quick Decisions, Questions, Announcements

Chat tends to be the beating heart of a team. It’s a newspaper of the current events, where most collaboration happens.

To improve chat communication, create laser-focused channels. Each project should have a channel so that any conversation about it can be kept in one place. Just beware not to overdo it and harm productivity as a result.

Chat is also a great place to talk, make jokes, and connect with your peers. Create “share” channels where random discussions, articles, and funny cat gifs don’t interrupt serious conversations.

Depending on the app you use, you might have “threads”. If you do, try to keep all discussion inside a thread. It dramatically reduces noise in the main channel and keeps the conversation focused.

Documentation: Long-Form Discussion, Asynchronous Brainstorming, Evergreen Information

Deciding whether to document something can be tricky. If the answer to any of the following questions is yes then you should document it.

  • Will someone need to read this again?
  • Will we keep contributing to this?
  • Is this a repeating event?
  • Is this information evergreen?

Event summaries, technical guides, team decisions or guidelines, checklists, and results of brainstorming sessions should all be documented. Writing documentation isn’t fun, but spending two hours writing something that could save hours for multiple people in the long run is a huge productivity win. Time savings compound!

Documentation saves time in other ways too. It helps to spread knowledge throughout the organization, to answer questions, and people to be self-reliant. You can create templates for common tasks such as team meetings and investigation tasks to simplify the work. Apps like Notion and Confluence have ready-made templates you can choose from or you can create your own.

When chat discussions are becoming a long thread, move it over to documentation. One person writes down a summary of the problem at hand, and everyone can collaborate asynchronously.

For more effective decision making through documentation, explain the problem at hand, its context, and list possible solutions. That helps stakeholders choose and leads to more focused discussions, instead of a back and forth between options.

Product Management: Laser-Focused Documentation

Product management tools such as Jira are complex. But they can boost productivity by connecting any decision or important information relevant to a task in a corresponding ticket. This is a game-changer if done properly.

This follows the idea of having a single source of truth. By compiling all the information about a feature or task in a single place it becomes simple to stay up to date and to solve misunderstandings by pointing to earlier agreements. If the feature is blocked, put on pause, or someone else takes over, being able to follow through with all the decisions saves a lot of time, and anyone that needs to verify information knows where to find it.

We often make product decisions in chat or documentation. Keep your ticket up to date by adding a link to it. For example:

“We’ll implement animations next sprint to ship on time, discussion in the link below.”

However, we’re all human. We’ll miss things. Decisions won’t be recorded, information might not be up to date, and some knowledge will live in our heads, but porting at least some information could save someone hours down the road.

Video: Sometimes There’s Nothing Like Face-To-Face

We should try to offload knowledge and information onto software tools for organization and ease of access, but sometimes talking to each other directly is priceless. Being able to call our colleagues friends is a valuable part of our professional lives, but creating strong connections in a remote team is challenging. Talking directly to others helps a lot.

From pair-programming, brainstorming in real-time, important private conversations, delivering critical news, or simply hanging out, video conferences excel at making us feel connected to our peers.

Team rituals are great ways to strengthen bonds and to foster human connection. You’ll be surprised at how natural it becomes to talk with friends via video after a while. In my team, we meet every Tuesday to do a roundup of what everyone’s working on by demoing it and to crack a few jokes in between. On Fridays, we play simple browser games together and have a good time.

But beware, overuse of video calls can hurt productivity just as much as an open office. A request for help via video is hard to deny. Make sure your team is respectful of each other’s needs to focus. Having an asynchronous mindset helps. If video is needed, schedule it, it could be in 30 minutes or tomorrow morning. Unless it’s something critical everyone is happy to wait to get help.

Video communication should be linked with your other tools too. If a decision is made in a call you should document it, it’s easy to forget what was agreed on otherwise. If the meeting is important consider recording it.

Just like any other productivity tool, you can use video to save time. Switch to it when the conversation is becoming entangled in confusion, there’s too much context to share via text, or an in-person explanation is better.

Allow Yourself And Your Team To Be Productive

Follow all the best practices highlighted in this article and you’ll notice how you and your team spend less time on discussions, disagreements, and reminding each other about things, and more time-solving problems and doing the things you enjoy.

Getting started can feel overwhelming, so the first step is to promote asynchronous communication by letting others know that answering chat, contributing to documentation, and even video calls should be done when it’s not interrupting their focus time.

Start leading by example. Don’t wait for others to improve the docs or send well-crafted messages. Soon enough, everyone in your team will consider improving communication as a top priority and will start to contribute ideas and find ways to be more productive.

Further Reading

API Security Weekly: Issue #115

Happy New Year 2021!

This week, we revisit the API aspects of the SolarWinds breach and check out how APIs featured in the recent Ledger breach. There is also an API vulnerability found in Microsoft’s Office 365 Outlook and a new API development and security plugin for JetBrains IDEs.

Best of Best WordPress Tutorials of 2020 on WPBeginner

2020 is about to come to an end, and it has been an unprecedented year.

Despite the COVID lockdowns and challenges, a record number of people started new businesses and took advantage of WPBeginner’s free resources and community support.

We want to thank all of you for your continued support that keeps us motivated and energized.

To keep up with our tradition, in this article we will share our staff-pick of the best of best WordPress tutorials on WPBeginner. We’ll also share an overview of 2020 from our CEO to gain some perspective and reflect upon the progress.
Best WordPress tutorials of 2020 on WPBeginner

WPBeginner Recap 2020 by Syed Balkhi

2020 was a challenging year, and it taught me many lessons, but above all it reminded me to truly appreciate and be grateful for all that I’m blessed with: an amazing family, great friends, supportive team members, financial stability, and good health.

This year felt like the longest year of my life.

I turned 30 years old, bought multiple companies, hit a mental burnout, nearly lost $1.4 million dollars in a fraud case, but despite all that, I’m closing the year stronger than ever.

None of it would be possible without the support of my beautiful wife, Amanda, and my family.

Balkhi Family 2020

If you want to see more of my personal journey, then please check out my 2020 Year in Review blog post on my personal blog. It has everything that happened to me in 2020 both personally & professionally along with lessons that I learned, my favorite books, and my goals for 2021.

Let’s take a look at some of the business highlights of WPBeginner and our family of products.

WPBeginner

WPBeginner turned 11 years old this year.

Our YouTube channel passed 220,000 subscribers, and our WPBeginner Engage Facebook group grew to over 66,000 members.

We added two new free tools on the WPBeginner website: WordPress theme detector and a free business name generator. We also added a free business tools page that has a list of all our free tools.

I switched the WPBeginner website hosting to SiteGround Enterprise platform. This was the first time in 10 years that I made the change on WPBeginner hosting. I wrote about 6 reasons why we switched to SiteGround.

We hired 2 new full-time and 2 part-time support team members to dedicate 100% of their time giving back to the WordPress community through free support on channels like Facebook, Twitter, etc.

What many don’t realize is how much free WordPress support we offer through WPBeginner. If you need help, just send us a message through our contact form, facebook messenger, or in our Facebook group.

This year, we also created a new full-time WordPress Core contributor role and welcomed Peter Wilson to our team. Peter is a well-known WordPress developer and a prolific WordPress core committer. He is now spending 100% of his time working on improving WordPress core and our free open source plugins.

WordPress has had a huge impact on my life, and I’m really honored to be in a position where we’re able to increase our contributions to the community. We’ll be doing a lot more of that in 2021.

Want to join our team? We’re hiring!

I’m also working on a WPBeginner site design refresh which will be coming out in 2021, hopefully before our 12th birthday.

One of the questions I often get from new readers is how does WPBeginner make money? Well, it’s through our suite of premium plugins and SaaS application. I did a brief overview of WPBeginner income, but here’s a quick recap of our various products.

WPForms

WPForms passed over 4 million active installs, and it’s now one of the top 10 most popular WordPress plugins of all time. Considering that we only launched it in 2016, it’s amazing to see how far we have come.

This year we expanded our integration ecosystem by making it easy for our users to connect WPForms with Salesforce, ActiveCampaign, Sendinblue, Authorize.net (payments), Webhooks API (external platforms), WP Activity Log (security), WPML (multilingual sites), and page builders like Divi and Elementor.

We introduced a brand new User Journeys feature which lets you see all the pages a user visits before they submit your contact or lead form. Combine this with our conversational forms, form landing pages, and form abandonment addon, and you have one of the most powerful form toolkits to grow your business!
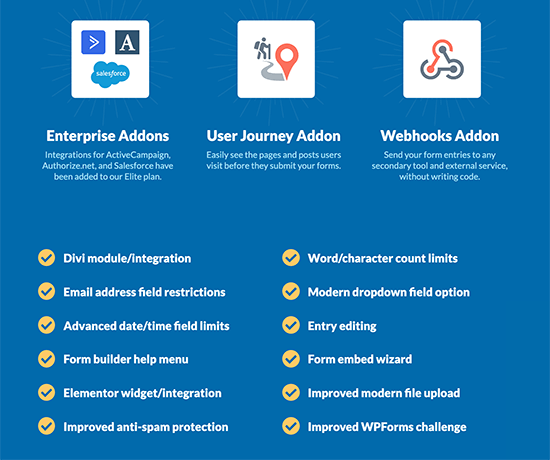
WPForms 2020 Recap

WPForms team did a very slick year in review post which is more like an interactive infographic that you can check out.

Not using WPForms yet? You can try the free version and then upgrade to Pro when you’re ready.

SeedProd

SeedProd is now a fully revamped drag & drop landing page builder for WordPress (that’s both easy to use & FAST).
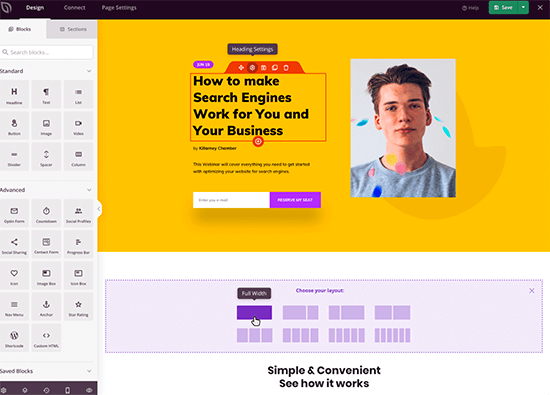
SeedProd Page Builder

I built this product because I wanted to have the ability to build landing pages that are completely independent of my WordPress theme, without writing any code.

With SeedProd, you can have custom headers, footers, content layouts, etc. Unlike other page builders, this won’t slow down your site. It’s basically like building a fast static website similar to Webflow, except in WordPress.

Want to try SeedProd? You can start with the free version and then upgrade to Pro when you’re ready.

OptinMonster

OptinMonster is the best conversion optimization toolkit to help you get more subscribers & sales.

This is the plugin I use to get more email subscribers. It’s one of our flagship brands that’s trusted across industries.

Each month, we help optimize billions of sessions for our customers, so they can turn their website traffic into subscribers, leads, and sales.

Since many of our readers asked me for a free version, I had our team create a secret free plan that I shared with our newsletter subscribers earlier.

All you have to do is install the OptinMonster WordPress plugin, and then create an account from there. This will let you create a free account which is otherwise not available from our site.

This year, we revamped our plugin to offer a more native user experience for WordPress users, and we also added tons of powerful features like TruLead verification to help you get more subscribers and sales.
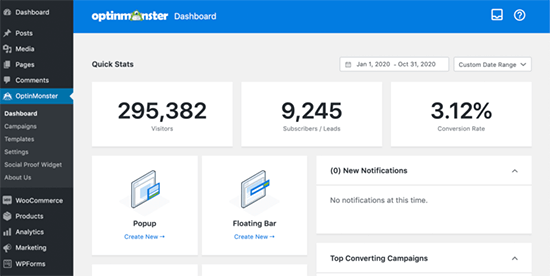
OptinMonster Plugin Revamp

Other Plugins

MonsterInsights added a really powerful popular posts feature that I’m super excited about. It will help you get more pageviews. It’s the #1 analytics plugin, and I highly recommend it for all sites.

WP Mail SMTP passed 2 million active installs and is now in the top 20 most popular plugins of all time. This helps you fix WordPress not sending email issue, and we added several more powerful features there.

RafflePress team added LinkedIn share actions and many other powerful features to help you grow your social following through giveaways.

TrustPulse introduced Click AutoMatic detection which automatically detects user clicks and show it as live activity. It’s the best social proof notification plugin to increase your sales conversion.

Acquisitions and Investments

This year, we acquired three companies.

AIOSEO which is a leading WordPress SEO plugin used by over 2 million websites. We’re working hard to add new features and I’m super excited for the new upcoming items in 2021 (see the full story).

Smash Balloon is the #1 social feeds plugin used by over 1.4 million websites. We introduced a new social wall feature that lets you combine all your social media content on one page (see the full story).

PushEngage is a leading push notification software with over 10,000+ customers in 150+ countries who use the platform to reliably send over 9 billion notifications each month. Push notifications are a top 5 traffic source on WPBeginner (see the full story).

We also took an investment stake in UncannyOwl, the parent company of Uncanny Automator Plugin and the popular Uncanny Toolkit, eLearning extensions (see the full story).

In 2018, I created the WPBeginner Growth fund to invest and advise other WordPress focused companies.

All of our portfolio companies did really well this year.

MemberPress team launched a brand new course feature to help you create online courses with an immersive learning experience.

Formidable Forms team launched a powerful calculator feature, so you can easily build lead calculators.

Rymera team improved their Advanced Coupons plugin to add powerful features like free shipping, buy one get one, and many more for WooCommerce store owners.

Other products crushed it this year as well. The list includes: Pretty Links, Thirsty Affiliates, WooCommerce Wholesale Suite, Business Directory Plugin (new), AWP classified plugin (new), and Affiliate Royale (revamp coming in 2021).

If you run a WordPress company and would like me to invest in your company, then you can learn more about the WPBeginner Growth Fund here.

With that said, let’s take a look at 2020’s best WordPress tutorials on WPBeginner.

January

How to fix your connection is not private error – A lot of website owners come across this error on websites using the SSL / HTTPs protocol when your browser is unable to validate the SSL certificate issued by the website. In this guide, we showed how to easily troubleshoot and fix this error.

How to set up WooCommerce conversion tracking – Many WooCommerce beginners struggle with converting website visitors into paying customers. In this step by step guide, we showed how to easily set up conversion tracking on a WooCommerce store. We also talked about using the conversion tracking data to grow a business and get more sales.

11 Things you should do when inheriting a WordPress site – whether you’re a business owner who recently acquired a new website, or an office assistant who’s inheriting your company’s existing website from another team member, here are the most important next steps.

How to send a custom welcome email to new WordPress users – Want to welcome your new users with an email? Here are two ways to send a custom welcome email. Method 2 allows you to schedule automated emails for the entire onboarding period.

February

How to uninstall and delete a WordPress theme – We have been asked by users about the proper way to uninstall a WordPress theme and delete it from their websites. In this guide, we showed how to easily uninstall a WordPress theme and safely delete all its files and data.

Best blogging niche – 7 that will make money (easily) – Blogging is still going strong and many users ask us which blogging niche or topics would be the easiest to generate a regular passive income. In this article, we shared the best blogging niches that are very successful and easy to monetize.

How to clear your cache in WordPress – Installing a caching plugin to your WordPress website is the best way to optimize speed and performance. However, it can become annoying if caching is making you unable to see the changes you have made to your website. In this article, we showed how to easily clear your WordPress cache and fix many common issues which may be caused due to caching issues.

How to add Google Optimize in WordPress – Google Optimize is a free tool that lets you split test your pages and personalize them for your customers. In this tutorial, we showed two methods to easily add Google Optimize in WordPress. We also talked about how to use it to run split tests on your site.

How to create a contract agreement form with digital signatures in WordPress – A user asked us how they can create a contract agreement form and allow users to digitally sign them directly on their website. In this tutorial, we showed how to create a contract agreement form with an option to digitally sign and submit them.

March

How to use cookie retargeting in WordPress to show custom on-site messages – Retargeting helps you personalize user experience across the internet but what about doing the same on your own website? In this tutorial, we showed you how to use cookie retargeting in WordPress to show personalized user experience, targetted messages, and custom offers.

How to code a website (complete beginner’s guide) – This is a common question that we get asked by our users. In this beginner’s guide, we talked about how to code a website when you don’t have hours and months to spend learning different coding languages.

How to make a logo for your website – Your business logo plays a crucial role in building a brand identity for your business. However, as a startup you may not have the budget to hire an agency for that. In this article, we showed users how to make a logo for their website using free tools and come up with something very professional looking.

How to create an online order form in WordPress – Some business owners just need a simple order form that users can fill in to place an order. In this tutorial, we shared how to easily create an online order form in WordPress without installing a shopping cart or eCommerce plugin.

April

How to run a virtual classroom online with WordPress – Due to challenging times a lot of users turned to offer online learning using virtual classrooms. In this article, we taught how to easily run a virtual classroom online using WordPress and other tools.

How to perform a WordPress security audit – Often users asked us how they can perform a complete WordPress security audit by themselves? In this tutorial, we shared our checklist for performing a WordPress security audit without hiring a security expert.

How to create a buy one get one free offer in WordPress – Running a buy one get one free (BOGO) offer helps you bring more customers to your online store and make more sales. In this tutorial, we showed how to easily create a buy one get one free offer in WooCommerce with step by step instructions.

How to set up email newsletter tracking in Google Analytics – Running an email newsletter is a great way to stay in touch with customers and bring them back to your site. However, how do you track users coming to your website from your email campaigns? In this guide, we explained how to easily set up email newsletter tracking in Google Analytics.

How to easily add an affiliate program in WooCommerce – Adding an affiliate program to your business allows you to build partnerships with other marketers and customers. In this tutorial, we showed users how to easily add an affiliate program in WooCommerce to grow your business with affiliate partnerships.

May

Best WordPress newsletter plugins – Sending an email newsletter is the most effective way to stay in touch customers and bring them back to your website. In this guide, we shared our top pick of the best WordPress newsletter plugins that are beginner-friendly and powerful.

How to open a WordPress popup form on click of link or image – Popups are an excellent marketing tool when used creatively. One such creative method is to show a popup when user clicks on a link or image, Since the user started the action, they are more likely to complete it. See our step by step instructions on how to add click to open popups in WordPress (no coding required).

How to add image choices in WordPress forms – Forms can get quite boring with text fields and buttons. What if you wanted to add images as multiple choice fields in your forms? In this article, we showed how to easily add image choices in WordPress forms to boost user engagement.

WordPress conversion tracking made simple – Once you start getting visitors to your website or online store, you want to track your conversions to make important business decisions. However, most beginners struggle to figure out how to do that properly. In this beginner’s guide, we made WordPress conversion tracking simple with a step by step instructions.

June

How to send SMS messages to your WordPress users – SMS marketing is proving to be another effective way to communicate with customers. In this tutorial, we showed how to easily send SMS messages to your WordPress users or WooCommerce customers.

How to create smart coupons in WooCommerce – Coupons help you run effective marketing campaigns throughout the year. In this tutorial, we showed users how to easily create smart coupons in WooCommerce including BOGO offers, scheduled coupons, auto-apply coupons, and free gift coupons.

How to put images side by side in WordPress – Many beginners find it a bit confusing to place images side by side in their WordPress posts and pages. In this beginner’s guide, we showed you different ways to place images side by side in WordPress.

How to easily edit a WordPress homepage – Many users struggle with creating a perfect layout for the homepage of their WordPress website. In this tutorial, we showed how to set up a homepage for your website step by step and how to easily edit it to create very professional looking homepage layouts.

How to create a custom Instagram photo feed in WordPress – An easy way to grow your Instagram following is by sending traffic from your WordPress website. In this article, we shared how to easily display your Instagram feed in WordPress using different styles and views.

July

How to create a secure contact form in WordPress – Many users ask us how they can make their WordPress contact forms more secure. In this detailed guide, we showed how to easily create secure contact forms in WordPress without compromising functionality.

Best Instagram WordPress plugins (Compared) – Instagram is a massive social platform so naturally our users want to build Instagram following while also getting traffic from Instagram to their website. In this showcase, we hand-picked the best Instagram WordPress plugins that help you achieve both goals.

How to create a paywall in WordPress (with preview options) – Adding a paywall for premium content on your WordPress website is a sustainable way to monetize and grow your business. In this tutorial, we shared how to easily create a paywall in WordPress while giving users option to preview before they pay.

How to sell group memberships in WordPress for corporate teams – We were asked by a user how they can sell bundled memberships for corporate teams on their membership website. In this tutorial, we showed how to easily create and sell group membership plans to corporate clients on your WordPress membership site.

How to run a social media contest to grow your site – Social media contests are an easy way to quickly get lots of traffic to your website. In this guide, we shared how to run a social media contest with some practical tips and examples.

August

How to add automatically drip content in WordPress – Running a WordPress membership community or an online course, you can give away all the content to the users at once after payment. However, it is not sustainable in the long run as users may not return to your site to renew a subscription or simply ask for a refund. In this tutorial, we shared how to automatically drip content in WordPress at a fixed schedule.

How to create a WooCommerce popup to increase sales – Popups have a very high conversion rate on eCommerce sites. In this guide, we shared how to create a WooCommerce popup with 6 different methods to boost sales.

How to write math equations in WordPress – Sharing math equations on the web can be a bit difficult and challenging for new users. In this tutorial, we showed different ways to easily write math equations in WordPress.

How to embed Facebook group feed in WordPress – If you want to quickly get new members for your Facebook group or boost activity, then you need to promote it on your website. In this tutorial, we showed how to easily embed your Facebook group’s feed anywhere on your WordPress website.

September

How to password protect your WordPress forms – A user asked us how they can add password protection to your WordPress forms so that only authorized users can fill those forms. In this article, we shared how to easily password protect your WordPress forms.

Best lead generation WordPress plugins – Collecting leads allows businesses to grow and make more sales and there are a ton of tools to help you do that. In this article, we shared the best lead generation WordPress plugins that are incredibly powerful and easy to use.

How to make a print on demand shop in WordPress – A popular online business idea is to sell print on demand products online. In this guide, we shared how to easily start a print on demand shop in WordPress with step by step instructions.

How to prevent newsletter signup spam in WordPress – Spambots may target your newsletter signup form by adding spam email addresses to your list. This costs you money and your email service may mark your emails as spam. In this tutorial, we shared several methods to block newsletter signup spam on your WordPress site.

How to show personalized content to different users in WordPress – Personalization helps you improve user experience and boost engagement on your site. Both of them ultimately lead to more sales and conversions. In this guide, we shared how to show personalized content to users based on user activity, location, behavioral data, cookies, and more.

October

Best social proof plugins for WordPress and WooCommerce – Adding social proof to your website helps build customer trust and triggers FOMO effect. In this showcase, we picked up the best social proof plugins for WordPress and WooCommerce that you can use.

How to find out who is hosting a certain website – We have been often asked by users how to find out who is hosting a specific website. In this guide, we shared how to find out who is hosting a certain website using two methods.

How to get SMS text messages from your WordPress forms – A user asked us how to to get an SMS alert when someone submits a form on their website. In this tutorial, we showed how to easily get SMS text messages from your WordPress forms.

How to fix the Facebook and Instagram oEmbed issue in WordPress – Due to Facebook and Instagram API changes, all embeds on WordPress websites were broke. In this article, we shared how to fix the Facebook and Instagram oEmbed issue in WordPress.

How to add web push notification to your WordPress site – Push notifications allow you to send notifications to users regardless of their device or browser. This makes them an incredibly powerful marketing tool. In this article, we shared how to easily add web push notifications to your WordPress site.

November

How to translate your WooCommerce store – Users prefer to shop from stores that offer information in their own language and currency. If you ship internationally, then translating your WooCommerce store into other languages can improve user experience significantly. In this article, we shared 2 easiest ways to translate your WooCommerce store.

How to accept recurring payments in WordPress – Recurring payments allow you to automatically charge users on a regular basis for the services, products, or digital subscriptions. In this tutorial, we shared four easier ways to accept recurring payments in WordPress.

Best push notification software (Compared) – Push notifications is a popular marketing tool that allows you to send messages to your users regardless of device or browser. However, there are so many of them with different features and pricing. In this showcase, we compared the top push notification software with pros and cons to help you pick the best tool for your business.

How to create mobile popups that convert (Without hurting SEO) – Mobile popups are a bit tricky because you have smaller screen and popups can hurt user experience and SEO. In this tutorial, we showed how to create mobile popups that only convert well but also don’t ruin customer satisfaction or SEO.

December

What is VoIP and How Does it Work? – VoIP provides a cheaper way to manage your business calls. In this article, we explained how does VoIP (Voice over Internet Protocol) work in plain English for small business owners. We also talked about how it can help you grow your business.

How to change domain nameservers and point to a new host – We have been often asked by users about changing domain nameservers when moving to a new host. In this guide, we showed how to easily change domain nameservers on all the popular hosting platforms.

How to create automated workflows in WordPress – Do you want to create automated workflows on your website to offer a better user experience and avoid repetitive tasks? In this tutorial, we shared how to easily create automated workflows in WordPress with Uncanny Automator.

How to save a blog post to your computer (5 methods) – Learn how to easily save a copy of your blog content that you can read, share, or even convert to an eBook or physical book.

How to export a WordPress site – beginner’s guide on how to export WordPress site to move hosts or make a local copy.

These were some of the best WordPress tutorials on WPBeginner in 2020. We hope that you found them helpful.

We want to thank all WPBeginner users, who visited our website, offered feedback, left comments, and shared it with others. We truly appreciate you.

We look forward to adding even more useful WordPress tutorials in 2021. Have a Happy New Year.

If you liked this article, then please subscribe to our YouTube Channel for WordPress video tutorials. You can also find us on Twitter and Facebook.

The post Best of Best WordPress Tutorials of 2020 on WPBeginner appeared first on WPBeginner.

API Security Weekly: Issue #114

This week, we check out the API aspects of the recent SolarWinds and PickPoint breaches. Also, we have a review on how to shift API security left with GitHub and 42Crunch and an introduction video on GraphQL security.

Breach: SolarWinds

The SolarWinds hacking reported this weekend was not API-related as such. It was a supply chain attack in which hackers (likely a state actor) managed to add their backdoor in one of the DLL files of SolarWind’s IT monitoring and management software, Orion. After a dormant period, the malicious code would contact the command and control center (C2) to get further instructions and execute them. This was in turn used against SolarWinds’ customers, including multiple US government agencies.

API Security Weekly: Issue #113

This week, we take a look at the recent API vulnerabilities reported at YouTube and 1Password, a detailed OpenID Connect (OIDC) security research, and how Assetnote Wordlists can be used in API discovery.

Vulnerability: YouTube

Ryan Kovatch was testing YouTube Video Builder beta when he discovered API flaws in YouTube APIs that it uses.

API Security Weekly: Issue #109

This week, another API has been leaking voter data in the US, we take a look at Dynatrace’s API token best practices as well as Dredd, an open-source OpenAPI verification tool, and there is a video with tips on locating broken object-level authorization vulnerabilities in APIs.

Vulnerability: Trump Campaign’s Post-Election Site

Although the campaigns are finally over, the US elections still feature in our newsletter. This time the dubious star of the week is the website that the Trump campaign launched to collect anecdotal evidence of voting issues. Researchers found that the APIs behind the site were poorly protected and leaking voter information.
API Security Weekly: Issue #107

This week, we check out three API vulnerability reports for Waze, Amazon Web Services (AWS), and the UK NHS COVID-19 app. In addition, the new Forrester study of the technologies constituting application security as of Q4 2020 has been published.

Vulnerability: Waze

Remember the fun “other cars” icons that Waze, Google’s social GPS navigation app providing travel times and route details by other users, is showing on the maps? Peter Gasper decided to have a look on the API behind them and found exposure of some sensitive data lurking there.

How To Use Mailchimp’s New Creative Assistant To Brand Your Campaigns Automatically

If you’re not already familiar with Mailchimp, you should be! Mailchimp is one of the top online marketing platforms around – we use it here at 1WD to send out our newsletters every other week. There are many other ways you can use Mailchimp to market your business, and now they have made it even easier with their new AI-powered design tool: Creative Assistant.

Mailchimp's Creative Assistant

In this article we’re going to show you what the new Creative Assistant is, what it does, and how easy it is to use it. Let’s get started!

What Is Mailchimp’s Creative Assistant?

Creative Assistant is the first AI-powered design tool in a major online marketing platform that makes beautiful multichannel designs for you. By simply entering your website’s URL, the AI gets to know your brand and then creates a Brand Kit along with unique, branded designs so you can build better marketing and grow your sales. It uses design best practices and AI to ensure your designs help drive engagement and are professional, beautiful and consistent across channels  —  but you still have the final say to easily make adjustments before publishing. It also resizes the designs based on the marketing channel you plan to use them on. In short, it’s pretty sweet!

How Does The Creative Assistant Work?

To show you how simple it is to start using the Creative Assistant, we decided to give it a try in our own Mailchimp account. Here’s how easy it was to get up and running.

First, we signed into our Mailchimp account, navigated to the Content Studio, entered our URL and clicked the button labeled “Show Me Designs”.

Mailchimp's Creative Assistant - Step 1

After a minute or two, this screen showed up:

Mailchimp's Creative Assistant - Designs

As you can see, the AI grabbed our logo, Google fonts, brand colors, and an excerpt from one of our latest posts. It even managed to take our logo and create a white version for darker backgrounds (this setting can be tweaked in the Brand Kit that is also created). The stock image was pulled by the AI from Unsplash.

This was an impressive start, but we wanted to take this up a notch, so we clicked on the “Content” button in the top right and quickly changed out the text and images to get this:

Mailchimp's Creative Assistant - Results Edited

Wow! That was quick! Now we have ready-made, professional designs that we can use across our marketing channels to promote this post. By clicking the dropdown next to the size we’re viewing, we could see the designs in various sizes, automatically generated for a number of marketing channels at the correct sizes. Check out some of the Instagram posts that were generated:

Mailchimp's Creative Assistant - Instagram Post Designs

Color us impressed! There are also a variety of other sizes that the Creative Assistant can generate for Facebook posts and ads, Twitter, Linkedin, and much more. So instead of having to open up your favorite design software and create your own marketing assets for each platform every time, it can all be done quickly and easily for you all in one place. This can save us so much time!

Of course, you can also edit the style and designs of each of the assets created, and do the same with the Brand Kit that was generated. Here’s a look at the Brand Kit it created for us:

Mailchimp's Creative Assistant - Brand Kit

By clicking on any of the above assets we were able to edit them to our liking, changing colors, contexts, setting primary logo, and setting the Brand Personality. The changes we make are then used throughout our account in design assets and campaigns.

The Creative Assistant can also be used in other ways and other areas throughout Mailchimp. For instance, it can be used while editing a newsletter’s design. Look how, by simply clicking the Creative Assistant button within the newsletter editing page, the first screenshot was replaced by the second.

Before:

Newsletter Before

After:

Newsletter After

Start Using This New Tool Today!

Obviously, the results of our experience with Mailchimp’s new Creative Assistant were beyond impressive. We will definitely be using it from now on and learning how our marketing efforts can benefit even more than this brief look has shown us. The Creative Assistant is currently in beta, but that doesn’t mean you can’t start using it today. As you’ve seen, it is already an important, time-saving, and unique tool to add to your marketing arsenal. If you’re already using Mailchimp, you must give this new feature a try. And if you’re not a current Mailchimp account holder, we strongly encourage you to get signed up – their pricing plans are inexpensive and they even have a free plan. So head on over and get started with Mailchimp’s Creative Assistant now!