The two inquiries everybody is posing at a home deal are: "what is this?" and "what is it worth?" The normal purchaser at a flea market occasion is regularly confronted with speculating if the substance of the house are sensibly evaluated and if the items they would like to buy have any genuine worth.
It used to be that domain deal purchasers would come equipped with evaluating indexes, books and custom made spreadsheets to endeavor to make sense of if a thing at the yard sale was esteemed decently and what might be a sensible wrangle cost. This is particularly basic if you will likely exchange the thing being referred to later, for example, with vendors who turn over their merchandise at retail costs. On the off chance that they don't buy their stock at a sensible discount cost, at that point they truly can't bring in cash.
Frequently these books and lists hauled around by purchasers were outdated, and the capacity to check what a thing may have sold for at an ongoing closeout or retail shop was close to unimaginable except if the customer approached proficient assets or companions in the business they could tap. In the event that purchasers were fortunate, the bequest deal gave the chance to see a portion of the things ahead of time so they could pack in however much exploration as could reasonably be expected before the occasion o settle on a more educated choice.
[b] [url=https://www.bcellphonelist.com] Buy Mobile Database [/url][/b]
Versatile innovation has drastically changed the condition of home and flea markets. Indeed, even a first-time beginner purchaser furnished with a cell phone or tablet can rapidly approach the most exceptional incentive on for all intents and purposes any article accessible for procurement. These gadgets rapidly permit a purchaser to check the mark on a composition or confirm what that heap of vintage PEZ distributors is as of now selling for on eBay. You can explore the trademark on the base of a bit of earthenware or check the legitimacy of a thing directly on the spot with the goal that you can settle on an educated choice on the off chance that you are paying honest assessment.
Now that you’ve done renovations, chosen a color scheme, and arranged furniture, your house is almost complete, but it’s the finishing touches that will make your house feel like a home....
We all agree that COVID has turned our lives upside down. Each one of us is now under house arrest and struggling to adapt to this new lifestyle of managing home and work simultaneously.
This new lifestyle has not only taken a toll on our physical health but also on our mental health. I am no different, with the added household responsibilities, it has become arduous for me to manage it along with the office work especially when it comes to maintain a grocery list. Every time a grocery item was missed out of the list, the task became more daunting.
How many people would you hand your house keys to and let get into anything that they want? The same can be said about your WordPress account and its users. In this article, we explore some of the easiest ways to limit access for WP users using the admin, code, and plugins.
If you considered your WordPress site like an online home, you wouldn’t always want everyone going through all of your drawers.
The good news is, after reading this, you’ll know how to hand out digital permission accordingly to your users and keep certain areas inaccessible.
WordPress has its own access capabilities — without having an actual access pass.
To kick things off…
Why Limit Usage?
You trust everyone that has access to your WordPress account, right? Well, sure. Maybe. However, it doesn’t mean they need to have TOTAL access to everything.
For example, if you’re running a multi-author blog and just want editors to have access to write and publish — and nothing else. That way they can’t change the themes or plugins while logged in.
Or, maybe you don’t want subscribers to access your dashboard at all.
Whatever the case may be, it’s nice to have control over who has access to what, and set your WordPress site up accordingly.
Let’s start by limiting dashboard access in the WordPress dashboard.
Limiting Dashboard Access With Different User Roles and Permissions
WordPress roles come with different capabilities and actions that users are allowed to conduct, such as writing and editing posts, creating pages, moderating comments, and more.
An easy way to limit access is to set up a new user as a Subscriber. The Subscriber role is very limited and only allows the user to read content on the frontend of the site and manage their profiles.
This can all be done in the admin area of WordPress.
To do this, simply go to Settings and then General. From there, just set any New User Default Role as a Subscriber.
Where you’ll set up new user default settings.
You can change the roles of any user that has access to your site at any time. So, any existing user roles can be modified under Users and then All Users.
From there, click the box of the user whose role you’d like to change or you can select numerous users in bulk.
The dropdown to change roles in WordPress’ admin.
So what’s the difference of roles? The WordPress role options are:
Admin/Super Admin: Allows access to the site network administration features and every other feature in a single site. Super Admin is only available with multisite.
Editor: A user who can publish and manage posts, including the posts of other users.
Author: Users can publish and manage their posts.
Contributor: Will allow a user to write and manage their posts, but not publish them.
Subscriber: As I mentioned, it’s very limited. It only allows the user to manage their profile.
As you can see, each role has different capabilities. You can adjust and change roles as needed.
Using Code to Limit Access
Another way of limiting access is with code. It’s easy to paste the following snippet of code into your child themes functions.php file.
This will block non-administrators from accessing your WordPress site’s backend. Only admins can have access and all other users will be redirected to the home page.
This code only functions when a user logs into the WordPress dashboard. It won’t apply to any user that’s not non-logged, because they wouldn’t have any dashboard access, to begin with.
If code isn’t your thing, there’s always a way to…
Prevent Users From Access with a Plugin
Plugins can have some advantages over the other options of limiting users. Plus, let’s face it, they’re easy to use.
For example, you can simply restrict access to user roles or users that have specific permissions and redirect others to a specific page. This makes it so that only trusted users can have dashboard access.
Here’s a quick rundown of several plugins (some with familiar faces) that can help limit access to your WordPress dashboard.
All of these are free to use, rated well, and have specific functionality.
Remove Dashboard Access
The Remove Dashboard Access plugin is a simple and easy way to limit access for users in your WordPress dashboard. With 5-star ratings and over 40K downloads, it’s a quality and popular option for many WordPress users.
Once you have it downloaded and installed, it’s just a click of the button to limit users to the admin area.
In the Dashboard Access Controls area, you can allow the dashboard access for administrators only, editors and administrators, or authors, editors, and administrators.
There is also an advanced option for numerous options of more specific areas (e.g. ability to view story budget).
Where you’ll select access options.
You can also input a redirect URL for disallowed users, allow all users to edit their profile, and also add a customized login message.
Where you’ll put a redirect and also an option for a login message.
Overall, if you’re looking to quickly limit your user’s options in the dashboard, this plugin has the essential features to do so.
Branda
If you want to take things up a notch, with Branda, our very own 5-star rated white label plugin, you can customize every aspect of WordPress to match your brand.
Plus, she can customize your admin menu based on user roles or custom user in the dashboard, which will allow users to have access to specific areas.
Once you have her installed and activated, all an be done in the Admin Menu and by clicking Activate.
In the Custom Admin menu area, you can fully customize the admin sidebar for selected user roles or specific users.
There’s a Customize button that when hit, will display all of your options. You can decide from the dropdown if you want to customize the menu for user roles or specific users.
The custom admin area.
If you have User Roles selected, you’ll see that you have the option of picking a role (e.g. Administrator).
It will refresh and automatically populate the admin menu items that the user role has access to by default.
You can also now drag and drop the top-level menu items if you’d like to re-order them.
When you hover your cursor over any menu item it will reveal Duplicate and Hide options for that item. You can also Select All or use the checkbox in any menu item to reveal the same to perform this in bulk.
Where you have the option to duplicate or hide.
The Hide option will hide it from the user in the selected role and Unhide will then appear as an option if you’d ever like to revert this.
The Duplicate option will create an exact duplicate of the menu item (including its sub-menu).
You also have additional options for any menu item by clicking the dropdown arrow. This includes options to add your own custom top-level menu item, adding a submenu, CSS classes, and much more.
Additional user settings.
Once all of your changes are made, just hit Apply and everything will stay that way. You can always discard all changes and adjust them at any time.
Along with allowing users to access certain areas in the admin area of WordPress, Branda can totally brand your admin area and site with tons of other customization options.
Defender
Defender is WPMU DEV’s 5-star plugin and our answer to security. Amongst numerous security features, one function Defender does well is disabling the file editor, so that only the admin can make any changes to the file editor that’s built into WordPress.
All of this can be done with a click of a button in an area called Security Tweaks.
Here, it shows a list of various security features that can be enabled and disabled at any time. One of the features is to Disable the file editor. Simply click the switch over if it’s in the Issues area.
If it’s not, it will be highlighted green and in the Resolved section. Once doing that, it will let you know that it switched over okay.
Where it shows that you’ve disabled the file editor.
You can revert this feature at any time by clicking Revert.
Defender is a great additional way to limit your users in the WordPress admin and keeps your files secure. Try him out for free today for your security and to limit access to files.
Admin Bar & Dashboard Access Control
The Admin Bar & Dashboard Access Control plugin allows you to limit dashboard access for users. It has a solid 4.5-star rating and over 5,000 downloads.
The Dashboard Access area lets you disable dashboard access to various user roles with just a few clicks. You can also enter a customized redirect for users without dashboard access.
Dashboard access area.
In the Admin Bar area, you can disable the admin bar and select user roles for users you’d like it to be disabled for.
The admin bar.
And that’s it! This simple and easy to use plugin is a quick option to limit your user’s admin access. It very basic, similar to the Remove Dashboard Access plugin.
We’ll Limit It to That…
As you can see, it’s very easy to limit dashboard access for users. You have several options when it comes to doing this; whether it be directly from the admin, a code snippet, file access, or with the help of a plugin like Branda.
What matters most is you’re in control of your WordPress site and know who can do what when you allow users access.
Otherwise, your users might be snooping in areas of your site that you might not want them. That can be, well, awkward (and insecure).
React Error Handling And Reporting With Error Boundary And Sentry
React Error Handling And Reporting With Error Boundary And Sentry
Chidi Orji
In this article, we’ll look at error boundaries in React. We’ll learn what they are and how to use them to deliver a better user experience, even when something breaks in our app. We’ll also learn how to integrate with Sentry for realtime error monitoring.
This tutorial is aimed at React developers of every level who wants to start using error boundaries in their react apps.
The only prerequisite is that you have some familiarity with React class components.
I will be using Yarn as my package manager for this project. You’ll find installation instructions for your specific operating system over here.
What Is An Error Boundary And Why Do We Need It?
A picture, they say, is worth a thousand words. For that reason, I’d like to talk about error boundaries using — you guessed it — pictures.
The illustration below shows the component tree of a simple React app. It has a header, a sidebar on the left, and the main component, all of which is wrapped by a root <App /> component.
In an ideal world, we would expect to see the app rendered this way every single time. But, unfortunately, we live in a non-ideal world. Problems, (bugs), can surface in the frontend, backend, developer’s end, and a thousand other ends. The problem could happen in either of our three components above. When this happens, our beautifully crafted app comes crashing down like a house of cards.
React encourages thinking in terms of components. Composing multiple smaller components is better than having a single giant component. Working this way helps us think about our app in simple units. But aside from that won’t it be nice if we could contain any errors that might happen in any of the components? Why should a failure in a single component bring down the whole house?
In the early days of React, this was very much the case. And worse, sometimes you couldn’t even figure out what the problem was. The React repository on Github has some of such notable errors here, here, and here.
React 16 came to the rescue with the concept of an “error boundary”. The idea is simple. Erect a fence around a component to keep any fire in that component from getting out.
The illustration below shows a component tree with an <ErrorBoundary /> component wrapping the <Main /> component. Note that we could certainly wrap the other components in an error boundary if we wanted. We could even wrap the <App /> component in an error boundary.
As we discussed earlier, this red line keeps any errors that occur in the <Main /> component from spilling out and crashing both the <Header /> and <LeftSideBar /> components. This is why we need an error boundary.
Now that we have a conceptual understanding of an error boundary, let’s now get into the technical aspects.
What Makes A Component An Error Boundary?
As we can see from our component tree, the error boundary itself is a React component. According to the docs,
A class component becomes an error boundary if it defines either (or both) of the lifecycle methods static getDerivedStateFromError() or componentDidCatch().
There are two things to note here. Firstly, only a class component can be used as an error boundary. Even if you’re writing all your components as function, you still have to make use of a class component if you want to have an error boundary. Secondly, it must define either (or both) of static getDerivedStateFromError() or componentDidCatch(). Which one(s) you define depends on what you want to accomplish with your error boundary.
Functions Of An Error Boundary
An error boundary isn’t some dumb wall whose sole purpose in life is to keep a fire in. Error boundaries do actual work. For starters, they catch javascript errors. They can also log those errors, and display a fallback UI. Let’s go over each of \these functions one after the other.
Catch JavaScript Errors
When an error is thrown inside a component, the error boundary is the first line of defense. In our last illustration, if an error occurs while rendering the <Main /> component, the error boundary catches this error and prevents it from spreading outwards.
Logs Those Errors
This is entirely optional. You could catch the error without logging it. It is up to you. You can do whatever you want with the errors thrown. Log them, save them, send them somewhere, show them to your users (you really don’t want to do this). It’s up to you.
But to get access to the errors you have to define the componentDidCatch() lifecycle method.
Render A Fallback UI
This, like logging the errors, is entirely optional. But imagine you had some important guests, and the power supply was to go out. I’m sure you don’t want your guests groping in the dark, so you invent a technology to light up the candles instantaneously. Magical, hmm. Well, your users are important guests, and you want to afford them the best experience in all situations.
You can render a fallback UI with static getDerivedStateFromError() after an error has been thrown.
It is important to note that error boundaries do not catch errors for the following situations:
Errors inside event handlers.
Errors in asynchronous code (e.g. setTimeout or requestAnimationFrame callbacks).
Errors that happen when you’re doing some server-side rendering.
Errors are thrown in the error boundary itself (rather than its children). You could have another error boundary catch this error, though.
Working With Error Boundaries
Let’s now dive into our code editor. To follow along, you need to clone the repo.
After cloning the repo, check out the 01-initial-setup branch. Once that is done, run the following commands to start the app.
# install project dependencies
yarn install

# start the server
yarn start
When started, the app renders to what we have in the picture below.
The app currently has a header and two columns. Clicking on Get images in the left column makes an API call to the URL https://picsum.photos/v2/list?page=0&limit=2 and displays two pictures. On the right column, we have some description texts and two buttons.
When we click the Replace string with object button, we’ll replace the text {"function":"I live to crash"}, which has been stringified, with the plain JavaScript object. This will trigger an error as React does not render plain JavaScript objects. This will cause the whole page to crash and go blank. We’ll have to refresh the page to get back our view.
Try it for yourself.
Now refresh the page and click the Invoke event handler button. You’ll see an error screen popup, with a little X at the top right corner. Clicking on it removes the error screen and shows you the rendered page, without any need to refresh. In this case, React still knows what to display even though an error is thrown in the event handler. In a production environment, this error screen won’t show up at all and the page will remain intact. You can only see that something has gone wrong if you look in the developer console.
Note: To run the app in production mode requires that you install serve globally. After installing the server, build the app, and start it with the below command.
# build the app for production
yarn build

# serve the app from the build folder
serve -s build
Having seen how React handles two types of errors, (rendering error, and event handler error), let’s now write an error boundary component.
Create a new ErrorBoundary.js file inside the /src folder and let’s build the error boundary component piece by piece.
We define both of the two lifecycle methods that make a component an error boundary. Whenever an error occurs inside the error boundary’s child component, both of our lifecycle methods are activated.
static getDerivedStateFromError() receives the error and updates the state variables, error and hasError.
componentDidCatch() receives the error, which represents the error that was thrown and errorInfo which is an object with a componentStack key containing information about which component threw the error. Here we logged the error and also update the state with the errorInfo. It’s totally up to you what you want to do with these two.
Then in the render method, we return this.props.children, which represents whatever component that this error boundary encloses.
Let’s add the final piece of code. Copy the following code and paste it inside the render() method.
const { hasError, errorInfo } = this.state;
if (hasError) {
  return (
    <div className="card my-5">
      <div className="card-header">
        <p>
          There was an error in loading this page.{' '}
          <span
            style={{ cursor: 'pointer', color: '#0077FF' }}
            onClick={() => {
              window.location.reload();
            }}
          >
            Reload this page
          </span>{' '}
        </p>
      </div>
      <div className="card-body">
        <details className="error-details">
          <summary>Click for error details</summary>
          {errorInfo && errorInfo.componentStack.toString()}
        </details>
      </div>
    </div>
  );
}
In the render() method, we check if hasError is true. If it is, then we render the <div className="card my-5"></div> div, which is our fallback UI. Here, we’re showing information about the error and an option to reload the page. However, in a production environment, it is not advised to show the error to the user. Some other message would be fine.
Let’s now make use of our ErrorBoundary component. Open up App.js, import ErrorBoundary and render ColumnRight inside it.
# import the error boundary
import ErrorBoundary from './ErrorBoundary';

# wrap the right column with the error boundary
<ErrorBoundary>
  <ColumnRight />
</ErrorBoundary>
Now click on Replace string with object. This time, the right column crashes and the fallback UI is displayed. We’re showing a detailed report about where the error happened. We also see the error log in the developer console.
We can see that everything else remains in place. Click on Get images to confirm that it still works as expected.
At this point, I want to mention that with error boundaries, you can go as granular as you want. This means that you can use as many as necessary. You could even have multiple error boundaries in a single component.
With our current use of Error Boundary, clicking Replace string with object crashes the whole right column. Let’s see how we can improve on this.
Open up src/columns/ColumnRight.js, import ErrorBoundary and render the second <p> block inside it. This is the paragraph that crashes the <ColumnRight /> component.
# import the component
import ErrorBoundary from '../ErrorBoundary';

# render the erring paragraph inside it.
<ErrorBoundary>
  <p>
  Clicking this button will replace the stringified object,{' '}
    <code>{text}</code>, with the original object. This will result in a
  rendering error.
  </p>
</ErrorBoundary>
This time, we still have most of the page intact. Only the second paragraph is replaced with our fallback UI.
Click around to make sure everything else is working.
If you’d like to check out my code at this point you should check out the 02-create-eb branch.
In case you’re wondering if this whole error boundary thing is cool, let me show you what I captured on Github a few days ago. Look at the red outline.
I’m not certain about what is happening here, but it sure looks like an error boundary.
Error boundaries are cool, but we don’t want errors in the first place. So, we need to monitor errors as they occur so we can get a better idea of how to fix them. In this section, we’ll learn how Sentry can help us in that regard.
Integrating With Sentry
As I opened the Sentry homepage while writing this line, I was greeted by this message.
Software errors are inevitable. Chaos is not. Sentry provides self-hosted and cloud-based error monitoring that helps all software teams discover, triage, and prioritize errors in real-time.
Sentry is a commercial error reporting service. There are many other companies that provide similar services. My choice of Sentry for this article is because it has a free developer plan that lets me log up to 5,000 events per month across all my projects (pricing docs). An event is a crash report (also known as an exception or error). For this tutorial, we will be making use of the free developer plan.
You can integrate Sentry with a lot of web frameworks. Let’s go over the steps to integrate it into our React project.
Visit the Sentry website and create an account or login if you already have one.
Click on Projects in the left navigation. Then, click on Create Project to start a new project.
Under Choose a platform, select React.
Under Set your default alert settings check Alert me on every new issue.
Give your project a name and click Create project. This will create the project and redirect you to the configuration page.
Let’s install the Sentry browser SDK.
# install Sentry
yarn add @sentry/browser
On the configuration page, copy the browser SDK initialization code and paste it into your index.js file.
import * as Sentry from '@Sentry/browser';

# Initialize with Data Source Name (dsn)
Sentry.init({ dsn: 'dsn-string' });
And that is enough for Sentry to start sending error alerts. It says in the docs,
Note: On its own, @Sentry/browser will report any uncaught exceptions triggered from your application.
Click on Got it! Take me to the issue stream to proceed to the issues dashboard. Now return to your app in the browser and click on the red buttons to throw some error. You should get email alerts for each error (Sometimes the emails are delayed). Refresh your issues dashboard to see the errors.
The Sentry dashboard provides a lot of information about the error it receives. You can see information such as a graph of the frequency of occurrence of each error event type. You can also assign each error to a team member. There’s a ton of information. Do take some time to explore them to see what is useful to you.
You can click on each issue to see more detailed information about the error event.
Now let’s use Sentry to report errors that are caught by our error boundary. Open ErrorBoundary.js and update the following pieces of code.
# import Sentry
import * as Sentry from '@sentry/browser'

# add eventId to state
state = {
  error: '',
  eventId: '', // add this to state
  errorInfo: '',
  hasError: false,
};

# update componentDidCatch
componentDidCatch(error, errorInfo) {
  // eslint-disable-next-line no-console
  console.log({ error, errorInfo });
  Sentry.withScope((scope) => {
    scope.setExtras(errorInfo);
    const eventId = Sentry.captureException(error);
    this.setState({ eventId, errorInfo });
  });
}
With this setup, Sentry sends all errors captured by our error boundary to our issue dashboard using the Sentry.captureException method.
Sentry also gives us a tool to collect user feedback. Let’s add the feedback button as part of our fallback UI inside our error boundary.
Open ErrorBoundary.js and add the feedback button just after the div with a className of card-body. You could place this button anywhere you like.
Now, whenever our fallback UI is rendered, the Report feedback button is displayed. Clicking on this button opens a dialog that the user can fill to provide us with feedback.
Go ahead and trigger an error, then, fill and submit the feedback form. Now go to your Sentry dashboard and click on User Feedback in the left navigation. You should see your reported feedback.
Currently, we get alerts for every error, even those that happen during development. This tends to clog our issue stream. Let’s only report errors that happen in production.
On the left navigation click on Settings. Underneath the ORGANIZATION menu, click on Projects. In that list, click on your error boundary project. From Project Settings on the lefthand side, click on Inbound Filters. Look for Filter out events coming from localhost and enable it. This is just one of the numerous configurations that are available in Sentry. I encourage you to have a look around to see what might be useful for your project.
If you’d like to take a look at my code, the corresponding branch in my repo is 03-integrate-sentry.
Conclusion
If you haven’t been using error boundaries in your React app, you should immediately add one at the top level of your app. Also, I encourage you to integrate an error reporting service into your project. We’ve seen how easy it is to get started with Sentry for free.
I love side projects. They give me the opportunity to flex my creative muscles and tinker with tech like the Internet of Things (IoT) in new ways. Fortunately, I didn't have to look far for my next one; a common conundrum for pet owners fueled this concept for an IoT dog collar.
My dog had been out in the backyard for a while. When I decided it was time to bring him back into the house, I couldn't find him anywhere! After several minutes of searching and calling his name, I found him napping in the shade of a tree. If this scenario sounds all too familiar to you, then this post is for you!
There is a popular Latin phrase, "scientia potentia est." which means "knowledge is power."
Knowledge is intangible, and it is something that is accrued over time with learning and practicing a particular skill. Applying knowledge at the right time to achieve/perform a task is popularly known as intelligence. From this perspective, what you call intelligence is a certain amount of information accumulated. Such acquired knowledge is vital if you want to cook a meal, manufacture a car, create a great computer, or build a house.
I’m writing this from my new “office”, which is a small desk in a large closet located under the stairs of my house. Harry Potter style. We have our first baby on the way so I got kicked out of our second bedroom, and I’m embracing the office-under-the-stairs life.
This isn’t a normal work-from-home situation for any of us. No one had time to prepare.
While we were cleaning some house in our Projects infrastructure, we fixed a few things that we know have been annoying to some users for quite some time.
You can now use .dev domains with custom domains for your Projects.
Favicons will now host and display properly for deployed Projects.
Well folks, here we are. Word came down over the weekend that all schools here in the Great Bold North (otherwise known as Minnesota) would close for a few weeks. Maybe longer. Our district has been prepping a remote learning plan, and while that’s being finalized, the kids basically get some bonus snow days. But my husband and I? No snow days for us. We’ll need to be working from home as normal – or as close to normal as we can manage.
Fortunately for us, working from home is our normal, as we’re both full-time remote employees. So we’ve had some practice dealing with the kiddos being at the house with us on days school is closed for parent-teacher conferences, curriculum development, and, y’know, actual snow. If, like us, you’re suddenly a stay-at-home parent and stay-at-home employee, here are a few ways to make this experience less stressful.
I recently started drawing on my iPad using the Procreate app with Apple Pencil. I’m enjoying the flexibility of drawing this way. What usually keeps me from painting at home are basic things, like setup, cleaning brushes, proper ventilation, and other factors not really tied to the painting itself. Procreate does a pretty nice job of emulating painting and drawing processes, but adding digital features like undo/redo, layers, and layer effects.
Here’s a Procreate painting I made that I wound up exporting and animating on the web.
You can do this too! There are two basic animation effects we’ll cover here: the parallax effect that takes place on hover (with the ability to turn it off for those with vestibular disorders), and the small drawing effect when the page loads.
Parallax with drawing layers
I mentioned that part of the reason I enjoy drawing on the iPad is the ability to work in layers. When creating layers, I take care to keep certain “themes” on the same layer, for instance, the zebra stripes are on one layer and the dots are on own layer under beneath the stripes.
I’ll extend the drawing beyond the boundaries of where the line from the layer above ends, mainly because you’ll be able to peek around it a bit as we move the drawing around in the parallax effect. If the lines are sharp at any point, this will look unnatural.
Once I'm done creating my layers, I can export things as a Photoshop (PSD) file, thanks to Procreate's exporting options.
The same drawing opened in Photoshop.
Then I’ll join together a few, so that I’m only working with about 8 layers at most. I use a photoshop plugin called tinyPNG to export each layer individually. I’ve heard there are better compression tools, but I’ve been pretty happy with this one.
Next, I'll go into my code editor and create a div to house all the various images that are contained in the layers. I give that div relative positioning while all of the images inside it get absolute positioning. This places the images one on top the other.
The 100% width on the image will confines all of the images to the size of the parent div. I do this so that I’m controlling them all at once with the same restrictions, which works well for responsive conditions. The max-width and min-height on the parent allow me to confine the way that the div shrinks and grows, especially as when it gets dropped into a CSS Grid layout. It will need to be flexible, but have some constraints as well and CSS Grid is great for that.
Next, I add a mousemove event listener on the parent div with JavaScript. That lets me capture some information about the coordinates of the mouse using e.clientX and e.clientY.
const zebraIll = document.querySelector('#zebra-ill')

// Hover
zebraIll.addEventListener('mousemove', e => {
  let x = e.clientX;
  let y = e.clientY;
})
Then, I’ll go through each of the drawings and use those coordinates to move the images around. I'll even apply transform styles connected to those coordinates.
const zebraIll = document.querySelector('#zebra-ill')
const zebraIllImg = document.querySelectorAll('.zebraimg')
const rate = 0.05

//hover
zebraIll.addEventListener('mousemove', e => {
  let x = e.clientX;
  let y = e.clientY;

  zebraIllImg.forEach((el, index) => {
    el.style.transform =
      `rotateX(${x}deg) rotateY(${y}deg)`
  })
})
Woah, slow down there partner! That’s way too much movement, we want something a little more subtle. So I’ll need to slow it way down by multiplying it by a low rate, like 0.05. I also want to change it a just bit per layer, so I'll use the layers index to speed up or slow down the movement.
const zebraIll = document.querySelector('#zebra-ill')
const zebraIllImg = document.querySelectorAll('.zebraimg')
const rate = 0.05

// Hover
zebraIll.addEventListener('mousemove', e => {
  let x = e.clientX;
  let y = e.clientY;

  zebraIllImg.forEach((el, index) => {
    let speed = index += 1
    let xPos = speed + rate * x
    let yPos = speed + rate * y

    el.style.transform =
      `rotateX(${xPos - 20}deg) rotateY(${yPos - 20}deg) translateZ(${index * 10}px)`
  })
})
Finally, I can create a checkbox that asks the user if want to turn off this effect.
<p>
  <input type="checkbox" name="motiona11y" id="motiona11y" />
  <label for="motiona11y">If you have a vestibular disorder, check this to turn off some of the effects</label>
</p>
const zebraIll = document.querySelector('#zebra-ill')
const zebraIllImg = document.querySelectorAll('.zebraimg')
const rate = 0.05
const motioncheck = document.getElementById('motiona11y')
let isChecked = false

// Check to see if someone checked the vestibular disorder part
motioncheck.addEventListener('change', e => {
  isChecked = e.target.checked;
})

// Hover
zebraIll.addEventListener('mousemove', e => {
  if (isChecked) return
  let x = e.clientX;
  let y = e.clientY;

  // ...
})
Now the user has the ability to look at the layered dimensionality of the drawing on hover, but can also turn the effect off if it is bothersome.
Take an SVG path and make it dashed with dashoffset.
Make the dash the entire length of the shape.
Animate the dashoffset (the space between dashes).
What you get in the end is a kind of “drawn-on” effect.
But in this particular drawing you might have noticed that the parts I animated look like they were hand-drawn, which is a little more unique. You see, though that effect will work nicely for more mechanical drawings, the web doesn’t quite yet support the use of tapered lines (lines that vary in thickness, as is typical of a more hand-drawn feel).
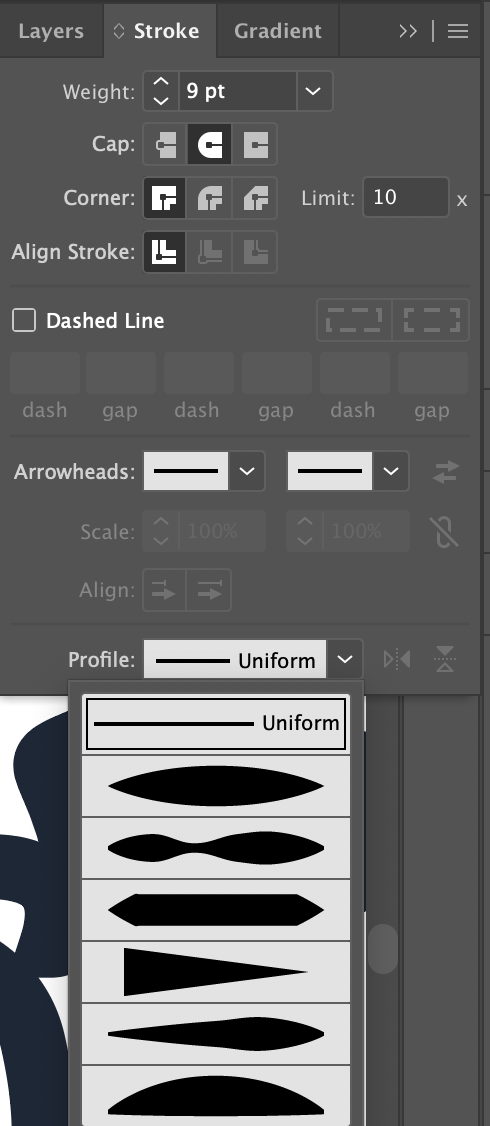
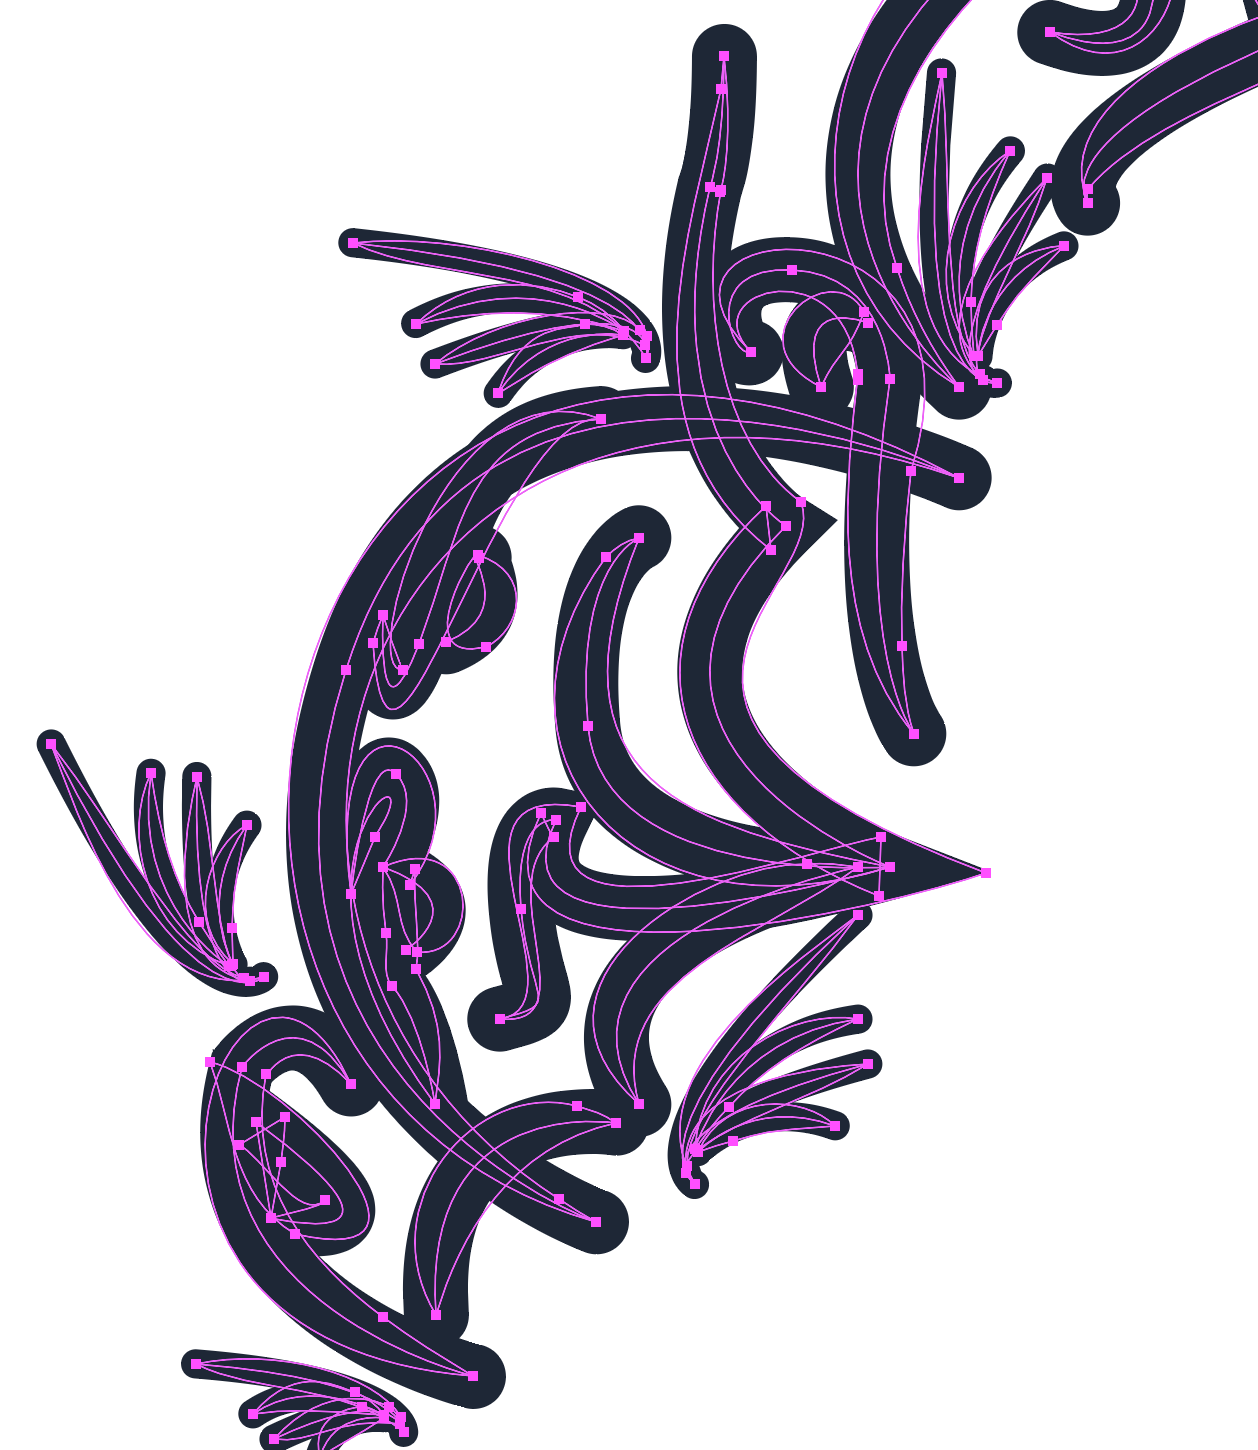
For this approach, I brought the file into Illustrator, traced the lines from that part of my drawing, and made those lines tapered by going into the Stroke panel, where I selected "More options" and clicked the tapered option from the dropdown.
I duplicated those lines, and created fatter, uniform paths underneath. I then took those fat lines and animate them onto the page. Now my drawing shows through the shape:
Here's what I did:
I traced with Pen tool and used tapered brush.
I duplicated the layer and changed the lines to be uniform and thicker.
I took the first layer and created a compound path.
I simplified path points.
I created clipping mask.
From there, I can animate everything with drawSVG and GreenSock. Though you don’t need to, you could use CSS for this kind of animation. There’s a ton of path points so in this case, so it makes sense to use something more powerful. I wrote another post that goes into depth on how to start off creating these kinds of animations. I would recommend you start there if you’re fresh to it.
To use drawSVG, we need to do a few things:
Load the plugin script.
Register the plugin at the top of the JavaScript file.
Make sure that paths are being used, and that there are strokes on those paths.
Make sure that those paths are targeted rather than the groups that house them. The parent elements could be targeted instead.
Here’s a very basic example of drawSVG (courtesy of GreenSock):
So, in the graphics editor, there is a clipping mask with more artful lines, that expose fat uniform lines underneath. From here, we’ll grab a hold of those thicker paths and use the drawSVG plugin to animate them onto the page.
And there we have it! An initial illustration for our site that’s created from a layered drawing in the Procreate iPad app. I hope this gets you going making your web projects unique with wonderful hand-drawn illustrations. If you make anything cool, let us know in the comments below!
Human beings may be created equal, but admin users–not so much. Some admins know their roles and stick to them, while others behave like over-stimulated children in a toy store, touching everything in sight until something breaks.
In this post, we’ll show you how to use Branda, WPMU DEV’s ultimate white label branding plugin, to customize the default WordPress user role system and put the expensive toys out of reach of your more accident-prone users.
More specifically we’ll be covering:
Understanding user roles and capabilities
Customizing WordPress user roles with the Branda white label plugin
Creating custom menus for each role
Why give users the power to white label WordPress
Let’s get to it…
Understanding User Roles and Capabilities
Does the person who delivers your mail have a set of keys to your house? Is it OK if the plumber tinkers with the electrical system when he gets tired of repairing the kitchen sink?
The answer in both cases is likely no.
The postman doesn’t need your house key to perform that job, and the plumber should leave electricity to the electrician.
Likewise, it’s a mistake to view user roles as job titles or see them as a hierarchy in which some roles are superior to others.
User roles should be defined by the degree of access required to accomplish a given task or set of tasks.
WordPress User Roles And Capabilities – Good Practices
Good user role policies should:
Help secure your WordPress site by ensuring users don’t have access to things they shouldn’t.
Improve workflow by limiting access to unnecessary and distracting features, while funneling users to their assigned tasks.
A capability is a permission to perform one or more types of tasks. Each user of a WordPress site might have some permissions, but not others, depending on their role.
For example, users who have the Author role usually have permission to edit their own posts (the “edit_posts” capability), but not permission to edit other users’ posts (the “edit_others_posts” capability).
WordPress comes with six pre-defined user roles that provide access to various areas of the site:
Super Admin – a user with access to the site network administration features and all other capabilities.
Administrator – a user who has access to all the administration features within a single site.
Editor – a user who can publish and manage posts including the posts of other users.
Author – a user who can publish and manage their own posts.
Contributor – a user who can write and manage their own posts but cannot publish them.
Subscriber – a user who can only manage their profile.
WordPress also provides over fifty capabilities in its role-based access system. Plugins can modify this system.
Practices To Avoid
It’s a mistake to give users access to features they don’t currently require.
For example, you might not want a contributing writer to be able to install plugins. Or you may want contributors to be able to upload files but not edit them.
The goal, then, is to give everyone the access they need and nothing more. WordPress user roles and capabilities give you this option.
As you’ll soon see, removing distracting features from menus is another way to control who can and can’t do things on your site.
This is not something that WordPress lets you do by default, but you can do it by editing code or using plugins.
As every site is a little different, here are some things to think about when assigning user roles:
Give each user only the level of access they need. This is key for security, so no one can make unapproved changes to configuration settings or accidentally delete content.
Keep the number of top-level user roles limited. A solid rule of thumb is to stick with one administrator and a few trusted editors. The ‘Author’ role can be assigned to regular content creators who have proven themselves and new or one-time writers can simply be given the role of ‘Contributor’.
When in doubt, too few permissions are better than too many. It’s very common for sites with multiple backend users to occasionally need someone to step in and help in an area they normally don’t access. WordPress and Branda both make it easy to modify user roles, so giving someone additional authority on a temporary basis is better than giving someone access to functions they may only need once or twice a month.
Customizing WordPress User Roles With Branda
Branding isn’t branding if it’s not custom and consistent.
The problem is, applying custom branding and ensuring consistency when replicating the brand for other purposes is a challenge – especially if multiple sites are involved.
This is where our white labelling plugin can help you, so allow me to introduce you to Branda and tell you a little about her background.
Over a period of several years, WPMU DEV developed plugins to improve admin’s ability to rebrand sites, modify user roles and customize system emails.
In early 2019, our developers began merging those plugins into one super-powerful plugin named Branda.
My, how she has grown, currently boasting more than 480,000 downloads and just over 40,000 active installs.
Branda was only born in February 2019, but grew up fast!
Branda includes over 30 modules for fully rebranding the WordPress admin area in places your theme can’t – including allowing site admins to customize the features and tools various users can access.
The nuts and bolts of customizing any of Branda’s features, including user roles, are the same for both single sites and multisite networks.
There are differences in the scope of user permissions (as we’ll soon discuss) but other than that, this quick guide works for both single and multisite installations.
How To Control Who Can Modify Branda Settings and Who Cannot
It doesn’t make sense to configure custom user roles and then not secure the plugin that governs these rules.
So the first thing to do is decide which roles should and should not have access to Branda, then configure user permissions accordingly.
Multisite Super Admins have the option to control all of Branda’s features for the entire network or to delegate control to subsites – allowing each to have its own custom roles, branding, system emails, help content, and more.
First, we’ll cover how to enable or disable subsite controls, and then we’ll get into the nuts and bolts of customizing user roles.
If you’re not managing a multisite network, just ignore the section below and go to the ‘Customizing User Roles’ section down further.
How to Enable or Disable Subsite Controls
Once Branda is installed and activated on your multisite network, open the Settings tab and click Permissions.
Locate Subsite Controls and note that there are three options: None, All and Custom.
The Custom tab allows Super Admins to maintain control of some settings while passing control of others to the subsites.
Selecting Custom reveals tabs for Branda’s six main modules and each tab contains a menu of that module’s features.
Super Admins can delegate control of entire modules or select specific features within a module to delegate while retaining control of others.
Custom permissions allow Super Admins to control Branda for an entire network or delegate control to the subsites.
Customizing User Roles
Make sure that Branda is installed on the WordPress site or Multisite network you want to customize or give other users access to.
This WordPress site’s looking good already!
Next, from your WordPress menu, select Branda > Settings.
Click on Settings …
This brings you to the plugin’s Settings screen.
This is where the magic happens.
Click on the Permissions tab to configure which users and user roles can access and configure Branda’s settings.
Click on the Permissions tab.
Select the user roles you want to give permissions for branding and customizing the site. Note that permissions cannot be removed for administrators.
Just one of the many features of Branda that truly ticks all the boxes.
You can also give access to specific users by clicking on the ‘Add User’ button and typing in their username. Remember to click the ‘Save’ button to update your settings.
Branda’s new user role features are now available, so your clients no longer have to wait until their faces turn blue to customize their WordPress admin.
Anyone you’ve given access to Branda’s features can now customize WordPress admin areas.
Give your users access to Branda’s WordPress customization features.
How to Customize the Admin Area by User Role
Depending on how you have set up your permission settings for different user roles, users can customize the admin bar with their logo, control the visibility of menu items, add custom menu items, or reorder existing items.
For example, you can allow different users to customize their Admin Bar based on their role.
This allows users to do things like add, hide, and reorder menu items and add their own custom menu items to the toolbar.
In the Branda Pro menu, select Admin Area > Admin Bar > Toolbar Visibility, then choose which user roles can display the Admin Toolbar on the front-end of their sites.
Select which user roles can show the Admin toolbar on the front-end.
You can also customize the Admin Menu by user role or by custom user.
This allows users with permissions to enable the Link Manager feature, remove the “Dashboard” link from the admin panel for users without a site (in WordPress Multisite), display helpful tips, promotions, or announcements in their admin panels, and remove the “permalinks” menu item.
Go to the Branda Pro menu, select Admin Area > Admin Menu > Custom Admin Menu, then toggle the options on the screen on or off to enable or disable different features.
Allow different user roles to customize your WordPress Admin Menu.
Why Give Users The Power To White Label WordPress?
Many website owners don’t know or care about WordPress, so white labeling is a great opportunity to customize sites according to clients’ needs and capabilities.
As an added bonus, it also presents them with a more professional image of your business.
But why would you want to give someone else the ability to customize and brand a WordPress site that you have built and or manage?
If you run a single WordPress site for a client and provide mostly technical support or maintenance, you can set up a separate admin account for your client and customize their admin account while leaving yours untouched. The same thing goes for customizing user roles like editors, members, etc. This also applies if your client wants someone else to manage their site who knows how to use WordPress but doesn’t want to look after the technical side.
Some users just need to accessorize. They accessorize and personalize their phone, their car, their home… why not also allow them to customize the backend of the website they work in?
Branda’s branding abilities give users the flexibility to make WordPress their own.
Thank You To Everyone Who Requested Branda’s New Features
Hopefully, you can see from the above how the ability to customize areas of WordPress based on user roles can benefit developers and users.
We want to thank WPMU DEV members like Teddy, Pedro, Dominique, Charlie, Jonathan, and Chris for requesting new features that allow Branda to:
Hide/show and fully customize WordPress admin menu items based on user roles.
Create a different menu for different user roles.
Add custom admin menu items.
Reorder admin menu items and subitems.
White label any menu item.
Do all of the above on a multisite installation.
Also, thank you Ani, Hassan, and Ivan from Branda’s development team!
To discover what new features are in store for Branda (and all of our other super plugins), check out our Roadmap.
Unlock All Of Branda’s Stylish Features
If you’re ready to unleash the full power of WordPress white label branding with the best WordPress white label branding plugin available, why not give our free 30-day WPMU DEV trial membership a try?
This way you can download Branda and customize your WordPress site to your heart’s content with no risk or obligation.
Signs Your Website Feels More Like A Haunted House Than A Welcoming Home
Signs Your Website Feels More Like A Haunted House Than A Welcoming Home
Suzanne Scacca
When building a website or PWA, no one ever thinks, “I really hope my visitors run away in fear!” Yet, one wrong move could make a visit to your website seem like a nightmarish walk through a haunted house instead of an awe-inspiring tour of a new home.
To be clear, I’m not talking about dark color palettes or blood-red typography that might remind someone of something they’d seen in a horror movie. If those kinds of design choices make sense and don’t intrude on readability, go for it! What I’m talking about are those ominous feelings emitted by the design and content of a website — similar to the ones someone might feel when walking through a haunted house.
Dr. Frank T. McAndrew answered the question “What Makes a House Feel Haunted?” in an article on Psychology Today back in 2015. He explains:
“From a psychological point of view, the standard features of haunted houses trigger feelings of dread because they push buttons in our brains that evolved long before houses even existed. These alarm buttons warn us of potential danger and motivate us to proceed with caution.”
When a visitor shows up on your website, the last thing you want is for them to be wary of moving through it. You want your website to give off a welcoming and safe vibe; not one that makes visitors wonder what’s lurking around the corner.
So, today, I want to look at some ways in which a website might be giving your visitors the heebie-jeebies and what you can do to eliminate those haunted house-like elements from the experience.
Four Signs Your Website Feels Like A Haunted House
In a lot of ways, a website is like your home. You add comfortable furnishings to it. You make it feel warm and inviting. And you clean up before anyone comes over, so they’re not freaked out by the accumulated dust or clutter.
If you keep that in the back of your mind (i.e. your website = your home), you can avoid these scary missteps as you design websites (as well as PWAs and mobile apps) for your clients.
There’s a video game and movie called Silent Hill that’s based on Centralia, a real ghost town in Pennsylvania. Decades ago, there was a coal mine fire in the town that led to toxic conditions like the gas and smoke that billow up from the ground to this day.
It’s an element the video game designers and cinematographers latched onto when creating their own eerily abandoned setting for Silent Hill:
A still from the movie Silent Hill, featuring the toxic smoke that Centralia is known for. (Source: GIPHY)
Eventually, Centralia was condemned due to the dangers posed by the fire and the resulting toxicity. Today, there are only a few residents who remain in town.
While there are some tourists who venture to Centralia out of curiosity, they don’t stay long. And why would they? The town is unlivable and it’s devoid of any meaningful experiences.
Your website may be sending similar signals if it’s:
Too simple in design,
Too outdated looking,
Devoid of useful content,
Seemingly uncared for,
Powered only by a basic chatbot,
Missing contact details or a working contact form.
The Blockbuster website (which I can’t believe still exists) is a good example of the kinds of signals a website might send to visitors if it were abandoned:
The Blockbuster website has become nothing but a single landing page owned by DISH. (Source: Blockbuster) (Large preview)
The copyright on this website is from 2017, which is why the design of the site isn’t as bad as one might expect it to be. Even the mobile counterpart is responsive:
The nearly defunct Blockbuster still has a decent looking and mobile responsive website. (Source: Blockbuster) (Large preview)
That said, this website is nothing but a husk of what it once was in its heyday.
For example, this is what shows when someone clicks on “Blockbuster Store Location”:
The Blockbuster website advertises a location, but the pop-up leaves visitors with more questions than answers. (Source: Blockbuster) (Large preview)
If I had arrived at this site hoping to find a local video store to rent a movie from, I’d be confused by this pop-up. Does the store actually exist at 211 NE Revere Ave? What’s going to happen when I call the number? And why are they telling me I don’t have to leave the couch?
What DISH should’ve done when buying out Blockbuster is to take ownership of this domain, but then direct it to their own website. As it stands now, it feels as though there’s no one on the other side of this website and there’s no point in keeping it alive (much like the business itself).
It’s these kinds of questions and that eerie feeling of “What’s going on here????” that you want to keep your visitors from experiencing.
2. It’s Too Confusing
Another hallmark of a haunted house is excessive confusion. This is something that real-life serial killer H. H. Holmes mastered with his “Murder Castle”.
“This edifice became Holmes’ booby-trapped Murder Castle. The space featured soundproof rooms, secret passages and a disorienting maze of hallways and staircases. The rooms were also outfitted with trapdoors over chutes that dropped Holmes’ unsuspecting victims to the building’s basement.”
Interestingly, there is a term in the field of environmental psychology related to this particular quality of a space: legibility.
Essentially, if a space (like a home or a website) has clear pathways and a logical organization, it’s much easier for visitors to get oriented. Not only that, if a layout mirrors that of other spaces, it assists in recognizability and comfort. That sounds a lot like the legibility and navigability of a website, right?
Obviously, you don’t want your visitors to feel as though they’re going to get lost in your website or like they’re trapped within the walls of it. There are a number of things that could make them feel this way though:
Poor color contrasts,
Jarring typography or animations,
Excessively deep navigation without a trail of breadcrumbs,
Disappearing navigation,
Infinite scroll,
Incessant pop-ups and disruptions that won’t go away no matter how many times they’re dismissed,
An unclear or confusing call-to-action that makes them wonder what happens when they click it.
Let’s look at an example.
How many of you would feel confident pursuing any of the paths (links) available to you on the ARNGREN website?
The ARNGREN website is littered with excessive links and not enough organization. (Source: ARNGREN) (Large preview)
This is what appears when you click on the “PEDALS” image/link in the top-middle of the ARNGREN home page:
An example of one of ARNGREN’s product/category pages. (Source: ARNGREN) (Large preview)
As you can see, the “Index” disappears from the left, so the only option visitors have is to click the home page link or hit the browser “Back” button to depart from the path they’ve taken.
Then there’s the page itself which scrolls on and on, showing off more pictures of bicycles and scooters. There are occasional descriptions and links that appear, but it’s really nothing more than a painful rabbit hole to fall down:
A disorganized and poorly designed page on the ARNGREN website. (Source: ARNGREN) (Large preview)
This website is exactly how I expect visitors of H. H. Holmes’ Murder Castle felt when they first stepped inside those confusing hallways or fell through one of his trap doors. There’s no rhyme or reason to any of the pages and it almost feels as dangerous to backtrack as it is to move forward.
If you’d like to avoid taking your visitors on such a harrowing journey, focus on creating a clear and open path that’s easy to traverse and to get off of when they want to.
3. It Looks Too Low Budget
It’s not just real haunted houses you want to avoid emulating. You should also steer clear of certain types of haunted house attractions.
I’m what you might call a horror addict. I watch scary movies all year long. I take haunted tours every time I visit a new city. And I spend a good chunk of the months of September and October going to haunted house attractions.
As you can imagine, I’ve seen some really impressive haunted houses, and I’ve seen some that are really poorly done.
Although I have a slightly cowered stance, you can see that I'm laughing. That’s because I could see his face through the holes of his mask.
Now, this by no means is a low budget haunted house/Halloween event. And this actor deserves all sorts of kudos for walking around steamy hot Florida in that getup and on stilts, no less. But I will say that being there in the daytime where I could see through the mask did deflate my enthusiasm. It also had me wondering if the rest of the experience would be as disappointing. (For the record, it wasn’t.)
You definitely don’t want your visitors noticing flaws, odd design choices and other errors on your site. Then, wondering why the company behind it didn’t put more money into design and development.
If your website looks cheesy, overdone or like it was cheaply thrown together, you’re going to have a big problem on your hands. The rest of the web has set a very high bar for what a website should look like and how it should work. Fail to live up to those expectations and you’ll find that people will start to question the legitimacy or worth of the business behind it.
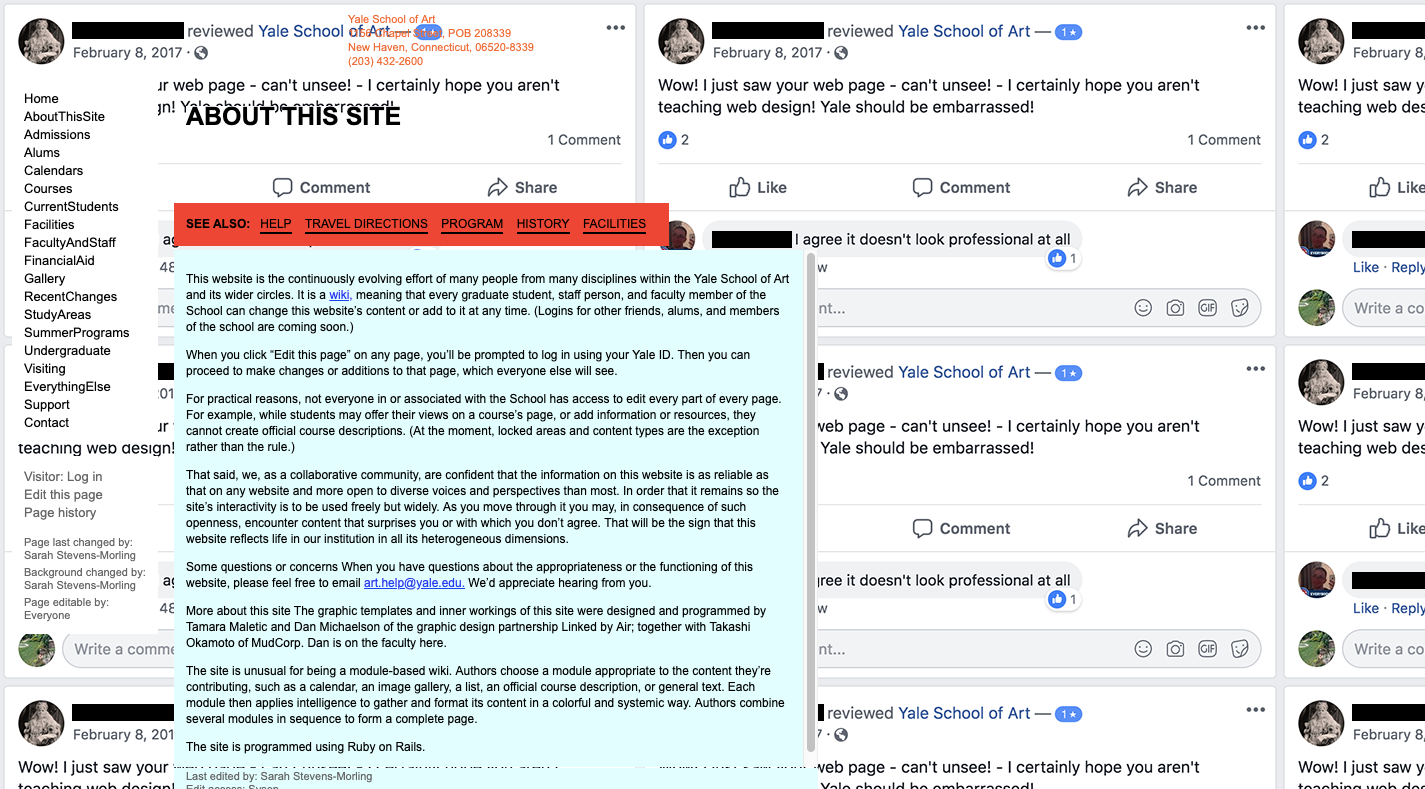
I thought it was a joke, that somehow I’d landed on someone pretending to be Yale University at yale.net instead of yale.edu. But I was wrong. This is the real website of the art department at the Ivy League university.
So, I dug a little further, hoping that somewhere on this subdomain would be an explanation of why this website sucked so much. This is what I found:
Let me point you to the most revealing parts of the explanation. First, they explain that this site is an open-source wiki:
It is a wiki, meaning that every graduate student, staff person, and faculty member of the School can change this website’s content or add to it at any time.
Next, they warn you that you may be shocked by what you see:
As you move through it you may, in consequence of such openness, encounter content that surprises you or with which you don’t agree. That will be the sign that this website reflects life in our institution in all its heterogeneous dimensions.
Considering the editor of this page used a negative review from Facebook as the repeating background image, there must be some inside joke here. In fact, when I looked into it further, it seems as though this school has had a tradition of scary web design choices as far back as 2010. So, they obviously know what they’re doing.
Here’s the thing though: even if you’re designing for someone with as well-known a reputation as Yale, building something that looks like it was thrown together in Paint back in 2001 is no way to go. There’s no exception for design this bad and I don’t think your visitors will be happy that you wasted their time either.
I realize this might help with the virality of a site, but it’ll do nothing for the credibility of it. All you’ll end up with is a few thrill seekers stumbling through in search of a good laugh or shock. What you need instead is visitors who feel comfortable and confident enough to convert.
4. It Looks Unsafe
The last thing that might leave people feeling unsettled is a lack of security (or at least the perception of none).
One of the things I often get asked by people who don’t like scary movies or going to haunted houses is:
“But aren’t you scared?”
Of course, I’m scared! I enjoy all of this horror stuff because I can do so safely from a distance. I know that the scare actors in a haunted house aren’t going to hurt me and I know that Michael Myers isn’t going to pop out of my TV screen and butcher me in the middle of the night. Plus, it’s a much more enjoyable way to get my cardio in without having to hit the treadmill.
A still of Michael Myers sneaking up on Laurie Strode in Halloween. (Source: GIPHY)
I think for some people, though, they don’t have that same sense of security when partaking in activities like these, which is why they steer clear. And this is something you need to be extra careful about when it comes to your website. Specifically, be mindful of:
Installing SSL certificates on every website.
Using security badges at checkout.
Preventing 404 errors.
Fixing faulty contact forms.
Blocking spam in comment sections and forums.
Monitoring for server downtime.
Repairing the white screen of death.
Let’s look at an example of a website that sends a number of red flags pertaining to security. This is RoadKill T-Shirts:
At first glance, you might think this e-commerce website is okay. The design is outdated, but it’s a low-end tee-shirt shop. Visitors can’t be expecting too much from the design.
But then you move over to your mobile device and realize it’s not responsive:
That said, there may be some visitors who are able to look past these design missteps, especially if there’s a tee shirt decal they really want.
One of the first red flags that should stop them in their tracks though is the “Not Secure” notice in their browser window. Although there is a GoDaddy security seal at the very bottom of the checkout page, I’m not all that sure I’d trust that to protect my purchase as a consumer either.
Then, there’s the matter of the contact form. I was curious to see how secure users would feel about filling in contact information without submitting a payment, so I forced an error:
I’m happy to see that the failure to fill in required fields triggered such a response. However, here’s what happens to the bottom of the form as a result:
RoadKill T-Shirts error-filled contact form leads to a hidden “Submit” button. (Source: RoadKill T-Shirts) (Large preview)
Users can tab down to reveal the “Submit” button. However, what if your visitors don’t know that they can do that? They may just end up abandoning the form and the website altogether if something as simple as the contact form is so fraught with error.
There are a variety of ways a website might seem unsafe to visitors, so do what you can to fortify it on the backend and then provide trust marks on the frontend to put their minds at ease.
Wrapping Up
When a visitor enters your website, what do you want their first thought to be?
“Oh great! There’s the product I was looking for!”
Or:
“Hmmm... Maybe I should go back to Google and see if there’s a different place to buy this product from.”
There are so many ways to give your visitors pause when they visit a website. But if you start looking at your website like a home, you can avoid the common pitfalls that make a website feel more like a haunted house than a warm and welcome homecoming.
The merits of Git as a version control system are difficult to contest, but while Git will do a superb job in keeping track of the commits you and your teammates have made to a repository, it will not, in itself, guarantee the quality of those commits. Git will not stop you from committing code with linting errors in it, nor will it stop you from writing commit messages that convey no information whatsoever about the nature of the commits themselves, and it will, most certainly, not stop you from committing poorly formatted code.
Fortunately, with the help of Git hooks, we can rectify this state of affairs with only a few lines of code. In this tutorial, I will walk you through how to implement Git hooks that will only let you make a commit provided that it meets all the conditions that have been set for what constitutes an acceptable commit. If it does not meet one or more of those conditions, an error message will be shown that contains information about what needs to be done for the commit to pass the checks. In this way, we can keep the commit histories of our code bases neat and tidy, and in doing so make the lives of our teammates, and not to mention our future selves, a great deal easier and more pleasant.
As an added bonus, we will also see to it that code that passes all the tests is formatted before it gets committed. What is not to like about this proposition? Alright, let us get cracking.
Prerequisites
In order to be able to follow this tutorial, you should have a basic grasp of Node.js, npm and Git. If you have never heard of something called package.json and git commit -m [message] sounds like code for something super-duper secret, then I recommend that you pay this and this website a visit before you continue reading.
Our plan of action
First off, we are going to install the dependencies that make implementing pre-commit hooks a walk in the park. Once we have our toolbox, we are going to set up three checks that our commit will have to pass before it is made:
The code should be free from linting errors.
Any related unit tests should pass.
The commit message should adhere to a pre-determined format.
Then, if the commit passes all of the above checks, the code should be formatted before it is committed. An important thing to note is that these checks will only be run on files that have been staged for commit. This is a good thing, because if this were not the case, linting the whole code base and running all the unit tests would add quite an overhead time-wise.
In this tutorial, we will implement the checks discussed above for some front-end boilerplate that uses TypeScript and then Jest for the unit tests and Prettier for the code formatting. The procedure for implementing pre-commit hooks is the same regardless of the stack you are using, so by all means, do not feel compelled to jump on the TypeScript train just because I am riding it; and if you prefer Mocha to Jest, then do your unit tests with Mocha.
Installing the dependencies
First off, we are going to install Husky, which is the package that lets us do whatever checks we see fit before the commit is made. At the root of your project, run:
npm i husky --save-dev
However, as previously discussed, we only want to run the checks on files that have been staged for commit, and for this to be possible, we need to install another package, namely lint-staged:
npm i lint-staged --save-dev
Last, but not least, we are going to install commitlint, which will let us enforce a particular format for our commit messages. I have opted for one of their pre-packaged formats, namely the conventional one, since I think it encourages commit messages that are simple yet to the point. You can read more about it here.
npm install @commitlint/{config-conventional,cli} --save-dev

## If you are on a device that is running windows
npm install @commitlint/config-conventional @commitlint/cli --save-dev
After the commitlint packages have been installed, you need to create a config that tells commitlint to use the conventional format. You can do this from your terminal using the command below:
Great! Now we can move on to the fun part, which is to say implementing our checks!
Implementing our pre-commit hooks
Below is an overview of the scripts that I have in the package.json of my boilerplate project. We are going to run two of these scripts out of the box before a commit is made, namely the lint and prettier scripts. You are probably asking yourself why we will not run the test script as well, since we are going to implement a check that makes sure any related unit tests pass. The answer is that you have to be a little bit more specific with Jest if you do not want all unit tests to run when a commit is made.
As you can tell from the code we added to the package.json file below, creating the pre-commit hooks for the lint and prettier scripts does not get more complicated than telling Husky that before a commit is made, lint-staged needs to be run. Then you tell lint-staged to run the lint and prettier scripts on all staged JavaScript and TypeScript files, and that is it!
At this point, if you set out to anger the TypeScript compiler by passing a string to a function that expects a number and then try to commit this code, our lint check will stop your commit in its tracks and tell you about the error and where to find it. This way, you can correct the error of your ways, and while I think that, in itself, is pretty powerful, we are not done yet!
By adding "jest --bail --coverage --findRelatedTests" to our configuration for lint-staged, we also make sure that the commit will not be made if any related unit tests do not pass. Coupled with the lint check, this is the code equivalent of wearing two safety harnesses while fixing broken tiles on your roof.
What about making sure that all commit messages adhere to the commitlint conventional format? Commit messages are not files, so we can not handle them with lint-staged, since lint-staged only works its magic on files staged for commit. Instead, we have to return to our configuration for Husky and add another hook, in which case our package.json will look like so:
If your commit message does not follow the commitlint conventional format, you will not be able to make your commit: so long, poorly formatted and obscure commit messages!
If you get your house in order and write some code that passes both the linting and unit test checks, and your commit message is properly formatted, lint-staged will run the Prettier script on the files staged for commit before the commit is made, which feels like the icing on the cake. At this point, I think we can feel pretty good about ourselves; a bit smug even.
Implementing pre-commit hooks is not more difficult than that, but the gains of doing so are tremendous. While I am always skeptical of adding yet another step to my workflow, using pre-commit hooks has saved me a world of bother, and I would never go back to making my commits in the dark, if I am allowed to end this tutorial on a somewhat pseudo-poetical note.
People hide keys under their welcome mats, under the potted plant next to the front door, above the door jam, or maybe under that fake-looking rock next to the front walk. But why would they hide their front door key in such obvious places? If I were a burglar, these are the first places that I would check (well, I would first check to see if the front door was even locked).
But some people are smarter than this. Instead of putting the spare key in an obvious hiding place, they make a few copies and hand them out to the dog sitter, the next-door neighbor, their boyfriend/girlfriend, or the handyman fixing the washing machine. Before they know it, they’ve lost track of who they have given keys to and their house is vulnerable once again.
In this post, we’ll be using an ecommerce store demo I built and deployed to Netlify to show how we can make dynamic routes for incoming data. It’s a fairly common use-case: you get data from an API, and you either don’t know exactly what that data might be, there’s a lot of it, or it might change. Luckily for us, Nuxt makes the process of creating dynamic routing very seamless.
In the last post, we showed how to set up stripe payments with Netlify Functions, which allow us to create serverless lambda functions with ease. We’ll use this same application to show another Nuxt-specific functionality as well.
In this case, we’ve got some dummy data for the store that I created in mockaroo and am storing in the static folder. Typically you’ll use fetch or axios and an action in the Vuex store to gather that data. Either way, we store the data with Vuex in store/index.js, along with the UI state, and an empty array for the cart.
import data from '~/static/storedata.json'

export const state = () => ({
 cartUIStatus: 'idle',
 storedata: data,
 cart: []
})
It’s important to mention that in Nuxt, all we have to do to set up routing in the application is create a .vue file in the pages directory. So we have an index.vue page for our homepage, a cart.vue page for our cart, and so on. Nuxt automagically generates all the routing for these pages for us.
In order to create dynamic routing, we will make a directory to house those pages. In this case, I made a directory called /products, since that’s what the routes will be, a view of each individual product details.
In that directory, I’ll create a page with an underscore, and the unique indicator I want to use per page to create the routes. If we look at the data I have in my cart, it looks like this:
[
 {
   "id": "9d436e98-1dc9-4f21-9587-76d4c0255e33",
   "color": "Goldenrod",
   "description": "Mauris enim leo, rhoncus sed, vestibulum sit amet, cursus id, turpis. Integer aliquet, massa id lobortis convallis, tortor risus dapibus augue, vel accumsan tellus nisi eu orci. Mauris lacinia sapien quis libero.",
   "gender": "Male",
   "name": "Desi Ada",
   "review": "productize virtual markets",
   "starrating": 3,
   "price": 50.40,
   "img": "1.jpg"
 },
  …
]
You can see that the ID for each entry is unique, so that’s a good candidate for something to use, we’ll call the page:
_id.vue
Now, we can store the id of the particular page in our data by using the route params:
data() {
 return {
   id: this.$route.params.id,
  }
},
For the entry from above, our data if we looked in devtools would be:
id: "9d436e98-1dc9-4f21-9587-76d4c0255e33"
We can now use this to retrieve all of the other information for this entry from the store. I’ll use mapState:
And we’re filtering the storedata to find the entry with our unique ID!
Let the Nuxt config know
If we were building an app using yarn build, we’d be done, but we’re using Nuxt to create a static site. When we use Nuxt to create a static site, we’ll use the yarn generate command. We have to let Nuxt know about the dynamic files with the generate command in nuxt.config.js.
This command will expect a function that will return a promise that resolves in an array that will look like this:
To create this, at the top of the file we’ll bring in the data from the static directory, and create the function:
import data from './static/storedata.json'
let dynamicRoutes = () => {
 return new Promise(resolve => {
   resolve(data.map(el => `product/${el.id}`))
 })
}
We’ll then call the function within our config:
generate: {
  routes: dynamicRoutes
},
If you’re gathering your data from an API with axios instead (which is more common), it would look more like this:
import axios from 'axios'
let dynamicRoutes = () => {
 return axios.get('https://your-api-here/products').then(res => {
   return res.data.map(product => `/product/${product.id}`)
 })
}
And with that, we’re completely done with the dynamic routing! If you shut down and restart the server, you’ll see the dynamic routes per product in action!
For the last bit of this post, we’ll keep going, showing how the rest of the page was made and how we’re adding items to our cart, since that might be something you want to learn, too.
Populate the page
Now we can populate the page with whatever information we want to show, with whatever formatting we would like, as we have access to it all with the product computed property:
In our case, we’ll also want to add items to the cart that’s in the store. We’ll add the ability to add and remove items (while not letting the decrease count dip below zero
In our methods on that component, we’ll add the item plus a new field, the quantity, to an array that we’ll pass as the payload to mutation in the store.
In the Vuex store, we’ll check if the item already exists. If it does, we’ll just increase the quantity. If not, we’ll add the whole item with quantity to the cart array.
addToCart: (state, payload) => {
 let itemfound = false
 state.cart.forEach(el => {
   if (el.id === payload.id) {
     el.quantity += payload.quantity
     itemfound = true
   }
 })
 if (!itemfound) state.cart.push(payload)
}
We can now use a getter in the store to calculate the total, which is what we’ll eventually pass to our Stripe serverless function (the other post picks up from here). We’ll use a reduce for this as reduce is very good at retrieving one value from many. (I wrote up more details on how reduce works here).
cartTotal: state => {
 if (!state.cart.length) return 0
 return state.cart.reduce((ac, next) => ac + next.quantity * next.price, 0)
}
And there you have it! We’ve set up individual product pages, and Nuxt generates all of our individual routes for us at build time. You’d be Nuxt not to try it yourself. 😬
CSS-Tricks is 12 years old! Firmly into that Early Adolescence stage, I'd say ;) As we do each year, let's reflect upon the past year. I'd better have something to say, right? Otherwise, John Prine would get mad at me.
How the hell can a person go to work in the morning
And come home in the evening and have nothing to say.
- Angel From Montgomery
Easily the biggest change this year was design v17
We redesign most years, so it's not terribly shocking I suppose that we did this year, but I think it's fairly apparent that this was a big one. The biggest since v10.
The aesthetics of it still feel fresh to me, 6 months later. There are no plans at all yet for what the next version will be. I imagine this one will last a good couple of years with tweaks along the way. I'm always working on it. Just in the last few days, I have several commits cleaning things up, adding little features, and optimizing. That work is never done. v18 might just be a more thorough scrubbing of what is here. Might be a good release to focus on the back-end tech. I've always wanted to try some sort of MVC setup.
In a way, things feel easier.
There is a lot going right around here. We've got a great staff. Our editorial workflow, led by Geoff, has been smooth. There are ebbs and flows of how many great guest posts are in the pipeline, but it never seems to run dry and these days we stay more ahead than we ever have.
We stay quite organized with Notion. In fact, I still use it heavily across all the teams I'm on. It's just as fundamental as Slack and email.
We're still working with BuySellAds as a partner to help us sell advertising and sponsorship partnerships. We've worked with them for ages and they really do a good job with clean ad tech, smooth integration workflows, and finding good companies that want to run campaigns.
On the 10th anniversary I wrote:
If you do all the work, the hope is that you just keep to keep on keeping on. Everyone gets paid for their effort. This is not a hockey-stick growth kind of site. It's a modest publication.
Yep.
Check out a year over year chart from Google Analytics:
I can look at that and celebrate the moments with growth. Long periods of 20% year over year growth, which is cool. Then if you look at just this last month, we're more even or a little bit under 2018 (looking at only pageviews). Good to know, kinda, but I never put much stock in this kind of generic analytics. I'm glad we record them. I would want to know if we started tanking or growing hugely. But we never do. We have long slow steady growth and that is a comfortable place for me.
Thinking on ads
The world of advertising is tightly integrated around here, of course. I'm sure many of you look at this site and go JEEZ, LITTLE HEAVY ON THE ADS, EH? I hope it's not too big a turnoff, as I really try to be tasteful with them. But another thing you should know is that the ad tech is clean. No tracking stuff. No retargetting. No mysterious third-party JavaScript. There might be an impression-tracking pixel here and there, but that's about it. No slew of 100's of requests doing god-knows-what.
That's not by accident. It's clear to me now how to go down that other road, and that road has money on it. Twice as much. But I look at it as what would be short term gains. Nobody is going to be more mad at me than you if I slap 80 tracking scripts on this site, my credibility amongst devs goes out the window along with any hopes of sustaining or growing this site. It's no surprise to me that on sites without developers as an audience, the tendency is to go down the golden road of tracking scripts.
Even the tech is easier.
Just starting in July I've gotten all my sites on Flywheel hosting, and I've written about that here just today. Flywheel is a new sponsor here to the site, and I'm equally excited about that as I am in actually using it. Between using Local for local WordPress development, GitHub for repos, Buddy for deployment, Cloudflare for DNS/CDN... everything just feels smooth and easy right now.
The way I feel about tech at the moment is that nearly anything is doable. Even stuff that feels insurmountable. It's just work. Do a bunch of work, get the thing done.
Fancy posts
One thing that we snuck in this year is the idea of posts that have special design applied to them. The term "Art-directed articles" seems to be the term that has stuck for that, for better or worse, and we've added to that.
There are posts like The Great Divide that I intentionally wanted to make stand out.
And now we've taken that and turned it into a template. The point of an art-directed article is to do something unique, so a template is a little antithetical to that, but I think this strikes a nice middle ground. The template assumes a big full-width header with background image under big title and then is otherwise just a centered column of type on white. The point is to use the template, then apply custom styles on top of it as needed to do something special for the post. I have a good feeling we'll keep using it and have fun with it, and that it won't be too burdensome for future designs.
Elsewhere
Last year at this time I was just settling into living in Bend, Oregon. It still feels that way. I'm in a new house now, that we've bought, and it feels like this is a very permanent living situation. But we're less than a year into the new house so there is plenty of dust to settle. I'm still honeymooning on Bend as I just love it here so much. My daughter is just over a year and a half now so stability is very much what we're after.
Professionally, most of my time is on CodePen, of course. There is a lot of overlap, like the fact that we work with BuySellAds on both sites and often sell across both. Plus working on CSS-Tricks always has me in CodePen anyway ;). Miraculously, Dave Rupert and I almost never miss a week on ShopTalk Show. Going strong after all these years. Never a shortage of stuff to talk about when it comes to websites.
Thank you
A bit hearty thanks from me! Y'all reading this site is what makes it possible.
In an episode of “Let’s Talk” hosted by Swapnil Bhartiya, Weaveworks COO, Steve George discusses what Weaveworks solves for Kubernetes users.
“We’ve spoken to a lot of quite advanced Kubernetes users who have got Kubernetes up and running. They are operating in production, but their biggest complaint is that it takes too much time and effort. Most users want to just go on with their applications deployed into Kubernetes and operate it easily,” Steve George, Weaveworks.
Everyone understands how to deploy, monitor, manage, and look after Linux distributions. But in the Kubernetes world, nothing is standardized. People do things with custom-built tools. Everyone's building their own house in their own way. “What Weaveworks is doing is providing standardized workflows for how to deploy, configure, monitor, update and look after Kubernetes,” he said.


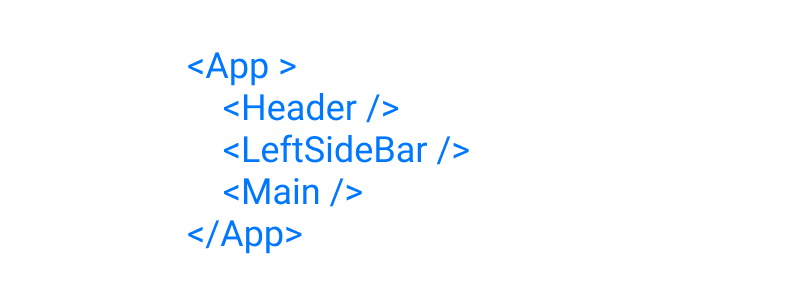

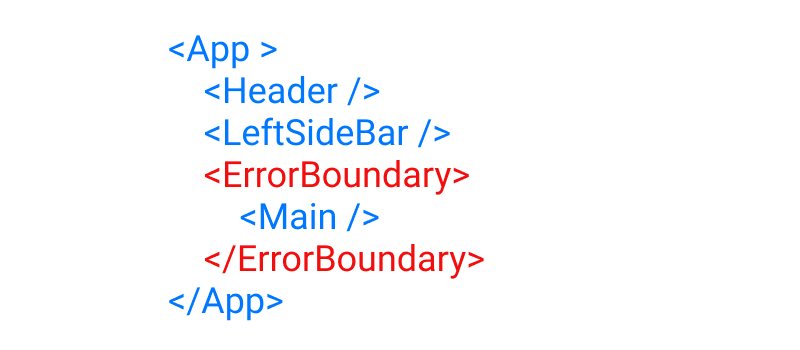


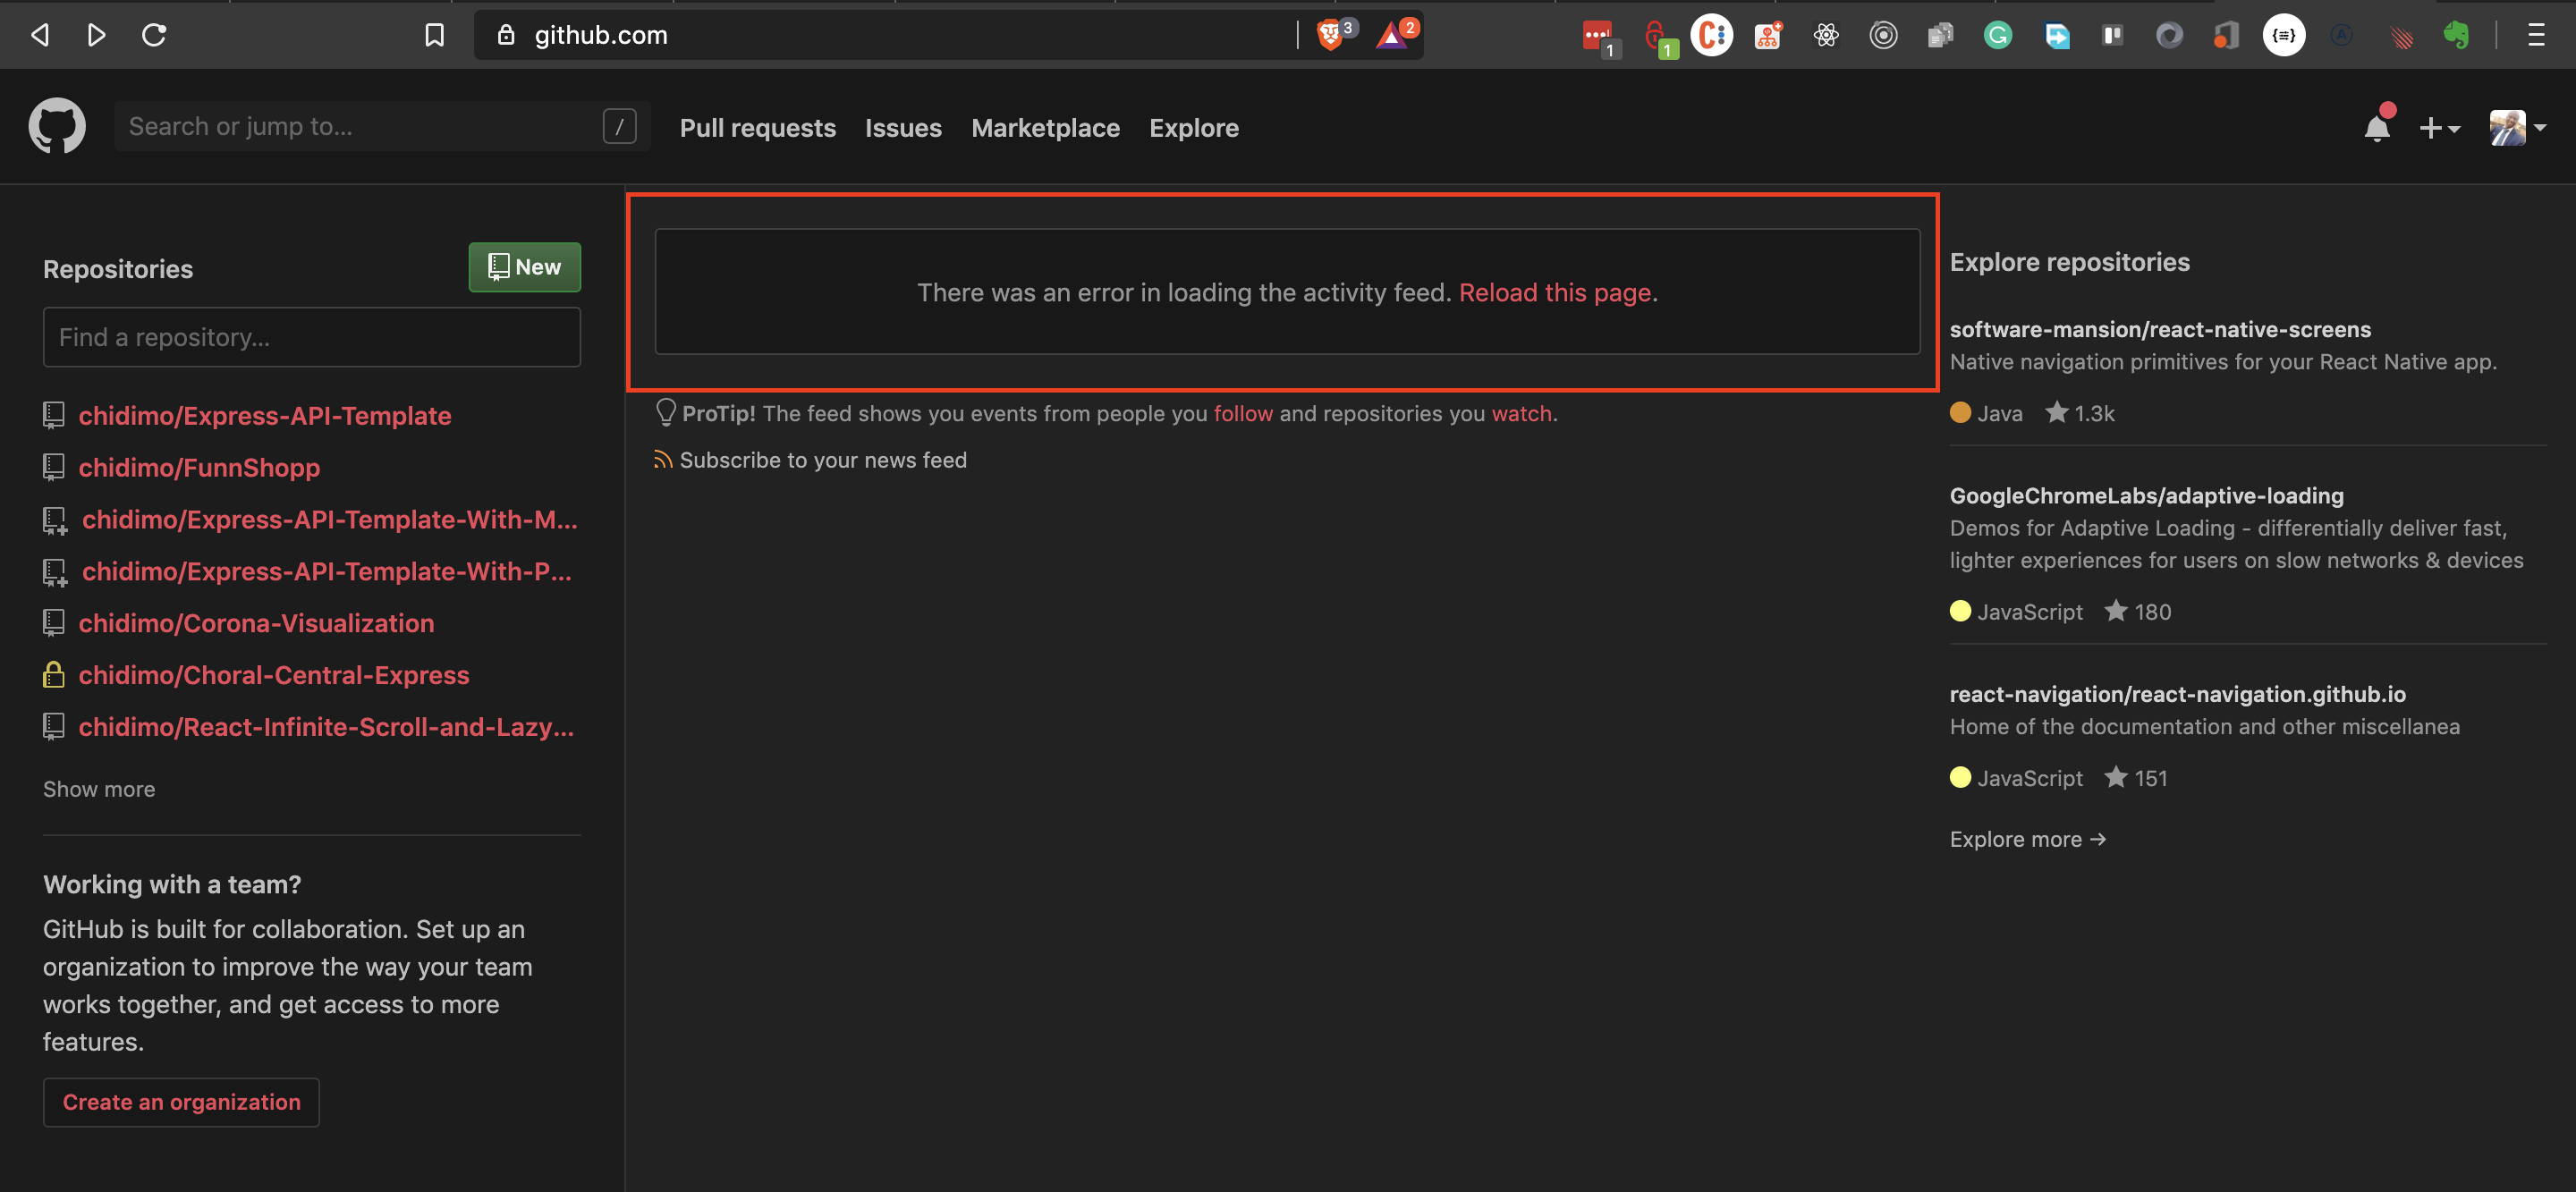
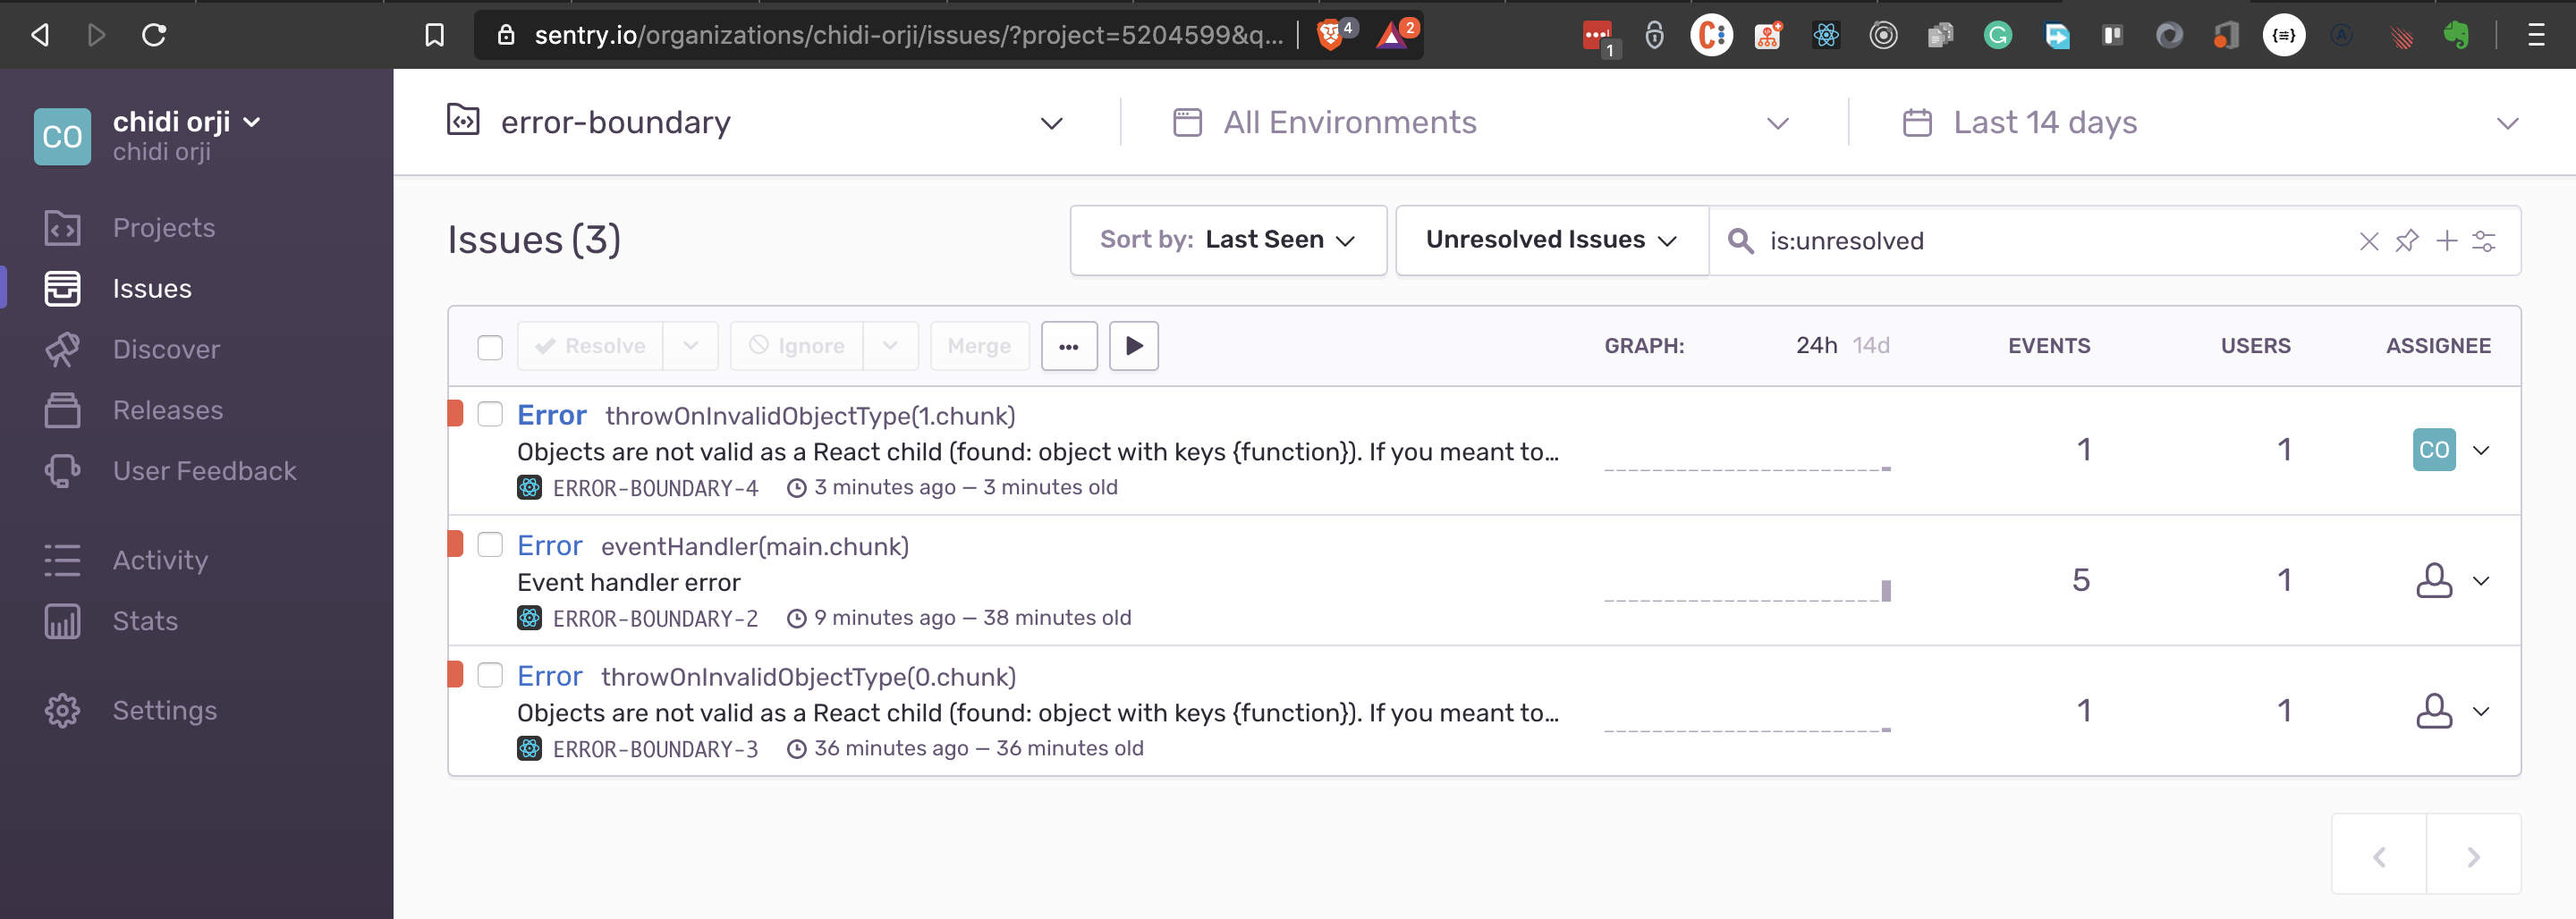

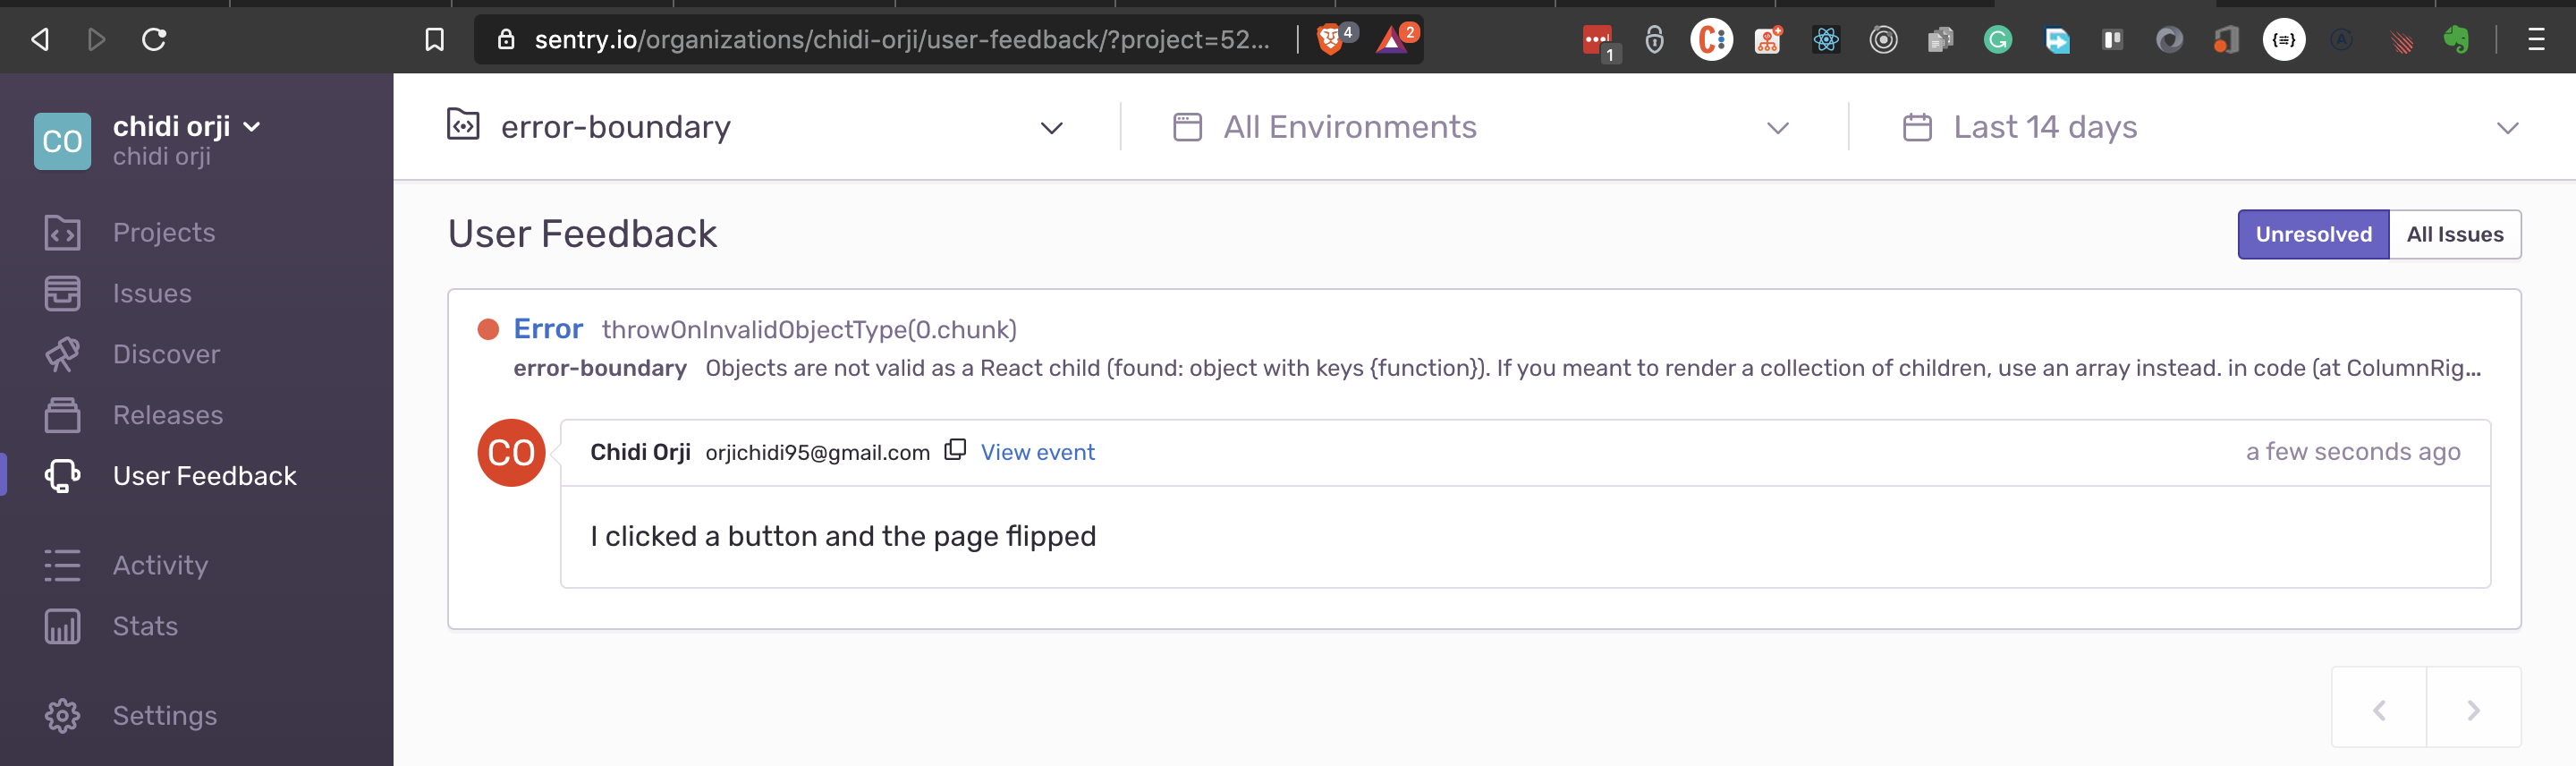


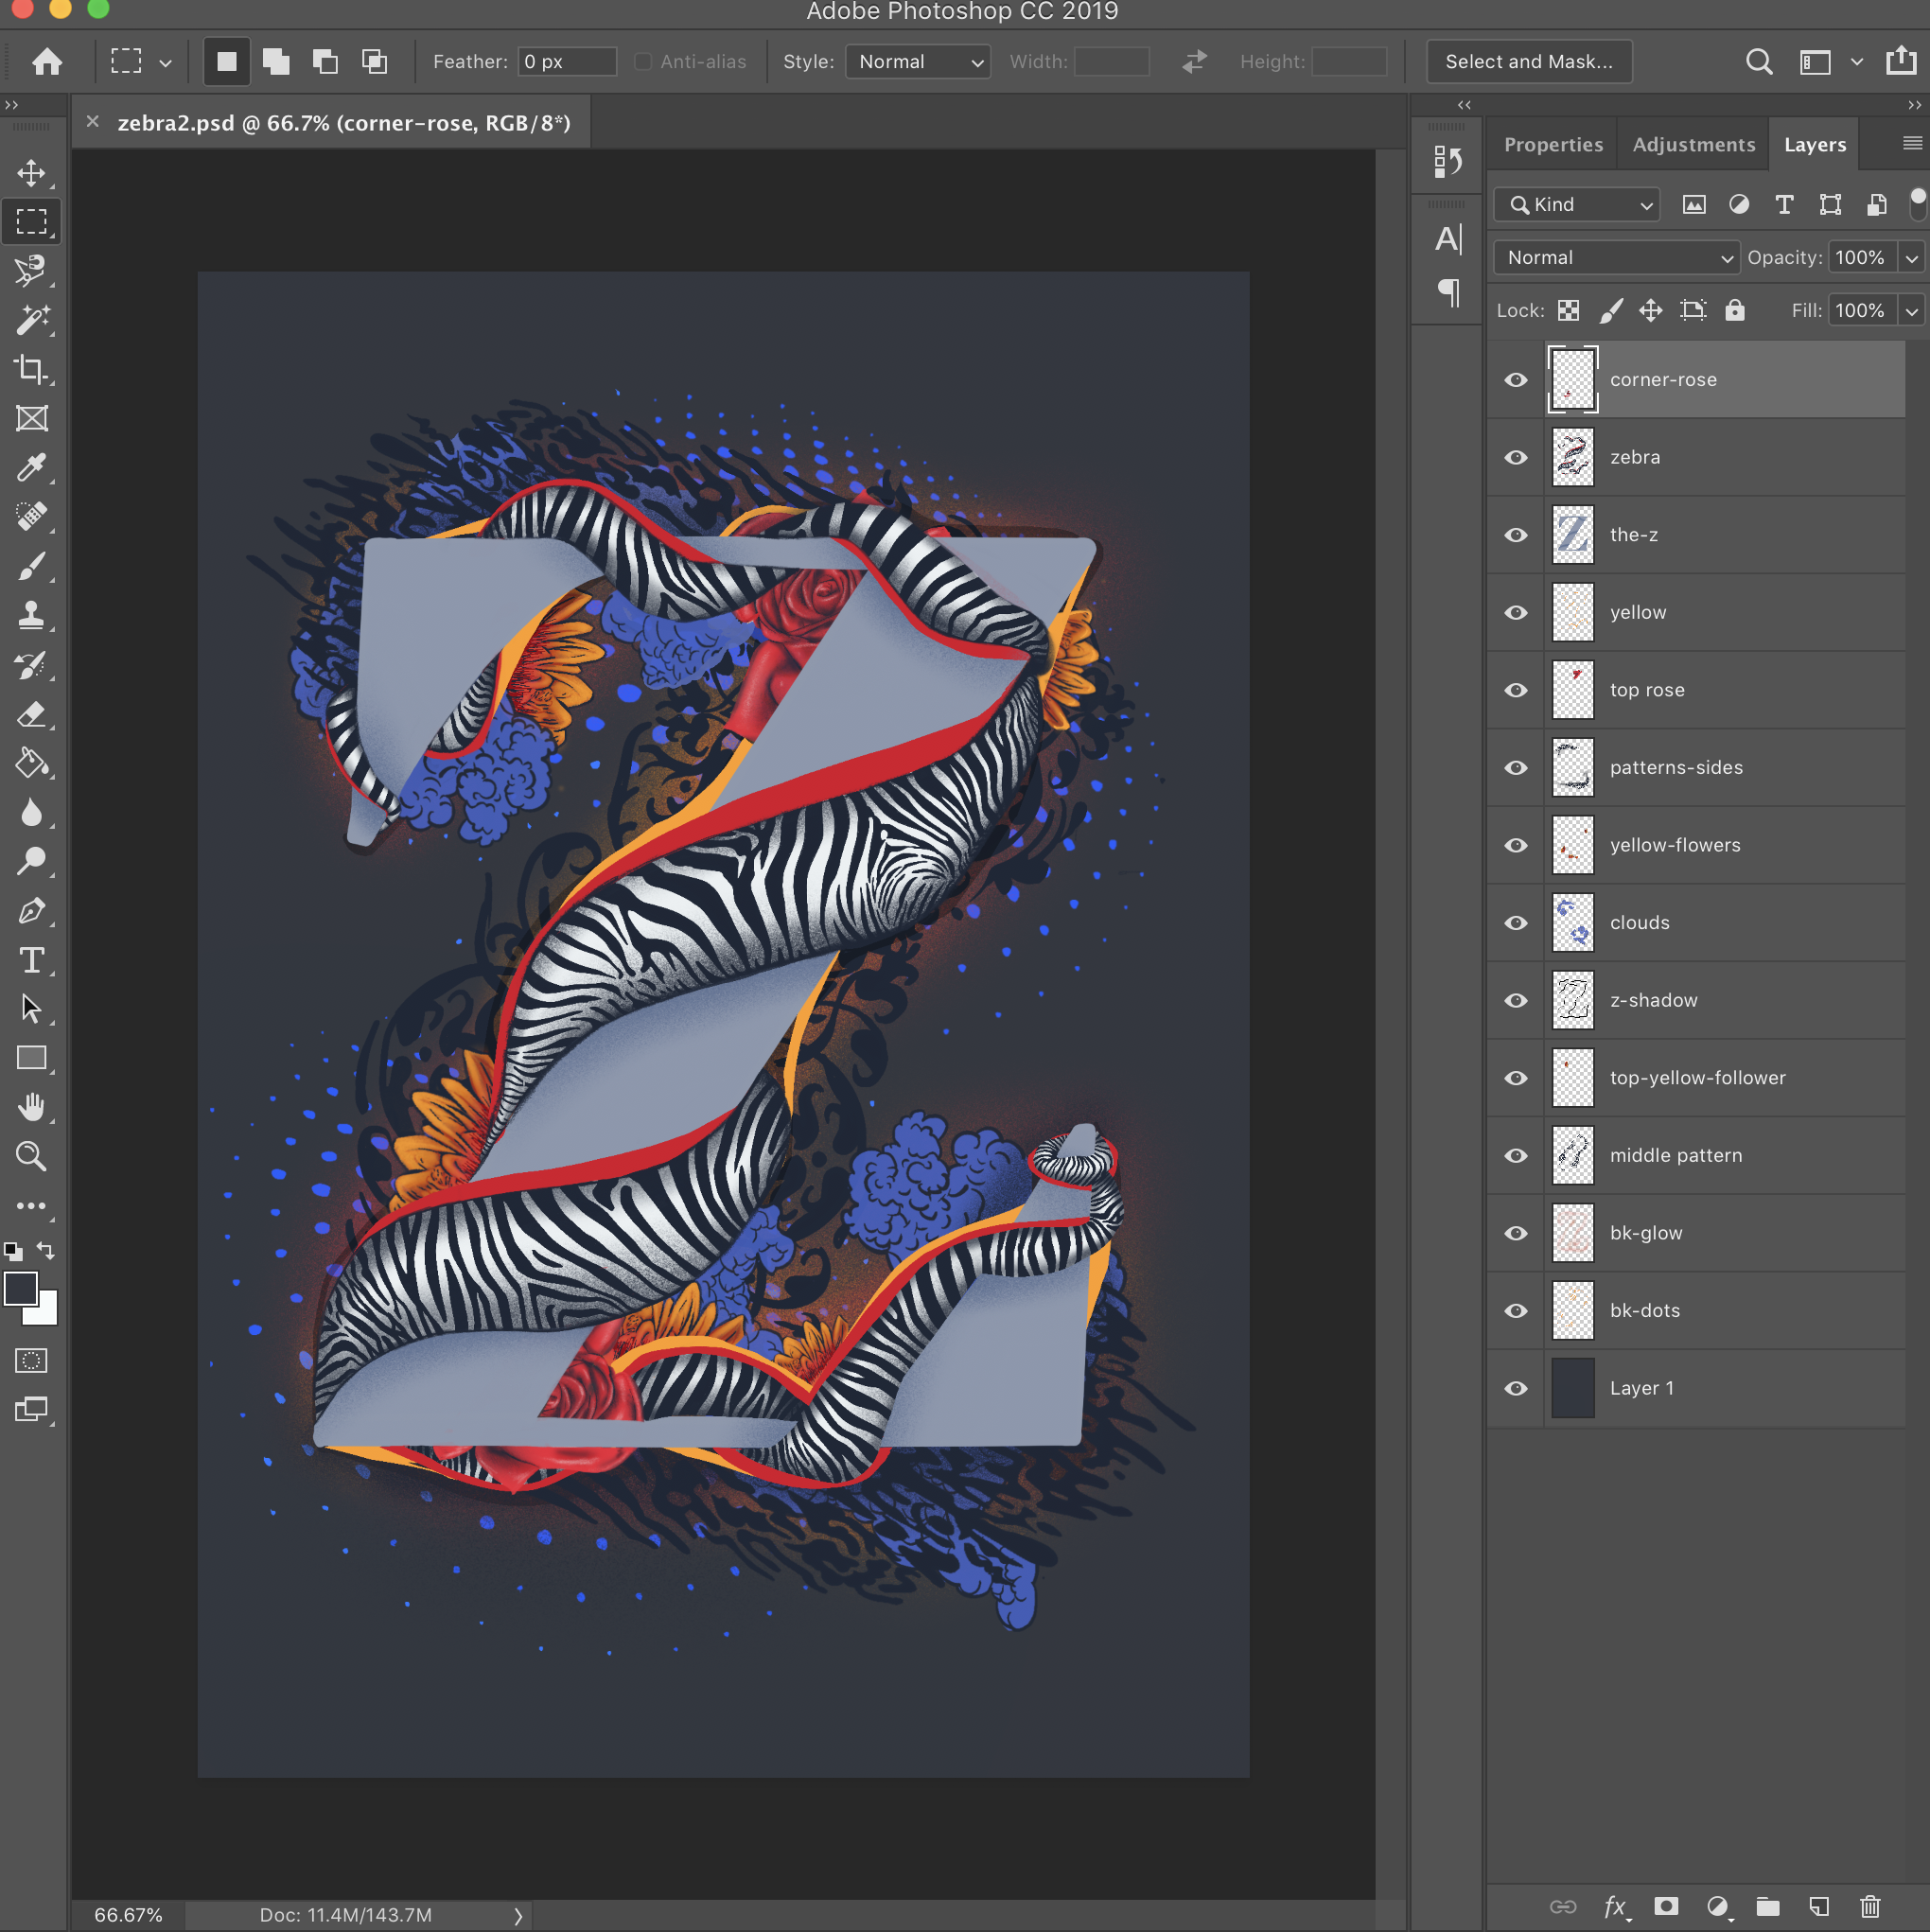 The same drawing opened in Photoshop.