The Scent Of UX: The Unrealized Potential Of Olfactory Design

Imagine that you could smell this page. The introduction would emit a subtle scent of sage and lavender to set the mood. Each paragraph would fill your room with the coconut oil aroma, helping you concentrate and immerse in reading. The fragrance of the comments section, resembling a busy farmer’s market, would nudge you to share your thoughts and debate with strangers.

How would the presence of smells change your experience reading this text or influence your takeaways?

Scents are everywhere. They fill our spaces, bind our senses to objects and people, alert us to dangers, and arouse us. Smells have so much influence over our mood and behavior that hundreds of companies are busy designing fragrances for retail, enticing visitors to purchase more, hotels, making customers feel at home, and amusement parks, evoking a warm sense of nostalgia.

At the same time, the digital world, where we spend our lives working, studying, shopping, and resting, remains entirely odorless. Our smart devices are not designed to emit or recognize scents, and every corner of the Internet, including this page, smells exactly the same.

We watch movies, play games, study, and order dinner, but our sense of smell is left unengaged. The lack of odors rarely bothers us, but occasionally, we choose analog things like books merely because their digital counterparts fail to connect with us at the same level.

Could the presence of smells improve our digital experiences? What would it take to build the “smelly” Internet, and why hasn't it been done before? Last but not least, what power do scents hold over our senses, memory, and health, and how could we harness it for the digital world?

Let’s dive deep into a fascinating and underexplored realm of odors.

Olfactory Design For The Real World

Why Do We Remember Smells?

In his novel In Search of Lost Time, French writer Marcel Proust describes a sense of déjà vu he experienced after tasting a piece of cake dipped in tea:

“Immediately the old gray house upon the street rose up like a stage set… the house, the town, the square where I was sent before lunch, the streets along which I used to run errands, the country roads we took… the whole of Combray and of its surroundings… sprang into being, town and gardens alike, all from my cup of tea.”

— Marcel Proust

The Proust Effect, the phenomenon of an ‘involuntary memory’ evoked by scents, is a common occurrence. It explains how the presence of a familiar smell activates areas in our brain responsible for odor recognition, causing us to experience a strong, warm, positive sense of nostalgia.

Smells have a potent and almost magical impact on our ability to remember and recognize objects and events. “The nose makes the eyes remember”, as a renowned Finnish architect Juhani Pallasmaa puts it: a single droplet of a familiar fragrance is often enough to bring up a wild cocktail of emotions and recollections, even those that have long been forgotten.

A memory of a place, a person, or an experience is often a memory of their smell that lingers long after the odor is gone. J. Douglas Porteous, Professor of Geography at the University of Victoria, coined the term Smellscape to describe how a collective of smells in each particular area form our perception, define our attitude, and craft our recollection of it.

To put it simply, we choose to avoid beautiful places and forget delicious meals when their odors are not to our liking. Pleasant aromas, on the other hand, alter our memory, make us overlook flaws and defects, or even fall in love.

With such an immense power that scents hold over our perception of reality, it comes as no surprise they have long become a tool in the hands of brand and service designers.

Scented Advertising

What do a luxury car brand, a cosmetics store, and a carnival ride have in common? The answer is that they all have their own distinct scents.

Carefully crafted fragrances are widely used to create brand identities, make powerful impressions, and differentiate brands “emotionally and memorably”.

Some choose to complement visual identities with subtle, tailored aromas. 12.29, a creative “olfactive branding company,” developed the “scent identity” for Cadillac, a “symbol of self-expression representing the irrepressible pursuit of life.”

The branded Cadillac scent is diffused in dealerships and auto shows around the world, evoking a sense of luxury and class. Customers are expected to remember Cadillac better for its “signature nutty coffee, dark leather, and resinous amber notes”, forging a strong emotional connection with the brand.

Next time they think of Cadillac, their brain will recall its signature fragrance and the way it made them feel. Cadillac is ready to bet they will not even consider other brands afterwards.

Others may be less subtle and employ more aggressive, fragrant marketing tactics. LUSH, a British cosmetics retailer, is known for its distinct smells. Although even the company co-founder admits that odors can be overwhelming for some, LUSH’s scents play an important role in crafting the brand’s identity.

Indeed, the aroma of their stores is so recognizable that it lures customers in from afar with ease, and few walk away without forever remembering the brand’s distinct smell.

However, retail is not the only area that employs discernible smells.

Disney takes a holistic approach to service design, carefully considering every aspect that influences customer satisfaction. Smells have long been a part of the signature “Disney experience”: the main street smells like pastry and popcorn, Spaceship Earth is filled with the burning wood aroma, and Soarin’ is accompanied by notes of orange and pine.

Dozens of scent-emitting devices, Smellitzers, are responsible for adding scents to each experience. Deployed around each park and perfectly synced with every other sensory stimulus, they “shoot scents toward passersby” and “trigger memories of childhood nostalgia.”

As shown in the patent, Smellitzer is a rather simple odor delivery system designed to “enhance the sense of flight created in the minds of the passengers.” Scents are carefully curated and manufactured to evoke precise emotions without disrupting the ride experience.

Disney’s attractions, lanes, and theaters are packed with smell-emitting gadgets that distribute sweet and savoury notes. The visitors barely notice the presence of added scents, but later inevitably experience a sudden but persistent urge to return to the park.

Could it be something in the air, perhaps?

Well-curated, timely delivered, recognizable scents can be a powerful ally in the hands of a designer.

They can soothe a passenger during a long flight with the subtle notes of chamomile and mint or seduce a hungry shopper with the familiar aroma of freshly baked cinnamon buns. Scents can create and evoke great memories, amplify positive emotions, or turn casual buyers into eager and loyal consumers.

Unfortunately, smells can also ruin otherwise decent experiences.

Scented Entertainment

Why Fragrant Cinema Failed

In 1912, Aldous Huxley, author of the dystopian novel Brave New World, published an essay “Silence is Golden”, reflecting on his first experience watching a sound film. Huxley despised cinema, calling it the “most frightful creation-saving device for the production of standardized amusement”, and the addition of sound made the writer concerned for the future of entertainment. Films engaged multiple senses but demanded no intellectual involvement, becoming more accessible, more immersive, and, as Huxley feared, more influential.

“Brave New World,” published in 1932, features the cinema of the future — a multisensory entertainment complex designed to distract society from seeking a deeper sense of purpose in life. Attendees enjoy a ​​“scent organ” playing “a delightfully refreshing Herbal Capriccio — rippling arpeggios of thyme and lavender, of rosemary, basil, myrtle, tarragon,” and get to experience every physical stimulation imaginable.

Huxley’s critical take on the state of the entertainment industry was spot-on. Obsessed with the idea of multisensory entertainment, studios did not take long to begin investing in immersive experiences. The 1950s were the age of experiments designed to attract more viewers: colored cinema, 3D films, and, of course, scented movies.

In 1960, two films hit the American theaters: Scent of Mystery, accompanied by the odor-delivery technology called “Smell–O–Vision”, and Behind the Great Wall, employing the process named AromaRama. Smell–O–Vision was designed to transport scents through tubes to each seat, much like Disney’s Smellitzers, whereas AromaRama distributed smells through the theater’s ventilation.

Both scented movies were panned by critics and viewers alike. In his review for the New York Times, Bosley Crowther wrote that “...synthetic smells [...] occasionally befit what one is viewing, but more often they confuse the atmosphere”. Audiences complained about smells being either too subtle or too overpowering and the machines disrupting the viewing experience.

The groundbreaking technologies were soon forgotten, and all plans to release more scented films were scrapped.

Why did odors, so efficient at manufacturing nostalgic memories of an amusement park, fail to entertain the audience at the movies? On the one hand, it may attributed to the technological limitations of the time. For instance, AromaRama diffused the smells into the ventilation, which significantly delayed the delivery and required scents to be removed between scenes. Suffice it to say the viewers did not enjoy the experience.

However, there could be other possible explanations.

First of all, digital entertainment is traditionally odorless. Viewers do not anticipate movies to be accompanied by smells, and their brains are conditioned to ignore them. Researchers call it “inattentional anosmia”: people connect their enjoyment with what they see on the screen, not what they smell or taste.

Moreover, background odors tend to fade and become less pronounced with time. A short exposure to a pleasant odor may be complimentary. For instance, viewers could smell orange as the character in “Behind the Great Wall” cut and squeezed the fruit: an “impressive” moment, as admitted by critics. However, left to linger, even the most pleasant scents can leave the viewer uninvolved or irritated.

Finally, cinema does not require active sensory involvement. Viewers sit still in silence, rarely even moving their heads, while their sight and hearing are busy consuming and interpreting the information. Immersion requires suspension of disbelief: well-crafted films force the viewer to forget the reality around them, but the addition of scents may disrupt this state, especially if scents are not relevant or well-crafted.

For the scented movie to engage the audience, smells must be integrated into the film’s events and play an important role in the viewing experience. Their delivery must be impeccable: discreet, smooth, and perfectly timed. In time, perhaps, we may see the revival of scented cinema. Until then, rare auteur experiments and 4D–cinema booths at carnivals will remain the only places where fragrant films will live on.

Fortunately, the lessons from the early experiments helped others pave the way for the future of fragrant entertainment.

Immersive Gaming

Unlike movies, video games require active participation. Players are involved in crafting the narrative of the game and, as such, may expect (and appreciate) a higher degree of realism. Virtual Reality is a good example of technology designed for full sensory stimulation.

Modern headsets are impressive, but several companies are already working hard on the next-gen tech for immersive gaming. Meta and Manus are developing gloves that make virtual elements tangible. Teslasuit built a full-body suit that captures motion and biometry, provides haptic feedback, and emulates sensations for objects in virtual reality. We may be just a few steps away from virtual multi-sensory entertainment being as widespread as mobile phones.

Scents are coming to VR, too, albeit at a slower pace, with a few companies already selling devices for fragrant entertainment. For instance, GameScent has developed a cube that can distribute up to 8 smells, from “gunfire” and “explosion” to “forest” and “storm”, using AI to sync the odors with the events in the game.

The vast majority of experiments, however, occur in the labs, where researchers attempt to understand how smells impact gamers and test various concepts. Some assign smells to locations in a VR game and distribute them to players; others have the participants use a hand-held device to “smell” objects in the game.

The majority of studies demonstrate promising results. The addition of fragrances creates a deeper sense of immersion and enhances realism in virtual reality and in a traditional gaming setting.

A notable example of the latter is “Tainted”, an immersive game based on South-East Asian folklore, developed by researchers in 2017. The objective of the game is to discover and burn banana trees, where the main antagonist of the story — a mythical vengeful spirit named Pontianak — is traditionally believed to hide.

The way “Tainted” incorporates smells into the gameplay is quite unique. A scent-emitting module, placed in front of the player, diffuses fragrances to complement the narrative. For instance, the smell of banana signals the ghost’s presence, whereas pineapple aroma means that a flammable object required to complete the quest is nearby. Odors inform the player of dangers, give directions, and become an integral part of the gaming experience, like visuals and sound.

Some of the most creative examples of scented learning come from places that combine education and entertainment, most notably, museums.

Jorvik Viking Centre is famous for its use of “smells of Viking-age York” to capture the unique atmosphere of the past. Its scented halls, holograms, and entertainment programs turn a former archeological site into a carnival ride that teleports visitors into the 10th century to immerse them into the daily life of the Vikings.

Authentic smells are the center’s distinct feature, an integral part of its branding and marketing, and an important addition to its collection. Smells are responsible for making Jorvik exhibitions so memorable, and hopefully, for visitors walking away with a few Viking trivia facts firmly stuck in their heads.

At the same time, learning is becoming increasingly more digital, from mobile apps for foreign languages to student portals and online universities. Smart devices strive to replace classrooms with their analog textbooks, papers, gel pens, and teachers. Virtual Reality is a step towards the future of immersive digital education, and odors may play a more significant role in making it even more efficient.

Education will undoubtedly continue leveraging the achievements of the digital revolution to complement its existing tools. Tablets and Kindles are on their way to replace textbooks and pens. Phones are no longer deemed a harmful distraction that causes brain cancer.

Odors, in turn, are becoming “learning supplements”. Teachers and parents have access to personalized diffusers that distribute the smell of peppermint to enhance students’ attention. Large scent-emitting devices for educational facilities are available on the market, too.

At the same time, inspired to figure out the way to upload knowledge straight into our brains, we’ve discovered a way to learn things in our sleep using smells. Several studies have shown that exposure to scents during sleep significantly improves cognitive abilities and memory. More than that, smells can activate our memory while we sleep and solidify what we have learnt while awake.

Odors may not replace textbooks and lectures, but their addition will make remembering and recalling things significantly easier. In fact, researchers from MIT built and tested a wearable scent-emitting device that can be used for targeted memory reactivation.

In time, we will undoubtedly see more smart devices that make use of scents for memory enhancement, training, and entertainment. Integrated into the ecosystems of gadgets, olfactory wearables and smart home appliances will improve our well-being, increase productivity, and even detect early symptoms of illnesses.

There is, however, a caveat.

The Challenging UX Of Scents

We know very little about smells.

Until 2004, when Richard Axel and Linda Buck received a Nobel Prize for identifying the genes that control odor receptors, we didn’t even know how our bodies processed smells or that different areas in our brains were activated by different odors.

We know that our experience with smells is deep and intimate, from the memories they create to the emotions they evoke. We are aware that unpleasant scents linger longer and have a stronger impact on our mental state and memory. Finally, we understand that intensity, context, and delivery matter as much as the scent itself and that a decent aroma diffused out of place ruins the experience.

Thus, if we wish to build devices that make the best use of scents, we need to follow a few simple principles.

Design Principle #1: Tailor The Scents To Each User

In his article about Smellscapes, J. Douglas Porteous writes:

“The smell of a certain institutional soap may carry a person back to the purgatory of boarding school. A particular floral fragrance reminds one of a lost love. A gust of odour from an ethnic spice emporium may waft one back, in memory, to Calcutta.”

— J. Douglas Porteous

Smells revive hidden memories and evoke strong emotions, but their connection to our minds is deeply personal. A rich, spicy aroma of freshly roasted coffee beans will not have the same impact on different people, and in order to use scents in learning, we need to tailor the experience to each user.

In order to maximize the potential of odors in immersion and learning, we need to understand which smells have the most impact on the user. By filtering out the smells that the user finds unpleasant or associates with sad events in their past, we can reduce any potential negative effect on their wellness or memory.

Design Principle #2: Stick To The Simpler Smells

Humans are notoriously bad at describing odors.

Very few languages in the world feature specific terms for smells. For instance, the speakers of Jahai, a language in Malaysia, enjoy the privilege of having specific names for scents like “bloody smell that attracts tigers” and “wild mango, wild ginger roots, bat caves, and petrol”.

English, on the other hand, often uses adjectives associated with flavor (“smoky vanilla”) or comparison (“smells like orange”) to describe scents. For centuries, we have been trying to work out a system that could help cluster odors.

Aristotle classified all odors into six groups: sweet, acid, severe, fatty, sour, and fetid (unpleasant). Carl Linnaeus expanded it to 7 types: aromatic, fragrant, alliaceous (garlic), ambrosial (musky), hircinous (goaty), repulsive, and nauseous. Hans Henning arranged all scent groups in a prism. None of the existing classifications, however, help accurately describe complex smells, which inevitably makes it harder to recreate them.

Academics have developed several comprehensive lists, for instance, the Odor Character Profiling that contains 146 unique descriptors. Pleasant smells from the list are easier to reproduce than unique and sophisticated odors.

Although an aroma of the “warm touch of an early summer sun” may work better for a particular user than the smell of an apple pie, the high price of getting the scent wrong makes it a reasonable trade-off.

Design Principle #3: Ensure Stable And Convenient Delivery

Nothing can ruin a good olfactory experience more than an imperfect delivery system.

Disney’s Smellitzers and Jorvik’s scented exhibition set the standard for discreet, contextual, and consistent inclusion of smells to complement the experience. Their diffusers are well-concealed, and odors do not come off as overwhelming or out of place.

On the other hand, the failure of scented movies from the 1950s can at least partially be attributed to poorly designed aroma delivery systems. Critics remembered that even the purifying treatment that was used to clear the theater air between scenes left a “sticky, sweet” and “upsetting” smell.

Good delivery systems are often simple and focus on augmenting the experience without disrupting it. For instance, eScent, a scent-enhanced FFP3 mask, is engineered to reduce stress and improve the well-being of frontline workers. The mask features a slot for applicators infused with essential oil; users can choose fragrances and swap the applicator whenever they want. Beside that, eScent is no different from its “analog” predecessor: it does not require special equipment or preparation, and the addition of smells does not alter the experience of wearing a mask.

In The Not Too Distant Future

We may know little about smells, but we are steadily getting closer to harnessing their power.

In 2022, Alex Wiltschko, a former Google staff research scientist, founded Osmo, a company dedicated to “giving computers a sense of smell.” In the long run, Osmo aspires to use its knowledge to manufacture scents on demand from sustainable synthetic materials.

Today, the company operates as a research lab, using a trained AI to predict the smell of a substance by analyzing its molecular structure. Osmo’s first tests demonstrated some promising results, with machine accurately describing the scents in 53% of cases.

Should Osmo succeed at building a machine capable of recognizing and predicting smells, it will change the digital world forever. How will we interact with our smart devices? How will we use their newly discovered sense of smell to exchange information, share precious memories with each other, or relive moments from the past? Is now the right time for us to come up with ideas, products, and services for the future?

Odors are a booming industry that offers designers and engineers a unique opportunity to explore new and brave concepts. With the help of smells, we can transform entire industries, from education to healthcare, crafting immersive multi-sensory experiences for learning and leisure.

Smells are a powerful tool that requires precision and perfection to reach the desired effect. Our past shortcomings may have tainted the reputation of scented experiences, but recent progress demonstrates that we have learnt our lessons well. Modern technologies make it even easier to continue the explorations and develop new ways to use smells in entertainment, learning, and wellness — in the real world and beyond.

Our digital spaces may be devoid of scents, but they will not remain odorless for long.

Data Lineage in a Data-Driven World

Data Lineage

It won’t be an exaggeration to say that the success of today's business is driven by the data. Whether it be a small enterprise or a big business house, everyone has understood that data can give them an edge in this competitive world. This realization of the importance of data is leading them towards implementing better data governance in their business. Data lineage is an important function of data governance that tracks the journey of data from its origin to its final destinations via various hops. 

Importance of Data Lineage

The necessity for data lineage in businesses arises due to various factors and different reasons that may apply to different enterprises.

ShardingSphere’s Built-In Metadata Handling Function for Sharded Database Environments

Apache ShardingSphere is a widely recognized and trusted open-source data management platform that provides robust support for key functionalities such as sharding, encryption, read/write splitting, transactions, and high availability. The metadata of ShardingSphere encompasses essential components such as rules, data sources, and table structures, which are fundamental for the smooth operation of the platform. ShardingSphere leverages the advanced capabilities of governance centers like ZooKeeper and etc., for efficient sharing and modification of cluster configurations, enabling seamless horizontal expansion of computing nodes. 

In this informative blog post, our emphasis will be on gaining a comprehensive understanding of the metadata structure employed by Apache ShardingSphere. We will delve into the intricacies of the three-layer metadata structure within ZooKeeper, which encompasses crucial components such as metadata information, built-in metadata database, and simulated MySQL database.

Metadata Structure

For a comprehensive grasp of the metadata structure utilized in Apache ShardingSphere, a closer examination of the cluster mode of ShardingSphere-Proxy can be beneficial. The metadata structure in ZooKeeper adopts a three-layer hierarchy, with the first layer being the governance_ds. This layer encompasses critical components such as metadata information, built-in metadata database, and simulated MySQL database.
governance_ds
--metadata (metadata information)
----sharding_db (logical database name)
------active_version (currently active version)
------versions
--------0
----------data_sources (underlying database information)
----------rules (rules of logical database, such as sharding, encryption, etc.)
------schemas (table and view information)
--------sharding_db
----------tables
------------t_order
------------t_single
----------views
----shardingsphere (built-in metadata database)
------schemas
--------shardingsphere
----------tables
------------sharding_table_statics (sharding statistics table)
------------cluster_information (version information)
----performance_schema (simulated MySQL database)
------schemas
--------performance_schema
----------tables
------------accounts
----information_schema (simulated MySQL database)
------schemas
--------information_schema
----------tables
------------tables
------------schemata
------------columns
------------engines
------------routines
------------parameters
------------views
----mysql
----sys
--sys_data (specific row information of built-in metadata database)
----shardingsphere
------schemas
--------shardingsphere
----------tables
------------sharding_table_statistics
--------------79ff60bc40ab09395bed54cfecd08f94
--------------e832393209c9a4e7e117664c5ff8fc61
------------cluster_information
--------------d387c4f7de791e34d206f7dd59e24c1c
The metadata directory serves as a repository for storing essential rules and data source information, including the currently active metadata version, which is stored under the active_version node. Meanwhile, the versions stored within the metadata directory house different iterations of rules and database connection details. 

On the other hand, the schemas directory is designated for storing comprehensive tables and viewing information from the logical database. ShardingSphere meticulously preserves the decorated table structure information after applying the rules. For instance, in the case of sharding tables, it retrieves the structure from one of the actual tables, replaces the table name, and omits the real encrypted column information in the table structure, allowing users to conveniently operate on the logical database directly. The built-in metadata database, located within the metadata directory, boasts a structure that resembles that of the logical database. However, it is specifically designed to house certain built-in table structures such as sharding_table_statics and cluster_information, which will be elaborated on in subsequent discussions. In addition, the metadata directory also includes other nodes such as performance_schema, information_schema, mysql, sys, and more, which emulate the data dictionary of MySQL. These nodes serve the purpose of supporting various client tools to connect to the proxy, and future plans involve expanding data collection to facilitate queries on these data dictionaries. 

The three-layer metadata structure of ShardingSphere consists of governance_ds, metadata, and a built-in metadata database, is designed to provide compatibility with different database formats. For instance, PostgreSQL has a three-layer structure consisting of instance, database, and schema, whereas MySQL has a two-layer structure of database and table. Therefore, ShardingSphere adds an identical logical schema layer for MySQL to ensure logical uniformity. The meticulously designed three-layer metadata structure of ShardingSphere, encompassing governance_ds, metadata, and a built-in metadata database, has been formulated to ensure seamless compatibility with diverse database formats. For instance, while PostgreSQL follows a three-layer structure comprising instance, database, and schema, MySQL adopts a two-layer structure of database and table. 

To ensure logical uniformity, ShardingSphere introduces an additional logical schema layer for MySQL.Gaining a comprehensive understanding of the metadata structure employed in Apache ShardingSphere is of utmost significance for developers seeking to utilize the platform optimally. By thoroughly examining the metadata structure of ShardingSphere, developers can gain valuable insights into how the platform effectively stores and manages data sources and table structures.

In the preceding section, we examined ShardingSphere's integrated metadata database, encompassing two tables: sharding_table_statistics (a table for collecting sharding information) and cluster_information(a table for storing version information). We also explored the potential of the metadata database to house both internal collection data and user-defined information (yet to be implemented).In this section, we will delve into the inner workings of the built-in metadata database, including its data collection and query implementation mechanisms.

Data Collection

The ShardingSphere's integrated metadata database relies on data collection to aggregate information into memory and synchronizes it with the governance center to ensure consistency across clusters. To illustrate the process of data collection into memory, let's use the sharding_table_statistics table as an example. The ShardingSphereDataCollectorinterface outlines a method for data collection:
Java
 
public interface ShardingSphereDataCollector extends TypedSPI {
    Optional<ShardingSphereTableData> collect(String databaseName, ShardingSphereTable table, Map<String, ShardingSphereDatabase> shardingSphereDatabases) throws SQLException;
}


The aforementioned method is invoked by the ShardingSphereDataCollectorRunnable scheduled task. The current implementation initiates a scheduled task on the Proxy for data collection, utilizing the built-in metadata table to differentiate data collectors for specific data collection tasks. It is worth noting that based on feedback from the community, this approach may evolve into an e-job trigger method for collection in the future. The logic for collecting information is encapsulated in the ShardingStatisticsTableCollectorclass. This class employs the underlying data source and sharding rules to query relevant database information and extract statistical data.

Query Implementation

Upon completion of the data collection process, the ShardingSphereDataScheduleCollector class compares the collected information and the data stored in memory. In the event of any inconsistencies, it triggers an event  EVENTBUSto notify the governance center. Subsequently, upon receiving the event, the governance center updates the information of other nodes and executes memory synchronization accordingly. The code for the event listening class is depicted below:
Java
 
public final class ShardingSphereSchemaDataRegistrySubscriber {
    
    private final ShardingSphereDataPersistService persistService;
    
    private final GlobalLockPersistService lockPersistService;
    
    public ShardingSphereSchemaDataRegistrySubscriber(final ClusterPersistRepository repository, final GlobalLockPersistService globalLockPersistService, final EventBusContext eventBusContext) {
        persistService = new ShardingSphereDataPersistService(repository);
        lockPersistService = globalLockPersistService;
        eventBusContext.register(this);
    }
    
    @Subscribe
    public void update(final ShardingSphereSchemaDataAlteredEvent event) {
        String databaseName = event.getDatabaseName();
        String schemaName = event.getSchemaName();
        GlobalLockDefinition lockDefinition = new GlobalLockDefinition("sys_data_" + event.getDatabaseName() + event.getSchemaName() + event.getTableName());
        if (lockPersistService.tryLock(lockDefinition, 10_000)) {
            try {
                persistService.getTableRowDataPersistService().persist(databaseName, schemaName, event.getTableName(), event...


Agile Vs. Waterfall Project Management

Whether you’re a project leader at a software development company, a university, or a marketing agency, facing down a big project can feel overwhelming. If you dive in right away, ditching organization for the sake of saving time, you’ll probably end up swamped with what feels like an impossible amount of work. 

Even worse, the people you’re completing the project for—your stakeholders—may be breathing down your neck as the deadline looms. 

Using a project management methodology can help you organize your team and get the job done well. Two of the most popular project management methodologies are Agile and Waterfall. Which one should you choose for your project?

Top-Rated Software to Implement Agile Project Management

To see which tools we recommend for Agile project management, see our top list below. Many of these can also be used to implement the Waterfall methodology or a hybrid of both.

  • Monday.com – Best Simple Agile Project Management Tool
  • Jira Software – Best Overall Agile Project Management Tool
  • Toggl Plan – Best Project Management Tool for Creative Teams
  • Pivotal Tracker – Best Agile Project Management Tool for Integrations
  • CollabNet VersionOne – Best Agile Project Management Tool for Scalability
  • Targetprocess – Best Agile Project Management Tool for Enterprise Security
  • ActiveCollab – Best Agile Project Management Tool for Time Tracking

You can read our full reviews of each project management tool here.

What Are Agile and Waterfall Project Management Methodologies?

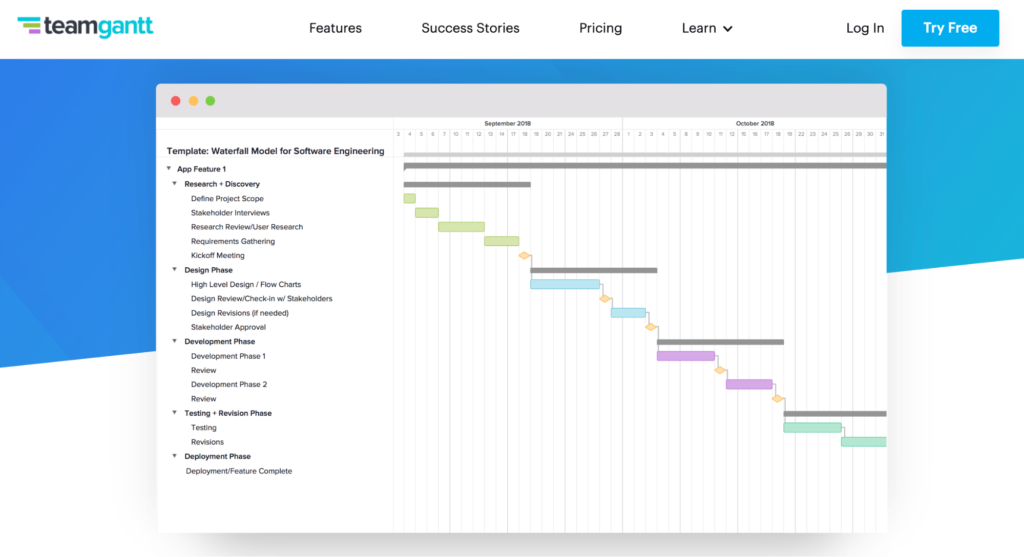
As its name suggests, Agile methodology is flexible. Teams break tasks up into manageable sections and work on these sections at the same time, frequently collaborating with stakeholders as they work to meet short-term deadlines known as sprints.

In nature, a waterfall starts at one point and flows straight down to its destination, and that’s exactly what the Waterfall methodology does. A team gathers requirements and a final deadline date from stakeholders before planning out each step required to complete the project. The team then works on the project in a linear fashion, completing each step before beginning the next. 

The Basics of Agile vs. Waterfall Methodology

The Waterfall methodology works best in fields where certain steps must be completed before others, such as building a house: if you don’t lay a foundation first, you can’t put the framing up. 

Agile project management, on the other hand, excels in scenarios where multiple steps can be completed at the same time. Take a publishing house, for example, where there are multiple moving parts at all times–editing, design, layout, marketing, and more. Using an Agile methodology means the design team can work on the cover while the writer finishes revisions and the marketing team drafts a promotion plan. 

Here are the three core elements that help us understand the differences between Agile vs. Waterfall project methodology.

Framework

Both methodologies take completely different approaches to organizing a project. Each has its own strengths and weaknesses, as we’ll cover below.

Agile

This project management system centers on the belief that being able to quickly pivot and adapt is critical to the success of a project. Instead of sticking to one specific framework, like Waterfall does, Agile focuses instead on four core values. Each Agile project framework, from Kanban to Scrum to Extreme Programming (XP), abides by these core values:

  • Individuals and interactions over processes and tools
  • A working product over exhaustive documentation
  • Customer collaboration over contract negotiation
  • Responding to change over following a plan

Keep in mind that processes, tools, documentation, contracts, and plans are all important in Agile, too—they’re just not the most important elements. 

By design, Agile is less structured than Waterfall. This can be a downside for some. Because there are several Agile frameworks to choose from, you and your team may need to spend time learning a framework before you can begin a project.

Waterfall 

Unlike Agile, Waterfall tends to follow one specific framework: 

  • Initiating the project
  • Planning each step
  • Completing each step in order
  • Testing the results
  • Delivering the product to the customer

This methodology places a strong focus on mapping out an entire project before the team starts working on it. Each step is carefully documented and placed into a spot according to a strict timeline. 

The Waterfall system makes it easy for new team members to quickly join a project because they can read all the documentation to understand what’s required of them. However, organizing a project into a rigid framework can make fixing mistakes difficult and expensive. 

If someone makes a mistake or the customer isn’t satisfied with the end result, you may have to go all the way back to the beginning and start over—often an enormously expensive and time-consuming task.

Planning

Regardless of which framework you choose for either methodology, Agile and Waterfall come with wildly different approaches to planning. 

Agile

Agile methodology uses what’s called an iterative approach to project planning. Working in collaboration with the customer, a project is sorted into phases, sometimes called sprints, each with its own mini-deadline and set of deliverables. Agile uses checklists, drag-and-drop cards, templates, and other tools to help organize these project phases.

Regardless of the specific framework you choose to work with, project development and testing happen all the time in an Agile project, allowing for greater flexibility. 

If the client gives you constructive criticism on a certain sprint deliverable, for example, you can adjust both the deliverable and the due date. This means you can easily make changes without derailing an entire project. 

Waterfall

With Waterfall, you and your team will plan a whole project at once and organize it into steps that have to be completed in order. This can help you visualize the project and give you a solid understanding of what you need to do. It can also help keep the project moving forward smoothly, as there’s never a need to ask what needs to happen next. 

On the flip side, any minor mistake or missed deadline can throw your team off track. This can cause frustration and make you lose focus as you scramble to put the plan back together after an interruption.

Communication

Now more than ever, businesses everywhere understand just how important communication is to the success of a product or project. I’m not going to lie—Agile beats Waterfall when it comes to communication. Let’s take a look. 

Agile

Perhaps more than anything else, Agile focuses on listening to people—both your stakeholders and your team members. This methodology encourages you to bring customers into the whole process of creating a product, from start to finish. 

Instead of holding your breath and hoping your customer will approve of the end result, you can feel confident that the project meets their standards because they’ve been there all along. 

Frequent input from the customer can cause plans to change more often than you’d like, but that’s the heart of Agile project management. Ultimately, your goal is to satisfy your customer, and that’s what Agile helps you do. 

Waterfall

The project stakeholder often provides input at the initial stage of a Waterfall-based project, but once the project is set and contracts are signed, the stakeholder doesn’t have much of a role. The team develops and tests the project on its own before delivering it to the customer.

This means there’s a risk that the customer won’t like the way you’ve done something. To keep them satisfied with you, your team, and your product, you may need to go back and fix an early step. This can cost a lot of time and money. 

3 Tools to Improve Agile and Waterfall Project Management

Whether you want to try an Agile or Waterfall project management methodology—or you want to build your own system that incorporates elements of both—here are three tools to help you get started.

Monday.com

No matter what type of project you’re working on, Monday.com can handle it. Monday gives you control over the type of dashboard you see, and you can customize it to fit the needs of your team. Monday offers templates for both Agile and Waterfall workflows, which is part of why we love it. 

Screenshot example of a Monday Agile methodology template with sprints, also called iterations.
Monday Agile methodology template with sprints, also called iterations

Despite the flexibility and customization Monday offers, the tool is intuitive and user-friendly. It’s also GDPR compliant and has earned SOC and ISO security certifications, which means you don’t have to worry about the security of your projects and data. Plus, teams with 25 or more members can select HIPAA-compliant plans.

Toggl Plan

The more flexible your team needs to be, the more flexible Toggl Plan is. This tool offers drag-and-drop timelines to help you organize projects according to multiple due dates. Toggl Plan really shines when it comes to creative projects—think magazines with multiple stories to juggle or video streaming sites that constantly need to serve up new content.

A screenshot showing how Toggl Plan helps you schedule multiple projects with multiple deadlines.
Toggl Plan helps you schedule multiple projects with multiple deadlines

Toggl Plan also lets you color-code milestones to help implement those sprints that Agile project management is known for. 

ActiveCollab

This tool comes with a suite of features to help you organize each element of your project management strategy. Even better, ActiveCollab offers visually pleasing, UI-friendly instructions that make it easy to learn how to use said features. 

An image showcasing ActiveCollab’s project management software
ActiveCollab’s project management software

Whether you want to implement a more Waterfall-oriented strategy or keep things Agile, ActiveCollab can do both. Or a hybrid of both. With ActiveCollab, it’s easy to bring both team members and clients together on any project.

3 Tricks for Agile and Waterfall Project Management

Wondering how to get started with Agile vs. Waterfall project management? These tricks can help.

Trick #1 — Determine Your Project Methodology

Everyone is different, which means that some people on your team may work better with a Waterfall methodology, while others will thrive with Agile. 

If you’re just starting out, introduce both methodologies to your team. Discuss the pros and cons of each one. Collaborate with your team to figure out which methodology works best for everyone. Or, map out a plan for a hybrid of both Agile and Waterfall for your team to implement. 

Trick #2 — Research the Best Tools for Your Team

Before you choose a tool like Monday.com or Toggl Plan, research their features with your team in mind. Are you more of a remote team, or do you all work together in an office? Which tool best serves your team’s particular skillset? How ready is your team to learn new software, and which software would be the most valuable for them to learn?

Our guide to the top Agile management tools—some of which can also work well with Waterfall methodology—is a great place to start, as is our guide to the best project management software.

By doing this research in advance, you’ll lower the risk of wasting valuable time learning how to use a tool that ultimately doesn’t work for you.

Trick #3 — Give Everyone Time to Learn the Methodology

Once you and your team have decided on a methodology and tool to use for a project, make sure to take the time you need to learn how to use both before you embark on a big project. Take a few days to learn your chosen methodology together using videos, blogs, and discussions between team members. 

During this time, learn how to use the tool you and your team have chosen to work with by watching demos and reading how-to articles. When everyone feels knowledgeable and prepared, you can tackle projects with confidence. 

What to Do Next 

Even though Waterfall came first, both Agile and Waterfall have been around for decades. This means that there are tons of resources out there—and plenty more to learn. Dig deeper into Waterfall project management or discover project methodologies that go beyond both Agile and Waterfall to help you decide what could work best for you. 

Reach out to other project managers in your network and ask them which methodology they use and why. By taking the time to explore project management systems, you’ll help set your team up for success no matter what project you take on. 

Android Native – How to use Navigation Component

Introduction

Navigation component is an abstraction on top of FragmentManager, which simplifies navigation between fragments. In this tutorial, we will learn how to use the Navigation component in our App.

Goal

At the end of the tutorial, you would have learned:

  1. How to use the Navigation Component.
Tools Required
  1. Android Studio. The version used in this tutorial is Arctic Fox 2020.3.1 Patch 4.
Prerequisite Knowledge
  1. Basic Android.
Project Setup

To follow along with the tutorial, perform the steps below:

  1. Create a new Android project with the default Empty Activity.

  2. Remove the default Hello World! TextView.

  3. Add the two string resources below into strings.xml.

     <string name="hello_blank_fragment">Hello blank fragment</string>
     <string name="second_screen">2nd Screen</string>
  4. Add dependencies below to your Module gradle file.

     def nav_version = "2.3.5"
    
     // Kotlin
     implementation("androidx.navigation:navigation-fragment-ktx:$nav_version")
     implementation("androidx.navigation:navigation-ui-ktx:$nav_version")
Navigation Component Concept Overview

Before we can start using the Navigation component, we will need to understand the basic concepts of this library.

  1. Navigation Graph: this is an XML file that contains the navigation logics for your Destinations. Android Studio includes a powerful GUI editor to make it easy to visualize your Apps navigation flow.
    10000201000006280000029B667BE17906B2A331.png
  2. Navigation Host: this is an empty activity that houses a NavHostFragment.
  3. NavHostFragment: an object whose primary job is swapping out destinations using its NavController.
  4. NavController: an object with navigate() functions that you can call to direct user navigation.
  5. Destination: where the user navigates to.
  6. Home Destination: the first screen that the user sees.
Create the Nav graph

Now that we are somewhat familiar with the basic concepts, the first thing that we will need to do is to create the Navigation Graph XML file by following the steps below.

  1. Right-click on res > New > Android Resource File.
  2. Generate the nav_graph.xml file based on the settings in the below screenshot. This will place the file under the navigation directory as well as letting Android Studio know that this file can be opened with the Navigation Editor.
    10000201000003FC00000220958C87BFA99664B9.png
  3. Open nav_graph.xml in the Design surface. Notice that there is currently zero Host under the Hosts panel.

100002010000011C000001CF5BAC800E9F0FCB11.png

Designate an Activity as the Navigation Host

We need a Navigation Host to house the NavHostFragment. Follow the steps below to add a Navigation Host:

  1. Open activity_main.xml.

  2. Palette > Container > (select) NavHostFragment.
    100002010000017D000000A5EE21CAEF5E0E7ED1.png

  3. Drag NavHostFragment into the Component Tree.
    100002010000021200000074DFA962A23D54C486.png

  4. Go back to nav_graph.xml in the Design surface, we will now see that acitivty_main now shows up as a Host. This means that the activity_main Navigation Host is associated with this navigation graph (nav_graph.xml).
    10000201000001410000008DB3BDBE45FF5CDA01.png

  5. Now open activity_main.xml in Code view. The app:navGraph attribute that you see here determines that association.

     app:navGraph="@navigation/nav_graph"
Home Destination

Next, we need to create a new destination(Fragment) and designate it as the Home Destination.

  1. Open nav_graph.xml in the Surface view.

  2. Select the New Destination icon > Create new destination.
    10000201000001F8000000FACB9D96E1C75D4CD3.png

  3. We only need a very simple Fragment, so select Fragment (Blank) > Next.
    10000201000001140000011F19E301EDB89A63AB.png

  4. Use BlankFragment as the Fragment Name.

  5. Use fragment_blank as the Fragment Layout Name > Finish.
    10000201000000AB0000009E5DEFB4BC2DC36B0F.png

  6. Designate fragment_blank as the Home Destination by selecting it and then click on the house icon.
    10000201000000F10000006678271276887EAEA0.png

  7. While we are at it, let us modify fragment_blank.xml a little bit more for this tutorial. Remove the default TextView from this fragment.

  8. Convert the Fragment FrameLayout to ConstraintLayout**.
    10000201000001D00000004D2485626060142E12.png

  9. Add a new Button inside ConstraintView using the code below. We will use this Button to navigate to another screen later.

     <Button
        android:id="@+id/button"
        android:layout_width="wrap_content"
        android:layout_height="wrap_content"
        android:text="@string/second_screen"
        app:layout_constraintBottom_toBottomOf="parent"
        app:layout_constraintEnd_toEndOf="parent"
        app:layout_constraintStart_toStartOf="parent"
        app:layout_constraintTop_toTopOf="parent" />
Add another Destination

Next, we will need to add another destination(Fragment) to navigate to. Repeat the steps 1-5 in the previous section, but suffix this fragments Fragment Name and Fragment Layout Name with a number 2.

Connect the Destinations

Now that we have both destinations, we can start connecting them with actions.

  1. Connect the two fragments by dragging the circle on the right side of blankFragment to blankFragment2.
    10000201000003080000024013900087C3F5632A.png
  2. Alternatively, you can also use the Add Action button to link the two destinations.
    100002010000026B0000030F97CDD7A732D58D8E.png
  3. After connecting the two destinations, you should see something similar to the screenshot below. The Navigation Editor becomes a powerful tool to visualize your Application flow especially when you have a lot of destinations.
    10000201000003F2000002D490D9ED886E8FB6A3.png
Navigate to Destinations

To navigate to another destination, we will need to obtain the reference of the NavController object.

  1. Inside BlankFragment.kt, override the onViewCreated() callback.

     override fun onViewCreated(view: View, savedInstanceState: Bundle?) {
        super.onViewCreated(view, savedInstanceState)
    
     }
  2. Inside onViewCreated(), get a reference to the NavController object with findNavController(). This function comes from the navigation-fragment-ktx dependency that we added in the beginning.

     val navController = findNavController() //gets the navController
  3. Get a reference to the Button.

     val button = view.findViewById<Button>(R.id.button) //finds the Button
  4. Bind the Button onClickListener to a Navigation action with the code below. Note that we are using the android:id of the <action> element located inside nav_graph.xml here.

     button.setOnClickListener {
        //navigate using the Action ID, not fragment ID
        navController.navigate(R.id.action_blankFragment_to_blankFragment2)
     }
Run the app

We are now ready to run the App. Try clicking on the Button to navigate to the next destination in the flow and then back.

10000022000001D7000003785FCA2C5F17C99608.gif

Solution Code

build.gradle

plugins {
   id 'com.android.application'
   id 'kotlin-android'
}

android {
   compileSdk 31

   defaultConfig {
       applicationId "com.example.daniwebnavigationcomponentsbasics"
       minSdk 21
       targetSdk 31
       versionCode 1
       versionName "1.0"

       testInstrumentationRunner "androidx.test.runner.AndroidJUnitRunner"
   }

   buildTypes {
       release {
           minifyEnabled false
           proguardFiles getDefaultProguardFile('proguard-android-optimize.txt'), 'proguard-rules.pro'
       }
   }
   compileOptions {
       sourceCompatibility JavaVersion.VERSION_1_8
       targetCompatibility JavaVersion.VERSION_1_8
   }
   kotlinOptions {
       jvmTarget = '1.8'
   }
}

dependencies {
   implementation 'androidx.legacy:legacy-support-v4:1.0.0'
   def nav_version = "2.3.5"

   // Kotlin
   implementation("androidx.navigation:navigation-fragment-ktx:$nav_version")
   implementation("androidx.navigation:navigation-ui-ktx:$nav_version")

   implementation 'androidx.core:core-ktx:1.7.0'
   implementation 'androidx.appcompat:appcompat:1.4.0'
   implementation 'com.google.android.material:material:1.4.0'
   implementation 'androidx.constraintlayout:constraintlayout:2.1.2'
   testImplementation 'junit:junit:4.+'
   androidTestImplementation 'androidx.test.ext:junit:1.1.3'
   androidTestImplementation 'androidx.test.espresso:espresso-core:3.4.0'
}

strings.xml

<resources>
   <string name="app_name">Daniweb Navigation Components Basics</string>
   <string name="hello_blank_fragment">Hello blank fragment</string>
   <string name="second_screen">2nd Screen</string>
</resources>

nav_graph.xml

<?xml version="1.0" encoding="utf-8"?>
<navigation xmlns:android="http://schemas.android.com/apk/res/android"
   xmlns:app="http://schemas.android.com/apk/res-auto"
   xmlns:tools="http://schemas.android.com/tools"
   android:id="@+id/nav_graph"
   app:startDestination="@id/blankFragment">

   <fragment
       android:id="@+id/blankFragment"
       android:name="com.example.daniwebnavigationcomponentsbasics.BlankFragment"
       android:label="fragment_blank"
       tools:layout="@layout/fragment_blank" >
       <action
           android:id="@+id/action_blankFragment_to_blankFragment2"
           app:destination="@id/blankFragment2" />
   </fragment>
   <fragment
       android:id="@+id/blankFragment2"
       android:name="com.example.daniwebnavigationcomponentsbasics.BlankFragment2"
       android:label="fragment_blank2"
       tools:layout="@layout/fragment_blank2" />
</navigation>

fragment_blank.xml

<?xml version="1.0" encoding="utf-8"?>
<androidx.constraintlayout.widget.ConstraintLayout xmlns:android="http://schemas.android.com/apk/res/android"
   xmlns:app="http://schemas.android.com/apk/res-auto"
   xmlns:tools="http://schemas.android.com/tools"
   android:id="@+id/frameLayout"
   android:layout_width="match_parent"
   android:layout_height="match_parent"
   tools:context=".BlankFragment" >

   <Button
       android:id="@+id/button"
       android:layout_width="wrap_content"
       android:layout_height="wrap_content"
       android:text="@string/second_screen"
       app:layout_constraintBottom_toBottomOf="parent"
       app:layout_constraintEnd_toEndOf="parent"
       app:layout_constraintStart_toStartOf="parent"
       app:layout_constraintTop_toTopOf="parent" />
</androidx.constraintlayout.widget.ConstraintLayout>

fragment_blank2.xml

<?xml version="1.0" encoding="utf-8"?>
<FrameLayout xmlns:android="http://schemas.android.com/apk/res/android"
   xmlns:tools="http://schemas.android.com/tools"
   android:layout_width="match_parent"
   android:layout_height="match_parent"
   tools:context=".BlankFragment2">

   <!-- TODO: Update blank fragment layout -->
   <TextView
       android:layout_width="match_parent"
       android:layout_height="match_parent"
       android:text="@string/hello_blank_fragment" />

</FrameLayout>

activity_main.xml

<?xml version="1.0" encoding="utf-8"?>
<androidx.constraintlayout.widget.ConstraintLayout xmlns:android="http://schemas.android.com/apk/res/android"
   xmlns:app="http://schemas.android.com/apk/res-auto"
   xmlns:tools="http://schemas.android.com/tools"
   android:layout_width="match_parent"
   android:layout_height="match_parent"
   tools:context=".MainActivity">

   <androidx.fragment.app.FragmentContainerView
       android:id="@+id/fragmentContainerView"
       android:name="androidx.navigation.fragment.NavHostFragment"
       android:layout_width="match_parent"
       android:layout_height="match_parent"
       app:defaultNavHost="true"
       app:navGraph="@navigation/nav_graph"
       />

</androidx.constraintlayout.widget.ConstraintLayout>

BlankFragment.kt

package com.example.daniwebnavigationcomponentsbasics

import android.os.Bundle
import androidx.fragment.app.Fragment
import android.view.LayoutInflater
import android.view.View
import android.view.ViewGroup
import android.widget.Button
import androidx.navigation.fragment.findNavController

// TODO: Rename parameter arguments, choose names that match
// the fragment initialization parameters, e.g. ARG_ITEM_NUMBER
private const val ARG_PARAM1 = "param1"
private const val ARG_PARAM2 = "param2"

/**
* A simple [Fragment] subclass.
* Use the [BlankFragment.newInstance] factory method to
* create an instance of this fragment.
*/
class BlankFragment : Fragment() {
   // TODO: Rename and change types of parameters
   private var param1: String? = null
   private var param2: String? = null

   override fun onCreate(savedInstanceState: Bundle?) {
       super.onCreate(savedInstanceState)
       arguments?.let {
           param1 = it.getString(ARG_PARAM1)
           param2 = it.getString(ARG_PARAM2)
       }
   }

   override fun onCreateView(
       inflater: LayoutInflater, container: ViewGroup?,
       savedInstanceState: Bundle?
   ): View? {
       // Inflate the layout for this fragment
       return inflater.inflate(R.layout.fragment_blank, container, false)
   }

   override fun onViewCreated(view: View, savedInstanceState: Bundle?) {
       super.onViewCreated(view, savedInstanceState)

       val navController = findNavController() //gets the navController

       val button = view.findViewById<Button>(R.id.button) //finds the Button

       button.setOnClickListener {
           //navigate using the Action ID, not fragment ID
           navController.navigate(R.id.action_blankFragment_to_blankFragment2)
       }
   }

   companion object {
       /**
        * Use this factory method to create a new instance of
        * this fragment using the provided parameters.
        *
        * @param param1 Parameter 1.
        * @param param2 Parameter 2.
        * @return A new instance of fragment BlankFragment.
        */
       // TODO: Rename and change types and number of parameters
       @JvmStatic
       fun newInstance(param1: String, param2: String) =
           BlankFragment().apply {
               arguments = Bundle().apply {
                   putString(ARG_PARAM1, param1)
                   putString(ARG_PARAM2, param2)
               }
           }
   }
}
Summary

We have learned how to use the Navigation Component.

The full project code can be found here https://github.com/dmitrilc/DaniwebNavigationComponentsBasics

How To Build A Geocoding App In Vue.js Using Mapbox

Pinpoint accuracy and modularity are among the perks that make geocodes the perfect means of finding a particular location.

In this guide, we’ll build a simple geocoding app from scratch, using Vue.js and Mapbox. We’ll cover the process from building the front-end scaffolding up to building a geocoder to handle forward geocoding and reverse geocoding. To get the most out of this guide, you’ll need a basic understanding of JavaScript and Vue.js and how to make API calls.

What Is Geocoding?

Geocoding is the transformation of text-based locations to geographic coordinates (typically, longitude and latitude) that indicate a location in the world.

Geocoding is of two types: forward and reverse. Forward geocoding converts location texts to geographic coordinates, whereas reverse geocoding converts coordinates to location texts.

In other words, reverse geocoding turns 40.714224, -73.961452 into “277 Bedford Ave, Brooklyn”, and forward geocoding does the opposite, turning “277 Bedford Ave, Brooklyn” into 40.714224, -73.961452.

To give more insight, we will build a mini web app that uses an interactive web map with custom markers to display location coordinates, which we will subsequently decode to location texts.

Our app will have the following basic functions:

  • give the user access to an interactive map display with a marker;
  • allow the user to move the marker at will, while displaying coordinates;
  • return a text-based location or location coordinates upon request by the user.

Set Up Project Using Vue CLI

We’ll make use of the boilerplate found in this repository. It contains a new project with the Vue CLI and yarn as a package manager. You’ll need to clone the repository. Ensure that you’re working from the geocoder/boilerplate branch.

Set Up File Structure of Application

Next, we will need to set up our project’s file structure. Rename the Helloworld.vue file in the component’s folder to Index.vue, and leave it blank for now. Go ahead and copy the following into the App.vue file:

<template>
  <div id="app">
    <!--Navbar Here -->
    <div>
      <nav>
        <div class="header">
          <h3>Geocoder</h3>
        </div>
      </nav>
    </div>
    <!--Index Page Here -->
    <index />
  </div>
</template>
<script>
import index from "./components/index.vue";
export default {
  name: "App",
  components: {
    index,
  },
};
</script>

Here, we’ve imported and then registered the recently renamed component locally. We’ve also added a navigation bar to lift our app’s aesthetics.

We need an .env file to load the environment variables. Go ahead and add one in the root of your project folder.

Install Required Packages and Libraries

To kickstart the development process, we will need to install the required libraries. Here’s a list of the ones we’ll be using for this project:

  1. Mapbox GL JS
    This JavaScript library uses WebGL to render interactive maps from vector tiles and Mapbox.
  2. Mapbox-gl-geocoder
    This geocoder control for Mapbox GL will help with our forward geocoding.
  3. Dotenv
    We won’t have to install this because it comes preinstalled with the Vue CLI. It helps us to load environment variables from an .env file into process.env. This way, we can keep our configurations separate from our code.
  4. Axios
    This library will help us make HTTP requests.

Install the packages in your CLI according to your preferred package manager. If you’re using Yarn, run the command below:

cd geocoder && yarn add mapbox-gl @mapbox/mapbox-gl-geocoder axios

If you’re using npm, run this:

cd geocoder && npm i mapbox-gl @mapbox/mapbox-gl-geocoder axios --save

We first had to enter the geocoder folder before running the installation command.

Scaffolding the Front End With Vue.js

Let’s go ahead and create a layout for our app. We will need an element to house our map, a region to display the coordinates while listening to the marker’s movement on the map, and something to display the location when we call the reverse geocoding API. We can house all of this within a card component.

Copy the following into your Index.vue file:

<template>
  <div class="main">
    <div class="flex">
      <!-- Map Display here -->
      <div class="map-holder">
        <div id="map"></div>
      </div>
      <!-- Coordinates Display here -->
      <div class="dislpay-arena">
        <div class="coordinates-header">
          <h3>Current Coordinates</h3>
          <p>Latitude:</p>
          <p>Longitude:</p>
        </div>
        <div class="coordinates-header">
          <h3>Current Location</h3>
          <div class="form-group">
            <input
              type="text"
              class="location-control"
              :value="location"
              readonly
            />
            <button type="button" class="copy-btn">Copy</button>
          </div>
          <button type="button" class="location-btn">Get Location</button>
        </div>
      </div>
    </div>
  </div>
</template>

To see what we currently have, start your development server. For Yarn:

yarn serve

Or for npm:

npm run serve

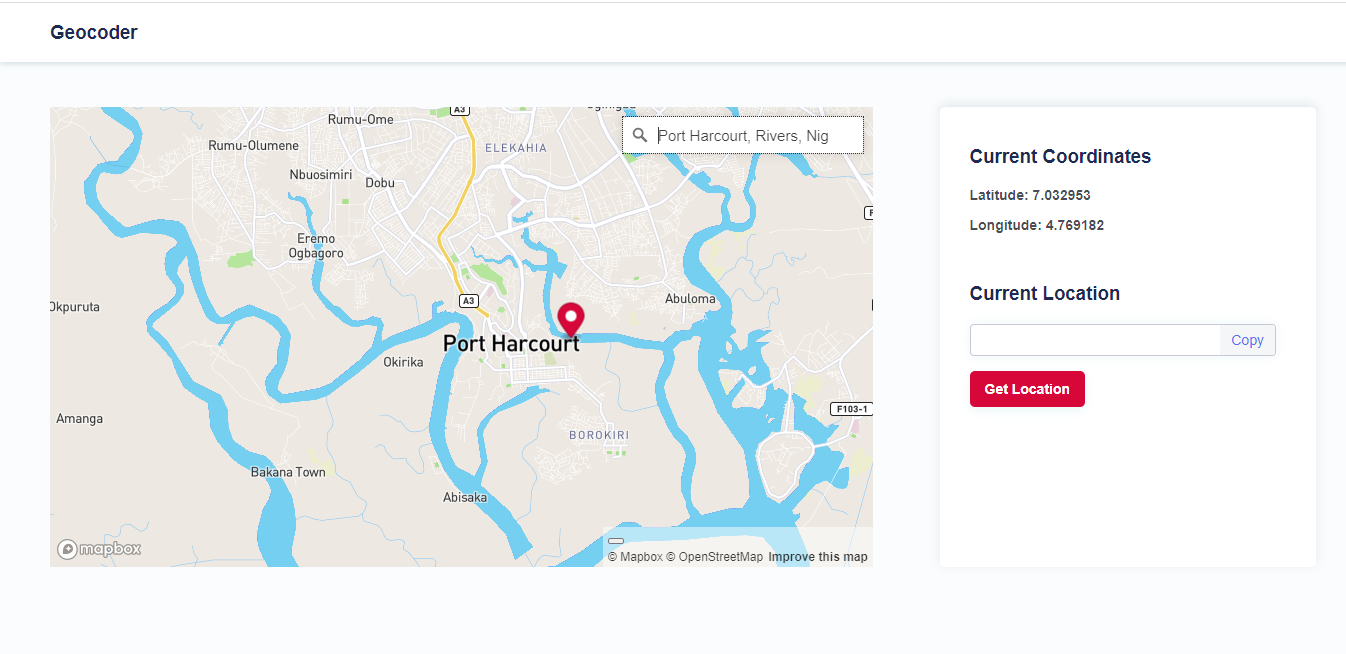
Our app should look like this now:

The blank spot to the left looks off. It should house our map display. Let’s add that.

Interactive Map Display With Mapbox

The first thing we need to do is gain access to the Mapbox GL and Geocoder libraries. We’ll start by importing the Mapbox GL and Geocoder libraries in the Index.vue file.

import axios from "axios";
import mapboxgl from "mapbox-gl";
import MapboxGeocoder from "@mapbox/mapbox-gl-geocoder";
import "@mapbox/mapbox-gl-geocoder/dist/mapbox-gl-geocoder.css";

Mapbox requires a unique access token to compute map vector tiles. Get yours, and add it as an environmental variable in your .env file.

.env
VUE_APP_MAP_ACCESS_TOKEN=xxxxxxxxxxxxxxxxxxxxxxxxxxxxxxxxxxxx

We also need to define properties that will help with putting our map tiles together in our data instance. Add the following below the spot where we imported the libraries:

export default {
  data() {
    return {
      loading: false,
      location: "",
      access_token: process.env.VUE_APP_MAP_ACCESS_TOKEN,
      center: [0, 0],
      map: {},
    };
  },
}
  • The location property will be modeled to the input that we have in our scaffolding. We will use this to handle reverse geocoding (i.e. display a location from the coordinates).
  • The center property houses our coordinates (longitude and latitude). This is critical to putting our map tiles together, as we will see shortly.
  • The access_token property refers to our environmental variable, which we added earlier.
  • The map property serves as a constructor for our map component.

Let’s proceed to create a method that plots our interactive map with our forward geocoder embedded in it. This method is our base function, serving as an intermediary between our component and Mapbox GL; we will call this method createMap. Add this below the data object:

mounted() {
  this.createMap()
},

methods: {
  async createMap() {
    try {
      mapboxgl.accessToken = this.access_token;
      this.map = new mapboxgl.Map({
        container: "map",
        style: "mapbox://styles/mapbox/streets-v11",
        center: this.center,
        zoom: 11,
      });

    } catch (err) {
      console.log("map error", err);
    }
  },
},

To create our map, we’ve specified a container that houses the map, a style property for our map’s display format, and a center property to house our coordinates. The center property is an array type and holds the longitude and latitude.

Mapbox GL JS initializes our map based on these parameters on the page and returns a Map object to us. The Map object refers to the map on our page, while exposing methods and properties that enable us to interact with the map. We’ve stored this returned object in our data instance, this.map.

Forward Geocoding With Mapbox Geocoder

Now, we will add the geocoder and custom marker. The geocoder handles forward geocoding by transforming text-based locations to coordinates. This will appear in the form of a search input box appended to our map.

Add the following below the this.map initialization that we have above:

let geocoder =  new MapboxGeocoder({
    accessToken: this.access_token,
    mapboxgl: mapboxgl,
    marker: false,
  });

this.map.addControl(geocoder);

geocoder.on("result", (e) => {
  const marker = new mapboxgl.Marker({
    draggable: true,
    color: "#D80739",
  })
    .setLngLat(e.result.center)
    .addTo(this.map);
  this.center = e.result.center;
  marker.on("dragend", (e) => {
    this.center = Object.values(e.target.getLngLat());
  });
});
Here, we’ve first created a new instance of a geocoder using the `MapboxGeocoder` constructor. This initializes a geocoder based on the parameters provided and returns an object, exposed to methods and events. The `accessToken` property refers to our Mapbox access token, and `mapboxgl` refers to the [map library](https://docs.mapbox.com/#maps) currently used. Core to our app is the custom marker; the geocoder comes with one by default. This, however, wouldn’t give us all of the customization we need; hence, we’ve disabled it. Moving along, we’ve passed our newly created geocoder as a parameter to the `addControl` method, exposed to us by our map object. `addControl` accepts a `control` as a parameter. To create our custom marker, we’ve made use of an event exposed to us by our geocoder object. The `on` event listener enables us to subscribe to events that happen within the geocoder. It accepts various [events](https://github.com/mapbox/mapbox-gl-geocoder/blob/master/API.md#on) as parameters. We’re listening to the `result` event, which is fired when an input is set. In a nutshell, on `result`, our marker constructor creates a marker, based on the parameters we have provided (a draggable attribute and color, in this case). It returns an object, with which we use the `setLngLat` method to get our coordinates. We append the custom marker to our existing map using the `addTo` method. Finally, we update the `center` property in our instance with the new coordinates. We also have to track the movement of our custom marker. We’ve achieved this by using the `dragend` event listener, and we updated our `center` property with the current coordinates. Let’s update the template to display our interactive map and forward geocoder. Update the coordinates display section in our template with the following:
<div class="coordinates-header">
  <h3>Current Coordinates</h3>
  <p>Latitude: {{ center[0] }}</p>
  <p>Longitude: {{ center[1] }}</p>
</div>

Remember how we always updated our center property following an event? We are displaying the coordinates here based on the current value.

To lift our app’s aesthetics, add the following CSS file in the head section of the index.html file. Put this file in the public folder.

Our app should look like this now:

Reverse Geocode Location With Mapbox API

Now, we will handle reverse geocoding our coordinates to text-based locations. Let’s write a method that handles that and trigger it with the Get Location button in our template.

Reverse geocoding in Mapbox is handled by the reverse geocoding API. This accepts longitude, latitude, and access token as request parameters. This call returns a response payload — typically, with various details. Our concern is the first object in the features array, where the reverse geocoded location is.

We’ll need to create a function that sends the longitude, latitude and access_token of the location we want to get to the Mapbox API. We need to send them in order to get the details of that location.

Finally, we need to update the location property in our instance with the value of the place_name key in the object.

Below the createMap() function, let’s add a new function that handles what we want. This is how it should look:

async getLocation() {
  try {
    this.loading = true;
    const response = await axios.get(
      https://api.mapbox.com/geocoding/v5/mapbox.places/${this.center[0]},${this.center[1]}.json?access_token=${this.access_token}
    );
    this.loading = false;
    this.location = response.data.features[0].place_name;
  } catch (err) {
    this.loading = false;
    console.log(err);
  }
},

This function makes a GET request to the Mapbox API. The response contains place_name — the name of the selected location. We get this from the response and then set it as the value of this.location.

With that done, we need to edit and set up the button that will call this function we have created. We’ll make use of a click event listener — which will call the getLocation method when a user clicks on it. Go ahead and edit the button component to this.

<button
  type="button"
  :disabled="loading"
  :class="{ disabled: loading }"
  class="location-btn"
  @click="getLocation"
>
  Get Location
</button>

As icing on the cake, let’s attach a function to copy the displayed location to the clipboard. Add this just below the getLocation function:

copyLocation() {
  if (this.location) {
    navigator.clipboard.writeText(this.location);
    alert("Location Copied")
  }
  return;
},

Update the Copy button component to trigger this:

<button type="button" class="copy-btn" @click="copyLocation">

Conclusion

In this guide, we’ve looked at geocoding using Mapbox. We built a geocoding app that transforms text-based locations to coordinates, displaying the location on an interactive map, and that converts coordinates to text-based locations, according to the user’s request. This guide is just the beginning. A lot more could be achieved with the geocoding APIs, such as changing the presentation of the map using the various map styles provided by Mapbox.

Resources

Frustrating Design Patterns: Mega-Dropdown Hover Menus

Complex websites often rely on complex navigation. When a website houses thousands of pages, often combined with micro-websites and hundreds of subsections, eventually the navigation will go deep and broad. And with such a complex multi-level navigation, showing the breadth of options requires quite a bit of space. Think of large eCommerce retailers and large corporate sites, catering to many audiences and having plenty of entry points.

No wonder that a common way to deal with this complexity is to expose customers to a large amount of navigation quickly. That’s exactly why mega-dropdowns have become somewhat an institution on the web — albeit mostly for complex and large projects. A mega-dropdown is essentially a large overlay that appears on a user’s action. Usually it includes a mixed bag of links, buttons, thumbnails and sometimes nested dropdowns and overlays on its own.

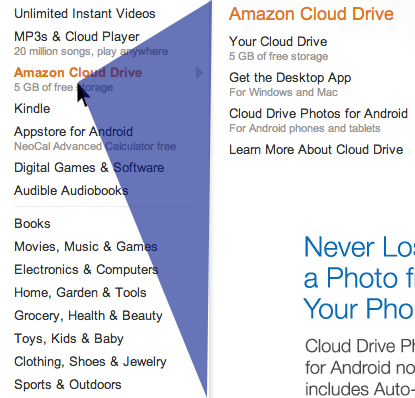
For decades, a common behavior for this kind of navigation is to open the menu on mouse hover. And for decades, a common user’s complaint about this pattern has been the absolute lack of certainty and control about how and when the sub-navigation opens and closes.

Sometimes the submenu appears unexpectedly, and sometimes it suddenly disappears, and sometime it stays on the screen for a while, although the mouse pointer is already in a very different part of the page, or on another page altogether.

Why Are Mega-Dropdowns Hover Menus Frustrating?

The main reason why mega-dropdowns can be cumbersome to use is because of a mismatch of intentions and expectations. With hover menus, we try to deduce and act on a particular intent by tracking mouse behavior, yet our customers might have very different objectives and very different limitations when accessing a page.

Customer’s behavior is usually unpredictable, even although our analytics might tell a slightly different story with data points gathered and normalized over a longer period of time. We just rarely can predict behavior accurately.

The common scenarios we usually explore are:

  1. The customer is aiming at the category link and travels there directly to explore the sub-navigation items in that category.
  2. The customer is moving the mouse towards a target on the screen, but the trajectory that the mouse has to travel covers a nav link that opens a mega-dropdown.

However, there are also plenty of other situations to consider. Just to name a few:

  1. The customer wants to look up mega-dropdown options while typing in a search autocomplete. To do that, they have to keep re-opening mega-dropdown, or use separate browse tabs, positioned side by side.
  2. The customer might use a trackpad (or a mouse) to operate a large secondary display, so pointer movements will be slower, abrupt and inaccurate. This would cause the mega-dropdown to open involuntarily every time the user pauses when traveling to CTAs or shopping cart at the top of the page.
  3. The customer wants to open the category page, so they travel to the category link, click on it, but experience flickering because a mega-dropdown appears delayed.
  4. With nested sub-menus within a mega-dropdown, the customer wants to explore similar items within the category in which they currently are, but because of nesting, they have to re-open the mega-dropdown over and over again, and travel the same hover tunnel over and over again.
  5. Imagine a situation when you want to resize the window, and just as you are about to snap to the right edge of the window, a hover menu keeps showing up — just because you’ve moved your mouse cursor too closely.
  6. The user starts scrolling down slowly to assess the content on a page, but the menu keeps popping up. And every time the user bumps away a cursor to read the contents of the mega-dropdown, the menu accidentally disappears.

The problem is that we need to support all these intentions and all these accidents, but at the same time we need to make sure that we don’t create an annoying and frustrating experience for any of these cases either. Of course, as designers and developers, we’ve invented a number of techniques to tackle this problem.

Hover Entry/Exit Delay

One of the first solutions, and also one of the most common ones still, is to introduce a hover entry/exit delay. We need to make sure that the enu mdoesn’t open and doesn’t close too early. To achieve that, we introduce a delay, usually around 0.5 seconds. That means that we give customers a buffer of around 0.5 seconds to:

  • Cross the trajectory to a remote target if needed, or
  • Indicate that they intent to explore the navigation by remaining on the mega-dropdown category link, or
  • Correct a mistake if they left the boundaries of a mega-dropdown by accident.

In other words, as long as the customer stays within the mega-dropdown overlay, we keep displaying it. And we hide the overlay once the customer has moved their mouse cursor outside of the sub-navigation overlay for at least 0.5 seconds.

While it solves the problem of accidental flickering on the page, it introduces a lag in cases when a user has left the mega-dropdown for more than 0.5 seconds. As a result, it slows down every interaction with the mega-dropdown across the entire site. Unfortunately, it becomes very quickly very noticeable, especially if the navigation is used a lot.

As long as the user stays within the triangle or within the entire mega-dropdown area, the overlay is still displayed. If the user chooses to travel outside of the triangle, the content of the mega-dropdown overlay will change accordingly. And of course it will disappear altogether immediately once the user has moved outside of the category list altogether.

Chris Coyier highlights some of the technical intricacies of this technique in his post on Dropdown Menus with More Forgiving Mouse Movement Paths, along with a vanilla JavaScript demo by Alexander Popov on “Aim-Aware Menus”.

With this technique we minimize the friction of sudden disappearance and re-appearance of sub-navigation. But it might become ineffective if category links are positioned too close to each other, or we display the hover menu by hovering over a larger button. We can do a bit better with SVG path exit areas.

SVG Path Exit Areas

When calculating a trajectory triangle with the previous technique, sometimes we would not only track the exact position of the mouse pointer, but also recalculate the triangle with every pointer movement — all the time. We can improve the strategy by calculating the overall SVG overlay area once and track whether the mouse pointer is inside it — without recalculating the triangle all the time. A great example of it is Hakim el Hattab’s implementation that draws the areas dynamically with SVG based on the position of the navigation item on the screen.

Hakim’s solution is actually responsive, so if the sub-navigation doesn’t fit on the screen, it will float next to the main navigation item, displayed in full width or height. The SVG path area will be recalculated accordingly, but only if the user scrolls vertically or horizontally. You can see a working demo of the technique in action on Hakim’s debug view mode of the Menu pattern.

In case you do have to deal with a complex navigation of this kind, it might be worth testing if issues disappear when only one (rather than two) hover menu is used. That menu would be slightly larger and house all options within columns. Or if possible, for every category, consider displaying all navigation options within that category as a permanent navigation bar (sidebar or a sticky top bar) — usually it should eliminate all these issues altogether.

Category titles doing too many things

As we’ve seen previously, sometimes category titles have two different functions. On the one hand, each category title could be linked to the category’s page, so customers could click on them to go straight to the page. On the other hand, they also could open a mega-dropdown overlay. So if the user is hovering over the title for a long enough time, the mega-dropdown will open, but the user might have clicked on a link already, and this will cause flickering. For customers, it’s difficult to have the right expectations when the interface doesn’t really provide any hints.

There are a few options to resolve this problem:

  1. To indicate that the category’s title is a link, it might be helpful to underline it,
  2. To make the distinction between the category title and a dropdown more obvious, add a vertical separator (e.g. vertical line) and an icon (chevron),
  3. Leave the category’s title opening only the mega-dropdown, and add a link to the category’s “Home” section within the mega-dropdown overlay. It could also be a prominent “See all options” button instead (see The Guardian example above).

As mentioned above, sometimes you can see an extra icon being used to indicate that the menu opens an overlay, while the category’s title is a link. In our usability tests, we noticed that whenever an icon is present (and it doesn’t matter which icon that is), users often make a mental distinction between the action that will be prompted by a click on an icon, and the action prompted by a click on the category title.

In the former case, they usually expect a dropdown to open, and in the latter case, the category page to appear. More importantly, they seem to expect the menu to open on tap/click, rather than hover.

If you are looking for a technical implementation, you can check In Praise of the Unambiguous Click Menu, in which Mark Root-Wiley shows how to build an accessible click menu. The idea is to start building the menu as a CSS-only hover menu that uses li:hover > ul and li:focus-within > ul to show the submenus.

Then, we use JavaScript to create the <button> elements, set the aria attributes, and add the event handlers. The final result is available as a code example on CodePen and as a GitHub repo. This should be a good starting point for your menu as well.

Accordions vs. Overlays vs. Split-Menus On Mobile

It goes without saying that not every mega-dropdown on tap/click is performing well though. Target.com is another interesting example for an accessible, large navigation that avoids multi-column layout and shows only one level of navigation on the time — all opening on tap/click.

“Our brands” leads to a separate page while each label under it opens a new navigation overlay on top of the mega-dropdown. Did you notice that “All brands” is underlined, while the rest of the navigation option isn’t? One can see the intention of designers creating the menu. Indeed, “All brands” is a link, while the other labels open an overlay:

With all of these options in place, how would we go around displaying a mega-dropdown navigation on mobile? As it turns out, grouping such mega-dropdown overlays on mobile is difficult: usually there isn’t enough space nor visual aid to highlight different levels differently and make them easy to distinguish. In the example above, it might take a while to figure out on which page we actually have landed.

It’s a bit easier to understand at which level we currently are and what options we have with an accordion approach, as we can see on Dinoffentligetransport.dk. However, it might be a good idea to underline links within each subsection as they drive customers to the category’s page. Also, the entire category bar should probably be clickable and expand the accordion.

In the example above, most of the time we probably will be able to show a limited amount of navigation sections at a time. But if the titles of each sections are relatively short, we could split the screen horizontally and display multiple levels at the same time. LCFC.com is a good example of this pattern in action.

Which Option Works Best?

In my personal experience, when we compare the implementations of mega-dropdowns on mobile, vertical accordions appear to be faster and more predictable than overlays (be it single-column or multiple layers). And split-menus appear to be faster and more predictable than accordions.

There are a few advantages that both accordions and split-menus provide:

  • There is no need to display a “Back” button to return to the parent page.
  • The eye doesn’t have to jump between the top of the navigation menu and the section’s sub-navigation with every jump.
  • Customers can navigate between multiple levels faster: instead of hitting “Back” multiple times, the can jump to the accordion that they find interesting.
  • Customers can explore multiple sections at the same time (unless the implementation automatically closes one accordion when another one has been opened). It isn’t possible with overlays.

In general, accordions and split-menus appear to be a better option. But they don’t seem to be working well when there is a lot of navigation in place. Whenever each category has more than 6–7 items, it proved to be a good idea to either add a “Browse all” button underneath 6–7 items within another accordion (or on a separate page), or use overlays instead.

So depending on the amount of navigation, we can start out with split-menus, then if it’s not viable, move to accordions, and if the navigation is getting complex still, eventually turn accordions into overlays.

When Mega-Dropdown Might Not Be Needed After All

We’ve referenced the work of the Gov.uk team in the previous article already, but their insights are valuable in the context of mega-dropdowns as well. For large, multi-level navigation, the team has decided employed findings by form expert Caroline Jarrett’s one thing per page principle. According to Caroline, “questions that naturally ‘go together’ from the point of designers […] don’t need to be on the same page to work for users”. Caroline primarily applied it to the design of web forms, but we could apply it in the context of navigation as well.

The idea, then, is to avoid complex mega-dropdowns altogether, and provide customers with a clear, structured way to navigate through the trenches of the website, from one page to another. In the case of Gov.uk, it seems to be happening through a well-considered information architecture and guides, that lead the visitors through predictable steps towards the goal.

The Kanton Zürich is using the same pattern. Instead of layers of mega-dropdown navigation, all options are displayed in a structured way, with main topics featured on the top as “Top topics” and the navigation within each section displayed as a sticky navigation bar on the top.

An alternative approach is to use the “I-want-to” navigation pattern. In addition to the conventional navigation, we could provide a “navigation dropdown” to allow customers to construct a navigation query of their choice, and be directed straight to the page they are lookin for. Basically, it’s a series of drop-downs that appear under another to let the user select what they intend to do or find on the website.

For a while, the pattern was used on Commonbond (see the video above), and it’s also used on Corkchamber.ie. An interesting, albeit unconventional way to provide access to a deep level of navigation without having to use a mega-dropdown at all.

Mega-Dropdown Navigation Design Checklist

Every time we bring up a conversation about mega-dropdown menus, everyone seems be settling in a few groups: some colleagues prefer hover, the others prefer tap and click, some prefer both, and the others don’t mind either as long as there is both a category link and an icon that opens the menu.

It’s impossible to say that one approach is always better than the others, but both in terms of technical implementation and UX, opening the menu on tap/click usually causes way less trouble and way less frustration while allowing for a simple implementation, and thus resulting in a predictable and calm navigation. Before moving to a hover menu, we could try keeping tap/click behavior first, measure the engagement, and study if hover is needed after all.

And as always, here are some general things to keep in mind when designing and building a mega-dropdown:

  • Avoid placing important, frequently used items close to the mega-dropdown navigation (e.g. search bar, CTA, shopping cart icon) (if hover),
  • Avoid multiple sub-navigations within mega-dropdown appearing after each other with delays (if hover),
  • Avoid overloading category titles with multiple functions.
  • Underline category titles to identify them as links to the category’s page (of course if they are linked to the category page).
  • If you can, add a “Home” link or a “Browse all” button within each sub-category instead of linking the category directly.
  • Avoid horizontal overlays and consider replacing them with vertical accordions and split-menus,
  • Add an icon to indicate that a category title triggers a mega-dropdown on click (e.g. chevron) and always make it large enough for comfortable tapping (e.g. 50×50px),
  • Avoid long fade-in/fade-out transitions when a mega-dropdown appears/disappears (at most 300ms),
  • Consider testing a structured guide or a navigation query (“I-want-to” navigation pattern) instead or additionally to the mega-dropdown.
  • Avoid mega-dropdown hover menus if possible.

Related Articles

If you find this article useful, here’s an overview of similar articles we’ve published over the years — and a few more are coming your way.

Little Smashing Stories

This is not a regular Smashing article. Over a decade ago, we set out to send a truly smashing newsletter with useful tips and techniques for designers and developers. The first issue was sent out in early 2009. And we would have never imagined that we'd reach 190.000 wonderful folks like you, who read email every other week. In fact, most newsletters we send out these days have pretty much stayed true to our original course that we set out back in the day.

Today, we have a little celebration for our 300th newsletter edition which coincides with the birthday of our incredible illustrator Ricardo Gimenes who is the creative mind behind all of the Smashing Cats (over 150, and still counting!). Ricardo must be dreaming in cats at this point. Happy birthday, dear Ricardo! (Please sing along, if possible.)

In this post, we show stories of some of the people behind these weekly newsletters, and our little magazine. We asked everyone on the team to share a personal story, something from their memories, childhood or anything that made a world difference to them. These stories are the heart of this little article.

But of course you — yes, you, dear reader, and your story — are at the heart of this issue as well. We’d love to hear your story on Twitter and in the comments. When you started reading the newsletter, and perhaps how a little tip in the newsletter helped you in some way.

And of course, thank you so much for being and staying smashing. I would love to meet you, and hear your story, and I’m very hopeful that we all will be able to do just that in the nearest future.

Vitaly (@smashingmag)

Esther Fernández (Sponsorships)

Last week, as my parents were tidying up the family house, they came across some old pictures that they chose to share with me. Amongst them was this old picture of me proudly standing on the top of an olive tree in the wild spaces that once surrounded my hometown.

The photo arrived at the perfect time. As a mirror, it reminded me of who I once was and who I still am. At times when I have to confront some of my deepest fears, this picture proves to me that I have the audacity of climbing and standing, hands-free.

Iris Lješnjanin (Editorial)

I had just turned five when my parents and I moved from Slovenia to the United Arab Emirates where I lived until high school. Later on, with my friends and family scattered all across the globe, I remember missing them so much that I made a promise to myself to write letters and send pictures so that we could stay in touch — even though it sometimes took ages to get one back or I never even heard back from them.

I loved collecting stickers, postcards, and different types of paper to write on, and even found penpals who also shared my passion of writing and lived in Germany, Bosnia, Australia, and even Brunei (just to name a few).

Later on, when communication turned into emails and chatting via various messaging apps (does anyone else still remember mIRC, MSN, and ICQ?), the hand-written letters slowly stopped filling our mailbox and all of the writing was turned into endless typing alongside emoticons and all sorts of ASCII art.

Still, I remember printing out my favorite emails on a continuous form paper (the one with punched holes on the sides), just so that I’d always have them at hand and could read them along with the other letters kept away in my memory box that I kept on the top shelf of my closet.

Now that I’m in my 30’s, I still love getting snail mail, and especially in times like these, a letter can be a considerate and gentle way to reach out to someone and not make them feel like they’re pressured to get back to you right away. (Dear Inbox, I’m looking at you.) There’s something special about writing letters. It’s a piece of paper that creates a sort of intimacy and connection that cannot be felt online.

It’s a sign that somebody has actually taken their time to sit down and prepare something just for you. It’s a piece of paper with somebody’s gentle touch who wrote down meaning into some words while thinking about you and put it in an envelope beautifully wrapped — with not just any stamp. That truly makes every letter I’ve ever received quite unique, special, and dear to my heart.

Before I joined Smashing, Vitaly had already started sending out the Smashing Newsletter, and what actually started out as a fun writing project for the entire team, turned into something so precious and valuable that we can’t imagine ourselves without today. Not only is it an opportunity to connect with folks who share their passion for the web, but it also allows us to contribute to designers and developers by shining the spotlight on those who don’t get the credit and attention they truly deserve for their dedication and hard work.

It is with that same enthusiasm of personally writing each and every letter that we (on behalf of the Smashing team) would like to personally say "Thank you" with each and every Smashing email newsletter that we send out. A heartfelt thanks to both those who share their work online, as well as you, dear reader, for sticking around throughout the years while supporting and inspiring others by simply spreading the word.

Alma Hoffmann (Editorial)

I’ve been in a long distance relationship with Smashing since 2010. It all started with a tweet from Vitaly looking for writers. I replied. The rest is history. Met Vitaly, Iris, Markus, Ricardo, Inge, Rachel, Amanda, and many others in person in 2017. It was one of the biggest highlights in my career.

I walked around with Iris looking for a sweater because I was so cold. We hustled as we walked around the streets finding the stores. She took me to stores to buy gifts to bring back home. And we did it all practically under an hour. She gave me a sketchbook which I filled with photos of Freiburg and a canary yellow bag which I still use to carry my art supplies around town. Love my bag! Some years before, I was having a sad day and on the mail was a gift from Smashing. It made my day!

I love working at Smashing. The commitment to quality is not only impressive, but also, an unifying element that keep all of us connected to a single purpose: to be the best magazine about web development and design. I’ve become a better writer because of it.

Jarijn Nijkamp (Membership)

I have worked in or ‘around’ the educational field for the better part of my professional life, and helping people find their path is just the coolest thing. I still feel very happy (and a bit proud) when an old student gets in touch and shares something with me — either personal or professional.

The other day I found this nice graduation photo from the first ‘cohort’ I taught and managed. A very international bunch of great students who have since grown up to be wonderful people!

Vitaly Friedman (Editorial)

I used to travel somewhere almost every week: from one place to another, between projects, conferences, workshops and just random coffee breaks in favorite places in the world. Back in 2013, I moved out of my apartment without moving in anywhere. I gave away all my belongings to a homeless shelter, and decided to run a creative experiment, traveling from one place to another. I’ve been privileged to have visited an incredible amount of places, and meet an incredible amount of remarkable people, and that experiment never really stopped.

Until 2020. It was a difficult and remarkably unsettling transition for me personally, but it did give me an extremely refreshing perspective on how things can be. We move forward by inertia at times, but stopping and looking around and revisiting things is such a healthy exercise in self-understanding. Over the last year, I’ve rediscovered the beauty of a mouse, secondary screen and a comfy external keyboard. I’ve learned about the importance of true, meaningful, deep relationships. Of letting go, and embracing things that lie in your heart. In my case, it’s writing, editing, building, designing.

I even started feeling comfortable in the online space with our online workshops, and having more focused time to write and code and build and design. I still miss traveling a lot, and can’t wait to meet dear friends all over the world in person. But it’s not as bad as I thought it would be a year ago. The new remote world changed my perspective around myself, and if anything, I can now make a more balanced and conscious choice of how to shape the future. And that’s a decision I won’t take lightly.

Amanda Annandale (Events)

I’ve been at Smashing for over four years, but that was all possible because of a small decision that completely changed my life ten years ago. I was a Stage and Event Manager in NYC, and decided to take a freelance job running events. In my first event, I assisted the 'Carsonified/Future Of...' event while working on the "Avenue Q" stage. Their team was lovely, including their tech guy, who has since become my husband!

After moving to England to be with my husband, I was able to spend more time with the 'Carsonified/Future Of...' friends, and one of them was just moving on from a job at Smashing. She introduced me to the the Smashing team, where I joined just a few months later. In an amazing twist, the first SmashingConf I produced was on that very same “Avenue Q” stage, where my Smashing journey began nearly ten years ago — over five years before I joined the team!

We’d Love To Hear Your Story!

These are just a few of our stories, but all of us have some as well. We’d love to hear yours! What changed your point of view around the world? What makes you smile and happy? What memory keeps your optimistic and excited about the future?

Or perhaps you have a story of how you learned about the newsletter in the first place, and when you first started reading it? We’d love to hear your story, perhaps how a little tip in the newsletter helped you in some way. And yet again, thanks for being smashing, everyone!

The Complete Guide to Critical Path Project Management

The critical path management (CPM) methodology is a popular framework for project management. It can be applied to a wide range of potential project types, including construction, product launches, software development, debugging, manufacturing, and more.

Critical path management is designed to optimize the sequence of tasks required to complete any given project. The methodology helps project managers estimate the time it will take to complete a project and shorten that timeline by calculating the critical path.

The concepts behind CPM for project management are actually quite simple. But as a beginner, you need to fully understand how CPM works before applying it to an actual project.

Once you’ve figured out the basics of critical path management, you’ll have a much easier time completing projects on time and under budget.

What is Critical Path Project Management?

Critical path management involves a scheduling procedure that identifies the sequence of tasks required to complete a given project. By identifying the key tasks and dependencies within the sequence, CPM helps you determine the fastest completion path.

CPM allows project managers to establish which activities are a top priority. Then all of the necessary resources can be allocated accordingly, ensuring the most important tasks are completed.

Any task that’s not on the critical path will be a lesser priority and can be delayed if the project team and resources have reached capacity.

4 Tools to Improve Critical Path Project Management

It’s much easier to implement critical path management if you’re using software to your advantage. These are some of the top tools on the market for this methodology type.

#1 — Zoho Projects

Zoho Projects is a cloud-based project management solution trusted by organizations across industries like construction, education, marketing, software development, consulting, and more. It’s a feature-rich tool that comes with task tracking, Gantt charts, time tracking, and other useful tools for project management. With Premium plans starting at just $5 per month, Zoho Projects is an excellent value for any project management team.

For CPM, Zoho Projects contains features for creating and editing task dependencies. You’ll easily be able to adjust any lag time between dependent tasks as your project changes. The software also allows project managers to identify critical tasks in a sequence. Zoho’s Gantt charts allow you to plan and allocate your resources accordingly for tasks on the critical path. By setting up baselines in your Gantt chart, Zoho Projects ensures your project will be completed on time. It even helps you identify delayed tasks that can impact your entire timeline. Try Zoho Projects for free with a seven-day trial.

#2 — Wrike

Wrike is another viable option for critical path management. This project management software is used by industry leaders like Google, Airbnb, Dell, and 20,000+ other companies worldwide. The software is best known for its interactive Gantt charts managed with a drag-and-drop interface. Use Wrike to create task dependencies, establish a baseline, and run critical path analysis.

The visual timeline is ideal for spotting bottlenecks in your critical path. You can even use the software to manage multiple projects from a single platform using CPM. If you’ve already listed project durations, dependencies, and tasks in a spreadsheet, Wrike allows you to import that data for faster project planning. I like Wrike because the software makes it easy to adjust your plans on the fly. These adjustments will automatically get shared with your entire team. Wrike is free for up to five users, but that plan doesn’t come with Gantt charts. To use Wrike for critical path management, upgrade to a professional plan starting at $9.80 per month. Try it free for 14 days.

#3 — LiquidPlanner

LiquidPlanner is a project management tool that’s known for its intelligent scheduling capabilities. The software is a popular choice for larger organizations running complex projects. You can use the tool to manage risk, manage project resources, and even manage multiple projects simultaneously. LiquidPlanner starts at $45 per user per month and is a bit more expensive compared to other tools on the market. But its advanced capabilities help justify the price.

If you’re running a project with complex tasks and dependencies, LiquidWeb can automatically calculate your critical path in a single click. The software accounts for all high-priority tasks using the same resource and explicit dependencies to determine which items to highlight on the path. The software is ideal for helping team members stay on track when they’re working on time-sensitive activities. Sign up for LiquidPlanner’s 14-day free trial to get started.

#4 — Celoxis

Celoxis is another industry leader in the project management space. This enterprise-grade tool is an all-in-one solution for managing projects, workflows, and resources. You can use it for critical path analysis without leaving your dashboard. Establish baselines and assess your tasks and milestones on the critical path. You can even set up automatic alerts to keep you informed of the progress. Use Celoxis for project dependencies, assigning multiple resources to tasks, and automatically adjust your schedule based on real-world conditions.

Overall, Celoxis is a bit more advanced than some of the other project management tools out there. It’s an ideal solution for larger organizations managing a portfolio of projects with critical path analysis. The software stands out from the crowd with its resource allocation tools and dynamic reporting capabilities. Pricing starts at $22.50 per month, and you can try it free with a 30-day trial.

The Basics of Critical Path Project Management

Let’s take a closer look at the core components of critical path project management. This will make it easier for you to apply the methodology in the real world.

Project Scope

The first step to CPM is defining every individual task that must be done to complete a project. For example, let’s say you’re planning a wedding. Some of the tasks would look something like this:

  • Choose a date
  • Select a venue
    • Decide budget
    • Research venues
    • Tour top options
    • See if date is available
    • Sign contract with venue
  • Hire a band
    • Ask for recommendations
    • Listen to demos
    • Get quotes and review contracts
    • Pick a band and book them
  • Hire a photographer
    • Ask for recommendations
    • Look at portfolios
    • Get quotes and review contracts
    • Pick a photographer and book them
  • Send invitations
    • Review different vendors
    • Pick invitations
    • Order invitations
    • Gather addresses
    • Mail invitations out

As you analyze this list, you’ll quickly see that some of these tasks cannot be completed without another being done first. You can’t send invitations without a date or a venue. So selecting a date and venue would both be on the critical path.

Hiring a band and a photographer are both dependent on the date and venue as well, but these are smaller tasks that don’t necessarily fall on the critical path. You could do those in any order without disrupting the critical path.

Critical Path Analysis

Critical path analysis (CPA) takes your project scope to the next level by attaching time constraints and dependencies. Once you’ve identified all the tasks required to complete the project, you can ultimately use this information to estimate the project timeline.

For each task, you’ll need to establish the following:

  • Early Start – The earliest time a task can begin based on its constraints.
  • Duration – The estimated time required to complete a task.
  • Early Finish – The earliest time a task can be finished based on constraints.
  • Late Start – The latest a task can start based on dependencies without changing the total project completion date.
  • Float – The amount of time a task could be delayed without changing the estimated project duration.
  • Late Finish – The latest amount of time a task could be finished based on dependencies without changing the project finish date.

The goal for the project manager is to find the fastest path to completion. To do this, you must determine the specific order for all tasks on the list.

Let’s look at another example. If you’re building a house, you can’t start framing the walls until the foundation is poured and set. Your team can’t add the roof until the walls are built. So Task B (the walls) is dependent on Task A (the foundation). Task C (the roof) is dependent on Tasks A and B.

If you estimate all three tasks will take two weeks each, then the total time would be six weeks. This number represents the minimum project duration.

Obviously, a house is more than just a foundation, walls, and roof. But other tasks can be completed simultaneously. For example, flooring, plumbing, and electrical can be installed while the roof is being put on. These likely won’t take as long as the tasks on the critical path.

But if there are any delays in the critical path (foundation, framing, roof), then the entire project will be delayed.

Multiple Paths and Parallel Tasks

The critical path management methodology is not used to determine the most important activities within a project. Instead, this method is designed to identify which tasks are necessary for completing the project on time.

For many projects, it’s possible to have several different paths to completion. You might even have more than one critical path that runs concurrently based on different task dependencies.

There could be certain steps outside of the critical path that are still crucial to your project’s success.

Let’s go back to the house example. You could have a completely separate sequence for building a kitchen, running parallel to your critical path. While parallel paths are non-critical, they are still an important part of your project.

Adding cabinets, countertops, and appliances are flexible and can be completed at any time between the start date and end date. But any significant delays here could still prevent the project from finishing on time. So don’t overlook parallel tasks just because they aren’t on the critical path.

Resource Constraints

Critical path management is based on basic dependencies between tasks. Task B can’t be started until Task A is complete. Task C can’t be started until Task B is done, and so on.

But at a practical level, some projects need to consider resource limitations. Your resources could create additional dependencies, known as resource constraints.

You can also create a resource critical path. This is an extension of CPA, which ties resources to each activity. Including resource allocation in your critical path helps plan for delays or bottlenecks due to unavailable resources.

For example, let’s say you’re managing a software launch. If you only have one developer, that person can’t code two things simultaneously. In theory, certain parts of your critical path could be completed in a set amount of time. But based on your resources, the path might actually be longer.

3 Tricks For Critical Path Project Management

Apply these quick tricks to improve your success with critical path management. This will make your life much easier, especially as a beginner.

Trick #1: Use Software Calculate Your Critical Path

Critical path management could be done using a pencil and paper. But that’s not really an effective use of your time. There are tons of great software programs that allow you to plug in tasks, dependencies, and durations easily.

This software can calculate your critical path and display your timeline on a visual chart.

In addition to the tools listed earlier in this guide, check out our guide and reviews of the best project management software for some alternative suggestions.

Rather than spending hours or days trying to calculate your critical path by hand, you can use these tools to figure out a solution in a matter of minutes. Technology also makes it easier to plan for contingencies and make adjustments in real-time.

Trick #2: Use Flexible Deadlines

CPM should be used to estimate your project timeline. “Estimate” is the keyword here.

Your timeline should be a bit more flexible than this estimate and build in some wiggle room. Just because you guess that a certain task should take a week, it’s not the end of the world if it takes ten days.

Make sure your deadlines are feasible. If you’ve been a part of any project team in the past, you know that things come up. People get sick. Weather can cause delays. Unexpected bugs can arise. The list goes on and on.

Avoid committing to firm deadlines when you’re meeting with project stakeholders and clients. Make sure the timeline is realistic and achievable for your team to accomplish.

Trick #3: Create Plan Contingencies

As stated above, not everything will always go according to plan. The best project managers will have contingencies in place ahead of time to prepare for certain scenarios.

If you’re using software, you can even play around with “what-if” scenarios to see how a change will impact your overall project.

For example, if you extend the duration of a critical task, how will other critical tasks be affected? Some tasks will contain something called “free slack,” which is the amount of time that a task can be delayed without delaying the subsequent task.

What-if planning will help you prepare for any unexpected delays or setbacks your team faces along the way.

The Complete Guide to Waterfall Project Management

There are several unique approaches to project management. Among these options is the waterfall methodology.

Compared to some of the other project management styles out there, the waterfall method has been around for a while. And there are still plenty of applicable use cases for it today. If you’re looking for a simple way to manage projects, the waterfall methodology might just be the best option for you and your team.

Whether you just need a quick refresher or you’re a complete beginner, this guide will tell you everything you need to know about implementing waterfall project management.

What is Waterfall Project Management?

The waterfall methodology follows a linear path. Each step must be taken in sequential order, and a new phase cannot begin until the prior one is complete.

Waterfall project management started in non-software industries like construction and manufacturing. In these types of fields, sequential steps are required (it’s impossible to put up drywall before a house has been framed).

There are five different phases in the waterfall methodology—planning, designing, implementation, testing, and maintenance. There is no returning to the previous phase once you’ve moved on; the only option is starting over from the beginning.

Waterfall project management is designed for long projects that follow a singular timeline. Changes to the plan are typically discouraged and often expensive.

4 Tools to Improve Waterfall Project Management

Implementing the waterfall methodology is futile without the right tools. The following resources will help ensure your entire team has success managing your projects.

#1 — Wrike

Trusted by over 20,000 organizations across a wide range of industries, Wrike is one of the most popular project management tools on the market. It’s easy to deploy and use, and it can accommodate several different project management methodologies—including waterfall. That’s why it’s trusted by well-known brands like Google, Dell, Airbnb, and Siemens. As a project manager, it’s easy to implement the waterfall management style on Wrike using Gantt charts. This timeline view will show your tasks organized by a horizontal calendar. You can even establish dependencies between two tasks or link one task to a milestone. It’s very easy to set up your waterfall with a dependency that one task cannot start until another is complete.

Another cool feature about using Wrike for project management is that your team will get notified when it’s time for a particular task to start. So if one person or a department is waiting on Task A to get done before they start Task B, they’ll be notified ASAP instead of constantly having to check in with whoever is working on the former. There’s a free version of Wrike that can accommodate up to five users. However, this plan does not include a Gantt chart. So you can’t use it to deploy your waterfall methodology. Gantt charts are available on all Wrike paid plans, which start at $9.80 per user per month. Try it free for 14 days.

#2 — TeamGantt

TeamGantt is another powerful and reputable online project planning tool. Anyone can use this software to start planning a project in a matter of minutes, regardless of their experience level. But don’t let TeamGantt’s simplicity fool you. The software is used by industry leaders like Nike, Disney, Netflix, Amazon, and Intuit. As the name implies, TeamGantt specializes in using Gantt charts—a crucial tool for managing a project using the waterfall methodology. One of my favorite parts of TeamGantt is that it comes with pre-built project management templates. So you don’t have to build out your waterfall from scratch. Customizing the templates is easy, and changes can be made by leveraging TeamGantt’s drag-and-drop functionality.

Getting started is simple. You can create your first project with up to three users 100% free when you sign up. Premium plans start at $24.95 per month and support an unlimited number of projects. In addition to the Gantt charts and waterfall benefits, you’ll also love top features like workload forecasting, project history, daily reminders, task lists, team conversations, file attachments, a project discussion board, and more. These plans even support unlimited guest users. Try a premium TeamGantt plan for free with a 30-day trial.

#3 — ProjectManager.com

More than 375,000 project managers across the globe rely on ProjectManager.com. The tool is used by NASA, Ralph Lauren, the United States Postal Service, AVIS, and more. It’s an excellent option for anyone seeking an online resource to manage, track, and report projects using the waterfall methodology. With Gantt charts from ProjectManager, your entire team will have the ability to schedule, plan, and update projects in real-time. It’s really easy to adjust start dates and end dates using the draggable interface on ProjectManager. Colors and columns are fully customizable.

I like ProjectManager because it also has built-in team collaboration tools. You can use it to add comments, share files, update the status of a task, and more. You’ll be notified immediately when tasks have been completed so the next phase can begin. The tool is trusted by construction teams, manufacturing teams, IT and development teams, professional services organizations, engineering teams, product teams, and more. ProjectManager.com integrates with 1,000+ third-party apps like Salesforce, Dropbox, Slack, Microsoft Office, and other business tools that you’re using daily. Plans start at just $15 per user per month. Give it a try for 30 days by signing up for a free trial.

#4 — Celoxis

Celoxis is a bit more advanced compared to some of the other waterfall project management tools on the market today. While it’s definitely a viable option for managing linear projects, it comes with enterprise-grade features commonly needed by larger organizations. That’s why the tool is trusted by brands like Tesla, LG, Lufthansa, HBO, Adobe, Whirlpool, Rolex, and more. As an all-in-one tool, it comes with solutions for project planning, project accounting, team and client collaboration, resource management, project portfolio management, and other advanced features that go above and beyond waterfalls and Gantt charts.

Another standout of Celoxis is its advanced reporting and shareable dashboards. This gives project managers unique insights into the progress of a project and allows them to share necessary information with clients, stakeholders, and executives. You can even automate this process and set it up, so reports are automatically emailed directly to your company’s CEO. Celoxis integrates with 400+ business apps like Slack, Salesforce, Zendesk, QuickBooks, Zapier, Google Drive, Jira, and more. The cloud package starts at $22.50 per user per month with an annual contract. There’s an on-premise version of Celoxis starting at $450 per user that’s offered as a single purchase with no recurring fees. Try Celoxis for free with a 30-day trial.

The Basics of Waterfall Project Management

As previously mentioned, there are five core components to the waterfall methodology. This section will break down each phase into greater detail, so you have a complete understanding of how to implement this methodology with your team.

Planning

The first phase of the waterfall methodology is planning. Since the phases must be followed in a strict linear order, this is arguably the most important part of the process.

Essentially, you’ll use this step to plan for all subsequent steps. This is also known as the “requirements” stage, as you’ll prepare and gather as much information as possible about the project and what needs to be accomplished. It’s common for project managers to obtain information via questionnaires and interviews to get started, whether from clients, stakeholders, or internally. Assigning roles to your team will also be established in the planning phase.

Make sure you put as much thought and time as possible here, and don’t take any shortcuts. Otherwise, you might be forced to start back from the beginning if things go wrong down the road.

Designing

The design phase takes the planning one step further. This is where you’ll establish the specifics of the project.

Actions, budgets, timelines, scope, and everything else will be outlined here. For the waterfall methodology, this should be very specific and not account for a ton of change along the way. Budgets and timelines are super strict and not up for much flexibility.

The designing process can best be described as how you’ll get everything in the planning phase accomplished.

Implementation

Now it’s time to execute your plan. The majority of a project will be spent in the implementation stage.

For example, let’s say you’re working on a software development project. All of the coding and product development will happen here. For a construction project, the actual building process takes place during the implementation phase. This part of the project will typically last for several months and sometimes over a year, depending on the scope.

It’s critical that all tasks and activities are documented during this step. Sometimes clients will want to see evidence of specific tasks, and you may even need to keep track of time or resources for billing purposes.

Testing

Once the implementation phase is complete, it’s time to test everything. This step is pretty self-explanatory, though it varies by industry and project type.

For software, this is when QA takes place, and real people actually test the product. You’ll look for bugs and ensure that the software functions as it was designed to.

After the testing is done, you’ll deliver or deploy what you’ve been working on.

Maintenance

The final step of waterfall project management is maintenance. Most products, whether in software, construction, or another field, aren’t perfect upon delivery.

It’s common for issues to arise down the road. Depending on your contract agreements with the clients or stakeholders, your team should be prepared to assist with ongoing maintenance in the future. This could include software updates, patches, or minor adjustments to improve the overall performance.

You and your team should also take the time to look back and review the project. Figure out what went well and where you can improve. This will make it easier for everyone to do better when it’s time to start the next project.

4 Tricks For Waterfall Project Management

As a waterfall project manager, there are a few quick hacks and best practices you should keep in mind. Here’s what you need to know to ensure your project runs as smooth as possible:

Trick #1: Leverage Project Management Software

The software you use can ultimately make or break the success of your project. This is especially true in the modern workforce, where your team is likely dispersed or remote. You may not have access to everyone in the same room for 40 hours a week.

Your team might even be working in different time zones or completing tasks at other times of the day. The only way to keep everyone on the same page is with software as your single source of truth.

In addition to the tools mentioned earlier in this guide, check our list of the best project management software on the market today. The article even describes our methodology for choosing the right tool for your unique situation.

Trick #2: Be Sure the Project is Suitable For the Waterfall Methodology

The last thing you want to do is try and force this methodology on a project that it won’t work for. This will cause you and your team many problems down the road and will likely be an expensive issue to fix.

With the waterfall methodology, there is always a clearly defined end goal. Your client or any stakeholders know exactly what they want. Anyone joining the project should clearly understand the end goal and see how you’re going to get there.

If the project scope has some uncertainty and required flexibility and changes along the way, then the waterfall methodology won’t work.

So if your client isn’t providing well-defined requirements or they expect to add changes while the project is in process, you cannot use this methodology. You’d be better off using an agile methodology in this scenario.

Trick #3: Clearly Articulate Project Expectations With Stakeholders

This piggybacks off the last point. It’s one thing to understand how the waterfall methodology works in-house, but it’s another aspect altogether to explain this to your clients.

Stakeholders need to know from the beginning that the original scope and requirements of the project can’t be changed along the way, and this isn’t an adaptable or flexible method. They won’t know this unless you tell them.

While you don’t need to bore them with the specifics of how the project will be managed, you do need to make it clear that whatever was agreed upon at the beginning will be the final result. They can’t change their mind and add a feature or remove something in three months.

Trick #4: Leave Plenty of Time For Testing

Due to the rigid nature of these projects, it’s common for project teams to feel rushed as deadlines approach.

Don’t assume that things will go smoothly in the testing phase. If enough issues are found, a lot more work might be required to fix them. Too many project managers underestimate the testing timeline, causing them to miss deadlines and go over budget.

It’s better to plan for the worst and leave yourself some extra time here. If the testing goes well, nobody will be upset if the project is delivered early. But most people won’t be happy if things are delivered late, especially if it costs more money.

Good, Better, Best: Untangling The Complex World Of Accessible Patterns

Marc Benioff memorably stated that the only constant in the technology industry is change. Having worked in tech for over 15 years, I can confirm this. Fellow tech dinosaurs can attest that the way the web worked in the early days is drastically different than many of us could have even imagined.

While this constant change in the technology industry has led to innovation and advancements we see today, it has also introduced the concept of choice. While choice — on the surface — may seem like an inherently positive thing, it does not always equal rainbows and roses. The influx of technological change also brings the splintering of coding languages and the never-ending flavors of programming “hotness.” Sometimes this abundance of choice turns into overchoice — a well-studied cognitive impairment in which people have difficulty making a decision due to having too many options.

In this article, we will attempt to untangle the complex world of accessible patterns — one step at a time. We will kick things off by reviewing current accessible patterns and libraries, then we will consider our general pattern needs and potential restrictions, and lastly, we will walk through a series of critical thinking exercises to learn how to better evaluate patterns for accessibility.

What A Tangled Web We Weave

Overchoice has crept its way into all aspects of technology, including the patterns and libraries we use to build our digital creations — from the simple checkbox to the complex dynamic modal and everything in between. But how do we know which pattern or library is the right one when there are so many choices? Is it better to use established patterns/libraries that users encounter every day? Or is it better to create brand new patterns for a more delightful user experience?

With the myriad of options available, we can quickly become paralyzed by the overabundance of choices. But if we take a step back and consider why we build our digital products in the first place (i.e. the end-user) doesn’t it make sense to choose the pattern or library that can add the most value for the largest number of people?

If you thought choosing a pattern or library was an already daunting enough process, this might be the point where you start to get worried. But no need to fret — choosing an accessible pattern/library isn’t rocket science. Like everything else in technology, this journey starts with a little bit of knowledge, a huge heaping of trial and error, and an understanding that there is not just one perfect pattern/library that fits every user, situation, or framework.

How do I know this? Well, I have spent the past five years researching, building, and testing different types of accessible patterns while working on the A11y Style Guide, Deque’s ARIA Pattern Library, and evaluating popular SVG patterns. But I have also reviewed many client patterns and libraries on every framework/platform imaginable. At this point in time, I can say without qualms that there is an innate hierarchy for pattern accessibility that starts to develop when you look long enough. And while there are occasionally patterns to avoid at all costs, it isn’t always so clear-cut. When it comes to accessibility, I would argue most patterns fall into gradients of good, better, best. The difficult part is knowing which pattern belongs in what category.

Thinking Critically About Patterns

So how do we know which patterns are good, better, best when it comes to accessibility? It depends. This often invoked phrase from the digital accessibility community is not a cop-out but is shorthand for “we need more context to be able to give you the best answer.” However, the context is not always clear, so when building and evaluating the accessibility of a pattern, some fundamental questions I ask include:

  • Is there already an established accessible pattern we can use?
  • What browsers and assistive technology (AT) devices are we supporting?
  • Are there any framework limitations or other integrations/factors to consider?

Of course, your specific questions may vary from mine, but the point is you need to start using your critical thinking skills when evaluating patterns. You can do this by first observing, analyzing, and then ranking each pattern for accessibility before you jump to a final decision. But before we get to that, let’s first delve into the initial questions a bit more.

Is There Already An Established Accessible Pattern?

Why does it seem that with each new framework, we get a whole new set of patterns? This constant reinvention of the wheel with new pattern choices can confuse and frustrate developers, especially since it is not usually necessary to do so.

Don’t believe me? Well, think about it this way: If we subscribe to the atomic design system, we understand that several small “atoms” of code come together to create a larger digital product. But in the scientific world, atoms are not the smallest component of life. Each atom is made of many subatomic particles like protons, neutrons, and electrons.

That same logic can be applied to our patterns. If we look deeper into all the patterns available in the various frameworks that exist, the core subatomic structure is essentially the same, regardless of the actual coding language used. This is why I appreciate streamlined coding libraries with accessible patterns that we can build upon based on technological and design needs.

Note: Some great reputable sources include Inclusive Components, Accessible Components, and the Gov.UK Design System, in addition to the list of accessible patterns Smashing Magazine recently published (plus a more detailed list of patterns and libraries at the end of the article).

What Browsers And Assistive Technology (AT) Devices Are We Supporting?

After researching a few base patterns that might work, we can move on to the question of browser and assistive technology (AT) device support. On its own, browser support is no joke. When you add in AT devices and ARIA specifications to the mix, things begin to get tricky...not impossible, just a lot more time, effort, and thought-process involved to figure it all out.

But it’s not all bad news. There are some fabulous resources like HTML5 Accessibility and Accessibility Support that help us build a greater understanding of current browser + AT device support. These websites outline the different HTML and ARIA pattern sub-elements available, include open source community tests, and provide some pattern examples — for both desktop and mobile browsers/AT devices.

Are There Any Framework Limitations Or Other Integrations/Factors To Consider?

Once we have chosen a few accessible base patterns and factored in the browser/AT device support, we can move on to more fine-grained contextual questions around the pattern and its environment. For example, if we are using a pattern in a content management system (CMS) or have legacy code considerations, there will be certain pattern limitations. In this case, a handful of pattern choices can quickly be slashed down to one or two. On the flip side, some frameworks are more forgiving and open to accepting any pattern, so we can worry less about framework restrictions and focus more on making the most accessible pattern choice we can make.

Besides all that we have discussed so far, there are many additional considerations to weigh when choosing a pattern, like performance, security, search engine optimization, language translation, third-party integration, and more. These factors will undoubtedly play into your accessible pattern choice, but you should also be thinking about the people creating the content. The accessible pattern you choose must be built in a robust enough way to handle any potential limitations around editor-generated and/or user-generated content.

Evaluating Patterns For Accessibility

Code often speaks louder than words, but before we jump into all of that, a quick note that the following pattern examples are not the only patterns available for each situation, nor is the one deemed “best” in the group the best option in the entire world of accessible patterns.

For the pattern demos below, we should imagine a hypothetical situation in which we are comparing each group of patterns against themselves. While this is not a realistic situation, running through these critical thinking exercises and evaluating the patterns for accessibility should help you be more prepared when you encounter pattern choice in the real world.

Accessible Button Patterns

The first group of patterns we will review for accessibility are ubiquitous to almost every website or app: buttons. The first button pattern uses the ARIA button role to mimic a button, while the second and third button patterns use the HTML <button> element. The third pattern also adds aria-describedby and CSS to hide things visually.

See the Pen Accessible Button Patterns by Carie Fisher.

Good: role="button"
<a role="button" href="[link]">Sign up</a>
Better: <button>
<button type="button">Sign up</button>
Best: <button> + visually hidden + aria-describedby
<button type="button" aria-describedby="button-example">Sign up</button>
<span id="button-example" class="visually-hidden"> for our monthly newsletter</span>

While the first patterns seem simple at first glance, they do evoke some accessibility questions. For example, on the first button pattern, we see ARIA role="button" is used on the “good” pattern instead of an HTML <button> element. Thinking in terms of accessibility, since we know the HTML <button> element was introduced in HTML4, we can reasonably speculate that it is fully supported by the latest versions of all the major browsers and will play nicely with most AT devices. But if we dig deeper and look at the accessibility support for ARIA role="button" we see a slight advantage from an assistive technology perspective, while the HTML <button> element is missing some areas of browser + AT coverage, especially when we consider voice control support.

So then why isn’t the ARIA pattern in the “better” category? Doesn’t ARIA make it more accessible? Nope. In fact, in cases like this, accessibility professionals often recite the first rule of ARIA — don’t use ARIA. This is a tongue-in-cheek way of saying use HTML elements whenever possible. ARIA is indeed powerful, but in the wrong hands, it can do more harm than good. In fact, the WebAIM Million report states that “pages with ARIA present averaged 60% more errors than those without.” As such, you must know what you are doing when using ARIA.

Another strike against using ARIA in this situation is that the button functionality we need would need to be built for the role="button" pattern, while that functionality is already pre-baked into the <button> element. Considering the <button> element also has 100% browser support and is an easy pattern to implement, it edges slightly ahead in the hierarchy when evaluating the first two patterns. Hopefully, this comparison helps bust the myth that adding ARIA makes a pattern more accessible — oftentimes the opposite is true.

The third button pattern shows the HTML <button> element coupled with aria-describedby linked to an ID element that is visually hidden with CSS. While this pattern is slightly more complex, it adds a lot in terms of context by creating a relationship between the button and the purpose. When in doubt, anytime we can add more context to the situation, the better, so we can assume if coded correctly, it is the best pattern when comparing only these specific button patterns.

Accessible Contextual Link Patterns

The second group of patterns we will review are contextual links. These patterns help give more information to AT users than what is visible on the screen. The first link pattern utilizes CSS to visually hide the additional contextual information. While the second and third link patterns add ARIA attributes into the mix: aria-labelledby and aria-label, respectively.

See the Pen Accessible Link Patterns by Carie Fisher.

Good: visually-hidden
<p>“My mother always used to say: The older you get, the better you get, unless you’re a banana.” — Rose (Betty White)<a href="[link]">Read More<span class="visually-hidden"> Golden Girl quotes</span></a></p>
Better: visually-hidden + aria-labelledby
<p>“I'm either going to get ice cream or commit a felony...I'll decide in the car.” — Blanche (Rue McClanahan)<a href="[link]" aria-labelledby="quote">Read More</a><span class="visually-hidden" id="quote">Read more Golden Girl quotes</span></p>
Best: aria-label
<p>“People waste their time pondering whether a glass is half empty or half full. Me, I just drink whatever’s in the glass.” — Sophia (Estelle Getty)<a href="[link]" aria-label="Read more Golden Girls quotes">Read More</a></p>

While all three of the contextual link patterns look the same, when we inspect the code or test them with AT devices, there are some obvious differences. The first pattern uses a CSS technique to hide the content visually for sighted users but still renders the hidden content to non-sighted AT users. And while this technique should work in most cases, there is no real relationship formed between the link and the additional information, so the connection is tentative at best. As such, the first link pattern is an OK choice but not the most robust link pattern of the three.

The next two link patterns are a bit more tricky to evaluate. According to the ARIA specs from the W3C “The purpose of aria-label is the same as that of aria-labelledby. It provides the user with a recognizable name of the object.” So, in theory, both attributes should have the same basic functionality.

However, the specs also point out that user agents give precedence to aria-labelledby over aria-label when deciding which accessible name to convey to the user. Research has also shown issues around automatic translation and aria-label attributes. So that means we should use aria-labelledby, right?

Well, not so fast. The same ARIA specs go on to say “If the interface is such that it is not possible to have a visible label on the screen (or if a visible label is not the desired user experience), authors should use aria-label and should not use aria-labelledby.” Talk about confusing — so which pattern should we choose?

If we had large-scale translation needs, we might decide to change the visual aspect and write out the links with the full context displayed (e.g. “Read more about this awesome thing”) or decide to use aria-labelledby. However, let’s assume we did not have large-scale translation needs or could address those needs in a reasonable/accessible way, and we didn’t want to change the visual — what then?

Based on the current ARIA 1.1 recommendations (with the promise of translation of aria-label in ARIA 1.2) plus the fact that aria-label is a bit easier for devs to implement versus aria-labelledby, we could decide to weight aria-label over aria-labelledby in our pattern evaluation. This is a clear example of when context weighs heavily in our accessible pattern choice.

Accessible <svg> Patterns

Last, but certainly not least, let’s investigate a group of SVG image patterns for accessibility. SVGs are a visual representation of code, but code nonetheless. This means an AT device might skip over a non-decorative SVG image unless the role="img" is added to the pattern.

Assuming the following SVG patterns are informational in nature, a role="img" has been included in each. The first SVG pattern uses the <title> and <text> in conjunction with CSS to visually hide content from sighted users. The next two SVG patterns involve the <title> and <desc> elements, but with an aria-labelledby attribute added to the last pattern.

See the Pen Accessible SVG Patterns by Carie Fisher.

Good: role="img" + <title> + <text>
<svg xmlns="http://www.w3.org/2000/svg" xmlns:xlink="http://www.w3.org/1999/xlink" version="1.1" role="img" x="0px" y="0px" viewBox="0 0 511.997 511.997" style="enable-background:new 0 0 511.997 511.997;" xml:space="preserve">
    <title>The first little pig built a house out of straw.</title>
    <text class="visually-hidden">Sadly, he was eaten by the wolf.</text>...
</svg>
Better: role="img" + <title> + <desc>
<svg xmlns="http://www.w3.org/2000/svg" xmlns:xlink="http://www.w3.org/1999/xlink" version="1.1" role="img" x="0px" y="0px" viewBox="0 0 511.997 511.997" style="enable-background:new 0 0 511.997 511.997;" xml:space="preserve">
    <title>The second little pig built a house out of sticks.</title>
    <desc>Sadly, he too was eaten by the big, bad wolf.</desc>...
</svg>
Best: role="img" + <title> + <desc> + aria-labelledby="[id]"
<svg xmlns="http://www.w3.org/2000/svg" xmlns:xlink="http://www.w3.org/1999/xlink" version="1.1" role="img" aria-labelledby="pig3house pig3wolf" x="0px" y="0px" viewBox="0 0 511.997 511.997" style="enable-background:new 0 0 511.997 511.997;" xml:space="preserve">
    <title id="pig3house">The third little pig built a house out of bricks.</title>
    <desc id="pig3wolf">Thankfully he wasn't eaten by the wolf.</desc>...
</svg>

Let’s first look at the first pattern using <title> and <text> and visually hidden CSS. Unlike previous visibly hidden text in patterns, there _is_ an inherent relationship between the <title> and <text> elements since they are grouped under the same SVG element umbrella. However, this relationship is not very strong. In fact, if you look back at my research on SVG patterns, we see that only 3 out of 8 browser/AT combinations heard the complete message. (Note: Pig pattern #1 is equivalent to light bulb pattern #7.)

This is true though the working W3C SVG specs define the <text> element as “a graphics element consisting of text…the characters to be drawn are expressed as character data. As a result, text data in SVG content is readily accessible to the visually impaired.” This first pattern is OK, but we can do better.

The second pattern removes the <text> element and replaces it with a <desc> element. The W3C SVG specs state:

“The <title> child element represents a short text alternative for the element... and the <desc> element represents more detailed textual information for the element such as a description.”

Meaning the <title> and <desc> elements in SVGs can be used similarly to image alternative text and long description options found traditionally in <img> elements. After adding the <desc> element to the second SVG, we see similar browser/AT support with 3 out of 8 combinations hearing the complete message. (Note: Pig pattern #2 is equivalent to light bulb pattern #10.) While these test results seem to mirror the first pattern, the reason this pattern gets a bump into the “better” category is it is slightly easier to implement code-wise and it impacts more AT users, as it worked on JAWS, VoiceOver desktop, and VoiceOver mobile, while the first pattern supported less popular browser/AT combinations.

The third pattern again uses the <title> and <desc> elements but now has an aria-labelledby plus ID added into the mix. According to the same SVG tests, adding this additional piece of code means we can fully support 7 out of 8 browser/AT combinations. (Note: Pig pattern #3 is equivalent to light bulb pattern #11.) Out of the three SVG patterns, this third one is the “best” since it supports the most AT devices. But this pattern does have a draw-back in using some browser/AT combinations; you will hear duplicate image title/description content for this pattern. While potentially annoying to users, I’d argue it is generally better to hear duplicated content than none at all.

Closing Thoughts

While we all certainly value choice in tech, I wonder if we’ve come to a point in time where the overabundance of options has left us paralyzed and confused about what to do next? In terms of picking accessible patterns, we can ask straight-forward questions around pattern/library options, browser/AT device support, framework limitations, and more.

With the right data in hand, these questions are easy enough to answer. However, it becomes a bit more complicated when we go beyond patterns and really consider the people using them. It is then that we realize the impact our choices have on our users’ ability to succeed. As Prof. George Dei eloquently states:

“Inclusion is not bringing people into what already exists — it is making a new space, a better space for everyone.”

By taking a bit more time to critically think about patterns and choose the most accessible ones, we will undoubtedly create a more inclusive space to reach more users — on their terms.

Related Resources

Tools
Pattern Libraries

How Not To Get Hacked – A Guide For WordPress Website Developers (And Their Clients)

You’ve built your clients their dream website. Don’t allow hackers to take it over and turn it into a nightmare. Our “how not to get hacked” guide shows you how…

When hackers start breaking into the security firms that are protecting us from hackers, you know it’s time to take security seriously!

Especially when you consider stats like these:

  • There is a hacker attack every 39 seconds.
  • 95% of cybersecurity breaches are due to human error.
  • 64% of companies have experienced web-based attacks.
  • 43% of cyber attacks target small businesses.

Source: Cybint

Yeah…But Not All Hacking is Done Via Websites

True, but here is the thing…

Most security threats are multidimensional.

This means that no matter how much time, money, and effort you invest into building and hosting a website securely, there are many factors that can threaten web security and allow hackers to wreak havoc on your website.

Take a look at this flowchart to see what I mean…

Security threat factors.
Security threats are multidimensional.

The above is my condensed version of the security threats classification model shown below…

ScienceDirect.com - Multi-dimensional Security Threats Model.
Multidimensional threats can affect the security of your website. (Source: ScienceDirect.com,  Classification of Security Threats in Information Systems.)

As you can see from the diagram above, web security threats can come from either:

  • External sources (e.g. unauthorized users and natural disasters) or
  • Internal sources (e.g. an employee with admin access to the site, server, or a network account).

Add in human, environmental, and technological agents with malicious or non-malicious motivation and accidental or non-accidental intent, and the security threats posed by any combination of these factors are further multiplied.

To put it simply…

Web Security is Freaking Complex!

A failure in any part of the system can threaten the security of the whole.

Even in situations where cyber attackers are not directly involved (e.g. natural disasters), these threats can create security blind spots that could impair your site and lead to:

  • Destruction of information – e.g. deletion of important files or data.
  • Corruption of information – e.g. corrupted database tables and files.
  • Disclosure of information – e.g. exposing confidential data to unauthorized users or the general public.
  • Theft of service – e.g. data theft or misuse, stealing server resources, etc.
  • Denial of service – e.g. a Distributed Denial of Service attack (DDoS).
  • Unauthorized elevation of privilege – e.g. exploiting a weakness in the system to gain admin privileges to the site or network,
  • Illegal usage – e.g. using the site to attack other sites, spread viruses, run scams, identity theft, etc.

To prevent sites from being hacked, damaged, or disrupted, then, all threat factors in this multidimensional security beast need to be considered.

DevMan vs Multidimensional Security Threats.
Keeping security threats out is tough, especially when you’re battling a multidimensional beast!

Now that we understand the enormity of what we’re dealing with, let’s narrow down how to tackle this web security beast.

We’ll focus on how to prevent your sites from being hacked by addressing the following areas:

  1. Mitigating Web Security Risks
  2. Defence is Your Only Plan of Attack
  3. Securing 95% of Vulnerabilities Against Hackers

1. Mitigating Web Security Risks

Many things can go wrong outside of your website and create an opportunity for hackers to get into your site.

These things include:

  • External Services – who and where you purchase services from or outsource to, including hosting, plugins, themes, other website developers, etc.
  • Processes and methods used to build, secure, and manage sites.
  • Human vulnerabilities – inadequate knowledge, understanding, experience, and skill level of security-related issues.

Mitigating Risks from External Services

As a WordPress developer, your main service providers include the following:

  • Your hosting company and data centers.
  • Third-party plugin and theme developers.
  • Integrated third-party platforms and software.
  • Outsourced developers, contractors, etc.

Data Centers

Webhosting companies typically own or lease space to house their servers within multiple data centers located around the world.

All of your hosting company’s hardware, data, and information processing takes place inside data centers, so it’s important for data centers to take physical and digital security seriously to mitigate all threats and risks of attacks and damage, and to ensure the safety and security of the servers housing your websites and data.

Most developers choose their web hosting company and the web host chooses their data center(s). Both hosting companies and data centers, however, have a shared responsibility to ensure website security.

Data Center responsibilities for ensuring security include managing things like:

  • Environmental controls – electronic equipment generates heat that can lead to failure, so it needs to operate at a safe temperature.
  • Backup power supplies – servers need to keep running even if the main power grid unexpectedly goes down.
  • Employing advanced security methods – this includes CCTV surveillance systems and technologies to ensure that hardware and people don’t enter or exit the center without approval, such as using trap rooms with biometrics and limited security access, single-entry doors (only one person allowed in at a time), server cages that enclose, protect, and segregate servers with sensitive data and equipment, metal detectors, etc.
  • Securing facilities – this includes employing guards and installing protective measures like bulletproof glass, high-impact crash barriers, weatherproofing, fire suppression systems, etc.

Your Hosting Company

Focusing on areas like server speed and reliability or recommending companies based on plan pricing, affiliate commissions, and reseller incentives without prioritizing security can put your clients’ sites at risk.

Performance factors and economic benefits should not be discounted, but it’s also important to evaluate your host’s commitment to security.

95% of breached records in 2016 came from three industries and technology was one of them (government and retail were the others). Companies that store a high level of personally identifiable information (PII) in their records are very popular targets. So, it’s important to know how your hosting company stores data and what active and passive security measures are in place to protect it.

Some hosting options are more secure than others. We have written a detailed guide on different types of hosting, including which types are more secure and how to choose the right type of hosting for your needs.

Understanding the network redundancies in your host’s infrastructure is also important. What happens if a network server or a router fails or a component is breached and hacked into? How are your sites isolated and protected from network incidents and service disruptions caused by security breaches?

When evaluating a host, find out what kind of security measures are built into their hosting management and servers. Does your plan include server-side firewalls that proactively prevent malicious codes from entering the network (e.g. WAF), security features for encrypting and transmitting data like SSL, SFTP, and CDN?

What about file scanning, dedicated IPs, two-factor authentication (2FA), nightly backups and one-click restores, and a secure staging area for developing client sites, performing maintenance updates, and installing or testing new applications without leaving your websites vulnerable and exposed to attack?

Also, if despite all security measures, your site ends up being compromised, what kind of security guarantees and support does your web host offer?

Here at WPMU DEV, for example, we not only offer affordable, blazing fast, and secure managed WordPress hosting, but we also provide members with a dedicated 24×7 helpdesk for all WordPress-related issues (including security) and we’ll help you clean your hacked sites. We also provide extensive documentation covering all of our hosting security features.

If you’re serious about protecting your sites from hackers, you should expect nothing less than a total commitment to web security from your hosting provider.

Mitigating Risks from Third-party Sources

Although WordPress is a secure platform, it’s hard to avoid using third-party plugins, themes, and integrations with other platforms.

Any vulnerability in a third-party solution can open the door to hackers and lead to a compromised website.

To minimize risk when using third-party solutions, only download plugins from trusted sources (and themes), use reputable third-party platforms in your site integrations, and always keep your WordPress site up to date.

An excellent resource to check before installing any third-party solutions is the National Vulnerability Database.

For example, while writing this article, I did a quick search of the database on “WordPress” and over 3,000 results popped up, many listing vulnerabilities in WordPress plugins and themes (I also ran a search on “WordPress themes” which brought up 180+ theme vulnerabilities).

National Vulnerability Database
Search the National Vulnerability Database for vulnerabilities in plugins, themes, and third-party software.

(As a point of interest, when we wrote an article about searching for WordPress vulnerabilities almost a decade ago, we looked at eight years of previous data and found that security vulnerabilities reported for WordPress core were trending downward, but issues reported for 3rd-party plugins were trending upward. We plan to revisit this in the near future and we’ll report our findings here, so watch this space!)

Mitigating Risks from Internal Processes

To keep things simple, let’s divide everyone into two groups:

  1. People you outsource services to (e.g. other web developers, remote workers, etc.)
  2. People you provide services to (e.g. your clients) – we’ll address this group later.

Suppose you own a web development agency and you employ/outsource other people. Every person in your business is a potential security threat. Your partners, staff, outsourced contractors, remote workers…and — from your client’s perspective — even you!

For example:

  • You outsource technical work to someone with such high-level skills that no one else can understand or figure out what they are doing.
  • Someone in your team with network access has been careless with a password or an email attachment.
  • A remote worker with access to your systems and data is working from an unsecured wi-fi location.

In the introduction section, I pointed out that:

  • 64% of companies have experienced web-based attacks.
  • 43% of cyber attacks target small businesses.

Do the maths and you will quickly realize that some of your clients are bound to experience a cyber attack.

For example, if you are looking after 10 small business client sites, there’s a good chance that 2 or 3 of those websites will be targeted by hackers (10 x 64% = 6.4 sites x 43% =2.75 sites).

To reduce the probability that your business is responsible for client sites going down, it’s important to develop and implement internal security policies and guidelines covering areas like:

  • Passwords & Accounts – This includes specifying how often passwords should be changed, setting expiring passwords and accounts, revoking access for employees who leave or are terminated, archiving, storing, and deleting stale data and sensitive information, etc.
  • Use of BYOD (Bring Your Own Device) equipment – Do you allow staff, outsourced, or remote workers to use their own phones and laptops? If so, what security measures can you implement to store and handle proprietary data and client information on their devices securely? What happens if they delete important data accidentally or maliciously from your systems or server? Do you have a Mobile Device Management (MDM) policy giving you the power to wipe their devices clean remotely if their devices are stolen or lost?
  • Training – If you employ remote workers make sure that they know how to securely log in and work remotely. Also, consider implementing training programs for employees, especially those in roles that are vulnerable to cyberattacks, and give them options to develop preventative and defensive skills and understand security best practices.
  • Periodic Reviews & Evaluations – Just like software, the security of your business also needs to be reviewed, revised, and updated on a regular basis. Conduct periodic assessments of your internal security practices and policies to identify and patch up any weaknesses.

For additional tips on implementing security practices in your business or work environment, check out this great list of cybersecurity tips.

Now that we have looked at threats that can allow hackers into your business, let’s look at protecting ourselves from threats that can allow hackers into your website.

2. Defence is Your Only Plan of Attack

You’ve done all you can to mitigate security risks from external threats. You’ve chosen a web host that takes security seriously and runs servers from a data center more secure than Fort Knox. You only install third-party plugins and themes from reliable and trusted sources and integrate with established third-party platforms. Your workplace has implemented best security practices.

All that’s left now is to build amazing WordPress sites for your clients and make sure they’re impregnable fortresses to hackers.

Consider this quote from Sense of Security, a leading IT security firm on the escalation of the cybersecurity arms race:

Just as the advancements in technologies help security professionals identify and neutralise potential threats more effectively, it also provides the tools for hackers to undertake larger, more complex attacks. And these attacks are evolving faster than our defences can keep up.

Web security is not just a classic case of good guys vs bad guys, it’s also good guys training bad guys to become even badder guys!

As a web developer focused on building websites and not “cybersecurity weapons” the best you can do is try to keep up and defend as best as you can.

The more you know and understand about security-related issues, the better you will be able to defend sites from cyberattacks, hackers, malicious bots, etc.

To help you with this, we have written many in-depth articles and step-by-step tutorials on WordPress security and how to harden WordPress sites.

So, in this section, I’ll just provide you with a list of articles and tutorials that will turn you into a WordPress security pro.

If You’re a New WordPress Developer

If you’re just starting out as a web developer, we recommend checking out some of our hosting tutorials related to security, like understanding server file permissions, SSL, and WAF.

Also, make sure you understand why hackers want to target your WordPress site and how to scan a WordPress site for malware.

If your client has a small budget, check out how to secure a WordPress site for free.

We also recommend getting these quick and easy WordPress security vulnerability fixes into your tool belt.

Once you’ve got the basics covered, it’s time to…

Become A WordPress Security Pro

Start by checking out our Ultimate Guide To WordPress Security.

Next, go through our checklist for securing a WordPress site, checklist for making your site hacker-proof (with a downloadable PDF so you can tick off the boxes), and our guide to security resources for WordPress.

Also, check out our WordPress security expert interview (coming real soon!) for some great tips on what WordPress security experts do to keep their clients’ sites safe and protected from hackers and malicious threats.

As part of developing your security expertise, make sure to also become familiar with resources like our DDos protection guide and how to test your WordPress site security.

And if your site has been hacked, make sure to head over to this post and learn how to clean up a hacked WordPress site.

Use Defender for Smart WordPress Security

As stated earlier,

“There is a hacker attack every 39 seconds.”

If you don’t believe these statistics, you can confirm this yourself by installing our WordPress security plugin, Defender.

Defender sends out a notification and logs every time someone tries to hack your site.

Defender Lockout Notification
Hackers keep knocking, and Defender keeps blocking.

Defender blocks hackers at every level and adds layers of protection to your site. With just a few clicks, your WordPress site is protected from brute force attacks, SQL injections, cross-site scripting XSS, and many other WordPress vulnerabilities and hacks.

Defender also runs malware scans and antivirus scans and provides IP blocking, firewall, activity logs, security logs, and two-factor authentication login security.

And that’s just the free version of the plugin.

Check out our Defender WordPress security plugin tutorials to see everything that this plugin does and to learn how to easily configure it on your clients’ sites (tip: our WordPress management console The Hub makes it even easier and faster to install and configure Defender on multiple WordPress sites.)

3. Securing 95% of Vulnerabilities Against Hackers

As I stated earlier,

“95% of cybersecurity breaches are caused by human error.”

Choosing a super-secure web host is not a problem. (You can do this with one click here.)

Implementing internal security processes in your business takes some effort, but it’s also not a problem.

Hardening WordPress security…not a problem either. You can find everything you need to know to make WordPress impenetrable to hackers right here on this site.

The main challenge when it comes to preventing hackers is how to make sure people don’t make errors when “to err is human.”

If you can figure that one out, you’ll have protected your clients from 95% of all security vulnerabilities on the web and put hackers permanently out of a job. ;)

Until this happens, however, you’ll just need to be patient with people. Help them implement good security practices and develop better online safety habits, starting with basic things like password security, avoiding email phishing scams, etc.

Also, encourage your clients to implement good security policies in their workplace and train and educate them as best as you can on ways to become more aware of threats and how to reduce security risks.

Netflix Scam Email
All the WordPress security hardening in the world can’t stop hackers if your clients are falling for email phishing scams.

Remember that in the end, no matter what we do, we are all human and we are all going to make mistakes at some point or another.

Also, everyone in the world has problems. Addictions, resentments, job dissatisfaction, greed, opportunism, and disgruntled personalities can manifest at any time in the work environment and these can become a potential security threat too.

So, unless your clients are perfect human beings without problems, you’re still left with 95% of security vulnerabilities to deal with.

The Best You Can Do To Not Get Hacked

Web security threats are multidimensional and cybersecurity is an escalating arms race, so hackers will always have new opportunities to identify weaknesses and vulnerabilities on many levels.

The best you can do to not get hacked is to do your best.

Mitigate as many of the risks as you can, implement best security practices at every level, keep learning and improving your knowledge of web security, stay vigilant, and help your clients do the same.

If you need expert help with anything WordPress-related contact our 24/7 support team. We’re the good guys fighting on your side.

Solving Remote Working Problems For Designers – Renting a Modular Office

This year has brought about a lot of changes for all of us, but specifically us designers.

Luckily and thankfully, we all work jobs that give us the privilege of working from home.

And although working from home is a privilege, that doesn’t mean that remote work won’t come with its fair share of problems.

I’m sure that lots of us have experienced the pros and cons of remote working and have encountered some problems with it.

That’s why today, I want to share with you the best solution that I have to offer for all these problems, and that is renting a modular office space.

But before we get into the solution, let’s talk about the five main problems that remote design workers run into when working from home.

#1. It’s Hard to Stay Focused

When we all first started working from home, it was amazing. You could wake up when you pleased, take your calls in your PJs, and play with your pets as you wanted.

But then you realized you wanted to start cooking lunch at 12, and sneaky in a short episode of that tv show you like on Netflix, and then you needed to clean up your space, take the dogs on a walk, and oh hey, are those the neighbors outside? You should go say hello!

Working from home means it’s a lot more difficult to stay focused because there are a million other things that need to get done around the house and you’re not in your typical office space where you’re separated from that.

Getting or renting a modular office space gives you that separation so that you can stay focused and on top of your tasks.

#2. You Easily Lose Inspiration

Because you’re in the same place every single waking moment of the day, it’s incredibly easy to lose inspiration. You’re in you’re bedroom when you wake up when you work, and when you go to sleep.

You need a change of scenery and some fresh air in order to keep your inspiration levels high.

By renting a modular office, you can have a separate space where you go to, where your brain is trained to know that this is a creative space where I can work well.

As soon as you walk in, your creative wheels are guaranteed to start spinning.

#3. There’s No Start or Finish To The Work Day

When we were all in lockdown, the hours, days, weeks, and months all jumbled into one big blur. Was it February or was it May? Because it all felt the same to me.

When you work, eat, sleep, and breathe all in the same place, it’s hard to differentiate your time and work hours from relaxation hours.

You may wake up incredibly late and work til dawn, or randomly start working at 10 pm because you have no sense of reality anymore.

When you have a designated workplace, like a modular backyard office that you can rent or buy, it’s easy to create a good schedule for yourself.

Like you actually have a reason to wake up early, get dressed, and walk out to the office. Even if it’s just a few feet away from your home, it really does make that big of a difference.

You have a place that feels like a bit of normalcy, a place that inspires you to get ready by 9 and work til 5.

#4. No Separation of Work-Life + Home Life

Riding off of our last point about how it’s hard to keep a good work schedule in order, it’s also important to keep your work-life separate from your home-life.

You need a place where you can just switch off.

And our brains are crazy in the way that they associate things and feelings so quickly to certain places.

When you’re always working from your couch, you’ll no longer be able to just sit down and read a book. Oh no, your brain will tell you and try to fool you into believing you always need to be working when you sit on that couch.

Your mental health should be your top priority and by having a designated backyard office to work from, you’ll be able to switch off after work, go back inside your cozy home and have a relaxing night. No more itching to work when sitting comfortably on the couch.

#5. Difficulty Staying Organized

And one final major problem that we all run into at some point or another while working from home is the ability to stay organized.

It’s hard to keep everything tidy all the time when you’re there all day. And it’s important to have a tidy environment when you’re trying to work and create so that you can be focused and inspired.

The Solution? Renting + Buying a Modular Office

A modular office so sleek and modern, you’ll never want to leave.

And I could never recommend for you to use another modular office provider other than NOOKA.

Nooka is the first company worldwide that offers a home garden office that is smart and connected(smart lighting and smart heat control, high-speed wifi, zero human interactions for accessing it with the mobile app, smart scheduling, mobile in-app payment, air control sensors and smart furniture).

Nooka offers you 3 different styles of Nooks, the main differentiator being the size of each one.

Nooka One is 3×4 meters. Nooka Two is 6x4m and has all the standard features like smart lighting, smart access by a mobile app, wi-fi, UV light for disinfection. It also has two interior design options: single-use, with 1 working desk, or multiple-use, which has up to 6 desks. And finally, Nooka Three is 3x9m, and has extra space for more desks, and also comes with a gorgeous deck terrace.

All you have to do to get your hands on one of these beauties is to visit their website and register for one, then pay the upfront set-up fee of approximately 1,000€.

After the initial payment, they will come and set it up for you and the payment plan will be based on your monthly subscription type.

Another great thing about Nooka is that if you’re looking for a business opportunity and an amazing community, you can set up a Nook in your own town, with an extremely low initial investment, and start subleasing it to other remote workers.

Visit Nooka.com to register for your Nook today to solve all those problems you face and start working from a comfortable, beautiful, modern office space that you love!

Read More at Solving Remote Working Problems For Designers – Renting a Modular Office

Dreaming Of A Magical December (2020 Wallpapers Edition)

2020 was a year that was anything but ordinary, and, well, the upcoming holiday season will be different from what we all are used to, too. To cater for a little bit of holiday cheer in these weird times, artists and designers from across the globe got their creative juices flowing and created festive and inspiring wallpapers for December. Following our monthly tradition, they all come in versions with and without a calendar and can be downloaded for free.

We are very thankful to everyone who took the time to create an artwork and shared it with us this month — you are truly smashing! And since so many talented people have helped fill our archives with designs that are just too good to be forgotten in all these years we’ve been running this wallpapers challenge, we also compiled a little best-of from past December editions at the end of this post. Maybe you’ll spot one of your almost-forgotten favorites in there, too? Have a cozy December, everyone, and stay safe!

  • All images can be clicked on and lead to the preview of the wallpaper,
  • We respect and carefully consider the ideas and motivation behind each and every artist’s work. This is why we give all artists the full freedom to explore their creativity and express emotions and experience through their works. This is also why the themes of the wallpapers weren’t anyhow influenced by us but rather designed from scratch by the artists themselves.

Submit your wallpaper

Did you know that you could get featured in one of our upcoming wallpapers posts, too? We are always looking for creative talent, so if you have an idea for a wallpaper for January, please don’t hesitate to submit it. We’d love to see what you’ll come up with. Join in! →

Holiday Season

“As the holiday season is coming, let’s not let this situation that has befallen us all spoil the most beautiful moments with our loved ones. The LibraFire team wishes you a lot of love, health and understanding in the new year!” — Designed by LibraFire from Serbia.

Stay Cozy

“For our December calendar, we drew inspiration from the contrast of the home warmth and brisk weather outside. Cut off from reality, though at the same time, intimate for those on the inside. This December, stay cozy, stay warm, and stay safe.” — Designed by PopArt Studio from Serbia.

Happy Holidays

Designed by Ricardo Gimenes from Sweden.

It’s Christmas

“The holiday season is finally here, which means it’s time to deck the halls, bring out the figgy pudding and embrace all things merry and bright. It’s Christmas !” — Designed by Divya (DimpuSuchi) from Malaysia.

Winter Landscape

Designed by Morgane Van Achter from Belgium.

Porcupine Christmas

“I got you something for this Christmas. I hope you like it: porcupine gifting watercolor flowers.” — Designed by Divya (DimpuSuchi) from Malaysia.

Oldies But Goodies

Whether it’s Christmas, the frosty winter weather, or International Bathtub Party Day, a lot of things have inspired the community to design a December wallpaper in the past. Below you’ll find a selection of timeless December goodies from our archives. Please note that these wallpapers don’t come with a calendar.

Dear Moon, Merry Christmas

“Please visit Vladstudio website if you like my works!” — Designed by Vlad Gerasimov from Russia.

Christmas Mood

Designed by MasterBundles from the United States.

Getting Hygge

“There’s no more special time for a fire than in the winter. Cozy blankets, warm beverages, and good company can make all the difference when the sun goes down. We’re all looking forward to generating some hygge this winter, so snuggle up and make some memories.” — Designed by The Hannon Group from Washington D.C.

December Through Different Eyes

“As a Belgian, December reminds me of snow, cosiness, winter, lights and so on. However, in the Southern Hemisphere it is summer at this time. With my illustration I wanted to show the different perspectives on December. I wish you all a Merry Christmas and Happy New Year!” — Designed by Jo Smets from Belgium.

’Tis The Season (To Drink Eggnog)

“There’s nothing better than a tall glass of Golden Eggnog while sitting by the Christmas tree. Let’s celebrate the only time of year this nectar of the gods graces our lips.” — Designed by Jonathan Shears from Connecticut, USA.

Cardinals In Snowfall

“During Christmas season, in the cold, colorless days of winter, Cardinal birds are seen as symbols of faith and warmth! In the part of America I live in, there is snowfall every December. While the snow is falling, I can see gorgeous Cardinals flying in and out of my patio. The intriguing color palette of the bright red of the Cardinals, the white of the flurries and the brown/black of dry twigs and fallen leaves on the snow-laden ground fascinates me a lot, and inspired me to create this quaint and sweet, hand-illustrated surface pattern design as I wait for the snowfall in my town!” — Designed by Gyaneshwari Dave from the United States.

Have A Minimal Christmas

“My brother-in-law has been on a design buzzword kick where he calls everything minimal, to the point where he wishes people, “Have a minimal day!” I made this graphic as a poster for him.” — Designed by Danny Gugger from Madison, Wisconsin.

Snow & Flake

“December always reminds me of snow and being with other people. That’s why I created two snowflakes Snow & Flake who are best buddies and love being with each other during winter time.” — Designed by Ian De Lantsheer from Belgium.

A Merry Christmas You Will Have

“I am a huge fan of Star Wars, so I designed a parody cartoon image of Master Yoda on Dagobah wishing everyone a Merry Christmas… Yoda-style. I designed a candy cane as his walking stick and added a Christmas hat to complete the picture. I hope you like it!” — Designed by Evita Bourmpakis from Greece.

Enchanted Blizzard

“A seemingly forgotten world under the shade of winter glaze hides a moment where architecture meets fashion and change encounters steadiness.” — Designed by Ana Masnikosa from Belgrade, Serbia.

Christmas Owl

“Christmas waves a magic wand over this world, and behold, everything is softer and more beautiful.” — Designed by Suman Sil from India.

The House On The River Drina

“Since we often yearn for a peaceful and quiet place to work, we have found inspiration in the famous house on the River Drina in Bajina Bašta, Serbia. Wouldn’t it be great being in nature, away from the civilization, swaying in the wind and listening to the waves of the river smashing your house, having no neighbors to bother you? Not sure about the Internet, though…” — Designed by PopArt Studio from Serbia.

Don’t Stop

“The year isn’t over yet — don’t stop pushing yourself!” — Designed by Shawna Armstrong from the United States.

A South Pole Christmas

“Reindeer and elves don’t deserve all the fun in December!” — Designed by Michaela Schuett from the United States.

Joy To The World

“Joy to the world, all the boys and girls now, joy to the fishes in the deep blue sea, joy to you and me.” — Designed by Morgan Newnham from Boulder, Colorado.

Christmas Time!

Designed by Sofie Keirsmaekers from Belgium.

Ninja Santa

Designed by Elise Vanoorbeek from Belgium.

House Of The Birds

Designed by Pietje Precies from the Netherlands.

Ice Flowers

“I took some photos during a very frosty and cold week before Christmas.” Designed by Anca Varsandan from Romania.

Bathtub Party Day

“December 5th is also known as Bathtub Party Day, which is why I wanted to visualize what celebrating this day could look like.” — Designed by Jonas Vanhamme from Belgium.

Reactive Variables In GraphQL Apollo Client

In this article, we will look at how to set up reactive variables, how the GraphQL cache polices come into place in defining read and writes to the cache, and provide the ability for developers to add types that exist on the client-side alone so that we can structure queries for client-side variables same way we can for remote GraphQL data. After learning more about the fundamentals of reactive variables, we will build a simple app that switches the theme of our application to either dark mode or light mode based on the value of our reactive variable. We will be looking at how to query a reactive variable, how to update the value stored in a reactive variable, and how the change in value triggers updates in components that depend on the reactive variable for certain actions to occur.

The target audience for this article would include software developers who already use GraphqQL with state management tools like Context API or Redux and willing to explore a new pattern of handling state management in GraphQL, or GraphQL beginners who are looking for effective ways to handle globally shared local state within GraphQL without Making things too complicated with external tooling. To follow along with this, you should have an existing knowledge of ReactJS and CSS too.

A Quick Introduction To GraphQL

With GraphQL, you get exactly what you need, and also get the data returned as well as structured how you need it.

“GraphQL is a query language for APIs and a runtime for fulfilling those queries with your existing data. GraphQL provides a complete and understandable description of the data in your API, gives clients the power to ask for exactly what they need and nothing more, makes it easier to evolve APIs over time, and enables powerful developer tools.”

GraphQL website

What Is Apollo Client In GraphQL?

Apollo Client helps you avoid manually tracking loading and error states. It also provides the ability to use GraphQL with modern React patterns like hooks, and so on.

“Apollo Client is a comprehensive state management library for JavaScript that enables you to manage both local and remote data with GraphQL. Use it to fetch, cache, and modify application data, all while automatically updating your UI.”

— “Introduction to Apollo Client,” Apollo Docs

Let’s define some terms here that you will need to understand to move forward:

  • Variable
    A variable is a name you give to an assigned memory location where a value is stored. The variable name is used as a reference to the value stored in it when you need to make use of it.
  • Reactivity
    We will explain reactivity as something that triggers change on its dependents when an update is passed to it. Like the local state in React triggers component updates, the reactive variables in Apollo GraphQL also automatically trigger component updates based on changes.

State management is a really important part of building a modern application. Having a global state is important when different components or screens require access to the same state value and possibly trigger changes when that particular state is changed.

In the next section, we will look at how to set up a reactive variable.

Writing Our First Reactive Variable

Here’s what a reactive variable looks like:

import { makeVar } from '@apollo/client';

const myReactiveVariable = makeVar(/** An initial value can be passed in here.**/)

The makeVar is imported from Apollo Client and is used to declare our a reactive variable. The makeVar takes an initial value that the reactive variable would hold. The ease of constructing a reactive variable is amazing.

There are two ways to read data from our created reactive variable. The easiest way is to call our declared reactive variable which we have created above, as a function without an argument:

const variable = myReactiveVariable();

Getting the value of a reactive variable is that easy. In the code block above, we declared a variable that holds our reactive variable which was called without an argument to read the data it already holds.

We can also get the value of a reactive variable with the useQuery syntax we normally would use to fetch remote data in GraphQL. To explain how we can do this, let’s look at the Cache type and field policies.

Type And Field Policies

The cache type and field policies help you define how a specific field in your Apollo Client cache is read and written to. You do this by providing field policies to the constructor of inMemoryCache. Each field policy is defined inside the typePolicy that corresponds to the type which contains the field. Let’s define a typePolicy called Query and define a field policy for accessing a field called myReactiveVariable.

import { InMemoryCache } from '@apollo/client';

// Here we import our reactive variable which we declared in another
// component
import { myReactiveVariable } from './reactivities/variable.js';

// The field policies hold the initial cached state of a field.
export default new InMemoryCache({
  typePolicies: {
    Query: {
      fields: {
        myReactiveVariable: {
          read() {
            return myReactiveVariable();
          }
        }
      }
    }
  }
})

In the code snippet above, we declared a type called Query and defined a field called myReactiveVariable. Next, we added a read function that specifies what happens when the field’s cached value is read. Here’s what happens when the myReactiveVariable field cached value is being read:

We pass in the reactive variable we had declared in another component and imported here as the value the field returns.

Now that we have defined our typePolicies and fieldPolicies, let us go ahead and write our query to get the value store in our reactive variable. Here’s what the query would look like:

import { gql } from "@apollo/client";

export const GET_REACTIVE_VARIABLE = gql`
  query getReractiveVariable{
    myReactiveVariable @client
  }
`

The gql template literal tag we imported from Apollo Client above is used to write a GraphQL query in Apollo client.

The query name myReactiveVariable should match the field name declared in the field policy. If you have been using GraphQL, you will notice that this querying pattern is identical to the normal query you would write if it were to be a remote GraphQL API we were querying. The only difference is the @client placed after the field name. This instructs Apollo to resolve this particular query on the client and not on any external API.

That’s it! We have successfully set up our first reactive variable. The process looks a little bit lengthy initially but subsequently, you can declare a new reactive variable by simply declaring the reactive variable and adding a field policy for it.

To fetch the reactive variable, you can use the useQuery hook in any component where you need it. Here’s an example.

import { useQuery } from '@apollo/client';
import { GET_REACTIVE_VARIABLE } from 'FILE_PATH_TO_YOUR_QUERY_FILE';

const {loading, error, data} = useQeury(GET_DARK_MODE);

// you can track loading, error states, and data the same way with a normal query in Apollo

In the above code, we imported useQuery from @apollo/client. Next, we imported the GET_REACTIVE_VARIABLE query from the file it was exported from.

Lastly, we pass on to the useQuery hook in our query, and destructure loading, error, and data from it.

Modifying A reactive variable

Apollo client provides a beautiful way to modify a reactive variable — calling the function returned by makeVar and pass in a single argument to the function. The argument passed in is the new value the reactive variable will hold. Let us look at an example below where we modify our reactive variable which we declared above:

import { myReactiveVariable } from 'PATH_TO_OUR_REACTIVE_VARIABLE_FILE'

myReactiveVariable("A new value is in!");

In the above code, we import myReactiveVariable and we update it by calling the variable and placing the new value inside of it.

It is so easy to update the values of a reactive variable. Once the value in a reactive variable is updated, corresponding actions are triggered in components that depend on the variable and the user-interface is adjusted automatically.

In the next section, we will build out a simple theme-changing application that switches themes from dark mode to light mode with a click of a button. The button changes itself based on the value of the current theme. This will help us put all that we have learned together by building out something that fully and simply illustrates the concept of reactive variables and show how the user interface is automatically triggered when the reactive variable is updated.

Here’s what our result will look like:

(Large preview)

Let’s begin.

Setup

First, we create a new React app.

npx create-react-app theme_toggle

Next, let’s install the necessary libraries we need for Apollo and GraphQL including the react-feather library to get our icons and react-router-dom to setup routing

npm install @apollo/client graphql react-feather react-router-dom

Once we are done with all the installations, let’s go ahead and set up our graphQL, including defining our darkMode reactive variable.

Create a folder called graphql inside the src folder and then create a sub-folder called reactivities to house all the reactive variables. Here’s how the folder tree would look like: src > graphql > reactivities > themeVariable.js

I decided to arrange our file and folder structure simulating a real-world use case so follow along. Let’s go ahead to declare our reactive variable in the themeVariable.js file we just created:

import { makeVar, gql } from "@apollo/client";
export const darkMode = makeVar(false);

Next, inside the same file let’s construct our query to get our reactive variable and specify that the query should be resolved on the client-side. We can decide to create a separate folder to house all our query, especially when we have many queries in our application, but for the sake of this tutorial, we will write the query inside the same file as the reactive variable and export them individually:

import { makeVar, gql } from "@apollo/client";

export const darkMode = makeVar(false);

// This is the query to get the darkMode reactive variable.
export const GET_DARK_MODE = gql`
  query getDarkMode{
    darkMode @client
  }
`

In the above piece of code, we see how straightforward it was to declare a reactive variable with the makeVar() and passed in an initial value of false for our new variable. Next, we imported gql from Apollo client and used it in writing our query.

Next, let’s create our cache.js file and define our type and field policies to control how variables will be queried and structured:

Create a file called cache.js inside the graphql folder. Inside cache.js here’s how we declare our policies:

import { InMemoryCache } from '@apollo/client';
import { darkMode } from './reactivities/themeVariable';

export default new InMemoryCache({
  typePolicies: {
    Query: {
      fields: {
        darkMode: {
          read() {
            return darkMode();
          }
        }
      }
    }
  }
})

In the above code, first, we imported inMemoryCache from Apollo client, and we imported our reactive variable from the file path where we stored it. Next, we created a new instance of inMemoryCache and our field policy is defined inside of the typePolicy object. The code above defines a field policy for the darkMode field on the Query type.

There’s one final step to complete our setup for Apollo for our React app, we need to create a client.js file. The client.js file is a file you’re already familiar with if you use GraphQL before now. It holds the ApolloClient constructor which would finally get passed into the ApolloProvider on a top-level file (usually the index.js file). Our client.js file should be located directly inside the src folder.

src > client.js

import { ApolloClient } from '@apollo/client';
import cache from './graphql/cache';
const client = new ApolloClient({
  cache,
  connectToDevTools: true,
});
export default client;

Here’s what we did above. We imported ApolloClient. Next, we imported our cache from where it was previously declared. Inside our ApolloClient constructor, we passed in our cache which we imported and set connectToDevTools as true to enable us to use the Apollo Dev Tools in our browser.

Finally, we need to pass in the new ApolloClient instance which we exported as client into ApolloProvider in our top-level index.js file inside the src folder. Open the index.js file and replace the code there with this.

import React from 'react';
import ReactDOM from 'react-dom';
import { ApolloProvider } from '@apollo/client';
import './index.css';
import App from './App';
import client from './client';
ReactDOM.render(
  <ApolloProvider client={client}>
    <App />
  </ApolloProvider>,
  document.getElementById('root')
);

In the above code block, we wrapped our App component with the ApolloProvider and passed client (which we imported) to the Apollo provider. We did this in the top-level scope so that our entire app can access the ApolloProvider and the client.

We have successfully finished everything in the setup of Apollo and the reactive variable. You’ll notice that many things we did here were related to setting up Apollo which you would still have done even if you were using Apollo with other external API for managing context.

Since we are done with everything we need to set up Apollo and create our reactive variable, let’s now go ahead and set up our page and routing.

We would only have one route to a page called landingPage.jsx. Inside the src folder, create a folder called pages to house all the pages (in our case, we have just one page) and create a file called landingPage.jsx in it.

src > pages > landingPage.jsx

Inside our newly created page, let’s create a functional component with a h1 tag containing or heading. Here’s what will be in it.

import React from 'react';

const LandingPage = () => {
  return (
    <div
      style={{
        height: '100vh',
        backgroundColor: 'white',
        }}
    >
      <h1>Welcome to Theme Toggle Appliation!</h1>
    </div>
  )
}
export default LandingPage

Next, let’s create our button component. Inside src, create a folder called components, and create a button.jsx file. src > components > button.jsx

Inside our button component, here are the things we should import icons from react-feather, the useQuery hook from apollo/client, our query and reactive variable from the file it was exported from.

import React from 'react'
import { Moon, Sun } from 'react-feather';
import {  useQuery } from '@apollo/client';
import { GET_DARK_MODE, darkMode as reactiveDarkMode } from '../graphql/reactivities/themeVariable';

Inside the button component, let’s query our GraphQL client with the GET_DARK_MODE query like how we would normally query in GraphQL with Apollo.

...

const ButtonComponent = () => {

  {loading, error, data} = useQuery(GET_DARK_MODE);

  return (...)
}

export default ButtonComponent;

Next, we want to change the buttons based on the boolean value of our reactive variable that will be returned from data. To do this, we will create two buttons and use a ternary operator to display them conditionally based on the boolean value of our reactive variable:

...

const ButtonComponent = () => {

  const {loading, error, data} = useQuery(GET_DARK_MODE);

  return (
    <div>
      {
        data.darkMode ? (
          <button
            style={{
              backgroundColor: '#00008B',
              border: 'none',
              padding: '2%',
              height: '120px',
              borderRadius: '15px',
              color: 'white',
              fontSize: '18px',
              marginTop: '5%',
              cursor: 'pointer'
            }}
            onClick={toggleMode}
          >
            <Sun />
            <p>Switch To Light Mood</p>
          </button>
        ) :(
          <button
          style={{
            backgroundColor: '#00008B',
            border: 'none',
            padding: '2%',
            height: '120px',
            borderRadius: '15px',
            color: 'white',
            fontSize: '18px',
            marginTop: '5%',
            cursor: 'pointer'
          }}
          onClick={toggleMode}
        >
          <Moon />
          <p>Switch To Dark Mood</p>
        </button>
        )
      } 
    </div>
  )
}
export default ButtonComponent;

In the above code, we displayed both buttons conditionally with the ternary operator to display when the value of data.darkMode is either true or false. Our initial value as declared in our themeVariable.js is false.

Note: Remember that we can pull out darkMode from the data because we declared it this way in our cache.js field policy.

We added some CSS to the buttons to make them look better and also added the icons we imported from react-feather to each button.

If you noticed we had an onClick property passed into each button which called toggleMode. Let’s declare the function above but still inside the ButtonComponent:

...

const ButtonComponent = () => {

  const toggleMode = () => {
    console.log("Clicked toggle mode!")
  }

return (...)
}

export default ButtonComponent;

Currently, we have a console.log() inside the toggleMode function. In a later part of this article, we will come back to properly write this function to update the value of the reactive variable.

Now let’s go back to the ladingPage.jsx file we created before now and add the button we just created:

import React from 'react';
import ButtonComponent from '../components/button';

const LandingPage = () => {
  return (
    <div
      style={{
        height: '100vh',
        backgroundColor: 'white',
        }}
    >
      <h1>Welcome to Theme Toggle Appliation!</h1>
      <ButtonComponent />
    </div>
  )
}
export default LandingPage

To add the button, we simply imported it into our page and added it below the h1 element we already had on the page.

Here’s how our web app looks like at the moment.

We are almost done building our app. Next, let’s change the background and text color of the page in the landingPage.jsx style to conditionally be black or white based on the boolean value of our reactive variable which would be toggled in the button component later. To do this, we will also use the useQuery hook to get the current value of our reactive variable.

Our landingPage.jsx file will finally look like this:

import React from 'react'
import { useQuery } from '@apollo/client';
import ButtonComponent from '../components/button';
import { darkMode, GET_DARK_MODE } from '../graphql/reactivities/themeVariable';

const LandingPage = () => {
  const {loading, error, data} = useQuery(GET_DARK_MODE);
  return (
    <div style={{ height: '100vh', backgroundColor: data.darkMode ? 'black' : 'white', color: data.darkMode ? 'white' : 'black' }}>
      <h1>Welcome to Theme Toggle Appliation!</h1>
      <ButtonComponent />
    </div>
  )
}
export default LandingPage

Pay attention to the way we change the backgroundColor and color of the div container conditionally based on the boolean value of the reactive variable returned. We make use of a ternary operator to set the backgroundColor to black or white depending on the value of data.darkMode. The same thing should be done for the value of color. This is all we need to for the landingPage.jsx component.

The final thing we will need to do to get our application to be working is to make our toggleMode function in the button component able to modify the reactive variable on click of the button. Let’s look at how to modify a reactive variable again, this time, in a real app example.

Modifying A Reactive Variable

As we’ve previously learned, to modify a reactive variable, all you need to do is to call the function returned by makeVar and pass in the new value inside of it. Here’s how that will work in our case:

Go to the button component and do this:

...
import { GET_DARK_MODE, darkMode } from '../graphql/reactivities/themeVariable';

const ButtonComponent = () => {

  const toggleMode = () => {
    darkMode(!darkMode)
  }

return (...)
}

export default ButtonComponent;

First, we imported the GET_DARK_MODE query and the darkMode reactive variable from the file they were exported from.

Next, we wrote an arrow function for toggleMode and called the darkMode function returned by makeVar and passed an invert of the current value it contained as the new value the reactive variable will carry when it is clicked on.

We have our entire app powered by a reactive variable and once there’s a change to the value held in the reactive variable, every component or page dependent on that variable for an action to trigger is updated and the user interface is updated with the current changes. We escaped all the hurdles of dispatch functions and other ambiguous steps we have to follow when using other state management libraries like Redux or Context API.

Conclusion

Reactive variables in Apollo client give you a sweet, easy to use, easy to update, and a consistent querying pattern with querying a regular remote GraphQL API. Learning to use reactive variables for state management is a plus to you because it gives you the flexibility of choice among many tools. reactive variables would enable you to manage locally shared global state among components without the extra boilerplate that would usually come with the dominant state management libraries that already exist.

  • Check out the finished code on GitHub.

Related Resources

Pringles “Must-ache” You a Question: Do You Like Their New Logo?

It is finally November.

And with this new month comes some wonderful seasonal traditions.

While many people are looking forward to Thanksgiving, Christmas, Hanukkah, or just relaxing around the house with friends and family, millions of people all around the world are celebrating Movember (or no-shave November). 

Movember Means Mr. Pringle Gets A New Look

https://www.instagram.com/p/CG9i29GlOQB/?utm_source=ig_web_button_share_sheet

As the name implies, this tradition encourages people to shave once at the start of November and then put their razors away till the end of the month. 

This fairly new tradition came about to help raise awareness of men’s mental, physical, and sociological issues. 

Many brands have taken up the cause and decided to shave their mascots’/logos’ facial hair.

 In our opinion, Pringle’s new cleanly shaven face has stolen the spotlight. 

This will be the first time Mr. Pringles has shaven off his mustache. 

The brand began in the mid-20th century, meaning he has not shaved in over 50 years. 

The real question we have on our minds is, “how long will it take to grow it back?”

 Will the stache slowly grow back over the course of November? Will it be thicker and more gnarly by the end of November? Only time will tell.

Pop, Share. Chat

Pringles also decided to change its motto to “Pop, Share. Chat.” 

This new slogan is designed to encourage men to talk openly with those close to them about the struggles they are facing as men.

According to one study in 2018, men were 3.65x more likely to end their own lives than their female counterparts. 

While many experts disagree on what is the underlying cause of this discrepancy, our hope is that all men around the world this month will take up the true meaning of this cause.

Gather around with your friends and try to enjoy this season with others who care for you. 

Happy holidays and let that facial hair grow wild!

Read More at Pringles “Must-ache” You a Question: Do You Like Their New Logo?

What amount would you say you will spend?

Prior to bouncing into the choice to purchase a house, you need to think about your buying power first. Most triple wide trailers cost $20,000-$100,000. The cost differs with the size of the ground surface, style and luxuries. This value quote does exclude the part cost.
[b] [url=https://www.bcellphonelist.com] Buy Mobile Database [/url][/b]
How enormous should your home be?

An extraordinary favorable position in purchasing a pre-assembled house is that it is anything but difficult to track down a style that will suit your requirements. These instant houses come in various sizes and plans you can browse. They accompany various sizes for rooms including the dinning room and the family room. All you need is to painstakingly pick a structure and a scale that will accommodate your preference for style.

Elements to Keep in Mind When Buying a Manufactured Home

Purchasing another house isn't a choice you can rapidly make very quickly. Purchasing a mobile home requires a similar measure of steady assessment. It is significant that you remember some significant focuses before you buy it for you not to lament your choice later. I am handing out some significant components that one should remember while picking a trailer home and they are as per the following:

Site

It is basic to pick the ideal area for your bought mobile home. You have various options you can browse for your fantasy house.
[b] [url=https://www.bcellphonelist.com] Buy Mobile Database [/url][/b]
Private Lot - You can obviously pick to have your home at a private part. For this situation, you need to organize with your vendor to talk about things like neighborhood laws, water and power flexibly associations and other significant understanding.

Land-rent Community - This sort of network where you will be permitted to have your home arranged in it on the understanding that you'll need to rent the part. You will experience less things to manage like the water and electric flexibly associations.

Purchasing the Home just as the Land - You can select to purchase your pre-assembled home just as your parcel in a region. A great deal of purchasers take this choice since they wouldn't need to stress a lot. Serious issues with respect to setting the house are overseen by the engineer. Paying for the part is likewise not a major difficulty.