Do you want to stop storing IP addresses in your WordPress comments?
By default, WordPress logs and stores the IP addresses of commenters to protect you against spammers. That said, with the rise of data privacy laws, you may want to stop this functionality to protect your website visitor data.
In this article, we will show you how to stop storing IP addresses in WordPress comments.
Should You Stop Storing IP Addresses in WordPress Comments?
Unless your commenters use a VPN, WordPress will store their IP addresses on your website.
This is mainly used to combat spam comments from suspicious IP addresses. Some security plugins may also use IP addresses to put users in a comment blacklist or block malicious IP addresses to prevent threats like brute force attacks and DDoS attacks.
That said, some users may feel uncomfortable knowing that their IP address is logged after they leave a comment. They may think that this information can be used against them, which can make them hesitant to engage with your WordPress website.
If your website caters to a global audience, then storing IP addresses without user consent can also make your site less compliant with the General Data Protection Regulation (GDPR). This is because the GDPR classifies IP addresses as personal data.
Most WordPress web hosting providers keep raw access logs of all visitors to your website for a limited period of time. Plus, you can view these IP addresses when viewing the Comments page in the WordPress dashboard.
Now, let’s look at how to stop storing IP addresses and improve your WordPress security. Here is an overview of what we will cover:
How to Stop Storing IP Addresses in WordPress Comments
This first method uses the WPCode plugin. We will use this plugin to insert a custom code snippet that stops your website from storing IP addresses from the comments section.
If this is your first time using code, don’t worry. WPCode’s user-friendly interface makes it easy to insert and manage custom code, even for a beginner.
Note: This article will use the WPCode free version, but feel free to upgrade to a Pro plan for more advanced features like conditional logic and scheduled snippets.
Now, you need to go to Code Snippets » + Add Snippet from your WordPress admin panel. After that, click the ‘Use snippet’ button under ‘Add Your Custom Code Snippet’.
You will now see the Create Custom Snippet screen.
First things first, you have to add a title for your code snippet. It can be something like ‘Disable IP Address in Comments.’
In the Code Type dropdown, choose ‘PHP Snippet.’ Then, in the Code Preview box, you can insert the following code:
After that, make sure the toggle in the top right corner says ‘Active’ and click ‘Save Snippet.’
It should look like this.
Now, the next time someone leaves a comment, you won’t see their IP address on the WordPress Comments page.
However, you will notice that previous comments still have this information stored. We will talk more about how to remove this data in the next part of the tutorial.
How to Remove IP Addresses From Older WordPress Comments
To remove IP addresses from your older WordPress comments, you will need to use phpMyAdmin. It’s a database management platform that usually comes with your WordPress hosting control panel.
Note: Before you do anything, we strongly recommend you back up your WordPress database first. That way, you can restore the database if you make a critical error.
Once you do that, you need to log in to your WordPress hosting account and look for the phpMyAdmin menu.
For Bluehost users, you will find phpMyAdmin by going to ‘Websites’ and selecting the website you want to configure in your dashboard. It should be under ‘Quick Links’.
Inside phpMyAdmin, you can navigate to the ‘SQL’ tab.
Are you looking for a way to convert your Figma design into a WordPress theme or page?
Figma is a cloud-based design tool that allows you to create an attractive user interface for your website. It lets you quickly test ideas through prototyping and also supports real-time collaboration. By converting these designs to WordPress, you can make your website more visually appealing for users.
In this article, we will show you how to easily convert Figma to WordPress, step by step.
Why Convert Figma to WordPress?
Figma lets you create beautiful layouts for your website and offers amazing tools like animation effects, prototyping, vector editing, and more.
If you have a WordPress website, then using this tool to create a layout for your site will allow multiple designers and developers to work on the same Figma file. This can improve collaboration and reduce the need for back-and-forth emails.
Plus, you can create interactive mockups of your blog to test user flows and get feedback before your site goes into development.
You can also use Figma’s advanced tools like grids, guides, layers, and auto layouts to create visually appealing pages and templates including:
However, keep in mind that Figma does not integrate with WordPress by default, so you will need to use a conversion tool. That being said, let’s see how to easily create a Figma design and convert it to WordPress, step by step:
To design a page with Figma, you will first need to create an account on the website.
To do that, visit the Figma website and click the ‘Get started for free’ button in the top right corner of the screen.
This will open a new tab in your window, where you must provide your email address and password.
After that, click the ‘Create Account’ button.
Once you do that, you will be sent a verification email.
Simply open this email from your inbox and click the ‘Verify email’ button.
You will now be taken to the Figma website, where you will be asked for your name.
After that, you must provide some details on how you plan to use the tool and then click the ‘Continue’ button at the bottom.
You will then be asked to choose a pricing plan. You can select the ‘Starter’ plan, which is free, and click the ‘Continue’ button.
Step 2: Design a Page on Figma
You will now be directed to your Figma dashboard
Once you are there, go ahead and click the ‘Design File’ button at the top right corner to create a Figma page.
The Figma builder will now open up on your screen. Here, you have to select the ‘Frame’ option from the top.
This will open a list of design frames in the right column, where you must select the ‘Desktop’ option. This is because the plugin we will use to convert Figma to WordPress currently only supports the desktop canvas.
Next, you can add images to the canvas by clicking on the square icon at the top and choosing the ‘Place image/video’ option.
This will open your computer folder, where you can upload an image or video of your choice.
You can also add text to your page by clicking on the ‘T’ icon at the top of the screen.
Once you do that, you can adjust the text size, alignment, font, and spacing from the settings in the right column.
You can also use free style tools like ‘Pen’ and ‘Pencil’ from the top, add feedback questions, create more layers and pages, change the background color, and much more.
If you are a developer and want to add CSS code to the page, then you can also do that by switching to ‘Dev Mode’ using the toggle in the top right corner of the screen.
Step 3: Copy the Figma Page’s API Key
Once you are satisfied with your Figma page’s customization, it is time to get its API key. This key will allow the plugin to embed the Figma page in WordPress.
To do this, click on the ‘Figma’ icon in the top left corner of the screen. This will open a menu prompt, where you must select the Help and account » Account Settings option.
A new prompt will now open up on the screen.
From here, scroll down to the ‘Personal access tokens’ section and click the ‘Generate new token’ link.
This will open some new settings, where you must provide a name and expiration date for the token that you are creating. We recommend selecting the ‘No Expiration’ option for the token if you don’t want the Figma page to disappear from your website after a specific time period.
After that, you can set all the scopes except for File Content to ‘Write’ and then click the ‘Generate token’ button.
You will now be taken back to the ‘Personal access tokens’ section.
From here, you can copy the newly generated token and paste it into Notepad or another plain text editor.
Step 4: Convert Figma to WordPress
Once you have gotten the API key, it is now time to convert your Figma page to WordPress.
Upon activation, open up the page or post where you want to add the Figma page. Once you are there, simply click the ‘Import From Figma’ button at the top of the screen.
This will open a prompt, where you must paste the Figma page access token that you copied earlier.
After that, you have to add the Figma page URL into the ‘FIGMA FILE URL’ field.
To get this URL, open your Figma file and copy the link in the browser tab. Keep in mind that the desktop frame should be selected before you copy the URL.
Upon pasting the link in WordPress, click the ‘Start Import’ button.
The plugin will then convert your Figma page into the Group block. You can now customize the block’s alignment, position, typography, and color from the block panel.
After that, click the ‘Publish’ or ‘Update’ button to store your settings.
This is how the converted Figma file looked on our demo website.
Alternative: Use Seahawk Media Services to Convert Figma to WordPress
If you have created your entire website using Figma, then the above method will not be suitable because the plugin only works with the desktop frame.
Plus, the plugin may have trouble transferring complex designs accurately because Figma focuses on design only while WordPress requires coding for dynamic content and functionality. This means that some of the elements that you have added in Figma may not work in WordPress.
That’s why we recommend using Seahawk Media services to convert Figma to WordPress because they consider all these factors during the conversion.
Seahawk Media is a premier WordPress services company that offers numerous services, including development, design, maintenance, migration, support, and more.
They are trusted by over 1000+ businesses and will perform a fully responsive, cleanly coded, SEO-ready, and pixel-perfect Figma to WordPress conversion for you.
All you will have to do is send your Figma files to the business.
After understanding your requirements, Seahawk will set an approximate timeline and convert your Figma files to a WordPress site in just a few days.
You can also use the company’s services for an SEO audit, content writing services, white label services, support, and hacked site repair.
Bonus: Use SeedProd to Build a Visually Appealing Website
If you feel like it’s too much to work to build pages with Figma and then convert them to WordPress, then you can use SeedProd instead.
It is the best WordPress theme builder and page builder on the market that it super easy to build custom themes and landing pages for your website using drag and drop.
SeedProd comes with a user-friendly drag-and-drop builder, 300+ premade templates, advanced WooCommerce blocks, and integrations with email marketing services.
You can easily drag and drop images, headings, videos, CTA, optin forms, giveaways, or paragraph blocks from the left column in the builder to create an attractive page.
Once you’ve done that, simply click on the block you added to open its settings in the left column. From here, you can insert dynamic text and change the font size, alignment, color, and more.
Finally, click the ‘Save’ and ‘Publish’ buttons at the top to store your settings and make your changes live. For detailed instructions, you can see our tutorial on how to create a landing page in WordPress.
For more information about the plugin in general, see our SeedProd review.
Frequently Asked Questions About Converting Figma to WordPress
Here are some questions frequently asked by our readers about Figma and WordPress.
Do Figma and WordPress work together?
By default, Figma and WordPress cannot directly integrate. However, you can use tools and plugins like UiChemy, pxCode, or Animation and Design Converter for Gutenberg Block to convert a Figma design to WordPress.
If this method is too complex for you, then you can simply hire a developer or dedicated company like Seahawk Media for this conversion.
Do I need to know coding to convert Figma to WordPress?
You don’t need to know coding to create and convert Figma designs to WordPress because you can easily do it with a plugin or hire a developer.
However, if you want to do it yourself without a plugin, then you must know HTML, CSS, and possibly PHP to hand-code your website. This is because some of the Figma design elements will need to be coded to provide functionality in WordPress.
Does converting from Figma to WordPress hurt SEO (Search Engine Optimization)?
If you convert a Figma design to WordPress, then your content or backlinks won’t be affected. However, Figma designs can negatively affect your website structure, page speed, and images.
That is why we recommend using Seahawk Media services for a Figma to WordPress conversion because they will make sure that your website is fully responsive, cleanly coded, and SEO-ready after the conversion.
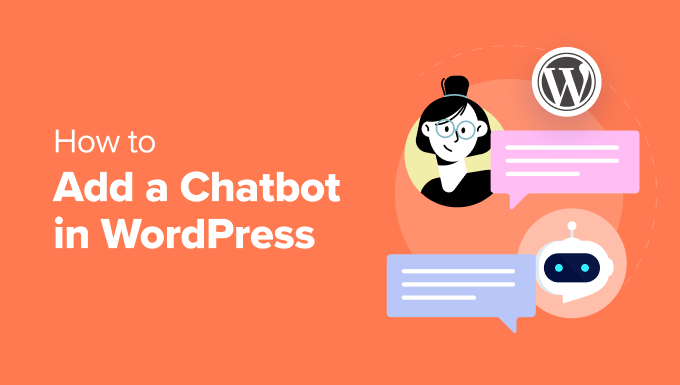
A chatbot is software that can start talking with your website visitors. Adding a chatbot to your website can help you provide instant customer support, generate leads, and improve the user experience.
In this article, we will show you how to easily add a chatbot in WordPress, step by step.
What Is a Chatbot?
A chatbot is a computer program that uses a chat interface to talk with your website visitors. It acts just like your customer support team does when they use a live chat plugin.
However, while live chat is a real-time conversation between a customer and your support staff, chatbots are automated.
This means that they can only provide answers that you have programmed them for.
For example, a customer service chatbot can answer questions about products or services, troubleshoot problems, and make recommendations.
Similarly, a healthcare chatbot might answer questions about health conditions, provide reminders for appointments, and connect patients with doctors.
Why Should You Use a Chatbot in WordPress?
Adding a chatbot to your WordPress website will allow you to provide 24/7 customer support to your visitors, even when your support team isn’t available.
This will reduce the number of support tickets on your website and improve user experience.
Chatbots can also be used to automate other customer support tasks like answering frequently asked questions, providing product support, and fixing smaller issues.
This will save a lot of time and let your team focus on more complex issues.
If you have an online store, then you can also use a chatbot to find out about a customer’s interests and ask them about their needs. The chatbot can then answer the customer’s queries and close the deal.
Having said that, let’s see how to easily add a chatbot in WordPress, step by step. We’ll cover three different methods, and you can use the quick links below to jump to the one you want to use:
It also comes with a powerful Heroic AI Assistant that lets you easily add a chatbot to your knowledge base page. The AI chatbot is trained directly from your knowledge base articles so it can provide accurate responses to visitor questions.
Note: You’ll need the Heroic KB Pro plan to access the Heroic AI Assistant.
Once the plugin is activated, you need to create a knowledge base so that you can train your AI chatbot on it. Make sure that your knowledge base includes detailed, high-quality articles that will help your audience learn how to use your products/services.
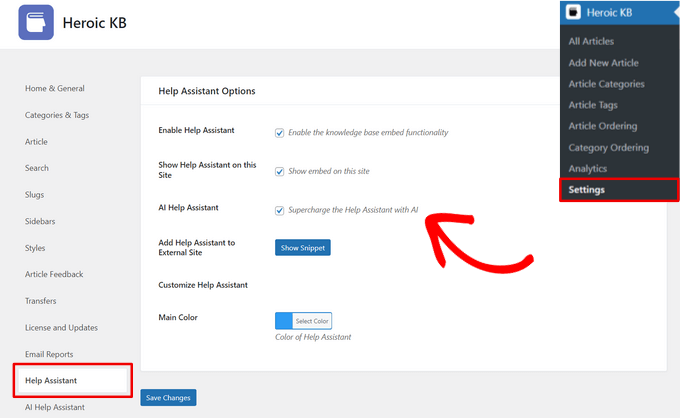
After you’ve created your knowledge base, you can set up the Heroic AI Assistant.
To do that, go to Heroic KB »Settings from the WordPress dashboard and click on the ‘Help Assistant’ tab.
From there, you need to place a checkmark next to the Enable Help Assistant, Show Help Assistant on this Site, and AI Help Assistant options.
You can also select the main color of your Help Assistant chatbot on this page.
When you’re done, click on the ‘Save Changes’ button.
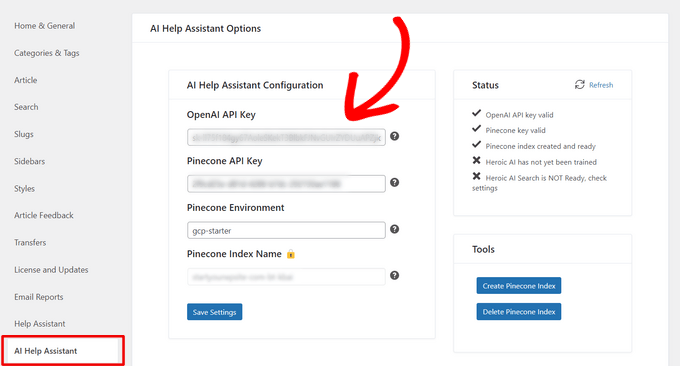
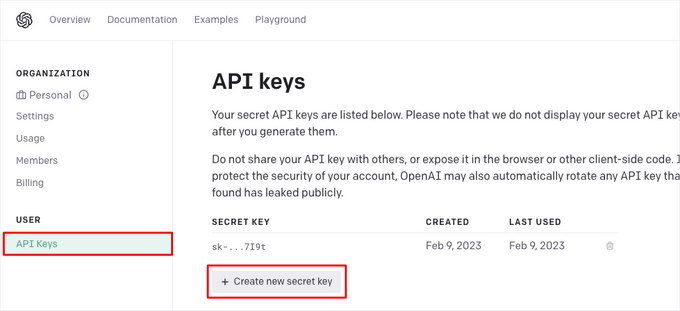
Next, you need to click on the ‘AI Help Assistant’ tab from the Heroic KB Settings page. Here, you need to add API keys for OpenAI and Pinecone.
You can generate an OpenAI API key on the OpenAI website by visiting the API Keys page from your paid account.
Simply generate a new secret key and copy and paste it into the Heroic KB AI Help Assistant Configuration settings.
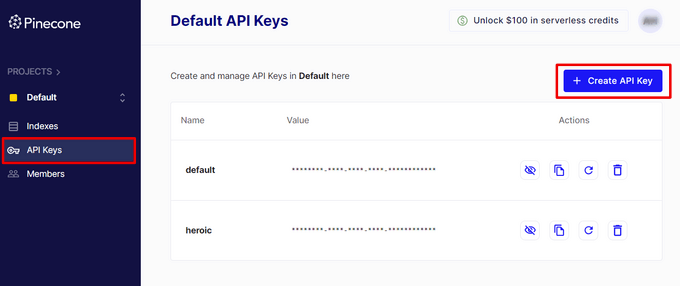
You can generate a Pinecone API key on the Pinecone website with a free or paid account.
Just go to the ‘API Keys’ page and click on the ‘Create API Key’ button. Then, copy and paste it into the Heroic KB settings.
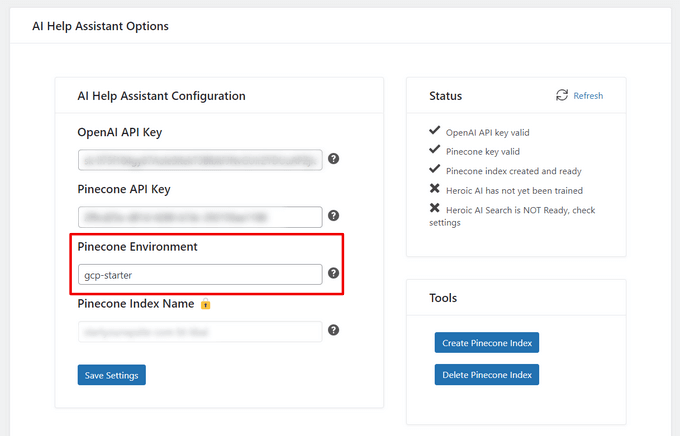
After copying and pasting your API keys, you also need to fill out the ‘Pinecone Environment’ field.
For free Pinecone accounts, you can use gcp-starter as the Pinecone Environment. For paid accounts, you can use any GCP Region supported by Pinecone like eu-west4-gcp or us-central1-gcp, for example.
Don’t forget to hit the ‘Save Settings’ button.
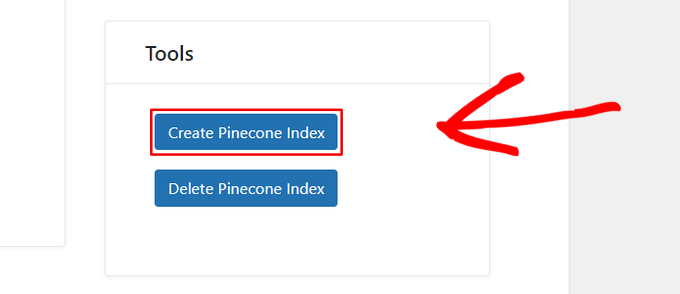
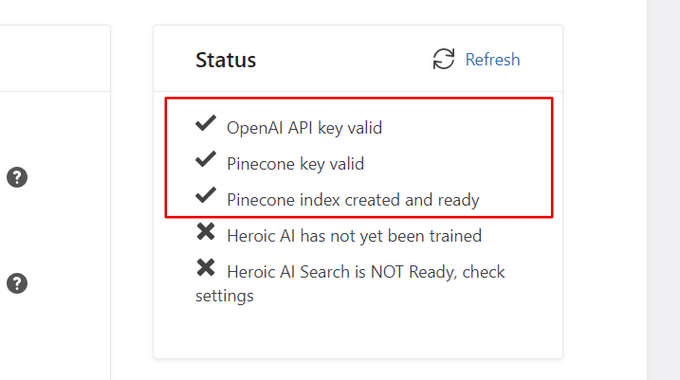
Next, click on the ‘Create Pinecone Index’ button to automatically create a new Pinecone index.
You can check the ‘Status’ box to see if your API keys have been validated and the Pinecone index has been created.
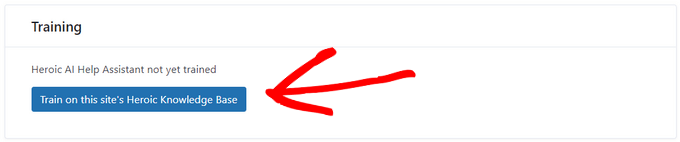
Once those are ready, you can start to train the AI assistant chatbot on your knowledge base.
To do that, simply click on the ‘Train on this site’s Heroic Knowledge Base’ button.
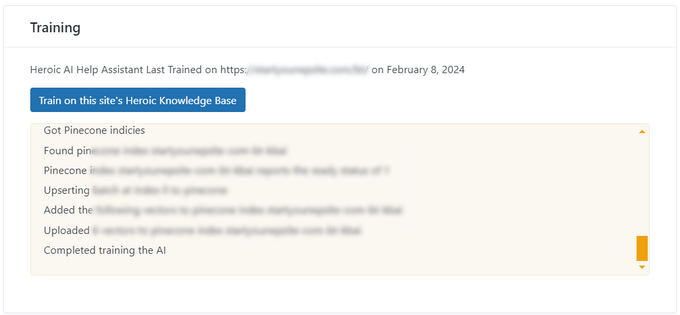
The AI assistant will then begin training, this may take a few minutes depending on the size of your knowledge base. The progress will be displayed in the Training panel.
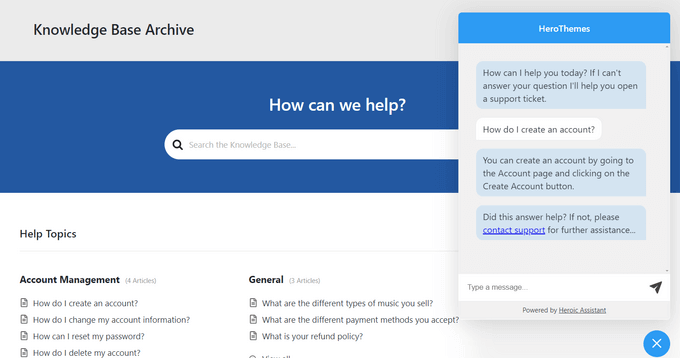
When the training is complete, you can visit your Knowledge Base page to see your Heroic AI Assistant chatbot in action.
Visitors can ask a question and the chatbot will provide an accurate response based on your knowledge base documentation.
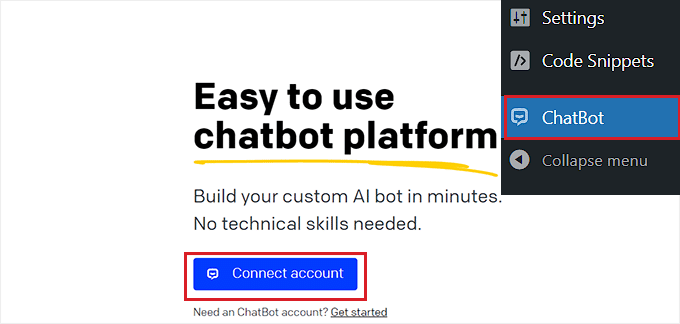
Add a Chatbot in WordPress Using ChatBot (Best for Sales & Customer Service)
If you are looking for an all-in-one chatbot for lead generation, sales, customer service, and more, then this method is for you.
You can easily add a chatbot to your WordPress site using ChatBot. It is the best AI chatbot software that allows you to make chatbots using a drag-and-drop builder. It also offers more chatbot customization options and multilingual features.
Upon activation, visit the ChatBot menu tab from the WordPress admin sidebar and click the ‘Connect Account’ button.
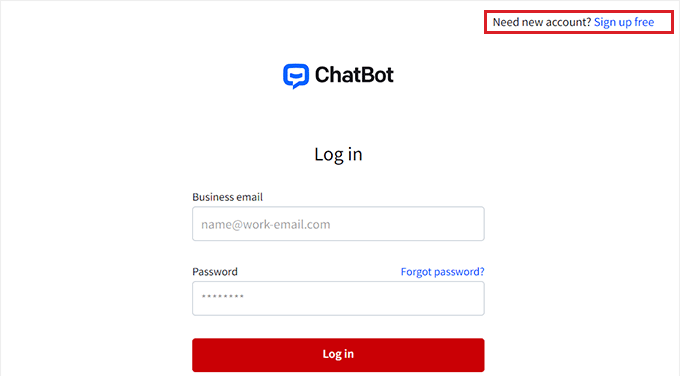
This will open the ChatBot website in a new window, where you have to enter your login credentials and click the ‘Login’ button.
However, if you don’t have an account on ChatBot yet, then just click the ‘Sign up free’ link at the top.
This will take you to a new page where you will need to provide your email address and enter an account name and password.
Once you are done, just click the ‘Create account’ button.
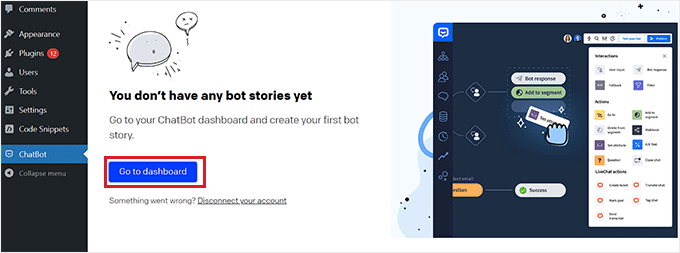
Upon account creation, you will be redirected to your WordPress dashboard. You have now successfully connected your WordPress site with ChatBot.com.
Now, to start creating a chatbot, just click the ‘Go to dashboard’ button.
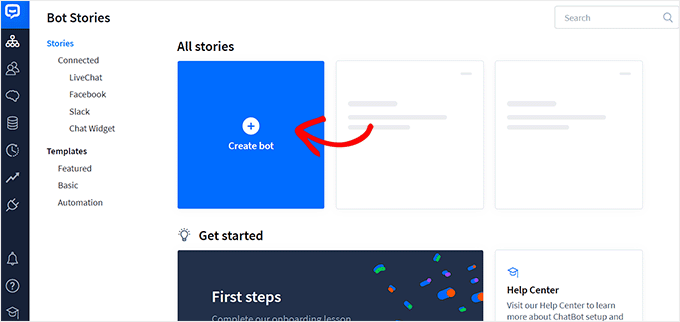
You will then be directed to your ChatBot account dashboard.
From here, click the ‘Create bot’ button at the top to start the process.
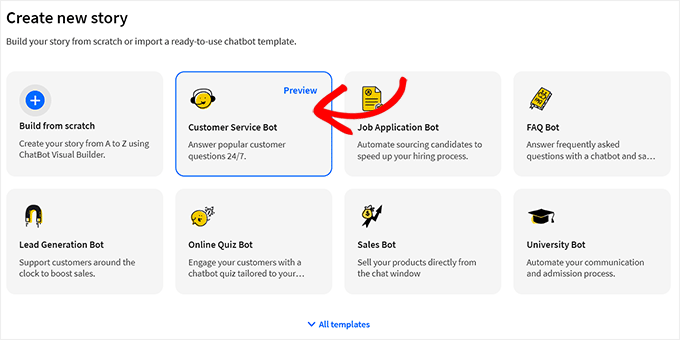
This will take you to the ‘Create new story’ page, where you need to choose the type of chatbot that you want to make.
By default, ChatBot allows you to create a customer service bot, job application bot, lead generation bot, FAQ bot, sales bot, and more.
However, you can also pick the ‘Build from Scratch’ option to make a bot yourself. For this tutorial, we will be creating a customer service bot.
This will open the premade customer service bot template on your screen.
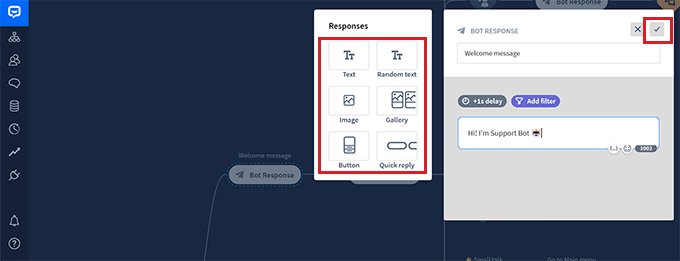
From here, you can easily create a conversation flow for your chatbot by clicking on the ‘Bot Response’ tabs in the chatflow.
This will open a prompt on the screen, where you can add chat responses and quick replies like text, images, and buttons by dragging and dropping the blocks into the prompt.
Once you have done that, just add the bot response and click the ‘Save and Close’ button at the top.
If you want, you can also add custom filters with the chatbot response by clicking on the ‘Add Filter’ button in the prompt.
This will open a dropdown menu where you can pick a filter that will be added to your chatbot’s response, including:
Message: Personalize the conversation by tailoring the responses to the user’s message.
Score: Prevent irrelevant conversations by filtering out messages that have a low score.
Failures: Improve chatbot accuracy by filtering out messages that are likely to result in failure. This can prevent the chatbot from giving incorrect or misleading information.
Name: Create a personalized experience for the user or block messages that contain certain names.
Username: Filter out messages that contain certain usernames.
Integration: Create specific messages for users who use a particular tool.
Language: Write messages in specific languages for multilingual websites.
Timezone: Filter messages according to the relevant time zone.
Additionally, you can create specific messages for users in different regions and countries. This can be helpful if you have a large international audience.
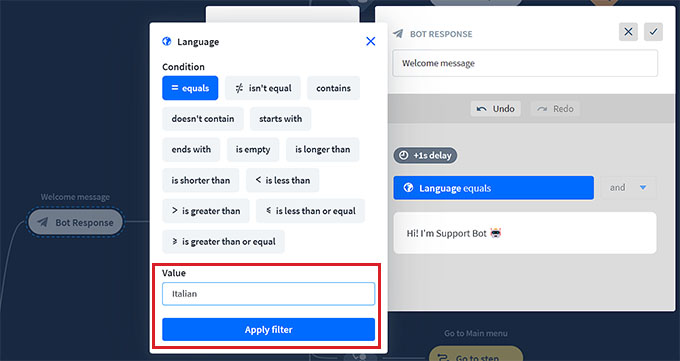
After that, you can also select conditional logic for the now-filtered response. The response that you are creating will only be used by the chatbot if the customer that it is interacting with fits the filter.
For example, if you have a multilingual website and want to create a chatbot for different languages, then you can use the ‘Language’ filter.
Once you do that, select the ‘= equals’ option as the condition and then type in the language name.
After that, you can add the response in the language that you chose. In our example, when a user types a query in the chatbot in Italian, the chatbot will show them the Italian response that we created with this filter.
When you have finished adding your filter, just click on ‘Apply filter’.
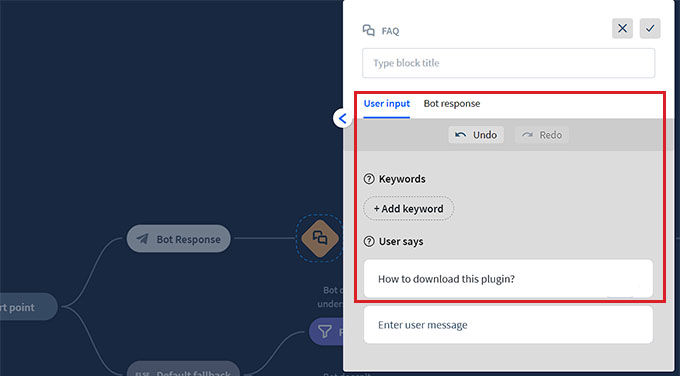
After that, you can also use the ‘+’ button to add different blocks to your chat flow. This will open a prompt where you can select any block of your choice, including:
User Input: Add user messages that will trigger the bot’s response.
FAQ: Add frequently asked questions and their answers in this block.
Attachment Input: Let users attach files in an ongoing conversation with the chatbot.
Bot Response: Add a chatbot’s response to a question.
Backtracking: Prevent users from viewing previously matched interactions with the bot.
Fallback: Display a general message or trigger an action anytime your chatbot can’t match the user query with any chatbot response.
Flow: Visually organize complex chatbot response scenarios.
Add to segment: Segment all the users into different groups based on user data.
Delete from segment: Delete users from a specific segment.
Set attribute: Save information about users.
Mark Goal: Mark a conversation as having reached its goal.
You also have the option to send a transcript of a conversation to an email address or tag different chatbot conversations with keywords and phrases.
For example, if you choose the FAQ block, it will open on your screen, where you can now add common customer support questions and their answers.
Your chatbot will then use these responses to answer customer queries on your website.
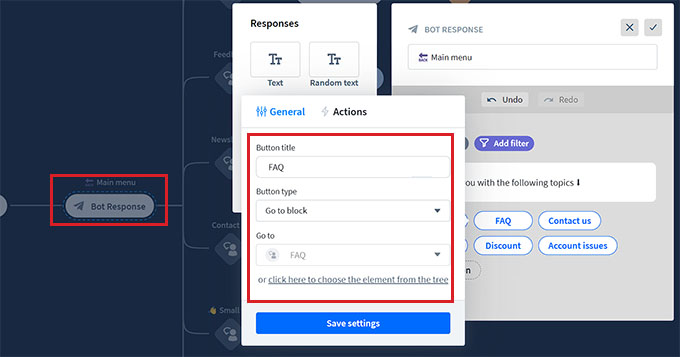
Next, click on the ‘Main Menu’ bot response tab to open the block prompt. Here, you can add buttons for all the services that your chatbot can offer using the Button block.
After that, click on each Button block to open its settings and configure where you want the button to direct the users.
For example, you can allow users to be directed to the FAQs chatbot response that you created by selecting the button type as ‘Go to block’.
Next, select the ‘FAQ’ block from the ‘Go to’ dropdown menu and click the ‘Save Settings’ button.
Other than FAQs, you can also create buttons for directing users to your newsletter signup, contact us page, discount offers, and more.
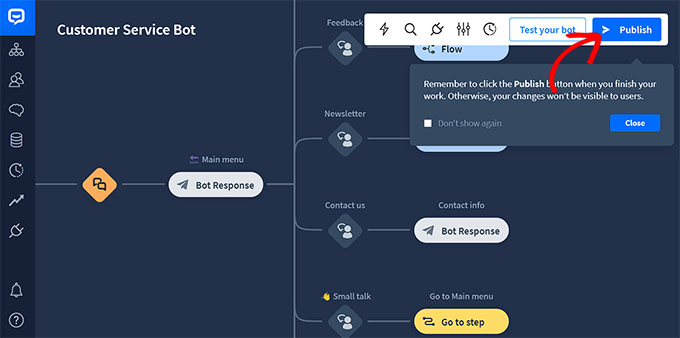
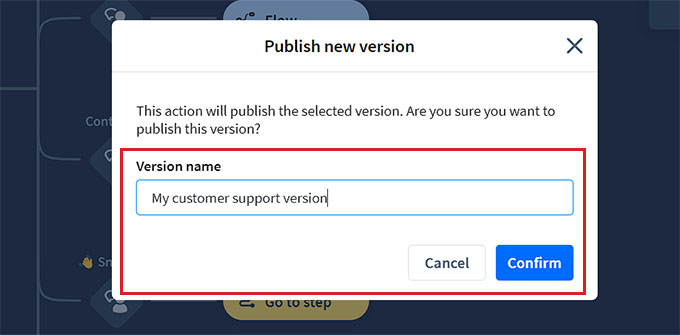
Once you are done, don’t forget to click the ‘Publish’ button at the top to store your settings.
A prompt will now open on your screen, asking you to provide a name for your chatbot.
After entering the details, simply click the ‘Confirm’ button to publish your chatbot.
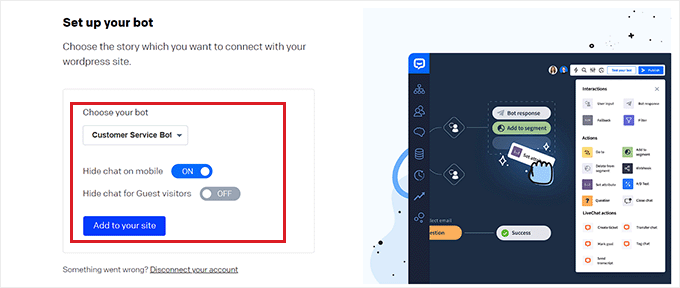
Next, visit your WordPress dashboard and head over to the ChatBot tab, where you will now notice that the ‘Choose your bot’ section will be visible on the screen.
Note: Keep in mind that it might take 3-4 hours between creating your chatbot and it being visible in your WordPress dashboard.
Now, simply choose the bot that you just created from the dropdown menu.
After that, toggle the ‘Hide chat on mobile’ switch to ‘On’ if you don’t want people visiting your website from their phones to be able to see the chatbot.
You can also toggle the ‘Hide chat for Guest visitors’ to ‘On’ if you want the chatbot to be exclusive for your members only.
Finally, click the ‘Add to Site’ button. Now, you can visit your website to view the chatbot in action.
Add a Chatbot in WordPress Using HubSpot (Free & Easy)
If you are looking for a free and easy way to build a chatbot, then you can use this method.
HubSpot is an amazing customer relationship management (CRM) system that comes with a suite of tools for sales, customer service, marketing, and content management.
It even lets you create automated conversations with your website visitors with its free chatbot builder.
First, you will need to install and activate the HubSpot plugin on your website. For detailed instructions, you may want to see our beginner’s guide on how to install a WordPress plugin.
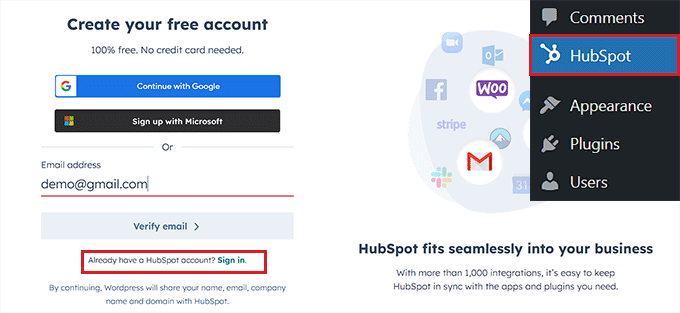
Upon activation, you need to visit the HubSpot menu tab from the WordPress admin sidebar and enter your email address to create a HubSpot account.
If you already have one, then just click the ‘Sign In’ link at the bottom.
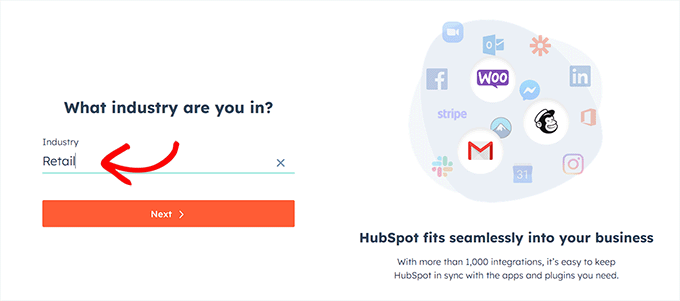
Once you’ve provided your details and set a password for your new account, HubSpot will ask you about the industry that you work in.
Simply select an industry of your choice from the dropdown menu and click the ‘Next’ button.
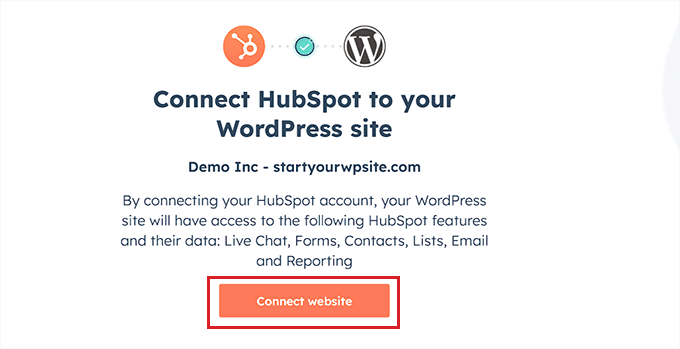
After that, HubSpot will create a new account for you and then ask you to connect it with your WordPress site.
From here, simply click the ‘Connect Website’ button.
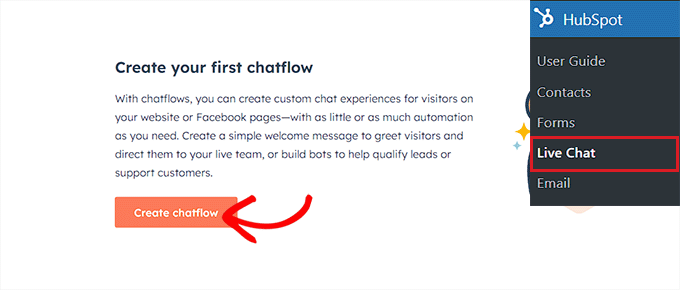
Now, it’s time for you to start creating your chatbot.
To do this, visit the HubSpot » Live Chat page from the WordPress dashboard and click the ‘Create chatflow’ button.
This will take you to the next page, where you can select any of the premade chatbot templates.
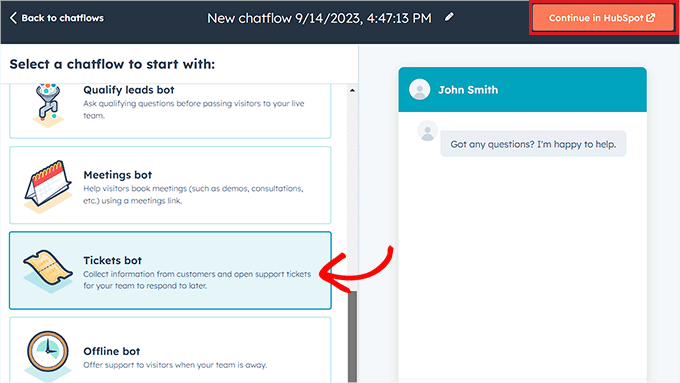
By default, HubSpot allows you to create a concierge bot, qualify leads bot, meetings bot, ticket bot, offline bot, or even a chatbot from scratch.
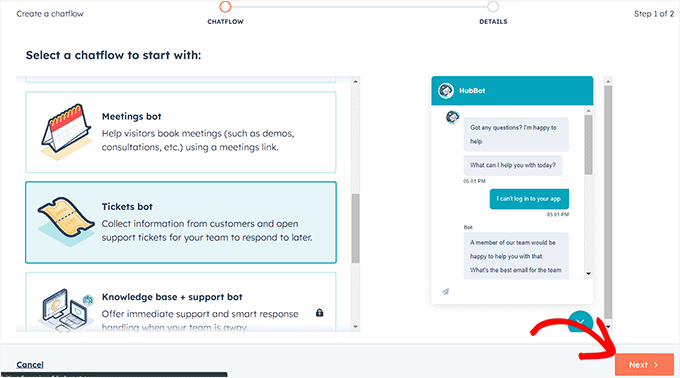
For this tutorial, we will be creating a ‘Tickets bot’.
Just select the chatflow you want to use and then click the ‘Continue in HubSpot’ button to move forward.
You will then be directed to your HubSpot account, where you will be creating the rest of your chatbot.
From here, click the ‘Next’ button to move ahead.
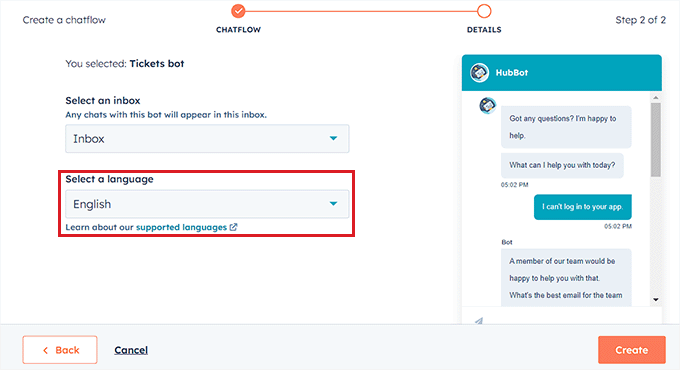
In the next step, you need to select the language for your chatbot from the dropdown menu.
You can leave the other settings as they are and click the ‘Create’ button.
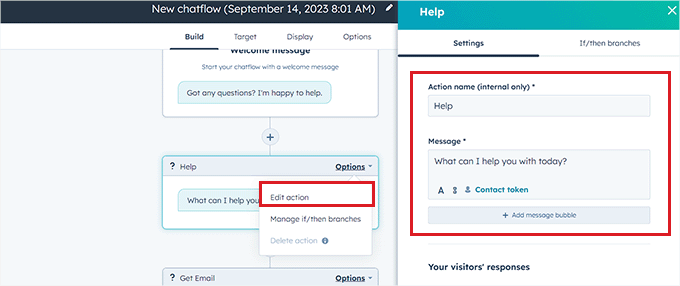
Your template will now open in the chatbot builder, where you can edit the chatflow.
Simply click on the ‘Options’ tab in the bot response and select the ‘Edit’ link.
This will open the action settings in the left column, where you can change the action name and text.
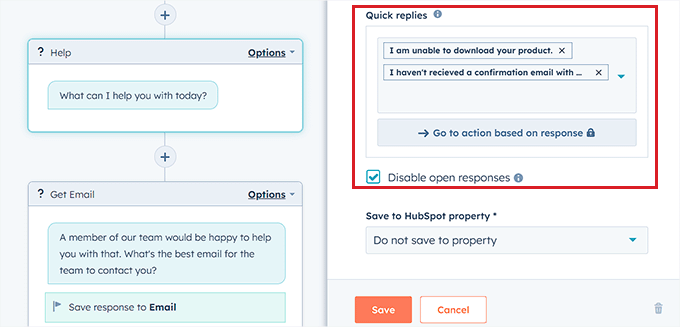
In HubSpot, an action is a step in the chatbot conversation that performs a specific task, like asking questions or sending responses. The first action for your chatbot will be the first question that is sent to the website visitor.
After that, scroll down to the ‘Your visitors’ responses’ section and type all the quick replies that a visitor may potentially give to this question.
For example, a visitor may ask you how to purchase your product, or they might want to report an error that they are facing on your website.
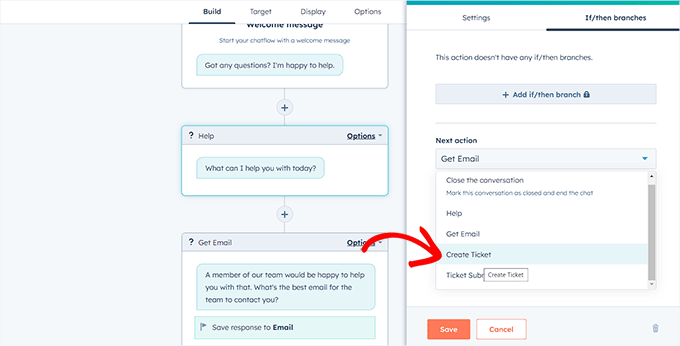
After that, scroll back to the top and switch to the ‘If/then branches’ tab.
From here, you have to select the action the chatbot will take if the customer replies with one of the quick responses that you just added.
For example, if you want the chatbot to open support tickets every time a user is unable to receive a confirmation email with credentials, then select the ‘Create Ticket’ option from the dropdown menu.
After that, just click the ‘Save’ button to store the action settings.
After that, you can leave the rest of the chatflow settings as they are or keep editing the different actions for your chatbot.
Chatbot will now create a support ticket for all the quick responses that you’ve added to the action prompt.
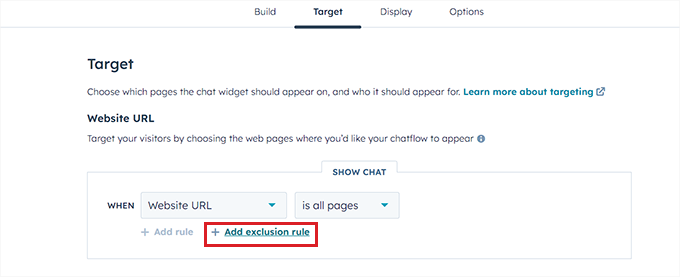
Next, switch to the ‘Target’ tab from the top. Here, you have to choose where the chatbot widget will appear on your website.
You can leave these settings as they are if you want the chatbot to appear on every page of your website.
However, if you want to hide the chatbot on specific pages, then you will have to click the ‘Add exclusion rule’ link. This will open another rule where you can simply add the URL of the page where you want to hide the chatbot in the field on the right.
Once you are done, scroll down to the ‘Visitor information and behavior’ section. Here, you can choose the visitors that you want the chatbot to be shown to.
For example, if you only want visitors who are part of your contact list to be able to see the chatbot, then you can choose the ‘Visitor’ option from the left dropdown menu and the ‘Is a contact’ option in the right field.
After that, click the ‘Save’ button and switch to the ‘Display’ tab.
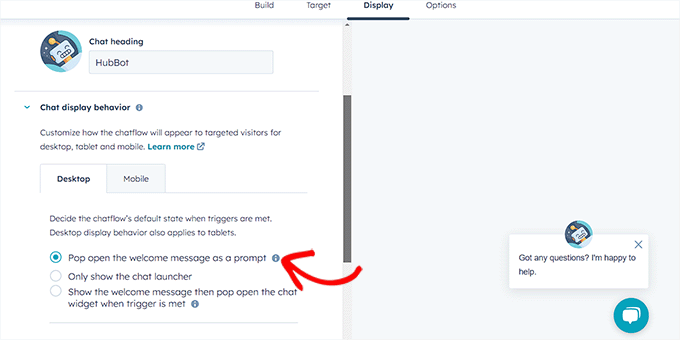
From here, you can upload an avatar image for your chatbot and change its name.
Next, expand the ‘Chat display behavior’ section and choose the chatbot’s default state when the triggers are met.
For example, if you want the bot’s welcome message to appear immediately once someone visits your website, then you can choose the ‘Pop open the welcome message as a prompt’ option.
If you pick ‘Only show the chat launcher’, then visitors will have to click on your chatbot to see its prompts.
However, if you want the chatbot to appear only when a trigger is met, then you can select the third option.
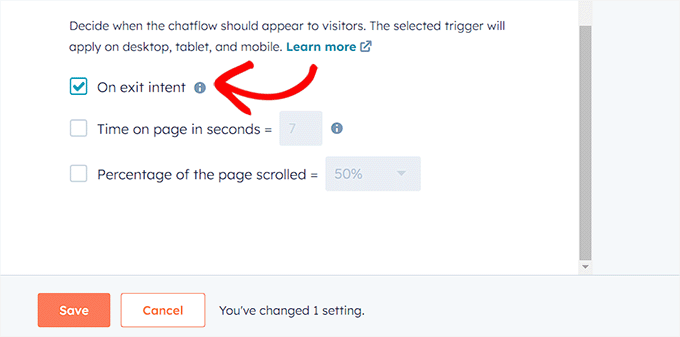
After that, scroll down and choose the trigger for the chatbot appearance.
For instance, if you want the chatbot to be displayed once the visitor is leaving your site, then select the ‘On exit intent’ option.
However, you can also choose the percentage of pages scrolled or minutes spent on your website as triggers.
Next, you can also switch to the ‘Mobile’ tab to configure chat display settings for mobile phones.
Once you have done that, simply click the ‘Save’ button to store your changes.
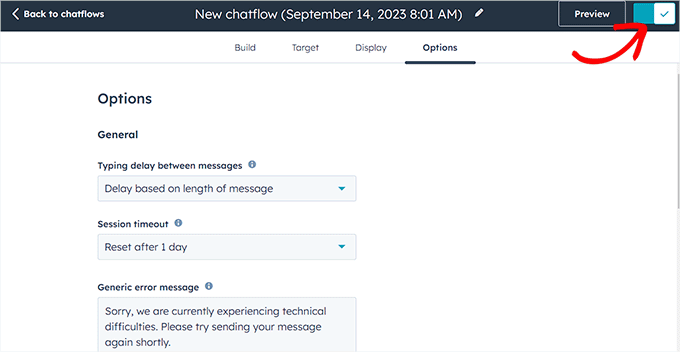
Now, switch to the ‘Options’ tab from the top to configure general settings like delay message text, session timeout, generic error message, bot language, availability, and more.
After that, click the ‘Save’ button to store your settings. Finally, toggle the switch at the top to activate your chatbot on your website.
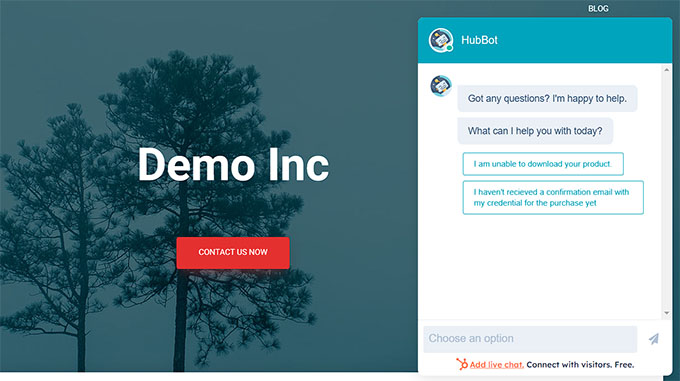
Now, you can visit your WordPress site to see your chatbot in action.
This is what it looked like on our demo website.
Bonus: Add Live Chat to Your WordPress Site
Live chat is a communication tool that allows visitors to chat with a member of your customer support team through a chat window on your website.
It is a super popular way to connect with customers and has a satisfaction level of 73%, which is much higher than email, phone, and SMS support.
It comes with pre-made live chat templates, real-time chat, multiple support channels, canned responses, chat transcripts, chat analytics, and so much more.
Recently, one of our readers asked us how they can pass payment processing fees to customers in WordPress.
Most payment processors charge additional fees to facilitate a secure transaction process for the buyer and seller. Asking customers to pay the payment processing fees helps you increase your earning by around 3%.
In this article, we will show you how to easily pass payment processing fees to customers in WordPress, step by step.
Why Pass Payment Processing Fees to Customers in WordPress?
If you have an online store, then you may have noticed that most payment processors charge you additional per-transaction fees, percentage-based fees, and gateway fees.
For instance, if a user buys a chair from your furniture store for $50 and uses Stripe as a payment method, then you will only get $48.55 in your account. This is because Stripe collects 2.9% + $0.30 per transaction.
Passing this processing fee to customers allows you to receive the entire amount ($50) for your product/service without having to worry about absorbing this fee as a business expense.
Plus, it gives you more control over your product pricing strategy.
It also helps build transparency with customers by adding a separate line for the fees on the checkout page, which can act as a competitive advantage. It will allow you to set lower base prices for your products and attract more customers who are looking for the lowest total cost.
Having said that, let’s see how to easily pass the payment processing fees to customers in WordPress. In this tutorial, we will cover three methods, and you can use the links below to jump to the one of your choice:
Method 1: Pass Payment Processing Fees to Customers With WP Simple Pay
WP Simple Pay is the best WordPress Stripe plugin on the market that allows you to accept payments from customers without adding a shopping cart. It comes with premade templates, has a form builder, and lets you add payment processing fees directly to the customer’s bill.
Plus, WP Simple Pay is a great choice if you have a membership site, sell courses online, or sell a single product in your online store.
Now, you can start by visiting the WP Simple Pay » Add New page from the WordPress admin sidebar. This will direct you to the ‘Select a Template’ page where you can choose any template you like.
For this tutorial, we will be creating a simple payment form.
The form builder will now open up on your screen. Here, you have to provide a name and description for the form that you are about to create.
Then, select ‘On-site payment form’ as the form type and switch to the ‘Payment’ tab.
Once you are there, scroll down to the ‘Price Options’ section and simply add an amount for your product or service. You can also pick if you want it to be a one-time or recurring payment.
If you want to add multiple prices, then you can click the ‘Add Price’ button at the top.
After that, scroll down to the ‘Payment Method’ section and check the boxes next to the gateways that you want to add to your payment form.
With WP Simple Pay, you can add KIarna, Affirm, AliPay, debit card, credit card, SEPA Debit, and many more methods.
Once you do that, click the ‘Configure’ link next to the payment option of your choice.
This will open a prompt on the screen, where you have to check the ‘Add an additional fee to payments made with this payment method’ option. Once you do that, you can set a transaction fee percentage for the product that you are selling.
If you don’t configure this setting, then Stripe will automatically add 2.9% of the product price as the fee. Then, click the ‘Update’ button to store your settings.
Now, the payment processing fee will automatically be added to the customer’s bill on the checkout page.
However, if you think that adding a recovery fee without customer consent can damage your reputation, then you can also provide a choice to your customer.
To do this, switch to the ‘Form Fields’ tab. Here, you can add, rearrange, or delete fields in the form according to your liking. For more information, you can see our tutorial on how to accept payments with Stripe in WordPress.
Once you do that, open the ‘Form Fields’ dropdown menu and select the ‘Fee Recovery Toggle’ option. Then, click the ‘Add’ button.
Now, users on your site will have to toggle this switch if they want to pay the payment processing fee themselves.
Next, switch to the ‘Payment Page’ tab and check the ‘Enable a dedicated payment page’ option.
After that, you can now customize your payment form page by adding a permalink, color scheme, image, and footer text.
Once you are done, don’t forget to click the ‘Publish’ button at the top.
Now, simply visit your payment form page to view the fee recovery feature in action.
Method 2: Pass Payment Processing Fees to Customers With Easy Digital Downloads
If you sell digital products like eBooks, PDFs, music, or spreadsheets, then this method is for you.
Easy Digital Downloads is the best WordPress plugin for selling digital products that makes it super easy to pass processing fees to customers using an addon.
First, you will need to install and activate the Easy Digital Downloads plugin. For detailed instructions, see our beginner’s guide on how to install a WordPress plugin.
Note: EDD has a free plan. However, you need the pro version to unlock the ‘Gateway Fees’ extension.
Upon activation, head over to the Downloads » Settings page from the WordPress dashboard to enter your license key.
You can get this information from your account on the Easy Digital Downloads website.
After that, you must set up your store to start selling products. For detailed instructions, you can check out our beginner’s guide on how to sell digital downloads in WordPress.
Once you have done that, visit the Downloads » Extensions page from the WordPress admin sidebar and locate the ‘Gateway Fees’ extension.
Then, click the ‘Install’ button under it.
Upon addon activation, visit the Downloads » Settings » Payments page and switch to the ‘Gateway Fees’ tab.
Here, you can add the payment processing fee that you want to charge your customers next to the ‘Percent fee for Stripe’ or ‘Flat fee for Stripe’ options.
Once you do that, you can add a label that will be displayed on the checkout page to explain the additional fee being charged to the user.
You can configure the gateway for all the payment methods that you have added to your site from this page.
After that, don’t forget to click the ‘Save Changes’ button to store your settings.
You can now visit your WordPress site to view the additional payment processing fee on the checkout page.
Method 3: Pass Payment Processing Fees to Customers With WP Charitable
If you accept donations or do crowdfunding through your website, then this method is for you.
WP Charitable is a popular WordPress donation plugin that lets you create unlimited fundraising campaigns and comes with a Fee Relief extension to allow users to cover payment processing fees.
For this tutorial, you will need the WP Charitable Plus license to unlock this extension.
Next, visit the Charitable » Settings page from the WordPress dashboard to enter your pro plan’s license key and click the ‘Verify Key’ button.
You can find this information in your account on the WP Charitable website.
After that, head over to the Charitable » Addons page from the WordPress admin sidebar and find the ‘Charitable Fee Relief’ extension.
Then, click the ‘Install Addon’ button.
Upon addon activation, you need to go to the Charitable » Settings page and switch to the ‘Extensions’ tab.
Here, you can check the ‘Opt-in checkbox, checked by default’ option as a fee relief mode. This will add a checked box to the donation form for fee recovery. If the user does not want to pay the processing fee, then they will have to uncheck this box.
However, if you don’t want to provide users with an option and automatically add the recovery fee along with the donation amount, then you can check the ‘Automatic opt-in’ option.
After that, you must click the ‘Enable Fee Relief’ button next to the payment gateways to activate fee recovery for payment processing.
Once you do that, you can set a payment processing fee as a combination of a percentage and a fixed amount per donation.
For instance, if PayPal charges 2.9% and $0.30 per transaction, then these are the amounts that you will have to add in the fields.
Once you are done, don’t forget to click the ‘Save Changes’ button to store your settings.
Here, you will have to enter a campaign name, after which you will be taken to the ‘Select a Template’ page.
From here, click the ‘Create Campaign’ button under a template of your choice.
This will open the drag-and-drop builder, where you can drag, rearrange, and delete form fields according to your liking.
For example, you can add the ‘Donation Amount’ field and then add some custom amounts that users can choose from in the left column.
Once you do that, you can also add a progress bar, social links, a campaign title, and more from the left sidebar. You can also configure payment gateways by switching to the ‘Payment’ tab.
Once you are done, simply change the form status to ‘Publish’ from the dropdown menu in the top right corner of the screen. Then, click the ‘Save’ button at the top to store your settings.
Now, just visit your WordPress site to view the donation form with the fee recovery option.
Bonus: Accept ACH Payments in WordPress
If you do not want to pass payment processing fees to customers in WordPress, then you should consider accepting ACH payments on your website.
ACH is an electronic bank-to-bank payment made through the Automated Clearing House (ACH) network in the United States. Keep in mind that this method will only work if your business is based in the USA.
Accepting ACH payments can lower your transaction fees a lot as Stripe’s fee for ACH is just 0.8% per transaction compared to its usual 2.9%.
For example, if you have a WooCommerce store and a customer buys some products for $100, then the transaction fee with ACH payments will be only $0.80. On the other hand, payment processing fees using other methods will be $3.20.
You can easily start accepting ACH payments on your website using WP Simple Pay.
Simply install and activate the plugin and then visit the WP Simple Pay » Add New page from your WordPress dashboard. Here, you must choose the ‘ACH Direct Debit Form’ template and create a payment form in the builder.
Once you add the form to your website, you will have to pay a lower transaction fee for users choosing this option as a payment gateway.
Do you want to use Google search on your WordPress site?
By default, WordPress comes with a built-in search feature, but it is not very good. By adding Google Search in its place, you can display more accurate and relevant search results to visitors.
In this article, we will show you how to easily add Google Search to a WordPress site.
Why Should You Use Google Search in WordPress?
The default WordPress search feature is not very useful and often fails to find relevant results to user queries. This forces many site owners to look for alternatives.
You can use a popular WordPress search plugin. However, the problem is that you still have to manage that plugin, and it will have an impact on your server resources.
On the other hand, you can use Google’s reliable and powerful search feature instead. It is free, allows you to limit the search to your sites only, and can be run from your WordPress site.
Plus, the Google search is fast, users already trust the brand, and you will not have to maintain or update it. You can even allow users to search external websites on Google if needed.
Having said that, let’s see how you can easily add a Google site search to your WordPress site.
How to Add Google Search to a WordPress Site
You can easily add Google Search to your WordPress site by visiting the Google Programmable Search Engine website.
From here, click the ‘Get Started’ button.
This will direct you to the ‘Create a new search engine’ page, where you must add a name for the search form you are about to create.
Next, select the ‘Search specific sites or pages’ option in the ‘What to search?’ section and add your WordPress site’s URL.
Now, the Googe Site Search will only index the content available on your website. However, if you want Google to show search results from other websites as well, then you can choose the ‘Search the entire web’ option.
Next, scroll down and toggle on the ‘Image Search’ option to allow your Google Search form to index images on your website. We recommend this option if you sell photos online, have a photography website, or run a travel blog.
After that, you can also toggle on the ‘Safe Search’ switch so that users won’t be shown inappropriate results for their queries.
Once you are done, click the ‘Create’ button.
Google will now generate your search engine ID code for you.
From here, simply copy the code and paste it into a notepad app or plain text editor.
Now, you must visit your WordPress dashboard and edit your theme files to add the search to your site’s <body>. However, this can be risky, and the smallest error can break your website.
That is why we recommend using WPCode instead. It is the best WordPress code snippets plugin on the market that makes it safe and easy to add custom code.
Note: WPCode has a free plan that you can use for this tutorial. However, upgrading to the pro version will give you access to more features like smart conditional logic, a cloud library of code snippets, and more.
Upon activation, visit the Code Snippets » + Add Snippet page from the WordPress admin sidebar. Here, click the ‘Use Snippet’ button under the ‘Add Your Custom Code (New Snippet)’ option.
This will take you to the ‘Create Custom Snippet’ page, where you can type any name you like for the snippet. Then, select ‘Universal Snippet’ as the code type from the dropdown menu on the right.
Once you do that, simply paste the Google Search Engine ID into the ‘Code Preview’ box.
Then, scroll down to the ‘Insertion’ section and select the ‘Auto Insert’ mode. The Google Search form will be automatically added to your site upon activation.
After that, you can expand the ‘Location’ dropdown menu to choose where you want to display your search box.
For example, if you want to display the search form at the top of all your pages and posts, then you can select the ‘Insert Before Post’ option.
Next, scroll back to the top and toggle the ‘Inactive’ switch to ‘Active’.
Finally, click the ‘Save Snippet’ button to store your settings.
You have successfully added a Google Site search form manually.
You can now visit your WordPress blog to see it in action.
Alternative: Use SearchWP to Create an Amazing Search Form
If you find it difficult to add Google Site Search to your website or you are looking for an alternative, then you can use SearchWP for internal search.
It is the best WordPress search plugin on the market that automatically replaces the default search form and allows users to find anything they need on your site.
SearchWP is used by over 30,000 websites and lets you create a custom relevance scale to adjust the search algorithm.
You can also make any part of your site searchable including PDFs, custom post types, media, comments, custom fields, WooCommerce products, and more.
If you have a multilingual site, then you can also create a multilingual search with the plugin.
However, you must keep in mind that, unlike Google Search, the plugin can only index and show results for content available on your website.
Do you want to learn how to create custom meta boxes for your WordPress posts, pages, and custom post types?
WordPress adds metadata to your content automatically, such as the publication date, categories, and tags. However, you may also want to add your own custom meta data.
In this article, we will show you how to easily add unique information to your content, by creating a custom meta data box in WordPress.
What is a Custom Meta Box in WordPress?
When you create posts and pages, or custom post types in WordPress, that content usually has its own metadata. This metadata is information related to the content like date and time, the author name, title, and more.
You can also add your own metadata using the default custom fields box.
The Custom Fields box is a good solution if you just want to add custom metadata to a few posts. However, if you plan to add lots of unique information to your content, then it makes sense to create a custom metadata box.
In fact, many of the popular WordPress plugins add custom meta boxes to the Edit screen for posts and pages. In the following image, you can see how easy it is to add SEO information to your post, using a custom meta box provided by AIOSEO.
With that being said, let’s see how you can easily add custom meta boxes in WordPress posts and post types.
How to Add Custom Meta Boxes in WordPress Posts and Post Types
The easiest way to add custom meta boxes to WordPress is by using Advanced Custom Fields. This plugin allows you to attach all kinds of extra information to your posts and pages, and then show that data to visitors using a shortcode.
The first thing you need to do is install and activate the Advanced Custom Fields plugin. For more details, see our step-by-step guide on how to install a WordPress plugin.
Create a Custom Meta Box
Upon activation, go to ACF » Field Groups and then click on the ‘Add New’ button.
Here, you can create the custom fields that will appear in the metadata box.
To start, you’ll need to type a title into the field that shows ‘Field Group Title’ by default. This will appear in the WordPress content editor, and it will be used as the title of your meta box.
With that being said, you should use something descriptive, especially if you manage a multi-author WordPress blog or share the dashboard with other people.
With that done, you’re ready to add the first field to your meta box.
Add Custom Fields to the Meta Box
To start, open the ‘Field Type’ dropdown and choose the type of field you want to add, such as Text, Date Picker, Checkbox, or any other field type.
After that, type in a label for the field.
Advanced Custom Fields will show this label before the field, so it will help users understand what information they need to enter.
Advanced Custom Fields will generate the ‘Field Name’ automatically, so you can leave this field empty.
With that done, you may want to type in a ‘Default Value.’ This will be added to the page, post, or custom post type automatically if the user doesn’t add their own information.
You may see more options depending on the kind of field you’re creating. For example, if you selected ‘Image’ from the ‘File Type’ dropdown, then you can choose the image format.
Most of these options are self-explanatory so you can follow the onscreen instructions to configure the custom field.
When you’re happy with how the field is set up, click on ‘Close Field’ to collapse the section.
You can now add more fields to the custom meta box by clicking on the ‘Add Field’ button.
Then, simply configure the field by following the exact same process described above.
Add a Custom Meta Box to the WordPress Content Editor
When you’re happy with how the custom meta box is set up, you’ll need to define where and when the meta box will appear.
Scroll to the ‘Settings’ section and then click on the ‘Location Rules’ tab.
Advanced Custom Fields can add the box to all kinds of content. For example, you can show the meta box on specific post types, categories, taxonomies, navigation menus, and more.
Simply use the dropdown menus to choose where the meta box will appear in your WordPress dashboard. For example, if you accept guest posts then you may want to add the box to all posts in the ‘Guest Posts’ category.
After that, click on the ‘Presentation’ tab.
Here, you can choose the meta box style, where it appears on your WordPress blog, and where the label and instructions will appear.
If you plan to add multiple boxes in the same location, then you can change the order they appear in by typing into the ‘Order No’ field.
If you’re unsure, then you can leave this field set to 0.
On this screen, you’ll also see a list of all the fields that WordPress usually shows on the post edit screen.
If you want to hide a field, then simply check its box. For example, if you’re using custom fields to create an author info box, then you may want to hide the default ‘Author’ field.
When you’re happy with the changes you’ve made, click on ‘Save Changes’ to make the field group live.
You’ve now successfully created a custom meta box for your WordPress post, page, or custom post type. Depending on your settings, you can now visit the post editor to see the custom meta box in action.
Displaying Your Custom Meta Box Data in WordPress Theme
You’ve now successfully added a custom meta box to the WordPress dashboard. Any information users type into the meta box will be stored in the WordPress database when they save or publish the post. However, this information won’t appear on your website by default.
With that in mind, let’s make sure the custom metadata appears in your WordPress theme, so visitors can see it.
You can do this using shortcode or by editing your WordPress theme files.
How to Display Custom Metadata using Shortcode
Adding a shortcode in WordPress is the easiest method, and allows you to control exactly where the information appears on your website. For example, if you’ve created a ‘Star Rating’ field, then you can show this information after the post title, inside the content, in the footer, or anywhere else simply by adding a shortcode.
However, you will need to add a shortcode to every page, post, or custom post type manually. This can take a lot of time and effort, especially if you have a lot of content.
To get a field’s shortcode, go to ACF » Field Groups. Then, hover over the field group that you want to display and click on the ‘Edit’ link when it appears.
You’ll now see all the fields that make up this group.
For each field you want to display, make a note of the value in the ‘Name’ field.
With that done, go to the page, post, or custom post type where you want to show the custom metadata.
You can now click on the ‘+’ icon and type in ‘Shortcode.’
When the right block appears, click to add it to your layout.
You can now add the following shortcode to the block, making sure to replace "article_byline" with the name of the field you want to show.
You can now repeat these steps to add multiple custom fields to the post.
When you’re happy with the changes you’ve made, either click on the ‘Publish’ or ‘Update’ button. Now, simply visit your WordPress website to see the custom metadata in action.
How to Display Custom Metadata by Editing Your WordPress Theme
If you want to show custom metadata in the same location on every page, post, or custom post type, then you can add code to your WordPress theme files.
This can save you time in the long-term, but it isn’t the most beginner-friendly method. You’ll also lose all the custom code the next time you update your WordPress theme, which is why we recommend creating a child theme. You can then add your custom code to the child.
You’ll need to edit the file where you want to show the custom metadata. This will vary depending on your theme, but you’ll usually need to edit your site’s single.php, content.php, or page.php file.
Once you have the right file, you’ll need to add the code inside the WordPress loop. To find this loop, simply search for code that looks something like this:
<?php while ( have_posts() ) : the_post(); ?>
You can then paste your code after this line and before the line that ends the loop:
<?php endwhile; // end of the loop. ?>
As an example, your custom field code should look something like this:
Notice how we wrapped the code in a h2 heading with a CSS class. This allows us to format and style the custom field later by adding custom CSS to our theme.
Recently, one of our users asked us if it’s possible to create an online training manual in WordPress.
Training manuals are helpful for onboarding new employees, sharing product information and instructions, teaching customers how to use your products and services, and more. With the right tools, you can easily add training manuals to your website.
In this article, we will show you how to create an online training manual in WordPress.
Why Create an Online Training Manual in WordPress?
While some people may think that training manuals are a thing of the past, they are still very important for completing a task properly.
The purpose of an online training manual is to provide a set of instructions and guidelines to perform a task, job, or process. Whether you have a remote team or an in-person company, training manuals can help educate your employees and customers.
For example, you can use training manuals for onboarding new employees. This documentation allows new staff members to learn about your company, how to perform certain tasks, and understand different processes.
Besides that, you can create an online training manual for a specific project or task. The manual will have all the steps documented and help people complete the task correctly.
Online training manuals can also be helpful for customers. You can educate users on how to properly configure and use your products in your online documentation.
That said, let’s look at how to create an online training manual in WordPress.
Setting Up a WordPress Online Training Manual Plugin
The best way to create an online training manual in WordPress is by using the HeroThemes suite of plugins. HeroThemes has the best WordPress knowledge base plugin and theme that lets you add training manuals without editing code.
HeroThemes plugins are very easy to use and offer lots of features that allow you to deliver exceptional customer support. For instance, you can add a detailed knowledge base to your site, manage support tickets and emails, and add FAQs to improve response time.
First, you will need to visit the HeroThemes website and sign up for an account. You will need at least the Heroic Knowledge Base plugin to create an online training manual.
Once you’ve created an account, the next step is to download the Heroic Knowledge Base WordPress plugin. You can find it in your account dashboard under Downloads.
Next, you will need to install the plugin on your website. If you need help, then please see our guide on how to install a WordPress plugin.
Upon activation, you will see the welcome screen. Go ahead and enter your license key and click the ‘Activate’ button.
Next, you will need to follow the onscreen setup wizard to configure the plugin.
For instance, it will ask you to install sample content, categories, and tags. We recommend that you skip this step, as the plugin will automatically populate the knowledge base section.
After that, you can also install optional plugins like Heroic Blocks, Heroic Glossary, and Heroic Table of Contents. For this tutorial, we will install the additional plugins so that we can create advanced documentation.
Next, you will see that the installation process is complete.
The plugin will also show basic instructions for your knowledge base section.
After that, you can go to Heroic KB » Settings from the WordPress admin panel.
In the ‘Home & General’ settings, you can choose the knowledge base home page, edit the header text, choose the number of category columns to show, enable breadcrumbs, and more.
If you switch to the ‘Categories & Tags’ tab, then you will find more settings.
For instance, there are options to sort categories by date, title, comment count, and more. Other options include sorting order, number of articles, and showing article excerpts.
Next, you can go to the ‘Sidebars’ tab.
Here, you will see options to change the position of the sidebar in the training manual. There is also an option to make the article sidebar sticky.
Lastly, you can head to the ‘Style’ tab from the menu on the left.
The plugin lets you edit the width of your training manual, change the link colors, heading style, and more.
When you are done, don’t forget to save your changes.
There are also more settings offered by the plugin that you can explore and change.
Now, the next step is to add content and create an online training manual.
Creating Categories for Your Online Training Manual
To start, you’ll first need to create categories for your online training manual. This will allow you to organize your documentation.
Simply head to Heroic KB » Article Categories from the WordPress dashboard.
Here, you can organize content in the training manual by creating different categories or editing the existing ones.
For example, if you want to create a new category, then simply enter a name, decide on a slug, choose a parent category if it is a subcategory, and add the new article category.
For this tutorial, we added 5 new categories to the training manual.
Next, you can head to Heroic KB » Category Ordering from the WordPress dashboard.
When you are done, just click the ‘Save Order’ button at the bottom.
Adding Content to Your Online Training Manual
Once your categories are ready, you can add new articles for each section.
Note that by default, HeroThemes will add some content to the knowledge base section on your WordPress website if you installed sample content during the setup process.
You can view these articles by going to Heroic KB » All Articles from the WordPress dashboard.
Next, you can edit or remove these pages and add your own to create a training manual.
To add new content to your online training manual, simply click the ‘Add New Article’ button at the top.
This will take you to the WordPress content editor, where you can add new text and customize it.
HeroThemes offers a table of contents block. You can use it in your training manual articles to help users easily navigate the post.
Simply click the ‘+’ button to add the Heroic Table of Contents block. Next, you can edit each heading in the table of contents and hide different headings.
Besides that, HeroThemes also offers Heroic Blocks that can add interactive content to your online training manual articles.
For example, you can add the Heroic Message block to display an important notice, warning, or additional information.
You can also include an accordion/toggle block. This helps group related content together. Users can click to expand the section and view additional information.
More blocks offered by HeroThemes include tabs, lists, zoomable images, and more. Feel free to take your time experimenting with different blocks and creating your online training manual.
You can also select the category for your new article in the online training manual.
Simply head to the Article Categories section from the Article settings menu on the right and choose a category.
Once you’ve added the content, simply publish or update your page.
Next, you can go to Heroic KB » Article Ordering from the WordPress admin panel. Here, you can choose an option from the ‘Category’ dropdown menu and then edit the order of each article in the respective category.
When you are done, go ahead and click the ‘Save Order’ button.
Now, you can visit your WordPress website to view the online training manual in action.
For example, we have multiple categories in the training manual, like Getting Started and Tutorials.
Clicking any of these categories will show the content for the training manual.
You will also want to make sure that your training manual is part of your WordPress menu so that readers can find it easily. For details, you can see our guide on how to add a navigation menu in WordPress.
Restricting Access to the Online Training Manual
HeroThemes also offers an option to restrict access to your online training manual.
For example, let’s say you have an employee onboarding manual that contains sensitive company information. You can restrict its access by only allowing logged-in users to view it.
To start, simply go to Heroic KB » Settings from the WordPress dashboard. Under the ‘Home & General’ settings tab, scroll down to the ‘Restrict Access’ section.
From here, you can click the dropdown menu and select the ‘Logged In’ option.
Besides that, HeroThemes also lets you restrict access to certain categories in the training manual.
Simply go to Heroic KB » Article Categories from the WordPress admin panel. After that, edit any category you’d like to restrict.
Next, you will need to scroll down to the ‘Category Access’ section.
From here, click the dropdown menu and select the ‘Logged In’ option.
Once you are done, click the ‘Update’ button.
Now, only logged-in users can view that specific category in the online training manual.
The news that Google is shuttering Google Business Profile websites has made many users ask us how to migrate their site to WordPress before the service shuts down for good.
In March 2024, Google will be shutting down more than 21.7 million websites created with Google Business Profiles. This is the latest in a history of Google removing products and services.
If you’re one of the users who will be affected by this change, then now is the perfect time to relocate your website.
In this article, we will show you how to migrate a Google Business Profile website to WordPress.
Here’s an overview of what we will cover in this guide. You can click the links below to jump ahead to your preferred section:
Why Migrate a Google Business Profile Site to WordPress?
When you create a Google Business Profile, you get an option to add a website. Previously, if you didn’t have a website, Google would allow you to create a free single-page site instantly.
This way, users looking up your brand on a local search will see a detailed business profile, including a business site, working hours, store locations, directions, phone numbers, and more.
Unfortunately, that redirection will only work until June 10, 2024. People visiting your site after this date will see a ‘page not found’ error.
This can have a negative effect on your business, as it will look less professional. Not to mention, customers won’t be able to view detailed information about your company, products, and services.
As a result, your conversions may drop, and you could end up losing customers to your competitors.
That’s why it’s important to migrate your Google Business Profile site to WordPress.
Note: Google is only shutting down the service that hosts sites through Google Business Profiles. The profile for your business itself will still be available in search results. Later in this post, we will show you how to link your new WordPress site with your business profile.
Why Choose WordPress as a Platform for Your Website?
WordPress is the most popular website builder in the world, as it powers more than 43% of websites on the internet.
The best part is that WordPress is free to use and open-source. By migrating your Google Business Profile site to WordPress, you get more control and flexibility.
For instance, you get to own all your content and don’t have to rely on a third-party platform. All you need is a web hosting service and a domain name to get started.
With WordPress, you get multiple themes. This makes it very flexible, as you can create a simple 1-page WordPress website or a complete online store. It also offers thousands of plugins which help add more features and functionality.
Besides that, WordPress is SEO-friendly. What this means is that you can easily optimize it for search engines like Google. This helps attract users to your website and boost conversion.
Note: Remember that WordPress.com and WordPress.org are different platforms. WordPress.com is a hosted solution that offers limited features, whereas WordPress.org is the famous platform that everyone has come to love and use. You can see our complete comparison of WordPress.com vs. WordPress.org.
That said, let’s look at how you can easily migrate your Business Profile site to WordPress.
Step 1: Create a Backup of Google Business Profile Site
Before you can migrate your website to WordPress, the first step is to backup data from your Google My Business site.
Note that Google Business Profile doesn’t offer an export option, so you’ll need to download all the images, videos, and other media files manually.
To do that, simply open your Google Business Profile website and then right-click on the image you want to save.
After that, simply click the ‘Save as’ option and save the image anywhere on your computer.
Similarly, you can simply copy the text on your website and paste it into a document.
To start, first highlight the text on your website and then hit the right-click button on your mouse. From here, select the ‘Copy’ button.
You can also use keyboard shortcuts to copy the text. For instance, you’ll need to hit ‘Ctrl + C’ on Windows and ‘Command + C’ on Mac.
Next, open a Notepad file, Google Docs, or a Microsoft Word document and simply paste the content from your website. If you have links in the text, it’s a good idea to use Google Docs or Microsoft Word because they will keep those in the pasted text.
You can right-click anywhere on the document and select the ‘Paste’ option. Or use the ‘Ctrl + V’ keyboard shortcut on Windows and ‘Command + V’ on Mac to paste the text.
Since Business Profile sites are small and single-page, downloading and copying your data should be a quick process.
Step 2: Choosing a Web Hosting Platform for Your Site
Next, you will need a web hosting service to run a website using WordPress. Web hosting is where all your website files are stored. You can think of it as a house where your site’s content lives.
While WordPress is free to download, you’ll need to subscribe to a platform like Bluehost to host the site
Usually, web hosting costs around $7.99 per month (paid annually), and domain name prices start from $16.99 per year, depending on the domain extension. The cost to build a WordPress site can go even higher if you want a custom theme and more features.
This can be a significant investment, considering it was free to create a website using Google Business Profile.
Luckily, Bluehost is offering an exclusive discount for WPBeginner users. You can get started for as low as $1.99 per month and get a free domain + SSL certificate.
Bluehost is one of the best hosting companies in the industry. It is an officially recommended WordPress hosting provider.
WPBeginner users can enjoy up to 61% off and get a 1-click WordPress install. To start, simply visit the Bluehost website and click the ‘Get Started Now’ button.
After that, you will need to select a hosting plan.
Simply click the ‘Select’ button to choose a pricing plan. You can select the Basic or Choice Plus plans to get started, as they should be suitable for small business websites.
On the next screen, you will need to pick a domain name for your website. A domain name is your site’s name that users will enter in their browsers (like wpbeginner.com or google.com).
Bluehost lets you create a new domain name, or you can use an existing domain that you own.
Pro Tip: If you need help picking the right name, then try our free business name generator tool. Simply enter words related to your business, and the tool will generate lots of ideas for your domain name.
After choosing a name for your website, you’ll need to fill in your account details and finalize the Bluehost package.
Bluehost will add extra options to your package. We recommend unchecking all the additional options as you’ll save money. Plus, you can always add them later on if needed.
Next, you can add your payment details and complete the purchase.
Once that’s done, Bluehost will create your hosting account and email you the login details.
Step 3: Install and Set Up WordPress
Next, you can log in to the Bluehost account to view the dashboard. From here, you’ll be able to manage your website, get support, and install WordPress.
The best part about using Bluehost is that it automatically installs WordPress for you.
You just need to head to the ‘Websites’ tab from the menu on the left. After that, simply click the ‘Edit Site’ button.
This will open the WordPress dashboard, where you can log in and start adding content, customizing the design, and creating new pages.
Bluehost offers an AI-powered setup wizard that will guide you through the initial configuration. You can simply follow the on-screen instructions to create a WordPress website. You can also opt-out of the AI assistant.
Step 4: Add Content From Business Profile Site to WordPress
Now that your WordPress site is ready, the next step is to import content from the Google Business Profile site.
Since there is no way to directly import data from your Google My Business site into WordPress, you’ll need to add content manually.
You can start by creating different pages for your website, like an about us page, a contact page, and more. Simply head to Pages in the WordPress dashboard and click the ‘Add New Page’ button.
Next, you will need to enter content that you copied from the Google Business Profile site in the content editor.
To start, enter a title for your page at the top. After that, you can type the text or simply copy it from the file you created earlier and paste it into the content editor.
Simply use the keyboard shortcut keys to copy and paste the text. For Windows, you’ll need to press ‘Ctrl + C’ to copy and ‘Ctrl + V’ to paste. If you’re using Mac, then simply press ‘Command + V’ to copy and ‘Command + V’ to paste.
WordPress also lets you add images, videos, and other media files to your content.
To add a picture, you can click the ‘+’ sign and add an Image block in your content. From here, you’ll need to click the ‘Media Library’ button.
Once you’re done, go ahead and click ‘Publish’ at the top of the page. Simply repeat this step to create as many pages as you want for your website.
Next, you can add the content to each of these pages that you saved and copied from your Google Business Profile site.
Pro Tip: We highly recommend checking out our guide to the important pages that every WordPress site should have. This will take you through the pages that ensure your migration from Google Business Profile to WordPress is as complete as possible.
We recommend that you create a custom landing page for your website using the block editor or a plugin like SeedProd.
SeedProd is the best WordPress theme and landing page builder. It offers a drag-and-drop builder, pre-built templates, and lots of customization options.
You can easily edit and control the appearance of your site using the plugin. Plus, there are different blocks to add to the design.
After creating pages, you can also add new blog posts to your business website. For more details, please see our guide on how to add a new post in WordPress.
There are various topics you can write about related to your business. These can be helpful guides, list articles, how-to tutorials that help explain how to use different features of your products and services, and more.
Step 5: Optimizing Your Business Site for Local SEO
After adding content from your Google My Business site to WordPress, you will need to optimize your site for local search results. This way, people searching for your business can easily find it on search engines like Google.
A simple way of doing that is by using All in One SEO (AIOSEO). It is the best WordPress SEO plugin that helps optimize your website for search engines. It automatically adds schema markup and helps configure local SEO settings without any technical knowledge.
Schema markup is a special code format that’s used on your site, and it tells search engines extra information about your business. For instance, schema markup helps you show details like address, opening hours, map location, and more on Google search results.
Note: To use the Local SEO feature in AIOSEO, you will need at least the Plus plan.
Next, you can scroll down and enter your business information. For instance, you can provide a name, logo, image, address, select type of business, phone number, and more.
Add Opening Hours for Your Business
After that, head to the ‘Opening Hours’ tab and enable the option.
Simply click the ‘Show Opening Hours’ toggle to Yes.
Next, you can scroll down and add your business hours.
There is also an option where you can show your business is open 24/7.
Show Business Location on Google Maps
AIOSEO also lets you integrate Google Maps and help users find where your business is located.
You can do that by going to the ‘Maps’ tab and entering the Google Maps API key.
Step 6: Update Website URL in Google Business Profile
Now that your new WordPress website is ready, the next step is to update the link in Google Business Profile.
You can do that by visiting your Business Profile on Google. From here, simply click the ‘Edit Profile’ option.
You should now see a new popup window open with your business information.
Next, you can navigate to the ‘Website’ section and replace the URL with your new WordPress website.
That’s it! You’ve successfully migrated your Google Business Profile website to WordPress.
Now, users who click the ‘Website’ link on your Business Profile will land on your new WordPress website.
Bonus: Install WordPress Plugins to Get the Most of Your Site
The best part about using WordPress is the plugins. You can think of them as apps, and they help add additional features and functionality to your site.
For instance, there are plugins for creating backups, improving security, boosting speed and performance, starting an online store, and more.
That said, there are over 59,000 free and paid plugins that you can use. This can get overwhelming for new users who don’t know which plugin to pick and install.
To help you out, here are some of the top plugins we recommend using on your WordPress site:
WPForms – It is the best form builder for WordPress. You can easily create different types of forms and add them to your site. For example, it lets you create simple contact forms, payment forms, surveys, registration forms, and more.
MonsterInsights – It is the best Analytics plugin for WordPress. You can connect Google Analytics to WordPress without editing code using MonsterInsights. Plus, it helps you find out how people behave on your site, where they come from, which links they click, and uncover other useful insights.
OptinMonster – A powerful conversion optimization and lead generation toolkit for WordPress. You can create different campaigns to grow your email list, get more leads, and increase sales.
Duplicator – It is the best WordPress backup plugin. You can create backups of your WordPress site and store them on the cloud. This way, you’ll have a fresh copy to restore your site in case there’s a security breach, or something goes wrong.
Do you want to set up WooCommerce abandoned cart emails?
Around 70% of shopping carts are abandoned by the customers in your online store. By sending abandoned cart emails to these potential buyers, you can improve the customer experience and boost conversions.
In this article, we will show you how to easily set up abandoned cart emails in WooCommerce. We will also show you different ways to reach out to these customers and get their sales.
Why Send WooCommerce Abandoned Cart Emails to Customers?
When users visit your online store, they usually start adding products to their shopping carts but some of them abandon the items before finishing their purchases. This can happen due to multiple reasons, including high shipping costs, a slow checkout process, or needing to create an account on your website.
However, you can easily recover your abandoned cart sales by sending emails to these potential buyers. These abandoned cart emails will remind customers about the items in their cart and urge them to revisit your WooCommerce store to make a purchase.
It is a cost-effective marketing strategy that can improve your brand perception, strengthen your customer relationships, and increase your conversion rate by up to 30%.
Having said that, let’s see how to easily set up WooCommerce abandoned cart emails, step-by-step. We will also cover abandoned cart SMS, popups, and notifications, so you can use the quick links below to jump to the method you want to use:
You can easily set up automated WooCommerce abandoned cart emails using FunnelKit Automations.
It is the best marketing automation tool for WooCommerce stores that comes with a drag-and-drop builder and pre-built email sequences that you can set up in a few minutes. You can even design your own emails from scratch and design workflows without needing any code.
Note: FunnelKit Automations also has a free plan that you can use for this tutorial. However, upgrading to the paid plan will give you access to more features like smart delays, unlimited automation, SMS marketing, and more.
Upon activation, you need to visit the FunnelKit Automations » Settings page from the WordPress admin sidebar and switch to the ‘Cart’ tab in the left column.
Once you do that, check the ‘Enable Cart Tracking’ box. You will not be able to run an automated workflow for abandoned carts until you allow FunnelKit Automations to track the product carts on your website.
You can also configure other settings here, including the waiting period to mark a cart as recoverable, blacklist emails, and GDPR consent.
After that, just click the ‘Save Settings’ button to store your changes.
Next, head to the FunnelKit Automations » Automations page from the WordPress dashboard.
Here, click the ‘Add New Automation’ button in the top right corner of the screen.
This will take you to the ‘Add Automation’ page, where you can select from premade templates that have abandoned cart email examples and workflows.
For this tutorial, we will choose the ‘Abandoned Cart Reminder’ workflow that will send users 3 abandoned cart emails over time.
You will now be taken to a new screen where you can see the trigger, action, and delays for this workflow.
From here, click the ‘Import’ button at the top right corner of the screen to save this template.
Once you do that, an ‘Add Automation’ prompt will open up on your screen.
Here, type in a name for the workflow according to your liking and click the ‘Create’ button.
FunnelKit will now open the template in its automation editor, where you can edit your workflow’s trigger, delay, and actions.
You can even add other actions and delays by clicking the ‘+’ button.
Here, the trigger has been set to ‘Cart Abandoned’, meaning that the automation will start once a customer abandons their cart.
Now, you must click on the ‘Delay’ action to configure its settings.
This will open a prompt on the screen where you can configure the time for your first abandoned cart email.
For example, if you want to send the first email two days after the cart abandonment, then you can type ‘2’ and select ‘Days’ from the dropdown menu.
After that, click the ‘Save’ button to store your settings.
Next, move to the ‘Action’ step in the workflow and click on it to open the prompt.
From here, you can change the subject and text for the cart abandonment email you want to send to your users. You can also use merge tags to add dynamic content like the user’s name and the items in their cart.
Once you are done, click the ‘Save’ button to store your settings.
Next, you can configure the second and third delays and action emails for cart abandonment in a similar way.
Finally, toggle the ‘Inactive’ switch to ‘Active’ to activate your automated workflow.
The potential customers who abandoned carts in your store will now be sent these emails after multiple delays.
Here is an automated abandoned cart email example from our testing site:
Send WooCommerce Cart Abandonment SMS
Other than abandoned cart emails, it’s also a good idea to send cart abandonment SMS to users. This is because open rates for SMS messages are significantly higher than email marketing, so your messages are more likely to reach your potential customers.
Plus, sending SMS ensures that your messages will be seen instantly compared to other communication channels.
It is super easy to set up WooCommerce cart abandonment SMS with FunnelKit Automations.
Note: You will need the premium plan of the plugin to unlock the Twilio SMS feature and send automated messages to users.
Upon activation, visit the FunnelKit » Automations page from the WordPress dashboard and click the ‘Add New Automation’ button.
You will now be directed to the ‘Add Automation’ page, where you will see a list of premade automated workflow templates.
However, since FunnelKit Automations does not have a template for sending SMS messages, you need to click the ‘Start from Scratch’ button.
This will open a prompt on the screen asking you to name your automation workflow.
Simply type in a title and click the ‘Create’ button.
This will open the automation editor on the screen where you have to click the ‘Select Trigger’ button.
The ‘Select an Event’ prompt will now open on the screen. From here, switch to the ‘WooCommerce’ tab and select the ‘Cart Abandoned’ option as your trigger.
After that, click the ‘Done’ button.
Now, click the ‘+’ button in the automation editor.
This will expand the ‘Add Step’ tab, where you must select the ‘Delay’ option.
Once you do that, the ‘Delay’ prompt will open up on the screen. Here, you can configure the time for sending the abandoned cart SMS.
For example, if you want to send the cart abandonment message a week later, then you can select that option from the dropdown menu.
After that, click the ‘Save’ button to store your settings.
Now click the ‘+’ button in the automation editor again to expand the tab and then choose the ‘Action’ option.
This will open another prompt on the screen where you have to select the ‘Send SMS’ option under the ‘Twilio’ section.
Once you select that option, you can start typing the text message that will be sent to the users once they abandon their carts.
You can also use merge tags to add dynamic content. After you are satisfied, just click the ‘Save’ button to store your settings.
Finally, toggle the ‘Inactive’ switch at the top right corner to activate the automated workflow.
Now the users will be sent an SMS message a week after cart abandonment from your Twilio phone number.
Create WooCommerce Cart Abandonment Popups
Additionally, we recommend setting up abandoned cart popups on your website.
This method is a bit different from sending emails because cart abandonment popups will be immediately triggered when a visitor adds items to their cart and then attempts to leave your website.
Overall, opting for this method can encourage users to take immediate action and can be highly effective, as popups have a conversion rate of over 30%.
It comes with a drag-and-drop builder and premade templates to create popups and banners for your website. OptinMonster even has Exit Intent technology that will only display the popup when a user is about to leave your website.
First, you must visit the OptinMonster website and sign up for an account by clicking the ‘Get OptinMonster Now’ button.
Once you are satisfied, switch to the ‘Display Rules’ tab from the top and expand the ‘current URL path’ dropdown menu.
This will open up a list of different settings. Now, select the ‘Exit Intent’ option.
After that, you can select the type of device where the popup will be displayed and configure its sensitivity.
Next, choose the ‘Page Targeting’ option from the second dropdown menu on the left. Then, pick the ‘exactly matches’ option from the menu in the middle.
Once you do that, you must add the URL of the product checkout page in the field on the left.
Now, the abandoned cart popup will only be displayed once the visitor starts leaving the checkout page.
Finally, switch to the ‘Publish’ tab from the top and click the ‘Publish’ button to store your settings.
The exit intent popup will now be displayed when the visitor tries to leave your WordPress website.
Here is a preview of how the abandoned cart popup will look in your WooCommerce store.
Send WooCommerce Cart Abandonment Notifications
Finally, another way to reduce cart abandonment is to set up push notifications on your website. These messages will be displayed inside the browser for users who have already left your online store.
Unlike emails or popups, push notifications don’t require you to collect additional user data like email addresses or phone numbers. This means that users may be more likely to opt in to the notifications, but you won’t be able to ask for their contact details.
PushEngage has a custom-triggered campaigns feature that can send users abandoned cart push notifications. It also comes with powerful features like A/B testing, automatic drip campaigns, and smart opt-in reminders, and supports all devices and browsers.
First, you have to visit the PushEngage website and click the ‘Get Started For Free Now’ button.
This will take you to the pricing page, where you have to select a plan for your online store. Keep in mind that the triggered campaign feature is only available in the Growth plan.
After that, create your PushEngage account and provide website details like your domain name, industry, company size, and more.
Upon account creation, you will then be taken to the PushEngage dashboard, where you must provide your website URL and name.
You also have to add an image that will be used as a site icon in your push notifications.
Once you do that, visit the Campaign » Triggered Campaign page from the PushEngage dashboard.
Here, you need to click the ‘+ Create New Triggered Campaign’ button.
This will open another screen where you will see a list of premade templates by PushEngage.
Go ahead and click the ‘Create’ button under the ‘Cart Abandonment’ template.
You will now be taken to another page where you can start by adding a name for the triggered campaign that you are creating.
Once you do that, click the ‘>’ icon on the right to configure push notification settings.
This will expand the tab and you can start by adding a notification title and message in the prompt.
You will notice that the ‘Notification URL’ and ‘Image URL’ fields will already have variables. We recommend leaving these settings as they are.
When the user sees this notification, they will also see an image of the product they added to their cart in the image section, while the notification URL will direct them to the checkout page.
Upon configuring these settings, switch to the ‘Trigger Settings’ tab from the top.
Here, you will see that the conditional logic for the campaign has already been configured. It will send a push notification to a user once they have added an item to the cart and left your website. The notification will stop displaying once the user is back on the checkout page.
Next, you have to click the ‘Activate Triggered Campaign’ button. After that, you also have to click the ‘Integration Code’ button.
This will open a prompt on the screen displaying multiple code snippets for your website, including the add-to-cart event, checkout event, and goal tracking.
Simply copy these snippets and paste them on your WordPress site. Keep in mind that you will need a developer to fill out these snippets with the variables used on your website.
Finally, click the ‘Activate Autoresponder’ button to store your settings.
Now, the customers who abandon their carts will be sent a cart abandonment push notification.
Here is an example of a cart abandonment notification sent to a user.
As you can see, the notification has a photo of the product and a link to the checkout page.
You can also connect the PushEngage software with your WordPress site to create different kinds of push notifications, including sending notifications upon a sale, successful transactions, and more.
An automated workflow is a sequence of tasks that is executed once an event is triggered on your website. You simply set up the trigger and the action, and the automation will take care of the rest.
For example, you can send automated coupons to bring back users to your website or create personalized email marketing strategies.
You can do all of this using Uncanny Automator, which is the best WordPress automation plugin on the market.
It is super easy to use and can connect your WooCommerce store with over 150 tools like WPForms, Zoom Meetings, Facebook, Twilio, and WhatsApp to create automated workflows.
With Uncanny Automator, you can send emails and SMS messages to users upon a failed transaction, product statuses, coupons, product reviews, and so much more.
You can also create, update, and delete users based on various triggers, like user registration or form submissions.
By accepting SEPA payments on your website, you can reach customers within the SEPA region, which contains 36 European countries. This can help you get more sales as the region generates more than 20 billion transactions every year.
In this article, we will show you how to easily accept SEPA payments in WordPress.
Why Use SEPA Payments in WordPress?
The Single European Payments Area (SEPA) is a European Union initiative that aims to make it easy and convenient to make payments within and across the 36 member countries.
It creates a single Europe-wide market for Euro payments and uses the same set of rules and standards for domestic or cross-border money transfers.
This means that you can use your bank account to make Euro payments to anyone in the SEPA area, regardless of their bank or country.
By using SEPA payments on your WordPress website, you can directly accept payments from your customer’s bank account, making the process smooth and simple.
This payment method streamlines the transaction process and also charges lower fees than traditional cross-border payments.
Plus, if you have an online store or membership site, then integrating SEPA payments allows you to tap into a vast customer base across Europe, expanding your potential market reach.
Having said that, let’s see how to easily accept SEPA payments in WordPress, step by step. We will cover different methods, and you can use the quick links below to jump to the one you want to use:
Method 1: Accept SEPA Payments in WordPress Using WP Simple Pay (Recommended)
This method is recommended if you have a membership site or accept donations since you can receive money through a simple payment form. It is also a good option if you have a small online store.
For this method, we will be using WP Simple Pay. It is the best WordPress Stripe plugin on the market that allows you to accept online payments without needing to set up a shopping cart.
It comes with a payment form builder, premade templates, secure payment processing, and lets you accept SEPA payments.
Note: WP Simple Pay has a free plan. However, you will need the pro version of the plugin to unlock the SEPA payments template.
Upon activation, a setup wizard will be launched on your screen. Here, simply click the ‘Let’s Get Started’ button.
You will now be taken to the next step, where you must provide your license key and click the ‘Activate and Continue’ button.
You can find this information in your account on the WP Simple Pay website.
Once you do that, you will have to connect the plugin to your Stripe account. Stripe is one of the best payment gateways that lets you accept online payments easily.
To do this, click the ‘Connect with Stripe’ button.
After that, you must log in to your Stripe account to connect it with WP Simple Pay.
Once you connect your account with the plugin, the setup wizard will ask you to configure your emails.
You can toggle different switches to receive email notifications for payment receipts, upcoming invoices, and payment notifications. Next, type the email address where you want to receive these notifications.
You can now exit the setup wizard to create a payment form for SEPA payments.
For this, you must visit the WP Simple Pay » Add New page from the WordPress admin sidebar.
This will take you to the ‘Select a template’ screen, where you will see numerous premade templates that you can use on your website.
From here, locate the SEPA Direct Debit Form template and click the ‘Use Template’ button under it.
You will now be directed to the ‘Add New Payment Form’ page, where you can start by adding a title and description for your form.
After that, you must select your form payment type as ‘On-site payment form’.
Next, you have to switch to the ‘Payment’ tab from the left column. From here, select preferred tax collection rates from under the ‘Tax Collection’ option.
Once you do that, add the price for the product/service that you are creating the form for under the ‘Amount’ option.
Now scroll down to the ‘Payment Methods’ section, where you will notice that the ‘SEPA Direct Debit’ method has already been selected.
However, if you also want to add other payment gateways like Klarna, Alipay, Affirm, or iDeal, then you can check the boxes next to these options.
Next, switch to the ‘Form Fields’ tab from the sidebar on the left. Once you are there, you can add different form fields to your payment form and configure their settings by expanding the tab.
For example, you can add a coupon field to your payment form if you regularly offer discounts and coupons on your website.
You can also rearrange the order of the form fields by dragging and dropping them.
Once you do that, switch to the ‘Confirmation Page’ tab from the left column.
Here, you can type a message that will be displayed to the users once they successfully make a payment on your website.
If you also want to send an email to users upon successfully making a purchase, then switch to the ‘Email Notifications’ tab.
Here, type the custom email that will be sent to users upon making a purchase using the SEPA payment form.
Next, switch to the ‘Payment Page’ tab and check the ‘Enable a dedicated payment page’ option.
WP Simple Pay will now allow you to create a custom page for your SEPA payment form without making a new page on your website.
Some new settings will now appear on the page where you can add a permalink, color scheme, image, and footer text for your form.
Once you are done customizing, click the ‘Publish’ button on the right to store your settings.
Now, go ahead and visit your WordPress site to view the payment form page.
Alternatively, if you want to add the SEPA payment form to an existing page, then you must click the ‘Publish’ button once you add the form fields and configure confirmation messages.
After that, open a page of your liking in the WordPress block editor and click the add block ‘+’ button.
Next, you need to find and add the WP Simple Pay block to the page and select the SEPA payment form from the dropdown menu within the block.
Finally, click the ‘Update’ or ‘Publish’ button to store your settings.
Now, you can visit your WordPress site to view the SEPA payment form in action.
Method 2: Accept SEPA Payments in WooCommerce Using FunnelKit Stripe Payment Gateway Plugin (Free)
If you have a WooCommerce store and are looking for a free way to accept SEPA payments, then this method is for you.
It is a free plugin by FunnelKit that lets you easily add different payment gateways.
Upon activation, visit the WooCommerce » Settings page from the WordPress dashboard and switch to the ‘Payments’ tab.
Here, click the ‘Stripe Gateway’ option to open further settings.
On the new page, check the ‘Enable Stripe Gateway’ box. After that, you can also add a title and description for the payment gateway.
Next, click the ‘Save Changes’ button to store your settings and then click the ‘Stripe API Settings’ link at the top.
This will take you to a new page where you must click on the ‘Connect to Stripe’ button to connect the payment gateway with your online store.
You will then be taken to a new screen where you must enter your Stripe username and password. If you don’t have an account, then you can create one from here.
Once you connect your WooCommerce store with your account, click on the ‘SEPA’ link at the top. Here, check the ‘Enable Stripe SEPA Direct Debit’ option.
After that, you can also add a title, description, company name, and selling locations where this payment method can be displayed.
Finally, click the ‘Save Changes’ button to store your settings.
You have now successfully activated the SEPA payment method on your WooCommerce store. You can now see it on the checkout page of your store.
Bonus: Add PayPal in WordPress and WooCommerce
Apart from Stripe and SEPA, you can also use PayPal to accept payments all across Europe.
PayPal is one of the pioneers in the payment industry and offers a variety of services suitable for personal, business, and eCommerce. It also has a large user base in Europe, with over 400 million active accounts.
Plus, the payment gateway has a robust security system and seamless cross-border transactions, making PayPal an ideal choice.
You can easily add PayPal to your site using WPForms. It is the best WordPress PayPal plugin on the market that offers a drag-and-drop builder, premade form templates, and complete spam protection.
If offering your clients impregnable hosting security for their WordPress websites without lifting a finger sounds great, you’re going to love Block XML-RPC … our newest weapon against XML-RPC attacks!
Block XML-RPC … find out what it means to me!
Since its inception, WordPress has allowed users to interact remotely with their sites using a built-in feature called XML-RPC. This is not only wonderful for smartphone users who want to blog on the go … but hackers too!
In this article, we’ll cover everything you need to know about XML-RPC and show you how to easily and automatically protect WordPress sites hosted with WPMU DEV from hackers exploiting XML-RPC vulnerabilities using our latest hosting security tool.
We’ll also show you how to protect WordPress sites hosted elsewhere.
Read on or click on a link below to skip the basics and get to the good stuff:
XML-RPC is a remote procedure call (RPC) protocol that uses XML to encode its calls and HTTP as a transport mechanism.
In simple and practical terms, XML-RPC is used for enabling external applications to interact with your WordPress site. This includes actions like posting content, fetching posts, and managing comments remotely, without using the WordPress web interface.
WordPress supports XML-RPC through a file called xmlrpc.php, which can be found in the root directory of every WordPress install. In fact, WordPress support for XML-RPC has been a part of WordPress even before WordPress officially became WordPress.
The file xmlrpc.php is found in every install of WP.
If you need to access your WordPress website, but you’re nowhere near your computer, XML-RPC facilitates remote content management and integration with third-party applications and streamlines the process of managing WordPress sites without direct access to the admin dashboard.
WordPress users can benefit from using XML-RPC in areas like:
Mobile Blogging: Publish posts, edit pages, and upload media files remotely using the WordPress mobile app or other mobile apps.
Integration with Desktop Blogging Clients: Applications like Windows Live Writer or MarsEdit allow users to write and publish content from their desktops.
Integration with Services: Make connections to services like IFTTT
Remote Management Tools: Enable the management of multiple WordPress sites from a single dashboard.
Trackbacks and Pingbacks used by other sites to refer to your site.
Despite losing its popularity to newer, more efficient, and more secure APIs built on standards like REST or GraphQL and no longer being supported by PHP from version 8.0 onward, XML-RPC is still widely used in WordPress as it is integrated into many existing systems.
XML-RPC and WordPress Security
If you are using the WordPress mobile app, want to make connections to services like IFTTT, or want to access and publish to your blog remotely, then you need XML-RPC enabled. Otherwise it’s just another portal for hackers to target and exploit.
Pros and Cons of Using XML-RPC
The pros of using XML-RPC are mostly convenience and efficiency.
Though most applications can use the WordPress API instead of XML-RPC, some may still require access to xmlrpc.php and use it to ensure backward compatibility with actively installed older versions.
It’s important, however, to know the cons of using XML-RPC.
Basically, XML-RPC is an outdated protocol with inherent security flaws.
These include:
Security Risk: XML-RPC can be exploited for large scale brute force attacks, as it allows unlimited login attempts. Attackers have used XML-RPC functionality to execute widespread brute force attacks against WordPress sites. By leveraging the system.multicall method, attackers can test thousands of password combinations with a single request.
Performance: XML-RPC can be a vector for DDoS attacks through the pingback feature, turning unsuspecting WordPress sites into bots against targeted domains, and potentially slowing down or crashing the site.
How to Check if XML-RPC is Enabled/Disabled on WordPress Sites
You can use an XML-RPC validation tool to check whether your WordPress site has XML-RPC enabled or disabled.
A validation tool like xmlrpc.blog lets you easily check whether XML-RPC is enabled on your site.
Enter your URL into the Address field and click the Check button.
If XML-RPC is enabled, you will see a message like the one shown below.
XML-RPC is enabled for this site.
As explained above, XML-RPC can make WordPress sites vulnerable to spam and cyber attacks.
This is why the best hosting companies block XML-RPC by default and why we recommend you should disable XML-RPC on your WordPress site(s), unless you have applications installed that require it to be enabled.
Let’s take a look, then, at a couple of options you can use to automatically disable XML-RPC on your site (see this post for a manual method that involves adding code to your .htaccess file).
Automate Your Hosting Security with WPMU DEV’s Block XML-RPC Tool
We’ve recently launched a hosting tool called Block XML-RPC that automatically blocks incoming requests on /xmlrpc.php when enabled.
If the tool is disabled, your WordPress site will allow applications access to the /xmlrpc.php file.
Note: New sites hosted on WPMU DEV are created with the Block XML-RPC tool enabled by default.
To access the tool and enable XML-RPC blocking on existing sites, go to The Hub and select the Hosting > Tools tab.
Note: WordPress plugins only block XML-RPC at the WordPress PHP level, so if an attack occurs, the request will still reach WordPress PHP, subsequently increasing server load.
In contrast, when you enable Block XML-RPC at the server level, the requests will never reach your site and return a “403 Forbidden” error message to the attackers.
This site is protected at the server level.
For more information and detailed tutorials on the above, see these doc sections: Block XML-RPC tool (Hosting) and Disable XML RPC (Defender plugin).
R-E-S-P-E-C-T XML-RPC
Given the potential security risks, WordPress site owners should carefully consider whether the convenience offered by XML-RPC outweighs its vulnerabilities.
For WordPress sites that benefit from XML-RPC, we recommend implementing strong passwords, limiting login attempts, and using a security plugin like Defender to help mitigate the risks.
However, if the functionality is not needed and your sites run on any of our hosting plans, we strongly recommend disabling XML-RPC at the server level using the XML-RPC tool to further reduce the possibility of DDoS and brute force attacks.
Do you want to add photo filters like Instagram in WordPress?
If you like to edit your photos using Instagram filters, then you may want to know how to create a similar effect for the images on your WordPress site. This can help your content stand out.
In this article, we will cover how to add Instagram-like photo filters in WordPress.
Why Add Instagram-Like Photo Filters in WordPress?
An Instagram filter is a feature in the social media platform that lets you edit your photo with a single click. You simply choose from a library of pre-set edits for the image, and Instagram automatically applies those changes.
For each photo, you can choose how much of the filter you want to apply to the photo, ranging from 0 to 100%.
So why should you use Instagram filters? Here are a few key reasons:
Edit your photos more easily and quickly: We all want to post beautiful images on our WordPress sites. Unless your photos are already stunning or you are a master of Adobe Photoshop, you probably want an easier way to retouch your photos.
Create a consistent brand image: Branding is everything. It tells a story about the type of company you are and the message you want to send to your audience. Using on-brand filters will increase your website’s visual appeal and create a more cohesive look.
Get creative: Filters can add variety to your content, allowing you to make images stand out. This can be helpful for showcasing products or portfolio items.
That being said, let’s go over how to add Instagram-like photo filters to your WordPress site.
How to Add Instagram Photo Effects With Easy Image Filters
The good news is that you can add image filters in WordPress for free. You don’t need to go through the hassle of using a separate platform like Instagram or photo-editing software to do it.
To get started, you need to install and activate the Easy Image Filters plugin.
Once activated, go ahead and upload the photos you’d like to edit to your WordPress Media library.
To do so, head over to Media » Add New Media File. From there, choose the image files you want to add and select ‘Upload.’
Now, simply upload all the photos you’d like to add filters to.
Next, you must head over to the Media » Library tab and then select the photo you want to edit.
The attachment details of the image should open up, where you’ll see a full preview of the photo.
In the bottom right corner, go ahead and click on ‘Edit more details.’
Under the Description field, you’ll see the ‘Add Image effects’ feature, where you can apply various filters to your selected image.
Click on ‘Add.’
In this screen, you will see the image on the top of the screen, followed by available adjustments and presets you can make.
Some of the important adjustments you can make are changes to the photo include:
Brightness
Contrast
Vibrance
Saturation
Exposure
Hue
And more
You are also given 25 different presets to choose from. A preset is a configuration of settings designed to achieve a certain look. It automatically adjusts certain colors and lighting in the photo so you don’t need to do it manually.
Go ahead and toggle the adjustments, or select any preset that fits your preference.
Once you are happy with the filter enhancements, click on ‘Save.’ Or, if you’d like to revert the image to its original state, you can select ‘Reset’ instead.
Once you’ve saved your edits, the updated image will automatically appear in your Media library.
Just head back to the Media » Library tab, and you will find the updated image with the Instagram-like filter added.
Now, you are able to upload that photo anywhere on your site.
For example, you can add the image to a WordPress page or post and it should look like this.
Adding photo effects to your images is a great way to make them stand out. But in some cases, you might want also to add your filtered pictures to an image gallery.
Here are a few examples where this might be useful:
You are a photographer and want to showcase your portfolio.
You run a real estate company and are looking to highlight photos of your residential homes.
You are a digital agency that wants to show potential clients a preview of the type of work you can do.
But galleries are not limited to these businesses either. Almost any website could use an image gallery to visually showcase their products or services.
To create an image gallery for your filtered photos, you will need to install and activate the Envira Gallery plugin.
Note: You can simply use the free version of Envira Gallery if you are only interested in adding image sliders. But if you want advanced features like more gallery themes, lightboxes, or video sliders, then you should consider using the pro version.
The first thing you’ll need to do is install and activate the Envira Gallery plugin. If you need step-by-step instructions, check out our guide on how to install a WordPress plugin.
Upon activation, you’ll need to go to the Envira Gallery » AddNew page to create a new gallery. Give it a title so you can easily refer to it later.
Then click on ‘Select Files from Your Computer.’
Then, you need to choose the images from your computer.
Once the photos are uploaded, you can scroll down to see all the images added in the ‘Gallery’ tab.
In the ‘Configurations’ tab, you can choose the gallery layout, image size, image dimensions, and more.
That way you can customize the gallery appearance to fit your needs.
From there, just hit the ‘Publish’ button in the right-side panel.
You can then use the Envira Gallery block to add your gallery to any post or page.
Are you wondering how to hire virtual assistants for your WordPress site?
Running a business is a lot of work. But if you fail to maintain your WordPress website properly, then you may see your traffic and sales quickly drop. The good news is you can get a virtual assistant (VA) to manage your site for you.
In this article, you will learn how to hire a WordPress virtual assistant so that you can focus on the most important activities in your business.
What Is a Virtual Assistant?
A virtual assistant (VA) is an independent contractor who helps support your business remotely.
They handle all the repetitive or time-consuming tasks that you don’t have the time for or could use a helping hand with. These could be tasks like scheduling appointments, managing your calendar, or even sending emails.
Unlike an office manager or executive assistant, a virtual assistant does their work completely remotely. Also, VAs are generally used for simpler tasks, while executive assistants are trusted to perform more complex activities that require more experience.
Why You Need to Hire Virtual Assistants for Your WordPress Site?
Managing a WordPress website means being responsible for keeping website backups, plugin and theme updates, and WordPress core updates.
If you fail to maintain your site, then it could be at risk of hacks, experience downtime, or even have slow loading times. And that can directly cause you to lose visitors and even customers.
If you don’t have the time to maintain your site or don’t know how to, then you may want to hire a virtual assistant.
Your virtual assistant will be responsible for helping with WordPress-related tasks remotely. They can perform a wide range of tasks that go beyond maintenance, such as:
Technical support: Perform regular WordPress backups, keep your WordPress plugins and themes updated, optimize site performance, and more.
Content management: Perform content updates for SEO, schedule posts, and manage comments.
Customer support: Respond to blog posts and social media comments, engage with your audience, and schedule appointments.
E-commerce support: If you own an online store, then you can have your VA process orders, manage product listings, and handle customer inquiries. Or they can perform data entry tasks like updating inventory levels or prices.
Design: If they have design or coding skills, then VAs can make layout changes, adjust styles, or even create visuals.
VAs can take the workload off your plate so you can focus on higher-priority activities that drive revenue for your business.
To put it into perspective, let’s say your time is worth $50 an hour. Many administrative tasks can be outsourced to VAs for $5 to $25 per hour. As a result, those extra hours you have regained will allow you to earn more money.
Hiring VAs might just be the best move you can make in your business. With that being said, here’s how you can build a reliable team of VAs.
1. Decide Which Tasks to Outsource and Document Your Process
The first thing you need to do is make a list of tasks you’d like your WordPress virtual assistant to perform.
This will help you filter VAs to only those that fit your needs. As previously mentioned, there are dozens of tasks an assistant can handle for you.
Assuming these are all tasks you are currently doing yourself, you should document the entire process and create guidelines for them to follow. There are many efficient ways to document the process:
Use Snagit to record your screen and capture every click you make for each task.
Create a checklist or resources hub in Notion. You may need to include tutorials, scripts, and templates to follow.
Not only does this help make it easier to onboard your new team members, but it also helps to write a more accurate job description and find the right candidates for the role.
Here’s an example of what a resource hub on Notion may look like.
You can tag each document by the type of task it is.
Within each document, we’ve included step-by-step instructions along with screenshots to help guide VAs to execute a task.
2. Write an Accurate Job Listing
If you want to find the right WordPress virtual assistant, then you will have to write a compelling job description that attracts someone with the qualities and skills you need.
This serves as a filter for identifying the right candidate. An effective virtual assistant job post should include:
Scope of work: Outline the tasks and responsibilities the VA will be handling. You should clearly state the expected availability and whether you are looking to fill a full-time or part-time role.
Skills needed: Specify the skills and qualifications you are looking for. Also, list the tools and software the VA is expected to know how to use, such as the WordPress CMS.
Experience: Mention the level of experience you are looking for, whether it’s entry-level or someone with specific years of experience.
Budget: Set a budget and indicate your preference for hourly rates or fixed-priced contracts.
The more detailed you can include, the better. For instance, here’s what a job post could look like.
3. Know Where to Find Top Virtual Assistants
Once you’ve got your documentation in place and written your job ad, you are ready to start looking for virtual assistants.
Freelance websites are a great starting point to find a dedicated VA, especially when you have specific needs in mind.
While you could go the traditional route of hiring virtual assistants through job boards, freelance platforms have some benefits, such as:
A review system to see how they worked with previous clients
Global payments and easy invoicing
A chat feature to discuss project details and share files
Payments are through an escrow service, so you will only pay for work that gets completed
That being said, we recommend these freelance platforms to get started:
Codeable is a reliable WordPress freelance platform that helps match you with WordPress experts. You can find experts in pretty much all areas of WordPress, including:
Theme and plugin development and customization
E-commerce development
Custom WordPress web development
Web design
APIs and integration
Troubleshooting and maintenance
Security and performance
Basically, if you are having trouble with the technical side of WordPress and want qualified experts to handle it for you, then Codeable is an excellent option. And because the platform accepts only the top 2% of applicants, you can be sure that you are working with skilled WordPress professionals.
Upwork is one of the largest freelance marketplaces out there, with over 12 million registered freelancers on the platform.
Unlike Codeable, you can find virtual assistants with a wider range of skills. That allows you to find professionals for various tasks beyond WordPress.
Since there are more users on the platform, there’s a good chance you can find a virtual assistant within your budget.
Upwork also shows testimonials and job success scores on each freelancer’s profile so you can see their track record. On top of that, Upwork allows you to browse talent, message them directly, and even invite them to apply.
While you could choose a site like Fiverr instead, it may be more suited for one-time projects rather than a recurring role like a VA.
Toptal is a freelance platform known for their rigorous screening platform, accepting only the top 3% of applicants.
Freelancers have to pass five steps of the screening process, including a comprehensive English evaluation and project assessment.
Unlike other platforms, Toptal takes a more customized approach. A team member will hop on a call with you to gather requirements and talent preferences. From there, they’ll introduce you to the right match for your job from their expert-vetted talent network.
This personalized matching process ensures that you work with virtual assistants who have the right skills and experience for your WordPress tasks. And it saves you from sifting through thousands of resumes and coordinating interviews yourself.
Toptal even has a dedicated invoicing and time-tracking feature called TopTracker. With this service, you can easily track hours and make payments via PayPal, Payoneer, or direct bank transfer. But you could also use a dedicated time-tracking tool like TimeDoctor as well.
4. Interview Qualified Candidates
Once you’ve had your job post up for a few days, you should see applications flooding in. Sifting through applicants can be a chore, but it’s a must if you want to find the right person.
You need to narrow down your list of candidates to ones that meet your qualifications. From there, you can choose to have applicants undergo a skills test. This filters out candidates who simply don’t have the skill set to do the job.
For example, you can create a dummy WordPress site and have them perform a full backup of the site, troubleshoot a common issue, or optimize a blog post for SEO. The list of duties you’ve already made will help you decide how to vet your candidates.
After that, you can pick the few candidates who scored the highest and are most qualified for the job. You will need to interview those potential hires over Google Meet or Zoom.
By now, you know that the candidates are capable of performing the role. But you will also want to know if they are a good cultural fit for your company. Evaluate how they like to work in a team setting, problem-solve unknown situations, or prioritize tasks, especially when handling multiple responsibilities.
5. Hire and Onboard New Virtual Assistants
Generally, you will hire the candidate who has made the best impression. Make sure to have any new hires sign an Independent Contractor Agreement. This contract outlines the terms, including the scope of work and payment terms.
Also, it details intellectual property rights, which is important to clarify, especially when dealing with website content, designs, or other creative elements.
With software like signNow, you can create agreements in PDF format and invite your new hires to sign the contract.
But before your new VA starts, you should also have an onboarding process in place.
All you have to do is use a project management tool to create a series of onboarding tasks that need to be completed in order to get the VA caught up to speed.
You can use Asana to assign a checklist of tasks to help onboard your new virtual assistants. Every new team member will go through a series of action items to get them familiar with your company and how you operate. In the checklist, it should outline things such as:
Your company’s mission and core values
Access to WordPress site login and other tools
Documentation and training on how to perform tasks
Access to team communication tools for collaboration (for example, using Slack is a great way to chat with VAs 1 on 1, or you can create a dedicated channel to make announcements to your entire team.
You can simply add links to the resource hub you created earlier with Notion or similar software.
When adding permissions and roles to WordPress and other software, it’s vital that you use a password manager like 1Password.
This software will generate and store strong, unique passwords for each account, which can help prevent anyone from hacking into your WordPress site.
Alternative: Use WP Maintenance Services
You may decide that you are not quite ready to hire a VA, either because you don’t have enough tasks to delegate or it doesn’t make financial sense.
In that case, you might want to choose WordPress maintenance services instead. They can help streamline and automate all the tasks you need to perform to keep your site healthy and up-to-date, including:
Automatically update the WordPress core to the latest versions
WordPress.org recommends that you perform these housekeeping tasks about every three to six months.
While you could hire a VA to perform these tasks, it’s much cheaper to simply pay for a service provider to do the job for you.
We recommend choosing Seahawk, which is the best WordPress maintenance service on the market. They do backup services, core updates, theme and plugin updates, assets optimization, malware removal, uptime monitoring, and much more.
Their SeaCare package, starting at $99 per month, provides all the essential services you need to take good care of your site.
You will even get a dedicated account manager who is there for you whenever you need it. That means you are just a call away from resolving any issues.
Another alternative is to use a managed WordPress hosting company like WP Engine, which can handle most maintenance services. Managed hosting providers take care of all server management tasks like server setup, security, and maintenance.
Frequently Asked Questions
Our readers often ask us about how to hire WordPress virtual assistants. Here are the answers to the most common questions:
How much does a virtual assistant cost?
Prices for virtual assistants vary but generally will cost between $5 to $50 per hour, with specialized and US-based VAs costing more than admin-focused and overseas ones.
While many charge by the hour, some may price their fees as a monthly retainer of $500 to $4,000 for a set number of hours.
When should you hire a virtual assistant?
As business owners, it’s hard to know when it’s time to hire a virtual assistant. But here are a few signs that it’s time to begin delegating:
You are spending too much time on low-value tasks. It’s best to spend your time adding value to your company in a way that only you can.
You are losing customers because you can’t respond to support emails. Poor customer experience will lead to a bad reputation, which can affect the growth of your business.
You aren’t good with WordPress. A VA with technical skills can handle fixing WordPress errors and perform backups, ensuring that your site stays secure and up-to-date.
You are struggling to manage content for your WordPress site. A WordPress virtual assistant can help write blog posts, create graphics, and schedule content updates.
Outsourcing may feel unnatural for entrepreneurs who like to be in control. But part of growing a business is putting trust in others so that your company can run without your full attention.
That said, if you only need help maintaining your WordPress site, then WordPress maintenance services are the more reliable and affordable solution.
Google is shutting down more than 21.7 million websites created with Google My Business.
These were free small business websites that Google offered to users when they created a Google Business Profile.
All of these websites will be turned off in March 2024, and users visiting those sites will be redirected to the Google Business Profiles associated with those accounts.
Let’s talk about how this change may affect your business and what you can do to not lose valuable online traffic.
Here is a list of topics we will cover in this article:
A Google Business Profile helps businesses appear in Google’s local search results with detailed information, including directions, business hours, phone numbers, and a link to visit the business’s website.
Local searches have increased almost 500% over the past few years. According to Google, almost 78% of searches for a local business end up in a physical visit within a week. (Source: ThinkwithGoogle)
This makes it essential for businesses to appear in local search results, and the easiest way to do this is by creating a Google Business Profile.
When you create a Google Business Profile, Google gives you the option to add your website. Previously, businesses that didn’t have a website were offered to create a free one instantly using the information in their Google Business Profile.
Many small businesses took advantage of this option and created these free websites. This drove them traffic, leads, and in-store visits from local searches.
Why Migrate Your Google Business Profile Site?
Google Business Profile sites will be shut down in March 2024. These were small, single-page sites that Google offered free to users when they created a Google Business Profile.
Once this service is closed, users will be redirected to the Business Profile page until June 10, 2024. After that, users visiting your site will see a page not found error. This will make your business look less professional and legitimate.
More importantly, it will affect the conversions you get from local searches. If you don’t have another website to replace the Business Profile site, then potential customers may not be able to learn everything they want to know about your company before visiting it. Unfortunately, this could lead to them choosing a competitor instead.
What to Do Before Google Business Profile Site Shutdown
If you are among the millions of businesses who used the option to create a Google Business Profile site, then here is what you need to do before Google shuts down the service.
Step 1: Make a Website You Own and Control
Google has a long history of shutting down services and products. Remember Orkut, Google+, and, more recently, Google Domains? There is a long list of products and services that have been shut down, and you can see Google Graveyard for a full list.
That’s why you need to make a website for your business that you own and control.
You will be able to display your website content in local search results. And since you have full control, you can drive even more traffic to your business.
The best way to do this is by using WordPress. It is the world’s most popular website builder, used by over 43% of all websites.
Note: When we say WordPress, we are talking about WordPress.org, also known as self-hosted WordPress. This is not to be confused with WordPress.com, which is a web hosting service. To understand the difference, just see our guide on WordPress.org vs. WordPress.com.
Why Use WordPress for Your Business Website?
WordPress is the most powerful yet easy-to-use website builder on the market. Here are some of the reasons for choosing WordPress:
It is free and open-source and has been around for 20+ years.
Websites you create using WordPress are fully controlled and owned by you.
It is infinitely extendible. You can use it to make a 1-page website, or you can use it to create a full-fledged online store.
It has thousands of design templates, tools, and plugins to choose from.
Lastly, it is very SEO-friendly and you can use it to get even more traffic from Google search results.
WordPress itself is free to download and use, but you’ll need a domain name and web hosting to run it.
These things used to be quite technical for average users, but luckily, they are not anymore.
You simply need to sign up for a web hosting account and purchase a domain name, and they will have a 1-click WordPress installer ready for you.
Web hosting typically costs around $7.99 per month (paid annually), and domain names start at ($16.99/year).
This is a significant investment, especially considering you didn’t pay anything to create your Google Business Profile site.
Luckily, the folks at Bluehost are offering a generous discount on hosting with a free domain name. This deal will help you get started at just $1.99 per month.
Bluehost is one of the biggest hosting companies in the world. They are also one of the officially recommended WordPress hosting providers.
Simply go to the Bluehost website and click on the green ‘Get Started Now’ button.
Next, you’ll be asked to choose a hosting plan.
Basic and Choice Plus plans should be quite enough for a small business website.
Click ‘Select’ to choose your plan and continue.
After that, you will need to pick your domain name, or if you have a domain name already, then you can use that.
A domain name is your website’s name and the address that users will enter in their browser to visit it (e.g. wpbeginner.com or google.com).
💡Tip: Try our free business name generator tool. It will help you quickly generate dozens of ideas for your domain name.
After choosing your domain, you will be asked to fill in your account information and finalize the package.
You will see some additional options on the screen under Package Extras. You can uncheck all of them as they will increase your costs. You can always add them later if needed.
After that, enter your payment information to complete the purchase.
Bluehost will now create your hosting account and send you an email with login details.
Once you log in to your Bluehost hosting account, they will automatically install WordPress for you.
You can just click on the ‘Edit Site’ button to log in to WordPress and start working on your website.
Bluehost will walk you through the initial setup, and you can follow the on-screen instructions to create your website.
Local SEO is a set of techniques used to improve a business website’s visibility in local search results.
It sounds a bit technical, but it isn’t. Let us explain a bit.
Basically, you just need to add your business information to your website using Schema.org markup.
This markup is added to your website’s code in a special format, and search engines like Google can then find and use this data. This allows search engines to show your company in the search results to people who are looking for businesses like yours.
Luckily, you don’t even need to write this markup code. There are excellent tools that help you add that data to your website and optimize it for local SEO.
Scroll down a little to the Business Info section.
Here, you will need to provide general information for your business, including its name, logo image, type of business, complete address, phone number, and more.
Next, switch to the ‘Opening Hours’ tab to enter your business hours.
Ensure that the ‘Show Opening Hours’ toggle is set to ‘Yes’ if you want to display business hours on your website.
Scroll down a little and then add your business hours.
After that, you can switch to the ‘Google Maps’ tab.
Step 3: Add Your New Website to Google Business Profile
Once you have created your new website, you can add it to your Google Business Profile.
To do that, you need to visit the Google Business Profile website or search Google with your exact business name.
This will bring up a popup with your business information.
Scroll down to the Website section and replace your old website address with the new one.
Now, visitors who click on the ‘Website’ link in your Google Business Profile will be directed to your new WordPress website instead of the old Business Profile website.
Step 4: Create Landing Pages for Your Google Ads (Optional)
Google previously offered free ad credits to businesses when they added their sites to Google Business Profile.
If your ads were bringing users to your old Google Business Profile site, then you may want to send them to your new WordPress website.
Now that you are using an actual website builder, you can also create attractive landing pages for your Google Ads campaigns.
The easiest way to create professional-looking landing pages is by using SeedProd. It is an easy-to-use drag-and-drop page builder for WordPress.
Note: There is also a free version of SeedProd. However, we recommend upgrading to the paid version to unlock more features.
SeedProd comes with 300+ page templates to use as a starting point. After that, you can use its drag-and-drop interface to design your ad landing page.
By default, Google hosted Google Business Profile sites on URLs like:
https://example.business.site
Some businesses started using their own custom domains and simply redirected them to their Google Business Profile sites.
Depending on where you registered your domain name, you will need to sign in to your domain registrar website, undo that redirect, and point it to your new WordPress site.
On the other hand, if you want to start using that domain as the primary domain for your new WordPress site, then you need to point it to your hosting provider’s nameservers.
Simply log in to the domain management area and look for ‘DNS & Nameservers’. We are showing the Domain.com settings in screenshots, but it looks pretty much the same across all domain providers.
Here, you will see nameservers pointing to your domain registrar. You need to remove those entries.
After that, click on the ‘Add Nameserver’ button and add your new hosting provider’s nameservers.
For instance, if your WordPress site is hosted on Bluehost, then your nameserver information will look like this:
Once you have changed the nameserver information, it may take some time (between a few hours to two days) for those changes to propagate across the internet.
Bonus: Make the Most Out of Your New WordPress Site
Now that you have set up your WordPress website and added it to your Google Business profile, you can start customizing your site.
Here are some tips to help you get started.
1. Choose a WordPress Theme
WordPress gives you access to thousands of themes (website templates). Many of them are free, and you can install one of them to instantly transform the appearance of your website.
However, it may get quite confusing when you have this much choice. To avoid this, you can take a look at our curated lists of WordPress themes that are hand-picked by our WordPress experts:
We also recommend adding blog posts so that you can get more traffic to your business website. You can see our guide on how to start a WordPress blog for more information.
3. Install Necessary Plugins
Plugins are like apps for your WordPress website. They allow you to add extra functionality and new features to WordPress.
For a small business website, here are some must-have plugins:
WPForms – You will need it to create forms that users can submit on your website. These include a contact form, booking forms, appointments, and more. Plus, you can also use WPForms to accept online payments.
All in One SEO – We have already mentioned it above, but it’s worth repeating here. This SEO plugin allows you to optimize your website and get free traffic from search engines.
MonsterInsights – It helps you see how many users are coming to your site, where they are visiting from, and what they do on your site. It connects WordPress to Google Analytics and unlocks a treasure trove of data that you can use to make informed decisions for your business’s growth.
Duplicator – It is a powerful WordPress backup plugin that allows you to create automatic backups and store them on the cloud. Most importantly, it helps you easily restore your website from backups.
We hope this article helped you learn what you need to do to protect your business when Google Business Profile sites shut down. Next, you may want to see our guide on how to grow your business online or take a look at our complete WordPress SEO handbook to get more traffic to your new website.
If you liked this article, then please subscribe to our YouTube Channel for WordPress video tutorials. You can also find us on Twitter and Facebook.
Do you want to switch from NextGEN Gallery to Envira Gallery?
From our experience, both NextGEN and Envira are powerful WordPress gallery plugins. But some of our readers asked us how to switch from NextGen to Envira because the second plugin is better suited to their needs.
In this article, we will show you how to easily switch from NextGEN Gallery to Envira Gallery in WordPress.
Why Switch From NextGEN Gallery to Envira Gallery?
NextGEN Gallery and Envira Gallery are both drag-and-drop gallery plugins that are easy to use. But when we compared them in our best WordPress gallery plugin article, we found that each one caters to different types of WordPress users:
Envira Gallery– An excellent all-around gallery plugin, with plans starting at $39.50 per year. You can get addons for various use cases, like video galleries, WooCommerce, and deep linking for SEO. It also performs the fastest out of all the top gallery plugins.
NextGEN Gallery – With a starting price of $69.50 per year, this plugin is better for pro photographers. It comes with multiple gallery templates, watermarking, and eCommerce tools to sell photos.
All in all, if you need a premium plugin for displaying multiple images in a user-friendly way, then Envira is an excellent option. The NextGEN Gallery plugin is also great, but it’s more for professional use, especially considering its price tag.
With that in mind, let’s see how you can switch from NextGEN to Envira to display images on your WordPress.org website. You can use the quick links below to navigate through the steps:
Step 1: Install and Set up the Envira Gallery Plugin
The first step to switching from NextGEN to Envira is to install and activate the Envira Gallery plugin.
While Envira has a free version, you will need one of the Premium plans to access the NextGEN Importer Addon. This is what you will use to transfer your NextGEN galleries later.
Once the plugin is active, you can go to Envira Gallery » Addons from the WordPress dashboard. After that, find the NextGEN Importer Addon and click ‘Install.’
Now, you should see the status change to ‘Inactive’, and the button text will say ‘Activate.’
Just click on the button to turn on the addon.
Step 2: Choose Which NextGEN Photo Galleries to Import
At this point, you can go ahead and refresh your WordPress admin area. Then, go to Envira Gallery » NextGEN Import. You should now see a list of NextGEN galleries to import.
Tick the boxes next to the galleries that you’d like to transfer to Envira and click ‘Import Galleries.’
Wait for a few minutes for the addon to finish importing.
If the photo gallery plugin successfully imported your files, then you should see a message like this:
Step 3: Edit Your WordPress Envira Image Galleries
Now that your image gallery has been imported, you can edit it further.
What you need to do is go to Envira Gallery » Envira Gallery and hover over the title of the newly imported gallery. Then, click ‘Edit.’
There are many things you can do here.
At the top section of the user interface, you can add new images from the media library, desktop, or other sources like your Instagram account.
If you scroll down, you will find more customization options to configure your new gallery.
In the ‘Gallery’ tab, you can manage the images, delete them, or sort them as you like.
Switching to the ‘Configuration’ tab, you can change many different elements of your gallery.
One is the Gallery Layout. You can choose Automatic (the layout will adjust automatically based on your image amount and size), Mason, Grid, Square, Blogroll, or BnB.
Moving down the page, you’ll find more gallery display options. Here, we recommend enabling the lazy loading feature to speed up your WordPress site performance.
The rest of the settings, like the titles or captions and the crop position for the thumbnails, can be adjusted to your needs. Depending on your gallery layout, you may find more settings to configure here.
Let’s go ahead and switch to the ‘Lightbox’ tab. Lightbox is basically a feature that displays your images in a fullscreen pop-up window when a user clicks on them.
If you tick the ‘Create Mobile Gallery Images?’ setting, then that means you can enable or disable specific images for mobile devices to save some screen space.
The ‘Standalone’ tab lets you create a dedicated page for your galleries and use a custom page template for it.
However, if your WordPress theme doesn’t have a custom page template, then you can skip this tab and move on to ‘Misc.’
In this tab, you can edit the gallery’s slug, add custom CSS classes, import or export galleries from or to your computer, copy images to another existing gallery, and enable the right-to-left language function.
Once you are happy with the settings, scroll up to the ‘Publish’ section.
Then, simply click ‘Update’ to make the changes official.
Step 4: Display Your Imported Photo Galleries
With your gallery edited and looking good, let’s start adding it to your pages, posts, and other parts of your site where your NextGEN gallery used to be.
The Envira image gallery plugin offers three ways to insert galleries in WordPress: using the Gutenberg block, shortcodes, or template tag. Let’s explore each method.
Adding the Envira Gallery Gutenberg Block
First, go to the page or post where your NextGEN gallery is. After that, you can click the ‘+ Add Block’ button to find the Envira Gallery block.
Simply drag and drop the block to wherever looks best on the screen.
Then, type in the name of the gallery you just imported and edited earlier.
Once that’s done, you can use the Block settings sidebar to configure the block further. The editing options here are similar to the ones available in the previous step.
Alternatively, you can add new images to the gallery from your desktop or media library.
At this stage, you can just remove the NextGEN Gallery block or shortcode that you had on this page.
All you need to do is click the three-dot menu in the block toolbar and select ‘Delete.’
Now, simply click the ‘Update’ button in the top right corner of the page to make your changes.
Adding the Envira Gallery to WordPress With Shortcode
Another method is to use the shortcodes provided by Envira and insert them using the Shortcode block. This option is recommended if the Gutenberg block doesn’t work.
To find the gallery’s shortcode, you can go to Envira Gallery » Envira Gallery and copy the code in the ‘Shortcode’ column.
Alternatively, you can open your gallery and navigate to the ‘Envira Code’ section.
The two shortcodes at the top (the one with the ID and the one with the slug) basically work the same way. When added, the shortcode will display the gallery like normal.
Meanwhile, the special shortcode below is if you want to add a link that directs users to the gallery.
You can add these shortcodes to your pages, posts, or any other widget-ready area. For step-by-step guidance, head over to our how to add shortcodes in WordPress article.
Adding the Envira Template Tag in a Theme File
The last option is to display the Envira image gallery by inserting its template tag into a theme file. You can find these tags below the shortcode list in the gallery editor.
This method is recommended if you want to display the gallery in the header or footer of your website. Or maybe you want to show the gallery on all of your pages and posts at once.
Since inserting custom code can potentially break your website, we recommend using WPCode. This code snippet plugin makes it easy and safe to add code to WordPress without directly interacting with your core files.
First, install the plugin on your WordPress website. Then, go to Code Snippets » + Add Snippet. Once you do that, just select ‘Add Your Custom Code (New Snippet)’ and click the ‘Use snippet’ button.
Then, go ahead and insert the title of your snippet. This is just to make it easy to identify. It can be something like ‘Envira Gallery Snippet.’
After that, change the Code Type to ‘PHP Snippet.’
Now, copy and paste one of Envira’s template tags into the Code Preview box. While they look different, they actually work the same way. Their difference is one uses the gallery’s ID, while the other uses its slug.
At this stage, you can scroll down to the Insertion section. You can keep the Insert Method as ‘Auto Insert.’
As for the Location, you can choose the one that suits your needs best.
For example, if you want to display the gallery in the header area, then select ‘Site Wide Header.’ If you want the gallery to appear before the blog post title, then choose ‘Insert Before Post.’
After that, make the code active and click ‘Save Snippet.’
Now, just make sure to visit your website to see if the code works.
Here’s what our test site looked like when we used the ‘Insert Before Post’ location:
Ultimate Guides to Improve Your Envira Photo Galleries
Congratulations! You have officially switched from NextGEN to Envira in WordPress. If you need more inspiration to improve your Envira image galleries, we have some great tutorials that you can check out:
Since the release of Forminator’s new PDF Generator Addon, the team has been hard at work cooking up even more handy features, and today we’re excited to announce the first of our time-saving PDF templates!
A PDF receipt/invoice template was highly-requested by Forminator users. Learn everything you need to know about the new addition and see it in action in this post.
But wait, there’s more… Forminator 1.29 also added another handy ‘slider’ form field feature, perfect for forms where selecting a range is required or beneficial – you can now add one in a few clicks!
So, we knew it was essential for us to provide an easy and streamlined way for you to create professional receipts/invoices for clients.
The new PDF receipt template does exactly this…
You can easily create professional PDF receipts that automatically and accurately output with form data and can be sent to clients after on-site form payment.
No more manual work or sending receipts via a third-party payments provider – now it’s all easy and automated for you.
Use a form with a Stripe or PayPal payments field.
Cool? Let’s continue!
After creating your on-site payment form, navigate to Edit Form > PDF, then click Create New PDF.
Creating a new PDF couldn’t be easier thanks to Forminator’s integrated addon.
…Give your PDF a name.
…Select the brand new Receipt PDF template.
Choose from a selection of unique templates, including the new Receipt option.
Next, enter the payee and payer data you want included on your receipts.
You will notice you can add dynamic data merge tags, which automatically pulls and outputs data from your forms.
For example, you can dynamically include form fields like Name, Email, or Phone Number, and these will automatically populate in your PDF receipt.
Easily add payee and payer info, including dynamic field population that automatically outputs in your final PDF.
After confirming the details, you’ll be taken back to the Edit PDF screen where you can also edit your PDF header, footer, and add any additional fields if needed.
On top of the default template settings, you can edit the header, footer, and add more fields.
Next, you can customize the appearance of your PDF and adjust page size and margin settings.
We’ll be adding more advanced customization options soon. In the meantime, you can manually adjust the appearance of your PDFs with the Custom CSS option.
Adjust the appearance of your PDF with some basic customization options.
When you’re happy with the appearance, layout, and info included, you can preview your receipt with one click.
Easily preview your PDF before you set it up for clients.
That’s it! Your PDF receipt template is now ready to be sent to your client via email.
To do this, just go to Edit Form > Email Notifications.
Here you can add and edit email notifications to be sent to admins or form users.
Simply create a new email notification and you’ll see you can add your newly created PDF as an attachment to your confirmation email.
Easily attach your newly created PDF receipt to a client email.
You can also edit more settings, such as the recipients and conditions of the email, depending on your particular form.
Try Forminator’s new free slider form field!
As mentioned earlier, another handy feature Forminator 1.29 introduced was a new slider form field.
This was another hotly requested addition and it’s available with the free version of Forminator, so anyone can use and benefit from it.
You can use the slider field for anything from mortgage or loan calculators and donation forms, to price filtering and product customization.
Adding a slider to a form is easy, just go to Edit Form > Fields > Insert Field, and select the Slider field.
Easily add a convenient slider functionality to forms that could benefit from it.
…Edit the type of slider you want to display, and label it.
Choose the type of slider you want to add and label it.
…With Settings you can also adjust the slider size, values, and advanced settings like default value, and suffix/prefix text.
Adjust the settings of your range slider to suit the unique needs of your form.
…You can also choose whether or not to enable calculations, and set your own visibility rules based on your form.
Choose whether or not to enable/disable calculations for your field.
Easy as that! Here’s an example of a simple rating slider in action:
Upgrade your forms with these new game-changing additions
We hope you enjoyed this overview of Forminator’s new PDF Receipt Template and Slider field features.
Forminator Pro also comes free with any paid WPMU DEV membership, along with a whole lot of other amazing WordPress tools, services, plugins, and 24/7 support from our expert team.
Or, if you’re looking for the lowest barrier of entry, trying the free version of Forminator is also a great option. Just note that the free version will not have the full functionality available with Pro (including the new PDF Receipt Template).
Want to know what’s coming next for Forminator? Check the WPMU DEV Roadmap, where we add regular progress updates.
Do you want to use WordPress in your browser for testing purposes?
Meet WordPress Playground, a platform where you can try out open-source WordPress.org in a browser without purchasing a hosting plan first. You can also use it to test plugins and themes without affecting your live WordPress website.
In this article, we will explain what WordPress Playground is and how to use it.
What Is WordPress Playground and How Does It Work?
It’s like an online sandbox where you can do all sorts of WordPress development without affecting your real website.
All you need to do is go to the WordPress Playground website to open it. Then, you can use WordPress as you normally would: install new plugins, try out new themes, add new pages, and so on.
If you refresh the WordPress Playground page, all the customizations will disappear. However, you can also download your WordPress instance and upload it again to WordPress Playground.
How Does WordPress Playground Work?
WordPress Playground runs on some cool technologies that let you use WordPress without the usual web server and database setup:
WebAssembly binary (Wasm): It lets you run PHP code directly in your web browser, making WordPress work without a traditional server. It also makes the platform compatible with all browsers, from Chrome and Edge to Firefox and Safari.
SQLite database: Instead of MySQL, WordPress Playground uses a lighter file-based database system called SQLite, which runs right in your browser.
Service Worker and Worker Threads APIs: These web tools help handle requests and run background JavaScript scripts, making it possible for WordPress Playground to run PHP apps smoothly in your browser.
These technologies also enable developers to integrate WordPress Playground with node.js, Visual Studio Code, and a CLI tool called wp-now.
With these tools, developers can also use WordPress Playground on a development platform for testing or staging purposes.
What Are the Limitations of WordPress Playground?
Despite its benefits, WordPress Playground has several limitations, like:
No direct access to the theme and plugin directory–You will have to install themes and plugins by manually downloading and uploading them. That said, a network access beta feature aims to solve this problem.
Customizations in WordPress Playground are temporary – If you decide not to save the changes in the browser, you will have to be careful not to accidentally refresh the page to avoid losing your progress.
iFrame issues are common – If you embed a WordPress Playground instance on your web page, you may expect some problems, from accidental refreshes to iFrame not working.
It’s a relatively new feature – Not everything will work properly, so you can expect some hiccups here and there as you explore the environment.
All that being said, the Playground is a relatively new WordPress project. So you can expect the team to release new features and bug fixes to improve the user experience.
Now that you know what WordPress Playground is, let’s see how you can use it. You can use the quick links below to navigate through our tutorial:
Once you are on the website, wait a few moments for the Playground to set up. Then, you will see the front end of the website using a default WordPress theme.
If you are using WordPress Playground for testing, then you may want to configure the environment to reflect the WordPress software for your actual website.
To do this, click the menu that says ‘PHP 8.0 WP 6.4 – Storage: None.’
The first setting you have to configure is the storage type. There are three options.
‘None’ means all changes will be lost on page refresh. Meanwhile, ‘Browser’ means changes will be stored in the browser but disappear if you close the browser tab or clear your cache.
You can also save the changes on your computer by selecting ‘Device.’ This option will let you select a folder in your computer to store your WordPress Playground files, similar to creating a localhost WordPress site.
The next thing you want to configure is the PHP version.
Below that, you can optionally enable the ‘Load extensions: libxml, openssl, mbstring, iconv, gd’ and ‘Network access (e.g., for browsing plugins)’ settings.
The first setting will load those specific PHP extensions (libxml, openssl, mbstring, iconv, and gd) to enhance your WordPress Playground. But they are not necessary.
The second setting is called ‘Network access.’ It’s a beta feature and will connect your WordPress Playground to the official plugin directory so that you can install WordPress themes and plugins right from the environment.
Finally, you can select a WordPress version for the Playground. You should pick the version you currently use for your WordPress blog or website.
WordPress also makes the ‘WordPress Nightly’ version available. This is the development version of WordPress that includes the latest changes made by the WordPress development team.
You can use this if you are a plugin or theme developer and want to test compatibility with the next WordPress update.
Once you are done configuring these settings, go ahead and click ‘Apply changes.’
And that’s all for the settings. Now, you can head to the admin area to start testing out the sandbox.
To open the admin area, hover over the site title menu and click ‘Dashboard.’ Or, you can also go to the Full Site Editor by clicking ‘Edit site.’
How to Install Themes and Plugins in WordPress Playground
There are two ways to install a WordPress plugin or theme in WordPress Playground. One is to go to a plugin or theme page on WordPress.org and click the ‘Download’ button.
This will save the plugin or theme’s zip file to your computer.
Then you can continue with the usual, manual WordPress installation for plugins and themes. You can read our guides for more instructions:
For plugins, simply go to the dashboard of the WordPress Playground and navigate to Plugins » Add New Plugin.
After that, click the ‘Upload Plugin’ button and select ‘Choose File’ to upload the plugin zip file you downloaded earlier. Finally, click ‘Install Now.’
As for themes, WordPress will have a default theme installed for you when you first use the Playground.
But if you want to use a new free WordPress theme, you can download it manually from the WordPress theme directory. Then, in the Playground, go to Appearance » Themes and click ‘Add New Theme.’
On the next screen, click the ‘Upload Theme’ button.
After that, choose the theme file you downloaded earlier and click ‘Install Now.’
If this process seems a bit tedious, don’t worry. WordPress has been working on a beta feature allowing Playground to connect with the plugin or theme directory. This should be enabled if you choose ‘Network access’ during the setup earlier.
This way, the Playground works just like any typical WordPress dashboard and you can install free themes and plugins without saving them first to your computer.
Another way to install themes and plugins in WordPress dashboard is by using WordPress Playground’s Query API. It works by requiring you to add some query parameters to the WordPress Playground URL.
So, for example, if you want to install and test AIOSEO’s free version in WordPress Playground, then you can go to AIOSEO’s WordPress.org page. After that, take note of the AIOSEO’s URL slug.
Now, on a new browser tab, type in WordPress Playground’s URL with AIOSEO’s slug, like so:
When you hit the ‘Enter’ key, WordPress Playground will automatically create a new environment with the AIOSEO plugin installed.
If you want to install the theme, then just replace the plugin parameter with theme, like so:
https://playground.wordpress.net/?theme=astra
You can even combine multiple query parameters if you want to install multiple plugins or themes on top of WordPress core. Just make sure to separate each parameter with the ampersand & sign.
Here’s what the URL will look like if you are installing the AIOSEO and MonsterInsights plugins as well as the Astra theme:
If you are a Chrome user, you can also install the Open in WordPress Playground extension. With this, whenever you go to a plugin or theme page on WordPress.org, you will see the ‘Playground’ button.
Clicking it will open a new WordPress Playground environment with the plugin or theme installed. It simplifies the query parameter method.
How to Export/Import a Site Made With WordPress Playground
Let’s say you’ve played around with WordPress Playground, added some new posts using the Gutenberg editor, and maybe even created an entire website. It would be a waste to just close the tab and lose all of your progress forever.
Luckily, you can export your site from WordPress Playground and save it to your computer. Whenever you open the Playground again, you can always upload that exported zip file to continue where you left off.
To do this, navigate to the top menu of the Playground and click the three-line menu in the top right corner. Then, click ‘Download as .zip.’
Your browser will then start downloading the file to your computer.
To upload the file to WordPress Playground, just open the Playground site and click the three-line menu again. After that, click ‘Restore from .zip.’
A popup will now ask you to choose a file that you exported earlier.
Once you’ve selected the file, just click ‘Import.’
If the file is valid, you will see a popup notifying you that the import was successful and the Playground will be refreshed with the new instance.
Just click ‘OK’ to close the popup.
Import/Export WordPress Playground to GitHub
If you have a GitHub account, you can also export and import your site from WordPress Playground. GitHub is a great platform that allows you to track changes to your website, back up your files, and collaborate with other users.
To export a site from WordPress Playground to GitHub, click the three-line menu and select ‘Export Pull Request to GitHub.’
In the next popup, you will see that WordPress encourages saving your website to your computer as a backup. Once you do that, you can tick the ‘I exported my Playground as zip’ box.
Then, click the ‘Connect to your GitHub account’ button.
Next, you must confirm that you are authorizing WordPress Playground to access your repositories.
Just click ‘Authorize adamziel’ to continue.
At this stage, go ahead and select what type of files you are exporting: plugins, themes, or wp-content directory. If you want to export plugins, themes, media files, widgets, menus, and fonts, then select the last option.
You will also need to specify the GitHub repository’s URL to which you’d like to export the site. Then, click the ‘Next step’ button.
Once you’ve done that, you need to choose whether you are creating a new pull request or updating an existing one. For demonstration purposes, we will choose the first option.
After that, enter the path in the repository where the changes should be committed.
You will also need to insert a commit message to specify what changes have been made using the WordPress Playground.
With all that done, click ‘Create Pull Request.’
If the export is successful, WordPress will show a popup with a link to the new pull request.
Just click the link to see it in action.
Now, if you want to import a site from GitHub into WordPress Playground, just click the three-line menu again.
Then, select ‘Import from GitHub.’
If you are opening a completely new WordPress Playground environment, then you might need to do the whole GitHub Playground authorization process again.
After that, just click the GitHub repository URL you’d like to import from. WordPress provides some examples if you are unsure.
Next, you have to specify what files you are importing: themes, plugins, or the entire wp-content directory.
You may also insert the path of the repository that you are importing from. Once done, simply click ‘Import.’
If the import works, you will see a success message popup, confirming that the WordPress Playground will be refreshed with the new instance.
How to Embed WordPress Playground on Your Website
If you are writing a WordPress tutorial, then you will likely include screenshots from the WordPress dashboard to guide users through your instructions. However, sometimes screenshots just don’t accurately illustrate the actions you are describing.
This is where WordPress Playground can come in handy. You can embed it on your page or post, giving users a more interactive reading experience. They can follow along with your instructions using Playground.
First, you need to open the Gutenberg block editor for a page or post. Once there, click the ‘+’ add block button and select the Custom HTML block.
Now, go ahead and copy the code below, and paste it into the HTML block:
Here, the iFrame tag is wrapped in div tags to make the Playground embed follow the padding and margin of the container.
We also added the style attribute to set the iFrame’s width to 100% of its container, and the height to be 500 pixels tall.
Here’s what it looks like on the front end:
Frequently Asked Questions About WordPress Playground
Let’s cover some frequently asked questions about WordPress Playground.
Can you use WordPress in your browser?
Yes, WordPress Playground lets you use WordPress directly in your browser. You can build websites and try out themes and plugins before installing them on your live site.
Can I install custom themes and plugins in WordPress Playground?
Yes, you can install custom themes and plugins in WordPress Playground to see if they work in the admin area and are compatible with certain WordPress versions.
Can I upload a site made with WordPress Playground to my hosting account?
Technically, you can export your site from WordPress Playground and import it into your WordPress hosting account. However, since WordPress Playground uses the SQLite database, you may need to convert the database to MySQL for the site to run on a web server.
How do I run WordPress plugins and themes locally?
If you want to run WordPress plugins and themes in a local development environment, then you must create a local WordPress site first. You can read our tutorial on how to build a local WordPress site for step-by-step instructions.