Three years ago, I published “Making GraphQL Work In WordPress,” where I compared the two leading GraphQL servers available for WordPress at the time: WPGraphQL and Gato GraphQL. In the article, I aimed to delineate the scenarios best suited for each.
Full disclosure: I created Gato GraphQL, originally known asGraphQL API for WordPress, as referenced in the article.
A lot of new developments have happened in this space since my article was published, and it’s a good time to consider what’s changed and how it impacts the way we work with GraphQL data in WordPress today.
This time, though, let’s focus less on when to choose one of the two available servers and more on the developments that have taken place and how both plugins and headless WordPress, in general, have been affected.
Headless Is The Future Of WordPress (And Shall Always Be)
There is no going around it: Headless is the future of WordPress! At least, that is what we have been reading in posts and tutorials for the last eight or so years. Being Argentinian, this reminds me of an old joke that goes, “Brazil is the country of the future and shall always be!” The future is both imminent and far away.
Truth is, WordPress sites that actually make use of headless capabilities — via GraphQL or the WP REST API — represent no more than a small sliver of the overall WordPress market. WPEngine may have the most extensive research into headless usage in its “The State of Headless” report. Still, it’s already a few years old and focused more on both the general headless movement (not just WordPress) and the context of enterprise organizations. But the future of WordPress, according to the report, is written in the clouds:
“Headless is emphatically here, and with the rapid rise in enterprise adoption from 2019 (53%) to 2021 (64%), it’s likely to become the industry standard for large-scale organizations focused on building and maintaining a powerful, connected digital footprint. […] Because it’s already the most popular CMS in the world, used by many of the world’s largest sites, and because it’s highly compatible as a headless CMS, bringing flexibility, extensibility, and tons of features that content creators love, WordPress is a natural fit for headless configurations.”
Just a year ago, a Reddit user informally polled people in r/WordPress, and while it’s far from scientific, the results are about as reliable as the conjecture before it:
Headless may very well be the future of WordPress, but the proof has yet to make its way into everyday developer stacks. It could very well be that general interest and curiosity are driving the future more than tangible works, as another of WPEngine’s articles from the same year as the bespoke report suggests when identifying “Headless WordPress” as a hot search term. This could just as well be a lot more smoke than fire.
That’s why I believe that “headless” is not yet a true alternative to a traditional WordPress stack that relies on the WordPress front-end architecture. I see it more as another approach, or flavor, to building websites in general and a niche one at that.
That was all true merely three years ago and is still true today.
WPEngine “Owns” Headless WordPress
It’s no coincidence that we’re referencing WPEngine when discussing headless WordPress because the hosting company is heavily betting on it becoming the de facto approach to WordPress development.
Take, for instance, WPEngine’s launch of Faust.js, a headless framework with WPGraphQL as its foundation. Faust.js is an opinionated framework that allows developers to use WordPress as the back-end content management system and Next.js to render the front-end side of things. Among other features, Faust.js replicates the WordPress template system for Next.js, making the configuration to render posts and pages from WordPress data a lot easier out of the box.
WPEngine is well-suited for this task, as it can offer hosting for both Node.js and WordPress as a single solution via its Atlas platform. WPEngine also bought the popular Advanced Custom Fields (ACF) plugin that helps define relationships among entities in the WordPress data model. Add to that the fact that WPEngine has taken over the Headless WordPress Discord server, with discussions centered around WPGraphQL, Faust, Atlas, and ACF. It could very well be named the WPEngine-Powered Headless WordPress server instead.
But WPEngine’s agenda and dominance in the space is not the point; it’s more that they have a lot of skin in the game as far as anticipating a headless WordPress future. Even more so now than three years ago.
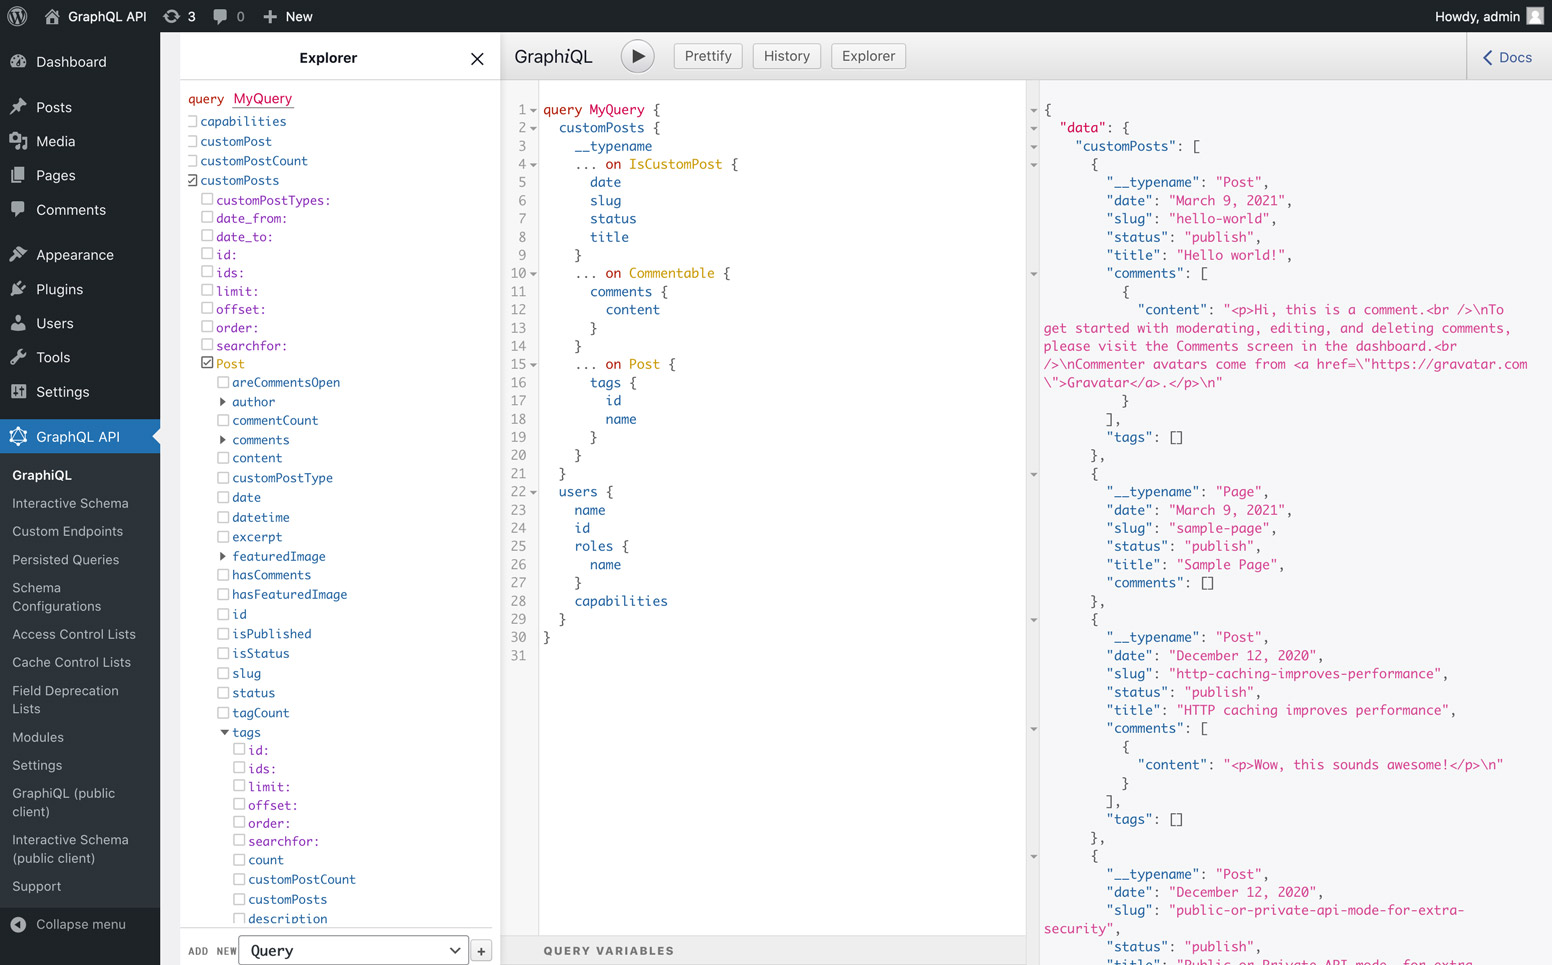
GraphQL API for WordPress → Gato GraphQL
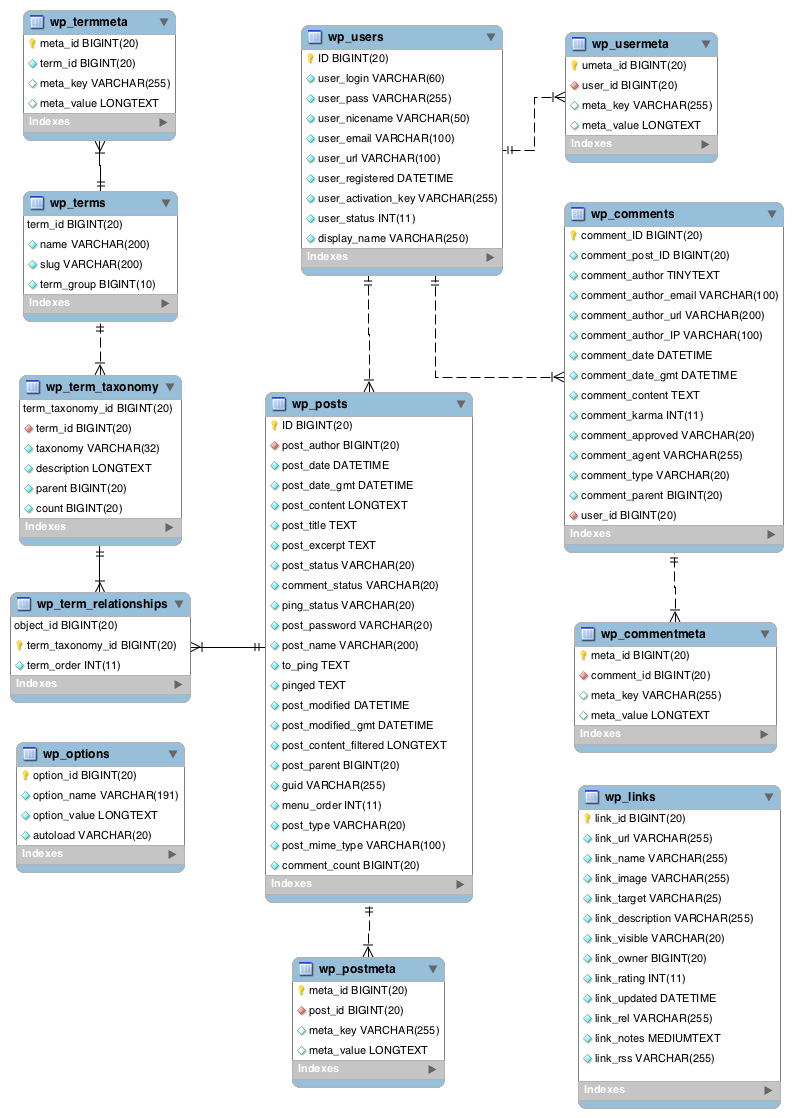
I created a plugin several years ago called GraphQL API for WordPress to help support headless WordPress development. It converts data pulled from the WordPress REST API into structured GraphQL data for more efficient and flexible queries based on the content managed and stored in WordPress.
More recently, I released a significantly updated version of the plugin, so updated that I chose to rename it to Gato GraphQL, and it is now freely available in the WordPress Plugin Directory. It’s a freemium offering like many WordPress plugin pricing models. The free, open-source version in the plugin directory provides the GraphQL server, maps the WordPress data model into the GraphQL schema, and provides several useful features, including custom endpoints and persisted queries. The paid commercial add-on extends the plugin by supporting multiple query executions, automation, and an HTTP client to interact with external services, among other advanced features.
I know this sounds a lot like a product pitch but stick with me because there’s a point to the decision I made to revamp my existing GraphQL plugin and introduce a slew of premium services as features. It fits with my belief that
WordPress is becoming more and more open to giving WordPress developers and site owners a lot more room for innovation to work collaboratively and manage content in new and exciting ways both in and out of WordPress.
JavaScript Frameworks & Headless WordPress
Gatsby was perhaps the most popular and leading JavaScript framework for creating headless WordPress sites at the time my first article was published in 2021. These days, though, Gatsby is in steep decline and its integration with WordPress is no longer maintained.
Next.js was also a leader back then and is still very popular today. The framework includes several starter templates designed specifically for headless WordPress instances.
Today, in 2024, we continue to see new JavaScript framework entrants in the space, notably Astro. Despite Gatsby’s recent troubles, the landscape of using JavaScript frameworks to create front-end experiences from the WordPress back-end is largely the same as it was a few years ago, if maybe a little easier, thanks to the availability of new templates that are integrated right out of the box.
GraphQL Transcends Headless WordPress
The biggest difference between the WPGraphQL and Gato GraphQL plugins is that, where WPGraphQL is designed to convert REST API data into GraphQL data in a single direction, Gato GraphQL uses GraphQL data in both directions in a way that can be used to manage non-headless WordPress sites as well. I say this not as a way to get you to use my plugin but to help describe how GraphQL has evolved to the point where it is useful for more cases than headless WordPress sites.
Managing a WordPress site via GraphQL is possible because GraphQL is an agnostic tool for interacting with data, whatever that interaction may be. GraphQL can fetch data from the server, modify it, store it back on the server, and invoke external services. These interactions can all be coded within a single query.
GraphQL can then be used to regex search and replace a string in all posts, which is practical when doing site migrations. We can also import a post from another WordPress site or even from an RSS feed or CSV source.
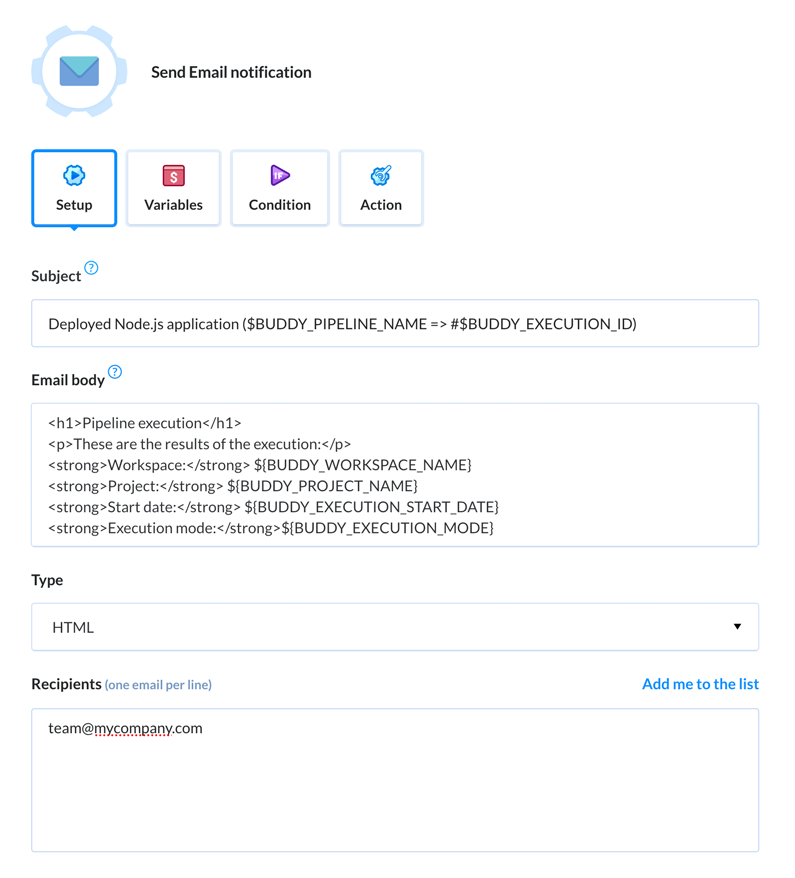
And thanks to the likes of WordPress hooks and WP-Cron, executing a GraphQL query can be an automated task. For instance, whenever the publish_post hook is triggered — i.e., a new post on the site is published — we can execute certain actions, like an email notification to the site admin, or generate a featured image with AI if the post lacks one.
In short, GraphQL works both ways and opens up new possibilities for better developer and author experiences!
GraphQL Becomes A “Core” Feature In WordPress 6.5
I have gone on record saying that GraphQL should not be a core part of WordPress. There’s a lot of reasoning behind my opinion, but what it boils down to is that the WP REST API is perfectly capable of satisfying our needs for passing data around, and adding GraphQL to the mix could be a security risk in some conditions.
My concerns aside, GraphQL officially became a first-class citizen of WordPress when it was baked into WordPress 6.5 with the introduction of Plugin Dependencies, a feature that allows plugins to identify other plugins as dependencies. We see this in the form of a new “Requires Plugins” comment in a plugin’s header:
/**
 * Plugin Name: My Ecommerce Payments for Gato GraphQL
 * Requires Plugins: gatographql
 */
WordPress sees which plugins are needed for the current plugin to function properly and installs everything together at the same time, assuming that the dependencies are readily available in the WordPress Plugin Directory.
So, check this out. Since WPGraphQL and Gato GraphQL are in the plugin directory, we can now create another plugin that internally uses GraphQL and distributes it via the plugin directory or, in general, without having to indicate how to install it. For instance, we can now use GraphQL to fetch data to render the plugin’s blocks.
In other words, plugins are now capable of more symbiotic relationships that open even more possibilities! Beyond that, every plugin in the WordPress Plugin Directory is now technically part of WordPress Core, including WPGraphQL and Gato GraphQL. So, yes, GraphQL is now technically a “core” feature that can be leveraged by other developers.
Helping WordPress Lead The CMS Market, Again
While delivering the keynote presentation during WordCamp Asia 2024, Human Made co-founder Noel Tock discussed the future of WordPress. He argues that WordPress growth has stagnated in recent years, thanks to a plethora of modern web services capable of interacting and resulting in composable content management systems tailored to certain developers in a way that WordPress simply isn’t.
Tock continues to explain how WordPress can once again become a growth engine by cleaning up the WordPress plugin ecosystem and providing first-class integrations with external services.
Do you see where I am going with this? GraphQL could play an instrumental role in WordPress’s future success. It very well could be the link between WordPress and all the different services it interacts with, positioning WordPress at the center of the web. The recent Plugin Dependencies feature we noted earlier is a peek at what WordPress could look like as it adopts more composable approaches to content management that support its position as a market leader.
Conclusion
“Headless” WordPress is still “the future” of WordPress. But as we’ve discussed, there’s very little actual movement towards that future as far as developers buying into it despite displaying deep interest in headless architectures, with WordPress purely playing the back-end role.
There are new and solid frameworks that rely on GraphQL for querying data, and those won’t go away anytime soon. And those frameworks are the ones that rely on existing WordPress plugins that consume data from the WordPress REST API and convert it to structured GraphQL data.
Meanwhile, WordPress is making strides toward greater innovation as plugin developers are now able to leverage other plugins as dependencies for their plugins. Every plugin listed in the WordPress Plugin Directory is essentially a feature of WordPress Core, including WPGraphQL and Gato GraphQL. That means GraphQL is readily available for any plugin developer to tap into as of WordPress 6.5.
GraphQL can be used not only for headless but also to manage the WordPress site. Whenever data must be transformed, whether locally or by invoking an external service, GraphQL can be the tool to do it. That even means that data transforms can be triggered automatically to open up new and interesting ways to manage content, both inside and outside of WordPress. It works both ways!
So, yes, even though headless is the future of WordPress (and shall always be), GraphQL could indeed be a key component in making WordPress once again an innovative force that shapes the future of CMS.
A good chunk of all websites out there runs on Amazon Web Services (AWS). At the most basic, a website will usually use Amazon EC2 and Amazon S3 solutions (for computing power and data storage, respectively), and most likely also Amazon CloudFront (as the content delivery network [CDN] to distribute the assets).
This stack works very well and is super powerful, but it is not dead easy to set up, as each of these services needs to be configured to interact with one another. And once that’s done, we need to configure the operating system and install the CMS, and anything else needed to run our software.
If all we need is to launch a website quickly and easily (for instance, to show the website under development to our client or to test a WordPress plugin), spending time to set up all these separate AWS services could be a bit too much.
This is why AWS created Amazon Lightsail, a service that aggregates the other services (EC2, S3, CloudFront, and a few others) via a simplified user interface to launch webservers with everything installed and configured (for both hardware and core software) and ready to be used.
With Lightsail, we can have our website up and running in a matter of minutes.
Unlike most AWS services, Lightsail has a flat pricing structure, with a fixed price per month. (In contrast, EC2 is charged per number of seconds of use; EBS — which provides the volumes to store data in EC2 — by the size and type of disk along with any additional provisioned IOPS; S3, by the size of the stored objects and duration of storage; and CloudFront, by the amount of data transferred.) This makes it way easier to estimate our AWS bill at the end of the month.
Let’s click on “Create instance” to host a WordPress site.
We must select the location of the server, the platform to use (Linux/Unit or Windows), and what software to install (OS + Apps) via the provided blueprints. Please notice that the WordPress blueprint installs the latest version and that there are separate blueprints for WordPress as a single site and as a multisite.
Choose a location that is as close as possible to your users to reduce the latency when accessing the site.
Lightsail has different prices based on how powerful the server is: The more traffic the website has, the more resources the server must have.
We can get a basic server that is good for testing for $3.50/month USD; for production, we’d rather start with a server at $5 or 10/month, monitor its traffic, and analyze (over time) if to upgrade it.
We finally assign a name to the instance and click on “Create instance.”
The instance will be created in the background. After less than 1 minute, it will be ready, and its status on the dashboard will change from “Pending” to “Running.”
Please notice the “Terminal” icon right next to the instance’s name. In the sections below, we will be using it to connect to the instance via SSH and execute commands on the server.
Attaching A Static IP
When the instance is created, the IP assigned to it is “elastic,” which can change (for instance, when rebooting the server). So we must create a static IP and attach it to the instance so that it never changes.
For that, head over to the Networking tab and, under “Public IP,” click on “Attach static IP.”
We must provide a name to identify the static IP.
Click on “Create and attach,” upon which the server will now have a static IP associated with it.
We can now access our WordPress site in the browser under http://{PUBLIC_IP}.
Hello, WordPress site! 👋
Accessing The WP Admin
The WordPress admin’s username is user, and we need to retrieve the password from the server by connecting to it via SSH.
For that, we click on the “Terminal” icon next to the instance name (as seen earlier), upon which a new window opens up in the browser, with a CLI running on the instance.
Execute the following command to print the password on the screen.
cat bitnami_application_password
Then highlight the password, and click on the orange clipboard icon (on the bottom right corner) to copy the password from the popping window.
Head over to the WordPress admin screen under http://{PUBLIC_IP}/wp-login.php, and input the username and password.
Voilà, we are in.
Using A Custom Domain
Accessing the website straight from the public IP is not ideal, so let’s create a custom domain.
In your DNS service, create an A record mapping your domain or subdomain to the instance’s public IP (if you don’t have a domain, you can also register a new one via Lightsail). I use AWS Route 53, but any DNS service will work.
We can now access the website via the chosen domain.
Installing SSL
So far, we have been accessing the website under http. If we try https, we are told it is not secure.
So it’s time to install an SSL certificate provided via Let’s Encrypt. For this, we need to log in to the terminal again and enter the following command:
sudo /opt/bitnami/bncert-tool
The program will request to input the list of domains for which to create the certificate (so you can add yourdomain.com and www.yourdomain.com).
The program will then request some more info (including your email) and ask if to redirect HTTP traffic to HTTPS (it’s recommended to say yes). Once it’s all provided, the certificate will be created.
Now, accessing the site under https works well:
There’s one final step to do: Change the site URL in WordPress from http to https so that all links in the site point to the secure location, and we avoid the HTTP to HTTPS redirects.
Heading to the General Settings screen in WordPress, we see that both the “WordPress Address (URL)” and “Site Address (URL)” inputs cannot be edited.
To modify this configuration, we need to edit the wp-config.php file via the terminal.
Then connect to the terminal again, and execute this command:
sudo nano /opt/bitnami/wordpress/wp-config.php
The command opens the file in the nano text editor.
Then press Ctrl + O (to save) and Ctrl + X (to exit). Reloading the General Settings screen in WordPress, we see the site URL now uses https.
Modifying The Admin Username
Lightsail sets the admin’s username as user. Because WordPress does not allow modification of the username once registered, if we’d like to modify it, we need to do it directly in the MySQL database.
To do this, execute the following command in the terminal (in this case, updating the username to leo):
mysql -u root -p$(cat /home/bitnami/bitnami_application_password) -e 'UPDATE wp_users set user_login = "leo" where ID = 1;' bitnami_wordpress
Going to the admin user’s profile, we can see the username has been updated.
Storing The Images In An S3 Bucket
When uploading images (or any media asset) to WordPress, these are stored under the server’s folder wp-content/uploads and subsequently served from there.
This is a concern because the server should be considered expendable so that if it crashes and needs to be regenerated, no data will be lost. We can create a snapshot from the server to backup our data, and that will contain the folder with the images, but only starting from the moment in which the snapshot was taken; any image uploaded afterward would be lost.
Another issue could arise when hosting the site on multiple servers. If our traffic goes up, we can increase the computing power in Lightsail by launching additional servers (accessed behind a load balancer, and all of them reading/writing to the same managed database).
However, images hosted in one server are in that server alone; if a request for that image were handled by a different server, the image would be missing.
The solution is to host the images in an S3 bucket and have the WordPress site serve the images directly from the bucket.
Let’s do that. In Lightsail, head over to the Storage tab and click on “Create bucket.”
Lightsail offers the same flat pricing structure for S3 buckets as for EC2 instances: Depending on our storage and transfer needs, we can choose a plan that costs $1, 3, or 5 per month.
Make sure to choose the same AWS region as the location for the bucket as you had for the server (to reduce latency when uploading the images).
Finally, provide a unique name for the bucket, and click on “Create bucket.”
The bucket is now created, but we still need to configure it to update its permissions to make the uploaded assets public.
Click on the bucket name and, under the Permissions tab, select “Individual objects can be made public and read-only.”
Under Resource access, attach the server to the bucket (then we can avoid defining our AWS credentials on the WordPress site).
Our Lightsail configuration is done. Next, we need to configure the WordPress site to upload images to the bucket.
This is achieved via WP Offload Media Lite, a free WordPress plugin that automatically uploads to S3 any asset added to the WordPress Media Library.
Head over to the plugins screen, search for “WP Offload Media Lite for Amazon S3,” and install and activate the plugin from the search results.
Once activated, head over to Settings > WP Offload Media to configure the plugin.
In the Connection Method section, select “My server is on Amazon Web Services, and I'd like to use IAM Roles,” and save your changes.
Next, edit the wp-config.php file via the terminal (as explained earlier), and paste the following code anywhere near the top:
Back to the plugin settings, there is a Storage Provider > Bucket tab, where we must select the bucket we created to host our images.
On the next screen, we can optionally adjust the permissions to access the assets or click on “Keep Bucket Security As Is,” which will finalize the bucket configuration.
Finally, let’s make the plugin always retrieve the assets using HTTPS. In the Delivery Settings tab, select “Force HTTPS” and then “Save Changes.”
The plugin settings are now complete. We test it out by going to Media > Add New, uploading an image, and inspecting its file URL. If everything goes well, this should start with the bucket URL.
Distributing Images Via A CDN
We are almost done configuring the website. There is only one thing left to do: Add a CDN to access the images, so these will be served from a location nearby the user, reducing the latency and improving the overall performance of the site.
For this, head over to the Networking tab and click on “Create distribution.”
In the Create a distribution screen, choose the bucket as the origin of the distribution.
Note: The image request will be processed by an edge location near the user, which will first retrieve the asset from the bucket, cache it, and serve it from this location from then on.
The pricing structure is flat. Choose the 50 GB plan at $2.50/month, which is free for the first year.
Then provide a unique name for the distribution, and click on “Create distribution.”
The distribution is now created. On the top right, we can visualize the domain from which to access our assets, of shape {subdomain}.cloudfront.net (we can change this to a custom domain under the Custom domains tab).
We must modify the settings for WP Offload Media Lite to indicate to serve images from the CDN.
For that, head over to the Delivery Settings tab and edit the provider (currently set as Amazon S3).
Choose “Amazon CloudFront” and click on “Save Delivery Provider.”
Now back to the Delivery Settings tab, there is a new section, “Use Custom Domain Name (CNAME).” Paste there the distribution domain, and click on “Save Changes.”
To test it out, go once again to Media > Add New, upload an image, and check that the file URL now starts with the distribution domain.
Success! Accessing our WordPress site will now have its assets served by the AWS CDN, greatly increasing the performance of the site.
We’re Done Here, Now It’s Your Turn
Lightsail provides all the power we need to host our websites, as we are used to from AWS, but making it way easier than ever before. In this article, we saw how to launch a WordPress site quickly and easily (the whole process took me between 15 and 30 minutes).
Lightsail conveniently offers a flat pricing structure that takes all surprises away from our bills. And you can try it without spending a penny: it’s free for the first three months. So check it out!
To make the development experience faster, I moved all the PHP packages required by my projects to a monorepo. When each package is hosted on its own repo (the "multirepo" approach), it'd need be developed and tested on its own, and then published to Packagist before I could install it on other packages via Composer. With the monorepo, because all packages are hosted together, these can be developed, tested, versioned and released at the same time.
The monorepo hosting my PHP packages is public, accessible to anyone on GitHub. Git repos cannot grant different access to different assets, it's all either public or private. As I plan to release a PRO WordPress plugin, I want its packages to be kept private, meaning they can't be added to the public monorepo.
The solution I found is to use a "multi-monorepo" approach, comprising two monorepos: one public and one private, with the private monorepo embedding the public one as a Git submodule, allowing it to access its files. The public monorepo can be considered the "upstream", and the private monorepo the "downstream".
As my kept iterating on my code, the repo set-up I needed to use at each stage of my project also needed to be upgraded. Hence, I didn't arrive at the multi-monorepo approach on day 1, but it was a process that spanned several years and took its fair amount of effort, going from a single repo, to multiple repos, to the monorepo, to finally the multi-monorepo.
In this article I will describe how I set-up my multi-monorepo using the Monorepo builder, which works for PHP projects based on Composer.
Reusing Code In The Multi-Monorepo
The public monorepo leoloso/PoP is where I keep all my PHP projects.
class PluginDataSource
{
  public function getPluginConfigEntries(): array
  {
    return [
      // GraphQL API for WordPress
      [
        'path' => 'layers/GraphQLAPIForWP/plugins/graphql-api-for-wp',
        'zip_file' => 'graphql-api.zip',
        'main_file' => 'graphql-api.php',
        'dist_repo_organization' => 'GraphQLAPI',
        'dist_repo_name' => 'graphql-api-for-wp-dist',
      ],
      // GraphQL API - Extension Demo
      [
        'path' => 'layers/GraphQLAPIForWP/plugins/extension-demo',
        'zip_file' => 'graphql-api-extension-demo.zip',
        'main_file' => 'graphql-api-extension-demo.php',
        'dist_repo_organization' => 'GraphQLAPI',
        'dist_repo_name' => 'extension-demo-dist',
      ],
    ];
  }
}
Generating multiple WordPress plugins all together, and configuring the workflow via PHP, has reduced the amount of time needed managing the project. The workflow currently handles two plugins (the GraphQL API and its extension demo), but it could handle 200 without additional effort on my side.
It is this set-up that I want to reuse for my private monorepo leoloso/GraphQLAPI-PRO, so that the PRO plugins can also be generated without effort.
The custom PHP services to configure the workflows.
The private monorepo can then generate the PRO WordPress plugins, simply by triggering the workflows from the public monorepo, and overriding their configuration in PHP.
Linking Monorepos Via Git Submodules
To embed the public repo within the private one we use Git submodules:
git submodule add <public repo URL>
I embedded the public repo under subfolder submodules of the private monorepo, allowing me to add more upstream monorepos in the future if needed. In GitHub, the folder displays the submodule's specific commit, and clicking on it will take me to that commit on leoloso/PoP:
Since it contains submodules, to clone the private repo we must provide the --recursive option:
git clone --recursive <private repo URL>
Reusing The GitHub Actions Workflows
GitHub Actions only loads workflows from under .github/workflows. Because the public workflows in the downstream monorepo are are under submodules/PoP/.github/workflows, these must be duplicated into the expected location.
In order to keep the upstream workflows as the single source of truth, we can limit ourselves to copying the files to downstream under .github/workflows, but never edit them there. If there is any change to be done, it must be done in the upstream monorepo, and then copied over.
As a side note, notice how this means that the multi-monorepo leaks: the upstream monorepo is not fully autonomous, and will need to be adapted to suit the downstream monorepo.
In my first iteration to copy the workflows, I created a simple Composer script:
Then, after editing the workflows in the upstream monorepo, I would copy them to downstream by executing:
composer copy-workflows
But then I realized that just copying the workflows is not enough: they must also be modified in the process. This is so because checking out the downstream monorepo requires option --recurse-submodules, as to also checkout the submodules.
In GitHub Actions, the checkout for downstream is done like this:
So checking out the downstream repo needs input submodules: recursive, but the upstream one does not, and they both use the same source file.
The solution I found is to provide the value for input submodules via an environment variable CHECKOUT_SUBMODULES, which is by default empty for the upstream repo:
Then, when copying the workflows from upstream to downstream, the value of CHECKOUT_SUBMODULES is replaced with "recursive":
env:
  CHECKOUT_SUBMODULES: "recursive"
When modifying the workflow, it's a good idea to use a regex, so that it works for different formats in the source file (such as CHECKOUT_SUBMODULES: "" or CHECKOUT_SUBMODULES:'' or CHECKOUT_SUBMODULES:) as to not create bugs from this kind of assumed-to-be-harmless changes.
Then, the copy-workflows Composer script seen above is not good enough to handle this complexity.
In my next iteration, I created a PHP command CopyUpstreamMonorepoFilesCommand, to be executed via the Monorepo builder:
This command uses a custom service FileCopierSystem to copy all files from a source folder to the indicated destination, while optionally replacing their contents:
namespace PoP\GraphQLAPIPRO\Extensions\Symplify\MonorepoBuilder\SmartFile;

use Nette\Utils\Strings;
use Symplify\SmartFileSystem\Finder\SmartFinder;
use Symplify\SmartFileSystem\SmartFileSystem;

final class FileCopierSystem
{
  public function __construct(
    private SmartFileSystem $smartFileSystem,
    private SmartFinder $smartFinder,
  ) {
  }

  /**
   * @param array $patternReplacements a regex pattern to search, and its replacement
   */
  public function copyFilesFromFolder(
    string $fromFolder,
    string $toFolder,
    array $patternReplacements = []
  ): void {
    $smartFileInfos = $this->smartFinder->find([$fromFolder], '*');

    foreach ($smartFileInfos as $smartFileInfo) {
      $fromFile = $smartFileInfo->getRealPath();
      $fileContent = $this->smartFileSystem->readFile($fromFile);

      foreach ($patternReplacements as $pattern => $replacement) {
        $fileContent = Strings::replace($fileContent, $pattern, $replacement);
      }

      $toFile = $toFolder . substr($fromFile, strlen($fromFolder));
      $this->smartFileSystem->dumpFile($toFile, $fileContent);
    }
  }
}
When invoking this method to copy all workflows downstream, I also replace the value of CHECKOUT_SUBMODULES:
/**
 * Copy all workflows to `.github/`, and convert:
 *   `CHECKOUT_SUBMODULES: ""`
 * into:
 *   `CHECKOUT_SUBMODULES: "recursive"`
 */
$regexReplacements = [
  '#CHECKOUT_SUBMODULES:(\s+".*")?#' => 'CHECKOUT_SUBMODULES: "recursive"',
];
(new FileCopierSystem())->copyFilesFromFolder(
  'submodules/PoP/.github/workflows',
  '.github/workflows',
  $regexReplacements
);
Workflow generate_plugins.yml needs an additional replacement. When the WordPress plugin is generated, its code is downgraded from PHP 8.0 to 7.1 by invoking scriptci/downgrade/downgrade_code.sh:
In the downstream monorepo, this file will be located under submodules/PoP/ci/downgrade/downgrade_code.sh. Then, we have the downstream workflow point to the right path with this replacement:
File monorepo-builder.php — placed at the root of the monorepo — holds the configuration for the Monorepo builder. In it we must indicate where the packages (and plugins, clients, or anything else) are located:
use Symfony\Component\DependencyInjection\Loader\Configurator\ContainerConfigurator;
use Symplify\MonorepoBuilder\ValueObject\Option;

return static function (ContainerConfigurator $containerConfigurator): void {
  $parameters = $containerConfigurator->parameters();
  $parameters->set(Option::PACKAGE_DIRECTORIES, [
    __DIR__ . '/packages',
    __DIR__ . '/plugins',
  ]);
};
The private monorepo must have access to all code: its own packages, plus those from the public monorepo. Then, it must define all packages from both monorepos in the config file. The ones from the public monorepo are located under "/submodules/PoP":
As it can be seen, the configuration for upstream and downstream are pretty much the same, with the difference that the downstream one will:
Change the path to the public packages.
Add the private packages.
Then, it makes sense to rewrite the configuration using object-oriented programming, so that we make code DRY (don't repeat yourself) by having a PHP class in the public repo be extended in the private repo.
use PoP\PoP\Config\Symplify\MonorepoBuilder\Configurators\ContainerConfigurationService;
use Symfony\Component\DependencyInjection\Loader\Configurator\ContainerConfigurator;

return static function (ContainerConfigurator $containerConfigurator): void {
  $containerConfigurationService = new ContainerConfigurationService(
    $containerConfigurator,
    __DIR__
  );
  $containerConfigurationService->configureContainer();
};
The __DIR__ param points to the root of the monorepo. It will be needed to obtain the full path to the package directories.
namespace PoP\PoP\Config\Symplify\MonorepoBuilder\Configurators;

use PoP\PoP\Config\Symplify\MonorepoBuilder\DataSources\PackageOrganizationDataSource;
use Symfony\Component\DependencyInjection\Loader\Configurator\ContainerConfigurator;
use Symplify\MonorepoBuilder\ValueObject\Option;

class ContainerConfigurationService
{
  public function __construct(
    protected ContainerConfigurator $containerConfigurator,
    protected string $rootDirectory,
  ) {
  }

  public function configureContainer(): void
  {
    $parameters = $this->containerConfigurator->parameters();
    if ($packageOrganizationConfig = $this->getPackageOrganizationDataSource($this->rootDirectory)) {
      $parameters->set(
        Option::PACKAGE_DIRECTORIES,
        $packageOrganizationConfig->getPackageDirectories()
      );
    }
  }

  protected function getPackageOrganizationDataSource(): ?PackageOrganizationDataSource
  {
    return new PackageOrganizationDataSource($this->rootDirectory);
  }
}
The configuration can be split across several classes. In this case, ContainerConfigurationService retrieves the package configuration through class PackageOrganizationDataSource, which has this implementation:
namespace PoP\PoP\Config\Symplify\MonorepoBuilder\DataSources;

class PackageOrganizationDataSource
{
  public function __construct(protected string $rootDir)
  {
  }

  public function getPackageDirectories(): array
  {
    return array_map(
      fn (string $packagePath) => $this->rootDir . '/' . $packagePath,
      $this->getRelativePackagePaths()
    );
  }

  public function getRelativePackagePaths(): array
  {
    return [
      'packages',
      'plugins',
    ];
  }
}
Overriding The Configuration In The Downstream Monorepo
Now that the configuration in the public monorepo is setup via OOP, we can extend it to suit the needs of the private monorepo.
In order to allow the private monorepo to autoload the PHP code from the public monorepo, we must first configure the downstream composer.json to reference the source code from the upstream, which is under path submodules/PoP/src:
Below is file monorepo-builder.php for the private monorepo. Notice that the referenced class ContainerConfigurationService in the upstream repo belongs to the PoP\PoP namespace, but now it switched to the PoP\GraphQLAPIPRO namespace. This class must receive the additional input $upstreamRelativeRootPath (with value "submodules/PoP") as to recreate the full path to the public packages:
use PoP\GraphQLAPIPRO\Config\Symplify\MonorepoBuilder\Configurators\ContainerConfigurationService;
use Symfony\Component\DependencyInjection\Loader\Configurator\ContainerConfigurator;

return static function (ContainerConfigurator $containerConfigurator): void {
  $containerConfigurationService = new ContainerConfigurationService(
    $containerConfigurator,
    __DIR__,
    'submodules/PoP'
  );
  $containerConfigurationService->configureContainer();
};
The downstream class ContainerConfigurationService overrides which PackageOrganizationDataSource class is used in the configuration:
namespace PoP\GraphQLAPIPRO\Config\Symplify\MonorepoBuilder\Configurators;

use PoP\PoP\Config\Symplify\MonorepoBuilder\Configurators\ContainerConfigurationService as UpstreamContainerConfigurationService;
use PoP\GraphQLAPIPRO\Config\Symplify\MonorepoBuilder\DataSources\PackageOrganizationDataSource;
use Symfony\Component\DependencyInjection\Loader\Configurator\ContainerConfigurator;

class ContainerConfigurationService extends UpstreamContainerConfigurationService
{
  public function __construct(
    ContainerConfigurator $containerConfigurator,
    string $rootDirectory,
    protected string $upstreamRelativeRootPath
  ) {
    parent::__construct(
      $containerConfigurator,
      $rootDirectory
    );
  }

  protected function getPackageOrganizationDataSource(): ?PackageOrganizationDataSource
  {
    return new PackageOrganizationDataSource(
      $this->rootDirectory,
      $this->upstreamRelativeRootPath
    );
  }
}
Finally, downstream class PackageOrganizationDataSource contains the full path to both public and private packages:
namespace PoP\GraphQLAPIPRO\Config\Symplify\MonorepoBuilder\DataSources;

use PoP\PoP\Config\Symplify\MonorepoBuilder\DataSources\PackageOrganizationDataSource as UpstreamPackageOrganizationDataSource;

class PackageOrganizationDataSource extends UpstreamPackageOrganizationDataSource
{
  public function __construct(
    string $rootDir,
    protected string $upstreamRelativeRootPath
  ) {
    parent::__construct($rootDir);
  }

  public function getRelativePackagePaths(): array
  {
    return array_merge(
      // Public packages - Prepend them with "submodules/PoP/"
      array_map(
        fn ($upstreamPackagePath) => $this->upstreamRelativeRootPath . '/' . $upstreamPackagePath,
        parent::getRelativePackagePaths()
      ),
      // Private packages
      [
        'packages',
        'plugins',
        'clients',
      ]
    );
  }
}
Injecting The Configuration From PHP Into GitHub Actions
Monorepo builder offers command packages-json, which we can use to inject the package paths into the GitHub Actions workflow:
Unfortunately, command packages-jsonoutputs the package names but not their paths, which works when all packages are under the same folder (such as packages/). It doesn't work in our case, since public and private packages are located in different folders.
As it can be appreciated, it works well: the configuration for the downstream monorepo contains both public and private packages, and the paths to the public ones were prepended with "submodules/PoP".
Skipping Public Packages In The Downstream Monorepo
So far, the downstream monorepo has included both public and private packages in its configuration. However, not every command needs to be executed on the public packages.
Take static analysis, for instance. The public monorepo already executes PHPStan on all public packages via workflow phpstan.yml, as shown in this run. If the downstream monorepo runs once again PHPStan on the public packages, it is a waste of computing time. Then, the phpstan.yml workflow needs to run on the private packages only.
That means that depending on the command to execute in the downstream repo, we may want to either include both public and private packages, or only private ones.
To add public packages or not on the downstream configuration, we adapt downstream class PackageOrganizationDataSource to check this condition via input $includeUpstreamPackages:
namespace PoP\GraphQLAPIPRO\Config\Symplify\MonorepoBuilder\DataSources;

use PoP\PoP\Config\Symplify\MonorepoBuilder\DataSources\PackageOrganizationDataSource as UpstreamPackageOrganizationDataSource;

class PackageOrganizationDataSource extends UpstreamPackageOrganizationDataSource
{
  public function __construct(
    string $rootDir,
    protected string $upstreamRelativeRootPath,
    protected bool $includeUpstreamPackages
  ) {
    parent::__construct($rootDir);
  }

  public function getRelativePackagePaths(): array
  {
    return array_merge(
      // Add the public packages?
      $this->includeUpstreamPackages ?
        // Public packages - Prepend them with "submodules/PoP/"
        array_map(
          fn ($upstreamPackagePath) => $this->upstreamRelativeRootPath . '/' . $upstreamPackagePath,
          parent::getRelativePackagePaths()
        ) : [],
      // Private packages
      [
        'packages',
        'plugins',
        'clients',
      ]
    );
  }
}
Next, we need to provide value $includeUpstreamPackages as either true or false depending on the command to execute.
We can do this by replacing config file monorepo-builder.php with two other config files: monorepo-builder-with-upstream-packages.php (which passes $includeUpstreamPackages => true) and monorepo-builder-without-upstream-packages.php (which passes $includeUpstreamPackages => false):
// File monorepo-builder-without-upstream-packages.php
use PoP\GraphQLAPIPRO\Config\Symplify\MonorepoBuilder\Configurators\ContainerConfigurationService;
use Symfony\Component\DependencyInjection\Loader\Configurator\ContainerConfigurator;

return static function (ContainerConfigurator $containerConfigurator): void {
  $containerConfigurationService = new ContainerConfigurationService(
    $containerConfigurator,
    __DIR__,
    'submodules/PoP',
    false, // This is $includeUpstreamPackages
  );
  $containerConfigurationService->configureContainer();
};
We then update ContainerConfigurationService to receive parameter $includeUpstreamPackages and pass it along to PackageOrganizationDataSource:
namespace PoP\GraphQLAPIPRO\Config\Symplify\MonorepoBuilder\Configurators;

use PoP\PoP\Config\Symplify\MonorepoBuilder\Configurators\ContainerConfigurationService as UpstreamContainerConfigurationService;
use PoP\GraphQLAPIPRO\Config\Symplify\MonorepoBuilder\DataSources\PackageOrganizationDataSource;
use Symfony\Component\DependencyInjection\Loader\Configurator\ContainerConfigurator;

class ContainerConfigurationService extends UpstreamContainerConfigurationService
{
  public function __construct(
    ContainerConfigurator $containerConfigurator,
    string $rootDirectory,
    protected string $upstreamRelativeRootPath,
    protected bool $includeUpstreamPackages,
  ) {
    parent::__construct(
      $containerConfigurator,
      $rootDirectory,
    );
  }

  protected function getPackageOrganizationDataSource(): ?PackageOrganizationDataSource
  {
    return new PackageOrganizationDataSource(
      $this->rootDirectory,
      $this->upstreamRelativeRootPath,
      $this->includeUpstreamPackages,
    );
  }
}
Next, we should invoke the monorepo-builder with either config file, by providing the --config option:
However, as we saw earlier on, we want to keep the GitHub Actions workflows in the upstream monorepo as the single source of truth, and they clearly do not need these changes.
  - name: Run validation
    run: vendor/bin/monorepo-builder validate --config=config/monorepo-builder/validate.php
Now, there are no config files in the upstream monorepo, since it doesn't need them. But it will not break, because the Monorepo builder checks if the config file exists and, if it does not, it loads the default config file instead. So we will either override the config, or nothing happens.
The downstream repo does provide the config files for each command, specifying if to add the upstream packages or not:
Btw, as a side note, this is another example of how the multi-monorepo leaks.
We are almost done. By now the downstream monorepo can override the configuration from the upstream monorepo. So all that's left to do is to provide the new configuration.
In class PluginDataSource I override the configuration of which WordPress plugins must be generated, providing the PRO ones instead:
namespace PoP\GraphQLAPIPRO\Config\Symplify\MonorepoBuilder\DataSources;

use PoP\PoP\Config\Symplify\MonorepoBuilder\DataSources\PluginDataSource as UpstreamPluginDataSource;

class PluginDataSource extends UpstreamPluginDataSource
{
  public function getPluginConfigEntries(): array
  {
    return [
      // GraphQL API PRO
      [
        'path' => 'layers/GraphQLAPIForWP/plugins/graphql-api-pro',
        'zip_file' => 'graphql-api-pro.zip',
        'main_file' => 'graphql-api-pro.php',
        'dist_repo_organization' => 'GraphQLAPI-PRO',
        'dist_repo_name' => 'graphql-api-pro-dist',
      ],
      // GraphQL API Extensions
      // Google Translate
      [
        'path' => 'layers/GraphQLAPIForWP/plugins/google-translate',
        'zip_file' => 'graphql-api-google-translate.zip',
        'main_file' => 'graphql-api-google-translate.php',
        'dist_repo_organization' => 'GraphQLAPI-PRO',
        'dist_repo_name' => 'graphql-api-google-translate-dist',
      ],
      // Events Manager
      [
        'path' => 'layers/GraphQLAPIForWP/plugins/events-manager',
        'zip_file' => 'graphql-api-events-manager.zip',
        'main_file' => 'graphql-api-events-manager.php',
        'dist_repo_organization' => 'GraphQLAPI-PRO',
        'dist_repo_name' => 'graphql-api-events-manager-dist',
      ],
    ];
  }
}
Creating a new release on GitHub will trigger the generate_plugins.yml workflow and generate the PRO plugins on my private monorepo:
Tadaaaaaaaa! 🎉
Conclusion
As always, there is no "best" solution, only solutions that may work better depending on the context. The multi-monorepo approach is not suitable to every kind of project or team. I believe the biggest beneficiaries are plugin creators who release public plugins to be upgraded to their PRO versions, and agencies customizing plugins for their clients.
In my case, I'm quite happy with this approach. It takes a bit of time and effort to get right, but it's a one-off investment. Once the set-up is over, I can just focus on building my PRO plugins, and the time savings concerning project management can be huge.
I’ve been working on the same project for several years. Its initial version was a huge monolithic app containing thousands of files. It was poorly architected and non-reusable, but was hosted in a single repo making it easy to work with. Later, I “fixed” the mess in the project by splitting the codebase into autonomous packages, hosting each of them on its own repo, and managing them with Composer. The codebase became properly architected and reusable, but being split across multiple repos made it a lot more difficult to work with.
As the code was reformatted time and again, its hosting in the repo also had to adapt, going from the initial single repo, to multiple repos, to a monorepo, to what may be called a “multi-monorepo.”
Let me take you on the journey of how this took place, explaining why and when I felt I had to switch to a new approach. The journey consists of four stages (so far!) so let’s break it down like that.
Stage 1: Single repo
The project is leoloso/PoP and it’s been through several hosting schemes, following how its code was re-architected at different times.
It was born as this WordPress site, comprising a theme and several plugins. All of the code was hosted together in the same repo.
Some time later, I needed another site with similar features so I went the quick and easy way: I duplicated the theme and added its own custom plugins, all in the same repo. I got the new site running in no time.
I did the same for another site, and then another one, and another one. Eventually the repo was hosting some 10 sites, comprising thousands of files.
A single repository hosting all our code.
Issues with the single repo
While this setup made it easy to spin up new sites, it didn’t scale well at all. The big thing is that a single change involved searching for the same string across all 10 sites. That was completely unmanageable. Let’s just say that copy/paste/search/replace became a routine thing for me.
Fast forward a couple of years. I completely split the application into PHP packages, managed via Composer and dependency injection.
Composer uses Packagist as its main PHP package repository. In order to publish a package, Packagist requires a composer.json file placed at the root of the package’s repo. That means we are unable to have multiple PHP packages, each of them with its own composer.json hosted on the same repo.
As a consequence, I had to switch from hosting all of the code in the single leoloso/PoP repo, to using multiple repos, with one repo per PHP package. To help manage them, I created the organization “PoP” in GitHub and hosted all repos there, including getpop/root, getpop/component-model, getpop/engine, and many others.
In the multirepo, each package is hosted on its own repo.
Issues with the multirepo
Handling a multirepo can be easy when you have a handful of PHP packages. But in my case, the codebase comprised over 200 PHP packages. Managing them was no fun.
The reason that the project was split into so many packages is because I also decoupled the code from WordPress (so that these could also be used with other CMSs), for which every package must be very granular, dealing with a single goal.
Now, 200 packages is not ordinary. But even if a project comprises only 10 packages, it can be difficult to manage across 10 repositories. That’s because every package must be versioned, and every version of a package depends on some version of another package. When creating pull requests, we need to configure the composer.json file on every package to use the corresponding development branch of its dependencies. It’s cumbersome and bureaucratic.
I ended up not using feature branches at all, at least in my case, and simply pointed every package to the dev-master version of its dependencies (i.e. I was not versioning packages). I wouldn’t be surprised to learn that this is a common practice more often than not.
There are tools to help manage multiple repos, like meta. It creates a project composed of multiple repos and doing git commit -m "some message" on the project executes a git commit -m "some message" command on every repo, allowing them to be in sync with each other.
However, meta will not help manage the versioning of each dependency on their composer.json file. Even though it helps alleviate the pain, it is not a definitive solution.
So, it was time to bring all packages to the same repo.
Stage 3: Monorepo
The monorepo is a single repo that hosts the code for multiple projects. Since it hosts different packages together, we can version control them together too. This way, all packages can be published with the same version, and linked across dependencies. This makes pull requests very simple.
The monorepo hosts multiple packages.
As I mentioned earlier, we are not able to publish PHP packages to Packagist if they are hosted on the same repo. But we can overcome this constraint by decoupling development and distribution of the code: we use the monorepo to host and edit the source code, and multiple repos (at one repo per package) to publish them to Packagist for distribution and consumption.
The monorepo hosts the source code, multiple repos distribute it.
Switching to the Monorepo
Switching to the monorepo approach involved the following steps:
First, I created the folder structure in leoloso/PoP to host the multiple projects. I decided to use a two-level hierarchy, first under layers/ to indicate the broader project, and then under packages/, plugins/, clients/ and whatnot to indicate the category.
I didn’t need to keep the Git history of the packages, so I just copied the files with Finder. Otherwise, we can use hraban/tomono or shopsys/monorepo-tools to port repos into the monorepo, while preserving their Git history and commit hashes.
Next, I updated the description of all downstream repos, to start with [READ ONLY], such as this one.
The downstream repo’s “READ ONLY” is located in the repo description.
I executed this task in bulk via GitHub’s GraphQL API. I first obtained all of the descriptions from all of the repos, with this query:
{
  repositoryOwner(login: "getpop") {
    repositories(first: 100) {
      nodes {
        id
        name
        description
      }
    }
  }
}
…which returned a list like this:
{
  "data": {
    "repositoryOwner": {
      "repositories": {
        "nodes": [
          {
            "id": "MDEwOlJlcG9zaXRvcnkxODQ2OTYyODc=",
            "name": "hooks",
            "description": "Contracts to implement hooks (filters and actions) for PoP"
          },
          {
            "id": "MDEwOlJlcG9zaXRvcnkxODU1NTQ4MDE=",
            "name": "root",
            "description": "Declaration of dependencies shared by all PoP components"
          },
          {
            "id": "MDEwOlJlcG9zaXRvcnkxODYyMjczNTk=",
            "name": "engine",
            "description": "Engine for PoP"
          }
        ]
      }
    }
  }
}
From there, I copied all descriptions, added [READ ONLY] to them, and for every repo generated a new query executing the updateRepository GraphQL mutation:
Finally, I introduced tooling to help “split the monorepo.” Using a monorepo relies on synchronizing the code between the upstream monorepo and the downstream repos, triggered whenever a pull request is merged. This action is called “splitting the monorepo.” Splitting the monorepo can be achieved with a git subtree split command but, because I’m lazy, I’d rather use a tool.
I feel at home with the monorepo. The speed of development has improved because dealing with 200 packages feels pretty much like dealing with just one. The boost is most evident when refactoring the codebase, i.e. when executing updates across many packages.
The monorepo also allows me to release multiple WordPress plugins at once. All I need to do is provide a configuration to GitHub Actions via PHP code (when using the Monorepo builder) instead of hard-coding it in YAML.
This figure shows plugins generated when a release is created.
If, in the future, I add the code for yet another plugin to the repo, it will also be generated without any trouble. Investing some time and energy producing this setup now will definitely save plenty of time and energy in the future.
Issues with the Monorepo
I believe the monorepo is particularly useful when all packages are coded in the same programming language, tightly coupled, and relying on the same tooling. If instead we have multiple projects based on different programming languages (such as JavaScript and PHP), composed of unrelated parts (such as the main website code and a subdomain that handles newsletter subscriptions), or tooling (such as PHPUnit and Jest), then I don’t believe the monorepo provides much of an advantage.
That said, there are downsides to the monorepo:
We must use the same license for all of the code hosted in the monorepo; otherwise, we’re unable to add a LICENSE.md file at the root of the monorepo and have GitHub pick it up automatically. Indeed, leoloso/PoP initially provided several libraries using MIT and the plugin using GPLv2. So, I decided to simplify it using the lowest common denominator between them, which is GPLv2.
There is a lot of code, a lot of documentation, and plenty of issues, all from different projects. As such, potential contributors that were attracted to a specific project can easily get confused.
When tagging the code, all packages are versioned independently with that tag whether their particular code was updated or not. This is an issue with the Monorepo builder and not necessarily with the monorepo approach (Symfony has solved this problem for its monorepo).
The issues board needs proper management. In particular, it requires labels to assign issues to the corresponding project, or risk it becoming chaotic.
The issues board can become chaotic without labels that are associated with projects.
All these issues are not roadblocks though. I can cope with them. However, there is an issue that the monorepo cannot help me with: hosting both public and private code together.
I’m planning to create a “PRO” version of my plugin which I plan to host in a private repo. However, the code in the repo is either public or private, so I’m unable to host my private code in the public leoloso/PoP repo. At the same time, I want to keep using my setup for the private repo too, particularly the generate_plugins.yml workflow (which already scopes the plugin and downgrades its code from PHP 8.0 to 7.1) and its possibility to configure it via PHP. And I want to keep it DRY, avoiding copy/pastes.
It was time to switch to the multi-monorepo.
Stage 4: Multi-monorepo
The multi-monorepo approach consists of different monorepos sharing their files with each other, linked via Git submodules. At its most basic, a multi-monorepo comprises two monorepos: an autonomous upstream monorepo, and a downstream monorepo that embeds the upstream repo as a Git submodule that’s able to access its files:
The upstream monorepo is contained within the downstream monorepo.
This approach satisfies my requirements by:
having the public repo leoloso/PoP be the upstream monorepo, and
creating a private repo leoloso/GraphQLAPI-PRO that serves as the downstream monorepo.
A private monorepo can access the files from a public monorepo.
leoloso/GraphQLAPI-PRO embeds leoloso/PoP under subfolder submodules/PoP (notice how GitHub links to the specific commit of the embedded repo):
This figure show how the public monorepo is embedded within the private monorepo in the GitHub project.
Now, leoloso/GraphQLAPI-PRO can access all the files from leoloso/PoP. For instance, script ci/downgrade/downgrade_code.sh from leoloso/PoP (which downgrades the code from PHP 8.0 to 7.1) can be accessed under submodules/PoP/ci/downgrade/downgrade_code.sh.
In addition, the downstream repo can load the PHP code from the upstream repo and even extend it. This way, the configuration to generate the public WordPress plugins can be overridden to produce the PRO plugin versions instead:
GitHub Actions will only load workflows from under .github/workflows, and the upstream workflows are under submodules/PoP/.github/workflows; hence we need to copy them. This is not ideal, though we can avoid editing the copied workflows and treat the upstream files as the single source of truth.
To copy the workflows over, a simple Composer script can do:
Then, each time I edit the workflows in the upstream monorepo, I also copy them to the downstream monorepo by executing the following command:
composer copy-workflows
Once this setup is in place, the private repo generates its own plugins by reusing the workflow from the public repo:
This figure shows the PRO plugins generated in GitHub Actions.
I am extremely satisfied with this approach. I feel it has removed all of the burden from my shoulders concerning the way projects are managed. I read about a WordPress plugin author complaining that managing the releases of his 10+ plugins was taking a considerable amount of time. That doesn’t happen here—after I merge my pull request, both public and private plugins are generated automatically, like magic.
Issues with the multi-monorepo
First off, it leaks. Ideally, leoloso/PoP should be completely autonomous and unaware that it is used as an upstream monorepo in a grander scheme—but that’s not the case.
When doing git checkout, the downstream monorepo must pass the --recurse-submodules option as to also checkout the submodules. In the GitHub Actions workflows for the private repo, the checkout must be done like this:
As a result, we have to input submodules: recursive to the downstream workflow, but not to the upstream one even though they both use the same source file.
To solve this while maintaining the public monorepo as the single source of truth, the workflows in leoloso/PoP are injected the value for submodules via an environment variable CHECKOUT_SUBMODULES, like this:
The environment value is empty for the upstream monorepo, so doing submodules: "" works well. And then, when copying over the workflows from upstream to downstream, I replace the value of the environment variable to "recursive" so that it becomes:
env:
  CHECKOUT_SUBMODULES: "recursive"
(I have a PHP command to do the replacement, but we could also pipe sed in the copy-workflows composer script.)
This leakage reveals another issue with this setup: I must review all contributions to the public repo before they are merged, or they could break something downstream. The contributors would also completely unaware of those leakages (and they couldn’t be blamed for it). This situation is specific to the public/private-monorepo setup, where I am the only person who is aware of the full setup. While I share access to the public repo, I am the only one accessing the private one.
As an example of how things could go wrong, a contributor to leoloso/PoP might remove CHECKOUT_SUBMODULES: "" since it is superfluous. What the contributor doesn’t know is that, while that line is not needed, removing it will break the private repo.
I guess I need to add a warning!
env:
  ### ☠️ Do not delete this line! Or bad things will happen! ☠️
  CHECKOUT_SUBMODULES: ""
Wrapping up
My repo has gone through quite a journey, being adapted to the new requirements of my code and application at different stages:
It started as a single repo, hosting a monolithic app.
It became a multirepo when splitting the app into packages.
It was switched to a monorepo to better manage all the packages.
It was upgraded to a multi-monorepo to share files with a private monorepo.
Context means everything, so there is no “best” approach here—only solutions that are more or less suitable to different scenarios.
Has my repo reached the end of its journey? Who knows? The multi-monorepo satisfies my current requirements, but it hosts all private plugins together. If I ever need to grant contractors access to a specific private plugin, while preventing them to access other code, then the monorepo may no longer be the ideal solution for me, and I’ll need to iterate again.
I hope you have enjoyed the journey. And, if you have any ideas or examples from your own experiences, I’d love to hear about them in the comments.
Which param is the array and which is the callback in PHP functions array_map and array_filter? I can never get it right. To avoid this confusion we can use Inline Parameters, which prints inline the names of the function parameters (for JavaScript, TypeScript, PHP, and Lua).
HTML End Tag Labels
With deeply nested <div> tags we can easily get lost, not knowing which is their ending </div>. HTML End Tag Labels helps us understand the structure of the HTML code, by having the class names of the opening tag be displayed next to its closing tag.
TO-DO Tree
You have something to do in your code, but you don't have time for it now. Better do it later. Quick and easy reminder: add a "TODO" in your code. Fast forward 6 months, and you've accumulated 150 TODOs, and you need to take care of them. The Todo Tree will help you find all TODOs in your code.
Code Snippet Screenshots
You created some really beautiful code, and you want to share it with the world? You can take a screenshot, download it, go to Twitter, upload it and send it. Or you can select the code right within the editor, and have Snipped generate a beautiful image of it and send it straight to Twitter.
These four extensions have proven very handy for my work with web development. What other useful extensions do you use? Let me know in the comments.
When building themes and plugins for WordPress, we need to make sure they work well in all the different environments where they will be installed. We can sometimes control this environment when creating a theme for our own websites, but at other times we cannot, such as when distributing our plugins via the public WordPress repository for anyone to download and install it.
Concerning WordPress, the possible combinations of environments for us to worry about include:
Different versions of PHP,
Different versions of WordPress,
Different versions of the WordPress editor (aka the block editor),
HTTPS enabled/disabled,
Multisite enabled/disabled.
Let’s see how this is the case. PHP 8.0, which is the latest version of PHP, has introduced breaking changes from the previous versions. Since WordPress still officially supports PHP 5.6, our plugin may need to support 7 versions of PHP: PHP 5.6, plus PHP 7.0 to 7.4, plus PHP 8.0. If the plugin requires some specific feature of PHP, such as typed properties (introduced in PHP 7.4), then it will need to support that version of PHP onward (in this case, PHP 7.4 and PHP 8.0).
Concerning versioning in WordPress, this software itself may occasionally introduce breaking changes, such as the update to a newer version of jQuery in WordPress 5.6. In addition, every major release of WordPress introduces new features (such as the new Gutenberg editor, introduced in version 5.0), which could be required for our products.
The block editor it’s no exception. If our themes and plugins contain custom blocks, testing them for all different versions is imperative. At the very minimum, we need to worry about two versions of Gutenberg: the one shipped in WordPress core, and the one available as a standalone plugin.
Concerning both HTTPS and multisite, our themes and plugins could behave differently depending on these being enabled or not. For instance, we may want to disable access to a REST endpoint when not using HTTPS or provide extended capabilities to the super admin from the multisite.
This means there are many possible environments that we need to worry about. How do we handle it?
Figuring Out The Environments
Everything that can be automated, must be automated. For instance, to test the logic on our themes and plugins, we can create a continuous integration process that runs a set of tests on multiple environments. Automation takes a big chunk of the pain away.
However, we can’t just rely on having machines do all the work for us. We will also need to access some testing WordPress site to visualize if, after some software upgrade, our themes still look as intended. For instance, if Gutenberg updates its global styles system or how a core block behaves, we want to check that our products were not impacted by the change.
How many different environments do we need to support? Let’s say we are targeting 4 versions of PHP (7.2 to 8.0), 5 versions of WordPress (5.3 to 5.7), 2 versions of Gutenberg (core/plugin), HTTPS enabled/disabled, and multisite on/off. It all amounts to a total of 160 possible environments. That’s way too much to handle.
To simplify matters, instead of producing a site for each possible combination, we can reduce it to a handful of environments that, overall, comprise all the different properties.
For instance, we can produce these five environments:
PHP 8.0 + WP 5.7 + Gutenberg core + no HTTPS + no multisite
Spinning up 5 WordPress sites is manageable, but it is not easy since it involves technical challenges, particularly enabling different versions of PHP, and providing HTTPS certificates.
We want to spin up WordPress sites easily, even if we have limited knowledge of systems. And we want to do it quickly since we have our development and design work to do. How can we do it?
Managing Local WordPress Sites With DevKinsta
Fortunately, spinning up local WordPress sites is not difficult nowadays, since we can avoid the manual work, and instead rely on a tool that automates the process for us.
DevKinsta is exactly this kind of tool. It enables to launch a local WordPress site with minimum effort, for any desired configuration. The site will be created in less time it takes to drink a cup of coffee. And it certainly costs less than a cup of coffee: DevKinsta is 100% free and available for Windows, macOS, and Ubuntu users.
As its name suggests, DevKinsta was created by Kinsta, one of the leading hosting providers in the WordPress space. Their goal is to simplify the process of working with WordPress projects, whether for designers or developers, freelancers, or agencies. The easier we can set up our environment, the more we can focus on our own themes and plugins, the better our products will be.
The magic that powers DevKinsta is Docker, the software that enables to isolate an app from its environment via containers. However, we are not required to know about Docker or containers: DevKinsta hides the underlying complexity away, so we can just launch the WordPress site at the press of a button.
In this article, we will explore how to use DevKinsta to launch the 5 different local WordPress instances for testing a plugin, and what nice features we have at our disposal.
Launching A WordPress Site With DevKinsta
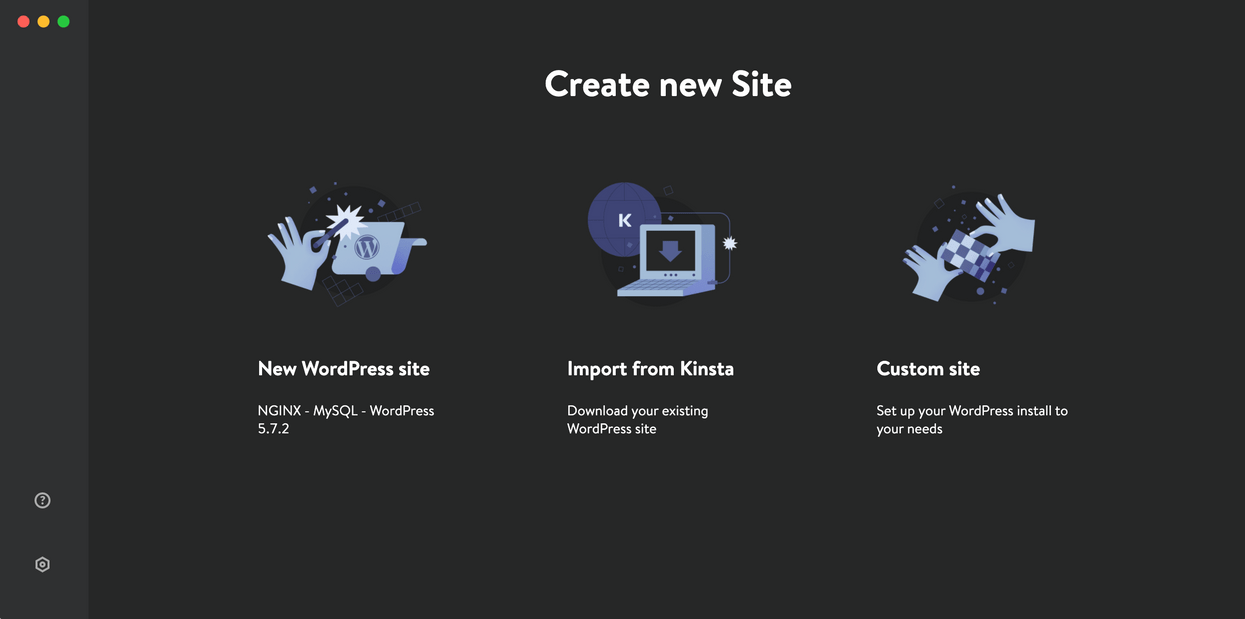
The images from above show DevKinsta when opening it for the first time. It presents 3 options for creating a new local WordPress site:
New WordPress site It uses the default configuration, including the latest WordPress release and PHP 8.
Import from Kinsta It clones the configuration from an existing site hosted at MyKinsta.
Custom site It uses a custom configuration, provided by you.
Pressing on option #1 will literally produce a local WordPress site without even thinking about it. I could explain a bit further if only I could; there’s really not more to it than that.
If you happen to be a Kinsta user, then pressing on option #2 allows you to directly import a site from MyKinsta, including a dump of its database. (Btw, it works in the opposite direction too: local changes in DevKinsta can be pushed to a staging site in MyKinsta.)
Finally, when pressing on option #3, we can specify what custom configuration to use for the local WordPress site.
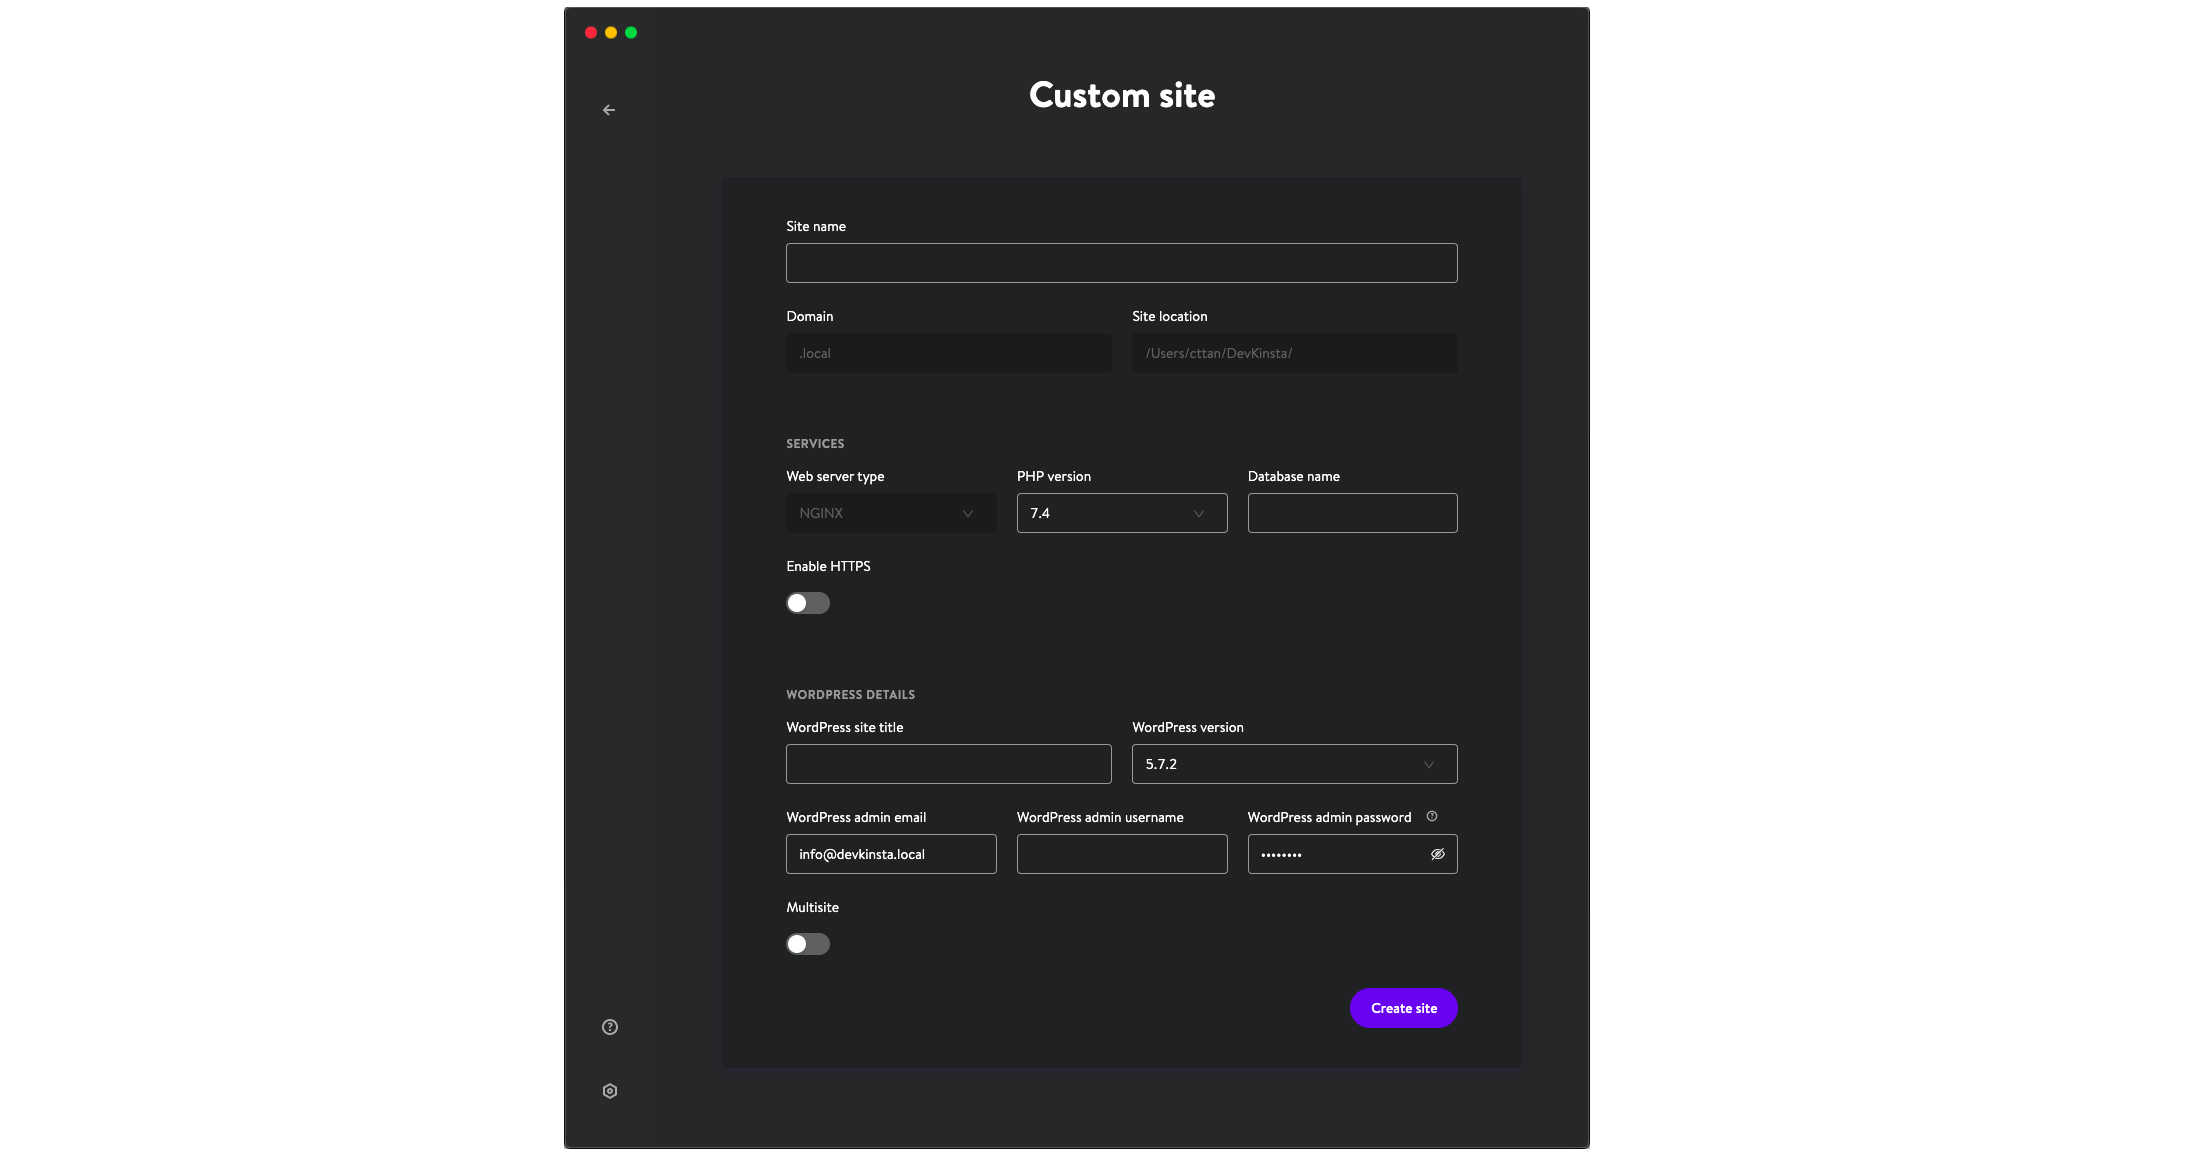
Let’s press the button for option #3. The configuration screen will look like this:
A few inputs are read-only. These are options that are currently fixed but will be made configurable sometime in the future. For instance, the webserver is currently set to Nginx, but work to add Apache is underway.
The options we can presently configure are the following:
The site’s name (from which the local URL is calculated),
PHP version,
Database name,
HTTPS enabled/disabled,
The WordPress site’s title,
WordPress version,
The admin’s email, username and password,
Multisite enabled/disabled.
After completing this information for my first local WordPress site, called “GraphQL API on PHP 80”, and clicking on “Create site”, all it took for DevKinsta to create the site was just 2 minutes. Then, I’m presented the info screen for the newly-created site:
The new WordPress site is available under its own local domain graphql-api-on-php80.local. Clicking on the “Open site” button, we can visualize our new site in the browser:
I repeated this process for all the different required environments, and voilà, my 5 local WordPress sites were up and running in no time. Now, DevKinsta’s initial screen list down all my sites:
Using WP-CLI
From the required configuration for my environments, I’ve so far satisfied all items except one: installing Gutenberg as a plugin.
Let’s do this next. We can install a plugin the usual via the WP admin, which we can access by clicking on the “WP admin” button from the site info screen, as seen in the image above.
Even better, DevKinsta ships with WP-CLI already installed, so we can interact with the WordPress site via the command-line interface.
In this case, we need to have a minimal knowledge of Docker. Executing a command within a container is done like this:
There are a couple of handy features available for our local WordPress sites.
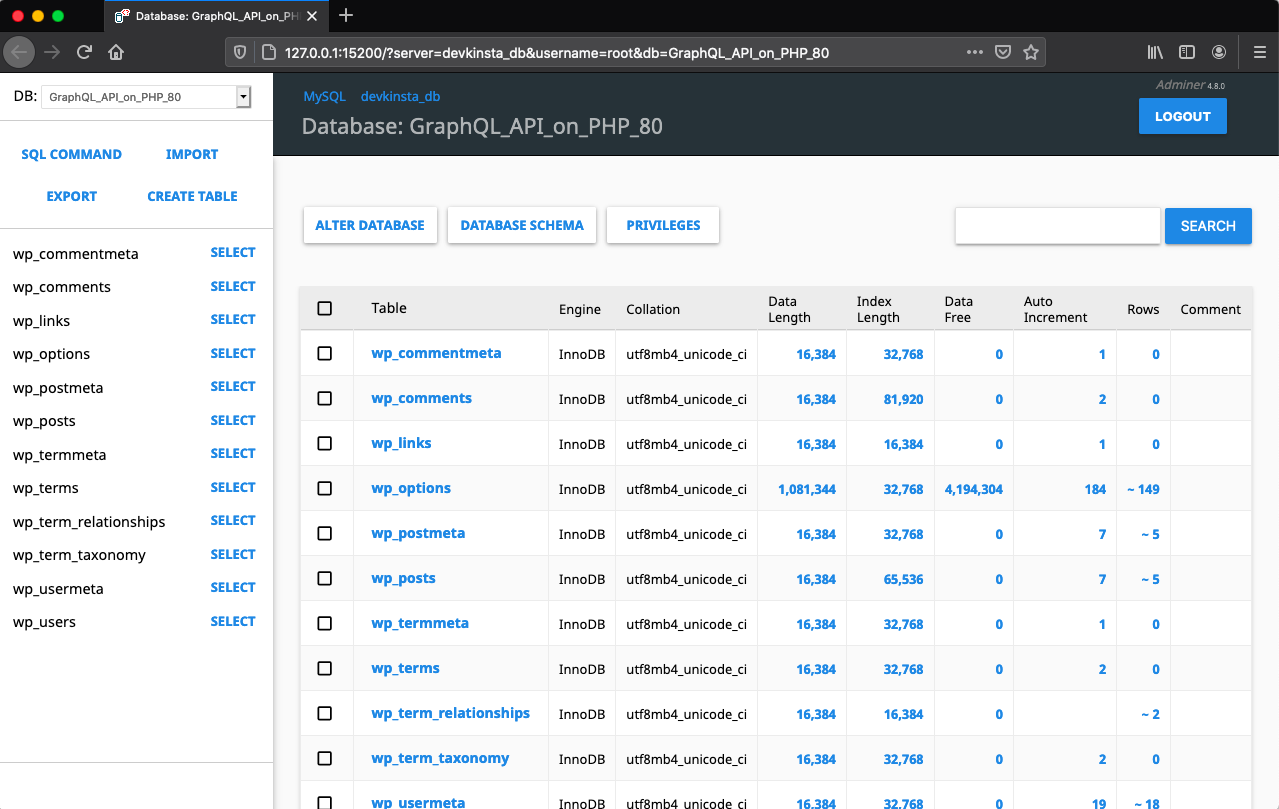
The first one is the integration with Adminer, a tool similar to phpMyAdmin, to manage the database. With this tool, we can directly fetch and edit the data through a custom SQL query. Clicking on the “Database manager” button, on the site info screen, will open Adminer in a new browser tab:
The second noteworthy feature is the integration with Mailhog, the popular email testing tool. Thanks to this tool, any email sent from the local WordPress site is not actually sent out, but is captured, and displayed on the Email inbox:
Clicking on an email, we can see its contents:
Accessing The Local Installation Files
After installing the local WordPress site, its folder containing all of its files (including WordPress core, installed themes and plugins, and uploaded media items) will be publicly available:
Mac and Linux: under /Users/{username}/DevKinsta/public/{siteName}.
Windows: under C:\Users\{username}\DevKinsta\public\{siteName}.
(In other words: the local WordPress site’s files can be accessed not only through the Docker container, but also through the filesystem in our OS, such as using My PC on Windows, Finder in Mac, or any terminal.)
This is very convenient since it offers a shortcut for installing the themes and plugins we’re developing, speeding up our work.
For instance, to test a change in a plugin in all 5 local sites, we’d normally have to go to the WP admin on each site, and upload the new version of the plugin (or, alternatively, use WP-CLI).
By having access to the site’s folder, though, we can simply clone the plugin from its repo, directly under wp-content/plugins:
$ cd ~/DevKinsta/public/MyLocalSite/wp-content/plugins
$ git clone git@github.com:leoloso/MyAwesomePlugin.git
This way, we can just git pull to update our plugin to its latest version, making it immediately available in the local WordPress site:
$ cd MyAwesomePlugin
$ git pull
If we want to test the plugin under development on a different branch, we can similarly do a git checkout:
git checkout some-branch-with-new-feature
Since we may have several sites with different environments, we can automate this procedure by executing a bash script, which iterates the local WordPress sites and, for each, executes a git pull for the plugin installed within:
#!/bin/bash

iterateSitesAndGitPullPlugin(){
  cd ~/DevKinsta/public/
  for file in *
  do
    if [ -d "$file" ]; then
      cd ~/DevKinsta/public/$file/wp-content/plugins/MyAwesomePlugin
      git pull
    fi
  done
}

iterateSitesAndGitPullPlugin
Conclusion
When designing and developing our WordPress themes and plugins, we want to be able to focus on our actual work, as much as possible. If we can automate setting up the working environment, we can then invest the extra time and energy into our product.
This is what DevKinsta makes possible. We can spin up a local WordPress site by just pressing a button, and create many sites with different environments in just a few minutes.
DevKinsta is being actively developed and supported. If you run into any issue or have some inquiry, you can browse through the documentation or head to the Community forum, where the creators of DevKinsta will help you out.
All of this, for free. Sounds good? If so, download DevKinsta and go spin up your local WordPress sites.
Products and services are increasingly accessed and bought online. As we live in a global village, if we have an online shop, many of our visitors will quite likely be based on a different country than our own, and use a different currency than our own.
If we want to provide a great user experience for them, to increase the chances of them buying our product, and coming back to the site, there is something very simple we can do: Display the price of the shopping items in their own currency. To achieve that, we can convert the price of the item from a base currency (say, EUR) to the visitor’s currency (say, CNY) using the exchange rate between the two currencies at that specific time.
Currency exchange rates change constantly, on an hourly basis (and even faster). This means that we can’t have a pre-defined list of exchange rates stored in our application; these must be gathered in real-time. However, this is not a problem nowadays. Thanks to APIs providing currency exchange data, we can add a currency convertor to our online shops rather effortlessly.
In this article, we will introduce ExchangeRatesApi.io, a popular API solution providing data for current and historical exchange rates for 168 currencies.
What We Want To Achieve
Simply said, we want to do what Amazon is doing: Give the option to the user in our online shop to display the prices in a currency of their own choosing.
When visiting a product page in amazon.co.uk, we are presented the price in British pounds:
But we can also see the price in a different currency, if we wish to. In the country/region settings, there is the option to change the currency:
After clicking on "Change", we are presented a select input, containing several pre-defined currencies. From among them, I’ve chosen the Euro:
Finally, back on the product page, the price is displayed in euros:
Having access to exchange rate data via an API, we can implement this same functionality for our own online shops.
How Do We Do It
ExchangeRatesApi.io provides a REST API, offering the latest forex data for 168 currencies. It is always up-to-date, compiling the data from a broad base of commercial sources and banks around the world.
To visualize the response, copy/paste the endpoint in your browser:
As can be possibly appreciated in the image above, the data for all 168 currencies has been retrieved. To narrow down the results to just a few of them, we indicate the currency codes via paramsymbols.
For instance, to retrieve data for the USD, British pound, Australian dollar, Japanese Yen and Chinese Yuan (compared against the Euro, which is the base currency by default), we execute this endpoint:
ExchangeRatesApi.io provides several REST endpoints, to fetch different sets of data. Depending on the subscribed plan, endpoints may or may not be available (their pricing page explains what features are covered by each tier).
The endpoints indicated below must be attached to https://api.exchangeratesapi.io/v1/ (eg: latest becomes https://api.exchangeratesapi.io/v1/latest), and added the access_key param with your API access key.
Latest rates
The latestendpoint returns exchange rate data in real-time for all available currencies or for a specific set.
Currency Conversion
The convertendpoint enables to convert an amount, from any currency to any other one within the supported 168 currencies.
Historical Rates
This endpoint has the shapeYYYY-MM-DD (such as 2021-03-20), corresponding to the date for which we want to retrieve historical exchange rate information.
Time-Series Data
The timeseriesendpoint returns the daily historical data for exchange rates between two specified dates, for a maximum timeframe of 365 days.
Fluctuation Data
The fluctuationendpoint returns the fluctuation data between specified dates, for a maximum timeframe of 365 days.
Fetching Data From The API
In order to implement the currency convertor, we can use the convert endpoint (for which we need be subscribed to the Basic tier):
Because the data is exposed via a REST API, we can conveniently retrieve it for any application based on any stack, whether it runs on the client-side or server-side, without having to install any additional library.
Client-Side
The following JavaScript code connects to the API, and prints the converted amount and exchange rate in the console:
// Set endpoint and your access key
const access_key = 'YOUR_API_KEY';
const from = 'GPB';
const to = 'JPY';
const amount = 25;
const url = https://api.exchangeratesapi.io/v1/convert?access_key=${ access_key }&from=${ from }&to=${ to }&amount=${ amount };

// Get the most recent exchange rates via the "latest" endpoint:
fetch(url)
 .then(response => response.json())
 .then(data => {
   // If our tier does not support the requested endpoint, we will get an error
   if (data.error) {
     console.log('Error:', data.error);
     return;
   }

   // We got the data
   console.log('Success:', data);
   console.log('Converted amount: ' + data.result);
   console.log('(Exchange rate: ' + data.info.rate + ')');
 })
 .catch((error) => {
   console.error('Error:', error);
 });
Server-Side
The following code demonstrates how to connect to the REST API, and print the converted result, within a PHP application.
The same procedure can be implemented for other languages:
Define the endpoint URL, attach your API access key.
Connect to the endpoint, retrieve its response in JSON format.
Decode the JSON data into an object/array.
Obtain the converted amount from under the result property.
// Set endpoint and your access key
$access_key = 'YOUR_API_KEY';
$from = 'GBP';
$to = 'JPY';
$amount = 25;

// Initialize CURL:
$ch = curl_init("https://api.exchangeratesapi.io/v1/convert?access_key=${access_key}&from=${from}&to=${to}&amount=${amount}");
curl_setopt($ch, CURLOPT_RETURNTRANSFER, true);

// Get the JSON data:
$json = curl_exec($ch);
curl_close($ch);

// Decode JSON response:
$conversionResult = json_decode($json, true);

// Access the converted amount
echo $conversionResult['result'];
Conclusion
ExchangeRatesApi.io was born as an open-source project, with the intention to provide current and historical foreign exchange rates published by the European Central Bank, and written in Python.
If you’d like to incorporate currency conversion for your online shop, to emulate Amazon and provide a compelling user experience for your visitors, then you can download and install the open-source project.
And you can also make it much easier: If you’d like to have your currency convertor working in no time, for any programming language, accessing always up-to-date data which includes a wide array of commercial sources, and from a super-fast API with uptime of nearly 100% (99.9% in the last 12 months), then check out ExchangeRatesApi.io.
Headless WordPress seems to be in vogue lately, with many new developments taking place in just the last few weeks. One of the reasons for the explosion in activity is the release of version 1.0 of WPGraphQL, a GraphQL server for WordPress.
WPGraphQL provides a GraphQL API: a way to fetch data from, and post data to, a WordPress website. It enables us to decouple the experience of managing our content, which is done via WordPress, from rendering the website, for which we can use the library of the framework of our choice (React, Vue.js, Gatsby, Next.js, or any other).
Until recently, WPGraphQL was the only GraphQL server for WordPress. But now another such plugin is available: GraphQL API for WordPress, authored by me.
These two plugins serve the same purpose: to provide a GraphQL API to a WordPress website. You may be wondering: Why another plugin when there’s already WPGraphQL? Do these two plugins do the same thing? Or are they for different situations?
Let me say this first: WPGraphQL works great. I didn’t build my plugin because of any problem with it.
I built GraphQL API for WordPress because I had been working on an engine to retrieve data efficiently, which happened to be very suitable for GraphQL. So, then I said to myself, “Why not?”, and I built it. (And also a couple of other reasons.)
The two plugins have different architectures, giving them different characteristics, which make particular tasks easier to achieve with one plugin or the other.
In this article, I’ll describe, from my own point of view but as objectively as possible, when WPGraphQL is the way to go and when GraphQL API for WordPress is a better choice.
Use WPGraphQL If: Using Gatsby
If you’re building a website using Gatsby, then there is only one choice: WPGraphQL.
The reason is that only WPGraphQL has the Gatsby source plugin for WordPress. In addition, WPGraphQL’s creator, Jason Bahl, was employed until recently by Gatsby, so we can fully trust that this plugin will suit Gatsby’s needs.
Gatsby receives all data from the WordPress website, and from then on, the logic of the application will be fully on Gatsby’s side, not on WordPress’. Hence, no additions to WPGraphQL (such as the potential additions of @stream or @defer directives) would make much of a difference.
WPGraphQL is already as good as Gatsby needs it to be.
Use WPGraphQL If: Using One of the New Headless Frameworks
As I mentioned, lately there has been a flurry of activity in the WordPress headless space concerning several new frameworks and starter projects, all of them based on Next.js:
If you need to use any of these new headless frameworks, then you will need to use WPGraphQL, because they have all been built on top of this plugin.
That’s a bit unfortunate: I’d really love for GraphQL API for WordPress to be able to power them too. But for that to happen, these frameworks would need to operate with GraphQL via an interface, so that we could swap GraphQL servers.
I’m somewhat hopeful that any of these frameworks will put such an interface into place. I asked about it in the Headless WordPress Framework discussion board and was told that it might be considered. I also asked in WebDevStudios’ Next.js WordPress Starter discussion board, but alas, my question was immediately deleted, without a response. (Not encouraging, is it?)
So WPGraphQL it is then, currently and for the foreseeable future.
Use Either (Or Neither) If: Using Frontity
Frontity is a React framework for WordPress. It enables you to build a React-based application that is managed in the back end via WordPress. Even creating blog posts using the WordPress editor is supported out of the box.
Frontity manages the state of the application, without leaking how the data was obtained. Even though it is based on REST by default, you can also power it via GraphQL by implementing the corresponding source plugin.
This is how Frontity is smart: The source plugin is an interface to communicate with the data provider. Currently, the only available source plugin is the one for the WordPress REST API. But anyone can implement a source plugin for either WPGraphQL or GraphQL API for WordPress. (This is the approach that I wish the Next.js-based frameworks replicated.)
Conclusion: Neither WPGraphQL nor the GraphQL API offers any advantage over the other for working with Frontity, and they both require some initial effort to plug them in.
Use WPGraphQL If: Creating a Static Site
In the first two sections, the conclusion was the same: Use WPGraphQL. But my response to this conclusion was different: While with Gatsby I had no regret, with Next.js I felt compelled to do something about it.
Why is that?
The difference is that, while Gatsby is purely a static site generator, Next.js can power both static and live websites.
I mentioned that WPGraphQL is already good enough for Gatsby. This statement can actually be broadened: WPGraphQL is already good enough for any static site generator. Once the static site generator gets the data from the WordPress website, it is pretty much settled with WordPress.
Even if GraphQL API for WordPress offers additional features, it will most likely not make a difference to the static site generator.
Hence, because WPGraphQL is already good enough, and it has completely mapped the GraphQL schema (which is still a work in progress for GraphQL API for WordPress), then WPGraphQL is the most suitable option, now and for the foreseeable future.
Use GraphQL API If: Using GraphQL in a Live (i.e. Non-Static) Website
Now, the situation above changes if we want GraphQL to fetch data from a live website, such as when powering a mobile app or plotting real-time data on a website (for instance, to display analytics) or combining both the static and live approaches on the same website.
For instance, let’s say we have built a simple static blog using one of the Next.js frameworks, and we want to allow users to add comments to blog posts. How should this task be handled?
We have two options: static and live (or dynamic). If we opt for static, then comments will be rendered together with the rest of the website. Then, whenever a comment is added, we must trigger a webhook to regenerate and redeploy the website.
This approach has a few inconveniences. The regeneration and redeployment process could take a few minutes, during which the new comment will not be available. In addition, if the website receives many comments a day, the static approach will require more server processing time, which could become costly (some hosting companies charge based on server time).
In this situation, it would make sense to render the website statically without comments, and then retrieve the comments from a live site and render them dynamically in the client.
For this, Next.js is recommended over Gatsby. It can better handle the static and live approaches, including supporting different outputs for users with different capabilities.
Back to the GraphQL discussion: Why do I recommend GraphQL API for WordPress when dealing with live data? I do because the GraphQL server can have a direct impact on the application, mainly in terms of speed and security.
For a purely static website, the WordPress website can be kept private (it might even live on the developer’s laptop), so it’s safe. And the user will not be waiting for a response from the server, so speed is not necessarily of critical importance.
For a live site, though, the GraphQL API will be made public, so data safety becomes an issue. We must make sure that no malicious actors can access it. In addition, the user will be waiting for a response, so speed becomes a critical consideration.
In this respect, GraphQL API for WordPress has a few advantages over WPGraphQL.
WPGraphQL does implement security measures, such as disabling introspection by default. But GraphQL API for WordPress goes further, by disabling the single endpoint by default (along with several other measures). This is possible because GraphQL API for WordPress offers persisted queries natively.
As for speed, persisted queries also make the API faster, because the response can then be cached via HTTP caching on several layers, including the client, content delivery network, and server.
These reasons make GraphQL API for WordPress better suited at handling live websites.
Use GraphQL API If: Exposing Different Data for Different Users or Applications
WordPress is a versatile content management system, able to manage content for multiple applications and accessible to different types of users.
Depending on the context, we might need our GraphQL APIs to expose different data, such as:
expose certain data to paid users but not to unpaid users,
expose certain data to the mobile app but not to the website.
To expose different data, we need to provide different versions of the GraphQL schema.
WPGraphQL allows us to modify the schema (for instance, we can remove a registered field). But the process is not straightforward: Schema modifications must be coded, and it’s not easy to understand who is accessing what and where (for instance, all schemas would still be available under the single endpoint, /graphql).
In contrast, GraphQL API for WordPress natively supports this use case: It offers custom endpoints, which can expose different data for different contexts, such as:
/graphql/mobile-app and /graphql/website,
/graphql/pro-users and /graphql/regular-users.
Each custom endpoint is configured via access control lists, to provide granular user access field by field, as well as a public and private API mode to determine whether the schema’s meta data is available to everyone or only to authorized users.
These features directly integrate with the WordPress editor (i.e. Gutenberg). So, creating the different schemas is done visually, similar to creating a blog post. This means that everyone can produce custom GraphQL schemas, not only developers.
GraphQL API for WordPress provides, I believe, a natural solution for this use case.
Use GraphQL API If: Interacting With External Services
GraphQL is not merely an API for fetching and posting data. As important (though often neglected), it can also process and alter the data — for instance, by feeding it to some external service, such as sending text to a third-party API to fix grammar errors or uploading an image to a content delivery network.
Now, what’s the best way for GraphQL to communicate with external services? In my opinion, this is best accomplished through directives, applied when either creating or retrieving the data (not unlike how WordPress filters operate).
I don’t know how well WPGraphQL interacts with external services, because its documentation doesn’t mention it, and the code base does not offer an example of any directive or document how to create one.
In contrast, GraphQL API for WordPress has robust support for directives. Every directive in a query is executed only once in total (as opposed to once per field and/or object). This capability enables very efficient communication with external APIs, and it integrates the GraphQL API within a cloud of services.
For instance, this query%0A%20%20%20%20excerpt%20%40translate(from%3A%22en%22%2Cto%3A%22es%22)%0A%20%20%7D%0A%7D) demonstrates a call to the Google Translate API via a @translate directive, to translate the titles and excerpts of many posts from English to Spanish. All fields for all posts are translated together, in a single call.
GraphQL API for WordPress is a natural choice for this use case.
Note: As a matter of fact, the engine on which GraphQL API for WordPress is based, GraphQL by PoP, was specifically designed to provide advanced data-manipulation capabilities. That is one of its distinct characteristics. For an extreme example of what it can achieve, check out the guide on “Sending a Localized Newsletter, User by User”.
Use WPGraphQL If: You Want a Support Community
Jason Bahl has done a superb job of rallying a community around WPGraphQL. As a result, if you need to troubleshoot your GraphQL API, you’ll likely find someone who can help you out.
In my case, I’m still striving to create a community of users around GraphQL API for WordPress, and it’s certainly nowhere near that of WPGraphQL.
Use GraphQL API If: You Like Innovation
I call GraphQL API for WordPress a “forward-looking” GraphQL server. The reason is that I often browse the list of requests for the GraphQL specification and implement some of them well ahead of time (especially those that I feel some affinity for or that I can support with little effort).
GraphQL API for WordPress offers an extension for Events Manager, and it will keep adding more after the release of version 1.0 of the plugin.
Use Either If: Creating Blocks for the WordPress Editor
Both WPGraphQL and GraphQL API for WordPress are currently working on integrating GraphQL with Gutenberg.
Jason Bahl has described three approaches by which this integration can take place. However, because all of them have issues, he is advocating for the introduction of a server-side registry to WordPress, to enable identification of the different Gutenberg blocks for the GraphQL schema.
GraphQL API for WordPress also has an approach for integrating with Gutenberg, based on the “create once, publish everywhere” strategy. It extracts block data from the stored content, and it uses a single Block type to represent all blocks. This approach could avoid the need for the proposed server-side registry.
WPGraphQL’s solution can be considered tentative, because it will depend on the community accepting the use of a server-side registry, and we don’t know if or when that will happen.
For GraphQL API for WordPress, the solution will depend entirely on itself, and it’s indeed already a work in progress.
Because it has a higher chance of producing a working solution soon, I’d be inclined to recommend GraphQL API for WordPress. However, let’s wait for the solution to be fully implemented (in a few weeks, according to the plan) to make sure it works as intended, and then I will update my recommendation.
Use GraphQL API If: Distributing Blocks Via a Plugin
I came to a realization: Not many plugins (if any) seem to be using GraphQL in WordPress.
Don’t get me wrong: WPGraphQL has surpassed 10,000 installations. But I believe that those are mostly installations to power Gatsby (in order to run Gatsby) or to power Next.js (in order to run one of the headless frameworks).
Similarly, WPGraphQL has many extensions, as I described earlier. But those extensions are just that: extensions. They are not standalone plugins.
For instance, the WPGraphQL for WooCommerce extension depends on both the WPGraphQL and WooCommerce plugins. If either of them is not installed, then the extension will not work, and that’s OK. But WooCommerce doesn’t have the choice of relying on WPGraphQL in order to work; hence, there will be no GraphQL in the WooCommerce plugin.
My understanding is that there are no plugins that use GraphQL in order to run functionality for WordPress itself or, specifically, to power their Gutenberg blocks.
The reason is simple: Neither WPGraphQL nor GraphQL API for WordPress are part of WordPress’ core. Thus, it is not possible to rely on GraphQL in the way that plugins can rely on WordPress’ REST API. As a result, plugins that implement Gutenberg blocks may only use REST to fetch data for their blocks, not GraphQL.
Seemingly, the solution is to wait for a GraphQL solution (most likely WPGraphQL) to be added to WordPress core. But who knows how long that will take? Six months? A year? Two years? Longer?
We know that WPGraphQL is being considered for WordPress’ core because Matt Mullenweg has hinted at it. But so many things must happen before then: bumping the minimum PHP version to 7.1 (required by both WPGraphQL and GraphQL API for WordPress), as well as having a clear decoupling, understanding, and roadmap for what functionality will GraphQL power.
(Full site editing, currently under development, is based on REST. What about the next major feature, multilingual blocks, to be addressed in Gutenberg’s phase 4? If not that, then which feature will it be?)
Having explained the problem, let’s consider a potential solution — one that doesn’t need to wait!
A few days ago, I had another realization: From GraphQL API for WordPress’ code base, I can produce a smaller version, containing only the GraphQL engine and nothing else (no UI, no custom endpoints, no HTTP caching, no access control, no nothing). And this version can be distributed as a Composer dependency, so that plugins can install it to power their own blocks.
The key to this approach is that this component must be of specific use to the plugin, not to be shared with anybody else. Otherwise, two plugins both referencing this component might modify the schema in such a way that they override each other.
Luckily, I recently solved scoping GraphQL API for WordPress. So, I know that I’m able to fully scope it, producing a version that will not conflict with any other code on the website.
That means that it will work for any combination of events:
If the plugin containing the component is the only one using it;
If GraphQL API for WordPress is also installed on the same website;
If another plugin that also embeds this component is installed on the website;
If two plugins that embed the component refer to the same version of the component or to different ones.
In each situation, the plugin will have its own self-contained, private GraphQL engine that it can fully rely on to power its Gutenberg blocks (and we need not fear any conflict).
This component, to be called the Private GraphQL API, should be ready in a few weeks. (I have already started working on it.)
Hence, my recommendation is that, if you want to use GraphQL to power Gutenberg blocks in your plugin, please wait a few weeks, and then check out GraphQL API for WordPress’ younger sibling, the Private GraphQL API.
Conclusion
Even though I do have skin in the game, I think I’ve managed to write an article that is mostly objective.
I have been honest in stating why and when you need to use WPGraphQL. Similarly, I have been honest in explaining why GraphQL API for WordPress appears to be better than WPGraphQL for several use cases.
In general terms, we can summarize as follows:
Go static with WPGraphQL, or go live with GraphQL API for WordPress.
Play it safe with WPGraphQL, or invest (for a potentially worthy payoff) in GraphQL API for WordPress.
On a final note, I wish the Next.js frameworks were re-architected to follow the same approach used by Frontity: where they can access an interface to fetch the data that they need, instead of using a direct implementation of some particular solution (the current one being WPGraphQL). If that happened, developers could choose which underlying server to use (whether WPGraphQL, GraphQL API for WordPress, or some other solution introduced in the future), based on their needs — from project to project.
WordPress is a CMS that’s coded in PHP. But, even though PHP is the foundation, WordPress also holds a philosophy where user needs are prioritized over developer convenience. That philosophy establishes an implicit contract between the developers building WordPress themes and plugins, and the user managing a WordPress site.
GraphQL is an interface that retrieves data from—and can submit data to—the server. A GraphQL server can have its own opinionatedness in how it implements the GraphQL spec, as to prioritize some certain behavior over another.
Can the WordPress philosophy that depends on server-side architecture co-exist with a JavaScript-based query language that passes data via an API?
Let’s pick that question apart, and explain how the GraphQL API WordPress plugin I authored establishes a bridge between the two architectures.
You may be aware of WPGraphQL. The plugin GraphQL API for WordPress (or “GraphQL API” from now on) is a different GraphQL server for WordPress, with different features.
Reconciling the WordPress philosophy within the GraphQL service
This table contains the expected behavior of a WordPress application or plugin, and how it can be interpreted by a GraphQL service running on WordPress:
Category
WordPress app expected behavior
Interpretation for GraphQL service running on WordPress
Accessing data
Democratizing publishing: Any user (irrespective of having technical skills or not) must be able to use the software
Democratizing data access and publishing: Any user (irrespective of having technical skills or not) must be able to visualize and modify the GraphQL schema, and execute a GraphQL query
Extensibility
The application must be extensible through plugins
The GraphQL schema must be extensible through plugins
Dynamic behavior
The behavior of the application can be modified through hooks
The results from resolving a query can be modified through directives
Localization
The application must be localized, to be used by people from any region, speaking any language
The GraphQL schema must be localized, to be used by people from any region, speaking any language
User interfaces
Installing and operating functionality must be done through a user interface, resorting to code as little as possible
Adding new entities (types, fields, directives) to the GraphQL schema, configuring them, executing queries, and defining permissions to access the service must be done through a user interface, resorting to code as little as possible
Access control
Access to functionalities can be granted through user roles and permissions
Access to the GraphQL schema can be granted through user roles and permissions
Preventing conflicts
Developers do not know in advance who will use their plugins, or what configuration/environment those sites will run, meaning the plugin must be prepared for conflicts (such as having two plugins define the SMTP service), and attempt to prevent them, as much as possible
Developers do not know in advance who will access and modify the GraphQL schema, or what configuration/environment those sites will run, meaning the plugin must be prepared for conflicts (such as having two plugins with the same name for a type in the GraphQL schema), and attempt to prevent them, as much as possible
Let’s see how the GraphQL API carries out these ideas.
Accessing data
Similar to REST, a GraphQL service must be coded through PHP functions. Who will do this, and how?
Altering the GraphQL schema through code
The GraphQL schema includes types, fields and directives. These are dealt with through resolvers, which are pieces of PHP code. Who should create these resolvers?
The best strategy is for the GraphQL API to already satisfy the basic GraphQL schema with all known entities in WordPress (including posts, users, comments, categories, and tags), and make it simple to introduce new resolvers, for instance for Custom Post Types (CPTs).
This is how the user entity is already provided by the plugin. The User type is provided through this code:
class UserTypeResolver extends AbstractTypeResolver
{
  public function getTypeName(): string
  {
    return 'User';
  }

  public function getSchemaTypeDescription(): ?string
  {
    return __('Representation of a user', 'users');
  }

  public function getID(object $user)
  {
    return $user->ID;
  }

  public function getTypeDataLoaderClass(): string
  {
    return UserTypeDataLoader::class;
  }
}
The type resolver does not directly load the objects from the database, but instead delegates this task to a TypeDataLoader object (in the example above, from UserTypeDataLoader). This decoupling is to follow the SOLID principles, providing different entities to tackle different responsibilities, as to make the code maintainable, extensible and understandable.
Adding username, email and url fields to the User type is done via a FieldResolver object:
class UserFieldResolver extends AbstractDBDataFieldResolver
{
  public static function getClassesToAttachTo(): array
  {
    return [
      UserTypeResolver::class,
    ];
  }

  public static function getFieldNamesToResolve(): array
  {
    return [
      'username',
      'email',
      'url',
    ];
  }

  public function getSchemaFieldDescription(
    TypeResolverInterface $typeResolver,
    string $fieldName
  ): ?string {
    $descriptions = [
      'username' => __("User's username handle", "graphql-api"),
      'email' => __("User's email", "graphql-api"),
      'url' => __("URL of the user's profile in the website", "graphql-api"),
    ];
    return $descriptions[$fieldName];
  }

  public function getSchemaFieldType(
    TypeResolverInterface $typeResolver,
    string $fieldName
  ): ?string {
    $types = [
      'username' => SchemaDefinition::TYPE_STRING,
      'email' => SchemaDefinition::TYPE_EMAIL,
      'url' => SchemaDefinition::TYPE_URL,
    ];
    return $types[$fieldName];
  }

  public function resolveValue(
    TypeResolverInterface $typeResolver,
    object $user,
    string $fieldName,
    array $fieldArgs = []
  ) {
    switch ($fieldName) {
      case 'username':
        return $user->user_login;

      case 'email':
        return $user->user_email;

      case 'url':
        return get_author_posts_url($user->ID);
    }

    return null;
  }
}
As it can be observed, the definition of a field for the GraphQL schema, and its resolution, has been split into a multitude of functions:
getSchemaFieldDescription
getSchemaFieldType
resolveValue
Other functions include:
getSchemaFieldArgs: to declare the field arguments (including their name, description, type, and if they are mandatory or not)
This code is more legible than if all functionality is satisfied through a single function, or through a configuration array, thus making it easier to implement and maintain the resolvers.
Retrieving plugin or custom CPT data
What happens when a plugin has not integrated its data to the GraphQL schema by creating new type and field resolvers? Could the user then query data from this plugin through GraphQL?
For instance, let’s say that WooCommerce has a CPT for products, but it does not introduce the corresponding Product type to the GraphQL schema. Is it possible to retrieve the product data?
Concerning CPT entities, their data can be fetched via type GenericCustomPost, which acts as a kind of wildcard, to encompass any custom post type installed in the site. The records are retrieved by querying Root.genericCustomPosts(customPostTypes: [cpt1, cpt2, ...]) (in this notation for fields, Root is the type, and genericCustomPosts is the field).
Then, to fetch the product data, corresponding to CPT with name "wc_product", we execute this query:
{
  genericCustomPosts(customPostTypes: "[wc_product]") {
    id
    title
    url
    date
  }
}
However, all the available fields are only those ones present in every CPT entity: title, url, date, etc. If the CPT for a product has data for price, a corresponding field price is not available. wc_product refers to a CPT created by the WooCommerce plugin, so for that, either the WooCommerce or the website’s developers will have to implement the Product type, and define its own custom fields.
CPTs are often used to manage private data, which must not be exposed through the API. For this reason, the GraphQL API initially only exposes the Page type, and requires defining which other CPTs can have their data publicly queried:
Transitioning from REST to GraphQL via persisted queries
While GraphQL is provided as a plugin, WordPress has built-in support for REST, through the WP REST API. In some circumstances, developers working with the WP REST API may find it problematic to transition to GraphQL.
For instance, consider these differences:
A REST endpoint has its own URL, and can be queried via GET, while GraphQL, normally operates through a single endpoint, queried via POST only
The REST endpoint can be cached on the server-side (when queried via GET), while the GraphQL endpoint normally cannot
As a consequence, REST provides better out-of-the-box support for caching, making the application more performant and reducing the load on the server. GraphQL, instead, places more emphasis in caching on the client-side, as supported by the Apollo client.
After switching from REST to GraphQL, will the developer need to re-architect the application on the client-side, introducing the Apollo client just to introduce a layer of caching? That would be regrettable.
The “persisted queries” feature provides a solution for this situation. Persisted queries combine REST and GraphQL together, allowing us to:
create queries using GraphQL, and
publish the queries on their own URL, similar to REST endpoints.
The persisted query endpoint has the same behavior as a REST endpoint: it can be accessed via GET, and it can be cached server-side. But it was created using the GraphQL syntax, and the exposed data has no under/over fetching.
Extensibility
The architecture of the GraphQL API will define how easy it is to add our own extensions.
class UserFieldResolver extends AbstractDBDataFieldResolver
{
  public static function getClassesToAttachTo(): array
  {
    return [UserTypeResolver::class];
  }

  public static function getFieldNamesToResolve(): array
  {
    return [
      'username',
      'email',
      'url',
    ];
  }
}
The User type does not know in advance which fields it will satisfy, but these (username, email and url) are instead injected to the type by the field resolver.
This way, the GraphQL schema becomes easily extensible. By simply adding a field resolver, any plugin can add new fields to an existing type (such as WooCommerce adding a field for User.shippingAddress), or override how a field is resolved (such as redefining User.url to return the user’s website instead).
Code-first approach
Plugins must be able to extend the GraphQL schema. For instance, they could make available a new Product type, add an additional coauthors field on the Post type, provide a @sendEmail directive, or anything else.
To achieve this, the GraphQL API follows a code-first approach, in which the schema is generated from PHP code, on runtime.
The alternative approach, called SDL-first (Schema Definition Language), requires the schema be provided in advance, for instance, through some .gql file.
The main difference between these two approaches is that, in the code-first approach, the GraphQL schema is dynamic, adaptable to different users or applications. This suits WordPress, where a single site could power several applications (such as website and mobile app) and be customized for different clients. The GraphQL API makes this behavior explicit through the “custom endpoints” feature, which enables to create different endpoints, with access to different GraphQL schemas, for different users or applications.
To avoid performance hits, the schema is made static by caching it to disk or memory, and it is re-generated whenever a new plugin extending the schema is installed, or when the admin updates the settings.
Support for novel features
Another benefit of using the code-first approach is that it enables us to provide brand-new features that can be opted into, before these are supported by the GraphQL spec.
Let’s see this novel feature in action. In this query, we first query the post through Root.post, then execute mutation Post.addComment on it and obtain the created comment object, and finally execute mutation Comment.reply on it and query some of its data (uncomment the first mutation to log the user in, as to be allowed to add comments):
# mutation {
#   loginUser(
#     usernameOrEmail:"test",
#     password:"pass"
#   ) {
#     id
#     name
#   }
# }
mutation {
  post(id:1459) {
    id
    title
    addComment(comment:"That's really beautiful!") {
      id
      date
      content
      author {
        id
        name
      }
      reply(comment:"Yes, it is!") {
        id
        date
        content
      }
    }
  }
}
Dynamic behavior
WordPress uses hooks (filters and actions) to modify behavior. Hooks are simple pieces of code that can override a value, or enable to execute a custom action, whenever triggered.
Is there an equivalent in GraphQL?
Directives to override functionality
Searching for a similar mechanism for GraphQL, I‘ve come to the conclusion that directives could be considered the equivalent to WordPress hooks to some extent: like a filter hook, a directive is a function that modifies the value of a field, thus augmenting some other functionality.
For instance, let’s say we retrieve a list of post titles with this query:
query {
  posts {
    title
  }
}
…which produces this response:
{
  "data": {
    "posts": [
      {
        "title": "Scheduled by Leo"
      },
      {
        "title": "COPE with WordPress: Post demo containing plenty of blocks"
      },
      {
        "title": "A lovely tango, not with leo"
      },
      {
      "title": "Hello world!"
      },
    ]
  }
}
These results are in English. How can we translate them to Spanish? With a directive @translate applied on field title (implemented through this directive resolver), which gets the value of the field as an input, calls the Google Translate API to translate it, and has its result override the original input, as in this query:
query {
  posts {
    title @translate(from:"en", to"es")
  }
}
…which produces this response:
{
  "data": {
    "posts": [
      {
        "title": "Programado por Leo"
      },
      {
        "title": "COPE con WordPress: publica una demostración que contiene muchos bloques"
      },
      {
        "title": "Un tango lindo, no con leo"
      },
      {
        "title": "¡Hola Mundo!"
      }
    ]
  }
}
Please notice how directives are unconcerned with who the input is. In this case, it was a Post.title field, but it could’ve been Post.excerpt, Comment.content, or any other field of type String. Then, resolving fields and overriding their value is cleanly decoupled, and directives are always reusable.
Directives to connect to third parties
As WordPress keeps steadily becoming the OS of the web (currently powering 39% of all sites, more than any other software), it also progressively increases its interactions with external services (think of Stripe for payments, Slack for notifications, AWS S3 for hosting assets, and others).
As we‘ve seen above, directives can be used to override the response of a field. But where does the new value come from? It could come from some local function, but it could perfectly well also originate from some external service (as for directive @translate we’ve seen earlier on, which retrieves the new value from the Google Translate API).
For this reason, GraphQL API has decided to make it easy for directives to communicate with external APIs, enabling those services to transform the data from the WordPress site when executing a query, such as for:
translation,
image compression,
sourcing through a CDN, and
sending emails, SMS and Slack notifications.
As a matter of fact, GraphQL API has decided to make directives as powerful as possible, by making them low-level components in the server’s architecture, even having the query resolution itself be based on a directive pipeline. This grants directives the power to perform authorizations, validations, and modification of the response, among others.
Localization
GraphQL servers using the SDL-first approach find it difficult to localize the information in the schema (the corresponding issue for the spec was created more than four years ago, and still has no resolution).
Using the code-first approach, though, the GraphQL API can localize the descriptions in a straightforward manner, through the __('some text', 'domain') PHP function, and the localized strings will be retrieved from a POT file corresponding to the region and language selected in the WordPress admin.
For instance, as we saw earlier on, this code localizes the field descriptions:
class UserFieldResolver extends AbstractDBDataFieldResolver
{
  public function getSchemaFieldDescription(
    TypeResolverInterface $typeResolver,
    string $fieldName
  ): ?string {
    $descriptions = [
      'username' => __("User's username handle", "graphql-api"),
      'email' => __("User's email", "graphql-api"),
      'url' => __("URL of the user's profile in the website", "graphql-api"),
    ];
    return $descriptions[$fieldName];
  }
}
User interfaces
The GraphQL ecosystem is filled with open source tools to interact with the service, including many provide the same user-friendly experience expected in WordPress.
Visualizing the GraphQL schema is done with GraphQL Voyager:
This can prove particularly useful when creating our own CPTs, and checking out how and from where they can be accessed, and what data is exposed for them:
Executing the query against the GraphQL endpoint is done with GraphiQL:
However, this tool is not simple enough for everyone, since the user must have knowledge of the GraphQL query syntax. So, in addition, the GraphiQL Explorer is installed on top of it, as to compose the GraphQL query by clicking on fields:
Access control
WordPress provides different user roles (admin, editor, author, contributor and subscriber) to manage user permissions, and users can be logged-in the wp-admin (eg: the staff), logged-in the public-facing site (eg: clients), or not logged-in or have an account (any visitor). The GraphQL API must account for these, allowing to grant granular access to different users.
Granting access to the tools
The GraphQL API allows to configure who has access to the GraphiQL and Voyager clients to visualize the schema and execute queries against it:
Only the admin?
The staff?
The clients?
Openly accessible to everyone?
For security reasons, the plugin, by default, only provides access to the admin, and does not openly expose the service on the Internet.
In the images from the previous section, the GraphiQL and Voyager clients are available in the wp-admin, available to the admin user only. The admin user can grant access to users with other roles (editor, author, contributor) through the settings:
As to grant access to our clients, or anyone on the open Internet, we don’t want to give them access to the WordPress admin. Then, the settings enable to expose the tools under a new, public-facing URL (such as mywebsite.com/graphiql and mywebsite.com/graphql-interactive). Exposing these public URLs is an opt-in choice, explicitly set by the admin.
Granting access to the GraphQL schema
The WP REST API does not make it easy to customize who has access to some endpoint or field within an endpoint, since no user interface is provided and it must be accomplished through code.
The GraphQL API, instead, makes use of the metadata already available in the GraphQL schema to enable configuration of the service through a user interface (powered by the WordPress editor). As a result, non-technical users can also manage their APIs without touching a line of code.
Managing access control to the different fields (and directives) from the schema is accomplished by clicking on them and selecting, from a dropdown, which users (like those logged in or with specific capabilities) can access them.
Preventing conflicts
Namespacing helps avoid conflicts whenever two plugins use the same name for their types. For instance, if both WooCommerce and Easy Digital Downloads implement a type named Product, it would become ambiguous to execute a query to fetch products. Then, namespacing would transform the type names to WooCommerceProduct and EDDProduct, resolving the conflict.
The likelihood of such conflict arising, though, is not very high. So the best strategy is to have it disabled by default (as to keep the schema as simple as possible), and enable it only if needed.
If enabled, the GraphQL server automatically namespaces types using the corresponding PHP package name (for which all packages follow the PHP Standard Recommendation PSR-4). For instance, for this regular GraphQL schema:
…with namespacing enabled, Post becomes PoPSchema_Posts_Post, Comment becomes PoPSchema_Comments_Comment, and so on.
That’s all, folks
Both WordPress and GraphQL are captivating topics on their own, so I find the integration of WordPress and GraphQL greatly endearing. Having been at it for a few years now, I can say that designing the optimal way to have an old CMS manage content, and a new interface access it, is a challenge worth pursuing.
I could continue describing how the WordPress philosophy can influence the implementation of a GraphQL service running on WordPress, talking about it even for several hours, using plenty of material that I have not included in this write-up. But I need to stop… So I’ll stop now.
I hope this article has managed to provide a good overview of the whys and hows for satisfying the WordPress philosophy in GraphQL, as done by plugin GraphQL API for WordPress.
Abstracting WordPress Code To Reuse With Other CMSs: Implementation (Part 2)
Abstracting WordPress Code To Reuse With Other CMSs: Implementation (Part 2)
Leonardo Losoviz
In the first part of this series, we learned the key concepts to build an application that is as CMS-agnostic as possible. In this second and final part, we will proceed to abstract a WordPress application, making its code ready to be used with Symfony components, Laravel framework, and October CMS (which is based on Laravel).
Accessing Services
Before we start abstracting the code, we need to provide the layer of dependency injection to the application. As described in the first part of this series, this layer is satisfied through Symfony’s DependencyInjection component. To access the defined services, we create a class ContainerBuilderFactory which simply stores a static instance of the component’s ContainerBuilder object:
use Symfony\Component\DependencyInjection\ContainerBuilder;

class ContainerBuilderFactory {
  private static $instance;
  public static function init()
  {
    self::$instance = new ContainerBuilder();
  }
  public static function getInstance()
  {
    return self::$instance;
  }
}
Then, to access a service called "cache", the application requests it like this:
$cacheService = ContainerBuilderFactory::getInstance()->get('cache');
// Do something with the service
// $cacheService->...
Abstracting WordPress Code
We have identified the following pieces of code and concepts from a WordPress application that need be abstracted away from WordPress’s opinionatedness:
accessing functions
function names
function parameters
states (and other constant values)
CMS helper functions
user permissions
application options
database column names
errors
hooks
routing
object properties
global state
entity models (meta, post types, pages being posts, and taxonomies —tags and categories—)
translation
media.
Let’s proceed to abstract them, one by one.
Note: For ease of reading, I have omitted adding namespaces to all classes and interfaces throughout this article. However, adding namespaces, as specified in PHP Standards Recommendation PSR-4, is a must! Among other advantages, the application can then benefit from autoloading, and Symfony’s dependency injection can rely on automatic service loading as to reduce its configuration to the bare minimum.
Accessing functions
The mantra “code against interfaces, not implementations” means that all those functions provided by the CMS cannot be accessed directly anymore. Instead, we must access the function from a contract (an interface), on which the CMS function will simply be the implementation. By the end of the abstraction, since no WordPress code will be referenced directly anymore, we can then swap WordPress with a different CMS.
For instance, if our application accesses function get_posts:
$posts = get_posts($args);
We must then abstract this function under some contract:
interface PostAPIInterface
{
  public function getPosts($args);
}
The contract must be implemented for WordPress:
class WPPostAPI implements PostAPIInterface
{
  public function getPosts($args) {
    return get_posts($args);
  }
}
A service "posts_api" must be added to the dependency injection services.yaml configuration file, indicating which class resolves the service:
services:
  posts_api:
    class: \WPPostAPI
And finally, the application can reference the function through service "posts_api":
If you have noticed from the code demonstrated above, function get_posts is abstracted as getPosts. There are a couple of reasons why this is a good idea:
By calling the function differently, it helps identify which code belongs to WordPress and which code belongs to our abstracted application.
Function names must be camelCased to comply with PSR-2, which attempts to define a standard for writing PHP code.
Certain functions can be redefined, making more sense in an abstract context. For instance, WordPress function get_user_by($field, $value) uses parameter $field with values "id", "ID", "slug", "email" or "login" to know how to get the user. Instead of replicating this methodology, we can explicitly define a separate function for each of them:
interface UsersAPIInterface
{
  public function getUserById($value);
  public function getUserByEmail($value);
  public function getUserBySlug($value);
  public function getUserByLogin($value);
}
And these are resolved for WordPress:
class WPUsersAPI implements UsersAPIInterface
{
  public function getUserById($value)
  {
    return get_user_by('id', $value);
  }
  public function getUserByEmail($value)
  {
    return get_user_by('email', $value);
  }
  public function getUserBySlug($value)
  {
    return get_user_by('slug', $value);
  }
  public function getUserByLogin($value)
  {
    return get_user_by('login', $value);
  }
}
Certain other functions should be renamed because their names convey information about their implementation, which may not apply for a different CMS. For instance, WordPress function get_the_author_meta can receive parameter "user_lastname", indicating that the user’s lastname is stored as a “meta” value (which is defined as an additional property for an object, not originally mapped in the database model). However, other CMSs may have a column "lastname" in the user table, so it doesn’t apply as a meta value. (The actual definition of “meta” value is actually inconsistent in WordPress: function get_the_author_meta also accepts value "user_email", even though the email is stored on the user table. Hence, I’d rather stick to my definition of “meta” value, and remove all inconsistencies from the abstracted code.)
Then, our contract will implement the following functions:
interface UsersAPIInterface
{
  public function getUserDisplayName($user_id);
  public function getUserEmail($user_id);
  public function getUserFirstname($user_id);
  public function getUserLastname($user_id);
  ...
}
Which are resolved for WordPress:
class WPUsersAPI implements UsersAPIInterface
{
  public function getUserDisplayName($user_id)
  {
    return get_the_author_meta('display_name', $user_id);
  }
  public function getUserEmail($user_id)
  {
    return get_the_author_meta('user_email', $user_id);
  }
  public function getUserFirstname($user_id)
  {
    return get_the_author_meta('user_firstname', $user_id);
  }
  public function getUserLastname($user_id)
  {
    return get_the_author_meta('user_lastname', $user_id);
  }
  ...
}
Our functions could also be re-defined as to remove the limitations from WordPress. For instance, function update_user_meta($user_id, $meta_key, $meta_value) can receive one meta attribute at a time, which makes sense since each of these is updated on its own database query. However, October CMS maps all meta attributes together on a single database column, so it makes more sense to update all values together on a single database operation. Then, our contract can include an operation updateUserMetaAttributes($user_id, $meta) which can update several meta values at the same time:
interface UserMetaInterface
{
  public function updateUserMetaAttributes($user_id, $meta);
}
Which is resolved for WordPress like this:
class WPUsersAPI implements UsersAPIInterface
{
  public function updateUserMetaAttributes($user_id, $meta)
  {
    foreach ($meta as $meta_key => $meta_value) {
      update_user_meta($user_id, $meta_key, $meta_value);
    }
  }
}
Finally, we may want to re-define a function to remove its ambiguities. For instance, WordPress function add_query_arg can receive parameters in two different ways:
Using a single key and value: add_query_arg('key', 'value', 'http://example.com');
Using an associative array: add_query_arg(['key1' => 'value1', 'key2' => 'value2'], 'http://example.com');
This becomes difficult to keep consistent across CMSs. Hence, our contract can define functions addQueryArg (singular) and addQueryArgs (plural) as to remove the ambiguity:
public function addQueryArg(string $key, string $value, string $url);
public function addQueryArgs(array $key_values, string $url);
Function parameters
We must also abstract the parameters to the function, making sure they make sense in a generic context. For each function to abstract, we must consider:
renaming and/or re-defining the parameters;
renaming and/or re-defining the attributes passed on array parameters.
For instance, WordPress function get_posts receives a unique parameter $args, which is an array of attributes. One of its attributes is fields which, when given the value "ids", makes the function return an array of IDs instead of an array of objects. However, I deem this implementation too specific for WordPress, and for a generic context I’d prefer a different solution: Convey this information through a separate parameter called $options, under attribute "return-type".
To accomplish this, we add parameter $options to the function in our contract:
interface PostAPIInterface
{
  public function getPosts($args, $options = []);
}
Instead of referencing WordPress constant value "ids" (which we can’t guarantee will be the one used in all other CMSs), we create a corresponding constant value for our abstracted application:
class Constants
{
  const RETURNTYPE_IDS = 'ids';
}
The WordPress implementation must map and recreate the parameters between the contract and the implementation:
class WPPostAPI implements PostAPIInterface
{
  public function getPosts($args, $options = []) {
    if ($options['return-type'] == Constants::RETURNTYPE_IDS) {
      $args['fields'] = 'ids';
    }
    return get_posts($args);
  }
}
And finally, we can execute the code through our contract:
While abstracting the parameters, we should avoid transferring WordPress’s technical debt to our abstracted code, whenever possible. For instance, parameter $args from function get_posts can contain attribute 'post_type'. This attribute name is somewhat misleading, since it can receive one element (post_type => "post") but also a list of them (post_type => "post, event"), so this name should be in plural instead: post_types. When abstracting this piece of code, we can set our interface to expect attribute post_types instead, which will be mapped to WordPress’s post_type.
Similarly, different functions accept arguments with different names, even though these have the same objective, so their names can be unified. For instance, through parameter $args, WordPress function get_posts accepts attribute posts_per_page, and function get_users accepts attribute number. These attribute names can perfectly be replaced with the more generic attribute name limit.
It is also a good idea to rename parameters to make it easy to understand which ones belong to WordPress and which ones have been abstracted. For instance, we can decide to replace all "_" with "-", so our newly-defined argument post_types becomes post-types.
Applying these prior considerations, our abstracted code will look like this:
class WPPostAPI implements PostAPIInterface
{
  public function getPosts($args, $options = []) {
    ...
    if (isset($args['post-types'])) {
      $args['post_type'] = $args['post-types'];
      unset($args['post-types']);
    }
    if (isset($args['limit'])) {
      $args['posts_per_page'] = $args['limit'];
      unset($args['limit']);
    }
    return get_posts($args);
  }
}
We can also re-define attributes to modify the shape of their values. For instance, WordPress parameter $args in function get_posts can receive attribute date_query, whose properties ("after", "inclusive", etc) can be considered specific to WordPress:
To unify the shape of this value into something more generic, we can re-implement it using other arguments, such as "date-from" and "date-from-inclusive" (this solution is not 100% convincing though, since it is more verbose than WordPress’s):
class WPPostAPI implements PostAPIInterface
{
  public function getPosts($args, $options = []) {
    ...
    if (isset($args['date-from'])) {
      $args['date_args'][] = [
        'after' => $args['date-from'],
        'inclusive' => false,
      ];
      unset($args['date-from']);
    }
    if (isset($args['date-from-inclusive'])) {
      $args['date_args'][] = [
        'after' => $args['date-from-inclusive'],
        'inclusive' => true,
      ];
      unset($args['date-from-inclusive']);
    }
    return get_posts($args);
  }
}
In addition, we need to consider if to abstract or not those parameters which are too specific to WordPress. For instance, function get_posts allows to order posts by attribute menu_order, which I don’t think it works in a generic context. Then, I’d rather not abstract this code and keep it on the CMS-specific package for WordPress.
Finally, we can also add argument types (and, since here we are, also return types) to our contract fuction, making it more understandable and allowing the code to fail in compilation time instead of during runtime:
interface PostAPIInterface
{
  public function getPosts(array $args, array $options = []): array;
}
States (and other constant values)
We need to make sure that all states have the same meaning in all CMSs. For instance, posts in WordPress can have one among the following states: "publish", "pending", "draft" or "trash". To make sure that the application references the abstracted version of the states and not the CMS-specific one, we can simply define a constant value for each of them:
class PostStates {
  const PUBLISHED = 'published';
  const PENDING = 'pending';
  const DRAFT = 'draft';
  const TRASH = 'trash';
}
As it can be seen, the actual constant values may or may not be the same as in WordPress: while "publish" was renamed as "published", the other ones remain the same.
For the implementation for WordPress, we convert from the agnostic value to the WordPress-specific one:
This strategy works under the assumption that all CMSs will support these states. If any CMS does not support a particular state (eg: "pending") then it should throw an exception whenever a corresponding functionality is invoked.
CMS helper functions
WordPress implements several helper functions that must also abstracted, such as make_clickable. Because these functions are very generic, we can implement a default behavior for them that works well in an abstract context, and which can be overridden if the CMS implements a better solution.
We first define the contract:
interface HelperAPIInterface
{
  public function makeClickable(string $text);
}
And provide a default behaviour for the helper functions through an abstract class:
abstract class AbstractHelperAPI implements HelperAPIInterface
{
  public function makeClickable(string $text) {
    return preg_replace('!(((f|ht)tp(s)?://)[-a-zA-Zа-яА-Я()0-9@:%_+.~#?&;//=]+)!i', '<a href="$1">$1</a>', $text);
  }
}
Now, our application can either use this functionality or, if it runs on WordPress, use the WordPress-specific implementation:
class WPHelperAPI extends AbstractHelperAPI
{
  public function makeClickable(string $text) {
    return make_clickable($text);
  }
}
User permissions
For all CMSs which support user management, in addition to abstracting the corresponding functions (such as current_user_can and user_can in WordPress), we must also make sure that the user permissions (or capabilities) have the same effect across all CMSs. To achieve this, our abstracted application needs to explicitly state what is expected from the capability, and the implementation for each CMS must either satisfy it through one of its own capabilities or throw an exception if it can’t satisfy it. For instance, if the application needs to validate if the user can edit posts, it can represent it through a capability called "capability:editPosts", which is satisfied for WordPress through its capability "edit_posts".
This is still an instance of the “code against interfaces, not implementations” principle, however here we run against a problem: Whereas in PHP we can define interfaces and classes to model contracts and service providers (which works in compilation time, so that the code doesn’t compile if a class implementing an interface does not implement all functions defined in the interface), PHP offers no similar construct to validate that a contract capability (which is simply a string, such as "capability:editPosts") has been satisfied through a capability by the CMS. This concept, which I call a “loose contract”, will need to be handled by our application, on runtime.
To deal with “loose contracts”, I have created a service LooseContractService through which:
the application can define what “contract names” must be implemented, through function requireNames.
the CMS-specific implementations can satisfy those names, through function implementNames.
the application can get the implementation of a name through function getImplementedName.
the application can also inquire for all non-satisfied required names through function getNotImplementedRequiredNames, as to throw an exception or log the error if needed.
The service looks like this:
class LooseContractService
{
  protected $requiredNames = [];
  protected $nameImplementations = [];

  public function requireNames(array $names): void
  {
    $this->requiredNames = array_merge(
      $this->requiredNames,
      $names
    );
  }

  public function implementNames(array $nameImplementations): void
  {
    $this->nameImplementations = array_merge(
      $this->nameImplementations,
      $nameImplementations
    );
  }

  public function getImplementedName(string $name): ?string {
    return $this->nameImplementations[$name];
  }

  public function getNotImplementedRequiredNames(): array {
    return array_diff(
      $this->requiredNames,
      array_keys($this->nameImplementations)
    );
  }
}
The application, when initialized, can then establish loose contracts by requiring names:
The application can then resolve the required name to the implementation from the CMS. If this required name (in this case, a capability) is not implemented, then the application may throw an exception:
$cmsCapabilityName = $looseContractService->getImplementedName('capability:editPosts');
if (!$cmsCapabilityName) {
  throw new Exception(sprintf(
    "The CMS has no support for capability \"%s\"",
    'capability:editPosts'
  ));
}
// Now can use the capability to check for permissions
$userManagementAPIService = ContainerBuilderFactory::getInstance()->get('user_management_api');
if ($userManagementAPIService->userCan($user_id, $cmsCapabilityName)) {
  ...
}
Alternatively, the application can also fail when first initialized if any one required name is not satisfied:
if ($notImplementedNames = $looseContractService->getNotImplementedRequiredNames()) {
  throw new Exception(sprintf(
    "The CMS has not implemented loose contract names %s",
    implode(', ', $notImplementedNames)
  ));
}
Application options
WordPress ships with several application options, such as those stored in table wp_options under entries "blogname", "blogdescription", "admin_email", "date_format" and many others. Abstracting application options involves:
abstraction the function getOption;
abstracting each of the required options, aiming to make the CMS satisfy the notion of this option (eg: if a CMS doesn’t have an option for the site’s description, it can’t return the site’s name instead).
Let’s solve these 2 actions in turn. Concerning function getOption, I believe that we can expect all CMSs to support storing and retrieving options, so we can place the corresponding function under a CMSCoreInterface contract:
interface CMSCoreInterface
{
  public function getOption($option, $default = false);
}
As it can be observed from the function signature above, I’m making the assumption that each option will also have a default value. However, I don’t know if every CMS allows setting default values for options. But it doesn’t matter since the implementation can simply return NULL then.
This function is resolved for WordPress like this:
class WPCMSCore implements CMSCoreInterface
{
  public function getOption($option, $default = false)
  {
    return get_option($option, $default);
  }
}
To solve the 2nd action, which is abstracting each needed option, it is important to notice that even though we can always expect the CMS to support getOption, we can’t expect it to implement each single option used by WordPress, such as "use_smiles" or "default_ping_status". Hence, we must first filter all options, and abstract only those that make sense in a generic context, such as "siteName" or "dateFormat".
Then, having the list of options to abstract, we can use a “loose contract” (as explained earlier on) and require a corresponding option name for each, such as "option:siteName" (resolved for WordPress as "blogname") or "option:dateFormat" (resolved as "date_format").
Database column names
In WordPress, when we are requesting data from function get_posts we can set attribute "orderby" in $args to order the results, which can be based on a column from the posts table (such as values "ID", "title", "date", "comment_count", etc), a meta value (through values "meta_value" and "meta_value_num") or other values (such as "post__in" and "rand").
Whenever the value corresponds to the table column name, we can abstract them using a “loose contract”, as explained earlier on. Then, the application can reference a loose contract name:
Now, let’s say that in our WordPress application we have created a meta value "likes_count" (which stores how many likes a post has) to order posts by popularity, and we want to abstract this functionality too. To order results by some meta property, WordPress expects an additional attribute "meta_key", like this:
Because of this additional attribute, I consider this implementation WordPress-specific and very difficult to abstract to make it work everywhere. Then, instead of generalizing this functionality, I can simply expect every CMS to add their own, specific implementation.
Let’s do that. First, I create a helper class to retrieve the CMS-agnostic query:
class QueryHelper
{
  public function getOrderByQuery()
  {
    return array(
      'orderby' => $looseContractService->getImplementedName('dbcolumn:orderby:posts:likesCount'),
    );
  }
}
The OctoberCMS-specific package can add a column "likes_count" to the posts table, and resolve name "dbcolumn:orderby:posts:likesCount" to "like_count" and it will work. The WordPress-specific package, though, must resolve "dbcolumn:orderby:posts:likesCount" as "meta_value" and then override the helper function to add the additional property "meta_key":
class WPQueryHelper extends QueryHelper
{
  public function getOrderByQuery()
  {
    $query = parent::getOrderByQuery();
    $query['meta_key'] = 'likes_count';
    return $query;
  }
}
Finally, we set-up the helper query class as a service in the ContainerBuilder, configure it to be resolved to the WordPress-specific class, and we obtain the query for ordering results:
Abstracting the values for ordering results that do not correspond to column names or meta properties (such as "post__in" and "rand") seems to be more difficult. Because my application doesn’t use them, I haven’t considered how to do it, or even if it is possible. Then I took the easy way out: I have considered these to be WordPress-specific, hence the application makes them available only when running on WordPress.
Errors
When dealing with errors, we must consider abstracting the following elements:
the definition of an error;
error codes and messages.
Let’s review these in turn.
Definition of an error:
An Error is a special object, different than an Exception, used to indicate that some operation has failed, and why it failed. WordPress represents errors through class WP_Error, and allows to check if some returned value is an error through function is_wp_error.
We can abstract checking for an error:
interface CMSCoreInterface
{
  public function isError($object);
}
Which is resolved for WordPress like this:
class WPCMSCore implements CMSCoreInterface
{
  public function isError($object)
  {
    return is_wp_error($object);
  }
}
However, to deal with errors in our abstracted code, we can’t expect all CMSs to have an error class with the same properties and methods as WordPress’s WP_Error class. Hence, we must abstract this class too, and convert from the CMS error to the abstracted error after executing a function from the CMS.
The abstract error class Error is simply a slightly modified version from WordPress’s WP_Error class:
class Error {

  protected $errors = array();
  protected $error_data = array();

  public function __construct($code = null, $message = null, $data = null)
  {
    if ($code) {
      $this->errors[$code][] = $message;
      if ($data) {
        $this->error_data[$code] = $data;
      }
    }
  }

  public function getErrorCodes()
  {
    return array_keys($this->errors);
  }

  public function getErrorCode()
  {
    if ($codes = $this->getErrorCodes()) {
      return $codes[0];
    }

    return null;
  }

  public function getErrorMessages($code = null)
  {
    if ($code) {
      return $this->errors[$code] ?? [];
    }

    // Return all messages if no code specified.
    return array_reduce($this->errors, 'array_merge', array());
  }

  public function getErrorMessage($code = null)
  {
    if (!$code) {
      $code = $this->getErrorCode();
    }
    $messages = $this->getErrorMessages($code);
    return $messages[0] ?? '';
  }

  public function getErrorData($code = null)
  {
    if (!$code) {
      $code = $this->getErrorCode();
    }

    return $this->error_data[$code];
  }

  public function add($code, $message, $data = null)
  {
    $this->errors[$code][] = $message;
    if ($data) {
      $this->error_data[$code] = $data;
    }
  }

  public function addData($data, $code = null)
  {
    if (!$code) {
      $code = $this->getErrorCode();
    }

    $this->error_data[$code] = $data;
  }

  public function remove($code)
  {
    unset($this->errors[$code]);
    unset($this->error_data[$code]);
  }
}
We implement a function to convert from the CMS to the abstract error through a helper class:
class WPHelpers
{
  public static function returnResultOrConvertError($result)
  {
    if (is_wp_error($result)) {
      // Create a new instance of the abstracted error class
      $error = new Error();
      foreach ($result->get_error_codes() as $code) {
        $error->add($code, $result->get_error_message($code), $result->get_error_data($code));
      }
      return $error;
    }
    return $result;
  }
}
And we finally invoke this method for all functions that may return an error:
class UserManagementService implements UserManagementInterface
{
  public function getPasswordResetKey($user_id)
  {
    $result = get_password_reset_key($user_id);
    return WPHelpers::returnResultOrConvertError($result);
  }
}
Error codes and messages:
Every CMS will have its own set of error codes and corresponding explanatory messages. For instance, WordPress function get_password_reset_key can fail due to the following reasons, as represented by their error codes and messages:
"no_password_reset": Password reset is not allowed for this user.
"no_password_key_update": Could not save password reset key to database.
In order to unify errors so that an error code and message is consistent across CMSs, we will need to inspect these and replace them with our custom ones (possibly in function returnResultOrConvertError explained above).
Hooks
Abstracting hooks involves:
the hook functionality;
the hooks themselves.
Let’s analyze these in turn.
Abstracting the hook functionality
WordPress offers the concept of “hooks”: a mechanism through which we can change a default behavior or value (through “filters”) and execute related functionality (through “actions”). Both Symfony and Laravel offer mechanisms somewhat related to hooks: Symfony provides an event dispatcher component, and Laravel’s mechanism is called events; these 2 mechanisms are similar, sending notifications of events that have already taken place, to be processed by the application through listeners.
When comparing these 3 mechanisms (hooks, event dispatcher and events) we find that WordPress’s solution is the simpler one to set-up and use: Whereas WordPress hooks enable to pass an unlimited number of parameters in the hook itself and to directly modify a value as a response from a filter, Symfony’s component requires to instantiate a new object to pass additional information, and Laravel’s solution suggests to run a command in Artisan (Laravel’s CLI) to generate the files containing the event and listener objects. If all we desire is to modify some value in the application, executing a hook such as $value = apply_filters("modifyValue", $value, $post_id); is as simple as it can get.
In the first part of this series, I explained that the CMS-agnostic application already establishes a particular solution for dependency injection instead of relying on the solution by the CMS, because the application itself needs this functionality to glue its parts together. Something similar happens with hooks: they are such a powerful concept that the application can greatly benefit by making it available to the different CMS-agnostic packages (allowing them to interact with each other) and not leave this wiring-up to be implemented only at the CMS level. Hence, I have decided to already ship a solution for the “hook” concept in the CMS-agnostic application, and this solution is the one implemented by WordPress.
In order to decouple the CMS-agnostic hooks from those from WordPress, once again we must “code against interfaces, not implementations”: We define a contract with the corresponding hook functions:
interface HooksAPIInterface
{
  public function addFilter(string $tag, $function_to_add, int $priority = 10, int $accepted_args = 1): void;
  public function removeFilter(string $tag, $function_to_remove, int $priority = 10): bool;
  public function applyFilters(string $tag, $value, ...$args);
  public function addAction(string $tag, $function_to_add, int $priority = 10, int $accepted_args = 1): void;
  public function removeAction(string $tag, $function_to_remove, int $priority = 10): bool;
  public function doAction(string $tag, ...$args): void;
}
Please notice that functions applyFilters and doAction are variadic, i.e. they can receive a variable amount of arguments through parameter ...$args. By combining this feature (which was added to PHP in version 5.6, hence it was unavailable to WordPress until very recently) with argument unpacking, i.e. passing a variable amount of parameters ...$args to a function, we can easily provide the implementation for WordPress:
class WPHooksAPI implements HooksAPIInterface
{
  public function addFilter(string $tag, $function_to_add, int $priority = 10, int $accepted_args = 1): void
  {
    add_filter($tag, $function_to_add, $priority, $accepted_args);
  }

  public function removeFilter(string $tag, $function_to_remove, int $priority = 10): bool
  {
    return remove_filter($tag, $function_to_remove, $priority);
  }

  public function applyFilters(string $tag, $value, ...$args)
  {
    return apply_filters($tag, $value, ...$args);
  }

  public function addAction(string $tag, $function_to_add, int $priority = 10, int $accepted_args = 1): void
  {
    add_action($tag, $function_to_add, $priority, $accepted_args);
  }

  public function removeAction(string $tag, $function_to_remove, int $priority = 10): bool
  {
    return remove_action($tag, $function_to_remove, $priority);
  }

  public function doAction(string $tag, ...$args): void
  {
    do_action($tag, ...$args);
  }
}
As for an application running on Symfony or Laravel, this contract can be satisfied by installing a CMS-agnostic package implementing WordPress-like hooks, such as this one, this one or this one.
Finally, whenever we need to execute a hook, we do it through the corresponding service:
We need to make sure that, whenever a hook is executed, a consistent action will be executed no matter which is the CMS. For hooks defined inside of our application that is no problem, since we can resolve them ourselves, most likely in our CMS-agnostic package. However, when the hook is provided by the CMS, such as action "init" (triggered when the system has been initialized) or filter "the_title" (triggered to modify a post’s title) in WordPress, and we invoke these hooks, we must make sure that all other CMSs will process them correctly and consistently. (Please notice that this concerns hooks that make sense in every CMS, such as "init"; certain other hooks can be considered too specific to WordPress, such as filter "rest_{$this->post_type}_query" from a REST controller, so we don’t need to abstract them.)
The solution I found is to hook into actions or filters defined exclusively in the application (i.e. not in the CMS), and to bridge from CMS hooks to application hooks whenever needed. For instance, instead of adding an action for hook "init" (as defined in WordPress), any code in our application must add an action on hook "cms:init", and then we implement the bridge in the WordPress-specific package from "init" to "cms:init":
Finally, the application can add a “loose contract” name for "cms:init", and the CMS-specific package must implement it (as demonstrated earlier on).
Routing
Different frameworks will provide different solutions for routing (i.e. the mechanism of identifying how the requested URL will be handled by the application), which reflect the architecture of the framework:
Symfony provides a Routing component which is independent (any PHP application can install it and use it), and which enables to define custom routes and which controller will process them.
Laravel’s routing builds on top of Symfony’s routing component to adapt it to the Laravel framework.
As it can be seen, WordPress’s solution is the outlier here: the concept of mapping URLs to database queries is tightly coupled to WordPress’s architecture, and we would not want to restrict our abstracted application to this methodology (for instance, October CMS can be set-up as a flat-file CMS, in which case it doesn’t use a database). Instead, it makes more sense to use Symfony’s approach as its default behavior, and allow WordPress to override this behavior with its own routing mechanism.
(Indeed, while WordPress’s approach works well for retrieving content, it is rather inappropriate when we need to access some functionality, such as displaying a contact form. In this case, before the launch of Gutenberg, we were forced to create a page and add a shortcode "[contact_form]" to it as content, which is not as clean as simply mapping the route to its corresponding controller directly.)
Hence, the routing for our abstracted application will not be based around the modeled entities (post, page, category, tag, author) but purely on custom-defined routes. This should already work perfectly for Symfony and Laravel, using their own solutions, and there is not much for us to do other than injecting the routes with the corresponding controllers into the application’s configuration.
To make it work in WordPress, though, we need to take some extra steps: We must introduce an external library to handle routing, such as Cortex. Making use of Cortex, the application running on WordPress can have it both ways:
if there is a custom-defined route matching the requested URL, use its corresponding controller.
if not, let WordPress handle the request in its own way (i.e. retrieving the matched database entity or returning a 404 if no match is successful).
To implement this functionality, I have designed the contract CMSRoutingInterface to, given the requested URL, calculate two pieces of information:
the actual route, such as contact, posts or posts/my-first-post.
the nature of the route: core nature values "standard", "home" and "404", and additional nature values added through packages such as "post" through a “Posts” package or "user" through a “Users” package.
The nature of the route is an artificial construction that enables the CMS-agnostic application to identify if the route has extra qualities attached to it. For instance, when requesting the URL for a single post in WordPress, the corresponding database object post is loaded into the global state, under global $post. It also helps identify which case we want to handle, to avoid inconsistencies. For instance, we could have defined a custom route contact handled by a controller, which will have nature "standard", and also a page in WordPress with slug "contact", which will have nature "page" (added through a package called “Pages”). Then, our application can prioritize which way to handle the request, either through the controller or through a database query.
Let’s implement it. We first define the service’s contract:
interface CMSRoutingInterface
{
  public function getNature();
  public function getRoute();
}
We can then define an abstract class which provides a base implementation of these functions:
abstract class AbstractCMSRouting implements CMSRoutingInterface
{
  const NATURE_STANDARD = 'standard';
  const NATURE_HOME = 'home';
  const NATURE_404 = '404';

  public function getNature()
  {
    return self::NATURE_STANDARD;
  }

  public function getRoute()
  {
    // By default, the URI path is already the route (minus parameters and trailing slashes)
    $route = $_SERVER['REQUEST_URI'];
    $params_pos = strpos($route, '?');
    if ($params_pos !== false) {
       $route = substr($route, 0, $params_pos);
    }
    return trim($route, '/');
  }
}
And the implementation is overriden for WordPress:
class WPCMSRouting extends AbstractCMSRouting
{
  const ROUTE_QUERY = [
    'custom_route_key' => 'custom_route_value',
  ];
  private $query;
  private function init()
  {
    if (is_null($this->query)) {
      global $wp_query;
      $this->query = $wp_query;
    }
  }

  private function isStandardRoute() {
    return !empty(array_intersect($this->query->query_vars, self::ROUTE_QUERY));
  }

  public function getNature()
  {
    $this->init();
    if ($this->isStandardRoute()) {
      return self::NATURE_STANDARD;
    } elseif ($this->query->is_home() || $this->query->is_front_page()) {
      return self::NATURE_HOME;
    } elseif ($this->query->is_404()) {
      return self::NATURE_404;
    }

    // Allow components to implement their own natures
    $hooksAPIService = ContainerBuilderFactory::getInstance()->get('hooks_api');
    return $hooksAPIService->applyFilters(
      "nature",
      parent::getNature(),
      $this->query
    );
  }
}
In the code above, please notice how constant ROUTE_QUERY is used by the service to know if the route is a custom-defined one, as configured through Cortex:
$hooksAPIService->addAction(
  'cortex.routes',
  function(RouteCollectionInterface $routes) {
    // Hook into filter "routes" to provide custom-defined routes
    $appRoutes = $hooksAPIService->applyFilters("routes", []);
    foreach ($appRoutes as $route) {
      $routes->addRoute(new QueryRoute(
        $route,
        function (array $matches) {
          return WPCMSRouting::ROUTE_QUERY;
        }
      ));
    }
  }
);
Now, the application can find out the route and its nature, and proceed accordingly (for instance, for a "standard" nature invoke its controller, or for a "post" nature invoke WordPress’s templating system):
$cmsRoutingService = ContainerBuilderFactory::getInstance()->get('routing');
$nature = $cmsRoutingService->getNature();
$route = $cmsRoutingService->getRoute();
// Process the requested route, as appropriate
// ...
Object properties
A rather inconvenient consequence of abstracting our code is that we can’t reference the properties from an object directly, and we must do it through a function instead. This is because different CMSs will represent the same object as containing different properties, and it is easier to abstract a function to access the object properties than to abstract the object itself (in which case, among other disadvantages, we may have to reproduce the object caching mechanism from the CMS). For instance, a post object $post contains its ID under $post->ID in WordPress and under $post->id in October CMS. To resolve this property, our contract PostObjectPropertyResolverInterface will contain function getId:
interface PostObjectPropertyResolverInterface {
  public function getId($post);
}
Which is resolved for WordPress like this:
class WPPostObjectPropertyResolver implements PostObjectPropertyResolverInterface {
  public function getId($post)
  {
    return $post->ID;
  }
}
Similarly, the post content property is $post->post_content in WordPress and $post->content in October CMS. Our contract will then allow to access this property through function getContent:
interface PostObjectPropertyResolverInterface {
  public function getContent($post);
}
Which is resolved for WordPress like this:
class WPPostObjectPropertyResolver implements PostObjectPropertyResolverInterface {
  public function getContent($post)
  {
    return $post->post_content;
  }
}
Please notice that function getContent receives the object itself through parameter $post. This is because we are assuming the content will be a property of the post object in all CMSs. However, we should be cautious on making this assumption, and decide on a property by property basis. If we don’t want to make the previous assumption, then it makes more sense for function getContent to receive the post’s ID instead:
interface PostObjectPropertyResolverInterface {
  public function getContent($post_id);
}
Being more conservative, the latter function signature makes the code potentially more reusable, however it is also less efficient, because the implementation will still need to retrieve the post object:
class WPPostObjectPropertyResolver implements PostObjectPropertyResolverInterface {
  public function getContent($post_id)
  {
    $post = get_post($post_id);
    return $post->post_content;
  }
}
In addition, some properties may be needed in their original value and also after applying some processing; for these cases, we will need to implement a corresponding extra function in our contract. For instance, the post content needs be accessed also as HTML, which is done through executing apply_filters('the_content', $post->post_content) in WordPress, or directly through property $post->content_html in October CMS. Hence, our contract may have 2 functions to resolve the content property:
interface PostObjectPropertyResolverInterface {
  public function getContent($post_id); // = raw content
  public function getHTMLContent($post_id);
}
We must also be concerned with abstracting the value that the property can have. For instance, a comment is approved in WordPress if its property comment_approved has the value "1". However, other CMSs may have a similar property with value true. Hence, the contract should remove any potential inconsistency or ambiguity:
interface CommentObjectPropertyResolverInterface {
  public function isApproved($comment);
}
Which is implemented for WordPress like this:
class WPCommentObjectPropertyResolver implements CommentObjectPropertyResolverInterface {
  public function isApproved($comment)
  {
    return $comment->comment_approved == "1";
  }
}
Global state
WordPress sets several variables in the global context, such as global $post when querying a single post. Keeping variables in the global context is considered an anti-pattern, since the developer could unintentionally override their values, producing bugs that are difficult to track down. Hence, abstracting our code gives us the chance to implement a better solution.
An approach we can take is to create a corresponding class AppState which simply contains a property to store all variables that our application will need. In addition to initializing all core variables, we enable components to initialize their own ones through hooks:
class AppState
{
  public static $vars = [];

  public static function getVars()
  {
    return self::$vars;
  }

  public static function initialize()
  {
    // Initialize core variables
    self::$vars['nature'] = $cmsRoutingService->getNature();
    self::$vars['route'] = $cmsRoutingService->getRoute();

    // Initialize $vars through hooks
    self::$vars = $hooksAPIService->applyFilters("AppState:init", self::$vars);

    return self::$vars;
  }
}
To replace global $post, a hook from WordPress can then set this data through a hook. A first step would be to set the data under "post-id":
$hooksAPIService->addFilter(
  "AppState:init",
  function($vars) {
    if (is_single()) {
      global $post;
      $vars['post-id'] => $post->ID;
    }
    return $vars;
  }
);
However, we can also abstract the global variables: instead of dealing with fixed entities (such as posts, users, comments, etc), we can deal with the entity in a generic way through "object-id", and we obtain its properties by inquiring the nature of the requested route:
$hooksAPIService->addFilter(
  "AppState:init",
  function($vars) {
    if ($vars['nature'] == 'post') {
      global $post;
      $vars['object-id'] => $post->ID;
    }
    return $vars;
  }
);
From now own, if we need to display a property of the current post, we access it from the newly defined class instead of the global context:
$vars = AppState::getVars();
$object_id = $vars['object-id'];
// Do something with it
// ...
Entity models (meta, post types, pages being posts, and taxonomies —tags and categories—)
We must abstract those decisions made for WordPress concerning how its entities are modeled. Whenever we consider that WordPress’s opinionatedness makes sense in a generic context too, we can then replicate such a decision for our CMS-agnostic code.
Meta:
As mentioned earlier, the concept of “meta” must be decoupled from the model entity (such as “post meta” from “posts”), so if a CMS doesn’t provide support for meta, it can then discard only this functionality.
Then, package “Post Meta” (decoupled from, but dependent on, package “Posts”) defines the following contract:
interface PostMetaAPIInterface
{
  public function getMetaKey($meta_key);
  public function getPostMeta($post_id, $key, $single = false);
  public function deletePostMeta($post_id, $meta_key, $meta_value = '');
  public function addPostMeta($post_id, $meta_key, $meta_value, $unique = false);
  public function updatePostMeta($post_id, $meta_key, $meta_value);
}
Which is resolved for WordPress like this:
class WPPostMetaAPI implements PostMetaAPIInterface
{
  public function getMetaKey($meta_key)
  {
    return '_'.$meta_key;
  }
  public function getPostMeta($post_id, $key, $single = false)
  {
    return get_post_meta($post_id, $key, $single);
  }
  public function deletePostMeta($post_id, $meta_key, $meta_value = '')
  {
    return delete_post_meta($post_id, $meta_key, $meta_value);
  }
  public function addPostMeta($post_id, $meta_key, $meta_value, $unique = false)
  {
    return add_post_meta($post_id, $meta_key, $meta_value, $unique);
  }
  public function updatePostMeta($post_id, $meta_key, $meta_value)
  {
    return update_post_meta($post_id, $meta_key, $meta_value);
  }
}
Post types:
I have decided that WordPress’s concept of a custom post type, which allows to model entities (such as an event or a portfolio) as extensions of posts, can apply in a generic context, and as such, I have replicated this functionality in the CMS-agnostic code. This decision is controversial, however, I justify it because the application may need to display a feed of entries of different types (such as posts, events, etc) and custom post types make such implementation feasible. Without custom post types, I would expect the application to need to execute several queries to bring the data for every entity type, and the logic would get all muddled up (for instance, if fetching 12 entries, should we fetch 6 posts and 6 events? but what if the events were posted much earlier than the last 12 posts? and so on).
What happens when the CMS doesn’t support this concept? Well, nothing serious happens: a post will still indicate its custom post type to be a “post”, and no other entities will inherit from the post. The application will still work properly, just with some slight overhead from the unneeded code. This is a trade-off that, I believe, is more than worth it.
To support custom post types, we simply add a function getPostType in our contract:
interface PostAPIInterface
{
  public function getPostType($post_id);
}
Which is resolved for WordPress like this:
class WPPostAPI implements PostAPIInterface
{
  public function getPostType($post_id) {
    return get_post_type($post_id);
  }
}
Pages being posts:
While I justify keeping custom post types in order to extend posts, I don’t justify a page being a post, as it happens in WordPress, because in other CMSs these entities are completely decoupled and, more importantly, a page may have higher rank than a post, so making a page extend from a post would make no sense. For instance, October CMS ships pages in its core functionality, but posts must be installed through plugins.
Hence we must create separate contracts for posts and pages, even though they may contain the same functions:
interface PostAPIInterface
{
  public function getTitle($post_id);
}

interface PageAPIInterface
{
  public function getTitle($page_id);
}
To resolve these contracts for WordPress and avoid duplicating code, we can implement the common functionality through a trait:
trait WPCommonPostFunctions
{
  public function getTitle($post_id)
  {
    return get_the_title($post_id);
  }
}

class WPPostAPI implements PostAPIInterface
{
  use WPCommonPostFunctions;
}

class WPPageAPI implements PageAPIInterface
{
  use WPCommonPostFunctions;
}
Taxonomies (tags and categories):
Once again, we can’t expect all CMSs to support what is called taxonomies in WordPress: tags and categories. Hence, we must implement this functionality through a package “Taxonomies”, and, assuming that tags and categories are added to posts, make this package dependent on package “Posts”.
interface TaxonomyAPIInterface
{
  public function getPostCategories($post_id, $options = []);
  public function getPostTags($post_id, $options = []);
  public function getCategories($query, $options = []);
  public function getTags($query, $options = []);
  public function getCategory($cat_id);
  public function getTag($tag_id);
  ...
}
We could have decided to create two separate packages “Categories” and “Tags” instead of “Taxonomies”, however, as the implementation in WordPress makes evident, a tag and a category are basically the same concept of entity with only a tiny difference: categories are hierarchical (i.e. a category can have a parent category), but tags are not. Then, I consider that it makes sense to keep this concept for a generic context, and shipped under a single package “Taxonomies”.
We must pay attention that certain functionalities involve both posts and taxonomies, and these must be appropriately decoupled. For instance, in WordPress we can retrieve posts that were tagged "politics" by executing get_posts(['tag' => "politics"]). In this case, while function getPosts must be implemented in package “Posts”, filtering by tags must be implemented in package “Taxonomies”. To accomplish this separation, we can simply execute a hook in the implementation of function getPosts for WordPress, allowing any component to modify the arguments before executing get_posts:
class WPPostAPI implements PostAPIInterface
{
  public function getPosts($args) {
    $args = $hooksAPIService->applyFilters("modifyArgs", $args);
    return get_posts($args);
  }
}
And finally we implement the hook in package “Taxonomies for WordPress”:
Please notice that in the abstracted code the attributes were re-defined (following the recommendations for abstracting function parameters, explained earlier on): "tag" must be provided as "tags" and "cat" must be provided as "categories" (shifting the connotation from singular to plural), and these values must be passed as arrays (i.e. removed accepting comma-separated strings as in WordPress, to add consistency).
Translation
Because calls to translate strings are spread all over the application code, translation is not a functionality that we can opt out from, and we should make sure that the other frameworks are compatible with our chosen translation mechanism.
In WordPress, which implements internationalization through gettext, we are required to set-up translation files for each locale code (such as ‘fr_FR’, which is the code for french language from FRance), and these can be set under a text domain (which allows themes or plugins to define their own translations without fear of collision with the translations from other pieces of code). We don’t need to check for support for placeholders in the string to translate (such as when doing sprintf(__("Welcome %s"), $user_name)), because function sprintf belongs to PHP and not to the CMS, so it will always work.
Let’s check if the other frameworks support the required two properties, i.e. getting the translation data for a specific locale composed of language and country, and under a specific text domain:
The locale used in Laravel’s localization involves the language but not the country, and text domains are not supported (they could be replicated through overriding package language files, but the domain is not explicitly set, so the contract and the implementation would be inconsistent with each other).
However, luckily there is library Laravel Gettext which can replace Laravel’s native implementation with Symfony’s translation component. Hence, we got support for all frameworks, and we can rely on a WordPress-like solution.
We can then define our contract mirroring the WordPress function signatures:
interface TranslationAPIInterface
{
  public function __($text, $domain = 'default');
  public function _e($text, $domain = 'default');
}
The implementation of the contract for WordPress is like this:
class WPTranslationAPI implements TranslationAPIInterface
{
  public function __($text, $domain = 'default')
  {
    return __($text, $domain);
  }
  public function _e($text, $domain = 'default')
  {
    _e($text, $domain);
  }
}
WordPress has media management as part of its core functionality, which represents a media element as an entity all by itself, and allows to manipulate the media element (such as cropping or resizing images), but we can’t expect all CMSs to have similar functionality. Hence, media management must be decoupled from the CMS core functionality.
For the corresponding contract, we can mirror the WordPress media functions, but removing WordPress’s opinionatedness. For instance, in WordPress, a media element is a post (with post type "attachment"), but for the CMS-agnostic code it is not, hence the parameter must be $media_id (or $image_id) instead of $post_id. Similarly, WordPress treats media as attachments to posts, but this doesn’t need to be the case everywhere, hence we can remove the word “attachment” from the function signatures. Finally, we can decide to keep the $size of the image in the contract; if the CMS doesn’t support creating multiple image sizes for an image, then it can just fall back on its default value NULL and nothing grave happens:
interface MediaAPIInterface
{
  public function getImageSrcAndDimensions($image_id, $size = null): array;
  public function getImageURL($image_id, $size = null): string;
}
The response by function getImageSrcAndDimensions can be asbtracted too, returning an array of our own design instead of simply re-using the one from the WordPress function wp_get_attachment_image_src:
class WPMediaAPI implements MediaAPIInterface
{
  public function getImageSrcAndDimensions($image_id, $size = null): array
  {
    $img_data = wp_get_attachment_image_src($image_id, $size);
    return [
      'src' => $img_data[0],
      'width' => $img_data[1],
      'height' => $img_data[2],
    ];
  }
  public function getImageURL($image_id, $size = null): string
  {
    return wp_get_attachment_image_url($image_id, $size);
  }
}
Conclusion
Setting-up a CMS-agnostic architecture for our application can be a painful endeavor. As it was demonstrated in this article, abstracting all the code was a lengthy process, taking plenty of time and energy to achieve, and it is not even finished yet. I wouldn’t be surprised if the reader is intimidated by the idea of going through this process in order to convert a WordPress application into a CMS-agnostic one. If I hadn’t done the abstraction myself, I would certainly be intimidated too.
My suggestion is for the reader is to analyze if going through this process makes sense based on a project-by-project basis. If there is no need whatsoever to port an application to a different CMS, then you will be right to stay away from this process and stick to the WordPress way. However, if you do need to migrate an application away from WordPress and want to reduce the effort required, or if you already need to maintain several codebases which would benefit from code reusability, or even if you may migrate the application sometime in the future and you have just started a new project, then this process is for you. It may be painful to implement, but well worth it. I know because I’ve been there. But I’ve survived, and I’d certainly do it again. Thanks for reading.
Abstracting WordPress Code To Reuse With Other CMSs: Concepts (Part 1)
Abstracting WordPress Code To Reuse With Other CMSs: Concepts (Part 1)
Leonardo Losoviz
Making code that is agnostic of the CMS or framework has several benefits. For instance, through its new content editor Gutenberg, WordPress enables to code components which can be used for other CMSs and frameworks too, such as for Drupal and for Laravel. However, Gutenberg’s emphasis on re-utilization of code is focused on the client-side code of the component (JavaScript and CSS); concerning the component’s backend code (such as the provision of APIs that feed data to the component) there is no pre-established consideration.
Since these CMSs and frameworks (WordPress, Drupal, Laravel) all run on PHP, making their PHP code re-usable too will make it easier to run our components on all these different platforms. As another example, if we ever decide to replace our CMS with another one (as has recently happened that many people decried WordPress after its introduction of Gutenberg), having the application code be agnostic from the CMS simplifies matters: The more CMS-agnostic our application code is, the less effort will be required to port it to other platforms.
Starting with application code built for a specific CMS, the process of transforming it to CMS-agnostic is what, in this article, I will call “abstracting code”. The more abstract the code is, the more it can be re-used to work with whichever CMS.
Making the application completely CMS-agnostic is very tough though — even possibly impossible — since sooner or later it will need to depend on the specific CMS’s opinionatedness. Then, instead of attempting to achieve 100% code reusability, our goal must simply be to maximize the amount of code that is CMS-agnostic to make it reusable across different CMSs or frameworks (for the context of this article, these 2 terms will be used interchangeably). Then, migrating the application to a different framework will be not without pain, but at least it will be as painless as possible.
The solution to this challenge concerns the architecture of our application: We must keep the core of the application cleanly decoupled from the specifics of the underlying framework, by coding against interfaces instead of implementations. Doing so will grant additional benefits to our codebase: We can then focus our attention almost exclusively on the business logic (which is the real essence and purpose of the application), causing the code to become more understandable and less muddled with the limitations imposed by the particular CMS.
This article is composed of 2 parts: In this first part we will conceptualize and design the solution for abstracting the code from a WordPress site, and on the 2nd part we will implement it. The objective shall be to keep the code ready to be used with Symfony components, Laravel framework, and October CMS.
Code Against Interfaces, Rely On Composer, Benefit From Dependency Injection
The design of our architecture will be based on the following pillars:
Code against interfaces, not implementations.
Create packages, distribute them through Composer.
Dependency Injection to glue all parts together.
Let’s analyze them one by one.
Code Against Interfaces, Not Implementations
Coding against interfaces is the practice of interacting with a certain piece of code through a contract. A contract, which is set up through an interface from our programming language (PHP in our case since we are dealing with WordPress), establishes the intent of certain functionality, by explicitly stating what functions are available, what inputs are expected for each function, and what each function will return, and it is not concerned with how the functionality must be implemented. Then, our application can be cleanly decoupled from a specific implementation, not needing to know how its internals work, and being able to change to another implementation at any time without having to drastically change code. For instance, our application can store data by interacting with an interface called DataStoreInterface instead of any of its implementations, such as instances of classes DatabaseDataStore or FilesystemDataStore.
In the context of WordPress, this implies that — by the end of the abstraction — no WordPress code will be referenced directly, and WordPress itself will simply be a service provider for all the functions that our application needs. As a consequence, we must consider WordPress as a dependency of the application, and not as the application itself.
Contracts and their implementations can be added to packages distributed through Composer and glued together into the application through dependency injection which are the items we will analyze next.
Create Packages, Distribute Them Through Composer
Remember this: Composer is your friend! This tool, a package manager for PHP, allows any PHP application to easily retrieve packages (i.e. code) from any repository and install them as dependencies.
Note: I have already described how we can use Composer together with WordPress in a previous article I wrote earlier this year.
Composer is itself CMS-agnostic, so it can be used for building any PHP application. Packages distributed through Composer, though, may be CMS-agnostic or not. Therefore, our application should depend on CMS-agnostic packages (which will work for any CMS) as much as possible, and when not possible, depend on the corresponding package that works for our specific CMS.
This strategy can be used to code against contracts, as explained earlier on. The packages for our application can be divided into two types: CMS-agnostic and CMS-specific ones. The CMS-agnostic package will contain all the contracts and all generic code, and the application will exclusively interact with these packages. For each CMS-agnostic package containing contracts, we must also create a CMS-specific package containing the implementation of the contracts for the required CMS, which is set into the application by means of dependency injection (which we’ll analyze below).
For example, to implement an API to retrieve posts, we create a CMS-agnostic package called “Posts”, with contract PostAPIInterface containing function getPosts, like this:
interface PostAPIInterface
{
  public function getPosts($args);
}
This function can be resolved for WordPress through a package called “Posts for WordPress”, which resolves the contract through a class WPPostAPI, implementing function getPosts to simply execute WordPress function get_posts, like this:
class WPPostAPI implements PostAPIInterface
{
  public function getPosts($args) {
    return get_posts($args);
  }
}
If we ever need to port our application from WordPress to another CMS, we must only implement the corresponding CMS-specific package for the new CMS (e.g. “Posts for October CMS”) and update the dependency injection configuration matching contracts to implementations, and that’s it!
Note: It is a good practice to create packages that only define contracts and nothing else. This way, it is easy for implementers to know exactly what must be implemented.
Dependency Injection To Glue All Parts Together
Dependency injection is a technique that allows declaring which object from the CMS-specific package (aka the “service provider”) is implementing which interface from the CMS-agnostic package (aka the “contract”), thus gluing all parts of the application together in a loosely-coupled manner.
Different CMSs or frameworks may already ship with their own implementation of a dependency injection component. For instance, whereas WordPress doesn’t have any, both Symfony and Laravel have their own solutions: DependencyInjection component and Service Container respectively.
Ideally, we should keep our application free from choosing a specific dependency injection solution, and leave it to the CMS to provide for this. However, dependency injection must be used also to bind together generic contracts and services, and not only those depending on the CMS (for instance, a contract DataStoreInterface, resolved through service provider FilesystemDataStore, may be completely unrelated to the underlying CMS). In addition, a very simple application that does not require an underlying CMS will still benefit from dependency injection. Hence, we are compelled to choose a specific solution for dependency injection.
Note: When choosing a tool or library, prioritize those ones which implement the corresponding PHP Standards Recommendation (in our case, we are interested in PSR-11), so they can be replaced without affecting the application code as much as possible (in practice, each solution will most likely have a custom initialization, so some re-writing of application code may be unavoidable).
Choosing The Dependency Injection Component
For my application, I have decided to use Symfony’s DependencyInjection component which, among other great features, can be set-up through YAML and XML configuration files, and it supports autowiring, which automatically resolves how different services are injected into one another, greatly reducing the amount of configuration needed.
For instance, a service Cache implementing a contract CacheInterface, like this one:
namespace MyPackage\MyProject;
class Cache implements CacheInterface
{
  private $cacheItemPool;
  private $hooksAPI;

  public function __construct(
    CacheItemPoolInterface $cacheItemPool,
    HooksAPIInterface $hooksAPI
  ) {
    $this->cacheItemPool = $cacheItemPool;
    $this->hooksAPI = $hooksAPI;
  }

  // ...
}
… can be set as the default service provider through the following services.yaml configuration file:
As it can be observed, class cache requires two parameters in its constructor, and these are resolved and provided by the dependency injection component based on the configuration. In this case, while parameter $cacheItemPool is manually set, parameter $hooksAPI is automatically resolved through type-hinting (i.e. matching the expected parameter’s type, with the service that resolves that type). Autowiring thus helps reduce the amount of configuration required to glue the services and their implementations together.
Make Your Packages As Granular As Possible
Each package must be as granular as possible, dealing with a specific objective, and containing no more or less code than is needed. This is by itself a good practice in order to avoid creating bloated packages and establishing a modular architecture, however, it is mandatory when we do not know which CMS the application will run on. This is because different CMSs are based on different models, and it is not guaranteed that every objective can be satisfied by the CMS, or under what conditions. Keeping packages small and objective then enables to fulfill the required conditions in a progressive manner, or discard using this package only when its corresponding functionality can’t be satisfied by the CMS.
Let’s take an example: If we come from a WordPress mindset, we could initially assume that entities “posts” and “comments” will always be a part of the Content Management System, and we may include them under a package called “CMS core”. However, October CMS doesn’t ship with either posts or comments in its core functionality, and these are implemented through plugins. For the next iteration, we may decide to create a package to provide for these two entities, called “Posts and Comments”, or even “Posts” under the assumption that comments are dependent on posts and bundled with them. However, once again, the plugins in October CMS don’t implement these two together: There is a plugin implementing posts and another plugin implementing comments (which has a dependency on the posts plugin). Finally, our only option is to implement two separate packages: “Posts” and “Comments”, and assign a dependency from the latter to the former one.
Likewise, a post in WordPress contains post meta attributes (i.e. additional attributes to those defined in the database model) and we may assume that every CMS will support the same concept. However, we can’t guarantee that another CMS will provide this functionality and, even if it did, its implementation may be so different than that from WordPress that not the same operations could be applied to the meta attributes.
For example, both WordPress and October CMS have support for post meta attributes. However, whereas WordPress stores each post meta value as a row on a different database table than where the post is stored, October CMS stores all post meta values in a single entry as a serialized JSON object in a column from the post table. As a consequence, WordPress can fetch posts filtering data based on the meta value, but October CMS cannot. Hence, the package “Posts” must not include the functionality for post meta, which must then be implemented on its own package “Post Meta” (satisfiable by both WordPress and October CMS), and this package must not include functionality for querying the meta attributes when fetching posts, which must then be implemented on its own package “Post Meta Query” (satisfiable only by WordPress).
Identifying Elements That Need To Be Abstracted
We must now identify all the pieces of code and concepts from a WordPress application that need be abstracted for it to run with any other CMS. Digging into an application of mine, I identified the following items:
accessing functions
function names
function parameters
states (and other constant values)
CMS helper functions
user permissions
application options
database column names
errors
hooks
routing
object properties
global state
entity models (meta, post types, pages being posts, and taxonomies —tags and categories—)
translation
media
As long as it is, this list is not yet complete. There are many other items that need abstraction, which I will not presently cover. Such items include dealing with the location of assets (some framework may require to place image/font/JavaScript/CSS/etc. files on a specific directory) and CLI commands (WordPress has WP-CLI, Symfony has the console component, and Laravel has Artisan, and there are commands for each of these which could be unified).
In the next (and final) part of this series of articles, we will proceed to implement the abstraction for all the items identified above.
Evaluating When It Makes Sense To Abstract The Application
Abstracting an application is not difficult, but, as shall be observed in the next article, it involves plenty of work, so we must consider carefully if we really need it or not. Let’s consider the advantages and disadvantages of abstracting the application’s code:
Advantages
The effort required to port our application to other platforms is greatly reduced.
Because the code reflects our business logic and not the opinionatedness of the CMS, it is more understandable.
The application is naturally organized through packages which provide progressive enhancement of functionalities.
Disadvantages
Extra ongoing work.
Code becomes more verbose.
Longer execution time from added layers of code.
There is no magic way to determine if we’ll be better off by abstracting our application code. However, as a rule of thumb, I’ll propose the following approach:
Concerning a new project, it makes sense to establish an agnostic architecture, because the required extra effort is manageable, and the advantages make it well worth it; concerning an existing project, though, the one-time effort to abstract it could be very taxing, so we should analyze what is more expensive (in terms of time and energy): the one-time abstraction, or maintaining several codebases.
Conclusion
Setting-up a CMS-agnostic architecture for our application can allow to port it to a different platform with minimal effort. The key ingredients of this architecture are to code against interfaces, distribute these through granular packages, implement them for a specific CMS on a separate package, and tie all parts together through dependency injection.
Other than a few exceptions (such as deciding to choose Symfony’s solution for dependency injection), this architecture attempts to impose no opinionatedness. The application code can then directly mirror the business logic, and not the limitations imposed by the CMS.
In the next part of this series, we will implement the code abstraction for a WordPress application.
The combination of WordPress’ versatility for managing data (since its database model supports the creation of different content models, easily extensible through meta attributes) and Gutenberg’s rich user interactions provide a powerful mechanism to create, edit and manage content.
In this article, I want to shine some light on these upgraded capabilities, exploring the new tools at our disposition and presenting several new ones to be released sometime in the future.
Existing Features
The following features are already part of Gutenberg-powered WordPress.
Create Once, Publish Everywhere
As I have described in my recent article “Create Once, Publish Everywhere” with WordPress, the block-based nature of Gutenberg enables it to enhance how content is organized/architected on the database, making it available on a granular basis (block by block) to any application running on any medium or platform (web, email, iOS/Android apps, VR/AR, home assistants, and so on). Content managed through Gutenberg can then become the single source of truth for all of our applications, allowing us to reduce the cost associated with re-formatting content to make it suitable for each required platform.
Copy/paste from Google Docs with (almost) perfect formatting
Whenever we need to collaborate with other people to create content, we will quite likely use online tools such as Google Docs, Dropbox Paper, Coda or others. These tools make it easy for different people to edit the content in a document concurrently and provide and incorporate feedback. If we are going to choose a Content Management System to store our content, we need to make sure that it works well with these tools.
Gutenberg does the job fairly well: When copying the content from a Google Doc and then pasting it into a Gutenberg blog post, the formatting is preserved, bullet lists are properly transformed to the list block, and images are inserted where they should. There may be a few inconsistencies (for instance different spacing across blocks and in the original document) however, for the most part, the process is fit for use.
Copy/pasting from GDoc preserves the format of the document. (Large preview)
Crafting art direction
Several Gutenberg blocks support creating distinctive and engaging layouts and assisting the art direction of the site, to give it more personality and emphasize its identity. This way, even though we may base the site on a standard, plain-looking WordPress theme, we can customize the content’s appearance to make it stick out from the sea of sameness out there on the web. Let’s explore some of these blocks.
The Shape divider block allows to insert dividers in between two blocks. We can choose one among several basic shapes and customize its width, proportions and colors and then, with a bit of resourcefulness, create more intrinsic patterns from it. For instance, the divider below was created by first creating and customizing a divider, then flipping it both vertically and horizontally to mirror itself, then grouping these 2 halves so we can use it as a single unit (the grouping functionality will be available in core through the release of WordPress 5.3 next week, and is currently available through the Gutenberg plugin), and finally saving the grouped block as a reusable block so it can be used everywhere across the whole site:
The shape divider block connects, or breaks apart, components. (Large preview)
The Advanced columns and Row layout blocks allow to create row-based layouts, inside of which we can place nested blocks (i.e. any other Gutenberg block). They are highly configurable: They offer to define how many columns the row must have, with what padding, margin and proportion of width for each column, setting an image or custom color in the background, and several other attributes.
The row layout block allows to easily configure the proportion of width among columns. (Large preview)
We can also create grid-based layouts with predefined content. For instance, through the Post grid, Post carousel and Post masonry blocks we can display a list of posts in different ways, defining what attributes from each post to show (title, date, excerpt, author, and so on), and through the Advanced gallery block we can create beautiful image galleries.
Masonry gallery created with Advanced gallery block. (Large preview)
Some other blocks, such as Feature grid, allow to create grid layouts with predefined templates filled with custom content.
The feature grid block enables to add custom content inside of a grid layout. (Large preview)
These are just a sample of those blocks which can help us fill the content with visually attractive layouts and craft the art direction of our sites. To keep exploring possibilities, we can head to the directory of plugins offering blocks and check these out.
Assisting the user while editing content
Gutenberg assists the user when creating content through the following features:
Real-Time Preview
The Gutenberg editor gives a relatively accurate preview of how the content will look like in the website.
Error Warnings
Gutenberg makes the content creator be aware of accessibility concerns. For instance, if our content structure jumps from an <h2> header to an <h4> one without adding an <h3> tag in between, Gutenberg provides a warning message about this potential error. Similarly, when setting up the color of some text against its background color, if the contrast between the two colors is not clear enough then Gutenberg provides a warning message and helps fix the problem.
Suggesting/Executing Improvements
Blocks can connect to third-party services to analyze content and enhance it. For instance, a service could suggest how to improve the grammar of the content, provide alternative titles and tags for a better SEO, and even automatically translate the content to another language, as done by this plugin which automatically translates from English to Hindi as the user types.
New Features Under Implementation
The following features will hopefully/eventually be coming to Gutenberg in the future.
Snap to grid when resizing images
Contributors are already working on adding a grid system to Gutenberg which will, among other things, enable to resize images in an assisted manner by snapping it to the grid:
Snapping an image to grid (image from the GitHub issue). (Large preview)
Inline installation of blocks
Sometimes, while we are writing a blog post, we find out that we need some functionality that we don’t have yet installed. Hence, we need to switch to the Plugins screen, search and install the corresponding plugin, and then go back to the blog post. This process adds friction to our content-writing workflow.
Wouldn’t it be nicer if we could install the required functionality right from within the editor itself, whenever we need to use it? Well, this proposal is already being implemented through this pull request (it first depends on blocks being installed on their own, i.e. without depending on being shipped through a plugin). Once merged, our content-writing workflow will not be impaired anymore, as visible in the mockup below.
Installing a block from within Gutenberg (image from the GitHub pull request). (Large preview)
Installing blocks directly from the editor could lead to unintended bloat, from making it too easy for the user to install blocks. To address this issue, after installing and using it, the block could be removed! This was not possible before Gutenberg, because if the plugin providing a shortcode (which was the way to render dynamic content inside the blog post before Gutenberg) was disabled, then the invocation of the shortcode would be rendered in the blog post (instead of the shortcode’s output), messing up our content. However, Gutenberg works differently: Blocks only save HTML content inside of the blog post (including HTML comments to store configuration attributes), so, if the block is disabled, its intended HTML output is still part of the blog post’s content. (Even though there may be problems if the block needs to load CSS assets which are not loaded anymore once the block is disabled. I am not aware how this issue will be handled.)
Page/Site builder
Currently Gutenberg can only be used for the creation of content inside a blog post or a page, however it will soon support the creation of any part of the website: Content-block areas can define the header, sidebars, footer or any section needed for our layouts. Automattic (the company behind WordPress.com) is already working on a plugin to add full site editing capabilities to its WordPress.com product, which should eventually be extensible to the open source WordPress software too.
Creating a new page with full site editing allows to select a page template. (Large preview)
Real-time collaboration
Google Docs is incredibly useful to teams because it enables their members to work on the same document at the same time. Sometime in the future, Gutenberg will also incorporate a mechanism for real-time collaboration, allowing different people to work on the same blog post at the same time. This mechanism will (at least initially) be based on giving editing-locks to users on a block-by-block basis, as shown in the mockup image below.
Real-time collaboration through Gutenberg (image from the GitHub issue). (Large preview)
This feature will be particularly useful to online magazines (such as the New York Times and the like) since they may already have teams collaborating on a story (for instance, designers dealing with images, journalists, proofreaders and editors dealing with content, and others). Having real-time collaboration tools will enable these magazines to speed up their content-creation workflows and publish their articles faster.
Translation
WordPress core has never added support to translate content (it only supports translation of strings inside of core, plugin and theme files), but instead left this responsibility to plugins. Through Gutenberg, WordPress will finally add native support for this feature.
Translation is not a priority yet, so it has been targeted for Gutenberg phase 4, expected in the year 2020+. Since it is a long way off, there are yet no technical considerations of its implementation or mockups of its intended user experience. So we can only guess how it will be. Since it will be implemented after the real-time collaboration feature (described above), I would expect it will enable different people to translate the same blog post to different languages at the same time, block by block.
Inline media editing
Through the Media Library, WordPress already provides some image editing capabilities: resizing, cropping, rotating and flipping. These capabilities are very basic, and they are applied on to the image on a different screen, which creates some friction to the process of fitting the image into the blog post.
Through Gutenberg, the media-editing experience could be greatly enhanced: One one side, it could support editing the image in more advanced ways, such as applying effects or filters, altering the contrast, replacing colors, adding text as watermark, adding transparent regions, converting it to different formats, and others (for instance, Cloudinary provides an API to apply many transformations to an image, which could be perfectly accessed by a block). On the other side, the editing could happen inline, right where the image is placed inside the blog post. Then, for instance, if the image was added as an overlay against some background, and we add transparent regions to the image, we can visualize in real-time how the composite result looks like.
(I haven’t found any proposal to tackle this issue in Gutenberg’s GitHub repo, but I learned about this idea talking to some core contributors, who expected to be able to work on it some time in the future.)
Conclusion
Already being the most popular CMS (close to 35% of the web), WordPress has also the chance to offer the most compelling tools to manipulate content. This is because Gutenberg offers an appealing mechanism to create, edit and manage content: A single interface, simple to use, fairly powerful and versatile. With its new content management capabilities, WordPress can become the single source of truth of all our content, to power all our applications (websites, newsletters, apps, and so on) through APIs. Kudos to that!
COPE is a strategy for reducing the amount of work needed to publish our content into different mediums, such as website, email, apps, and others. First pioneered by NPR, it accomplishes its goal by establishing a single source of truth for content which can be used for all of the different mediums.
Having content that works everywhere is not a trivial task since each medium will have its own requirements. For instance, whereas HTML is valid for printing content for the web, this language is not valid for an iOS/Android app. Similarly, we can add classes to our HTML for the web, but these must be converted to styles for email.
The solution to this conundrum is to separate form from content: The presentation and the meaning of the content must be decoupled, and only the meaning is used as the single source of truth. The presentation can then be added in another layer (specific to the selected medium).
For example, given the following piece of HTML code, the <p> is an HTML tag which applies mostly for the web, and attribute class="align-center" is presentation (placing an element “on the center” makes sense for a screen-based medium, but not for an audio-based one such as Amazon Alexa):
<p class="align-center">Hello world!</p>
Hence, this piece of content cannot be used as a single source of truth, and it must be converted into a format which separates the meaning from the presentation, such as the following piece of JSON code:
This piece of code can be used as a single source of truth for content since from it we can recreate once again the HTML code to use for the web, and procure an appropriate format for other mediums.
Why WordPress
WordPress is ideal to implement the COPE strategy due of several reasons:
It is versatile. The WordPress database model does not define a fixed, rigid content model; on the contrary, it was created for versatility, enabling to create varied content models through the use of meta field, which allow the storing of additional pieces of data for four different entities: posts and custom post types, users, comments, and taxonomies (tags and categories).
It is powerful. WordPress shines as a CMS (Content Management System), and its plugin ecosystem enables to easily add new functionalities.
It is widespread. It is estimated that 1/3rd of websites run on WordPress. Then, a sizable amount of people working on the web know about and are able to use, i.e. WordPress. Not just developers but also bloggers, salesmen, marketing staff, and so on. Then, many different stakeholders, no matter their technical background, will be able to produce the content which acts as the single source of truth.
It is headless. Headlessness is the ability to decouple the content from the presentation layer, and it is a fundamental feature for implementing COPE (as to be able to feed data to dissimilar mediums).
Since incorporating the WP REST API into core starting from version 4.7, and more markedly since the launch of Gutenberg in version 5.0 (for which plenty of REST API endpoints had to be implemented), WordPress can be considered a headless CMS, since most WordPress content can be accessed through a REST API by any application built on any stack.
In addition, the recently-created WPGraphQL integrates WordPress and GraphQL, enabling to feed content from WordPress into any application using this increasingly popular API. Finally, my own project PoP has recently added an implementation of an API for WordPress which allows to export the WordPress data as either REST, GraphQL or PoP native formats.
It has Gutenberg, a block-based editor that greatly aids the implementation of COPE because it is based on the concept of blocks (as explained in the sections below).
Blobs Versus Blocks To Represent Information
A blob is a single unit of information stored all together in the database. For instance, writing the blog post below on a CMS that relies on blobs to store information will store the blog post content on a single database entry — containing that same content:
As it can be appreciated, the important bits of information from this blog post (such as the content in the paragraph, and the URL, the dimensions and attributes of the Youtube video) are not easily accessible: If we want to retrieve any of them on their own, we need to parse the HTML code to extract them — which is far from an ideal solution.
Blocks act differently. By representing the information as a list of blocks, we can store the content in a more semantic and accessible way. Each block conveys its own content and its own properties which can depend on its type (e.g. is it perhaps a paragraph or a video?).
For example, the HTML code above could be represented as a list of blocks like this:
Through this way of representing information, we can easily use any piece of data on its own, and adapt it for the specific medium where it must be displayed. For instance, if we want to extract all the videos from the blog post to show on a car entertainment system, we can simply iterate all blocks of information, select those with type="embed" and provider="Youtube", and extract the URL from them. Similarly, if we want to show the video on an Apple Watch, we need not care about the dimensions of the video, so we can ignore attributes width and height in a straightforward manner.
How Gutenberg Implements Blocks
Before WordPress version 5.0, WordPress used blobs to store post content in the database. Starting from version 5.0, WordPress ships with Gutenberg, a block-based editor, enabling the enhanced way to process content mentioned above, which represents a breakthrough towards the implementation of COPE. Unfortunately, Gutenberg has not been designed for this specific use case, and its representation of the information is different to the one just described for blocks, resulting in several inconveniences that we will need to deal with.
Let’s first have a glimpse on how the blog post described above is saved through Gutenberg:
With the exception of global (also called “reusable”) blocks, which have an entry of their own in the database and can be referenced directly through their IDs, all blocks are saved together in the blog post’s entry in table wp_posts.
Hence, to retrieve the information for a specific block, we will first need to parse the content and isolate all blocks from each other. Conveniently, WordPress provides function parse_blocks($content) to do just this. This function receives a string containing the blog post content (in HTML format), and returns a JSON object containing the data for all contained blocks.
Block Type And Attributes Are Conveyed Through HTML Comments
Each block is delimited with a starting tag <!-- wp:{block-type} {block-attributes-encoded-as-JSON} --> and an ending tag <!-- /wp:{block-type} --> which (being HTML comments) ensure that this information will not be visible when displaying it on a website. However, we can’t display the blog post directly on another medium, since the HTML comment may be visible, appearing as garbled content. This is not a big deal though, since after parsing the content through function parse_blocks($content), the HTML comments are removed and we can operate directly with the block data as a JSON object.
Blocks Contain HTML
The paragraph block has "<p>Look at this wonderful tango:</p>" as its content, instead of "Look at this wonderful tango:". Hence, it contains HTML code (tags <p> and </p>) which is not useful for other mediums, and as such must be removed, for instance through PHP function strip_tags($content).
When stripping tags, we can keep those HTML tags which explicitly convey semantic information, such as tags <strong> and <em> (instead of their counterparts <b> and <i> which apply only to a screen-based medium), and remove all other tags. This is because there is a great chance that semantic tags can be properly interpreted for other mediums too (e.g. Amazon Alexa can recognize tags <strong> and <em>, and change its voice and intonation accordingly when reading a piece of text). To do this, we invoke the strip_tags function with a 2nd parameter containing the allowed tags, and place it within a wrapping function for convenience:
function strip_html_tags($content)
{
  return strip_tags($content, '<strong><em>');
}
The Video’s Caption Is Saved Within The HTML And Not As An Attribute
As can be seen in the Youtube video block, the caption "An exquisite tango performance" is stored inside the HTML code (enclosed by tag <figcaption />) but not inside the JSON-encoded attributes object. As a consequence, to extract the caption, we will need to parse the block content, for instance through a regular expression:
function extract_caption($content)
{
  $matches = [];
  preg_match('/<figcaption>(.*?)<\/figcaption>/', $content, $matches);
  if ($caption = $matches[1]) {
    return strip_html_tags($caption);
  }
  return null;
}
This is a hurdle we must overcome in order to extract all metadata from a Gutenberg block. This happens on several blocks; since not all pieces of metadata are saved as attributes, we must then first identify which are these pieces of metadata, and then parse the HTML content to extract them on a block-by-block and piece-by-piece basis.
Concerning COPE, this represents a wasted chance to have a really optimal solution. It could be argued that the alternative option is not ideal either, since it would duplicate information, storing it both within the HTML and as an attribute, which violates the DRY (Don’t Repeat Yourself) principle. However, this violation does already take place: For instance, attribute className contains value "wp-embed-aspect-16-9 wp-has-aspect-ratio", which is printed inside the content too, under HTML attribute class.
Note:I have released this functionality, including all the code described below, as WordPress plugin Block Metadata. You’re welcome to install it and play with it so you can get a taste of the power of COPE. The source code is available in this GitHub repo.
Now that we know what the inner representation of a block looks like, let’s proceed to implement COPE through Gutenberg. The procedure will involve the following steps:
Because function parse_blocks($content) returns a JSON object with nested levels, we must first simplify this structure.
We iterate all blocks and, for each, identify their pieces of metadata and extract them, transforming them into a medium-agnostic format in the process. Which attributes are added to the response can vary depending on the block type.
We finally make the data available through an API (REST/GraphQL/PoP).
Let’s implement these steps one by one.
1. Simplifying The Structure Of The JSON Object
The returned JSON object from function parse_blocks($content) has a nested architecture, in which the data for normal blocks appear at the first level, but the data for a referenced reusable block are missing (only data for the referencing block are added), and the data for nested blocks (which are added within other blocks) and for grouped blocks (where several blocks can be grouped together) appear under 1 or more sublevels. This architecture makes it difficult to process the block data from all blocks in the post content, since on one side some data are missing, and on the other we don’t know a priori under how many levels data are located. In addition, there is a block divider placed every pair of blocks, containing no content, which can be safely ignored.
For instance, the response obtained from a post containing a simple block, a global block, a nested block containing a simple block, and a group of simple blocks, in that order, is the following:
A better solution is to have all data at the first level, so the logic to iterate through all block data is greatly simplified. Hence, we must fetch the data for these reusable/nested/grouped blocks, and have it added on the first level too. As it can be seen in the JSON code above:
The empty divider block has attribute "blockName" with value NULL
The reference to a reusable block is defined through $block["attrs"]["ref"]
Nested and group blocks define their contained blocks under $block["innerBlocks"]
Hence, the following PHP code removes the empty divider blocks, identifies the reusable/nested/grouped blocks and adds their data to the first level, and removes all data from all sublevels:
/**
 * Export all (Gutenberg) blocks' data from a WordPress post
 */
function get_block_data($content, $remove_divider_block = true)
{
  // Parse the blocks, and convert them into a single-level array
  $ret = [];
  $blocks = parse_blocks($content);
  recursively_add_blocks($ret, $blocks);

  // Maybe remove blocks without name
  if ($remove_divider_block) {
    $ret = remove_blocks_without_name($ret);
  }

  // Remove 'innerBlocks' property if it exists (since that code was copied to the first level, it is currently duplicated)
  foreach ($ret as &$block) {
    unset($block['innerBlocks']);
  }

  return $ret;
}

/**
 * Remove the blocks without name, such as the empty block divider
 */
function remove_blocks_without_name($blocks)
{
  return array_values(array_filter(
    $blocks,
    function($block) {
      return $block['blockName'];
    }
  ));
}

/**
 * Add block data (including global and nested blocks) into the first level of the array
 */
function recursively_add_blocks(&$ret, $blocks)
{
  foreach ($blocks as $block) {
    // Global block: add the referenced block instead of this one
    if ($block['attrs']['ref']) {
      $ret = array_merge(
        $ret,
        recursively_render_block_core_block($block['attrs'])
      );
    }
    // Normal block: add it directly
    else {
      $ret[] = $block;
    }
    // If it contains nested or grouped blocks, add them too
    if ($block['innerBlocks']) {
      recursively_add_blocks($ret, $block['innerBlocks']);
    }
  }
}

/**
 * Function based on `render_block_core_block`
 */
function recursively_render_block_core_block($attributes)
{
  if (empty($attributes['ref'])) {
    return [];
  }

  $reusable_block = get_post($attributes['ref']);
  if (!$reusable_block || 'wp_block' !== $reusable_block->post_type) {
    return [];
  }

  if ('publish' !== $reusable_block->post_status || ! empty($reusable_block->post_password)) {
    return [];
  }

  return get_block_data($reusable_block->post_content);
}
Calling function get_block_data($content) passing the post content ($post->post_content) as parameter, we now obtain the following response:
[[
  {
    "blockName": "core/image",
    "attrs": {
      "id": 70,
      "sizeSlug": "large"
    },
    "innerHTML": "\n<figure class=\"wp-block-image size-large\"><img src=\"http://localhost/wp-content/uploads/2017/12/sandwich-1024x614.jpg\" alt=\"\" class=\"wp-image-70\"/><figcaption>This is a normal block</figcaption></figure>\n",
    "innerContent": [
      "\n<figure class=\"wp-block-image size-large\"><img src=\"http://localhost/wp-content/uploads/2017/12/sandwich-1024x614.jpg\" alt=\"\" class=\"wp-image-70\"/><figcaption>This is a normal block</figcaption></figure>\n"
    ]
  },
  {
    "blockName": "core/paragraph",
    "attrs": [],
    "innerHTML": "\n<p>Lorem ipsum dolor sit amet, consectetur adipiscing elit, sed do eiusmod tempor incididunt ut labore et dolore magna aliqua.</p>\n",
    "innerContent": [
      "\n<p>Lorem ipsum dolor sit amet, consectetur adipiscing elit, sed do eiusmod tempor incididunt ut labore et dolore magna aliqua.</p>\n"
    ]
  },
  {
    "blockName": "core/columns",
    "attrs": [],
    "innerHTML": "\n<div class=\"wp-block-columns\">\n\n</div>\n",
    "innerContent": [
      "\n<div class=\"wp-block-columns\">",
      null,
      "\n\n",
      null,
      "</div>\n"
    ]
  },
  {
    "blockName": "core/column",
    "attrs": [],
    "innerHTML": "\n<div class=\"wp-block-column\"></div>\n",
    "innerContent": [
      "\n<div class=\"wp-block-column\">",
      null,
      "</div>\n"
    ]
  },
  {
    "blockName": "core/image",
    "attrs": {
      "id": 69,
      "sizeSlug": "large"
    },
    "innerHTML": "\n<figure class=\"wp-block-image size-large\"><img src=\"http://localhost/wp-content/uploads/2017/12/espresso-1024x614.jpg\" alt=\"\" class=\"wp-image-69\"/></figure>\n",
    "innerContent": [
      "\n<figure class=\"wp-block-image size-large\"><img src=\"http://localhost/wp-content/uploads/2017/12/espresso-1024x614.jpg\" alt=\"\" class=\"wp-image-69\"/></figure>\n"
    ]
  },
  {
    "blockName": "core/column",
    "attrs": [],
    "innerHTML": "\n<div class=\"wp-block-column\"></div>\n",
    "innerContent": [
      "\n<div class=\"wp-block-column\">",
      null,
      "</div>\n"
    ]
  },
  {
    "blockName": "core/paragraph",
    "attrs": [],
    "innerHTML": "\n<p>This is how I wake up every morning</p>\n",
    "innerContent": [
      "\n<p>This is how I wake up every morning</p>\n"
    ]
  },
  {
    "blockName": "core/group",
    "attrs": [],
    "innerHTML": "\n<div class=\"wp-block-group\"><div class=\"wp-block-group__inner-container\">\n\n</div></div>\n",
    "innerContent": [
      "\n<div class=\"wp-block-group\"><div class=\"wp-block-group__inner-container\">",
      null,
      "\n\n",
      null,
      "</div></div>\n"
    ]
  },
  {
    "blockName": "core/image",
    "attrs": {
      "id": 71,
      "sizeSlug": "large"
    },
    "innerHTML": "\n<figure class=\"wp-block-image size-large\"><img src=\"http://localhost/wp-content/uploads/2017/12/coffee-1024x614.jpg\" alt=\"\" class=\"wp-image-71\"/><figcaption>First element of the group</figcaption></figure>\n",
    "innerContent": [
      "\n<figure class=\"wp-block-image size-large\"><img src=\"http://localhost/wp-content/uploads/2017/12/coffee-1024x614.jpg\" alt=\"\" class=\"wp-image-71\"/><figcaption>First element of the group</figcaption></figure>\n"
    ]
  },
  {
    "blockName": "core/paragraph",
    "attrs": [],
    "innerHTML": "\n<p>Second element of the group</p>\n",
    "innerContent": [
      "\n<p>Second element of the group</p>\n"
    ]
  }
]
Even though not strictly necessary, it is very helpful to create a REST API endpoint to output the result of our new function get_block_data($content), which will allow us to easily understand what blocks are contained in a specific post, and how they are structured. The code below adds such endpoint under /wp-json/block-metadata/v1/data/{POST_ID}:
/**
 * Define REST endpoint to visualize a post’s block data
 */
add_action('rest_api_init', function () {
  register_rest_route('block-metadata/v1', 'data/(?P\d+)', [
    'methods'  => 'GET',
    'callback' => 'get_post_blocks'
  ]);
});
function get_post_blocks($request)
{
  $post = get_post($request['post_id']);
  if (!$post) {
    return new WP_Error('empty_post', 'There is no post with this ID', array('status' => 404));
  }

  $block_data = get_block_data($post->post_content);
  $response = new WP_REST_Response($block_data);
  $response->set_status(200);
  return $response;
}
To see it in action, check out this link which exports the data for this post.
2. Extracting All Block Metadata Into A Medium-Agnostic Format
At this stage, we have block data containing HTML code which is not appropriate for COPE. Hence, we must strip the non-semantic HTML tags for each block as to convert it into a medium-agnostic format.
We can decide which are the attributes that must be extracted on a block type by block type basis (for instance, extract the text alignment property for "paragraph" blocks, the video URL property for the "youtube embed" block, and so on).
As we saw earlier on, not all attributes are actually saved as block attributes but within the block’s inner content, hence, for these situations, we will need to parse the HTML content using regular expressions in order to extract those pieces of metadata.
After inspecting all blocks shipped through WordPress core, I decided not to extract metadata for the following ones:
"core/columns" "core/column" "core/cover"
These apply only to screen-based mediums and (being nested blocks) are difficult to deal with.
"core/html"
This one only makes sense for web.
"core/table" "core/button" "core/media-text"
I had no clue how to represent their data on a medium-agnostic fashion or if it even makes sense.
This leaves me with the following blocks, for which I’ll proceed to extract their metadata:
To extract the metadata, we create function get_block_metadata($block_data) which receives an array with the block data for each block (i.e. the output from our previously-implemented function get_block_data) and, depending on the block type (provided under property "blockName"), decides what attributes are required and how to extract them:
/**
 * Process all (Gutenberg) blocks' metadata into a medium-agnostic format from a WordPress post
 */
function get_block_metadata($block_data)
{
  $ret = [];
  foreach ($block_data as $block) {
    $blockMeta = null;
    switch ($block['blockName']) {
      case ...:
        $blockMeta = ...
        break;
      case ...:
        $blockMeta = ...
        break;
      ...
    }

    if ($blockMeta) {
      $ret[] = [
        'blockName' => $block['blockName'],
        'meta' => $blockMeta,
      ];
    }
  }

  return $ret;
}
Let’s proceed to extract the metadata for each block type, one by one:
"core/paragraph"
Simply remove the HTML tags from the content, and remove the trailing breaklines.
case 'core/paragraph':
  $blockMeta = [
    'content' => trim(strip_html_tags($block['innerHTML'])),
  ];
  break;
'core/image'
The block either has an ID referring to an uploaded media file or, if not, the image source must be extracted from under <img src="...">. Several attributes (caption, linkDestination, link, alignment) are optional.
case 'core/image':
  $blockMeta = [];
  // If inserting the image from the Media Manager, it has an ID
  if ($block['attrs']['id'] && $img = wp_get_attachment_image_src($block['attrs']['id'], $block['attrs']['sizeSlug'])) {
    $blockMeta['img'] = [
      'src' => $img[0],
      'width' => $img[1],
      'height' => $img[2],
    ];
  }
  elseif ($src = extract_image_src($block['innerHTML'])) {
    $blockMeta['src'] = $src;
  }
  if ($caption = extract_caption($block['innerHTML'])) {
    $blockMeta['caption'] = $caption;
  }
  if ($linkDestination = $block['attrs']['linkDestination']) {
    $blockMeta['linkDestination'] = $linkDestination;
    if ($link = extract_link($block['innerHTML'])) {
      $blockMeta['link'] = $link;
    }
  }
  if ($align = $block['attrs']['align']) {
    $blockMeta['align'] = $align;
  }
  break;
It makes sense to create functions extract_image_src, extract_caption and extract_link since their regular expressions will be used time and again for several blocks. Please notice that a caption in Gutenberg can contain links (<a href="...">), however, when calling strip_html_tags, these are removed from the caption.
Even though regrettable, I find this practice unavoidable, since we can’t guarantee a link to work in non-web platforms. Hence, even though the content is gaining universality since it can be used for different mediums, it is also losing specificity, so its quality is poorer compared to content that was created and customized for the particular platform.
Simply retrieve the video URL from the block attributes, and extract its caption from the HTML content, if it exists.
case 'core-embed/youtube':
  $blockMeta = [
    'url' => $block['attrs']['url'],
  ];
  if ($caption = extract_caption($block['innerHTML'])) {
    $blockMeta['caption'] = $caption;
  }
  break;
'core/heading'
Both the header size (h1, h2, …, h6) and the heading text are not attributes, so these must be obtained from the HTML content. Please notice that, instead of returning the HTML tag for the header, the size attribute is simply an equivalent representation, which is more agnostic and makes better sense for non-web platforms.
Unfortunately, for the image gallery I have been unable to extract the captions from each image, since these are not attributes, and extracting them through a simple regular expression can fail: If there is a caption for the first and third elements, but none for the second one, then I wouldn’t know which caption corresponds to which image (and I haven’t devoted the time to create a complex regex). Likewise, in the logic below I’m always retrieving the "full" image size, however, this doesn’t have to be the case, and I’m unaware of how the more appropriate size can be inferred.
Obtain the video URL and all properties to configure how the video is played through a regular expression. If Gutenberg ever changes the order in which these properties are printed in the code, then this regex will stop working, evidencing one of the problems of not adding metadata directly through the block attributes.
Now that we have extracted all block metadata, we need to make it available to our different mediums, through an API. WordPress has access to the following APIs:
REST, through the WP REST API (integrated in WordPress core)
Let’s see how to export the data through each of them.
REST
The following code creates endpoint /wp-json/block-metadata/v1/metadata/{POST_ID} which exports all block metadata for a specific post:
/**
 * Define REST endpoints to export the blocks' metadata for a specific post
 */
add_action('rest_api_init', function () {
  register_rest_route('block-metadata/v1', 'metadata/(?P\d+)', [
    'methods'  => 'GET',
    'callback' => 'get_post_block_meta'
  ]);
});
function get_post_block_meta($request)
{
  $post = get_post($request['post_id']);
  if (!$post) {
    return new WP_Error('empty_post', 'There is no post with this ID', array('status' => 404));
  }

  $block_data = get_block_data($post->post_content);
  $block_metadata = get_block_metadata($block_data);
  $response = new WP_REST_Response($block_metadata);
  $response->set_status(200);
  return $response;
}
To see it working, this link (corresponding to this blog post) displays the metadata for blocks of all the types analyzed earlier on.
GraphQL (Through WPGraphQL)
GraphQL works by setting-up schemas and types which define the structure of the content, from which arises this API’s power to fetch exactly the required data and nothing else. Setting-up schemas works very well when the structure of the object has a unique representation.
In our case, however, the metadata returned by a new field "block_metadata" (which calls our newly-created function get_block_metadata) depends on the specific block type, so the structure of the response can vary wildly; GraphQL provides a solution to this issue through a Union type, allowing to return one among a set of different types. However, its implementation for all different variations of the metadata structure has proved to be a lot of work, and I quit along the way 😢.
As an alternative (not ideal) solution, I decided to provide the response by simply encoding the JSON object through a new field "jsonencoded_block_metadata":
Note: This functionality is available on its own GitHub repo.
The final API is called PoP, which is a little-known project I’ve been working on for several years now. I have recently converted it into a full-fledged API, with the capacity to produce a response compatible with both REST and GraphQL, and which even benefits from the advantages from these 2 APIs, at the same time: no under/over-fetching of data, like in GraphQL, while being cacheable on the server-side and not susceptible to DoS attacks, like REST. It offers a mix between the two of them: REST-like endpoints with GraphQL-like queries.
The block metadata is made available through the API through the following code:
class PostFieldValueResolver extends AbstractDBDataFieldValueResolver
{
  public static function getClassesToAttachTo(): array
  {
    return array(\PoP\Posts\FieldResolver::class);
  }

  public function resolveValue(FieldResolverInterface $fieldResolver, $resultItem, string $fieldName, array $fieldArgs = [])
  {
    $post = $resultItem;
    switch ($fieldName) {
      case 'block-metadata':
        $block_data = \Leoloso\BlockMetadata\Data::get_block_data($post->post_content);
        $block_metadata = \Leoloso\BlockMetadata\Metadata::get_block_metadata($block_data);

        // Filter by blockName
        if ($blockName = $fieldArgs['blockname']) {
          $block_metadata = array_filter(
            $block_metadata,
            function($block) use($blockName) {
              return $block['blockName'] == $blockName;
            }
          );
        }
        return $block_metadata;
    }

    return parent::resolveValue($fieldResolver, $resultItem, $fieldName, $fieldArgs);
  }
}
To see it in action, this link displays the block metadata (+ ID, title and URL of the post, and the ID and name of its author, à la GraphQL) for a list of posts.
In addition, similar to GraphQL arguments, our query can be customized through field arguments, enabling to obtain only the data that makes sense for a specific platform. For instance, if we desire to extract all Youtube videos added to all posts, we can add modifier (blockname:core-embed/youtube) to field block-metadata in the endpoint URL, like in this link. Or if we want to extract all images from a specific post, we can add modifier (blockname:core/image) like in this other link|id|title).
Conclusion
The COPE (“Create Once, Publish Everywhere”) strategy helps us lower the amount of work needed to create several applications which must run on different mediums (web, email, apps, home assistants, virtual reality, etc) by creating a single source of truth for our content. Concerning WordPress, even though it has always shined as a Content Management System, implementing the COPE strategy has historically proved to be a challenge.
However, a couple of recent developments have made it increasingly feasible to implement this strategy for WordPress. On one side, since the integration into core of the WP REST API, and more markedly since the launch of Gutenberg, most WordPress content is accessible through APIs, making it a genuine headless system. On the other side, Gutenberg (which is the new default content editor) is block-based, making all metadata inside a blog post readily accessible to the APIs.
As a consequence, implementing COPE for WordPress is straightforward. In this article, we have seen how to do it, and all the relevant code has been made available through several repositories. Even though the solution is not optimal (since it involves plenty of parsing HTML code), it still works fairly well, with the consequence that the effort needed to release our applications to multiple platforms can be greatly reduced. Kudos to that!
Postmortem Of Gutenberg The Launch, So We Can Embrace Gutenberg The Product
Postmortem Of Gutenberg The Launch, So We Can Embrace Gutenberg The Product
Leonardo Losoviz
After 10 months of being released as WordPress’s new default editor, Gutenberg is still shrugged off by a sizable amount of people from the web development community, who frequently cite as reasons to disregard it its lack of accessibility support (even though major accessibility improvements have taken place), how slow it is (even though it is running much faster now), and several other grievances. This pessimistic reaction to Gutenberg is most evident in online articles demonstrating Gutenberg’s capabilities which, instead of eliciting a positive reaction from the readers, they mostly attract contempt (as reflected in a stream of negative comments).
Many people seem to be angry “at Gutenberg” (we will see in a while what Gutenberg actually is), expressing that Gutenberg should never have happened or, at least, never have been integrated to WordPress core as its default experience, or at least not so soon. Different people have different reasons to be opposed to Gutenberg, with some of their reasons being more personally significant than others. For instance, some people have seen their livelihoods jeopardized, having worked hard to specialize on a certain solution which, due to Gutenberg’s arrival, is in peril of disappearing (such as anyone working with this brand or that brand of page builders). I can truly understand why these people are angry at Gutenberg, and I sympathize with them.
However, I do also believe that being endlessly angered by Gutenberg and dismissing the whole of it — without even considering if it may be worth using after all — is not a sensible approach. When it was initially launched, I was quite opposed to Gutenberg, thinking that it was not ready, and this stance lasted for several months. However, I have lately found myself using Gutenberg more and more, and I can even claim that, nowadays, I’m actually enjoying it. While at the beginning I was a bit angered “at Gutenberg” myself too, I let my anger go away, and now I can actually benefit from it.
Through this article, I will attempt to change the narrative under which Gutenberg is most commonly depicted. I will enumerate what went wrong in the past, and describe what Gutenberg has been and what it is, from which I can give a leap of faith to present Gutenberg in a favorable light. I will also argue that Gutenberg already is a positive force, and as such, it deserves being given another chance (if you haven’t done so yet).
What Gutenberg Actually Is
From my point of view, the most important reason why Gutenberg is not more widely accepted is that, when people talk about Gutenberg, they equal it to not one but actually two entities (which are confused with each other), namely:
Gutenberg, the launch;
Gutenberg, the product.
Gutenberg as “the product” is the plugin/functionality itself. Gutenberg as “the launch” was the process that involved the initial development and release of Gutenberg, possibly starting when WordPress founder Matt Mullenweg introduced Gutenberg to the wider audience in June 2017 during WordCamp Europe 2017, and ending in early December 2018 when WordPress 5.0 was released with Gutenberg merged into it.
(Once the launch was over, a new stage started which continues until today: The “Gutenberg continuous delivery cycle”. However, this stage is very different from “Gutenberg the launch”, as there have been no serious issues with it, and as such it doesn’t produce any misconception towards “Gutenberg the product”. For this reason, there is no need to talk about it in this article.)
We must distinguish between the two entities, “the launch” and “the product”. As such, from now on, I hope that when we refer to “Gutenberg” it invariably means “Gutenberg the product”, and if we want to reference “Gutenberg the launch” then we must explicitly name it (possibly using any of its variations, such as “Gutenberg’s initial development/release” or similar phrases). Most importantly, we must refrain from mixing the launch and the product in the same bag: Mentioning any factor that contributed to Gutenberg’s disappointing launch as a reason to not use Gutenberg in our projects should be phased out, and Gutenberg as a product should be judged only against its own qualities. This is being fair to Gutenberg the product.
I believe that, while “Gutenberg the launch” has been justly criticized, the constant scorn aimed at Gutenberg the product has been unfair (even if it were justified), and that Gutenberg the product is, itself, a victim from the stained reputation conferred to the name “Gutenberg” during its frustrating launch. For instance, when searching for “Gutenberg” in the WordPress plugin directory, because the algorithm deciding the plugin ranking factors in the plugins’ rating, Gutenberg appears only around the 10th position. However, many of the 1-star ratings would not have taken place if Gutenberg had not been merged into core; had it been initially released as a plugin only, and waited until the most important bugs and issues (such as the lack of accessibility) had been resolved before merging to core, then its rating would today be higher.
If we are able to split apart the two entities (the launch and the product) and deal with them separately, then, on one side, we can do a postmortem of what went wrong during Gutenberg’s launch and feed this knowledge into the current continuous delivery cycle, so that the same mistakes will not be repeated (indeed, this seems to be happening already, as I will describe below); on the other side, we can allow ourselves to appreciate Gutenberg as a product, add it to our stacks, and hopefully benefit from it.
I will do exactly this, from my own point of view.
What Went Wrong During The Launch Of Gutenberg
In a single sentence, the team leading the process messed it up (that’s the polite way to say it).
WordPress 5.0 with Gutenberg merged into it was launched in early December 2018, just before WordCamp US. Launching it then was the wrong decision, for a very simple reason: Gutenberg was not yet ready. In particular, the accessibility situation was very dire, with Gutenberg being almost useless through accessibility devices such as screen readers, effectively making anyone depending on such devices unable to use the WordPress editor. And because the WordPress community is very vocal in protecting the rights of everyone (literally everyone) to be able to access the Internet, this rushed launch was not well received.
Matt Mullenweg (who was leading the release process) may have had good reasons to be adamant about launching on that date, which could have, for instance, made sense from a business perspective. However, it certainly did not make sense from a community perspective. Indeed, many community members felt betrayed, complaining that they had to hurry to test their clients’ sites even though they were on holiday. We can safely say that, for many people, such a premature launch was perceived as a wreck (even if the software was working properly, so no Y2K actually happened), which created unnecessary discontent, and which could have perfectly been avoided by either postponing the launch, or by first releasing Gutenberg as a plugin to be merged into core at a later, more stable stage.
Was the pain, frustration and disappointment inflicted in the community really worth the cost? I believe most people will say it was not. I absolutely think it was not. In my opinion, these kind of situations in which an action is taken against the will of the majority of the community members must be avoided in the future (unless there are really good reasons for it, even if not everyone agrees on them; if that was the case concerning Gutenber’s launch I do not know, since I’m unaware of any really good reason to justify it).
In his presentation during that same WordCamp US, Matt Mullenweg did acknowledge that mistakes were made during the launch of Gutenberg, and that he had learned the lesson so that these mistakes will hopefully not be repeated. I reckon we can accept his apology and trust that his decisions will be the right ones next time (even though new quarrels on equally-important topics have taken place since then). However, the damage is already done: A wound has opened up which may take time to heal, so the community will be less trustful until confidence in the WordPress leadership is fully restored.
Why Things Seem To Be Much Better Now
Now comes the good news: The state of affairs appears to have mostly taken a positive direction, with the improvements listed below already happening.
Improved Communication
One of the loudest complaints about the Gutenberg launch was the lack of communication by the leadership. Because no proper channels to manage the project and communicate its decisions were put in place (at least not in a comprehensive manner), it was difficult to have an accurate picture of the overall situation. (For instance, information by different authors or teams was published through different avenues, including unofficial ones such as personal blogs.)
This concern has been greatly improved. In particular, the amount of information in the make blogs (where the different communities interact to take decisions concerning WordPress for different areas, such as core, accessibility, design, internationalization, and others) and the frequency with which the information is updated have been increased, and every team holds a regular Slack-based meeting (mostly taking place on a weekly or biweekly basis) in which anyone with a WordPress.org user account can participate. As experienced by some community members, it is now possible to reliably follow the developments on some topic, and have enough information to be able to become involved.
The fallout from Gutenberg’s launch also prompted Matt Mullenweg to expand WordPress’s leadership with two new roles: an Executive Director, to oversee and direct all contributor teams in their work to build and maintain WordPress, and a Marketing & Communications Lead, to lead the marketing team and oversee improving WordPress.org, related websites, and all its outlets (unfortunately, the person assigned to this role quit not long after, so somebody else must be found to take over this position).
Triage Team Formed To Tackle Open Issues
During the initial development phase of Gutenberg, several people complained that existing bugs, which had accumulated into the thousands, should be fixed before venturing out into adding new functionality to WordPress.
In March this year, a triage team was formed to clean up the open issues in the WordPress Trac bug tracker. This is hard work that has been needed for many years. If ever finished, WordPress would then have the chance to switch from Trac to a more modern bug tracker, such as GitHub.
Accessibility Is Steadily Becoming A Non-Issue
Accessibility issues are being tackled in every new Gutenberg release, with version 6.3 providing the lionshare of improvements. At the current pace of improvement, the most outstanding accessibility issues (as reported in the Gutenberg Accessibility Audit) should soon be a part of the past.
Judging Gutenberg On Its Own Merits
Now that we have split Gutenberg the launch from Gutenberg the product, we can proceed to analyze Gutenberg as a product and decide if it is worth adding to our application stack, based solely on its own merits and shortcomings. Many people do rightfully point out Gutenberg’s problems as the reason to not trust it (instead of focusing on the failed launch). However, Gutenberg has been improving by leaps and bounds, and many of the criticized issues may have been solved or may be on the brink of being solved. As such, the negative assessments should have a date of expiry and be re-evaluated. If we can give Gutenberg a new try and see where it stands nowadays, we may appreciate that, after all, it is not so bad. In my opinion, Gutenberg deserves a warmer welcome than it currently gets.
I am amazed that Gutenberg is still being compared to the previous way of editing content in WordPress (mainly through the tinymce, but also shortcodes, widgets, and others), arguing that it is more difficult to code through Gutenberg. This may be true, but it is also missing the point: Gutenberg is not here to provide a new way to code our application, producing the same features as in the past; instead, it is here to greatly enhance what can be done, offering to add features to our applications that could only be dreamt of in the past. Also, Gutenberg is not another page builder. Indeed, comparing Gutenberg to Divi or Beaver Builder is similarly missing the point, because it is like comparing a Victorinox to a regular knife: Yes, you can do site/page building with Gutenberg (actually not yet, but it is already a work in progress), but that is just one of its many uses; there are several other uses which are initially hidden, but once you pull them up from their compartment and understand how they work, a new world of possibilities will be revealed. Below, I will describe some of these new possibilities that Gutenberg brings to the table.
First, let’s discuss what’s not so great about Gutenberg. The one thing where I believe Gutenberg can be truly considered detrimental is in the steep curve of learning of React (which is the JavaScript library Gutenberg is coded with). WordPress has always been very inclusive, enabling people from any background (not only coders, but also non-techies such as bloggers, marketing people, salesmen, and the like) to create a theme or plugin or launch a site. This is beyond doubt not the case anymore, and it is unfair to expect everyone to have to learn React to create a Gutenberg block (this is not necessarily the case, since we can also create blocks using other JavaScript libraries, and even without using JavaScript, such as through ACF blocks, however using React is the most logical option if only because Gutenberg is coded with it). The only argument that could justify this disadvantage is if it makes the experience better for the user. Let’s see if this can be considered the case.
As I argued in a previous article of mine, the block-based architecture from Gutenberg radically changes the way in which applications are built: Instead of thinking in HTML code, we can now think in terms of components as the unit for building the website. This architecture is more maintainable and resilient, since each component (or block) can be independently developed and tested, and because it is easily reusable it can lower down the cost of developing several applications. Indeed, the recent popularity of JavaScript libraries such as Vue and React can be greatly attributed to their support for components. It is a great feature that developers love and which, I believe, once you start coding with, there is no turning back.
In this same article, I also describe how Gutenberg could support the “Create Once, Publish Everywhere” strategy (also known as “COPE”), enabling to produce a single source of truth of content to feed to all of our applications, for whichever medium or platform they run on: web, email/newsletters, iOS/Android apps, VR/AR, home-assistants (like Amazon Alexa), and others. Because it makes the overall content management much simpler, COPE also enables to lower the costs of producing content for different platforms. When I first wrote my article, I was theorizing that it could be done. However, I have recently implemented COPE for WordPress, and it works like a charm! (Stay tuned for another article in which I explain how it works in detail.)
The combination of COPE and the WordPress APIs (WP REST API, WPGraphQL, and my own PoP API) will provide one compelling reason for managing all of our content, for all of our applications, through WordPress. The other compelling reason will be Gutenberg’s ease of use (which is not fully here yet, but at the current pace of development, will arrive sooner than later), enabling the end-user to create elaborate content in a very simple way.
We already have access to great new features, such a real-time preview of how the content looks like, copy/pasting from Google Docs with perfect formatting, creation of intricate grid layers with nested elements inside, and many others. We can also expect new blocks to deliver utterly-unexpected features we have never imagined. My bet is that, through Gutenberg, WordPress is poised to become the digital assets manager of the web. (I’ve already written an article which will soon be published here on Smashing Magazine concerning this topic and my justification for this bold statement.)
In addition, Gutenberg allows to reuse code with other CMSs or frameworks (such as for Drupal and for Laravel), so that coding for WordPress needs not to be restricted to WordPress anymore, once again allowing us to lower the cost to develop a library that needs to run in as many systems as possible (for instance, a company providing an integration of its API for many different platforms and languages, such as Stripe, could benefit from it). Currently, only the client-side code (JavaScript and CSS) seems to be re-used, however, the server-side PHP code can also be re-used. (I will, once again, soon publish an article on Smashing explaining how to do just this.)
These features are already a reality, and we can expect Gutenberg to provide many more compelling reasons for its existence in the years to come (according to Matt Mullenweg, Gutenberg has currently implemented only some 10% of its potential).
We can finally attempt to reach a verdict on Gutenberg the product: My stance is that it establishes a higher barrier of entry to WordPress, which is regrettable, however, it also is a beautifully engineered piece of software which grants real new powers to WordPress and, due to WordPress’s prominence, to the web development world in general. And between this trade-off between costs and benefits, I believe that having Gutenberg as part of WordPress is more worth it than not. I hope you can agree with my opinion or, if not, at least the reasons against it can be based solely on the characteristics of Gutenberg as a product.
Conclusion
Gutenberg is currently at its best — having started to provide delightful user experiences that were not possible with WordPress before. However, not everyone is aware of this fact because not everyone can get down to embracing Gutenberg. This is an unfortunate circumstance because Gutenberg (as the product) should not be faulted for the mistakes that took place during the launch of Gutenberg. If we are able to split these two entities apart and treat each of them independently, we can then convincingly ask people to give Gutenberg another chance, suggesting that Gutenberg as a product is worth having, even if Gutenberg the launch was a failed process.
In this article, I did a postmortem of the failed Gutenberg launch, based on my own understanding of the events. Carrying out such a postmortem can help the community and the leadership make sure that those unfortunate mistakes do not happen again. After the postmortem, I proceeded to evaluate Gutenberg based on its own merits and declared my stance: I believe that Gutenberg is a great tool to have, and the WordPress community can certainly benefit from it. And because it will only be getting better and better, Gutenberg could even inaugurate a new golden era for WordPress.
(This is a sponsored article.) Managing the deployment of a website used to be easy: It simply involved uploading files to the server through FTP and you were pretty much done. But those days are gone: Websites have gotten very complex, involving many tools and technologies in their stacks.
Nowadays, a typical web project may require to execute build tools to compress assets and generate the deliverable files for production, upload the assets to a CDN and invalidate stale ones, execute a test suit to make sure the code has no errors (for both client and server-side code), do database migrations (and, to be on the safe side, first execute a backup of the database), instantiate the desired number of servers behind a load balancer and deploy the application to them (through an atomic deployment, so that the website is always available), download and install the dependencies, deploy serverless functions, and finally notify the team that everything is ready through Slack or by email.
All this process sounds like a bit too much, right? Well, it actually is too much. How can we avoid getting overwhelmed by the complexity of the task at hand? The solution boils down to a single word: Automation. By automating all the tasks to execute, we will not dread doing the deployment (and having a trembling sweaty finger when pressing the Enter button), indeed we may not be even aware of it.
Automation improves the quality of our work, since we can avoid having to manually execute mind-numbing tasks again and again, which will enable us to use all our time for coding, and reassures us that the deployment will not fail due to human errors (such as overriding the wrong folder as in the old FTP days).
Introduction To Continuous Integration, Delivery, And Deployment
Managing and automating software deployment involves both tools and processes. In particular, Git as the version control system where to store our source code, and the availability of Git-hosting services (such as GitHub, GitLab and BitBucket) which trigger events when new code is pushed into the repository, enable to benefit from the following processes:
Continuous Integration The strategy of merging changes in the code into the main branch as often as possible, upon which automated tests against a build of the codebase are run to validate that the new code doesn’t introduce errors;
Continuous Delivery An extension to Continuous Integration which also automates the release process, enabling to deploy the project into production at any moment;
Continuous Deployment An extension to Continuous Delivery which automatically deploys the new code whenever it passes all required tests (as small a change it may contain), enabling to easily identify the source of any problem that might arise, and removing pressure off the team as it doesn’t need to deal with a "release day" anymore.
Adhering to these strategies has several benefits. The most immediate one is that our product can ship new features faster, indeed they can go live as soon as the team has finished coding them. The team can also receive feedback immediately (either from team members on a development environment, from the client on a staging environment, and from the users after it goes live) and be able to react straight away, thus creating a positive feedback loop. And because the whole process is fully automated, the team can save time and focus on the code, thus improving the quality of the product.
Continuous delivery enables getting feedback as early as possible. (Large preview)
Introducing Buddy, A Tool For Automating Software Deployment
The popularity of Git has given rise to a new generation of tools to manage the complexity of software deployments. Buddy is one of these new tools, born with the goal of making it easy to implement Continuous Integration/Delivery/Deployment, while broadening the number of features our application can provide, improving its quality, and reducing its costs by allowing to incorporate the offerings of the best or cheapest cloud-based service providers (among them AWS, DigitalOcean, Google Cloud Platform, Cloudflare, Rackspace, Azure, and others) into our stacks. This way, for instance, our application can be hosted on GitHub, be protected from DDoS through Cloudflare, have its static files hosted through DigitalOcean, use serverless functions from AWS Lambda, and authenticate users through Firebase, and everything is handled seamlessly.
Buddy operates through the use of pipelines: Sets of actions defined by the developer in a specific order, executed either manually or automatically when executing a Git push, that deliver the application from a Git repository to wherever needed and transforming it as required. Pipelines are extremely flexible, enabling developers to add only the required actions and have them customized for their specific needs.
For instance, the following pipeline performs all required tasks to deploy some Node.js application: execute the build step, upload files to the server through SFTP, upload assets to AWS S3 and purge them from the CDN, restart the server and finally inform the team through Slack (as it can be appreciated in the image below, the pipeline can be self-explanatory):
An example of a pipeline to deploy a Node.js application. (Large preview)
We can create different pipelines for different environments, and execute special actions when the process fails (such as when a test was not successful when the server to deploy to is down, or others). For instance, the following pipeline (to deploy a Node.js & PHP app that uses DigitalOcean, Fortrabbit & AWS CloudFront for hosting) makes a backup of assets and purges the CDN only when deploying to production, and sends a notification to the team through Slack in case of failure:
Pipeline configured for different environments. (Large preview)
A noteworthy effect of configuring our pipelines with actions from different cloud-service providers is that we can conveniently switch among them whenever the need arises, making it easy to avoid vendor lock-in (this includes also changing the repository provider). Buddy offers slightly over 100 actions out of the box, and also allows developers to create and use their own actions. This image shows all the readily available actions:
Let’s see how to create a simple pipeline to test and deploy a Node.js application, and send a notification to the team. The first step is to create a new project, during which you will be asked to select the project’s hosting provider (from among GitHub, GitLab, Bitbucket, Buddy Git Hosting, and your private Git server), and then to select the repository:
Then we can create the pipeline, specifying when it must run (either manually, automatically after new code is pushed to the repository, or automatically every x amount of time) and from which branch:
Then we can add actions to the pipeline. For that, we simply click on the “+” button to add a new action, upon which we must configure it as needed. To build and test a Node.js application we add and configure a “Node.js” action:
After testing the application, we can deploy it by uploading it to our production server through SFTP. For this, we add an “SFTP” action, and configure it through custom-defined environment variables ${SFTP} and ${SFTP_USER}:
From this moment on, if the pipeline was configured to run when new code is pushed to the repository, doing a git push will trigger the execution of the pipeline.
Staying Constantly Up To Date
Web development is in a never-ending state of flux, with new tools and services being launched without a break, some of them often becoming a hot trend immediately and the new normal barely a few months later. Technologies seldom heard of a few years ago progressively gain importance and eventually become a must (voice search, machine learning, WebAssembly), new frameworks and libraries offer new ways of building sites (GraphQL, Gatsby, Next.js, Nuxt.js), and our applications need to be accessed from newly-invented devices (Amazon Echo, In-car systems). To keep our applications relevant, we must continuously evaluate the latest offerings and decide if to add them to our technology stack. Hence, it is extremely important that our platforms for developing the application do not restrict what technologies we can use.
Automation has become a must to avoid being overwhelmed by the complexity of modern website deployment. We can make use of Continuous Integration/Delivery/Deployment (readily feasible by hosting our source code through Git) to shorten the time needed for delivering new features into our applications and getting feedback from the users.
Buddy helps in this task, enabling developers to create pipelines to execute actions concerning a wide array of technologies and cloud-service providers, and combining these actions in any possible way to satisfy the most particular needs.
It has been 8 months since Gutenberg was launched as the default content editor in WordPress. Depending who you ask, you may hear that Gutenberg is the worst or the best thing that has happened to WordPress (or anything in between). But something that most people seem to agree with, is that Gutenberg has been steadily improving. At the current pace of development, it’s only a matter of time until its most outstanding issues have been dealt with and the user experience becomes truly pleasant.
Gutenberg is an ongoing work in progress. While using it, I experience maddening nuisances, such as floating options that I can’t click on because the block placed below gets selected instead, unintuitive grouping of blocks, columns with so much gap that make them useless, and the “+” element calling for my attention all over the page. However, the problems I encounter are still relatively manageable (which is an improvement from the previous versions) and, moreover, Gutenberg has started making its potential benefits become a reality: Many of its most pressing bugs have been ironed out, its accessibility issues are being solved, and new and exciting features are continuously being made available. What we have so far is pretty decent, and it will only get better and better.
Let’s review the new developments which have taken place since Gutenberg’s launch, and where it is heading to.
Gutenberg arrived just in time to kick-start the rejuvenation of WordPress, to attempt to make WordPress appealing to developers once again (and reverse its current status of being the most dreaded platform). WordPress had stopped looking attractive because of its focus on not breaking backwards compatibility, which prevented WordPress from incorporating modern code, making it look pale in comparison with newer, shinier frameworks.
Many people argue that WordPress was in no peril of dying (after all, it powers more than 1/3rd of the web), so that Gutenberg was not really needed, and they may be right. However, even if WordPress was in no immediate danger, by being disconnected from modern development trends it was headed towards obsolescence, possibly not in the short-term but certainly in the mid to long-term. Let’s review how Gutenberg improves the experience for different WordPress stakeholders: developers, website admins, and website users.
Developers have recently embraced building websites through JavaScript libraries Vue and React because (among other reasons) of the power and convenience of components, which translates into a satisfying developer-experience. By jumping into the bandwagon and adopting this technique, Gutenberg enables WordPress to attract developers once again, allowing them to code in a manner they find gratifying.
Website admins can manage their content more easily, improve their productivity, and achieve things that couldn’t be done before. For instance, placing a Youtube video through a block is easier than through the TinyMCE Textarea, blocks can serve optimal images (compressed, resized according to the device, converted to a different format, and so on) removing the need to do it manually, and the WYSIWYG (What You See Is What You Get) capabilities are decent enough to provide a real-time preview of how the content will look like in the website.
By giving them access to powerful functionality, website users will have a higher satisfaction when browsing our sites, as experienced when using highly-dynamic, user-friendly web applications such as Facebook or Twitter.
In addition, Gutenberg is slowly but surely modernizing the whole process of creating the website. While currently it can be used only as the content editor, some time in the future it will become a full-fledged site builder, allowing to place components (called blocks) anywhere on a page, including the header, footer, sidebar, etc. (Automattic, the company behind WordPress.com, has already started work on a plugin adding full site editing capabilities for its commercial site, from which it could be adapted for the open-source WordPress software.) Through the site-building feature, non-techy users will be able to add very powerful functionality to their sites very easily, so WordPress will keep welcoming the greater community of people working on the web (and not just developers).
Fast Pace Of Development
One of the reasons why Gutenberg has seen such a fast pace of development is because it is hosted on GitHub, which simplifies the management of code, issues and communication as compared to Trac (which handles WordPress core), and which makes it easy for first-time contributors to become involved since they may already have experience working with Git.
Being decoupled from WordPress core, Gutenberg can benefit from rapid iteration. Even though a new version of WordPress is released every 3 months or so, Gutenberg is also available as a standalone plugin, which sees a new release every two weeks (while the latest release of WordPress contains Gutenberg version 5.5, the latest plugin version is 6.2). Having access to powerful new functionality for our sites every two weeks is very impressive indeed, and it enables to unlock further functionality from the broader ecosystem (for instance, the AMP plugin requires Gutenberg 5.8+ for several features).
Headless WordPress To Power Multiple Stacks
One of the side effects of Gutenberg is that WordPress has increasingly become “headless”, further decoupling the rendering of the application from the management of the content. This is because Gutenberg is a front-end client that interacts with the WordPress back-end through APIs (the WP REST API), and the development of Gutenberg has demanded a consistent expansion of the available APIs. These APIs are not restricted to Gutenberg; they can be used together with any client-side framework, to render the site using any stack.
An example of a stack we can leverage for our WordPress application is the JAMstack, which champions an architecture based on static sites augmented through 3rd party services (APIs) to become dynamic (indeed, Smashing Magazine is a JAMstack site!). This way, we can host our content in WordPress (leveraging it as a Content Management System, which is what it is truly good at), build an application that accesses the content through APIs, generate a static site, and deploy it on a Content Delivery Network, providing for lower costs and greater access speed.
New Functionality
Let’s play with Gutenberg (the plugin, not the one included in WordPress core, which is available here) and see what functionality has been added in the last few months.
Block Manager
Through the block manager, we can decide what blocks will be available on the content editor; all others will be disabled. Removing access to unwanted blocks can be useful in several situations, such as:
Many plugins are bundles of blocks; when installing such a plugin, all their blocks will be added to the content editor, even if we need only one
As many as 40 embed providers are implemented in WordPress core, yet we may need just a few of them for the application, such as Vimeo and Youtube
Having a large amount of blocks available can overwhelm us, impairing our workflow by adding extra layers that the user needs to navigate, leading to suboptimal use of the time; hence, temporarily disabling unneeded blocks can help us be more effective
Similarly, having only the blocks we need avoids potential errors caused by using the wrong blocks; in particular, establishing which blocks are needed can be done in a top-down manner, with the website admin analyzing all available blocks and deciding which ones to use, and imposing the decision on the content managers, who are then relieved from this task and can concentrate on their own duties.
Enabling/disabling blocks through the manager (Large preview)
Cover Block With Nesting Elements
The cover block (which allows us to add a title over a background image, generally useful for creating hero headers) now defines its inner elements (i.e. the heading and buttons, which can be added for creating a call to action) as nested elements, allowing us to modify its properties in a uniform way across blocks (for instance, we can make the heading bold and add a link to it, place one or more buttons and change their background color, and others).
The cover block accepts nested elements (Large preview)
Block Grouping And Nesting
Please beware: These features are still buggy! However, plenty of time and energy is being devoted to them, so we can expect them to work smoothly soon.
Block grouping allows to group several blocks together, so when moving them up or down on the page, all of them move together. Block nesting means placing a block inside of a block, and there is no limit to the nesting depth, so we can have blocks inside of blocks inside of blocks inside of… (you’ve got me by now). Block nesting is especially useful for adding columns on the layout, through a column block, and then each column can contain inside any kind of block, such as images, text, videos, etc.
Blocks can be grouped together, and nested inside each other (Large preview)
Migration Of Pre-Existing Widgets
Whereas in the past there were several methods for adding content on the page (TinyMCE content, shortcodes, widgets, menus, etc.), the blocks attempt to unify all of them into a single method. Currently, newly-considered legacy code, such as widgets, is being migrated to the block format.
Recently, the “Latest Posts” widget has been re-implemented as a block, supporting real-time preview of how the layout looks when configuring it (changing the number of words to display, showing an excerpt or the full post, displaying the date or not, etc).
The “Latest posts” widget includes several options to customize its appearance (Large preview)
Motion Animation
Moving blocks up or down the page used to involve an abrupt transition, sometimes making it difficult to understand how blocks were re-ordered. Since Gutenberg 6.1, a new feature of motion animation solves this problem by adding a realistic movement to block changes, such as when creating, removing or reordering a block, giving a greatly improved visual cue of the actions taken to re-order blocks. In addition, the overall concept of motion animation can be applied throughout Gutenberg to express change and thus improve the user experience and provide better accessibility support.
Blocks have a smooth effect when being re-ordered. (Large preview)
Functionality (Hopefully) Coming Soon
According to WordPress founder Matt Mullenweg, only 10% of Gutenberg’s complete roadmap has been implemented by now, so there is plenty of exciting new stuff in store for us. Work on the new features listed below has either already started, or the team is currently experimenting with them.
Block directory
A new top-level item in wp-admin which will provide block discovery. This way, blocks can be independently installed, without having to ship them through a plugin.
Navigation blocks
Currently, navigation menus must be created through their own interface. However, soon we will be able to create these through blocks and place them anywhere on the page.
Inline installation of blocks
Being able to discover blocks, the next logical step is to be able to install a new block on-the-fly, where is needed the most: On the post editor. We will be able to install a block while writing a post, use the new block to generate its HTML, save its output on the post, and remove the block, all without ever browsing to a different admin page.
Snap to grid when resizing images
When we place several images on our post, resizing them to the same width or height can prove to be a painful process of trying and failing repeatedly until getting it right, which is far from ideal. Soon, it will be possible to snap the image to a virtual grid layer which appears on the background as the image is being resized.
WordPress Is Becoming Attractive (Once Again)
Several reasons support the idea that WordPress will soon become an attractive platform to code for, as it used to be once upon a time. Let’s see a couple of them.
PHP Modernization
WordPress’s quest to modernize does not end with incorporating modern JavaScript libraries and tooling (React, webpack, Babel): It also extends to the server-side language: PHP. WordPress’s minimum version of PHP was recently bumped up to 5.6, and should be bumped to version 7.0 as early as December 2019. PHP 7 offers remarkable advantages over PHP 5, most notably it more than doubles its speed, and later versions of PHP (7.1, 7.2 and 7.3) have each become even faster.
Even though there seems to be no official plans to further upgrade from PHP 7.0 to its later versions, once the momentum is there it is easier to keep it going. And PHP is itself being improved relentlessly too. The upcoming PHP 7.4, to be released in November 2019, will include plenty of new improvements, including arrow functions and the spread operator inside of arrays (as used for modern JavaScript), and a mechanism to preload libraries and frameworks into the OPCache to further boost performance, among several other exciting features.
Reusability Of Code Across Platforms
A great side effect of Gutenberg being decoupled from WordPress is that it can be integrated with other frameworks too. And that is exactly what has happened! Gutenberg is now available for Drupal, and Laraberg (for Laravel) will soon be officially released (currently testing the release candidate). The beauty of this phenomenon is that, through Gutenberg, all these different frameworks can now share/reuse code!
Conclusion
There has never been a better time to be a web developer. The pace of development for all concerned languages and technologies (JavaScript, CSS, image optimization, variable fonts, cloud services, etc) is staggering. Until recently, WordPress was looking at this development trend from the outside, and developers may have felt that they were missing the modernization train. But now, through Gutenberg, WordPress is riding the train too, and keeping up with its history of steering the web in a positive direction.
Gutenberg may not be fully functional yet, since it has plenty of issues to resolve, and it may still be some time until it truly delivers on its promises. However, so far it is looking good, and it looks better and better with each new release: Gutenberg is steadily bringing new possibilities to WordPress. As such, this is a great time to reconsider giving Gutenberg a try (that is, if you haven’t done so yet). Anyone somehow dealing with WordPress (website admins, developers, content managers, website users) can benefit from this new normal. I’d say this is something to be excited about, wouldn’t you?
(This is a sponsored article.) It is a truth universally acknowledged, that a website in pursuit of success must be in want of speed. And so, it goes serverless.
At its core, serverless is a strategy for a website’s architecture, based on deploying static files (the good old HTML, CSS and image files) on cloud-based hosting, and augmenting the website’s capabilities by accessing cloud-based, charge-per-use dynamic functionality. There is nothing mystical or mysterious about serverless: its end result is simply a website or application.
In spite of its name, “serverless” doesn’t mean “without a server”. It simply means “without my own server”. This means that my site is still hosted on some server, but by offloading this responsibility to the cloud services provider, I can devote all my energies to developing my own product (the website) and not have to worry about the infrastructure.
Serverless is very appealing for several reasons:
Low-cost
You only pay for what you use. Hosting static files on the cloud can cost just a few cents a month (or even be free in some cases).
Fast
Static files can be delivered to the user from a Content Delivery Network (CDN) located near the user.
Secure
The cloud provider constantly keeps the underlying platform up-to-date.
Easy to scale
The cloud provider’s business is to scale up the infrastructure on demand.
Serverless is also becoming increasingly popular due to the increasing availability of services offered by cloud providers, simple-yet-powerful template-based static site generators (such as Jekyll, Hugo or Gatsby) and convenient ways to feed data into the process (such as through one of the many git based CMS’s).
The Network Is The Computer: Introducing Cloudflare Workers
Cloudflare, one of the world’s largest cloud network platforms, is well versed in providing the benefits we are after through serverless: for some time now they have made their extensive CDN available to make our sites fast, offered DDoS protection to make our sites secure, and made their 1.1.1.1 DNS service free so we could afford having privacy on the Internet, among many other services.
Their new serverless offering, Cloudflare Workers (or simply “Workers”), runs on the same global cloud network of over 165 data centers that powers those services. Cloudflare Workers is a service that provides a lightweight JavaScript execution environment to augment existing applications or create new ones.
Being stacked on top of Cloudflare’s widespread network makes Cloudflare Workers a big deal. Cloudflare can scale up its infrastructure based on spikes in demand, serving a serverless application from locations on five continents and supporting millions of users, making our applications fast, reliable, and scalable.
The Cloudflare network is powered by 165 data centers around the world. (Large preview)
On top of that, Cloudflare Workers provides unique features that make it an even more compelling service. Let’s explore these in detail.
Architecture Based On V8 For Fast Access And Low Cost
The Cloudflare engineers went out of their way to architect Workers, as they proudly explain in depth. Whereas almost every provider offering cloud computing has an architecture based on containers and virtual machines, Workers uses “Isolates”, the technology that allows V8 (Google Chrome’s JavaScript engine) to run thousands of processes on a single server in an efficient and secure manner.
Compared to virtual machines, Isolates greatly reduce the overhead required to execute user code, which translates into faster execution and lower use of memory.
Isolates allow thousands of processes to run efficiently on a single machine (Large preview)
Cloudflare Workers is not the first serverless cloud computing platform in operation: for instance, Amazon has offered AWS Lambda and Lambda@Edge. However, as a consequence of the lower overhead produced by Isolates, Cloudflare claims that when executing a similar task, Workers beats the competition where it matters most: speed and money.
Lower Price
While a Worker offering 50 milliseconds of CPU costs $0.50 per million requests, the equivalent Lambda costs $1.84 per million. Hence, running Workers ends up being around 3x cheaper than Lambda per CPU-cycle.
This chart shows what percentage of requests to Lambda, Lambda@Edge, and Cloudflare Workers were faster than a given number of milliseconds. (Large preview)
The better performance achieved by Cloudflare Workers is confirmed by the third-party site serverless-benchmark.com, which measures the performance of serverless providers and provides continuously updated statistics.
Statistics for Overhead (the time from request to response without the actual time the function took) and Cold start (the latency it takes a function to respond to the event) for Cloudflare Workers and its competitors. (Large preview)
Coded In JavaScript, Modeled On The Service Workers API
Because it is based on V8, programming for Workers is done in those languages supported by V8: JavaScript and languages that support compilation to WebAssembly, such as Go and Rust. V8’s code is merged into Workers at least once a week, so we can always expect it to support the latest implemented flavor of ECMAScript.
Workers are modeled on the Service Workers available in modern web browsers, and they use the same API whenever possible. This is significant: Because Service Workers are part of the foundation to create a Progressive Web App (PWA), creating Workers is done through an API that developers are already familiar with (or may be in the process of learning) for creating modern web applications.
In addition, relying on the Service Workers API allows developers to boost their productivity since it allows isomorphism of code, i.e. the same code that powers the Service Worker can be used for a Cloudflare Worker. Even though this is not always feasible because of the different contexts (while a Service Worker runs in the browser, the Cloudflare Worker runs in the network), certain use cases could apply to both contexts.
For instance, among the Service Workers recipes described in serviceworke.rs, recipes for API Analytics, Load Balancer, and Dependency Injection can be implemented on both the client side and the network using the same code (or most of it). And even when the functionality makes sense only on either the client-side or the network, it can be partly implemented using chunks of code that are context-agnostic and can be conveniently reused.
Furthermore, using the same API for Service Workers and Cloudflare Workers makes it easy to provide progressive enhancement. An application can execute a Service Worker whenever possible, and fall back on a Cloudflare Worker when the user visits the site for the first time (when the Service Worker is still not installed on the client), or when Service Workers are not supported (for instance, when the browser is old, or it is just Opera mini).
Finally, relying on a unique API simplifies the overall language stack, once again making it easier for the developer to get more work done. For instance, defining a caching policy for the CDN in Varnish is done through the Varnish Configuration Language, which has its own syntax. Cloudflare Workers, though, enables develpers to code the same tasks through, you guessed it, the Service Workers API.
It Leverages The Modern Toolbox
In addition to Workers not requiring developers to learn any new language or API, it follows modern conventions and provides integration with popular technologies, allowing us to use our current toolbox:
It’s time to have fun! Let’s play with some Workers based on common use cases to see how we can augment our sites or even create new ones.
Cloudflare makes available a browser-based testing tool, the Cloudflare Workers Playground. This tool is very comprehensive and easy to use: simply copy the Worker script on the left-side panel, execute it against the URL defined on the top-right bar, see the results on the ‘Preview‘ tab and the source code on the ‘Testing‘ tab (from where we can also add custom headers), and execute console.log inside the script to bring the results on the DevTools on the bottom-right. To share (or also store) your script, you can simply copy your browser’s URL at that point in time.
The Playground allows us to test-drive our Cloudflare Workers (Large preview)
Starting with the Playground will take you far, but, at some point, you will want to test on the actual Cloudflare network and, even better, deploy your scripts for production. For this, your site must be set up with Cloudflare. If you already are a Cloudflare user, simply sign in, navigate to the ‘Workers’ tab on the dashboard, and you are ready to go.
If you are not a Cloudflare user, you can either sign up, or you can request a workers.dev subdomain, under which you will soon be able to deploy your Workers. The workers.dev site is currently accepting reservations of subdomains, so hurry up and reserve yours before it is taken by someone else!
workers.dev is currently accepting reservations of subdomains (Large preview)
The most straightforward use case for Workers is to create a new site, dynamically responding to requests without needing to connect to an origin server at all. So, hello world!
Instead of printing the HTML output in the script, we can also host static HTML files with some hosting service, and fetch these with a simple Worker script. Indeed, the Worker script can retrieve the content of any file available on the Internet: While the domain under which the Worker is executed must be handled by Cloudflare, the origin website from which the script fetches content does not have to. And this works not just for HTML pages, but also for CSS and JS assets, images, and everything else.
Making the API highly dynamic by retrieving data from a database is covered too! Workers KV is a global, low-latency, key-value data store. It is optimized for quick and frequent reads, and data should be saved sparingly. Then, it is a sensible approach to input data through the Cloudflare API:
curl "https://api.cloudflare.com/client/v4/accounts/$ACCOUNT_ID/storage/kv/namespaces/$NAMESPACE_ID/values/first-key" \
-X PUT \
-H "X-Auth-Email: $CLOUDFLARE_EMAIL" \
-H "X-Auth-Key: $CLOUDFLARE_AUTH_KEY" \
--data 'My first value!'
addEventListener('fetch', event => {
 event.respondWith(handleRequest(event.request))
})

async function handleRequest(request) {
 const value = await FIRST_KV_NAMESPACE.get("first-key")
 if (value === null)
   return new Response("Value not found", {status: 404})

 return new Response(value)
}
At the time of writing, KV is still in beta and released only to beta testers. If you are interested in testing it out, you can reach out to the Cloudflare team and request access.
addEventListener('fetch', event => {
  event.respondWith(fetchAndApply(event.request))
})

async function fetchAndApply(request) {
  const name = 'experiment-0'
  let group          // 'control' or 'test', set below
  let isNew = false  // is the group newly-assigned?

  // Determine which group this request is in.
  const cookie = request.headers.get('Cookie')
  if (cookie && cookie.includes(`${name}=control`)) {
    group = 'control'
  } else if (cookie && cookie.includes(`${name}=test`)) {
    group = 'test'
  } else {
    // 50/50 Split
    group = Math.random() < 0.5 ? 'control' : 'test'
    isNew = true
  }

  // We'll prefix the request path with the experiment name. This way,
  // the origin server merely has to have two copies of the site under
  // top-level directories named "control" and "test".
  let url = new URL(request.url)
  // Note that `url.pathname` always begins with a `/`, so we don't
  // need to explicitly add one after `${group}`.
  url.pathname = `/${group}${url.pathname}`

  request = new Request(url, request)

  let response = await fetch(request)

  if (isNew) {
    // The experiment was newly-assigned, so add a Set-Cookie header
    // to the response. We need to re-construct the response to make
    // the headers mutable.
    response = new Response(response.body, response)
    response.headers.append('Set-Cookie', `${name}=${group}; path=/`)
  }

  return response
}
Because speed matters, websites are going serverless. Cloudflare Workers is a new offering that enables this transition. It blurs the boundaries between the computer and the network, enabling developers to deploy apps globally that run on the fabric of the Internet itself, leveraging Cloudflare’s worldwide network of servers to run our code near where our users are located. It is fast, cheap, and secure, and it scales as much as we need it.
A Detailed Comparison Between WordPress And October CMS
A Detailed Comparison Between WordPress And October CMS
Leonardo Losoviz
Three months ago, WordPress finally released React-powered Gutenberg to power its default content editing experience, triggering many people who are not happy with this change to look for alternatives. Some folks decided to fork and release pre-Gutenberg WordPress, however, for me this doesn’t make much sense since it still carries 15 years worth of technical debt. If I were to find an alternative to WordPress, I would try to avoid being stuck in the past, and aim for a clean cut through some mature platform built on modern foundations.
This article compares WordPress to the arguably similar yet more modern October CMS on a wide arrange of both technical and non-technical topics. The goal of the article is not to convince people to stick to WordPress or to switch to October CMS, but simply to demonstrate what aspects must be taken into account before concluding the move to a different platform. The same comparison could (and should) also be done with other platforms before making a sensible decision.
Why October CMS
I found out about October CMS when it won an award, after which I went into research mode and spent a good deal of time digging deep into this CMS — from the perspective of both a user and a developer. As I gained knowledge on this CMS, I felt confident that I could provide an objective evaluation of its features as contrasted to WordPress. I chose this CMS for the comparison over alternative options such as Grav, Statamic, ButterCMS, Joomla, Drupal, Jekyll, Hugo, and others, for the following reasons:
I know how this CMS works (unlike Grav);
It is free and open source (unlike Statamic and ButterCMS);
At five years, it is “relatively” new (unlike Joomla and Drupal);
It is a dynamic (not static) content generator and based in PHP (unlike Jekyll and Hugo).
I believe that October CMS is a good candidate because it is based on Laravel which is a framework used for building modern applications. After seven years of existence, it has received positive approval from developers (as evidenced by its sizeable community and ecosystem), and marks a distinct contrast over coding in WordPress, i.e. WordPress is mostly procedural programming while Laravel is decidedly object-oriented programming.
What’s The Difference Between The Two?
Below I will compare WordPress and October CMS on different categories and highlight what, I believe, is good and not so good about them. However, I will not pick a winner, since that’s not the objective of the article and, in any case, there is no “best” or even “better” CMS: each CMS has its own set of strengths and weaknesses that will make it more or less suitable for each task, project, company, team, and anything else. Moreover, a project may benefit from using more than one CMS, such as using some CMS to manage and provide data, and another CMS to render the view. To decide which of the dozens of CMSs out there is most suitable for your own needs is entirely up to you.
In addition, this article could never draw definitive conclusions since it is only concerned with a subset of all possibilities. For instance, we can also find online comparisons such as “WordPress vs Drupal vs Joomla”, “WordPress vs Static Site Generators” and even “WordPress vs Medium”. Because none of these articles sees the full picture, then none of these comparisons can ever be conclusive, and should not be treated as such.
Let’s start with the comparison.
Philosophy And Target Group
It is no coincidence that WordPress powers nearly 1 in 3 websites. Ever since its inception, it has strived to be extremely user-friendly and has done so successfully, removing friction for technical and non-technical users alike as well as for people from all backgrounds — irrespective of their education and economic levels. WordPress’ founder Matt Mullenweg expressed that WordPress’ motto of “Democratize Publishing” for the current era meant the following:
“People of all backgrounds, interests, and abilities should be able to access Free-as-in-speech software that empowers them to express themselves on the open web and to own their content.”
WordPress is easy to use for everyone and its inclusivity is evidenced on the development side too: It’s not uncommon to find people without a programming background (such as marketers, designers, bloggers, sales people, and others) tinkering with their WordPress installations, designing their own themes and successfully launching their own websites. WordPress is user-centric, and the needs of the users trump those of the developers. In WordPress, the user is king (or queen).
“October makes one bold but obvious assumption: clients don’t build websites, developers do. The role of a client is to manage the website and convey their business requirements. The web developer, and the industry itself, revolves around mediating these factors.”
In the words of its founders, the CMS’ mission is to “prove that making websites is not rocket science.” Being based on Laravel, October CMS can claim to have strong foundations of reusable, modular code that can produce properly-architected applications, maintainable in the long term and fully customizable without requiring hacks — the type which attracts serious programmers. October CMS can also provide a great user experience, however, it is not as simple or frictionless as that provided by WordPress. Users may need to be explained how to use certain functionality before being able to use it. For instance, embedding a form from some plugin has a lengthy explanation on how to do it, which is more cumbersome than the self-evident, drag-and-drop functionality provided by several form plugins in WordPress.
Installation
WordPress is famous for its 5-minute installation, even though many people point out that (taking into consideration all the plugins that must be installed) a typical installation requires 15 minutes or more. In addition, WordPress also offers the Multisite feature, which allows us to create a network of multiple virtual sites under a single installation. This feature makes it easy for an agency to administer the sites of multiple clients — among other user cases.
Installing October CMS is also very smooth: The Wizard installation itself takes even less than five minutes, and if you install it through the Console installation, it is even faster. You can do the latter by simply navigating to the target directory and then executing curl -s https://octobercms.com/api/installer | php (after which we need to input the database configuration, otherwise it behaves as a flat-file CMS). Once the installation has been completed, we will have a fully functioning website, but still quite bare (if you add the time needed to install and configure the required plugins, you can expect it to take at least 15 minutes).
Installing October CMS with the Wizard is a breeze. (Large preview)
Security
WordPress has been accused of being insecure due to the high amount of vulnerabilities that are constantly found. This forces users to have the software for the CMS and all installed plugins always up to date to avoid security exploits. Among the main issues is WordPress’ support for older versions of PHP which are not supported by the PHP development community anymore (WordPress currently supports PHP 5.2.4, while the latest fully supported PHP version is 5.6). However, this problem should be resolved in April 2019 when WordPress will officially start supporting PHP versions 5.6 and upwards.
Otherwise, WordPress is not necessarily insecure because of itself, but because of its high popularity, which makes it a primal target for hackers. However, this plays both ways: WordPress ubiquity means that its security team must really take their job seriously by constantly looking for exploits and fixing them as soon as possible, otherwise up to a third of the web is at risk. The stakes are just too high.
October CMS, on the other hand, doesn’t have a reputation of being insecure. However, since there are roughly 27,000 live sites that use October as compared with WordPress’ millions, we can’t judge the two of them on the same terms. Nevertheless, the team behind October CMS does take security seriously, as evidenced by the Wizard installation’s prompt to input the CMS backend URL, set as /backend by default but changeable to anything else, as to make it more difficult for hackers to target the site. In contrast, changing WordPress’ login and backend URLs from /wp-login.php and /wp-admin respectively to something else must be done through a plugin. In addition, October CMS can function as a flat-file CMS (i.e. without a database) and avoid database-related vulnerabilities such as SQL injection.
Technology Stack
Both WordPress and October CMS run on the traditional LAMP stack: Linux, Apache, MySQL, and PHP. (However, only PHP is fixed: we can also use Windows, Nginx, MariaDB, and others.) October CMS can also behave as a flat-file CMS, meaning that it can do without a database, however, at the cost of forgoing many functionalities (such as blog posts and users) the only functionality that is guaranteed is pages, which is considered to be the basic unit for the creation and publishing of content and shipped as a core feature.
Concerning the language stack, sites built with both WordPress and October CMS are based on HTML, CSS, and JavaScript (note that PHP is used to generate the HTML). October CMS also makes it easy to use LESS and SASS files.
Programming Paradigm
WordPress follows a functional programming paradigm, based on calculating computations by calling functions devoid of application state. Even though WordPress developers do not need to stick to functional programming (for instance, for coding their themes and plugins), the WordPress core code inherits this paradigm from 15 years of preserving backwards compatibility, which has been one of the pillars to WordPress’ success but which has the unintended consequence of accumulating technical debt.
Programming in WordPress could be characterized as HDD which stands for “Hook-Driven Development”. A hook is a mechanism that allows changing a default behavior or value and allowing other code to execute related functionality. Hooks are triggered through “actions” which allow executing extra functionality, and “filters” that allow modifying values.
Hooks, which are widespread across the WordPress codebase, are one of the concepts that I most like from coding in WordPress. They allow plugins to interact with other plugins (or with a core or theme) in a clean way, providing some basic support of Aspect-Oriented Programming.
Good news is that Laravel (and in consequence October CMS) also supports the concept of hooks, which is called “events”. Events provide a simple observer implementation, enabling code to subscribe and listen for events that occur in the application and react as needed. Events make it possible to split a complex functionality into components, which can be installed independently yet collaborate with each other, thus enabling the creation of modular applications.
Dependence on JavaScript Libraries
The latest version of WordPress incorporates React-powered Gutenberg for its default content creation experience. Hence, WordPress development now relies by and large on JavaScript (predominantly through React), even though it is also possible to use other frameworks or libraries (as evidenced by Elementor Blocks for Gutenberg which is based on Marionette). In addition, WordPress still relies on Backbone.js (for the Media Manager) and jQuery (legacy code), however, we can expect the dependence on these libraries to wither away as Gutenberg is consolidated as the new norm.
October CMS depends on jQuery, which it uses to implement its optional AJAX framework to load data from the server without a browser page refresh.
Pages, Themes and Plugins
Both WordPress and October CMS treat a page as the basic unit for creating and publishing content (in WordPress case, in addition to the post), support changing the site’s look and feel through themes, and allow to install and extend the site’s functionalities through plugins. Even though the concepts are the same in both CMSs, there are a few differences in implementation that produce somewhat different behavior.
In WordPress, pages are defined as content and stored in the database. As a result, page content can be created through the CMS only (e.g. in the dashboard area), and switching from one theme to another doesn’t make an existing page become unavailable. This produces an overall frictionless experience.
In October CMS, on the other hand, pages are static files stored under the theme directory. On the positive side from this architectural decision, page content can be created from an external application, such as text editors like Sublime or Visual Studio Code. On the negative side, when switching from one theme to another, it is required to manually recreate or copy the pages from the current to the new theme, or otherwise, they will disappear.
Significantly, October CMS resolves routing through pages, hence pages are used not just as containers for content but also for functionality. For instance, a plugin for blogging depends on a page for displaying the list of blog posts under a chosen URL, another page to display a single blog post under another chosen URL, and so on. If any of these pages disappear, the associated functionality from the plugin becomes unavailable, and that URL will produce a 404. Hence, in October CMS themes and plugins are not thoroughly decoupled, and switching themes must be done carefully.
October CMS enables the creation of content from external applications. (Large preview)
Core vs Plugin Functionality
WordPress attempts to deliver a minimal core functionality which is enhanced through plugins. WordPress relies on the “80⁄20 rule” to decide if to include some functionality in its core experience or not. If it benefits 80% of the users it goes in, otherwise, it belongs to plugin-land. When adding plugins to a site, they can lead to bloat if too many plugins are installed. Plugins may also not work well with one another, or execute similar code or load similar assets, resulting in suboptimal performance. Hence, whereas launching a WordPress site is relatively easy, a bigger challenge is its general maintenance and being able to preserve an optimal and performant state when adding new features.
The WordPress plugin directory claims to have almost 55,000 plugins. (Large preview)
Likewise, October CMS also attempts to deliver a minimal core functionality, but on steroids: the only guaranteed functionality is the creation and publication of pages, and for everything else we will need to install one plugin or another, which is expressed as:
“Everything you need, and nothing you don't.”
The objective is clear: most simple sites are only composed of pages, with possibly no blog posts, users or login area. So why should the application load resources for these when they are not needed? As a consequence, functionalities for blogging, user management, translation and several others are released through the plugin directory.
Searching for 'Rainlab' in October’s plugins directory displays plugins created by October CMS' team. (Large preview)
October CMS also includes certain features in its core which (even though they are not always needed) can enhance the application significantly. For instance, it provides out-of-the-box support to upload media files to Amazon S3 and accesses them through the Rackspace CDN. It also includes a Media Manager which is mostly used through plugins, e.g. for adding images into a blog post. (Pages can also use the Media Manager to embed media files, however, the CMS also ships with an Assets section to upload media files for these which seems more suitable.)
I believe that October’s opinionatedness can perfectly enable us to produce an application that is as lean as possible — mostly concerning simple sites. However, it can also backfire and encourage bloat, because the line of what is needed and what is not is an arbitrary one, and it’s difficult to be set in advance by the CMS. This difficulty can be appreciated when considering the concept of a “user”: In WordPress, website users and website admins belong to the same user entity (and through roles and privileges we can make a user become an admin). In October CMS, these two are implemented separately, shipping in core the implementation for the website administrator which can log in to the backend area and modify the settings, and through a plugin the implementation of the website user. These two types of users have a different login process and a different database table for storing their data, thus arguably breaching the DRY (Don’t Repeat Yourself) principle.
This problem arises not only concerning the behavior of an entity but also what data fields it must contain. For instance, should the website user data fields be predefined? Is a telephone field required? What about an Instagram URL field, considering that Instagram got kind of cool only recently? But then, when building a professional website shouldn’t we use a LinkedIn URL field instead? These decisions clearly depend on the application and can’t be decided by either CMS or plugin.
The October CMS plugin called User implements users but without any user field, on top of which plugin User Plus adds several arbitrary user fields, which are possibly not enough, so plugin User Plus+ adds yet other user fields. When, where and how do we stop this process?
Another problem is when there is no room to add new capabilities to an entity, which leads to the creation of another, extremely similar entity, just to support those required capabilities. For instance, October CMS ships with pages, and allows to create “static pages” through a plugin. Their nature is the same: both pages and static pages are saved as static files. The only difference between them (as far as I can tell) is that static pages are edited with a visual editor instead of the HTML editor, and can be added to menus. In my opinion, only structural differences, such as having one entity saved as a static file and the other one stored in the database, could justify creating a second entity for a page (there is a pull request to do this), but for simple features, as is the case currently, it constitutes development bloat.
In summary, a well implemented October CMS application can be very lean and efficient (e.g. by removing the database when not needed), but on the contrary it can also become unnecessarily bloated, forcing developers to implement several solutions for similar entities, and which can be very confusing to use (“Should I use a page or a static page?”). Because neither WordPress or October CMS has found a perfect solution for removing bloat, we must design either application architecture with care to avoid down-the-road pain.
Content Creation
Gutenberg makes two important contributions to WordPress: It uses components as the unit for building sites (which offers several advantages over coding blobs of HTML), and it introduces an entity called a “block” which, once Gutenberg Phase 2 is completed (presumably in 2019), will provide a unified way to incorporate content into the site, thus enabling a simpler user experience as opposed to the more chaotic process of adding content through shortcodes, TinyMCE buttons, menus, widgets, and others.
Since WordPress 5.0 Gutenberg is the default content creation experience. (Large preview)
Because Gutenberg blocks can produce and save static HTML as part of the blog post, then installing many Gutenberg blocks doesn’t necessarily translate into bloat on the website on the user side, but can be kept restricted to the admin side. Hence, Gutenberg can arguably be considered a good approach to produce websites in a modular way, with a simple yet powerful user experience for creating content. Possibly the biggest drawback is the (unavoidable, but not easily so) requirement to learn React, whose learning curve is rather steep.
If React components are the basic unit for creating content in WordPress, October CMS is based on the premise that knowing good old HTML is enough for building sites. Indeed, when creating a page, we are simply presented an HTML (Markup) editor:
If the page were solely static HTML, then there would be no need for a CMS. Instead, October CMS pages are written using Twig templates which are compiled to plain optimized PHP code. They can select a layout to include the scaffolding of the page (i.e. repetitive elements, such as the header, footer, and so on), can implement placeholders, which are defined on the layout to allow the page to customize content, and can include partials, which are reusable chunks of code. In addition, pages can include content blocks, which are either text, HTML or Markdown files that can be edited on their own and can attach components which are functionalities implemented through plugins. And finally, for whenever HTML is not enough and we need to produce dynamic code, we can add PHP functions.
The editor is all about HTML. There is no TinyMCE textarea for adding content in a visual manner — at least not through the default experience (this functionality belongs to plugin-land). Hence, having knowledge of HTML could be considered a must for using October CMS. In addition, the several different inputs for creating content (pages, layouts, placeholders, partials, content blocks, components, and PHP functions) may be very effective, however, it is certainly not as simple as through the unified block interface from WordPress. It can even get more complex since other elements can also be added (such as static pages and menus, and snippets), and some of them, such as pages and static pages, seemingly provide the same functionality, making it confusing to decide when to use one or the other.
As a result, I dare say that while pretty much anyone can use a WordPress site from the admin side, October CMS is more developer-friendly than non-technical user-friendly, so programmers may find it a joy to use, but certain other roles (marketers, sales people, and the like) may find it non-intuitive.
Media Manager
Both WordPress and October CMS are shipped with a Media Manager which allows adding media files to the site effortlessly, supporting the addition of multiple files simultaneously through a drag-and-drop interface and displaying the images within the content area. They look and behave similarly; the only notable differences I found are that WordPress’ Media Manager allows to embed image galleries, and October’s Media Manager allows to manually create a folder structure where to place the uploaded files.
October CMS ships with a powerful Media Manager. (Large preview)
Since the introduction of Gutenberg, though, WordPress’ media capabilities have been enhanced greatly, enabling to embed videos, pictures and photo galleries in place as compared to within a TinyMCE textarea (which only provides a non-accurate version of how it will look like in the site), and unlocking powerful, yet easy-to-use features as shown in this video.
Internationalization
WordPress core uses gettext to enable the translation of themes and plugins. Starting from a .pot file containing all strings to translate, we need to create a .po file containing their translation to the corresponding language/locale, and this file is then compiled to a binary .mo file suitable for fast translation extraction. Tools to perform these tasks include GlotPress (online) and Poedit (downloadable application). Conveniently, this mechanism also works for client-side localization for Gutenberg.
Poedit allows to translate strings for themes and plugins for WordPress. (Large preview)
WordPress currently doesn’t ship any solution in core to translate content, and will not do so until Phase 4 of Gutenberg (targeted for year 2020+). Until then, this functionality is provided by plugins which offer different strategies for storing and managing the translated content. For example, while plugins such as Polylang and WPML store each translation on its own row from a custom database table (which is clean since it doesn’t mix content together, but slower since it requires an additional INNER JOIN of two tables when querying the database), plugin qTranslate X stores all translations on the same field from the original database table (faster for querying the data, but content mixed all together can produce wreckage on the site if disabling the plugin). Hence, we can shop around and decide the most suitable strategy for our needs.
October CMS doesn’t ship the multilingual functionality through its core, but as a plugin created by the October CMS team that guarantees a faultless integration into the system. From a functional point of view, this plugin delivers what it promises. From a development point of view, it is not quite ideal how this plugin actually works. In WordPress, a page is simply a post with post type “page” and there is a single translation mechanism for them, but in October CMS, there are entities “page”, “static page” and “blog post” and, even though quite similar, they require three different implementations for their translations! Then, the content from a “page” can include message codes (e.g. codes called nav.content, header.title, and so on), each of which contains its translations for all locales as a serialized JSON object in database table rainlab_translate_messages. The content from a “static page” is created into a new static file per locale, however, all translated URLs for all locales are stored not in their corresponding file but instead on the default language’s file. The content for the “blog post” is stored as a serialized JSON object with one row per locale in database table rainlab_translate_attributes and the translated URL is stored with one row per locale in database table rainlab_translate_indexes. I don’t know if this complexity is due to how the plugin was implemented or whether it is due to October CMS’ architecture. Whichever the case, this is another instance of undesired bloat on the development side.
Plugin Management
Both WordPress and October CMS offer a sophisticated plugin manager which allows to search for plugins, install new plugins, and update currently-installed plugins to their latest version — all from within the backend.
October CMS enables to keep all plugins up-to-date effortlessly. (Large preview)
Dependency Management
October CMS uses Composer as the package manager of choice, enabling plugins to download and install their dependencies when being installed, thus delivering a painless experience.
WordPress, on the opposite side, hasn’t officially adopted Composer (or any PHP dependency manager) because the community can’t agree if WordPress is a site or a site dependency. Hence, if they require Composer for their projects, developers must add it on their own. With the switch to Gutenberg, npm has become the preferred JavaScript dependency manager, with a popular developer toolkit depending on it, and the client-side libraries being steadily released as autonomous packages in the npm registry.
Interaction With The Database
WordPress provides functions to retrieve database data (such as get_posts) and store it (such as wp_insert_post and wp_update_post). When retrieving data, we can pass parameters to filter, limit and order the results, in order to indicate if the result must be passed as an instance of a class or as an array of properties and others. When the function doesn’t fully satisfy our requirements (e.g. when we need to do an INNER JOIN with a custom table) then we can query the database directly through global variable $wpdb. When creating a plugin with a custom post type, the code will most likely be executing custom SQL queries to retrieve and/or save data into custom tables. In summary, WordPress attempts to provide access to the database through generic functions in the first stage, and through low-level access to the database in the second stage.
October CMS employs a different approach: Instead of connecting to the database straight away, the application can use Laravel’s Eloquent ORM to access and manipulate database data through instances of classes called Models, making the interaction with the database also be based on Object-Oriented Programming. It is high-level access; just by following the rules on how to create tables and set-up relationships among entities, a plugin can retrieve and/or save data without writing a line of SQL. For instance, the code below retrieves an object from the database through model Flight, modifies a property, and stores it again:
$flight = Flight::find(1);
$flight->name = 'Darwin to Adelaide';
$flight->save();
Upgrading The Data Model
Another reason for WordPress’ success (in addition to not breaking backward compatibility) has been its database architecture, which was engineered to enable applications to grow over time. This objective is accomplished through “meta” properties, i.e. properties that can be loosely added to a database object at any moment. These properties are not stored in a column from the corresponding entity table (either wp_posts, wp_users, wp_comments or wp_terms), but instead as a row in the corresponding “meta” table (wp_postmeta, wp_usermeta, wp_commentmeta or wp_termmeta) and retrieved doing an INNER JOIN. Hence, even though retrieving these meta values is slower, they provide unlimited flexibility, and the application’s data model rarely needs to be re-architected from scratch in order to implement some new functionality.
WordPress provides unlimited flexibility for upgrading the application’s data model. (Large preview)
October CMS doesn’t use meta properties but instead can store several arbitrary values, which are not directly mapped as columns in the database tables, as a serialized JSON object. Otherwise, when an object needs some new property, we need to add a new column on the corresponding table (which is the reason behind plugins User Plus and User Plus+, mentioned earlier on). To update the application’s database schema, October CMS relies on Laravel’s Migrations, which are sets of instructions to execute against the schema (such as add or drop a column, rename an index, etc) and which are executed when upgrading the software (e.g. when installing a plugin’s new version).
Headless Capabilities
Both WordPress and October CMS can be used as headless, i.e. treating the CMS as a content management system that makes content accessible through APIs, which allows to render the website on the client-side and can power other applications (such as mobile apps). Indeed, WordPress is steadily heading towards headless, since the Gutenberg content editor itself treats WordPress as a headless CMS (and, as a consequence, Gutenberg can also work with any other CMS too, as Drupal Gutenberg demonstrates).
A headless system needs to implement some API to return the data, such as REST and GraphQL. WordPress supports REST through WP REST API (merged in core), exposing endpoints under some predefined route /wp-json/wp/v2/...; October CMS supports REST through plugins RESTful and API Generator, which allow to create custom endpoints and, as a consequence, support versioning as part of the endpoint URL and can offer a better security against bots. Concerning GraphQL, WordPress supports it through WPGraphQL, while October CMS currently has no implementations for it.
Quite importantly, a headless system needs to offer powerful content management capabilities. As mentioned earlier on, WordPress has a very solid database architecture, offering a plethora of data entities (users, posts and custom posts, pages, categories, tags and custom taxonomies, comments) over which the application can be reasonably well modelled, meta properties to extend these data entities (enabling the application to upgrade its data model accordingly and without major changes), and with plugin Advanced Custom Fields filling the gap to construct relationships among the data entities. In addition, plugin VersionPress allows to version control the database content using Git. Hence, WordPress is undoubtedly a good fit for managing content, as demonstrated in severalprojectsinthewild.
On its part, and as mentioned earlier on, October CMS can omit the database and behave as a flat-file system, or it can have a database and behave as a hybrid, storing the content from pages as static files and blog posts (and others) on the database. As a consequence, content is not centralized, and its management involves a different approach. For instance, while we can use Git to version control pages, there is no support to version control the database per se; the solution to this is to populate data into the database through Seeders which, being code, can be put under version control and executed upon deployment. In addition, October CMS doesn’t offer a baked-in database model featuring predefined data entities that can support the needs of most applications. Hence, more likely than not the application will need custom development to implement its data model, which means more work, but also means that it can be more efficient (e.g. accessing a property from a column is faster than from a row in another table through an INNER JOIN, which is the case with WordPress’ meta properties).
CLI Support
Both WordPress and October CMS can be interacted with from the console through a Command Line Interface (CLI): WordPress through WP-CLI and October CMS through Laravel’s Artisan. In addition to Laravel’s commands, October CMS implements several custom commands for updating the system, migrating the database, and others. These tools make it very convenient to access the site from outside a browser, for instance for testing purposes.
Managed Hosting
It is not a problem finding a managed hosting provider for a WordPress site: given WordPress’ market share, there are dozens (if not hundreds) of providers out there vying with each other for the business, constituting a very dynamic market. The only problem is finding the most suitable provider for our specific sites based on all of their offerings, which can vary based on price, quality, type (shared or dedicated services), bandwidth and storage size, customer support, location, frequency of renewal of equipment, and other variables which we can navigate mainly through reviews comparing them (such as this one, this one or this one).
Even though nothing near as many as WordPress, October CMS still enjoys the offering from several hosting providers, which allows for some consideration and selection. Many of them are listed as October Partners, and several others are found DuckDuckGoing, but since I haven’t found any independent review of them or article comparing them, the task of finding out the most suitable one will take some effort.
Marketplace, Ecosystem And Cost
WordPress’ commercial ecosystem is estimated to be USD $10 billion/year, evidencing how many people and companies have managed to make a living by offering WordPress products and services, such as the creation of sites, hosting, theme and plugin development, support, security, and others. Indeed, its size is so big it is even bloated, meaning that it is very common to find different plugins solving the same problem, plugins that underdeliver, underperform or have not been updated for years, and themes which seem to look-alike each other. However, when creating a new site, the size and variety of the ecosystem also means that we will most likely find at least one plugin implementing each of the required functionalities, enabling us to save money by not having to develop the functionality ourselves, and the availability of customizable themes enables to produce a reasonably distinctive-looking site with minimal effort. As a consequence, we can easily create and launch a WordPress site for less than USD $100, making WordPress a sensible option for projects of any budget.
Being relatively new (only five years so far), OctoberCMS certainly doesn’t enjoy anything near WordPress’ marketplace and ecosystem sizes, however, it has been growing steadily so its size is bound to become bigger. Currently, its marketplace boasts 600+ plugins, and only a handful of themes. Concerning plugins, the October CMS team is requesting the community to put their effort into the creation of original plugins, delivering functionality not yet provided by any other plugin.
Hence, even though 600+ plugins doesn’t sound like much, at least these translate into 600+ different functionalities. This way, even though it is not possible to choose among several vendors, at least we can expect to have those basic website features (such as blogging, comments, forum, integration with social media, e-commerce, and others) to be covered. Also, since October’s founders are personally reviewing all submitted plugins and judging them according to quality guidelines, we can expect these plugins to perform as expected. As another plus, October plugins can incorporate elements from Laravel packages (even though not all of them are compatible with October, at least not without some hacks). Concerning themes, the low number of offerings implies we will most likely need to develop our own theme by hiring a developer for the task. In fact, I dare say that the theme in October CMS will most likely be a custom development, since themes and plugins are not thoroughly decoupled (as explained earlier), with the consequence that a market for easily-swappable themes is more difficult to arise. (This is a temporary problem though: once this pull request is resolved, pages will be able to be stored in the database, and swapping themes should not disrupt functionality.)
In my opinion, because of the smaller offerings of themes and plugins, creating a simple site with OctoberCMS will be more expensive than creating a simple WordPress site. For complex sites, however, October’s better architecture (Object-Oriented Programming and Model-View-Controller paradigms) makes the software more maintainable and, as a consequence, potentially cheaper.
Community
Being a part of and having access, WordPress’ community represents one of the most compelling reasons for using WordPress. This is not simply as a matter of size (powering nearly one third of all websites in the world, there are so many stakeholders involved with WordPress, and its community is representatively big) but also as a matter of diversity. The WordPress community involves people from many different professions (developers, marketers, designers, bloggers, sales people, and so on), from all continents and countries, speaking countless languages, from different social, educational and economic backgrounds, with or without disabilities, from corporate, not-for-profit and governmental organizations, and others. Hence, it is quite likely that, for whatever problem we encounter, somebody will be able to help on any of the support forums. And contributing to WordPress is pretty straightforward too: The Make WordPress group congregates stakeholders interested in supporting different projects (accessibility, design, internationalization, and many others) and organizes how and how regularly they communicate — mostly through some dedicated channel on its Slack workspace.
Furthermore, the WordPress community is real and tangible: it doesn’t exist just online, but it gathers offline in WordCamps and meetups all over the world; in 2018, there were a total of 145 WordCamps in 48 countries with over 45,000 tickets sold, and a total of 5,400 meetup events from 687 meetup groups. Hence, it is likely that there is a local chapter nearby which anyone can join to ask for help, learn how to use the platform, keep learning on a regular basis, and teach others as well. In this sense, WordPress is not just a CMS but, more importantly, it’s also people, and considering to leave WordPress should never be done only on its technical merits but on the power of its community, too.
WordCamp Kuala Lumpur 2017 drew more than 200 attendees, coming from several countries. (Large preview)
October CMS’ community is nothing near in size or diversity as WordPress’, even though it has been growing steadily following the increasing popularity of the software. October provides a support forum to ask for help, however, it is not very active. A Slack workspace exists which is pretty active and where, quite importantly, October’s founders participate regularly, helping make sure that all enquiries are properly addressed. This channel is a great source for learning low-level tips and tricks about the software, however, it is geared towards developers mainly: There are no channels concerning accessibility, design, internationalization, and other topics as in the WordPress community, at least not yet. Currently, there are no conferences concerning October CMS, but there is Laracon, the conference for the Laravel community.
Maintainers And Governance
Can we trust that the software will be maintained in the long term, so that if we decide to start a project today, we will not need to migrate to some other platform down the road? How many people are taking care of developing the software? And who is deciding in what direction the software moves towards?
Powering one-third of all sites in the world, WordPress is not short of stakeholders contributing to the software; hence we need not fear that the software will fall into decay. However, WordPress is going through internal deliberations concerning its governance model, with many members of the community expressing that decisions concerning WordPress’s direction are being taken unilaterally by Automattic, the company running WordPress.com. Center stage of this perception was the decision to launch Gutenberg, which many members disagreed with, and which suffered a lack of proper communication by the project leads during its development and release. As a consequence, many community members are questioning the role of “benign dictator”, which has been historically granted to WordPress’ founder and Automattic’s CEO Matt Mullenweg, and researching different governance models to find a more suitable one for the future of WordPress. It is yet to be seen if this quest produces any result, or if the status quo perseveres.
Decisions concerning October CMS’ direction are mainly taken by founders Alexey Bobkov and Samuel Georges and developer and community manager Luke Towers, which keep the project going strong. October CMS doesn’t have the luxury of having a governance problem yet: Its current concern is how to make the project sustainable by generating income for the core software’s maintainers.
Documentation
WordPress documentation in its own site is not extremely comprehensive, but it does the job reasonably well. However, when taking all of the documentation about WordPress into account from all sources, such as general sites (Smashing Magazine, CSS tricks, and many others), specialized sites (WPShout, WPBeginner, and many others), personal blogs, online courses, and so on, there is practically no aspect of dealing with WordPress that hasn’t already been covered.
October CMS doesn’t enjoy anything near the many third-party courses, tutorials or blog posts about it as much as WordPress does, however, the documentation on its site is reasonably comprehensive and certainly enough to start coding. October founders also regularly add new documentation through tutorials. One aspect that I personally enjoyed is the duplication of Laravel’s documentation into October’s documentation for everything of relevance, so the reader must not fill the gaps by him/herself and having to guess what is October’s domain and what is Laravel’s. However, this is not 100% perfect. October’s documentation uses terms originating from Laravel, such as middleware, service containers, facades and contracts, without adequately explaining what these are. Then, reading Laravel’s documentation in advance can be helpful (luckily, Laravel’s documentation is decidedly comprehensive, and Laravel’s screencasts, Laracasts, are another great source of learning, not just concerning Laravel but web development in general).
Conclusion
I set out to discover what features may be enticing for developers looking for alternatives to WordPress by comparing WordPress to a similar CMS, which I defined as being free and open source, based in PHP and producing dynamic content, and enjoying the support from some community. From the CMSs fulfilling these conditions, I chose October CMS for the comparison because of the knowledge I got about it, and because I appreciated its clean and modular coding approach as provided by Laravel, which could offer a fresh and modern perspective for building sites.
This article did not intend to pick a winner, but simply analyze when it makes sense to choose one or the other CMS, highlighting their strengths and weaknesses. There is no “best” CMS: only the most suitable CMS for a specific situation. Furthermore, anyone looking for a CMS to use on a particular project with a specific team and given a certain budget, should do some research and compare all the offerings out there to find out which one is most suitable for the particular context. It’s important not to limit to a few CMSs as I’ve done here in this article, but instead give a chance to all of them.
On a personal note, as a developer, what I found in October CMS is really appealing to me, mostly its ability to build modular applications as provided through Laravel. I would certainly consider this CMS for a new website. However, in the process of writing this article I also “rediscovered” WordPress. Being so popular, WordPress receives more than its fair share of criticisms, mostly concerning its old codebase and, since recently, the introduction of Gutenberg; however, WordPress also has certain excellent features (such as its super-scalable database model) which are seldom praised but should be taken into account too. And most importantly, WordPress should not be considered on its technical aspects alone: in particular, the size of its community and ecosystem places it a level or two above its alternatives. In a nutshell, some projects may benefit from sticking to WordPress, while others may better rely on October CMS or another platform.
As a final note, I would like to remark that exploring how another CMS works is a very rewarding activity on its own, independent of the decision reached concerning whether to use that particular CMS or not. In my case, I had been working for years on WordPress alone, and delving into October CMS was very refreshing since it taught me many things (such as the existence of PHP Standards Recommendations) which I had not been exposed to through WordPress. I may now decide to switch CMSs, or stick to WordPress knowing how to produce better code.