This article explains how to build a secure platform using HashiCorp’s stack; many of the steps are well documented, but we missed hints to iron out the wrinkles found in the process; here, we want to show how to glue together the whole procedure. We will highlight in detail the most critical parts explaining where we found issues and how we solved them, and leave references on the official tutorials, if sufficient, to prevent this article from getting too long and difficult to follow.
The Physical Architecture
As shown in the picture below, the physical architecture we want to achieve is composed of a Consul and Nomad cluster of five nodes: three of them are Control Plane nodes configured for High Availability (HA), while the remaining two are Data Plane nodes.
Precise endeavors must be done to exact standards in clean environments. Surgeons scrub in, rocket scientists work in clean rooms, and data scientists…well, we try our best.
We’ve all heard the platitude, “garbage in, garbage out,” so we spend most of our time doing the most tedious part of the job: data cleaning. Unfortunately, no matter how hard we scrub, poor data quality is often too pervasive and invasive for a quick shower.
No doubt — writing secure smart contracts is hard. Even smart contracts written by senior developers can get hacked. And since these smart contracts often hold a high monetary value, the incentive to hack them is also high. Add in the immutability of web3, and getting security right becomes even more important. As a smart contract developer, smart contract security should be your top priority.
In this article, I will walk through several of the security tools available at each stage of smart contract development. I'll review these tools, offer some opinions, and highlight some of my personal favorites.
Since years videos have been considered to be the best means of communicating with the website visitors. Whether you’ve a business website or run an informative website, placing videos on web pages can act as a convenient tool for gathering the attention of maximum web users residing in different parts of the world. Nowadays, a majority […]
Fine tuning your website through manual optimization can be tricky, but our new Safe Mode feature in Hummingbird puts that problem in the rearview.
Now, you can now test optimization in a temporary area that allows for non-permanent changes, so you can work out any kinks, then push them to your live site. For free!
Introducing Safe Mode for Manual Asset Optimization – allowing you to optimize in a private space while your users still enjoy a fully functioning site.
In this article, we’re going to look at how Safe Mode in Hummingbird works, while touching on a few related features and settings in the plugin. Plus, we’ll take a look at an additional (surprise!) feature also included in this release.
Continue reading, or jump ahead using these links:
Hummingbird makes your website faster by optimizing site performance with fine-tuned controls. Setting enhancements make things easy and efficient, giving you new ways to boost PageSpeed Insights.
First, it identifies files that can be optimized (HTML, Javascript, and CSS), then offers a variety of means (compress, combine, or move) to make that happen.
The result gives you marked improvement in your website’s performance.
There are two different modes for asset optimization in Hummingbird:
Automatic – use our preset options to optimize your assets and improve page load times.
Manual – configure each file yourself to achieve the setup best suited to your specific site needs.
Drilling down even further, there are two options within Automatic Optimization mode:
Speedy – compresses & auto-combines smaller files together, and optimizes your fonts for faster delivery.
Basic – compresses all your files to deliver a faster version of each.
Automatic mode allows for a quick setup, providing positive gains without the time commitment that manual adjustment requires.
Both of the Automatic options can be configured for Files (CSS, JavaScript), and/or Fonts.
Hummingbird lets you optimize CSS, JS, and font files.
Manual mode allows you to tinker with any and every file individually, so you can optimize your site on a very granular level.
It’s a good idea to test files one at a time to measure results; that way if something doesn’t work it’s easy to identify what caused it and revert back without issue.
We’ve mapped out specific steps for what to do in each mode, so that you can easily follow along in Hummingbird and produce optimal results.
You can see these anytime by navigating to Hummingbird > Asset Optimization > Assets, then click on the How Does it Work? text at right.
There is a page for Automatic and one for Manual; just click on the corresponding header button that you’d like to read about.
Get one-click access to summarized details on both modes of asset optimization.
If you’re just starting out with Hummingbird, we recommend selecting Automatic optimization in Speedy mode to start. As you use and test your site and the plugin further, you can switch to auto basic or manual mode to check for possible improvements.
And of course, you can always view our detailed documentation, or reach out to our customer support gurus, available 24/7/365.
Testing Changes in Safe Mode
We’re going to zero in today on optimization done in Manual, as that’s where the new Safe Mode lives.
Hummingbird’s Safe Mode allows you to test different asset optimization settings in a safe environment, without affecting your website visitors’ experience.
You’ll be able to preview your site from the frontend and check for any errors in your browser’s console, then publish your changes to go live once you’ve got everything just right.
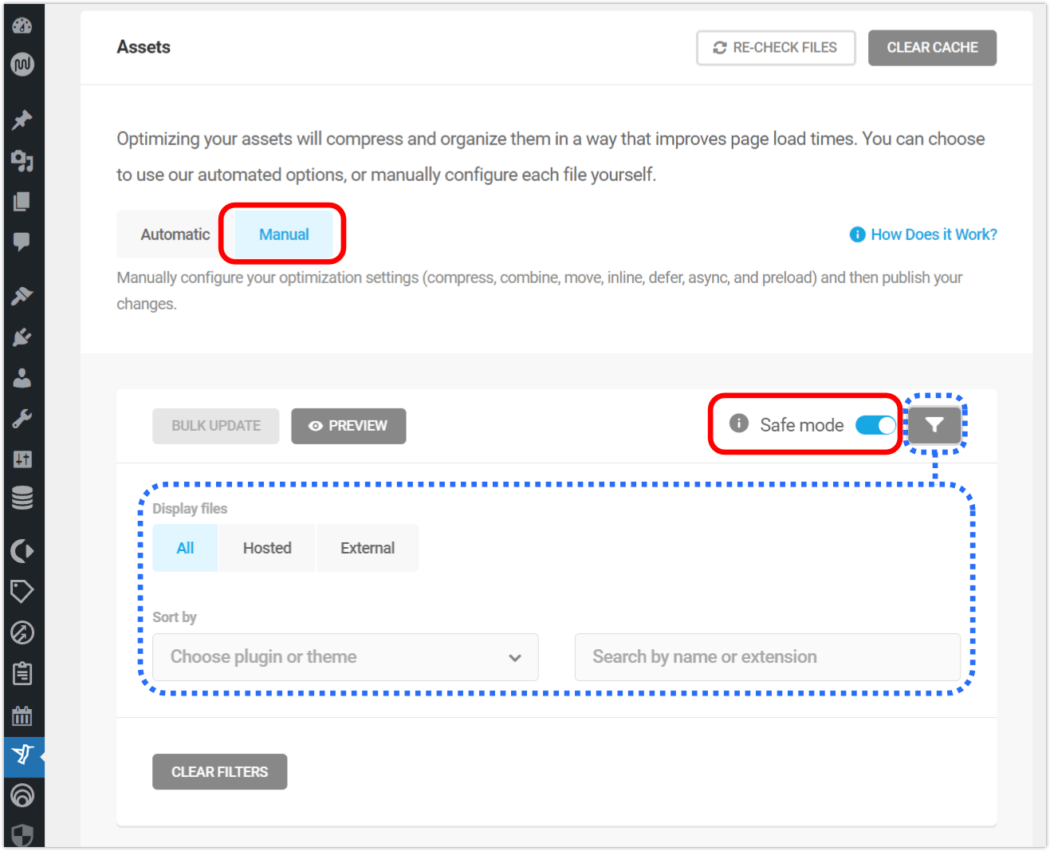
To enable this feature, go to Asset Optimization > Manual Asset Optimization, and click on the toggle button next to Safe Mode.
From here, you can also click on the filter icon, which will open a panel for finding files faster. You can free type or select from the dropdown menu.
You can filter to search for files while in Safe Mode.
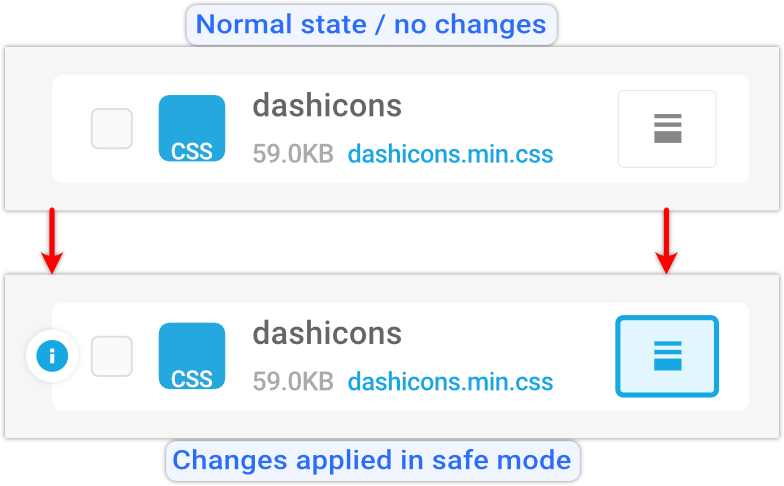
When you’re in Safe Mode, clicking on any icon box will change its state.
You will see a solid outline around it, indicating it’s been selected, and a circular info icon will also appear on the far left of the row.
These visuals are to remind you’re in preview mode, and will remain until you click Publish, committing the changes you’ve made.
Visual cues will alert you to unsaved changes.
With Safe Mode enabled, you can start tweaking your files for peak optimization.
Each asset will have a status icon indicating its current state, and these vary based on the asset they’re attached to.
As an example, the Compress option can have the following states:
Gray icon – files that are already compressed
White icon – indicates which files can be compressed
Blue icon – New assets selected for compression
Can’t be compressed – marks files that can’t be compressed
Hover your mouse over any icon for a popup description of what action this change would make.
Need info on a particular icon? Just hover over it for a status popup.
To see the effect any change makes, click the Preview button.
The Preview button shows up once you turn Safe Mode on, taking the place of the Publish Changes button.
Hitting Preview will load the frontend of your site, where you can check on the asset optimization you configured, making sure it doesn’t generate errors or break anything on your site.
What our Preview page looks like in Hummingbird’s Safe Mode.
As you can see, the preview page has three clickable buttons at the top: Go Back, Copy Test Link, and Publish.
Click on Copy Test Link if you want to gauge asset optimization you’ve made using a third-party performance test. Just paste the copied text into your preferred tool.
Click on the Publish button if you’re content with the change(s) you made, and are ready to save.
Click on the Go Back button if you’ve gotten an error message, a site break, or had no observable performance improvements, so you can continue to tweak your assets further.
Once you’ve completed this exercise, turn Safe Mode OFF, as leaving it on can cause page load delays on your live site.
And there you go! Maximum optimization achieved, which is completely changeable at any time.
What’s The Other New Feature in Hummingbird 3.4?
There’s another new feature in the latest release that I wanted to mention, as it’s sure to make your search experience in Hummingbird better.
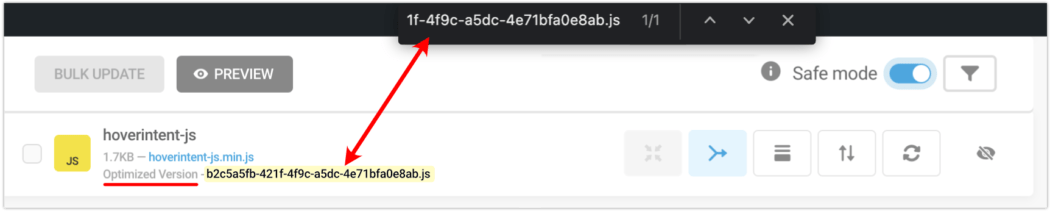
In the past, if you were working with a particular encrypted file from your performance test reports, locating it on the Manual Asset optimization tab by filename was a bit messy.
That was because Hummingbird generates special filenames for optimized files, and there was no direct way to find them there. Until now!
Copy filenames, then use Ctrl/Cmd+F to quickly find them in the browser search.
With this release, you can copy filenames from the performance reports, then look them up directly in the browser search in the Manual Asset Optimization tab.
This makes finding optimized files easier and faster.
Get Your Site Humming with Optimal Performance
Hummingbird is the ultimate performance suite for all users – whether you’re looking for simple, one-click solutions, or want to fine-tune your site performance down to the last CSS file.
You’ll get faster loading pages and higher search rankings and PageSpeed scores with Hummingbird’s speed optimization.
Now with Safe Mode for asset optimization, you can manually configure and test any files without worrying about a site break or interrupting the visitor experience on your site.
Hummingbird is only one of our highly rated and multi-functional Pro plugins. You can try them all – along with WPMU DEVs membership or hosting – for free! Everything comes with our money-back guarantee, fully supported by our always on-call, 5-star support.
We’ll help you keep your sites humming and your clients happy.
Ask any Gen Z or even Millennial: What makes a business stand out? And you’ll likely receive answers that touch on accessibility and relatability. Two of these factors weigh heavily on modern consumers because they want to support brands that share their ethos or values, and they also want them to be easily obtained.
When you think about how people used to walk to stores and browse around with no internet references, that’s archaic behaviour because everything now is driven by technology. A simple meal is no longer just walking into a restaurant or cafe and just filling up your tummy, it’s a flurry of searches to make sure that it checks the consumer’s expectations, whether from the yummy factor to how Instagrammable it is. If you think that travel is safe from this consumer behaviour, it cannot be further from the truth.
Do you want to show random quotes in the WordPress sidebar?
Displaying quotes from happy customers can convince more visitors to buy your products. Or you might simply want to brighten your audience’s day by showing them a random inspirational quote.
In this article, we will show you how to easily show random quotes in the WordPress sidebar by using a free plugin.
How to Show Random Quotes in Your WordPress Sidebar
You can show random quotes in the WordPress sidebar using the Quotes and Tips plugin. It lets you add an unlimited number of quotes to your site.
It also lets you display quotes on any page, post, or widget area, including your WordPress sidebar.
First, you’ll need to install and activate the plugin. If you need help, then please see our guide on how to install a WordPress plugin.
After activating the plugin, you can start adding quotes. To add your first quote, go to Quotes » Add New.
First you’ll need to type a title for your quote into the ‘Add Title’ field. In a later step, we’ll show you how to choose whether or not to display the quote’s title to your visitors, or use it for internal reference only.
Next, type your quote into the text editor. In our example, we’re using a quote from a case study.
You may want to organize your quotes into categories. This becomes important when it’s time to display your quotes.
Basically, you have two options.
The Quotes and Tips plugin can select a random quote from all of the quotes you’ve added. Or, it can select a random quote from a specific quote category.
For example, if you have an online store, you might want to display quotes about a specific product on that product page only.
If you already have some categories in mind, then it makes sense to organize your quotes into these categories now. But you can always add, remove, and edit your categories later. We’ll be covering that at the end of the post.
If you do want to create a quote category now, then you can find the Quotes Categories box on the right side of the page.
To add your category, first click on the ‘Add New Quotes Category’ link.
A field will display where you can type your category name. The category won’t appear to your visitors, so it’s just for your reference.
After you type it in, click on the ‘Add New Quotes Category’ button.
This category will now appear in the Quotes Category tab. To add the current quote to this category, simply select the category’s checkbox.
You can keep repeating these steps to create more quote categories.
Next, you’ll typically want to show where a quote comes from. This might be a valued customer, a famous brand, or even a celebrity.
To assign your quote to a person or company, scroll down to the ‘Name and Official Position’ section.
You can now type the person or company’s name into the Name field.
You might also want to add this person’s job title, or some information that explains why they’re qualified to make this statement. You can type this information into the Official Position field.
When you’re happy with your quote, click on the Publish button.
You can now repeat these steps to create all of the quotes that you want to show in your WordPress sidebar.
Configuring Your Quotes and Tips Settings
After creating your quotes, it’s time to take a look at the Quotes and Tips settings. This contains some important settings that control how and when your site displays a random quote.
To take a look at these settings, go to Tips » Settings.
By default, Quotes and Tips will display a new quote every time the page reloads. This means visitors will see a new quote every time they visit a new page or press the Refresh button in their web browser.
If you prefer, you can display a new quote automatically every few seconds or minutes. The visitor doesn’t even have to refresh their web browser.
To do this, select ‘AJAX (no page reload).’ You can then find the Change Frequency field. Here, simply type how frequently WordPress should display a new quote in seconds.
Next, it’s time to choose the title that will appear above your quote.
The default setting is ‘Set Title From Post’. This will display the title you entered when adding the quote to WordPress.
Another option is creating a title that WordPress will use for all of your quotes. This might be something such as ‘Words of Wisdom’ or ‘Don’t take our word for it! Here’s what our customers think’ for testimonials.
To use the same title for all your quotes, click on ‘Set Custom Titles.’ You can now type your title into the Quote Title field.
When you’re finished, don’t forget to click on the Save Changes button.
How to Display a Random Quote
Now it’s time to display your quotes.
Let’s start by showing a random quote from your entire quote collection. If you’ve created multiple categories, then this method will ignore all of these categories.
You can add your quote to any page, post, or widget using the Quotes and Tips shortcode. To get this shortcode, go to Quotes » Settings.
Now, copy the shortcode in the ‘Quotes and Tips’ section.
Another option is to simply copy the following: [quotes_and_tips]
Since we want to show random quotes in the WordPress sidebar, you’ll need to go to Appearance » Widgets. This shows all the areas of your site that support widgets.
This screen may look slightly different depending on your WordPress theme. However, most modern WordPress themes have a sidebar.
Find the Main Sidebar or similar section, and give it a click. This section will now expand.
You need to add a Shortcode block to this widget, so click on the + button. In the search field, type Shortcode.
You can now select the Shortcode block when it appears. Next, either paste or type the shortcode into this block.
Finally, click on the blue Update button at the top of the screen. Now, if you visit your website you should see a random quote in your WordPress sidebar.
How to Display Random Quotes From a Specific Category
Another option is to display a quote from a specific quote category.
To display a random quote from a particular category, you’ll need to use a different shortcode.
To get this code, head over to Quotes » Quote Category.
Here, you’ll find a list of all the categories you’ve created. Each category has its own shortcode.
Simply find the category that you want to use, and copy its shortcode. You can then paste this shortcode into any page, post, or widget, following the same process above.
How to Style and Brand Your Random Quotes
By default, Quotes and Tips adds a blue background to the quote area. It also uses a background image of silhouettes.
You can change this default styling to better match the rest of your website’s design. You can even remove the styling completely.
To change the background color, text color, or background image, go to Quotes » Settings.
In the left menu, click on the Appearance tab.
You can now change the background color and text color, by clicking on the Select Color button.
This adds an area where you can choose your perfect color.
If you change your mind, you can restore the plugin’s default colors at any point. Simply click on the Default button.
You can also change the background image. To remove the default background image, scroll to Background Image, and then click on the None button.
You can also add your own background image.
Using your company or product logo as a background image can be a great way to brand your quotes.
To upload a new background image, click on the Custom button. This adds a Choose File button.
Give this button a click. This will open a window where you can select the file that you want to use as your background image.
After making your choice, you can customize how this image looks on your site.
This includes changing the background image alignment and the opacity, which is how transparent the background image is.
Why not experiment, to see what different effects you can create?
How to Add, Edit and Delete Quote Categories
Sometimes, you may want Quotes and Tips to display a completely random quote.
Other times, you may need more control over the kind of quotes that it displays.
You can do this using quote categories. We’ve already seen how to create a category when adding a new quote. However, Quotes and Tips has an entire menu where you can make changes to these categories, and create new ones.
To see these settings, go to Quotes » Quotes Categories.
Here, you can quickly and easily create quote categories. To add a new category, type a name for your category into the Name field.
By default this plugin creates each quote category as a parent category.
Another option is to create a subcategory. For example, you might have an OptinMonster parent category, and then create subcategories for your different promotions, such as ‘OptinMonster summer sale’ and ‘OptinMonster holiday promotion.’
To create a quote subcategory, you’ll need to select a Parent Category.
When you’re happy with your quote category, click on the blue Add New Quotes Category button.
You can also edit any of the categories you created earlier.
To edit a category, hover over it. Then, click on the Edit link when it appears.
This launches a new page where you can make changes to this category. This includes editing the category’s name, and choosing a new parent.
There’s been a lot of hype lately around the CSS :has()pseudo-class. And rightly so! It’s basically the “parent selector” we’ve been asking for for years. Today I want to focus on ways we can use :has() to make HTML forms even better.
Preface
In this article I’ll be working with custom form controls that look like this:
This two-part series explores from a persistence perspective topics such as application architecture, code design, framework solutions, traps, and news of the Jakarta EE world that can help you design and architect better solutions in the upcoming years.
In part one, we coved how potential behaviors that can add extra processing and resource consumption to your database's integration and got up to date with news on what's out there and what's coming for Java applications that rely on relational data storage integration.
TiDB, an open-source NewSQL database, features horizontal scalability, which shelters users from the complexity of cross-shard queries and operations. However, when users migrate from a sharding solution to TiDB, the complexity is still there. The TiDB Data Migration (DM) tool supports full data migration and incremental data replication from sharding databases to TiDB.
This article explains how Sync, DM’s core component, processes Data Manipulation Language (DML) statements through the binlog replication workflow. It covers how Sync reads, filters, routes, converts binlog events, and optimizes executions.
Being able to quickly spin up a WordPress instance has been the strength of WordPress ever since its famous “five-minute install”. Upload a few files, configure a few settings, and you’re off.
The friction of uploading files has gotten a lot easier, thanks to plenty of “one-click” install options many hosts offer (including DigitalOcean and Cloudways).
Some companies have tried to abstract the process even more, using the multi-site features of WordPress to fire up disposable instances for testing and demos. WordPress Sandbox and WP Sandbox come to mind. Scaling can be an issue here, as instances run on the same install adding lag to the entire network. I worked on a headless WordPress project that did this in the background for users, and I recall the incredibly long wait it would take users to create a new account as the number of sites in the network piled up.
Enter WordPress Playground. It runs entirely in the browser which is mindblowing to me as a long-time WordPress user. If you’re having a hard time wrapping your head around how it all works like I did, that link to the overview spells it out nicely:
Dang, that’s cool. The move to SQLite is especially interesting, as it could bring huge performance gains to many sites that might not need the full heft of WordPress — a “WordPress Lite” as Chris recently described it in a different context. In fact, that work is already happening in the experimental WordPress performance plugin.
The evolution to a light, frictionless WordPress is a fun space to watch. I imagine there’s a good chunk of existing WordPress sites that stand to benefit from a slimmed-down CMS. The demo offers a glimpse at what an onboarding experience for that sort of thing could look like.
We are getting together for a new project, to build a 2-way API connectivity tool for programmers experimenting with new forms of e-commerce, and merchants operating across a range of e-commerce platforms. We would be grateful for any programming language choosing tips. We are looking for an experienced Full-stack/API Engineer to join our small team, to help us move fast and build a low latency and highly secure data exchange. Ideally someone thats experienced in backend engineering and building scalable API products, but to also know Javascript, because of our frontend work which is underway. We are not sure which language would be the best for our backend in this case. Could anyone help suggest where else we could post this requirement to find a knowledgable programmer to join us with this project?
Message-passing applications are one of the main components of reliable distributed systems; above all, they make it feasible to decouple the "when" and "where" of a problem from "who does it how." Event-driven applications go one step further and give you the causal chain of your system as a first-class citizen.
While the difference between an event-driven system and one that’s not event-driven is pretty clear and obvious to most software engineers, there are a gazillion ways to design such a system. Each has its own trade-offs and is useful in a specific context. The one I’m going to talk about in this article is modeling applications as state machines that compose and form a fractal-like structure — as each component is an application, and composed ones are also the same kind of application.
In a previous article, I introduced the open-source test tool JMeter and used a simple HTTP test as an example to demonstrate its capabilities. This article shows you how to build test scripts for complex test scenarios.
The user interface displays a JMeter test script in the "tree" format. The saved test script (in the .jmxformat) is XML. The JMeter script tree treats a test plan as the root node, and the test plan includes all test components. In the test plan, you can configure user-defined variables called by components throughout the entire test plan. Variables can also thread group behavior, library files used in the test, and so on. You can build rich test scenarios using various test components in the test plan.
This tutorial will discuss how to build an Android image feed application using Amity Social Cloud. By the end of this tutorial, you will have built your own social app capable of algorithmically ranking image posts in an aggregated feed from your community.
We’ll start with prerequisites for creating a new network in Amity Portal and a project in Android Studio. Then we’ll discuss how to create the Gradle setup and initialize the Social SDK. After this, we’ll go through the implementation, and finally, we'll code the components and build out the screens.
The financial applications that make it easier to invest money or trade stocks are currently rapidly taking over the investing business. Online, there are millions of brokerage houses, investment businesses, and fintech consulting organizations. As...