I have been working in the sales business for some time explaining a webinar for aliexpress with a lot of information so that you can become an expert on the subject and meet all the expectations achieved to maximize sales, already know my website people with all the tricks and tools in marketing sales any questions ask me I'm here to teach but also to learn is an interesting forum
Accessible SVGs: Perfect Patterns For Screen Reader Users
While Scalable Vector Graphics (SVGs) were first introduced in the late 90s, they have seen a massive resurgence in popularity in the last decade due to their extreme flexibility, high fidelity, and relative lightness in a world where bandwidth and performance matter more than ever. Advancements in JavaScript and the introduction of CSS media queries such @prefers-color-scheme and @prefers-reduced-motion have extended the functionality of SVGs way beyond their initial use case of simply displaying vector images on a website.
As SVG technology advances, our understanding of how we design and develop SVGs needs to advance as well. Part of that advancement includes considering the impact of such designs and code on actual humans, aka our end users.
This article outlines twelve distinct SVG patterns found “in the wild” and each alternative description announced when accessed by different combinations of operating systems, browsers, and screen readers.
Of course, the following examples are not meant to be an exhaustive list of all the possible patterns being used in the digital sphere, but they do highlight some of the more popular or ubiquitous SVG patterns you might encounter. Continue reading to discover which SVG patterns you should avoid and which patterns are the most inclusive!
Basic Alternative Descriptions Using The <img> Tag
The first group of four patterns utilizes the <img> tag linking out to an SVG file. This is a good choice for basic, uncomplicated images on your website, app, or other digital product. While the drawback to using this pattern is that you cannot easily control many visual elements or animations as an inline SVG, this pattern should render lighter and faster images overall and allow for easier maintenance on SVGs that you use in multiple locations.
Pattern #1: <img> + alt="[words]"

<img role="img" class="fox" alt="What does the fox say?" src="https://upload.wikimedia.org/wikipedia/commons/3/39/Toicon-icon-fandom-howl.svg">
Pattern #2: <img> + role="img" + alt="[words]"

<img role="img" class="fox" alt="What does the fox say?" src="https://upload.wikimedia.org/wikipedia/commons/3/39/Toicon-icon-fandom-howl.svg">
Pattern #3: <img> + role="img" + aria-label="[words]"
<img role="img" class="fox" aria-label="What does the fox say?" src="https://upload.wikimedia.org/wikipedia/commons/3/39/Toicon-icon-fandom-howl.svg">
Pattern #4: <img> + role="img" + aria-labelledby="[ID]"

<p id="caption1" class="visually-hidden">What does the fox say?</p>
<img role="img" aria-labelledby="caption1" class="fox" src="https://upload.wikimedia.org/wikipedia/commons/3/39/Toicon-icon-fandom-howl.svg">
Basic Alternative Descriptions Using The <svg> Tag
The second group of four patterns utilizes the <svg> tag with an inline SVG file. Although adding the SVG code directly into the markup could potentially make the page a bit slower to load, that minor inefficiency will be offset by having more control over the visual elements or animations of your images. By adding your SVG to the HTML directly, you also have more options when it comes to providing image information to your screen reader users.
Pattern #5: <svg> + role="img" + <title>
<svg role="img" ...>
   <title>What does the fox say?</title>
   [design code]
</svg>
Pattern #6: <svg> + role="img" + <text>

<svg role="img" ...>
   <text class="visually-hidden" font-size="0">What does the fox say?</text>
   [design code]
</svg>
Pattern #7: <svg> + role="img" + <title> + aria-describedby="[ID]"

<svg role="img" aria-describedby="fox7" ...>
   <title id="fox7">What does the fox say?</title>
   [design code]
</svg>
Pattern #8: <svg> + role="img" + <title> + aria-labelledby="[ID]"

<svg role="img" aria-labelledby="fox8" ...>
   <title id="fox8">What does the fox say?</title>
   [design code]
</svg>
Extended Alternative Descriptions Using The <svg> Tag
The last group of four patterns utilizes the <svg> tag with an inline SVG file, much like the second group. However, in this case, we are extending the simple alternative descriptions with additional information due to the complexity of the image.
This would be a good pattern choice for more complicated images that need more explanation. However, it is important to keep in mind that there are some people with disabilities — like cognitive disorders — who might benefit from having this additional image information readily available on the screen instead of buried in the SVG code.
Depending on the type and amount of information you need to add to your SVG, you might consider taking a different approach altogether.
Pattern #9: <svg> + role="img" + <title> + <text>
<svg role="img" ...>
   <title>What does the fox say?</title>
   <text class="visually-hidden" font-size="0">Will we ever know?</text>
   [design code]
</svg>
Pattern #10: <svg> + role="img" + <title> + <desc>

<svg role="img" ...>
   <title>What does the fox say?</title>
   <desc>Will we ever know?</desc>
   [design code]
</svg>
Pattern #11: <svg> + role="img" + <title> + <desc> + aria-labelledby="[ID]"

<svg role="img" aria-labelledby="fox11 description11" ...>
   <title id="fox11">What does the fox say?</title>
   <desc id="description11">Will we ever know?</desc>
   [design code]
</svg>
Pattern #12: <svg> + role="img" + <title> + <desc> + aria-describedby="[ID]"

<svg role="img" aria-describedby="fox12 description12" ...>
   <title id="fox12">What does the fox say?</title>
   <desc id="description12">Will we ever know?</desc>
   [design code]
</svg>
See the full CodePen Accessible SVG Pattern Comparison (Fox Version) by Carie Fisher.
SVG Pattern Winners And Losers
By running various screen readers on different combinations of operating systems and browsers, we see definite patterns emerging in the final results table. There are some clear SVG pattern winners and losers, plus a few patterns somewhere in the middle that you could implement as long as you are aware of, and can accept their limitations. Looking over the results table, we can conclude the following:
Basic Alternative Descriptions Using The <img> Tag (Group 1)
Best In Show
- Pattern 2:
<img> + role="img"+alt="[words]" - Pattern 3:
<img>+role="img"+aria-label="[words]"
Use Caution
- Pattern 4:
<img>+role="img"+aria-labelledby="[ID]"
Not Recommended
- Pattern 1:
<img>+alt="[words]"
Basic Alternative Descriptions Using The <svg> Tag (Group 2)
Best In Show
- Pattern 5:
<svg>+role="img"+<title> - Pattern 8:
<svg>+role="img"+<title>+aria-labelledby="[ID]"
Use Caution
- Pattern 7:
<svg>+role="img"+<title>+aria-describedby="[ID]"
Not Recommended
- Pattern 6:
<svg>+role="img"+<text>
Extended Alternative Descriptions Using The <svg> Tag (Group 3)
Best In Show
- Pattern 11:
<svg>+role="img"+<title>+<desc>+aria-labelledby="[ID]"
Note: While this pattern is not perfect as it repeated alternative descriptions, it did not ignore any of the elements in the testing, unlike the “use caution” patterns.
Use Caution
- Pattern 9:
<svg>+role="img"+<title>+<text> - Pattern 10:
<svg>+role="img"+<title>+<desc> - Pattern 12:
<svg>+role="img"+<title>+<desc>+aria-describedby="[ID]"
Not Recommended
- None of the patterns in this group completely failed the tests.
Testing Results
See the Pen Testing Results by Carie Fisher.
Wrapping Up
It is important to note that part of interpreting the results of the SVG pattern tests is understanding that creators of each screen reader have a recommended browser(s) that they fully support. This doesn’t mean you shouldn’t or couldn’t use a screen reader on a different browser, this just means that if you do, the results may not be as accurate as if you used the recommended one(s).
The pattern testing for this article did include some combinations of browsers and screen readers that may fall into the “fringe” category, but there are also notes on which combinations of operating systems, browsers, and screen readers are recommended for your own testing. The results of these tests should help you make the best SVG pattern decision possible, based on your pattern needs and constraints.
A reminder that before you settle on a pattern, please make sure you know the basics of how and when to create accessible images and that you fully understand the required alternative information needed for the different image types.
If you need additional help deciding on which pattern to use for your environment, check out the article Good, Better, Best: Untangling The Complex World Of Accessible Patterns to help you navigate the tricky waters of accessible patterns. Armed with all of this information and just a little bit of effort, your SVGs are well on their way to being more inclusive to all.
Editor’s note: You can learn best practices on accessibility with Carie in her upcoming online workshop on Accessible Front-End Patterns — with guidelines, testing tools, assistive technology and inclusive design patterns. Online, and live.
Undefined array key in php _post
Hi everyone here,
I'm trying to show information about the material according to the year of meeting(is a meeting when they decide to buy a new material)
so I use a drop-down list and the information will show according to the year chosen by the user, but it shows the error as is mentioned in the title.
this the code.
Thanks in advance.
<!DOCTYPE html>
<html>
<head>
  <title></title>
</head>
<body>
<div class="container">
<form method="POST" action="" name="form">
   <div class="row">
    <div class="col-25">
      <label for="year">annee marche</label>
    </div>
    <div class="col-75">
    <?php
require("connexion.php");
$sql = "SELECT DISTINCT(annee) FROM  marche";
 $result = mysqli_query($conn, $sql);
 print '<select name="year">';
 if (mysqli_num_rows($result) > 0) {

  while($row = mysqli_fetch_assoc($result)) {

print '<option value="'.$row ['annee'].'" >'.$row ['annee'].'</option>';
}}
print '</select>';
?>
  </div></div>

</form>
</div>
<div >
<table class="table">
  <thead>
      <tr>
    <th>material</th>
    <th>serial number</th>
    <th> inventory number </th>
    <th>type</th>
    <th>state</th>
    <th>number_meeting</th>
    <th></th>
    <th></th>
    <th></th>
    <th></th>
  </tr>
  </thead>
  <tbody>
  <?php  require("connexion.php");
  //  if ($_SERVER["REQUEST_METHOD"] == "POST"){
          $an=mysqli_real_escape_string($conn,$_POST["year"]);
            $sql="SELECT id_mat, libelle_mat, num_serie, num_inv,etat,libelle_type,num_mar FROM materiel,type,marche WHERE type.id_type_mat=materiel.id_type_mat
          AND marche.id_mar=materiel.id_mar
            AND marche.annee =".$an;
          $result = mysqli_query($conn, $sql);
          if (mysqli_num_rows($result) > 0) {
                // Parcourir les lignes de rsultat
              while($row = mysqli_fetch_assoc($result)) {

                       echo "<tr><td>".$row["libelle_mat"]
                      ."</td><td>".$row["num_inv"]
                      ."</td><td>".$row["num_serie"]
                      ."</td><td>".$row["libelle_type"]
                      ."</td><td>".$row["etat"]
                      ."</td><td>".$row["num_mar"]
                      ."</td><td><a href=\"modify.php?id_mat=".$row["id_mat"]."\"></a>"
                      ."</td><td><a href=\"supp.php?id_mat=".$row["id_mat"]."\" onclick=\"confirm('   ')\"></a></td><td><a href=\"showrepa.php?id_mat=".$row["id_mat"]."\"></a>"
                      ."</td><td><a href=\"bureaux.php?id_mat=".$row["id_mat"]."\"></a>"
                      ."</td></tr><br>";


            }
          }
        ?>
  </tbody>
</table></div>
</body>
</html>How to Code a Crosshair Mouse Cursor with Distortion Hover Effect
Today I’d like to show you how to code a special cursor effect. Custom cursors have been very popular and there’s so many creative possibilities that can enhance a certain design and an interaction logic.
Let’s have a look how to create a fullscreen crosshair cursor in SVG and how to distort the cursors’s lines with an SVG filter when hovering over links. We’ll also add a nice hover animation for some menu items using Splitting.js.
The Markup
For the SVG cursor we want a singe SVG for each line that has enough of space to get the distortion effect applied to it:
<div class="cursor">
	<svg class="cursor__line cursor__line--horizontal" viewBox="0 0 200 20" preserveAspectRatio="none">
		<line class="cursor__line-element" x1="0" y1="10" x2="200" y2="10" shape-rendering="crispEdges" vector-effect="non-scaling-stroke" />
	</svg>
	<svg class="cursor__line cursor__line--vertical" viewBox="0 0 20 200" preserveAspectRatio="none">
		<line class="cursor__line-element" x1="10" y1="0" x2="10" y2="200" shape-rendering="crispEdges" vector-effect="non-scaling-stroke" />
	</svg>
</div>
We’ll add the filters like this:
<div class="cursor">
	<svg class="cursor__line cursor__line--horizontal" viewBox="0 0 200 20" preserveAspectRatio="none">
		<defs>
			<filter id="filter-noise-x" x="-50%" y="-50%" width="200%" height="200%"
			filterUnits="objectBoundingBox">
				<feTurbulence type="fractalNoise" baseFrequency="0" numOctaves="1" result="warp" />
				<feOffset dx="-30" result="warpOffset" />
				<feDisplacementMap xChannelSelector="R" yChannelSelector="G" scale="30" in="SourceGraphic" in2="warpOffset" />
			</filter>
		</defs>
		<line class="cursor__line-element" x1="0" y1="10" x2="200" y2="10" shape-rendering="crispEdges" vector-effect="non-scaling-stroke" />
	</svg>
	<svg class="cursor__line cursor__line--vertical" viewBox="0 0 20 200" preserveAspectRatio="none">
		<defs>
			<filter id="filter-noise-y" x="-50%" y="-50%" width="200%" height="200%"
			filterUnits="objectBoundingBox">
				<feTurbulence type="fractalNoise" baseFrequency="0" numOctaves="1" result="warp" />
				<feOffset dy="-30" result="warpOffset" />
				<feDisplacementMap xChannelSelector="R" yChannelSelector="G" scale="30" in="SourceGraphic" in2="warpOffset" />
			</filter>
		</defs>
		<line class="cursor__line-element" x1="10" y1="0" x2="10" y2="200" shape-rendering="crispEdges" vector-effect="non-scaling-stroke" />
	</svg>
</div>
Let’s set up our menu with some data-splitting attributes:
<nav class="menu">
	<a href="#content-1" class="menu__item">
		<span data-splitting class="menu__item-title">Maputo</span>
		<span data-splitting class="menu__item-sub">Nights</span>
	</a>
	<a href="#content-1" class="menu__item">
		<span data-splitting class="menu__item-title">Gaborone</span>
		<span data-splitting class="menu__item-sub">Vibes</span>
	</a>
	<a href="#content-1" class="menu__item">
		<span data-splitting class="menu__item-title">Kinshasa</span>
		<span data-splitting class="menu__item-sub">Walks</span>
	</a>
</nav>
The CSS
First, we need to hide our cursor by default, and we just want to show it if the user has a pointing device, like a mouse. So we add a media query with the any-pointer media feature:
.cursor {
	display: block;
}

@media (any-pointer:fine) {
	.cursor {
		position: fixed;
		top: 0;
		left: 0;
		display: block;
		pointer-events: none;
		z-index: 1001;
	}

	.no-js .cursor {
		display: none;
	}

	.cursor__line {
		position: fixed;
		display: block;
		will-change: transform, opacity;
	}

	.cursor__line--horizontal {
		top: -10px;
		left: -10%;
		width: 120%;
		height: 20px;
	}

	.cursor__line--vertical {
		left: -10px;
		top: -10%;
		height: 120%;
		width: 20px;
	}

	.cursor__line-element {
		fill: none;
		stroke: var(--cursor-stroke);
		stroke-width: var(--cursor-stroke-width);
	}

}
The variables are define in the body.
For the menu, we’ll use some flexbox magic to lay out the menu items beneath each other:
.menu {
	display: flex;
	flex-direction: column;
	width: 100vw;
	height: calc(100vh - 13rem);
	position: relative;
	justify-content: flex-start;
	align-items: center;
}

.menu {
	text-align: center;
	padding-top: 10vh;
}

.menu__item {
	display: inline-block;
	margin-bottom: 3rem;
	text-decoration: none;
	color: var(--color-menu);
	font-family: vortice-concept, sans-serif;
}

.menu__item-title {
	line-height: 1;
	font-size: 7.5vw;
}

.menu__item-sub {
	font-size: 1.5vw;
	display: block;
}

@media screen and (min-width: 53em) {
	.menu {
		height: 100vh;
		justify-content: center;
	}
}
The JavaScript
Let’s create our custom cursor. So we have two SVGs, one for each line. As we saw in the markup earlier, each one of the SVGs will include a filter that we’ll apply to the respective line when hovering over a menu link.
Let’s start coding the entry JavaScript file (index.js):
import { Cursor } from './cursor';

// initialize custom cursor
const cursor = new Cursor(document.querySelector('.cursor'));

// mouse effects on all links
[...document.querySelectorAll('a')].forEach(link => {
    link.addEventListener('mouseenter', () => cursor.enter());
    link.addEventListener('mouseleave', () => cursor.leave());
});
Now, let’s create a class for the cursor (in cursor.js):
import { gsap } from 'gsap';
import { getMousePos } from './utils';

// Track the mouse position and update it on mouse move
let mouse = {x: 0, y: 0};
window.addEventListener('mousemove', ev => mouse = getMousePos(ev));

export class Cursor {
    constructor(el) {
    }
    // hovering over a link
    enter() {
    }
    // hovering out a link
    leave() {
    }
    // create the turbulence animation timeline on the cursor line elements
    createNoiseTimeline() {
    }
    // render styles and loop
    render() {
        // ...
        requestAnimationFrame(() => this.render());
    }
}
What we do here is to update the mouse position as we move the mouse around. For that, we use the getMousePos function (in utils.js).
Let’s move on to the next interesting part:
...
constructor(el) {
    // main DOM element which includes the 2 svgs, each for each line
    this.DOM = {el: el};
    // both horizontal and vertical lines
    this.DOM.lines = this.DOM.el.children;
    [this.DOM.lineHorizontal, this.DOM.lineVertical] = this.DOM.lines;
    // hide initially
    gsap.set(this.DOM.lines, {opacity: 0});
    ...
}
...
We initialize the line DOM elements and hide them initially.
We want to update the lines transform (translation values) as we move the mouse. For that, let’s create an object that stores the translation state:
...
constructor(el) {
    ...
    // style properties that will change as we move the mouse (translation)
    this.renderedStyles = {
        tx: {previous: 0, current: 0, amt: 0.15},
        ty: {previous: 0, current: 0, amt: 0.15}
    };
    ...
}
...
With interpolation, we can achieve a smooth animation effect when moving the mouse. The “previous” and “current” values are the values we’ll be interpolating. The current value of one of these “animatable” properties will be one between these two values at a specific increment. The value of “amt” is the amount to interpolate. As an example, the following formula calculates our current translationX value:
this.renderedStyles.tx.previous = lerp(this.renderedStyles.tx.previous, this.renderedStyles.tx.current, this.renderedStyles.tx.amt);
...
constructor(el) {
    ...
    // svg filters (ids)
    this.filterId = {
        x: '#filter-noise-x',
        y: '#filter-noise-y'
    };
    // the feTurbulence elements per filter
    this.DOM.feTurbulence = {
        x: document.querySelector(`${this.filterId.x} > feTurbulence`),
        y: document.querySelector(`${this.filterId.y} > feTurbulence`)
    }
    // turbulence current value
    this.primitiveValues = {turbulence: 0};
    // create the gsap timeline that will animate the turbulence value
    this.createNoiseTimeline();
}
...
Next, we initialize the filter ids, the feTurbulence elements for each SVG filter (one per line) and also the current turbulence value. Then we create the GSAP timeline that will take care of updating the baseFrequency of each filter with the current turbulence value. Here’s how that timeline and the methods that start/stop it look like:
...
createNoiseTimeline() {
    // turbulence value animation timeline:
    this.tl = gsap.timeline({
        paused: true,
        onStart: () => {
            // apply the filters for each line element
            this.DOM.lineHorizontal.style.filter = `url(${this.filterId.x}`;
            this.DOM.lineVertical.style.filter = `url(${this.filterId.y}`;
        },
        onUpdate: () => {
            // set the baseFrequency attribute for each line with the current turbulence value
            this.DOM.feTurbulence.x.setAttribute('baseFrequency', this.primitiveValues.turbulence);
            this.DOM.feTurbulence.y.setAttribute('baseFrequency', this.primitiveValues.turbulence);
        },
        onComplete: () => {
            // remove the filters once the animation completes
            this.DOM.lineHorizontal.style.filter = this.DOM.lineVertical.style.filter = 'none';
        }
    })
    .to(this.primitiveValues, {
        duration: 0.5,
        ease: 'power1',
        // turbulence start value
        startAt: {turbulence: 1},
        // animate to 0
        turbulence: 0
    });
}
enter() {
    // start the turbulence timeline
    this.tl.restart();
}
leave() {
    // stop the turbulence timeline
    this.tl.progress(1).kill();
}
...
The animation will change the turbulence value (which starts at 1 and ends at 0) and apply it to each feTurbulence’s baseFrequency attribute. The filters get applied to the lines in the beginning and removed once the animation is completed.
To finalize the constructor method we fade in the lines and start updating the translation values the first time we move the mouse:
...
constructor(el) {
    ...
    import { lerp, getMousePos } from './utils';
    ...
    // on first mousemove fade in the lines and start the requestAnimationFrame rendering function
    this.onMouseMoveEv = () => {
        this.renderedStyles.tx.previous = this.renderedStyles.tx.current = mouse.x;
        this.renderedStyles.ty.previous = this.renderedStyles.ty.previous = mouse.y;
        gsap.to(this.DOM.lines, {duration: 0.9, ease: 'Power3.easeOut', opacity: 1});
        requestAnimationFrame(() => this.render());
        window.removeEventListener('mousemove', this.onMouseMoveEv);
    };
    window.addEventListener('mousemove', this.onMouseMoveEv);
}
...
Now we’re only missing the actual method that updates the lines’ translation values as we move the mouse:
...
render() {
    // update the current translation values
    this.renderedStyles['tx'].current = mouse.x;
    this.renderedStyles['ty'].current = mouse.y;
    // use linear interpolation to delay the translation animation
    for (const key in this.renderedStyles ) {
        this.renderedStyles[key].previous = lerp(this.renderedStyles[key].previous, this.renderedStyles[key].current, this.renderedStyles[key].amt);
    }
    // set the new values
    gsap.set(this.DOM.lineVertical, {x: this.renderedStyles['tx'].previous});
    gsap.set(this.DOM.lineHorizontal, {y: this.renderedStyles['ty'].previous});
    // loop this until the end of time
    requestAnimationFrame(() => this.render());
}
As an extra, let’s add a little glitch effect to the menu items texts when we hover over them. We’ll use the Splitting library to split the menu texts into spans/chars so we can animate each one individually. We want to change the translation values of each character and also it’s color. Let’s update our index.js file:
import { Cursor } from './cursor';
import { MenuItem } from './menuItem';
// Splitting (used to split the menu item texts to spans/characters)
import 'splitting/dist/splitting.css';
import 'splitting/dist/splitting-cells.css';
import Splitting from 'splitting';

// initialize Splitting
const splitting = Splitting();

// initialize custom cursor
const cursor = new Cursor(document.querySelector('.cursor'));

// Menu Items
[...document.querySelectorAll('.menu > a')].forEach(el => new MenuItem(el));

// mouse effects on all links
[...document.querySelectorAll('a')].forEach(link => {
    link.addEventListener('mouseenter', () => cursor.enter());
    link.addEventListener('mouseleave', () => cursor.leave());
});
Assuming we have data-splitting set in all elements we want to split into chars, then we only need to call Splitting() and we then have each text split into a bunch of spans, for every letter of the text.
Let’s now have a look at our MenuItem class:
import { gsap } from 'gsap';

export class MenuItem {
    constructor(el) {
        this.DOM = {el};
        // all text chars (Splittingjs)
        this.DOM.titleChars = this.DOM.el.querySelectorAll('span.char');
        // initial and final colors for each span char (before and after hovering)
        const bodyComputedStyle = getComputedStyle(document.body);
        this.colors = {
            initial: bodyComputedStyle.getPropertyValue('--color-menu'),
            final: bodyComputedStyle.getPropertyValue('--color-link')
        };
        this.initEvents();
    }
    ...
}
We get a reference to all the characters of the menu item text and also it’s initial and final colors for the hover animation.
...
initEvents() {
    this.onMouseEnterEv = () => this.onMouseEnter();
    this.DOM.el.addEventListener('mouseenter', this.onMouseEnterEv);

    this.onMouseLeaveEv = () => this.onMouseLeave();
    this.DOM.el.addEventListener('mouseleave', this.onMouseLeaveEv);
}
...
We initialize the mouseenter/mouseleave events which will triggger the animation on the characters.
When hovering over a menu item we will randomly change its characters position and color, and when hovering out we reset the original color:
onMouseEnter() {
    if ( this.leaveTimeline ) {
        this.leaveTimeline.kill();
    }

    // let's try to do an animation that resembles a glitch effect on the characters
    // we randomly set new positions for the translation and rotation values of each char and also set a new color
    // and repeat this for 3 times
    this.enterTimeline = gsap.timeline({
        defaults: {
            duration: 0.05,
            ease: 'power3',
            x: () => gsap.utils.random(-15, 15),
            y: () => gsap.utils.random(-20, 10),
            rotation: () => gsap.utils.random(-5, 5),
            color: () => gsap.utils.random(0, 3) < 0.5 ? this.colors.final : this.colors.initial
        }
    })
    // repeat 3 times (repeatRefresh option will make sure the translation/rotation values will be different for each iteration)
    .to(this.DOM.titleChars, {
        repeat: 3,
        repeatRefresh: true
    }, 0)
    // reset translation/rotation and set final color
    .to(this.DOM.titleChars, {
        x: 0,
        y: 0,
        rotation: 0,
        color: this.colors.final
    }, '+=0.05');
}
onMouseLeave() {
    // set back the initial color for each char
    this.leaveTimeline = gsap.timeline()
    .to(this.DOM.titleChars, {
        duration: 0.4,
        ease: 'power3',
        color: this.colors.initial
    });
}
And that is all!
I hope this has not been too difficult to follow and that you have gained some insight into constructing this fancy effect.
Please let me know if you have any question @codrops or @crnacura.
Thank you for reading!
The post How to Code a Crosshair Mouse Cursor with Distortion Hover Effect appeared first on Codrops.
How to Check if Your Website is SEO Optimized (2 Easy Ways)
Do you want to check if your website is SEO optimized?
By analyzing your WordPress website’s on-page SEO setup, you can easily find and fix SEO errors, so you can improve your search engine rankings and get more traffic.
In this article, we’ll show you how you can check if your WordPress website is SEO optimized, step by step.

Why Check if Your Website is SEO Optimized?
By checking if your website is SEO optimized, you’ll know if there are any improvements that you can make to grow your search engine traffic.
Since search engines are often the largest source of website traffic, this can be very valuable to your WordPress business website.
However, when it comes to SEO there’s a lot you need to get right, including a lot of technical SEO jargon that can be confusing for beginners.
Luckily, there are a variety of SEO tools you can use to see if your website is SEO optimized and the steps you can take to improve your SEO.
With that said, let’s look at two ways you can check if your website is SEO optimized.
Method 1: Use AIOSEO to Check and Optimize Your WordPress SEO
All in One SEO is the best WordPress SEO plugin in the market used by over 2 million users. It lets you easily improve your search engine rankings and optimize your site without having to learn the ins and outs of SEO.
First thing you need to do is install and activate the plugin. For more details, see our step by step guide on how to install a WordPress plugin.
Note: there is a free version of AIOSEO available, but we’ll use the pro version since it gives us even more SEO optimization features.
Upon activation, you’ll have a new menu item called ‘All in One SEO’. You need to go toAll in One SEO » Dashboard, and it will take you to the main settings panel.
After that, click the ‘Launch the Setup Wizard’ button.
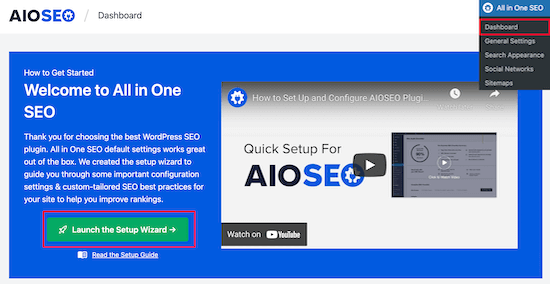
This will walk you through the process of setting up the plugin for your website.
For more details, see our guide on how to setup All in One SEO for WordPress correctly.
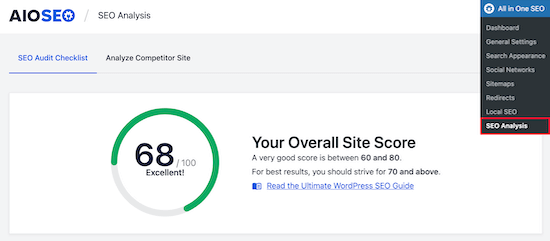
Once the plugin is set up, navigate to All in One SEO » SEO Analysis.
The ‘SEO Audit Checklist’ tab will give you a breakdown of your overall SEO score.
Under that, you’ll see the ‘Complete SEO Checklist’.
You can think of this as your checklist for properly optimizing your WordPress website.
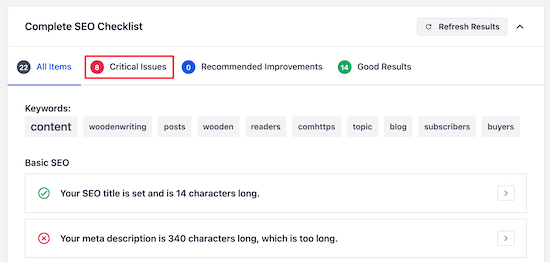
The ‘Critical Issues’ are what you need to fix first because they will have the biggest impact on your SEO score.
Simply click the ‘Arrow’ to the right of an SEO issue, and a box will drop down that explains the problem, and what you can do to fix it.
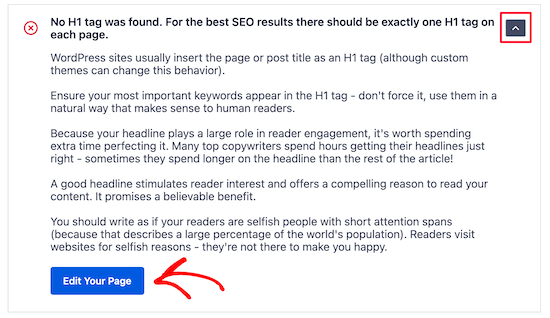
In this case, clicking the blue ‘Edit Your Page’ button will take you to the page where the change needs to be made.
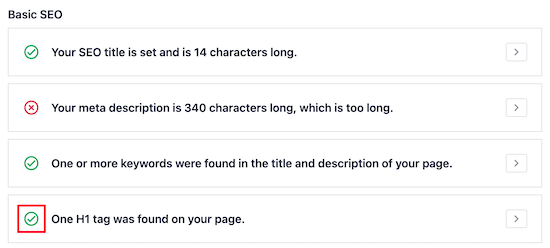
After you make the changes, you need to navigate back to the ‘SEO Analysis’ page and click the ‘Refresh Results’ button.

This will update your results and reflect the positive SEO improvements you have made.
You can see here the red ‘Critical Issue’ has now changed into a green ‘Checkbox’.
Now, you need to follow the same steps for any of the ‘Critical Issues’ found by the plugin and make the ‘Recommended Improvements’ if there are any suggestions.
Check the SEO of Any Competitor Website
Another great feature is the competitor analyzer that will show you how SEO optimized are your competitor’s websites.
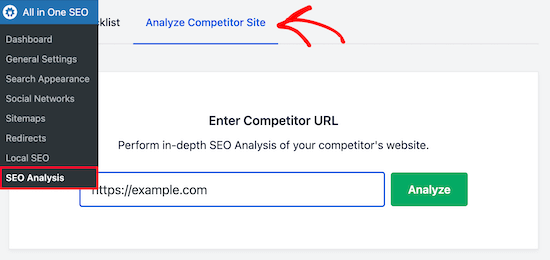
To use this, you need to go to All in One SEO » SEO Analysis and click the ‘Analyze Competitor Site’ menu item.
Simply enter the competitor URL into the box and click ‘Analyze’.
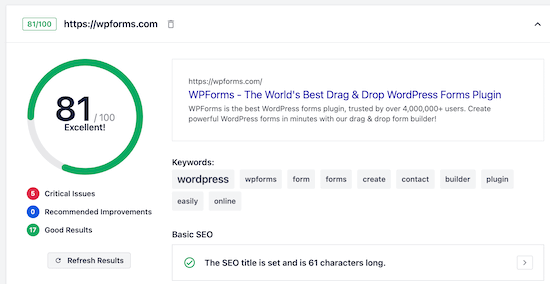
The results you’ll get for your competition are similar to the SEO analysis results for your website.
By seeing what they’re doing right and wrong, you can easily outrank your competition in the search engine results pages.
Improve Your Individual Page SEO with TruSEO
Now that you’ve made changes to your website to improve your onsite SEO and fix any errors, the next step is to use the TruSEO analysis feature to see how well your posts and pages are SEO optimized.
Simply open up the post or page that you want to optimize and scroll down to the bottom of the content editor. There you will see the SEO settings area.
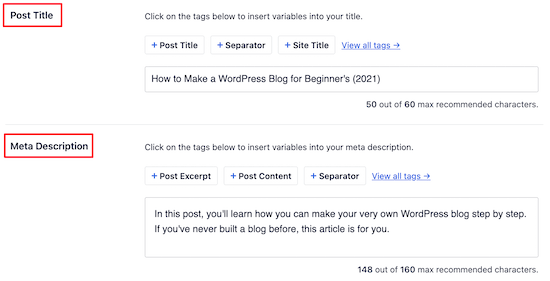
First, you can optimize your ‘Post Title’ and ‘Meta Description’. This is what will display in the search results.
There’s a built-in headline analyzer that will help you maximize your click through rates to get more traffic.
Next, you can enter your ‘Focus Keyphrase’ into the box.
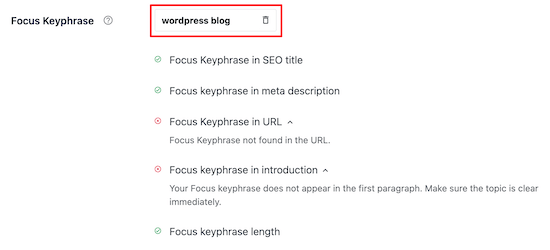
This keyword is what you want the post or page to rank for.
After you enter the keyword, the plugin will analyze your content and give you tips to improve.
You can also enter multiple keywords into the ‘Additional Keyphrases’ box.
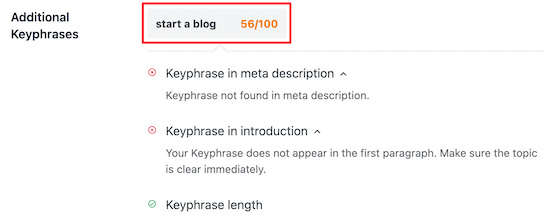
This lets you optimize your content for multiple keywords and bring in even more traffic.
After that, you’ll get a detailed ‘Page Analysis’ that will tell you how well your page is SEO optimized.
The ‘Basic SEO’ tab will tell you how well your content is optimized for common SEO guidelines.
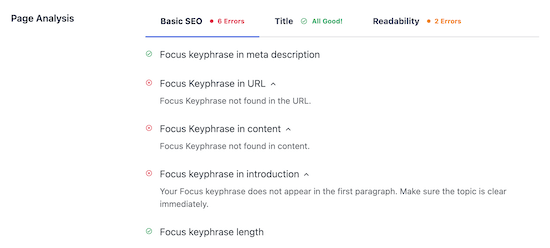
The ‘Title’ tab will tell you how well your title is optimized for the search engines.
Click this tab to see how well your title is performing.

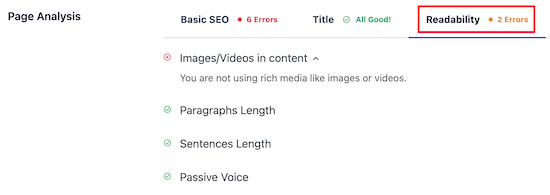
Next, you have the ‘Readability’ tab.
This gives you a detailed breakdown of how easy your content is to read. It offers you suggestions to improve your content and tells you what you’re doing well.
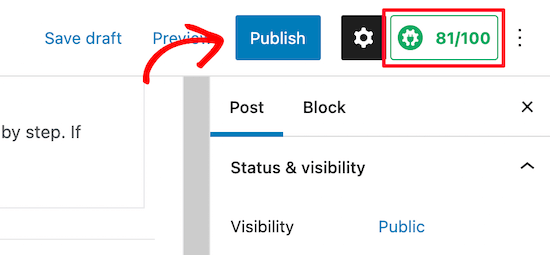
After you’ve finished making changes to optimize your content, make sure you click ‘Update’ or ‘Publish’.
You’ll also notice your TruSEO score in the upper right corner of the page. The higher this number, the better your content is optimized for the search engines.
Method 2: Use SEMRush to Get Advanced WordPress SEO Data
SEMRush is one of most popular SEO tools, and they offer the best keyword research tool in the market.
This is the tool that we use for WPBeginner and our other companies. You have to use it along with a WordPress plugin like AIOSEO.
With the help of SEMRush, you can see how well your SEO strategy is working.
First thing you need to do is visit the SEMRush website and click ‘Sign Up’ to create an account.
You can create a free account that will give you a limited amount of website SEO data. You will need to sign up for a paid SEMRush subscription to get all the features (it’s totally worth it).
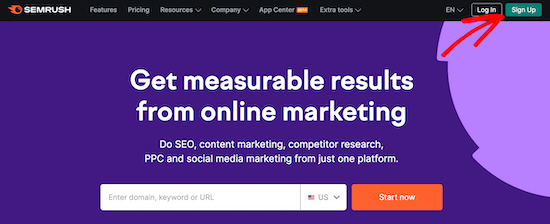
Next, you’ll be asked to provide an email address, password, and phone number.
After that, you’ll be taken to your SEO Dashboard, where you can start checking if your WordPress site is optimized.
The first tool we’ll use is the ‘Site Audit’ feature. This will give you a detailed breakdown of any SEO errors that exist on your website or WordPress blog.
Click on ‘Site Audit’ under the On Page & Tech SEO menu option and then enter your website domain name and click ‘Start Audit’.
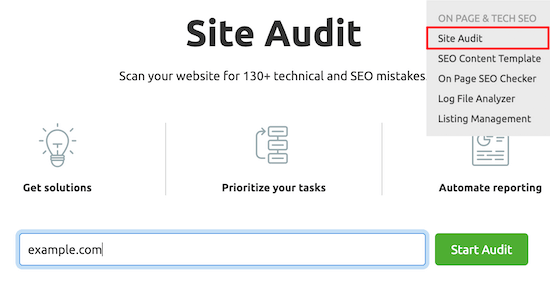
The report will run automatically.
After it’s complete, you’ll get a detailed breakdown of any SEO errors your site has.
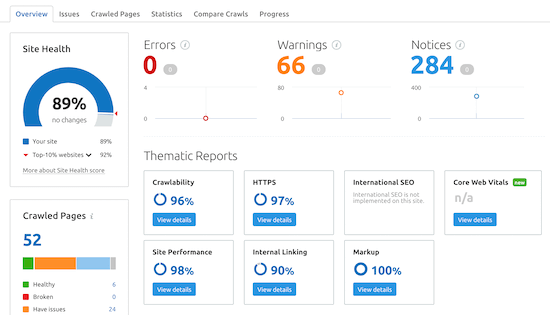
Scroll down until you see the ‘Top Issues:’ category, and this will show you the main issues your website has.
You can click to expand any of these areas, and it will show you all the pages that have that issue.
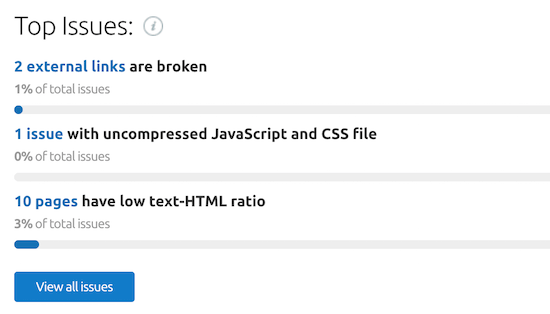
For example, on this website, 2 external links are broken.
If you’re not sure what the problem is or how to fix it, then click the ‘Why and how to fix it’ link.

This will bring up a popup that’ll describe the issue in-depth.
It’s important to fix all of the ‘Errors’ and ‘Warnings’ that your site has. Fixing these issues alone will go a long way towards improving your SEO.
Uncover Your Backlinks and Advanced Website Analytics
Beyond helping you find and fix technical SEO errors, SEMRush is one of the best backlink checker tools.
To use this feature, select ‘Backlink Analytics’ from your SEMRush dashboard and then enter your website URL and click ‘Check it’.
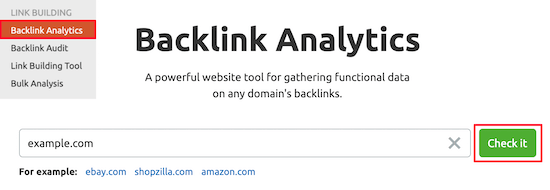
This will bring up lots of information about your domain name and your backlinks.
In general, the more high-quality relevant backlinks you have pointing towards your website, the higher you will rank in the search engines.
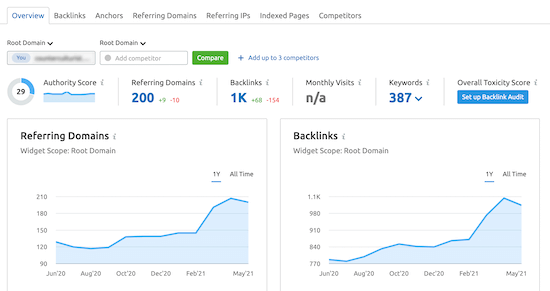
If you click the ‘Backlinks’ menu option, then you’ll see a detailed breakdown of the domain names that are linking to your website.
This can be useful because it can help you pinpoint any issues, such as low quality links.
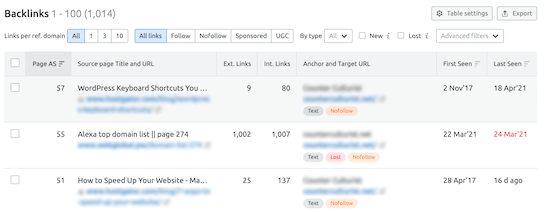
You can see the total number of links that a page linking to you has. If it has hundreds of links, then it could be a spammy website.
Track Your Traffic and Keyword Rankings Over Time
Another very useful tool is the keyword rank tracking feature. This will let you know if your SEO optimization changes are helping you get more traffic.
Navigate to ‘Organic Research’ in the Competitive Research section of your SEMRush dashboard.
Then, enter your domain name and click ‘Search’.
This screen will give you detailed information about the performance of your website.
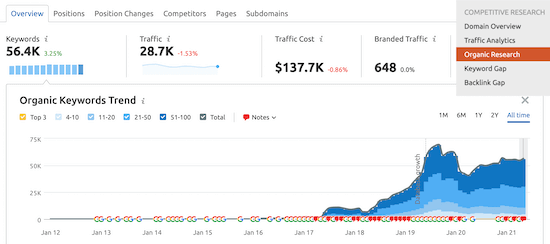
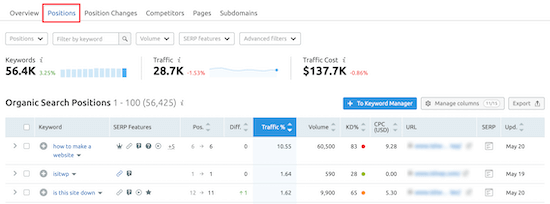
You can click on the ‘Positions’ tab to get an overview of what keywords bring your website the most traffic.
These keywords are the most valuable to your website.
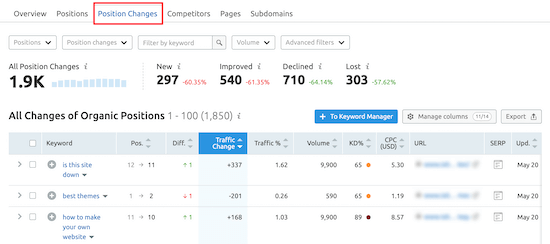
As you optimize your WordPress SEO, you’ll want to pay attention to the ‘Position Changes’ tab.
This will tell you the changes that are happening in the organic search results. As you optimize your website, you should see your website ranking higher for certain keywords and getting more traffic.
One final useful SEO tool from SEMRush is called the SEO Writing Assistant.
This can help you write SEO optimized content, format your articles, write in a casual tone, and more.
For more details, see our guide on how to use the SEO Writing Assistant in WordPress to improve SEO.
We hoped this article helped you check if your website is SEO optimized. You may also want to see our expert picks of the must have WordPress plugins for business websites, and the best drag and drop page WordPress builders to create custom pages.
If you liked this article, then please subscribe to our YouTube Channel for WordPress video tutorials. You can also find us on Twitter and Facebook.
The post How to Check if Your Website is SEO Optimized (2 Easy Ways) appeared first on WPBeginner.
Revisionism and accelerationism
Revisionism and accelerationism are similar in that their political spectrum is difficult to define: Compared with the Marxist "orthodox" that they compete with, these initiatives often express alternative options outside the mainstream and carry a certain degree of radicalism. Nature, but was classified as a rightist by the guiding discourse in the discourse struggle.
Update MySQL with PHP checkboxes
Hello, I want to use the checkbox to update the status of a row in mysql using php. If it is checked and submitted, the status will change from 'collect' to 'received'. I tried many ways but I am not sure where the problem is :( please help!
<?php
include(config.php);

$query = "SELECT * FROM deliveredGoods";
$result = mysqli_query($query);

if ($result === false){
    die(mysqli_error());
}
?>
<!doctype html>
<html>
<head>
<meta charset="utf-8">
<title>Update Goods Status</title>
<style>
body {
font-family:Cambria, "Hoefler Text", "Liberation Serif", Times, "Times New Roman", "serif";
}

h2{
text-align: center;
font-weight:normal;
}

table{
border-collapse: collapse;
width: 100%;
}

tr, th {
border: 1.5px solid #C0C0C0;
padding:5px;
}
</style>
</head>

<body>
<form method='post' action='#'>
<h2>Update Goods Status</h2>

<table>
    <tr>
    <th>Goods ID</th>
    <th>GoodsListID</th>
    <th>Resident ID</th>
    <th>Tracking Number</th>
    <th>Company Name</th>
    <th>Arrival Date</th>
    <th>Date To Collect</th>
    <th>Status</th>
    <th>Action
        (mark as received)</th>
    </tr>

<?php
    while ($row = mysql_fetch_array($result)) {

    $row_id=$row['goodsID'];
    $goodsListID=$row['goodsListID'];
    $residentID=$row['residentID'];
    $trackingNum=$row['trackingNum'];
    $companyName=$row['companyName'];
    $arrivalDate=$row['arrivalDate'];
    $collectDate=$row['collectDate'];
    $status=$row['status'];

echo"<tr>
    <td><?php echo $goodsID; ?></td>
    <td><?php echo $goodsListID; ?></td>
    <td><?php echo $residentID; ?></td>
    <td><?php echo $trackingNum; ?></td>
    <td><?php echo $companyName; ?></td>
    <td><?php echo $arrivalDate; ?></td>
    <td><?php echo $collectDate; ?></td>
    <td><?php echo $status; ?></td>
    <td><?php echo "<input type='checkbox' name='goodsID[]' value='".$row_id."'>"; ?></td>
    </tr>";
    }
</table>
<input type='submit' name='submit' value='Update'/>
</form>
</body>
</html>

<?php
if(gettype($_POST['goodsID'])=="submit"){
foreach($_POST['goodsID'] as $value){
    $goodsID_c = $value;
    $query2 = "UPDATE 'deliveredGoods' SET status = 'Received' where goodsID ='"/$goodsID_c."'";
    $result2 = mysqli_query($query2);
    if ($result2 === false){
        die(mysqli_error());
    }
    echo "Status for .$goodsID_c. has been updated.<br>";
    header(location: goodsList.php);
}

}
mysqli_close();
?>
