begin
writeln('what is the total cots of your 3 items');
readln(x)
if (x<100) then
writeln('you get no discount');
if(x>100) and (x<150) then
writeln ('you get a 10% discount');
if (x>150) and (x<200) then
writeln('you get a 20% discount');
if (x>200) and (x<250) then
writeln('you get a 25% discount')
if (x>250) then
writeln ('you get a 30% discount');
readln;
You can always traceroute an IP address in Fedora using the standard traceroute command. However, if you are looking to find out more about each hop’s geolocation information inside the trace, you should consider using the IP2Trace command tool.
In addition to the geolocation information, such as country, region, city, latitude, and longitude, IP2Trace also provides you with the ZIP code, time zone, ISP, domain name, area code, weather, mobile information, elevation, and usage type of an IP address. The type of data returned will depend on the IP2Location BIN data that you are using for the lookup, which can be downloaded for free.
This article summarizes the webinar ‘Breaking The Monolith’, presented by Daniel Gutiérrez Saavedra, Senior Software Engineer at Zartis. You can watch the full webinar, which also includes a Q&A session below!
Are you working with monolithic systems and legacy applications? Are you looking for ways to modernize your architecture and switch to microservices? This article will cover the ways you can break up a monolithic application into smaller pieces that make up a modular system.
In the browser, the event loop coordinates the execution of code between the call stack, web APIs, and the callback queue. Node.js, however, implements its own "Node.js event loop," which is different from the regular "JavaScript event loop." How confusing!
Last year, Google started emphasizing the importance of Core Web Vitals and how they reflect a person’s real experience when visiting sites around the web. Performance is a core feature of our company, Instant Domain Search—it’s in the name. Imagine our surprise when we found that our vitals scores were not great for a lot of people. Our fast computers and fiber internet masked the experience real people have on our site. It wasn’t long before a sea of red “poor” and yellow “needs improvement” notices in our Google Search Console needed our attention. Entropy had won, and we had to figure out how to clean up the jank—and make our site faster.
I founded Instant Domain Search in 2005 and kept it as a side-hustle while I worked on a Y Combinator company (Snipshot, W06), before working as a software engineer at Facebook. We’ve recently grown to a small group based mostly in Victoria, Canada and we are working through a long backlog of new features and performance improvements. Our poor web vitals scores, and the looming Google Update, brought our focus to finding and fixing these issues.
When the first version of the site was launched, I’d built it with PHP, MySQL, and XMLHttpRequest. Internet Explorer 6 was fully supported, Firefox was gaining share, and Chrome was still years from launch. Over time, we’ve evolved through a variety of static site generators, JavaScript frameworks, and server technologies. Our current front-end stack is React served with Next.js and a backend service built-in Rust to answer our domain name searches. We try to follow best practice by serving as much as we can over a CDN, avoiding as many third-party scripts as possible, and using simple SVG graphics instead of bitmap PNGs. It wasn’t enough.
Next.js lets us build our pages and components in React and TypeScript. When paired with VS Code the development experience is amazing. Next.js generally works by transforming React components into static HTML and CSS. This way, the initial content can be served from a CDN, and then Next can “hydrate” the page to make elements dynamic. Once the page is hydrated, our site turns into a single-page app where people can search for and generate domain names. We do not rely on Next.js to do much server-side work, the majority of our content is statically exported as HTML, CSS, and JavaScript to be served from a CDN.
When someone starts searching for a domain name, we replace the page content with search results. To make the searches as fast as possible, the front-end directly queries our Rust backend which is heavily optimized for domain lookups and suggestions. Many queries we can answer instantly, but for some TLDs we need to do slower DNS queries which can take a second or two to resolve. When some of these slower queries resolve, we will update the UI with whatever new information comes in. The results pages are different for everyone, and it can be hard for us to predict exactly how each person experiences the site.
The Chrome DevTools are excellent, and a good place to start when chasing performance issues. The Performance view shows exactly when HTTP requests go out, where the browser spends time evaluating JavaScript, and more:
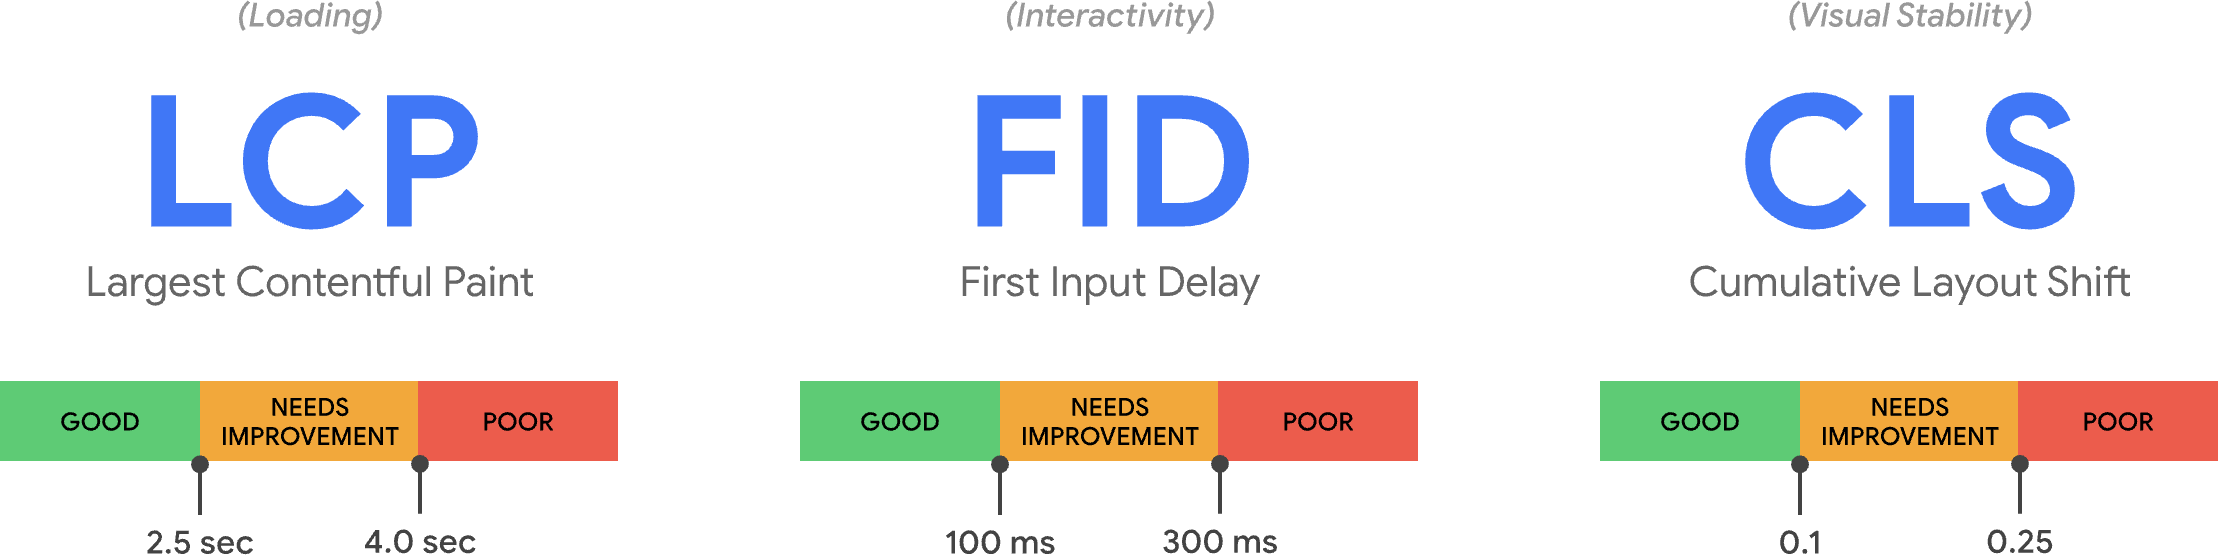
There are three Core Web Vitals metrics that Google will use to help rank sites in their upcoming search algorithm update. Google bins experiences into “Good”, “Needs Improvement”, and “Poor” based on the LCP, FID, and CLS scores real people have on the site:
LCP, or Largest Contentful Paint, defines the time it takes for the largest content element to become visible.
FID, or First Input Delay, relates to a site’s responsiveness to interaction—the time between a tap, click, or keypress in the interface and the response from the page.
CLS, or Cumulative Layout Shift, tracks how elements move or shift on the page absent of actions like a keyboard or click event.
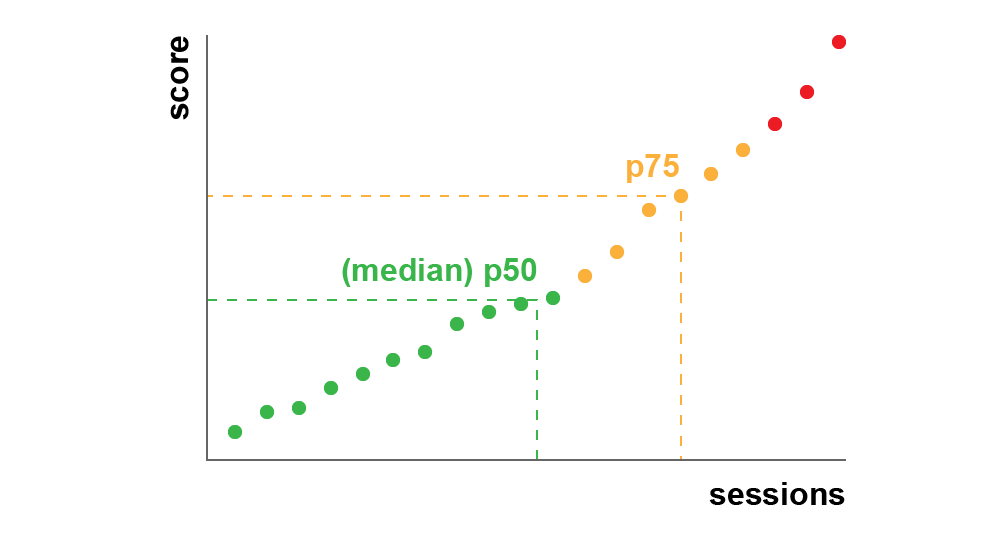
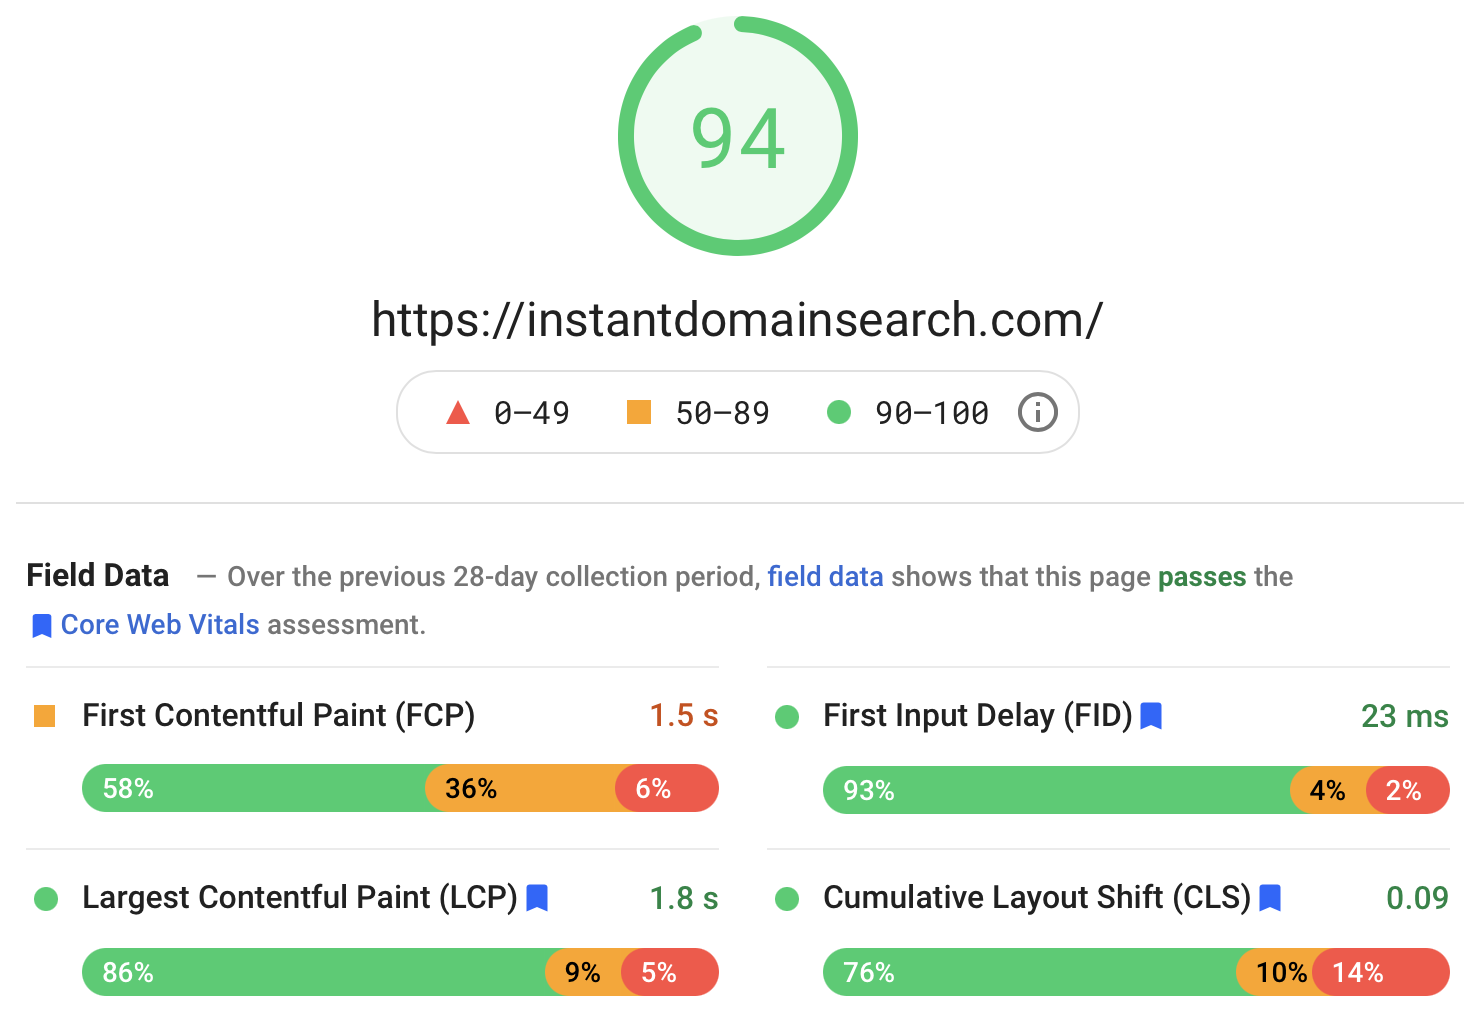
Chrome is set up to track these metrics across all logged-in Chrome users, and sends anonymous statistics summarizing a customer’s experience on a site back to Google for evaluation. These scores are accessible via the Chrome User Experience Report, and are shown when you inspect a URL with the PageSpeed Insights tool. The scores represent the 75th percentile experience for people visiting that URL over the previous 28 days. This is the number they will use to help rank sites in the update.
A 75th percentile (p75) metric strikes a reasonable balance for performance goals. Taking an average, for example, would hide a lot of bad experiences people have. The median, or 50th percentile (p50), would mean that half of the people using our product were having a worse experience. The 95th percentile (p95), on the other hand, is hard to build for as it captures too many extreme outliers on old devices with spotty connections. We feel that scoring based on the 75th percentile is a fair standard to meet.
To get our scores under control, we first turned to Lighthouse for some excellent tooling built into Chrome and hosted at web.dev/measure/, and at PageSpeed Insights. These tools helped us find some broad technical issues with our site. We saw that the way Next.js was bundling our CSS and slowed our initial rendering time which affected our FID. The first easy win came from an experimental Next.js feature, optimizeCss, which helped improve our general performance score significantly.
Lighthouse also caught a cache misconfiguration that prevented some of our static assets from being served from our CDN. We are hosted on Google Cloud Platform, and the Google Cloud CDN requires that the Cache-Control header contains “public”. Next.js does not allow you to configure all of the headers it emits, so we had to override them by placing the Next.js server behind Caddy, a lightweight HTTP proxy server implemented in Go. We also took the opportunity to make sure we were serving what we could with the relatively new stale-while-revalidate support in modern browsers which allows the CDN to fetch content from the origin (our Next.js server) asynchronously in the background.
It’s easy—maybe too easy—to add almost anything you need to your product from npm. It doesn’t take long for bundle sizes to grow. Big bundles take longer to download on slow networks, and the 75th percentile mobile phone will spend a lot of time blocking the main UI thread while it tries to make sense of all the code it just downloaded. We liked BundlePhobia which is a free tool that shows how many dependencies and bytes an npm package will add to your bundle. This led us to eliminate or replace a number of react-spring powered animations with simpler CSS transitions:
Through the use of BundlePhobia and Lighthouse, we found that third-party error logging and analytics software contributed significantly to our bundle size and load time. We removed and replaced these tools with our own client-side logging that take advantage of modern browser APIs like sendBeacon and ping. We send logging and analytics to our own Google BigQuery infrastructure where we can answer the questions we care about in more detail than any of the off-the-shelf tools could provide. This also eliminates a number of third-party cookies and gives us far more control over how and when we send logging data from clients.
Our CLS score still had the most room for improvement. The way Google calculates CLS is complicated—you’re given a maximum “session window” with a 1-second gap, capped at 5 seconds from the initial page load, or from a keyboard or click interaction, to finish moving things around the site. If you’re interested in reading more deeply into this topic, here’s a great guide on the topic. This penalizes many types of overlays and popups that appear just after you land on a site. For instance, ads that shift content around or upsells that might appear when you start scrolling past ads to reach content. This article provides an excellent explanation of how the CLS score is calculated and the reasoning behind it.
We are fundamentally opposed to this kind of digital clutter so we were surprised to see how much room for improvement Google insisted we make. Chrome has a built-in Web Vitals overlay that you can access by using the Command Menu to “Show Core Web Vitals overlay”. To see exactly which elements Chrome considers in its CLS calculation, we found the Chrome Web Vitals extension’s “Console Logging” option in settings more helpful. Once enabled, this plugin shows your LCP, FID, and CLS scores for the current page. From the console, you can see exactly which elements on the page are connected to these scores. Our CLS scores had the most room for improvement.
Of the three metrics, CLS is the only one that accumulates as you interact with a page. The Web Vitals extension has a logging option that will show exactly which elements cause CLS while you are interacting with a product. Watch how the CLS metrics add when we scroll on Smashing Magazine’s home page:
The best way to track progress from one deploy to the next is to measure page experiences the same way Google does. If you have Google Analytics set up, an easy way to do this is to install Google’s web-vitals module and hook it up to Google Analytics. This provides a rough measure of your progress and makes it visible in a Google Analytics dashboard.
This is where we hit a wall. We could see our CLS score, and while we’d improved it significantly, we still had work to do. Our CLS score was roughly 0.23 and we needed to get this below 0.1—and preferably down to 0. At this point, though, we couldn’t find something that told us exactly which components on which pages were still affecting the score. We could see that Chrome exposed a lot of detail in their Core Web Vitals tools, but that the logging aggregators threw away the most important part: exactly which page element caused the problem.
To capture all of the detail we need, we built a serverless function to capture web vitals data from browsers. Since we don’t need to run real-time queries on the data, we stream it into Google BigQuery’s streaming API for storage. This architecture means we can inexpensively capture about as many data points as we can generate.
After learning some lessons while working with Web Vitals and BigQuery, we decided to bundle up this functionality and release these tools as open-source at vitals.dev.
Using Instant Vitals is a quick way to get started tracking your Web Vitals scores in BigQuery. Here’s an example of a BigQuery table schema that we create:
Integrating with Instant Vitals is easy. You can get started by integrating with the client library to send data to your backend or serverless function:
import { init } from "@instantdomain/vitals-client";

init({ endpoint: "/api/web-vitals" });
Then, on your server, you can integrate with the server library to complete the circuit:
import fs from "fs";

import { init, streamVitals } from "@instantdomain/vitals-server";

// Google libraries require service key as path to file
const GOOGLE_SERVICE_KEY = process.env.GOOGLE_SERVICE_KEY;
process.env.GOOGLE_APPLICATION_CREDENTIALS = "/tmp/goog_creds";
fs.writeFileSync(
  process.env.GOOGLE_APPLICATION_CREDENTIALS,
  GOOGLE_SERVICE_KEY
);

const DATASET_ID = "web_vitals";
init({ datasetId: DATASET_ID }).then().catch(console.error);

// Request handler
export default async (req, res) => {
  const body = JSON.parse(req.body);
  await streamVitals(body, body.name);
  res.status(200).end();
};
Simply call streamVitalswith the body of the request and the name of the metric to send the metric to BigQuery. The library will handle creating the dataset and tables for you.
After collecting a day’s worth of data, we ran this query like this one:
SELECT
  `<project_name>.web_vitals.CLS`.Value,
  Node
FROM
  `<project_name>.web_vitals.CLS`
JOIN
  UNNEST(Entries) AS Entry
JOIN
  UNNEST(Entry.Sources)
WHERE
  Node != ""
ORDER BY
  value
LIMIT
  10
This shows us which elements on which pages have the most impact on CLS. It created a punch list for our team to investigate and fix. On Instant Domain Search, it turns out that slow or bad mobile connections will take more than 500ms to load some of our search results. One of the worst contributors to CLS for these users was actually our footer.
The layout shift score is calculated as a function of the size of the element moving, and how far it goes. In our search results view, if a device takes more than a certain amount of time to receive and render search results, the results view would collapse to a zero-height, bringing the footer into view. When the results come in, they push the footer back to the bottom of the page. A big DOM element moving this far added a lot to our CLS score. To work through this properly, we need to restructure the way the search results are collected and rendered. We decided to just remove the footer in the search results view as a quick hack that’d stop it from bouncing around on slow connections.
We now review this report regularly to track how we are improving — and use it to fight declining results as we move forward. We have witnessed the value of extra attention to newly launched features and products on our site and have operationalized consistent checks to be sure core vitals are acting in favor of our ranking. We hope that by sharing Instant Vitals we can help other developers tackle their Core Web Vitals scores too.
Google provides excellent performance tools built into Chrome, and we used them to find and fix a number of performance issues. We learned that the field data provided by Google offered a good summary of our p75 progress, but did not have actionable detail. We needed to find out exactly which DOM elements were causing layout shifts and input delays. Once we started collecting our own field data—with XPath queries—we were able to identify specific opportunities to improve everyone’s experience on our site. With some effort, we brought our real-world Core Web Vitals field scores down into an acceptable range in preparation for June’s Page Experience Update. We’re happy to see these numbers go down and to the right!
Travel blogs are becoming very popular lately, and like any other blog, should have a strategy for improving and attracting as many readers as possible. Once you achieve that, you can create a strategy and...
For the last 10 years, I have been building RESTful services as the feature team member on projects assigned to me via consulting opportunities or as a full-time corporate employee. This represents one-third of my career and is what I have enjoyed the most.
However, in all of those years, when the system is part of an application modernization initiative, I feel like I'm learning the same lessons over and over:
In this ALL YOUR HTML coding session we’re going to look at recreating the curly noise tubes with light scattering from the fantastic website of Lusion using Three.js.
This coding session was streamed live on May 16, 2021.
Are you wondering how to increase ad impressions in WordPress?
Many WPBeginner readers have asked us how to maximize ad income while keeping their sites user-friendly. With ad refresh, you can rotate different advertisements in the same spot, boosting ad impressions and ad revenue.
In this article, we will show you how to increase your ad impressions in WordPress by using ad refresh.
How Can Ad Refresh Increase Ad Impressions in WordPress?
Ad refresh in WordPress means displaying multiple ads in one spot. Unlike traditional ads, which show only in one place, ad refresh constantly updates the advertisement shown to visitors without reloading the page.
Ad refresh can improve the user experience as it’s much less intrusive than having multiple ads on one page. Plus, it helps you earn more money on your blog without needing extra pageviews to boost the number of impressions.
Plus, over time, ad refresh helps you figure out which types of ads work best on your WordPress website. Then, you can just show the best-performing ones and leave out the ones that don’t perform to maximize your revenue.
That said, there are some considerations to using ad refresh:
Ad networks may limit the total number of visible ads.
Ad refresh may conflict with Google AdSense guidelines, so be cautious or explore alternative advertising networks.
With that in mind, we will show you 2 ways to use ad refresh to increase ad impressions in WordPress. You can use the quick links below to skip to your preferred method:
Method 1: Enable Ad Refresh With Advanced Ads (Paid Plugin)
The first method is to use Advanced Ads, which is an easy-to-use plugin for setting up ad refresh across your website. We are going to use the premium version because that’s where the ad refresh feature is available.
Step 1: Set Up Advanced Ads Pro
The first thing you need to do is install and activate the Advanced Ads plugin. For more details, see our step-by-step guide on how to install a WordPress plugin.
Once activated, you need to enter the license key for the pro version of the plugin. To do this, navigate to Advanced Ads » Licenses. Then, enter your license key in ‘Pro’ and click ‘Activate License.’
Now, switch to Advanced Ads » Settings and go to the ‘Pro’ tab. On this screen, you need to enable the ‘Cache Busting’ option.
Then, tick the ‘Force passive cache-busting’ checkbox.
Cache busting prevents a web browser from serving cached versions of JavaScript, CSS, or image files, including ads. This setting is essential to make sure ads appear correctly and relevant to users.
Now, just scroll down and click ‘Save settings on this page.’
Step 2: Set Up Your Ads
Let’s now go ahead and add the ads you want to display on WordPress. What you want to do is go to Advanced Ads » Ads. Then, you will see an interface where you can set up your first ad.
First, make sure to give your new ad a name. After that, choose one of the available ad types: plain text and code, dummy (for testing), rich content, image ad, ad group, Google Ad Manager, AdSense, or AMP.
Note: Advanced Ads Pro does not recommend using Google AdSense for ad refresh, so we suggest using other ad types with this plugin.
Scrolling down to the Ad Parameters section, you will see some settings to set up your ad, which will vary depending on the ad type you choose.
If you use the image ad option, then you can upload the ad image, customize the size, enable tracking, add a custom link, make the link open in a new window, add a nofollow attribute, and add a ‘sponsored’ attribute to your ad.
If you move further down, you will find the ‘Layout / Output’ section.
This is where you can adjust how the ad layout looks on your website by customizing its margins, text wrapping, alignment, and so on.
This section also includes settings to customize the ad with custom HTML and CSS.
Additionally, you can make the ad display only once, which is a good idea so that the ad doesn’t reload multiple times in the same ad refresh spot later. This way, your users don’t get annoyed as much or become blind to the ad.
The next section is Targeting. Here, you can add display conditions for when the ad should appear.
For example, you could have the ad appear if the page being viewed is a blog post. Feel free to click the dropdown menu to see the available display conditions.
You could also customize the visitor conditions, which will determine what type of user the ad should appear for.
Examples include if the user is logged in, uses a certain device, comes from a specific location, or has not seen the ad a certain number of times.
Once you are happy with the ad settings, just scroll up and click ‘Save Draft.’
Then, hit the ‘Publish’ button if you want to launch the ad right away.
Now, just repeat the same steps until you have enough ads for your ad refresh spot.
Step 3: Create an Ad Group
After setting up all of your ads, you can now create an ad group. This feature lets you display multiple ads from one spot.
First, navigate to Advanced Ads » Groups & Rotation and click the ‘+ New Ad Group’ button.
Then, you need to choose an Ad Group type. There are four to choose from: random ads (the ads will show in random order), ordered ads (customize which ads show up first), grid (show the ads in a grid format), and slider (the ads will appear in a slider).
For the sake of example, we will use ‘Random ads.’
Don’t forget to write the name of your ad group as well and click ‘Save New Group.’
Now, a popup will appear with settings for you to configure the ad group. In ‘Visible ads,’ you can specify the number of ads that are visible at the same time. We recommend leaving it at 1.
Then, you want to enable the ‘Refresh Interval’ setting. With this option, you can set ads to refresh at regular intervals. This means you can show visitors different ads over an amount of time, making it more likely they will click on them.
You can also adjust how long each ad appears before refreshing in milliseconds. The default number is 2000.
Go down the window and start adding your ads one by one.
All you need to do is select an ad in the dropdown menu, choose a number for the ad weight, and click ‘add.’
With the random ads setting, ad weights determine how often an ad is displayed within a group. They don’t define the sequence of ads but affect the likelihood of each one appearing.
Once done, just click the ‘Save [your ad group name]’ button.
Step 4: Place the Ad Group on Your WordPress Website
With your ad group set up, let’s embed it into your WordPress blog or site. To do this, go to Advanced Ads » Placements and click ‘+ New Placement.’
Next, go ahead and choose an ad placement type. There are many options to choose from, and you can hover over each one to see more details about the placement.
You could display the ad in your website’s header, footer, in between a list of posts, after several paragraphs in a blog post content, and so on.
Once done, just give your ad placement a name and select the ad group you created earlier.
Then, click ‘Save New Placement.’
Alternatively, you can also display the ad on your individual pages, posts, sidebar, widget areas, or theme template parts.
If you want to do that, then you can navigate to Advanced Ads » Groups & Rotations. Then, click the ‘Show usage’ button.
A popup will appear showing you the shortcode or PHP code you can use to display the ad group.
That’s it! You can now preview your website to see what the ad group looks like.
Here is what the demo Advanced Ads random ads look like:
Method 2: Enable Ad Refresh With Ad Refresh Control (Free Plugin)
If you prefer not to set up your ads in a new plugin but simply add the refresh feature to your existing ad slots, then you can use the free Ad Refresh Control plugin.
Keep in mind that this plugin is not an ad management plugin. If you haven’t set up your ads yet, then you will need a plugin for that first. You can see our list of the best ad management plugins and solutions for WordPress for recommendations.
Once you add your ad units to WordPress, you can add the ad refresh feature to them.
The first thing you need to do is install and activate the Ad Refresh Control plugin. For more details, see our step-by-step guide on how to install a WordPress plugin.
Once the plugin is active, navigate to Settings » Ad Refresh Control. On this screen, you will set your ad refresh settings. These settings are global and will apply to all of the ad units on your website.
The most important plugin settings are ‘Viewability Threshold’, ‘Refresh Interval’, and ‘Maximum Refreshes’.
The ‘Visibility Threshold’ setting refers to how much of the ad needs to be viewable to be considered an impression.
The ‘Refresh Interval’ is how long an ad will be displayed before refreshing.
Finally, ‘Maximum Refreshes’ will set the number of times an ad slot can be refreshed.
Feel free to change these numbers. However, we will leave the default settings since they comply with most existing ad network guidelines.
The final plugin settings can be left empty. However, if you want to exclude specific ad units or ad sizes, then you can add the ad unit sizes or ad unit IDs.
Once you have finished making changes, just click the ‘Save Changes’ button.
Your ad units will now automatically refresh for your visitors based on the settings above.
Bonus Tip: Set Up Tracking to See How Your Ads Are Performing
After you set up ad refresh in WordPress, you will want to monitor how your ads are performing. This will tell you which advertisements are converting the best and if your ad refresh units are getting more impressions.
The best way to do this is by using Google Analytics. That said, the manual setup can seem intimidating for beginners.
With MonsterInsights, you can set up conversion tracking to measure the success of your ads. This way, you can focus on the campaigns that actually convert.
The Arab countries are famous for the Arab councils, in which a large number of individuals meet and which needs permanent cleaning, so we provide a cleaning company in Riyadh that provides its services in the Kingdom of Saudi Arabia through which the council can be cleaned and sterilized and overcome all kinds of insects and dirt accumulated inside the place with ease from During the work team assigned by the company
Smilz CBD Gummies Loosens up, calms facilitates pressure, works with rest Increases safety stage Guards from free progressives, which may cause, developing Increases obsession and memory Increases veins Improves hormonal balance mollifies premenstrual turmoil Enhances creation, has antagonistic to skin break out properties Decrease cholesterol level It helps in giving better versatility and flexibility. Helps the immune system and ketosis level properly work It keeps up as a distress killer and alleviation from inconvenience procedure Provides more strong muscles and joint working. Licenses a person to discard muscle and joint injuries. Helps in reestablishing joint irritation. It gives a more ordinary rest amount to you It surrenders calm and releases the mind Hit to purchase Smilz CBD Gummies: https://www.laweekly.com/smilz-cbd-gummies-reviews-2021-shocking-price-for-sale-real-customer-complaints/
Some exceptional option dependent on what's all around expected we need to make reference to about Green Lobster CBD Gummies is that it works for the most part. In this way, you don't have to worry about flooding your body with fake beautifications. Truly, some Green Lobster CBD Gummies tones online use fake upgrades. In what cutoff may you tell? Either read the drawing or in the event that you're basically a couple of bucks for the condition, that is all the more then likely a fake one. Luckily, this condition uses unadulterated, mind blowing CBD and that is it. If you wind up getting it a couple of bucks, that is because they run a starter offer unpredictably. In any case, again, Green Lobster CBD Gummies Drops can help you with feeling better in your steadily life. You can save it around night effort to calm down in the wake of a monotonous day. Or on the other hand obviously, you can take it before a disturbing work show, as it can calm bothered quickly. You can even take it in the wake of a seriously arranged day of looking at a screen to diminish your back and neck torment. At any rate you take it, you need to try it for yourself. Tap any image to get a low Green Lobster CBD Gummies and try this surprising condition today! Hit on the Link to get Green Lobster CBD Gummies: https://www.laweekly.com/green-lobster-cbd-gummies-reviews-cbd-neon-cubes-working-price/