Nailing That Cool Dissolve Transition

We’re going to create an impressive transition effect between images that’s, dare I say, very simple to implement and apply to any site. We’ll be using the kampos library because it’s very good at doing exactly what we need. We’ll also explore a few possible ways to tweak the result so that you can make it unique for your needs and adjust it to the experience and impression you’re creating.

Take one look at the Awwwards Transitions collection and you’ll get a sense of how popular it is to do immersive effects, like turning one media item into another. Many of those examples use WebGL for the job. Another thing they have in common is the use of texture mapping for either a displacement or dissolve effect (or both).

To make these effects, you need the two media sources you want to transition from and to, plus one more that is the map, or a grid of values for each pixel, that determines when and how much the media flips from one image to the next. That map can be a ready-made image, or a <canvas> that’s drawn upon, say, noise. Using a dissolve transition effect by applying a noise as a map is definitely one of those things that can boost that immersive web experience. That’s what we’re after.

Setting up the scene

Before we can get to the heavy machinery, we need a simple DOM scene. Two images (or videos, if you prefer), and the minimum amount of JavaScript to make sure they’re loaded and ready for manipulation.

<main>
  <section>
    <figure>
      <canvas id="target">
        <img id="source-from" src="path/to/first.jpg" alt="My first image" />
        <img id="source-to" data-src="path/to/second.jpg" alt="My second image" />
      </canvas>
    <figure>
  </section>
</main>

This will give us some minimal DOM to work with and display our scene. The stage is ready; now let’s invite in our main actors, the two images:

// Notify when our images are ready
function loadImage (src) {
  return new Promise(resolve => {
    const img = new Image();
    img.onload = function () {
      resolve(this);
    };
    img.src = src;
  });
}
// Get the image URLs
const imageFromSrc = document.querySelector('#source-from').src;
const imageToSrc = document.querySelector('#source-to').dataset.src;
// Load images  and keep their promises so we know when to start
const promisedImages = [
  loadImage(imageFromSrc),
  loadImage(imageToSrc)
];

Creating the dissolve map

The scene is set, the images are fetched — let’s make some magic! We’ll start by creating the effects we need. First, we create the dissolve map by creating some noise. We’ll use a Classic Perlin noise inside a turbulence effect which kind of stacks noise in different scales, one on top of the other, and renders it onto a <canvas> in grayscale:

const turbulence = kampos.effects.turbulence({ noise: kampos.noise.perlinNoise });

This effect kind of works like the SVG feTurbulence filter effect. There are some good examples of this in “Creating Patterns With SVG Filters” from Bence Szabó.

Second, we set the initial parameters of the turbulence effect. These can be tweaked later for getting the specific desired visuals we might need per case:

// Depending of course on the size of the target canvas
const WIDTH = 854;
const HEIGHT = 480;
const CELL_FACTOR = 2;
const AMPLITUDE = CELL_FACTOR / WIDTH;

turbulence.frequency = {x: AMPLITUDE, y: AMPLITUDE};
turbulence.octaves = 1;
turbulence.isFractal = true;

This code gives us a nice liquid-like, or blobby, noise texture. The resulting transition looks like the first image is sinking into the second image. The CELL_FACTOR value can be increased to create a more dense texture with smaller blobs, while the octaves=1 is what’s keeping the noise blobby. Notice we also normalize the amplitude to at least the larger side of the media, so that texture is stretched nicely across our image.

Next we render the dissolve map. In order to be able to see what we got, we’ll use the canvas that’s already in the DOM, just for now:

const mapTarget = document.querySelector('#target'); // instead of document.createElement('canvas');
mapTarget.width = WIDTH;
mapTarget.height = HEIGHT;

const dissolveMap = new kampos.Kampos({
  target: mapTarget,
  effects: [turbulence],
  noSource: true
});
dissolveMap.draw();

Intermission

We are going to pause here and examine how changing the parameters above affects the visual results. Now, let’s tweak some of the noise configurations to get something that’s more smoke-like, rather than liquid-like, say:

const CELL_FACTOR = 4; // instead of 2

And also this:

turbulence.octaves = 8; // instead of 1

Now we have a more a dense pattern with eight levels (instead of one) superimposed, giving much more detail:

Fantastic! Now back to the original values, and onto our main feature…

Creating the transition

It’s time to create the transition effect:

const dissolve = kampos.transitions.dissolve();
dissolve.map = mapTarget;
dissolve.high = 0.03; // for liquid-like effect

Notice the above value for high? This is important for getting that liquid-like results. The transition uses a step function to determine whether to show the first or second media. During that step, the transition is done smoothly so that we get soft edges rather than jagged ones. However, we keep the low edge of the step at 0.0 (the default). You can imagine a transition from 0.0 to 0.03 is very abrupt, resulting in a rapid change from one media to the next. Think of it as clipping.

On the other hand, if the range was 0.0 to 0.5, we’d get a wider range of “transparency,” or a mix of the two images — like we would get with partial opacity — and we’ll get a smoke-like or “cloudy” effect. We’ll try that one in just a moment.

Before we continue, we must remember to replace the canvas we got from the document with a new one we create off the DOM, like so:

const mapTarget = document.createElement('canvas');

Plug it in, and… action!

We’re almost there! Let’s create our compositor instance:

const target = document.querySelector(‘#target’);
const hippo = new kampos.Kampos({target, effects: [dissolve]});

And finally, get the images and play the transition:

Promise.all(promisedImages).then(([fromImage, toImage]) => {
  hippo.setSource({media: fromImage, width, height});
  dissolve.to = toImage;
  hippo.play(time => {
    // a sin() to play in a loop
    dissolve.progress = Math.abs(Math.sin(time * 4e-4)); // multiply time by a factor to slow it down a bit
  });
});

Sweet!

Special effects

OK, we got that blobby goodness. We can try playing a bit with the parameters to get a whole different result. For example, maybe something more smoke-like:

const CELL_FACTOR = 4;
turbulence.octaves = 8;

And for a smoother transition, we’ll raise the high edge of the transition’s step function:

dissolve.high = 0.3;

Now we have this:

Extra special effects

And, for our last plot twist, let’s also animate the noise itself! First, we need to make sure kampos will update the dissolve map texture on every frame, which is something it doesn’t do by default:

dissolve.textures[1].update = true;

Then, on each frame, we want to advance the turbulence time property, and redraw it. We’ll also slow down the transition so we can see the noise changing while the transition takes place:

hippo.play(time => {
  turbulence.time = time * 2;
  dissolveMap.draw();
  // Notice that the time factor is smaller here
  dissolve.progress = Math.abs(Math.sin(time * 2e-4));
});

And we get this:

That’s it!

Exit… stage right

This is just one example of what we can do with kampos for media transitions. It’s up to you now to mix the ingredients to get the most mileage out of it. Here are some ideas to get you going:

  • Transition between site/section backgrounds
  • Transition between backgrounds in an image carousel
  • Change background in reaction to either a click or hover
  • Remove a custom poster image from a video when it starts playing

Whatever you do, be sure to give us a shout about it in the comments.


The post Nailing That Cool Dissolve Transition appeared first on CSS-Tricks.

You can support CSS-Tricks by being an MVP Supporter.

This Web Site is a Tech Talk

This literal tech talk (YouTube video embedded in there) by Zach Leatherman is a good time. The talk is sprinkled with fun trickery, so I’m just taking notes on some on it here:

  • I have no idea how he pulled off the “bang on the keyboard and get perfect code” thing, but it reminds me of Jake Albaugh’s “Self-Coding” Pens.
  • Adding contenteditable on the <body> makes the whole page editable! Did you know document.designMode = "on" does the same thing in JavaScript? (More on making DevTools a design tool.)
  • There’s a short bit where the typing happens in two elements at once. CodePen supports that! Just CMD + click into the editor where you want another one to be, or make it part of a snippet.
  • System fonts are nice. I like how easy they are to invoke with system-ui. Firefox doesn’t seem to support that, so I guess we need the whole stack. I wonder how close we are to just needing that one value. Iain Bean has more on this in his “System fonts don’t have to be ugly” post.
  • box-decoration-break is a nice little touch for “inline headers.” The use of @supports here makes great sense as it’s not just that one property in use, but several. So, in a non-support situation, you’d want to apply none of it.
  • Slapping a <progress> in some <li> elements to compare rendering strategies is a neat way to get some perfect UI without even a line of CSS.
  • Making 11ty do syntax highlighting during the build process is very cool. I still use Prism.js on this site, which does a great job, but I do it client-side. I really like how this 11ty plugin is still Prism under the hood, but just happens when the page is built. I’d love to get this working here on this WordPress site, which I bet is possible since our code block in the block editor is a custom JavaScript build anyway.
  • In the first bullet point, I wrote that I had no idea how Zach did the “bang on the keyboard and get perfect code” but if you watch the bit about syntax highlighting and keep going, Zach shows it off and it’s a little mind spinning.

I think Zach’s overall point is strong: we should question any Single-Page-App-By-Default website building strategy.

As a spoonful of baby bear porridge here, I’d say I’m a fan of both static site generators and JavaScript frameworks. JavaScript frameworks offer some things that are flat-out good ideas for building digital products: components and state. Sometimes that means that client-side rendering is actually helpful for the interactivity and overall feel of the site, but it’s unfortunate when client-side rendering comes along for the ride by default instead of as a considered choice.

Direct Link to ArticlePermalink


The post This Web Site is a Tech Talk appeared first on CSS-Tricks.

You can support CSS-Tricks by being an MVP Supporter.

Hardware store problem using C

You are the owner of a hardware store and need to keep an inventory that can tell you
what different tools you have, how many of each you have on hand and the cost of
each one. Write a program that initializes the random-access file hardware.dat to
100 empty records, lets you input the data concerning each tool, enables you to list all
your tools, lets you delete a record for a tool that you no longer have and lets you
update any information in the file. The tool identification number should be the record
number.Need to make use of File Processing technique and code in C.
Use the following information to start your file:

Record# Tool name Quantity Cost
3 Electric sander 7 57.98
17 Hammer 76 11.99
24 Jig saw 21 11.00
39 Lawn mower 3 79.50
56 Power saw 18 99.99
68 Screwdriver 106 6.99
77 Sledge hammer 11 21.50
83 Wrench 34 7.50

I am new to programming and this is kinda hard for me. If anyone willing to help please help me.
Thank you in advanced.

20 Best Productivity Apps for Mac You Need in 2021

If you’re looking for some of the best productivity apps for Mac, you’re in the right place! I have 20 excellent options for you to choose from. Each of these apps does a different thing, and each can be useful to you in many different ways. I, for instance, use and love all of them, and I couldn’t recommend them more!

UI Interactions & Animations Roundup #15

After many weeks of collecting some interesting UI interaction shots, it’s now time to share it with you! Some super cool trends are emerging; from swirly motion to visual repetition and infinite depths, there’s lots to explore and draw inspiration from!

I really hope you get some fresh ideas from this set.

Si™ Design & Dev | Paris & Co Iteration 001

by Shaban Iddrisu

Intergalactic Disassociation

by Michael Crawford

GoDaddy Online Store

by Rolf Jensen

Realistic Expeditions

by Ali Zafar Iqbal

Crypto Art Landing Page Animation

by Igor Pavlinski

Product Landing Page Experience

by Francesco Zagami

Presence Lessons

by Slava Kornilov

One step at a time…

by Fontfabric

Rogue Site Update

by Britton Stipetic

Planet X landing page

by Manoj Rajput

Estliving

by Hrvoje Grubisic

Branding Inspiration Platform

by Hrvoje Grubisic

Modular Architect

by Roman Salo

Layout (006) – Kombu® Art, Design & Culture Magazine

by Robbert Schefman

Layout Exploration

by Hrvoje Grubisic

Depth

by Vladimir Biondic

Confidence

by Vladimir Biondic

Floral

by Giorgi Gelbakhiani

Defund Tigray Genocide Site

by Rolf Jensen

Teennovate Interactions

by Maxim Berg

From Works to Single Project

by Francesco Zagami

Paul & Henriette — 002

by Aristide Benoist

The post UI Interactions & Animations Roundup #15 appeared first on Codrops.

How to Add Amazon Ads to Your WordPress Site (3 Methods)

Do you want to add Amazon ads to your WordPress site?

Amazon ads can be a great way to make money online. Plus, they have a faster and simpler approval process compared to other ad networks.

In this article, we’ll show you how to add Amazon ads to your WordPress site, step by step.

How to add Amazon ads to your WordPress site (3 methods)

What are Amazon Ads?

Amazon ads are display ads from the Amazon network. These ads operate similar to Google AdSense and other ad networks. However, these ads will display related products from Amazon.

You can add Amazon display ads throughout your content or at the end of your posts to encourage readers to click.

Native display ads will show relevant products to your visitors based on the content and their search history.

The setup process is very easy. All you need to do is add the code to your site once, and it’ll automatically display ads across your site. This means you earn more revenue without having to do any additional work.

There are 3 different types of native shopping ads you can add to your site:

  • Recommendation ads show products based on the content and user’s search history
  • Search ads let users search Amazon products directly from your website
  • Custom ads let you display your favorite products to your readers

Why Add Amazon Ads to WordPress?

Amazon ads have a much faster approval process, which means you can quickly start earning money with display ads and affiliate marketing.

Display advertising is one of the most popular ways WordPress blogs earn money.

However, a lot of advertising networks have strict approval processes, and it can take a while to get your site approved specially if you’re new.

Amazon ads can shortcut this waiting period. If you get approved by other networks in the future, then you can add these alongside your existing Amazon ads.

Depending on the type of site you have, these ads can convert pretty well too.

How to Add Amazon Ads to your WordPress Site

There are a handful of ways you can add Amazon ads to to your WordPress website.

Before you can ad Amazon ads to your site, you’ll need to join the Amazon.

Head over to the Amazon Associates program website and click the ‘Sign Up’ button.

Amazon Associates sign up

Next, you’ll be asked to log in to your existing Amazon account using the email and password associated with that account.

If you don’t have an Amazon account, then go ahead and create one now.

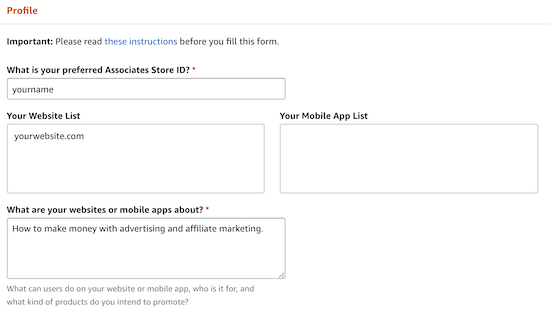
After you’ve logged in to your account, you’ll need to add additional account information and answer questions about your website. Follow the instructions to complete your profile.

Amazon Associates account information

Once you’ve finished, your application will be reviewed by Amazon. The approval process is pretty fast and much more accessible than other networks like Google AdSense.

Create Your Amazon Ads Code

Before you can add Amazon ads to WordPress, you’ll need to create your Amazon ad code.

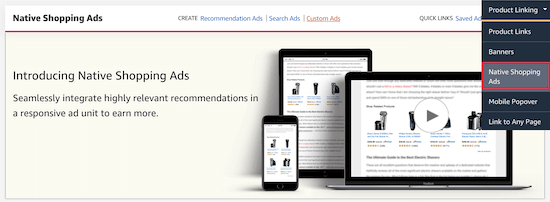
To do this, open up the Amazon Associates ad editor. Then, navigate to Product Linking » Native Shopping Ads.

Amazon Native shopping ads

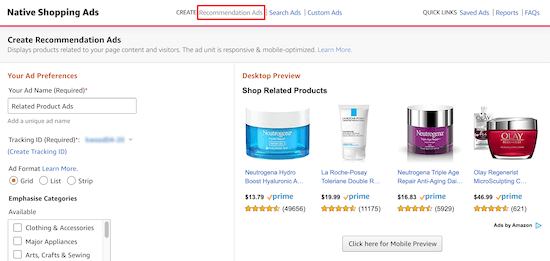
After that, click on ‘Recommendation Ads’.

You can also create ‘Custom Ads’ or ‘Search Ads’, but for this tutorial we’ll focus on recommended product ads.

Create recommendation ads

Here you’ll name your ad, choose your ad format, and select the product categories that products will display from.

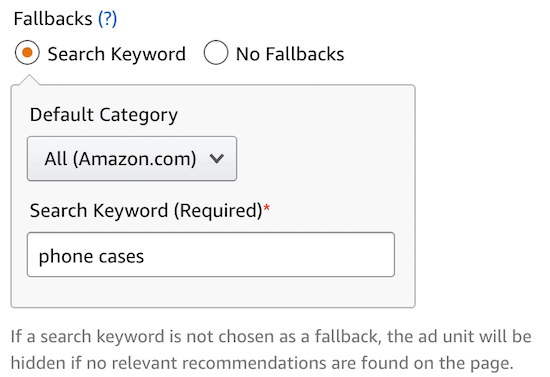
You can also set a keyword fallback.

Add product keyword fallback

If there are no relevant products to display, then Amazon will pull a product related to that keyword.

You can also preview your ad on both desktop and mobile.

Save Amazon ad code

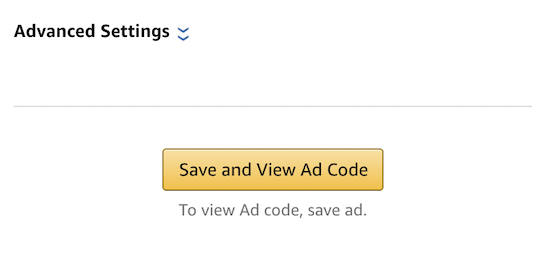
After you make your changes make sure to click ‘Save and View Ad Code’.

Then, you’ll need to copy the ad code and paste it into a text editor. You’ll need this code later to embed your ads into WordPress.

Copy Amazon ad code

Now, you’re ready to add Amazon ads to your WordPress site.

Method 1. Add Amazon Native Display Ads in WordPress

Adding Amazon display ads to WordPress is pretty simple.

You’ll have a variety of different display options and ad types to choose from.

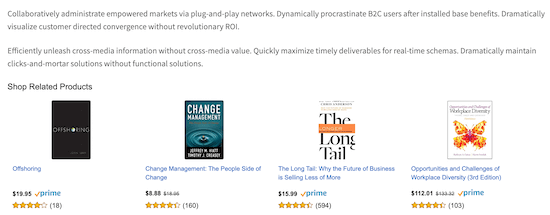
For example, let’s say you’re writing an article about how to improve your posture. You could include Amazon Native display ads at the end of your post that feature posture correctors and other mobility tools.

Amazon ads example

The easiest way to add Amazon Ads is by using a WordPress plugin.

We recommend using the WP Advanced Ads plugin. It’s easy to use and lets you quickly embed multiple ad types into your website, including Amazon ads.

First, you need to install and activate the plugin. For more details, see our guide on how to install a WordPress plugin.

WP Advanced Ads add new

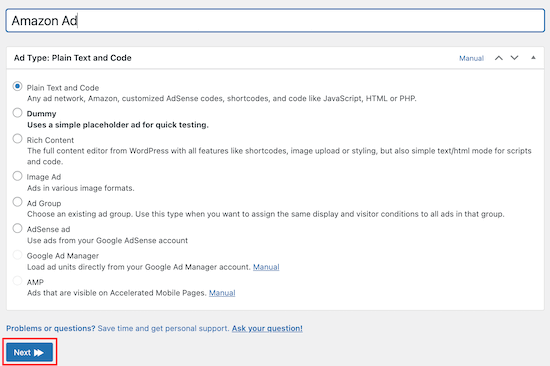
Once the plugin is installed and activated, you’ll have a new menu item called ‘Advanced Ads’. Navigate to Advanced Ads » Ads and click ‘New Ad’.

Next, add your title and select ‘Plain Text and Code’, then click ‘Next’.

WP Advanced Ads settings

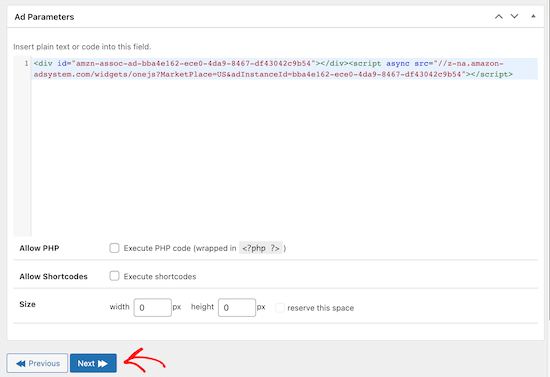
After that, paste your Amazon ad code that you created earlier.

Then, click ‘Next’.

Add Amazon ad code to WP Advanced Ads

On the next screen, you can choose to hide the ad from some users and pages. However, we’ll leave the default settings. After that, click ‘Next’.

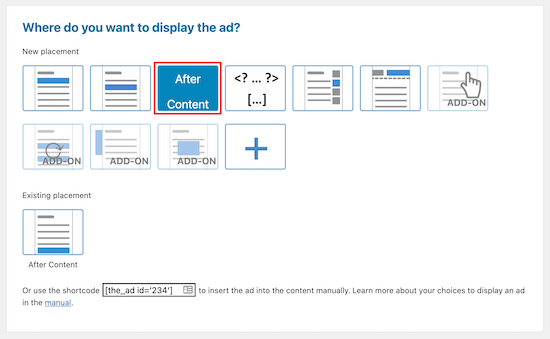
Now, we’re going to choose where our Amazon ads will display. You have multiple options to choose from including, before, after, and within your content. You also have the option to display Amazon ads in your sidebar.

We’re going to select ‘After Content’. However, you can choose the option that works best for your site.

Display Amazon ads after content

Once you select your display option, your ad will now be visible on the front end of your site.

Method 2. Add Amazon Affiliate Links in WordPress

Do you want to create an Amazon affiliate site? Affiliate websites operate a little differently than sites monetized by display ads alone.

With affiliate marketing, you’ll earn a commission whenever a visitor clicks on your link and purchases a product.

Adding Amazon affiliate links to your site is easy with the help of the right plugin. We recommend using Pretty Links or Thirsty Affiliates. These are two of the best affiliate marketing plugins for WordPress.

First thing you’ll need to do is install and activate the plugin. We’re going to use Pretty Links. However, you can choose Thirsty Affiliates as well. For more details, see our guide on how to install a WordPress plugin.

Upon activation, you’ll have a new menu item in your WordPress dashboard labeled Pretty Links.

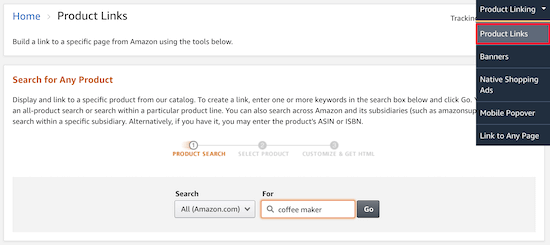
Before you create an affiliate link in Pretty Links, you’ll need to go to your Amazon Associates dashboard and create a link. Once you’re in your dashboard, navigate to Product Linking » Product links.

Amazon product links

Here you can search for the product that you want to create a link for.

Once you’ve found the product, click ‘Get Link’.

Get Amazon affiliate link

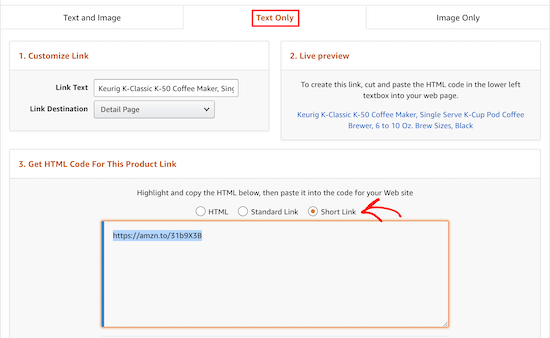
Next, you’ll need to copy the link code.

To do this, click the ‘Text Only’ navigation item, then click the ‘Short Link’ radio button.

Amazon affiliate link copy

This will bring up the affiliate link you need to copy.

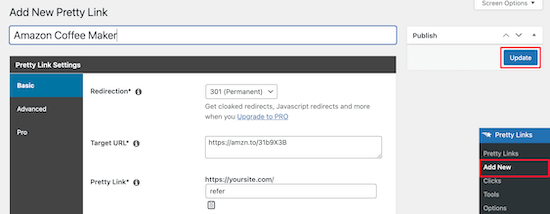
Now, go back to your WordPress dashboard and navigate to Pretty Links » Add New.

Pretty Links add new

Next, you’ll need to name your link, add your target URL, and create your link.

Your target URL is the link you copied from your Amazon Associates account. The ‘Pretty Link’ is the shortened URL you want to use instead.

Also, make sure you choose a 301 redirect. After you’ve made your changes click ‘Update’ to save the link.

Now, you can add your affiliate link to your content.

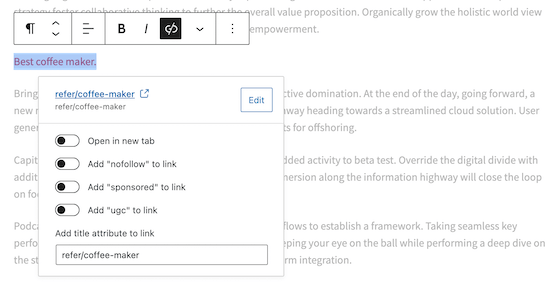
Open up a WordPress page or post. In the post editor, highlight the text you want to link and copy your affiliate link from above.

Add Amazon affiliate link

Now, when your readers click the link they’ll be taken to the product in the Amazon store. If they purchase the product, then you’ll receive a commission.

To learn more about affiliate marketing, see our ultimate affiliate marketing guide for beginners.

Method 3. Add Amazon Popup Ads in WordPress

Another unique way to add Amazon ads to your site is with a popup. You’ll have complete control over when and how the popup displays on your website.

You can even personalize the popups based on user behavior, their location, the page they’re viewing, and more.

The easiest way to add Amazon popup ads is by using OptinMonster. It’s one of the best WordPress lead generation plugins in the market used by over 1.2 million websites.

It allows you to add all kinds of popups to your WordPress site easily.

First, you’ll need to install and activate the OptinMonster plugin on your WordPress site.

The plugin acts as a connecter between your WordPress website and the OptinMonster software.

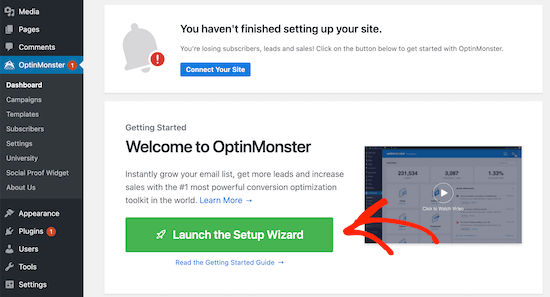
Once you’ve activated and installed the plugin, click on the ‘OptinMonster’ menu item in your WordPress admin bar.

OptinMonster main menu

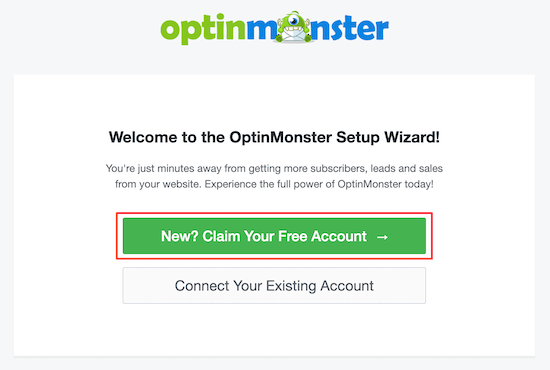
After that, you’ll need to connect your site to OptinMonster by clicking ‘Launch the Setup Wizard’.

Here, you can connect to an existing account or claim your free account.

OptinMonster setup wizard

After you’ve finished going through the setup wizard, your WordPress site will be connected to OptinMosnter.

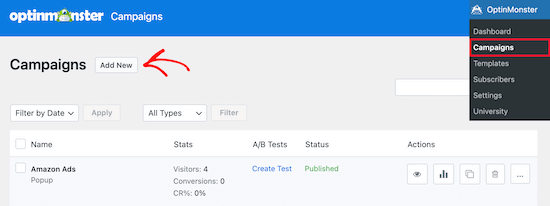
To start creating a popup ad, navigate to OptinMonster » Campaigns.

Then click ‘Add New’ to create a new campaign.

Add new OptinMonster campaign

After that, select the ‘Popup’ campaign type.

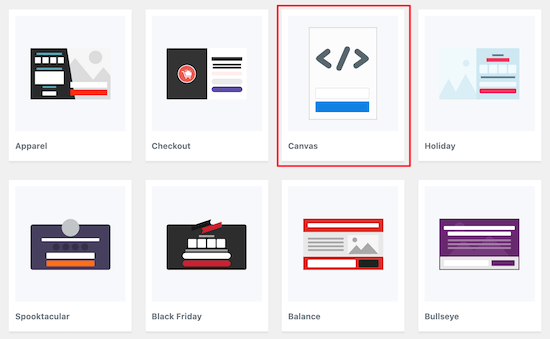
Next, choose the campaign template. We will select the ‘Canvas’ template since this gives us a blank template to add our Amazon ad code.

OptinMonster canvas template

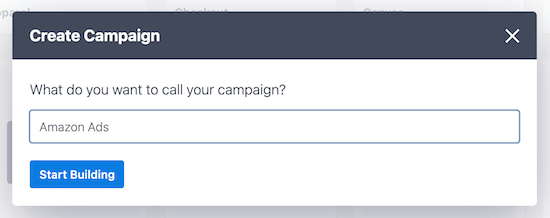
Then, enter the name of your campaign name and click ’Start Building’.

The name of your campaign won’t appear in your design but instead is to help you remember.

Name OptinMonster campaign

This will open up the OptinMonster app, where you can customize the appearance of your popup.

You won’t be making that many visual changes. Instead, you will copy and paste the Amazon ad code you generated earlier.

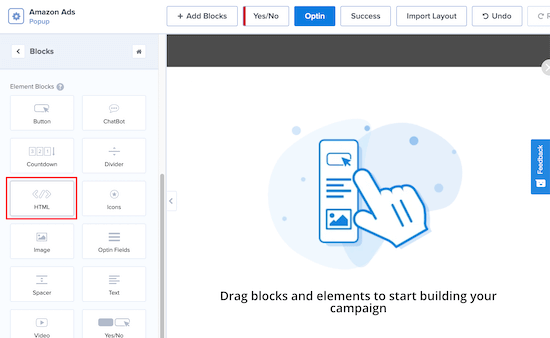
OptinMonster HTML block

First, click on ‘Blocks’, then select the ‘HTML’ block and drag it over.

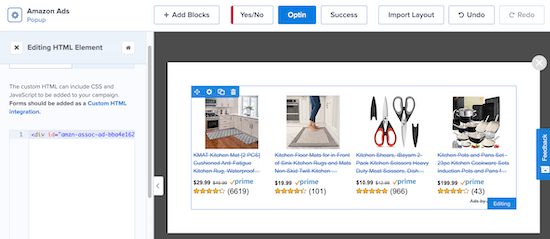
In the ‘Editing HTML Element’ box, paste your Amazon ad code. It’ll automatically appear in the editor.

Add Amazon HTML code

You can further customize your popup by adding new blocks, headings, text, and more.

Once you’re satisfied with the look of your popup, make sure to click ‘Save’, then click on the ‘Display Rules’ tab.

OptinMonster popup display rules

This is where we’ll set your popup display options.

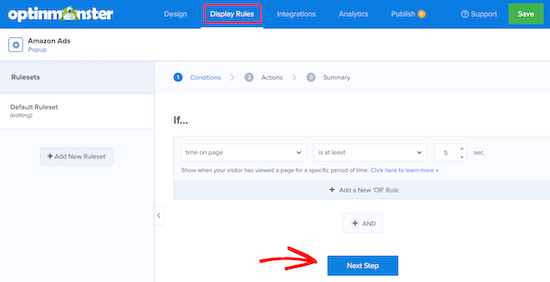
The default setting is for the popup to display when a visitor has been on the page for at least 5 seconds. However, you can adjust this if you want the period to be shorter or longer. After that, click ‘Next Step’.

You can leave the default options on the next screen. Feel free to add animation or sound effects if you’d like. Once you’re done, click ‘Next Step’.

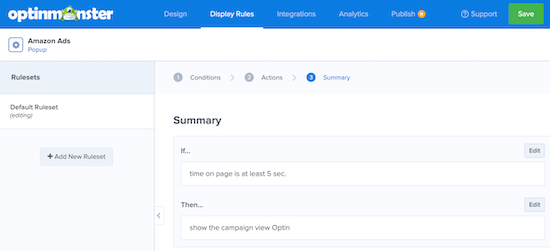
On the ‘Summary’ page, you can double check that your display settings are correct.

OptinMonster popup summary page

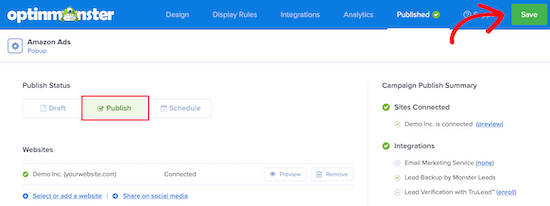
After that, go to the ‘Publish’ tab and switch the ‘Publish Status’ from Draft to Publish.

Then, click ‘Save’ and exit the screen.

Publish OptinMonster popup

Your Amazon ad popup will now be live on your site and display for visitors after the time period you set earlier.

The best part about OptinMonster is that it’s one of the few WordPress popup plugins that can give you complete control over personalization. Their display rules are extremely powerful, and you can use it to display multiple Amazon ads targeted towards different sections of your website.

We hoped this article helped you add Amazon ads to WordPress. You may also want to see our expert picks of the 24 must have plugins for WordPress and our list of the best email marketing services to grow your website revenue.

If you liked this article, then please subscribe to our YouTube Channel for WordPress video tutorials. You can also find us on Twitter and Facebook.

The post How to Add Amazon Ads to Your WordPress Site (3 Methods) appeared first on WPBeginner.

The Small Joys Of April (2021 Wallpapers Edition)

Starting off the new month with a little inspiration boost — that’s the motivation behind our monthly wallpapers series which has been going on for more than ten years already. Each month, the wallpapers are created by the community for the community and everyone who has an idea for a design is welcome to submit it — experienced designers just like aspiring artists. Of course, it wasn’t any different this time around.

For this edition, creative folks from all across the globe once again challenged their skills to cater for some good vibes on your screens. The wallpapers all come in versions with and without a calendar for April 2021 and can be downloaded for free. A huge thank-you goes out to everyone who shared their designs with us — you’re smashing!

Last but not least, you’ll also find a selection of April favorites from our archives at the end of this post. Because, well, some things are just too good to be forgotten, right? Enjoy!

  • You can click on every image to see a larger preview,
  • We respect and carefully consider the ideas and motivation behind each and every artist’s work. This is why we give all artists the full freedom to explore their creativity and express emotions and experience through their works. This is also why the themes of the wallpapers weren’t anyhow influenced by us but rather designed from scratch by the artists themselves.

Submit a wallpaper

Did you know that you could get featured in our next wallpapers post, too? We are always looking for creative talent! Don’t be shy, join in! →

European Capital Of Culture 2021

“The festivities marking Novi Sad as the European Capital of Culture may have been postponed to 2022, but to us, Novi Sad is the cultural, artistic, and educational hub every day. Novi Sad is a wonderful mix of various cultures and traditions, unhurried days, and memorable nights. From hiking endeavors on Fruška Gora Marathon and laid-back picnics in many of our city’s parks and Danube quay, the sounds of tambura coming from local restaurants to Petrovaradin fortress, jumping to the rhythm of global hits on Exit festival, museums and galleries, pubs and nightclubs in Laze Telečkog, the upbeat street of Novi Sad’s urban and night life — Novi Sad welcomes you with its diversity, uniqueness, and passion.” — Designed by PopArt Studio from Serbia.

Sunset In Sydney

“I can see a ship sailing in the river while I am hearing a beautiful opera.” — Designed by Veronica Valenzuela from Spain.

Spring Time

Designed by Ricardo Gimenes from Sweden.

Happy Easter

“Easter always feels like the start of Spring! And this year, after a particularly hard winter of lockdowns, it’s needed more than ever. Time to start living the outdoor life again and feeling the warmth of the sun! Happy Easter everyone!” — Designed by Ever Increasing Circles from the United Kingdom.

April Showers

“Inspired by the old saying, April Showers bring May flowers!” — Designed by Milica from Serbia.

I’m Ready For Spring

Designed by Ricardo Gimenes from Sweden.

Smashing Time

Designed by Ricardo Gimenes from Sweden.

Our Only Home

“In April, we celebrate World Health Day. This year’s celebration is perhaps more relevant than ever before. In addition to caring for the health of humanity, let us also take care of the health of the planet, because it is our only home.” — Designed by LibraFire from Serbia.

Oldies But Goodies

Sakura, rainy days, imagination filling up one’s mind with ideas — often it was the little things that inspired the community to design a wallpaper for April. Below you’ll find a selection of some of these almost-forgotten favorites from our archives. Maybe you’ll rediscover an old acquaintance in there, too?

Spring Awakens

“Despite the threat that has befallen us all, we all look forward to the awakening of a life that spreads its wings after every dormant winter and opens its petals to greet us. Long live spring, long live life.” — Designed by LibraFire from Serbia.

Clover Field

Designed by Nathalie Ouederni from France.

Fairytale

“A tribute to Hans Christian Andersen. Happy Birthday!” — Designed by Roxi Nastase from Romania.

Happy Easter

Designed by Tazi Design from Australia.

Sakura

“Spring is finally here with its sweet Sakura’s flowers, which remind me of my trip to Japan.” — Designed by Laurence Vagner from France.

Good Day

“Some pretty flowers and spring time always make for a good day.” — Designed by Amalia Van Bloom from the United States.

April Insignia

“April — its first day reminds us that laughter makes life better. Nature also laughs, but it does so in daisies!” — Designed by Ana Masnikosa from Belgrade, Serbia.

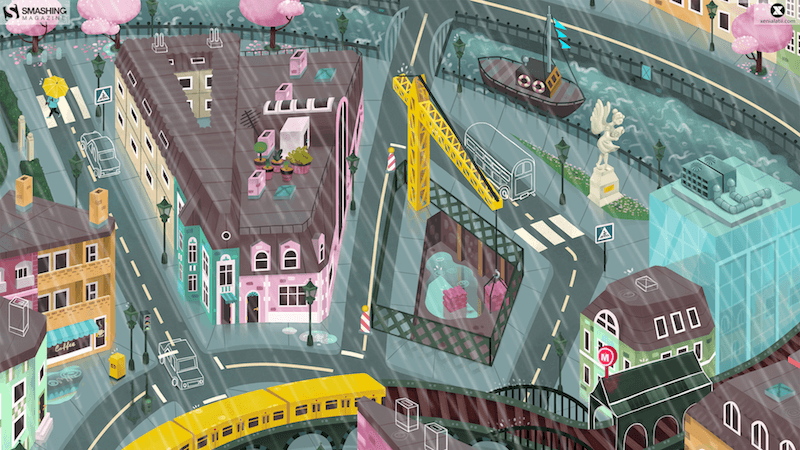
Rainy Day

Designed by Xenia Latii from Berlin, Germany.

Spring Serenity

“My inspiration was the arrival of spring that transmits a sense of calmness and happiness through its beautiful colors.” — Designed by Margarida Granchinho from Portugal.

Dreaming

“The moment when you just walk and your imagination fills up your mind with thoughts.” — Designed by Gal Shir from Israel.

April Flowers

“While April showers usually bring May flowers, we thought we all deserved flowers a little early this year. During a stressful time in the world, spending time thinking about others is an antidote to some of the uncertainty. We thought this message, Lift Others Up, reflected the energy the world needs.” — Designed by Mad Fish Digital from Portland, Oregon.

You’re Smashing

Designed by Ricardo Gimenes from Sweden.

A Time For Reflection

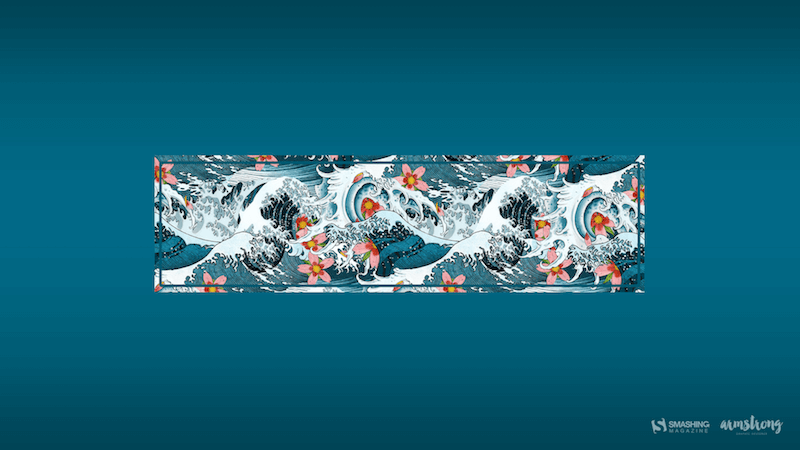
“‘We’re all equal before a wave.’ (Laird Hamilton)” — Designed by Shawna Armstrong from the United States.

The Perpetual Circle

“The Black Forest, which is beginning right behind our office windows, so we can watch the perpetual circle of nature, when we take a look outside.” — Designed by Nils Kunath from Germany.

Purple Rain

“This month is International Guitar Month! Time to get out your guitar and play. As a graphic designer/illustrator seeing all the variations of guitar shapes begs to be used for a fun design. Search the guitar shapes represented and see if you see one similar to yours, or see if you can identify some of the different styles that some famous guitarists have played (BTW, Prince’s guitar is in there and purple is just a cool color).” — Designed by Karen Frolo from the United States.

Egg Hunt In Wonderland

“April is Easter time and I wanted to remind us that there’s a child inside all of us. My illustration is based on the story that fills our imagination since childhood, Alice in Wonderland, and joined to one of the most traditional customs in America at this time of year, the egg hunt. That’s how we get an ‘egg hunt in wonderland’.” — Designed by Patrícia Garcia from Portugal.

Space Travel

“In April 1961, Yuri Gagarin became the first traveler who had a round trip to outer space.” — Designed by Igor Izhik from Canada.

Fusion

Designed by Rio Creativo from Poland.

Citrus Passion

Designed by Nathalie Ouederni from France.

Shakespeare’s Birthday

“April 23 sees the anniversary of William Shakespeare’s Birthday, arguably the finest writer England has ever produced. Here’s a jolly little wallpaper featuring some of his most famous quotes.” — Designed by Daniel Rooms from England.

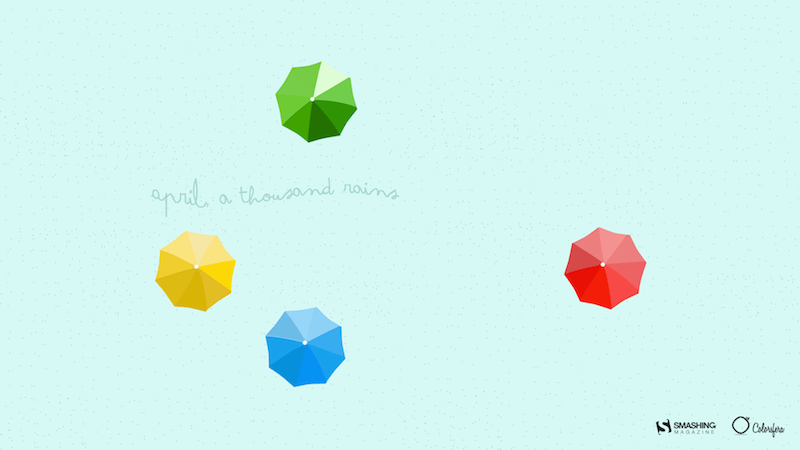
Abril Lluvias Mil

“We were inspired by the rain and a popular Spanish adage which says: ‘April a thousand rains’, which means a lot of rain in April.” — Designed by Colorsfera from Spain.

How to Build a Robust IoT Prototype In Less Than a Day (Part 2)

(Part 1 is here.)

Welcome back to our second article about creating a robust, bidirectional IoT prototype in less than a day using Arduino, Heroku, and Node-RED. If you missed the first part, we covered setting up Node-RED, adding security, and deploying to Heroku. In this article we'll look at creating our embedded system on the Arduino boards, connecting them to our Node-RED instance, customizing Sketches, and creating a flow that allows our devices to talk to each other. Let's get started.