Get Started With UI Design With These Tips To Speed Up Your Workflow

Get Started With UI Design With These Tips To Speed Up Your Workflow

Get Started With UI Design With These Tips To Speed Up Your Workflow

Tomáš Čakloš

This article is about creating limits and rules to follow throughout the entire design process. There is an unlimited number of ways in which you can combine elements in a user interface — and so you’ll need to set some rules and boundaries, or else the design workflow might become an unpleasant chore. You might be struggling with all of the possibilities and trying to pick the best option among many “correct” options. By setting (and following) some basic rules, you will make your design look more consistent, too.

This article is intended for beginner UI designers. You don’t need a lot of experience in order to be able to follow the tips and tricks shared in it.

setting limits and rules helps designing
Having a system is important!

The Importance of Making Your User-Interface Design Consistent

Let’s start at the very beginning. You want your design to look good and trustworthy, and you need to avoid chaos at all costs. For this to happen, it’s very important to have a system for your design work.

Your developers will appreciate a system, too — they’ll love the fact that your design has order, and that you are making their work easier.

A System Of Resizing By A Predetermined Size

It doesn’t matter whether you want to resize a text block, resize an image, or adjust some white space. You need to decide how big each element will be. And I’ll bet you have been in this situation: Have you ever chosen a size for an element, and after five minutes, you change it, and then again, and maybe again and again?

Which size is perfect? It could be one of the ones you tried, right? You need to avoid this endless time-wasting trap!

Start By Choosing The Basic Unit: The 8-Pixel Grid

To make the whole design look cleaner, it’s helpful to first set the measurement value that will then determine all of the sizes. It is completely up to you what value you choose, but quite often, the best option is to stick to a few proven rules. And one of these rules is to resize and move elements by exactly eight pixels. This rule will streamline your decision-making.

Aside on px versus dp: In addition to pixels (px), you may have heard of the term dp being used in screen design and prototyping. The dp unit is short for “density-independent pixel.” The unit is relative to a 160-dpi screen, so 1 dp is equal to 1 pixel on a 160-dpi screen, and equal 2 pixels on a 320-dpi screen, and so on. The numeric value formula is px = dp * (dpi/160).

Note: If you work with smaller elements or objects, it’s also OK to use 4-pixel increments, instead of 8 — occasionally, you can make further adjustments, when required.)

But Why Exactly 8 Pixels?

There are a few reasons why eight often works like a “magic number” here:

  • Eight pixels is a sufficient minimum “jump”.
  • Eight is a great number because it is divisible by four and two.
  • If you use eight, you can easily resize any element without ending up with half pixels, as 8 / 2 = 4, 4 / 2 = 2, and 2 / 2 = 1. If, on the other hand, you start with 10, you’ll end up with 5 pixels, then 2.5 pixels, then 1.25 pixels. When designing for screen, you’d like to avoid half pixels as much as possible. By using whole pixels, elements in the design will align to precise pixel boundaries, and so will look crisper.
  • Multiples of eight (8, 16, 24, 32, 40, 48, 56, 64, 72, 80, etc.) are intertwined with binary values (1, 2, 4, 8, 16, 32, 64, 128, 256, 512, etc.).
  • Finally, the numbers are easy to remember.

What Are The Advantages Of Using An 8-Pixel Grid?

  • As a designer, your decision time is precious. This will make you faster and more efficient.
  • If you are working with a developer, you can create a system that will help you and your team. If the developer needs to make some quick changes, he can adjust the values by 8-pixel increments. This will ensure consistency and order.
  • People using your website will feel comfortable when they visit it. They will trust the website, and it’ll be easier for them to use the interface.
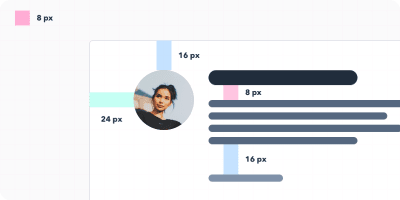
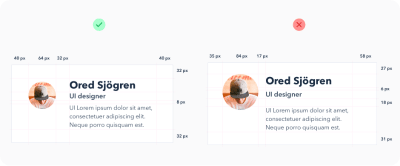
8 pixel grid
An effective way of using the 8px grid
using an 8 pixel grid
The result of using an 8px grid

Work With A Grid To Lay Out All Elements

Horizontal Harmony

I’m sure you have already used a grid when designing websites. Using a grid helps you to accurately place all elements on the digital canvas.

The grid forms the skeleton of your interface and determines where you can place elements. The template holds the composition, and it defines clear boundaries so that your design will be more consistent. Now it will be easier for you to decide where to put the elements. As you gain more experience, you can update the boundaries as needed.

But how do you create this grid? We will cover the specifics next. Basically, the number and size of columns may be random and depends on your needs. The more detailed your design, the more columns the grid will require. If you’re hesitant, ask an experienced colleague for assistance.

Also, I recommend that you read “A Comprehensive Guide to UI Design”, which should help you understand user-interface design a bit more in depth.
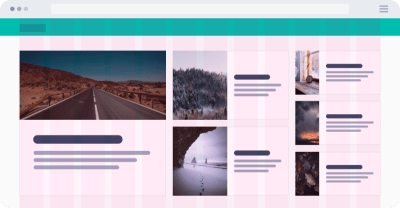
horizontal harmony
Horizontal harmony

Vertical Harmony

Similar to maintaining horizontal harmony, it is important to keep vertical distances consistent in a design as well. Like the rows in a spreadsheet, they help you to keep text at evenly spaced intervals.

How big should these rows be? Again, it’s up to you. However, I recommend using 8 pixels or multiples of 8 (such as 16). Redefine boundaries where elements or text are to be aligned.

vertical harmony
Vertical harmony

Picking Font Sizes The Right Way

If you look at some well-crafted designs, you will see consistency in font sizes. This is for a reason.

Note: Keep in mind also that you need only two, maybe three, fonts in your design. However, selecting the right typefaces and making them work together is beyond the scope of this tutorial.

Begin by defining a few key font sizes to use throughout the project. (For example, it would be foolish to use 30, 31, and 32 pixels. Rather, combine these three very similar sizes into one.)

Standard Font Sizes Bring Two Benefits:

  • Your design will be more consistent and more elegant.
  • It will speed up the design process and make you more efficient.

Font Sizes

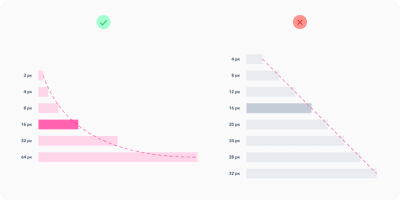
When you are defining font sizes, make sure not to increase sizes by the same increment. When you are enlarging text, it should be non-linear. This means that the larger the text you are creating, the larger the increment should be.

system in font sizes
Having a system in font sizes

Let’s say you have a text block with a 12-pixel font size, and you want to enlarge it. You try 14 pixels, and you are satisfied. But then imagine that you have a large headline (40 pixels) and you want to make it bigger. Would you increase the size by only 2 pixels, from 40 to 42? Of course not. Optically, the text requires a much bigger change. You might need to increase it by 24 pixels, giving you a bigger 64-pixel headline.

In short, this means that the bigger you want the text to be, the larger the increment you will need to use. This very simple principle applies not only to text, but also to the size of buttons, white space, and everything else.

It is typically based on a geometric progression. Here is a very useful chart demonstrating font scale:
geometric progression
Geometric progression

However, for typography, one proven scale is used with font sizes that you will want to stick with forever. The scale is 12, 14, 16, 18, 20, 24, 30, 36, 48, 60, and 72 pixels.
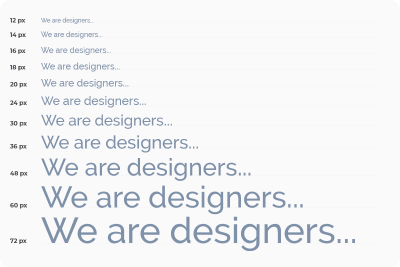
typography scale
Proven typography scale for sizes

Text Line Height

Once you have defined all font sizes, you will want to take care of line spacing. For line height, use increments of 4 pixels again. For example, for 16-pixel text, let’s set the line height to 24 pixels. If you want the text to breathe more, then increase the row height by 4 pixels to 28.

Define Your Project’s Colors

Do you know how many color combinations exist? A lot! You will waste too much time if you don’t predefine shades of color. You can’t limit yourself to black, white, and, say, blue. For each color, you will need other shades, and it is important to set them in advance, so that the shades are consistent throughout your design project. We don’t want to create chaos in the design. Aim for 5 to 10 shades for each color. I prefer to define 9 shades for each color.

Let’s take a closer look at color shades.

Why 9 Shades Of Each Color?

  • The first advantage is color naming. Whether you are using a graphics editor or CSS code, you will definitely benefit from this tip. Each shade would be assigned a number, such as 100, 200, 300, 400, 500, 600, 700, 800, and 900. (Why hundreds? Typically, this is how cuts of typefaces are also organized.)

  • Secondly, 9 is a handy number for defining colors. The best way to prepare these shades is to prepare a row of 9 squares and fill the squares with colors. The one in the middle will be the base color. Then, you define the lightest shade (at the far left) and the darkest shade (at the far right). The next step is to select the hues in between.
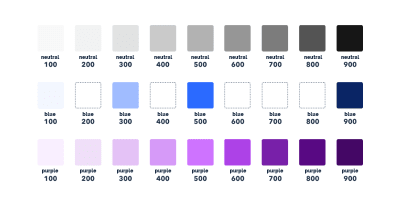
nine shades of each color
Nine shades of each color

Prepare The Different Sizes, Types, And States Of Elements

When working on a design, you will usually work with a countless number of icons, buttons, and other components. Again, it’s a good idea to prepare in advance several sizes for them, and limit the options to as few as possible. During the design process, do not add other sizes, and don’t try to adjust the size of components to suit your needs. Instead, just use the ones you have already defined, and the whole design will be more consistent and clean.

Let’s look at buttons as an example. When you begin, you’ll need to define their hierarchical structure. To do so, make a button with a primary action, a button with a secondary action, and perhaps another button with a less important action. For each button, specify its status (active, inactive) and the color variant. Always try to reduce the number of elements to the most important ones.

button styles
An example of button styles

Define Other Elements’ Properties

User interface designers often use shadows in their design work. However, for less-experienced designers, shadows can sometimes be a struggle. When creating a shadow, you must set the shadow’s distance along the x-axis and y-axis, and also the blur radius, color, and transparency. Shadows can take a lot of time to fine-tune, which is why you’ll want to prepare them before diving into the design. It is helpful to prepare a set of shadows (using the same method as for colors), and then just apply them throughout the design process.

Also, be aware of all the other properties of elements that you will be working with, such as corner radius, transparency, and color gradients.

shadow styles
An example of shadow styles

White Space

Properly adjusting white space is important. Whether you offset elements from the outside (margin) or from the inside (padding), you should rely on the magic number of 8 again. Increase the offset by 8 pixels (4 for small elements). As with font size, the larger the gap you want, the larger the increment will have to be (again, you’ll need to define these increments in advance).
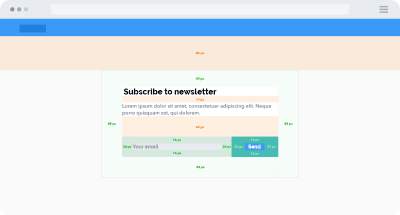
white space
White space

Conclusion

To make your designs clean and consistent, define some boundaries and a clear path through the process.

When working on each element of your design, keep in mind the following:

  • See whether you have used it already somewhere in your design. If so, you can simply copy that element.
  • Follow a horizontal and vertical rhythm, and adjust the size of elements using the steps that you defined at the very beginning.
  • Avoid complicated decisions and never-ending battles with pixels. Have a system in place.
  • Do not create the same element twice. If there is order in your design, your work will be better and more efficient, you will be able to iterate faster, and you will be able to communicate with the developers more easily. The developers will set variables that follow your styles, so define them clearly. You’ll get a clean design, and the developers will be able to create better and more sustainable code. Everyone will be happy.
Smashing Editorial (mb, il)

Awesome Demos Roundup #11

Some quite amazing web experiments were born in the past couple of weeks and we want to make sure that we collect them all for you so that you don’t miss any great demos out there. We hope this collection inspires you and gives you a pleasurable overview of the current creativity flow among developers. Enjoy!

Race Car Island

Perspective

nurbsTest

Image to Pin Point Impression

sheen

Pokéfolio

Geometric (2019)

Pure CSS Russian Bears

Frozen globe

Turn on your microphone to enjoy this experiment:

jiggles

Glitchy text w/ Splitting.js

Pattern Recognition 3

Unrailed

Skull

voxel disp by video

Meet Andre

Password Guide

Tetris + Snake

Dual Triangle Preloaders

Curve Typo

Plane Trails

Pure CSS CYBRTRK

blader runner

FREE DELAUNAY

Cool CSS Underline Effects

WebGL slideshow & ui navigation buttons with curtains.js

Fifth Avenue

Toggle Switch with Rolling Label

Realistic 3D Photo Cards (Hover Effect, Vue.Js)

spiral

Holiday CSSweater Generator

Interactive Hippo Button

Touch down at Berlin Tegel using the ArcGIS API for JavaScript and Anime.js

Awesome Demos Roundup #11 was written by Mary Lou and published on Codrops.

What is Git?

Curious how the coding world works? Well, there are lots of ways developers work on sites and apps together, and Git is one of the main tools they use to do it. What is Git? Git is a version control...

The post What is Git? appeared first on Treehouse Blog.

Dark Mode Favicons

Oooo! A bonafide trick from Thomas Steiner. Chrome will soon be supporting SVG favicons (e.g. <link rel="icon" href="/icon.svg">). And you can embed CSS within an SVG with a <style> element. That CSS can use a perfers-color-sceme media query, and as a result, a favicon that supports dark mode!

<svg width="100" height="100" xmlns="http://www.w3.org/2000/svg">
  <style>
    circle {
      fill: yellow;
      stroke: black;
      stroke-width: 3px;
    }
    @media (prefers-color-scheme: dark) {
      circle {
        fill: black;
        stroke: yellow;
      }
    }
  </style>
  <circle cx="50" cy="50" r="47"/>
</svg>

Safari also supports SVG, but it's different...

<link rel="mask-icon" href="/favicon.svg" color="#990000">

You specify the color, so there is no opportunity there for a dark mode situation. A little surprising, since Apple is so all-in on this dark mode stuff. I have no idea if they plan to address that or what.

The post Dark Mode Favicons appeared first on CSS-Tricks.

Black Friday Banner Gone Wrong: Advertising in Free Plugins

Screenshot of the Yoast SEO plugin Black Friday ad in the WordPress admin.
Screenshot of the Yoast Black Friday Ad

On November 28, millions of people awoke to a Black Friday ad on nearly every page of their WordPress admin, courtesy of the Yoast SEO plugin. That day also coincided with the U.S. Thanksgiving holiday, so it left freelancers and agencies scrambling to address a banner on their clients’ sites on a day they likely planned to spend with family. The ad was not limited to users with administrative permissions either, so some site owners were troubled to find users with low-level permissions could see the ad in the WordPress admin.

The initial code for the banner was added on October 25, which made its way into version 12.4 of the Yoast SEO plugin. The code for the banner ad limited its output between November 28 and December 3 (Cyber Monday).

After blowback from users, the Yoast team published an updated version of the plugin without the banner. However, the initial damage was done. Users began immediately leaving poor reviews for the plugin. The 1-star reviews are still coming in, putting the number over 100 in the span of five days.

“That BlackFridayBanner was not the best idea,” wrote Marieke van de Rakt, CEO of Yoast, on Twitter. “We’re truly sorry for the annoyance and difficulties it may have caused. We did not think this through properly. If you want, you can update to a new version of our plugin without that banner.”

The initial decision to place the ad was about growth for Yoast’s premium products. The company has not grown as fast as expected over the past year explained van de Rakt. They had also seen other plugins use those types of ads, which was a part of the decision to run it.

“Let’s be clear,” said van de Rakt. “This was a mistake. We just didn’t think this one through. It was incredibly stupid. So I can talk about why we made a decision, but I don’t want that to be the explanation. The explanation is that we made a mistake.”

The ad was an animated banner, and some users complained that it was difficult to dismiss. All notices in plugins available through the WordPress plugin directory must be dismissible. “That was a technical mistake,” said van de Rakt of the issues with clicking the “x” icon for dismissal.

While the team had seen other plugins run similar ads in the past, van de Rakt explained that they didn’t take into account how large of a user base Yoast SEO has in comparison to those plugins. “For so many users, we were the first plugin that done this,” she said. “They never saw this before in their backend. And they freak out. This was a complete error of judgment.”

Yoast plans to talk more with its plugin’s users. Currently, the team is looking into creating a user-testing panel to prevent similar situations in the future.

“In hindsight, and that’s what I feel most bad about, the banner did not fit our values,” said van de Rakt. “These kinds of banners are not ‘Yoast.’ Perhaps, if we state more explicitly what we as Yoast find important and what fits Yoast and what doesn’t, a mistake like this will be made less quickly.”

Making Money with Freemium Products

Yoast is a large company within the WordPress space. It employs 90 people in its primary office in Wijchen, the Netherlands. It also has an additional 20 employees around the world. Running a successful business means paying everyone, contributing back to WordPress with its five-for-the-future work, and running charitable programs such as the Yoast Diversity Fund.

Currently, the Yoast SEO plugin has over 5 million active installs. According to van de Rakt, only around 2% of the plugin’s users also use the company’s premium products. Such a large plugin needs continuous funding to support and maintain.

Advertising a product or service in an internet culture that is seemingly averse to ads is not always easy. “It’s rather hard to find ways to reach our audience, and we also have some principles on how (not) to do that,” said van de Rakt. “We like to advertise in a straight-forward way. Tell people what they’re buying. Ads are very annoying, but at least they are clear in what they’re doing.”

One issue that plugin companies run into is the lack of an official premium marketplace for WordPress. Currently, companies have to resort to in-admin advertising or similar tactics to push users on an upsell. Most of Yoast’s premium products are sold through banners on the plugin’s pages in the WordPress admin. Such practices do not always go over well with users, particularly when they are using a free product. One wrong step and it could spell disaster for future growth. Yoast is large enough to bounce back, but smaller companies may struggle more.

It is a tough balancing act between providing a valuable free product and making enough of a return to run a successful company. The Yoast team does not want to lock their popular SEO plugin completely behind a paywall. “Our mission is SEO for everyone,” said van de Rakt. “We believe that every idea should have a fair chance in the search results. That means that also without any funds, people should be able to have a good working SEO plugin. Our free plugin is really important to us.”

“I had a really bad weekend,” said van de Rakt. “I am a people pleaser and I was terribly sad by what happened. But, the discussion about how to handle this is a good one.”

Perhaps some good will come of this incident if there is an open dialogue. “These kinds of things sometimes lead to different ‘rule-sets’ or policies within WordPress,” said van de Rakt. “Might even mean that there will be different and better ways for premium plugins to market their products.”

WooCart Review: Is It The #1 WordPress Hosting For WooCommerce Stores?

Are you running an online store? With WordPress and an eCommerce plugin like WooCommerce, we can easily manage, properly run our online shop. Well, before going to host your blog, you might want to choose the best WooCommerce optimized hosting. There are a lot of WordPress hosting companies available, but not that many specialized in […]

The post WooCart Review: Is It The #1 WordPress Hosting For WooCommerce Stores? appeared first on WPArena.

State of JavaScript 2019 Survey

Well, hey, look at that — it's time for this year's State of JavaScript survey!

You have taken this survey last year. Or in 2017. Or in 2016. It's been going on for a little while now and it always lends interesting insights into things like the features developers are using, the popularity of specific frameworks, and general trends. And, since the survey is going into its fourth year, we may start to get some real insights into the evolution of JavaScript over time.

So go ahead and take the survey. The more people who take it, the better results we get.

In case this is new to you, the survey is brought to you by the same folks who brought us the first State of CSS survey just this year. You can listen to Sacha Greif chat with Chris and Dave about that one over on ShopTalk for little gems about the results.

Direct Link to ArticlePermalink

The post State of JavaScript 2019 Survey appeared first on CSS-Tricks.

Save Big on An Event Apart for a Limited Time!

(This is a sponsored post.)

If you could get one gift from your boss this holiday season, what would you want it to be? You know, other than the usual mouse pad, picture frame or, my favorite, the ol' coffee mug and Starbucks card combo.

What if you were to receive something, hmm, more substantial? Like something that keeps giving three days instead of one. Or something that levels up your front-end chops. Or something that lets you network with your peers and gain invaluable experience by learning from the brightest minds in the biz?

Yes, all of that would be awesome — nay — epic! And, yes, you can get all of that together with one ticket to An Event Apart.

There truly is no better gift for front-enders. It's a break from the desk into a three-day haven of learning about the most important movements in web development and design from the folks who are leading the way. Seriously, just check out the lineup for the Washington D.C. installment.

This is where we'd normally share a special coupon code that scores you a $100 discount and gives us credit for sending you there. You can totally do that by entering AEACP at checkout. We rely on sponsorships around here and supporting our sponsors keeps this boat moving.

But! An Event Apart are feeling extra generous this season and offering a discount of $200 off any two- or three-day pass to any of their 2020 events. That includes stops in D.C., Seattle, Boston, Minneapolis, Orlando and San Francisco!

OK, so what's that code? You're just gonna have to watch out on Twitter, Facebook or their mailing list on Friday, December 13, to get it.

Learn More

Direct Link to ArticlePermalink

The post Save Big on An Event Apart for a Limited Time! appeared first on CSS-Tricks.

Establishing an Open-Source Program Office

Learn more about establishing an open-source program office.

It feels like we don’t have a strong understanding of open source itself. Some scars have come from working with open source in an environment filled with proprietary software. When the words “open” and “source” were brought together, there was a visceral reaction. People were skeptical of it. Some even despised it.

There’s no one-size-fits-all way to bring open source into your ecosystem. But it does require a strong champion. That’s why Lee Calcote (@lcalcote) advocates for creating a specific office.

Selenium Java Tutorial: Automation Testing of a User Sign Up Form

If you are just starting with Selenium automation testing of your product, the first page you would probably want to automate would be the Sign Up or Login Page. If you have an online platform, like an ecommerce company or a Software-as-a-Service product, the Sign Up page acts as the door to welcome visitors to your web application. 

It is one of the simplest yet one of the most important pages of your platform, and comes at the start of every possible user journey that you may want to test. Hence, it is also one of the most important web pages for your web application.

Android App Architecture Part 2: Domain Layer

In the previous article, we talked about the basics of Clean Architecture, MVVM, and app modularization. Then, we created a sample WeatherApp with initial package structure (core, WeatherApp, data, domain, feature, navigation module, Gradle files, etc.).

In this article, I’ll take you through the process of creating the first feature for data parsing from local JSON that’ll display the results to the user. We can simply call this feature weather.

Solving Common IoT Challenges

Learn more about solving common IoT challenges in this post.

The Internet of Things (IoT) is a hot subject amongst technology companies today. According to Forbes, we expect to see over 20 million connected devices by 2020. As a result, we will begin to see a lot more IoT services and solutions to current IT problems.

But IoT solutions come with challenges. Among those challenges, IoT solution providers fall in the realm of connectivity, power, security, and integration. We'll look at each of these challenges and potential solutions to them in this post.

Types of Blockchain Ledgers

Over the years, Blockchain has acquired immense prominence in the digital world. Its capability of maintaining data transparency and its immutable structure has attracted more and more industry verticals to pursue and utilize it for their regular transactions.

Blockchain, in basic language, is an accumulation of blocks (ledger), in a distributed network (chain), which is utilized to record digital data of any value. The data is stored across all the blocks in the network. Consequently, there is no single proprietor or focal vault controlling it.

Change Data Capture (CDC) With Embedded Debezium and SpringBoot

While working with data or replicating data sources, you probably have heard the term Change Data Capture (CDC). As the name suggests, “CDC” is a design pattern that continuously identifies and captures incremental changes to data. This pattern is used for real-time data replication across live databases to analytical data sources or read replicas. It can also be used to trigger events based on data changes, such as the OutBox pattern.

Most modern databases support CDC through transaction logs. A transaction log is a sequential record of all changes made to the database while the actual data is contained in a separate file.