You can’t have one without the other … No, I’m not musing about love and marriage. I’m talking about content...
The post 9 Essential Elements of Effective Content Marketing appeared first on Copyblogger.

Tips, Expertise, Articles and Advice from the Pro's for Your Website or Blog to Succeed

You can’t have one without the other … No, I’m not musing about love and marriage. I’m talking about content...
The post 9 Essential Elements of Effective Content Marketing appeared first on Copyblogger.

I am working on an app where a user registers and its passed to the server where there information is added to the database.
It passes various checks along the way but ails to add the user.
Code below:
<?php

    $con = mysqli_connect('localhost', 'root', 'root', 'eat4lessaccess');

    //check connection
    if(mysqli_connect_errno())
    {
        echo "1: Connection Failed"; //Error code 1 = connection failed
        exit();
    }

    $username = $_POST["username"];
    $password = $_POST["password"];
    $name = $_POST["name"];
    $email = $_POST["email"];
    $phone = $_POST["phone"];

    //Check username exists
    $usernamecheckquery = "SELECT username FROM useraccounts WHERE username='" . $username . "';";
    $usernamecheck = mysqli_query($con, $usernamecheckquery) or die("2: Username Check Query Failed"); //Error code 2 = username check query failed;

    if(mysqli_num_rows($usernamecheck) > 0)
    {
        echo "4: Username Already Exists";
        exit();
    }

    //Check email exists
    $emailcheckquery = "SELECT email FROM useraccounts WHERE email='" . $email . "';";
    $emailcheck = mysqli_query($con, $emailcheckquery) or die("3: Email Check Query Failed"); //Error code 2 = email check query failed;

    if(mysqli_num_rows($emailcheck) > 0)
    {
        echo "5: Email Already Exists";
        exit();
    }

    //Add User Account To Table
    $salt = "\$5\$rounds=5000\$" . "dajmsoftware" . $username . "\$";
    $hash = crypt($password, $salt);
    $insertuserquery = "INSERT INTO 'useraccounts' ('id', 'username', 'hash', 'salt', 'name', 'email', 'phone', 'stickers') VALUES (NULL, '" . $username . "', '" . $hash . "', '" . $salt . "', '" . $name . "', '" . $email . "', '" . $phone . "', '0')";
    echo $insertuserquery;
    mysqli_query($con, $insertuserquery) or die("6: Insert User Query Failed");

    echo "0";
?>
The console message i get creating a user is as follows:
Error Creating User Account. Error #INSERT INTO 'useraccounts' ('id', 'username', 'hash', 'salt', 'name', 'email', 'phone', 'stickers') VALUES (NULL, 'teajunkie', '$5$rounds=5000$dajmsoftwareteaj$xXqvpiBkwn77es6CWeVvlq/uzLJ/Eunak.exeYaRbS.', '$5$rounds=5000$dajmsoftwareteajunkie$', 'Daryl Ashby', '[censored Email Account]', '[Censored Phone Number]', '0')6: Insert User Query Failed
I MANUALLY CENSORED MY EMAIL & PHONE FROM THE CONCOLE LOG! :)
The id is set to primary and auto incriment.
Can someone help?
Many Thanks.
Do you want to create a WooCommerce contest to boost customer engagement and increase sales?
Contests are an easy way to get new visitors to your WooCommerce store, increase brand awareness, and keep customers engaged.
They can also help you boost customer loyalty, improve conversions, and increase sales in the long run.
In this article, we’ll show you how to easily create a WooCommerce contest to boost loyalty and engagement.

As an online store, you need to bring new customers to your website. The challenge is that most of these users leave without making a purchase.
Only 30% of customers who add products to their cart actually finish the checkout. This is why we have a comprehensive guide on how to recover abandoned cart sales in WooCommerce.
Once a user leaves your website, it is hard to bring them back unless you find ways to stay in touch.
Adding contests and giveaways allows you to provide users a fun reason to stay a little longer. They also help you collect email addresses, user responses, and grow your social media following.
All of this ultimately leads to more sales and increased customer loyalty.
That being said, let’s take a look at how to easily create a WooCommerce contest to grow your business.
For this tutorial, we’ll be using a plugin called RafflePress. It is the best WooCommerce contest / giveaway plugin that allows you to easily run viral contests and giveaway campaigns on your website.
It comes with social actions that help you amplify your reach and find new customers. It also helps you grow your email list, increase social media followers, and boost customer loyalty.
Note: our team built RafflePress to help us grow our online presence. Based on user request, we released it as a plugin for anyone to use.
First, you need to install and activate the RafflePress plugin. For more details, see our step by step guide on how to install a WordPress plugin.
Upon activation, the plugin will add a new menu item labeled ‘RafflePress’ in your WordPress admin sidebar. Clicking on it will take you to the plugin’s settings page.

First, you will need to enter your license key. You can find this information under your account on the RafflePress website.
After entering your license key, you are now ready to create your first WooCommerce contest.
Simply visit RafflePress » Add New page to get started.

This will launch the RafflePress contest builder.
First, you need to provide a name for your new contest campaign. After that, you need to select a template to use as a starting point.

RafflePress comes with several goal-based contest templates to choose from. These templates are designed to help you get the best results for specific goals like growing your email list or social media following.
You can select one that best suits your goals. If you are unsure, then start with the classic template.
RafflePress will now load the template in the builder.
Let’s set a prize or incentive for your WooCommerce contest. You need to click on the pencil icon under the Giveaway Prize Details section to enter the prize title and description.

After that, don’t forget to upload prize image which will be prominently displayed with your contest.
Next, you need to choose the start and end date for your contest. We recommend leaving enough time before the start / end date to ensure that you can promote it properly.
Actions are the tasks you want website visitors to perform in order to join the contest. RafflePress comes with a number of actions designed to help you reach your intended goals.
You need to select actions that help you maximize your reach to new audiences as well as existing customers.
For example, if you run a fast fashion eCommerce store, then you would want to increase your Instagram following.
Let’s start adding actions to the contest.
Simply switch to the ‘Actions’ tab from the left menu, and you’ll see a list of actions.

You can click on an action to add it to your contest. It will appear below the prize description section.
You can then click on the individual action to see action settings in the left column.

Each action comes with some basic settings. You can set a title, the number of entries users will earn for completing it, allow daily entries, or make an action mandatory.
Apart from these settings, you will also see settings related to specific actions.
For instance, if you want users to visit your Instagram profile, then you will need to enter your Instagram profile URL.
You can add as many actions as you like. Adding more options gives your users more ways to participate, and helps you reach more marketing channels.
RafflePress seamlessly integrates with all the best email marketing services, so you can use it to grow your email list.
Bonus Tip: Prioritize channels based on your campaign goals. For instance, if you wanted to grow your email list, then you need to move it up and make it mandatory.

You can simply drag and drop actions to arrange them in the order you want customers to join in.
Once you are done, don’t forget to click on the ‘Save’ button to store your settings.
Next, you would want to change the appearance of your contest widget so that it stands out.
Simply, click on the ‘Design’ section from the left column and then select a layout, font, and button color for your contest widget.

You can also set a background color or image if you want to create landing page for your contest (more on this later in this article).
Once you are satisfied with the design click on the ‘Save’ button to save your progress.
RafflePress comes with a number of options that give you full control of your contest campaign.
Switch to the ‘Settings’ tab from the left menu and click on the ‘General’ tab. From here you can set basic options for your giveaway including the option to show winners, number of entries, limit signups per IP, and more.

After that, switch to the ‘Giveaway rules’ tab. RafflePress includes a Rules Generator which allows you to easily generate contest rules for your campaign.

After that, switch to the ‘Email Verification’ settings. From here you can turn on email verification, which will only accept entries from users who verify their email address.

Next, click on the ‘Success tracking’ option. If you want to add Google Analytics or other tracking code like Facebook pixel, then this option allows you to add those scripts.
![]()
Next, click on the ‘Success Redirect’ tab. From here you can redirect users to any page after they successfully complete all actions. This could be a WooCommerce product page, a landing page, or simply a thank you page.

Finally, you’ll reach the social logins section. From here you can turn on social logins and allow users to join the contest by signing in with their Facebook account.

Once you are done reviewing settings, don’t forget to click on the Save button to store your changes.
Now that your contest is ready, it is time to add it to your WooCommerce store.
RafflePress makes it super easy to add your giveaway anywhere. There are three ways you can do so.
Let’s check out each of these items.
1. Adding Contest Block to Blog Posts / Pages
Simply create a new post or page in WordPress or edit an existing one. On the edit screen, click on the add new block button and then select RafflePress.

You’ll see RafflePress block appear in the editor. From here, you need to click on the drop down menu in the block settings and select the contest giveaway you created earlier.

2. Add Contest Using Shortcode
Shortcodes come in handy when you want to add the contest to a product page, sidebar widget, or with a page builder plugin.
First, you need to edit the contest giveaway and then switch to the ‘Publish’ tab. From here, click on the shortcode option and copy the shortcode you see on the screen.

3. Create a Contest Page in WooCommerce
RafflePress also allows you to give your contest widget its own landing page. You can find the option under the Publish tab while editing your Contest giveaway.

You can launch the landing page settings by clicking on the link. From there you need to create a URL for your landing page. Once done, you can click on the view button to see your landing page in action.

RafflePress will take you to your contest landing page. You can now copy the URL and start promoting it across your marketing channels.

Now that you have created and added your WooCommerce contest, it is time to start promoting it.
We recommend adding your contest before it begins and give yourself plenty of time to build anticipation and excitement for the contest.
You can give a shout out to your email newsletter subscribers and spread the word around on your social media profiles. Reach out to influencers in your industry, friends, and family members to help you get the ball rolling.
You can also promote it on relevant online communities and forums. And don’t forget to promote it across your website using a platform like OptinMonster, so that your visitors are aware of it.
RafflePress will automatically start your contest on the time you selected in settings and will end it on your selected time as well.
Once the contest has ended, RafflePress can also help you pick a random winner.
Go to RafflePress » Giveaways page and click on the ‘Need Winners’ link next to your contest.

The plugin will now ask you how many winners you want to choose. After that, it will randomly pick the winners.
You can then email those users to let them know and provide the necessary information to get their prize.
We hope this article helped you learn how to easily create a WooCommerce contest and build customer loyalty. You may also want to see our expert pick of the best WooCommerce plugins for your online store.
If you liked this article, then please subscribe to our YouTube Channel for WordPress video tutorials. You can also find us on Twitter and Facebook.
The post How to Create a WooCommerce Contest to Boost Loyalty and Engagement appeared first on WPBeginner.

A fantastic interactive design that celebrates an exciting journey. Our pick this week.

In this excellent guide, Tania Rascia covers the practical parts of CSS that are important on a daily basis.

Learn how you can enjoy complete control over your entire website with the new and powerful Divi Theme Builder.

A fantastic collection of popular layouts and patterns made with CSS. Made by Phuoc Nguyen.

Advent of Code is an Advent calendar of small programming puzzles for a variety of skill sets and skill levels that can be solved in any programming language you like.

Learn how to augment a Grid-infused article layout that allows for certain sections of content to break out into full-width areas.

An excellent guide to variable fonts by Jason Pamental.

Brad Frost’s interesting thoughts on the parallels between Music and Web Design.

Léonie Watson writes about the AOM, an experimental JavaScript API that proposes several new features intended to solve existing accessibility use cases.

Play real-time music with a machine learning drummer that drums based on your melody. Read more about it in this article.

A musical player, with a binary twist. Built by Tim Holman using Tone.JS.

Drew McLellan talks to Smashing author Heydon Pickering about Inclusive Components.

An insightful list of what to expect for User Experience (UX) Design in the next year.

A smooth shadow generator inspired by Tobias Ahlin’s article. By Philipp Brumm.

Michelle Barker re-creates an interesting typographic logo with CSS.

A plethora of new developer tools features including the web socket message inspector, console multi-line editor mode and more are coming in the new Firefox version.

A great CSS pattern generator with a geeky Christmas theme. By Adam Kuhn.

A fun button that looks like a hungry Hippo. By Mariusz Dabrowski. Check out the written and video tutorial.

A hand-picked collection of fantastic web experiments from the past weeks.

An awesome Codevember demo by Ricardo Oliva Alonso.

An article by Cassie Evans that explores a few ways of moving an element along a path, including the upcoming CSS motion path module and the newly released GSAP3.
Collective #571 was written by Pedro Botelho and published on Codrops.
In this tutorial series, we will build a web-based multiplayer virtual reality game, where players will need to collaborate to solve a puzzle. In the first part of this series, we designed the orbs featured in the game. In this part of the series, we will add game mechanics and setup communication protocols between pairs of players.
The game description here is excerpted from the first part of the series: Each pair of players is given a ring of orbs. The goal is to “turn on” all orbs, where an orb is “on” if it’s elevated and bright. An orb is “off” if it’s lower and dim. However, certain “dominant” orbs affect their neighbors: if it switches state, its neighbors also switch state. Player 2 can control even-numbered orbs, and player 1 can control odd-numbered orbs. This forces both players to collaborate to solve the puzzle.
The 8 steps in this tutorial are grouped into 3 sections:
This part will conclude with a fully functioning demo online, for anyone to play. You will use A-Frame VR and several A-Frame extensions.
You can find the finished source code here.

To start, we will add visual indicators of an orb’s ID. Insert a new a-text VR element as the first child of #container-orb0, on L36.
<a-entity id="container-orb0" ...>
    <a-text class="orb-id" opacity="0.25" rotation="0 -90 0" value="4" color="#FFF" scale="3 3 3" position="0 -2 -0.25" material="side:double"></a-text>
    ...
    <a-entity position...>
        ...
    </a-entity>
</a-entity>
An orb’s “dependencies” are the orbs it will toggle, when toggled: for example, say orb 1 has as dependencies orbs 2 and 3. This means that if orb 1 is toggled, orbs 2 and 3 will be toggled too. We will add visual indicators of dependencies, as follows, directly after .animation-position.
<a-animation class="animation-position" ... />
<a-text class="dep-right" opacity="0.25" rotation="0 -90 0" value="4" color="#FFF" scale="10 10 10" position="0 0 1" material="side:double" ></a-text>
            <a-text class="dep-left" opacity="0.25"rotation="0 -90 0" value="1" color="#FFF" scale="10 10 10" position="0 0 -3" material="side:double" ></a-text>
Verify that your code matches our source code for Step 1. Your orb should now match the following:

This concludes the additional visual indicators we will need. Next, we will dynamically add orbs to the VR scene, using this template orb.
In this step, we will add orbs according to a JSON-esque specification of a level. This allows us to easily specify and generate new levels. We will use the orb from the last step in part 1 as a template.
To start, import jQuery, as this will make DOM modifications, and thus modifications to the VR scene, easier. Directly after the A-Frame import, add the following to L8:
<script src="https://code.jquery.com/jquery-3.3.1.min.js"></script>
Specify a level using an array. The array will contain object literals that encode each orb’s “dependencies”. Inside the <head> tag, add the following level configuration, :
     <script>
var orbs = [
  {left: 1, right: 4},
  {},
  {on: true},
  {},
  {on: true}
];
    </script>
For now, each orb can only have one dependency to the “right” of it and one to the “left” of it. Immediately after declaring orbs above, add a handler that will run on page load. This handler will (1) duplicate the template orb and (2) remove the template orb, using the provided level configuration:
$(document).ready(function() {

  function populateTemplate(orb, template, i, total) {}

  function remove(selector) {}

  for (var i=0; i < orbs.length; i++) {
    var orb = orbs[i];
    var template = $('#template').clone();
    template = populateTemplate(orb, template, i, orbs.length);
    $('#carousel').append(template);
  }

  remove('#template');
}

function clickOrb(i) {}
Next, populate the remove function, which simply removes an item from the VR scene, given a selector. Fortunately, A-Frame observes changes to the DOM, and thus, removing the item from the DOM suffices to remove it from the VR scene. Populate the remove function as follows.
  function remove(selector) {
    var el = document.querySelector(selector);
    el.parentNode.removeChild(el);
  }
Populate the clickOrb function, which simply triggers the click action on an orb.
function clickOrb(i) {
  document.querySelector("#container-orb" + i).click();
}
Next, begin writing the populateTemplate function. In this function, begin by getting the .container. This container for the orb additionally contains the visual indicators we added in the previous step. Furthermore, we will need to modify the orb’s onclick behavior, based on its dependencies. If a left-dependency exists, modify both the visual indicator and the onclick behavior to reflect that; the same holds true for a right-dependency:
function populateTemplate(orb, template, i, total) {
    var container = template.find('.container');
    var onclick = 'document.querySelector("#light-orb' + i + '").emit("switch");';

    if (orb.left || orb.right) {
      if (orb.left) {
        onclick += 'clickOrb(' + orb.left + ');';
        container.find('.dep-left').attr('value', orb.left);
      }
      if (orb.right) {
        onclick += 'clickOrb(' + orb.right + ');';
        container.find('.dep-right').attr('value', orb.right);
      }
    } else {
      container.find('.dep-left').remove();
      container.find('.dep-right').remove();
    }
}
Still in the populateTemplate function, set the orb ID correctly in all of the orb and its container’s elements.
    container.find('.orb-id').attr('value', i);
    container.attr('id', 'container-orb' + i);
    template.find('.orb').attr('id', 'orb' + i);
    template.find('.light-orb').attr('id', 'light-orb' + i);
    template.find('.clickable').attr('data-id', i);
Still in the populateTemplate function, set the onclick behavior, set the random seed so that each orb is visually different, and finally, set the orb’s rotational position based on its ID.
    container.attr('onclick', onclick);
    container.find('lp-sphere').attr('seed', i);
    template.attr('rotation', '0 ' + (360 / total * i) + ' 0');
At the conclusion of the function, return the template with all the configurations above.
return template;
Inside the document load handler and after removing the template with remove('#template'), turn on the orbs that were configured to be on initially.
$(document).ready(function() {
  ...
  setTimeout(function() {
    for (var i=0; i < orbs.length; i++) {
      var orb = orbs[i];
      if (orb.on) {
        document.querySelector("#container-orb" + i).click();
      }
    }
  }, 1000);
});
This concludes the Javascript modifications. Next, we will change the template’s default settings to that of an ‘off’ orb. Change the position and scale for #container-orb0 to the following:
position="8 0.5 0" scale="0.5 0.5 0.5"
Then, change intensity for #light-orb0 to 0.
intensity="0"
Verify that your source code matches our source code for Step 2.
Your VR scene should now feature 5 orbs, dynamically populated. One of the orbs should furthermore have visual indicators of dependencies, like below:

This concludes the first section in dynamically adding orbs. In the next section, we will spend three steps adding game mechanics. Specifically, the player will only be able to toggle specific orbs depending on the player ID.
In this step, we will add a terminal state. If all orbs are turned on successfully, the player sees a “victory” page. To do this, you will need to track the state of all orbs. Every time an orb is toggled on or off, we will need to update our internal state. Say that a helper function toggleOrb updates state for us. Invoke the toggleOrb function every time an orb changes state: (1) add a click listener to the onload handler and (2) add a toggleOrb(i); invocation to clickOrb. Finally, (3) define an empty toggleOrb.
$(document).ready(function() {
  ...
  $('.orb').on('click', function() {
    var id = $(this).attr('data-id')
    toggleOrb(id);
  });
});

function toggleOrb(i) {}

function clickOrb(i) {
  ...
  toggleOrb(i);
}
For simplicity, we will use our level configuration to indicate game state. Use toggleOrb to toggle the on state for the ith orb. toggleOrb can additionally trigger a terminal state if all orbs are turned on.
function toggleOrb(i) {
  orbs[i].on = !orbs[i].on;
  if (orbs.every(orb => orb.on)) console.log('Victory!');
}
Double-check that your code matches our source code for Step 3.
This concludes the “single-player” mode for the game. At this point, you have a fully functional virtual reality game. However, you will now need to write the multiplayer component and encourage collaboration via game mechanics.
In this step, we will create an abstraction for a player with a player ID. This player ID will be assigned by the server later on.
For now, this will simply be a global variable. Directly after defining orbs, define a player ID:
var orbs = ...

var current_player_id = 1;
Double-check that your code matches our source code for Step 4. In the next step, this player ID will then be used to determine which orbs the player can control.
In this step, we will modify orb toggling behavior. Specifically, player 1 can control odd-numbered orbs and player 2 can control even-numbered orbs. First, implement this logic in both places where orbs change state:
    $('.orb').on('click', function() {
        var id = ...
        if (!allowedToToggle(id)) return false;
        ...
    }
...

function clickOrb(i) {
    if (!allowedToToggle(id)) return;
    ...
}
Second, define the allowedToToggle function, right after clickOrb. If the current player is player 1, odd-numbered ids will return a truth-y value and thus, player 1 will be allowed to control odd-numbered orbs. The reverse is true for player 2. All other players are not allowed to control the orbs.
function allowedToToggle(id) {
  if (current_player_id == 1) {
    return id % 2;
  } else if (current_player_id == 2) {
    return !(id % 2);
  }
  return false;
}
Double-check that your code matches our source code for Step 5. By default, the player is player 1. This means that you as player 1 can only control odd-numbered orbs in your preview. This concludes the section on game mechanics.
In the next section, we will facilitate communication between both players via a server.
In this step, you will set up a simple server to (1) keep track of player IDs and (2) relay messages. These messages will include game state, so that players can be certain each sees what the other sees.
We will refer to your previous index.html as the client-side source code. We will refer to code in this step as the server-side source code. Navigate to glitch.com, click on “new project” in the top-right, and in the dropdown, click on “hello-express”.
From the left-hand panel, select “package.json,” and add socket-io to dependencies. Your dependencies dictionary should now match the following.
  "dependencies": {
    "express": "^4.16.4",
    "socketio": "^1.0.0"
  },
From the left-hand panel, select “index.js,” and replace the contents of that file with the following minimal socket.io Hello World:
const express = require("express");
const app = express();

var http = require('http').Server(app);
var io = require('socket.io')(http);

/**
 * Run application on port 3000
 */

var port = process.env.PORT || 3000;

http.listen(port, function(){
  console.log('listening on *:', port);
});
The above sets up socket.io on port 3000 for a basic express application. Next, define two global variables, one for maintaining the list of active players and another for maintaining the smallest unassigned player ID.
/**
 * Maintain player IDs
 */

var playerIds = [];
var smallestPlayerId = 1;
Next, define the getPlayerId function, which generates a new player ID and marks the new player ID as “taken” by adding it to the playerIds array. In particular, the function simply marks smallestPlayerId and then updates smallestPlayerId by searching for the next smallest non-taken integer.
function getPlayerId() {
  var playerId = smallestPlayerId;
  playerIds.push(playerId);

  while (playerIds.includes(smallestPlayerId)) {
    smallestPlayerId++;
  }
  return playerId;
}
Define the removePlayer function, which updates smallestPlayerId accordingly and frees the provided playerId so that another player may take that ID.
function removePlayer(playerId) {
  if (playerId < smallestPlayerId) {
    smallestPlayerId = playerId;
  }
  var index = playerIds.indexOf(playerId);
  playerIds.splice(index, 1);
}
Finally, define a pair of socket event handlers that register new players and un-register disconnected players, using the above pair of methods.
/**
 * Handle socket interactions
 */

io.on('connection', function(socket) {
  socket.on('newPlayer', function() {
    socket.playerId = getPlayerId();
    console.log("new player: ", socket.playerId);
    socket.emit('playerId', socket.playerId);
  });

  socket.on('disconnect', function() {
    if (socket.playerId === undefined) return;
    console.log("disconnected player: ", socket.playerId);
    removePlayer(socket.playerId);
  });
});
Double-check that your code matches our source code for Step 6. This concludes basic player registration and de-registration. Each client can now use the server-generated player ID.
In the next step, we will modify the client to receive and use the server-emitted player ID.
In these next two steps, we will complete a rudimentary version of the multiplayer experience. To start, integrate the player ID assignment client-side. In particular, each client will ask the server for a player ID. Navigate back to the client-side index.html we were working within Steps 4 and before.
Import socket.io in the head at L7:
<script src="https://cdnjs.cloudflare.com/ajax/libs/socket.io/2.1.1/socket.io.js"></script>
After the document load handler, instantiate the socket and emit a newPlayer event. In response, the server-side will generate a new player ID using the playerId event. Below, use the URL for your Glitch project preview instead of lightful.glitch.me. You are welcome to use the demo URL below, but any code changes you make will of course not be reflected.
$(document).ready(function() {
    ...
});

socket = io("https://lightful.glitch.me");
  socket.emit('newPlayer');
  socket.on('playerId', function(player_id) {
    current_player_id = player_id;
    console.log(" * You are now player", current_player_id);
  });
Verify that your code matches our source code for Step 7. Now, you can load your game on two different browsers or tabs to play two sides of a multiplayer game. Player 1 will be able to control odd-numbered orbs and player 2 will be able to control even-numbered orbs.
However, note that toggling orbs for player 1 will not affect orb state for player 2. Next, we need to synchronize game states.
In this step, we will synchronize game states so that players 1 and 2 see the same orb states. If orb 1 is on for player 1, it should be on for player 2 as well. On the client-side, we will both announce and listen for orb toggles. To announce, we will simply pass the ID of the orb that is toggled.
Before both toggleOrb invocations, add the following socket.emit call.
$(document).ready(function() {
    ...
    $('.orb').on('click', function() {
        ...
        socket.emit('toggleOrb', id);
        toggleOrb(id);
    });
});
...
function clickOrb(i) {
    ...
    socket.emit('toggleOrb', i);
    toggleOrb(i);
}
Next, listen for orb toggles, and toggle the corresponding orb. Directly underneath the playerId socket event listener, add another listener for the toggleOrb event.
socket.on('toggleOrb', function(i) {
  document.querySelector("#container-orb" + i).click();
  toggleOrb(i);
});
This concludes modifications to the client-side code. Double-check that your code matches our source code for Step 8.
Server-side now needs to receive and broadcast the toggled orb ID. In the server-side index.js, add the following listener. This listener should be placed directly underneath the socket disconnect listener.
  socket.on('toggleOrb', function(i) {
    socket.broadcast.emit('toggleOrb', i);
  });
Double-check that your code matches our source code for Step 8. Now, player 1 loaded in one window and player 2 loaded in a second window will both see the same game state. With that, you have completed a multiplayer virtual reality game. The two players, furthermore, must collaborate to complete the objective. The final product will match the following.
This concludes our tutorial on creating a multiplayer virtual reality game. In the process, you’ve touched on a number of topics, including 3-D modeling in A-Frame VR and real-time multiplayer experiences using WebSockets.
Building off of the concepts we’ve touched on, how would you ensure a smoother experience for the two players? This could include checking that the game state is synchronized and alerting the user if otherwise. You could also make simple visual indicators for the terminal state and player connection status.
Given the framework we’ve established and the concepts we’ve introduced, you now have the tools to answer these questions and build much more.
You can find the finished source code here.
In the spirit of treating APIs as though they are products -- something every organization should do for both their internal and external APIs -- the success or failure of those APIs depends on the comprehensiveness and digestibility of your API developer portal. Your API developer portal is where stakeholders of all types will go to learn everything possible about your API(s) and even your company. What makes for a world-class API developer portal?
With the Gutenberg block editor now the default option within WordPress, it’s important to think about how it works with the other components of your website. Themes are of particular concern, as they directly display the content you create.
In a broad sense, most themes (even older ones) are likely compatible with the new editor. At least in terms of avoiding breakage. However, that doesn’t mean that your theme can take advantage of every feature.
So, how should a Gutenberg-compatible WordPress theme work? What features can you expect to find? Today, we’ll introduce you to some basics that you can use as a guide when shopping for your next theme.
In the Classic editor, all of the content within a post was more or less considered a singular entity. While there may be various HTML elements included in that post, they are still tied together within the editor itself. That’s why adding goodies such as multicolumn layouts were so difficult. You had to be extra careful when making changes, as the whole thing could easily break.
Getting around this used to require either a page builder or even custom fields to create layouts that were more flexible and stable. Gutenberg’s block-based approach to content fixed this issue, but also requires themes to make some changes under the hood to support various block styles and features.
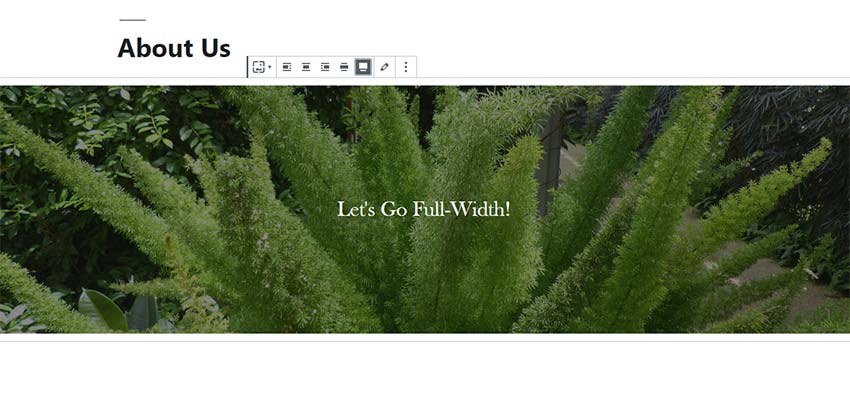
Among the most common features you’ll want a theme to support are wide alignment blocks, which can stretch content across the entire screen. Other items include preset color palettes, font sizes and custom editor styles that better reflect the front-end design of the website.
Beyond offering support for the default blocks, a well-thought-out theme will provide extra styles and customization options for them, as well. Items such as the Pullquote or Cover blocks are a perfect opportunity for a theme to add some extra personality.
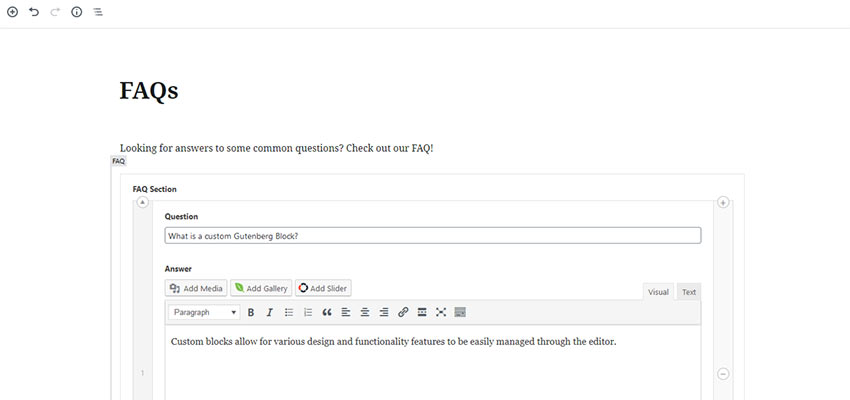
One of the most exciting features of Gutenberg is the ability for developers to create custom blocks. They can run the gamut in terms of functionality. Everything from complex layouts to simple design elements (like buttons), or preset content types (such as testimonials or staff profiles) are possible.
If nothing else, most WordPress themes are all about pouring on the extras. Well before blocks became a part of the discussion, theme authors were cramming in loads of custom widgets and shortcodes into their products.
These items have served users well, providing an extra level of high-end function. Thus, it only makes sense that authors will shift these features towards custom blocks instead. They can be placed anywhere within content, easily moved around and even used in multiple instances.
The bottom line is that both widgets (at least, as we’ve come to know them) and shortcodes are going to be phased out over time. If you’re shopping for a new theme, look for one that is embracing blocks over legacy solutions.
WordPress themes, particularly of the commercial variety, tend to bundle page builders. This is certainly a nice bonus – that is, if you want to utilize one.
But sometimes, authors declare these plugins to be “required” in order to use their theme. Now that Gutenberg can cover at least some of this ground, users should no longer be forced into installing plugins they don’t need.
To clarify, page builders and Gutenberg can successfully coexist on a website. There’s nothing inherently dangerous about using both. It’s just that users should be the ones to make that choice.

A theme that offers routine bug fixes and feature additions is always worth looking for, but it’s especially so when it comes to the block editor. Why? Because it’s in a constant state of change.
Since the day it officially rolled out in WordPress 5.0, Gutenberg has been a work-in-progress. So much so that the code deprecation log is full of things that have been removed over a relatively short period of time. Of course, care is taken to maintain some backward compatibility, but it’s something to be mindful of.
Therefore, just because a theme implements a specific feature today does not mean it will still work a few releases into the future. Theme authors need to stay vigilant to ensure that their products take advantage of new features and potentially refactor code where needed.
The block editor’s evolution doesn’t look like it will slow down anytime soon. Themes will need to keep pace.
Over the years, themes have become rather complicated. There are often tons of included options and companion plugins. Some even make cosmetic changes to the WordPress edit screen itself.
But perhaps Gutenberg offers a chance for simplification. Part of its aim is to standardize how themes (and plugins) interact with the editor. Blocks can offer similar functionality to most of those aforementioned extras and can be implemented in a much more uniform way.
In theory, taking advantage of what Gutenberg does best could lead to cleaner, less bloated themes. Or at least ones that are better organized. And above all, that may just be the biggest feature to look for when searching for your next WordPress theme.
In a pull request on the Gutenberg repository yesterday, Riad Benguella created an initial document that outlines how block-based WordPress themes might work. While the document is merely a starting point for the conversation, it is a set of ideas that will likely forever reshape the WordPress landscape. It is paradigm-shifting.
For the first time, theme authors can glimpse what their future holds. Since the inception of Gutenberg, many have asked for more technical details. Particularly, they wanted to know whether themes would be reduced to a stylesheet or a stylesheet and a few PHP files. What would themes look like architecturally? Would themes exist at all?
The document, while open for changes, makes a strong case about the structure of themes going forward. It is clear that much forethought has gone into the proposal. It matches the direction of the experimental site-editing feature in Gutenberg that has already been set in motion. Even though it is subject to change, there seems to be a finality to the overarching idea. The writing has long been on the wall. Now everyone can see the wall. The missing piece is figuring out how to bring the idea to fruition.
Before understanding how themes of the future might work, you must first understand the direction that Gutenberg is headed. The end goal for Gutenberg, and eventually WordPress, is for users to have the ability to customize every aspect of their site via the block system. Currently, the block system primarily handles editing post content.
To move to full-site editing, every piece of dynamic data about a site must be a block. For example, a site title block must exist as a placeholder for the site title. Users should be able to place it anywhere they desire to output the title, such as in the header.
This has left theme authors with a reasonable question: If users can move these blocks anywhere, where do themes fit into the picture?
It is easy to see how themes would become little more than a stylesheet that styles every WordPress block while also handling other necessary styles like typography and vertical rhythm. Even then, it makes one wonder if themes, at least in how we have come to know them, are necessary at all.
The proposed structure does not look much different from current WordPress themes. The big difference is that theme templates would become “block templates” and “block template parts.” These templates would be HTML files rather than PHP files.
The following is where the structure currently stands.
theme
|__ style.css
|__ functions.php
|__ block-templates
    |__ index.html
    |__ single.html
    |__ archive.html
    |__ ...
|__ block-template-parts
    |__ header.html
    |__ footer.html
    |__ sidebar.html
    |__ ...
From a templating perspective, it appears relatively normal for a WordPress theme. The files simply have a different type and are organized in specific folders.
However, the difference is how the HTML templates would work. They would essentially become placeholders for blocks. Users would also have the ability to edit or completely overwrite individual templates via the WordPress admin. Because templates are made up of blocks, no code would be necessary on the user’s part. They could simply point and click to insert or remove blocks with their mouse.
In other words, block templates within themes would be unique starting points for users to build their sites.
There are two noteworthy items about the proposed system: themes are still themes and end-users can become theme builders.
When you cut through everything else, WordPress themes have always been HTML and CSS. The PHP aspect of theming basically mixes PHP function calls (i.e., template tags) within some structured HTML markup. If you look at most themes going through the official WordPress theme directory, you will find that the underlying markup is mostly the same.
In the block template system, this idea doesn’t change. If anything, it could simplify the role of theme author by creating a set of standard elements (blocks) that themes output. If done right, it also creates a standard for class names so that styles can easily be shared across themes and all sorts of similar goodies.
The initial outline explains the potential of exporting themes:
Ultimately, any WordPress user with the correct capabilities (example: administrator WordPress role) will be able to access these templates in the WordPress admin, edit them in dedicated views and potentially export the templates as a theme.
This is where the proposed system could revolutionize website building. Those without the coding skills to create a WordPress theme today could have the tools to contribute something back tomorrow.
The idea aligns perfectly with the open-source ethos of WordPress. By giving everyone the ability to export their customizations, it provides an avenue for contributing that we have never had before for non-coders. A free directory of customized themes created by and for the community, anyone?
Block templates are merely the HTML. Themes will need to stand apart with their CSS. However, there must be standardization to pull this off.
Designers will need to shift to a block-based approach when it comes to design. Some may already be familiar with various “component-based” systems, which would work much the same way. Rather than designing from the top-down, theme authors would approach design on a more atomic level by designing each block.
There are also many unanswered questions about how styles will eventually work. Currently, there is an open ticket for discussing a style system for blocks. Much of the discussion is around how to integrate a design system with themes.
It is important to point out that nothing about this proposal is set in stone. It is a high-level outline of what the future of themes could hold. However, now is time for input from the community, especially theme authors who may have felt a bit out of the loop in the past. Now is the time to make your voice heard and to contribute ideas to the discussion.
The WordPress theme review team also has an open discussion on the future of themes that goes along with this proposal and whether themes should start taking advantage of experimental Gutenberg features.
I recently attended the ARTIFACT conference in Austin, TX, and was inspired by a few talks about accessibility through the lens of site performance. It became clear to me that there is this tendency to rely on big JavaScript frameworks to handle the work — like React, Vue, and Angular — but that can be overkill in some cases. That is, negatively affecting site performance, and thus accessibility. At the same time, these frameworks can make development easier and more efficient for developers. My big takeaway from the conference was to see how a fast, performant experience can be balanced with my own development process.
This was on my mind as I was building a list-filtering feature on a project a few days after the conference. Pretty standard stuff: I needed a list of posts and some category filtering. I was using CraftCMS for front-end routes and templating as well as some Vue components here and there for some added JavaScript juiciness. Not a full-on “single page app” but more like a sprinkle of Vue.
The typical way one might approach this is to:
Since the posts are held as an array within Vue, dynamic list rendering is a pretty cut and dry task.
Simple. Done, right? Well… that extra Ajax request means the user is presented with no content on the initial load depending on the user’s network, which might take some time. We could add a loading indicator, but maybe we can do better?
But how do we get the static HTML “hooked up” with Vue for the filtering?
After taking a step back to rethink the problem, I realized I could use v-if directives to achieve the same thing with some inline JavaScript from Twig (“in the loop”). Below, I’ll show how I went about it.
My original project used CraftCMS, but I’m going to do the demos below in WordPress. This is just a concept. It can be applied to CraftCMS/Twig or any other CMS/templating engine combo.
First we need a filtering UI. This will likely go above the start of the loop in an archive template.
<?php $terms = get_terms( [
  'taxonomy' => 'post_tag', // I used tags in this example, but any taxonomy would do
  'hide_empty' => true,
  'fields' => 'names'
] );

if(!empty($terms)): ?>
  <div>
    Filter:
    <ul class="filters">
      <li class="filters__item"><button class="filters__button" :class="{'filters__button--active': tag === ''}" @click="tag = ''">All</button></li>
      <?php foreach($terms as $term): ?>
      <li class="filters__item">
        <button class="filters__button" :class="{'filters__button--active': tag === '<?php echo $term; ?>'}" @click="tag = '<?php echo $term; ?>'"><?php echo $term; ?></button>
      </li>
      <?php endforeach; ?>
    </ul>
    <p aria-live="polite">Showing posts tagged {{ tag ? tag : 'all' }}.</p>
  </div>
<?php endif; ?>
Following along with the code, we get some tags from WordPress with get_terms() and output them in a foreach loop. You’ll notice the button for each tag has some Vue directives we’ll use later.
We have our loop!
    <div class="posts">
      <?php
      // Start the Loop.
      while ( have_posts() ) : the_post();

        <article id="post-<?php the_ID(); ?>"
          <?php post_class(); ?>
          v-if='<?php echo json_encode(wp_get_post_tags(get_the_ID(),  ['fields' => 'names'])); ?>.includes(tag) || tag === ""'
        >
          <header class="entry-header">
            <h2><?php the_title(); ?></h2>
          </header>

          <div class="entry-content">
            <?php the_excerpt(); ?>
          </div>
        </article>

      // End the loop.
      endwhile; ?>
    </div>
This is a pretty standard WordPress loop for posts. You’ll notice some Vue directives that make use of PHP outputting CMS content.
Aside from some styling, all that’s left is the Vue “app.” Are you ready for it? Here it is:
new Vue({
  el: '#filterablePosts',
  data: {
    'tag': ''
  }
});
Yes, really, that’s all that’s needed in the JavaScript file to get this to work!
Well, instead of some JSON array of posts that gets fed into Vue, we output the posts on the initial page load with WordPress. The trick is to use PHP to output what’s needed in the Vue directives: v-if and :class.
What’s happening on the filter buttons is an onclick event handler (@click) that sets the Vue variable “tag” to the value of the WordPress post tag.
@click="tag = '<?php echo $term; ?>'"Also, if that Vue variable equals the value of the button (in the :class directive), it adds an active class for the button. This is just for styling.
:class="{'filters__button--active': tag === '<?php echo $term; ?>'}"For the list of articles, we conditionally display them based on the value of the Vue “tag” variable:
v-if='<?php echo json_encode(wp_get_post_tags(get_the_ID(), ['fields' => 'names'])); ?>.includes(tag) || tag === ""'The PHP function json_encode allows us to output an array of post tags as JavaScript, which means we can use .includes() to see if the Vue “tag” variable is in that array. We also want to show the article if no tag is selected.
Here it is put together using the Twenty Nineteen theme template archive.php as a base:
<?php get_header(); ?>
  <section id="primary" class="content-area">
    <main id="main" class="site-main">
      <?php if ( have_posts() ) : ?>
        <header class="page-header">
          <?php the_archive_title( '<h1 class="page-title">', '</h1>' ); ?>
        </header>

        <div class="postArchive" id="filterablePosts">
          <?php $terms = get_terms( [
              'taxonomy' => 'post_tag',
              'hide_empty' => true,
              'fields' => 'names'
          ] );

          if(!empty($terms)): ?>
            <div class="postArchive__filters">
              Filter:
              <ul class="postArchive__filterList filters">
                <li class="filters__item"><button class="filters__button" :class="{'filters__button--active': tag === ''}" @click="tag = ''" aria-controls="postArchive__posts">All</button></li>

                <?php foreach($terms as $term): ?>
                  <li class="filters__item">
                    <button class="filters__button" :class="{'filters__button--active': tag === '<?php echo $term; ?>'}" @click="tag = '<?php echo $term; ?>'" aria-controls="postArchive__posts"><?php echo $term; ?></button>
                  </li>
                <?php endforeach; ?>

              </ul>

              <p aria-live="polite">Showing {{ postCount }} posts tagged {{ tag ? tag : 'all' }}.</p>
            </div>
          <?php endif; ?>

            <div class="postArchive__posts">
              <?php
              // Start the Loop.
              while ( have_posts() ) : the_post(); ?>
                <article
                  id="post-<?php the_ID(); ?>"
                  <?php post_class(); ?>
                  v-if='<?php echo json_encode(wp_get_post_tags(get_the_ID(), ['fields' => 'names'])); ?>.includes(tag) || tag === ""'
                >
                  <header class="entry-header">
                    <h2><?php the_title(); ?></h2>
                  </header>

                  <div class="entry-content">
                      <?php the_excerpt(); ?>
                  </div>

                </article>
              <?php endwhile; // End the loop. ?>
          </div>
        </div>

      <?php
      // If no content, include the "No posts found" template.
      else :
        get_template_part( 'template-parts/content/content', 'none' );
      endif; ?>
    </main>
  </section>

<?php
get_footer();
Here’s a working example on CodePen
See the Pen
Dynamic List Filtering in Vue using Server-side data fetching by Dan Brellis (@danbrellis)
on CodePen.
You may have noticed that I added in an aria-live="polite" notifier below the filter button list to let assistive tech users know the content has changed.
<p aria-live="polite">Showing {{ postCount }} posts tagged {{ tag ? tag : 'all' }}.</p>To get the postCount Vue variable, we add some extra JavaScript to our Vue component:
new Vue({
  el: '#filterablePosts',
  data: {
    'tag': '',
    'postCount': ''
},
  methods: {
    getCount: function(){
      let posts = this.$el.getElementsByTagName('article');
      return posts.length;
  }
  },
  beforeMount: function(){
    this.postCount = this.getCount();
  },
  updated: function(){
    this.postCount = this.getCount();
  }
});</p>
The new method getCount is used to select the article elements in our component div and return the length. Before the Vue component mounts we get the count to add to our new Vue postCount variable. Then, when the component updates after the user selects a tag, we get the count again and update our variable.
zvelo, a URL database provider, has announced the zvelo API. The company calls the new product "the ultimate precision tool for Web content classification and malicious detection." It covers full-path and page-level URLs and can be used in a number of use case scenarios (e.g. parental controls, endpoint security, phishing detection, threat intelligence, smart routers, and IoT security, etc.).
Chris and Marie talk about the various ways sponsorship and advertising has changed over the years at CodePen.
Flywheel is the best WordPress hosting out there. Of course they have local WordPress development down with Local by Flywheel, which you can use no matter what, the hosting itself is equally good. Everything is just easier on Flywheel, and the support you get from the early days of helping get your site moved to the fiddly little stuff you'll run into down the road, they got your back.
The post #247: Ads appeared first on CodePen Blog.
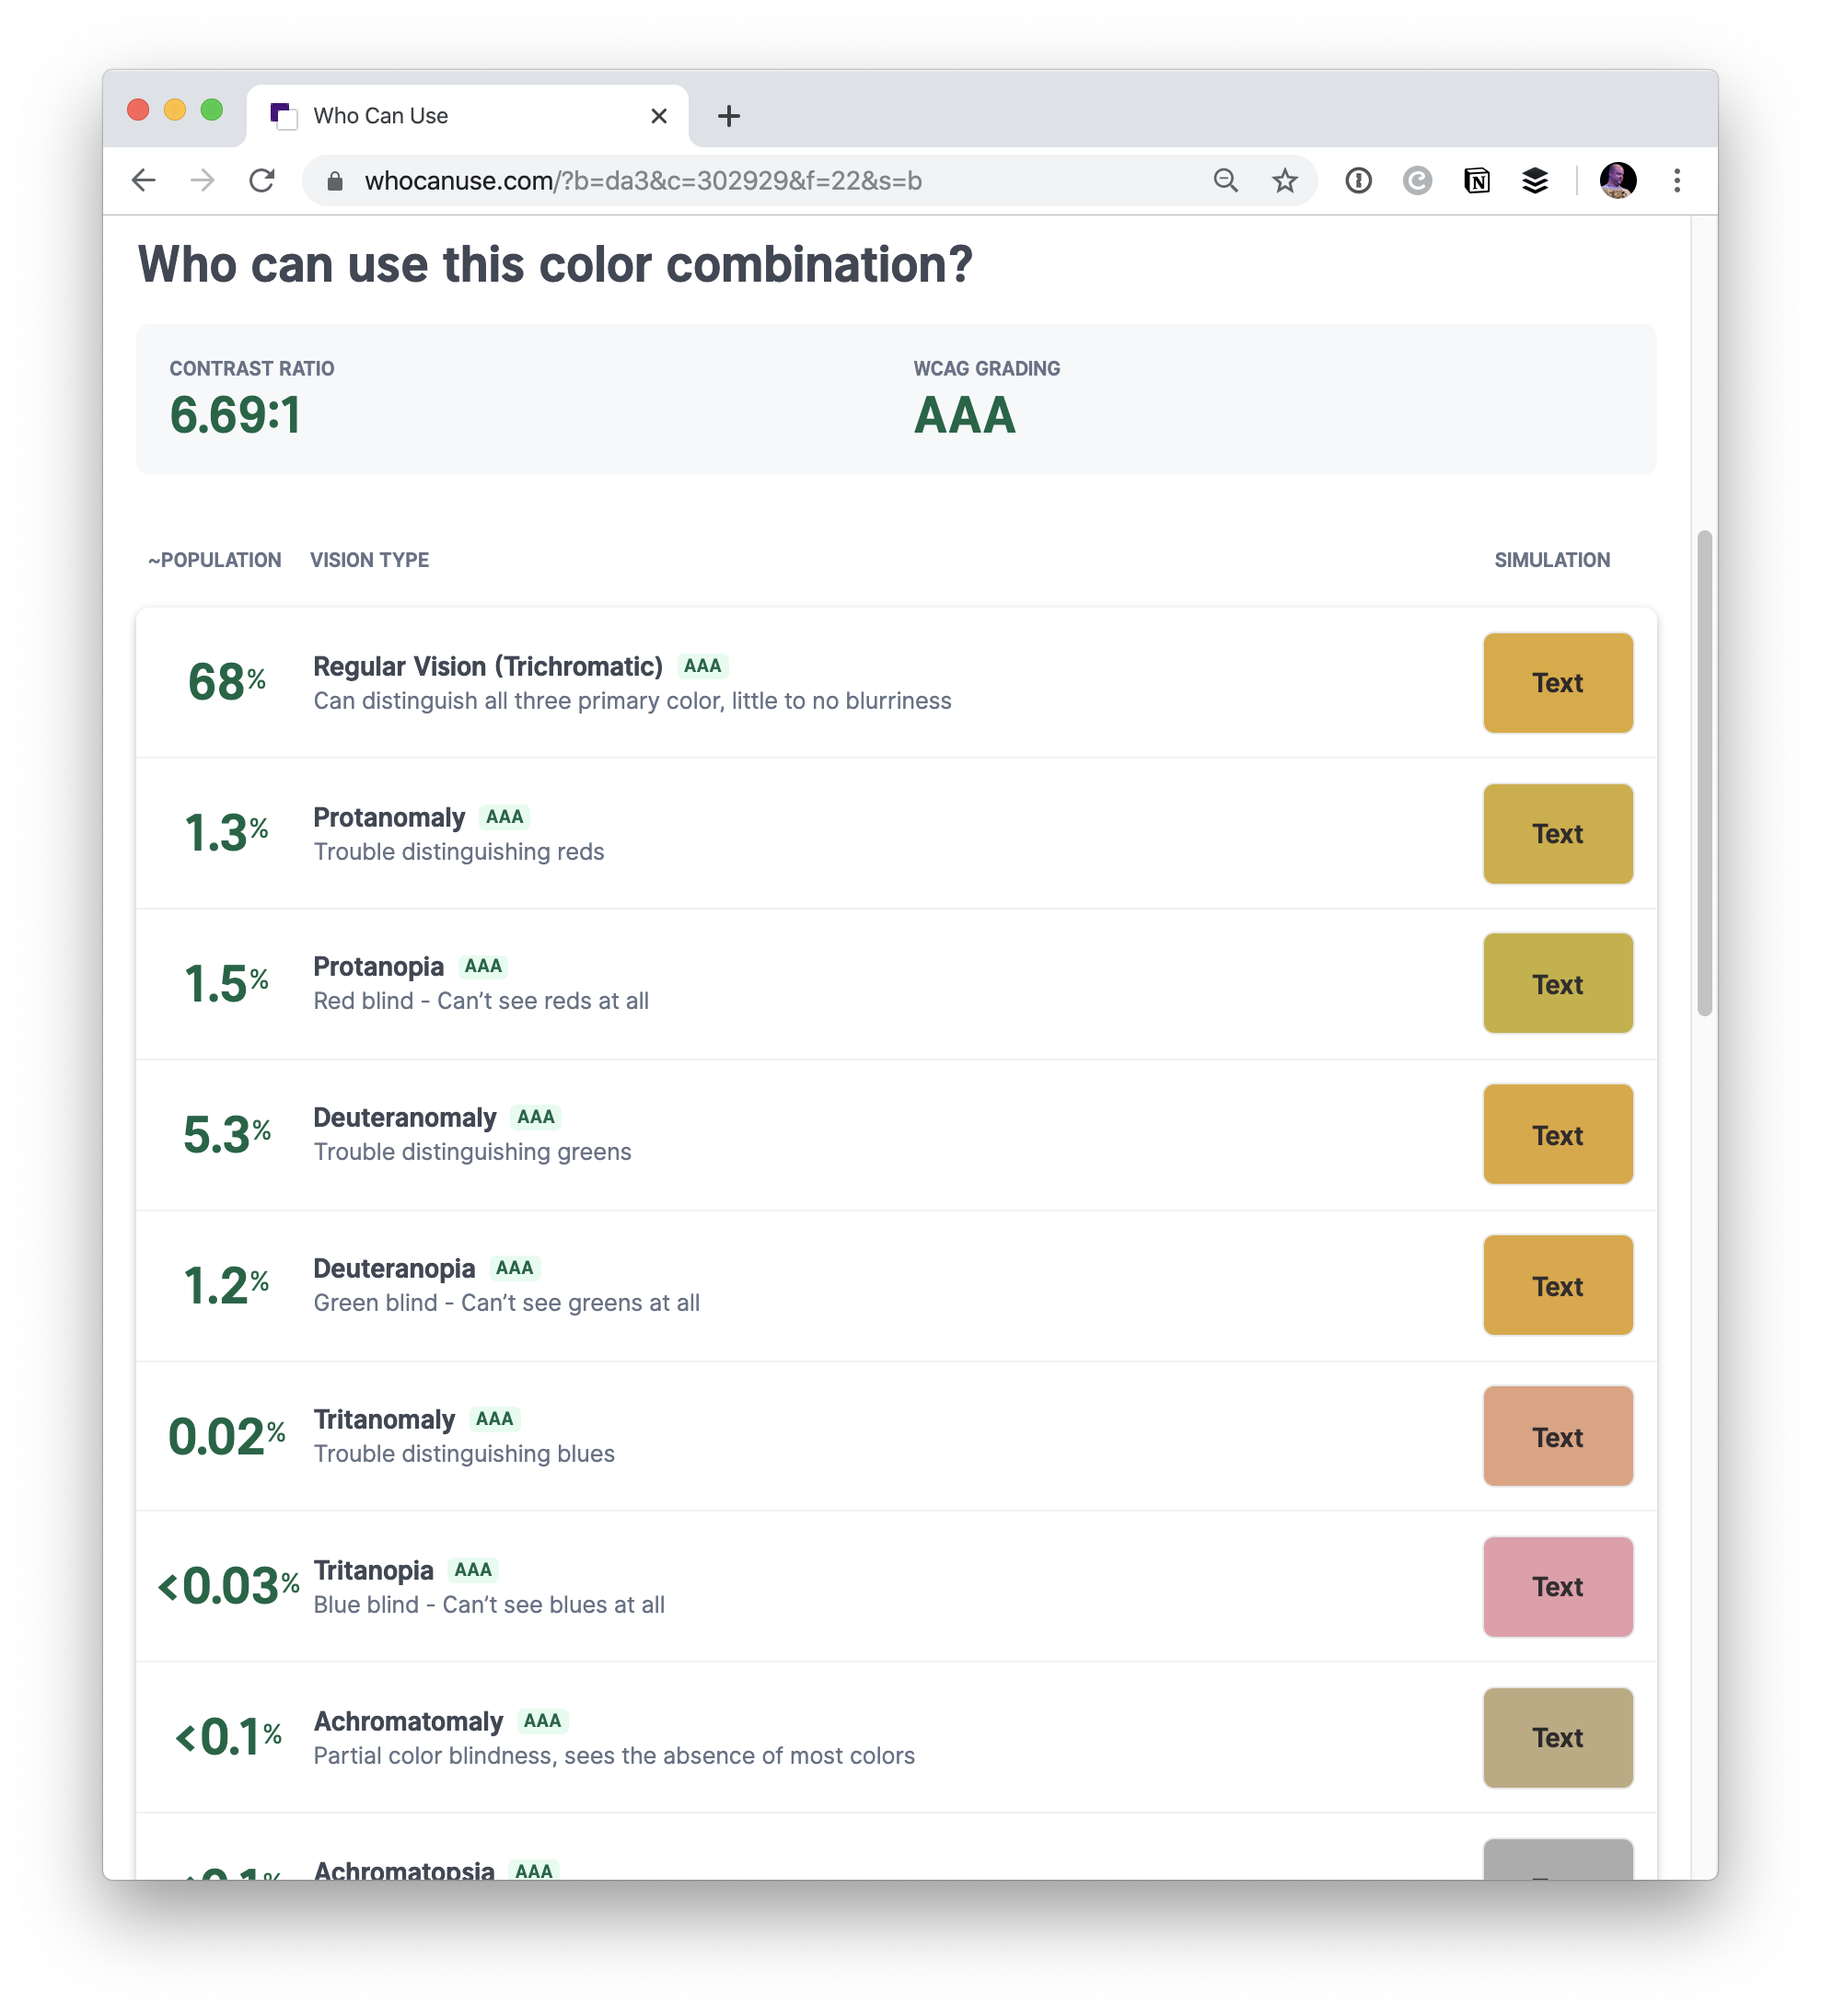
There are loads of microsites and developer tools for looking at color accessibility, including tools built right into browser DevTools. They often show you if a color passes AA or AAA WCAG guidelines. But color contrast is more complicated than that because there is a wide variety of vision impairments.
This site from Corey Ginnivan takes two colors and then shows you a simulation of different vision types (e.g. Tritanomaly, trouble distinguishing blues) and whether the colors still pass OK. It situational events, like whether a screen is in direct sunlight.
Direct Link to Article — Permalink
The post WhoCanUse appeared first on CSS-Tricks.
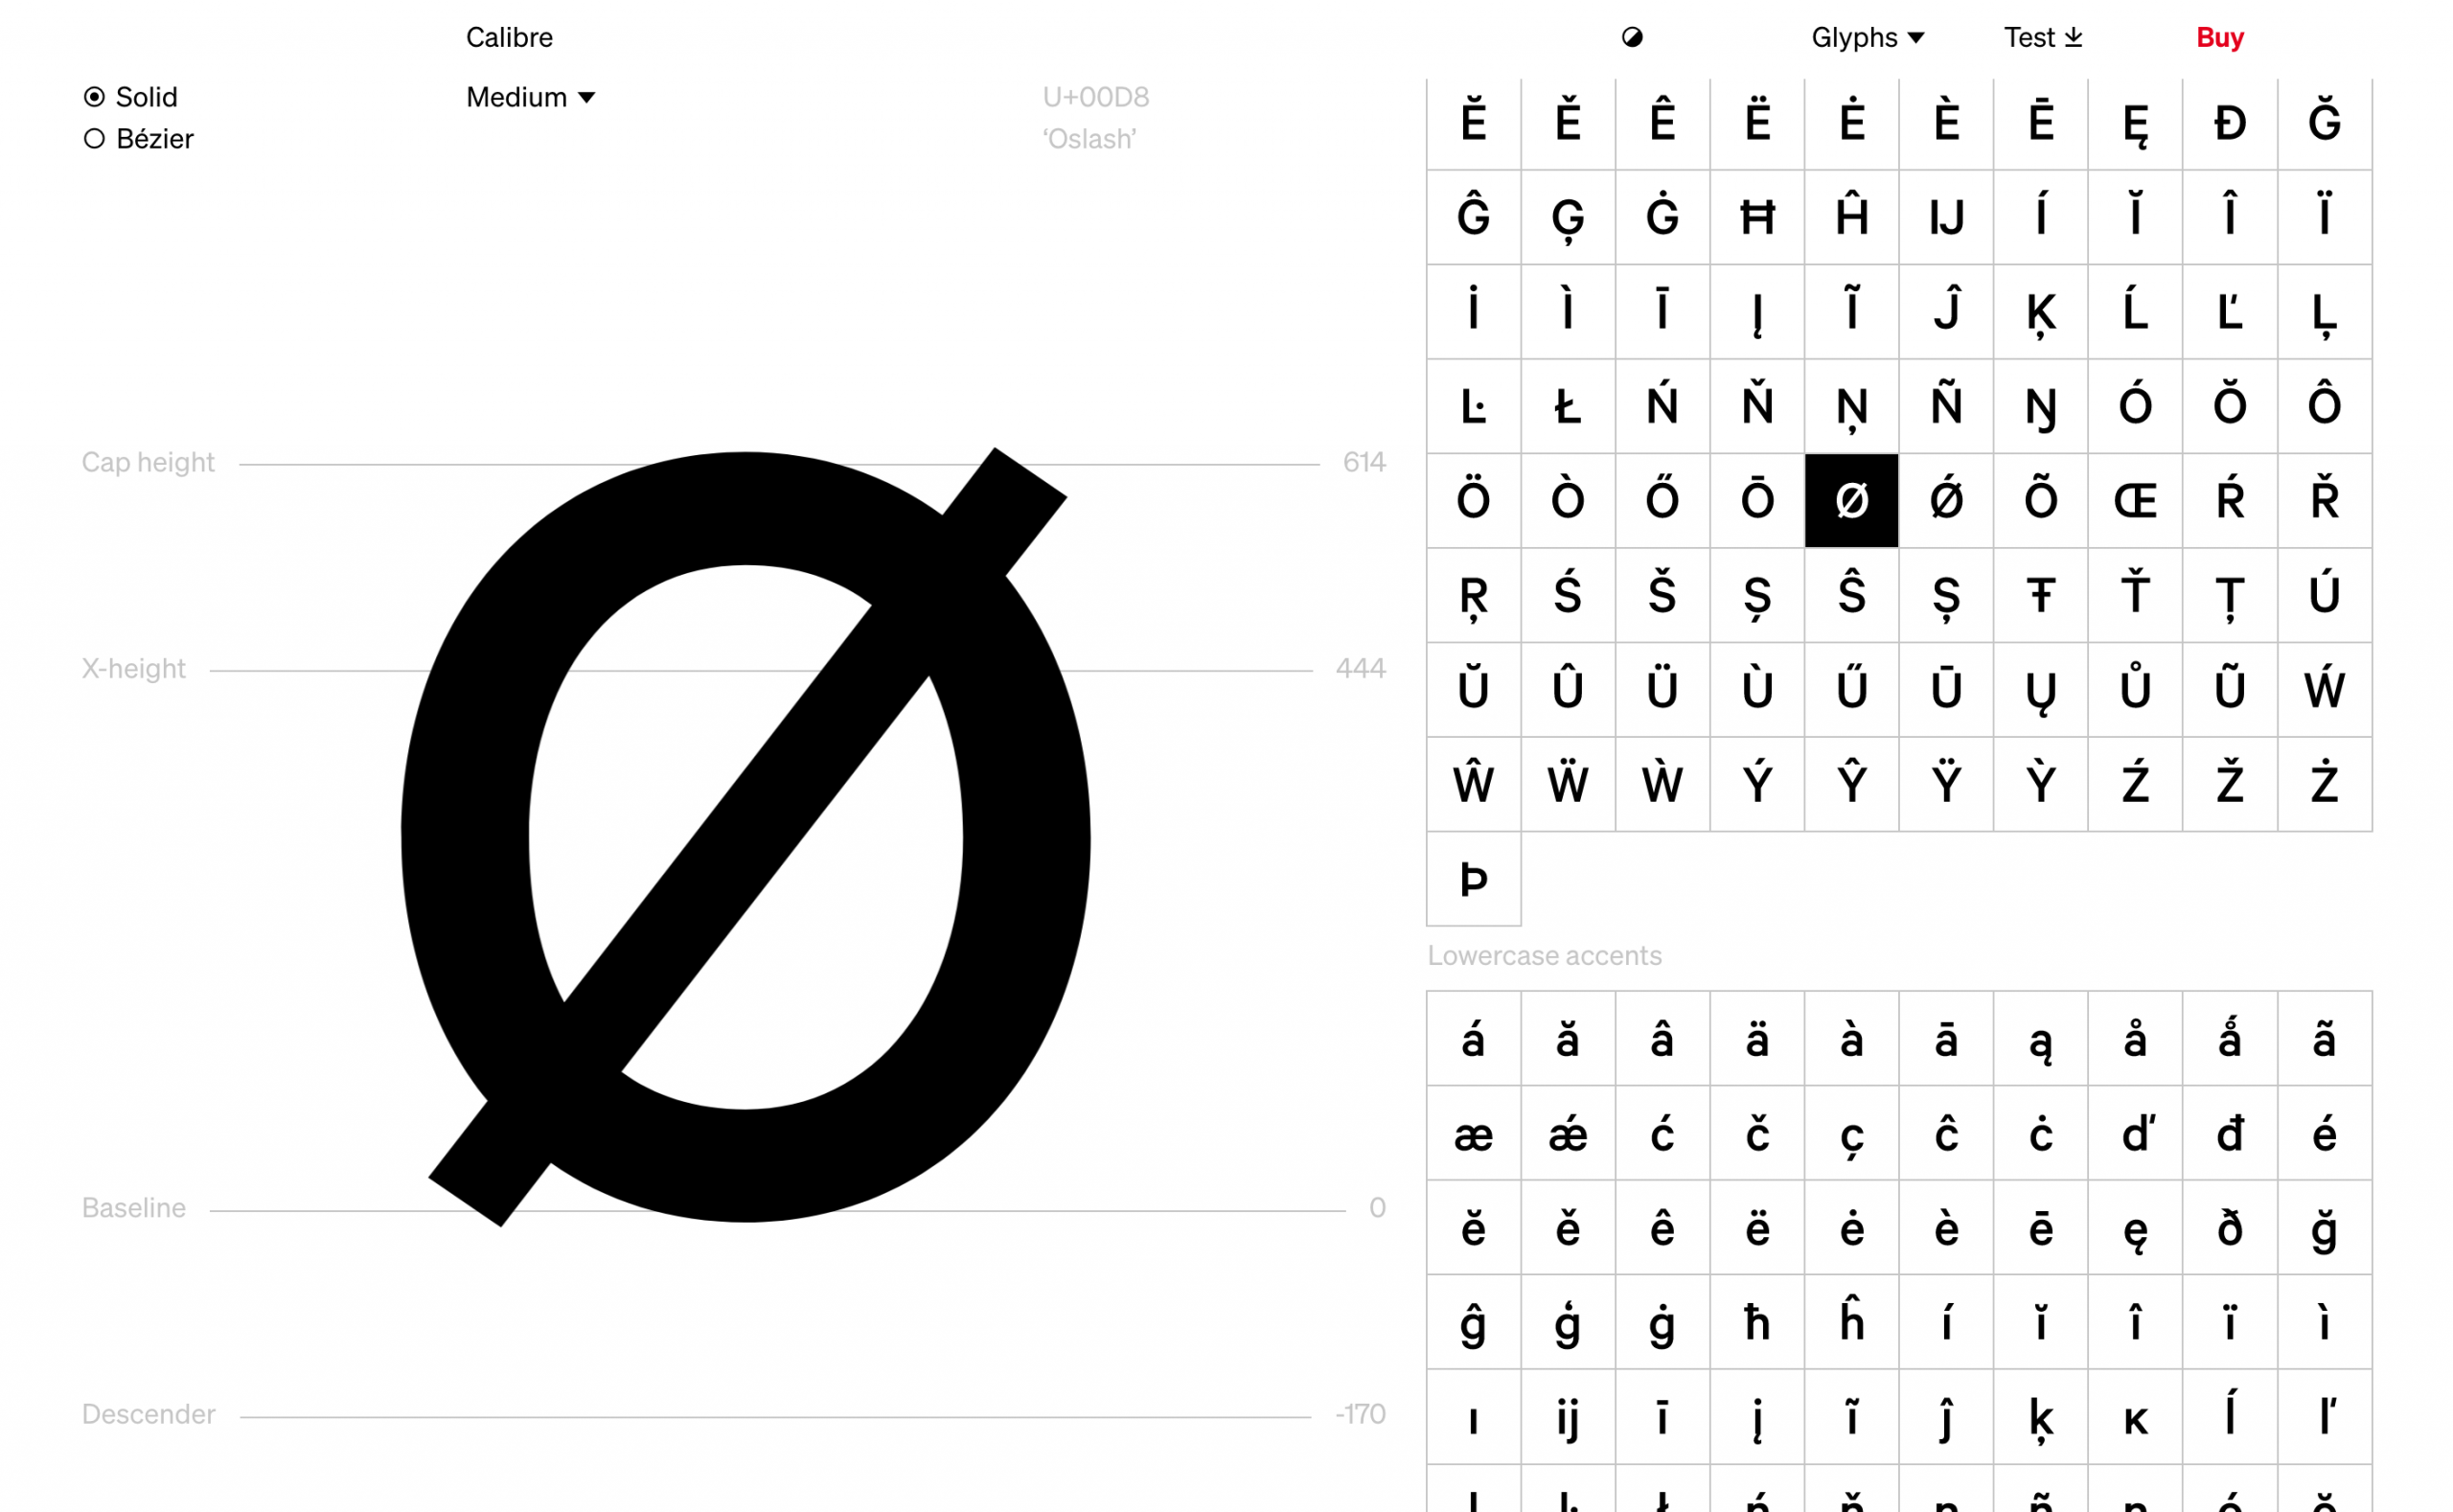
I’ve spent the last hour hunched over the new Klim Type foundry website with my arms outstretched as if it was a fire in a very dark cave. Klim Type makes and sells wondrous fonts — like Tiempos, and National 2 or Pitch — and this fresh redesign now showcases them in all their glory. Here’s an example of the type specimen from the Calibre typeface:
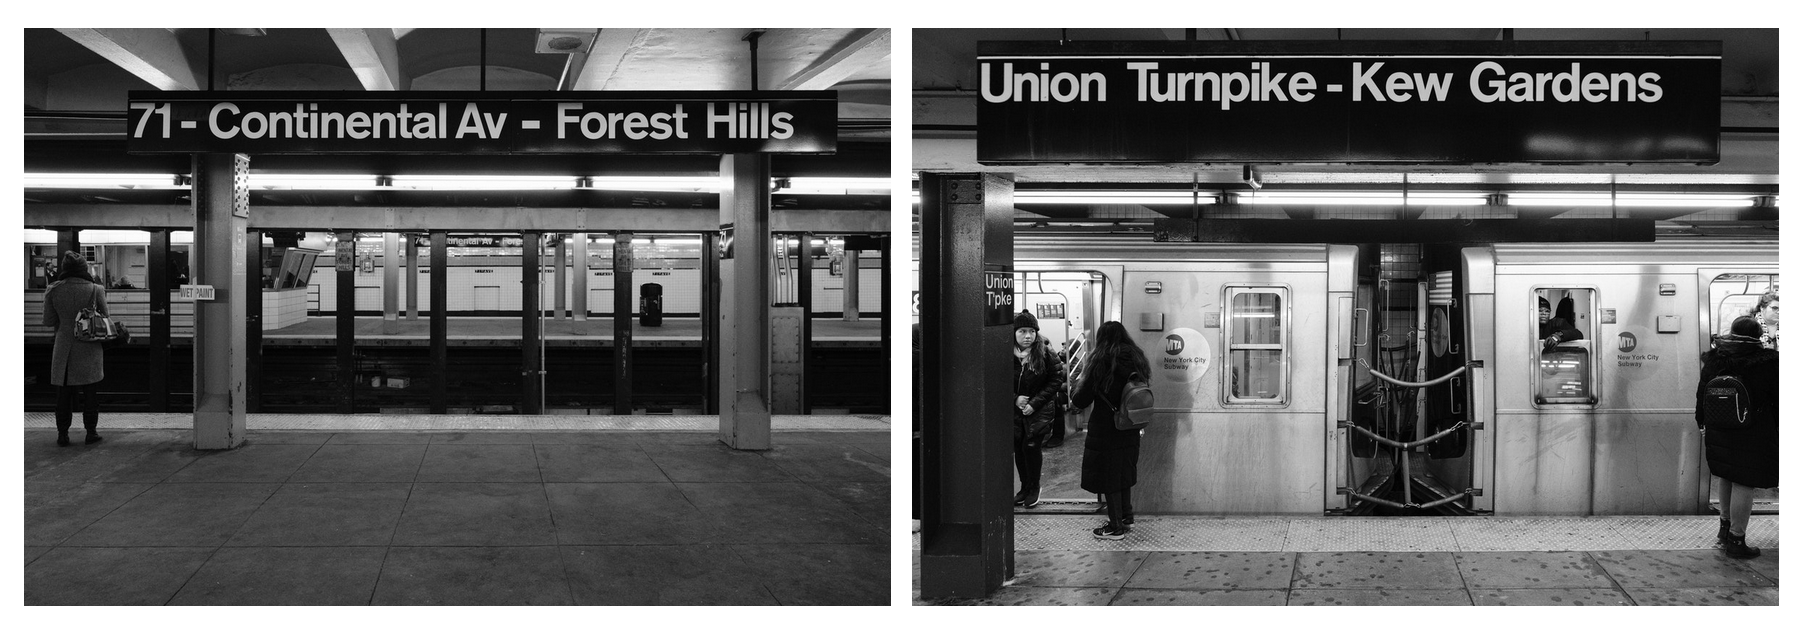
There’s a shocking amount of beautiful design in this little website and I particularly like the blog where Kris Sowersby recently wrote a wonderful essay about the design of their latest type release, Söhne, which looks into the design of the New York subway signage, too:
Direct Link to Article — Permalink
The post The New Klim Type Website is Impossibly Lovely appeared first on CSS-Tricks.
It's been a while ;) Still very busy, but hoping to pop in on a regular basis. How's everyone been?

Creativity is sparking and so is the fire in the fireplace. Christmas time is almost here!
With Christmas being only a few weeks away, it’s the perfect time to start getting your Christmas cards ready.
Nothing shows your friends and family that you care more than a homemade gift and a Christmas card.
Design your own Christmas cards to give away to your loved ones, or make designs to sell online!
No matter the reason behind why you’re creating Christmas card designs, you’re ultimately spreading Christmas cheer through your passion: designing.
Without further ado, let’s get into 32 Incredible Christmas Card Design ideas.
[source]


[source]

[source]

[source]


[source]

[source]

[source]

[source]

[source]

[source]


[source]


[source]


[source]


[source]


[source]

We wish you all the happiness in the world and happy holidays with those you love.
We hope these Christmas card design ideas inspired you to create your own!
Read More at 32 Jolly Christmas Card Design Ideas – The Best of Christmas Card Graphic Design
Looking to create an asset for the Unity Asset store in C#.
I don't want to give away the source code, yet I want users to be able to purchase + download my work and use it in their projects.
I'm not sure what this is called or how to do it.
Any ideas? Much appreciated!
One of the most important step in optimizing your WordPress site for SEO is adding it to Google Search Console (formerly Google Webmaster Tools).
Google Search Console offers specific webmaster tools to help website owners monitor and maintain their search presence and rankings.
In this guide, we will show you how to easily add and verify your WordPress site in Google Search Console also known as Webmaster Tools.

Google Search Console is a free tool offered by Google to help website owners monitor their website’s presence in Google search results.
It helps you track search rankings along with keeping you updated about site errors, security issues, and indexing issues that may affect your website’s search performance.
If you are serious about growing your website, then you need to add it to Google webmaster tools from day one.
That being, let’s take a look at how to easily add your site to Google Search Console.
First, you need to visit the Google Search Console website and click on the ‘Start Now’ button.

Next, you’ll need to sign in with your Google / Gmail account.
Once logged in, you’ll be asked to enter your website URL.
There are two methods for site verification: domain name or URL prefix. We recommend the URL prefix method because it is more flexible.

Keep in mind that Google considers an HTTP and HTTPS as two different protocols. It also considers https://www.example.com and https://example.com as two different websites.
You need to enter the correct website URL used by WordPress.
If you are unsure, then there is an easy way to find out the exact URL you need to enter. Simply login to your WordPress admin area and go to Settings » General page.
There you will see your website’s URL in the site address field.

After entering your correct website address in Google webmaster tools setup wizard, click on the ‘Continue’ button to go to the next step.
Now, you’ll be asked to verify ownership of your website. There are several ways to do that, but we will show the HTML tag method because it is the easiest one.

Click on the HTML tag to expand it and then copy the code inside it.
Now, you need to add this Google site verification meta tag in WordPress, so Google can verify that you are the owner of the website.
Most WordPress tutorials will guide you to just edit the header.php file in your WordPress theme and add the code just above the <body> tag.
However, we don’t recommend this method because if you update or change your theme, then the HTML tag will disappear.
Google periodically checks for the HTML tag and will disable your access to the site data in the search console if it cannot find the verification tag.
Here is how to make sure that Google can always verify your ownership of the website.
First, you need to install and activate the Insert Headers and Footers plugin. For more details, see our step by step guide on how to install a WordPress plugin.
Upon activation, go to Settings » Insert Headers and Footers page and paste the Google HTML tag code you copied earlier inside the ‘Scripts in Header’ box.

Don’t forget to click on the ‘Save’ button to store your changes.
You can now go back to Google Search Console settings and click on the ‘Verify’ button.

Google Search Console will now look for the HTML tag in your website code and will show you a success message.

Note: If you don’t see a success message, then you need to clear your WordPress cache. This will ensure that Google can fetch the latest version of your website.
That’s all. You have successfully added your site to the Google Search Console (Webmaster tools). You can now click on the ‘Go to Property’ link to visit your Google Search Console dashboard.

From here you can see your website’s performance reports and index coverage.
Before you do that, let’s tell Google a little bit more about your website. This will help Google crawl your website a bit more efficiently.
An XML sitemap is a file that lists all your website content in XML format, so search engines like Google can easily discover and index your content.
The easiest way to add an XML sitemap to your WordPress website is by installing and activating the Yoast SEO plugin.
Upon activation, go to SEO » General and switch to the ‘Features’ tab. From here, you need to scroll down to the ‘XML Sitemap’ option and make sure that it is turned on.

Next, you need to get the XML sitemap link. Simply click on the question mark icon next to the XML sitemap option, and you will see a link to your XML sitemap.

Clicking on the link will take you to your XML sitemap. From there, you can just copy the URL from your browser’s address bar.

Alternatively, you can directly access your XML sitemap by adding sitemap_index.xml at the end of your website address. For example:
https://www.example.com/sitemap_index.xml
Now that you have XML sitemap ready, let’s help Google find it quickly.
Simply switch to the Google Search Console dashboard and click on the Sitemaps menu from the left column.

After that, you need to add the last part of your sitemap URL under the ‘Add new sitemap’ section and click the Submit button.
Google will now add your sitemap URL to your Google Search Console.
That’s all, you have successfully added your website to Google Search Console.
The next step is to learn how to use the treasure trove of information in Google search console to grow your business. We have a complete Google Search Console guide for beginners which shows you how to make the most out of Google Search Console data.
Having helped thousands of readers add and verify their website in Google search console, we have seen just about every question you can think of. Here are the answers to some of the most frequently asked questions.
1. How can I upload a Google HTML verification file to my WordPress blog?
Google Search Console allows few different ways to verify website ownership. In this article, we covered the easiest method which is to use the Google site verification meta tag. However some website owners prefer to upload the HTML file to verify site ownership.
To upload the Google search console HTML verification file to WordPress, you will need to login to your WordPress hosting cPanel or connect to your hosting account using FTP.
Next, you need to upload the HTML verification file inside the /public_html/ folder of your website. This is the root directory where you’ll see other WordPress folders like /wp-admin/, /wp-content/, etc.
2. Should I use a Google Site verification plugin for WordPress?
There are many WordPress plugins that are designed specifically to help you with Google site verification. However you don’t need to use them because you’ll likely need to verify ownership on other webmaster tools and platforms like Bing, Yandex, Pinterest, etc.
It’s much better to use the Insert Headers and Footers plugin because it lets you add site verification for all platforms (in a single plugin).
3. How can I become a power user of Google Search Console?
Google search console has a lot of useful information that you can use to grow your business. We have created the ultimate Google Search Console guide that you can use to become a power user.
4. I’m running into problems, is there a Google Search console phone number that I can contact?
No, there’s no Google search console phone number that you can contact. If you’re running into problems with Google search console, then you can use their online support center. For specific questions about WordPress, you can always join our free WordPress help group to ask your questions.
We hope this article helped you learn how to easily add your WordPress site to Google Search Console. You may also want to see our guide on how to get more traffic to your website, and our comparison of the best email marketing services for small business.
If you liked this article, then please subscribe to our YouTube Channel for WordPress video tutorials. You can also find us on Twitter and Facebook.
The post How to Add Your WordPress Site to Google Search Console appeared first on WPBeginner.