If I were to guess, I have probably worked on approximately 100 projects since I started my career in Information Technology in 1992. Without a doubt, my current project is certainly the most complicated and challenging project of that I've ever had. It has been so complex, that I feel like I need to provide a strong background when interviewing new team members for the project.
The Matrix Metaphor
During those interviews, I often recall the scene in the original Matrix movie —where Neo meets with Morpheus for the very first time. If you need a recap, I've attached the scene below:
As a columnar database with both strong CPU and GPU performance, the OmniSci platform is well suited for Extract-Load-Transform (ELT) pipelines (as well as the data science workloads we more frequently demonstrate). In this blog post, I’ll demonstrate an example ELT workflow, along with some helpful tips when merging various files with drifting data schemas. If you’re not familiar with the two major data processing workflows, the next section briefly outlines the history and reasoning for ETL-vs-ELT; if you’re just interested in the mechanics of doing ELT in OmniSci, you can skip to the “Baywheels Bikeshare Data” section.
A Brief History of ETL vs. ELT for Loading Data
From the first computerized databases in the 1960s, the Extract-Transform-Load (ETL) data processing methodology has been an integral part of running a data-driven business. Historically, storing and processing data was too expensive to be accumulating data without knowing what you were going to do with it, so a process, such as the following. would occur each day:
While using Elasticsearch to handle custom fields in your product, you soon hit the limit of the total number of fields in an index. Now, there are two ways to go.
1. Increase this limit just by updating index.mapping.total_fields.limitwith a higher number. This will require additional memory for your Elasticsearch cluster.
The most likely answer from the thread: DOS was a massive operating system for PCs for a long time and it had a three-character limit on file extensions.
Interesting that the first book on HTML covers this specifically:
Where my mind went was server software. I know that web servers automatically do different things with different file types. In a test on my own server (set up to serve a WordPress site), I put some files at the root that all contain the exact same content: <h1>Cool</h1>
file.text = file is rendered as plain text in browser (Content-Type: text/plain)
file.html = file renders as HTML in browser (Content-Type: text/html)
file.htm = file renders as HTML in browser (Content-Type: text/html)
file.fart = file is downloaded by browser (Content-Type: application/octet-stream)
You can write code to serve files with whatever content types you want, but in lieu of that, file extensions do matter because they affect how default web servers choose to serve file type headers.
With stuff like template literals in JavaScript and templating languages, like JSX, I've gotten used to wanting to write my HTML templates in one nice chunk and sprinkling in variables wherever I need them.
I had a situation where I needed to do that in "raw" PHP the other day, so I'm just documenting it here.
Say I have some data like...
$title = "The Title";
$desc  = "Some information about this thing blah blah.";
$img   = "/images/header.jpg";
But that data changes, or there might be multiple sets of it, and I want to be able to pass that data into a function and have it spit out some HTML. That way, it's easy to change the template and have it affect everywhere that uses it.
Next up in our series about the Most Interesting APIs added to ProgrammableWeb in 2019 is our list of Business and Productivity APIs. These APIs can be used to integrate applications with business software and other tools that make business processes more efficient.
Create an Integration Builder Connector to an API Builder Microservices
In this post, we'll describe how to create an Integration Builder connector to an API Builder Microservice. We'll create an API Builder project, run it, and export its swagger definition. Then, we'll import the swagger into Integration Builder and create a connector that can be used in Integration Builder flows.
Create Your API Builder Project
In this section, we'll create an API Builder project and get the swagger for it.
An extendible hash is composed of a directory section, which points to leaf pages, and the leaf pages point to where the actual data resides.
My current implementation is incredibly naïve though. The leaf page has an array of records (two int64 values, for key and value) that we scan through to find a match. That works, but it works badly. It means that you have to scan through a lot of records (up to 254, if the value isn't found). At the same time, we also waste quite a bit of space here. We need to store int64 keys and values, but the vast majority of them are going to be much smaller.
How AI Can Help Us Predict Whether Antidepressants Will Work
One of the more peculiar aspects of psychiatry is why antidepressants only appear to help some people and others not all. Indeed, it’s not entirely known why they help those who do appear to benefit, but a couple of studies from the University of Texas Southwestern aims to recruit the help of AI to find out.
Both studies aimed to explore the brain activity of volunteers during various emotional states, with the participants generally split between a healthy control group and people suffering from depression who were either given a placebo or antidepressants.
One of the more powerful concepts I've stumbled across recently is the idea of abstract syntax trees, or ASTs. If you've ever studied alchemy, you may recall that the whole motivation for alchemists was to discover some way to transform not-gold into gold through scientific or arcane methods.
ASTs are kind of like that. Using ASTs, we can transform Markdown into HTML, JSX into JavaScript, and so much more.
Why are ASTs useful?
Early in my career, I tried to change files using a find-and-replace method. This ended up being fairly complicated, so I tried using regular expressions. I ended up abandoning the idea because it was so brittle; the app broke all the time because someone would enter text in a way I hadn’t anticipated and it would break my regular expressions causing the whole app to fall down.
The reason this was so hard is that HTML is flexible. That makes it extremely hard to parse using regular expressions. String-based replacement like this is prone to breaking because it might miss a match, match too much, or do something weird that results in invalid markup that leaves the page looking janky.
ASTs, on the other hand, turn HTML into something far more structured, which makes it much simpler to dive into a text node and do replacements on only that text, or to mess with elements without needing to deal with the text at all.
This makes AST transformation safer and less error-prone than a purely string-based solution.
What are ASTs used for?
To start, let's take a look at a minimal document using a couple lines of Markdown. This will be saved as a file called home.md, which we'll save in the content folder of our website.
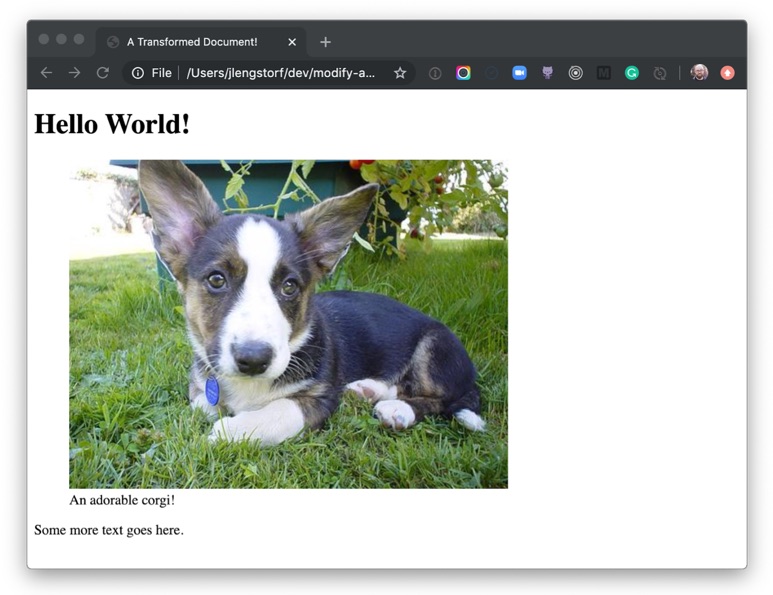
# Hello World!
 An adorable corgi!
Some more text goes here.
Assuming we know Markdown, we can infer that when this Markdown is parsed, it'll end up being an <h1> that says, "Hello World!" and a <p> that says, "This is some Markdown."
But how does it get transformed from Markdown to HTML?
First, we need to install the dependencies required to parse the Markdown into an AST and convert it to HTML. To do that, we need to make sure we've initialized the folder as a package. Run the following command in your terminal:
# make sure you’re in your root folder (where `content` is)
# initialize this folder as an npm package
npm init

# install the dependencies
npm install unified remark-parse remark-html
If we assume our Markdown is stored in home.md, we can get the AST with the following code:
This code takes advantage of Node’s built-in fs module, which allows us to access and manipulate the filesystem. For more information on how this works, check out the official docs.
If we save this as src/index.js and use Node to execute this script from the command line, we’ll see the following in our terminal:
$ node src/index.js
<h1>Hello World!</h1>
<p><img src="<https://images.dog.ceo/breeds/corgi-cardigan/n02113186_1030.jpg>" alt="cardigan corgi"> An adorable corgi!</p>
<p>Some more text goes here.</p>
We tell unified to use remark-parse to turn the Markdown file into an AST, then to use remark-html to turn the Markdown AST into a HTML — or, more specifically, it turns it into something called a VFile. Using the toString() method turns that AST into an actual string of HTML we can display in the browser!
Thanks to the hard work of the open-source community, remark does all the hard work of turning Markdown into HTML for us. (See the diff)
Next, let's look at how this actually works.
What does an AST look like?
To see the actual AST, let’s write a tiny plugin to log it:
Note that the position values have been truncated to save space. They contain information about where the node is in the document. For the purposes of this tutorial, we won’t be using this information. (See the diff)
This is a little overwhelming to look at, but if we zoom in we can see that each part of the Markdown becomes a type of node with a text node inside it.
The type tells us what kind of node we're dealing with.
Each node type has additional properties that describe the node. The depth property on the heading tells us what level heading it is — a depth of 1 means it’s an <h1> tag, 2 means <h2>, and so on.
The children array tells us what's inside this node. In both the heading and the paragraph, there’s only text, but we could also see inline elements here, like <strong>.
This is the power of ASTs: We've now described the Markdown document as an object that a computer can understand. If we want to print this back to Markdown, a Markdown compiler would know that a "heading" node with a depth of 1 starts with #, and a child text node with the value "Hello" means the final line should be # Hello.
How AST transformations work
Transforming an AST is usually done using the visitor pattern. It‘s not important to know the ins and outs of how this works to be productive, but if you’re curious, JavaScript Design Patterns for Humans by Soham Kamani has a great example to help explain how it works. The important thing to know is that the majority of resources on AST work will talk about "visiting nodes," which roughly translates to "find part of the AST so we can do stuff with it." The way this works practice is that we write a function that will be applied to AST nodes matching our criteria.
A few important notes about how it works:
ASTs can be huge, so for performance reasons we will mutate nodes directly. This runs counter to how I would usually approach things — as a general rule I don't like to mutate global state — but it makes sense in this context.
Visitors work recursively. That means that if we process a node and create a new node of the same type, the visitor will run on the newly created node as well unless we explicitly tell the visitor not to.
We're not going to go too deep in this tutorial, but these two ideas will help us understand what's going on as we start to mess with the code.
How do I modify the HTML output of the AST?
What if we want to change the output of our Markdown, though? Let's say our goal is to wrap image tags with a figure element and supply a caption, like this:
To accomplish this, we'll need transform the HTML AST — not the Markdown AST — because Markdown doesn't have a way of creating figure or figcaption elements. Fortunately, because unified is interoperable with multiple parsers, we can do that without writing a bunch of custom code.
Convert a Markdown AST to an HTML AST
To convert the Markdown AST to an HTML AST, add remark-rehype and switch to rehype-stringify for turning the AST back to HTML.
npm install remark-rehype rehype-stringify
Make the following changes in src/index.js to switch over to rehype:
This is the AST for the HTML representation of the image, so we can start changing it over to use the figure element. (See the diff)
Write a plugin for unified
To wrap our img element with a figure element, we need to write a plugin. In unified, plugins are added with the use() method, which accepts the plugin as a first argument and any options as a second argument:
.use(plugin, options)
The plugin code is a function (called an “attacher” in unified jargon) that receives option. These options are used to create a new function (called a “transformer”) that receives the AST and does work to, er, transform it. For more details on plugins, check out the plugin overview in the unified docs.
The function it returns will receive the entire AST as its argument, and it doesn't return anything. (Remember, ASTs are mutated globally.) Create a new file called img-to-figure.js in the same folder as index.js, then put the following inside:
module.exports = options => tree => {
  console.log(tree);
};
Next, we need to add a visitor. This will let us actually get at the code. Unified takes advantage of a number of utility packages, all prefixed with unist-util-*, that allow us to do common things with our AST without writing custom code.
We can use unist-util-visit to modify nodes. This gives us a visit helper that takes three arguments:
The entire AST we're working with
A predicate function to identify which nodes we want to visit
A function to make any changes to the AST we want to make
To install, run the following in your command line:
npm install unist-util-visit
Let's implement a visitor in our plugin by adding the following code:
const visit = require('unist-util-visit');

  module.exports = options => tree => {
    visit(
      tree,
      // only visit p tags that contain an img element
      node =>
        node.tagName === 'p' && node.children.some(n => n.tagName === 'img'),
      node => {
        console.log(node);
      }
    );
};
When we run this, we can see there's only one paragraph node logged:
Now that we have the image attributes, we can start to change the AST. Remember, because ASTs can be really large, we mutate them in place to avoid creating lots of copies and potentially slowing our script down.
We start by changing the node’s tagName to be a figure instead of a paragraph. The rest of the details can stay the same for now.
Make the following changes in src/img-to-figure.js:
const visit = require('unist-util-visit');

module.exports = options => tree => {
  visit(
    tree,
    // only visit p tags that contain an img element
    node =>
    node.tagName === 'p' && node.children.some(n => n.tagName === 'img'),
    node => {
      node.tagName = 'figure';
    }
  );
};
If we run our script again and look at the output, we can see that we’re getting closer!
<h1>Hello World!</h1>
<figure><img src="<https://images.dog.ceo/breeds/corgi-cardigan/n02113186_1030.jpg>" alt="cardigan corgi">An adorable corgi!</figure>
<p>Some more text goes here.</p>
To avoid needing to write custom syntax, we're going to use any text passed inline with an image as the image caption.
We can make an assumption that usually images don't have inline text in Markdown, but it’s worth noting that this could 100% cause unintended captions to appear for people writing Markdown. We're going to take that risk in this tutorial. If you're planning to put this into production, make sure to weigh the trade-offs and choose what's best for your situation.
To use the text, we're going to look for a text node inside our parent node. If we find one, we want to grab its value as our caption. If no caption is found, we don’t want to transform this node at all, so we can return early.
Make the following changes to src/img-to-figure.js to grab the caption:
const visit = require('unist-util-visit');

module.exports = options => tree => {
  visit(
    tree,
    // only visit p tags that contain an img element
    node =>
    node.tagName === 'p' && node.children.some(n => n.tagName === 'img'),
    node => {
      // find the text node
      const textNode = node.children.find(n => n.type === 'text');

      // if there’s no caption, we don’t need to transform the node
      if (!textNode) return;

      const caption = textNode.value.trim();

      console.log({ caption });
      node.tagName = 'figure';
    }
  );
};
Now that we have our caption text, we can add a figcaption to display it. We could do this by creating a new node and deleting the old text node, but since we’re mutating in place it’s a little less complicated to just change the text node into an element.
Elements don’t have text, though, so we need to add a new text node as a child of the figcaption element to display the caption text.
Make the following changes to src/img-to-figure.js to add the caption to the markup:
const visit = require('unist-util-visit');

module.exports = options => tree => {
  visit(
    tree,
    // only visit p tags that contain an img element
    node =>
      node.tagName === 'p' && node.children.some(n => n.tagName === 'img'),
    node => {
      // find the text node
      const textNode = node.children.find(n => n.type === 'text');

      // if there’s no caption, we don’t need to transform the node
      if (!textNode) return;

      const caption = textNode.value.trim();
      // change the text node to a figcaption element containing a text node
      textNode.type = 'element';
      textNode.tagName = 'figcaption';
      textNode.children = [
        {
          type: 'text',
          value: caption
        }
      ];

      node.tagName = 'figure';
    }
  );
};
If we run the script again with node src/index.js, we see the transformed image wrapped in a figure element and described with a figcaption!
<h1>Hello World!</h1>
<figure><img src="<https://images.dog.ceo/breeds/corgi-cardigan/n02113186_1030.jpg>" alt="cardigan corgi"><figcaption>An adorable corgi!</figcaption></figure>

<p>Some more text goes here.</p>
Now that we've made a bunch of transformations, we want to save those adjustments to an actual file so we can share them.
Since the Markdown doesn't include a full HTML document, we’re going to add one more rehype plugin called rehype-document to add the full document structure and a title tag.
Run the script again and we'll be able to see a new folder in root called public, and inside that we’ll see home.html. Inside, our transformed document is saved!
If we open public/home.html in a browser, we can see our transformed Markdown rendered as a figure with a caption.
Holy buckets! Look at that adorable corgi! And we know it’s adorable because the caption tells us so.
What to do next
Transforming files using ASTs is extremely powerful — with it, we’re able to create pretty much anything we can imagine in a safe way. No regexes or string parsing required!
From here, you can dig deeper into the ecosystem of plugins for remark and rehype to see more of what’s possible and get more ideas for what you can do with AST transformation, from building your own Markdown-powered static site generator; to automating performance improvements by modifying code in-place; to whatever you can imagine!
GoGetSSL is a company that sells SSL certificates. You know, those things that are required to make your site use https://, not http:// which doesn't feel like an optional choice these days with browsers making sites looks scarily insecure without it and search engines telling us is a ranking factor. I'm talking to developers that generally know this though, and I bet your question is exactly the same as the first question I had:
Why would I pay money for an SSL certificate when I can use Let's Encrypt for free?
So I asked them. This way I could make sure I understand it and then relay that information to you. Turns out, there is a bunch of stuff you get for a buying an SSL certificate from GoGetSSL. One is particularly interesting: they have free certificates too, and you don't have to do fancy command-line stuff to get one, and include customer support and other benefits. So there is that.
Here's a dozen other things they told me.
Paid SSL can use ECC (Elliptic Curve Cryptography, an popular alternative to RSA). All GoGetSSL certificates have ECC included.
Paid SSL has Multi-Domain and Multi-Domain Wildcard SSL certificate which allow protecting up to 250 different wildcard domains with the same certificate.
Let's Encrypt can be painful for some users who don't have knowledge of using the command line and configuring servers.
Paid SSL provides SSL management for you, like letting you know when your certificate is going to expire. Let's Encrypt has automatic 90-day renewals, but it has a volume limit. If someone floods them with new certificates, you may not receive your renewal SSL in time and could potentially leave your site unprotected.
Paid SSL verifies the business organization, which is an extra level of trust for customers. You can actually check the owner of a website within the certificate.
Paid SSL can include an LEI code, which is a cross-check verification for the organization. Let's Encrypt would never have that, as it is a paid feature.
Paid SSL offers a dynamic site seal logo with identity verification.
Paid SSL can protect the public IP address (a very popular product right now).
Paid SSL can have a warranty (the certificate vendor must provide reimbursement for end-users who are charged fraudulently).
Paid SSL has premium customer support.
Paid SSL may issue Code Signing Certificates (assurance that a piece of software is from a particular developer and has not been tampered with). Let's Encrypt does not offer this.
Paid SSL may issue Personal Authentication / S/MIME SSL certificates (like an SSL certificate for email), another thing Let's Encrypt does not offer.
Sound good? Try GoGetSSL for your SSL certificates.
Are you ready to track your’s author’s posts performance on search engines? Typically, with Google Analytics, we will be able to see the top-performing posts, countries, and related stats in our Google Analytics account. But, if we are running a multi-author blog, it is a great practice to track the author’s performance on search engines. […]
Our last inspirational websites collection this year is packed with some truly astonishing designs that shine with their exquisite colors and typography and that make use of some delicate motion design, implemented to perfection.
We hope you enjoy this grand finale of this year’s website designs and move smoothly into 2020!
Do you want to create a Dropbox upload form in WordPress?
A contact form with a file upload option could be hard to manage if you are getting too many attachments. You can connect your form to Dropbox and upload those files directly to the cloud.
In this article, we’ll show you how to easily create a Dropbox upload form in WordPress.
Why Use Dropbox to Upload Form Attachments
Some times you may need users to upload a file attachment using a form on your website.
For example, a job board website may need a file upload option to upload CV or work samples.
A customer feedback form may need a file upload option so users can send screenshots. A photo contest website may need it for users to upload their entries.
As you receive files, you can store those files on your WordPress website. They will be added to your website’s wp-content folder.
However, if you are expecting to get a ton of entries, and they are not related to your actual website files, then it is a good idea to save them separately.
Uploading form attachments to Dropbox has the following advantages:
Keeps form upload entries separate from your WordPress files
Dropbox makes it easier to share those files with anyone and you’ll not need to give them access to your website.
You can easily browse and manage form attachments from your Dropbox dashboard
If you no longer need those files, then you can download, archive, and delete them.
That being said, let’s take a look at how to make a WordPress form with an option to upload files to Dropbox.
Note: WPForms is a paid plugin built by the same team as WPBeginner, and you’ll need at least their ‘Pro’ plan to access the Zapier addon which we’ll be using in this tutorial.
Upon activation, you need to visit WPForms » Add New page in your WordPress admin area.
It’ll take you to the WPForms form builder page. Simply provide a name for your form and then select simple contact form template as a starting point.
WPForms will load the form template with commonly used form fields. You can click on any fields to edit it, and you can also drag the fields to rearrange them or add new fields to the form.
Next, you need to click on the ‘File Upload’ field located under the ‘Fancy fields’ section in the left column.
This will add the file upload field to your form.
Click on the ‘Save’ button to save your form, and your file upload form is ready.
Integrating Zapier with WPForms
Next, you need to connect your form to your Dropbox account.
We’ll be using a service called Zapier to do that. Zapier allows you to connect different apps to your website without writing any code. In this case, we’ll use it to build a connection between WPForms and Dropbox.
WPForms comes with a ‘Zapier Addon’ that you can use to integrate with over 1500 popular apps, including Dropbox.
To access this addon, you need to go to WPForms » Addons page. From there, you need to look for the Zapier addon and click on the ‘Install Addon’ button. It will activate the addon automatically.
Next, you need to go to WPForms » Settings » Integrations page in your WordPress admin area. From there, you need to copy the ‘Zapier API key’ that you will need to connect your WordPress website with Zapier.
Once copied, you should go to the Zapier website and login to your Zapier account. Then, click on the ‘Make a Zap’ button to continue.
There will be many apps available. Search for ‘WPForms’ and select it as a trigger app.
After that, you need to select ‘New Form Entry’ as a trigger event for the WPForms app. It will create a trigger on every form submission.
Now, you can go ahead and click on the ‘Sign in to WPForms’ button to connect your Zapier account with WPForms plugin on your site.
To connect Zapier with your website, you need to add your website URL and Zapier API key that you copied earlier.
It will display the WPForms account. Click on the ‘Continue’ button.
In the ‘Form’ dropdown, you need to select the file upload form that you created previously.
After that, click on the ‘Continue’ button.
Before going to the next step, Zapier will ask you to test the new file upload form to see if all the settings are working properly.
You can visit WPForms » All Forms page in the WordPress admin area and click on the ‘Preview’ link below the file upload form.
To make this test smooth, you should upload a file and also add dummy text in the message section. Submit the test entry and go to your Zapier account. Click on the ‘Test & Continue’ button.
Note: You can check the test entry in the ‘Find Data’ section.
If the test is successful, it will jump to the next step where you can integrate your form with Dropbox.
Connecting WPForms with Dropbox
First you need to visit your Dropbox account and create a new Dropbox upload folder. You can rename this folder as ‘WPForms Uploads’ or give it any name. All your file attachments will upload in this folder automatically.
Next, you need to go back to your Zapier account. In the ‘Do this’ section, you need to choose ‘Dropbox’.
It will ask you to create an action for Dropbox. Select the ‘Upload File’ option and click on the ‘Continue’ button.
After that, you need to click on the ‘Sign in to Dropbox’ button to select your Dropbox account and connect it with Zapier.
Upon connecting the account, click on the ‘Continue’ button.
Now, you need to configure the Dropbox file settings. It will ask you for 2 options:
The Dropbox folder where you want to save the file attachments
The WPForms file upload field
After setting up, you can go ahead and test your configurations. Click on the ‘Test & Continue’ button to continue.
Lastly, click on the ‘Turn Zap On’ button to store these settings. It will take a few seconds, and you will see the Zap status on the top rights corner of the screen.
Your online form with file upload option is ready to be added on your website.
Adding the Dropbox Upload Form in WordPress
To add the Dropbox upload form in WordPress, you can edit any page or post where you want to display it.
Simply add the WPForms block to the content editor and select the form you created earlier.
WPForms will load the live preview of your form inside the content editor.
You can now visit your website to the form in action. You can also test out the form by uploading a file and filling out the form.
That’s all.
We hope this article helped you learn how to create a Dropbox upload form in WordPress. You may also want to see our guide on how to run a giveaway contest in WordPress to boost user engagement.
If you liked this article, then please subscribe to our YouTube Channel for WordPress video tutorials. You can also find us on Twitter and Facebook.
About Us page is the section of your website where you can tell users about your brand and add value to it. Your WordPress About Us page has great potential to become one of the...