CoBlocks 1.9.5 Merges Block Gallery Plugin into Collection, Adds New Form Block

CoBlocks, a collection of page builder blocks that was recently acquired by GoDaddy, has added four new blocks in version 1.9.5. This is the first major release since the plugin was acquired from Rich Tabor and his co-creators. Tabor now heads up a WordPress Experience team at GoDaddy where CoBlocks’ development continues.

This release merges the three gallery blocks (Masonry, Stacked, and Carousel) from the Block Gallery plugin into CoBlocks. There is a migration path for users to convert their existing Block Gallery blocks to CoBlocks’ gallery blocks. Block Gallery is still available on WordPress.org as a separate plugin with 5,000 active installs, which is actually more installs than CoBlocks (4,000). Tabor said his team is still discussing whether or not it will remove the plugin in the future.

“CoBlocks is already a suite of blocks that level-up the block editor, bringing in those gallery blocks into the core plugin removes a barrier for folks who already have CoBlocks installed,” Tabor said. “Instead of folks having to install, activate, and maintain two plugins – only one is needed. On top of that, it’s far easier to maintain them collectively under one roof, as many of the components are shared between the two plugins.”

In addition to merging the gallery blocks, CoBlocks 1.9.5 introduces a new Form block that allows users to customize a simple form directly within the editor. The block includes name, email, and message form fields but does not offer the ability to create new fields or change them to different types of fields. Users can set any of the fields as required using a toggle inside the block preview. For anything beyond these capabilities, a dedicated forms plugin would be required.

CoBlocks 1.9.5 also adds official support for Gutenberg 5.7 and includes more than a dozen tweaks and fixes.

Tabor said his team is identifying further solutions that can be leveraged to make page building in WordPress more simple. CoBlocks is rapidly becoming a another one-stop shop for the mostly commonly used page building blocks.

“We’re looking at how to make adding maps easier (a better Map block) and developing a system that enables restaurants to build out menus,” Tabor said.

Several other block collections already offer a map block and/or a similar suite of page building functionality, such as Ghost Kit, Atomic Blocks, Stackable, and Editor Blocks. Collections seem to be the best way to offer multiple small UI elements, especially if they are all designed to be complimentary in style. Plugin authors differentiate their collections from the others with additional block options, support, complimentary themes, and immediate compatibility with the Gutenberg plugin.

At the moment, there is little incentive for developers to maintain functionality as separate plugins, but WordPress’ planned single block directory may change the way blocks are packaged for optimal discovery. For now, it’s a race to see which block collection can offer the most useful suite with the most intuitive UI.

WordPress 5.2 Improves the Security of Automatic Updates

WordPress 5.2, released earlier this month, added the first step towards fully secure updates with offline digital signatures. Scott Arciszewski, Chief Development Officer for Paragon Initiative Enterprises, explains how it works and how developers can migrate away from mcrypt to libsodium.

When your WordPress site installs an automatic update, from version 5.2 onwards, it will first check for the existence of an x-content-signature header.

If one isn’t provided by the update server, your WordPress site will instead query for a filenamehere.sig file.

No matter how it’s delivered, the signatures are calculated using Ed25519 of the SHA384 hash of the file’s contents. The signature is base64-encoded for safe transport.

Scott Arciszewski

The WordPress core development team manages the signing or secret keys. WordPress 5.2 contains a signing key that expires on April 1, 2021. The verification key or public key is used to decipher the secret key. This value determines the validity of the signature.

Since the feature is still in an experimental phase, WordPress 5.2 allows an update to occur if a soft error or invalid signature is encountered. This is to prevent more severe errors from causing the user to be locked out of the update process until a manual update is applied. The team will use the reported error information to improve the signature checking process.

The digital signatures are only supported for core updates with Themes and Plugins to follow in a later release. It’s also likely that the team will include separate keys for core releases, plugins, themes, translations, etc. to allow for more fine-grained control.

Digital signatures applied to WordPress core updates is an important milestone because it prevents users from unknowingly downloading updates from malicious sources.

For example, without digital signatures, if the server or servers that house the core update files were compromised, a false update could be sent to millions of sites. In 2016, WordFence explained how this scenario could play out when they publicized a security vulnerability they discovered with api.wordpress.org.

Persistence Pays Off

In early 2017, Arciszewski published a plea to Matt Mullenweg to focus on securing WordPress’ automatic updates system by using secure cryptographic signatures. Mullenweg responded to the article with one of his own on Medium.

We will at some point; as said above it’s a good idea — can’t hurt, might help. There are, however, some more important security issues in front of it, that impact millions of sites in the real world, so we are prioritizing those issues above a nice-to-have, defense in-depth effort.

Matt Mullenweg

Arciszewski has spent at least six years trying to convince the core team to implement digitally signed updates. Four months ago, Gary Pendergast, WordPress core developer, responded to the ticket saying that the feature fell in line with the list of WordPress priorities planned for 2019 and beyond. Pendergast laid out a plan and with a confirmed commitment to landing it in core, Arciszewski worked with the core team to make it a reality.

Millions of WordPress sites are on their way to becoming more secure thanks to the persistence and efforts of Arciszewski and the WordPress core team.

How to Use Heading Tags to Get More Search Engine Traffic

I wrote a ton of blog posts.

Over the last year alone, I’ve published a minimum of three blogs per week here at Quick Sprout. Some weeks it was even more, at times with multiple posts per day.

If you’ve been reading my blogs for a while now, you know that everything I produce is long-form content—just like the post you’re currently reading.

This means it falls somewhere in the 1.800-3,000+ word range. I’m not writing quick 500-word pieces for the sake of publishing at a high rate.

Over the years, I’ve covered lots of in-depth topics about content marketing, website optimization, conversions, SEO, and other related subjects. But today I want to share with you a seemingly small and subtle SEO hack that can drastically improve the performance of your content.

I’m referring to heading tags.

Some of you might be more familiar with these than others. I’m sure some of you even use them in your posts, whether you realize their SEO value or not.

I use heading tags in everything that I publish, including this post that you’re reading right now.

In fact, you’ll see them throughout the post as we continue. I’ll make sure to bring attention to them so you know exactly what I’m talking about. So follow along this guide to see how you can improve your content with heading tags.

What is a heading tag?

Before we go any further, let’s make sure we’re all on the same page here. So far in this guide, I’ve used two heading tags:

  • H1 for the title at the top of the page (How to Use Heading Tags to Get More Search Engine Traffic)
  • H2 for this subsection (What is a heading tag?)

There will be several more used throughout the guide as well.

By definition, these are HTML tags that specify headers on a website. Let me break that definition down for you even further.

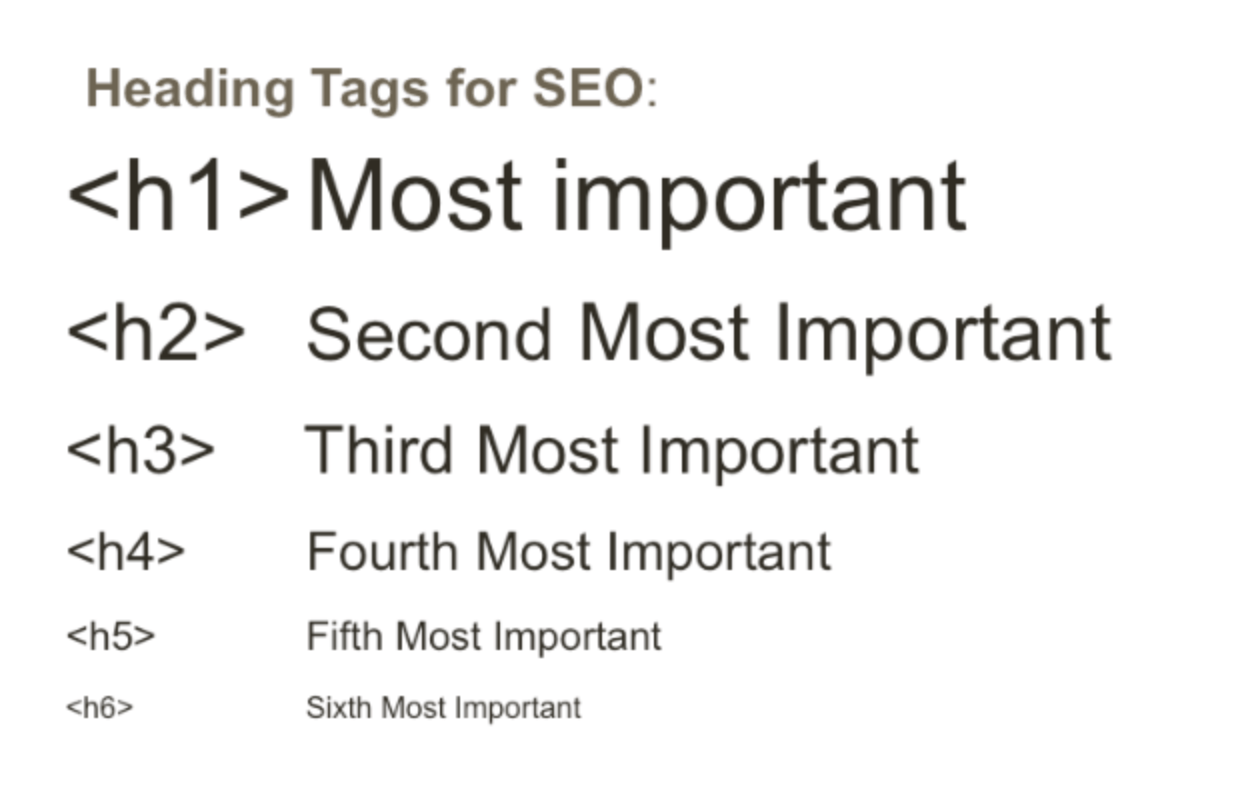
HTML (hypertext markup language) is the language used to create pages on websites. Tags are the code that tells a web browser how the content should be displayed on the page. There are six types of heading tags; H1-H6.

Each tag can be ranked from highest to lowest in the order of significance, which is clearly illustrated by the size.

Heading Tags

You can add these tags to your content before you publish your work.

Here at Quick Sprout, we use WordPress. But I don’t typically write my blogs directly in that platform. I work in Google Docs, just because I think it’s more user-friendly for writing long-form content.

Whether you’re using Docs, Microsoft Word, or another platform to produce content, you’ll be able to find those header options in the menu bar. Here’s what it looks like in Google Docs:

Google Docs Heading Tags

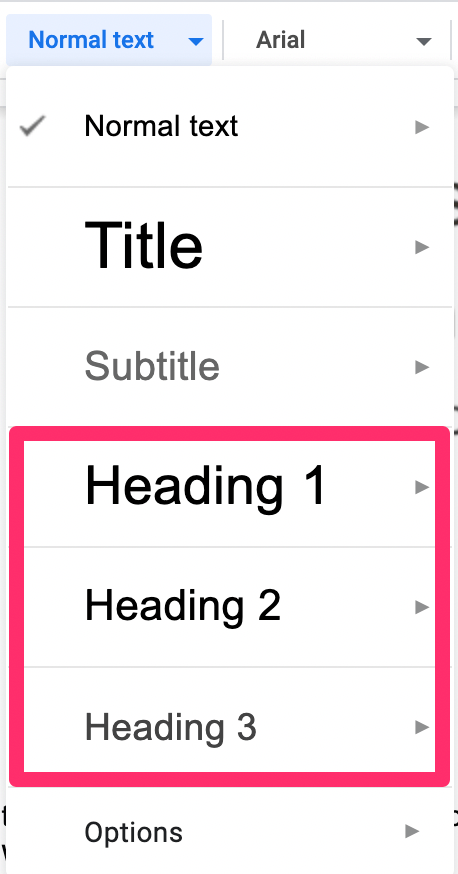
It’s very straightforward.

The options for H4 and higher won’t appear until after you add H3 tags to your content.

Here’s what the tags look like if you’re working directly in WordPress.

Wordpress Heading Tags

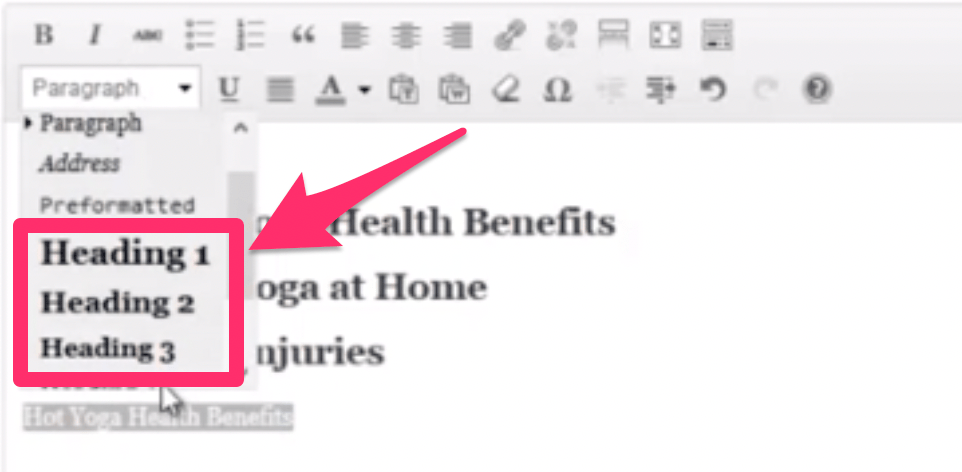
Again, it’s about as straightforward as it gets.

You can verify that the headers are applied properly into your content by viewing the source code of a page. In WordPress, just switch from the visual editor to the text editor to see the HTML code.

You can also view the source code of any page, even after it’s been published.

For example, let’s look at some previously published content here at Quick Sprout. Here is a post I wrote about online marketing for beginners.

Heading Tag Example

I’ve pointed out the different headers above. I’m sure you’re used to seeing content like this (especially on Quick Sprout).

Now, you might look at this and just think the font is larger. All of the main text is written in size 11, the title is size 20, and the subheader is size 16. While this might be the case, it’s not that simple.

Changing the size of the font alone doesn’t equate to a heading tag.

If you check the source code of the page, you’ll see what I mean.

Right click on any web page to see the source code. In fact, you can do it with what you’re reading right now. Then just click “view page source” and it will bring you to the source code. Here’s what that looks like for the Beginners Guide to Online Marketing.

Heading Tag Html Code

Finding those h tags in the source code is like a needle in a haystack. So use “command + f” to your advantage. Then just search for h1, h2, h3, etc…

I pointed out the tags to make it obvious.

As you can see, H1 tags were used for the title, and an H3 tag was used for the first subheader on the page.

SEO value for heading tags

Now let’s get into how heading tags are connected to SEO. By the way, here’s another heading tag (above) that I used for this subsection.

There has been a debate for quite some time amongst SEO experts about how much of an impact heading tags actually have on SEO.

You can’t compare their value to things like domain authority or backlinks, but heading tags still play a factor in your search ranking. That’s because they make it easier for search engines to read and interpret your content.

If you just have big walls of text without subheaders, it’s going to be difficult for bots to know what your page is about.

This can be compared to your overall website architecture as well.

Just like your homepage and top-level content have a hierarchy that makes it easy for crawlers to index pages, the heading tags explain the importance of topics on the page.

Without headers, you’re relying on search engines to take all of your text at the same face value, which won’t help your search ranking.

John Mueller, the senior webmaster trends analyst at Google was quoted saying that Google uses H tags to understand the structure of text on a page.

So it’s clear that they provide some SEO value.

Furthermore, research from the Hook Agency shows some of the most important factors of on-page SEO.

Important SEO Factors

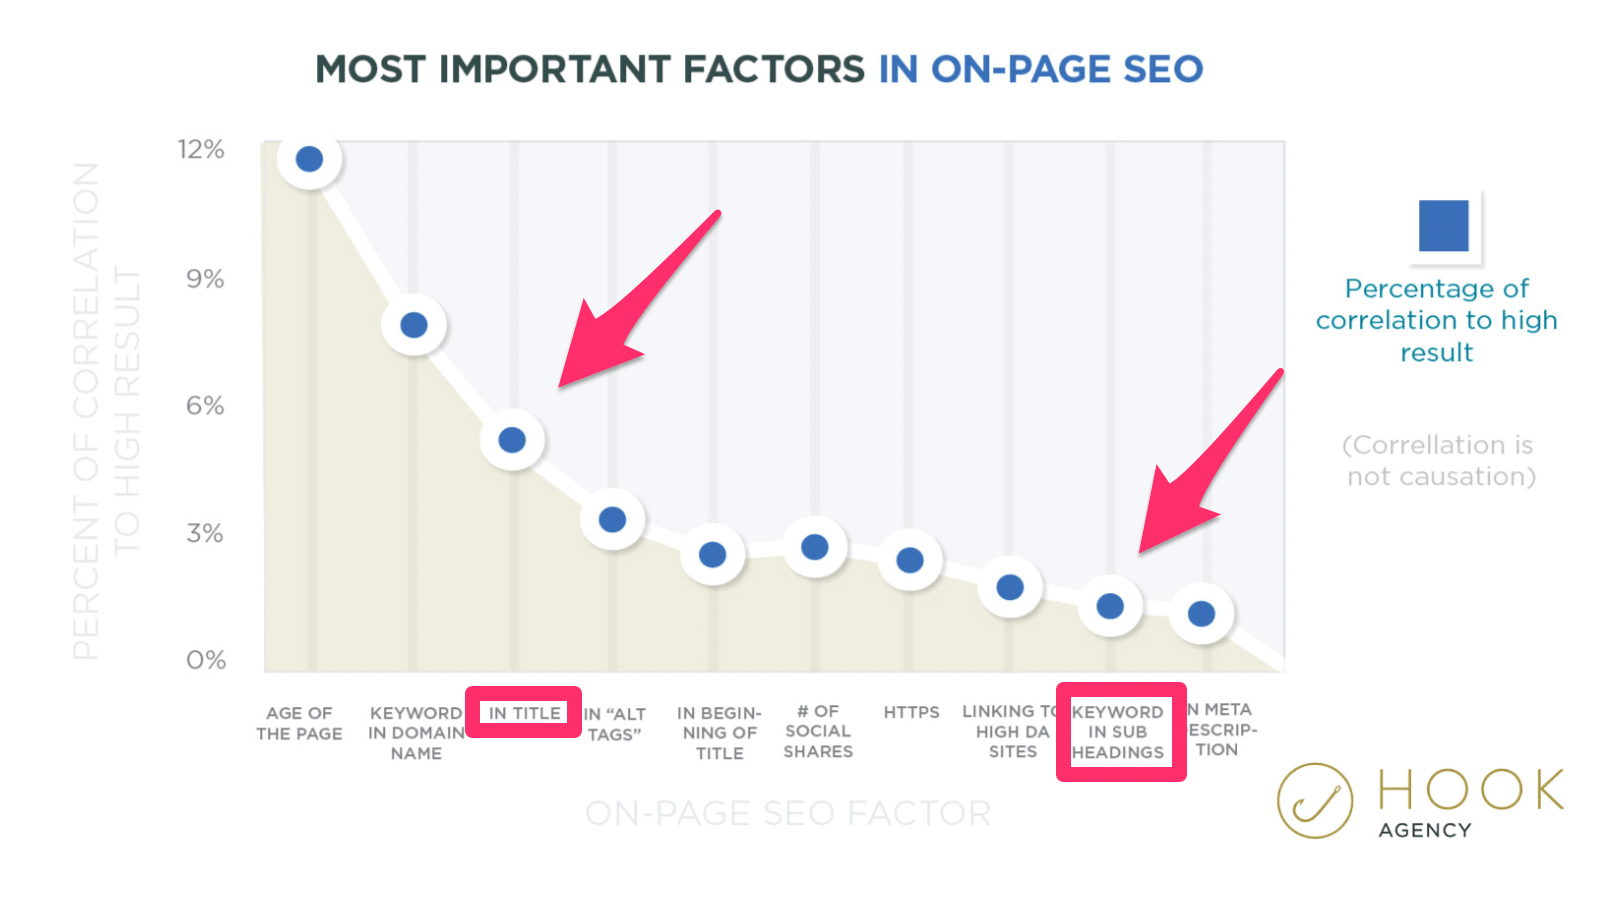
Two of the top ten factors are related to your heading tags.

I’ve found some really great case studies on the web that back up this claim as well. Here’s one of my favorites conducted by Search Eccentric.

The study is about a company called Motorcars Ltd.

They’ve been in business for over 40 years, but in the digital era, they struggled to rank in search engines for their keywords. After analyzing the website, it was clear that there was plenty that could be improved upon.

One of the things that they changed was adding H1 and H2 tags to the site.

The purpose of this was to improve the visibility and make the content more SEO friendly; simple, right? Take a look at the results of this tactic.

The changes had a huge impact on their search results.

Ranking Improvements

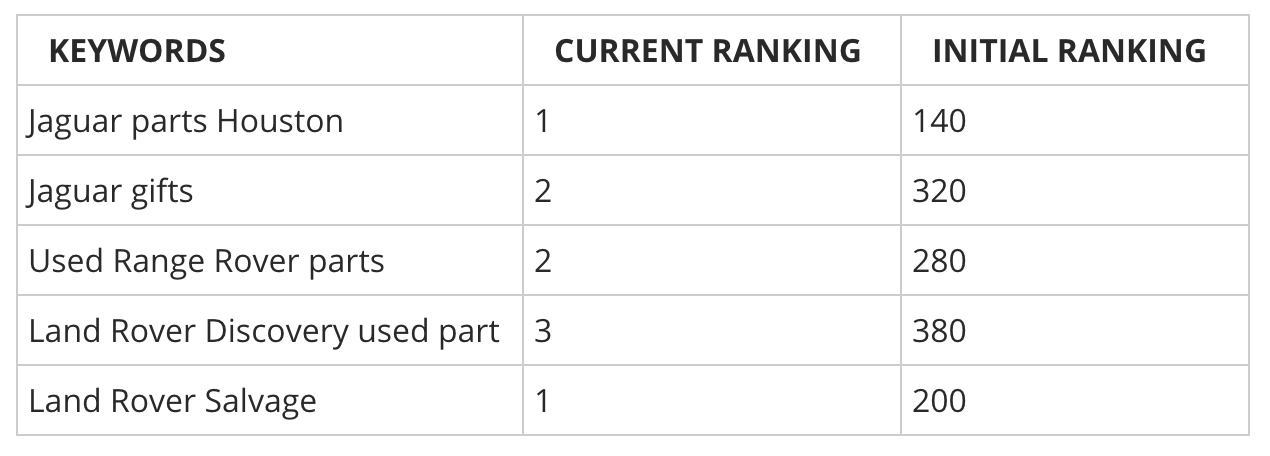
After the heading tags were added, the company held the top ranking spot for two of their targeted keywords. They held a top three position for five of their top keywords.

As you can see from the chart, they jumped hundreds of ranking spots.

Now, all of this can’t be attributed to the header tags alone. They also removed dead links and fixed some navigation issues. But the heading tags definitely played a huge role in their success.

How heading tags impact user experience

In addition to the SEO benefits of heading tags, adding these to your site will also help improve the user experience.

As a result, you’ll get more traffic to your site, frequent repeat visitors, and people will stay on your site for longer stretches of time. This simultaneously adds more SEO value as well.

How can heading tags benefit visitors on your website?

For starters, it just makes your content cleaner and more organized. 43% of people say that they skim blog posts. You need to make your content easy to skim by adding headers.

Take this post you’re reading now as an example.

Let’s say you already knew what heading tags were before you started reading. You may not think it’s necessary to read the first section. It would be very easy for you to skip over it because the tags are clear.

But if I eliminated all heading tags from the post, it would create a large wall of text that is extremely difficult to read. Here’s an example to show you what I mean.

No Heading Tag Example

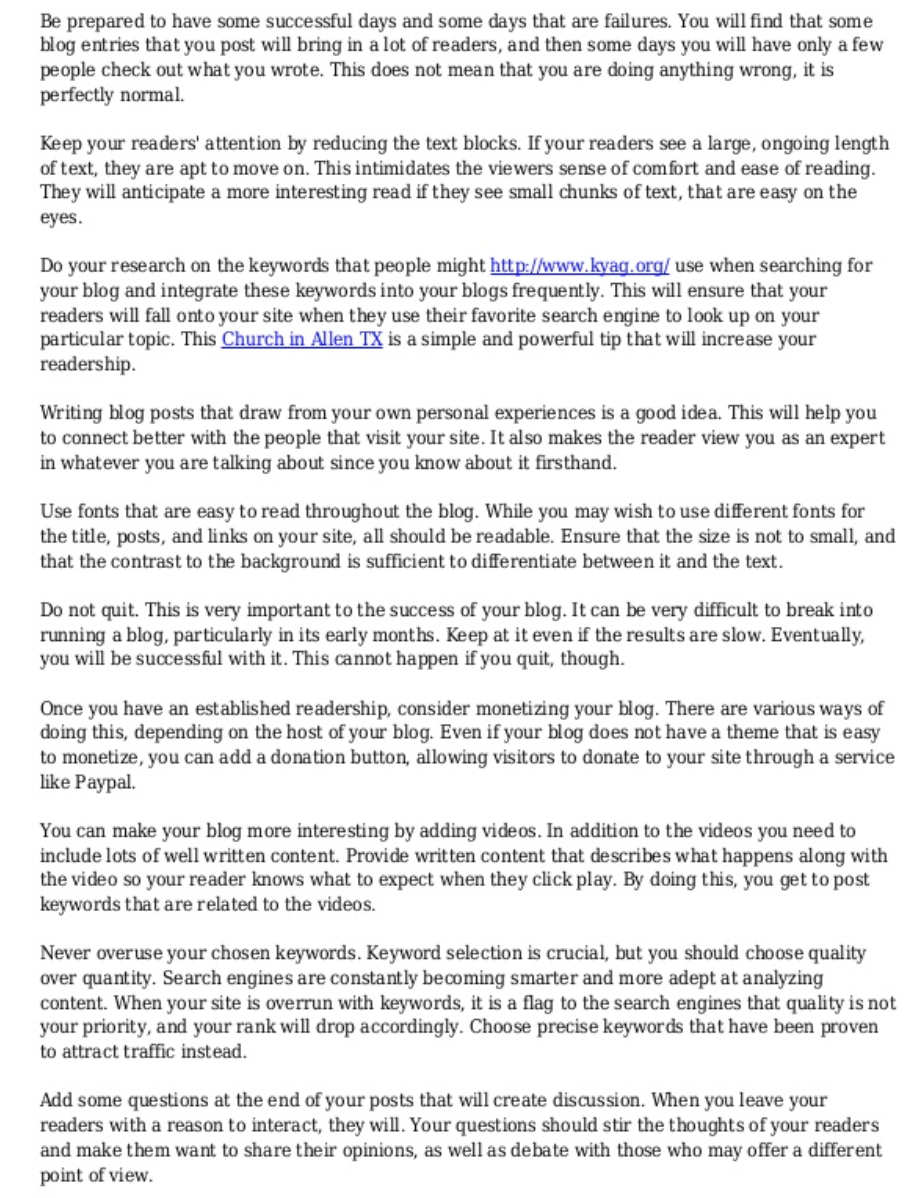
This content is not scannable, and it’s just one excerpt of several pages in the same format.

Now, let’s look at another example, only this time with heading tags used by Conversion XL.

Conversion-XL

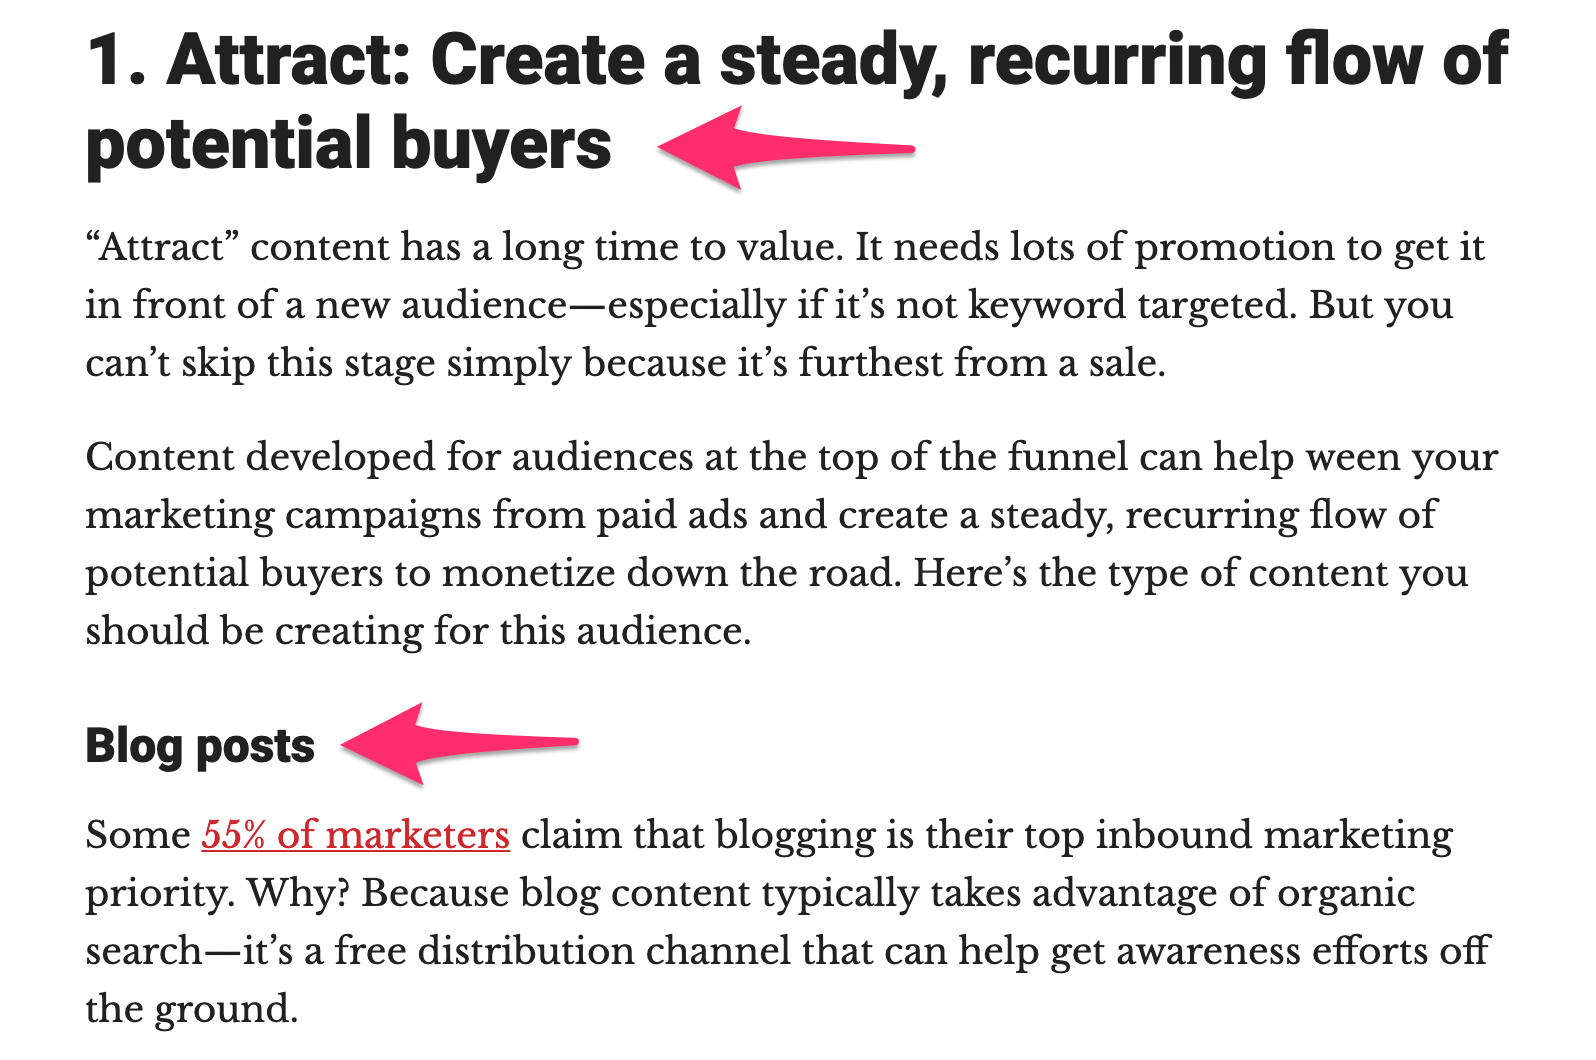
This is much easier to scan, and it’s visually appealing.

Now, is it possible to get this same effect just by making the font bigger and bolder? Sure, but why wouldn’t you take advantage of the header tags to get the SEO benefits as well?

In case you’re wondering if these are actual heading tags or just larger font, I checked the source code to prove it.

Conversion-XL code

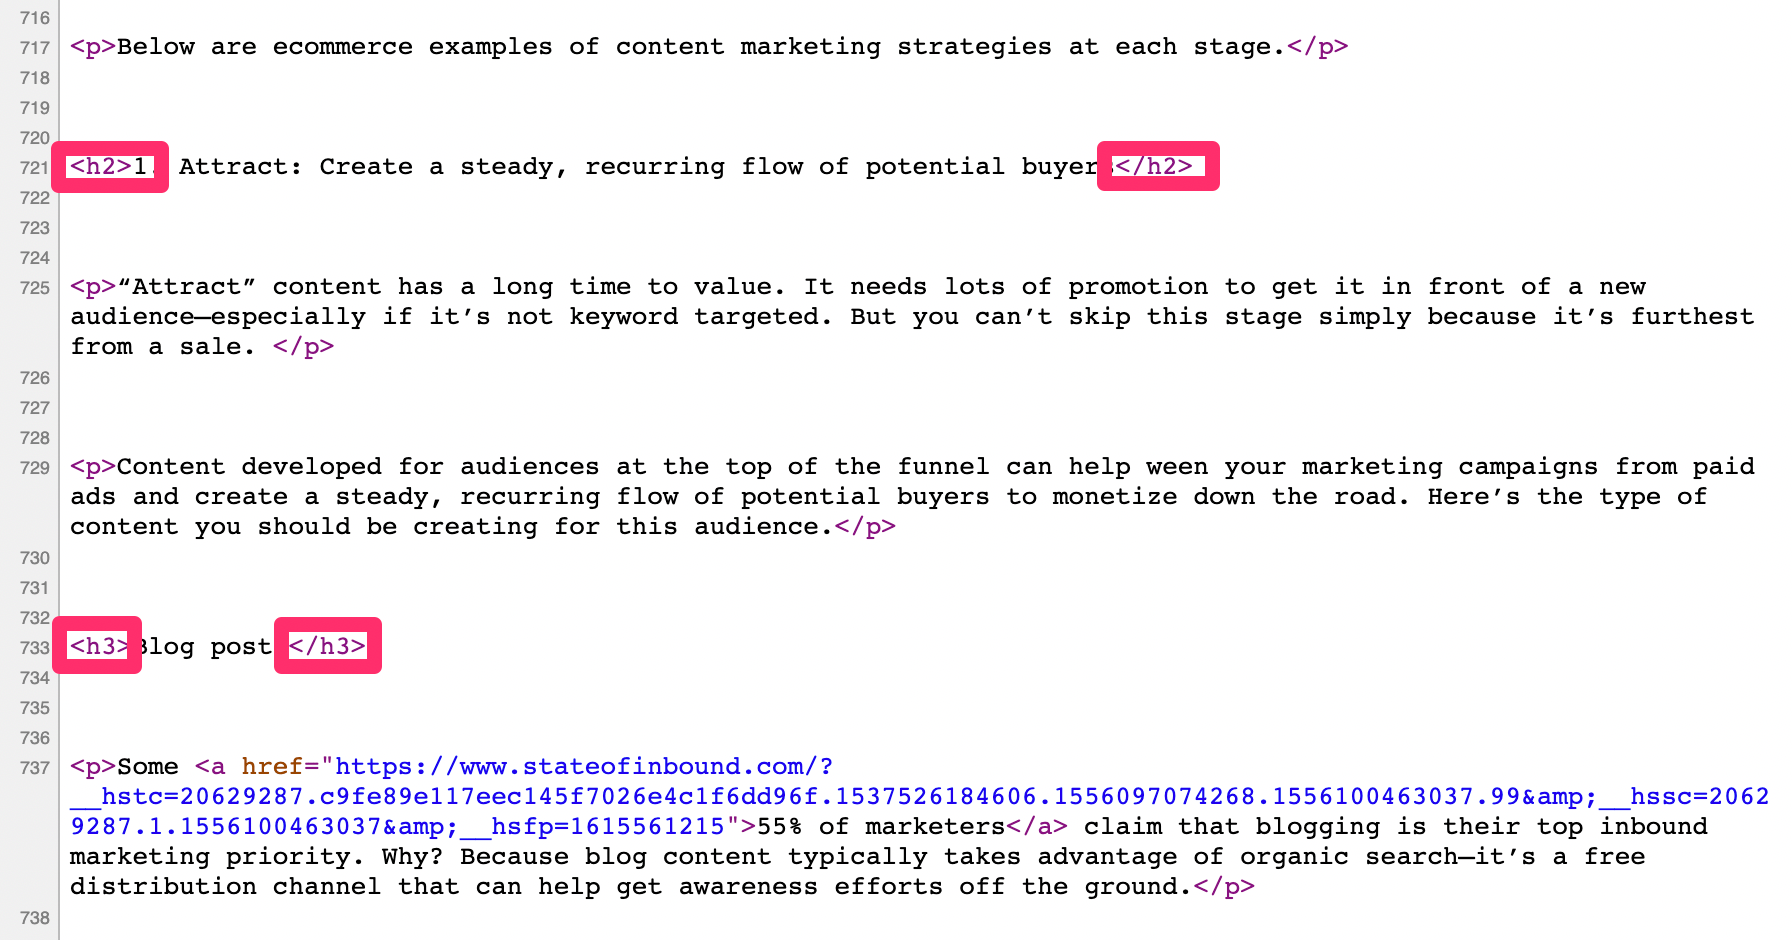
As you can see, they used H2s and H3s for this part of the post. Although it’s not pictured in this screenshot, an H1 tag was used for the title.

Heading tags best practices

Now that you know why you need to add heading tags on your website, I’ll go through some of the best practices to follow.

Each best practice on my list is going to have a heading tag as well. You’ll see what I mean as you continue reading.

Only use one H1 tag per page

H1 tags should be saved for the title.

By default, the title of your post should automatically become an H1. But you can view the page source code and the text editor to verify that.

If for some reason that’s not the case, you can always add it in yourself.

The idea here is that the H1 tag is the most important. Adding more than one will not only be less visually appealing, but it could potentially confuse crawlers when they’re indexing your content.

Use natural keywords in headers

When possible, you’ll always want to have keywords in your headers.

However, it’s a common misconception that every heading tag needs to be stuffed with keywords. That’s just not the case.

As with all of the content you create, the text needs to be natural and readable. If you can get some keywords in there, that’s great. If not, don’t try to force it.

A great resource for finding keywords to put in your headers is Google. Just scroll to the bottom of the page and look for related searches.

Let’s say you were writing a blog post about the benefits of yoga. Here’s what those related searches look like.

Search Examples

These keywords could be potential H2s or H3s of your post.

You wouldn’t put “benefits of yoga Wikipedia” in one of your headers, because that’s not natural and doesn’t make sense. But things like yoga benefits for men, benefits of yoga in the morning, or how to maximize yoga benefits would all be appropriate.

Use heading tags generously

Some people will tell you to use heading tags sparingly, but I think that’s another misconception.

I’m not saying you should have them every other line, but use them as you see fit. If a post calls for three, then use three. If it calls for 10 or 20, then use 10 or 20.

In most cases, the longer a post is, the more heading tags you can use.

Google Advice

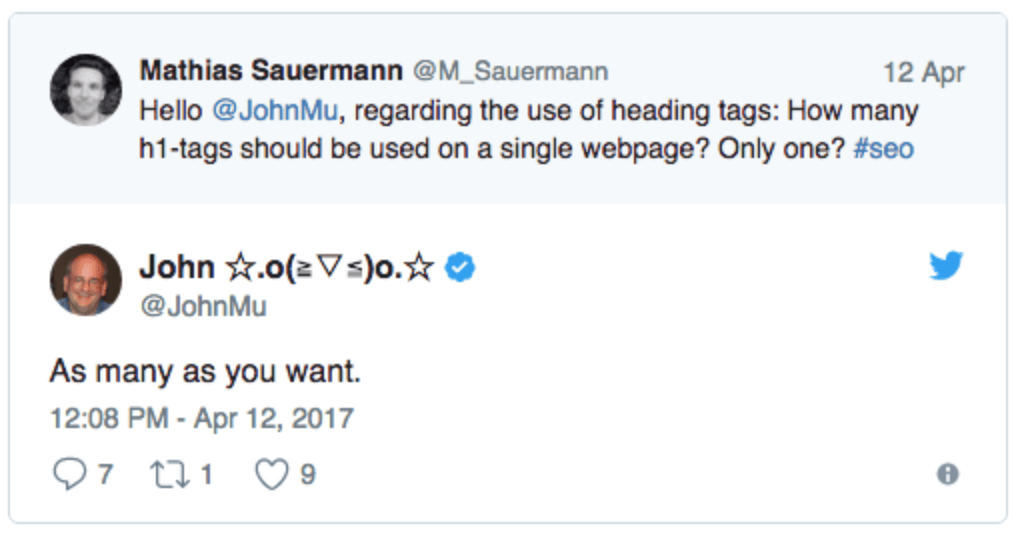
Here’s another quote from John Mueller at Google. He says you can use as many heading tags as you want.

Again, I’d still stick with just one H1 tag. But for H2, H3 (and so on), use as many as you need.

In most cases, I don’t find it necessary to go beyond H3 or H4. SEO aside, I think that’s too complex for the reader. So find other ways to organize your content instead.

You could always use bold or italics to emphasize something, as opposed to getting all the way to H6.

Conclusion

Heading tags are a subtle, yet powerful, SEO hack.

In addition to showcasing important content to search engine crawlers, they also make it easier for website visitors to consume content on your page.

I highly recommend adding heading tags to your content. As you can see from this blog, I use them all of the time.

So use this post as a reference for implementing heading tags and following the best practices.

Decision Table Modeling and Evaluation in Power Flows DMN

Power Flows, being a full-fledged and versatile decision engine, allows modeling decision tables and their evaluation. The source code is available on GitHub, and the home page can be found at Power Flows. The decision engine itself was written in Java. The latest version, 2.0.0, supports the modularity of dependencies, and this article will be based on it.

Decisions Modeling

For modeling, you can use several approaches supported by the DMN Power Flows. This is, among others:

What I Learned About IT From Rocking My Son

This adorable child has clearly taken a nap today.

In April, my wife Nicole ended up having shoulder surgery to repair a torn labrum, frozen shoulder, and a nearly detached bicept. As a result of this procedure and recovery, she currently isn't able to rock our son before his naps. Since I work from home a majority of the time, this task has fallen to me each afternoon.

From my experience, toddlers maintain the urge to fight nap time, regardless of their level of fatigue. In fact, the more exhausted they are, the worse the struggle. After some amount of time, though, the resistance gives way to acceptance. He is not in tears or upset, just resisting taking a much needed break from an already long day.

Seeing in the Dark: The Future of Automation With Unstructured Data

About 2.5 quintillion bytes of data are created every day according to Forbes magazine. And about 90 percent of that is unstructured data — video, audio, image, email, instant messaging, and other types.

This "dark data" creates a major headache for organizations. 80 percent of business processes today rely heavily on people to locate, organize, and input unstructured data before the process can even begin.

Introducing Java SpecialAgent: Start Tracing Without Writing Any Code

Java SpecialAgent is an extensible OSS Java agent for OpenTracing that enables end-to-end tracing without having to write any code.

With only a single command-line entry for installation, SpecialAgent seamlessly connects to OpenTracing-compliant tracers  —  such as the Jaeger and LightStep tracers  —  allowing you to immediately start observing and propagating distributed traces.

Collective #517


C517_tornis

Introducing Tornis

Tornis is a minimal JavaScript library that watches the state of your browser’s viewport, allowing you to respond whenever something changes.

Check it out


Divi

Our Sponsor

Divi: The Powerful Visual Page Builder

Divi is a revolutionary WordPress theme and visual page builder for WordPress. With Divi, you can build your website visually. Add, arrange and design content and watch everything happen instantly right before your eyes.

Try it


Collective #517 was written by Pedro Botelho and published on Codrops.

Top React Libraries for Developers to Check Out in 2019

Whether you are a single developer or a project manager, the first and the foremost thing you want is to keep up with the latest trends in the market and have a clear idea about the newest core technologies. Now, this does not come as a surprise as a core characteristic of a developer is to keep up with changing technologies. If we look at the things from the perspective of an entrepreneur, things are not much different. They want to opt for the best technology solution for their business to progress and grow.

So, from every perspective, if you are thinking about JavaScript, then it has to be React. React is an open source JavaScript library which is used to build amazing interfaces for mobile and web applications. This JavaScript library comes with standalone code in bits, which are called components, and it has the ability to combine with other JavaScript frameworks and libraries out there easily. Now, these components have managed to take up the limelight.

The “Inside” Problem

So, you're working on a design. You need a full-width container element because the design has a background-color that goes from edge-to-edge horizontally. But the content inside doesn’t necessarily need to be edge-to-edge. You want to:

  1. Limit the width (for large screens)
  2. Pad the edges
  3. Center the content

It's "the inside problem" in web layout. It's not hard, it's just that there are lots of considerations.

The classic solution is an outer and inner container.

The parent element is naturally as wide as it's own parent, and let's assume that's the <body> element, or the entire width of the browser window. That takes the background-color and pads the left and right sides. The inside element is what limits the width inside and centers.

<footer>
  <div class="inside">
    Content
  </div>
</footer>
footer {
  --contentWidth: 400px;
  background: lightcoral;
  padding: 2rem 1rem;
}

.inside {
  max-width: var(--contentWidth);
  margin: 0 auto;
}

This is what my brain reaches for first. Doesn't use anything fancy and feels perfectly understandable. That "inside" element isn't wonderfully desirable, only because it feels like busywork to remember to add it to the markup each time this pattern is used, but it does the trick with few other downsides.

See the Pen
Classic "inside" element
by Chris Coyier (@chriscoyier)
on CodePen.

What if you only can use a single element?

These type of limitations aren't my favorite, because I feel like a healthy project allows designers and developers to have whatever kind of control over the final HTML, CSS, and JavaScript output they need to do the best possible job. But, alas, sometimes you’re in a weird position as a contractor or have legacy CMS issues or whatever.

If you only have a single element to work with, padding sorrrrrta kinnnnda works. The trick is to use calc() and subtract half of the content’s maximum width from 100%.

<footer>
  Content
</footer>
footer {
  --contentWidth: 600px;
  
  background: lightcoral;
  padding: 2rem calc((100% - var(--contentWidth)) / 2);
}

See the Pen
VOYxOa
by Chris Coyier (@chriscoyier)
on CodePen.

The problem here is that it doesn't prevent edge-touching, which might make this entirely unacceptable. Maybe you could select elements inside (paragraphs and whatnot...) and add padding to those (with a universal selector, like footer > *). It's tempting to put padding way up on the <body> or something to prevent edge-touching, but that doesn't work because we want that edge-to-edge background color.

What if you're already inside a container you can't control and need to break out of it?

Well, you can always do the ol' full-width utility thing. This will work in a centered container of any width:

.full-width {
  width: 100vw;
  margin-left: 50%;
  transform: translateX(-50%);
}

But that leaves the content inside at full width as well. So, you'd need to turn to an inside element again.

See the Pen
Full width element with inside element
by Chris Coyier (@chriscoyier)
on CodePen.

Also, as soon as you have a vertical scrollbar, that 100vw value will trigger an obnoxious horizontal scrollbar. Some sites can pull off something like this to get rid of that scroll:

body { overflow-x: hidden; }

That’s pretty nice. If you can't do that, though, you might need to set an explicit width on the scrollbar, then subtract that from 100vw.

body {
  scrollbar-width: 20px; /* future standards way */
}

body::-webkit-scrollbar { /* long-standing webkit way */
  width: 20px;
}

.full-width {
  width: calc(100vw - 20px);
}

Even that kinda sucks as it means the full-width container isn't quite full width when there is no vertical scrolling. I'd love to see CSS step it up here and help, probably with improved viewport units handling.

There are a variety of other ways of handling this full-width container thing, like Yanking to the edges with margins and such. However, they all ultimately need viewport units and suffer from the same scrollbar-related fate as a result.

If you can definitely hide the overflow-x on the parent, then extreme negative-margin and positive-padding can do the trick.

This is kinda cool in that it uses nothing modern at all. All very old school CSS properties.

See the Pen
Full Width Bars Using Negative Margins
by Chris Coyier (@chriscoyier)
on CodePen.

Can CSS Grid or Flexbox help here?

Meh. Not really.

I mean, sure, you could set up a three-column grid and place the content in the center column, while using the outside columns as padding. I don't think that's a particularly compelling use of grid and it adds complication for no benefit — that is, unless you're already using and taking advantage of grid at this scope.

Fake the edges instead.

There is no law that the background-color needs to come from one single continuous element. You could always "fake" the left and right sides by kicking out a huge box-shadow or placing a pseudo element wherever needed.

We cover various techniques around that here.

The post The “Inside” Problem appeared first on CSS-Tricks.

New System of Encryption of User Data in Android 5.0

The latest versions of the mobile OS from Apple and Google will encrypt user data in a way that excludes access to these data from the companies themselves — developers of operating systems. Let's try to figure out what this means.

Encrypting Files "Out of the Box"

Law enforcement agencies are not very happy with this news. The rules of the games are changing. Now, even the presence of an order does not guarantee that they will be able to access the data that the user stores on his smartphone check all smartphones price here. Therefore, officials try to frighten the public and make them believe that the encryption of user data is bad and dangerous. To do this, they use their favorite slogans about pedophiles and terrorists.

Encryption, Part 1B: Symmetric Encryption of Voluminous Files

In my recent article, Encryption Part 1: Symmetric Encryption, I covered the symmetric encryption of data and shared example Java code.

The method I covered in that article operates on the complete data/string. Obviously, this method is not suitable when dealing with voluminous files — MBs, GBs, TBs — particularly in the world of Big Data. Ideally, I should have also shared the code to encrypt and decrypt voluminous files, which I am doing in this article.

Java 8 Comparator: How to Sort a List

In this article, we’re going to see several examples on how to sort a List in Java 8.

Sort a List of Strings Alphabetically

List<String> cities = Arrays.asList(
       "Milan",
       "london",
       "San Francisco",
       "Tokyo",
       "New Delhi"
);
System.out.println(cities);
//[Milan, london, San Francisco, Tokyo, New Delhi]

cities.sort(String.CASE_INSENSITIVE_ORDER);
System.out.println(cities);
//[london, Milan, New Delhi, San Francisco, Tokyo]

cities.sort(Comparator.naturalOrder());
System.out.println(cities);
//[Milan, New Delhi, San Francisco, Tokyo, london]

We’ve written London with a lowercase "L" to better highlight differences between Comparator.naturalOrder(), which returns a Comparator that sorts by placing capital letters first, and String.CASE_INSENSITIVE_ORDER, which returns a case-insensitive Comparator.

MailOptin Review: WordPress Newsletter Signup Made Easy

One of the few regrets anyone can have in an online business is the failure to collect email addresses of their visitors. Simply put, the failure to have a list.
More often than not, you will hear people say, "the money is in the list" and that by itself is a statement of truth. Email list gets people coming back to your website, and by extension increases profit in business, because you are already dealing with a targeted audience.

Therefore, it is essential that you build an email list if you intend reaching out to old customers and engaging your readers. Whichever the case, this doesn't happen by rocket science, you will need to deploy pretty and conversion-optimized optin forms to your website and analyze your data to know what technique and strategy will work best for you.

MailOptin WordPress Plugin

MailOptin is a WordPress plugin that makes it super easy to ask people to join your email list; this is the elemental aspect of list building. Unlike other alternatives, MailOptin goes a step further to ensure your list subscribers are nurtured and constantly engaged using its suite of event-triggered and automated emails such as new post notification and email digest.

Without any further ado, let's take a look at MailOptin features and what makes it a good choice for growing your list.

How Can MailOptin Grow My Business?

MailOptin is not just a plugin, it is an all-in-one solution that allows you grow your list, and by extension, increase sales and revenue. No doubt, if you can grow a targeted list, you are always going to make money out of it.

You can start creating eye-catching forms that actually converts with MailOptin. In the plugin, you will find a collection of done-for-you optin themes which you can customize further to your heart content.

You also have several optin form types to select from such as

  • Popups (also called lightbox)
  • Before and After Post Content Form
  • Sidebar/Widget Forms: displays an optin on the sidebar or widgetize area of your site
  • Notification Bar (also called hello or floating bar)
  • Shortcode and Template Tag Embed: allows you display your optin anywhere on your site
Optin TypesMultiple optin types available

Essentially, with MailOptin, you can easily:

  • Create multiple opt-in form types using a live visual editor
  • Connect the optin forms to multiple email service providers
  • Determine how you want these forms to be displayed using its advanced trigger rules
  • Take advantage of statistical data, including A/B split testing to analyse your optin forms for conversions

And much more is possible with provided options.

Creating Optin Forms in MailOptin

In other to demonstrate how the plugins works, let's create a popup optin form. Click on "Optin Campaigns," within this page you should be able to create a new campaign. It is possible to have different forms running on your site. For instance, you could have popups, as well as "in-post" optin forms append to your articles. So, after deciding the type of optin forms you want to create, click on "Add New" and you will be taken to a new page where you can select a "Campaign Template."

Add New OptinAdd new optin forms

Give the campaign a name, select a theme and you will be redirected to the builder or customizer where you customize and setup the optin.

Autoresponder Integrations

MailOptin supports all the leading email marketing software and autoresponder. Integration is very easy as saving your account API key or clicking a button to authorize MailOptin to connect to your account.

Optin API integrationsOptin API integrations

Advance Targeting and Display Rules

One of the features of MailOptin you will fall in love with is its precise targeting and trigger options. The Display Rules are set of rules that determine how and where your optin form will be displayed.

Optin Display RulesOptin Display Rules

Basically, you can decide:

  • Which pages you want your optin forms to be displayed
  • If you want to show your optin forms to new or returning visitors
  • To show a success message or close the optin forms after getting a lead
  • If you want to display your optin forms to mobile, pc, tablet users
Optin After ConversionOptin After Conversion

Digging deeper, MailOptin also allows you display your optins using any of the following rules:

  • Exit-Intent: displays the optin at the precise moment a visitor is leaving your website
  • Scroll trigger: displays optin after visitors scroll down your site page
  • Time on site: displays optin after visitors have been on your site for a specific time
  • Referrer detection: displays optin targeted at visitors from specific website referrals
  • Pageviews: displays optin to visitors once they reach a certain number of page views

That is not all, you can also trigger your optin forms using the following more advanced rules:

  • Geolocations
  • User targeting
  • Visitors using adblock
  • Cookies

There is also an option to display optins forms only when a visitor clicks a specific link in your post. This is called Click Launch in MailOptin. A very handy feature that lets you hide contents behind an email signup box. If your visitors are interested in getting whatever is behind the form, they have to subscribe to get it.

Click launch optin triggerClick launch optin trigger

Email Automation

It is also possible to automatically send out newsletters to your email list each time you publish a new post or you can send a daily, weekly or monthly digest of your posts. You have a default email template you can use. There is also an option to "code your design" from scratch. Here, you will require some level of coding to get this done, otherwise you are free to use the predefined templates which is pretty good.

Therefore, if you published a new post, MailOptin can automatically send out an email alert to all your subscribers containing relevant information.

Optin Email AutomationsOptin email automations

Publish Your Optin Form

After choosing a form type and selecting a template, customizing same and going through the configuration steps, the next thing to do is to publish or enable your optin form.

In the "Optin Campaign" page, toggle on/off your optin campaign to enable or disable it. A blue optin campaign indicates that the specific form is live while a grey color means that the optin form has been deactivated.

Optin EnabledOptin enabled

Insight and Analytics

When your campaign goes live, you can carry out some extended functions which are necessary for analysing the growth of your list. The following data are available in MailOptin analytics section such as top converting pages, top displayed optin, number of impressions, number of subscribers, conversion rate etc.

Optin AnalyticsOptin analytics

Then, you can use those data to improve your optin forms, in other to boost your click through rate and overall get better results.

MailOptin Pricing

There are three options for purchasing MailOptin leads generation plugin

  • $69, Standard plan for use on 1 website
  • $169, Pro plan for use on 3 websites
  • $269, Agency plan for use on unlimited websites

You can view the full list of the simple pricing plan on the MailOptin website.

Alternatively, if you want to first try MailOptin for free before purchasing a premium plan, you can download it right away from the WordPress repository.

Is MailOptin Worth Your Money?

MailOptin is a cost-effective way to start building an email list. It doesn't come with a complex interface. It uses the WordPress Customizer that you already know and love.

While it is very powerful, it is also very easy to use. It can be used by bloggers, eCommerce website owners, marketing agencies and essentially anyone who uses WordPress with the intention of building an email list.

In conclusion, MailOptin brings a lot of new features into play. The beautifully designed built-in templates makes your work easier, you won't go blank staring at an empty white space trying to figure out what to do from the scratch. Then, you have a bunch of targeting options you use to control how and where you want your optin forms to be displayed.

More also, you can use that feature to build a segmented email list that targets a particular set of people. MailOptin also enables you analyse your data with its analytical and split test engine so you can make data-driven decisions.

Take your list building journey to the next level by trying out MailOptin today.

Special guest post by Collins Agbonghama