Our culture glorifies being busy. But we don’t always glorify spending time on the right things. This week was about...
The post Sharpen Your Writing and Content Focus for Materially Better Results appeared first on Copyblogger.

Tips, Expertise, Articles and Advice from the Pro's for Your Website or Blog to Succeed

Our culture glorifies being busy. But we don’t always glorify spending time on the right things. This week was about...
The post Sharpen Your Writing and Content Focus for Materially Better Results appeared first on Copyblogger.

I try to mark content from a web-page (with pictures, hyperlinks etc) to clipboard and then paste it into Microsoft Word (belonging to the Office 365 Home suite).
Then I discover problems starting with the following warning:
"A potential vulnerability has been identified in Microsoft Office.
This document contains fields that can share data with external files
and Web sites. It is important that this file comes from a reliable
source."
(I do not use English as my working language, and this warning is translated to English using Google Translate... :-))
The screen is often flickering two or three times before the content is displayed.
In Office 2007/2010 it was possible to avoid this message by going to the Trust Center Setttings and under Privacy Options, select or clear "Check Microsoft Office documents that are from or link to suspicious Web sites" check box. But I do not find this check box in Office 365. :-(
What can I do to avoid this message ?
You want your client’s website to become the go-to destination for their target audience. So, you design them to look great, work perfectly and rank well in search. Is that enough? It could be, though I have a sneaking suspicion that the growing millennial and Gen Z consumer base are going to complicate that with their mobile-loving ways.
An eMarketer report from 2018 revealed that consumers’ time spent on mobile devices is about to surpass time spent watching TV:

And here’s why that matters so much:
TV is littered with celebrities. As consumers spend more time with their smartphones, there’s going to be a fundamental shift from trusting and admiring celebrities to trusting and admiring digital influencers.
In this post, I’m going to explain:
To be clear, this post has nothing to do with turning your clients’ websites into sponsor-driven money-making machines. This is about giving your website the same kind of clout as a digital influencer — and using that perceived expert status to consistently maintain high levels of traffic, engagement and referrals.
In the past, celebrities were mainly the ones that companies turned to promote their products or services. While that still happens today, you’re more likely to see celebrity influencers pushing luxury products.
Thanks to the Internet and social media, businesses no longer have to pay top-dollar to get a celebrity endorsement. Instead, we’re now seeing the rise of digital influencer marketing.
A digital influencer is one that’s built a brand around their expertise or knowledge. There are different ways to be an influencer, too:
In reality, you’ll find that most digital influencers cover each one of these categories. For example, you have Neil Patel:
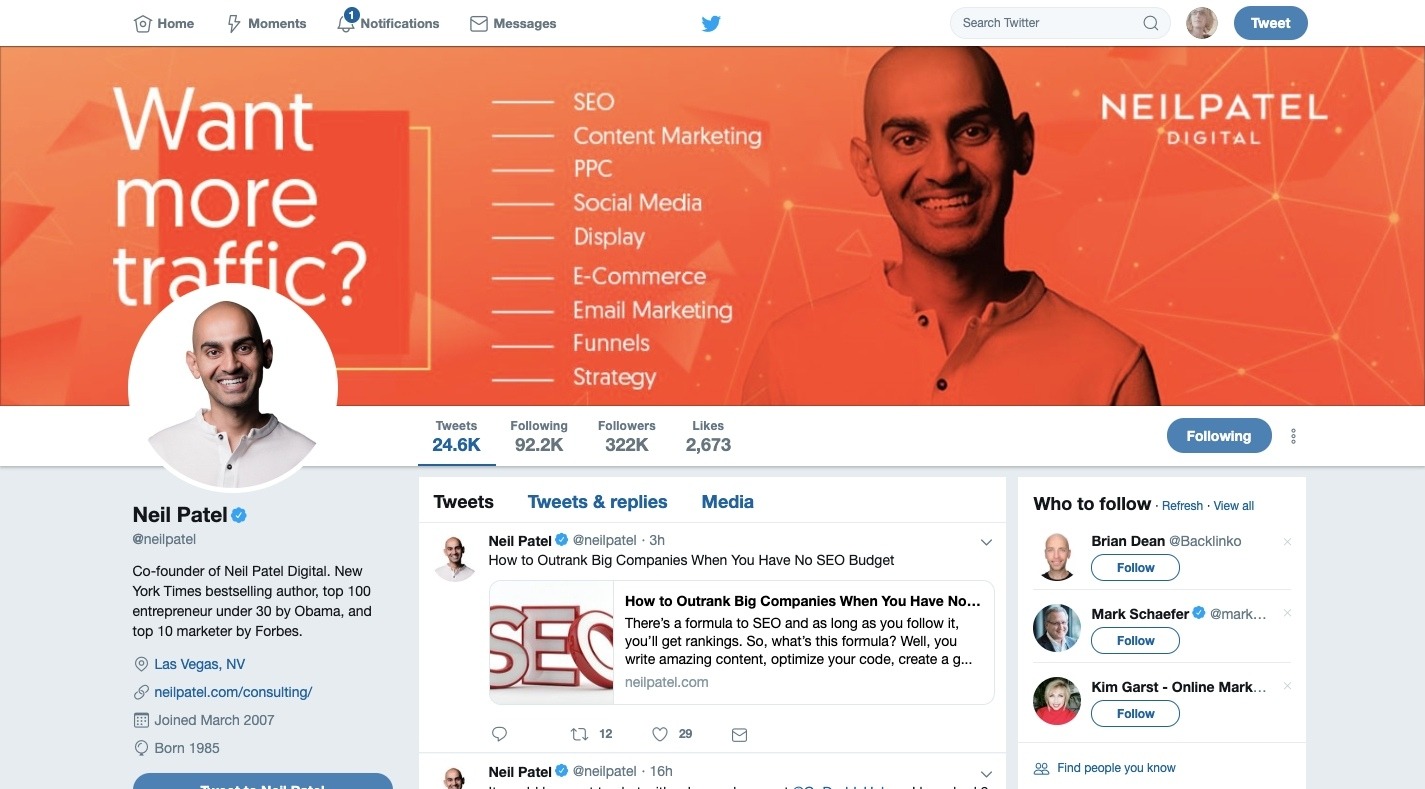
He’s an entrepreneur, content creator, thought leader, trusted expert in content marketing and has way more than 500 followers wherever you encounter him online.
That’s obviously an extreme example of a digital influencer though. How about we look at a web developer that’s established himself as an authority in his space?
This is Iain Poulson’s Twitter account:

Although his follower count and engagement levels don’t reach that of macro-influencers like Patel, it doesn’t make his words any less impactful with his target audience (on or off Twitter). The point is that he creates high-quality and engage-worthy content that his audience recognizes as such.
Regardless of the size of the influencer and the space in which they work, their words command so much authority that consumers can’t help but trust them. This is the power of the digital influencer.
This is why businesses flock to influencers for help in getting the word out about their brand. If a business can leverage that built-in authority, it can grow its follower and customer base with a solid recommendation from that influencer. Influencer Marketing Hub reports that those who’ve used influencer marketing earn $7.65, on average, for every $1.00 paid to a digital influencer.
Needless to say, digital influencers are powerful and valuable entities in the world we live in. Now, we need to look at how you can imbue your websites with digital influencer-like qualities to increase their own value on the web.
To turn a website into a digital influencer-like entity, you have to make it embody those qualities that make digital influencers so trustworthy and powerful in the first place.
For the purposes of demonstrating what these qualities are, I’m going to use websites that represent today’s top digital influencers and/or their businesses.
Whether you’re in the process of building a new site for a client or you’re looking for a way to rebrand or upgrade one that already exists, use these tips to up the influencer factor:
In general, the navigation (and sitemap) of a website is a very powerful tool for both your visitors as well as search engines.
The only thing is, many websites use a similarly-structured and labeled navigation. That’s fine if the website’s offer is plain and simple:
What makes many digital influencers stand apart is that they’ve crafted a robust brand for themselves, which means they’re usually a double- or triple-threat. And they make sure the navigation highlights each of these strengths or offerings.
Social Media Examiner, for instance, demonstrates that it’s not just a blog containing posts related to social media. Social Media Examiner does it all:

As you can see, the navigation shows you all of the different ventures Social Media Examiner has going on:
It’s an impressive list and one that will instantly demonstrate to visitors that they are the authority on social media.
The Marketing Nutz takes a similar approach with its navigation:

This navigation, however, is less focused on authority-building content. Instead, it highlights all of the ways in which it empowers its followers to get more out of their social media efforts with:
In sum, your navigation needs to be able to demonstrate the website’s/brand’s expertise and value within seconds. It should also be one that has visitors thinking, “Wow! They do all that?”
Another way to establish authority immediately is with a strong and unique visual. This sends the signal that this website isn’t just going to be a place to get information. It’s a place to actually experience something.
Take a look at the Youpreneur website:

What you can’t see in the screenshot above is the animation directly below the image and tagline that definitely took some time to design.
See the cursor after the word “speaker”? This is a text animation that types out and deletes different entrepreneurial titles. Speaker. Blogger. Consultant. If the banner image didn’t capture their attention, this certainly will.
Jay Baer’s personal website is another beautiful example of making a strong impression with visuals.

Not only does he include a uniquely personal photo of himself in the hero section of the home page, but he has also applied a powerful color filter atop it. Further, he leads with a call-to-action for visitors to watch his five-minute video.
Although the messaging puts the focus on the customer, these strong visuals simultaneously convey that Jay Baer is someone they need to stop and listen to.
You’ll want to strike the same balance with your own entry visuals and messaging. Make sure the text lets visitors know there’s something really valuable here to stick around for. But be savvy in how you design the visuals surrounding that message. There’s a lot you can to do to convince visitors that they’ve entered the website of authority instead of just a service provider or seller.
Recommended reading: Reasons Your Mobile App Retention Rate Might Be So Low
I touched on this point slightly in the navigation point, though I think it’s worth taking a closer look so you can see the ways influencer websites produce and disseminate a variety of content.
Here is the Single Grain blog:
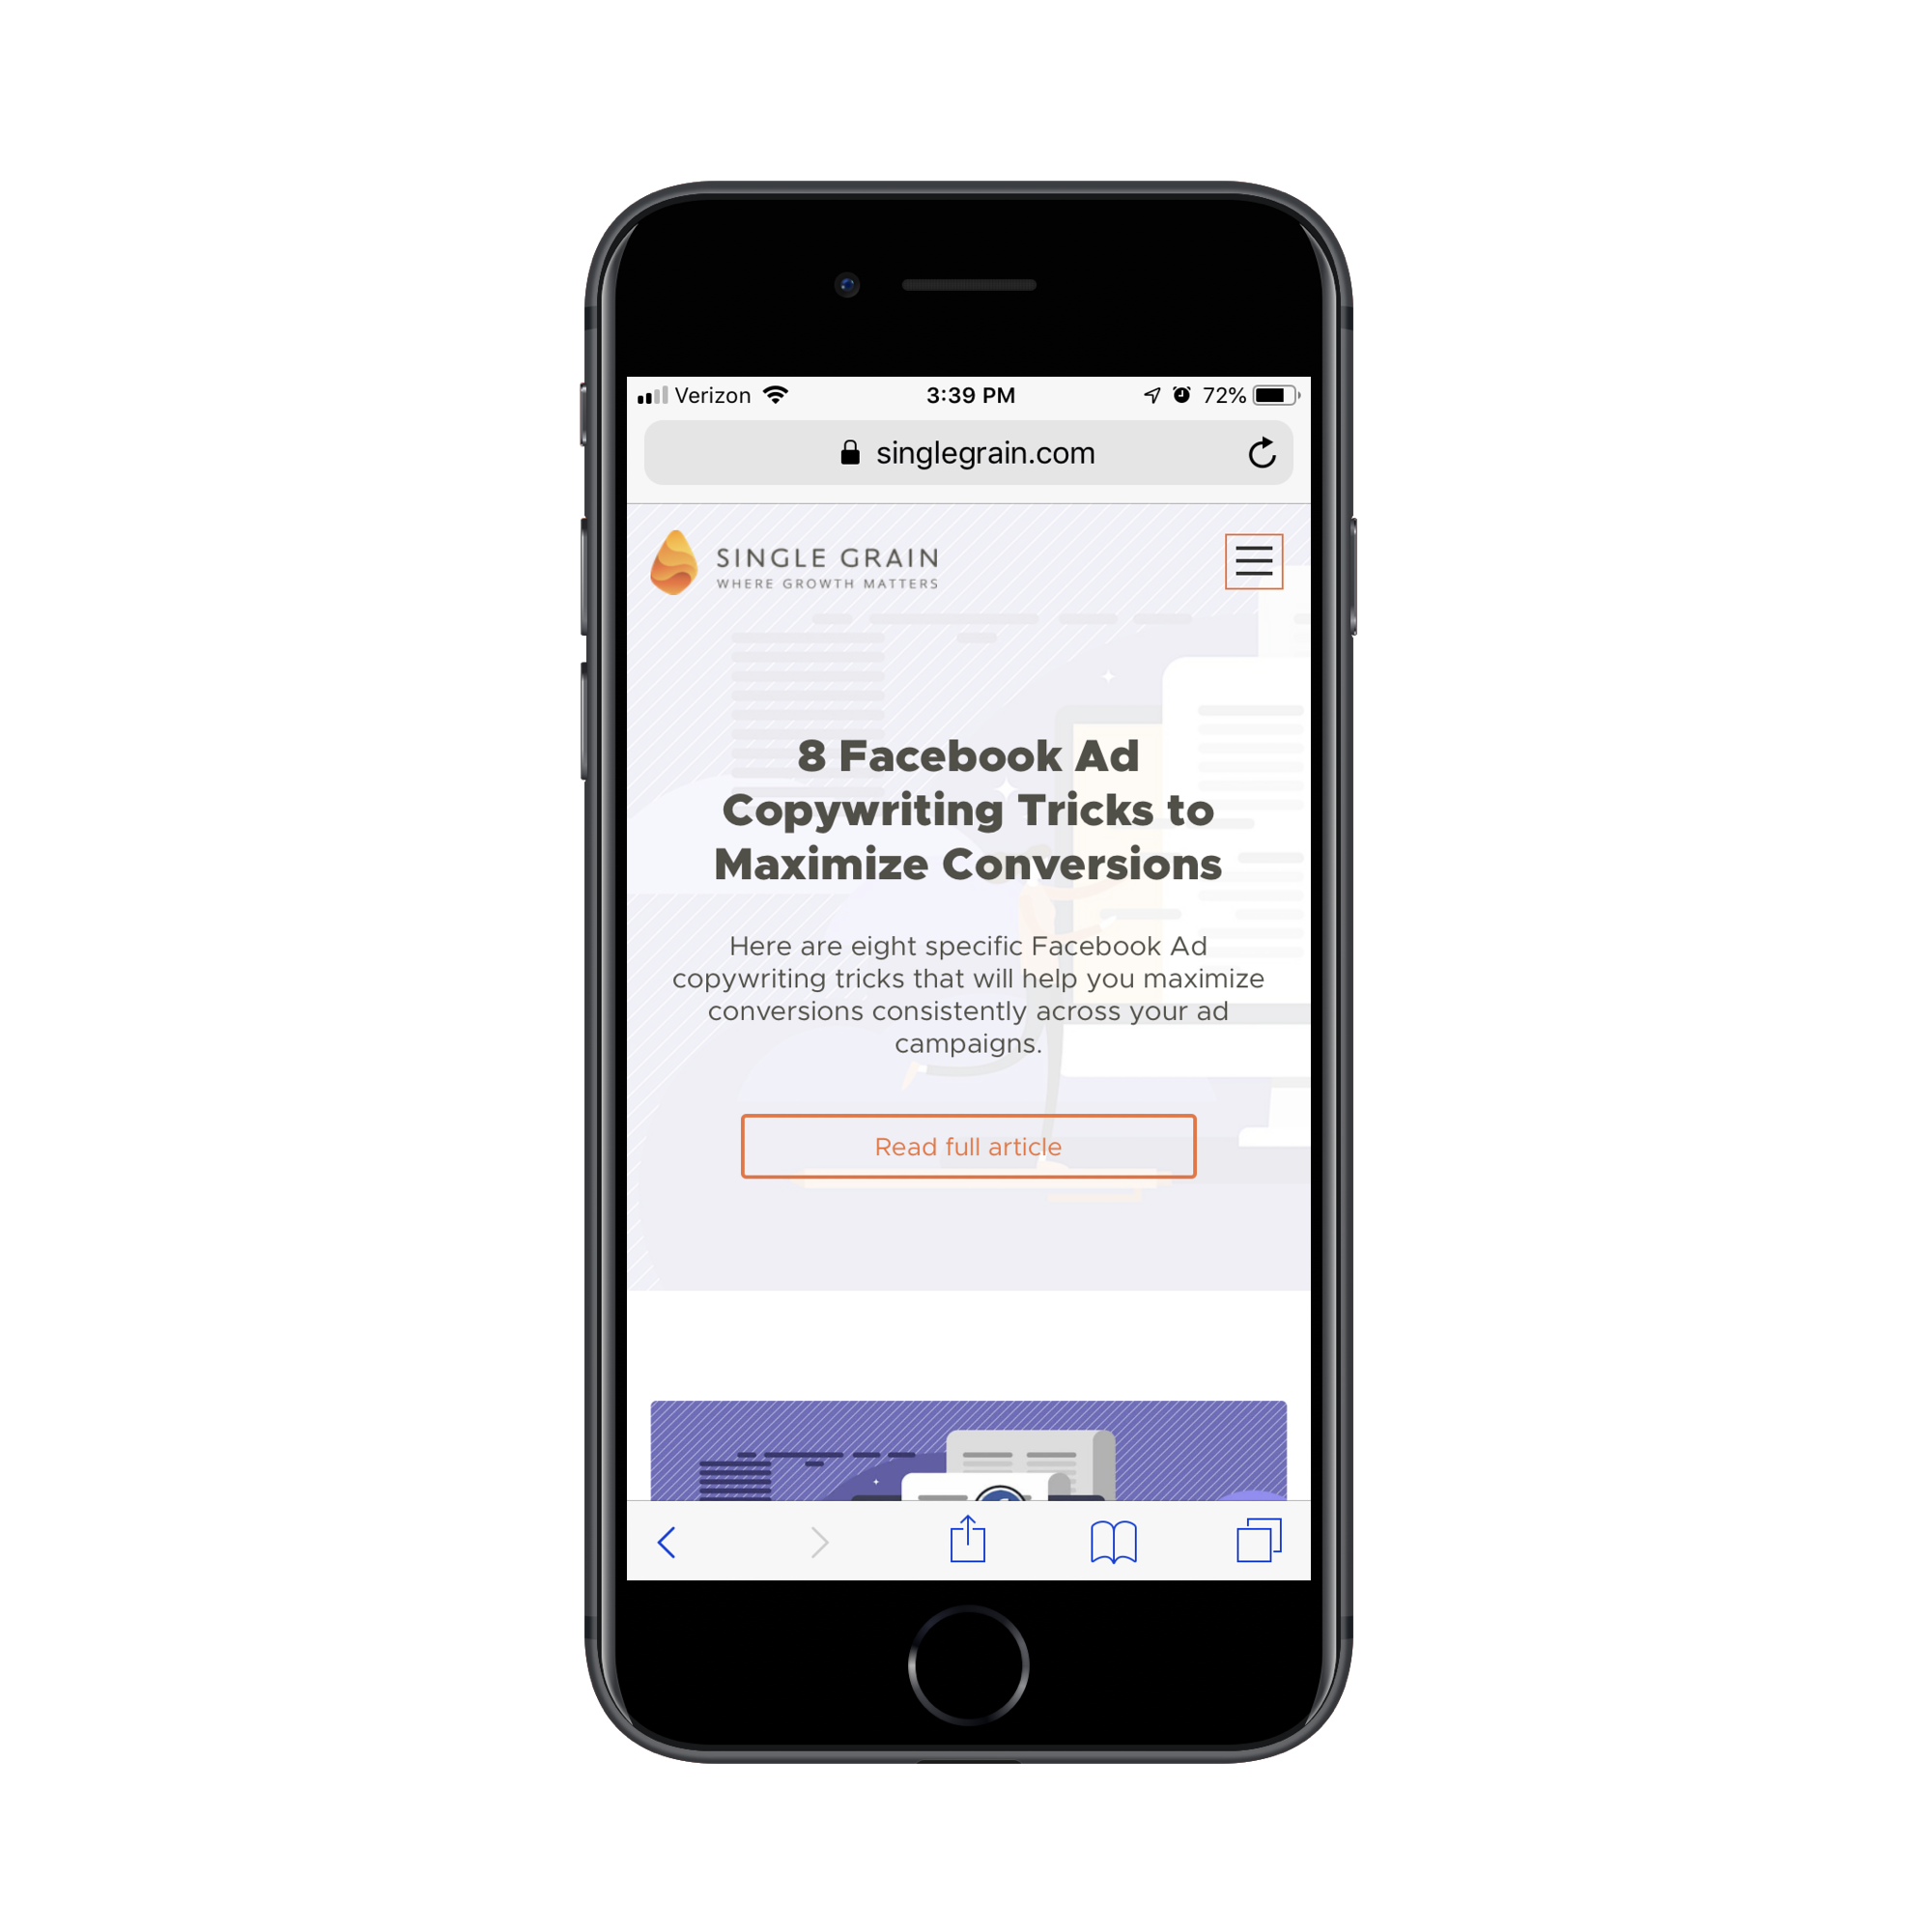
Single Grain’s blog is full of new and cutting-edge posts on the subject of digital marketing. As you scroll down the page, you’ll soon see that each of the featured images is designed in the same manner. All are customly illustrated and contain a mix of visuals and light text.
This not only gives the blog a consistent and easily recognizable look, but it also gives the content an edge up when it gets shared on social media. Imagine you’re looking through your social media feed and happen upon a short post with a descriptive image attached to it. In a sea of image-less posts or ones that use meaningless stock images, this kind of visual content is sure to stand out.
Now, what’s interesting about Single Grain is that its podcasts page has a different style from the blog:

You can tell right away that the lightness in design and custom illustrations for the blog posts have no place here. Instead, Single Grain uses a more traditional design and layout for its Growth Everywhere podcast.
That doesn’t necessarily say anything about the kind of content covered here compared to the blog; it’s not more serious in nature nor is it created by someone with more traditional leanings. It’s simply a matter of designing for the channel. In this case, simpler and less customized makes more sense for a podcast.
As you bring together the pieces of your client’s website, don’t feel as though all of their content needs to be shoved under a single “Resources” tab and designed in the same manner.
Instead, give each content channel (e.g. blog posts, podcast episodes, video training, etc.) a separate tab and design it in a way that makes the most sense. For instance, you want visitors to spend a lot of time looking through a blog post, so you might design custom yet consistently styled graphics for each one. With something like an ebook, you’d keep it simple: show a picture of a bound book (even if it’s a digital-only book) and pair it with some intro text.
Influencers treat their different channels like sub-brands with unique identities. You should do the same.
Recommended reading: Designing For Micro-Moments
Recently, I wrote about how to design lead gen landing pages for mobile. There were different examples included (a SaaS company, a digital magazine, a monthly subscription box company, etc.), which isn’t surprising considering how valuable lead generation is for online businesses.
That said, you’d be hard-pressed to find a digital influencer that doesn’t have a lead magnet offer on his or her website. It’s almost a guarantee.
The main difference between how some websites promote their lead gen offers and how digital influencers do it is the strength of the message and design.
This is the blog of Tim Ferriss:

All this is is a promotional banner asking visitors to subscribe to the blog. Take note, however, that this isn’t posed as a request. This is an invitation to something special. And it’s intense. This is because of the special way in which the banner is designed:
This is not at all the kind of thing you’d see on most websites and that’s because many of them just don’t exude the kind of in-your-face confidence and authority that digital influencers do.
Kim Garst is another influencer with an eye-catching lead gen banner:

Clearly, the color palette is one you can’t help but stop and look at. The teal and purple colors are pretty safe choices, but it’s the contrast of the red callouts that gives this an edge.
Also, check out the wording she uses — it’s very similar to how Ferriss gave his lead gen an air of exclusivity. With Kim’s lead gen promo, she uses strong wording like “Top Secret”, “Discover” and “A Matter of Minutes”. If visitors weren’t feeling as though they had to read any more of the content on her website, this would surely get them to reconsider.
Bottom line: to demonstrate your authority, you can’t waiver nor can you provide a soft sell (e.g. “Subscribe here”) when promoting a lead magnet. Instead, your messaging and design both need to convey the confidence and authority that tell visitors:
“Don’t miss this special opportunity to peek inside my brain and gain more valuable knowledge and skills than you could ever ask for!”
Digital influencers are a special breed, that’s for sure. But that doesn’t mean you can’t draw lessons from how they’ve managed to convey and reinforce authority through their websites.
What’s nice about digital influencer websites is that they show you that obvious cash-grab features (like affiliate advertising and gated content) aren’t necessary in order to increase conversions. By designing your website as an authority, you’ll see an increase in traffic, be able to more easily collect leads, and establish long-term trust with an audience.
The revenue increase will come naturally as visitors are dying to share the news about what they discovered.
Are you wondering how to turn off WordPress comments? While comments are a great way to interact with your site visitors, some website owners don’t want to allow comments on their site.
Thanks to WordPress, you have the ability to either disable comments on specific posts, pages, custom post types, or even completely remove comments from your entire website.
In this article, we’ll show you the step by step process on how to disable comments in WordPress.

Many small business owners use WordPress to create their website. These business websites often doesn’t have a blog section and mostly has static pages like services, about us, contact, etc. In such cases, it doesn’t make sense to allow comments at all.
In other cases, bloggers may publish certain posts like announcements that they don’t want to allow comments to trolls. In these cases, you can easily disable comments on those specific posts or pages.
The other scenario is some business blogs choose to disable comments entirely to prevent spam. Although you can always use spam protection techniques (which we’ll share later in this article), disabling the comment section will definitely solve the problem.
Whatever your reason may be, you can certainly disable comments and even remove the comment section from your WordPress site.
Here’s a quick overview of what you’ll learn in this article:
The first few methods will explain how you can disable comments on pages, posts, or media without using a plugin. We’ll later explain how to remove the comment section from your WordPress site with the help of a plugin.
With that said, let’s take a look at various ways to disable comments in WordPress.
If you’ve just started your WordPress site, you can easily stop comments on your future posts.
To do that, go to Settings » Discussion from the left sidebar of your WordPress admin panel.
On this page, you need to uncheck the option that says “Allow people to post comments on new articles” and then click on the Save Changes button to store your settings.

This will disable comments on all your future posts. However, if you want to allow or disallow comments on a specific post, then you can still do it without changing this setting.
We’ll cover that in the next section.
By default, comments are turned off on all your pages.
However, WordPress gives you the freedom to enable or disable comments on individual pages and posts.
Simply head over to Pages » All Pages from the left sidebar. On the next page, you need to hover your mouse cursor over the title of a page that you want enable or disable comments and click the Edit link.

On the top-right corner of your page, you’ll see the 3 vertical dots icon. You need to click on it to open a dropdown menu and then click on Options.
This will open a popup box, and you need to make sure the Discussion box is enabled here.

Once you close this modal box, you’ll see the Discussion meta box on the right side of your editor. If you don’t see it, then please make sure that you click on the Document tab to view it.

Now, you can uncheck the Allow Comments box to disable comments on this page and click on Update to save the changes.
On the other hand, if you want to selectively enable comments, then you can just check the box to enable it for certain pages.
You can follow the same process for turning off comments on individual posts or other custom post types.
Want to disable comments on all your published posts and pages without doing it individually? You can do that without the use of a plugin.
First of all, go to Posts » All Posts to see all your articles.
Next, select all the posts, choose Edit from the Bulk Actions dropdown box, and click on Apply.

You’ll now be able to perform bulk actions including changing the author name and turning off comments for all the selected posts.
Select Do not allow from the comments dropdown box and click on Update. This will disable comments on all your selected posts.

You can follow the same process to turn off comments on your pages.
While the above methods will disable comments on your posts and pages, it will not remove the existing comments from your WordPress site.
To delete all the comments from your site, click on Comments from the left sidebar of your admin panel.

Next select all the comments, choose Move to Trash option from the Bulk Actions dropdown box, and click on Apply. This will delete all the existing comments from your site.
If your website has a lot of comments, then you will have to repeat this step multiple times.
If you are looking to disable comments on media pages, then there are two ways to go about it.
You can either manually disable comments on individual media attachment files by following the methods we discussed above but that can be really time consuming.
The easier way to bulk disable comments on all media attachments is by using a code snippet. Simply paste the following code in your theme’s functions.php file or a site-specific plugin.
function filter_media_comment_status( $open, $post_id ) {
    $post = get_post( $post_id );
    if( $post->post_type == 'attachment' ) {
        return false;
    }
    return $open;
}
add_filter( 'comments_open', 'filter_media_comment_status', 10 , 2 );
In case you’re not comfortable with the above solution, you can check out the next section where we’ll show you how to use a plugin to disable comments on Media attachments.
If you don’t want to disable comments manually, then you can use the Disable Comments plugin to do it with just a click.
It allows you to completely disable comments everywhere on your WordPress site. You can also disable them on specific post types like posts, pages, media, and others. It also removes the comment form and stops displaying existing comments.

First thing you need to do is install and activate the Disable Comments plugin. You can follow our step by step guide on how to install a WordPress plugin for detailed instructions.
After activating the plugin, head over to Settings » Disable Comments from the left sidebar of your admin panel.
Selecting the first option allows you to disable comments on your WordPress site. The plugin will also remove the comments menu item from your WordPress admin area.

Using the second option, you can selectively disable comments on your posts, pages, or media.
If you want to remove comments only from the media attachments, then you can select On certain post types radio button and then check the Media checkbox.
You can do the same if you only want to turn off comments on WordPress pages. Using the plugin is the easiest way to disable comments on WordPress pages.
When you’re done, simply click on the Save Changes to complete the process.
If your WordPress theme is not checking the comment status properly, then it may still display the comment form, existing comments, or even show the “Comments are closed” message.
You can ask your theme developer to fix this because this is not a standard compliant approach.
Alternatively, you can also try fixing it yourself by following the instructions below.
First, connect to your WordPress site using FTP Client or the File Manager in your WordPress hosting control panel. Now navigate to your current theme folder which will be located in /wp-content/themes/ folder.
In your theme folder, you need to locate the file comments.php, right-click on that file, and rename it to comments_old.php.

Next, you need to right-click in the right panel of your FTP client and select Create new file option. And then, name your new file as comments.php and click the OK button.

This trick simply serves an empty comments template to your WordPress theme, so no comments or comment related messages will be shown.
If your WordPress theme does not have the comments.php file, then you need to ask your theme developer which file you need to edit.
If you’re planning to disable WordPress comments just for the sake of protecting your site from spammers and link builders, then we would rather recommend you to use some of the following techniques to combat spam.
Akismet

Akismet is one of the best plugins for dealing with spam comments. And the best part is it has been built by the team behind WordPress.
This plugin checks each comment on your site and verifies whether it’s spam or not. For more details, you can check out our guide on the Akismet plugin.
Closing Comments
Did you know that you can close comments after a certain period of time?

Head over to Settings » Discussion and check the field that says “Automatically close comments on articles older than 14 days”.
This will close the comments form after 14 days automatically. You can also change the number of days based on your needs.
Typically spammers target older posts, so several users change this setting to 180 days which significantly reduces spam.
Honeypot with Antispam Bee
On WPBeginner, we have found it helpful to add a second plugin called Antispam Bee which works alongside with Akismet to significantly reduce comment spam on your site.
It adds an invisible honeypot that blocks 99% of spam bot comments.
Comment Captcha
Though adding a captcha to your comment form is not user-friendly, it still helps you to protect your site from spammers.
You can use the Advanced noCaptcha and Invisible Captcha plugin to add Google reCaptcha just before the submit button of your comment form.
Remove Website URL Form Field
Another way to deal with link builders and spammers is to remove the website URL field from the comment form. Here’s an example from the WPForms website:

And you can use the Comment Link Remove and Comments Tool plugin for this purpose. It allows you to remove the website URL field from your comment form without touching a single line of code. Isn’t that great?
Blocking Bad IPs
You can also block bad IP addresses from accessing your WordPress site. This will help you to block spammers and hacking attacks.
To do that, you can check our guide on how to block IP addresses in WordPress.
Anyways, we hope this detailed guide helped you to understand how to completely disable comments in WordPress with and without using a plugin.
If you liked this article, then please subscribe to our YouTube Channel for WordPress video tutorials. You can also find us on Twitter and Facebook.
The post How to Completely Disable Comments in WordPress (Ultimate Guide) appeared first on WPBeginner.
At the Build developer conference on Monday, Microsoft CEO Satya Nadella announced ElectionGuard, an SDK designed to make voting systems more secure.
Part 1 of this article series provides an introduction to Bayesian learning. With that understanding, we will continue the journey to represent machine learning models as probabilistic models. Once we have represented our classical machine learning model as probabilistic models with random variables, we can use Bayesian learning to infer the unknown model parameters. Such a process of learning unknown parameters of a model is known as Bayesian inference.
In this article, we will first briefly discuss the importance of Bayesian learning for machine learning. Then, we will move on to interpreting machine learning models as probabilistic models. I will use the simple linear regression model to elaborate on how such a representation is derived to perform Bayesian learning as a machine learning technique.
In this article, we find out why you shouldn't mix and match scope. Here's a simple little PL/SQL block where we call an inner procedure PARAMETER_TESTER from its parent block. Pay particular attention to the parameter we pass to the procedure and its value throughout the execution of that procedure.
SQL> set serverout on
SQL> declare
  2
  3     glob_var  int := 0;
  4     local_var int;
  5
  6     procedure PARAMETER_TESTER(param int) is
  7     begin
  8         dbms_output.put_line('Param came in as: '||param);
  9         glob_var := glob_var + 1;
 10         dbms_output.put_line('Param left as   : '||param);
 11         dbms_output.put_line('glob_var is now : '||glob_var);
 12     end;
 13
 14  begin
 15     parameter_tester(100);
 16  end;
 17  /
Param came in as: 100
Param left as   : 100
glob_var is now : 1

PL/SQL procedure successfully completed.
Now I'll slowly extend the code, and just by eyeballing it, see if you can predict what the output will be before looking past the end of the PL/SQL block.
“We’re pleased to announce the delivery of Kubernetes 1.14, our first release of 2019!” Seeing a new blog post that starts with that sentence is always an exciting moment, isn’t it? Well, Kubernetes 1.14 is officially out, and boy, was it worth the wait.
It is a relatively big update, with the delivery bringing a whopping total of 31 enhancements, 10 of which are stable with an additional set of 12 enhancements that are in beta. There are some interesting changes to the ecosystem, but we are going to focus on the five most exciting ones. Let’s have a look!
Let’s talk about view controllers. Right off the hop, stop making a mess of your view controllers and start putting your code in logical places – view controllers are for views, and views only. It’s very tempting to throw all sorts of logic into a view controller, but when we separate concerns, we write code that’s easier to understand and easier to reuse.
There are handfuls of responsibilities we can dump into a view controller: data fetching, data transformation, user input, model-view binding, model mutation, animations, and navigation flow, just to name a few. But, we shouldn’t house all of these responsibilities in one place; otherwise, we’re working with a confusing and unwieldy view controller.
The public cloud has changed computing forever. It moves information technology into a world of utility where compute and storage are available as needed — easy to implement and decommission. It provides a flexible infrastructure for a data-centric world increasingly based on analytics, where experimentation is the foundation of digital transformation.
Analytics are a complex workflow that relies on both large data sets to take advantage of historic data for analytic models, and also high performance for making timely decisions and generating more iterations to derive deeper insights to your data.
When managing cloud-native applications, it's essential to have end-to-end visibility into what's happening at any given time. This is especially true because of the distributed and dynamic nature of cloud-native apps, which are often deployed using ephemeral technologies like containers and serverless functions.
With so much flux and complexity across a cloud-native system, it's important to have robust monitoring and logging in place to control and manage the inevitable chaos. This post discusses what we consider to be some of the best practices and standards to follow when logging and monitoring cloud-native applications.
Managing machine identities, such as SSL/TLS certificates is boring, right? It’s not inspiring work and it’s easily overlooked or forgotten in the day to day onslaught of changes and incidents in a typical enterprise technology department. And they seem like such little things… but when certificates go bad, well, life can turn pretty dark. Here are some real-life nightmares that happened as the result of mismanagement of machine identities.
The notorious breach at Equifax — talk about reputational damage, right? Nearly 150 million customer records stolen including date of birth and social security numbers. That’s a lot of people having sleepless nights about ID fraud thanks to an error somewhere in Equifax’s approach to cybersecurity. While the initial attack was performed via a Struts vulnerability (a common one I still frequently see during application scanning), the detection of the breach took 76 days. The reason it took 76 days to detect: misconfiguration of the device inspecting encrypted traffic on the network. The reason for the misconfiguration of the device: a digital certificate that had expired ten months previously.
Often, the very people whose involvement is most critical to an initiative are those who are least "available." Senior managers, for example, can have a deep level of domain experience which they have built up over years, and they can exert authority over important decisions. Enterprise architects and Product Owners, in particular, may have accumulated responsibilities over sweeping areas of organizational concern. Such people are notoriously time-poor, and can be unable or unwilling to focus on a single product or team. This means that they often fail to make the appropriate commitment to an Agile role, and do not demonstrate the quality of involvement expected of them.
One symptom is that they might see themselves as being "too busy" to fulfill the role and its responsibilities. A Product Owner, for example, may be "too busy" to attend Product Backlog refinement sessions, or perhaps even Sprint Planning, Sprint Reviews, and Sprint Retrospectives. They may allege that they "trust" the Development Team to make an appropriate delivery without their participation. This is unsatisfactory, as it means abdicating their collaborative responsibilities, and the inspection and adaptation of progress are compromised.