CSS-Tricks Chronicle XXXV

I like to do these little roundups of things going on with myself, this site, and the other sites that are part of the CSS-Tricks family.

I spoke at Smashing Conf San Francisco.

There's a video! I can't embed it here because of privacy settings or something, so here's a link to the Vimeo.

It's an evolution of my "How To Think Like A Front-End Developer" talk. That's kinda how I like to roll with talks. Give the same one for about a year, but every time it's different as I learn more.

I was on the One Month podcast.

Chris Castiglione and I chat about:

  • How Chris Coyier learned to code
  • What’s a front-end developer?
  • What resources does Chris Coyier use to stay up to date on web dev?
  • Lessons learned from over 300+ episodes of the ShopTalkShow Podcast

There's a full transcript available.

We've released a number of new things on CodePen.

Quick hits:

And, as always on CodePen, we have a new CodePen Challenge, a new CodePen Spark (newsletter), and a new CodePen Radio (podcast) every single week.

I'm speaking at some upcoming conferences.

The front-end conference website got some upgrades.

We keep a list of all conferences out there related to the topics we write about here on CSS-Tricks! All things front-end web design and development!

It's a little 11ty site on Netlify, where you can contribute to anytime — particularly by adding conferences that fit the vibe that you know about.

Notably, every conference listed has a permalink (example). We did that so we could play around with dynamically generating images for them. It's super basic right now, but it was fun to play with. Dynamic CMS data is fed into an SVG, then also converted to a PNG at build time. Fancy. My hope is to upgrade the CMS to allow for cool custom backgrounds for each conference and then use them in these generated graphics.

Also, each conference has a little button where you can email it to somebody via Netlify functions, like we wrote about.

Jobs are $100 off in May

You know we have a Job Board here on CSS-Tricks. It's powered by the CodePen Job Board, which also powers the ShopTalk Show Job Board.

The price of posting a job is reduced from $299 to $199 just in May and runs for 60 days instead of 30.

Post one!

Dave and I have talked with people like Heydon Pickering, Jessica Ivins, Scott Jehl, and Guillermo Rauch on ShopTalk Show.

It's a great podcast, really ;). You should subscribe.

I bought a new bike!

A Specialized Vado (eBike). Cool right?

The trip from my house to work is a short bike ride, but it's a fairly dramatic elevation change, and my big ass is not capable of hauling itself up there. It's much easier with this, even with a couple of loaded saddlebags and a toddler on the back of it.

The post CSS-Tricks Chronicle XXXV appeared first on CSS-Tricks.

Google Predicts IoT Devices to Overtake Non-IoT by 2025

Bill Huan (Senior Project Manager, Google Coral Team) presented Google’s prediction that the use of Internet of Things (IoT) devices will outpace standard computing devices in 2025. Huan presented the prediction during his talk, Introducing Google Coral: Building On-Device, Thursday at Google I/O.

DevOps for Database

While there has been a sharp focus and tremendous acceleration in the velocity of application software releases, updates to the underlying database have remained manual and are increasingly a bottleneck to the overall software delivery pipeline. Download this new Refcard to get started with Database Release Automation and eliminate bottlenecks. Learn the key best practices that your DevOps database solution should meet in order for you to get the most out of your investment.

For vs. For Each vs. While in C#

Introduction 

I am often asked by some people/colleagues, "which loop is faster?" "Which loop has higher performance?" Etc. I have heard that the For loop is faster than the For...each loop but I have never tried it before. So, I decided to see how big the difference is among all the loops and which one is faster at looping through an array and a list in terms of speed and performance.

Let's start our journey to fin the best C# loop. For this exercise, I'll be creating a console application in Visual Studio 2017.  

Advanced Custom Fields 5.8.0 Introduces ACF Blocks: A PHP Framework for Creating Gutenberg Blocks

After six months in development, Advanced Custom Fields 5.8.0 was released yesterday with a new PHP-based framework for developing custom Gutenberg block types. ACF Blocks was announced in October 2018, to the great relief of many developers who didn’t know how they were going to keep pace with learning the JavaScript required to use WordPress’ Block API.

ACF’s creator, Elliot Condon, was one of the more vocal critics of Gutenberg leading up to its inclusion in WordPress 5.0. Developers were concerned about whether or not their custom metaboxes generated by ACF would still be compatible. The ACF team worked to ensure the plugin was integrated into the Gutenberg UI as much as possible and surprised users by announcing an acf_register_block() function that would allow developers to use PHP to create custom blocks.

The new ACF Blocks add-on is built on top of Advanced Custom Fields Pro and does not require any JavaScript knowledge. It integrates with custom fields so developers can create custom solutions. ACF blocks are rendered using a PHP template file or a callback function that allows full control of the output HTML and live previews while editing the blocks. They also maintain native compatibility with WordPress core, meaning that all Gutenberg features like “alignment” and “re-usable blocks” work as expected.

Early feedback indicates that ACF Blocks has made custom Gutenberg development more approachable for developers who are not as well-versed in React, significantly speeding up the creation of custom blocks.

This is one example of how the WordPress product ecosystem continues to evolve to support developers in the transition to a more JavaScript-powered WordPress.

ACF Blocks also launched with a suite of nine ready-to-use bocks available as a plugin from the new acfblocks.com website. These include commonly-requested functionality for client sites, such as testimonial, team, multi-button, star-rating, pricing list, and click-to-tweet, with more on the way.

Google Proposes New Features for WebAssembly

This week at Google I/O, Software Engineer Deepti Gandluri presented a session titled “WebAssembly for Developers.” In this session she presented new features for WebAssembly which have already been implemented in the current version of the Chrome Web browser. The proposed new features are WebAssembly Threads, SIMD, Implicit Caching and ReferenceTypes.

How to Advertise on YouTube

In a perfect world, you’d be able to build brand awareness organically without spending a dime.

But as you and I both know, the world we live in is far from perfect. There comes a time when every business needs to start running paid advertisements.

However, just because you’re paying for ads it doesn’t necessarily mean that you’ll be successful. I’ve seen countless businesses blow their marketing budgets on unsuccessful campaigns because they didn’t have the right strategy.

The first piece to any successful advertising campaign is choosing the right platform. YouTube is arguably the best network for running ads. Here’s why.

More than 1.9 billion users visit YouTube each month. Those people are watching a billion hours of video each day.

According to Alexa, YouTube is the second most popular website in the world, second only to Google. Furthermore, the users spend an average of 8 minutes and 42 seconds using the platform each day. That’s just 42 seconds less than Facebook’s daily average. YouTube has an average of five daily unique page views per user as well.

YouTube was the most popular iOS mobile app of 2018, ranking ahead of other giants like Instagram, Facebook, Snapchat, Google Maps, and Gmail.

The advertising statistics on YouTube are just as impressive.

Users are attentive during 83% of YouTube mobile advertisements. To put that into perspective for you, the average attention rate for television ads is about 45%.

84% of consumers have bought something after watching a video about it.

Users who watch at least 30 seconds of a YouTube ad are 23 times more likely to subscribe to that brand’s channel, watch more videos by that brand, share a video, or visit the visit. People are ten times more likely to take these actions, even if they are just exposed to YouTube ad.

In short, YouTube is continuing to grow in popularity with no signs of slowing down. Ads on this platform have exceptional performance metrics.

Now that you understand why you should be advertising on YouTube, it’s time to learn how. I’ll explain everything you need to know about how to run ads on YouTube in this guide.

Step #1: Create a YouTube channel and Google Ads account

Let’s begin with the basics. Before you can proceed, you need to have accounts set up on two platforms.

  1. YouTube
  2. Google Ads

I’m assuming the majority of you already have these in place. If that’s the case, you can skip over this. But for those of you who don’t have one, the other, or both, this will be your first step.

Step #2: Upload your ad

Once your profiles are set up, simply upload your video advertisement to YouTube.

Upload Ad

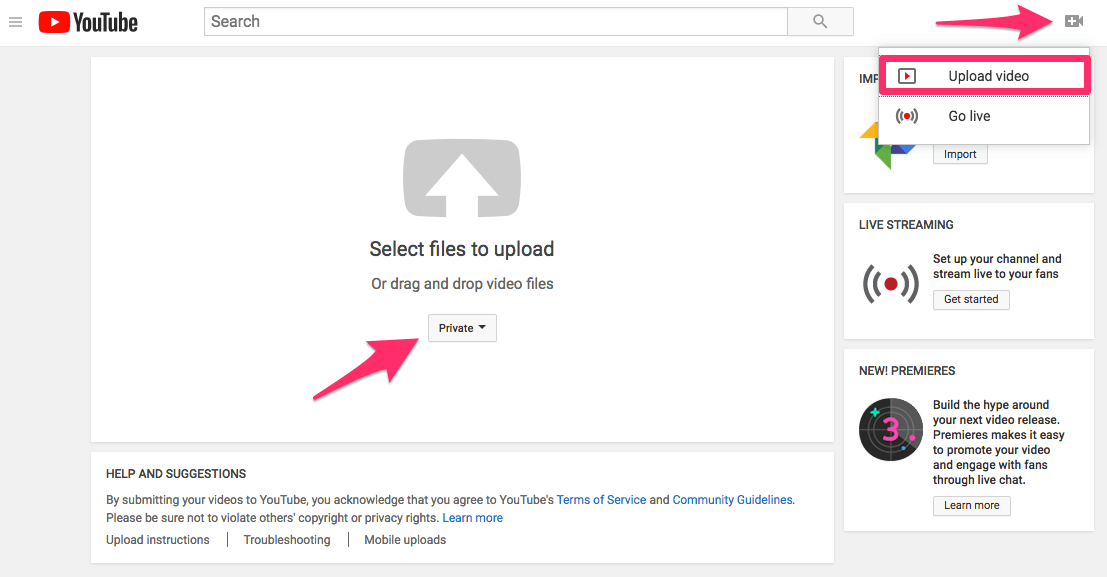
From your YouTube dashboard, look for the little video camera icon in the top right corner. If you click on it, a menu will pop up with two options.

  • Upload video
  • Go live

Select upload video, as I’ve highlighted above, to land on this screen.

From here, you can also decide who can see your video. These are the options:

  • Public
  • Unlisted
  • Private
  • Scheduled

This is completely up to you. If you want to keep your ads separate from the content that you share on your channel, keep it private. Alternatively, if you want to use your channel content as an ad, go with public or scheduled.

I think private is better because it gives you the option to run targeted ads without uploading irrelevant content to your channel. It’s easier to control things this way, and you can always change the privacy settings after the video has been uploaded.

Step #3: Create a new campaign

Now you’re going to navigate away from YouTube and head over the Google Ads. From here, you’ll be able to start a new campaign.

Create New Campaign

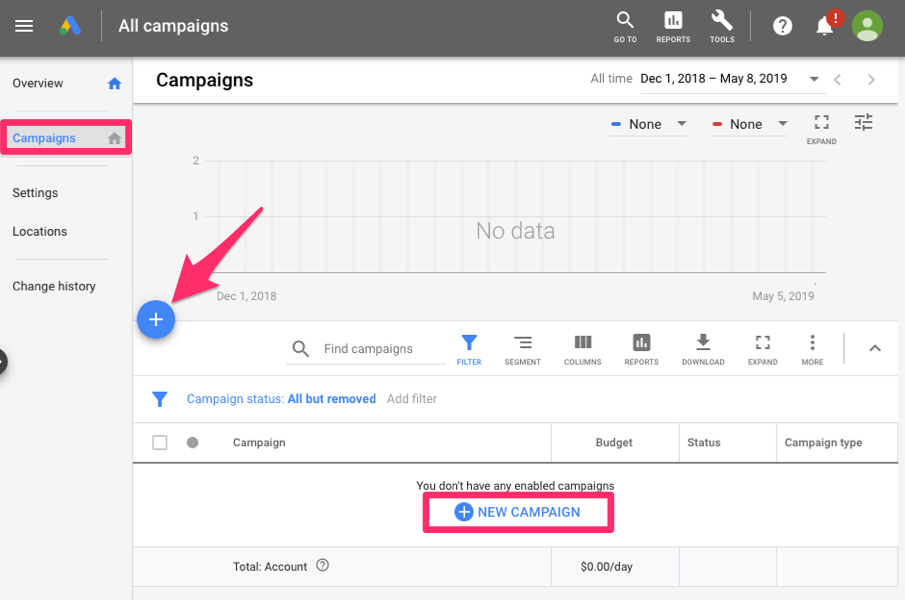
Select “campaigns” from the menu on the left side of the screen.

Once you’re on this page, you can start a new campaign by clicking the plus sign or new campaign. Both of these have been highlighted in the screenshot above.

Step #4: Select your goal

Technically, this an optional step. Google Ads will give you the option to proceed without choosing a goal, but it’s definitely in your best interest to do so.

Select Goal

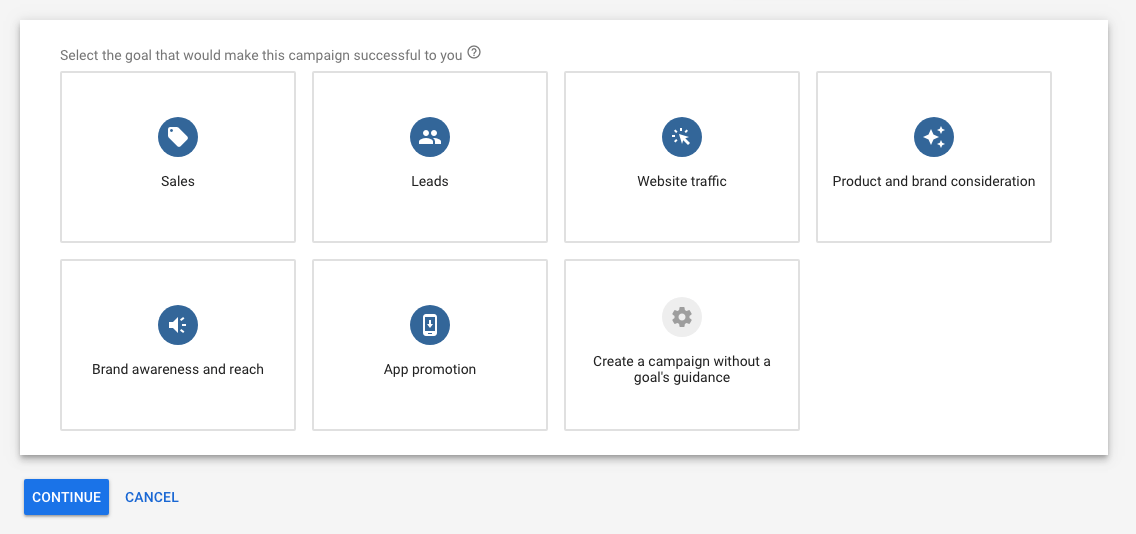
These are your options:

  • Sales
  • Leads
  • Website traffic
  • Product and brand consideration
  • Brand awareness and reach
  • App promotion

By selecting a goal, Google Ads will automatically suggest campaign settings that will be optimal for your ads. Video advertisements will be available for all of these choices, except for app promotion.

Step #5: Choose your campaign type

Now you have to pick what type of campaign you want to run. This selection determines where your ads will be displayed.

Select Campaign Type

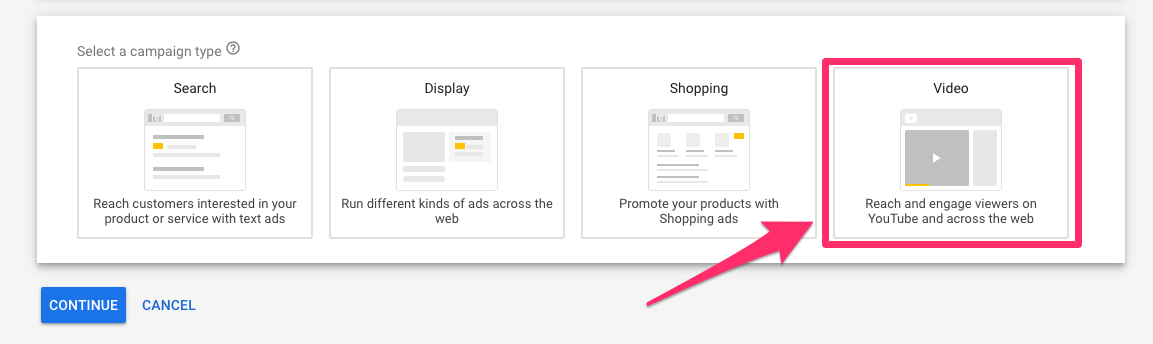
Obviously, for our purposes here today, you’re going to choose the video option.

As you can see from what I’ve highlighted above, this type of campaign will reach users on YouTube.

Step #6: Select an ad format

Now you’ll have to choose how your ad will be run. Your options will vary based on the goal you chose back in step #4.

Select Ad Format

Here’s a more detailed description of your options:

  • TrueView advertisements — These ads come in two forms; in-stream and discovery. The in-stream ads play before a video starts, and can be skipped after they’ve been played for a certain amount of time. Discovery ads appear in the search results.
  • Non-skippable in-stream advertisements — As the name implies, these video ads cannot be skipped. These are either played before an ad starts, or in the middle of videos that are longer (usually 10 minutes or more). In this case, they’re called “mid-roll” non-skippable ads.
  • Bumper advertisements — Bumper ads are just six seconds long, and appear right before a video starts playing. The time limit restricts what you can do, but this format can be part of your overall YouTube advertising strategy.
  • Sponsored cards — These ads are shown in the form of a pop-up with a CTA. They start as a small icon, and expand when clicked. Since the cards are small, they aren’t very intrusive the user, and don’t interfere with the video they’re watching.
  • Overlay advertisements — Overlays are extremely straightforward. They are basically banner advertisements that show up at the bottom of the screen. These can advertisements can be text or images.
  • Display advertisements — Display ads are shown on the right side of YouTube pages above the list of suggested videos. This is another format that does not require a video ad.

You’ll also have the option to set up ad sequencing. This is the process of showing a series of video advertisements to a singular person. Each video in the sequence will be assigned a step or number, so they are shown in the proper order to an individual over time.

Ad sequencing can be used for TrueView in-stream advertisements, bumper ads, or a combination of the two.

Step #7: Configure your campaign

It’s likely that you’re going to run more than campaign on YouTube. So this step is a crucial component for staying organized.

Configure Campaign

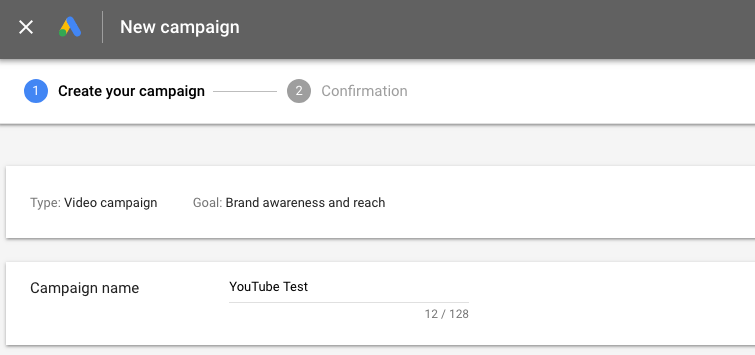
Now is your last chance to change your goal before you proceed. You’ll also be naming your campaign so you can access it to adjust the settings and monitor the performance.

For our purposes today, I just named it “YouTube Test” as an example.

Campaign Budget

Next, you’ll determine your budget and bidding strategy for the advertisement.

You can set your budget two ways. Either the total amount that you’ll spend for the duration of the campaign (as shown above) or a daily amount that you want to spend.

There are six different options for bidding strategies.

  • Maximum CPV — cost per view.
  • Maximum CPM — cost per 1,000 times the ad is displayed.
  • Target CPM — average cost per 1,000 times the ad is displayed.
  • Viewable CPM — cost per 1,000 times ad was viewed (at least 50% of ad is on the screen for two seconds or more).
  • Target CPA — automatic bids based on an action, billed at the CPM rate.
  • Maximize conversions – automatic bids set up by Google to give you the highest number of conversions to fit your budget.

I recommend experimenting with as many bidding options as possible to see what gives you the best return on your investment. When in doubt, you can always set up target CPA or maximize conversions to let Google Ads automate things for you.

During the campaign configuration process you’ll also be able to customize things like:

  • Networks
  • Languages
  • Locations
  • Inventory types
  • Excluded content

This is the first part of customizing who will see your campaigns. Next, you can break this down even further by choosing the people you want to reach. You’ll have options like:

  • Gender
  • Age
  • Parental status
  • Household income
  • Interests and habits
  • Life events
  • Previous interactions with your business

You’ll want to make this as specific as possible to ensure that your ads are reaching the right audience. The last thing you want to do is waste money on a campaign that’s being shown to the wrong person.

For help with this process, check out my guide on how to define your target audience.

Step #8: Select keywords and topics

In addition to selecting who will see your ads, you also have the ability to choose what types of videos your advertisements will be shown on.

So conduct keyword research that’s related to your brand, as well as what your target audience will be searching for. Google Ads can generate keyword ideas for you if you enter a related website along with the products or services that you’re marketing.

Select Keywords and Topics

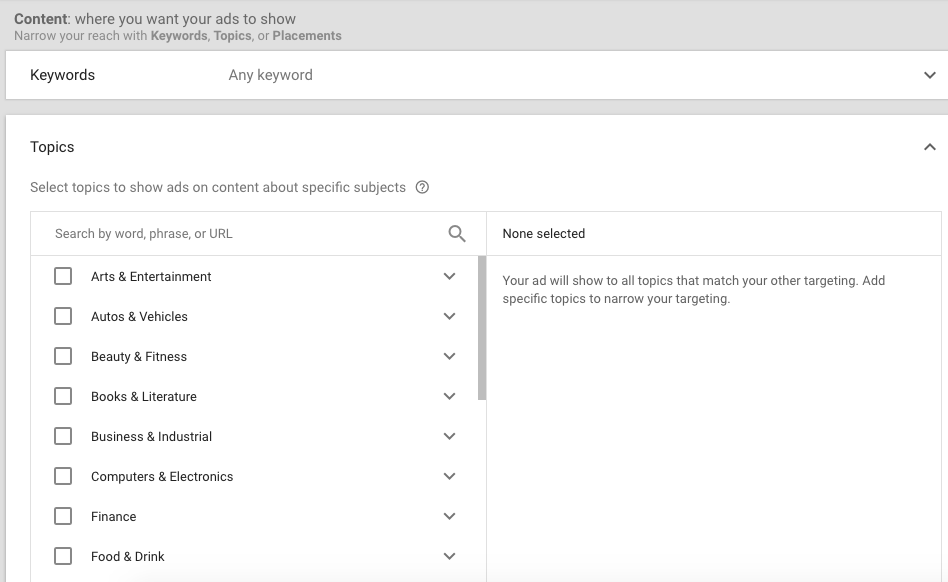
Each topic will also have subcategories to narrow the results even further. For example, if you choose arts and entertainment, you’ll be able to pick subtopics like:

  • Celebrities
  • Comics and animation
  • Events and listings
  • Humor
  • Movies
  • Visual art and design

Again, this entire process is designed to make sure your ads are associated with related videos and being shown to relevant audiences.

Step #9: Paste your video ad URL

I know it seems like a while ago, but remember back in step #2 when I had you upload your ad to YouTube? Now it’s time to circle back there and copy the ad URL.

You’re going to paste it into this section of Google Ads:

Video Url

That’s the final step of the process.

The last thing you’ll do from here is approval the details and then your ad will start being run on YouTube.

Conclusion

For those of you who have never advertised on YouTube before, this entire process can feel a bit intimidating or overwhelming.

But as you can see from the guide I’ve created, the entire process can be broken down into just nine simple steps. If you already have a YouTube account and Google Ads account, the first step is already completed.

The reality is this; YouTube is king when it comes to video content.

This platform is still rising and popularity and people all over the world are consuming billions of hours of video content on a daily basis. We’re beginning to reach the point where business can’t afford to compete if they don’t have an active YouTube presence.

If you’re going to run paid ads, you might as well do it on a platform like this one. The fact that everything is run through Google Ads makes it easier for you to customize your campaigns to ensure that they’re reaching the right audience.

You’ll be able to successfully advertise on YouTube with ease if you simply follow the step-by-step process that I’ve outlined above.

Collective #514


C514_svgwillsaveus

SVG Will Save Us

Sarah Drasner shows some great things we can do with SVGs in this PerfMatters Conference 2019 talk.

Watch it


C514_cssonly

CSS-Only Chat

An insane project that shows how it’s possible to achieve an asynchronous chat that sends and receives messages in the browser with no reloads and no JavaScript.

Check it out


C514_formation

Formation

Formation is a shell script to set up a macOS laptop for design and development.

Check it out


Collective #514 was written by Pedro Botelho and published on Codrops.

The Thinking Behind Simplifying Event Handlers

Events are used to respond when a user clicks somewhere, focuses on a link with their keyboard, and changes the text in a form. When I first started learning JavaScript, I wrote complicated event listeners. More recently, I've learned how to reduce both the amount of code I write and the number of listeners I need.

Let’s start with a simple example: a few draggable boxes. We want to show the user which colored box they dragged.

<section>
  <div id="red" draggable="true">
    <span>R</span>
  </div>
  <div id="yellow" draggable="true">
    <span>Y</span>
  </div>
  <div id="green" draggable="true">
    <span>G</span>
  </div>
</section>

<p id="dragged">Drag a box</p>

See the Pen
Dragstart events
by Tiger Oakes (@NotWoods)
on CodePen.

The intuitive way to do it

I wrote separate event listener functions for each element when I first started learning about JavaScript events. It’s a common pattern because it's the simplest way to start. We want specific behavior for each element, so we can use specific code for each.

document.querySelector('#red').addEventListener('dragstart', evt => {
  document.querySelector('#dragged').textContent = 'Dragged red';
});

document.querySelector('#yellow').addEventListener('dragstart', evt => {
  document.querySelector('#dragged').textContent = 'Dragged yellow';
});

document.querySelector('#green').addEventListener('dragstart', evt => {
  document.querySelector('#dragged').textContent = 'Dragged green';
});

Reducing duplicate code

The event listeners in that example are all very similar: each function displays some text. This duplicate code can be collapsed into a helper function.

function preview(color) {
  document.querySelector('#dragged').textContent = `Dragged ${color}`;
}

document
  .querySelector('#red')
  .addEventListener('dragstart', evt => preview('red'));
document
  .querySelector('#yellow')
  .addEventListener('dragstart', evt => preview('yellow'));
document
  .querySelector('#green')
  .addEventListener('dragstart', evt => preview('green'));

This is much cleaner, but it still requires multiple functions and event listeners.

Taking advantage of the Event object

The Event object is the key to simplifying listeners. When an event listener is called, it also sends an Event object as the first argument. This object has some data to describe the event that occurred, such as the time the event happened. To simplify our code, we can use the evt.currentTarget property where currentTarget refers to the element that the event listener is attached to. In our example, it will be one of the three colored boxes.

const preview = evt => {
  const color = evt.currentTarget.id;
  document.querySelector('#dragged').textContent = `Dragged ${color}`;
};

document.querySelector('#red').addEventListener('dragstart', preview);
document.querySelector('#yellow').addEventListener('dragstart', preview);
document.querySelector('#green').addEventListener('dragstart', preview);

Now there is only one function instead of four. We can re-use the exact same function as an event listener and evt.currentTarget.href will have a different value depending on the element that fires the event.

Using bubbling

One final change is to reduce the number of lines in our code. Rather than attaching an event listener to each box, we can attach a single event listener to the <section> element that contains all the colored boxes.

An event starts off at the element where the event originated (one of the boxes) when it is fired. However, it won't stop there. The browser goes to each parent of that element, calling any event listeners on them This will continue until the root of the document is reached (the <body> tag in HTML). This process is called "bubbling" because the event rises through the document tree like a bubble.

Attaching an event listener to the section will cause the focus event to bubble from the colored box that was dragged up to the parent element. We can also take advantage of the evt.target property, which contains the element that fired the event (one of the boxes) rather than the element that the event listener is attached to (the <section> element).

const preview = evt => {
  const color = evt.target.id;
  document.querySelector('#dragged').textContent = `Dragged ${color}`;
};

document.querySelector('section').addEventListener('dragstart', preview);

Now we’ve reduced many event listeners to just one! With more complicated code, the effect will be greater. By utilizing the Event object and bubbling, we can tame JavaScript events and simplify code for event handlers.

What about click events?

evt.target works great with events like dragstart and change, where there are only a small number of elements that can receive focus or have input changed.

However, we usually want to listen for click events so we can respond to a user clicking on a button in an application. click events fire for any element in the document, from large divs to small spans.

Let’s take our draggable color boxes and make them clickable instead.

<section>
  <div id="red" draggable="true">
    <span>R</span>
  </div>
  <div id="yellow" draggable="true">
    <span>Y</span>
  </div>
  <div id="green" draggable="true">
    <span>G</span>
  </div>
</section>

<p id="clicked">Clicked a box</p>
const preview = evt => {
  const color = evt.target.id;
  document.querySelector('#clicked').textContent = `Clicked ${color}`;
};

document.querySelector('section').addEventListener('click', preview);

See the Pen
Click events: Not quite working
by Tiger Oakes (@NotWoods)
on CodePen.

When testing this code, notice that sometimes nothing is appended to “Clicked” instead of when clicking on a box. The reason that it doesn't work is that each box contains a <span> element that can be clicked instead of the draggable <div> element. Since the spans don’t have a set ID, the evt.target.id property is an empty string.

We only care about the colored boxes in our code. If we click somewhere inside a box, we need to find the parent box element. We can use element.closest() to find the parent closest to the clicked element.

const preview = evt => {
  const element = evt.target.closest('div[draggable]');
  if (element != null) {
    const color = element.id;
    document.querySelector('#clicked').textContent = `Clicked ${color}`;
  }
};

See the Pen
Click events: Using .closest
by Tiger Oakes (@NotWoods)
on CodePen.

Now we can use a single listener for click events! If element.closest() returns null, that means the user clicked somewhere outside of a colored box and we should ignore the event.

More examples

Here are some additional examples to demonstrate how to take advantage of a single event listener.

Lists

A common pattern is to have a list of items that can be interacted with, where new items are inserted dynamically with JavaScript. If we have event listeners attached to each item, then y\our code has to deal with event listeners every time a new element is generated.

<div id="buttons-container"></div>
<button id="add">Add new button</button>
let buttonCounter = 0;
document.querySelector('#add').addEventListener('click', evt => {
  const newButton = document.createElement('button');
  newButton.textContent = buttonCounter;
  
  // Make a new event listener every time "Add new button" is clicked
  newButton.addEventListener('click', evt => {

    // When clicked, log the clicked button's number.
    document.querySelector('#clicked').textContent = `Clicked button #${newButton.textContent}`;
  });

  buttonCounter++;

  const container = document.querySelector('#buttons-container');
  container.appendChild(newButton);
});

See the Pen
Lists: no bubbling
by Tiger Oakes (@NotWoods)
on CodePen.

By taking advantage of bubbling, we can have a single event listener on the container. If we create many elements in the app, this reduces the number of listeners from n to two.

let buttonCounter = 0;
const container = document.querySelector('#buttons-container');
document.querySelector('#add').addEventListener('click', evt => {
  const newButton = document.createElement('button');
  newButton.dataset.number = buttonCounter;
  buttonCounter++;

  container.appendChild(newButton);
});
container.addEventListener('click', evt => {
  const clickedButton = evt.target.closest('button');
  if (clickedButton != null) {
    // When clicked, log the clicked button's number.
    document.querySelector('#clicked').textContent = `Clicked button #${clickedButton.dataset.number}`;
  }
});

Forms

Perhaps there’s a form with lots of inputs, and we want to collect all the user responses into a single object.

<form>
  <label>Name: <input name="name" type="text"/></label>
  <label>Email: <input name="email" type="email"/></label>
  <label>Password: <input name="password" type="password"/></label>
</form>
<p id="preview"></p>
let responses = {
  name: '',
  email: '',
  password: ''
};

document
  .querySelector('input[name="name"]')
  .addEventListener('change', evt => {
    const inputElement = document.querySelector('input[name="name"]');
    responses.name = inputElement.value;
    document.querySelector('#preview').textContent = JSON.stringify(responses);
  });
document
  .querySelector('input[name="email"]')
  .addEventListener('change', evt => {
    const inputElement = document.querySelector('input[name="email"]');
    responses.email = inputElement.value;
    document.querySelector('#preview').textContent = JSON.stringify(responses);
  });
document
  .querySelector('input[name="password"]')
  .addEventListener('change', evt => {
    const inputElement = document.querySelector('input[name="password"]');
    responses.password = inputElement.value;
    document.querySelector('#preview').textContent = JSON.stringify(responses);
  });

See the Pen
Forms: no bubbling
by Tiger Oakes (@NotWoods)
on CodePen.

Let's switch to a single listener on the parent <form> element instead.

let responses = {
  name: '',
  email: '',
  password: ''
};

document.querySelector('form').addEventListener('change', evt => {
  responses[evt.target.name] = evt.target.value;
  document.querySelector('#preview').textContent = JSON.stringify(responses);
});

Conclusion

Now we know how to take advantage of event bubbling and the event object to simplify complex jumbles of event handlers into just a few… and sometimes down to just one! Hopefully this article has helped you think about your event handlers in a new light. I know this was a revelation to me after I’d spent my early development years writing duplicative code to accomplish the same thing.

The post The Thinking Behind Simplifying Event Handlers appeared first on CSS-Tricks.

A responsive grid layout with no media queries

Andy Bell made a really cool demo that shows us how to create a responsive grid layout without any media queries at all. It happens to look like this when you change the size of the browser window:

I think this is a wonderful layout technique that’s just 6 lines (!) of CSS.

.auto-grid {
  --auto-grid-min-size: 16rem;
  display: grid;
  grid-template-columns: repeat(auto-fill, minmax(var(--auto-grid-min-size), 1fr));
  grid-gap: 1rem;
}

What this shows us is that we don’t have to write a million media queries to change the number of columns in a grid. Andy also proves that CSS Grid can automate so much of the tedious work of styling layouts.

I’ve seen this technique used in a couple of places (and we have a few starter grid templates to boot) but Andy’s article about how it all works finally made it all sink in just how useful grid is.

Direct Link to ArticlePermalink

The post A responsive grid layout with no media queries appeared first on CSS-Tricks.

The Impact of Team Collaboration and Communication on Projects

(This is a sponsored post.)

The CSS-Tricks team was cracking up the other day when Miranda introduced us to something called "swoop and poop." That was a new term for most of us, but tell me if you've ever experienced this for yourself.

The idea is that someone in an organization — usually someone higher up on the chain, like a manager or director — has had no involvement in a project but "swoops" into a review session for it (like a team demo) and "poops" all over the work that's been done. You know, things like colors in the design, why we're using this framework versus that, or any number of various things that pay no mind to the scope of the project or the meeting. And it's not like anyone want to push back on a HiPPO.

We then all turned to Chris because, well, case in point. Just kidding!

The thing about "swoop and poop" is that it's totally avoidable. Sure, it's a funny thing to say and there's a lot of truth in it, but the issue really comes down to a lack of transparency and communication.

That's where a system like monday.com can swoop in and make things shine. It's a project management platform that's more than project management. It has all the time tracking, milestones, calendars and task lists that you might expect, but there's a lot more to help facilitate better collaboration and communication among — not just the immediate team members of a project — but everyone across the organization.

We're talking about things like shared assets, comments and chat to help everyone on the team communicate better. Even better, monday.com puts all of these things in a central place so everyone has access to it. And if you feel out of the loop on a project, simply check your personalized news feed to catch up on all the latest activity for the things that directly affect your work.

That's exactly the sort of remedy that prevents any ol' person from swooping into a meeting and dropping bombs all over the work. By capturing important details, assets, decisions, discussions, budgets and everything else you could ever need on a project, monday.com makes it tough to be out of the loop, which leads to better team collaboration and communication.

Try monday.com and experience the difference better communication makes. It's free to sign up, so go ahead and give it a spin.

Get Started

Direct Link to ArticlePermalink

The post The Impact of Team Collaboration and Communication on Projects appeared first on CSS-Tricks.

Modern CSS Frameworks to Speed up the Design Process

Designing a website from scratch can be a very time-consuming experience. And while web designers always welcome shortcuts, maintaining quality is still a top priority.

That’s the beauty of a good CSS framework. It can provide you with a comprehensive set of responsive layouts and UI elements. This helps to get your projects off to a quick start, while still allowing plenty of room for customization.

Today, we’ll introduce you to a selection of the top modern CSS frameworks available. Some you may have heard of, while others may be completely new to you. But each offers a variety of useful, cutting-edge features that can improve your workflow. Let’s get started!

Frameworks Focused on CSS

Let’s start with some frameworks that are mainly focused on CSS. You’ll find all types of layouts and UI elements to form the basis of your project. Some may even include a bit of JavaScript to help with more complex features.

Tailwind CSS

Tailwind CSS

What separates Tailwind from many other frameworks is that it doesn’t come with any prebuilt UI components. Instead, it’s focused more on utility, with CSS classes that give you a head start on building out a site. Elements such as sizing, color and positioning are key here.

Bulma

Bulma

Built around CSS Flexbox, Bulma is a free and open source framework. Inside you’ll find a number of easy-to-customize UI elements. It’s modular, meaning you can import just the elements you want – like columns or buttons.

Picnic CSS

Picnic CSS

Picnic CSS has been developed to be super lightweight and comes in under 10KB when compressed. It features Flexbox-based grid layouts, along with plenty of UI elements to get your project off to a quick start. You’ll even find a simple navigation bar and modal windows.

Materialize

Materialize

Fans of Google’s Material Design will want to check out Materialize. This framework is based on the popular design language and includes a ton of CSS and JavaScript-based elements. There is also a focus on microinteractions to make the UI more user-friendly. It’s also worth noting that Materialize features support for custom themes as well.

Pure.css

Pure.css

Coming in at just 3.8KB when compressed, Pure.css is centered around a mobile-first philosophy. And it’s modular, so you can import just the element packages you want to use. There are also a number of common layouts that you can download and install.

Base

Base

Base is a modular framework that, as its name indicates, aims to provide a solid foundation for your design projects. It’s been built on top of Normalize.css and provides basic styles that are easy to customize. You won’t find anything too fancy here, but that’s the point!

mini.css

mini.css

With mini.css, you get a package that looks to strike a balance between being lightweight and packed with features. And it really hits the mark, coming in at around 10KB compressed while boasting a fairly large number of UI elements and layouts. There’s also a good bit of documentation, so you can really dive in and see how everything works.

Concise CSS

Concise CSS

Urging designers to “give up the bloat”, Concise CSS offers a utility-based framework to get you off to a fast start. Need UI elements? You can add those in via a separate kit.

Mobi.css

Mobi.css

Mobi.css is tiny (2.6KB gzipped) and is focused mainly on speed for mobile users. However, there’s room for growth with a built-in theme and plugin system. If the basic styles don’t provide everything you’re looking for, it’s possible to build on top of the framework in a modular way.

Spectre.css

Spectre.css

Billed as being “Lightweight, Responsive, Modern”, Spectre.css is a Flexbox-based framework. Included you’ll find some basic layout, UI and typography styles. Plus, there are a number of functional components (accordions, popovers, tabs, etc.) that have been built with pure CSS. Overall there’s a nice balance achieved here.

Frameworks That Go Beyond CSS

There are scenarios that call for a more robust framework – and the selections below will do the job. They not only offer plenty of CSS-based elements, but you’ll also find healthy doses of features like HTML and JavaScript. In some ways, it’s almost like starting out with a semi-complete template that you can customize to fit your needs.

Bootstrap

Bootstrap

Created by Twitter, Bootstrap is pretty much everywhere these days. But that’s because it’s well-maintained and offers a massive library of prebuilt features. And while you can roll with the default setup, Bootstrap is also quite extensible. Adding themes or custom components to the mix will help personalize the UI even further.

Foundation

Foundation

Foundation is library of modular components that add plenty of fit and finish to your projects. There are a wide array of options here – everything from responsive layouts to animation. And that’s not even scratching the surface of what’s available. Foundation also has its own JavaScript plugin API. Last but not least, the framework comes with ARIA attributes and roles for building sites with accessibility in mind.

Semantic UI

Semantic UI

Sometimes, frameworks can include CSS class names that make sense only to their original developer. Semantic UI looks to change that narrative by using natural language. The logic is easy to follow and should make for quicker development. Beyond language, you’ll find over 3,000 theming variables – all of which you can edit or remove, depending on need. In all, there are tons of layout and UI possibilities here.

Build It Better with a Framework

Getting your project off the ground takes a lot of work – that’s why frameworks exist. They handle some of that heavy lifting for us and provide the basis for everything that comes after.

The ability to integrate a common set of layouts and UI elements allows us to better focus on content. While more robust frameworks contain all manner of extras like JavaScript and page templates to help us go even further.

Whatever type of head start you’re looking for, it’s likely that one of the selections above will be the perfect fit.