Three Business Benefits of a Data-Driven Organization

Data is the new oil for forward-looking businesses to unlock the full potential of an entire organization, allowing all business units to make data-driven business decisions, and deliver personalized digital experiences to customers and stakeholders.

What Is Being a Data-Driven Enterprise All About?

Data-driven businesses rely on huge volumes of data – and smart analytics – to bolster and speed up business decision-making processes. By executing predictive data analytics, organizations can have superior data insights. Smarter and superior analytics technologies now empower businesses of all sizes to become more data-driven than ever before.

Methodical Approach to Performance Troubleshooting Cloud APIs

This article is intended to be a step-by-step guide, laying out methodology and guidance when solving a performance problem with backend APIs or services. And in using the tools needed, we are able to get to the root cause of performance issues and add monitoring to issues seen in cloud services.

APM Tools

Image title

The Best UI Design Trends of 2019

ui design trends

User interaction, or UI, is arguably the single most important aspect of anyone’s technological experience. However, people change, their needs change, and technology changes to go along with it. Every year, there are always new trends that everyone should integrate to their designs. Because it’s important to keep up with the times, we’ve compiled a list of the best UI design trends of 2019.

Seamless Interfaces

Nobody likes to have to navigate a website by clicking on an unnecessary amount of links. Loveforiceland.com executes this perfectly, so let’s use it as an example.

All of the information is located on the main page, so the user never have to leave the home page. This avoids loading times and ridiculous transitions.

Big Typography

Big fonts are in! Adding a simple, or even an interactive font to your home page can really set the mood for any user. It’s a great way to advertise and get people familiar with your brand. Weareacademy.com is a very great example of how to pull this off in a trendy way.

Gradient Transitions

We all need a splash of color. One color can be a little boring, but add too many, and you’ll confuse your users. Gradient transitions are not just one of the best UI design trends of 2018, but possibly of all time.

It has made quite the comeback this year and is spreading like wildfire. As your eyes move from one side of the screen to the other, they’ll be greeted with a fresh, new treat every inch of the way.

Custom Illustrations

What better way to give people a custom experience then to throw in some custom illustrations? If you have a unique logo or font, throw it in there! People really get the sense of uniqueness and genuine care when they see something other than copy and paste style UI.

These are just a few of the best UI design trends of 2018. There are many trends out there to be discovered, and even more to be created. Put on your thinking hat, gather the troops, and start getting creative. Who knows, maybe one day, someone will be writing an article about a trend you set.

Read More at The Best UI Design Trends of 2019

Game Changing Email Marketing Trends in 2019

There are now close to 4 billion email users worldwide – that’s almost half of the entire world population! And with an average ROI of 3,800%, you should be doing your best to hone your email marketing craft.

Here are some email marketing trends that could take your business to the next level in 2019.

AI Infusion

If you haven’t started yet, 2019 should be the year you begin implementing AI into your email marketing efforts. There are plenty of available tools on the market that can help you do the following:

  • Coming up with subject lines and images
  • Customizing content based on an individual’s past interactions with previous emails
  • Predicting when users could unsubscribe
  • Curate nurture emails
  • Provide insights into which types of content leads to website traffic

These are just a few examples among a whole host of features that AI could bring to your email marketing. But before you jump into a solutions provider, take a look at what elements you think can help your campaign and make a decision based on need.

Brain Diagram

AMP for Email

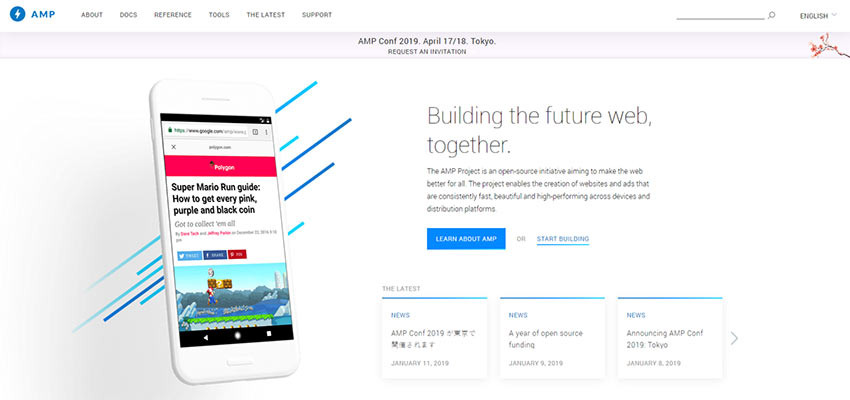
AMP (Accelerated Mobile Pages) is a Google initiative designed to speed up the rendering time of web pages on mobile devices. The tech allows marketers to create website-like experiences within an email. These could include:

  • Use of carousels and accordions
  • Accepting user input
  • Browse content straight from the inbox

But the most exciting possibility brought to email by AMP is the ability for content to be updated. For example, if you visit the Ritz Carlton website today, the following day, the hotel could email you a list of available rooms. When you return to the same email the following week to find the hotel’s contact info, you find that the content has been updated with the latest available listings.

Email that doesn’t get stale – that would be a blessing to marketers.

Additionally, because it is yet to be available to all email service providers, AMP is also backwards compatible with unsupported email clients. This means content would only fall back to older markup language if it’s unsupported.

Google AMP Home Page

Increased Segmentation

If you’re not segmenting your list in 2019, you’re not doing it right. According to HubSpot, segmented and targeted emails account for an estimated 58% of all earnings. This is mainly because it allows you to target highly specific groups of people with a personalized message relevant to their individual needs.

For example, you can segment a group based on preferred content streaming services, geographic location, and email opt-in dates. So if, say, a marketer is organizing a music festival in Calabasas, California, they can target a campaign based on:

  • People who live within a 200-mile radius of Calabasas
  • People who regularly open promotional emails from the company
  • People who have purchased a music-related product from the company
  • People under 40

Because you send targeted segmented emails to people who are actually interested in receiving them, this will lead to higher open rates, higher click-through rates and better customer relationships.

Dart Board

Interactive Content

SnapApp defines interactive content as content that requires participants’ active engagement, beyond simply watching or reading. Those who engage, in return, will receive real-time, hyper-relevant results they care about.

The Geek's Guide to London

The animated infographic above goes beyond the generic image slide shows of travel and lifestyle content. For example, if you click on “Walking Tour,” you’ll be presented with a suggested tour provider, why it’s different from the usual tour, and a CTA to check the tour’s availability. It’s not only highly-engaging and visually appealing, it’s extremely useful.

According to Martech Advisor, interactive content increases click-to-open rate by 73%. And if you’ve ever interacted with it yourself, you’ll understand why.

Hand Touching an Email Icon

More Storytelling in Content

Speaking of engaging content, emails in 2019 will be shifting from hard selling to more storytelling. Storytelling in email means that you’re providing content that engages audiences by creating an emotional connection.

As noted by Benchmark, these types of email content:

  • Provide stories focused on a customers’ pain points
  • Furthers the connection between the brand and its customers
  • Reduces the spam/promotional vibe of brand emails

In the “More Storytelling in Content” example mentioned in the Benchmark link above, Patagonia talks about their efforts to champion environmental sustainability. This subject resonates with their audience as they’re outdoors enthusiasts who care about their playground.

Paper That Reads "Once Upon a Time"

Countdown Timers

Countdown timers create a sense of urgency, which has been a proven technique to increase sales and conversions. These attention-grabbing timers also create a strong, visual CTA that can be processed by email recipients in an instant.

As well, countdown timers serve as a great tool for building anticipation, which would then increase the open rates of your successive emails. For example, if you send an email with a timer for a flash sale, if your recipient has been carefully targeted, chances are they’ll be looking forward to the next email with more info on the sale. This could then lead to future emails being instantly noticed in their inboxes.

Clock

Human Conversations

As people lean more and more toward authenticity, they prefer to engage with other people as opposed to a corporate message. This means that your email content should have more personality in order to create a genuine connection with your audience.

It’s important to note, though, that the tone of your emails should still take into consideration the target audience.

In the “Writing in Conversational Tones” example mentioned by Benchmark, Chubbies plays into their brand personality of being the carefree person who likes to chill and enjoy a few beers. While they’re essentially nudging their customer towards a purchase, they make it sound like a buddy just making a friendly suggestion.

Coffee Cups on a Tray

Takeaway

Email marketing will continue to be a valuable tool into the foreseeable future. Taking advantage of trends and technological innovation will elevate not only your email marketing, but your business as well.

What do you plan on implementing in 2019?

A Year of Continuous Deployment: Lessons Learned

About a year ago, we started working on the Run Insights feature for CloudBees DevOptics. A small team of engineers (averaging around three to four of us) worked on the Run Insights service over the course of the past year. The Run Insights service gave us the opportunity to develop a greenfield service using continuous deployment from the very start.

One year, and over 343 deployments later, I thought it would be a good idea to share what we have learned from our experience.

How We Got to Hyperconverged Infrastructure

With hyperconvergence adoption on the rise, it’s hard to believe HCI is a relatively new player in the grand scheme of IT. In fact, according to the State of the Enterprise Datacenter report, 67% of respondents are either using or are planning to adopt a hyperconverged infrastructure.

Growing demands for simplified management, increased performance, and reduced time-to-market mean that now, technologies like hyperconvergence are business necessities, not just “nice to haves.” Maintaining a competitive advantage is an increasingly difficult task, so benefits like scalability, operational efficiency, and reduced costs that help foster innovation and drive execution are integral in reaching that goal.

Adobe Experience Manager vs. WordPress: The Authoring Experience Compared

Adobe Experience Manager vs. WordPress: The Authoring Experience Compared

Adobe Experience Manager vs. WordPress: The Authoring Experience Compared

Kevin Weber

Thanks, WordPress and Gutenberg, for making block-based editing the standard for authoring web pages. In this article, I’m going to compare the new authoring experience in WordPress with the experience from Adobe Experience Manager (AEM), an enterprise content management system that also embraces block-based editing. I’ve implemented both WordPress and AEM for multiple companies (such as Informatica and Twitter) and had to realize that despite the authoring experience is critical for non-technical authors, it is often neglected by developers.

Note: With the term “authoring experience” I’m referring to the user experience for those people whose goal it is to create and publish content on a website. I’m not referring to the people that are going to consume the published content. If you haven’t thought about the authoring experience before, here’s a primer by Eileen Webb who was also featured in Smashing Book 5.

Adobe Experience Manager is, compared to WordPress, a complex system with a steep learning curve, especially for developers. At the same time, AEM is easier to use than more established and more expensive content management solutions, placing AEM somewhere in between free and very costly solutions.

From a technical perspective, AEM is a conglomerate of open source technologies with several touches from Adobe, placing AEM somewhere in between open-source and proprietary software. It is those touches from Adobe that make the system shiny and usable. For example, a visual drag and drop page builder has been the standard way for creating pages in AEM — long before WordPress Gutenberg was born.

Let’s take a look at some of the features that elevate the authoring experience above average.

Components (Blocks)

One of the most significant ideas for websites is the concept of a component (or block in WordPress lingo). A component represents a piece of content that follows specific rules instead of being a blob of anything. For example, you can have a video component where the author can only paste in a Youtube link and control Youtube-specific settings. Or you can have a quote component where the author adds a quote to one text field and the name of the person being quoted to another text field. You can even have a layout component that contains other components and displays them below each other on a mobile device, whereas on a large screen, those components get spread across three columns.

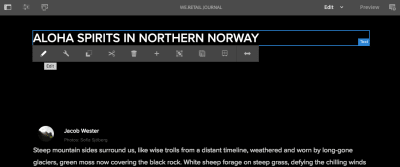
Title component in AEM with an overlay that includes an edit button
Authors can update components right in the visual editor. Available editing options get displayed based on the selected component. (Image source) (Large preview)

An author knows exactly what to expect from a specific component and can easily fill it with the appropriate content. Equally important are the long-term benefits and new opportunities that wouldn’t be feasible for the old school “one text field fits all content” approach that has been prevalent for the past decades:

  • If a component requires a date input, the component authoring dialog can display a date picker instead of a plain text field, making it easier for the author to pick a date with the right format.
  • If a designer wants the name of a quoted person to be displayed above the quote instead of below the quote, the developer can easily rearrange the code because the quote and the name are stored separately. If the quote and name would be stored the old-fashioned way, the developer would have to manually extract the name from the text blob and move it in front of the quote.
  • If a quote needs to be translated from English to German, the quote can be submitted to a translation service. If the translation service has translated this quote before already, it can return the saved translation. If the quote would be part of a longer paragraph instead of being standalone, the translation would be much harder and probably require a human translator.
  • If a video lacks a transcript and therefore prevents deaf users from consuming it, the component can be complemented with a summary text that makes the video more accessible to deaf users.

Component-based editing has been embraced by users of AEM for a while already, and because of the arrival of Gutenberg in WordPress 5.0, component-based editors are now the de facto standard for authoring web pages.

Note: Leonardo Losoviz dives deeper into the implications of blocks in the context of WordPress.

Fragments

Content fragments and experience fragments are new terms that have been dominating the AEM scene for the past year. I’ll summarize those two concepts simply as fragments. In essence, fragments allow authors to create neutral content that can be used across web, mobile, social media and other channels.

Fragments are created outside of a page editor and are, compared to a component, less opinionated about how their data is going to be used. Let’s imagine a fragment called “Quote of the day” that authors update once a day with a new quote. Now the quoted text of this fragment can be used in a variety of places:

  • A footer widget displays the quote of the day at the bottom of every page. As soon as an author updates the fragment, the footer updates as well. The fragment determines what is going to be displayed whereas the footer widget determines how the quote is going to be displayed.
  • A quote component allows authors to import a quote from past “Quotes of the day” and add it to the blog post.
  • A plugin adds a “Share quote of the day” button to the homepage. Whenever someone clicks on that button, the plugin takes the quote of the day and formats it to meet best practices for sharing via Facebook, Twitter, and email.
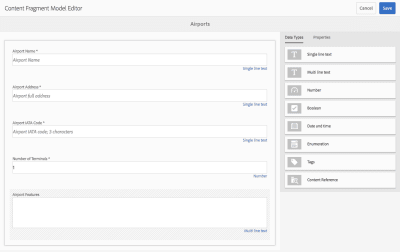
Fragment editor for populating a component with airport data
Using an editor for fragments, authors focus on related data without having to know how exactly it is going to be displayed on websites and in apps. (Image source) (Large preview)

In WordPress, widgets and menus resemble fragments: Authors create menu items in a neutral interface, then developers display those items as part of the theme in a way that makes sense for the theme. If the theme gets replaced with a new theme, those menu items persist and can be displayed in the new theme as well, even though the new theme might look very different from the previous one.

I expect fragments to become more widely used, even though the concept has different names in different systems. Indeed, Matt Mullenweg already announced that his team is currently focusing on “expanding the block interface to other aspects of content management [including the creation of] a navigation menu block [and] porting all widgets over to blocks.”

Page Templates

Pages templates can be described as higher-level components because they include several other components. In AEM, authors can create templates that lock components such as a header component into a fixed position while also defining flexible areas where components can be added on a per page basis.

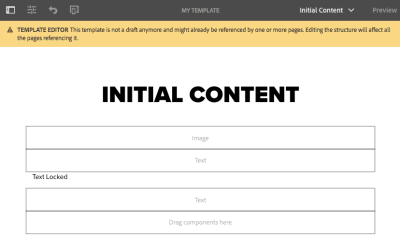
Page template editor
The template on this screen provides a heading, image and text component by default. It prevents authors from removing the “Text Locked” text and allows authors to add more components below that text. (Image source) (Large preview)

One important aspect of this is that such a flexible area can limit which components can go into it. That way you can create page templates for different purposes:

  • Template #1: Article page template
    Header, title, content area and footer are fixed. The author can update the title component but can’t remove it. The author can drop text, image and video components into the content area.
  • Template #2: Landing page template
    Only a logo and a title component at the top of the page are fixed. The author can choose among a set of landing page-specific components that are optimized for converting visitors into customers.

Permissions And Workflows

It’s unlikely that every author in a large team should be able to modify critical templates such as the article page template. In order to prevent people from being able to accidentally and irrevocably break the site, it is important to define who can modify which part of the site. Welcome to the concept of permissions and workflows. This concept is neither new nor special, but it’s important for large teams.

Screen where admins handle detailed permissions.
Yes, AEM’s interface for handling permissions could need a facelift. Anyhow, it works. (Image source) (Large preview)

A typical AEM site includes the actual production website and at least one production-like site, aka staging. Authors can publish content to a private staging site before publishing it to the public production site. The process of publishing content to staging followed by publishing content to production can be called a workflow. Another common type of workflow is that the content must go through an approval process before it can be published to the production site, and only certain people are able to hit the “publish to production” button.

Page editor with workflow message
This page indicates that a workflow has been initiated and the author can either complete or delegate the “Request for Activation”. (Image source) (Large preview)

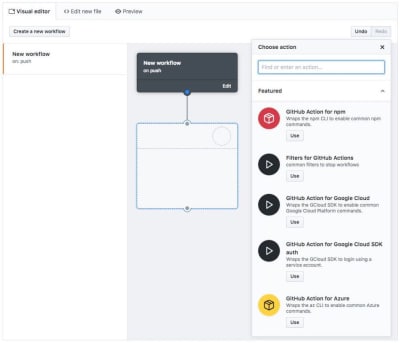
Permissions and workflows are features that are negligible on small teams. However, as a team grows, those features become critical for the productivity and success of the team. Despite AEM comes with the basics for creating workflows and developers can make AEM work for any specific need, it requires quite some code changes and isn’t implemented with the snap of a finger. This is even more true for WordPress. It would be nice to have an authoring-friendly tool to create custom workflows.

Visual workflow editor in Git
Imagine how a user-friendly tool could simplify the creation of workflows. Here is how the creation of workflows in Github will look like once Github Actions are out of beta. (Large preview)

Editing Modes

In AEM, authors can quickly edit and view each page in different modes. The author switches between modes based on what job needs to get done:

  • To arrange components and edit their content, choose Edit mode.
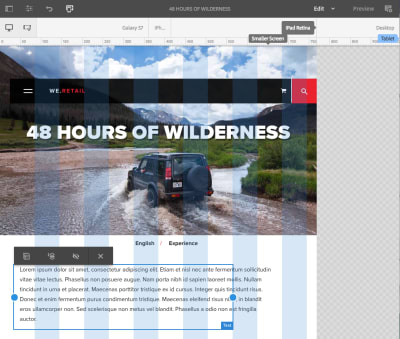
  • To change how components should be arranged on an iPad, choose Layout mode.
  • To look at the content as if you were a visitor, choose Preview mode.
Page editor emulating an iPad-sized screen
On this page responsive layout mode is active. The author can emulate different device sizes and adjust the position of components within a responsive grid. (Image source) (Large preview)

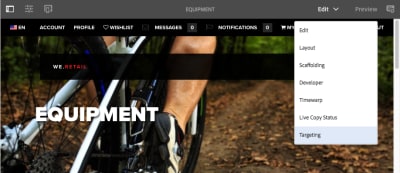
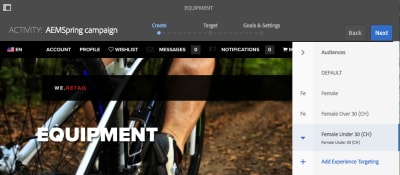
There are a few more modes that show up based on how the site is set up. One ideal scenario is that A/B testing and personalization is set up by integrating AEM with Adobe Target. Using Targeting mode, authors can define when to show certain components based on a visitor’s location, age, referral page, the time of the day, etc.

Integrations in AEM are comparable to plugins in WordPress but with the difference that AEM integrations are more complex and usually custom-tailored. Especially integrating AEM Target can be more painful than salespeople make it sound. 😉

Dropdown with layout modes
Switch the mode through a dropdown. (Image source) (Large preview)
Editor where author defines a target audience
In targeting mode, content can be personalized and tested right from the page editor. (Image source) (Large preview)

Putting development complexity and money aside, the consequence of such an effort can result in a superb authoring experience. The concept of editing modes demonstrates how a simple dropdown creates an opportunity for authors to get a range of jobs done while staying on a single page.

Visual Single-Page Editor

Looking at the screenshots in this article, you must have realized that AEM’s page editor is not just component-based but also visual: If a component gets updated, the change becomes visible immediately and the author doesn’t have to open a preview in a new window. Quite a feature. Even though page builders are omnipresent in the WordPress ecosystem, the team behind WordPress has yet to define a best practice for visual editing. Let me take this one step further and ask: What happens if you marry visual editors with single-page applications (SPAs)?

SPAs are websites where navigating from one page to another feels seamless because the browser doesn’t have to reload the whole page. Some popular websites such as Gmail and Facebook are SPAs but most of the sites on the internet are not. One reason for rather low adoption is that creating SPAs is hard, and maintaining SPAs with thousands of pages is even harder. There are currently two major ways for managing content in SPAs:

  • The content of a site gets updated by updating code. That’s obviously not authoring-friendly.
  • The content is managed in a CMS that is decoupled from the visitor-facing part of the website. The content from the CMS is consumed via an API, for example by a React app. The authoring interface looks different from the assembled site that the visitor will see.

Implementing a visual editor and an SPA each by itself is already a tough technical challenge. Having a visual editor that works with an SPA is nearly unheard. Adobe’s team is working on supporting SPAs in AEM while trying not to compromise any benefits of their existing system. Even though promising first versions have been released to the AEM community in 2018, there’s still a lot of work to be done.

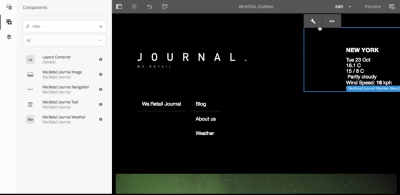
Weather component with overlay
This page shows a React app. Note how AEM has added a layer on top of the weather component so authors can edit its properties. (Image source) (Large preview)

Summary

Adobe Experience Manager comes with several useful features that have already made or will make their way into popular open-source projects. AEM didn’t necessarily invent the concepts highlighted in this article, but it certainly commercializes well as one of the most authoring-friendly systems on the market.

The concept of components became mainstream with the introduction of blocks in WordPress. The concept of fragments, page templates, permissions and workflows are at least partially implemented in WordPress and are important for teams with many authors that serve content to multiple channels.

The authoring experience can be improved even more using a visual editor with edit modes and support for single-page applications. Such an editor is difficult to implement but as the efforts by Adobe indicate, the improved experience might be worth the effort and eventually make it into WordPress as well.

Further Reading

Smashing Editorial (dm, ra, il)

Shopify vs WooCommerce – Which is the Better Platform? (Comparison)

Are you thinking of starting an online store? Not sure whether you should use Shopify or WooCommerce?

Shopify and WooCommerce are the two top eCommerce platforms in the world each with their own pros and cons.

As a business owner, choosing the right eCommerce platform that fits your business needs is crucial for your success.

In this guide, we will show you a detailed comparison of Shopify vs WooCommerce. The goal is to break down their advantages and disadvantages to help you choose the best option for your eCommerce store.
Shopify vs WooCommerce

Since this is a detailed comparison of Shopify vs WooCommerce, here’s a quick table of content:

Overview: Shopify vs WooCommerce

Before we start with our in-depth comparison of the two most popular eCommerce platforms on the web, it’s important that we cover the basics and highlight what makes these platform stand out.

What is Shopify?

Shopify is an all-in-one eCommerce platform that makes it easy for you to create an online store, accept payments, and manage your inventory all from a single platform without ever worrying about the technical aspects of managing a website such as web hosting, security, caching, etc.

What is WooCommerce?

WooCommerce is an open-source eCommerce plugin built for WordPress. It allows you to leverage the most powerful content management system (CMS) and use it to run an online store. Because of the open-source nature, you can customize every aspect of your store and easily build custom extensions.

The decision to choose between the two platforms depend entirely on your needs and skill level.

What to Look for in Your eCommerce Platform?

There are few things that you absolutely need to keep in mind when starting an online store. These key factors will help you decide which platform is better suited for your needs.

  • Budget – The initial cost of starting a fully functional ecommerce store.
  • Ease of use – It should be easy to use even for absolute beginners.
  • Payment Methods – It should have support for multiple payment methods (e.g. PayPal, Stripe, other merchant processors).
  • Integrations – Number of services and third party tools you can integrate to grow your business.
  • Scalability – The platform should be able to scale as your business grows.

These are the very basic requirements that all online store owners must consider. However, depending on your needs, you may also want to look at other options like shipping, inventory management, invoicing, taxes, dropshipping, etc.

Our goal with this article is to take an in-depth look at how Shopify and WooCommerce stand on these basic requirements, and which one of them is best suited for your needs.

Cost: Shopify vs WooCommerce

Cost is often the most important consideration for eCommerce website owners. You need to evaluate the cost of getting started while also keeping in mind the variable costs for add-on services and software.

The true cost of using Shopify

Shopify makes it super easy to start your online store. Their basic plan starts at $29 per month, and you can upgrade to the Shopify plan for $79 or the Advanced Shopify plan for $299 per month.
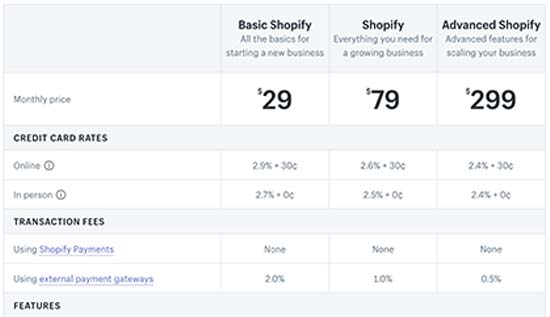
Shopify pricing

Each of these plans includes domain name, SSL certificate, and web hosting.

The basic plan comes with enough features to set up a new online store. You can add unlimited products, 2 user accounts, unlimited file storage, and more.

However, this pricing doesn’t include third-party tools and add-ons that you will need to take your Shopify store to the next level. As your business grows, these costs will start adding up, and you’ll soon be paying a lot more than the basic plan.

Payments are another factor that affects your costs. Shopify offers their own Shopify Payments solution which costs 2.9% + 30 cents per transaction.

If you want to use third-party payment gateways or your own merchant account, then you will be charged a flat fee of 2.0% for all transactions. You can reduce this fee to 0.5% by using the Shopify Advanced plan which costs $299 per month.

These payment processing fees are fairly steep when using external payment gateways. However, if you’re just starting out and want to use the Shopify payment solution, then the fees are fairly comparable to popular platforms like Stripe and Braintree.

The true cost of using WooCommerce

WooCommerce is an eCommerce plugin for WordPress.org (also known as self-hosted WordPress). It is open source and freely available as a WordPress plugin.

However, you’ll need a domain name, SSL Certificate, and a WordPress hosting account to start a WooCommerce store.

Typically, a domain name costs $14.99, SSL Certificate costs $69.99, and web hosting around $7.99 / month. This is not cheap, particularly when you are just starting out.

Thankfully, there are several hosting companies who are now offering specialized WooCommerce hosting plans which significantly reduces the cost.
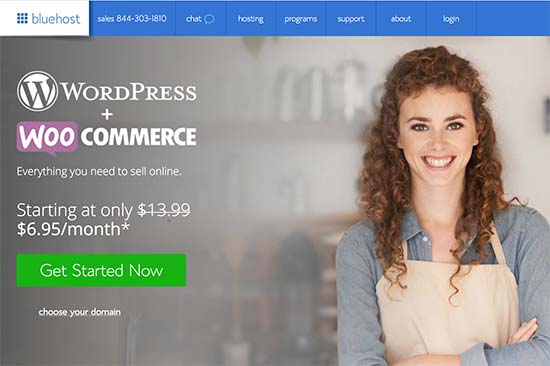
Getting started with WooCommerce

Bluehost, an official WordPress and WooCommerce recommended hosting provider, has agreed to offer our users a free domain name, free SSL certificate, and a discount on web hosting.

This will help you start your online store for as low as $6.95 / month.

→ Click here to Claim this Exclusive Bluehost offer ←

As you can see, the cost of starting a basic WooCommerce store is significantly lower than Shopify. WooCommerce also doesn’t charge you a percentage fee of your transactions which is a very nice perk.

But the WooCommerce costs start adding up as you purchase paid extensions. Your hosting costs will also increase as your online store grows.

However, one clear advantage of using WooCommerce is that you can often find free alternatives to the paid extensions. You can also keep your costs in control by only purchasing the tools and plugins as you need them.

With the number of free themes and free add-ons available for WooCommerce, it’s definitely the winner when it comes to cost.

Winner: WooCommerce

Ease of Use: Shopify vs WooCommerce

Most users starting an online store are not web designers or developers. Even users who are familiar with basic concepts need a platform that is easy to use and gets out of their way.

Let’s see how Shopify and WooCommerce stack up in terms of user-friendliness.

Shopify – Ease of Use

Shopify is a fully hosted platform which means you don’t need to install, manage, or update any software. You also don’t need to worry about security, performance, backups, and compatibility issues.

As soon as you sign up, it helps you pick a design for your website. After that, they walk you through customization and then help you add products.

Shopify customization

Shopify comes with an intuitive drag and drop interface. Managing your products, sales, and inventory inside Shopify is a breeze.

One downside of this guided, polished, and highly optimized user experience is that it limits your control. You can only use the design and development tools provided by Shopify or add-ons available in their marketplace.

However, this is not as bad as it sounds. For most users, the large selection of extensions and themes available in Shopify, is more than enough to get started and grow your online store.

WooCommerce – Ease of Use

WooCommerce is not a hosted platform like Shopify. This means you will need to install WooCommerce, manage updates, keep backups, and make sure that your website is secure. There are plenty of free and paid plugins that can automate most of these tasks for you.
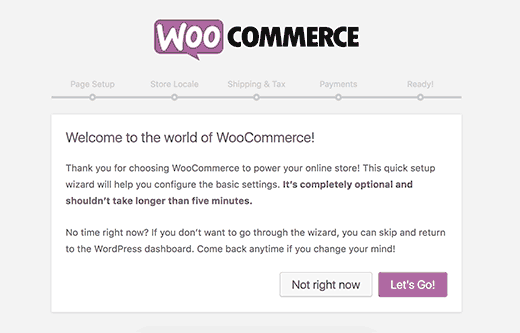
WooCommerce setup wizard

WooCommerce is super flexible when it comes to customizations. You have full control of the whole platform. You can add any functionality imaginable to your website with the help of more than 55,000+ WordPress plugins.

However, there is no built-in drag & drop design builder. You can use one of the WordPress page builders like Beaver Builder, but it adds to your cost.

The biggest downside of the flexibility is that it comes with a learning curve and requires a more hands-on management of your website. You also have to signup for a merchant account or similar service like Stripe / PayPal.

While the WooCommerce guided setup wizard is helpful, it does not come close to the onboarding and ease of use of Shopify.

Winner: Shopify

Payment Methods: Shopify vs WooCommerce

There are many payment gateways that you can use to accept payments online. Some payment methods may not be suitable for you, and others may not be available to your customers.

This is why it’s important that the platform you choose offers multiple payment options. Let’s take a look at how Shopify and WooCommerce compare when it comes to payment integrations.

Payment Options in Shopify

Shopify offers plenty of payment options that you can use to receive payments from customers. It has its own payments solution called Shopify Payments (powered by Stripe) as well as all popular third-party payment gateways.
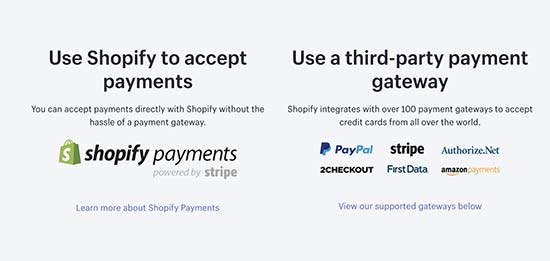
Shopify Payments

The problem is that Shopify charges an extra 2% fees on each transaction made through third party payment gateways. This is on top of the transaction fees charged by the payment gateway. You can reduce the fee to 0.5% by paying $299 per month for Advanced Shopify plan.

Shopify Payments has flat credit card fees, but no other transaction fees. Credit card rates start from 2.9% + 30¢ for the basic plan and get lower for other plans.

Payment Options in WooCommerce

WooCommerce offers PayPal and Stripe payments by default. It also supports all other popular payment service providers through add-ons.
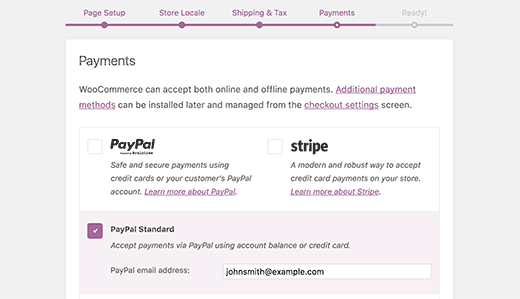
WooCommerce payment methods

For payment gateways, WooCommerce even has support for many regional and less popular payment services. Since there is no barrier to entry, any payments company can create add-ons for WooCommerce and provide support for it.

As a self-hosted platform, you are only charged transaction fees by your payment gateway or your bank. WooCommerce never charges you a % fee on your store transactions which is a major plus.

If choosing your own merchant account and using a third-party gateway is important for you, then you will save A LOT of money by using WooCommerce. But if you’re a small store and willing to use Shopify Payments which has the same credit card rates as Stripe / Paypal, then it makes no difference.

Winner: Tie

Integrations and Add-ons: Shopify vs WooCommerce

No matter how robust an e-commerce platform is, you’ll always need third-party tools and services to grow your store. For example, an email marketing software, lead generation tool, analytics tools, outreach services, etc.

Both Shopify and WooCommerce have a massive extensions directory, and they integrate with many third-party services.

Shopify Add-ons and Integrations

Shopify comes with a powerful API and an App Store where you can buy third-party add-ons for your Shopify store. They have hundreds of apps in the store covering every feature you’ll want to add to your store.
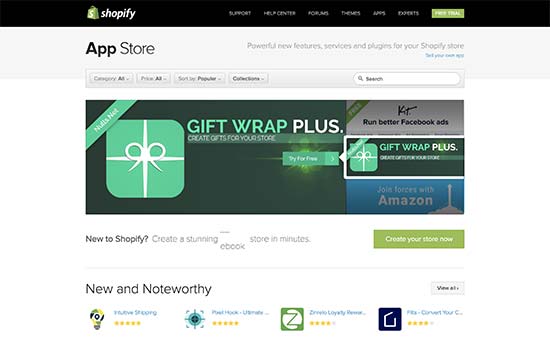
Shopify App Store

For lead generation, they have integrations with software like OptinMonster which helps you grow your email list and reduce cart abandonment. They have apps for SEO, product reviews, discounts, countdowns, and more.

Shopify’s app store contains both free and paid apps. Free apps are usually created by third-party services that have their own pricing, and the app only integrates your store to their APIs. Pricing for paid add-ons varies and most apps offer monthly subscriptions.

WooCommerce Add-ons and Integrations
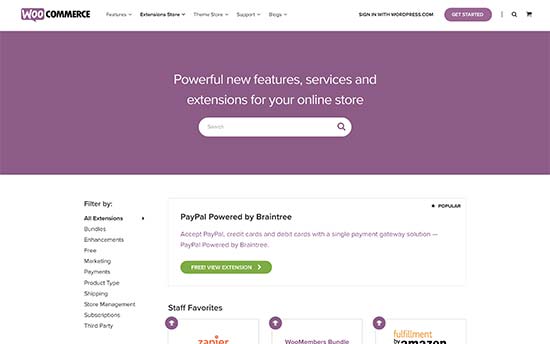
WooCommerce extensions

WooCommerce is open source and built on top of WordPress. This gives you access to more than 55,000 free WordPress plugins and many more paid plugins.

You can use these add-ons to add payment gateways, lead generation, SEO, performance optimization, and almost any feature you can think of.

Due to the low barrier of entry, there are a lot more integrations and add-ons available for WooCommerce than Shopify. Almost all third-party tools and service providers have their own plugins to seamlessly integrate with your WooCommerce store.

You can also hire a developer to create an integration or plugin just for your own website. However it’s important to keep in mind that WooCommerce is a lot easier to customize. Having personally gone through the process of submitting a plugin for WordPress and submitting an app to the Shopify store, we can say that the process is extremely harder on Shopify vs WooCommerce.

Winner: WooCommerce

Shopify vs WooCommerce Dropshipping

Shopify vs WooCommerce dropshipping

Dropshipping is an online business where an eCommerce store doesn’t keep the products in stock. Instead, it fullfills order by purchasing products from vendors and then shipping them directly to the customers.

Due to its low overhead, dropshipping has become popular around the world. Many of our users asked us to compare WooCommerce vs Shopify for dropshipping and which one of them is better for a dropshipping business.

Dropshipping with Shopify

When building a dropshipping business, the front-end of your website will look just like any online store. Your users will be able to browse the products, add them to cart, and make payment, just like they would do on any other eCommerce store.

Depending on the vendors you choose, you will then have to place user’s order for shipping.

Shopify also has integration apps for several popular dropshipping marketplaces like AliExpress, Oberlo, Printify, and more. However, each of these product marketplaces has their own membership fees, shipping, and other charges that you need to keep in mind when building your dropshipping website with Shopify.

Dropshipping with WooCommerce

WooCommerce is a popular choice among dropshipping businesses. Mainly because WooCommerce allows you to install extensions that make order fulfillment a breeze.

You can easily find extensions that allow you to instantly import products, fulfill orders from your website, and more. You can even create your own eCommerce marketplace allowing other vendors to sell on your website.

Keep in mind, that your supplier and vendor may have minimum order requirements, membership fees, and other charges. You need to keep those in mind when adding products to your WooCommerce dropshipping store.

Winner: WooCommerce

Scalability and Growth: Shopify vs WooCommerce

You have probably heard the term “growth-pains” from various CEOs. As your business grows, you will need more resources to handle new challenges and goals.

Shopify and WooCommerce can both be scaled to handle large amount of traffic and orders, but they’re not created equal. Let’s take a look at how these two eCommerce platform compare when it comes to scalability.

Scalability on Shopify
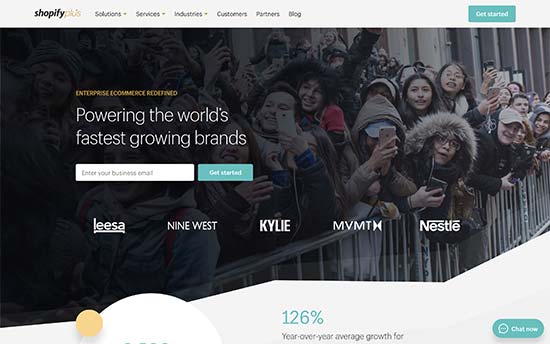
Shopify enterprise

Shopify handles the technical parts of your store which means you don’t ever have to worry about performance, security, and scalability. Once your business starts growing, you can simply upgrade your Shopify plans.

Their infrastructure can easily handle your growing business without you having to worry about downtimes, backups, updates, or security. They also offer enterprise services as part of the Shopify Plus plan.

This takes out the painful part of the growth, but it also adds to your cost of business. Your expenses will grow, and you’ll have to plan accordingly.

The good part is that your costs will be offset by you not having to hire / manage a technical team in-house.

Scalability on WooCommerce
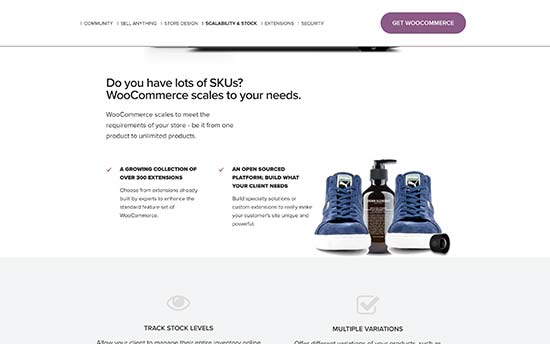
WooCommerce Scalability

WooCommerce is a self-hosted platform which makes you responsible for maintaining updates, backups, and security of your website.

Your starter WooCommerce hosting plan would run out of resources as your store starts getting more traffic.

The good part is that you have plenty of options to manage growth as you are in full control of your website. Starting with better management of resources with caching to upgrading your hosting plan to more powerful servers.

Your WooCommerce hosting costs will increase, but you will have better control on resources, and you can make sure that you are not paying for resources that you don’t need. You can use a managed WordPress hosting provider like WP Engine or LiquidWeb to help scale your WooCommerce store.

Despite the control that WooCommerce offers, some business owners simply prefer a hassle-free solution.

Winner: Shopify

Support Options for WooCommerce vs Shopify

Both WooCommerce and Shopify are quite easy to use. However, sometimes you may need help to learn how to do something new on your store.

Let’s see how WooCommerce and Shopify handle support and what are your options to get help when needed.

Support Options on Shopify

Shopify is a fully hosted platform, which means they control the software and they are the ones who know their platform the best.

Shopify provides 24/7 support via live chat, phone, email, and Twitter. For users who want to fix things on their own, Shopify offers extensive documentation, how-to guides, knowledge base, video tutorials, and forums.
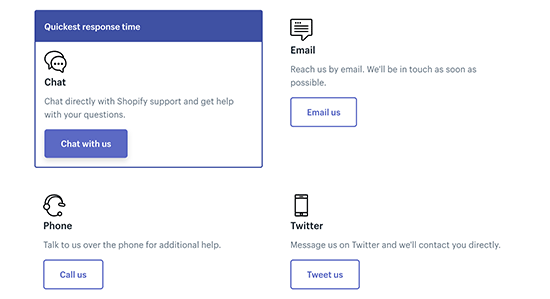
Shopify support options

It also maintains a directory of Shopify Experts that you can hire if you need extra help or if you want to integrate a third-party solution.

Shopify doesn’t provide support for any third-party apps or themes that you are using.

Support Options for WooCommerce

WooCommerce is the world’s most popular eCommerce platform, which means there are tons of support options that you can utilize when needed.

The official website has extensive documentation, tutorials, and guides that allow you to help yourself. They also have support forums where you can get help from other WooCommerce users and experts.

WooCommerce is a self-hosted platform, which means your hosting provider is responsible for providing support for issues with your server.

For your WooCommerce theme and extensions, those developers are responsible for answering support questions regarding their products.

Due to its immense popularity, it is quite easier and often cheaper to find developers to help you fix issues with your WooCommerce store. You can find developers on freelancing websites to fix WooCommerce issues.

Winner: Shopify

WooCommerce vs Shopify: Which is the Best eCommerce Platform?

Shopify and WooCommerce are both powerful platforms to start your eCommerce store. It truly comes down to your personal skills and preferences.

Shopify is a lot easier to use. It doesn’t require you to install anything, and you can get started quickly. Setting up payments is easier, and they have easy to understand pricing plans.

The disadvantage of Shopify is that you don’t have full control over everything. Your costs can go high with transaction fees, add-ons, and integrations. Your upgrade options are limited to select plans, and you cannot manage costs on a pay-as-you-grow basis.

WooCommerce is open source and gives you full control of your website. It costs a lot lower to start an online store with WooCommerce specially with these WooCommerce hosting companies.

The disadvantage is that you’ll have to maintain the software. It comes with a bit of learning curve. However, millions of beginners are already using it, and they get over the learning phase quite quickly.

If you are looking for a cost-effective solution, and you want to have full control of your online store, then WooCommerce is the best platform for you.

If you want something that’s completely hassle-free that has infinite scalability, then Shopify is the better platform for you.

We hope this article helped you compare pros and cons of Shopify vs WooCommerce. You may also want to see our guide on how to choose the best website builder.

If you liked this article, then please subscribe to our YouTube Channel for WordPress video tutorials. You can also find us on Twitter and Facebook.

The post Shopify vs WooCommerce – Which is the Better Platform? (Comparison) appeared first on WPBeginner.

SQL Power Doc to Discover, Diagnose, and Document SQL Server

This article will provide an overview of SQL Power Doc, a powerful script to document SQL Server including prerequisites, purpose, installation, processing, and output. Automation seems to be an increasing need in the IT industry. At present, PowerShell leads the game in Windows-based environments since it is capable of handling highly complex workflows. PowerShell is the go-to choice when it comes to automating even requirements such as configuration management. I got the opportunity to assess SQL Power Doc recently. I have worked with PowerShell a lot (I have even written a book on it) and have built my share of automation and designing tools using it. When I took a look at SQL Power Doc, I felt the tool did have its share of capabilities to help DBAs in its own way. Let me detail some of my experiences while exploring this tool.

What Is SQL Power Doc?

SQL Power Doc was written by Kendal VanDyke. It is a command line PowerShell manifest consisting of several PowerShell modules that will help you build a solid foundation to Discover, Document and Diagnose SQL Server instances and Windows Operating system details. Additionally, you’ll gain some insight into what directions you can go for future exploration. It basically invokes PowerShell cmdlets and give you the necessary details front and center.

IoT for Business Enterprises: Everything You Need to Know

Before digging out the details of IoT, let me explain what IoT actually means and how it has evolved over the years. To begin with, let's understand what IoT is. It is a device or software that connects the physical world to the digital. 

IoT allows access to things remotely; this could be any kind of gadgets or appliance, including things like TV, AC units, fans, doors, and other physical objects. At the same time, it not only helps people interact with things but also organizations and companies to maintain their business process. Importantly, as the potential of IoT enhances, a large number of business enterprises are realizing (some of them have already started using IoT applications) the need and are trying to learn how to implement this technology. According to research, more than 21 billion things will be connected through the IoT by 2020. In fact, IoT has the power to reincarnate your business. So, my aim here is to help you explore the benefits of IoT applications in business enterprises.

JDK 13: What Is AggressiveOpts?

The Java VM flag -XX:+AggressiveOpts was deprecated in JDK 11 [see JDK-8199777 and JDK-8199778] "because its behavior is ill-defined." The "Problem" section of JDK-8199778 further explains (I added the emphasis):

AggressiveOpts has been used as a catch-all method of enabling various experimental performance features, mostly targeted to improve score on very specific benchmarks. Most things it affected have been removed or integrated over time, leaving the behavior of the flag ill-defined and prone to cause more issues than it'll solve. The only effect that the flag currently has is setting AutoBoxCacheMax = 20000 and BiasedLockingStartupDelay = 500. Both can be done manually by setting the corresponding flags on the command line.

According to the document "Java HotSpot VM Options," the -XX:+AggressiveOpts flag was added with J2SE 5 Update 6 to "turn on point performance compiler optimizations that are expected to be default in upcoming releases."

Buildings Wave Animation with Three.js

This tutorial is going to demonstrate how to build a wave animation effect for a grid of building models using three.js and TweenMax (GSAP).

Attention: This tutorial assumes you already have a some understanding of how three.js works.
If you are not familiar, I highly recommend checking out the official documentation and examples .

Inspiration

Source: View
by: Baran Kahyaoglu

Core Concept

The idea is to create a grid of random buildings, that reveal based on their distance towards the camera. The motion we are trying to get is like a wave passing through, and the farthest elements will be fading out in the fog.

side-view

We also modify the scale of each building in order to create some visual randomness.

Getting started

First we have to create the markup for our demo. It’s a very simple boilerplate since all the code will be running inside a canvas element:

<html lang="en">
  <head>
    <meta charset="UTF-8">
    <meta name="viewport" content="width=device-width, initial-scale=1.0">
    <meta http-equiv="X-UA-Compatible" content="ie=edge">
    <meta name="target" content="all">
    <meta http-equiv="cleartype" content="on">
    <meta name="apple-mobile-web-app-capable" content="yes">
    <meta name="mobile-web-app-capable" content="yes">
    <title>Buildings Wave</title>
    <script src="https://cdnjs.cloudflare.com/ajax/libs/three.js/100/three.min.js">></script>
    <script src="https://Threejs.org/examples/js//loaders/OBJLoader.js" ></script>
    <script src="https://Threejs.org/examples/js/controls/OrbitControls.js"></script>
    <script src="https://cdnjs.cloudflare.com/ajax/libs/gsap/1.20.3/TweenMax.min.js"></script>
  </head>
  <body>
  </body>
</html>

Basic CSS Styles

html, body {
  margin: 0;
  padding: 0;
  background-color: #fff;
  color: #fff;
  box-sizing: border-box;
  overflow: hidden;
}

canvas {
  width: 100%;
  height: 100%;
}

Initial setup of the 3D world

We create a function called init inside our main class. All subsequent methods will be added inside this method.


init() {
  this.group = new THREE.Object3D();
  this.gridSize = 40;
  this.buildings = [];
  this.fogConfig = {
    color: '#fff',
    near: 1,
    far: 138
  };
}

Creating our 3D scene

createScene() {
  this.scene = new THREE.Scene();

  this.renderer = new THREE.WebGLRenderer({ antialias: true, alpha: true });
  this.renderer.setSize(window.innerWidth, window.innerHeight);

  this.renderer.shadowMap.enabled = true;
  this.renderer.shadowMap.type = THREE.PCFSoftShadowMap;

  document.body.appendChild(this.renderer.domElement);

  // this is the line that will give us the nice foggy effect on the scene
  this.scene.fog = new THREE.Fog(this.fogConfig.color, this.fogConfig.near, this.fogConfig.far);
}

Camera

Let’s add a camera for to scene:

createCamera() {
  const width = window.innerWidth;
  const height = window.innerHeight;

  this.camera = new THREE.PerspectiveCamera(20, width / height, 1, 1000);

  // set the distance our camera will have from the grid
  // this will give us a nice frontal view with a little perspective
  this.camera.position.set(3, 16, 111);

  this.scene.add(this.camera);
}

Ground

Now we need to add a shape to serve as the scene’s ground

addFloor() {
  const width = 200;
  const height = 200;
  const planeGeometry = new THREE.PlaneGeometry(width, height);

  // all materials can be changed according to your taste and needs
  const planeMaterial = new THREE.MeshStandardMaterial({
    color: '#fff',
    metalness: 0,
    emissive: '#000000',
    roughness: 0,
  });

  const plane = new THREE.Mesh(planeGeometry, planeMaterial);

  planeGeometry.rotateX(- Math.PI / 2);

  plane.position.y = 0;

  this.scene.add(plane);
}

Load 3D models

Before we can build the grid, we have to load our models.

models

loadModels(path, onLoadComplete) {
  const loader = new THREE.OBJLoader();

  loader.load(path, onLoadComplete);
}

onLoadModelsComplete(model) {
  // our buildings.obj file contains many models
  // so we have to traverse them to do some initial setup

  this.models = [...model.children].map((model) => {
    // since we don't control how the model was exported
    // we need to scale them down because they are very big

    // scale model down
    const scale = .01;
    model.scale.set(scale, scale, scale);

    // position it under the ground
    model.position.set(0, -14, 0);

    // allow them to emit and receive shadow
    model.receiveShadow = true;
    model.castShadow = true;

    return model;
  });

  // our list of models are now setup
}

Ambient Light

addAmbientLight() {
  const ambientLight = new THREE.AmbientLight('#fff');

  this.scene.add(ambientLight);
}

Grid Setup

Now we are going to place those models in a grid layout.

initialgrid

createGrid() {
  // define general bounding box of the model
  const boxSize = 3;

  // define the min and max values we want to scale
  const max = .009;
  const min = .001;

  const meshParams = {
    color: '#fff',
    metalness: .58,
    emissive: '#000000',
    roughness: .18,
  };

  // create our material outside the loop so it performs better
  const material = new THREE.MeshPhysicalMaterial(meshParams);

  for (let i = 0; i < this.gridSize; i++) {
    for (let j = 0; j < this.gridSize; j++) {

      // for every iteration we pull out a random model from our models list and clone it
      const building = this.getRandomBuiding().clone();

      building.material = material;

      building.scale.y = Math.random() * (max - min + .01);

      building.position.x = (i * boxSize);
      building.position.z = (j * boxSize);

      // add each model inside a group object so we can move them easily
      this.group.add(building);

      // store a reference inside a list so we can reuse it later on
      this.buildings.push(building);
    }
  }

  this.scene.add(this.group);

  // center our group of models in the scene
  this.group.position.set(-this.gridSize - 10, 1, -this.gridSize - 10);
}

Spot Light

We also add a SpotLight to the scene for a nice light effect.

spot-light

addSpotLight() {
  const light = { color: '#fff', x: 100, y: 150, z: 100 };
  const spotLight = new THREE.SpotLight(light.color, 1);

  spotLight.position.set(light.x, light.y, light.z);
  spotLight.castShadow = true;

  this.scene.add(spotLight);
}

Point Lights

Let's add some point lights.

point-lights

addPointLight(params) {
  // sample params
  // {
  //   color: '#00ff00',
  //   intensity: 4,
  //   position: {
  //     x: 18,
  //     y: 22,
  //     z: -9,
  //   }
  // };

  const pointLight = new THREE.PointLight(params.color, params.intensity);

  pointLight.position.set(params.position.x, params.position.y, params.position.z);

  this.scene.add(pointLight);
}

Sort Models

Before we animate the models into the scene, we want to sort them according to their z distance to the camera.

sortBuildingsByDistance() {
  this.buildings.sort((a, b) => {
    if (a.position.z > b.position.z) {
      return 1;
    }

    if (a.position.z < b.position.z) {
      return -1;
    }

    return 0;
  }).reverse();
}

Animate Models

This is the function where we go through our buildings list and animate them. We define the duration and the delay of the animation based on their position in the list.

showBuildings() {
  this.sortBuildingsByDistance();

  this.buildings.map((building, index) => {
    TweenMax.to(building.position, .3 + (index / 350), { y: 1, ease: Power3.easeOut, delay: index / 350 });
  });
}

Here is how a variation with camera rotation looks like:

Credits

Buildings Wave Animation with Three.js was written by Ion D. Filho and published on Codrops.

What does “pretentious customer” mean for a web design agency?

Spoiler: This article is for difficult customers and the specialists who work with them 🙂

In every field, but especially in the creative ones, there have been, and surely there will always be difficult customers. If you find yourself in a position to call on such services… this article is for you. If you are a web design magician on the other side of the barricade, your situation is as familiar as possible.

pretentious customer

From the outset, we need to clarify a small aspect: the purpose of the article is to explain to you, the client we always want to see satisfied with the outcome, which are the peritubular factors we often face. At the same time, we want you, a member of an agency that offers web design services, to feel that you are not the only one in this situation.

So … let’s get started!

Our dear customer,

You have probably already experienced various collaborations with web designers or freelancers. And at least once it happened to not be satisfied with the final product. Undoubtedly, your immediate conclusion was to criticize the work of the design team. If you find yourself in this description, we have less pleasant news: the problem in such situations can be caused by your requirements.

Let’s examine together some types of attitudes that can lead to poor collaboration and how we can improve them.

Pretentious customer

13 features of a pretentious customer

  1. You want the web designer to fulfill more desires than you paid for;
  2. You expect every requirement of yours to be fulfilled on the spot;
  3. You want your last-minute needs to be resolved “yesterday”;
  4. Your preferences are vague;
  5. You insist that your website imitates the model of another site;
  6. You copy the images you want to appear on the website;
  7. You expect the web designer to solve problems that do not fall within his job;
  8. For any dissatisfaction, you let the designer know that you will give up on his services in favor of cheaper services;
  9. You plan to pay less than your initial understanding;
  10. Do not trust the design services of an authorized person in the field;
  11. You make major design changes after approval of the initial variation;
  12. You communicate incomplete requirements and specifications to the web design team;
  13. You despise the web designer’s advice.

How can you be the ideal customer?

We are convinced that you also want to benefit from the much-wanted result, and we always aim to offer you the best web design services. We enjoy every time we see a happy customer. That’s why, anytime, a little help on your part contributes to a successful collaboration.

5 features of the ideal customer

  1. Clarifies all site-related concerns and respects the final design, as well as honoring its cost;
  2. Read and make sure they understand all the terms and conditions of the collaboration;
  3. Provides at least 5 sites that he/she likes and lists the reasons;
  4. Make sure he/she sends the design team all the logos, photos, and content they need and…
  5. He/she has effective communication skills.

At the end of the day, the responsibility of a perfect website also depends on us designers who want to offer you web design services to the highest standards. So if you need a refresh of the site, ask for the help of a team of specialists that is always ready to meet your web design wishes!

Read More at What does “pretentious customer” mean for a web design agency?