How to Simply Set Up Users & Roles in The Hub for You and Your Clients

With The Hub 2.0, you can give unlimited users multiple roles — even if they aren’t WPMU DEV members! All of this can be easily set up in a matter of minutes, allowing you the flexibility to give users access to as much or as little as you’d like on your WordPress site.

Plus, With The Hub Client, you can create your Hub for your clients and collaborators, using your branding.

Oh, and did we mention it’s all free for your users and you’re able to be set up in minutes?

In this article, we’ll be going over how to:

  1. Easily Set Up Users
  2. Set Up Roles in Just a Few Clicks
  3. Add User Customization Settings
  4. Gain Quick Access to Sites
  5. Set Up the Hub Client
  6. Include Users & Roles & The Hub Client

This post’s features are accomplished from the Users & Roles tab in The Hub dashboard, except for The Hub Client, accessed by the Hub Client Plugin (which I’ll show you how to activate).

1. Easily Set Up Users

You can create new users in The Hub, allowing them to access specific areas on your WordPress site. Creating new users in The Hub is the easiest way to allow access to users because everything is done from one place.

Click the Users tab and Add First User to get started.

Where you'll add your first user.
Creating new users is perfect for collaborations with other users.

From here, you’ll enter their email. Then, you can select sites that they’ll have access to (all the sites that you have with WPMU DEV are shown in the dropdown), and the user role to view, edit, or custom role (which can be modified and changed at any time).

Where you'll invite a new user.
Clicking on Invite will notify the new user with a confirmation email.

Once that user gets the email and hits Confirm, the user will be redirected to WPMU DEV to set up a free account with their email, name, and password.

They don’t even need to be a WPMU DEV member. And again, there’s no cost for the users. The only cost would be if the new user wants to upgrade to a WPMU DEV membership of their own.

Where a user creates a free account.
There are only three fields to fill out for a new user to get set up.

When they click Join – that’s it!

A new user is added and will have access to the sites and roles determined by the admin when invited.

From the admin point of view, they can then see their new user in the Users area. If the invited user accepts, it will show Active in the status. If the user hasn’t confirmed yet, it will show Pending.

All of the users and roles.
All your users are shown in one spot in The Hub.

It also displays the user’s email, role, sites that the user has access to, and status.

Add as many users as you’d like by clicking on the New User button.

Setting up a user can be done with the tap of a button.

As you can see, creating and organizing users takes no time at all.

2. Setting Up Roles in Just a Few Clicks

When you send a person an invite to be part of the team, you also add user roles. Roles are what determines which access capabilities users have.

The predetermined roles that are initially available are:

  • View & Edit
  • View Only

You can pick between these two or create your own.

Create your own role under Roles by clicking on New custom user role.

Where you'll create a new custom role.
All the available roles will be displayed here.

Name the new role anything you’d like and customize accordingly. Let’s check out how to customize it by…

3. Adding User Customization Settings

Customizing access for a role can be determined by clicking on all the available options (e.g. sites, security settings, SEO, etc). Also, choose to have View & Edit or View Only for sites.

You decide what to include in this new role.

The Custom option gives you detailed task descriptions about specific roles that each option can allow.

As an example, here are various tasks you can include for Plugins in this new role. Click on the options you want the user to have the capability to manage.

Plugin customization options
Allow this role to uninstall plugins, activate plugins, and more.

Once you have the new tasks determine, click Save, and you’re all set.

For more detailed information on each task description, you can see all of them listed here.

With roles determined, the ability to assign them is all in one place. Everything under Role shows what that user has access to.

Where it shows the roles.
As you can see, the current role is View & Edit – All.

Want to change roles? Customize what sites they have access to and switch roles accordingly by clicking on the roles and what sites you want the user to have access to.

Once updated, the user will have the roles that you applied to them.

And like all things in The Hub, you can edit anything whenever you want.

4. Gain Quick Access to Sites

You have instant access to view your sites and how many users each site has in the Sites tab. The Sites tab makes it quick and easy to view and edit roles for specific sites.

All the websites are displayed here with the number of users displayed next to the site’s name.

All of the sites under each user.
You can also click the arrow to sort by name or number.

Hover over the number to bring up all the users for that site.

Shows the user and role for site.
For this site, there’s one user and one role.

Click on the plus sign by the site’s name to manage the user’s access.

Editing a users access.
Clicking the plus site will lead you to edit a user’s access.

This shows who has access and whether they’re active or not. Uncheck the user to remove access and add a new user from here, too.

Who has access to a site and their roles.
Want to remove access for someone? Click on the green checkmark and that user won’t be able to access any longer.

You can also resend an invitation to a pending user from this section.

5. Set Up The Hub Client

The hub client image.
The Hub Client has arrived so that you can personalize The Hub the way you want it.

With The Hub Client, you can provide access to clients, collaborators, and users using your personalized white label Hub. It’s your own Hub, the way you and your organization want it, customized to your perfection.

Plus, you can use any host (including our own managed hosting), sell our services, and run at your domain.

To use The Hub Client plugin, you have to be connected with The Hub to access its API. You can see how to do that here.

When connected to The Hub, the Hub Client plugin can be downloaded from the White Label page and then clicking on Find out more about The Hub Client.

Download the hub client.
One-click on White Label, and you’re there.

Once downloaded and installed, you’ll get a welcome message.

The Hub client welcome screen.
Welcome to the Hub Client!

The welcome message can walk you through everything on getting started by, you guessed it – clicking Get Started.

Begin by changing your name to replace WPMU DEV by clicking on the title and entering whatever you’d like.

Where you change the brand name.
We’ll just call this one Dev Man.

Replace the WPMU DEV logo with your own by uploading an image in the Your Logo section (e.g. Dev Man).

Adding your logo.
A cartoon Dev Man will do for this example.

You can change the colors for the Navigation background, Navigation text, and Navigation text selected & hover in the Color scheme area. Do this by visually picking the colors or by color number (e.g. #FFFFFF for white).

Pick and choose appropriate colors that fit your branding.

Head over to the Configuration to select a pre-made menu to appear after Sites.

Where you configure the menu.
Configure the menu how you’d like.

And for the client page, you can set up any page you’d like to replace your client hub. All the pages you have in your WordPress site will appear in the dropdown menu.

Where you choose a page to replace the hub.
Choose a specific page to replace ‘hub.’

For example, I created a page called Client Login that I’m going to use for my clients to log in at.

A sample page used for the hub.
We’ll use this page as an example.

And now, when your users log in, they’ll be greeted with your branding, colors, and configurations.

Custom user log in area.
What the user login area now looks like.

That’s how you have your own completely white-labeled Hub Client organization (yippee!).

So, let’s set up…

6. Users & Roles & The Hub Client

Your colleagues, users, and clients can now log in and use your very own branded WordPress site and customized Hub with The Hub Client. The Hub Client includes controlling all user access levels and roles.

It has to be activated and running to do this, so be sure to read through the section in this article on setting up The Hub Client first.

Once The Hub Client is ready, adding, and setting up users & roles is all accessible in The Hub Client > Users & Roles.

The Hub client users and roles.
All of your users will be displayed instantly.

This section is precisely how Users & Roles are set up in The Hub, except the Setting tab.

The Hub has the Settings tab, and The Hub Client has a Terms of Service & Privacy tab, so you can edit and set your Terms of Service and Privacy Policy.

You can easily add a new client or user by clicking the New User box.

Where you add a new user in the hub client.
Add as many new users as you’d like.

Once clicking on that, you’ll fill out the new user’s email address, grant site access, and select the user’s role.

Adding a new user.
Three simple steps will get a new user set up.

The user will get an email invitation to join. Once confirmed, they’ll appear in your Users & Roles admin as active.

When you have your users in the system, you can manage their access to websites. All you do is click on the individual, and a pop-up will appear where you can select Access to Selected Websites or Access All Websites.

If you choose Access to Selected Websites, you can remove or add sites that the individual can access in one-click.

Where you can access websites for users.
The blue checkmark means the user can access it.

Create a new role in the Roles tab. Plus, see what User Roles are already set up. (For more on New Roles, please see the Add User Customization Settings).

create new role.
Have a new role you want to create? Get one set up in a minute or less.

To quickly view your websites, view users for each site, and add or remove users from your site, go to Sites.

The sites in users and roles.
Click on a number to view the users for a particular site.

With the Users & Roles in the Hub Client, you’ll have your clients up-and-running in your white-labeled Hub in minutes. All accessible right from the dashboard in your WordPress site.

You can add an unlimited amount of collaborators and users with access to WPMU DEV products, plugins, and support.

There is No Sub for The Hub

As you can see, adding users & roles and creating your Hub for you and your clients is doable in just a few clicks. There’s just no other substitute out there for an all-in-one CMS when it comes to managing your WordPress sites.

And if you think this is good, just wait. Coming soon, we’re including automated site creation & client billing, making your white label Hub your own SaaS business!

To keep tabs on what’s coming, be sure to follow our Roadmap. And for more, check out The Hub’s documentation and stay tuned to our blog.

Try Out The Hub 2.0 Beta (plus new member freebie offer!)

We’ve completely reimagined and redesigned our WordPress site management tool, The Hub… and added some pretty cracking new features as well.

Plus, for new members, we’ve extended our free trial by a multiple of more than 12 from 7 days to 3 months so you can really see if this works for you ongoing – read on to take us up on that.

Why have we done this? Well, basically, because you asked!

You asked for:

  • Ways to categorize, sort and manage all of your different WP sites
  • Adding subusers (clients or colleagues) to your account
  • The ability to white label The Hub
  • Better (and more granular) update tools
  • A more modern interface

And well, we hope we’re 80% of the way there.

So it’s time to invite you to take a look around and, if you like it, continue using it for your sites, just click on the button in the bottom left!

If you’re an existing member, just go to The Hub, if you’re new then sign up for a 3 month free trial following the link at the bottom of this post.

The Hub 1.0 and button turning into Hub 2.0
Go on, click the button. You know you want to!

Layout Options!

Previously, you’ve only had the opportunity to view your sites as a list.

This is useful, but if you only have a few sites or want to provide The Hub for a client who has only a few sites… well, why not make their view beautiful. Using our new thumbnail focused grid view!

The Hub thumbnail grid view.
The Hub thumbnail grid view … pretty thumbnails!

Like I mentioned, the list view is still there and it’s actually much improved too, with more information and a more compact design so that you can scan through all your sites even more quickly.

The Hub list view.
The Hub’s new List view.

But we don’t want to stop there… as you now visit each site on its own page (rather than expanding them), you can also now open up the right sidebar to quickly switch between them too. Nice huh?

The Hub sidebar view.
Jump to any site using the new sidebar.

Labels, Grouping, and Categories

In probably the most requested new feature for The Hub, WE’VE NOW GOT LABELS & GROUPING!

Hehe, specifically you can now label your sites by color (and shortly by color and your own category name) so that you can easily browse and manage sites in groups that you create.

So now managing hundreds of sites is not only easy, it’s actually a pleasure.

For example, you could have sites in development (green), in beta (blue), and live (yellow).

An example of sites being sorted and labels in The Hub.
Sort your sites and use labels … sweet!

And you can then sort by these labels… so let’s say you wanted ‘in development’ sites up top, just call them 1 – Development Sites, 2 – Beta Sites, etc. or ABC… your choice.

You can sort A-Z or Z-A (some people just want to watch the world burn).

If you want, just view the one label.

Example of viewing just one color label in The Hub.
View just one color label in the new Hub.

And you can sort all of your sites by issue too, for example, say you wanted to focus on security… then just select that.

The Hub - example of sorting by security.
Sort your sites by security issues.

Hey presto, you just saved yourself hours and hours of time.

And eeep, you’d better clean up your sites!

Although to make you feel better, with no extra cost for every website you manage, the more you use it, the more you save.

And, coming soon, you’ll be able to set your own label names, colors, and see more information by filter.

The Hub's new filter design.
Improve your site management with the new filter design.

Users & Roles

So we heard you wanted to add your colleagues and clients to your account, in a kinda ‘seats’ system.

Well, we just made that. For unlimited users. For free. You’re welcome :)

Just head to the ‘Users’ main menu item and you can invite users to manage one or all of your sites, and edit which sites they have access to after.

The Hub Users screen.
Users screen.

Coming very soon you’ll be able to set specific roles (and names of roles) for those users – for example, the ability to manage staging but not SFTP/SSH (thanks wolf Bishop).

But right now if you are happy giving a client or colleague access to cPanel you should be happy giving them access to this.

Oh, and this is also the first step towards….

White Labeling The Hub

Yep, you heard me right, we’re already working on (and are looking forward to presenting to you soon) the ability to completely white label The Hub.

In fact, a lot of the development work we’ve done and the framework this is built on is done specifically to allow this.

Now, of course, you’ve been able to white label all of the WPMU DEV pro plugins for some time now as well as provide your clients with white label reports, white label WordPress training videos,  and, of course, WordPress itself.

But this is The Hub, for your clients and colleagues, made how you’d like it.

White labeled Hub mockup.
Now you can brand The Hub too!

Not only will you be able to replace our logo with yours, change the color scheme, edit the copy and configure everything to work as if it was your very own managed WordPress platform, but you’ll also be able to run it AT YOUR OWN URL.

Yep, that’s correct, this new white labelled version of The Hub will be able to live at sites.my-web-agency.tld. 

So right now you can add clients if you’re happy with them seeing that you are using WPMU DEV… and very shortly you’ll be able to just get them to sign up for your own personal site management tool.

Like cPanel, for managed WordPress, with the complete WPMU DEV toolset (hey, we’ll even provide support!) at your own brand.

Start using it now and get ready for the transition (and also lock in the current pricing… we ‘aint gonna be able to stay this cheap forever!)

Better Updates, Integrated Hosting

Where once you could just click ‘Update All’, now you can manage pretty much every step of plugin, theme, and core updates either on one hit, via filters or on as granular a level as you would like.

The Hub Update example.
Update everything with one click or perform individual updates at the granular level.

And alongside that, you can now manage your sites’ hosting (if you choose to host with us) straight from The Hub.

The Hub hosting subtab.
Hosting with WPMU DEV? Now you can manage it all from one place … Hub, Hub, hurray!

Give it a go. We think you’ll like it (after all, most of you asked for it so we hope you’ll like it!)

Alongside Automate, everyone’s favorite Aussie updater (Automaaaaate!) who has had a UX makeover bringing him into the 2020s where he can even more effectively help every single website you run stay safely updated.

Hub 2.0 Automate
Hub 2.0 Automaaaaate!

So, going forward we’ll also be bringing you a few more significant new features (along the lines of White Label Reports 2.0… you’ll love that), making The Hub faster and faster (and having more interesting loading graphics for ya… our pleasure Rob ;) and a much improved mobile experience (currently while you can use your phone it’s tablet and up focused).

Which only leaves me to hand it over to you for feedback!

Either by:

We’ll get back to you in every channel and we *massively* appreciate constructive criticism*.

*apart from when it comes to my sense of humor, which is impeccable.

Q&A

When will the Beta become the main version?

Eventually, we’ll move to Hub 2.0 for everyone, but only when we’re certain it’s working perfectly, it’s much preferred over 1.0 and we’ve improved it by listening to your feedback. Until then, you can easily switch between the two.

Where’s feature X? I’m missing X, I really liked X! You swines! This sucks!

Ooops, sorry, that’s what betas are for, though… please let us know which favorite feature of yours we’ve missed and/or need to improve from Hub 1.0 and we’ll do our utmost to make you more than happy… and thank you for the feedback!

Will we be charging any more in the future for new features (like Users)?

If you’re a current member… we will not charge you a cent more! Just make sure you maintain your membership and we’ll grandfather you through any pricing changes in the future, though you can expect the cost of some aspects of WPMU DEV to go up… which is a good reason to get in now before it does :)

Where’s that 3 month free trial?

Click here to take us up on that.

Unfortunately we can’t make it available for existing or expired current members (we’ve gotta fund all this stuff somehow ;) but if you are an existing member and refer just 3 people who eventually become members (they can use this link too) you can get 3 months free yourself (12 months free for 10 referrals or a lifetime for 25!)

How to Improve Workflow in a Multi-Author WordPress Blog

This guest post is by Syed Balkhi of WPBeginner.

Running a multi-author blog can become a hassle, especially if you do not have a dedicated content manager for your site.Having run several multi-author blogs myself, I understand the issues you face and decisions you have to make.

If you’re running a multi-author blog, you may have asked yourself questions like, should I give the writer access to my WordPress dashboard? Is it secure? How do I monitor their activities to see they aren’t messing up my website? How do I improve my workflow?

In this article, I will share my personal experience in managing a collaborative WordPress site safely and effectively.

The “t” in “team” is also for “trust”

If you want to improve your workflow, then you will have to give your writers access to your WordPress dashboard. Otherwise, you will find yourself copying and pasting a lot of elements from a Word Document into your WordPress dashboard, attaching images, adding styling elements, and so on.

Fortunately, WordPress comes with numerous user roles with various permission levels.

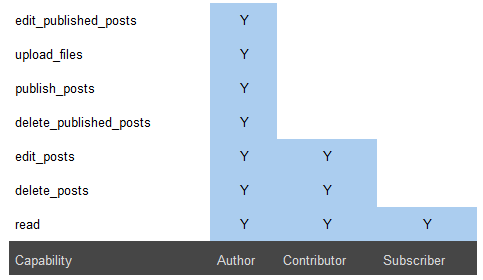
user capability

If you look at the charts above, the two permission levels that make the most sense for multi-author blogs are Contributor and Author.

The biggest issue with Contributors is that they can’t attach images because they do not have the ability to upload files. Since you want your authors to have the ability to upload and attach images to their articles, you will want to give them Author-level permissions.

The big issue with that is that it gives them the ability to publish posts, delete posts, edit published posts, and so on. While I trust all of my authors, I don’t want things to go live without going through an editorial review. So I don’t want them to have this capability.

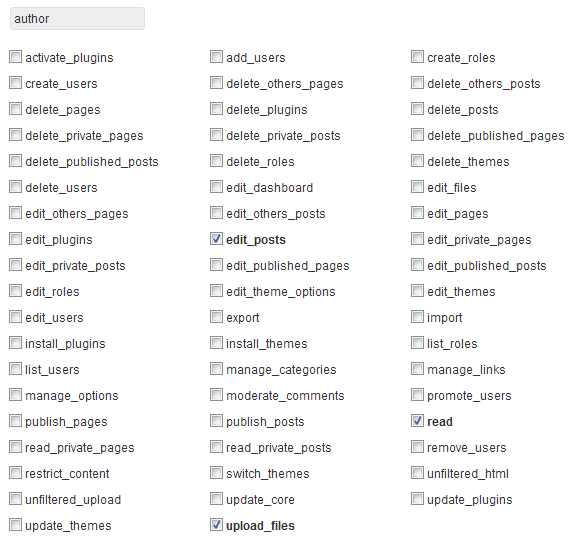
The good thing about WordPress is that there is a plugin for just about everything. You can use a popular plugin called Members to modify the capabilities of the Author role. Once you install the plugin, go to Users > Roles and modify the Author role. Your final permissions settings should look something like this:

The roles editor

As you notice, the only abilities we’ve given Authors here are editing posts, reading posts, and uploading files.

Security and monitoring

In the past, I have seen hackers trying brute force attacks through the login page. Because each author’s URL contains their username, they only have to guess the password for an author to get access to your site. What’s worse is if your author has used the same password elsewhere, and the hacker knows this.

To prevent this kind of attack, the first thing you need to do is to limit the number of failed login attempts. This means that after three failed login attempts, the user will be locked out.

The second thing you need to do is make sure that you use the plugin Force Strong Passwords. To monitor users’ activity, you can use plugins like Audit Trail or ThreeWP Activity Monitor.

Last, but certainly not least, make sure that you have a strong WordPress backup solution in place. Of course there are other security measures you can take to protect your site in other ways, but these are the ones that are specific to multi-author blogs.

Improving your workflow

A good editorial workflow can make things a lot easier. The key to a good workflow is communication. I use a plugin called Edit Flow to make things easy for me.

The first step is to define the stages of your workflow. My workflow looks like this:

  • Draft: default auto-saved posts, or any un-assigned posts
  • Pitch: when an author pitches a post idea
  • Assigned: the editor or admin assigns the post idea to a specific author
  • In progress: the author puts the article in this mode so everyone knows that someone is working on it
  • Pending review: once the author finishes the post, they submit it for an editorial review.
  • Ready to publish: once the editorial review is complete, we make the post Ready to publish. From there, I or another admin can take a look at it and schedule it for publication.

This workflow makes the process really easy, especially when we have a lot of writers. This plugin comes with default statuses, but you can always add your custom post statuses.

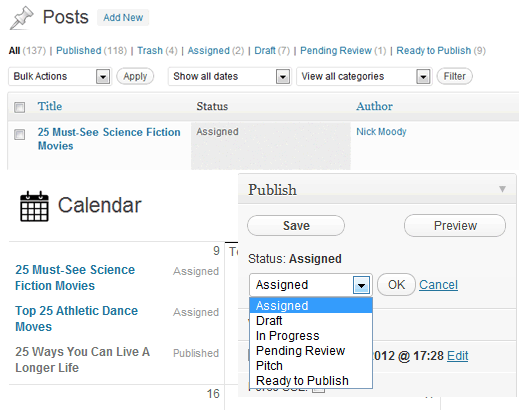
The best part is that you can sort posts by the custom status. Changing the status is extremely simple.

Custom status

You can also use the Edit Flow plugin to communicate with the author from within your dashboard. This makes the communication part really easy, and prevents you juggling through emails. Also, when assigning posts to a specific author, you can set deadlines in the Editorial Meta Data option.

The plugin also gives you a convenient month-by-month calendar-view of posts. This lets you know if you have a post scheduled for a specific day or not.

Calendar view

A private area just for contributors

Over time I have learned that I don’t have to do everything myself. I can assign tasks to trusted folks in my team. The best way to establish this trust and find out who is the right person for the job is by judging their interest level. Setting up a private area just for your team members can help you determine that.

I recommend that you set up a site with P2 theme and invite your team members and authors there. Password-protect the site, so only logged-in users can see the content. And when an author stands out in this environment, you can promote them to an Editor or another position within your business.

What’s your workflow process? I’d love to hear about it in the comments. Feel free to share your tips and tricks for multi-author blogging, too.

Syed Balkhi is the founder of WPBeginner, the largest unofficial WordPress resource site that offers free WordPress videos for beginners as well as comprehensive guides like choosing the best WordPress hosting, speeding up WordPress, and many more how-to’s.

The post How to Improve Workflow in a Multi-Author WordPress Blog appeared first on ProBlogger.

How to Improve Workflow in a Multi-Author WordPress Blog
https://problogger.com/how-to-improve-workflow-in-a-multi-author-wordpress-blog/
http://www.problogger.net/archives/category/blog-networks/feed/
Blog Networks – ProBlogger
Blog Tips to Help You Make Money Blogging – ProBlogger
https://problogger.com/wp-content/uploads/powerpress/problogger_podcast-891.jpg

Powered by WPeMatico