I want to view the list of followers of other accounts and also be able to search/ sort it
How can I see a list of someone’s followers on Twitter?


Tips, Expertise, Articles and Advice from the Pro's for Your Website or Blog to Succeed
I want to view the list of followers of other accounts and also be able to search/ sort it
Do you want to rank new WordPress content faster?
Sometimes search engines take some time to index new content, so your WordPress site may not show up in search results or get much traffic at first.
In this guide, we’ll show you how to easily rank new WordPress content faster with practical tips.
![]()
As a WordPress website owner, you’ll miss out on a ton of traffic if you don’t work on ranking your content from day one.
When you do, your content can gain higher search rankings and get more traffic from the start. Later on, your rankings will continue to improve as your site gets more credibility in search engines.
However, many websites struggle to get more organic traffic to their content right away.
Luckily, there are some easy to implement WordPress SEO best practices that can help. Simply follow the steps below to rank your new content and start getting more traffic right away.
That being said, let’s take a look at how to easily rank your new WordPress content faster.
First thing you need to do is install and activate All in One SEO for WordPress. For more details, see our step by step guide on how to install a WordPress plugin.

All in One SEO (AIOSEO) is the best WordPress SEO plugin on the market. It allows you to easily optimize WordPress SEO without any special skills.
Note: There is a free version of All in One SEO available as well. However, we recommend using the premium version to unlock its full potential.
Upon activation, the plugin will launch a setup wizard which will walk you through the process to get started. Simply follow the on-screen instructions and you’ll be all set in a few clicks.

Setting up AIOSEO will automatically take care of many important search engine optimization tasks. For instance, if an older blog post is missing an SEO title or description, then the plugin can automatically generate those for you.
However, there’s a lot more that you can do with the plugin that will further boost search rankings for your new content.
For step-by-step instructions and more tips, see our complete guide on how to set up All in One SEO.
Google Search Console is a free tool provided by Google to help website owners monitor their website performance in search results.
It allows you to track search rankings and get notified when Google is unable to crawl or index any page on your website. You’ll also be able to notify Google of any new content you publish automatically by using a sitemap.
First, you need to visit the Google Search Console website and click on the start now button.
Next, you need to provide your website URL and click on the continue button.

Now, you’ll be asked to verify ownership of your website. There are several ways to do that, but we will show the HTML tag method because it is the easiest one.

Click on the HTML tag to expand it and then copy the code inside it.
All in One SEO for WordPress comes with a built-in tool to easily add this code to your website. Simply switch to the admin area of your WordPress website and go to the All in One SEO » General Settings page.

From here, you need to switch to the Webmaster tools page and click on the Google Search Console box to add your search console verification code.
Don’t forget to click on the Save Changes button to store your settings.
You can now switch back to the Google Search Console tab and click on the Verify button.

That’s all! You’ve successfully added your website to Google Search Console.
An XML sitemap is a file that lists all your website content in an XML format, so search engines like Google can easily discover and index your content.
WordPress comes with its own basic XML sitemaps, which you can find by adding wp-sitemaps.xml at the end of your website address (for example, https://example.com/wp-sitemap.xml).
However, if you are using AIOSEO, then it generates its own XML sitemaps that are more powerful. It includes XML sitemaps, video sitemaps, news sitemaps, and RSS sitemaps as well.
AIOSEO sitemaps are also completely customizable, so you can decide exactly which content to include. You can even use your sitemap to help hide specific pages from Google.
You can view and manage your sitemaps by visiting All in One » Sitemaps.

To view your sitemap, simply click on the Open Sitemap button, or you can just add sitemap.xml at the end of your website domain (for example, https://example.com/sitemap.xml).
Next, login to your Google Search Console account dashboard and then click on the Sitemaps menu from the left column. After that, you need to add ‘sitemap.xml’ in the the ‘Add a New Sitemap’ field.

Click on the Submit button to continue.
Add RSS Sitemap to Google Search Console
All in One SEO also comes with an RSS Sitemap feature which contains your most recent blog posts.
Search engines recommend adding an RSS sitemap to your site, too. It is a smaller file and search engines can access it more frequently to look for new content.
First, you need to visit All in One SEO » Sitemaps page and switch to the RSS Sitemap tab.

From here you need to make sure that the RSS sitemap option is enabled. You can click on the Open Sitemap button to view it.
By default, the RSS sitemap URL has sitemap.rss added to your domain name (e.g. https://example.com/sitemap.rss).
Now you can switch back to Google Search Console dashboard and click on the Sitemaps menu. From here, add ‘sitemap.rss’ in the Add a New Sitemap option, and then click the Submit button.

That’s all. Google will now start using your sitemaps to find new content on your website more quickly.
The first three tips mentioned above ensure that search engines can quickly find your content. Now let’s talk about how to prepare your new content for ranking faster in higher positions.
All in One SEO allows you to easily add a meta title and description to any post or page under the AIOSEO settings box below your content.

Below that, you can add the Focus Keyphrase that you want to rank for.
This allows All in One SEO to analyze your content for those focus keywords, and give you suggestions to improve your optimization.

You can view your overall SEO score at the top right corner of the screen.
Clicking on it will also show you actionable tips that you can apply to improve your content.

For more details, see our checklist on improving your blog posts for SEO.
An internal link is a link to another page on your own website. Internal linking to your own content has a huge impact on SEO.
To improve your SEO, it’s smart to make it a habit to add links to your most important content in any new content that you write. This can help to boost rankings for your older content.
However, it’s also important to add internal links that point to your new content when you publish it.

You can do this by editing your older articles to add links to your newer content whenever you publish. Many successful bloggers dedicate time to add internal links to new articles on a weekly or monthly basis.
Another quick way to promote your new blog posts is by sharing them with your followers on social media platforms like Facebook, Twitter, Pinterest, and more.
To get the most engagement on social media, you want to make sure that your content looks good on every platform.
That’s where All in One SEO comes in. AIOSEO makes it possible to control how your content looks when it’s shared on social media websites like Facebook and Twitter.
You can add Open Graph meta data to include proper thumbnail images for each article on your website.

For more details, see our complete social media cheat sheet for WordPress with step by step instructions on promoting your content on social media.
Finally, you need a way to make sure your new content is getting indexed and ranked properly.
The easiest way to track this is by using MonsterInsights. It is the best Google Analytics plugin for WordPress and allows you to easily monitor your website traffic and rankings.
First, you need to install and activate the MonsterInsights plugin. For more details, see our guide on how to install Google Analytics in WordPress.
Once you have set up MonsterInsights, you can view your website performance directly from your WordPress dashboard.

MonsterInsights also shows you your search engine rankings, so you can track the performance of your content and make sure it’s indexed properly.

We hope this article helped you learn how to rank your new WordPress content faster. You may also want to see our guide on how to start your own podcast, or our expert comparison of the best email marketing services for small business.
If you liked this article, then please subscribe to our YouTube Channel for WordPress video tutorials. You can also find us on Twitter and Facebook.
The post How to Rank New WordPress Content Faster (In 6 Easy Steps) appeared first on WPBeginner.


We live in a time where visuals seem more important than ever. People really need to see things to believe them, so photos are of great importance.
Whether you’re looking to be a travel photographer, a fashion photographer, an event photographer, or any other type of photographer, you must understand the business side of things from the very start.
This ensures that your interest in photography is more than just a hobby, but that it actually turns into a business where you can make money, and potentially even make photography your full-time job.
The advances in technology and the availability of camera gear have made photography a much more realistic job for many people. Thus, you must tap into your skills and your creativity to set you apart from amateur photographers.
To help you get started in building a photography business that has the potential for success, we have crafted this article. Read on for all the information you need to stick clicking for cash.
As is the case with any kind of business, there are some easy parts and some hard parts. What those specific parts are will vary from business to business.
When it comes to photography, there are a couple of things that you may think are difficult, but are actually quite easy.
As mentioned above, the photography industry is quite saturated today, largely thanks to smartphones that can take some pretty incredible photos.
Thus, you must figure out what type of photography you’re good at. This is a crucial first step in the process of starting your business, but it doesn’t have to be hard.
If you aren’t sure yet what kind of photography you like, try a few different things. Take a trip and see if you’re able to create photos that way that would push you more towards a career in travel photography. Do a photoshoot with a model and see how that goes–maybe you’ll find that you are great at fashion shoots. Or volunteer to shoot an event and you may be surprised at how well your photos turn out.
Have fun with this part of the process. Be flexible and open to different styles of photography, and pay attention to what one(s) you are good at, and what one(s) you enjoy.
As much as we all love friends and family discounts, when it comes to your photography business, it is important that you, from the beginning, establish rules about discounts.
If your rules include no discounted prices, that’s okay! You are trying to make a living, so you have no obligation to offer lower prices to people you know. Just make it clear what your friends and family rules are so that the lines don’t get blurry down the road.
It is inevitable at some point in your photography career that you will have people ask you to shoot for free, and you have to decide if you are open to that. You may find that as you start in this career, you are willing to do shoots for free to gain experience.
However, set boundaries so you know at what point you will no longer do free/discounted shoots.
Before you decide to take the plunge into a full-time photography career, begin by doing a few small shoots here and there.
In other words, don’t quit your day job yet. Especially because building a business like this can take some time. And if you put too much pressure on yourself by quitting your job before you have a steady stream of new income, you may find yourself under a whole lot of stress.
Do some shoots on nights and/or weekends and grow from there.
Because of the highly visual world that we live in, you must get your photography out there where people can see it. And the best way to do that is via social media.
As a photographer, you will want to utilize Instagram and TikTok but should also consider LinkedIn and Twitter as well to link to your portfolio and Instagram. Some photographers treat Instagram as their portfolio, while some use it in addition to a website portfolio.
What many people who only use social media for fun don’t realize is that it can be a full-time job running a business social media account.
That’s where a tool such as Later will come in handy. This social media marketing platform can help you plan, analyze and publish your content.

We will share more on this below.
Starting a business in a creative industry is never an easy feat. Though you are likely doing it because you have found your passion, know that following that passion doesn’t come free of struggles.
Here are some of the difficult things you may face when starting your photography business.
Though you may think this is unnecessary for your photography business, think again.
A business plan is essentially a roadmap of what your business is and how you plan to make money from it. This is crucial to do so that you can see whether this business has to potential to provide you real income or now.
A business plan will cover things such as cash flow, expenses, competitors, and more.
This part of the process will take a lot of time, research, and thought, but is important to your success.
If you feel that you can’t do it on your own, hire someone who is experienced in business plans to help you through it.
There is no way around it–camera gear is expensive. Even if you start with just the basics, that includes:
You’re looking at thousands of dollars with that equipment alone. And as your business grows you will likely find yourself investing in more lenses, a drone, and much more.
Photography is an expensive business because of all the equipment involved. And, as much as we love how quickly technology advances because it makes our lives more simple, that means that your camera gear can become outdated quickly.
Be realistic about how much you need to spend on gear to get things started and what your budget is.
When it comes to a photography business, you have options of how you want the business to be structured legally speaking.
Here are the top three options that photographers usually go with.
This type of business is the easiest to get started but makes you more vulnerable to issues than the other options. With this business structure, if a client ever sued you, they can go after all of your assets, personal and business.
This type of business is one of the most popular because it separates your business liability from your personal assets. Thus, if a client sues you, they cannot come after your personal assets. An LLC does require that you fill out some paperwork, which varies depending upon the state you set up your business in.
If you are starting your photography business alone, this is not the right option for you. It is much more expensive than an LLC and will seem quite complicated. This may be a better option for you down the road when your photography business grows.
If you have enough money of your own to get all the gear you need for your photography, and also to fund other things such as branding, a website, social media, and more, then you won’t have to worry much about this step.
However, if you don’t have the funds to cover all those expenses, then you will have to figure out where that money will come from.
You have a couple of different options here. You can ask family or friends to loan you money and once your business gets rolling, you can pay them back.
Or you can head to the bank and apply for an official loan.
Either way, you will need your business plan to prove to your friends/family or the bank that you have thoughtfully planned out what each dollar you’re asking for will go towards and how you will pay the money back.
Once you’ve got your business plan and your gear all sorted, it’s time to decide what you need to charge for your services.
This is a tough part of the process but is important for setting your value. You can start off with lower prices and as you become more experienced and have more shoots under your belt, you can increase prices.
There are three parts to pricing: shooting, editing, and picture sales.
Think about what an hour of your time is worth when shooting. Take into account this may include you coming up with ideas for the shoot, finding locations, setting things up for a shoot, taking things down, and more.
You may decide that a good place to start with this is between $50-75 an hour.
Many photographers charge different rates for editing than they do for shooting. The choice is yours. If you charge $75/hour for shooting, you may only charge $50/hour for editing, as editing allows you to sit on your computer and do your work at home, or anywhere else you can take your laptop.
It is a good estimation that for every hour you spend shooting, you spend three hours editing.
Knowing these prices will help you give clients an estimate of what a shoot will cost.
Most photographers offer sales packages where clients can purchase print or digital images of pictures from their shoot. And while it’s customary to include a small number of these images at no extra cost as part of the shoot itself, a typical shoot will yield dozens or hundreds of photos. If a client wants more than the included number, these packages allow them to purchase more.
This is particularly important to keep in mind for more personal shoots where the client is an individual, like weddings, fashion shoots, and branding shoots. Brides and business owners want lots of pictures of themselves!
Offering picture packages as add-ons also can help cover editing costs–you might choose to have one package where the client gets unedited photos they can play with themselves, and another that covers a certain number of professionally edited photos.
Once you’ve decided what kind of photography you want to pursue, an important step is your branding.
Who is your target client? How do you speak to them using your brand?
Here is how to create your brand.
What sets you apart from other photographers? Are you the best event photographer in town? Can you capture a model’s identity in just one shot? Are you amazing at corralling kids for family pictures? Figure that out and use it as your selling point.
Since photography is all about visuals and how those visuals make people feel, your visual identity is key.
A photographer’s goal is to have someone look at a picture and immediately recognize who took it without seeing the photog’s name. So what will you do in your photos to make that happen?
Your brand is also represented in the way that you edit your photos. Most photographers tend to stick to the same tones and colors in their work, so you should aim to do the same.
This will also help you save time when it comes to editing. Presets are a major bonus for photographers to work on creating. Though each photo requires special attention, once you’ve established your brand style, you can use the presets you create as a starting point and edit more from there.
This allows your portfolio to be visually cohesive.
Most photographers turn to social media to promote their work, and we think it’s a great place to do so.
Instagram is a major platform for photographers, but we are also seeing TikTok grow in that area as well. Get creative on how you turn your photos into videos for TikToks.
Facebook may not be at the forefront of your mind, but there are still a lot of people out there using it. So make sure you think about social media marketing on this platform as well. You also want to tap into the power of Pinterest, a powerful platform that is underrated.
A great way to make use of multiple social media platforms without having to spend all of your time on the apps is by using Later.
As mentioned above, this marketing platform allows you to plan your content ahead of time and schedule it to post automatically so that you don’t have to deal with manually posting to multiple different platforms.

Later also provides you with Instagram analytics so you can see how your posts are helping you grow, and whether the strategies you’re using are working.

Though marketing online is a big piece of your photography business, what may be even more important may be putting yourself out there and networking.
Many photographers get their gigs via referrals from previous clients, so make sure you put in the work to establish relationships with people.
Networking is also another way to let people know what you do who may not see you on social media. You never know who may need a photographer, so always be on top of networking, even if you’re just out to dinner with friends and happen to meet a stranger. That stranger can easily become a future client who refers you to someone else, and the next thing you know, the domino effect is in full effect.
It is a good rule of thumb to set aside three months’ worth of income to fall back on in case anything with your business goes wrong. Once you have that in safety, then start thinking about reinvesting money into your business so that you can continue to grow it.
Since photography gear becomes more and more advanced every year, and your photography skills become more advanced every year, you should invest in new equipment.
Keep a list of what you need to take your business to the next level, and see how you can make it financially happen.
How can I download someone else's Twitter followers list
Can you suggest some great accurate ways by which I can track fake ad real accounts?
Data is the backbone of every software application because the main purpose of an application is to solve human problems. To solve human problems, it is necessary to have some information about them.
Such information is represented as data, especially through computation. On the web, data is mostly collected in the form of texts, images, videos, and many more. Sometimes, images contain essential texts that are meant to be processed to achieve a certain purpose. These images were mostly processed manually because there was no way to process them programmatically.
The inability to extract text from images was a data processing limitation I experienced first-hand at my last company. We needed to process scanned gift cards and we had to do it manually since we couldn’t extract text from images.
There was a department called “Operations” within the company that was responsible for manual confirming gift cards and crediting users' accounts. Although we had a website through which users connected with us, the processing of gift cards was carried out manually behind the scenes.
At the time, our website was built mainly with PHP (Laravel) for the backend and JavaScript (jQuery and Vue) for the frontend. Our technical stack was good enough to work with Tesseract.js provided the issue was considered important by the management.
I was willing to solve the problem but it was not necessary to solve the problem judging from the business’ or the management’s point of view. After leaving the company, I decided to do some research and try to find possible solutions. Eventually, I discovered OCR.
OCR stands for “Optical Character Recognition” or “Optical Character Reader”. It is used to extract texts from images.
The Evolution Of OCR can be traced to several inventions but Optophone, “Gismo” , CCD flatbed scanner, Newton MesssagePad and Tesseract are the major inventions that take character recognition to another level of usefulness.
So, why use OCR? Well, Optical Character Recognition solves a lot of problems, one of which triggered me to write this article. I realized the ability to extract texts from an image ensures a lot of possibilities such as:
Finding out all the uses above deepened my interests, so I decided to go further by asking a question:
“How can I use OCR on the web, especially in a React application?”
That question led me to Tesseract.js.
[Tesseract.js is a JavaScript library that compiles the original Tesseract from C to JavaScript WebAssembly thereby making OCR accessible in the browser. Tesseract.js engine was originally written in ASM.js and it was later ported to WebAssembly but ASM.js still serves as a backup in some cases when WebAssembly is not supported.
As stated on the website of Tesseract.js, it supports more than 100 languages, automatic text orientation and script detection, a simple interface for reading paragraphs, words and character bounding boxes.
Tesseract is an optical character recognition engine for various operating systems. It is free software, released under the Apache Licence. Hewlett-Packard developed Tesseract as proprietary software in the 1980s. It was released as open source in 2005 and its development has been sponsored by Google since 2006.
The latest version, version 4, of Tesseract was released in October 2018 and it contains a new OCR engine that uses a neural network system based on Long Short-Term Memory (LSTM) and it is meant to produce more accurate results.
To really understand how Tesseract works, we need to break down some of its APIs and their components. According to the Tesseract.js documentation, there are two ways to approach using it. Below is the first approach an its break down:
Tesseract.recognize(
  image,language,
  {
    logger: m => console.log(m)
  }
)
.catch (err => {
  console.error(err);
})
.then(result => {
 console.log(result);
})
}
The recognize method takes image as its first argument, language (which can be multiple) as its second argument and { logger: m => console.log(me) } as its last argument. The image format supported by Tesseract are jpg, png, bmp and pbm which can only be supplied as elements (img, video or canvas), file object (<input>), blob object, path or URL to an image and base64 encoded image. (Read here for more information about all of the image formats Tesseract can handle.)
Language is supplied as a string such as eng. The + sign could be used to concatenate several languages as in eng+chi_tra. The language argument is used to determine the trained language data to be used in processing of images.
Note: You’ll find all of the available languages and their codes over here.
{ logger: m => console.log(m) } is very useful to get information about the progress of an image being processed. The logger property takes a function that will be called multiple times as Tesseract processes an image. The parameter to the logger function should be an object with workerId, jobId, status and progress as its properties:
{ workerId: ‘worker-200030’, jobId: ‘job-734747’, status: ‘recognizing text’, progress: ‘0.9’ }
progress is a number between 0 and 1, and it is in percentage to show the progress of an image recognition process.
Tesseract automatically generates the object as a parameter to the logger function but it can also be supplied manually. As a recognition process is taking place, the logger object properties are updated every time the function is called. So, it can be used to show a conversion progress bar, alter some part of an application, or used to achieve any desired outcome.
The result in the code above is the outcome of the image recognition process. Each of the properties of result has the property bbox as the x/y coordinates of their bounding box.
Here are the properties of the result object, their meanings or uses:
{
  text: "I am codingnninja from Nigeria..."
  hocr: "<div class='ocr_page' id= ..."
  tsv: "1 1 0 0 0 0 0 0 1486 ..."
  box: null
  unlv: null
  osd: null
  confidence: 90
  blocks: [{...}]
  psm: "SINGLE_BLOCK"
  oem: "DEFAULT"
  version: "4.0.0-825-g887c"
  paragraphs: [{...}]
  lines: (5) [{...}, ...]
  words: (47) [{...}, {...}, ...]
  symbols: (240) [{...}, {...}, ...]
}
text: All of the recognized text as a string.lines: An array of every recognized line by line of text.words: An array of every recognized word.symbols: An array of each of the characters recognized.paragraphs: An array of every recognized paragraph. We are going to discuss “confidence” later in this write-up.Tesseract can also be used more imperatively as in:
import { createWorker } from 'tesseract.js';

  const worker = createWorker({
  logger: m => console.log(m)
  });

  (async () => {
  await worker.load();
  await worker.loadLanguage('eng');
  await worker.initialize('eng');
  const { data: { text } } = await     worker.recognize('https://tesseract.projectnaptha.com/img/eng_bw.png');
 console.log(text);
 await worker.terminate();
})();
This approach is related to the first approach but with different implementations.
createWorker(options) creates a web worker or node child process that creates a Tesseract worker. The worker helps set up the Tesseract OCR engine. The load() method loads the Tesseract core-scripts, loadLanguage() loads any language supplied to it as a string, initialize() makes sure Tesseract is fully ready for use and then the recognize method is used to process the image provided. The terminate() method stops the worker and cleans up everything.
Note: Please check Tesseract APIs documentation for more information.
Now, we have to build something to really see how effective Tesseract.js is.
We are going to build a gift card PIN extractor because extracting PIN from a gift card was the issue that led to this writing adventure in the first place.
We will build a simple application that extracts the PIN from a scanned gift card. As I set out to build a simple gift card pin extractor, I will walk you through some of the challenges I faced along the line, the solutions I provided, and my conclusion based on my experience.
Below is the image we are going to use for testing because it has some realistic properties that are possible in the real world.

We will extract AQUX-QWMB6L-R6JAU from the card. So, let’s get started.
There is a question to attend to before installing React and Tesseract.js and the question is, why using React with Tesseract? Practically, we can use Tesseract with Vanilla JavaScript, any JavaScript libraries or frameworks such React, Vue and Angular.
Using React in this case is a personal preference. Initially, I wanted to use Vue but I decided to go with React because I am more familiar with React than Vue.
Now, let’s continue with the installations.
To install React with create-react-app, you have to run the code below:
npx create-react-app image-to-text
cd image-to-text
yarn add Tesseract.js
or
npm install tesseract.js
I decided to go with yarn to install Tesseract.js because I was unable to install Tesseract with npm but yarn got the job done without stress. You can use npm but I recommend installing Tesseract with yarn judging from my experience.
Now, let’s start our development server by running the code below:
yarn start
or
npm start
After running yarn start or npm start, your default browser should open a webpage that looks like below:

You could also navigate to localhost:3000 in the browser provided the page is not launched automatically.
After installing React and Tesseract.js, what next?
In this case, we are going to adjust the home page (App.js) we just viewed in the browser to contain the form we need:
import { useState, useRef } from 'react';
import Tesseract from 'tesseract.js';
import './App.css';

function App() {
  const [imagePath, setImagePath] = useState("");
  const [text, setText] = useState("");

  const handleChange = (event) => {
    setImage(URL.createObjectURL(event.target.files[0]));
  }

  return (
    <div className="App">
      <main className="App-main">
        <h3>Actual image uploaded</h3>
        <img
           src={imagePath} className="App-logo" alt="logo"/>

          <h3>Extracted text</h3>
        <div className="text-box">
          <p> {text} </p>
        </div>
        <input type="file" onChange={handleChange} />
      </main>
    </div>
  );
}

export default App
The part of the code above that needs our attention at this point is the function handleChange.
const handleChange = (event) => {
    setImage(URL.createObjectURL(event.target.files[0]));
  }
In the function, URL.createObjectURL takes a selected file through event.target.files[0] and creates a reference URL that can be used with HTML tags such as img, audio and video. We used setImagePath to add the URL to the state. Now, the URL can now be accessed with imagePath.
<img src={imagePath} className="App-logo" alt="image"/>
We set the image’s src attribute to {imagePath} to preview it in the browser before processing it.
As we have grabbed the path to the image selected, we can pass the image’s path to Tesseract.js to extract texts from it.
import { useState} from 'react';
import Tesseract from 'tesseract.js';
import './App.css';

function App() {
  const [imagePath, setImagePath] = useState("");
  const [text, setText] = useState("");

  const handleChange = (event) => {
    setImagePath(URL.createObjectURL(event.target.files[0]));
  }

  const handleClick = () => {

    Tesseract.recognize(
      imagePath,'eng',
      {
        logger: m => console.log(m)
      }
    )
    .catch (err => {
      console.error(err);
    })
    .then(result => {
      // Get Confidence score
      let confidence = result.confidence

      let text = result.text
      setText(text);

    })
  }

  return (
    <div className="App">
      <main className="App-main">
        <h3>Actual imagePath uploaded</h3>
        <img
           src={imagePath} className="App-image" alt="logo"/>

          <h3>Extracted text</h3>
        <div className="text-box">
          <p> {text} </p>
        </div>
        <input type="file" onChange={handleChange} />
        <button onClick={handleClick} style={{height:50}}> convert to text</button>
      </main>
    </div>
  );
}

export default App
We add the function “handleClick” to “App.js and it contains Tesseract.js API that takes the path to the selected image. Tesseract.js takes “imagePath”, “language”, “a setting object”.
The button below is added to the form to call “handClick” which triggers image-to-text conversion whenever the button is clicked.
<button onClick={handleClick} style={{height:50}}> convert to text</button>
When the processing is successful, we access both “confidence” and “text” from the result. Then, we add “text” to the state with “setText(text)”.
By adding to <p> {text} </p>, we display the extracted text.
It is obvious that “text” is extracted from the image but what is confidence?
Confidence shows how accurate the conversion is. The confidence level is between 1 to 100. 1 stands for the worst while 100 stands for the best in terms of accuracy. It can also be used to determine whether an extracted text should be accepted as accurate or not.
Then the question is what factors can affect the confidence score or the accuracy of the entire conversion? It is mostly affected by three major factors — the quality and nature of the document used, the quality of the scan created from the document and the processing abilities of the Tesseract engine.
Now, let’s add the code below to “App.css” to style the application a bit.
.App {
  text-align: center;
}

.App-image {
  width: 60vmin;
  pointer-events: none;
}

.App-main {
  background-color: #282c34;
  min-height: 100vh;
  display: flex;
  flex-direction: column;
  align-items: center;
  justify-content: center;
  font-size: calc(7px + 2vmin);
  color: white;
}

.text-box {
  background: #fff;
  color: #333;
  border-radius: 5px;
  text-align: center;
}
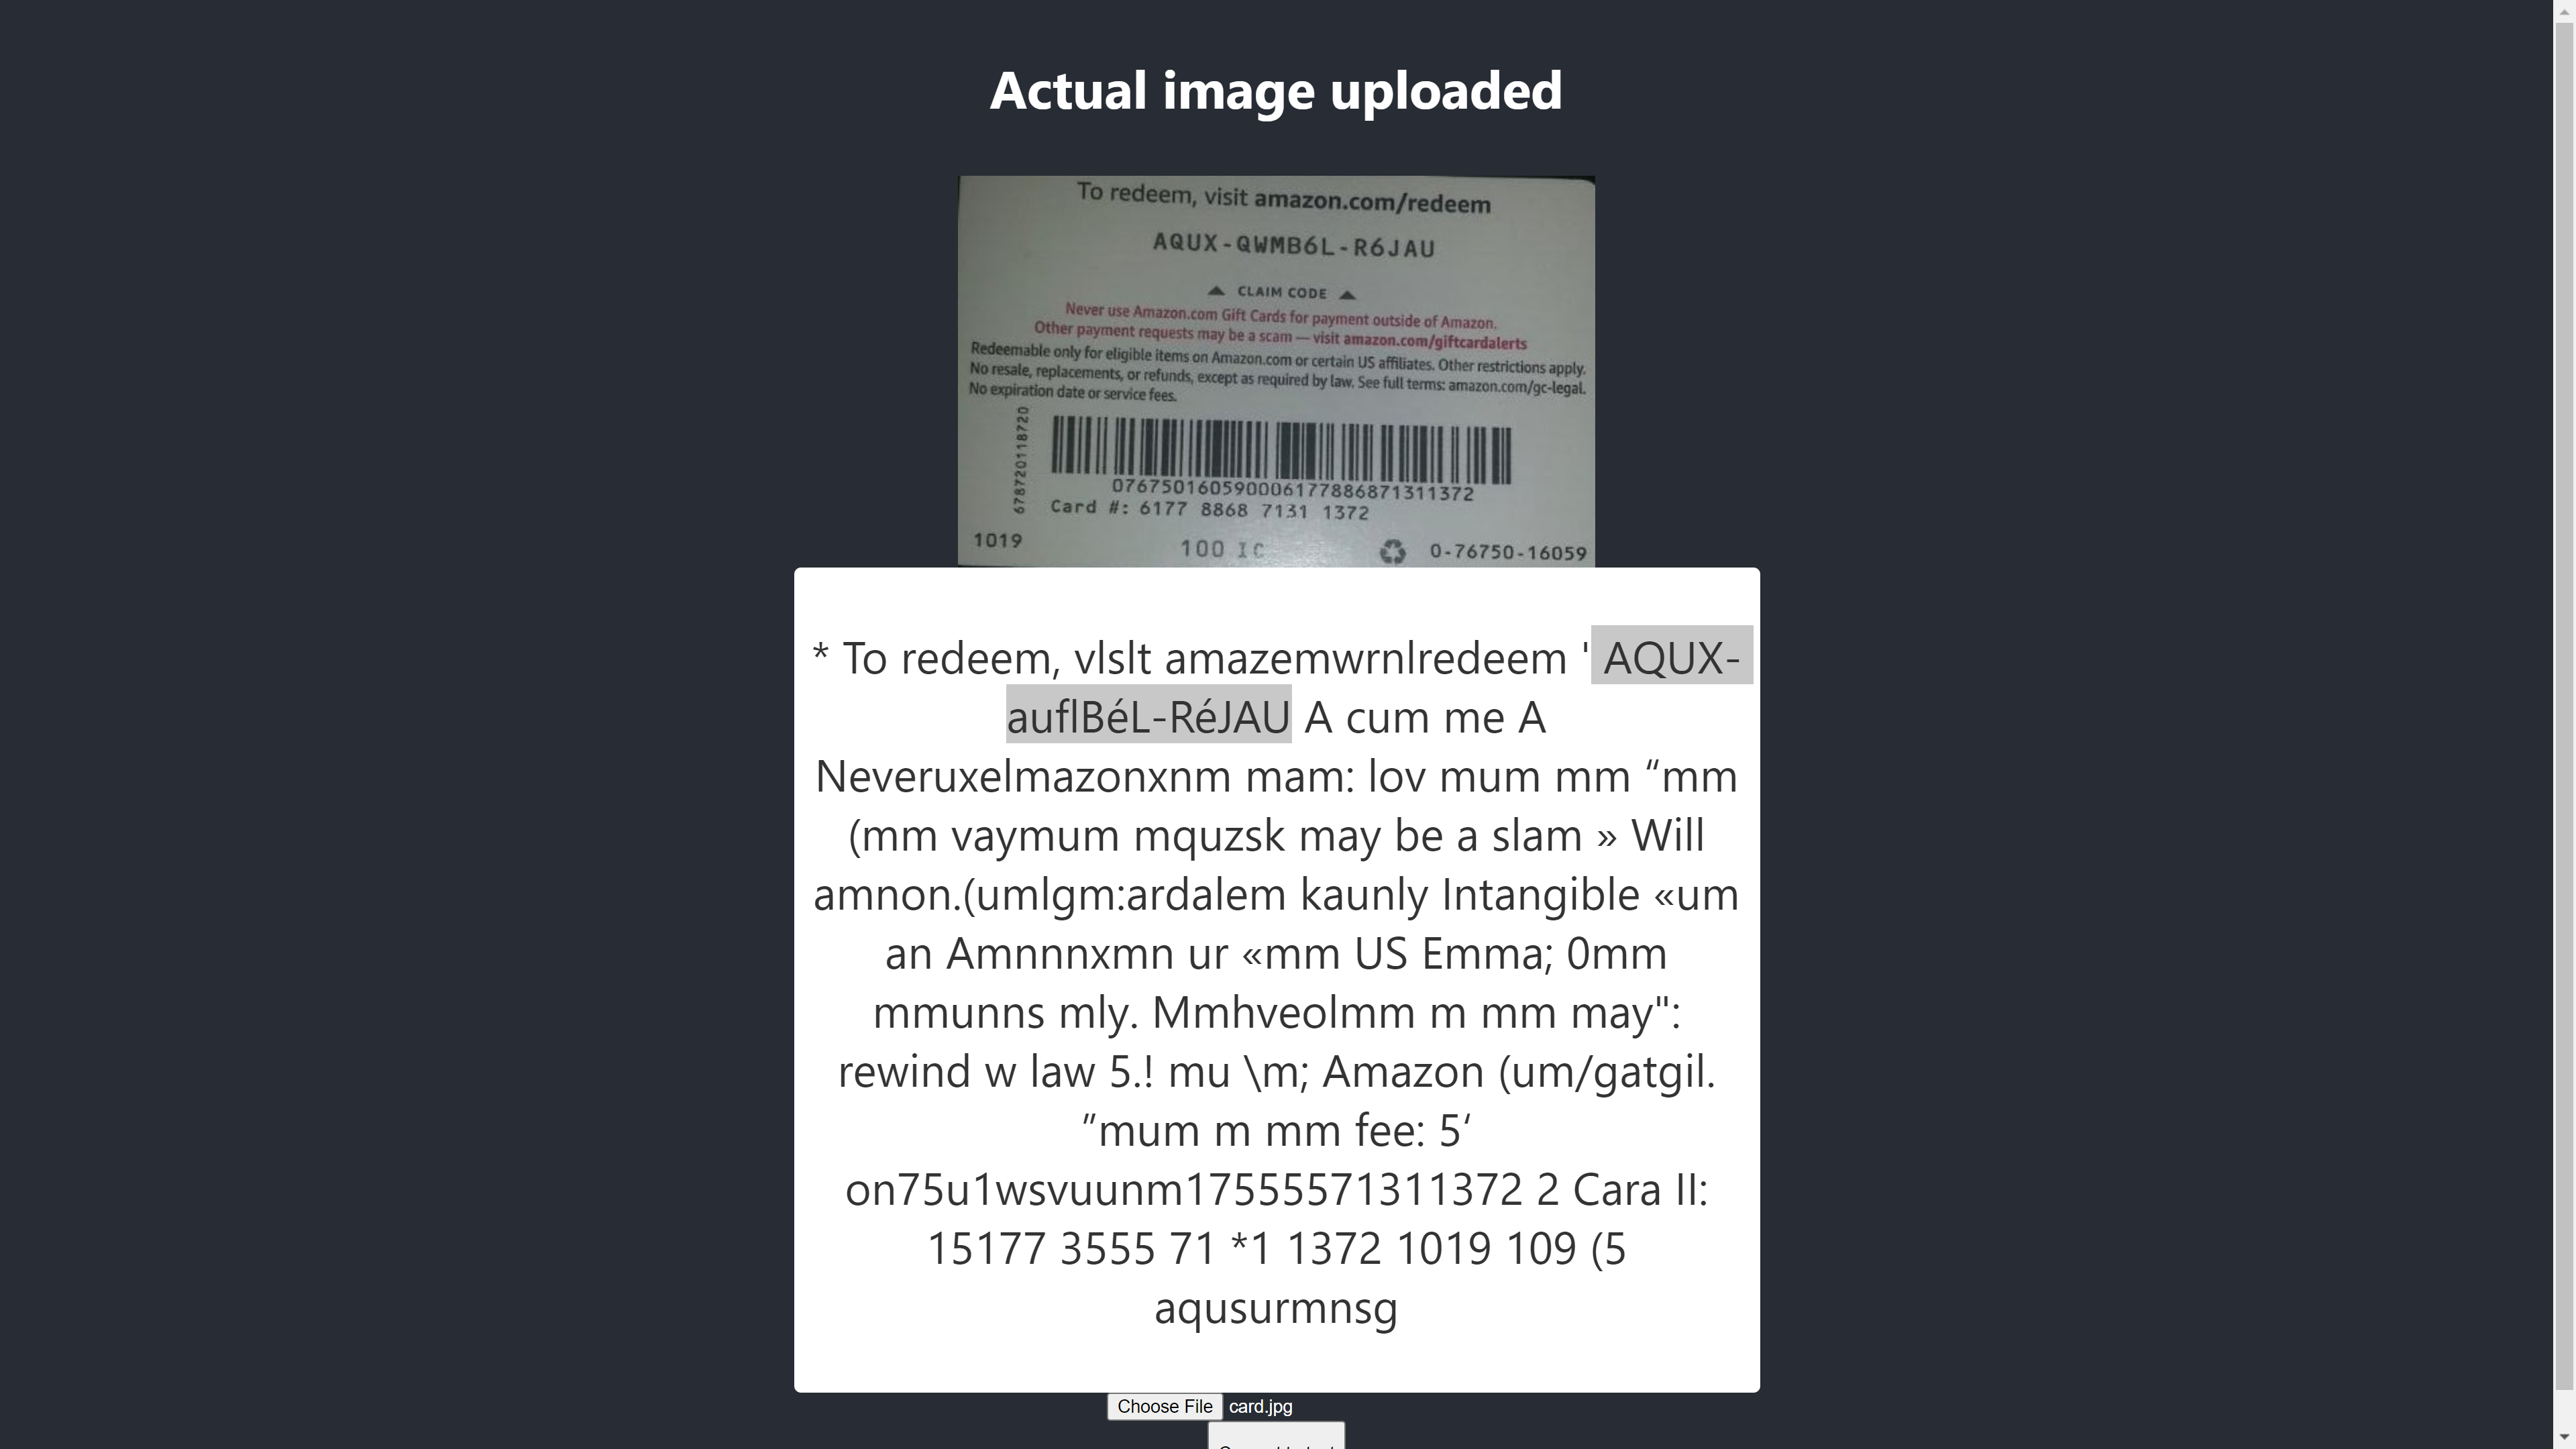
Here is the result of my first test:

The confidence level of the result above is 64. It is worth noting that the gift card image is dark in color and it definitely affects the result we get.
If you take a closer look at the image above, you will see the pin from the card is almost accurate in the extracted text. It is not accurate because the gift card is not really clear.
Oh, wait! What will it look like in Chrome?
Ah! The outcome is even worse in Chrome. But why is the outcome in Chrome different from Mozilla Firefox? Different browsers handle images and their colour profiles differently. That means, an image can be rendered differently depending on the browser. By supplying pre-rendered image.data to Tesseract, it is likely to produce a different outcome in different browsers because different image.data is supplied to Tesseract depending on the browser in use. Preprocessing an image, as we will see later in this article, will help achieve a consistent result.
We need to be more accurate so that we can be sure we are getting or giving the right information. So we have to take it a bit further.
Let’s try more to see if we can achieve the aim in the end.
There are a lot of factors that affect an image-to-text conversion with Tesseract.js. Most of these factors revolve around the nature of the image we want to process and the rest depends on how the Tesseract engine handles the conversion.
Internally, Tesseract preprocesses images before the actual OCR conversion but it doesn’t always give accurate results.
As a solution, we can preprocess images to achieve accurate conversions. We can binarise, invert, dilate, deskew or rescale an image to preprocess it for Tesseract.js.
Image pre-processing is a lot of work or an extensive field on its own. Fortunately, P5.js has provided all the image preprocessing techniques we want to use. Instead of reinventing the wheel or using the whole of the library just because we want to use a tiny part of it, I have copied the ones we need. All the image preprocessing techniques are included in preprocess.js.
Binarization is the conversion of the pixels of an image to either black or white. We want to binarize the previous gift card to check whether the accuracy will be better or not.
Previously, we extracted some texts from a gift card but the target PIN was not as accurate as we wanted. So there is a need to find another way to get an accurate result.
Now, we want to binarize the gift card, i.e. we want to convert its pixels to black and white so that we can see whether a better level of accuracy can be achieved or not.
The functions below will be used for binarization and it is included in a separate file called preprocess.js.
function preprocessImage(canvas) {
    const ctx = canvas.getContext('2d');
    const image = ctx.getImageData(0,0,canvas.width, canvas.height);
    thresholdFilter(image.data, 0.5);
    return image;
 }

 Export default preprocessImage
What does the code above do?
We introduce canvas to hold an image data to apply some filters, to pre-process the image, before passing it to Tesseract for conversion.
The first preprocessImage function is located in preprocess.js and prepares the canvas for use by getting its pixels. The function thresholdFilter binarizes the image by converting its pixels to either black or white.
Let’s call preprocessImage to see if the text extracted from the previous gift card can be more accurate.
By the time we update App.js, it should now look like the code this:
import { useState, useRef } from 'react';
import preprocessImage from './preprocess';
import Tesseract from 'tesseract.js';
import './App.css';

function App() {
  const [image, setImage] = useState("");
  const [text, setText] = useState("");
  const canvasRef = useRef(null);
  const imageRef = useRef(null);

  const handleChange = (event) => {
    setImage(URL.createObjectURL(event.target.files[0]))
  }

  const handleClick = () => {

    const canvas = canvasRef.current;
    const ctx = canvas.getContext('2d');

    ctx.drawImage(imageRef.current, 0, 0);
    ctx.putImageData(preprocessImage(canvas),0,0);
    const dataUrl = canvas.toDataURL("image/jpeg");

    Tesseract.recognize(
      dataUrl,'eng',
      {
        logger: m => console.log(m)
      }
    )
    .catch (err => {
      console.error(err);
    })
    .then(result => {
      // Get Confidence score
      let confidence = result.confidence
      console.log(confidence)
      // Get full output
      let text = result.text

      setText(text);
    })
  }

  return (
    <div className="App">
      <main className="App-main">
        <h3>Actual image uploaded</h3>
        <img
           src={image} className="App-logo" alt="logo"
           ref={imageRef}
           />
        <h3>Canvas</h3>
        <canvas ref={canvasRef} width={700} height={250}></canvas>
          <h3>Extracted text</h3>
        <div className="pin-box">
          <p> {text} </p>
        </div>
        <input type="file" onChange={handleChange} />
        <button onClick={handleClick} style={{height:50}}>Convert to text</button>
      </main>
    </div>
  );
}

export default App
First, we have to import “preprocessImage” from “preprocess.js” with the code below:
import preprocessImage from './preprocess';
Then, we add a canvas tag to the form. We set the ref attribute of both the canvas and the img tags to { canvasRef } and { imageRef } respectively. The refs are used to access the canvas and the image from the App component. We get hold of both the canvas and the image with “useRef” as in:
const canvasRef = useRef(null);
const imageRef = useRef(null);
In this part of the code, we merge the image to the canvas as we can only preprocess a canvas in JavaScript. We then convert it to a data URL with “jpeg” as its image format.
const canvas = canvasRef.current;
const ctx = canvas.getContext('2d');

ctx.drawImage(imageRef.current, 0, 0);
ctx.putImageData(preprocessImage(canvas),0,0);
const dataUrl = canvas.toDataURL("image/jpeg");
“dataUrl” is passed to Tesseract as the image to be processed.
Now, let’s check whether the text extracted will be more accurate.
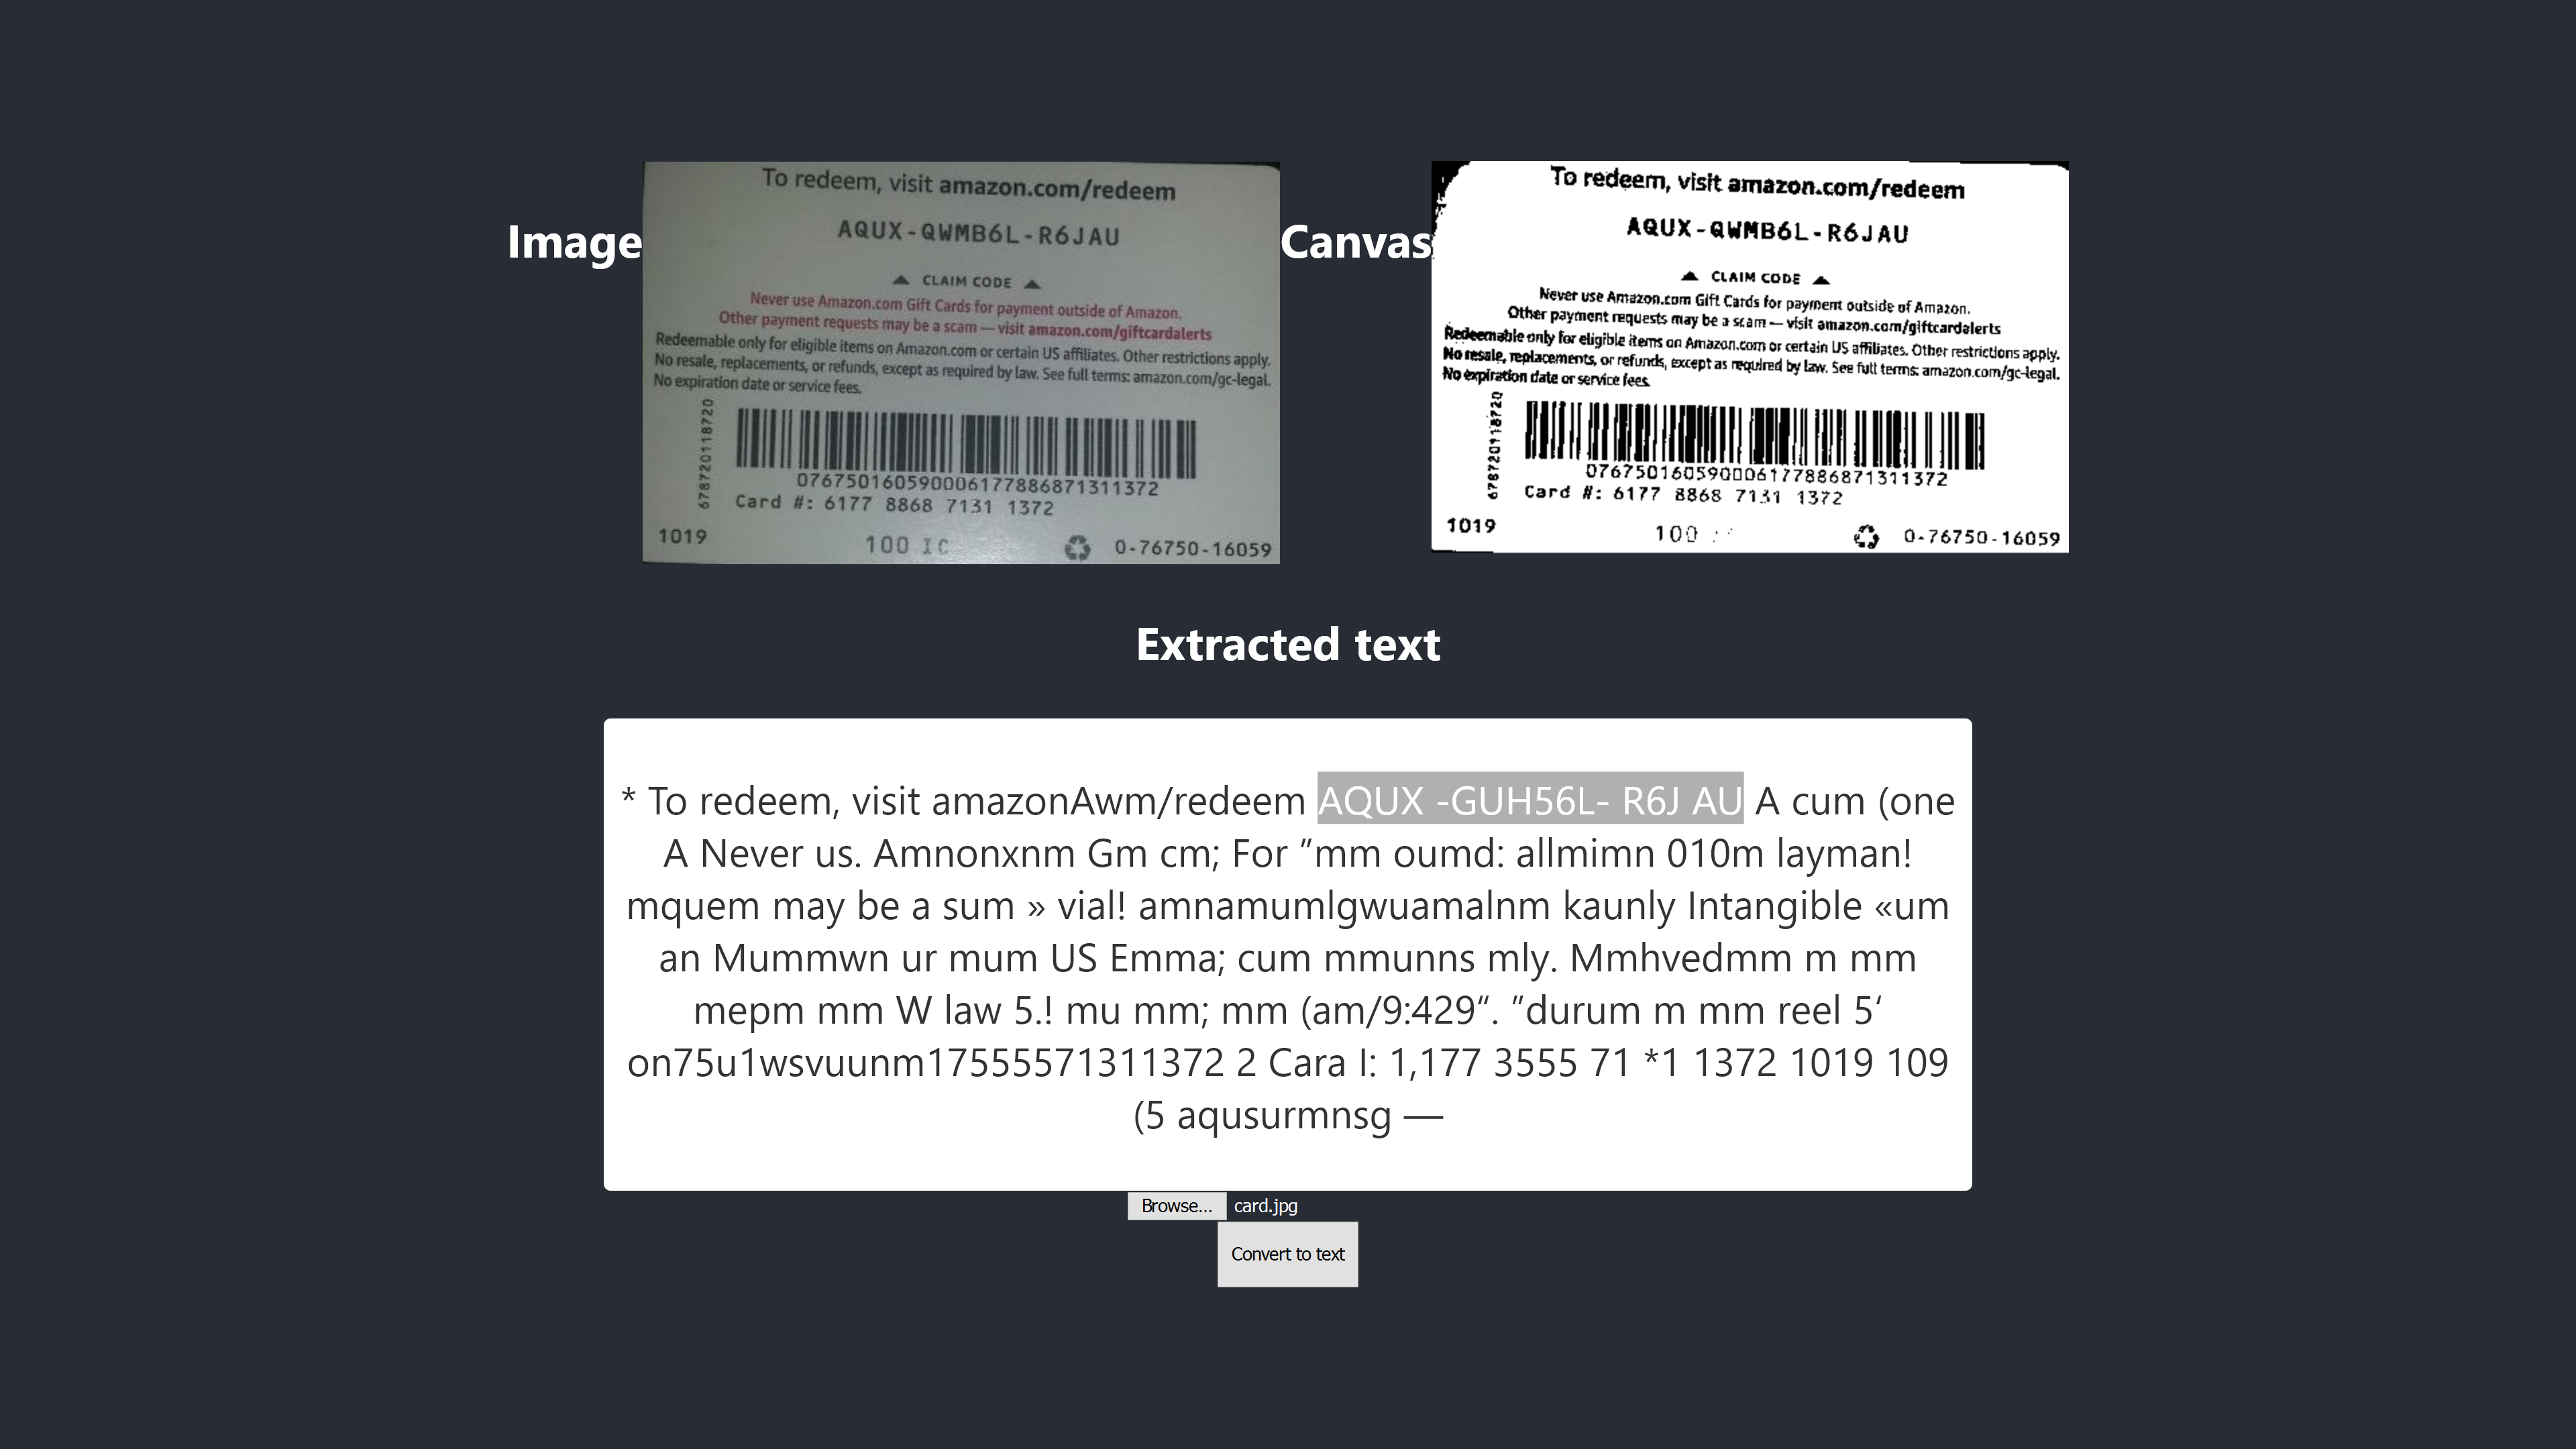
The image above shows the result in Firefox. It is obvious that the dark part of the image has been changed to white but preprocessing the image doesn’t lead to a more accurate result. It is even worse.
The first conversion only has two incorrect characters but this one has four incorrect characters. I even tried changing the threshold level but to no avail. We don’t get a better result not because binarization is bad but because binarizing the image doesn’t fix the nature of the image in a way that is suitable for the Tesseract engine.
Let’s check what it also looks like in Chrome:

We get the same outcome.
After getting a worse result by binarizing the image, there is a need to check other image preprocessing techniques to see whether we can solve the problem or not. So, we are going to try dilation, inversion, and blurring next.
Let’s just get the code for each of the techniques from P5.js as used by this article. We will add the image processing techniques to preprocess.js and use them one by one. It is necessary to understand each of the image preprocessing techniques we want to use before using them, so we are going to discuss them first.
Dilation is adding pixels to the boundaries of objects in an image to make it wider, larger, or more open. The “dilate” technique is used to preprocess our images to increase the brightness of the objects on the images. We need a function to dilate images using JavaScript, so the code snippet to dilate an image is added to preprocess.js.
Blurring is smoothing the colors of an image by reducing its sharpness. Sometimes, images have small dots/patches. To remove those patches, we can blur the images. The code snippet to blur an image is included in preprocess.js.
Inversion is changing light areas of an image to a dark color and dark areas to a light color. For example, if an image has a black background and white foreground, we can invert it so that its background will be white and its foreground will be black. We have also added the code snippet to invert an image to preprocess.js.
After adding dilate, invertColors and blurARGB to “preprocess.js”, we can now use them to preprocess images. To use them, we need to update the initial “preprocessImage” function in preprocess.js:
preprocessImage(...) now looks like this:
function preprocessImage(canvas) {
  const level = 0.4;
  const radius = 1;
  const ctx = canvas.getContext('2d');
  const image = ctx.getImageData(0,0,canvas.width, canvas.height);
  blurARGB(image.data, canvas, radius);
  dilate(image.data, canvas);
  invertColors(image.data);
  thresholdFilter(image.data, level);
  return image;
 }
In preprocessImage above, we apply four preprocessing techniques to an image: blurARGB() to remove the dots on the image, dilate() to increase the brightness of the image, invertColors() to switch the foreground and background color of the image and thresholdFilter() to convert the image to black and white which is more suitable for Tesseract conversion.
The thresholdFilter() takes image.data and level as its parameters. level is used to set how white or black the image should be. We determined the thresholdFilter level and blurRGB radius by trial and error as we are not sure how white, dark or smooth the image should be for Tesseract to produce a great result.
Here is the new result after applying four techniques:

The image above represents the result we get in both Chrome and Firefox.
Oops! The outcome is terrible.
Instead of using all four techniques, why don’t we just use two of them at a time?
Yeah! We can simply use invertColors and thresholdFilter techniques to convert the image to black and white, and switch the foreground and the background of the image. But how do we know what and what techniques to combine? We know what to combine based on the nature of the image we want to preprocess.
For example, a digital image has to be converted to black and white, and an image with patches has to be blurred to remove the dots/patches. What really matters is to understand what each of the techniques is used for.
To use invertColors and thresholdFilter, we need to comment out both blurARGB and dilate in preprocessImage:
function preprocessImage(canvas) {
    const ctx = canvas.getContext('2d');
    const image = ctx.getImageData(0,0,canvas.width, canvas.height);
    // blurARGB(image.data, canvas, 1);
    // dilate(image.data, canvas);
    invertColors(image.data);
    thresholdFilter(image.data, 0.5);
    return image;
}
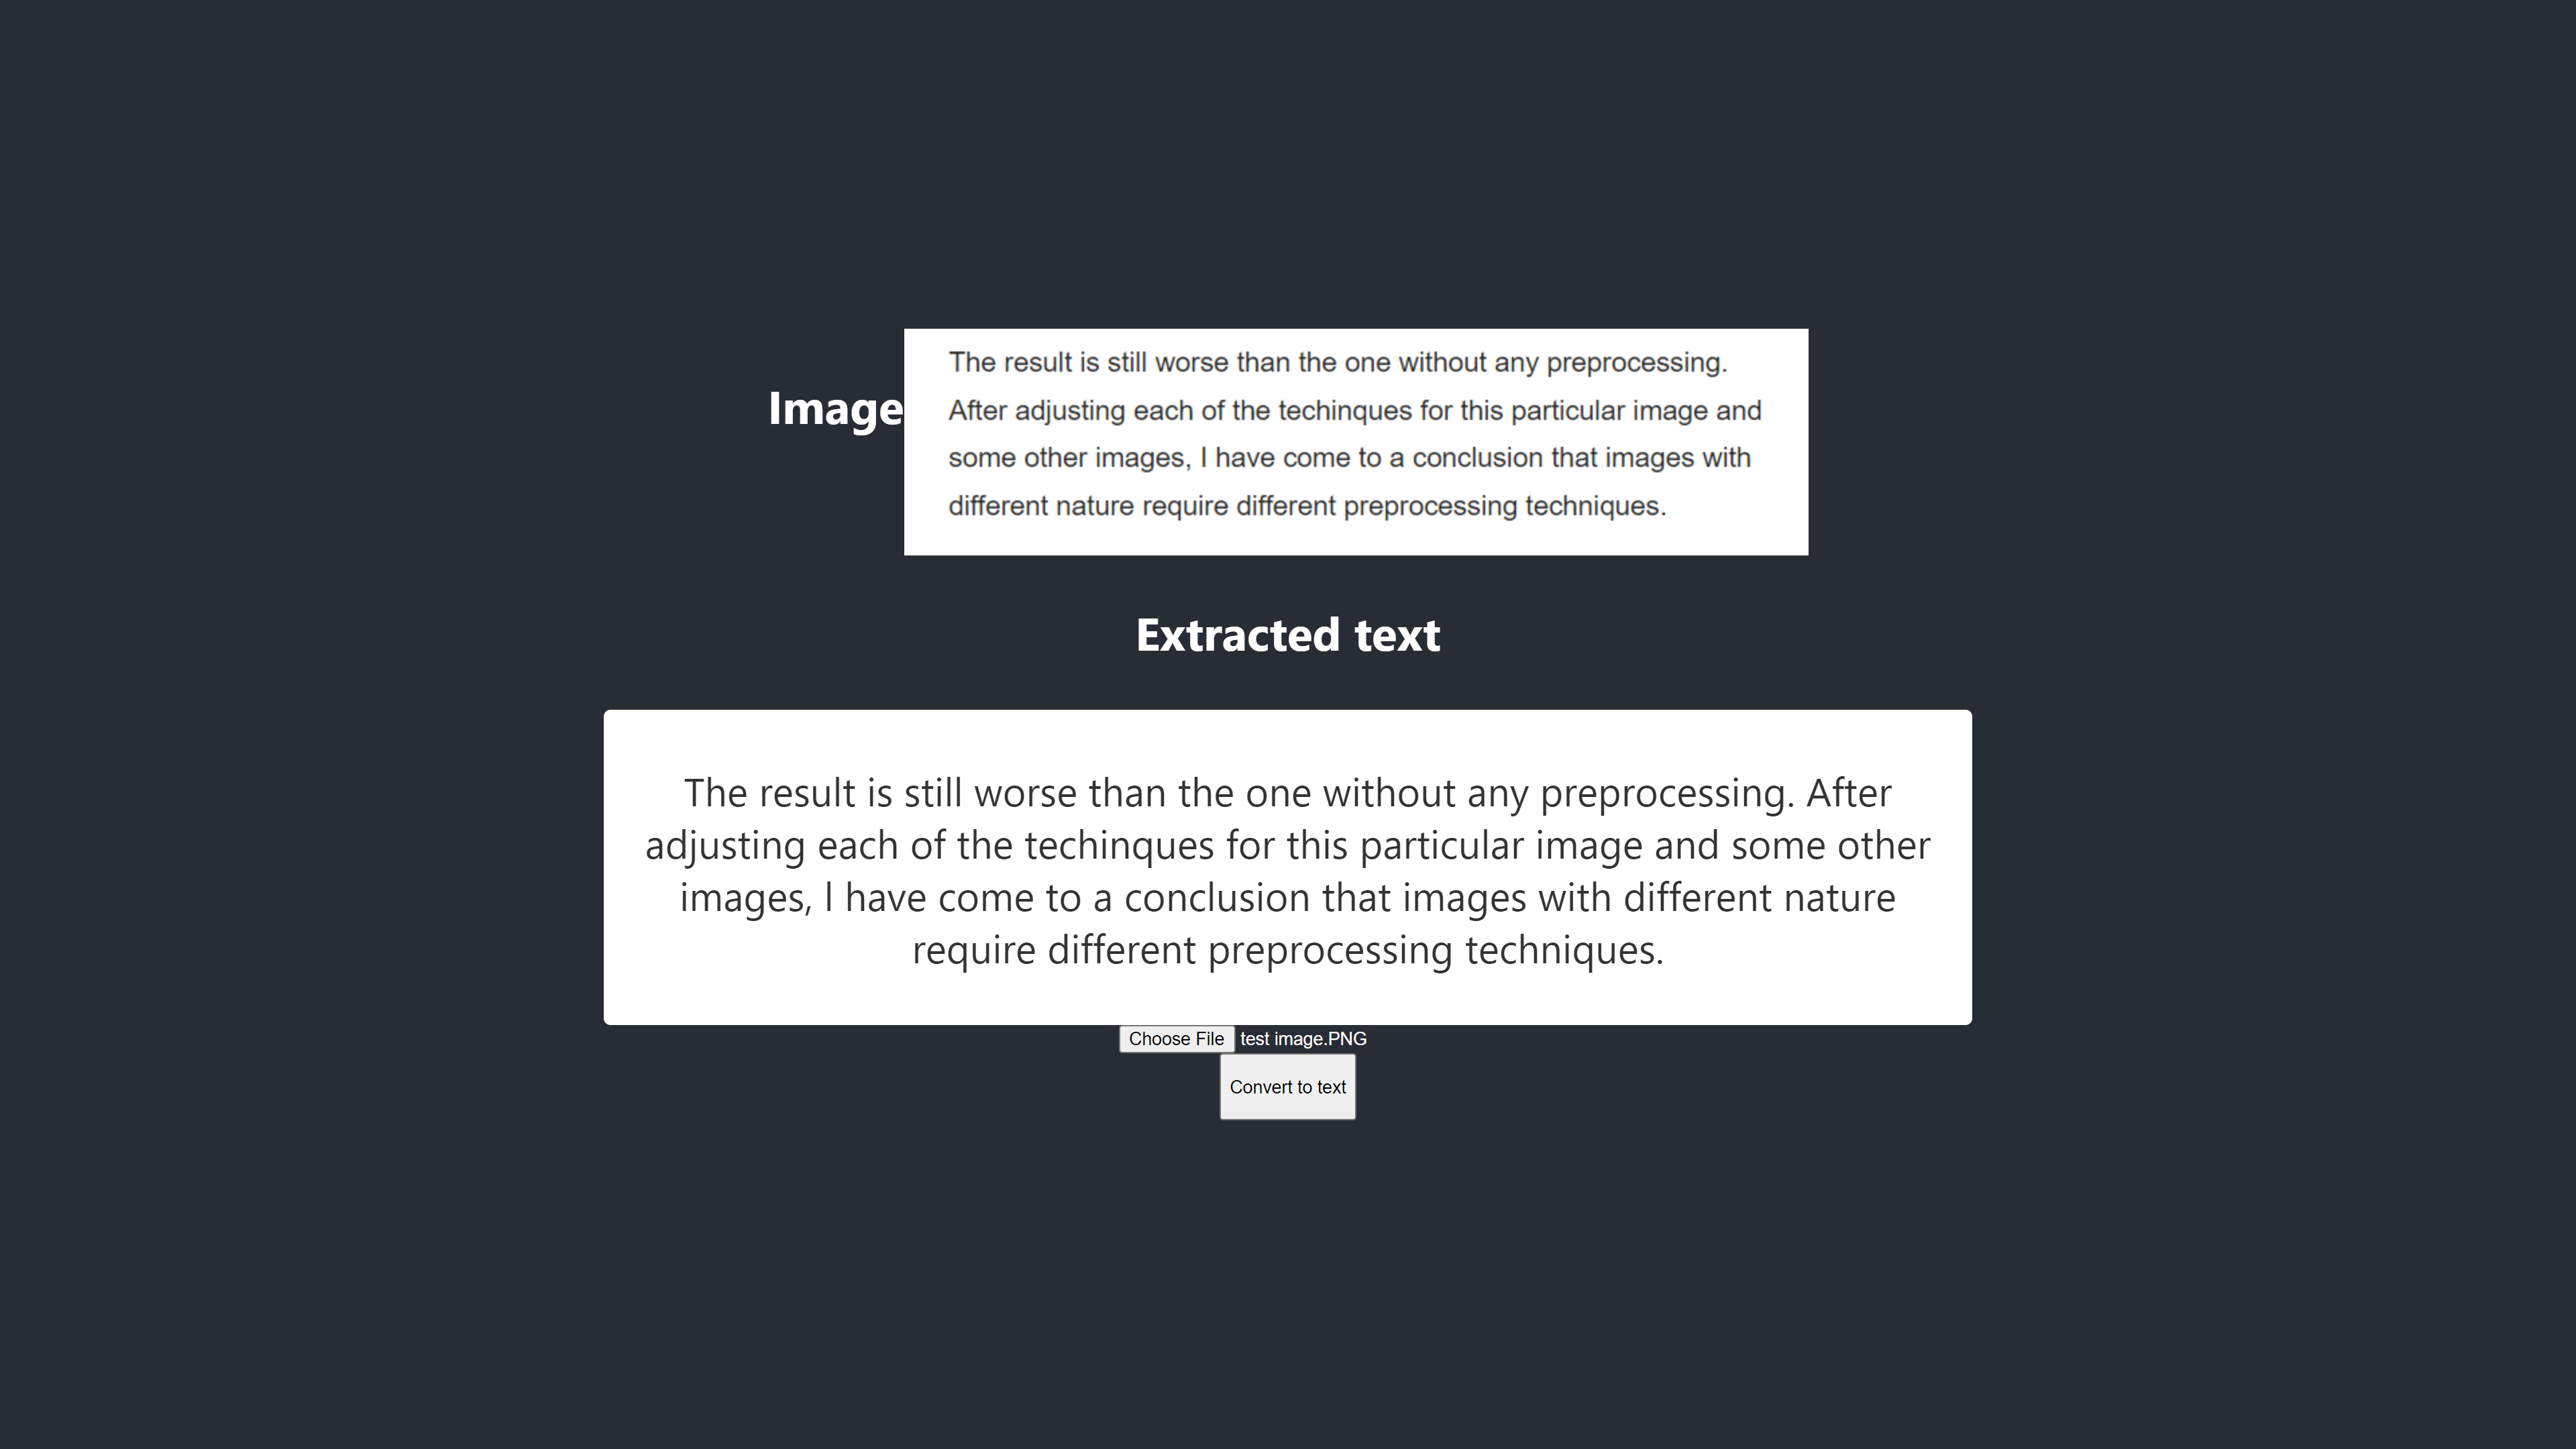
Now, here is the new outcome:

The result is still worse than the one without any preprocessing. After adjusting each of the techniques for this particular image and some other images, I have come to the conclusion that images with different nature require different preprocessing techniques.
In short, using Tesseract.js without image preprocessing produced the best outcome for the gift card above. All other experiments with image preprocessing yielded less accurate outcomes.
Initially, I wanted to extract the PIN from any Amazon gift card but I couldn’t achieve that because there is no point to match an inconsistent PIN to get a consistent result. Although it is possible to process an image to get an accurate PIN, yet such preprocessing will be inconsistent by the time another image with different nature is used.
The image below showcases the best outcome produced by the experiments.
The texts on the image and the ones extracted are totally the same. The conversion has 100% accuracy. I tried to reproduce the result but I was only able to reproduce it when using images with similar nature.
The conversion is 100% accurate.

In case I am dealing with texts without the need to extract any part of it, I will definitely accept a confidence score between 90 to 100 but reject any score below that. For example, 90 and above accuracy will be expected if I want to digitize documents such as cheques, a historic draft or whenever an exact copy is necessary. But a score that is between 75 and 90 is acceptable when an exact copy is not important such as getting the PIN from a gift card. In short, a confidence score helps in making decisions that impact our applications.
Given the data processing limitation caused by texts on images and the disadvantages associated with it, Optical Character Recognition (OCR) is a useful technology to embrace. Although OCR has its limitations, it is very promising because of its use of neural networks.
Over time, OCR will overcome most of its limitations with the help of deep learning, but before then, the approaches highlighted in this article can be utilized to deal with text extraction from images, at least, to reduce the hardship and losses associated with manual processing — especially from a business point of view.
It is now your turn to try OCR to extract texts from images. Good luck!
Hey, is there any way to identify if someone has fake followers
Do you want to make a link in bio page in WordPress?
A link in bio page is a popular way to send traffic from social media to multiple pages on your website. It’s commonly used by Instagram influencers and other social media celebrities.
In this article, we’ll show you how to easily make a link in bio page in WordPress.
")
A link in bio page lets you send social media traffic to specific pages on your WordPress website. Social media platforms like Instagram, Twitter, and Facebook only allow a single link in your profile.
But, instead of sending users to a single page, you can create a link in bio page that lets you send traffic to multiple pages.
There are services like LinkTree, ContactInBio, Bio.FM, and more that help you create link in bio pages.
By using a WordPress plugin, you can create your very own link in bio page without having to use a third party service.
Creating your own link in bio landing page gives you much more control and flexibility.
With that said, let’s take a look at how you can create a link in bio landing page in WordPress.
SeedProd is the best drag and drop WordPress page builder. It lets you simply create, edit, and customize your WordPress page layouts without having to write any code.
With this plugin, you can easily create a link in bio page that offers your visitors multiple links for Instagram.
For this tutorial, we’re going to focus on making an Instagram bio link page. However, the same page design can be used for any social media network.
First thing you need to do is install the SeedProd plugin. For more details, see our step by step guide on how to install a WordPress plugin.
Note: there is a free version of SeedProd that you can use, but we’ll be using the Pro version since it has more features and templates.
Once the plugin is activated, you need to navigate to SeedProd » Settings and enter your license key. This information is under your account on the SeedProd website.

To create a new landing page, navigate to SeedProd » Pages and then click the ‘Add New Landing Page’ button.
With SeedProd, you can create as many custom pages as you want.

Next, click on the ‘Lead Squeeze’ filter and select the ‘Personal Links’ page template.
All you have to do is hover over the template and click on the orange ‘Checkmark’ icon.

Once you’ve done that, you will see a popup where you can name your page.
The ‘Page Name’ won’t appear on your design, but it will set the URL for the page. So it’s important to choose a page name that makes sense when you add the link to Instagram.
After that, click the ‘Save and Start Editing the Page’ button.

This will bring up a new screen with the page builder. You can edit every single part of the page with the drag and drop builder.
The left-hand menu contains a variety of blocks that you can drag and drop onto the page.
Once an element is on your page, you can click it and bring up the options panel to customize it further.

Since we’re going to create an Instagram bio link page, we’ll delete the main image and the placeholder text.
To do this, hover over the image and click on the ‘Trash Can’ icon and then click on the ‘Yes, delete it!’ button.

After that, follow the same steps to delete the placeholder text.
Next, you can replace the header with your name, business name, or even upload your logo.
To add your logo to the top of the page, delete the text block, hover over the ‘Image’ block, and drag it to the top of the page.

Once you’ve done that, you can upload your logo by selecting ‘Use Your Own Image’ on the left-hand menu.
The process is the same as adding an image in WordPress.

The menu on the left lets you resize your image, change the alignment, and more.
You can even make your image a link that goes to your homepage, or another page on your WordPress blog.

Next, you can change the links to whatever you’d like to link to.
Simply click on one of the buttons, and you can change the button text, link, size, and more.

To change the overall look of the button, click the ‘Templates’ tab.
There are a ton of button presets for you to choose from.

If you want to customize the button further, then click on the ‘Advanced’ tab.
Here you can adjust the size of the button, change the background color, and more.

Once you’re done customizing your link in bio page, make sure to click ’Save’ at the top of the page.
To publish your page live, click the arrow next to ‘Save’ and select the ‘Publish’ option.

Your link in bio page is now live, and you can add the link to Instagram and your other social media profiles.
Best of all, the custom page you created is fully responsive, so it’ll look good no matter what screen size it’s being viewed on.

Another feature offered by services like LinkTree is page analytics. The best way to track your website analytics is with Google Analytics.
The easiest way to add Google Analytics to WordPress is by using MonsterInsights. It’s the best analytics plugin for WordPress and lets you view your website stats directly in your WordPress dashboard.
This means you can see how your link in bio page is performing at a glance.
Note: There is a free version of MonsterInsights available, but we’ll be using the pro version since it has more features and the addons we need.
For more details, see our step by step guide on how to install Google Analytics in WordPress.
Once you’ve integrated MonsterInsights and Google Analytics navigate to Insights » Addons. After that, find the ‘Page Insights’ addon and then install and activate.

Now, go to Page » All Pages and find the link in bio page you created.
Then, click the ‘Insights’ icon that looks like a traffic graph.

This will bring up your page statistics and show you the bounce rate, number of entrances, time on page, and more.
If you just added the link to your social media profiles, then it will take some time for this data to show up.

We hoped this article helped you make a link in bio page in WordPress. You may also want to see our guide on how to add social media feeds to WordPress and our expert picks of the best email marketing services for small businesses.
If you liked this article, then please subscribe to our YouTube Channel for WordPress video tutorials. You can also find us on Twitter and Facebook.
The post How to Make a Link in Bio Page in WordPress (Linktree Alternative) appeared first on WPBeginner.
When building websites or apps, accessibility testing is critical to ensure that what you build will work for all your users. This includes users with disabilities and also people with temporary and situational limitations (like that coworker who broke their arm skiing or the customer who is outdoors on their phone with glare on the screen).
We’re going to share how to "layer" accessibility testing by using a variety of tools and approaches at different stages in the digital product lifecycle to catch accessibility issues early — when it’s easier and cheaper to fix them. Taking a layered approach to testing your site for accessibility also improves the usability of your site — which in turn increases your customer base and reduces customer service inquiries. It can both make and save you money.
We’ll use a layered cake analogy to talk about the different layers of accessibility testing and when to use them. Food analogies have become quite popular in the accessibility world!

This approach has worked well for both of us. Mike is a seasoned accessibility advocate and senior strategist at a government technology firm (CivicActions), and Kate is the Head of Services at an accessibility testing platform (Fable).
While Mike looks at accessibility testing from a more technical angle early in the development phase and scanning for compliance on live sites, Kate focuses on the user experience. Both of us realized that combining many types of accessibility testing throughout the product development life cycle is a powerful way to improve overall product accessibility. In this article, we’ll share some of the things we’ve learned.
Most organizations approach accessibility in three main ways:

Far too many organizations rely exclusively on a single accessibility solution to validate their site. No one tool or process can give an organization the confidence that they are actually meeting the needs of the greatest possible number of people.
In many organizations, in order to do accessibility testing, you’ll need executives to prioritize and support the work. Here are tips on how to make that happen if you don’t already have buy-in for accessibility:
Accessibility should be baked into your process as early as possible. One place to start is with the procurement process. You can incorporate accessibility as part of the review process for any technology systems you are buying or building. DisabilityIN has some excellent resources on accessible IT procurement.
Looking for vendor accessibility statements or VPATs for products can help, but so can doing a quick review with some of the tools mentioned in the recipe below. Not all software is created equally, so you want to be sure you’re working with vendors who are actively contributing to tools and processes that help you prioritize accessibility from the start.
Another way to bake in accessibility early, if you’re creating or updating a design system, is to choose a component library that has been built with accessibility in mind. Look for libraries with a clear accessibility statement and an open issue queue that allows you to review problems.
Examples:
Another way to embed accessibility into your process is to update one of the personas your team uses to include disabilities. Many people have more than one disability, so creating at least one persona with several disabilities will ensure you keep that audience top-of-mind in all your early design work.

To flesh out that persona, talk to people with real disabilities — including temporary and situational limitations — to help you understand how they use technology, sites, and apps in the real world. One in five people have a permanent disability, but 100% of the population will be faced with vision, hearing, motion, or cognitive disabilities at some point in their lives. Our personas can reflect:
Little changes like these can have a big impact on how your team thinks. One way to pitch this change to leadership and teams is to talk about how it will make your personas more reflective of your actual users — which is the whole point of personas. They must be realistic.
One of the most impactful ways to involve people with disabilities is to have them help co-design services and products. Australia has a free training toolkit on how to do co-design with people with disabilities. There’s also a great case study on how one company ran co-design sessions with people with learning disabilities on behalf of the UK government.

Whether we like it or not, most of the decisions about organizational IT were made months (if not years) ago. Even when you are in the heat of a procurement process, accessibility is typically just one of many considerations. This is to be expected — even in organizations that are passionate about accessibility.
With legacy technology, the first step is simply to raise awareness with the vendor or team about the importance of accessibility. If you can detail accessibility issues that you want to be fixed using automated tools, it can help adjust how a vendor ranks their issue queue. There isn’t always a community portal to post concerns like this, but there might be a community on Twitter or Reddit where you could bring issues to light.
Additionally, there might be a customizable theme that could be adjusted to address some of the concerns. Some solutions may offer an Application Programming Interface (API) that would allow a developer to build an accessible user interface around it.
If a vendor has competitors, it can be useful to highlight the accessibility features that are included in that product. It can be beneficial to remind vendors that you do have options.
If legacy IT is an internally built product, a good way to quickly evaluate it is using the keyboard only. If you can’t use the product with a keyboard (for example, there’s no visible focus or the UI is only mouse clickable), it’s likely going to be a lot of effort to improve the accessibility of the product.
Consider offering alternative ways to access the service (e.g. phone support, in-person service, or email) so that people who can’t access the product digitally because of accessibility barriers can still get what they need.
Think about the organizational roadmap and when it might be feasible to upgrade or retire the product and weigh the cost and effort of accessibility against that. If you have other, newer products that aren’t accessible, it might be more productive to focus your efforts on those products if a legacy tool is nearing the end of life.
Here is an example of a comprehensive accessibility testing approach, with five layers for a really delicious accessibility testing cake. Figure out what your budget is going to be and then price out all the various testing approaches. Some are free, others will cost money. In the next section, we provide advice on where to start if all these layers of testing won’t fit in your budget.
Research User Needs
Ensure the questionnaire that you use to screen potential research participants asks about assistive technology use. This will make it easy to integrate people with disabilities into your existing research process at no extra cost. If you don’t have luck finding participants this way, try reaching out to disability organizations.
You can also modify your existing user personas to include users with disabilities. You can borrow aspects of user profiles from Gov.UK if you need to do this quickly and cheaply. If you have the budget for it, add people with disabilities into prototype and design reviews. This may be easiest to do if you engage a vendor that offers this type of service, hence the need for a budget. Alternatively, you can pay participants directly.
Manual QA
You don’t have to add extra people to do QA, just integrate it into your existing process. If you only do one thing, then stop using the mouse during your regular QA. You’ll catch accessibility bugs along with other functional bugs. If you want to do more, test with screen readers, and magnifiers too.
Here are various ways you can do manual accessibility QA without purchasing any tools:
User Testing
In large corporate environments with a dedicated budget for accessibility, you can pay assistive technology users to test functionality on your staging environment before launch.
Nothing gives you greater certainty that your product will work for people with disabilities than validating with users. Not even a perfect WCAG compliance score can give you that assurance the way a real person using the product can.
People with disabilities are often asked to do work for free, which is problematic as many with disabilities are already at an economic disadvantage. If you’re working on a personal project and there’s no budget, look at your network and see if there are people who would be interested in helping in exchange for an equivalent favor.
Specialist Review
If your organization has an accessibility team, have them do User Acceptance Testing pre-release. This is where you can get detailed feedback on WCAG compliance that you may have missed in earlier steps.
Think of it as a final check; your accessibility team isn’t doing all of the work on accessibility, everyone has a role to play. Accessibility teams are most effective when they set standards, provide training, give guidance and evaluate compliance. They support accessibility efforts but aren’t the only ones doing accessibility work. That way no one person or team becomes a bottleneck.
If you don’t have a team, you can hire accessibility professionals to do the reviews prior to release.
Start where you are. The goal isn’t perfection, but ongoing improvement. Implementing all layers at once doesn’t have to be the goal. Rather, it’s about starting with one or two layers and then gradually adding more layers as your team gets better at accessibility testing. A small slice of cake is better than no cake.
Every baker needs to have an arsenal of tools they can rely on. There are proprietary accessibility tools worth considering, but there are also excellent open-source tools including the ones we mentioned in the “recipe” above that are available for free.
In modern dynamic sites, it is important to use automated tools to catch accessibility errors early before they are published to the live site. It’s also important to crawl the site to see that all the pages still comply after they’ve been published and continuously updated.
The challenge is that designers and developers often assume that if the tests don’t report any errors, a site is good. When you give people a test, people tend to write towards it. Unfortunately, many designers and developers stop when they eliminate the errors that they see with WAVE or Axe.
To be clear, it is a small fraction of teams that even do this, but if we want to make sites that are perceivable, operable, and understandable for more people using different types of technology, we have to do better.
Automated tools are great but limited. Even the best available automated tools only catch about 30 to 40% of WCAG compliance accessibility errors. An automated tool can tell you if an image is missing an alternative description, but what it can’t tell you is if the description is entirely inaccurate or used in the wrong context and therefore useless. That still requires a person to evaluate.
To get past these limits, it’s important to recognize that accessibility doesn’t automatically mean usability for people with disabilities. Think of accessibility as the lowest bar; it works with assistive technology, but to go beyond “it works” to “it’s enjoyable and easy to use” you’ll need to test with real users.
Many organizations already do usability testing, but most don’t include people with disabilities. If you’re having trouble recruiting more diverse participants, consider working with an organization that has a community of assistive technology users and a platform to make testing quick and easy.
Use a layered accessibility testing approach when you are working to build an inclusive website. Don’t rely on just one type of testing to find barriers for people with disabilities.

Remember the goal isn’t to score high in a testing tool, or even to meet a WCAG guideline, but rather to make your content more widely available, including to assistive technology users.
Ultimately, accessibility statements are the icing on the cake. Include an accessibility statement with contact information on your site to provide a feedback loop. Your users are the experts and everyone should be part of making a site better over time.
There is always something happening behind the scenes at Smashing. Over the last months, we’ve been continuously working around the performance of the site, but we’ve also removed floating labels from our forms, redesigned our error messages, revamped our Membership dashboard, refactored and adjusted our responsive tables and worked with new authors on a bunch of new articles that will be published on the site over the next months. So, here’s your monthly Smashing update.
After we’ve published Adam Silver’s piece on why floating labels are a bad idea, we’ve seen a huge discussion on Twitter and in the comments about them. Surely you can save quite a bit of vertical space with them, but the cost of it has plenty of accessibility and autofill issues. Ironically, at the moment of publishing that article in late February, we still had floating labels used in most of our forms, and we wanted to explore if removing them would actually help us improve the overall experience on the site.

So we’ve removed the floating labels and redesigned input fields, placing the labels above the input field, just like Adam has suggested. We also used the opportunity to add some subtle adjustments to our actual forms, and we are still working on it. But the result looked better already.

After a few days of refinements, we’ve stumbled upon styling issues with autofill. We wanted to adjust the font-size and the font used with autofill with the :-webkit-autofill CSS pseudo-class — it matches when an <input> element has its value auto-filled by the browser — but it’s not supported across a range of browsers, and frankly caused quite a bit of a hassle when an auto-filled value is validated once the visitor leaves an input field.
In fact, we had to look into various cases for the form design:
:active and on :focus?Frankly, this turned out to be quite a rabbit hole, and we are still looking into all these issues at the moment. Given that a vast majority of our readers — wonderful people like you — are using autofill, it’s worth spending time designing an experience around it.

After a bit of refinements, around 2 weeks after the initial article by Adam was published, we pushed the changes live. We did manage to resolve plenty of accessibility issues and layout issues on mobile just by removing floating labels. But we can’t really say just yet whether it had any impact on the business metrics — well, we’ll need to wait for a big book release to see that.
Working around improving performance was an ongoing journey on SmashingMag for a while. At the end of last year, we noticed that we’ve seen quite a drop in performance in 2020, so we rolled up our sleeves and got to work. By changing the delivery of CSS and JavaScript we landed in the green score area for most pages on the site in desktop view; yet the performance on mobile was still quite low, averaging between the Lighthouse scores of 60-70 for most articles.
The final prompt for a more aggressive optimization was the “Core Web Vitals” dashboard in the Google Search Console. On February 19th, over 3590 articles were flagged with a poor CLS score (>0.25) — on desktop and on mobile. We first thought that it could be related to the cookie banner adjustments we made recently, but it turned out it was a Google Search Update that seemed to be more aggressively penalizing us for a high CLS.


So we’ve turned to Twitter to ask the community if anybody had further suggestions around what we could do. The feedback was fantastic from people all over the world — with some thorough reviews submitted via Twiter’s DMs, and general thoughts by people on what we could do.
Patrick Meenan has suggested to delay the service worker install, which we implemented the same day. Apparently, the service worker was installing and activating before LCP and was causing contention.
Gael Metais suggested to more aggressively subset web fonts and look into caching issues with our AVIF files. The next day we subset the fonts and pushed them live. We couldn’t fix the AVIF issue quickly due to the way media management is running currently, but then Barry Pollard suggested to test if using base64-encoding for images would help.
Base64-encoding seemed like a slightly odd concept in the world of HTTP/2, but we’ve decided to build a small prototype to test whether it helps. So, did it? Oh yes, it surely did.
We were very surprised by early results. After a few iterations, we ended up serving our LCP author profile photos in a slightly convoluted but quite effective way:
<picture>
  <source type="image/avif" srcset="data:image/avif;base64,AAA...">
  <img src="https://.../author.jpg"
    loading="eager"
    decoding="async"
    width="200"
    height="200"
    alt="">
</picture>
<picture> + srcset in the browser.This would be working only for the LCP author profile photos on the homepage and on article pages. At the moment, around 35% of our mobile traffic is on iOS, so those users wouldn’t be getting the images faster, but encoding a large JPEG image only, or encoding both AVIF and JPEG files would unnecessarily bloat HTML which we wanted to avoid.
We then adjusted our build to generate base64-strings for AVIF files automatically during the build time (if author images are available as AVIF images). That also makes it easy for us to remove it when we don’t need it any longer.
Additionally, we removed duplicates and redundancies with the YellowLab.Tools, refactored some CSS based on reports from CSS auditing tools, and adjusted our browserslist config to reduce optimizations for IE10 and IE11.

Overall we have:
The impact was quite noticeable! For the first time in years, we’ve found our way to the green score zone of 90–95 on mobile, while also making our rounds around 96–100 on desktop. And that with a React application running in the background and plenty of scripting happening behind the scenes.
Still quite a bit of work to do, especially in the JavaScript world, but we seem to be on the right track — plus we are just about to implement f-mods with the kind and generous help of Simon Hearne.
And the best bit: all the credit goes to the incredible community and generous, passionate, and kind folks who have been sending us suggestions and pointers via Twitter. For that, we are very grateful — that’s the true strength and kindness of people in the community. Thank you! ❤️
We were busy not only with performance and UX optimizations though. You probably visit the site because of the articles we publish, and so we’ve been experimenting with something new.
In March, we started working on a new series of articles dedicated to tools and resources that can help you as a designer or developer get better at your work. You could see them as good old-fashioned round-ups, but we take time to prepare pieces with pointers that you can use every now and again over time.

We’ve started out with tooling around CSS, but please expect more similar pieces around everything else front-end. We hope to keep you on your toes with them, so get ready! And here are the first articles we’ve published so far:
We've also been reaching out to invite new authors and smart folks like you to work on interesting case studies from your ongoing projects. So please reach out to us if you’ve been working on an interesting and challenging project recently — be it around accessibility, CSS/JS, performance, migration, refactoring or pretty much anything else. No worries if you’ve never written before — we are here to help and guide you.
Also, if you have released an open-source tool and would love to draw more attention to it, please let us know as well and we’d love to have you presenting your project here in the magazine as well. And, of course, if you have any feedback, please leave the comments here and let us know what you think!
 Almost a year ago, we started running our very own online workshops, and each and every one has been an incredible experience to our entire team. With wonderful attendees from all over the world coming together to learn together, so many ideas have been brought to life — especially in the live design and coding sessions.
Here’s a brief overview of the workshops that we have planned for the next months:
| Dates | Workshop | Speaker | Topic |
|---|---|---|---|
| March 30–31 | Designing The Perfect Navigation | Vitaly Friedman | UX, Design |
| April 8–16 | Architecting Design Systems | Nathan Curtis & Kevin Powell | Workflow & Code |
| April 20 – May 5 | Web Performance | Harry Roberts | Workflow, Code |
| April 22 – May 6 | Smart Interface Design Patterns | Vitaly Friedman | UX, Design |
| May 3–11 | Make Design Systems People Want to Use | Dan Mall | Workflow, Code |
| May 6–14 | Psychology For UX and Product Design | Joe Leech | UX, Design |
| May 20 – June 4 | The React Performance | Ivan Akulov | Workflow, Code |
| May 25 – June 8 | Dynamic CSS | Lea Verou | Workflow, Code |
| June 9–23 | New Adventures In Front-End 2021 | Vitaly Friedman | Workflow, Code |
| July 8–22 | Level-Up With Modern CSS | Stephanie Eckles | Workflow, Code |
Ah, we also have workshop bundles from which you can choose 3, 5 or even 10 tickets for the workshops of your choice — ongoing, upcoming or the ones happening in the future. Also, feel free to subscribe here if you’d like to be the first to be notified when new workshops come up. Plus, you get access to early-bird tickets as well.

 On April 27, you can join us live on Smashing Meets, a friendly and inclusive, online meetup for people who work on the web. This “Actions Speak Louder” edition features three amazing sessions where our experts will design and code live — to help an amazing NGO get a better site.
Smashing Meets is free for everybody, so please tell your friends and colleagues to join in! Of course, we’d love it if you join our community and become a member. A Smashing Membership starts at only 3 USD a month. You get access to all digital Smashing Books, webinars and receive many freebies and friendly discounts to events, services, and products. 🎪
Last year, we’ve published a new Smashing Podcast episode every two weeks, and the feedback has been awesome! With over 56k downloads (just over a thousand per week, and growing!), we’ve had 34 guests on the podcast with different backgrounds and so much to share!
If you don’t see a topic you’d like to hear and learn more about, please don’t hesitate to reach out to host Drew McLellan or get in touch via Twitter anytime — we’d love to hear from you!
With our Smashing Newsletter, we aim to bring you useful, practical tidbits and share some of the helpful things that folks are working on in the web industry. There are so many talented folks out there working on brilliant projects, and we’d appreciate it if you could help spread the word and give them the credit they deserve! Also, by subscribing, there are no third-party mailings or hidden advertising, and your support really helps us pay the bills. ❤️
this vs. thatprefers-reduced-*Phew, thanks for reading all the way till the end! We are a small team with just over 15 passionate and dedicated people scattered all over the world, and we do our best to help you and our wonderful community get better at our work. So thanks for sticking around for so long!
Frankly, we can’t wait to see you online and in person, but one thing is for certain: we sincerely appreciate you being smashing month after month, and for that, we are eternally grateful. And of course, we’ll keep you updated about our updates — for sure! ;-) (But you can always subscribe to our newsletter, too!)
Stay smashing, everyone!
Team communication platforms are getting popular day by day, as more and more people work from home. Slack and Discord are two of the most popular team communication platforms. While Discord is focused on gamers, some functionality, such as the ability to add up to 50 members in the voice call room, make it an excellent alternative to Slack. One of the most significant advantages of using such a platform is that many tasks can be automated using bots.
In this article, we’ll build a bot from scratch using JavaScript and with help from Discord.js. We’ll cover the process from building the bot up to deploying it to the cloud. Before building our bot, let’s jot down the functionality that our bot will have:
Because the Discord.js module is based on Node.js, I'll assume that you are somewhat familiar with Node.js and npm. Familiarity with JavaScript is a must for this article.
Now that we know the prerequisites and our goal, let’s start. And if you want to clone and explore the code right away, you can with the GitHub repository.
We will be building the bot by following a few steps.
First, we’ll build a Discord server. A Discord server is like a group in which you can assign various topics to various channels, very similar to a Slack server. A major difference between Slack and Discord is that Slack requires different login credentials to access different servers, whereas in Discord you can access all of the servers that you are part of with a single authentication.
The reason we need to create a server is that, without admin privileges for a server, we won’t be able to add a bot to the server. Once our server is created, we will add the bot to the server and get the access token from Discord’s developer portal. This token allows us to communicate with the Discord API. Discord provides an official open API for us to interact with. The API can be used for anything from serving requests for bots to integrating OAuth. The API supports everything from a single-server bot all the way up to a bot that can be integrated on hundreds of servers. It is very powerful and can be implemented in a lot of ways.
The Discord.js library will help us to communicate with the Discord API using the access token. All of the functions will be based on the Discord API. Then, we can start coding our bot. We will start by writing small bits of code that will introduce us to the Discord API and the Discord.js library. We will then understand the concept of partials in Discord.js. Once we understand partials, we’ll add what’s known as a “reaction role” system to the bot. With that done, we will also know how to communicate with Twitter using an npm package called twit. This npm package will help us to integrate the Twitter tweet-forwarding functionality. Finally, we will deploy it to the cloud using Heroku.
Now that we know how we are going to build our bot, let’s start working on it.
The first thing we have to do is create a Discord server. Without a server with admin privileges, we won’t be able to integrate the bot.
Building a Discord server is easy, and Discord now provides templates, which make it even easier. Follow the steps below, and your Discord server will be ready. First, we’ll choose how we are going to access the Discord portal. We can use either the web version or the app. Both work the same way. We’ll use the web version for this tutorial.
If you’re reading this article, I’ll assume that you already have a Discord account. If not, just create an account as you would on any other website. Click the “Login” button in the top right, and log in if you have an account, or click the “Register” button. Fill out the simple form, complete the Captcha, and you will have successfully created an account. After opening the Discord app or website, click the plus icon on the left side, where the server list is. When you click it, you’ll be prompted to choose a template or to create your own.

We’ll choose the “Create My Own” option. Let’s skip the next question. We’ll call our Discord server “Smashing Example”. You may also provide a photo for your server. Clicking the “Create” button will create your server.
Before coding the bot, we need to get a token provided by Discord. This token will establish a connection from our code to Discord. To get the token, we have to register our bot with our server. To register the bot, we have to visit Discord’s developer portal. If you are building a Discord app for the first time, you’ll find an empty list there. To register our app, click on the “New Application” link in the top-right corner. Give your application a name, and click the “Create” button. We’ll name our app “Smashing App”.

Visit this URL in a new tab, choose your server, and click on “Authorize”. Complete the Captcha, and our bot will now be connected with the server that we chose.
If you visit the Discord server now, you will see that a notification has already been sent by Discord, and the bot is now also showing up in the members’ list on the right side.
Now that our bot is connected with the server, if you send a “Hello” to the server, the bot will reply with a “Hi”. This is just an introduction to the Discord API. The real fun is about to start.
To familiarize ourselves a bit more with the Discord.js module, let’s add functionality that sends a joke whenever a particular command is received. This is similar to what we have just done.
To make this part clearer and easier to understand, we aren’t going to use any APIs. The jokes that our bot will return will be a simple array. A random number will be generated each time within the range of the array, and that specific location of the array will be accessed to return a joke.
In case you have ever used functionality provided by a bot in Discord, you might have noticed that some special character distinguishes normal messages from special commands. I am going to use a ? in front of our commands to make them look different than normal messages. So, our joke command will be ?joke.
We will create an array named jokes in our app.js file. The way we will get a random joke from the array is by using this formula:
jokes[Math.floor(Math.random() * jokes.length)]
The Math.random() * jokes.length formula will generate a random number within the range of the array. The Math.floor method will floor the number that is generated.
If you console.log() this, Math.floor(Math.random() * jokes.length), you’ll get a better understanding. Finally, jokes[] will give us a random joke from the jokes array.
You might have noticed that our first code was used to reply to our message. But we don’t want to get a reply here. Rather, we want to get a joke as a message, without tagging anyone. For this, the Discord.js module has a method named channel.send(). Using this method, we can send messages to the channel where the command was called. So, the complete code up to this point looks like this:
const Discord = require('discord.js');
require('dotenv').config();

const client = new Discord.Client();

client.login(process.env.BOT_TOKEN);

client.on('ready', () => console.log('The Bot is ready!'));

// Adding jokes function

// Jokes from dcslsoftware.com/20-one-liners-only-software-developers-understand/
// www.journaldev.com/240/my-25-favorite-programming-quotes-that-are-funny-too
const jokes = [
  'I went to a street where the houses were numbered 8k, 16k, 32k, 64k, 128k, 256k and 512k. It was a trip down Memory Lane.',
  '“Debugging” is like being the detective in a crime drama where you are also the murderer.',
  'The best thing about a Boolean is that even if you are wrong, you are only off by a bit.',
  'A programmer puts two glasses on his bedside table before going to sleep. A full one, in case he gets thirsty, and an empty one, in case he doesn’t.',
  'If you listen to a UNIX shell, can you hear the C?',
  'Why do Java programmers have to wear glasses? Because they don’t C#.',
  'What sits on your shoulder and says “Pieces of 7! Pieces of 7!”? A Parroty Error.',
  'When Apple employees die, does their life HTML5 in front of their eyes?',
  'Without requirements or design, programming is the art of adding bugs to an empty text file.',
  'Before software can be reusable it first has to be usable.',
  'The best method for accelerating a computer is the one that boosts it by 9.8 m/s2.',
  'I think Microsoft named .Net so it wouldn’t show up in a Unix directory listing.',
  'There are two ways to write error-free programs; only the third one works.',
];

client.on('message', (msg) => {
  if (msg.content === '?joke') {
    msg.channel.send(jokes[Math.floor(Math.random() * jokes.length)]);
  }
});
I have removed the “Hello”/“Hi” part of the code because that is of no use to us anymore.
Now that you have a basic understanding of the Discord.js module, let's go deeper. But the module can do a lot more — for example, adding roles to a person or banning them or kicking them out. For now, we will be building a simple reaction-role system.
Whenever a user responds with a special emoji in a particular message or channel, a role tied to that emoji will be given to the user. The implementation will be very simple. But before building this reaction-role system, we have to understand partials.
Partial is a Discord.js concept. Discord.js usually caches all messages, which means that it stores messages in a collection. When a cached message receives some event, like getting a message or a reply, an event is emitted. But messages sent before the bot has started are uncached. So, reacting to such instances will not emit any event, unless we fetch them before we use them. Version 12 of the Discord.js library introduces the concept of partials. If we want to capture such uncached events, we have to opt in to partials. The library has five types of partials:
USERCHANNELGUILD_MEMBERMESSAGEREACTIONIn our case, we will need only three types of partials:
USER, the person who reacts;MESSAGE, the message being reacted to;REACTION, the reaction given by the user to the message.The documentation has more about partials.
The Discord.js library provides a very easy way to use partials. We just need to add a single line of code, passing an object in the Discord.Client() constructor. The new constructor looks like this:
const client = new Discord.Client({
  partials: ['MESSAGE', 'REACTION', 'CHANNEL'],
});
To enable the reaction-role system, we have to create some roles. The first role we are going to create is the bot role. To create a role, go to “Server Settings”:

In the server settings, go to the “Roles” option, and click on the small plus icon (+) beside where it says “Roles”.
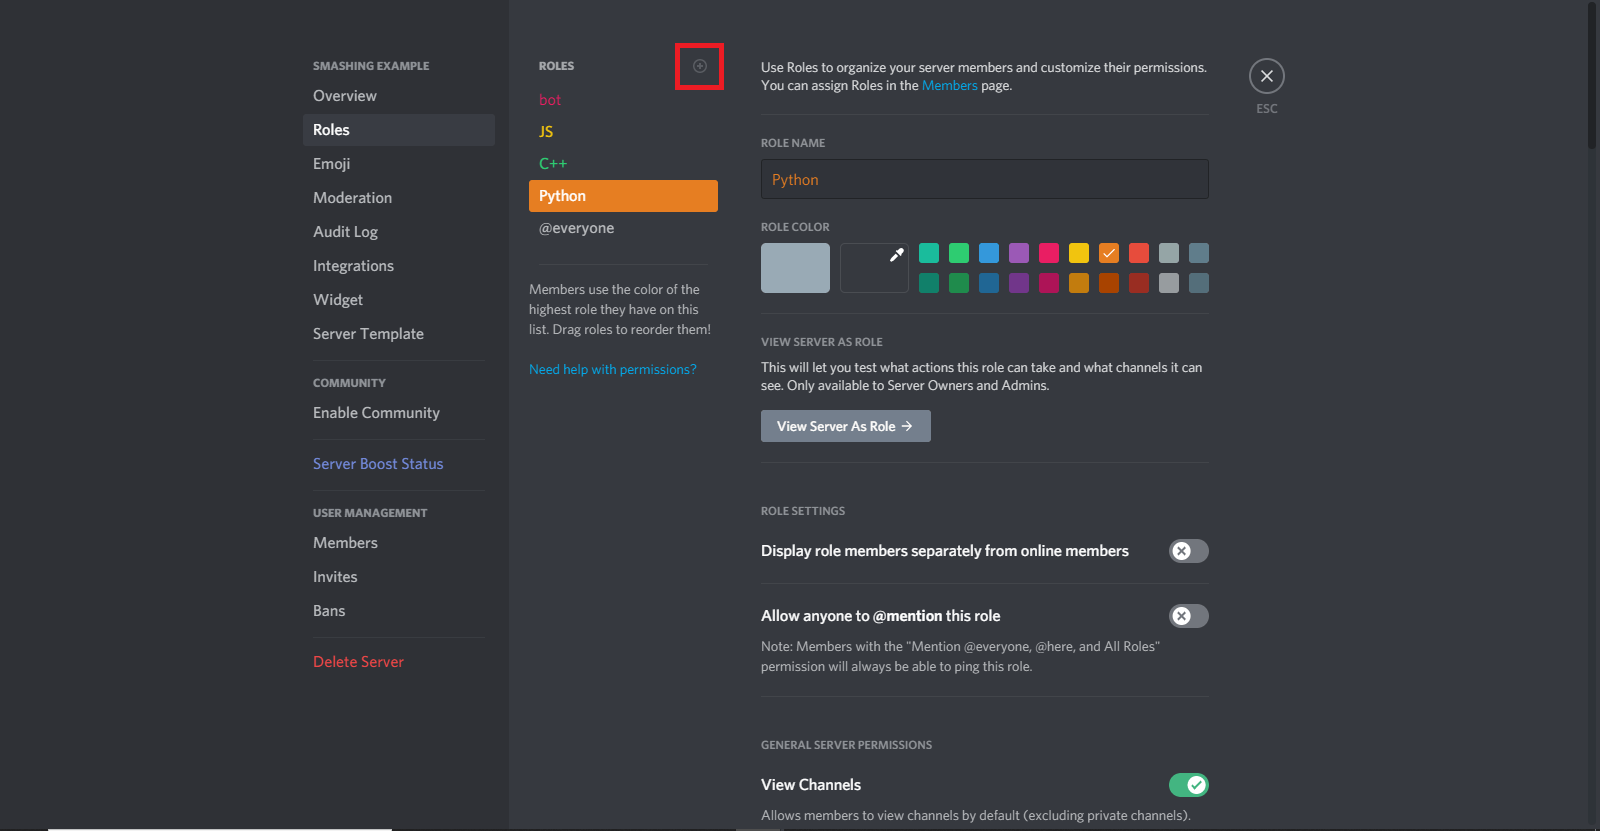
First, let’s create the bot role, and make sure to check the “Manage Roles” option in the role options menu. Once the bot role is created, you can add some more roles. I’ve added js, c++, and python roles. You don’t have to give them any special ability, but it’s an option.
Here, remember one thing: The Discord roles work based on priority. Any role that has roles below it can manage the roles below it, but it can’t manage the roles above it. We want our bot role to manage the js, c++, and python roles. So, make sure that the bot role is above the other roles. Simply drag and drop to change the order of the roles in the “Roles” menu of your server settings.
When you are done creating roles, assign the bot role to the bot. To give a role, click on the bot’s name in the members’ list on the server’s right side, and then click on the small plus icon (+). It’ll show you all of the available roles. Select the “bot” role here, and you will be done.

The roles we have created cannot be used by their names in our code. In Discord, everything from messages to roles has its own ID. If you click on the “more” indicator in any message, you’ll see an option named “Copy ID”. This option is available for everything in Discord, including roles.

Most likely, you won’t find this option by default. You’ll have to activate an option called “Developer Mode”. To activate it, head to the Discord settings (not your server settings), right next to your name in the bottom left. Then go to the “Appearance” option under “App Settings”, and activate “Developer Mode” from here. Now you’ll be able to copy IDs.
messageReactionAdd and messageReactionRemoveThe event that needs to be emitted when a message is reacted is messageReactionAdd. And whenever a reaction is removed, the messageReactionRemove event should be emitted.
Let’s continue building the system. As I said, first we need to listen for the messageReactionAdd event. Both the messageReactionAdd and messageReactionRemove events take two parameters in their callback function. The first parameter is reaction, and the second is user. These are pretty self-explanatory.
First, we’ll create a message that describes which emoji will give which role, something like what I’ve done here:

You might be thinking, how are we going to use those emoji in our code? The default emoji are Unicode, and we will have to copy the Unicode version. If you follow the syntax \:emojiName: and hit “Enter”, you will get an emoji with the name. For example, my emoji for the JavaScript role is fox; so, if I type in \:fox: and hit “Enter” in Discord, I’ll receive a fox emoji. Similarly, I would use \:tiger: and \:snake: to get those emoji. Keep these in your Discord setup; we will need them later.
 Getting Unicode emoji (Large preview)
Here is the starting code. This part of the code simply checks for some edge cases. Once we understand these cases, we’ll implement the logic of the reaction-role system.
// Adding reaction-role function
client.on('messageReactionAdd', async (reaction, user) => {
  if (reaction.message.partial) await reaction.message.fetch();
  if (reaction.partial) await reaction.fetch();
  if (user.bot) return;
  if (!reaction.message.guild) return;
});
We are passing in an asynchronous function. In the callback, the first thing we are doing is checking whether the message is a partial. If it is, then we fetch it, meaning caching or storing it in a JavaScript map method. Similarly, we are checking whether the reaction itself is a partial and then doing the same thing. Then, we check whether the user who reacted is a bot, because we don’t want to assign roles to the bot that is reacting to our messages. Finally, we are checking whether the message is on the server. Discord.js uses guild as an alternative name of the server. If the message is not on the server, then we would stop the function.
Our bot will only assign the roles if the message is in the roles channel. If you right-click on the roles channel, you’ll see a “Copy ID” option. Copy the ID and follow along.
if (reaction.message.channel.id == '802209416685944862') {
  if (reaction.emoji.name === '🦊') {
    await reaction.message.guild.members.cache
      .get(user.id)
      .roles.add('802208163776167977');
  }
  if (reaction.emoji.name === '🐯') {
    await reaction.message.guild.members.cache
      .get(user.id)
      .roles.add('802208242696192040');
  }
  if (reaction.emoji.name === '🐍') {
    await reaction.message.guild.members.cache
      .get(user.id)
      .roles.add('802208314766524526');
  }
} else return;
Above is the rest of the code in the callback. We are using the reaction.message.channel.id property to get the ID of the channel. Then, we are comparing it with the roles channel ID that we just copied. If it is true, then we check for the emoji and compare them with the reactions. The reaction.emoji.name returns the emoji that was used to react. We compare it with our Unicode version of the emoji. If they match, then we await for the reaction.message.guild.members.cache property.
The cache is a collection that stores the data. These collections are a JavaScript Map with additional utilities. One of the utilities that it provides is the get method. To get anything by ID, we can simply pass in the ID in this method. So, we pass the user.id in the get method to get the user. Finally, the roles.add method adds the role to the user. In the roles.add method, we are passing the role ID. You can find the role ID in your server setting’s “Role” option. Right-clicking on a role will give you the option to copy the role ID. And we are done adding the reaction-role system to our bot!
We can add functionality for a role to be removed when a user removes their reaction from the message. This is exactly the same as our code above, the only difference being that we are listening for the messageReactionRemove event and using the roles.remove method. So, the complete code for adding and removing roles would be like this:
// Adding reaction-role function
client.on('messageReactionAdd', async (reaction, user) => {
  if (reaction.message.partial) await reaction.message.fetch();
  if (reaction.partial) await reaction.fetch();
  if (user.bot) return;
  if (!reaction.message.guild) return;
  if (reaction.message.channel.id == '802209416685944862') {
    if (reaction.emoji.name === '🦊') {
      await reaction.message.guild.members.cache
        .get(user.id)
        .roles.add('802208163776167977');
    }
    if (reaction.emoji.name === '🐯') {
      await reaction.message.guild.members.cache
        .get(user.id)
        .roles.add('802208242696192040');
    }
    if (reaction.emoji.name === '🐍') {
      await reaction.message.guild.members.cache
        .get(user.id)
        .roles.add('802208314766524526');
    }
  } else return;
});

// Removing reaction roles
client.on('messageReactionRemove', async (reaction, user) => {
  if (reaction.message.partial) await reaction.message.fetch();
  if (reaction.partial) await reaction.fetch();
  if (user.bot) return;
  if (!reaction.message.guild) return;
  if (reaction.message.channel.id == '802209416685944862') {
    if (reaction.emoji.name === '🦊') {
      await reaction.message.guild.members.cache
        .get(user.id)
        .roles.remove('802208163776167977');
    }
    if (reaction.emoji.name === '🐯') {
      await reaction.message.guild.members.cache
        .get(user.id)
        .roles.remove('802208242696192040');
    }
    if (reaction.emoji.name === '🐍') {
      await reaction.message.guild.members.cache
        .get(user.id)
        .roles.remove('802208314766524526');
    }
  } else return;
});
The next function we are going to add to our bot is going to be a bit more challenging. We want to focus on a particular Twitter account, so that any time the Twitter account posts a tweet, it will be forwarded to our Discord channel.
Before starting to code, we will have to get the required tokens from the Twitter developer portal. Visit the portal and create a new app by clicking the “Create App” button in the “Overview” option. Give your app a name, copy all of the tokens, and paste them in the .env file of your code, with the proper names. Then click on “App Settings”, and enable the three-legged OAuth feature. Add the URLs below as callback URLs for testing purposes:
http://127.0.0.1/
https://localhost/
If you own a website, add the address to the website URL and click “Save”. Head over to the “Keys and Tokens” tab, and generate the access keys and tokens. Copy and save them in your .env file. Our work with the Twitter developer portal is done. We can go back to our text editor to continue coding the bot. To achieve the functionality we want, we have to add another npm package named twit. It is a Twitter API client for Node.js. It supports both REST and streaming API.
First, install the twit package using npm install twit, and require it in your main file:
const Twit = require('twit');
We have to create a twit instance using the Twit constructor. Pass in an object in the Twit constructor with all of the tokens that we got from Twitter:
const T = new Twit({
  consumer_key: process.env.API_TOKEN,
  consumer_secret: process.env.API_SECRET,
  access_token: process.env.ACCESS_KEY,
  access_token_secret: process.env.ACCESS_SECRET,
  bearer_token: process.env.BEARER_TOKEN,
  timeout_ms: 60 * 1000,
});
A timeout is also specified here. We want all of the forwards to be in a specific channel. I have created a separate channel called “Twitter forwards”, where all of the tweets will be forwarded. I have already explained how you can create a channel. Create your own channel and copy the ID.
// Destination Channel Twitter Forwards
const dest = '803285069715865601';
Now we have to create a stream. A stream API allows access to a stream of data over the network. The data is broken into smaller chunks, and then it is transmitted. Here is our code to stream the data:
// Create a stream to follow tweets
const stream = T.stream('statuses/filter', {
  follow: '32771325', // @Stupidcounter
});
In the follow key, I am specifying @Stupidcounter because it tweets every minute, which is great for our testing purposes. You can provide any Twitter handle’s ID to get its tweets. TweeterID will give you the ID of any handle. Finally, use the stream.on method to get the data and stream it to the desired channel.
stream.on('tweet', (tweet) => {
  const twitterMessage = Read the latest tweet by ${tweet.user.name} (@${tweet.user.screen_name}) here: https://twitter.com/${tweet.user.screen_name}/status/${tweet.id_str};
  client.channels.cache.get(dest).send(twitterMessage);
  return;
});
We are listening for the tweet event and, whenever that occurs, passing the tweet to a callback function. We’ll build a custom message; in our case, the message will be:
Read the latest tweet by The Count (@Stupidcounter) here: https://twitter.com/Stupidcounter/status/1353949542346084353
Again, we are using the client.channels.cache.get method to get the desired channel and the .send method to send our message. Now, run your bot and wait for a minute. The Twitter message will be sent to the server.
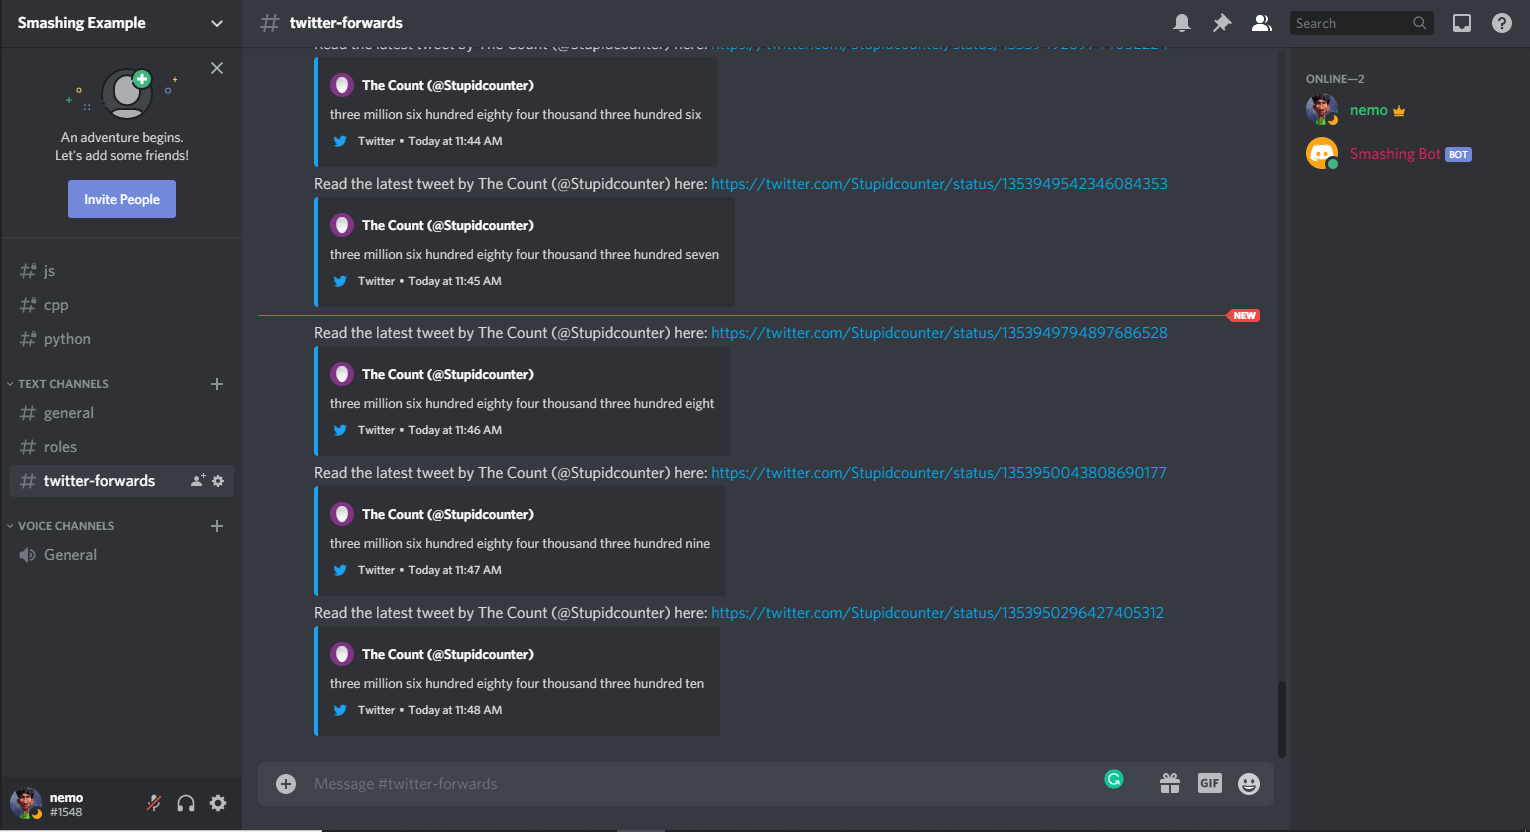
So, here is the complete Twitter forwarding code:
// Adding Twitter forward function
const Twit = require('twit');
const T = new Twit({
  consumer_key: process.env.API_TOKEN,
  consumer_secret: process.env.API_SECRET,
  access_token: process.env.ACCESS_KEY,
  access_token_secret: process.env.ACCESS_SECRET,
  bearer_token: process.env.BEARER_TOKEN,
  timeout_ms: 60 * 1000,
});

// Destination channel Twitter forwards
const dest = '803285069715865601';
// Create a stream to follow tweets
const stream = T.stream('statuses/filter', {
  follow: '32771325', // @Stupidcounter
});

stream.on('tweet', (tweet) => {
  const twitterMessage = Read the latest tweet by ${tweet.user.name} (@${tweet.user.screen_name}) here: https://twitter.com/${tweet.user.screen_name}/status/${tweet.id_str};
  client.channels.cache.get(dest).send(twitterMessage);
  return;
});
All of the functions that we want to add are done. The only thing left now is to deploy it to the cloud. We’ll use Heroku for that.
First, create a new file in the root directory of your bot code’s folder. Name it Procfile. This Procfile will contain the commands to be executed when the program starts. In the file, we will add worker: node app.js, which will inform Heroku about which file to run at startup.
After adding the file, let’s initiate a git repository, and push our code to GitHub (how to do so is beyond the scope of this article). One thing I would suggest is to add the node_modules folder and the .env file to the .gitignore file, so that your package size remains small and sensitive information does not get shared outside.
Once you’ve successfully pushed all of your code to GitHub, visit the Heroku website. Log in, or create an account if you don’t have one already. Click on the “New” button to create a new app, and name it as you wish. Choose the “Deployment Method” as GitHub.

Search for your app, and click on connect once you find it. Enable automatic deployment from the “Deploy” menu, so that each time you push changes to the code, the code will get deployed automatically to Heroku.
Now, we have to add the configuration variables to Heroku, which is very easy. Go to the “Settings” option, below your app’s name, and click on “Reveal Config Vars”.
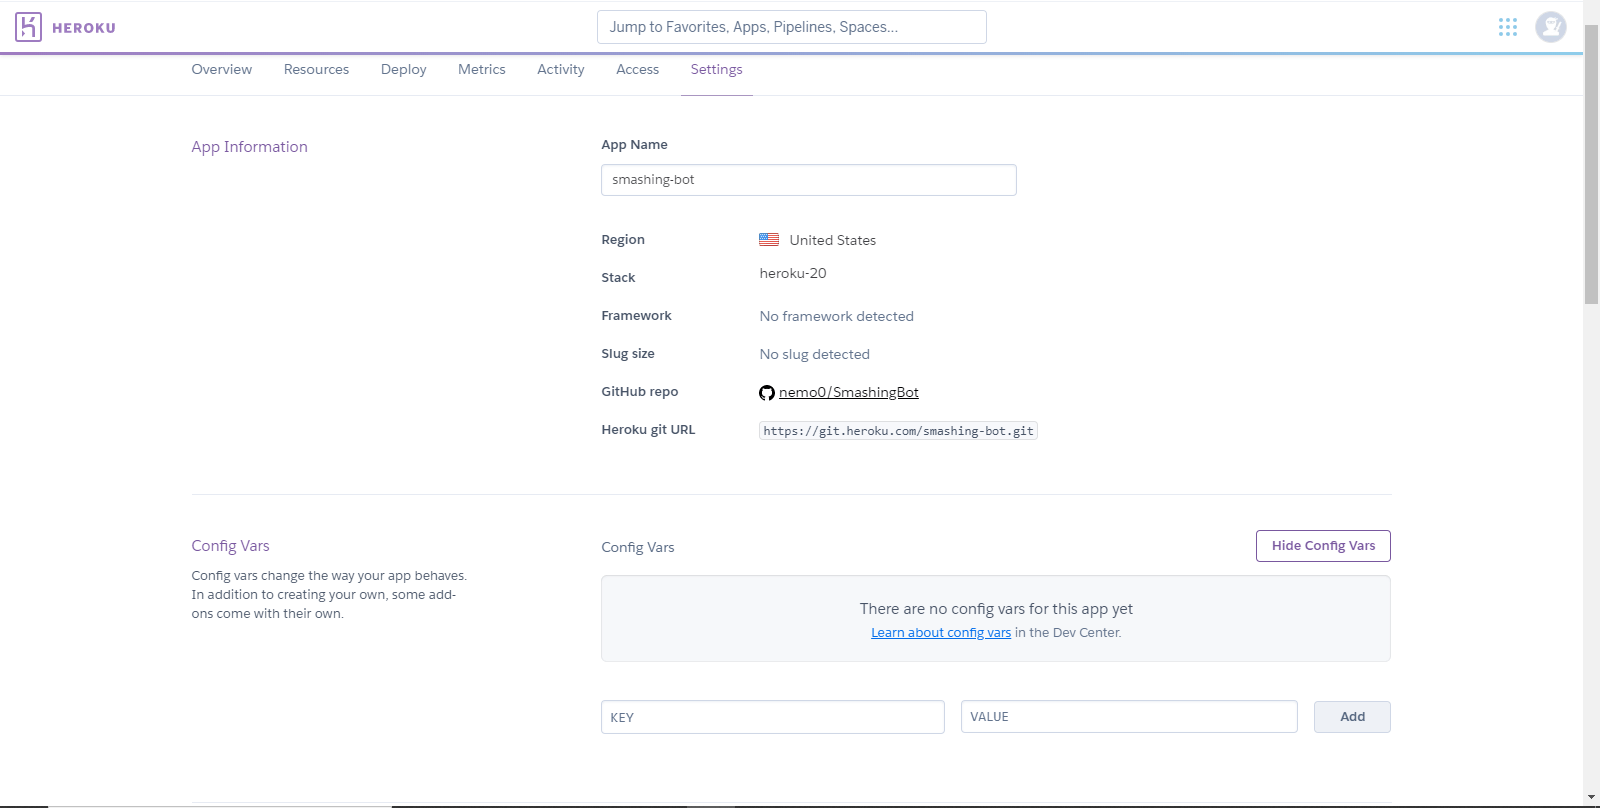
Here, we’ve added the configuration variables as key-value pairs. Once you are done, go to the “Deploy” tab again, and click on “Deploy Branch” under “Manual Deploy”.
The last thing to consider is that you might encounter a 60-second error crash that stops the bot from executing. To prevent this from happening, we have to change the worker type of the app. In Heroku, if you go to the “Resources” tab of your app, you’ll see that, under “Free Dynos”, web npm start is enabled. We have to turn this off and enable worker node app.js. So, click on the edit button beside the web npm start button, turn it off, and enable the worker node app.js option. Confirm the change. Restart all of your dynos, and we are done!
I hope you’ve enjoyed reading this article. I tried to cover all of the basics that you need to understand in developing a complicated bot. Discord.js’ documentation is a great place to learn more. It has great explanations. Also, you will find all of the code in the GitHub repository. And here are a few resources that will be helpful in your further development:
After completing a bootcamp in March 2019, I was overwhelmed by the choice of frameworks, libraries, languages, and courses I had to choose from to continue independent learning and hopefully score myself one of those elusive junior developer jobs. Almost everyone I spoke with had a different opinion on what was important and worth pursuing, but most of them agreed that learning ‘the fundamentals’ was important, while never really specifying what they were.
Even after getting my first developer job last summer it quickly became apparent that I had to do regular extra-curricular learning to meet the demands of this new role. I flitted between Udemy courses for a while, and while I did learn, I often found myself going through the motions of copying the instructor without developing problem-solving skills on my own. It took me making my own small, scratch pad side-project to really grasp the new material. So now I knew what my learning style was: initial exposure to ideas in a course or at work, create a sketch of a project to solidify concepts, and then use this new learning in my daily work if I could.
Most of us have a solid (if hard-earned) sense of how we learn best in the short-term, but how does that translate to the structure of long-term extracurricular learning? I’m going to tell you how I worked this problem out for myself. These strategies will work across the spectrum of experience, whether you’re brand new to software development or a seasoned engineer.
This is my method of putting together a learning curriculum. As someone with limited time and a tendency to be taken by the breeze of impulsivity at the expense of sustained, focused working, I found this method the most compatible with my brain and general rhythms. Your mileage, of course, may vary.
I found this step really useful for drowning out all the ambient noise and getting myself to focus on things that will be practically useful to my career in the next five or so years. (As more of a front-end developer, I often found myself making goo-goo eyes at learning Rust. While fascinating, it’s not exactly a priority.)
You may not want to work at a huge tech company yourself, but it is worth looking at what they prioritize when hiring as, for better or worse, the big companies tend to set the tone for the industry at large. I have a small shopping list of non-evil companies I’d like to end up at one day and they all broadly share the same priorities: semantic HTML/CSS, excellent vanilla JS skills, accessibility, and a popular framework. One day I am going to learn Rust, but, for now, working on these skills are my top priorities.

I tend to favor Indeed, Guardian Jobs and LinkedIn for getting a broad sweep of jobs that are on the market, but equally useful is Twitter (just search [company name you are interested in] and ‘jobs’), and keep a periodic eye on the ‘Careers’ page of your favorite few companies every couple of months. Jessica Rose, who tweets as @jesslynnrose, frequently writes long Twitter threads of job vacancies at ‘non-evil companies’ that sometimes aren’t very well publicized elsewhere.
Once you’ve gathered a few job specs, try to spot the commonalities between them and make note of them. We’ll use them for the next step.
Remember that list I mentioned? Split it into two columns. Column one: things you can work on in your day job. Column two: things you need to look at in your own time.
The things on your list that are covered by your day-job are the things you need to worry about the least. No matter what, your skills in these areas will improve with time. Some of you will be working at enormous organizations staffed by many developers with various levels of seniority and specialisms, and I advise you to milk that for all it’s worth, to put it bluntly.
If accessibility is a knowledge gap of yours that you’d like to improve on, try to swallow any nerves and approach someone at your workplace who has those skills for a chat/a Zoom coffee. Try to pair with them, with the understanding that you can ‘pair’ on things that aren’t coding problems. Chat to them about where they find their information, which Twitter accounts, blogs, and podcasts they keep up with, and how they remain up-to-date with new developments themselves.
As someone with two prior careers, neither of which were computer science-related, who entered the industry via a nine-week bootcamp a year ago, I have a rudimentary understanding of computer science, and lots of you are likely in the same situation.
I have found Frontend Masters to be invaluable when it comes to really well-designed courses on computer science principles and more specific learning. Personally, I’ve found Will Sentance’s courses on Frontend Masters to be valuable for understanding the how and why when it comes to vanilla JavaScript. Equally, Brian Holt’s ‘Four Semesters of Computer Science in 5 Hours’ courses expose students to the sort of concepts that can arise in tech interviews.
There is a monthly subscription fee for Frontend Masters, and it is well worth it, but there are plenty of wonderful free resources out there. I really recommend that anyone who hasn’t already done so enrolls in CS50. The course, run by Harvard University, is a wonderful, free resource, that will expose you to C, Python, JavaScript and modules on ethics and basic data structures. The lectures are enormous fun, and you can do as much or as little of the course as you like, with no time constraints.
Equally, FreeCodeCamp has well earned its status as a key starting point for both self-taught developers and those wishing to build on their existing skills, and I encourage you to seek out courses relevant to your interests on Udemy (I’d suggest not to buy a Udemy course that isn’t on a heavy discount. Their sales come around once every few weeks, and there are always discount codes floating around).
A particular favorite of mine is The Complete Node.js Developer Course by Andrew Mead, and I adore Colt Steele’s courses (there’s a particularly good one on algorithms and data structures that will help you if you ever find yourself on the more algorithm-heavy side of the tech interviewing spectrum). Smashing Magazine also runs frequent online workshops on a range of subjects that will help you to improve your skills.
As you might know, the skills that get people jobs in tech can often diverge from the skills people need to use on the job. These courses will teach you computer science fundamentals while keeping you nimble for interviews, and help you to fill any potentially crushing silences with snappy summations of different data structures, and their pros and cons. The point is not to do all of these courses, but to identify and combine the ones that fit with the job specs you’ve targeted.
I’ve found Twitter to be incredibly helpful for finding people to chat to about code problems. Last spring I shouted into the void about an issue I was having with Android Studio and was surprised to be on a video call with an Android developer less than ten minutes later, and, not only that, he seemed pleased to help!
Don’t underestimate the kindness of the developer community and don’t be shy about calling on it for help when you need it, and do your best to put yourself into situations where you can talk to people from a similar world to you within the wider context of the tech industry. The #CodeNewbie hashtag is a handy thing to use if you’re ever in need of help.
Now it’s time to tie your self-directed learning goals to some targets. Try not to set the bar too high — if it’s unrealistic for you to complete a Udemy course in one week, don’t try to push yourself to do it so hard you either meet the target at the expense of other important things in your life or fail to meet the target and make yourself feel like a failure. The idea is to keep yourself on track, applying gentle pressure to stay motivated, but not so much that you feel overwhelmed and lose all motivation.
As a morning person, I feel best able to concentrate on study in the hours before my day-job starts at 9.30 am. With this in mind, and using the wonderful time-tracking tool, Toggl, I spend 7 am to 9 am two mornings per week on code study. Using Toggl was extremely important to me because, no matter how much I do, I often feel as if it isn’t enough. But with Toggl’s help, I could see for certain that I was doing a minimum of four hours per week (with extra in the evenings and weekends if I felt like it) and I felt better able to step away from my laptop and rest when my time was up, safe in the knowledge that I’d racked up an acceptable amount of hours by my own standards.
Think about your average weekly schedule and try to block off some time in the day when you stand the best chance of securing unbroken focus. Some of you will be carers or otherwise extremely busy, and it’s probably going to be better for you to take your time as and when you can get it.
If it helps you to see an example, my personal targets are the following:
Try to err on the side of caution for your first set of targets. You can always turn up the pressure if you want to, but it’s better to do so once you’ve succeeded at a few; make sure you have the spare mental and physical space to really concentrate on what you need to do to stay on track.
Mentorship is something that most developers would recommend to improve skills, but, from my personal experience, finding someone with the time to guide you is a challenge, especially now. There are resources such as Coding Coach that may help you, and I know a few developers who found their dream mentor at meet-ups and on social media, but finding the perfect match is easier said than done.
I spoke to Falina Lothamer, an Instructional Designer at Thinkful — a Massive Open Online Course (or MOOC, for short) — to get an idea of how professionals approach independent learning. She was very clear that finding and working with a mentor is key to progressing your skills as a developer.
“If you need to have something laid out for you, having that mentor to say: ‘Here’s where I think you should focus’, showing you what they’re doing at their job, and sharing their opinion on what the future of your area of tech is is going to help a lot. I think there are a lot of people in the industry who are willing to fill that mentor role and do for others what someone has done for them.”
After expressing some of my frustrations at having hit a brick wall with a number of Udemy courses, simply finding myself retaining information and not necessarily having the confidence in what I’ve learned to apply it in other areas, or on other projects, Fallina was clear that being accountable to another person — ideally a mentor but equally another developer with a similar amount of professional experience to you — is essential.
“As a developer, you need to look for opportunities to demonstrate what you know, and how you’re learning. Having someone else to talk to about the challenges you’re facing, and having space to talk it over with someone and to realize ‘this thing that I’m trying to do is complicated, I’m not a terrible developer’, having that validation can be huge.”
For those who don’t manage to find a senior developer to take them under their wing, I recommend taking Fallina’s advice and making yourself accountable to someone else in the industry at a similar level to you. Developers banding together and sharing stories will reinforce that this job _is_ hard, and that they are not the only engineers struggling to get by at work some days. This work can be very emotionally taxing, and having a buddy to struggle along with will be invaluable on those days when nothing seems to be going well.
I’d recommend signing up to Interview Cake, Execute Program, or a relevant Udemy course for your skill level and specialism, and completing the same exercises as your buddy at roughly the same time. Discuss what you found easier, and where you fell down, and maintain contact with one another throughout. While you certainly can do these things alone, fostering a sense of community will help you to stay on task, and make it more likely that you stick at it.
If you’ve got the time and energy to pour into a large side-project on top of work, more power to you, but I find the pressure to do so somewhat burdensome. Instead, I am a fan of the scratch pad project, primarily because I really benefit from following lots of new ideas at once, and quickly become disinterested in personal projects there is no time pressure to drive me along.
If your side-project makes an API call, displays the information in a semi-appealing way, and you’ve learned something from the process, and building the project out into a larger application doesn’t fit with your neurology, your caring schedule, or your tastes, then give yourself a break. You wouldn’t sneer at an artist for sketching, and you certainly shouldn’t feel bad if your side-projects are half-formed mutants as long as you’re getting something out of the process. My GitHub repositories are elegies to good ideas gone by, and I’ve made my peace with it.
Given the state of the world right now, the last thing I want to be is another voice demanding productivity in lockdown. That’s not what this is about. These are simply steps that worked for me when I needed to learn over time, without burning out or placing undue pressure on myself. If they work for you, wonderful. If not, no worries. We all have our own pace.
Good luck!
Search engine optimization (SEO) is an essential part of a website’s design, and one all too often overlooked. The most beautiful, spectacular site in the world won’t do anyone much good if people can’t find it on Google (or Bing, or DuckDuckGo).
Implementing SEO best practice doesn’t just give you the best chance possible of ranking well in search engines; it makes your websites better by scrutinizing quality, design, accessibility, and speed, among other things. It’s a daunting world for those who aren’t familiar with it (and even those who are at times), so this checklist breaks down key factors to consider when undertaking an audit.
For an overview of the SEO community — publications, thought leaders, podcasts, documentation, forums, things like that — I humbly point you towards the Smashing Guide To The World of Search Engine Optimization.
If you’re ready to get stuck in, read on.
Note: You can also just download the checklist (PDF, 158 KB). Happy optimizing, everyone!
www.mywebsite.com/book-reviews/catch-22-joseph-heller/ is infinitely clearer than www.mywebsite.com/js7gw788. One is clear to people and algorithms alike; the other is a random jumble of letters. Take the time to establish formats for different post types then stick to them.Not everyone has the time or resources to go through a full audit of their website’s SEO. That’s ok, and it doesn’t mean you have to fall behind. The following tips are particularly easy to implement, can return quick results, and allow you to keep an eye on your search performance long term.
Please note that this cheat sheet will be updated occasionally, so if you think anything is missing and should be added, feel free to let us know! We’ll consider it for inclusion the next time we update the list.
Are you looking for the best testimonial plugins for your WordPress website?
Testimonials and reviews are a great way to add social proof to your website and help build trust among your users.
In this article, we have hand-picked the best testimonial plugins for WordPress that you can use on your website.

Using a testimonial plugin lets you easily add customer or client testimonials, reviews, or feedback to your WordPress website. This adds social proof to your site and helps you win new customers and boost sales.
You could add testimonials by manually copying them into your posts or pages. However, a testimonials plugin lets you display them attractively in a slider, carousel, grid, and other beautiful layouts.
Depending on the plugin you choose, you can show testimonials with photos, a short blurb, reviewer’s name, title, business, or star ratings.
That being said, let’s take a look at some of the best WordPress testimonial plugins that you can try.

Facebook Social Reviews Feed from Smash Balloon lets you display reviews from your Facebook Page on your site. This is a fantastic option if you already have some great reviews on Facebook. It means you don’t have to copy and paste any text or seek out fresh testimonials.
Facebook reviews boost user trust as they come from real Facebook profiles that can be looked up.
Custom Facebook Feed Pro itself is the most popular Facebook feed plugin out there and works with any WordPress theme. It makes it really easy to add a Facebook page feed to WordPress and boost engagement on your social profiles.
With the Reviews extension, you can display Facebook reviews as testimonials by entering the shortcode in any post or page, or even in a sidebar or footer widget. You can also display them anywhere on your landing pages or individual product pages.
Note: You will need to purchase the Custom Facebook Feed Pro plugin by Smash Balloon in order to use the Reviews extension.

Custom Twitter Review Feed from Smash Balloon is a great option for displaying Twitter testimonials on your site.
Like Facebook reviews, testimonials that are shared through tweets are a great way to show feedback from real individuals.
It’s easy to narrow your Twitter feed down to only show testimonials. You can do this by using hashtags or an advanced search to only display testimonials about you or your company.
The Custom Twitter Feeds Pro plugin has lots of other great features as well. For instance, you might create a curated list of Twitter accounts then display this as a feed on your website.
Plus, you can even automatically moderate tweets so that tweets containing specified words are hidden.

WPForms is the best WordPress form plugin in the market used by over 3 million users. It can be used to collect customer testimonials too. This helps you get all your testimonials in one place and one format.
WPForms’ special Form Templates Pack addon includes a Testimonial Form Template. This lets you get started quickly. You can modify the form and any form fields that you may need.
With WPForms, you could even add a file upload option to your testimonial form. This lets customers upload files, such as photos of themselves with your product or even a short video clip.
You can also use WPForms to run a survey with beautiful reports. You could use this to show data about how your customers use your products, what they like best, and how satisfied they are.

Site Reviews lets visitors submit reviews with a 1 to 5 star rating. With this plugin, you can pin your best reviews or testimonials so that they show up first.
It’s also possible to moderate new review submissions, approving them before they go live on your site. This helps you protect against unfairly bad reviews. Alternatively, you can require users to be logged into your site in order to leave a review.
Site Reviews lets you easily respond to reviews, display a summary, and more. The developers provide active support through the WordPress.org support forum for the plugin.

Easy Testimonials lets you enter testimonials from your WordPress admin area.
You can include a star rating, the person’s role, and the product or service they used, as well as the testimonial itself. If you enter their email address, Easy Testimonials will automatically use their Gravatar image if they have one.
The pro version of Easy Testimonials also allows you to add a customer feedback form on your website.
Easy Testimonials includes 5 blocks for the WordPress block editor (Gutenberg editor). You can also display testimonials using a simple shortcode.
For detailed instructions, see our guide on how to add a customer reviews page in WordPress.

Testimonials Widget is another flexible WordPress testimonials plugin. Despite the name, it allows you to add testimonials anywhere on your website, not just in widgets.
It comes with a sidebar widget allowing you to easily display testimonials in sidebars. Testimonials are displayed in a carousel with beautiful slide-in and fade effects.

Strong Testimonials is one of the most customizable WordPress testimonial plugins. It comes with multiple display options. These include a testimonial slider, grid layout, masonry layout, single column layout, and more.
It also includes a form that allows your customers to easily add their reviews and testimonials. If you have been getting customer reviews on social media, then the pro version of this plugin can also embed reviews from Facebook, Google My Business, Yelp, and more.

Testimonial Basics is a complete testimonial management solution for your WordPress website. It includes multiple display styles, a sidebar widget, and a feedback form to collect user testimonials.
If a user submits a testimonial, this plugin will use Gravatar to fetch their photo. However, you can also manually upload photos directly from your WordPress admin area.

WP Testimonials with Rotator Widget is a simple yet highly customizable testimonials plugin. It allows you to easily add testimonials and sort them into categories and tags.
After creating testimonials, you can display them using a shortcode. This shortcode comes with several parameters that let you customize the appearance of testimonials. The plugin also includes a widget with the same options as the shortcode.

BNE Testimonials is another easy to use option for adding testimonials to your WordPress site. It comes with a shortcode and a sidebar widget to easily display testimonials.
It has a slider and plain list layout for testimonials, which inherits your theme’s style for display.

Testimonial Builder is a straightforward WordPress testimonials plugin. It has simple options and the ability to choose your own colors.
It has draggable box items and allows you to choose different fonts, font-sizes, text color, and featured photo. The plugin does not have a slider or rotator, so testimonials will be displayed in a grid or list style.

Testimonial Slider offers a modern WordPress testimonial slider with an improved user experience. It comes with a slider as well as the option for a plain list layout. You can also add a front-end contact form to collect customer testimonials.
You can add testimonials anywhere using the shortcode or sidebar widget. The testimonial slider is touch / mobile friendly and works well at all screen sizes.
Testimonials show that users find your products/services good. However, you need to maximize social proof with other tools as well.
The following are a couple of tools that you can use to create the FOMO effect with social proof.

TrustPulse is a powerful social proof plugin for WordPress. It helps you boost conversions by showing real-time notifications of activity on your website.
For instance, TrustPulse can show notifications about sales, downloads, forms submitted, and more. It’s a powerful way to use the fear of FOMO to encourage potential customers to buy.
The TrustPulse notifications aren’t intrusive, but they are still highly effective. They can boost conversions up to 15% straight out of the box. You can customize the style, colors, text, image, and more for the notifications.

OptinMonster is the best conversion optimization tool on the market. It allows you to easily convert website visitors into paying customers.
It comes with beautiful popups, slide-in menus, countdown timers, floating headers, and other tools. All of them can be used to display social proof and customer testimonials.
It has powerful targeting features that allow you to show the right message at right time. For instance, you can show users a popup when they are about to leave.
It works with all top email marketing services, WordPress form plugins, and WooCommerce. This helps you boost your conversions several folds.
We hope this article helped you find the best testimonial plugin for your WordPress website. You may also want to see our complete list of must have WordPress plugins for business websites, and our proven tips to increase blog traffic.
If you liked this article, then please subscribe to our YouTube Channel for WordPress video tutorials. You can also find us on Twitter and Facebook.
The post 14 Best WordPress Testimonial Plugins (Compared) appeared first on WPBeginner.
For many of us, it didn't take long to get used to the idea of online conferences and workshops. They may not be as rewarding as in-person experiences are (and always will be), but they have their advantages, too. Online makes it possible for everyone to attend without leaving the comfort of their desks, as well as learn and network at their own individual pace. It’s also more affordable and makes traveling optional, which makes events accessible for young families and people who prefer not to travel.
We’ve been running online workshops since April this year, and each and every one has been an incredible experience. With wonderful attendees from all over the world coming together to learn together, so many ideas have been brought to life, especially in the live design and coding sessions. Check out this awesome pen created by Cassie Evans at SmashingConf SF just last week. Rock on!

 We all have busy schedules, but there’s always time to pop in those earplugs and listen to some music or podcasts that make you happy! We’re soon moving on to our 30th episode of the Smashing Podcast — with folks from different backgrounds and so much to share!
Is there a topic that you’d love to hear and learn more about? Or perhaps you or someone you know would like to talk about a web- and design-related topic that is dear to your hearts? Feel free to reach out to us on Twitter anytime — we’d love to hear from you!
 With our weekly newsletter, we aim to bring you useful content and share all the cool things that folks are working on in the web industry. There are so many talented folks out there working on brilliant projects, and we’d appreciate it if you could help spread the word and give them the credit they deserve!
Also, by subscribing, there are no third-party mailings or hidden advertising involved, and your support really helps us pay the bills. ❤️
Interested in sponsoring? Feel free to check out our partnership options and get in touch with the team anytime — they’ll be sure to get back to you as soon as they can.
Figma’s popularity is growing and with its popularity, the number of plugins, templates, and general tips and tricks that make working with the browser-based design tool even smoother is growing, too. If you’re a Figma user yourself (or are planning to become one), we came across some useful resources that are worth checking out.

One of them is “Awesome Figma Tips,” a collection of small but powerful tips to work faster in Figma, compiled by Trong Nguyen. If the design you’re working on is based on a design system, the Design System Manager plugin might come in handy. It lets you define or update design tokens in one single panel, right from Figma, and you’ll immediately see the changes cascading through your Figma design.
Breakpoints, on the other hand, is a plugin that brings resizable frames to the design tool to help you quickly resize to a breakpoint to create dynamic layouts. Last but not least, once your design is ready and you want to present it to your team or stakeholders, Templatery has got your back with free templates that you can use for your Figma presentations. Little timesavers that take your workflow to the next level.
There are squares, there are circles, and apparently, there are also squircicles! George Francis’s Squircley is a generator of organic shapes for any kind of visuals or background images. You choose the rotation, the scale, the “curvature” and the fill color, and the tool takes care of the rest.

The generator exports SVGs which they can be dropped straight into your HTML/CSS code, or used in your design application. Just a fun little application to use. If that’s not good enough, you can also use GetWaves to generate SVG waves, or Blobmaker to generate some fancy blobs. Happy experimenting!
User experience research is a crucial component of the human-centered design process. But how do you tackle the task and integrate a UX research process into your team’s workflow? To get you up and running, the folks at Maze put together the “Ultimate Guide to UX Research”.

The comprehensive guide dives into the fundamentals of UX research and its various methods. It starts off taking a closer look at what UX research is all about and why it’s the backbone of building good products, dissects different research methods and tools, and shares tips for creating a research plan and establishing a UX research process. A great read for UX designers and product managers alike.
Dark mode is quickly becoming a user preference with Apple, Windows, and Google having it implemented into their operating systems. But what about dark mode on the web? Adhuham wrote a comprehensive guide to dark mode that delves into different options and approaches to implementing a dark mode design on the web.

To start off, the guide looks at the technical considerations that implementing a dark mode entails, covering different approaches to toggling the themes and how to store a user’s preferences so that they will be applied consistently throughout the site and on subsequent visits. Tips for handling user agent styles with the color-scheme meta tag help avoid potential FOIT situations. Design considerations are also tackled, of course, with valuable tips to get images, shadows, typography, icons, and colors ready for dark mode.
56. That’s the number of actions a customer needs to complete to buy an American Airlines ticket. Let’s face it, checkout forms are often too long and a hassle to fill out. In the worst case, customers might even abandon the process. To help us do better, UX Planet published a four-part article series on streamlining the checkout experience back in 2017 which is still gold for everyone working on a checkout flow today.

The first part in the series examines examples where the checkout experience has gone wrong and why. The second part pins down the most important things that will help improve any checkout form experience in 16 easy-to-follow tips. Part three is dedicated to form validation and how to minimize the number of errors a customer might make, while also taking a closer look at differences between B2C and B2B markets that lead to differences in design. Last but not least, part four is all about bank card details, teaching you how to detect and validate a card number and how to deal with the other payment form fields. A long but worthwhile read.
For the past five years, organizations and designers have turned their focus to the importance of writing. They’ve realized that content can indeed help to design clear and meaningful experiences. But what is UX Writing and why is it that important?

According to the UX Writing Worldwide Report, UX Writing focuses on users and helps create experiences that are relevant to their needs. The survey results are quite interesting and useful because they can help to better understand the role of the UX Writer in companies around the world.
What’s the most popular programming language among developers? Which languages do developers plan to migrate to? And which is the most studied language? These are only some of the questions that the State of Developer Ecosystem 2020 report answers.

At the beginning of this year, JetBrains surveyed almost 19,700 developers to identify the latest trends around tools, technologies, programming languages, and other facets of the development world. Some of the key takeaways: Java is the most popular primary programming language, JavaScript the most-used overall programming language, and when it comes to adopting a new language, Go, Kotlin, and Python are at the top of developers’ lists. Apart from hard facts like these, the survey also takes a closer look at open-source contribution, team tools, life habits, and information seeking. Precious insights into what moves the development community.
Sometimes you come across an article that is already a few years old but that still turns out to be gold. Like Mihael Konjević’s post about inline validation. To find out what’s the best default user experience when it comes to displaying inline validation errors, Mihael analyzed different sites. As his findings show, there’s no consensus on validation handling, but asking the right questions can help you design a bug-free and user-friendly experience.

Mihael suggests a hybrid “reward early, punish late” approach: If the user is entering data in the field that was in a valid state, perform the validation after the data entry. If the user is entering the data in the field that was in an invalid state, perform the validation during the data entry. Different forms will have different needs, of course, so be sure to adjust the approach accordingly.
Almost every part of web design and development — from your choice of images to the performance of web servers — add up to how quickly your site will load. Metrics help you uncover bottlenecks that might stay unnoticed when you only test the site on your local setup. We collected some handy tools that make gathering and interpreting such data easy.

To help you assess how well your site performs, Measure by web.dev audits for performance, best practices, SEO, and accessibility and gives you tips to improve the user experience. The tests are run using a simulated mobile device, throttled to a fast 3G network and 4x CPU slowdown. Just like Measure, Lighthouse Metrics is also powered by Lighthouse to give you global performance insights and show you how your site performs from six different regions. Last but not least, Google’s PageSpeed Insights reports on the performance of a page on both mobile and desktop devices based on lab data which is collected in a controlled environment and field data to capture the real-world UX. If you need some more assistance to improve performance, our new performance guide with checklists, articles, and talks has got your back.
Learning a new language can be quite a challenge, especially when there are so many tools and frameworks out there to get the most out of it as there are in the case of JavaScript. To prevent you from getting lost in all the possibilities and help you learn the best practices from the ground up instead, William Oliveira and Allan Esquina put together the guide “JavaScript The Right Way”.

Aimed at both beginners as well as experienced developers who want to dive deeper into JavaScript best practices, the guide gathers articles, tips, and tricks from top developers, covering everything from the very basics to code style, tools, frameworks, game engines, reading resources, screencasts, and much more to make a developer’s life easier. The guide is available in eight languages. A gold mine full of JavaScript wisdom.
Tailwind and BEM are two approaches to writing and maintaining CSS. But when to use which? Comparing them is a bit like comparing apples and oranges, as Eric Bailey points out. Based on years of practical experience of using Tailwind and BEM on a variety of projects and scales, he summarized the benefits and drawbacks of each one of them.

Tailwind’s utility CSS approach with pre-written classes makes the implementation very similar across multiple projects and teams and promotes easier cross-project familiarity. However, it does not describe all of CSS’ capabilities, especially newer features. BEM, on the other hand, allows you to describe any user interface component you can think of in a flexible, modular, extensible way, making it a great choice for highly art-directed pieces. The strengths of both approaches lie in different areas, but Eric’s list helps you find the one to master the challenges your project brings along. By the way, have you heard of CUBE CSS yet? The methodology capitalizes on the strength of both approaches and is worth taking a closer look, too.
For years, Origami has been known to be one of the most fun craft art activities worldwide, but have you ever wondered how it would look like on screen? Well, Amanda Ghassaei had exactly this thought and took on the challenge of creating an app that simulates how any Origami crease pattern folds.

With the help of a number of external libraries such as Three.js and jQuery, Origami Simulator was brought to life. This app calculates the geometry of folded (or partially folded) Origami using a dynamic, GPU-accelerated solver and illustrates the physical properties of the folded material. It also supports an immersive, interactive VR mode using WebVR. Impressive!
Animations have become a popular way to improve the user experience in the last years. But how do we make sure that our CSS animations and transitions will be meaningful to users and not just decorative eye candy? Stéphanie Walter gave a talk about enhancing UX with CSS animations at the virtual Shift Remote conference back in August. In case you missed it, she summarized everything you need to know in a blog post accompanying the talk.

Starting with a reminder of CSS syntax to build transitions and animations, Stéphanie explores why certain animations work better than others. She shares tips for finding the correct timing and duration to make UI animations feel right and explains why and how animations do contribute to improving the user experience. And since great powers bring along great responsibility, she also takes a closer look at how you can make sure your animations don’t trigger motion sickness. A great reference guide.
How well do you master the Pen tool? If it causes you headaches when working with Photoshop, Illustrator, XD, or other tools, the Bézier Game helps you take your skills to the next level, in a quick and fun way.

After completing the quite self-explanatory tutorial stage, the challenge begins: In the first level, an unassuming (but quite tricky) little car shape is waiting for you to redraw it using the least amount of nodes possible. Each node and each curve that snaps into place reveals a little piece of the rainbow-colored path and brings you a step closer towards becoming a Pen tool master. Don’t despair if you can’t make it on the first try. As with everything, practice makes perfect.
Bugs happen, and when they happen, it’s good to know how to tackle them in a smart way. If you need to debug JavaScript code, Sean Higgings wrote a handy article to help you find the right debugging approach and master the challenge while adhering to best practices.

Sometimes you might want to log events to the console when debugging JavaScript events. For those occasions, Matthias Kupperschmidt shares a nifty trick that prevents sending and tracking browser events multiple times — perfect for when you want to see how many submit events a form sends out, for example.
 I hope you found today’s monthly update useful. As the new year approaches us with new challenges, we’re sure that there are many more good times ahead of us. Thanks for sticking around and for your ongoing support — we sincerely appreciate it! Let’s rock this together!

Are you looking for the best Facebook plugins for WordPress?
Facebook is the world’s largest social media platform with more than 2 billion monthly active users. That’s why there are many WordPress Facebook plugins that can help you maximize your online presence.
In this article, we have hand-picked the best WordPress Facebook plugins to grow your website and get more traffic.

Editor’s Note: If you’re looking for chatbot or messenger bot plugins, then please see our list of the best chatbot software for small businesses.

Smash Balloon Custom Facebook Feed Pro is the best Facebook plugin for WordPress. It lets you connect your WordPress site to your Facebook account with the click of a button.
With Custom Facebook Feed Pro, you can easily add your Facebook posts to any WordPress post, page, or sidebar. It comes with multiple layout choices with easy to use styling options.
You can take full control of your feed. You can choose to hide things like comments, likes, reactions, and shares.
It supports multiple feeds, so you can use them in different areas of your site. This plugin works with both Facebook pages and groups and helps you drive more engagement towards your Facebook community.
You can also use it to display your Facebook user reviews, embed your Facebook photo albums, create a carousel, and more.
Note: There’s also a free Facebook Feed plugin by Smash Ballon with limited features that you can use.

RafflePress is the best contest and giveaways plugin for WordPress. It lets you easily run a contest where people need to take specific actions to enter.
Contests are one of the fastest ways to get a ton of likes and engagement for your Facebook page. RafflePress comes with a built-in giveaway template for growing your Facebook page.
To enter your contest, people will need to visit your page on Facebook and/or view one of your posts or videos.
It comes with a drag and drop contest builder where you can simply add actions and assign them different numbers of entries into the contest.
You can also use it with other popular social media platforms like Twitter and Instagram, or run giveaways to grow your email list.
RafflePress lets you easily draw a winner, too. In fact, you even get a link to email the winner from inside the app itself.

Shared Counts is one of the best social media plugins for WordPress. It allows you to easily add social sharing buttons to your WordPress posts. This includes buttons for Facebook, Pinterest, Twitter, LinkedIn, and more.
It is highly optimized for speed and performance and can accurately show shares count for different social sites. It even comes with multiple button styles. This means you can choose the style that looks best on your site.
![]()
Pixel Cat – Conversion Pixel Manager allows you to add Facebook retargeting pixel to your WordPress site. This pixel allows you to show customized ads to Facebook users who have visited your website.
Pixel Cat also helps you track WooCommerce customers and show them better ads in their Facebook feed.
There’s also a Pro version that gives you extra power and flexibility.

Social Reviews and Recommendations lets you display Facebook page reviews on your WordPress website. It comes with an easy to use widget that allows you to connect your website to your Facebook page and display Facebook users’ reviews.
This helps you add social proof to your website and build trust in your brand. The free version works fine, but you will need to pay for the ‘Business’ version to display reviews in the Schema.org rich snippets format.

Facebook Page Like Widget allows you to easily add a Facebook page plugin to your blog’s sidebar. It is extremely easy to use and comes with a shortcode that you can use to display the Facebook Like box anywhere on your website.
It comes with the same customization options as the default Facebook page plugin. You can show or hide profile pics, include your page cover, customize width and height, and select language.

Nextend Social Login and Register plugin allows users to register and login on your website using their social profiles. It supports login with Facebook, Google, and Twitter.
This plugin works seamlessly with the default WordPress login and registration forms. Users have the option to use Facebook or use the default signup method. Once registered, a user can disconnect their social account at any time by visiting their user profile page inside the admin area.

FAuto Poster allows you to automatically share new articles on your Facebook page or profile. Upon activation, you will need to connect it to your profile and authorize your website.
It allows you to choose which content you want to share: posts, pages, and custom post types. You can even disable sharing for a single item before publishing it.
FAuto Poster is a lightweight plugin that’s quick and easy to install and configure. There’s also a pro version, which lets you automatically post to Twitter, LinkedIn, and Tumblr as well as to Facebook.

Social Snap lets you automatically post your content to Facebook. You can use it for other social media sites as well, including Instagram, Twitter, and LinkedIn.
It doesn’t just work for your new content, either. You can also use Social Snap to automatically re-share older content. That way, you can drive more traffic to content you’ve created in the past.
Social Snap also lets you add social links to your posts and pages and display follower counts. This can be a great form of social proof and can help grow your Facebook following.

All in One SEO is one of the best WordPress SEO plugin on the market. It has a huge range of features that let you optimize your content to rank higher in search engines.
Although it’s not a social media plugin, we’ve included it as a bonus on this list for one very important feature. All in One SEO lets you add Open Graph metadata to your content. This means you have more control over how your content displays when it’s shared on Facebook.
Using All in One SEO, you can set a custom image thumbnail to appear alongside your content on Facebook. You can even give your content a different title or description to use on Facebook. Most importantly, it fixes the incorrect thumbnail issue on Facebook.
We hope this article helped you discover the best WordPress Facebook plugins to grow your blog. We also recommend going through our proven tips to drive traffic to your WordPress site, and our comparison of the best email marketing services to connect with your readers.
If you liked this article, then please subscribe to our YouTube Channel for WordPress video tutorials. You can also find us on Twitter and Facebook.
The post 9 Best WordPress Facebook Plugins to Grow Your Blog appeared first on WPBeginner.
These Top Social Media Sites. If you have more relavent social media let me know


)