Creating Voice Skills For Google Assistant And Amazon Alexa

Creating Voice Skills For Google Assistant And Amazon Alexa

Creating Voice Skills For Google Assistant And Amazon Alexa

Tris Tolliday

Over the past decade, there has been a seismic shift towards conversational interfaces. As people reach ‘peak screen’ and even begin to scale back their device usage with digital wellbeing features being baked into most operating systems.

To combat screen fatigue, voice assistants have entered the market to become a preferred option for quickly retrieving information. A well-repeated stat states that 50% of searches will be done by voice in year 2020. Also, as adoption rises, it’s up to developers to add “Conversational Interfaces” and “Voice Assistants” to their tool belt.

Designing The Invisible

For many, embarking on a voice UI (VUI) project can be a bit like entering the Unknown. Find out more about the lessons learned by William Merrill when designing for voice. Read article →

What Is A Conversational Interface?

A Conversational Interface (sometimes shortened to CUI, is any interface in a human language. It is tipped to be a more natural interface for the general public than the Graphic User Interface GUI, which front end developers are accustomed to building. A GUI requires humans to learn its specific syntaxes of the interface (think buttons, sliders, and drop-downs).

This key difference in using human language makes CUI more natural for people; it requires little knowledge and puts the burden of understanding on the device.

Commonly CUIs comes in two guises: Chatbots and Voice Assistants. Both have seen a massive rise in uptake over the last decade thanks to advances in Natural Language Processing (NLP).

Understanding Voice Jargon

(Large preview)
Keyword Meaning
Skill/Action A voice application, which can fulfill a series of intents
Intent Intended action for the skill to fulfill, what the user wants the skill to do in response to what they say.
Utterance The sentence a user says, or utters.
Wake Word The word or phrase used to start a voice assistant listening, e.g. ‘Hey google’, ‘Alexa’ or ‘Hey Siri’
Context The pieces of contextual information within an utterance, that helps the skill fulfill an intent, e.g. ‘today’, ‘now’, ‘when I get home’.

What Is A Voice Assistant?

A voice assistant is a piece of software capable of NLP (Natural Language Processing). It receives a voice command and returns an answer in audio format. In recent years the scope of how you can engage with an assistant is expanding and evolving, but the crux of the technology is natural language in, lots of computation, natural language out.

For those looking for a bit more detail:

  1. The software receives an audio request from a user, processes the sound into phonemes, the building blocks of language.
  2. By the magic of AI (Specifically Speech-To-Text), these phonemes are converted into a string of the approximated request, this is kept within a JSON file which also contains extra information about the user, the request and the session.
  3. The JSON is then processed (usually in the cloud) to work out the context and intent of the request.
  4. Based on the intent, a response is returned, again within a larger JSON response, either as a string or as SSML (more on that later)
  5. The response is processed back using AI (naturally the reverse - Text-To-Speech) which is then returned to the user.

There’s a lot going on there, most of which don’t require a second thought. But each platform does this differently, and it’s the nuances of the platform that require a bit more understanding.

(Large preview)

Voice-Enabled Devices

The requirements for a device to be able to have a voice assistant baked in are pretty low. They require a Microphone, an internet connection, and a Speaker. Smart Speakers like the Nest Mini & Echo Dot provide this kind of low-fi voice control.

Next up in the ranks is voice + screen, this is known as a ‘Multimodal’ device (more on these later), and are devices like the Nest Hub and the Echo Show. As smartphones have this functionality, they can also be considered a type of Multimodal voice-enabled device.

Voice Skills

First off, every platform has a different name for their ‘Voice Skills’, Amazon goes with skills, which I will be sticking with as a universally understood term. Google opts for ‘Actions’, and Samsung goes for ‘capsules’.

Each platform has its own baked-in skills, like asking the time, weather and sports games. Developer-made (third-party) skills can be invoked with a specific phrase, or, if the platform likes it, can be implicitly invoked, without a key phrase.

Explicit Invocation: ”Hey Google, Talk to <app name>.”

It is explicitly stated which skill is being asked for:

Implicit Invocation: ”Hey Google, what is the weather like today?”

It is implied by the context of the request what service the user wants.

What Voice Assistants Are There?

In the western market, voice assistants are very much a three-horse race. Apple, Google and Amazon have very different approaches to their assistants, and as such, appeal to different types of developers and customers.

Apple’s Siri

Device Names: ”Google Home, Nest”

Wake Phrase: ”Hey Siri”

Siri has over 375 million active users, but for the sake of brevity, I am not going into too much detail for Siri. While it may be globally well adopted, and baked into most Apple devices, it requires developers to already have an app on one of Apple’s platforms and is written in swift (whereas the others can be written in everyone’s favorite: Javascript). Unless you are an app developer who wants to expand their app’s offering, you can currently skip past apple until they open up their platform.

Google Assistant

Device Names: ”Google Home, Nest”

Wake Phrase: ”Hey Google”

Google has the most devices of the big three, with over 1 Billion worldwide, this is mostly due to the mass of Android devices that have Google Assistant baked in, with regards to their dedicated smart speakers, the numbers are a little smaller. Google’s overall mission with its assistant is to delight users, and they have always been very good at providing light and intuitive interfaces.

Their primary aim on the platform is to use time — with the idea of becoming a regular part of customers’ daily routine. As such, they primarily focus on utility, family fun, and delightful experiences.

Skills built for Google are best when they are engagement pieces and games, focusing primarily on family-friendly fun. Their recent addition of canvas for games is a testament to this approach. The Google platform is much stricter for submissions of skills, and as such, their directory is a lot smaller.

Amazon Alexa

Device Names: “Amazon Fire, Amazon Echo”

Wake Phrase: “Alexa”

Amazon has surpassed 100 million devices in 2019, this predominantly comes from sales of their smart speakers and smart displays, as well as their ‘fire’ range or tablets and streaming devices.

Skills built for Amazon tend to be aimed at in skill purchasing. If you are looking for a platform to expand your e-commerce/service, or offer a subscription then Amazon is for you. That being said, ISP isn’t a requirement for Alexa Skills, they support all sorts of uses, and are much more open to submissions.

The Others

There are even more Voice assistants out there, such as Samsung’s Bixby, Microsoft’s Cortana, and the popular open-source voice assistant Mycroft. All three have a reasonable following, but are still in the minority compared to the three Goliaths of Amazon, Google and Apple.

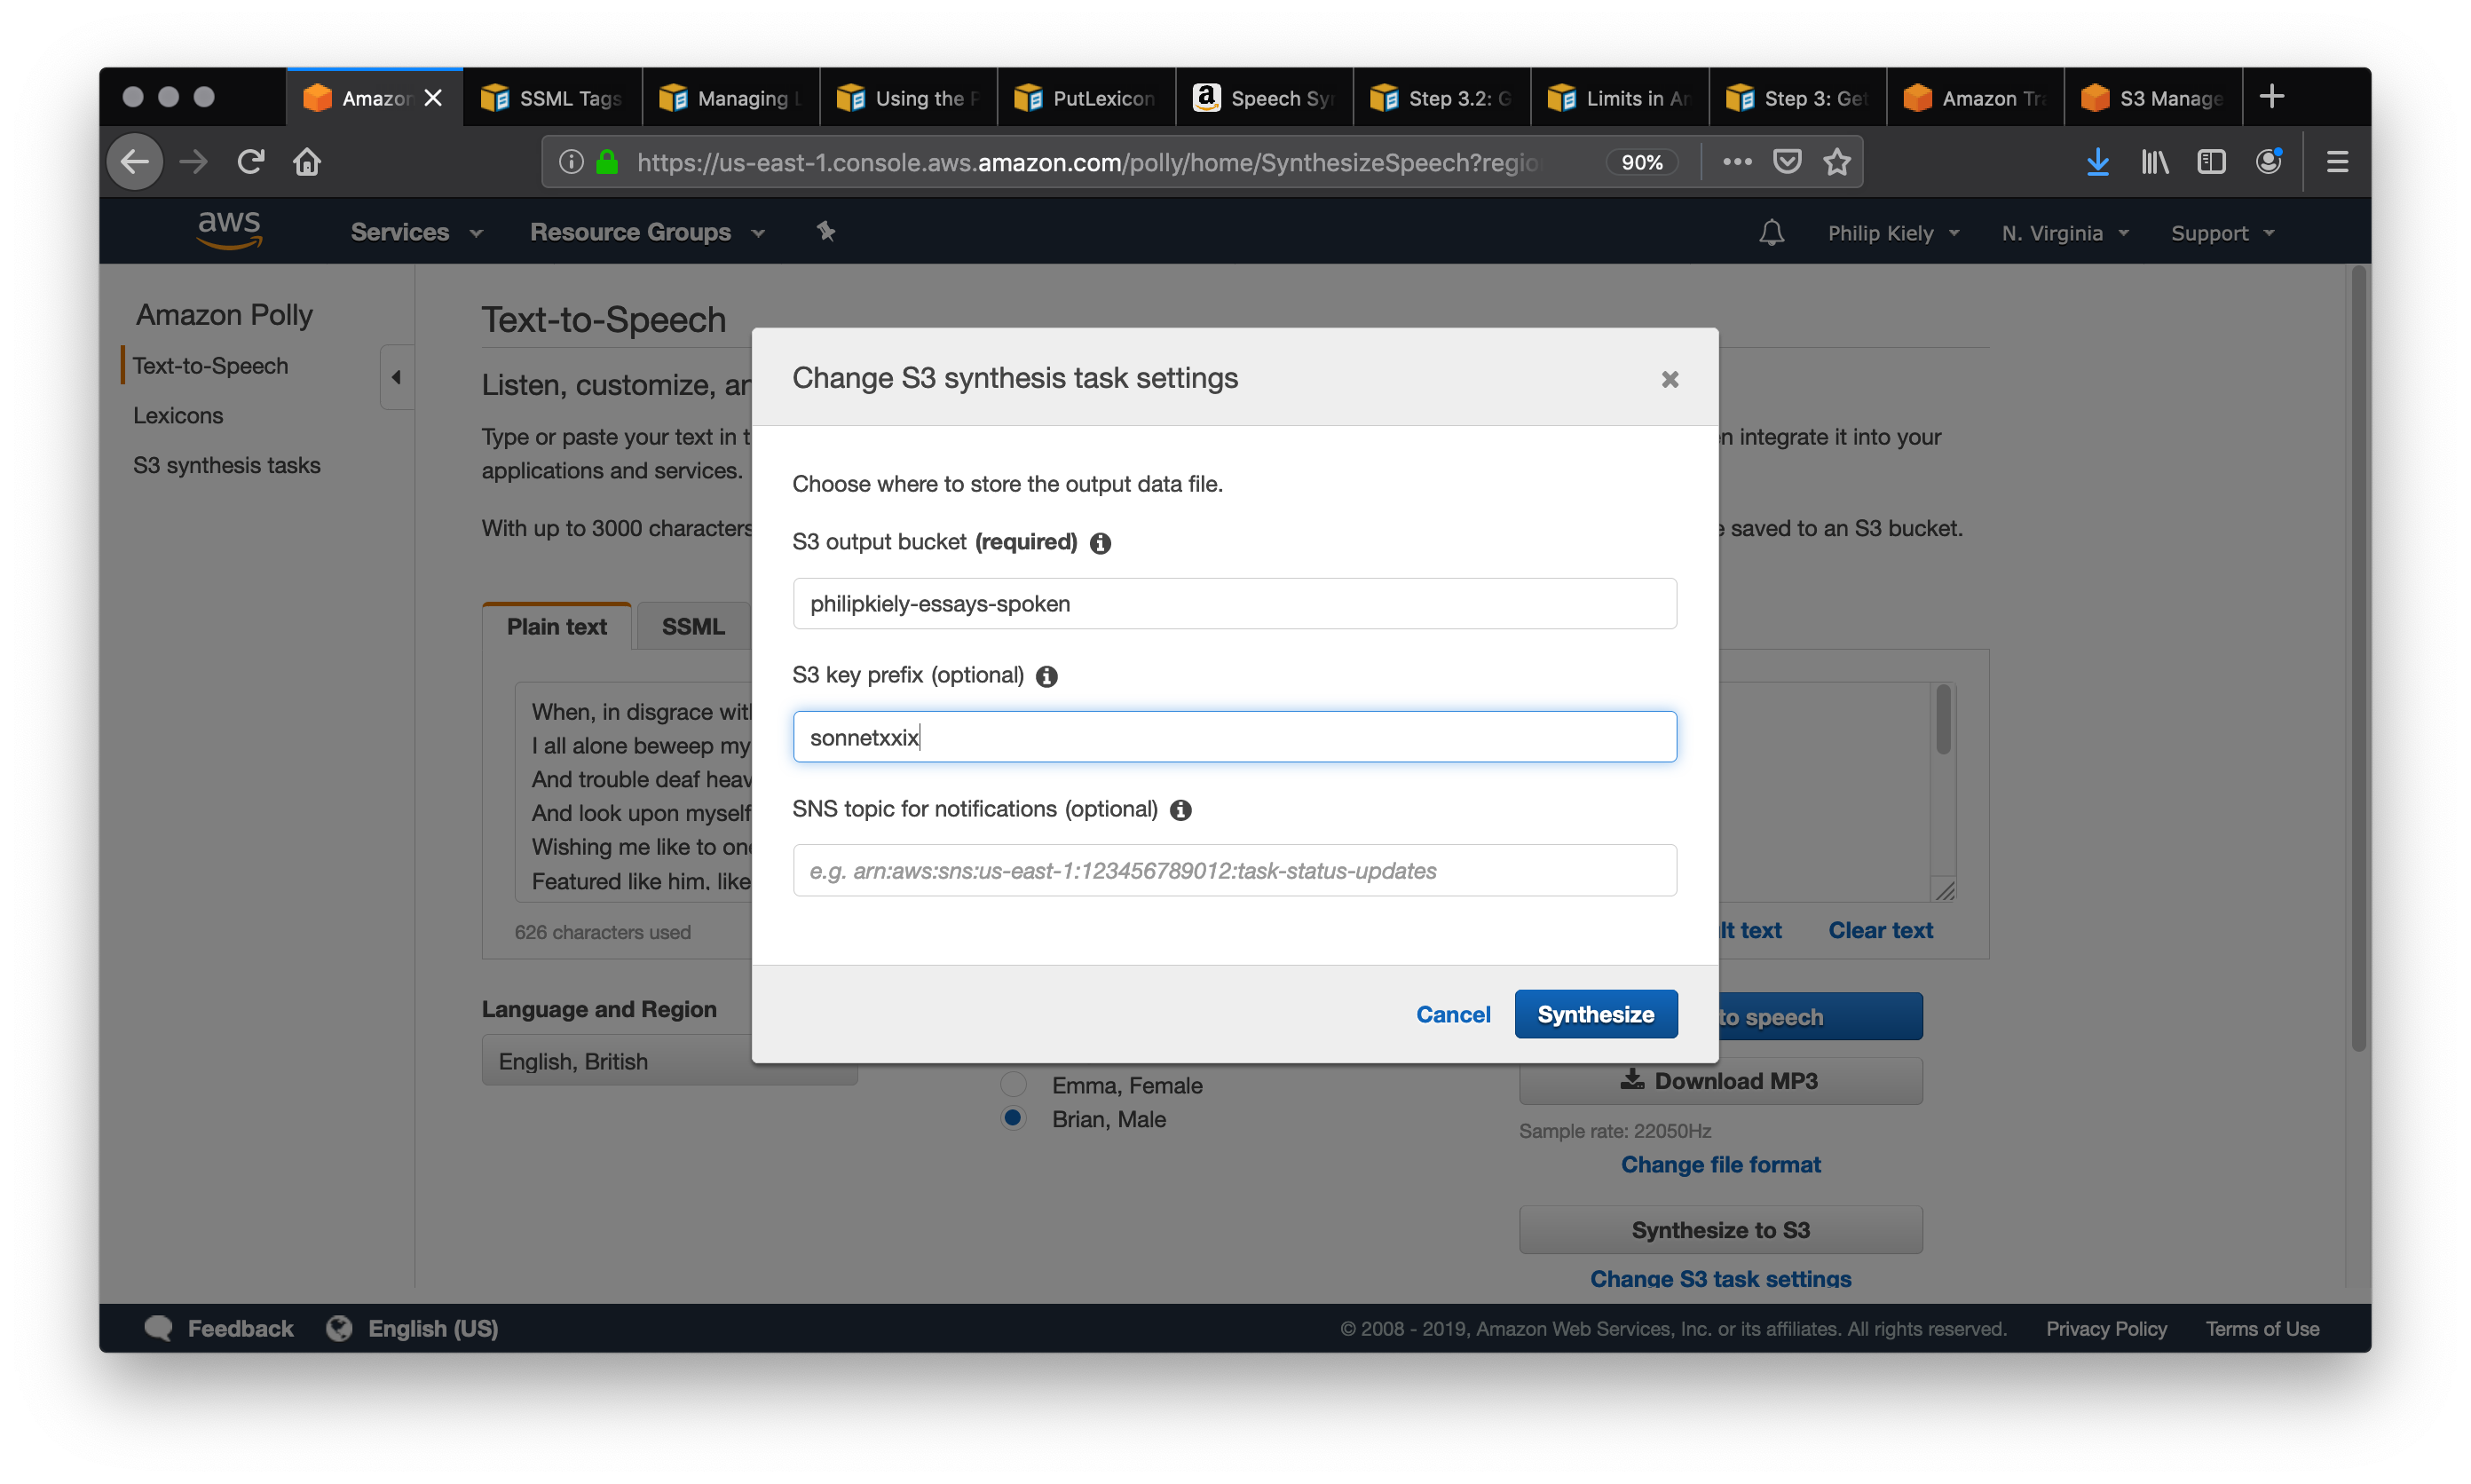
Building On Amazon Alexa

Amazons Ecosystem for voice has evolved to allow developers to build all of their skills within the Alexa console, so as a simple example, I am going to use its built-in features.

(Large preview)

Alexa deals with the Natural Language Processing and then finds an appropriate Intent, which is passed to our Lambda function to deal with the logic. This returns some conversational bits (SSML, text, cards, and so on) to Alexa, which converts those bits to audio and visuals to show on the device.

Working on Amazon is relatively simple, as they allow you to create all parts of your skill within the Alexa Developer Console. The flexibility is there to use AWS or an HTTPS endpoint, but for simple skills, running everything within the Dev console should be sufficient.

Let’s Build A Simple Alexa Skill

Head over to the Amazon Alexa console, create an account if you don’t have one, and log in,

Click Create Skill then give it a name,

Choose custom as your model,

and choose Alexa-Hosted (Node.js) for your backend resource.

Once it is done provisioning, you will have a basic Alexa skill, It will have your intent built for you, and some back end code to get you started.

If you click on the HelloWorldIntent in your Intents, you will see some sample utterances already set up for you, let’s add a new one at the top. Our skill is called hello world, so add Hello World as a sample utterance. The idea is to capture anything the user might say to trigger this intent. This could be “Hi World”, “Howdy World”, and so on.

What’s Happening In The Fulfillment JS?

So what is the code doing? Here is the default code:

const HelloWorldIntentHandler = {

    canHandle(handlerInput) {

        return Alexa.getRequestType(handlerInput.requestEnvelope) === 'IntentRequest'

            && Alexa.getIntentName(handlerInput.requestEnvelope) === 'HelloWorldIntent';

    },

    handle(handlerInput) {

        const speakOutput = 'Hello World!';

        return handlerInput.responseBuilder

            .speak(speakOutput)

            .getResponse();

    }

};

This is utilizing the ask-sdk-core and is essentially building JSON for us. canHandle is letting ask know it can handle intents, specifically ‘HelloWorldIntent’. handle takes the input, and builds the response. What this generates looks like this:

{

    "body": {

        "version": "1.0",

        "response": {

            "outputSpeech": {

                "type": "SSML",

                "ssml": "Hello World!"

            },

            "type": "_DEFAULT_RESPONSE"

        },

        "sessionAttributes": {},

        "userAgent": "ask-node/2.3.0 Node/v8.10.0"

    }

}

We can see that speak outputs ssml in our json, which is what the user will hear as spoken by Alexa.

Building For Google Assistant

(Large preview)

The simplest way to build Actions on Google is to use their AoG console in combination with Dialogflow, you can extend your skills with firebase, but as with the Amazon Alexa tutorial, let’s keep things simple.

Google Assistant uses three primary parts, AoG, which deals with the NLP, Dialogflow, which works out your intents, and Firebase, that fulfills the request, and produces the response that will be sent back to AoG.

Just like with Alexa, Dialogflow allows you to build your functions directly within the platform.

Let’s Build An Action On Google

There are three platforms to juggle at once with Google’s solution, which are accessed by three different consoles, so tab up!

Setting Up Dialogflow

Let’s start by logging into the Dialogflow console. Once you have logged in, create a new agent from the dropdown just below the Dialogflow logo.

Give your agent a name, and add on the ‘Google Project Dropdown’, while having “Create a new Google project” selected.

Click the create button, and let it do its magic, it will take a little bit of time to set up the agent, so be patient.

Setting Up Firebase Functions

Right, now we can start to plug in the Fulfillment logic.

Head on over to the Fulfilment tab. Tick to enable the inline editor, and use the JS snippets below:

index.js

'use strict';

// So that you have access to the dialogflow and conversation object
const {  dialogflow } = require('actions-on-google'); 

// So you have access to the request response stuff >> functions.https.onRequest(app)
const functions = require('firebase-functions');

// Create an instance of dialogflow for your app
const app = dialogflow({debug: true});


// Build an intent to be fulfilled by firebase, 
// the name is the name of the intent that dialogflow passes over
app.intent('Default Welcome Intent', (conv) => {
  
  // Any extra logic goes here for the intent, before returning a response for firebase to deal with
    return conv.ask(`Welcome to a firebase fulfillment`);
  
});

// Finally we export as dialogflowFirebaseFulfillment so the inline editor knows to use it
exports.dialogflowFirebaseFulfillment = functions.https.onRequest(app);

package.json

{
  "name": "functions",
  "description": "Cloud Functions for Firebase",
  "scripts": {
    "lint": "eslint .",
    "serve": "firebase serve --only functions",
    "shell": "firebase functions:shell",
    "start": "npm run shell",
    "deploy": "firebase deploy --only functions",
    "logs": "firebase functions:log"
  },
  "engines": {
    "node": "10"
  },
  "dependencies": {
    "actions-on-google": "^2.12.0",
    "firebase-admin": "~7.0.0",
    "firebase-functions": "^3.3.0"
  },
  "devDependencies": {
    "eslint": "^5.12.0",
    "eslint-plugin-promise": "^4.0.1",
    "firebase-functions-test": "^0.1.6"
  },
  "private": true
}

Now head back to your intents, go to Default Welcome Intent, and scroll down to fulfillment, make sure ‘Enable webhook call for this intent’ is checked for any intents your wish to fulfill with javascript. Hit Save.

(Large preview)

Setting Up AoG

We are getting close to the finish line now. Head over to the Integrations Tab, and click Integration Settings in the Google Assistant Option at the top. This will open a modal, so let’s click test, which will get your Dialogflow integrated with Google, and open up a test window on Actions on Google.

On the test window, we can click Talk to my test app (We will change this in a second), and voila, we have the message from our javascript showing on a google assistant test.

We can change the name of the assistant in the Develop tab, up at the top.

So What’s Happening In The Fulfillment JS?

First off, we are using two npm packages, actions-on-google which provides all the fulfillment that both AoG and Dialogflow need, and secondly firebase-functions, which you guessed it, contains helpers for firebase.

We then create the ‘app’ which is an object that contains all of our intents.

Each intent that is created passed ‘conv’ which is the conversation object Actions On Google sends. We can use the content of conv to detect information about previous interactions with the user (such as their ID and information about their session with us).

We return a ‘conv.ask object’, which contains our return message to the user, ready for them to respond with another intent. We could use ‘conv.close’ to end the conversation if we wanted to end the conversation there.

Finally, we wrap everything up in a firebase HTTPS function, that deals with the server-side request-response logic for us.

Again, if we look at the response that is generated:

{

  "payload": {

    "google": {

      "expectUserResponse": true,

      "richResponse": {

        "items": [

          {

            "simpleResponse": {

              "textToSpeech": "Welcome to a firebase fulfillment"

            }

          }

        ]

      }

    }

  }

}

We can see that conv.ask has had its text injected into the textToSpeech area. If we had chosen conv.close the expectUserResponse would be set to false and the conversation would close after the message had been delivered.

Third-Party Voice Builders

Much like the app industry, as voice gains traction, 3rd party tools have started popping up in an attempt to alleviate the load on developers, allowing them to build once deploy twice.

Jovo and Voiceflow are currently the two most popular, especially since PullString’s acquisition by Apple. Each platform offers a different level of abstraction, so It really just depends on how simplified you’re like your interface.

Extending Your Skill

Now that you have gotten your head around building a basic ‘Hello World’ skill, there are bells and whistles aplenty that can be added to your skill. These are the cherry on top of the cake of Voice Assistants and will give your users a lot of extra value, leading to repeat custom, and potential commercial opportunity.

SSML

SSML stands for speech synthesis markup language and operates with a similar syntax to HTML, the key difference being that you are building up a spoken response, not content on a webpage.

‘SSML’ as a term is a little misleading, it can do so much more than speech synthesis! You can have voices going in parallel, you can include ambiance noises, speechcons (worth a listen to in their own right, think emojis for famous phrases), and music.

When Should I Use SSML?

SSML is great; it makes a much more engaging experience for the user, but what is also does, is reduce the flexibility of the audio output. I recommend using it for more static areas of speech. You can use variables in it for names etc, but unless you intend on building an SSML generator, most SSML is going to be pretty static.

Start with simple speech in your skill, and once it is complete, enhance areas which are more static with SSML, but get your core right before moving on to the bells and whistles. That being said, a recent report says 71% of users prefer a human (real) voice over a synthesized one, so if you have the facility to do so, go out and do it!

(Large preview)

In Skill Purchases

In-skill purchases (or ISP) are similar to the concept of in-app purchases. Skills tend to be free, but some allow for the purchase of ‘premium’ content/subscriptions within the app, these can enhance the experience for a user, unlock new levels on games, or allow access to paywalled content.

Multimodal

Multimodal responses cover so much more than voice, this is where voice assistants can really shine with complementary visuals on devices that support them. The definition of multimodal experiences is much broader and essentially means multiple inputs (Keyboard, Mouse, Touchscreen, Voice, and so on.).

Multimodal skills are intended to complement the core voice experience, providing extra complementary information to boost the UX. When building a multimodal experience, remember that voice is the primary carrier of information. Many devices don’t have a screen, so your skill still needs to work without one, so make sure to test with multiple device types; either for real or in the simulator.

(Large preview)

Multilingual

Multilingual skills are skills that work in multiple languages and open up your skills to multiple markets.

The complexity of making your skill multilingual is down to how dynamic your responses are. Skills with relatively static responses, e.g. returning the same phrase every time, or only using a small bucket of phrases, are much easier to make multilingual than sprawling dynamic skills.

The trick with multilingual is to have a trustworthy translation partner, whether that is through an agency or a translator on Fiverr. You need to be able to trust the translations provided, especially if you don’t understand the language being translated into. Google translate will not cut the mustard here!

Conclusion

If there was ever a time to get into the voice industry, it would be now. Both in its prime and infancy, as well as the big nine, are plowing billions into growing it and bringing voice assistants into everybody’s homes and daily routines.

Choosing which platform to use can be tricky, but based on what you intend to build, the platform to use should shine through or, failing that, utilize a third-party tool to hedge your bets and build on multiple platforms, especially if your skill is less complicated with fewer moving parts.

I, for one, am excited about the future of voice as it becomes ubiquitous; screen reliance will reduce and customers will be able to interact naturally with their assistant. But first, it’s up to us to build the skills that people will want from their assistant.

Smashing Editorial (dm, il)

Text To Speech With AWS

Text To Speech With AWS

Text To Speech With AWS

Philip Kiely

This two-part series presents three projects that teach you how to use AWS (Amazon Web Services) to transform text between its written and spoken states. The first project will use text to speech to turn a blog post or other written content into a spoken .mp3 file to give more options to blind and dyslexic users of your site.

In the next article, we will embark on the return journey, from speech to text, and consider the accuracy of these transcriptions by sending various samples through a round-trip translation. To follow these tutorials, you will need an AWS account with billing enabled, though the tutorials will stay well within the constraints of free-tier resources. Examples will focus on using the AWS console, but I will also demonstrate the AWS CLI (Command Line Interface), which requires basic command line knowledge.

Introduction And Motivation

Most of the internet is text-based. Text is lightweight (1 byte per letter), widely supported, easy to interpret, and has a precedent as old as the internet as the default medium of online communication. Sending written text predates the internet: telegraphs carried text over wires hundreds of years ago and physical mail has transmitted writing for centuries. Voice transmission over radio and telephone also predates the internet, but did not translate to the same foundational medium that text did online. This is in almost all cases a good thing, again, text is lightweight and easy to interpret compared to audio. However, transforming between voice and text can add powerful functionality to and improve the accessibility of a wide variety of applications.

It has always been possible to transform between audio and text, you can read a written speech or transcribe an oral sermon. Indeed, if we think back to the telegram, trained operators transcoded Morse Code messages to words. In each example, it has always been very labor intensive to move from speech to writing or back, even with specialized training and equipment. With a variety of cloud services, we can automate these processes to allow transitioning between mediums in seconds without any human effort, which expands the possible use cases.

The most obvious benefit of implementing appropriate text to speech and speech to text options is accessibility. A visually impaired or dyslexic user would benefit from a narrated version of an article, while a deaf person could become a member of your podcasting audience by reading a transcript of the show.

Text to Speech Project

Say you wanted to add narrated versions of every post to your blog. You could purchase a microphone and invest hours into recording and editing spoken renditions of each post. This would result in a superior listener experience, but if you want most of the benefit for only a couple of minutes and a few pennies per post, consider using AWS instead. If you are the sort of person who regularly updates and revises older or evergreen content, this method also helps you keep the spoken version up to date with minimal effort.

We will begin with text to speech using Amazon Polly. For simple exploration, AWS provides a graphical user interface through its online console. After logging in to your AWS account, use the “Services” menu to find “Amazon Polly” or go to https://us-east-1.console.aws.amazon.com/polly/home/SynthesizeSpeech.

Using the Polly Console

Amazon Polly Console
Amazon Polly provides a console to perform text-to-speech operations. (Large preview)

You can use the Amazon Polly console to read 3,000 characters (about 500 words) and get an audio stream or immediate download. If you need up to 100,000 characters (about 16,600 words) read, your only option is to have AWS store the result in S3 after it has finished processing, which can take a couple of minutes. At the time of writing, Amazon Polly does not support inputs of over 100,000 billable characters, if you want to convert a longer text like a book you will most likely have to do so in chunks and concatenate the audio files yourself.

A “billable character” is one that the service actually pronounces. Specifically, that means that SSML tags are not billable characters, which we will cover later. For your first year of using Amazon Polly, you get 5 million billable characters per month for free, which is more than enough to run the examples from this article and do your own experimentation. Beyond that, Amazon Polly costs four dollars per million billable characters at the time of writing, meaning that converting a standard-length novel would cost about two dollars.

The console also allows you to change the language, region, and voice of the reader. Though this article only covers English, at the time of writing AWS supports 21 languages and 29 distinct language-region pairs. While most regions only have one or two voices, popular ones like United States English have several options to chose between.

Amazon Polly narrated text is very obviously read by a robot, but the resulting audio is quite listenable.

I often prefer to use the UK English voice “Brian.” To my American ears, the British accent covers some of the inflections in robotic speech and makes for a smoother listening experience. To be clear, Amazon Polly narrated text is very obviously read by a robot, but the resulting audio is quite listenable.

It is significantly better than the built-in reader that the MacOS say terminal command uses, and is comparable to the speech quality of voice assistants like Siri and Alexa.

Writing SSML

If you want full control over the resultant speech, you can take the time to tag your input with SSML. SSML (Speech Synthesis Markup Language) is a standardized language for representing verbal cues in text. Like HTML, XML, and other markup languages, it uses opening and closing tags. Amazon Polly supports SSML input, and tags do not count as “billable characters.” Alexa skills also use SSML for pre-programmed responses, so it is a worthwhile language to know.

The foundational tag, <speak>, wraps everything that you want read. Like HTML, use <p> to divide paragraphs, which results in a significant pause in the narration. Smaller pauses come from punctuation, and you always have the option to insert pauses of up to ten seconds with <break>.

SSML provides <say-as>, a very flexible tag that supports everything from pronouncing phone numbers to censoring expletives using the interpret-as argument. Consider the options from this tag with the following sample.

<speak>
Call 5551230987 by 11'00" PM to get tips on writing clean JavaScript.<break time="1s"/>
Call <say-as interpret-as="telephone">5551230987</say-as> by 11'00" PM to get tips on writing clean <say-as interpret-as="expletive">JavaScript</say-as>
</speak>

Further flexibility comes from the <prosody> tag, which provides you with control over the rate, pitch, and volume of speech. Unfortunately, at the time of writing Polly does not support the <voice> tag, which Alexa skills can use to speak in multiple standard voices, but does support the <lang> tag that allows voices in one language to correctly pronounce words from other languages. In this example, <lang> corrects the pronunciation of “tag” from American to German.

<speak>
    Guten tag, where is the airport?<break time="1s"/>
    <lang xml:lang="de-DE">Guten tag</lang>, where is the airport>
</speak>

Finally, if you want to customize pronunciation within a language, Amazon Polly supports the <phoneme> tag.

My last name, Kiely, is spelled differently than it is pronounced. Using the x-sampa alphabet, I am able to specify the correct pronunciation.

<speak>
    Philip Kiely<break time="1s"/>
    Philip <phoneme alphabet="x-sampa" ph="ˈkaI.li">Kiely</phoneme>
</speak>

This is not an exhaustive list of the customization options available with SSML. For a complete reference, visit the documentation.

Writing Lexicons

If you want to specify a consistent custom pronunciation or expand an abbreviation without tagging each instance with a phoneme tag, or you are using plain text instead of SSML, Amazon Polly supports lexicons of custom pronunciations. You can apply up to five lexicons of up to 4,000 characters each per language to a narration, though larger lexicons increase the processing time.

As with before, I want to make sure that Amazon Polly says my name correctly, but this time I want to do so without using SSML. I wrote the following lexicon:

<?xml version="1.0" encoding="UTF-8"?>
<lexicon version="1.0"
      xmlns="http://www.w3.org/2005/01/pronunciation-lexicon"
      xmlns:xsi="http://www.w3.org/2001/XMLSchema-instance"
      xsi:schemaLocation="http://www.w3.org/2005/01/pronunciation-lexicon
        http://www.w3.org/TR/2007/CR-pronunciation-lexicon-20071212/pls.xsd"
      alphabet="x-sampa"
      xml:lang="en-US">
  <lexeme><grapheme>Kiely</grapheme><alias>ˈkaIli</alias></lexeme>
</lexicon>

The <?xml?> header and <lexicon> tag will stay mostly constant between lexicons, though the <lexicon> tag supports two important arguments. The first, alphabet, lets you choose between x-sampa and ipa, two standard pronunciation alphabets. I prefer x-sampa because it uses standard ASCII characters, so I am unlikely to encounter encoding issues. The xml:lang argument lets you specify language and region. A lexicon is only usable by a voice from that language and region.

The lexicon itself is a sequence of <lexeme> tags. Each one contains a <grapheme> tag, which contains the original text, and the <alias> tag, which describes what you want said instead. Aliases go beyond pronunciation, you can use them for expanding abbreviations (“Jr” becomes “Junior”) or replacing words (“Bruce Wayne” becomes “Batman”). A lexicon can have as many lexeme tags as it can fit in the 4,000 character limit.

Amazon Polly Console with lexicon loaded
The included lexicon will modify the pronunciation of the input text. (Large preview)

The screenshot shows the plain text that would be mispronounced and the applied lexicon. Use the “Customize Pronunciation” menu to select up to five uploaded lexicons, uploaded from the left navbar tab “Lexicons.” Listening to the speech verifies that my name is said correctly.

Now that we have full control over the resultant speech, let’s consider how to save the output for use in our application.

Saving and loading from S3

If you want to re-use spoken text in your application, you’ll want to choose the “Synthesize to S3” option in the Amazon Polly console. In this example, I am using the voice “Brian” to perform a surprisingly capable reading of Shakespeare’s sonnet XXIX. We begin by copying in the poem as plain text and selecting “Synthesize to S3,” which launches the following modal.

S3 Synthesize Modal
The 'Synthesize to S3' button gives you options for where to save the resultant file. (Large preview)

S3 buckets have globally unique names, and you can enter any S3 bucket that you own or have the appropriate permissions to. Make sure the bucket allows for making its contents public, as that will be required in a future step. You should also set a “S3 key prefix,” which is a string that will help you identify the output in the bucket. After clicking Synthesize and giving it a moment to process, we navigate to the S3 bucket that we synthesized the speech into.

S3 Bucket main page
A S3 bucket stores your project's files. (Large preview)

The arrow points to the entry in the bucket that we just created. Selecting that item will bring us to the following page.

S3 Bucket file view
For each file, you can make it public using this button. (Large preview)

Follow the arrow to select the “Make Public” option, which will make the file accessible to anyone with a link. Scroll down and copy the link and use it in your application. For example, you can download the poem here. For many applications, you may wish to pass the url to an html <audio> tag to allow for web playback.

We have covered every necessary component for transforming text to speech on AWS. Next, we turn our attention to a more advanced interface that can provide automation potential and save time.

Using the AWS CLI

Back to our hypothetical blog post. The simplest workflow would be to take the final written version of each article, copy it into the console, click the “Synthesize to S3 button,” and embed a download link to the resultant .mp3 file in the blog. Honestly, this is a pretty decent workflow; it is exactly what I do for my personal website. However, AWS offers another option: the AWS CLI.

Make sure that you have installed and configured the AWS CLI appropriately. Begin by entering aws polly help to make sure that Polly is available and to read a list of supported commands. For troubleshooting, see the documentation.

To perform a conversion from the command line, I first copied the poem from earlier into a .txt file. I then ran the following command in terminal (MacOS/Linux):

aws polly synthesize-speech \
    --output-format mp3 \
    --voice-id Joanna \
    --text "`cat sonnetxxix.txt`" \
    poem.mp3

In a few seconds, the resulting .mp3 file was downloaded to my machine, ready for inclusion in my CMS or other application. Note the special characters around the --text argument, this passes the contents of the file rather than just the file name.

Finally, for more advanced applications, Amazon Polly has an SDK for 9 languages/platforms. The SDK would be overkill for these examples, but is exactly what you want for automating Amazon Polly calls, especially in response to user actions.

Conclusion

Text to speech can help you create more versatile, accessible content. Beginning in the Amazon Polly console, we can transform up to 100,000 billable characters in plain text or SSML, make the resulting .mp3 file public, and use that file in an application. We can use the AWS CLI for automation and more convenient access.

Stay tuned for the second installment of the series, we will convert media in the other direction, from speech to text, and consider the benefits and challenges of doing so. Part two will build on the technologies that we have used so far and introduce Amazon Transcribe.

Further Reference

Smashing Editorial (yk,ra)

How To Make A Speech Synthesis Editor

How To Make A Speech Synthesis Editor

How To Make A Speech Synthesis Editor

Knut Melvær

When Steve Jobs unveiled the Macintosh in 1984, it said “Hello” to us from the stage. Even at that point, speech synthesis wasn’t really a new technology: Bell Labs developed the vocoder as early as in the late 30s, and the concept of a voice assistant computer made it into people’s awareness when Stanley Kubrick made the vocoder the voice of HAL9000 in 2001: A Space Odyssey (1968).

It wasn’t before the introduction of Apple’s Siri, Amazon Echo, and Google Assistant in the mid 2015s that voice interfaces actually found their way into a broader public’s homes, wrists, and pockets. We’re still in an adoption phase, but it seems that these voice assistants are here to stay.

In other words, the web isn’t just passive text on a screen anymore. Web editors and UX designers have to get accustomed to making content and services that should be spoken out loud.

We’re already moving fast towards using content management systems that let us work with our content headlessly and through APIs. The final piece is to make editorial interfaces that make it easier to tailor content for voice. So let’s do just that!

What Is SSML

While web browsers use W3C’s specification for HyperText Markup Language (HTML) to visually render documents, most voice assistants use Speech Synthesis Markup Language (SSML) when generating speech.

A minimal example using the root element <speak>, and the paragraph (<p>) and sentence (<s>) tags:

<speak>
  <p>
    <s>This is the first sentence of the paragraph.</s>
    <s>Here’s another sentence.</s>
  </p>
</speak>
Press play to listen to the snippet:

Where SSML gets existing is when we introduce tags for <emphasis> and <prosody> (pitch):

<speak>
  <p>
    <s>Put some <emphasis strength="strong">extra weight on these words</emphasis></s>
    <s>And say <prosody pitch="high" rate="fast">this a bit higher and faster</prosody>!</s>
  </p>
</speak>
Press play to listen to the snippet:

SSML has more features, but this is enough to get a feel for the basics. Now, let’s take a closer look at the editor that we will use to make the speech synthesis editing interface.

The Editor For Portable Text

To make this editor, we’ll use the editor for Portable Text that features in Sanity.io. Portable Text is a JSON specification for rich text editing, that can be serialized into any markup language, such as SSML. This means you can easily use the same text snippet in multiple places using different markup languages.

Sanity.io’s default editor for Portable Text
Sanity.io’s default editor for Portable Text (Large preview)

Installing Sanity

Sanity.io is a platform for structured content that comes with an open-source editing environment built with React.js. It takes two minutes to get it all up and running.

Type npm i -g @sanity/cli && sanity init into your terminal, and follow the instructions. Choose “empty”, when you’re prompted for a project template.

If you don’t want to follow this tutorial and make this editor from scratch, you can also clone this tutorial’s code and follow the instructions in README.md.

When the editor is downloaded, you run sanity start in the project folder to start it up. It will start a development server that use Hot Module Reloading to update changes as you edit its files.

How To Configure Schemas In Sanity Studio

Creating The Editor Files

We’ll start by making a folder called ssml-editor in the /schemas folder. In that folder, we’ll put some empty files:

/ssml-tutorial/schemas/ssml-editor
                        ├── alias.js
                        ├── emphasis.js
                        ├── annotations.js
                        ├── preview.js
                        ├── prosody.js
                        ├── sayAs.js
                        ├── blocksToSSML.js
                        ├── speech.js
                        ├── SSMLeditor.css
                        └── SSMLeditor.js

Now we can add content schemas in these files. Content schemas are what defines the data structure for the rich text, and what Sanity Studio uses to generate the editorial interface. They are simple JavaScript objects that mostly require just a name and a type.

We can also add a title and a description to make a bit nicer for editors. For example, this is a schema for a simple text field for a title:

export default {
  name: 'title',
  type: 'string',
  title: 'Title',
  description: 'Titles should be short and descriptive'
}
Sanity Studio with a title field and an editor for Portable Text
The studio with our title field and the default editor (Large preview)

Portable Text is built on the idea of rich text as data. This is powerful because it lets you query your rich text, and convert it into pretty much any markup you want.

It is an array of objects called “blocks” which you can think of as the “paragraphs”. In a block, there is an array of children spans. Each block can have a style and a set of mark definitions, which describe data structures distributed on the children spans.

Sanity.io comes with an editor that can read and write to Portable Text, and is activated by placing the block type inside an array field, like this:

// speech.js
export default {
  name: 'speech',
  type: 'array',
  title: 'SSML Editor',
  of: [
    { type: 'block' }
  ]
}

An array can be of multiple types. For an SSML-editor, those could be blocks for audio files, but that falls outside of the scope of this tutorial.

The last thing we want to do is to add a content type where this editor can be used. Most assistants use a simple content model of “intents” and “fulfillments”:

  • Intents Usually a list of strings used by the AI model to delineate what the user wants to get done.
  • Fulfillments This happens when an “intent” is identified. A fulfillment often is — or at least — comes with some sort of response.

So let’s make a simple content type called fulfillment that use the speech synthesis editor. Make a new file called fulfillment.js and save it in the /schema folder:

// fulfillment.js
export default {
  name: 'fulfillment',
  type: 'document',
  title: 'Fulfillment',
  of: [
    {
      name: 'title',
      type: 'string',
      title: 'Title',
      description: 'Titles should be short and descriptive'
    },
    {
      name: 'response',
      type: 'speech'
    }
  ]
}

Save the file, and open schema.js. Add it to your studio like this:

// schema.js
import createSchema from 'part:@sanity/base/schema-creator'
import schemaTypes from 'all:part:@sanity/base/schema-type'
import fullfillment from './fullfillment'
import speech from './speech'

export default createSchema({
  name: 'default',
  types: schemaTypes.concat([
    fullfillment,
    speech,
  ])
})

If you now run sanity start in your command line interface within the project’s root folder, the studio will start up locally, and you’ll be able to add entries for fulfillments. You can keep the studio running while we go on, as it will auto-reload with new changes when you save the files.

Adding SSML To The Editor

By default, the block type will give you a standard editor for visually oriented rich text with heading styles, decorator styles for emphasis and strong, annotations for links, and lists. Now we want to override those with the audial concepts found in SSML.

We begin with defining the different content structures, with helpful descriptions for the editors, that we will add to the block in SSMLeditorSchema.js as configurations for annotations. Those are “emphasis”, “alias”, “prosody”, and “say as”.

Emphasis

We begin with “emphasis”, which controls how much weight is put on the marked text. We define it as a string with a list of predefined values that the user can choose from:

// emphasis.js
export default {
  name: 'emphasis',
  type: 'object',
  title: 'Emphasis',
  description:
    'The strength of the emphasis put on the contained text',
  fields: [
    {
      name: 'level',
      type: 'string',
      options: {
        list: [
          { value: 'strong', title: 'Strong' },
          { value: 'moderate', title: 'Moderate' },
          { value: 'none', title: 'None' },
          { value: 'reduced', title: 'Reduced' }
        ]
      }
    }
  ]
}

Alias

Sometimes the written and the spoken term differ. For instance, you want to use the abbreviation of a phrase in a written text, but have the whole phrase read aloud. For example:

<s>This is a <sub alias="Speech Synthesis Markup Language">SSML</sub> tutorial</s>
Press play to listen to the snippet:

The input field for the alias is a simple string:

// alias.js
export default {
  name: 'alias',
  type: 'object',
  title: 'Alias (sub)',
  description:
    'Replaces the contained text for pronunciation. This allows a document to contain both a spoken and written form.',
  fields: [
    {
      name: 'text',
      type: 'string',
      title: 'Replacement text',
    }
  ]
}

Prosody

With the prosody property we can control different aspects how text should be spoken, like pitch, rate, and volume. The markup for this can look like this:

<s>Say this with an <prosody pitch="x-low">extra low pitch</prosody>, and this <prosody rate="fast" volume="loud">loudly with a fast rate</prosody></s>
Press play to listen to the snippet:

This input will have three fields with predefined string options:

// prosody.js
export default {
  name: 'prosody',
  type: 'object',
  title: 'Prosody',
  description: 'Control of the pitch, speaking rate, and volume',
  fields: [
    {
      name: 'pitch',
      type: 'string',
      title: 'Pitch',
      description: 'The baseline pitch for the contained text',
      options: {
        list: [
          { value: 'x-low', title: 'Extra low' },
          { value: 'low', title: 'Low' },
          { value: 'medium', title: 'Medium' },
          { value: 'high', title: 'High' },
          { value: 'x-high', title: 'Extra high' },
          { value: 'default', title: 'Default' }
        ]
      }
    },
    {
      name: 'rate',
      type: 'string',
      title: 'Rate',
      description:
        'A change in the speaking rate for the contained text',
      options: {
        list: [
          { value: 'x-slow', title: 'Extra slow' },
          { value: 'slow', title: 'Slow' },
          { value: 'medium', title: 'Medium' },
          { value: 'fast', title: 'Fast' },
          { value: 'x-fast', title: 'Extra fast' },
          { value: 'default', title: 'Default' }
        ]
      }
    },
    {
      name: 'volume',
      type: 'string',
      title: 'Volume',
      description: 'The volume for the contained text.',
      options: {
        list: [
          { value: 'silent', title: 'Silent' },
          { value: 'x-soft', title: 'Extra soft' },
          { value: 'medium', title: 'Medium' },
          { value: 'loud', title: 'Loud' },
          { value: 'x-loud', title: 'Extra loud' },
          { value: 'default', title: 'Default' }
        ]
      }
    }
  ]
}

Say As

The last one we want to include is <say-as>. This tag lets us exercise a bit more control over how certain information is pronounced. We can even use it to bleep out words if you need to redact something in voice interfaces. That’s @!%&© useful!

<s>Do I have to <say-as interpret-as="expletive">frakking</say-as> <say-as interpret-as="verbatim">spell</say-as> it out for you!?</s>
Press play to listen to the snippet:
// sayAs.js
export default {
  name: 'sayAs',
  type: 'object',
  title: 'Say as...',
  description: 'Lets you indicate information about the type of text construct that is contained within the element. It also helps specify the level of detail for rendering
  the contained text.',
  fields: [
    {
      name: 'interpretAs',
      type: 'string',
      title: 'Interpret as...',
      options: {
        list: [
          { value: 'cardinal', title: 'Cardinal numbers' },
          {
            value: 'ordinal',
            title: 'Ordinal numbers (1st, 2nd, 3th...)'
          },
          { value: 'characters', title: 'Spell out characters' },
          { value: 'fraction', title: 'Say numbers as fractions' },
          { value: 'expletive', title: 'Blip out this word' },
          {
            value: 'unit',
            title: 'Adapt unit to singular or plural'
          },
          {
            value: 'verbatim',
            title: 'Spell out letter by letter (verbatim)'
          },
          { value: 'date', title: 'Say as a date' },
          { value: 'telephone', title: 'Say as a telephone number' }
        ]
      }
    },
    {
      name: 'date',
      type: 'object',
      title: 'Date',
      fields: [
        {
          name: 'format',
          type: 'string',
          description: 'The format attribute is a sequence of date field character codes. Supported field character codes in format are {y, m, d} for year, month, and day (of the month) respectively. If the field code appears once for year, month, or day then the number of digits expected are 4, 2, and 2 respectively. If the field code is repeated then the number of expected digits is the number of times the code is repeated. Fields in the date text may be separated by punctuation and/or spaces.'
        },
        {
          name: 'detail',
          type: 'number',
          validation: Rule =>
            Rule.required()
              .min(0)
              .max(2),
          description: 'The detail attribute controls the spoken form of the date. For detail='1' only the day fields and one of month or year fields are required, although both may be supplied'
        }
      ]
    }
  ]
}

Now we can import these in an annotations.js file, which makes things a bit tidier.

// annotations.js
export {default as alias} from './alias'
export {default as emphasis} from './emphasis'
export {default as prosody} from './prosody'
export {default as sayAs} from './sayAs'

Now we can import these annotation types into our main schemas:

// schema.js
import createSchema from "part:@sanity/base/schema-creator"
import schemaTypes from "all:part:@sanity/base/schema-type"
import fulfillment from './fulfillment'
import speech from './ssml-editor/speech'
import {
  alias,
  emphasis,
  prosody,
  sayAs
} from './annotations'

export default createSchema({
  name: "default",
  types: schemaTypes.concat([
    fulfillment,
    speech,
    alias,
    emphasis,
    prosody,
    sayAs
  ])
})

Finally, we can now add these to the editor like this:

// speech.js
export default {
  name: 'speech',
  type: 'array',
  title: 'SSML Editor',
  of: [
    {
      type: 'block',
      styles: [],
      lists: [],
      marks: {
        decorators: [],
        annotations: [
          {type: 'alias'},
          {type: 'emphasis'},
          {type: 'prosody'},
          {type: 'sayAs'}
        ]
      }
    }
  ]
}

Notice that we also added empty arrays to styles, and decorators. This disables the default styles and decorators (like bold and emphasis) since they don’t make that much sense in this specific case.

Customizing The Look And Feel

Now we have the functionality in place, but since we haven’t specified any icons, each annotation will use the default icon, which makes the editor hard to actually use for authors. So let’s fix that!

With the editor for Portable Text it’s possible to inject React components both for the icons and for how the marked text should be rendered. Here, we’ll just let some emoji do the work for us, but you could obviously go far with this, making them dynamic and so on. For prosody we’ll even make the icon change depending on the volume selected. Note that I omitted the fields in these snippets for brevity, you shouldn’t remove them in your local files.

// alias.js
import React from 'react'

export default {
  name: 'alias',
  type: 'object',
  title: 'Alias (sub)',
  description: 'Replaces the contained text for pronunciation. This allows a document to contain both a spoken and written form.',
  fields: [
    /* all the fields */
  ],
  blockEditor: {
    icon: () => '🔤',
    render: ({ children }) => <span>{children} 🔤</span>,
  },
};
// emphasis.js
import React from 'react'

export default {
  name: 'emphasis',
  type: 'object',
  title: 'Emphasis',
  description: 'The strength of the emphasis put on the contained text',
  fields: [
    /* all the fields */
  ],
  blockEditor: {
    icon: () => '🗯',
    render: ({ children }) => <span>{children} 🗯</span>,
  },
};

// prosody.js
import React from 'react'

export default {
  name: 'prosody',
  type: 'object',
  title: 'Prosody',
  description: 'Control of the pitch, speaking rate, and volume',
  fields: [
    /* all the fields */
  ],
  blockEditor: {
    icon: () => '🔊',
    render: ({ children, volume }) => (
      <span>
        {children} {['x-loud', 'loud'].includes(volume) ? '🔊' : '🔈'}
      </span>
    ),
  },
};
// sayAs.js
import React from 'react'

export default {
  name: 'sayAs',
  type: 'object',
  title: 'Say as...',
  description: 'Lets you indicate information about the type of text construct that is contained within the element. It also helps specify the level of detail for rendering the contained text.',
  fields: [
    /* all the fields */
  ],
  blockEditor: {
    icon: () => '🗣',
    render: props => <span>{props.children} 🗣</span>,
  },
};

The customized SSML editor
The editor with our custom SSML marks (Large preview)

Now you have an editor for editing text that can be used by voice assistants. But wouldn’t it be kinda useful if editors also could preview how the text actually will sound like?

Adding A Preview Button Using Google’s Text-to-Speech

Native speech synthesis support is actually on its way for browsers. But in this tutorial, we’ll use Google’s Text-to-Speech API which supports SSML. Building this preview functionality will also be a demonstration of how you serialize Portable Text into SSML in whatever service you want to use this for.

Wrapping The Editor In A React Component

We begin with opening the SSMLeditor.js file and add the following code:

// SSMLeditor.js
import React, { Fragment } from 'react';
import { BlockEditor } from 'part:@sanity/form-builder';

export default function SSMLeditor(props) {
  return (
    <Fragment>
      <BlockEditor {...props} />
    </Fragment>
  );
}

We have now wrapped the editor in our own React component. All the props it needs, including the data it contains, are passed down in real-time. To actually use this component, you have to import it into your speech.js file:

// speech.js
import React from 'react'
import SSMLeditor from './SSMLeditor.js'

export default {
  name: 'speech',
  type: 'array',
  title: 'SSML Editor',
  inputComponent: SSMLeditor,
  of: [
    {
      type: 'block',
      styles: [],
      lists: [],
      marks: {
        decorators: [],
        annotations: [
          { type: 'alias' },
          { type: 'emphasis' },
          { type: 'prosody' },
          { type: 'sayAs' },
        ],
      },
    },
  ],
}

When you save this and the studio reloads, it should look pretty much exactly the same, but that’s because we haven’t started tweaking the editor yet.

Convert Portable Text To SSML

The editor will save the content as Portable Text, an array of objects in JSON that makes it easy to convert rich text into whatever format you need it to be. When you convert Portable Text into another syntax or format, we call that “serialization”. Hence, “serializers” are the recipes for how the rich text should be converted. In this section, we will add serializers for speech synthesis.

You have already made the blocksToSSML.js file. Now we’ll need to add our first dependency. Begin by running the terminal command npm init -y inside the ssml-editor folder. This will add a package.json where the editor’s dependencies will be listed.

Once that’s done, you can run npm install @sanity/block-content-to-html to get a library that makes it easier to serialize Portable Text. We’re using the HTML-library because SSML has the same XML syntax with tags and attributes.

This is a bunch of code, so do feel free to copy-paste it. I’ll explain the pattern right below the snippet:

// blocksToSSML.js
import blocksToHTML, { h } from '@sanity/block-content-to-html'

const serializers = {
  marks: {
    prosody: ({ children, mark: { rate, pitch, volume } }) =>
      h('prosody', { attrs: { rate, pitch, volume } }, children),
    alias: ({ children, mark: { text } }) =>
      h('sub', { attrs: { alias: text } }, children),
    sayAs: ({ children, mark: { interpretAs } }) =>
      h('say-as', { attrs: { 'interpret-as': interpretAs } }, children),
    break: ({ children, mark: { time, strength } }) =>
      h('break', { attrs: { time: '${time}ms', strength } }, children),
    emphasis: ({ children, mark: { level } }) =>
      h('emphasis', { attrs: { level } }, children)
  }
}

export const blocksToSSML = blocks => blocksToHTML({ blocks, serializers })

This code will export a function that takes the array of blocks and loop through them. Whenever a block contains a mark, it will look for a serializer for the type. If you have marked some text to have emphasis, it this function from the serializers object:

emphasis: ({ children, mark: { level } }) =>
      h('emphasis', { attrs: { level } }, children)

Maybe you recognize the parameter from where we defined the schema? The h() function lets us defined an HTML element, that is, here we “cheat” and makes it return an SSML element called <emphasis>. We also give it the attribute level if that is defined, and place the children elements within it — which in most cases will be the text you have marked up with emphasis.

{
    "_type": "block",
    "_key": "f2c4cf1ab4e0",
    "style": "normal",
    "markDefs": [
        {
            "_type": "emphasis",
            "_key": "99b28ed3fa58",
            "level": "strong"
        }
    ],
    "children": [
        {
            "_type": "span",
            "_key": "f2c4cf1ab4e01",
            "text": "Say this strongly!",
            "marks": [
                "99b28ed3fa58"
            ]
        }
    ]
}

That is how the above structure in Portable Text gets serialized to this SSML:

<emphasis level="strong">Say this strongly</emphasis>

If you want support for more SSML tags, you can add more annotations in the schema, and add the annotation types to the marks section in the serializers.

Now we have a function that returns SSML markup from our marked up rich text. The last part is to make a button that lets us send this markup to a text-to-speech service.

Adding A Preview Button That Speaks Back To You

Ideally, we should have used the browser’s speech synthesis capabilities in the Web API. That way, we would have gotten away with less code and dependencies.

As of early 2019, however, native browser support for speech synthesis is still in its early stages. It looks like support for SSML is on the way, and there is proof of concepts of client-side JavaScript implementations for it.

Chances are that you are going to use this content with a voice assistant anyways. Both Google Assistant and Amazon Echo (Alexa) support SSML as responses in a fulfillment. In this tutorial, we will use Google’s text-to-speech API, which also sounds good and support several languages.

Start by obtaining an API key by signing up for Google Cloud Platform (it will be free for the first 1 million characters you process). Once you’re signed up, you can make a new API key on this page.

Now you can open your PreviewButton.js file, and add this code to it:

// PreviewButton.js
import React from 'react'
import Button from 'part:@sanity/components/buttons/default'
import { blocksToSSML } from './blocksToSSML'

// You should be careful with sharing this key
// I put it here to keep the code simple
const API_KEY = '<yourAPIkey>'
const GOOGLE_TEXT_TO_SPEECH_URL = 'https://texttospeech.googleapis.com/v1beta1/text:synthesize?key=' + API_KEY

const speak = async blocks => {
  // Serialize blocks to SSML
  const ssml = blocksToSSML(blocks)
  // Prepare the Google Text-to-Speech configuration
  const body = JSON.stringify({
    input: { ssml },
    // Select the language code and voice name (A-F)
    voice: { languageCode: 'en-US', name: 'en-US-Wavenet-A' },
    // Use MP3 in order to play in browser
    audioConfig: { audioEncoding: 'MP3' }
  })
  // Send the SSML string to the API
  const res = await fetch(GOOGLE_TEXT_TO_SPEECH_URL, {
    method: 'POST',
    body
  }).then(res => res.json())
  // Play the returned audio with the Browser’s Audo API
  const audio = new Audio('data:audio/wav;base64,' + res.audioContent)
  audio.play()
}

export default function PreviewButton (props) {
  return <Button style={{ marginTop: '1em' }} onClick={() => speak(props.blocks)}>Speak text</Button>
}

I’ve kept this preview button code to a minimal to make it easier to follow this tutorial. Of course, you could build it out by adding state to show if the preview is processing or make it possible to preview with the different voices that Google’s API supports.

Add the button to SSMLeditor.js:

// SSMLeditor.js
import React, { Fragment } from 'react';
import { BlockEditor } from 'part:@sanity/form-builder';
import PreviewButton from './PreviewButton';

export default function SSMLeditor(props) {
  return (
    <Fragment>
      <BlockEditor {...props} />
      <PreviewButton blocks={props.value} />
    </Fragment>
  );
}

Now you should be able to mark up your text with the different annotations, and hear the result when pushing “Speak text”. Cool, isn’t it?

You’ve Created A Speech Synthesis Editor, And Now What?

If you have followed this tutorial, you have been through how you can use the editor for Portable Text in Sanity Studio to make custom annotations and customize the editor. You can use these skills for all sorts of things, not only to make a speech synthesis editor. You have also been through how to serialize Portable Text into the syntax you need. Obviously, this is also handy if you’re building frontends in React or Vue. You can even use these skills to generate Markdown from Portable Text.

We haven’t covered how you actually use this together with a voice assistant. If you want to try, you can use much of the same logic as with the preview button in a serverless function, and set it as the API endpoint for a fulfillment using webhooks, e.g. with Dialogflow.

If you’d like me to write a tutorial on how to use the speech synthesis editor with a voice assistant, feel free to give me a hint on Twitter or share in the comments section below.

Further Reading on SmashingMag:

Smashing Editorial (dm, ra, yk, il)