
When we develop web-application or experiment with some technologies, it's quite common to need a certificate. A certificate for real world scenarios can be expensive, and it's over-engineering for testing purposes. So with this simple PowerShell script (on Windows), we can create a self-signed certificate for development enviroments.
$cert = New-SelfSignedCertificate -DnsName mydemowebapp.net -CertStoreLocation cert:\LocalMachine\My

$pwd = ConvertTo-SecureString -String "MyPassword" -Force -AsPlainText

Export-PfxCertificate -Cert $cert -FilePath C:\temp\cert.pfx -Password $pwdThe Ultimate WordPress Security Guide (Step by Step)

WordPress security is a topic of huge importance for every website owner. Google blacklists around 10,000+ websites every day for malware and around 50,000 for phishing every week.
If you are serious about your website, then you need to pay attention to the WordPress security best practices. In this guide, we will share all the top WordPress security tips to help you protect your website against hackers and malware.

While WordPress core software is very secure, and it’s audited regularly by hundreds of developers, there is a lot that can be done to keep your site secure.
At WPBeginner, we believe that security is not just about risk elimination. It’s also about risk reduction. As a website owner, there’s a lot that you can do to improve your WordPress security (even if you’re not tech savvy).
We have a number of actionable steps that you can take to protect your website against security vulnerabilities.
To make it easy, we have created a table of content to help you easily navigate through our ultimate WordPress security guide.
Table of Contents
Basics of WordPress Security
- Why WordPress Security is Important?
- Keeping WordPress Updated
- Passwords and User Permissions
- The Role of Web Hosting
WordPress Security in Easy Steps (No Coding)
- Install a WordPress Backup Solution
- Best WordPress Security Plugin
- Enable Web Application Firewall (WAF)
- Move WordPress Site to SSL/HTTPS
WordPress Security for DIY Users
- Change the Default “admin” username
- Disable File Editing
- Disable PHP File Execution
- Limit Login Attempts
- Add Two Factor Authentication
- Change WordPress Database Prefix
- Password Protect WP-Admin and Login
- Disable Directory Indexing and Browsing
- Disable XML-RPC in WordPress
- Automatically log out Idle Users
- Add Security Questions to WordPress Login
- Scanning WordPress for Malware and Vulnerabilies
- Fixing a Hacked WordPress Site
Ready? Let’s get started.
Why Website Security is Important?
A hacked WordPress site can cause serious damage to your business revenue and reputation. Hackers can steal user information, passwords, install malicious software, and can even distribute malware to your users.
Worst, you may find yourself paying ransomware to hackers just to regain access to your website.

In March 2016, Google reported that more than 50 million website users have been warned about a website they’re visiting may contain malware or steal information.
Furthermore, Google blacklists around 20,000 websites for malware and around 50,000 for phishing each week.
If your website is a business, then you need to pay extra attention to your WordPress security.
Similar to how it’s the business owners responsibility to protect their physical store building, as an online business owner it is your responsibility to protect your business website.
Keeping WordPress Updated

WordPress is an open source software which is regularly maintained and updated. By default, WordPress automatically installs minor updates. For major releases, you need to manually initiate the update.
WordPress also comes with thousands of plugins and themes that you can install on your website. These plugins and themes are maintained by third-party developers which regularly release updates as well.
These WordPress updates are crucial for the security and stability of your WordPress site. You need to make sure that your WordPress core, plugins, and theme are up to date.
Strong Passwords and User Permissions

The most common WordPress hacking attempts use stolen passwords. You can make that difficult by using stronger passwords that are unique for your website. Not just for WordPress admin area, but also for FTP accounts, database, WordPress hosting account, and your custom email addresses which use your site’s domain name.
Many beginners don’t like using strong passwords because they’re hard to remember. The good thing is that you don’t need to remember passwords anymore. You can use a password manager. See our guide on how to manage WordPress passwords.
Another way to reduce the risk is to not give anyone access to your WordPress admin account unless you absolutely have to. If you have a large team or guest authors, then make sure that you understand user roles and capabilities in WordPress before you add new user accounts and authors to your WordPress site.
The Role of WordPress Hosting
Your WordPress hosting service plays the most important role in the security of your WordPress site. A good shared hosting provider like Bluehost or Siteground take the extra measures to protect their servers against common threats.
Here is how a good web hosting company works in the background to protect your websites and data.
- They continuously monitor their network for suspicious activity.
- All good hosting companies have tools in place to prevent large scale DDOS attacks
- They keep their server software and hardware up to date to prevent hackers from exploiting a known security vulnerability in an old version.
- They have ready to deploy disaster recovery and accidents plans which allows them to protect your data in case of major accident.
On a shared hosting plan, you share the server resources with many other customers. This opens the risk of cross-site contamination where a hacker can use a neighboring site to attack your website.
Using a managed WordPress hosting service provides a more secure platform for your website. Managed WordPress hosting companies offer automatic backups, automatic WordPress updates, and more advanced security configurations to protect your website
We recommend WPEngine as our preferred managed WordPress hosting provider. They’re also the most popular one in the industry. (See our special WPEngine coupon).
WordPress Security in Easy Steps (No Coding)
We know that improving WordPress security can be a terrifying thought for beginners. Especially if you’re not techy. Guess what – you’re not alone.
We have helped thousands of WordPress users in hardening their WordPress security.
We will show you how you can improve your WordPress security with just a few clicks (no coding required).
If you can point-and-click, you can do this!
Install a WordPress Backup Solution

Backups are your first defense against any WordPress attack. Remember, nothing is 100% secure. If government websites can be hacked, then so can yours.
Backups allow you to quickly restore your WordPress site in case something bad was to happen.
There are many free and paid WordPress backup plugins that you can use. The most important thing you need to know when it comes to backups is that you must regularly save full-site backups to a remote location (not your hosting account).
We recommend storing it on a cloud service like Amazon, Dropbox, or private clouds like Stash.
Based on how frequently you update your website, the ideal setting might be either once a day or real-time backups.
Thankfully this can be easily done by using plugins like VaultPress or UpdraftPlus. They are both reliable and most importantly easy to use (no coding needed).
Best WordPress Security Plugin
After backups, the next thing we need to do is setup an auditing and monitoring system that keeps track of everything that happens on your website.
This includes file integrity monitoring, failed login attempts, malware scanning, etc.
Thankfully, this can be all taken care by the best free WordPress security plugin, Sucuri Scanner.
You need to install and activate the free Sucuri Security plugin. For more details, please see our step by step guide on how to install a WordPress plugin.
Upon activation, you need to go to the Sucuri menu in your WordPress admin. The first thing you will be asked to do is Generate a free API key. This enables audit logging, integrity checking, email alerts, and other important features.

The next thing, you need to do is click on the ‘Hardening’ tab from the settings menu. Go through every option and click on the “Apply Hardening” button.

These options help you lock down the key areas that hackers often use in their attacks. The only hardening option that’s a paid upgrade is the Web Application Firewall which we will explain in the next step, so skip it for now.
We have also covered a lot of these “Hardening” options later in this article for those who want to do it without using a plugin or the ones that require additional steps such as “Database Prefix change” or “Changing the Admin Username”.
After the hardening part, the default plugin settings are good enough for most websites and don’t need any changes. The only thing we recommend customizing is ‘Email Alerts’.
The default alert settings can clutter your inbox with emails. We recommend receiving alerts for key actions like changes in plugins, new user registration, etc. You can configure the alerts by going to Sucuri Settings » Alerts.

This WordPress security plugin is very powerful, so browse through all the tabs and settings to see all that it does such as Malware scanning, Audit logs, Failed Login Attempt tracking, etc.
Enable Web Application Firewall (WAF)
The easiest way to protect your site and be confident about your WordPress security is by using a web application firewall (WAF).
A website firewall blocks all malicious traffic before it even reaches your website.
DNS Level Website Firewall – These firewall route your website traffic through their cloud proxy servers. This allows them to only send genuine traffic to your web server.
Application Level Firewall – These firewall plugins examine the traffic once it reaches your server but before loading most WordPress scripts. This method is not as efficient as the DNS level firewall in reducing the server load.
To learn more, see our list of the best WordPress firewall plugins.

We use and recommend Sucuri as the best web-application firewall for WordPress. You can read about how Sucuri helped us block 450,000 WordPress attacks in a month.

The best part about Sucuri’s firewall is that it also comes with a malware cleanup and blacklist removal guarantee. Basically if you were to be hacked under their watch, they guarantee that they will fix your website (no matter how many pages you have).
This is a pretty strong warranty because repairing hacked websites is expensive. Security experts normally charge $250 per hour. Whereas you can get the entire Sucuri security stack for $199 per year.
Improve your WordPress Security with the Sucuri Firewall »
Sucuri is not the only DNS level firewall provider out there. The other popular competitor is Cloudflare. See our comparison of Sucuri vs Cloudflare (Pros and Cons).
Move Your WordPress Site to SSL/HTTPS
SSL (Secure Sockets Layer) is a protocol which encrypts data transfer between your website and users browser. This encryption makes it harder for someone to sniff around and steal information.

Once you enable SSL, your website will use HTTPS instead of HTTP, you will also see a padlock sign next to your website address in the browser.
SSL certificates were typically issued by certificate authorities and their prices start from $80 to hundreds of dollars each year. Due to added cost, most website owners opted to keep using the insecure protocol.
To fix this, a non-profit organization called Let’s Encrypt decided to offer free SSL Certificates to website owners. Their project is supported by Google Chrome, Facebook, Mozilla, and many more companies.
Due to this, it is now easier than ever to start using SSL for all your WordPress websites. For step by step instructions, see our article on how to get a free SSL certificate for your WordPress website.
WordPress Security for DIY Users
If you do everything that we have mentioned thus far, then you’re in a pretty good shape.
But as always, there’s more that you can do to harden your WordPress security.
Some of these steps may require coding knowledge.
Change the Default “admin” username
In the old days, the default WordPress admin username was “admin”. Since usernames make up half of login credentials, this made it easier for hackers to do brute-force attacks.
Thankfully, WordPress has since changed this and now requires you to select a custom username at the time of installing WordPress.
However, some 1-click WordPress installers, still set the default admin username to “admin”. If you notice that to be the case, then it’s probably a good idea to switch your web hosting.
Since WordPress doesn’t allow you to change usernames by default, there are three methods you can use to change the username.
- Create a new admin username and delete the old one.
- Use the Username Changer plugin
- Update username from phpMyAdmin
We have covered all three of these in our detailed guide on how to properly change your WordPress username (step by step).
Note: We’re talking about the username called “admin”, not the administrator role.
Disable File Editing
WordPress comes with a built-in code editor which allows you to edit your theme and plugin files right from your WordPress admin area. In the wrong hands, this feature can be a security risk which is why we recommend turning it off.

You can easily do this by adding the following code in your wp-config.php file.
// Disallow file edit
define( 'DISALLOW_FILE_EDIT', true );
Alternatively, you can do this with 1-click using the Hardening feature in the free Sucuri plugin that we mentioned above.
Disable PHP File Execution in Certain WordPress Directories
Another way to harden your WordPress security is by disabling PHP file execution in directories where it’s not needed such as /wp-content/uploads/.
You can do this by opening a text editor like Notepad and paste this code:
<Files *.php>
deny from all
</Files>
Next, you need to save this file as .htaccess and upload it to /wp-content/uploads/ folders on your website using an FTP client.
For more detailed explanation, see our guide on how to disable PHP execution in certain WordPress directories
Alternatively, you can do this with 1-click using the Hardening feature in the free Sucuri plugin that we mentioned above.
Limit Login Attempts
By default, WordPress allows users to try to login as many time as they want. This leaves your WordPress site vulnerable to brute force attacks. Hackers try to crack passwords by trying to login with different combinations.
This can be easily fixed by limiting the failed login attempts a user can make. If you’re using the web application firewall mentioned earlier, then this is automatically taken care of.
However, if you don’t have the firewall setup, then proceed with the steps below.
First, you need to install and activate the Login LockDown plugin. For more details, see our step by step guide on how to install a WordPress plugin.
Upon activation, visit Settings » Login LockDown page to setup the plugin.

For detailed instructions, take a look at our guide on how and why you should limit login attempts in WordPress.
Add Two Factor Authentication
Two-factor authentication technique requires users to log in by using a two-step authentication method. The first one is the username and password, and the second step requires you to authenticate using a separate device or app.
Most top online websites like Google, Facebook, Twitter, allow you to enable it for your accounts. You can also add the same functionality to your WordPress site.
First, you need to install and activate the Two Factor Authentication plugin. Upon activation, you need to click on the ‘Two Factor Auth’ link in WordPress admin sidebar.

Next, you need to install and open an authenticator app on your phone. There are several of them available like Google Authenticator, Authy, and LastPass Authenticator.
We recommend using LastPass Authenticator or Authy because they both allow you to back up your accounts to the cloud. This is very useful in case your phone is lost, reset, or you buy a new phone. All your account logins will be easily restored.
We will be using the LastPass Authenticator for the tutorial. However, instructions are similar for all auth apps. Open your authenticator app, and then click on the Add button.

You will be asked if you’d like to scan a site manually or scan the bar code. Select the scan bar code option and then point your phone’s camera on the QRcode shown on the plugin’s settings page.
That’s all, your authentication app will now save it. Next time you log in to your website, you will be asked for the two-factor auth code after you enter your password.

Simply open the authenticator app on your phone and enter the code you see on it.
Change WordPress Database Prefix
By default, WordPress uses wp_ as the prefix for all tables in your WordPress database. If your WordPress site is using the default database prefix, then it makes it easier for hackers to guess what your table name is. This is why we recommend changing it.
You can change your database prefix by following our step by step tutorial on how to change WordPress database prefix to improve security.
Note: This can break your site if it’s not done properly. Only proceed, if you feel comfortable with your coding skills.
Password Protect WordPress Admin and Login Page

Normally, hackers can request your wp-admin folder and login page without any restriction. This allows them to try their hacking tricks or run DDoS attacks.
You can add additional password protection on a server-side level, which will effectively block those requests.
Follow our step-by-step instructions on how to password protect your WordPress admin (wp-admin) directory.
Disable Directory Indexing and Browsing

Directory browsing can be used by hackers to find out if you have any files with known vulnerabilities, so they can take advantage of these files to gain access.
Directory browsing can also be used by other people to look into your files, copy images, find out your directory structure, and other information. This is why it is highly recommended that you turn off directory indexing and browsing.
You need to connect to your website using FTP or cPanel’s file manager. Next, locate the .htaccess file in your website’s root directory. If you cannot see it there, then refer to our guide on why you can’t see .htaccess file in WordPress.
After that, you need to add the following line at the end of the .htaccess file:
Options -Indexes
Don’t forget to save and upload .htaccess file back to your site. For more on this topic, see our article on how to disable directory browsing in WordPress.
Disable XML-RPC in WordPress
XML-RPC was enabled by default in WordPress 3.5 because it helps connecting your WordPress site with web and mobile apps.
Because of its powerful nature, XML-RPC can significantly amplify the brute-force attacks.
For example, traditionally if a hacker wanted to try 500 different passwords on your website, they would have to make 500 separate login attempts which will be caught and blocked by the login lockdown plugin.
But with XML-RPC, a hacker can use the system.multicall function to try thousands of password with say 20 or 50 requests.
This is why if you’re not using XML-RPC, then we recommend that you disable it.
There are 3 ways to disable XML-RPC in WordPress, and we have covered all of them in our step by step tutorial on how to disable XML-RPC in WordPress.
Tip: The .htaccess method is the best one because it’s the least resource intensive.
If you’re using the web-application firewall mentioned earlier, then this can be taken care of by the firewall.
Automatically log out Idle Users in WordPress
Logged in users can sometimes wander away from screen, and this poses a security risk. Someone can hijack their session, change passwords, or make changes to their account.
This is why many banking and financial sites automatically log out an inactive user. You can implement similar functionality on your WordPress site as well.
You will need to install and activate the Inactive Logout plugin. Upon activation, visit Settings » Inactive Logout page to configure plugin settings.

Simply set the time duration and add a logout message. Don’t forget to click on the save changes button to store your settings.
Add Security Questions to WordPress Login Screen

Adding a security question to your WordPress login screen makes it even harder for someone to get unauthorized access.
You can add security questions by installing the WP Security Questions plugin. Upon activation, you need to visit Settings » Security Questions page to configure the plugin settings.
For more detailed instructions, see our tutorial on how to add security questions to WordPress login screen.
Scanning WordPress for Malware and Vulnerabilies

If you have a WordPress security plugin installed, then those plugins will routinely check for malware and signs of security breaches.
However, if you see a sudden drop in website traffic or search rankings, then you may want to manually run a scan. You can use your WordPress security plugin, or use one of these malware and security scanners.
Running these online scans is quite straight forward, you just enter your website URLs and their crawlers go through your website to look for known malware and malicious code.
Now keep in mind that most WordPress security scanners can just scan your website. They cannot remove the malware or clean a hacked WordPress site.
This brings us to the next section, cleaning up malware and hacked WordPress sites.
Fixing a Hacked WordPress Site
Many WordPress users don’t realize the importance of backups and website security until their website is hacked.
Cleaning up a WordPress site can be very difficult and time consuming. Our first advice would be to let a professional take care of it.
Hackers install backdoors on affected sites, and if these backdoors are not fixed properly, then your website will likely get hacked again.
Allowing a professional security company like Sucuri to fix your website will ensure that your site is safe to use again. It will also protect you against any future attacks.
For the adventurous and DIY users, we have compiled a step by step guide on fixing a hacked WordPress site.
That’s all, we hope this article helped you learn the top WordPress security best practices as well as discover the best WordPress security plugins for your website.
If you liked this article, then please subscribe to our YouTube Channel for WordPress video tutorials. You can also find us on Twitter and Facebook.
The post The Ultimate WordPress Security Guide (Step by Step) appeared first on WPBeginner.
How to Connect to Redis on Java Over SSL
Redis, an open-source, in-memory data structure store, is one of the most popular choices for building NoSQL databases. However, one major stumbling block for using Redis is that it does not come with any of its own encryption features.
Of course, any enterprise-class database must be able to guarantee the security of the information stored within it. If your database may be accessible by untrusted parties, you will need to develop your own encryption capabilities, enveloping data within an encryption protocol.
How to Install an SSL Certificate on IBM Domino
IBM Domino, formally known as Lotus Domino, is a web-server and an advanced product of the IBM server. This web-server is widely used for hosting several social business applications and enterprise-level e-mail collaboration. It is considered to be a low-cost solution to enhance productivity and speed up the operations.
Installing an SSL Certificate on the IBM Domino (Lotus Domino) Web Server
After completing the check-out process for the SSL certificate, you will receive an e-mail attached with a *.zip file from your certification authority. This file comprises of primary, intermediate, and root certificates. You need to download and extract this *.zip file on your IBM Dominoserver directory where you intend to store all your certificates.
Measuring Percona Server for MySQL On-Disk Decryption Overhead
Percona Server for MySQL 8.0 comes with enterprise-grade total data encryption features. However, there is always the question of how much overhead — or performance penalty — comes with the data decryption. As we saw in my networking performance post, SSL under high concurrency might be problematic. Is this the case for data decryption?
To measure any overhead, I will start with a simplified read-only workload where data gets decrypted during read IO.
How Much Does It Really Cost to Build a WordPress Website?
One of the questions we often get asked is: how much does it cost to build a WordPress website? While the core WordPress software is free, the cost of a website depends entirely on your budget and goals.
In this article, we will break it all down to answer the ultimate question: How much does it really cost to build a WordPress website? We’ll also show you how to avoid overspending and minimize cost when building a website.

This is a lengthy read and that’s why we have added a table of contents. Here is what we will cover in this article.
- What do you need to build a WordPress website
- How to estimate the real cost of making a WordPress site
- What’s the cost of a low budget WordPress site
- What’s the cost of a WordPress site with more features
- What’s the cost of building a small business website with WordPress
- What’s the cost of building an eCommerce site with WordPress
- What’s the cost of a custom WordPress website
- How to avoid overpaying and cut down spending
What Do You Need to Build a WordPress Website?
WordPress is free for anyone to download and use. It is an open source software which gives you the freedom to install it on any kind of website.
So if WordPress is free, then where is the cost coming from?
The cost of a WordPress site can be broken down into following categories:
- WordPress hosting
- Domain Name
- Design
- Plugins and Extensions (Apps)
To create a self hosted WordPress site, you need web hosting to store your files. Every website on the internet needs hosting. This is your website’s home on the internet.
There are different hosting plans available for all kind of websites. You need to pick one that suits your requirements and fits your budget.
Next, you will need a domain name. This will be your website’s address on the internet, and this is what your users will type in the browser to reach your website (example, wpbeginner.com or google.com).
With WordPress, there are tons of free website templates available that you can use. However, if you want something more advanced / custom, then you can purchase a premium template or have one custom made which will raise the cost.
There are 54,000+ free plugins for WordPress. These are apps and extensions for your websites. Think features like contact form, gallery, etc.
So while you can build a website with just the hosting and domain cost, based on your situation, you may end up paying for additional tools and services. That’s why it’s often confusing for people to find out the real cost of a WordPress website.
Let us walk you through the real cost of building a WordPress site.
Estimating The Real Cost of Building a WordPress Site

Depending on your needs, your cost to start a WordPress website can range from $100 to $500 to $3000, to even as high as $30,000 or more.
It’s important to know what type of website you are building, and what you’ll need for it because that will directly affect your cost.
But don’t worry, we’ll show you how to avoid a financial disaster and make the best decisions.
For the sake of this article, let’s break down websites into different budget categories:
- Building a WordPress website (low budget)
- Building a WordPress website (with more features)
- Building a WordPress website for small business
- Building a WordPress eCommerce website
- Building a custom WordPress website
Now let’s see how much each of these projects cost and how you can avoid spending any more than necessary.
What’s the Cost of a WordPress Website (Low Budget)?

You can build a fully functional WordPress website for yourself and keep your costs under $100. Here is the cost break down of a WordPress website on a low budget.
First, you will need a domain name and web hosting.
A domain name typically costs $14.99 / year, and web hosting normally costs $7.99 / month.
Thankfully, Bluehost, an official WordPress recommended hosting provider, has agreed to offer our users a free domain name and over 60% off on web hosting.
→ Click here to Claim this Exclusive Bluehost offer ←
For more hosting recommendations check out our guide on how to choose the best WordPress hosting.
Next, you will need to install WordPress on your hosting account. See our step by step guide on how to start a WordPress blog for complete instructions.
Once you have installed WordPress, you can choose a design for your website using a free template.
These design templates are called WordPress themes, and they control the appearance of your website.
There are thousands of professionally designed free themes available for WordPress that you can install. See our expert-pick of 43 beautiful free WordPress blog themes for some examples.
Once you have chosen a WordPress template, follow the instructions in our step by step guide on how to install a WordPress theme.
Next, you may want to add certain features to your website like adding a contact form, a photo gallery, a slider, etc. Don’t worry there are more than 40,000 WordPress plugins available that will help you do that.
Plugins are like apps or extensions for your WordPress site. See our step by step guide on how to install a WordPress plugin.
Below is our selection of the essentials WordPress plugins that you should install on your website. All of them are available for free.
Features
- WPForms Lite – Add contact forms to your WordPress site
- Shared Counts – The best WordPress social media plugin that doesn’t slow down your website and is fully GDPR compliant.
- SeedProd Lite – Easily add a coming soon page to your website while you work on it.
Website Optimization
- Yoast SEO – Improve your WordPress SEO and get more traffic from Google
- MonsterInsights (Free) – Helps you track visitor stats using Google Analytics
- WP Super Cache – Improves your website’s speed by adding cache
Website Security
- UpdraftPlus – Free WordPress backup plugin
- Sucuri – Free website malware scanner
There are many more free WordPress plugins to add different features and extend your WordPress site. See our best WordPress plugins category where we have reviewed hundreds of WordPress plugins.
Total Cost of website: $46 – $100 per year
What’s the Cost of a WordPress Site (with More Features)?

We always recommend our users to start small and then add more features as their website grow. This way you will not be paying for anything that you don’t really need.
As you add more features to your website, your website cost will start to increase.
You can continue to use Bluehost for WordPress hosting to keep the cost low and get a free domain name.
However since you will be adding more features to your website, it may make sense to get a more powerful hosting configuration like SiteGround’s GoGeek plan. This will cost you a little more, but it comes with premium features like staging, faster performance, and can handle up to 100,000 visitors per month.
You can use our SiteGround coupon to get 60% off for the first year of your hosting.
You can also go for a premium WordPress template for your site. Unlike free WordPress templates, these templates come with extra features and priority support. See our expert selection of 40 best responsive WordPress themes for some great premium templates that you can use.
For more website features you need to use a combination of free + paid plugin addons.
Here are some essential premium WordPress plugins and extensions that you’ll need as your site grows:
Features
- WPForms (Pro) – Adds a drag drop form builder to your WordPress site
- WP Rocket – Premium WordPress caching plugin to speed up your site.
- Beaver Builder – Adds a drag and drop WordPress page builder
Marketing
- Constant Contact – One of the best email marketing services
- OptinMonster – Converts abandoning website visitors into subscribers. Lead generation for WordPress.
- MonsterInsights Pro – See how visitors find and use your website.
Security
- BackupBuddy – For automatic WordPress backups
- Sucuri Firewall – Website firewall and malware protection
There are many more WordPress plugins and services that you can add. Each paid service or addon that you add will increase the cost of your WordPress site.
Total cost of website: Depending on the premium WordPress plugins and services that you add, it can be anywhere between $500 and $1000 per year.
What’s the Cost of a Small Business Website with WordPress
A lot of people often ask us about how much does it cost to build a small business website with WordPress? The answer depends on your business needs and the tools you’ll be using to grow your business online.
Basically, you can estimate the cost to be somewhere between a low budget WordPress site and a WordPress site with more features.
Keeping in mind that you don’t add a full-fledged eCommerce store to your business website. In that case, see the next section in this article for a more accurate estimate.
If you are just starting out and need a simple website showcasing your products and services, then we recommend starting with the Bluehost. Their starter plan will reduce the cost significantly and will leave you with money that you can spend on other premium tools if needed.
If you have a more flexible budget, then you can sign up for SiteGround’s GrowBig plan. They are known for their excellent support, which is a good thing to have for a small business owner with no technical background.
Next, you will need to pick up a design for your website. You can look for a WordPress theme for business websites or pick a responsive WordPress theme that matches your requirements.
You can choose a free WordPress theme. However, since it is a business website, we will recommend you to purchase a premium theme that gives you access to support and updates.
Now let’s talk about plugins.
You will need to use a combination of free and premium plugins to control the cost. Following are some of the premium plugins that are absolutely essential for a small business website.
Features
- WPForms (Pro) – The premium version will give you access to all the features you’ll need for lead generation. This includes PayPal and Stripe payments, conversational forms, email marketing integration, and more.
- SeedProd – Helps you add beautiful coming soon and maintenance mode page to your site while you are setting it up.
- Beaver Builder – Allows you to easily build professional-looking landing pages for your website.
Marketing
- Constant Contact – One of the best email marketing service, specially for small businesses.
- OptinMonster -Helps you convert website visitors into leads and customers. You’ll need it for Lead generation and conversion optimization.
- MonsterInsights Pro – The best Google Analytics plugin helps you see where your users are coming from and what they do on your website. This allows you to make data-driven decisions to grow your business.
Security
- UpdraftPlus (Pro) – The premium version of the plugin comes with incremental backups, automatic backups before updates, and several remote storage locations to keep your backups.
- Sucuri Firewall – Website firewall and malware protection
Now there are many more plugins and tools that you would want to use. We recommend you to first try the free version and see if that does the job for you. Many premium tools are available with the free trials, take advantage of those to see if you really need that tool.
As a business website, you would want to spend money to grow your business. We are not advising you against spending money when it makes sense and you can afford it.
For more details see our step by step guide on how to make a small business website
Total cost of website: Once again it depends on premium tools and plugins you purchase. It can be anywhere between $300 and $700 per year but could go as high as $1000 per year.
What’s the Cost of a WordPress Ecommerce Website?

WordPress powers millions of eCommerce websites around the world.
The cost of building a WordPress eCommerce website can be significantly higher, but we will show you how to build a WordPress eCommerce website while avoiding potential losses and overspending.
In addition to hosting and domain, your eCommerce site will also need an SSL certificate which costs around $69.99/year. SSL is required to securely transfer customer data such as credit card information, usernames, passwords, etc.
We recommend using Bluehost Ecommerce plan. It gives you a free domain and SSL certificate, plus discount on hosting.
After that, you need to select a WordPress eCommerce plugin.
There are several eCommerce plugins for WordPress, but none comes even close to WooCommerce. It is the most popular WordPress eCommerce plugin that allows you to build robust online stores to sell your products/services.
Next, you will need to install WordPress and WooCommerce on your website. We have a step by step guide on how to start an online store.
While WooCommerce is free, you will need to use paid addons for additional features. The cost of your website will go up depending on how many addons you need to add on your website.
Once you are up and running, you will need to choose a WooCommerce ready WordPress template for your site. There are several paid and free WordPress templates with full WooCommerce support. Choosing a premium or paid template gives you access to support and extra features.
We have a list of the best free WooCommerce addons, but depending on your needs, you may have to use some paid extensions as well.
Here are some other paid services that you’ll need on your eCommerce website.
Features
- WPForms – To add customer inquiries and feedback forms
- Beaver Builder – To create stunning landing pages using a drag and drop page builder
- Soliloquy – Create beautiful product sliders with their WooCommerce addon
Marketing
- OptinMonster – Convert visitors into customers with this powerful lead generation tool
- Constant Contact – powerful email marketing service
- MonsterInsights – Ecommerce tracking with real time stats using Google Analytics
Security
- BackupBuddy – Automatic WordPress backups
- Sucuri – Website firewall and malware scanner
Remember the best way to keep your costs down is by starting small and adding extensions and services as your business grows.
Total cost of building a WordPress eCommerce website: $1000 – $3000. It could be higher depending on how many paid addons and services you add to your site.
What’s the Cost of a Custom WordPress Site?

A custom WordPress site is when you hire a WordPress developer to create a unique design and build specific features for it.
Usually well established, large to medium-sized businesses choose this route.
To support a custom WordPress site, you may also want to go for a managed WordPress hosting provider. This is a WordPress centric hosting environment, with managed updates, premium support, strict security, and developer friendly tools.
In addition to your hosting and domain name, you will also be paying the web developer that’s building your website. Depending on your need, you may want to get quotes from several theme developers, web designers, and agencies.
The cost of a custom website depends on your requirements, budget, and the rates of the developer or agency you hire.
A standard custom WordPress theme alone can cost you up to $5000. More robust WordPress sites with specific custom features can cost up to $15000 or even higher.
Update: Since several of you asked for a more details on this section, we have created a comprehensive guide on how much does a custom WordPress theme cost, and tips on how you can save money.
How to Avoid Overpaying and Cut Down Spending?
We always recommend our users to start small and then scale their WordPress site as it grows. In many cases, you don’t need all the premium features that you see on many well-established websites in your industry.
Keep in mind that those websites had a head start, and it likely took them some time to figure out how to manage costs and grow their business.
You can start with a budget website using free plugins and template. Once you start getting visitors, you can consider adding premium features like a premium template, email marketing, paid backup plugin, website firewall and so on.
Same goes for your eCommerce website. Start with the bare minimum and then as you start selling, you will find out exactly the tools that will help you and your customers.
Look for best WordPress deals and coupons to get additional discounts whenever you can.
Even for robust WordPress sites, you don’t always need to hire a developer. We have step by step tutorials on how to create different types of WordPress websites such as:
- How to create a business directory with WordPress
- How to create an online review website with WordPress
- How to build an auction website using WordPress
- How to build a coupons website with WordPress
- How to create a multilingual website with WordPress
- How to create a job board with WordPress
- How to create a questions & answers website with WordPress
- How to create a portfolio website with WordPress
- How to create a wiki knowledge base website using WordPress
We hope this article answered your questions about how much does a website cost to build. You may also want to see our list of 25 legit ways to make money online blogging with WordPress.
If you liked this article, then please subscribe to our YouTube Channel for WordPress video tutorials. You can also find us on Twitter and Facebook.
The post How Much Does It Really Cost to Build a WordPress Website? appeared first on WPBeginner.
Cybersecurity and the Need for SSL Monitoring
The cybersecurity industry is constantly striving to stay well prepared and well ahead of new threats. Data protection was in the spotlight all through 2018. It’s a common practice for applications to collect user data like the user’s personal information, location, and other personal preferences. Such important data is vulnerable and, if left unprotected, can be stolen and misused by hackers.
UK enacted the General Data Protection Regulation (GDPR) that forced companies to state and comply with data privacy policies. GDPR gives the users control over their data and the freedom to decide whether the data can be shared or not.
Self-Inflicted Wounds: The SSL Failure on the Linux Build Server
A nasty cousin of It Works On My Machine is the It Fails On That Machine. It is nasty because you know that there is something wrong, but you can’t reproduce it.
The machine in question was our Linux build agent, and the failure in question was a set of failing tests that failed to perform a certain operation when TLS was enabled. The problem? They were failing with I/O errors, but only with TLS, and the connection was using localhost. Further investigation showed that the most likely reason for the failure was a timeout. But how could that be? For fun, sometimes, the test passed. So it wasn’t an issue of a firewall of some kind. Testing using openssl s_server and connecting to it manually didn’t show any issues.
Server Name Indication (SNI) and Ingress TLS in Kubernetes with Ambassador
The open-source Ambassador 0.50 API gateway adds support for Server Name Indication (SNI), a much-requested feature from the community that allows the configuration of multiple TLS certificates to be served from a single ingress IP address. In this tutorial, we explore how multiple secure domains (e.g., https://www.datawire.io and https://www.getambassador.io.) can be provided by a single or load balanced Ambassador running within a Kubernetes cluster.
SNI Use Cases
In a nutshell (and with thanks to Wikipedia), SNI is an extension to the TLS protocol, which allows a client to indicate which hostname it is attempting to connect to at the start of the TCP handshaking process. This allows the server to present multiple certificates on the same IP address and TCP port number, which in turn enables the serving of multiple secure websites or API services without requiring all those sites to use the same certificate.
Ultimate Guide to Creating a WordPress Membership Site
Do you want to build a membership website? For a long time, website owners relied solely on advertising and affiliate revenue to monetize their content.
A membership website allows you to make money online by allowing users to pay for premium content, features, and access to the community.
You will need a platform that has features for managing users, memberships, payments, etc. Luckily, there are some really great membership plugins for WordPress that make it super easy.
In this step by step guide, we will show you how to easily create a WordPress membership site without any coding knowledge.

What Do You Need to Start a WordPress Membership Website?
Unlike 10 years ago, it’s quite easy to make a website these days. Out of all the platforms and website builders, WordPress makes it the easiest for anyone to build their own membership website and start selling with little to no technical skills.
You’ll need the following three things to start:
- A domain name. This will be your website’s address (Example, wpbeginner.com).
- A web hosting account. This is where your website files are stored.
- A membership addon (It will convert your regular website into a membership platform).
You can set up a fully functional membership website with WordPress in less than 30 minutes, and we’ll walk you through every step of the process.
Below are the steps that we will cover to help you make a powerful membership website with WordPress.
- Getting started with a membership site
- Choosing a WordPress membership plugin
- Setting up your membership website
- Adding payment methods
- Adding membership levels
- Restricting access based on membership plans
- Creating members only content
- Creating a pricing page
- Adding sign up and login forms
- Customizing email templates
- Viewing reports to grow your website
- Extending your membership website
Ready? Let’s get started.
Step 1. Getting Started with a WordPress Membership Site
To create a membership site, you must make sure that you are using the right WordPress platform. Yes, there are two types of WordPress.
We recommend using the self-hosted WordPress.org version because it gives you unrestricted access to all features and tools that you need (see the full comparison of WordPress.com vs WordPress.org).
For a self hosted WordPress site, you’ll need a WordPress hosting account, domain name, and a SSL certificate.
Typically, a domain name costs around $14.99 / year, web hosting around $7.99 / month, and SSL certificate costs around $69.99 / year.
If you are just starting out, then these startup costs can add up quickly.
Thankfully, we have a way to fix that.
Bluehost, an official WordPress recommended hosting provider, has agreed to offer our users a free domain name, free SSL certificate, and a discount on web hosting.
Basically, you can get all of the above for $2.75 per month.
→ Click here to Claim this Exclusive Bluehost offer ←
Note: At WPBeginner we believe in full transparency. If you sign up with Bluehost using our referral link, then we will earn a small commission at no extra cost to you (in fact, you will save money and get a free domain + SSL certificate). We would get this commission for recommending just about any WordPress hosting service, but we only recommend products that we use personally and believe will add value to our readers.
Once you have signed up for hosting, the next step is to install WordPress. Follow the instructions in our step by step guide on how to start a WordPress blog, and you’ll be up and running in no time.
Since Bluehost already comes with WordPress pre-installed, you can move on to setting up your WordPress membership site.
Step 2. Choosing a WordPress Membership Plugin
There are plenty of free and paid WordPress membership plugins that you can use. However, each one of them has its own pros and cons. We have a full comparison of the best WordPress membership plugins.
To choose the right WordPress membership plugin, you need to decide what kind of membership website do you want to build and what features will you need?
If you just want to allow user registration on your WordPress site, then you can use WPForms. It is a WordPress form builder plugin that allows you to easily create user login and registration forms. You can even allow users to submit articles without accessing the WordPress admin area.
On the other hand, if you want to sell subscriptions, paid content, or digital downloads, then you’ll need a more robust WordPress membership plugin, like MemberPress.
MemberPress comes with advanced membership features that allow you to accept payments, create membership levels, restrict access based on levels, and more.
Selling online courses can be another possible scenario. In this case, you’ll need LearnDash, a complete WordPress LMS plugin with all the learning management features.
You can also integrate LearnDash into MemberPress to create a powerful website with online courses as well as membership subscriptions.
That being said, let’s start setting up your WordPress membership website.
Step 3. Setting up Your WordPress Membership Website
We are choosing MemberPress as our go-to plugin because it has all the features we mentioned above, and it works perfectly with third-party plugins necessary for the growth of your business.
First thing you need to do is install and activate the MemberPress plugin. For more details, see our step by step guide on how to install a WordPress plugin.
Upon activation, you need to visit the MemberPress » Options page to configure the plugin settings.

Step 4. Add a Payment Method
The options page is divided into different tabs. The first thing you need to set up is a payment gateway because it allows you to accept payments on your membership site.
You can do this by switching to the ‘Payments’ tab and then selecting your payment gateway.

MemberPress supports PayPal (Standard, Express, and Pro), Stripe, and Authorize.net out of the box. You need to select the payment method you want to setup and provide the required credentials.
You can also add multiple payment methods by clicking on the add button to add another payment method.
We typically use two options: Stripe for credit cards and PayPal as a secondary option because some users prefer PayPal over giving out credit card details.
Don’t forget to click on the ‘Update Options’ button at the bottom of the page to save your settings.
Step 5. Creating Membership Levels
The next step is to create membership levels that your users can purchase. Each membership level can have different pricing plans, perks, and access. You can even have a free membership plan.
To create a membership level, you need to go to MemberPress » Memberships page and click on the ‘Add New’ button at the top.

On the next page, enter a title for this particular membership plan and then provide the plan details in the post editor.
You will need to set the pricing and expiration for this plan under the membership terms section.

In the example above, we have created a yearly membership plan.
After that, you need to scroll down to the membership options meta box below the post editor. This is where you can customize permissions and membership options for this particular plan.

Once you are satisfied with the membership plan, you can click on the publish button to make it available.
Go ahead and repeat this process to create as many membership plans that you need.
Step 6. Restrict Access for Membership Plans
The next step is to select which content would be available to different membership plans on your website. MemberPress makes it very easy to control access using ‘Rules’.
You can setup rules by visiting the MemberPress » Rules page and clicking on the Add New button at the top.

The rule edit page allows you to select different conditions and associate them to a membership plan.
For example, you can select all content that matches a particular tag or category to be available only to members with the silver subscription plan.

You can also create more specific rules. For example, a single post or page, child pages, or a specific URL.
Below the rules editor, you’ll see the content drip and expiration options.
Drip content allows you to gradually release content to users instead of giving it all away at once. The expiration option makes the content unavailable after a defined period of time.
If you are not sure, then you should leave them unchecked.
Once you are satisfied, go ahead and click on the ‘Save Rule’ button to save your rule settings.
Repeat the process to create more rules as needed for your membership site.
Step 7. Adding Members Only Content
MemberPress makes it super easy to create members-only content using Rules.
In the above example, we created a rule that restricted all content tagged as paid to be restricted. Now all we need to do is to create our paid content and add the paid tag to it.

MemberPress also adds ‘MemberPress Unauthorized Access’ metabox below the post editor. This allows you to select what logged out users (non-members) will see when they reach this content.

You can use the global default settings, or you can show excerpts, login form, or a custom message.
Once you have added members-only content, you can go ahead and publish it. As the page reloads, you will see a success message that this content is protected.

Step 8. Create a Pricing Page
This is the page your users will see when they want to sign up for a membership plan. On this page, users will be able to select a membership plan and then move to the payment page.
Users who try to access the restricted or paid areas of your website will also be redirected to this page.
You can configure this by going to MemberPress » Groups page and clicking on the Add New button at the top.

First, enter a title for the group plan page. This will also be the title for the plans page that users will see.
Next, go down to ‘Group options’ metabox and add memberships that you want to display on the page.

You can also select a theme for the pricing table. MemberPress comes with few ready-made templates for that.
Once satisfied, click on the ‘Publish’ button to make your plan publicly visible.
To preview your pricing page, click on the ‘View Group’ link after publishing it.

Redirect users to pricing page
Now that we have the pricing page ready, the next step is to redirect unauthorized users to the pricing page.
To do that, first you need to visit MemberPress » Groups page and copy the URL next to the group you created in the previous step.

After that, go to MemberPress » Options page and scroll down to the ‘Unauthorized Access’ section.
You need to check the box next to ‘Redirect unauthorized visitors to a specific URL’ option and then paste the group URL you copied earlier.

Click on the ‘Update Options’ button to save your settings.
Now unauthorized users will be redirected to the pricing plans page when they try to access a members only area.
Step 9. Add Sign up and User Login Forms
Now that you have everything set up, it is time to allow your users to easily find their way around your website.
First, you need to add a user login form so that members can sign in to their accounts.
Go to Appearance » Widgets and add ‘MemberPress login’ widget to a sidebar.

Next, we will be adding the pricing page link to the navigation menu, so that new users can select a plan and register.
You can do this by visiting the Appearance » Menus page in your WordPress admin. From the left column, you need to click on the Groups tab to expand it. It will show the pricing plan group you created earlier.

Check the box next to your pricing page and then click on the ‘Add to menu’ button.
The pricing plan page will now appear in the right column. You can drag and drop to rearrange its position in the menu. You can also edit it and change the link text.

Don’t forget to click on the save menu button to store your changes.
You can now log out of the WordPress admin area and visit your website to see everything in action.

Step 10. Customizing Membership Email Templates
Your WordPress membership plugin will send several email notifications to members. MemberPress allows you to easily edit those emails and make changes to include your own branding.
Simply go to MemberPress » Options page and click on the ‘Emails’ tab. From here you can manage email notifications sent by MemberPress.

You will see all the email notifications sent by MemberPress to members as well as Administrators. You can click on the edit button to customize any of these notices.

You can use a simple text editor to edit the email message with basic formatting options and smart tags to insert dynamic items like names, username, membership level, and more.
Make sure that you click on ‘Send Test’ button to send yourself a couple of test notifications. This will ensure that MemberPress can send email notifications.
If you are having trouble receiving email notifications, then see our guide on how to fix WordPress not sending email issue.
Step 11. Viewing Reports to Grow your Membership Website
To grow any business, you need data to make informed decisions. MemberPress comes with built-in reports to see how your membership website is doing.
Simply go to the MemberPress » Reports page. From here, you can sort reports by monthly, yearly, or all time data.

It will show you number of active, inactive, free, paid, and total members. It will also show you average member lifetime value and other data. You can scroll below to see more charts and click on a date to view transactions.
However, the most important metric of judging a membership website’s success is user engagement.
This is where you’ll need Google Analytics. It allows you to see where your users are coming from and what they do when they are on your website.
MonsterInsights, the most popular Google Analytics plugin for WordPress, offers a complete MemberPress integration that makes it easy to enable Enhanced Ecommerce Tracking for MemberPress.
For detailed instructions, see our guide on how to track user engagement using Google Analytics in WordPress.
Taking Your Membership Website to The Next Level
MemberPress is a powerful WordPress membership plugin. It allows you to easily grow your membership website.
It works beautifully with LearnDash, which allows you to easily create courses and leave the selling part to MemberPress.
You can also use it alongside BuddyPress and bbPress.
Here are some other useful resources to help you grow your WordPress membership site.
- Essential WordPress plugins – Our expert pick of the must have WordPress plugins for all business websites.
- WordPress Speed and Performance – The ultimate guide on how to speed up WordPress and boost performance.
- WordPress Security guide – This step by step guide will help improve your WordPress site’s security.
- Selecting the Perfect Theme – Beginner’s guide on how to select the perfect theme for your website.
- Common WordPress errors – The ultimate list of common WordPress errors and how to fix them.
That’s all, we hope this article helped you setup your WordPress membership website. You may also want to see our step by step WordPress SEO guide for beginners.
If you liked this article, then please subscribe to our YouTube Channel for WordPress video tutorials. You can also find us on Twitter and Facebook.
The post Ultimate Guide to Creating a WordPress Membership Site appeared first on WPBeginner.
Everything You Need To Know About Web Hosting
In order for your website to be live on the Internet, it needs to be hosted.
If you’re creating a website for the first time, move “set up hosting” to the top of your to do list, if it’s not already there.
Already own and operate a website? Did you rush into a plan without understanding how everything worked first? Maybe you feel like you’re fine with the host you picked at random. Makes sense — until you run into a problem with your website, you might not even think twice about your hosting plan. However, you don’t want to wait until that happens. It’s better to educate yourself on web hosting now so you can find the best option before anything goes awry. This will make your life much easier down the road.
Regardless of your situation, you’ve come to the right place. This beginner’s guide on web hosting will help you feel confident picking the host that’s right for you and your goals.
What is web hosting?
Let’s start with the basics. What exactly is web hosting? How does web hosting work?
Websites are hosted on servers. In simple terms, a server is a very powerful computer that does only one or two simple services, hence the name server. The type of server we’re interested in stores websites and delivers them to people over the internet. Your web host provides the server space and the technology for your website to be accessed on the Internet. It’s the process that allows someone to search for your site or enter your URL into their web browser to see your page online.
Everything that your website contains is stored and accessed through the web host. I’m referring to things like images, videos, files, text — everything.
Web hosting and data centers are often confused with one another. While the two are similar and work together, they are not quite the same. Web hosting refers to the servers that host websites or the hosting companies that provide you with server space. Data centers are the physical facilities where those servers are located.
Web hosting types
There is no one-size-fits-all plan for web hosting. It’s like buying a car. You don’t just walk into a dealership and say, “I’ll have a car please.”
What kind do you want? You need to decide if you want a sports car, sedan, coupe, hybrid, SUV, electric, diesel, automatic transmission, manual transmission, etc.
Fortunately with web hosting, you don’t have that many options to choose from. There are four main types of hosting.
- Shared
- VPS
- Dedicated
- Cloud
I’ll explain how each one of these works and what type of website would need that level of hosting, so you can decide which option is best for you.
Shared hosting
First, shared hosting. With this method, your website shares server space with other websites. Here’s a diagram that shows how shared web hosting works compared to the other web hosting types:
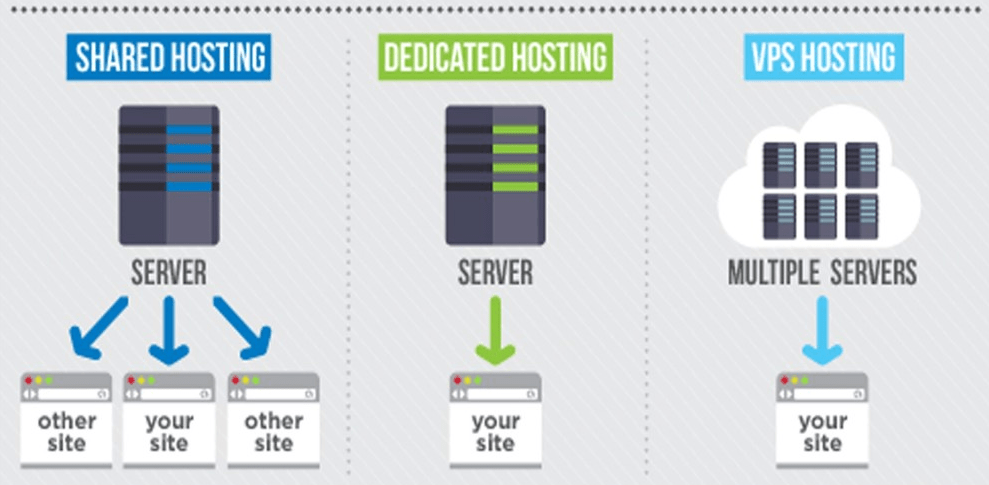
Since you’re sharing a server with other websites, this will be the most cost-effective method. Think of it like taking the bus to work instead of driving your own car. The bus will be less expensive, but you’ll be making some stops along the way to your destination in order accommodate other people.
While I don’t necessarily have a problem with shared hosting, you could potentially run into problems down the road as your website grows and gets more traffic. High spikes in traffic can impact loading time and even lead to error messages for people trying to access your site. The performance of your website can be affected by traffic to other sites on the same shared server. So, just like when you’re on the bus, there may be a ton of other people requesting stops, slowing down your commute. Or, it might be just you and the driver. You’re saving money, but you have less control of the quality of the experience.
Who is shared hosting best for?
Shared hosting is a common option for beginners and entry-level websites. It’s affordable and doesn’t require much technical knowledge. If this sounds like your situation, you’re probably a good candidate for shared hosting. (You can also upgrade later on, when your website traffic grows.)
VPS hosting (Virtual Private Server)
VPS hosting is the next step up from shared hosting. With this option, one server is basically split into multiple virtual servers. The main server is shared with other websites, but each site is given its own virtual server. Since fewer websites share the main server, page load times will be much faster with VPS hosting. Since fewer websites share the main server, page load times will be much faster with VPS hosting.
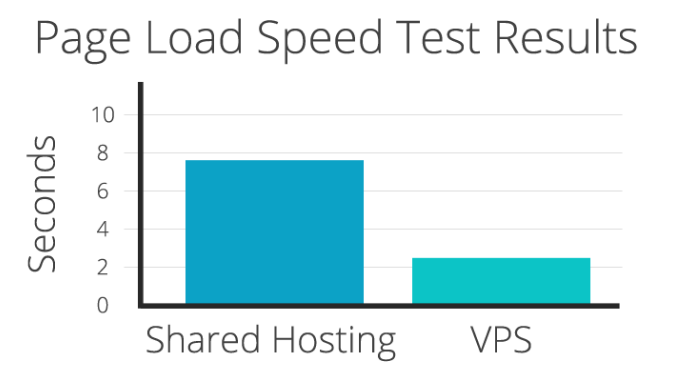
It’s definitely important for you to understand the principles that boost your website loading time since this will ultimately have an impact on your conversions.
It’s not quite as good as dedicated hosting, but it’s better than shared hosting and gives you, the website owner, more control. If you go with this option, you’ll have complete root access and more control at the server level. But if you’re expecting high volumes of traffic, VPS hosting can still be limiting.
I’d compare it to using a car-sharing service: it’s faster than taking the bus, but you’re still limited in some ways.
Who is VPS hosting best for?
Even small websites with lower volumes of traffic can benefit form VPS hosting. If your site has lots of visual elements like images and videos that could potentially slow down the loading time, you’ll be better off with VPS hosting than a shared host.
Dedicated server hosting
Dedicated servers are yours and only yours. They are more expensive than the other options we’ve looked at so far, but the premium pricing comes with added benefits. It’s like owning your own car, as opposed to taking public transportation. You are in control of everything.
Since you’re the only website on this server, you have complete technical control. This allows you to implement a greater range of software on your website. Downtimes should be minimal since you don’t have to worry about traffic from other sites impacting your site. And, your load time is only impacted by your site — not any other sites.
Depending on your hosting plan, you might be able to upgrade from a shared server to a dedicated server when your website grows without having to start over from scratch. I recommend looking for this room to grow when you sign up for a plan. Migrating isn’t any fun, and neither is capping your site’s success.
Who is dedicated server hosting for?
Dedicated servers are for sites with higher volumes of traffic. If you have an ecommerce platform and want to make changes to the server based on your ecommerce software, you should consider going with a dedicated server.
Cloud hosting
According to Statista, the cloud computing and hosting market has been growing for the last decade or so.

With this method, multiple servers will work together to host your website, as well as other sites. But unlike traditional shared hosting, cloud hosting accounts for traffic spikes, so high levels of traffic to your site or other sites on the same cloud shouldn’t impact anyone’s loading speed.
However, you won’t have root access for a cloud server, which means you can’t change any of the server settings or install specific software. But for those of you who have a simple website and don’t need those tech options, cloud hosting might be a good option to consider.
Who is cloud hosting for?
Cloud hosting is for websites that fall somewhere between shared hosting and a VPS.
If your site doesn’t need access to the technical side of a VPS, but want you’re anticipating high volumes of traffic and don’t want loading time to be an issue, cloud hosting is viable option.
Web hosting features
Now that you understand the four basic types of web hosting, it’s time to know what features to look for before you buy a hosting plan. These features will vary depending on the web hosting type, the hosting company, and the plan you select. Understanding these web hosting features will help you figure out how to choose a web hosting provider.
Bandwidth
Bandwidth refers to the speed of your network connection, as opposed to the transfer speed. Higher bandwidth allows more visitors to access your site at the same time while maintaining a fluid user experience.
Lower bandwidth connections will cause slow loading times, delays, and even errors.
So, take a look at the bandwidth options offered by your hosting provider. If you’re a new website, you probably don’t need the highest bandwidth right away. Find one that can meet your traffic needs and website content.
For example, if users are going to be watching videos, looking at photos, and buying items on your ecommerce shop, you’ll definitely want higher bandwidth. But if you’re just starting with a blog and don’t expect heavy traffic, you can go with a lesser plan.
Data storage and disc space
You might see some web hosting companies offering unlimited data. However, make sure you look at all the details before falling for something that sounds too good to be true. Sometimes there are hidden charges for exceeding average site usage.
Unlimited storage isn’t always the best option. I recommend picking a plan that clearly states the storage you get based on the amount of disc space that you actually need.
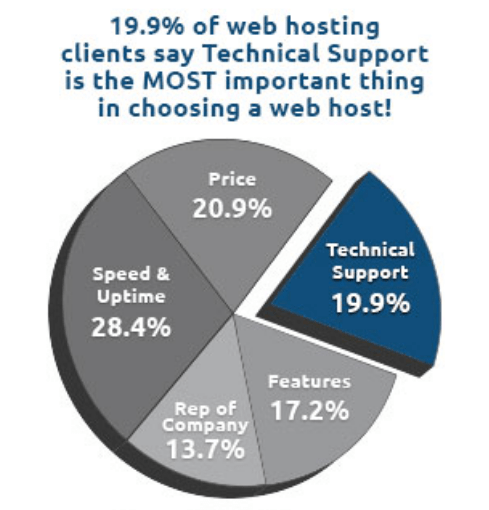
Customer support
Most site owners don’t think of this, but customer support should be one of the top considerations when looking for a web hosting company. Roughly 20% of web hosting clients named support as the most important feature when choosing a hosting plan — I think that number should be much higher.
Why?
Hopefully, you don’t have any problems. But in the event you need some help or have time-sensitive questions that need to be addressed, you want to know that your web host is available and at your service.
Read reviews online from their existing clients to see how well they handle customer service communication and response time before you proceed with a plan. It’s also helpful when web hosting companies offer other resources, such as video tutorials or extensive guides and FAQ sections on their website.
Domains
The majority of the best web hosting businesses will let you create multiple domain names under the same account. So if you’re planning to host several websites through the same hosting service, this is definitely something you’ll want to look into before you get started.
It’s easier to manage everything this way. Having to set up a new account for each domain can be a pain.
For those of you that still need to buy a domain name, you can consider using a web host that allows you to purchase domains through their platform, but I recommend keeping these two things separate in case you have to switch hosts later on, your domain won’t be tied to your old host.
SSL certification
SSL stands for “secure socket layer.” Basically, this certification adds encryption to your website to protect your personal information, as well as personal information of your site’s visitors.
There are different types of SSL certificates. Some are for businesses, while others are made for individuals. Major website hosting services will offer an SSL certificate, but they can also be provided by third-party security companies.
If a website hosting company doesn’t offer SSL certificates or doesn’t have a strong SSL certificate, you may want to consider an alternative option. It’s also worth noting that transport layer security (TLS) is an alternative to SSL. This gives you more security, but it’s not as popular or readily available as SSL certificates.
You may not need more than just a couple of company email addresses right now. However, as your website grows, you may want more. That’s why I think it’s important to look for web hosting services that offer multiple email addresses with your domain name. You could always get these email features through a third-party, but it’s much easier to handle everything in the same place.
Ecommerce software
If you’re going to be selling products through your website, proper ecommerce software needs to be a priority when you’re looking for the best web hosting option. You need to be sure that your plan either supports the software that you plan to use, or comes with ecommerce software that you can implement on your site.
It’s worth noting that ecommerce software is not considered a standard feature, so shop around and make sure your web host has what you need to operate your ecommerce platform accordingly.
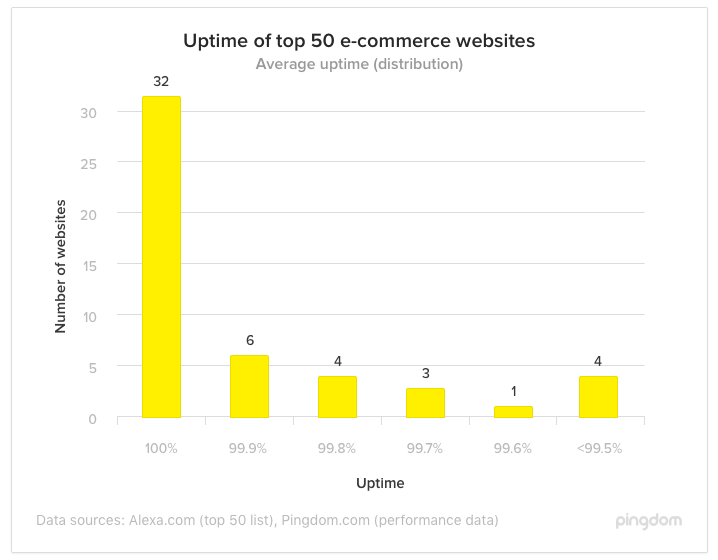
Uptime
For the most part, you’ll see the majority of web hosting companies offering 99.9% uptime. However, don’t assume anything.
Usually, those services don’t include scheduled downtimes in the percentages they advertise. So again, it’s best to read reviews and see if their clients are experiencing lots of downtime.
If visitors can’t access your site, it’s going to be a big problem for your business. The best websites have a high uptime percentage.
The cost of downtime can add up quickly. If users are experiencing problems on your website and can’t access content, they will leave and may not come back.
Backups
I do not recommend web hosting services that don’t offer backups. This is one of the most important web hosting features, but it’s often overlooked.
All of your website and company files should be backed up appropriately on the hosting server. You should be backing them up on your own as well, but it’s nice to know that you have this data secured by the hosting company.
Advertising credits
Some web hosts offer advertising credits as an incentive for buying a plan. Here’s an example from Bluehost.
Depending on the company you use for hosting, they’ll let you apply those credits to platforms like Google AdWords. I highly recommend taking advantage of any advertising credits you’re given.
Web hosting costs
So how much is all of this going to cost you? I’m sure this is your next logical question.
I know it’s not the answer you’re looking for, but the real answer is: It depends. Refer back to the car analogy that I gave you earlier. You could buy a new car for a few thousand dollars, or a hundred thousand dollars depending on the brand, type, and features. Well, the same goes for your web hosting service. The price can range anywhere from less than $10 per month to hundreds of dollars per month.
If you’re going to get a shared server with low bandwidth, poor support, and no added software, it’s going to be pretty inexpensive. Even the best shared hosts with great support will run you less than $10 per month; under $5 per month for the initial contract. But if you want a dedicated server, ecommerce software, unlimited email addresses, backups, and multiple domains, you can expect to pay a premium price.
The majority of us fall somewhere in between these two extremes. Just be aware that cheaper isn’t always the best option. You need to understand the hidden costs of website hosting and how these costs will change as your website grows.
Conclusion
Your website needs to be hosted to be online. There is simply no way around it.
But that doesn’t mean you should rush into a web hosting plan without doing your research first.
First, decide which type of web hosting type is best for your situation. Then, determine the web hosting features you want. Once you know the answer to these questions, look for a reputable web hosting service that meets the requirements you’re looking for.
Don’t be intimidated by web hosting. Use this beginner web hosting guide as a reference, and let me know if you have any additional questions.
What type of web hosting server are you planning to use for your website?
Extracting a Private Key From the Java Keystore (JKS)
I’ve been working with the AS2 Protocol and the AdroitLogic AS2Gateway for quite some time now, and hence, playing with JKS has been a must. One of the tricks that were required from time to time was extracting the private key and public key (certificate) from Java KeyStores. In this blog post, we’ll go through a couple of simple commands on how to do that.
What Is a Java KeyStore (JKS)?
A JKS is an encrypted security file used to store a set of cryptographic keys or certificates in the binary format, and it requires a password to be opened. JKS files are used for a variety of security purposes. They can be used to identify the author of an Android app during a build and when publishing to Android Market in Google Play or in SSL encryption.
How to Get a Free SSL Certificate for Your WordPress Website (Beginner’s Guide)
Did you know that Google shows all non-SSL websites as “Not Secure”. This means that if you are not using a SSL certificate on your website, then you’ll lose customers trust.
Because SSL certificate helps protect your website data, it’s actually a requirement for accepting payments online.
Normally, paid SSL certificates are quite expensive. If you are just starting a blog or making a DIY business website, then you likely want to keep costs low.
Luckily, there are multiple ways to get a free SSL certificate to reduce your website cost. In this article, we will show you how to easily get a free SSL certificate for your WordPress website and set it up all by yourself.

We will also cover the following topics:
- What is an SSL Certificate?
- Why You need an SSL certificate for Your WordPress Site
- How does SSL certificate work to keep information secure
- How much SSL certificates cost
- How you can get a free SSL certificate
- How to Install a free SSL certificate in WordPress
Ready? Let’s get started.
What is SSL?
SSL stands for Secure Sockets Layer. It is an internet protocol for securing data transfer between a user’s browser and the website they are visiting.
Every internet user transfers information when they visit websites. This information can often be sensitive like payment details, credit card information, or login credentials.
Using the normal HTTP protocol means this information can be hijacked by hackers. This is where SSL or HTTPS comes in.
Websites need an SSL certificate issued by one of the recognized certificate issuing authority. This certificate is verified and highlighted in the user’s browser address bar with a padlock sign and HTTPS instead of HTTP.

Do I Need an SSL Certificate for My WordPress Website?
SSL / HTTPS is recommended for all websites on the internet. However, it is absolutely required for all websites that collect user information like login details, payment information, credit cards, and more.
If you are running an e-commerce store, a membership website, or require users to login, then you need to get an SSL certificate right away.
Most online payment services require your website to use SSL/HTTPs before you can receive payments.
Apart from security, SSL certificate also creates a positive impression of your brand among your users. Google also recommends using SSL, and research shows that SSL-enabled websites rank slightly higher in search results.
Last but not least, if your website is not using an SSL certificate, then Google Chrome will show your users that your website is not secure.

This icon affects your brand image and user’s trust on your website.
How Does SSL Certificate Work?
Now that we have explained what is SSL and why is it important, you might be wondering how does an SSL certificate actually works?
SSL protects information by encrypting the data transfer between a user’s browser and the website.
When a user visits an SSL/HTTPs website, their browser first verifies if the website’s SSL certificate is valid.
If everything checks out, then the browser uses the website’s public key to encrypt the data. This data is then sent back to the intended server (website) where it is decrypted using the public key and a secret private key.

How Much Do SSL Certificates Cost?
Cost of SSL Certificates differs from one certificate authority to another. Their pricing could be anywhere between $50-200 / year. Some providers offer add-on services with their certificates which may also affect the cost of your SSL certificate.
If you are going to purchase an SSL certificate, then we recommend GoDaddy. They are the largest domain name registration service in the world, managing more than 77 million domains.
They offer simple SSL certificate plans starting from $74.99 / year. After you have purchased an SSL certificate, you can ask your hosting provider to install it for you.
But before you do that, you should check to see if you can get the SSL certificate for free.
How Can I Get an SSL Certificate for Free?
A lot of website owners are reluctant to use SSL due to the additional cost. This left many small websites vulnerable to data and information theft.
A non-profit project called Let’s Encrypt decided to fix this by establishing a free certificate authority.
The purpose of this certificate authority is to make it easier for website owners to get a free SSL certificate. Internet becomes a safer place if more and more websites start using SSL.
Due to the significance of the project, it quickly earned the support of major companies like Google, Facebook, Shopify, WordPress.com and many others.
The challenge is that installing the free SSL certificate by Let’s Encrypt for a beginner user is quite difficult because it requires coding knowledge and server systems knowledge.
Thankfully, all of the best WordPress hosting companies are now offering free SSL certificate with all their hosting plans (some are using Let’s Encrypt).
Choosing one of these providers will save you from the hassle of installing the free SSL certificate on your own.
Here are the top WordPress hosting companies that offer free SSL certificate with their hosting plans.
If you are already using one of these companies, then you can turn on your free SSL certificate from your hosting dashboard. Simply login to your hosting account’s cPanel dashboard and scroll down to the ‘Security’ section.

Bluehost users will find the free SSL option by visiting My Sites » Manage Site page. From here, you can switch to the security tab and turn on free SSL certificate for your website.

Depending on your hosting company, your web hosting control panel may look different than the screenshot above. If you are having trouble locating the free SSL option, then you can ask your hosting provider to enable it for you.
If your web hosting company does not offer free SSL, then you can easily follow our guide to switch your hosting and move your sites to one of the companies above.
Installing Free SSL Certificate and Setting up WordPress
Once you have enabled your free SSL Certificate, you will need to set up WordPress to start using HTTPS instead of HTTP in all your URLs.
The easiest way to do this is by installing and activating the Really Simple SSL plugin on your website. For more details, see our step by step guide on how to install a WordPress plugin.
Upon activation, the plugin will check to see if your SSL certificate is enabled. After that, it will turn on HTTP to HTTPS redirect and change your website settings to start using SSL/HTTPs.

To make your website completely secure, you need to make sure that URLs of your website are loading using the HTTPS protocol. Really Simple SSL plugin does that automatically by fixing the URLs when the page loads.
Even if a single URL still loads using the insecure HTTP protocol, then browsers will treat your entire website as not fully secure.

To fix these URLs, you will need to use your browser’s inspect tool to find them and then replace them with the correct HTTPs URLs. For more on this, see our tutorial on how to fix mixed content error in WordPress.
Really Simple SSL Plugin makes it super easy to set up free SSL certificate in WordPress. That’s why we recommend it for all beginners.
However, it catches insecure URLs when the page loads, which increases your page load time a little bit. This is why advanced users who are concerned about WordPress speed uses the manual method to setup their free SSL certificate.
We have created detailed step by step instructions to help you properly switch WordPress from HTTP to HTTPS (which shows both the manual method and the plugin method).
We hope this article helped you learn how to get a free SSL certificate for your WordPress site. You may also want to see our step by step guide on how to create free business email address for your WordPress site.
If you liked this article, then please subscribe to our YouTube Channel for WordPress video tutorials. You can also find us on Twitter and Facebook.
The post How to Get a Free SSL Certificate for Your WordPress Website (Beginner’s Guide) appeared first on WPBeginner.
7 Reasons Why Your WordPress Plugins or Themes Won’t Install
For the most part, I think WordPress is a pretty solid platform. Of course, we complicate things when we drag third-party elements into it for the sake of improving performance or security, adding new design features, or opening up greater functionality. But the payoff is generally worth it. Without those integrations, you’d have to do much more manual coding and that just doesn’t isn’t the most effective way to build a website these days.
That said, there are times when issues arise when you try using WordPress plugins and themes on your website. As I’ve talked about before, there are WordPress plugin conflicts that occur upon initial installation or during updates. But there are other ways in which they can cause issues for you before you even get them on the site.
Below, I’m going to break down the 7 reasons why a WordPress plugin or theme won’t install on a website and some ways to get around these errors.
7 Reasons Why Your WordPress Plugin or Theme Won’t Install
The nice thing about these kinds of WordPress errors is that they’re easy to identify. Usually, there’s an error message that accompanies each failure to load, so there isn’t as much troubleshooting with something like this as there are with other WordPress errors. It’s just more annoying than anything else.
So, here are the most common reasons why your WordPress plugin or theme won’t install and what to do about them:
- Uploading the Wrong File Format
- Missing Files
- Syntax Error
- Uploading the Wrong Zip File
- Exceeding the Memory Limit
- Exceeding the File Size Limit
- Miscellaneous Errors
1. Uploading the Wrong File Format
Typically, you’ll encounter an installation error during the manual upload of a theme or plugin through the Add New / Upload option in WordPress (as opposed to directly installing from the WordPress repository):

When you see the following “bad format” message, it means that you have not uploaded the native files provided to you by the theme or plugin developer.

The only plugin or theme files that should ever be uploaded to WordPress are zip files.
Before you get in touch with the plugin or theme developer, verify that you didn’t receive the correct file from them. If this came from your client, they may have unzipped the folder and given you what they thought was the correct file from within. If it didn’t come from the client and you really don’t have the right folders, get in touch with the developer.
2. Missing Files
Now, let’s say you did try and upload a zip file into WordPress, but you saw this error message instead:

This means that the files contained within the folder are not what WordPress was expecting.
Unzip the folder and review the contents. Is this even the correct zip? Does it contain all the files you would expect a plugin or theme to have? You can cross-check the contents of the folder against WordPress’s recommendations for files that should be included in the package:
If you’ve detected any missing files, reach out to the developer for assistance.
3. Syntax Error
When you purchase a WordPress plugin or theme from a reputable developer, you shouldn’t have to worry about this kind of error occurring.
However, let’s say your client was trying to cut corners and save money, and so they found some plugin or theme online that looked promising. You try to install it in WordPress and you receive a syntax error. It’ll usually say something about “parse error” and “syntax error”.
All this means is that there’s something wrong in the code. This error can actually come up if you erroneously try to edit a theme or plugin once it’s installed on your website. However, if you’re seeing it during installation, then the error lies with the developer.
If you want to review the code of the plugin or theme on your own, you might be able to detect and repair the error yourself. Before you dig in, check into any other reported issues with the plugin or theme if there’s a support system attached to it (through WordPress or a marketplace).
If there aren’t any, your safest bet might be to have your client get a new plugin or theme. If you don’t trust the developer to code the backend well, this issue could keep coming up with each new update (and you don’t want to deal with that).
4. Uploading the Wrong Zip File
This error is one you’re probably going to encounter with larger, multipurpose themes. You received a zip file from your client and, by all intents and purposes, it looks to be in good shape. However, let’s say you go to add the new theme:

Then you see this error:

In actuality, the stylesheet is not missing. You probably just downloaded the wrong version of the theme file.
Some developers offer up different zip packages for their themes, especially if they’re including plugins and child themes within them. Here’s an example of how Uncode includes various download options on Themeforest:

While it’s essential to have that full file with all the documentation, licenses, plugins, and alternate themes, that file cannot be uploaded into WordPress because it looks like this:

WordPress can unzip the top-level zip file, but it won’t be able to go through and unzip everything else contained within the folder. If you want to get your theme in there, then you need to upload the proper zip file.
5. Exceeding the Memory Limit
I touched on this error recently when I talked about the server issues that affect WordPress. Basically, this happens when your web hosting PHP memory limit is too low to process the installation.
The error will say something like, “Fatal error: Allowed memory size of _______ bytes exhausted…” If you see this memory error, it’s easy to fix.
Log into the control panel of your site and open your preferred file editor: FTP or file manager. In the root directory, you’ll find your wp-config.php file. Click on the edit button and add the following line of code:
define( 'WP_MEMORY_LIMIT', '256M' );
Since the default memory limit is usually 64M, this will significantly increase it and help you get your new theme or plugin installed without issue.
6. Exceeding the File Size Limit
Memory isn’t the only thing that can be pushed to its limit when uploading a new WordPress plugin or theme. You may also find that the allowable file size is exceeded. When this occurs, you’ll see a message similar to this:
“The uploaded file exceeds the upload_max_filesize directive in php.ini”
To fix this maximum upload limit, you’ll need to do so through the control panel. Access your directory using either FTP or a file manager. Once you’re in there, locate the wp-admin folder.
Do you see a php.ini file? If not, you’re going to have to create one.
Once you have the php.ini file open, look for a section that mentions “filesize”. If it exists, you’ll want to overwrite it with the following code. If it doesn’t, then enter the following lines of code into the file:
upload_max_filesize = 1000M

post_max_size = 2000M

memory_limit = 3000M

file_uploads = On

max_execution_time = 180
This will give you some more leeway in how large your WordPress theme and plugin files can be. If you’re still experiencing problems with this error, read through Jenni McKinnon’s guide on how to increase the maximum upload limit.
7. Miscellaneous Errors
I’m including this final hodgepodge error type because you never know what types of external conflicts might get in the way of you being able to install a plugin or theme. In my case, it was an old conflict between an SSL certificate and CDN I had on my site.
In a nutshell, here’s what happened:
- I bought a new WordPress theme.
- I installed the WordPress theme and activated it.
- When I uploaded the theme, I received a bunch of error messages about how some of the plugins wouldn’t install. I initially disregarded the message because I didn’t think I was going to use most of the plugins anyway.
- As it turns out, before I could customize or use my theme, I had to activate a required plugin from the developer… which would not install. The message below is what I saw.

I’ve had an SSL certificate on my website for over a year and had experienced issues with it in the past. Specifically, it conflicted with the CDN. To resolve the conflict, I asked my web host to get rid of the CDN. As far as I knew, the issue was fixed. (Funny enough, the CDN ended up being the problem here.)
Anyway, after working in conjunction with my web hosting company and the theme developer, we were able to sort out that the error could be bypassed by uploading the plugin files directly into WordPress. I had assumed that an inability to install through the theme upload would mean an inability to install through the normal process. However, the workaround took and I was able to get the plugin installed on my site.
I guess this is my roundabout way of saying that if you encounter an error during the installation of a WordPress plugin or theme, it doesn’t resemble numbers 1 through 6 above, and you’ve tried manually uploading, go to the perceived source of the problem. They should be able to provide you with insights into the problem and spare you the agony of trying to figure it out on your own.
Wrapping Up
So, is there a way to avoid these in the future? Well, using reputable themes and plugins from WordPress developers is a good place to start. Familiarizing yourself with what theme and plugin files should contain is another good thing to have under your belt.
All in all, I think this is probably one of the easier kinds of errors you might end up having to deal with in WordPress. That said, errors are a nuisance you often can’t afford to deal with when they pop up mid-workflow, so make sure you’re well-versed in what the most common errors are and how to go about fixing them.
Top eCommerce Payment Gateways for WordPress
Okay, so you’ve created a kickass design, your site’s running in tip-top shape, and your visitors are more than ready to convert. What more could you ask for?
But then your soon-to-be-customers get to the payment gateway and don’t see their preferred provider listed. Or there’s a security warning that’s thrown them off-guard. Or, even worse, they change their minds, want to go back to the site to add another item to their cart, but they realize they’re no longer on your site and don’t know how to get back.
So, what can you do to ensure that UX issues like the ones mentioned above don’t keep your visitors from converting? There’s really only one thing you can do: choose a payment gateway provider (or providers) that will provide a reliable and secure experience.
In this post I’m going to:
- Explain what payment gateways are and how they work
- Show you some popular payment gateways, how much they cost and how to use them
- Talk about how you can integrate these payment gateways with WordPress
If you already know what a payment gateway is, feel free to skip ahead to the section on popular gateways and WordPress integration. :)
What Is a Payment Gateway?
To briefly describe what a payment gateway is, it’s a third-party tool that evaluates and processes payments from your customers. So, rather than set up a basic contact form that requires customers to fill in their information to place an order—which you would then need to manually process on your end—the payment gateway handles it on your behalf.
There are a number of benefits to using a payment gateway. The time savings is obviously one of them. There’s also the matter of PCI compliance. And there’s the flexibility in payment types you can accept by using a payment processing tool.
Of course, like with any other third-party system you bring into your WordPress site, there are a number of things that must be taken into consideration. Here is what you will need to think about:
Cost
With most third-party integrations, there’s almost always an upfront cost associated with it. However, when it comes to payment processors, you also need to take a closer look at the fine print as there are fees you’ll need to pay for each transaction processed. There are some that also charge your customers a fee in order to use the payment gateway—and nothing screams “depart this transaction immediately” more than an unexpected cost.
Payment Location
Some payment gateways enable users to add the payment gateway directly onto their site through an API. This can be a good thing as it prevents that feeling of disruption as visitors are shuttled to a different website to enter their payment information. However, there are some payment gateway providers that are so well-known and trusted (think of PayPal) where the disruption might not matter that much if customers feel more confident submitting payment information through that site instead of your own.
That’s ultimately what you need to keep in mind here: what will your customers be more comfortable with. Do they want one seamless process that occurs entirely on your site or would they be more comfortable paying through a well-known provider? You can use A/B testing to see which option leads to higher conversions or you can solicit feedback from your customers and ask them directly what they prefer.
Merchant Account
You may run into a number of payment processors who require you to have a separate merchant account into which funds are deposited, which means yet another step you have to take care of in order to get your online payment system up and running. However inconvenient that may seem right now, though, it’s important to note that payment gateways who don’t require merchant accounts and are willing to directly deposit funds into your account are more likely to charge you a higher processing fee.
Security
Obviously, this point can’t be stressed enough as security shouldn’t stop even if the purchase experience is handed over to another party. Your payment gateway should be just as secure to use, if not more, than your own website. This means they need an SSL certificate, additional encryption, and must be PCI compliant.
Countries Accepted
The first thing to do before signing with any payment processor is to check your site’s analytics. This will tell you which countries your visitors are located in, so you can include country-compatible payment methods, currencies, and translations in your payment gateway.
Taxes
If you’re collecting revenue through your site, you need an easy way to collect the appropriate amount of taxes. While there will, of course, be local taxes, you’ll also have to be aware of country or region-specific taxes, like the value-added tax (VAT) in the EU. So, if you know you’re going to sell goods out of state or country, your payment gateway should be equipped to calculate those taxes for you.
Automated Payments
For product sales, this might not be something you need to worry about. However, for those of you offering a recurring service or something that customers will purchase frequently enough, automated payments are definitely worth thinking about. One way to do this is to create an option for recurring payments. You may also want to create an auto-pay method whereby payment information from previous transactions can be saved so customers don’t have to re-enter it every time.
Plugin Compatibility
If your site is making sales, then you most definitely have an eCommerce or shopping cart plugin at your disposal. Not every payment gateway will work with your plugin of choice, so confirm compatibility before signing up.
Design
And, of course, you’ve got to think about the design of the payment gateway. Will it allow for branding personalization so that it matches your site? Is it mobile responsive? How intuitive is it in terms of layout, numbers of steps or pages, etc.? Again, this is still part of your customers’ experience and you don’t want bad design to ruin that.
Best Payment Gateways for WordPress
Alright, so now that you know what you’re looking for, let’s narrow down that search and compare the best payment gateway providers for WordPress.
PayPal Payments Pro

If you need a little extra out of PayPal, their Pro option is worth consideration:
- Cost: There’s a $30 monthly fee to use this service, in addition to the per-transaction fee assessed.
- Payment Location: You won’t have to send customers to PayPal. They’ll see the recognizable and trusted logo on your site, but they can stay right where they are to make a payment.
- Merchant Account: There’s no need for one with PayPal, but you do have the option if you want a quick and easy way to deposit funds into your bank account.
- Security: PayPal provides you with options to keep transactions on your site PCI compliant.
- Global Friendliness: PayPal accepts only six currencies from credit card providers. If customers make PayPal payments, though, they’ll take over 25 currencies from 200+ markets.
- Payment Methods Accepted: Because this is PayPal, a good portion of the payment types available come from them, including: PayPal standard payments, PayPal credit, as well as PayPal special financing. You can also accept credit cards, bank transfers, and even phone-based credit card payments.
- Automated Payments: I don’t believe this is an option.
- Plugin Compatibility: PayPal Pro supports most major shopping carts.
- Design: The UI is fully customizable. It also works across all devices, so you won’t have to worry about the mobile payment experience.
Stripe

Stripe is definitely not lacking in features:
- Cost: There are no setup or monthly fees. Aside from the usual per-transaction charges, the only costs you have to worry about are from customer chargebacks.
- Payment Location: You can create a totally custom checkout for your site or you can use their pre-built Checkout.
- Merchant Account: No need for a merchant account.
- Security: If you’re keeping customers on your site to process payments, Stripe offers developers the option to use client-side tokenization to ensure PCI compliance.
- Global Friendliness: Strips works in over 100 countries (for your and your customers’ base of operations) and accepts over 135 currencies. There’s no change for currency conversion either.
- Payment Methods Accepted: Stripe accepts all major credit cards, bank and debit payments, Bitcoin, and digital payments from Apple Pay and Android Pay. Their API tools also enable developers to set up alternative payment processing options like selling products from a tweet.
- Automated Payments: Stripe is set up to help all e-commerce business types: basic stores, on-demand marketplaces, subscription services, and even crowdfunding.
- Design: This tool was built with the developer in mind, so its capabilities can be extended with simple APIs.
2CheckOut

Here are just a few of 2CheckOut’s features:
- Cost: In addition to the standard fees per transaction, they also charge for international transactions and currency conversion.
- Payment Location: You can either use the API to put the checkout on your site or you can use “inline” checkout which moves the process to their site while making it still look like it’s on yours.
- Merchant Account: You need a merchant account in order to accept payments.
- Security: They are Level 1 PCI compliant.
- Global Friendliness: Their payment gateway is offered in 15 languages, includes 87 currency options, and they’ll process payments in over 200 markets.
- Payment Methods Accepted: They accept credit card, debit card, and PayPal payments, among others.
- Automated Payments: You can create pricing plans, flexible billing schedules, automated payments, and more.
- Plugin Compatibility: Works with WooCommerce, WP e-commerce, Zoho, Shopify, osCommerce, and more.
- Design: You can brand the gateway to match your site. The checkout page is also mobile-friendly.
Authorize.net

Authorize.net is another widely accepted gateway that might offer precisely what you need:
- Cost: There’s an initial $49 setup fee, a $25 monthly fee, as well as per-transaction fee.
- Payment Location: It’s up to you: this can go on your site or on Authorize.net’s.
- Merchant Account: You’ll need a merchant bank account to collect your payments.
- Security: You’ll have free access to Authorize.net’s fraud protection tools if you integrate gateway on your site. Otherwise, Authorize.net is PCI DSS certified.
- Global Friendliness: While you’re free to accept payments from around the world, you must reside in the U.S., Canada, UK, Europe, or Australia in order to use this service.
- Payment Methods Accepted: Payment types include credit card, Authorize.net e-checks, as well as digital payments like Apple Pay, PayPal, and VisaCheckout.
- Automated Payments: There are a number of options available. You can store customer information for future transactions, set up subscriptions, or create dynamic recurring billing schedules.
- Plugin Compatibility: Works with e-commerce and banking plugins like BigCommerce, Shopify, Magento, Moolah, QuickBooks, and Wells Fargo.
- Design: You’re free to personalize the look of your checkout page to match your brand.
Braintree

Braintree offers another way to accept payments on your WordPress site. Check out some of its features:
- Cost: There are no monthly fees to use Braintree, just the standard per-transaction fee. Note that the fee depends on which country you’re processing payments from.
- Payment Location: You can use Braintree’s hosted service or you can use their drop-UI to put it directly on your site.
- Merchant Account: Since this is a PayPal service, you don’t need a merchant account.
- Security: Advanced fraud protection is included with this service.
- Global Friendliness: Braintree’s service will process payments in over 130 currencies and for customers in 44 countries.
- Payment Methods Accepted: You can accept payments from PayPal, credit cards, Apple Pay, Venmo, Masterpass, and more. In addition, you can split payments with other partners or providers.
- Automated Payments: There are recurring billing options for repeat customers, subscription-based services, as well as donations.
- Plugin Compatibility: This tool will integrate with a huge range of e-commerce and sales tools like Salesforce, Magento, Freshbooks, BigCommerce, and 3dcart.
- Design: You can customize the design of the checkout or use their ready-made interface.
Square

Square also lets you accept payments online easily. Check out Square’s features:
- Cost: No monthly fee and 2.2% per transaction.
- Payment Location: Although Square provides its own online store building platform, you can use Square’s APIs to accept payments directly on a WordPress website that you build yourself, or use plugins like a WooCommerce extension to integrate Square’s payment processing and other tools with your online store.
- Merchant Account: You need a transactional bank account in case of refunds or disputed payments.
- Security: They are Level 1 PCI compliant and offer layered security with fraud prevention methods.
- Global Friendliness: At this time, WooCommerce Square is currently only available for the U.S., Canada, Australia, Japan and the UK.
- Payment Methods Accepted: All major credit and debit cards are accepted. Payments are deposited into your linked bank account next business day with their standard schedule, or you can create a custom payment schedule to suit odd business hours.
- Automated Payments: You can receive automated payments for single and recurring transactions.
- Plugin Compatibility: Works with WooCommerce, WP EasyCart, Ecwid.
- Design: You can customize the gateway to match your site. The checkout page is also mobile-friendly.
Integrating Payment Gateways with WordPress
Here’s the thing about payment gateways: you might not be responsible for designing them or developing the code that processes payments in the first place, but that doesn’t mean you can wipe your hands clean of what happens once your visitors land on them. If you’re including a payment gateway on your site, then it’s a part of your visitors’ experience and needs to be accounted for as you shape that experience for them, so it’s important to integrate your payment gateway correctly not just with WordPress, but also any plugins used to enhance or extend your site’s functionality.
For example, our Forminator plugin not only lets you add forms, quizzes, polls, and calculators to your site, but also take payments, donations, down payments, and sell merchandise with built-in Stripe and PayPal integrations. The video below shows you how to build order forms with payments for free in WordPress using the plugin’s payment integration features:
Different types of applications like Learning Management Systems (LMS), membership sites, and listing directories have built-in payment integrations with WordPress.
Below are some plugins that help to make integrating payment gateways and WordPress easier:
WooCommerce Square

WooCommerce Square is a free plugin that lets you integrate the Square payment gateway on WordPress to sync inventory and product data between WooCommerce and Square POS.
Some of the benefits and features of using this plugin for payment integration with WordPress include:
- PCI compliant payment processing option that meets SAQ A levels of compliance.
- Support for WooCommerce Subscriptions
- Support for WooCommerce Pre-Orders
- Allow customers to save payment methods and use them at checkout
- Use an enhanced payment form with automatic formatting, mobile-friendly inputs, and retina card icons
- Sync product data automatically between WooCommerce and Square.
See the plugin documentation for setup instructions.
WP Easy Pay – Square for WordPress

WP Easy Pay – Square for WordPress is another free plugin you can use to integrate WordPress with the Square payment gateway and accept simple payments and donations if you are not using WooCommerce or don’t need to add a shopping cart to your store.
Some of the highlights of using this plugin for payment integration with WordPress include:
- SCA (Strong Customer Authentication) support.
- Sandbox support allows you to see test transactions in Square Dashboard.
- Use a single button to collect donations and simple payments.
- Users can enter custom amounts to make payments for donations.
The plugin also has a premium version with additional features like support for digital wallets, email notifications, and reports.
WooCommerce Stripe Payment Gateway

WooCommerce Stripe Payment Gateway is a free plugin that lets you accept Stripe payments through WooCommerce and add payment request buttons like Apple Pay and Google Pay and other payment methods on your website. It also supports recurring payments like subscriptions.
Stripe Payments

The Stripe Payments plugin lets you integrate your WordPress site with the Stripe payment gateway to accept credit card payments.
Once installed and configured, you can add ‘Buy Now’ buttons anywhere on your site using a simple shortcode and accept donations. After users purchase online with one-click payments, they are redirected to a “Checkout Result” page showing details of the transaction. Payment and order information can then be accessed from your WordPress dashboard.
Stripe Payments for WordPress – WP Simple Pay

WP Simple Pay is a free standalone Stripe Checkout plugin that lets you accept credit card payments with Stripe Checkout on your WordPress site with no complex shopping cart, form builder or membership site plugin required.
The free version comes with many built-in features, including unlimited payment forms, mobile responsive Stripe Checkout pages, product images display in Stripe Checkout page, optional verification and capture of user details, and the ability to specify payment success & failure pages. The paid version offers additional features including support for subscription payments and options.
WooCommerce PayPal Checkout Payment Gateway

If you’re using WooCommerce, you can add this free plugin to integrate your site with a PayPal in-context checkout payment gateway, which remains hosted on PayPal’s servers, allowing your site to meet security requirements without affecting your theme.
Refer to the documentation to learn how to integrate this plugin using PayPal’s easy setup method.
WordPress Simple PayPal Shopping Cart

WordPress Simple PayPal Shopping Cart is a free plugin that lets you insert an ‘Add to Cart’ button on any post or page using shortcodes and display the shopping cart on your pages or sidebar. The plugin also has an option to use smart PayPal payment buttons and various additional features.
See the plugin’s documentation section and video tutorials for setup and integration information.
2Checkout Payment Gateway for WooCommerce

If you want to process payments online using 2Checkout (2CO), this plugin integrates with your WooCommerce store to provide itemized checkout and pass all billing and shipping data to the 2CO purchase page.
Getting Paid Is The Easy Part
By this point, you should have a pretty good idea of what you want your payment gateway to do and have a few providers you’re thinking of using:
- Square offers relatively low processing fees and lets small businesses and independent sellers accept most consumer credit cards and facilitate cashless transactions.
- Stripe is the most developer-friendly platform, so if you really want to get into personalizing your checkout page, this is a good option to have.
- PayPal is a great choice if you want to leverage the trusted name of a payment processor that over 184 million people already use.
- 2Checkout seems to be the most global-friendly of the options, so if you’re hoping to cast a wider net, that may be the one you want to turn to.
Probably the easiest way to integrate payment processing gateways with WordPress is to use an eCommerce plugin that already has an extensive list of payment options built-in. Many eCommerce plugins not only give you this option, most will even provide links, wizards, and helpful tooltips to facilitate this process, so all you have to do is sign up for an account with the merchant, enter a registration code or special key into a settings field, and boom diggity… you’ve saved a whole lot of time!
One last thing to think about when researching payment gateways is how you’re going to deliver customers their goods after collecting their money, especially if you plan to sell physical goods. That’s why we’ve written a companion piece on the top eCommerce plugins for shipping products.
If you haven’t built your eCommerce site yet, make sure to read our comprehensive guide to planning an eCommerce store with WordPress before getting started.