Progressive web applications (PWA) are still gathering popularity in 2020. It doesn’t come as a surprise, considering the benefits of higher conversion rates, customer engagement, decreased page loading speed, and lower costs on development and overhead.
We can see respected companies also enjoying success with their PWAs, such as Twitter, Uber, Tinder, Pinterest, and Forbes. And they all boast about massive benefits from implementing the progressive apps.
The good news is that developing a PWA isn’t something that only big-budget companies can afford. These applications serve small and average businesses equally and are not that complicated to create.
You can find a comprehensive Beginner’s Guide To Progressive Web Apps on Smashing Magazine that focuses on building the core of PWAs.
However, let’s take a step further and learn how to deploy modern qualities to PWAs, such as offline functionality, network-based optimizing, cross-device user experience, SEO capabilities, and non-intrusive notifications and requests. You’ll also find example code or references to more specific guides so you can implement these tips to your PWA.
A Quick Overview Of Progressive Web Applications (PWA)
Let’s not skip the basics and quickly go over the heart of PWAs.
What Is A PWA?
“Progressive Web Apps (PWA) are built and enhanced with modern APIs to deliver enhanced capabilities, reliability, and installability while reaching anyone, anywhere, on any device with a single codebase.”
— Google’s developers
In other words, PWAs are websites that users can use as stand-alone applications. They are different from native apps mainly because PWAs don’t require installation and can be used with various devices — native apps are primarily built for mobile devices.
How Do PWAs Work?
The core of a PWA consists of three components: a web app manifest, service workers, and an application shell. You can find detailed instructions for building those in the beginner’s guide mentioned above.
Here’s what these components do.
Web App Manifest
The web app manifest is the core for making a website run as a stand-alone application in full-screen mode. You can define how the PWA looks, optimize it for different devices, and assign an icon that’s displayed after the application’s installation.
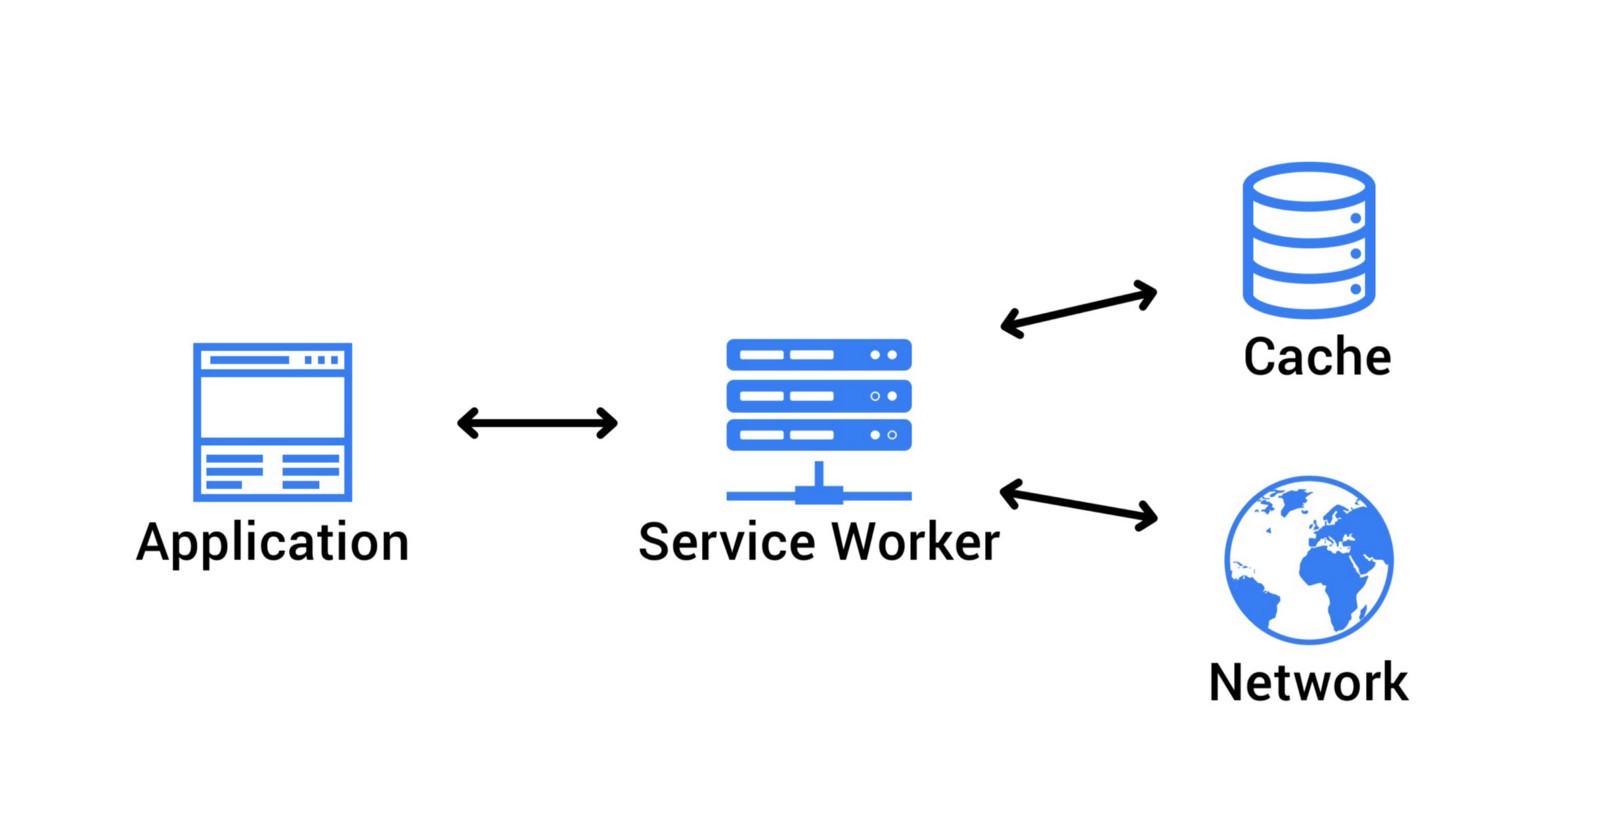
Service Workers
The service workers enable the offline usage of the PWA by fetching cached data or informing the user about the absence of an Internet connection. The service workers also retrieve the latest data once the server connection is restored.
Application shell architecture
The application shell is what the users see when they access a PWA. It’s the minimum HTML, CSS, and JavaScript that’s required to power the user interface. When developing a PWA, you can cache the application shell’s resources and assets in the browser.
Deploying Modern Characteristics To Your PWA
On top of the core features, modern PWAs embrace additional traits that further drive their users towards a more extraordinary user experience.
Let’s look at some specific modern characteristics of a PWA and learn about adding these to your PWA. The following qualities are considered great additions to the basic PWA by Google developers.
The Application Works Offline As It Does Online
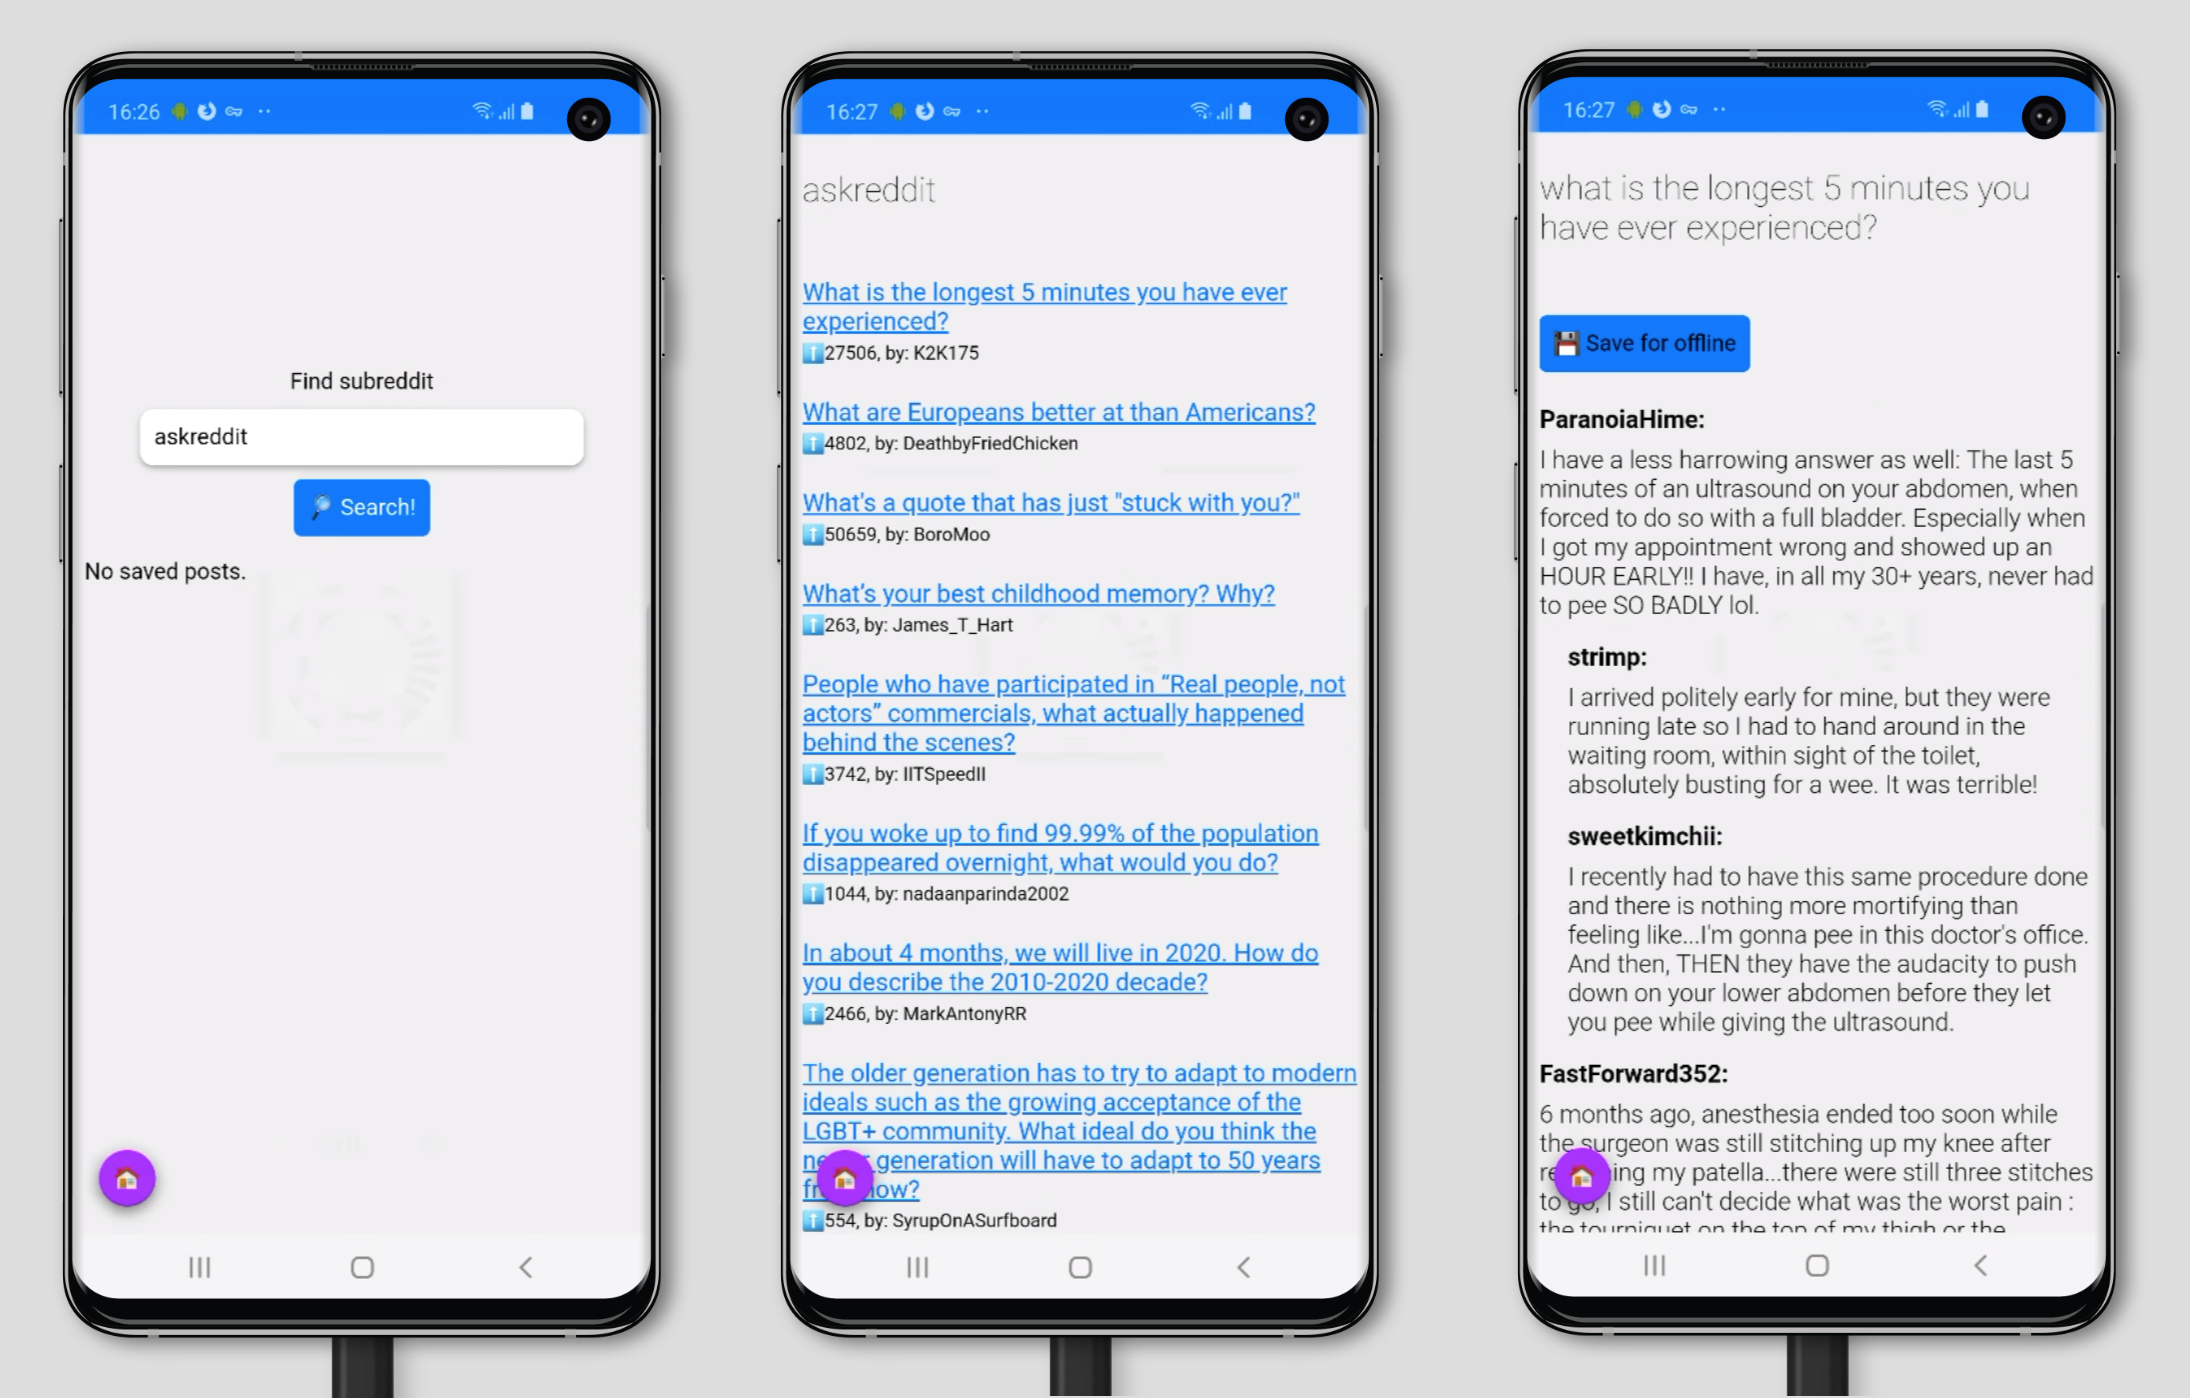
When building your PWA, you can also develop a custom offline page as part of the core. However, it’s much more user-friendly if your PWA continues to function even without an Internet connection — up to a certain point where the connection becomes necessary. Otherwise, the user experience could be as frustrating as Ankita Masand’s ordeal with ordering a cake as she describes in her article about the pain points of PWAs.
You can achieve a more significant user experience by using cached content, background syncing, and skeleton screens. Let’s look at each one.
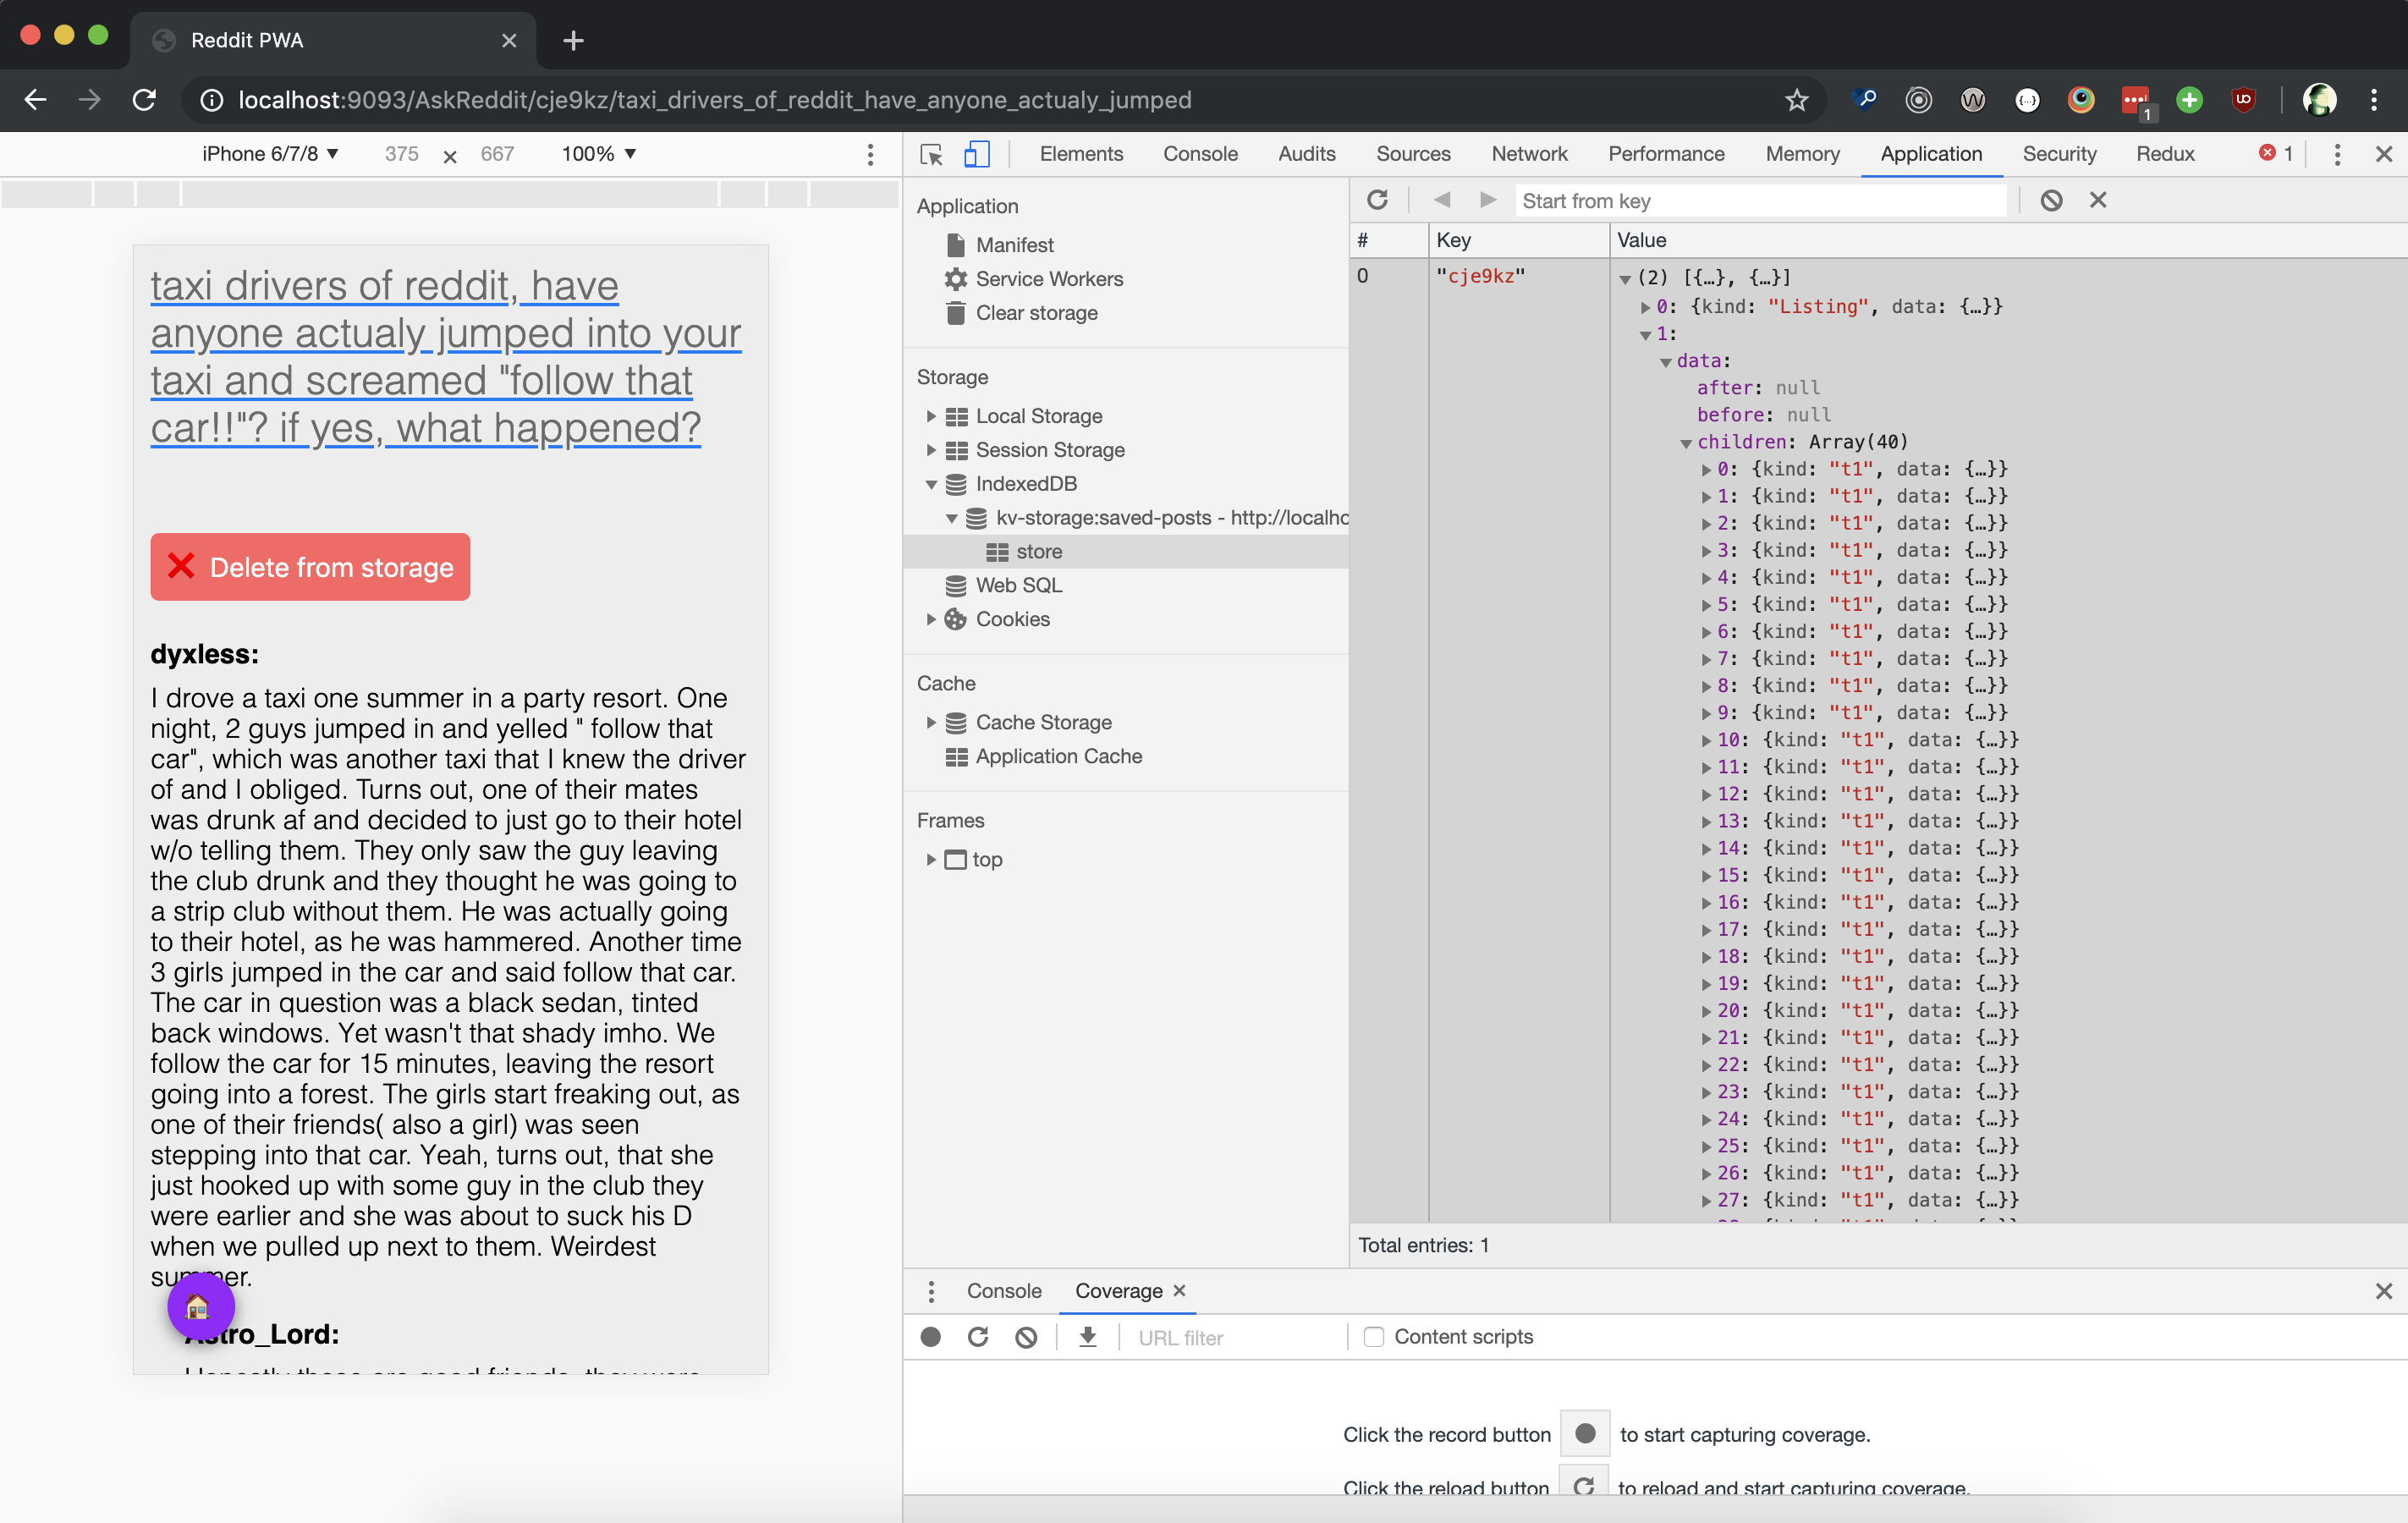
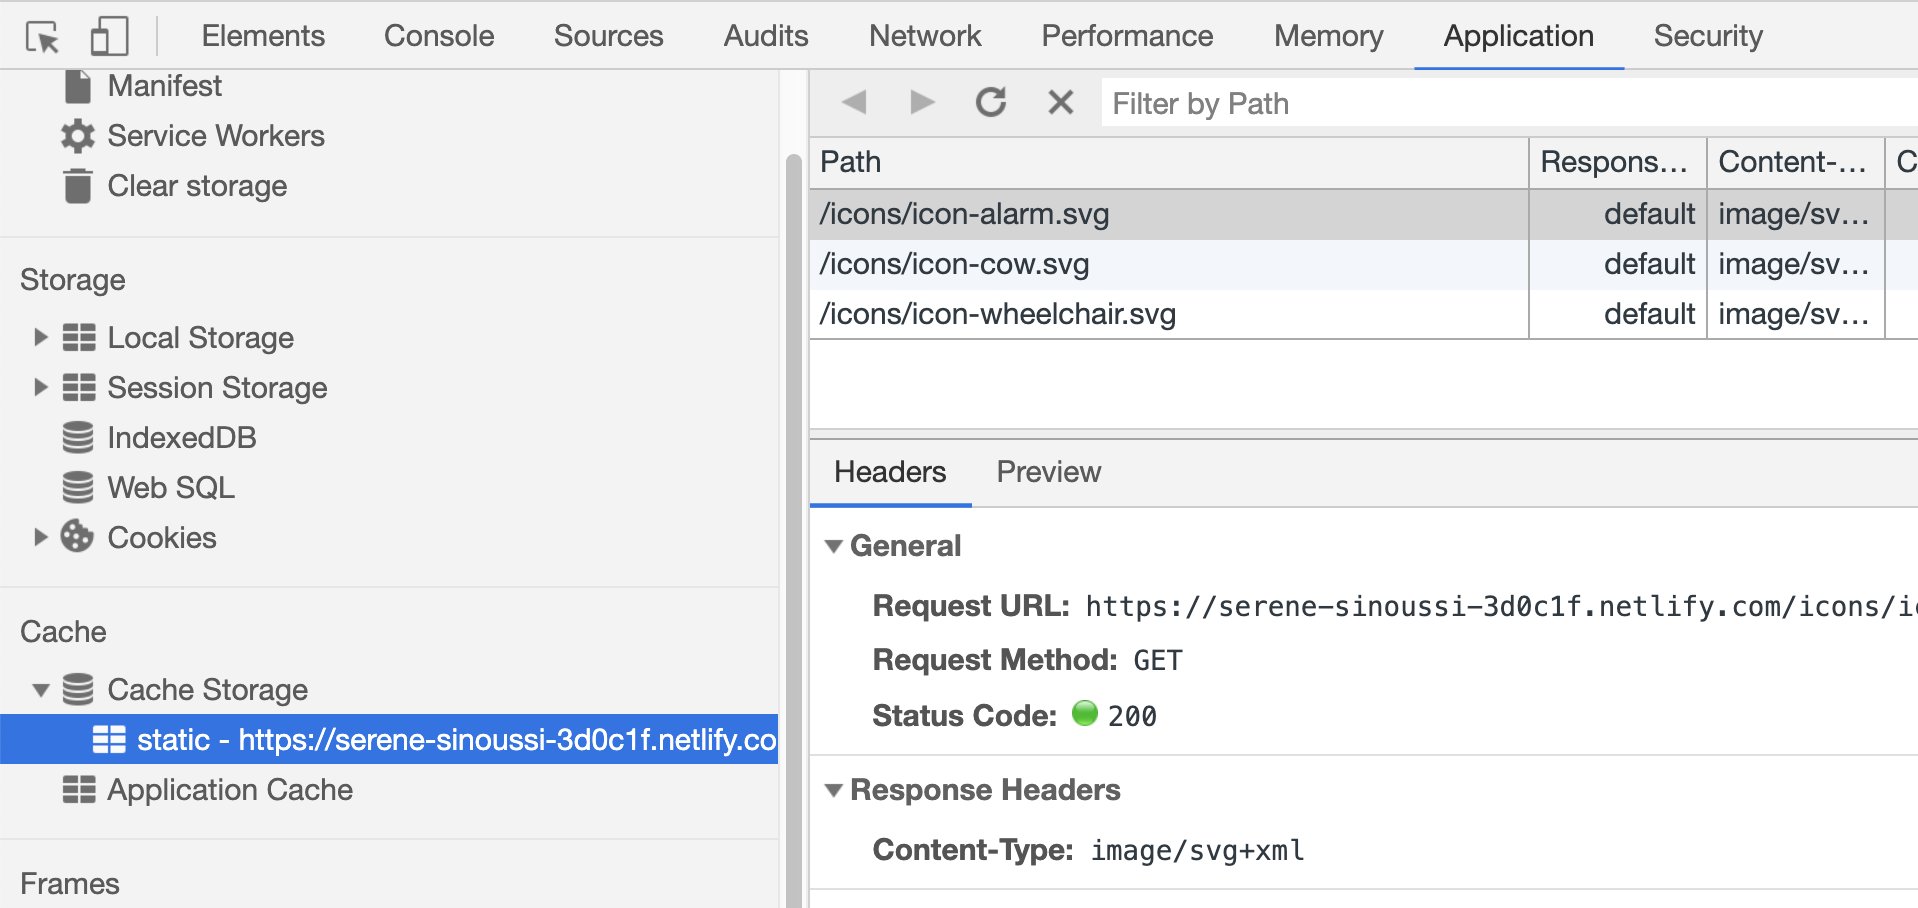
Cached content with IndexedDB
IndexedDB is an in-browser NoSQL storage system that you can use to cache and retrieve the required data to make your PWA work offline.
However, not all browsers support IndexedDB, so the first thing you want to do is check if the user’s browser supports it.
if (!('indexedDB' in window)) {
  console.log('This browser doesn\'t support IndexedDB');
  return;
}
After this, you can create cached content with the IndexedDB API. Here’s an example from Google developers of opening a database, adding an object store, and adding an item to this store.
var db;

var openRequest = indexedDB.open('test_db', 1);

openRequest.onupgradeneeded = function(e) {
  var db = e.target.result;
  console.log('running onupgradeneeded');
  if (!db.objectStoreNames.contains('store')) {
    var storeOS = db.createObjectStore('store',
      {keyPath: 'name'});
  }
};
openRequest.onsuccess = function(e) {
  console.log('running onsuccess');
  db = e.target.result;
  addItem();
};
openRequest.onerror = function(e) {
  console.log('onerror!');
  console.dir(e);
};

function addItem() {
  var transaction = db.transaction(['store'], 'readwrite');
  var store = transaction.objectStore('store');
  var item = {
    name: 'banana',
    price: '$2.99',
    description: 'It is a purple banana!',
    created: new Date().getTime()
  };

 var request = store.add(item);

 request.onerror = function(e) {
    console.log('Error', e.target.error.name);
  };
  request.onsuccess = function(e) {
    console.log('Woot! Did it');
  };
}
Background sync
If your PWA syncs data in the background, the user can take actions while offline, which are then executed when the Internet connection restores. A simple example is a messaging app. A user can send a message when offline without the need to wait until it is sent — the background sync automatically sends the message when the connection restores.
Here’s an example of how to develop a background sync feature by Jake Archibald.
// Register your service worker:
navigator.serviceWorker.register('/sw.js');

// Then later, request a one-off sync:
navigator.serviceWorker.ready.then(function(swRegistration) {
  return swRegistration.sync.register('myFirstSync');
});
Then listen for the event in /sw.js:
self.addEventListener('sync', function(event) {
  if (event.tag == 'myFirstSync') {
    event.waitUntil(doSomeStuff());
  }
});
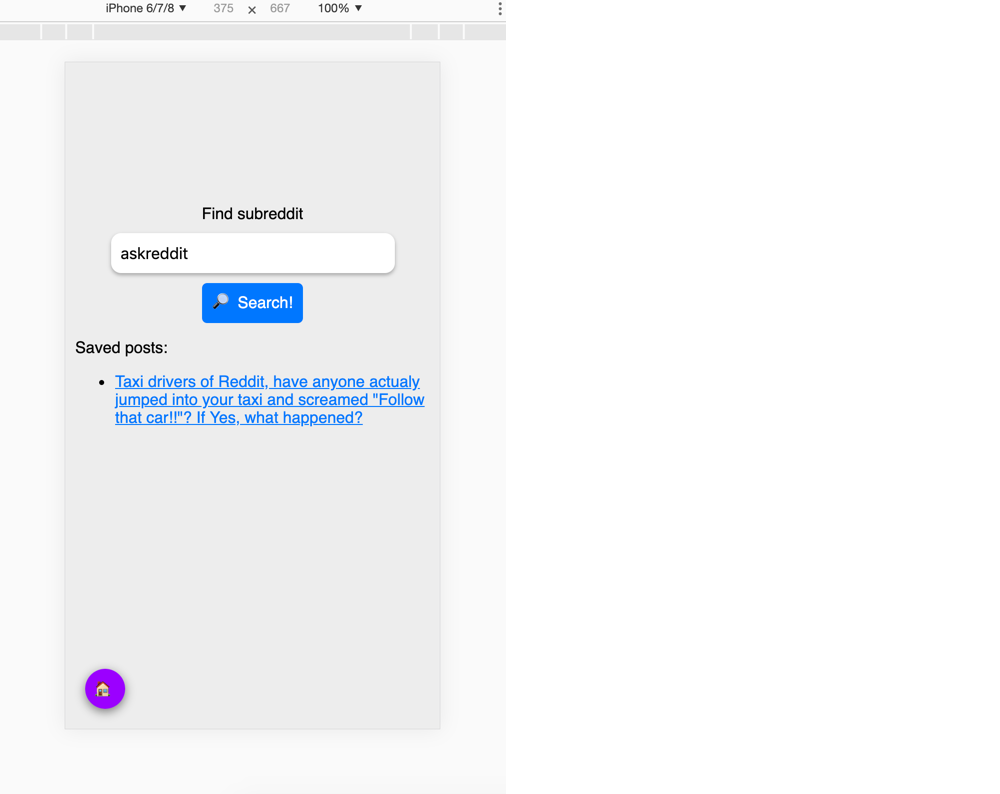
Skeleton screens
One of the main perks of using skeleton screens is that users perceive the application working rather than sitting idle. While the user doesn’t have a connection, the skeleton screen draws the interface out without content — which then fills once the connection restores.
Code My UI has some excellent code snippets available that you can use to create a skeleton screen for your PWA.

Optimizing Based On Network Usage
A central benefit of a PWA is that it provides a faster experience for users. You can further optimize the loading speed by having the PWA use cache-first networking, prioritizing resources, and use adaptive loading based on network quality.
Let’s look at how you can develop these to your PWA.
Cache first, then network
Using the cached content first further enables your PWA to function offline and paves the way for users to access the content even on low network coverage areas. You can do so by creating a service worker to cache the content and then fetching it.
Here’s an example from Jeff Posnick on caching static HTML using service workers.
self.addEventListener('fetch', event => {
  if (event.request.mode === 'navigate') {
    // See /web/fundamentals/getting-started/primers/async-functions
    // for an async/await primer.
    event.respondWith(async function() {
      // Optional: Normalize the incoming URL by removing query parameters.
      // Instead of https://example.com/page?key=value,
      // use https://example.com/page when reading and writing to the cache.
      // For static HTML documents, it's unlikely your query parameters will
      // affect the HTML returned. But if you do use query parameters that
      // uniquely determine your HTML, modify this code to retain them.
      const normalizedUrl = new URL(event.request.url);
      normalizedUrl.search = '';

      // Create promises for both the network response,
      // and a copy of the response that can be used in the cache.
      const fetchResponseP = fetch(normalizedUrl);
      const fetchResponseCloneP = fetchResponseP.then(r => r.clone());

      // event.waitUntil() ensures that the service worker is kept alive
      // long enough to complete the cache update.
      event.waitUntil(async function() {
        const cache = await caches.open('my-cache-name');
        await cache.put(normalizedUrl, await fetchResponseCloneP);
      }());

      // Prefer the cached response, falling back to the fetch response.
      return (await caches.match(normalizedUrl)) || fetchResponseP;
    }());
  }
});
Prioritizing resources
By default, PWAs have greater performance over similar native apps due to their lite nature. Furthermore, since PWAs use the browser’s cache, it’s possible to indicate which resources take priority and need to be rendered even before they are used. This mainly works with static elements as dynamic content needs updating before it’s fetched.
You can specify the priority of elements by using the <link> string in the HTML. You can also specify third-party server files by using rel=”preconnect” and rel=”dns-prefetch.”
Maximiliano Firtman gives a simple example of this by prioritizing Web Fonts within the browser’s engine:
<link rel=”preload” as=”font” href=”font.woff” crossorigin>
Implementing adaptive loading
The Internet speeds of WiFi and 4G aren’t accessible everywhere, and users still get on the Internet with 2G and 3G connections. Since you want your PWA to be accessible by as many people as possible, you might want to optimize it to perform at lower Internet speeds as well.
You can achieve this by implementing adaptive loading, which loads the PWAs elements based on the connection type that the user has.

The most straightforward way is to use Google’s Workbox tool, which includes numerous ready-made plugins for caching strategies.
Suppose you want to define a custom caching strategy. Here’s how you can do it as an example from Demian Renzulli and Jeff Posnick:
const adaptiveLoadingPlugin = {
  requestWillFetch: async ({request}) => {
    const urlParts = request.url.split('/');
    let imageQuality;

    switch (
      navigator && navigator.connection
        ? navigator.connection.effectiveType
        : ''
    ) {
      //...
      case '3g':
        imageQuality = 'q_30';
        break;
      //...
    }

    const newUrl = urlParts
      .splice(urlParts.length - 1, 0, imageQuality)
      .join('/')
      .replace('.jpg', '.png');
    const newRequest = new Request(newUrl.href, {headers: request.headers});

    return newRequest;
  },
};
Next, pass the plugin to a cacheFirst strategy containing a regular expression to match image URLs (e.g. /img/):
workbox.routing.registerRoute(
  new RegExp('/img/'),
  workbox.strategies.cacheFirst({
    cacheName: 'images',
    plugins: [
      adaptiveLoadingPlugin,
      workbox.expiration.Plugin({
        maxEntries: 50,
        purgeOnQuotaError: true,
      }),
    ],
  }),
);
Excellent User Experience On All Platforms
An excellent PWA works seamlessly on browsers, mobile, and tablet. While using an Android device is the most popular way (with a 38.9% market share) of accessing the Internet, optimizing your application for all platforms is part of developing the PWAs core functions.
You can take further steps to increase usability and offer a great user experience, such as reducing jumpiness when your PWA loads and making sure your PWA works with any input method.
Here’s how you can approach each of those aspects.
Reducing “jumpy” content loading
Even with high-speed Internet, the site’s content can shift while loading because the site’s elements load in order. This effect is even worse with slower connection speeds and badly hurts the user’s experience.
The most common elements causing the content to shift while loading are images since these are generally larger and not a priority when loading content. You can tackle this issue with “lazy loading” by using smaller placeholder images that you can prioritize after the HTML structure is rendered.
Here’s an example by Mozilla’s developers on how you can add a lightweight image that’s loaded first before the actual image in JavaScript:
<img src='data/img/placeholder.png' data-src='data/img/SLUG.jpg' alt='NAME'>
The app.js file processes the data-src attributes like so:
let imagesToLoad = document.querySelectorAll('img[data-src]');
const loadImages = (image) => {
  image.setAttribute('src', image.getAttribute('data-src'));
  image.onload = () => {
    image.removeAttribute('data-src');
  };
};
And then create a loop:
imagesToLoad.forEach((img) => {
  loadImages(img);
});
You can also check out a thorough guide on Smashing Magazine about reducing content jumping with other elements.
PWA works with any input method
We’ve covered how PWAs should work with a variety of different devices. To take a step further, you also need to account for other input methods the users can use on these devices, such as touch, mouse, and stylus.
Adding the Pointer Events API to your PWA mainly solves this question. Here’s how you can approach it according to Google’s developers.
First, check if the browser supports the Pointer Events:
if (window.PointerEvent) {
  // Yay, we can use pointer events!
} else {
  // Back to mouse and touch events, I guess.
}
Next, you can define the actions various input methods can take:
switch(ev.pointerType) {
  case 'mouse':
    // Do nothing.
    break;
  case 'touch':
    // Allow drag gesture.
    break;
  case 'pen':
    // Also allow drag gesture.
    break;
  default:
    // Getting an empty string means the browser doesn't know
    // what device type it is. Let's assume mouse and do nothing.
    break;
}
Since most browsers already have touch-enabled features, you won’t need to add anything else.
Discoverable Through Search
One of PWAs key benefits over a native application is that the PWA is a website by nature and search engines can index them. This allows you to deploy SEO strategies to make your PWA content more discoverable.
You can start by ensuring that each URL in your PWA has a unique, descriptive title and meta description, which is the baseline of any SEO optimization activity.
Let’s look at some other steps you can take to make your PWA searchable.
Analyze the findability of your PWA
Google has an excellent tool in its Search Console that analyses your site (PWA) and reports the results. You can use it to run a basic scan of your site and uncover any weak spots that you can then start fixing.
Alternatively, you can use Lighthouse in the Chrome browser to run an SEO audit.
First, navigate to the target URL. Then Press Control+Shift+J (or Command+Option+J on Mac) that opens the developer’s tools menu. Choose the Lighthouse tab, tick the SEO category box, and generate the report.

Use structured data
Google’s search engine uses structured data to understand the content’s purpose on your webpage.
Structured data is a standardized format for providing information about a page and classifying the page content; for example, on a recipe page, what are the ingredients, the cooking time and temperature, the calories, and so on.
— Google
Before you start coding, Google has also put together a useful list of common structured data errors and relevant guidelines to fix them. Studying this material should give you a good baseline of what to avoid.
Frederick O’Brien has written an excellent guide on Smashing Magazine, Baking Structured Data Into The Design Process, which describes how to build structured data from the start.
User-friendly Notifications And Permission Requests
Last but not least, you can increase the user experience by optimizing the notifications and permission requests, so they serve your users — as opposed to just being confusing and annoying.
While you can generally rely on common sense, there are practical tips that you can implement as well, such as creating non-intrusive push notifications and giving the user an option to unsubscribe from messages.
Subtle permission requests for communication
There are two modern ways to automate the communication between a website and a user — chatbots and notifications.
In a PWAs context, the main perk of a chatbot is that it doesn’t require the user’s permission to interact with the user. However, depending on which chatbot application you use, the user might miss the subtle message. Notifications, on the other hand, require the user’s permission but are much more visible.
Since you can add a chatbot as a separate third-party application, let’s focus on creating a user-friendly push notification. In case you need a guide on how to create a push notification in the first place, here’s a great one by Indrek Lasn.
The most straightforward way to create a non-intrusive permission request is by using a double request. This means that you include a custom interaction to your site on top of the default one from the user’s OS.
Matt Gaunt offers perfect illustrations for this effect with the following images.
Here’s the default notification permission request that provides no context:
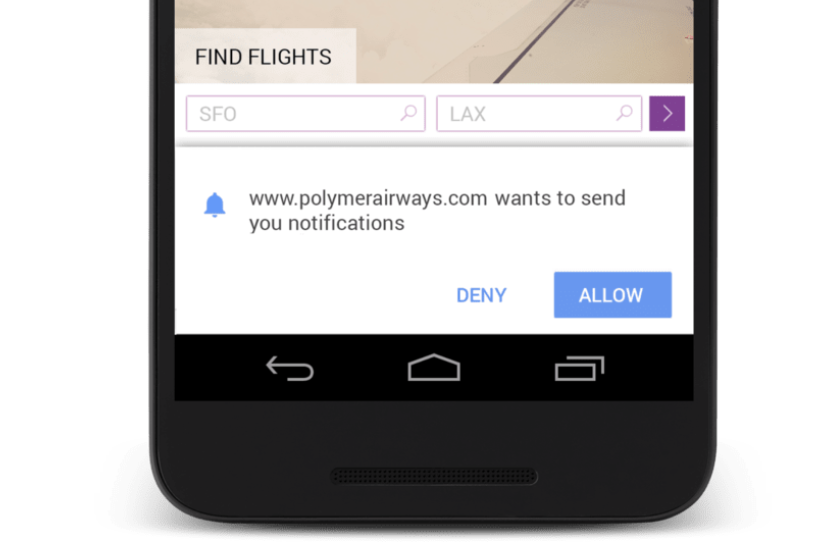
And here’s the custom interaction added before the default notification permission described above:

By adding a custom alert before the OS’s default one, you can describe the purpose of the notification more clearly to the user. This increases the chance of the user opting in for your site’s notifications.
Enable the user to opt-out from notifications
For a user, disabling the push notifications of a site is quite annoying regardless of the device they’re using. Therefore, giving the user an option to opt-out from the messages goes a long way in terms of user experience.
Here’s an example from Matt Gaunt on how to implement an unsubscribing function into your code and UI:
First, define the pushButton’s click listener:
pushButton.addEventListener('click', function() {
  pushButton.disabled = true;
  if (isSubscribed) {
    unsubscribeUser();
  } else {
    subscribeUser();
  }
});
Then, add a new function:
function unsubscribeUser() {
  swRegistration.pushManager.getSubscription()
  .then(function(subscription) {
    if (subscription) {
    // TODO: Tell application server to delete subscription
      return subscription.unsubscribe();
    }
  })
  .catch(function(error) {
    console.log('Error unsubscribing', error);
  })
  .then(function() {
    updateSubscriptionOnServer(null);

    console.log('User is unsubscribed.');
    isSubscribed = false;

    updateBtn();
  });
}
Here’s how it looks in the console after successfully implementing the subscribe button to disable the notifications if the user chooses.

Conclusion
PWAs can be mighty powerful for increasing your site’s traffic and expanding on user experience. To further optimize your PWA, you can use these modern solutions described in this article to enhance performance and functionality.
You also don’t need to implement everything at once. Feel free to cherry-pick the most relevant options since each of these suggestions helps you further your PWA.
Further Resources