How to Send Email to All Registered Users in WordPress

Do you want to send an email to all registered users in WordPress?

Sometimes you may need to send a mass email to everyone who has an account on your website. This may include customers, members, subscribers, and even other WordPress users.

In this article, we will show you how to send an email to all registered users in WordPress.

How to send email to all registered users in WordPress

Why and When You Need to Send Email to All Registered Users in WordPress?

If you allow user registration on your WordPress site, then there are a few different reasons why you may need to email all registered users. For example, you might want to let your site’s Authors and Editors know about a new plugin you’ve added to help them write great posts.

If you run an online store, then you may be launching a giveaway or contest in WordPress, exclusively for people who have the ‘Customer’ role.

Depending on how you’ve set up user registration, you may not add all users to your email list automatically. This can make it difficult to contact everyone who uses your site.

Thankfully, there are other ways to bulk message everyone who has an account with your WordPress website.

Before contacting your users, you’ll want to make sure you’re not breaking any laws. That said, we recommend reading our ultimate guide to WordPress and GDPR compliance.

Now, let’s see how you can easily email all registered users on your website.

How to Make Sure Your Emails Are Delivered Safely

Before we start, you want to make sure that users will receive the emails you send.

Sometimes, your WordPress hosting server may not be properly configured or email providers such as Gmail might use filters and tools that wrongly flag your emails as spam.

You can follow our tutorial on how to fix WordPress not sending email issue for more details.

With that in mind, we recommend using an SMTP service provider to improve your email deliverability and make sure all registered users receive their messages safely.

WP Mail SMTP is the best WordPress SMTP plugin on the market. It allows you to connect your WordPress site with a mailer service. This means your emails always end up in the user’s inbox, and not in the spam folder.

We recommend buying the paid version called WP Mail SMTP Pro as it allows you to send emails in WordPress using Gmail SMTP, SendLayer, Sendinblue, and more. You can also see the open and click-through rates for your emails, so you can monitor the success of your different email campaigns.

Upon activation, you need to visit the Settings » WP Mail SMTP page.

Here, enter your license into the ‘License Key’ field.

Entering your license key into the WP Mail SMTP WordPress plugin

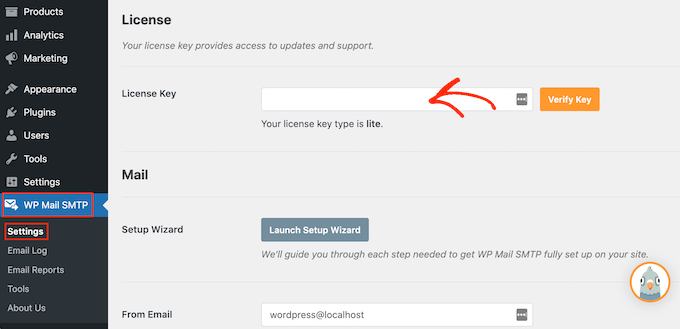
You can find this information by logging into your WP Mail SMTP account.

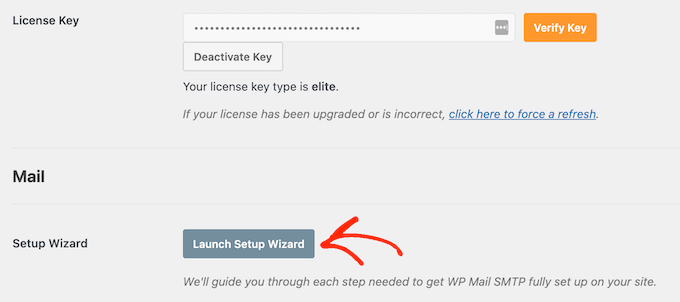
After entering the license key, click on the ‘Verify Key’ button. Now you’ve activated WP Mail SMTP, go ahead and click ‘Launch Setup Wizard.’

Launching the WP Mail SMTP setup wizard on your WordPress website

On the next screen, select ‘Let’s Get Started.’

WP Mail SMTP will now ask you to choose the mailer that you want to use with your WordPress website.

How to connect an SMTP email provider to WordPress

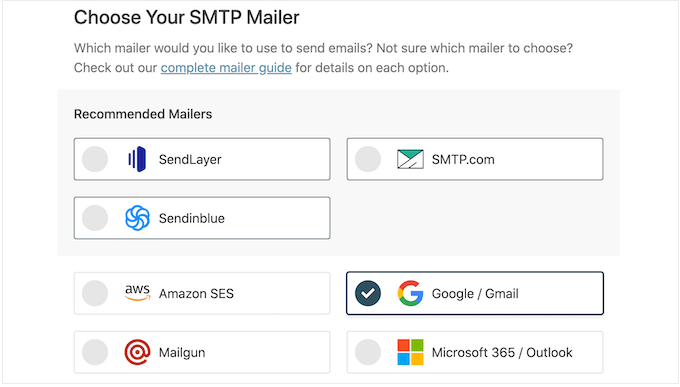
We recommend using SendLayer, SendinBlue, or SMTP.com as they’re reasonably priced and can scale to support your growing business.

After choosing your SMTP mailer, click on the ‘Save and Continue’ button.

Configuring your SMTP service provider

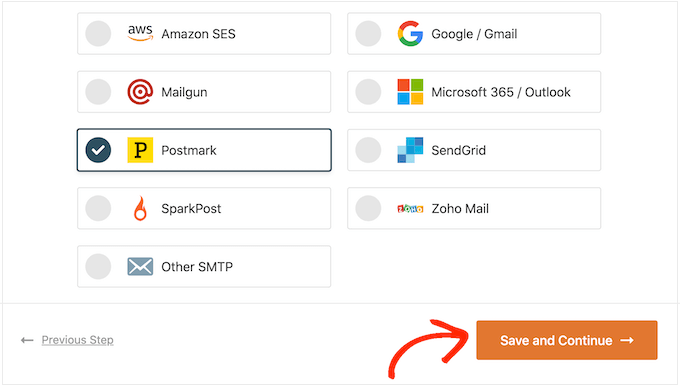
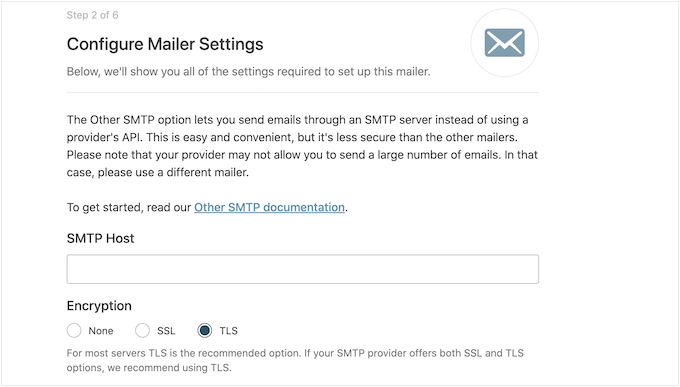
WP Mail SMTP will now show you how to configure this mailer.

If you need help, then see our ultimate guide on how to set up WP Mail SMTP with any host.

How to configure your email service provider in WordPress

If you want to use third-party mailers, then you can follow our guide to send WordPress emails via Gmail SMTP. We also have a similar guide for the Sendinblue SMTP setup.

Sending Email to All Registered Users in WordPress

The best way to email all your registered users, is by using Send Users Email. This simple plugin lets you send bulk messages based on the user’s role.

Before you get started with this plugin, you may want to check your user roles. You can then make any changes so that your users are properly organized by role.

For more details, see our beginner’s guide to WordPress user roles and permissions.

When you’re happy with how your roles are set up, the next step is installing and activating the Send Users Email plugin. For more details, please see our step-by-step guide on how to install a WordPress plugin.

Upon activation, go to Email to users » Email Roles in your WordPress dashboard.

Sending a bulk email to all users with an assigned user role

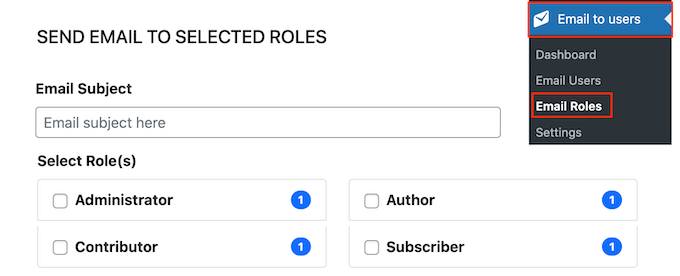
Here, you can choose which users will receive the email based on their role on your WordPress blog.

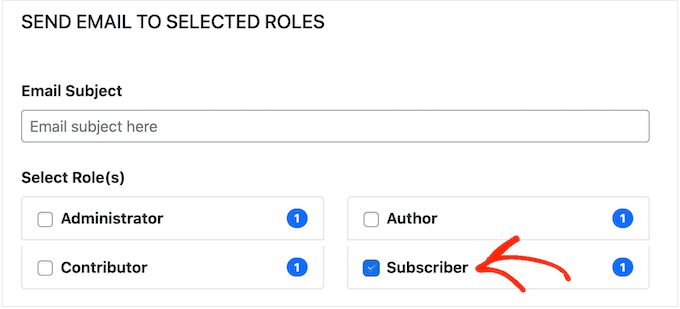
For example, in the following image, we’re messaging everyone who has the ‘Subscriber’ role.

Sending an email to all subscribers on your WordPress website

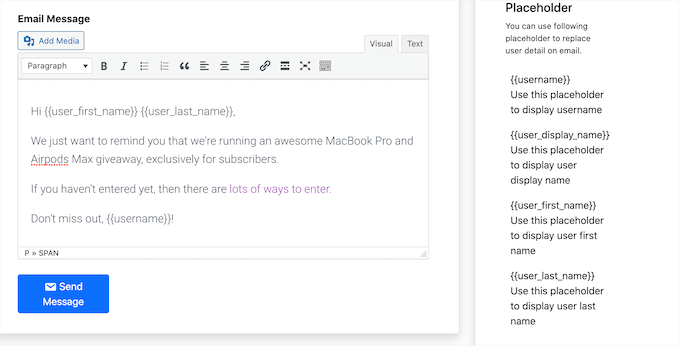
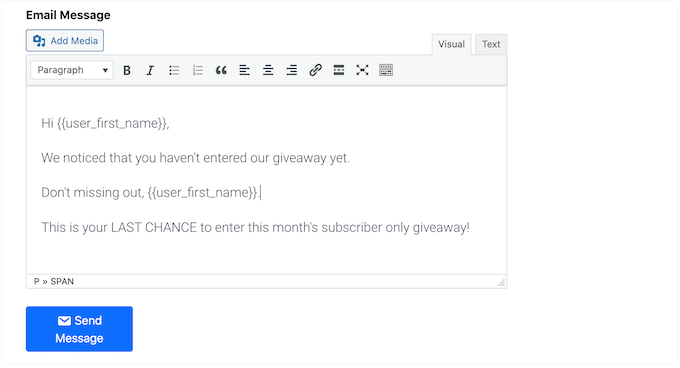
You can now type the email that you want to send to all registered users. The Send Users Email plugin also has a few placeholder tags that you can use to add user information to the message.

For example, you can address the user by name using the {{user_first_name}} placeholder. When Send Users Email creates each email, it will replace the placeholder with the recipient’s first name.

By using a combination of plain text and placeholders, you can send a personalized email to all registered users.

How to email all registered users in WordPress

When you’re happy with the information you’ve entered, click on the ‘Send Message’ button.

WordPress will now email everyone who has the selected user role.

How to Email Specific Registered Users in WordPress

The the Send Users Email plugin also lets you send an email to a small group of registered users, or even to a specific user. For example, you may want to send a follow-up email to a particular Subscriber, after sending a bulk email.

To message individual users, simply go to Email to users » Email Users. This shows a list of all your registered users.

Sending emails to a specific user

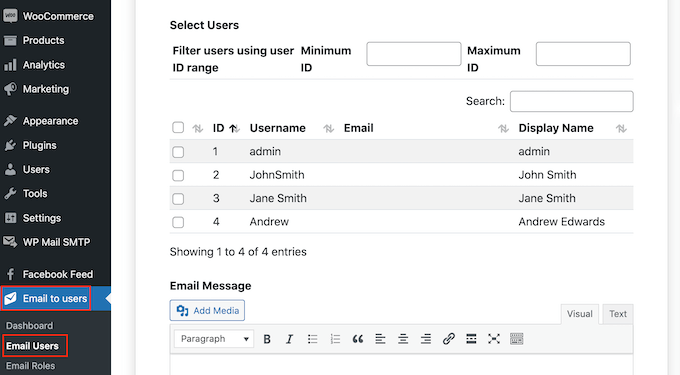
To message a user, simply check the box next to their username.

After selecting all the people you want to email, you can go ahead and create your message.

Messaging a specific person using a WordPress plugin

When you’re happy with the message, simply scroll to the bottom of the screen and then click on Send Message.

We hope this article helped you learn how to send an email to all registered users in WordPress. You may also want to see our guide on how to create an email newsletter and our expert pick of the best email marketing services for small businesses.

If you liked this article, then please subscribe to our YouTube Channel for WordPress video tutorials. You can also find us on Twitter and Facebook.

The post How to Send Email to All Registered Users in WordPress first appeared on WPBeginner.

How to Send Email with the Gmail API and Node.js

In a previous tutorial, we used a service account to connect to the Google Drive API from a Node.js application. We cannot use a service account to impersonate a Gmail account, but we can use the GMail API with Node.js and Nodemailer to send emails from a user’s own Gmail or Google Workspace account.

You may however use external services, such as Amazon’s SES or Twilio’s SendGrid, to send emails from a service account.

In this tutorial, we will describe how to send emails from a Gmail account using the GMail API and a Node.js application. Please note that Gmail imposes a sending limit of 2,000 messages per day with a total limit of 10,000 recipients per day. The email quota is reset at midnight Pacific time automatically.

1. Create a Google Cloud Project

Go to cloud.google.com and create a new Google Cloud project. Give your project a name, change the project ID and click the Create button.

Create Google Cloud Project

2. Enable Google APIs

Choose APIs & Services from the left menu and click on Enable APIs and Services to enable the Gmail API. The Gmail API lets you view and manage Gmail mailbox data like threads, messages, and labels.

Gmail API

Under the APIs and Services section, click on OAuth Consent Screen and set the user type as Internal. This will allow the application to access the Gmail API without having to go through the extensive OAuth verification process that can take several weeks. Click on Save and Continue.

OAuth Consent Screen

4. OAuth 2.0 Scopes

On the Consent Screen, enter a name for your application and provide your email address where Google may contact you if there are any changes to the consent screen.

On the next screen, you need to provide one or more OAuth 2.0 Scopes for Google APIs. Click the Add Or Remove Scopes button and add https://www.googleapis.com/auth/gmail.send to the list of scopes since we only want to send emails from Gmail and not read any user data. Click Save and Continue.

Gmail API Scopes

4. Create Gmail OAuth Client

In the APIs & Services section, click on Credentials and click on Create credentials > OAuth Client Id to create a new client ID that will be used to identify your application to Google’s OAuth servers.

Create OAuth Client ID

4. Application Type

Set the application type to Desktop App, give your OAuth Client a recognizable name and then click Create to generate the credentials. The name of your OAuth 2.0 client is only used to identify the client in the Google Cloud console and will not be shown to application users.

Node Application Type

Click the Download JSON button to download the credentials to your computer. It is recommended that you use Node environment variables to store your credentials and not commit this file to your Github repository.

OAuth Client ID

{
  "installed": {
    "client_id": "4181097263-eqfdl92e3r.apps.googleusercontent.com",
    "project_id": "developer-playground",
    "auth_uri": "https://accounts.google.com/o/oauth2/auth",
    "token_uri": "https://oauth2.googleapis.com/token",
    "auth_provider_x509_cert_url": "https://www.googleapis.com/oauth2/v1/certs",
    "client_secret": "GOCSPX-KW_5UbfcvCW9LeNsO-gD7T",
    "redirect_uris": ["http://localhost"]
  }
}

5. Get the authorization code

The OAuth authorization sequence begins when your application redirects the user to a Google URL containing the OAuth Client ID and scopes requested. Google handles the user authentication and return an authorization code, which the application can exchange for an access token and a refresh token.

// auth.js

const { google } = require('googleapis');
const credentials = require('./credentials.json');

const { client_secret, client_id, redirect_uris } = credentials.installed;
const oAuth2Client = new google.auth.OAuth2(client_id, client_secret, redirect_uris[0]);

const GMAIL_SCOPES = ['https://www.googleapis.com/auth/gmail.send'];

const url = oAuth2Client.generateAuthUrl({
  access_type: 'offline',
  prompt: 'consent',
  scope: GMAIL_SCOPES,
});

console.log('Authorize this app by visiting this url:', url);

Open your command prompt and run the following command. You will be redirected to the Google authorization page.

$ node auth.js

Authorize this app by visiting this url:

https://accounts.google.com/o/oauth2/v2/auth?access_type=offline&scope=https%3A%2F%2Fwww.googleapis.com%2Fauth%2Fgmail.send&response_type=code&client_id=4181097263-eqfdl92e3r.apps.googleusercontent.com&redirect_uri=http%3A%2F%2Flocalhost

6. Create an Authorized OAuth2 Client

The browser generates an authorization code that you can paste into token.js to generate an access token and a refresh token. The access token will be valid for 1 hour and the application will use the refresh token to obtain a new access token when it expires.

// token.js

const { google } = require('googleapis');
const path = require('path');
const fs = require('fs');
const credentials = require('./credentials.json');

// Replace with the code you received from Google
const code = '4/0AX4XfWjz8e2q81iC9TFzgHCn1tdTmQyMjA';
const { client_secret, client_id, redirect_uris } = credentials.installed;
const oAuth2Client = new google.auth.OAuth2(client_id, client_secret, redirect_uris[0]);

oAuth2Client.getToken(code).then(({ tokens }) => {
  const tokenPath = path.join(__dirname, 'token.json');
  fs.writeFileSync(tokenPath, JSON.stringify(tokens));
  console.log('Access token and refresh token stored to token.json');
});

Run the following command to generate the access token and refresh token.

$ node token.js
Access token and refresh token stored to token.json

This will add a new token.json file to your project directory that contains the access token and refresh token.

{
  "access_token": "ya29.A0ARrdaM_AaAL3mdEpVZshT-cFfpLkxeMOJz_d1Ok",
  "refresh_token": "1//0gdubhqQhx89VVNBR45_4eipxlYc4Nf5A9J67B8M",
  "scope": "https://www.googleapis.com/auth/gmail.send",
  "token_type": "Bearer",
  "expiry_date": 1649574729833
}

7. Email Sender Library

We are using the popular Nodemailer library to generate RFC822 formatted e-mail messages that can be streamed to SMTP. You can also create a Mime message manually but the former is easier to use.

// gmail.js

const { google } = require('googleapis');
const MailComposer = require('nodemailer/lib/mail-composer');
const credentials = require('./credentials.json');
const tokens = require('./tokens.json');

const getGmailService = () => {
  const { client_secret, client_id, redirect_uris } = credentials.installed;
  const oAuth2Client = new google.auth.OAuth2(client_id, client_secret, redirect_uris[0]);
  oAuth2Client.setCredentials(tokens);
  const gmail = google.gmail({ version: 'v1', auth: oAuth2Client });
  return gmail;
};

const encodeMessage = (message) => {
  return Buffer.from(message).toString('base64').replace(/\+/g, '-').replace(/\//g, '_').replace(/=+$/, '');
};

const createMail = async (options) => {
  const mailComposer = new MailComposer(options);
  const message = await mailComposer.compile().build();
  return encodeMessage(message);
};

const sendMail = async (options) => {
  const gmail = getGmailService();
  const rawMessage = await createMail(options);
  const { data: { id } = {} } = await gmail.users.messages.send({
    userId: 'me',
    resource: {
      raw: rawMessage,
    },
  });
  return id;
};

module.exports = sendMail;

8. Send Email with Gmail API

This is the last step. Create a mailOptions object that defines the different fields of the message including the sender’s name, recipients, attachments, HTML body and subject. You may also add headers to the message and these are useful for adding message tracking information.

For file attachments, you can directly attach any file from the local file system to the Gmail message or even pull an attachment from a remote URL.

const fs = require('fs');
const path = require('path');
const sendMail = require('./gmail');

const main = async () => {
  const fileAttachments = [
    {
      filename: 'attachment1.txt',
      content: 'This is a plain text file sent as an attachment',
    },
    {
      path: path.join(__dirname, './attachment2.txt'),
    },
    {
      filename: 'websites.pdf',
      path: 'https://www.labnol.org/files/cool-websites.pdf',
    },

    {
      filename: 'image.png',
      content: fs.createReadStream(path.join(__dirname, './attach.png')),
    },
  ];

  const options = {
    to: 'amit@labnol.org',
    cc: 'cc1@example.com, cc2@example.com',
    replyTo: 'amit@labnol.org',
    subject: 'Hello Amit 🚀',
    text: 'This email is sent from the command line',
    html: `<p>🙋🏻‍♀️  &mdash; This is a <b>test email</b> from <a href="https://digitalinspiration.com">Digital Inspiration</a>.</p>`,
    attachments: fileAttachments,
    textEncoding: 'base64',
    headers: [
      { key: 'X-Application-Developer', value: 'Amit Agarwal' },
      { key: 'X-Application-Version', value: 'v1.0.0.2' },
    ],
  };

  const messageId = await sendMail(options);
  return messageId;
};

main()
  .then((messageId) => console.log('Message sent successfully:', messageId))
  .catch((err) => console.error(err));

Send Personalized Emails

If you would like to send personalized emails with Gmail and Google Sheets, you can use Mail Merge for Gmail.

How to Send Email in WordPress using the Gmail SMTP Server

Are you having trouble sending emails from your WordPress site?

One easy way to solve this is by sending WordPress emails using the Gmail SMTP server.

In this article, we will show you how to send emails from your WordPress site using the Gmail SMTP server.

Using Gmail SMTP server in WordPress

Why and When You Need Gmail SMTP Server for WordPress Emails

Your WordPress site sends emails to notify you of new user registration, lost password reset, automatic updates, and even notifications from your contact forms.

By default, WordPress uses the PHP mail function to send out email notifications. However, this function doesn’t work as expected due to a number of reasons.

Most WordPress hosting companies restrict usage of this function to prevent abuse and spam.

Spam filters on popular email service providers check incoming emails to monitor if they are sent from authentic mail servers. Default WordPress emails fail this check and sometimes may not even make it to the spam folder.

SMTP (Simple Mail Transfer Protocol) is the industry standard for sending emails. Unlike the PHP mail function, SMTP uses proper authentication, which increases email deliverability.

Gmail provides SMTP service that you can use to send out emails from your WordPress site. If you just want to send WordPress notification emails to yourself and few users on your site, then Gmail SMTP servers are the best option.

However, if you are planning on sending newsletter emails using WordPress, then you should use a mass emailing service provider, like Sendinblue or Mailgun.

Free vs Paid Gmail SMTP Service for WordPress

You can use your free Gmail account to send out WordPress emails. However, for better deliverability, we recommend using paid G Suite.

With G Suite, you get your own professional branded email address such as (name@yoursite.com).

G Suite requires you to add MX records to your domain name which means that your emails will appear to be coming from your own domain name boosting authenticity and ensuring better deliverability.

We use G Suite for WPBeginner and can honestly say it’s the best.

How to Send Email using Google SMTP Video Tutorial

If you prefer written instructions, then please continue reading.

How to Send WordPress Emails Using Gmail SMTP Server

If you decided to use G Suite, then you first need to set up your domain to work with Google Apps. We have a step by step tutorial on how to set up a professional email address with G Suite.

The rest of the instructions are the same whether you are using a paid or free Gmail account.

First thing you need to do is install and activate the WP Mail SMTP plugin. For more details, see our step by step guide on how to install a WordPress plugin.

WP Mail SMTP is the best WordPress SMTP plugin on the market. It allows you to easily use any SMTP server to send WordPress emails with higher deliverability.

We recommend buying the paid version called WP Mail SMTP Pro which gives you access to premium support, more mailers, and white-glove set up by one of their experts.

Upon activation, you need to visit Settings » WP Mail SMTP page to configure the plugin settings.

WP Mail SMTP Settings

First, you need to make sure that you use your Gmail email address in the ‘From Email’ field. Next, you need to provide the sender’s name.

WP Mail SMTP plugin offers two ways to connect your WordPress site to the Gmail servers.

The first method uses OAuth Authentication. This is a more secure method to send emails using Gmail servers.

The second method is by entering Gmail SMTP settings manually. This method is not recommended because it is less secure.

That being said, let’s set up WordPress to use Gmail SMTP for sending emails.

Method 1: Setting up Gmail to Send WordPress Emails using OAuth Protocol

This method is recommended for all users. It is more secure and once you set it up, you’ll never have to do that again.

You need to start by selecting Gmail as your mailer and set the return path to be the same as sender.

Select Gmail and set return path

Next, you will see the option to enter your Client ID, Client Secret, and a URL in ‘Authorized redirect URI’ field.

Let’s set up these fields.

Creating an App and Generate API Keys for Gmail

Visit the Google Developers Console website and create a new project.

Create a new Google Developer Console project

If you don’t see the blue button to create a project, then you can also click on select a project drop-down and create a new project.

You’ll be asked to provide a name for your project. Give it a memorable name, so that you can easily recognize it in the future.

Name your project

After that, click on the create button to continue.

Developer console will now create your project and take you to its dashboard. Google offer developers access to many of their APIs and services. You need to enable the APIs that you will be needing for this project.

Enable APIs

Click on Enable APIs and services button to continue.

This will bring you to the APIs library page. Next, you need to type Gmail in the search box to quickly find the Gmail API and click to select it.

Select Gmail API

You will now see an overview of the API and what it can do. Simply click on the ‘Enable’ button to continue.

Enale Gmail API

Now that your API is enabled, the next step is to create credentials that you can use in your WP Mail SMTP plugin settings.

Click on the create credentials button to continue.

Create credentials

On the next screen, you will need to select ‘Web browser JavaScript’ in ‘Where you’ll be calling the API from’ field. After that click on the ‘User Data’ option.

API credentials step 1

To continue, click on the ‘What credentials do I need?’ button.

You will now be asked to provide a name for your OAuth client name. You can enter ‘WP Mail SMTP’ here.

API Credentials step 2

Under JavaScript origins field, you need to add your website’s domain name. Next, you need to copy and paste the authorized redirect URL from WP Mail SMTP plugin settings.

After that, click on the ‘Create client ID’ button to continue.

Next, you need to enter a name for OAuth consent screen. You can put the plugin’s name here.

Ouath consent screen

After entering the details, click on the continue button and the developer console will show your client ID. You can copy and paste this in the WP Mail SMTP plugin’s settings page. However, you will still need to add your client secret key.

Getting your client ID

Go ahead and click on the Done button to move on.

You will now be taken to your project’s credentials page. On this page, you can see your recently created credentials listed here. You need to click on the edit icon next to your credentials to continue.

Edit credentials

This will bring you to the edit credentials page where you will be able to see your client secret key. You need to copy and paste the key in your plugin’s settings page.

Client secret key

Return back to plugin’s settings page in your WordPress admin area. Now that you have both client ID and client secret keys, you need to click on the save settings button to continue.

Save client credentials in plugin settings

The plugin will now store your settings and reload the page. After that, you need to scroll down to the bottom of the settings page and click on the ‘Allow plugin to send emails using your Google account’ button.

Allow plugin to send emails

This will take you to your account on Google, and you will be asked to give the website permission to send emails on your behalf.

Allow Gmail

Click on the Allow button to give permissions.

After that, you will be redirected back to your website where you will see a success message.

Connected successfully

Method 2: Setting up Gmail SMTP as SMTP Sender

This method allows you to manually connect to Gmail’s SMTP servers to send your WordPress emails.

First, you need to visit Settings » WP Mail SMTP page to configure the plugin settings.

You need to start by providing the Gmail address you want to use in the ‘From Email’ field, and your name in the From ‘Name’ field.

Gmail SMTP

Next, you need to select ‘Other SMTP’ as your mailer and check the box next to return path.

After that, scroll down to the Other SMTP section to configure more settings.

Gmail SMTP settings for WP Mail SMTP plugin

Here is the exact configuration you need to add in the plugin settings:

  • SMTP Host: smtp.gmail.com
  • SMTP Port: 465
  • Encryption: Use SSL encryption
  • Authentication: Turn on authentication
  • Username: Your complete Gmail address, e.g. john.smith@yourdomain.com or john.smith@gmail.com
  • Password: Password of your Gmail account

Once you are done, click on the save changes button to store your settings.

That’s all, you have successfully set up WP Mail SMTP to use Gmail SMTP servers.

Note: If you use method two, please know that it’s less secure because your password is stored in text. You can enhance this by using the constants tip, but we strongly recommend using Method 1.

Testing Your WP Mail SMTP Settings

WP Mail SMTP plugin allows you to test your email settings, so you can make sure that everything is working properly.

You need to visit Settings » WP Mail SMTP page and click on the ‘Email Test’ tab. Simply provide an email address that you can access in the send to field and click on the send email button.

Send test email

You will see a success message. You can now check your inbox to see a message with the subject line ‘WP Mail SMTP: Test Email to…’.

That’s all, you have successfully setup your WordPress site to send emails using Gmail SMTP servers.

Get More With WP Mail SMTP Pro

If you want even more functionality, you should try WP Mail SMTP Pro.

With the Pro version of the plugin, you can connect with:

  • G Suite/Gmail
  • Amazon SES
  • Mailgun
  • Office 365 / Outlook.com
  • SendGrid
  • And more

You also get additional features like email logs, ability to fine-tune / control which notification your WordPress site sends, and more.

Troubleshooting Gmail SMTP Not Working Issues

We have seen users encounter few issues when using Gmail SMTP with certain shared hosting configurations.

Take the following steps to fix the Gmail SMTP issue:

  1. Log in to your cPanel account and create an email account that matches your Google apps email address. This might seem strange because you’re not using your server for emails. This step basically tricks your server into believing that you’re sending the email through the server.
  2. In your cPanel account, go to the MX Records and change the MX routing from automatic to remote. It might be a little tricky to find since each host now has a custom cPanel interface. You need to look for a small link next to MX that says Email Routing: Remote Mail Exchanger.
  3. After that log back into your WordPress site and send a test email.

We hope this article helped you learn how to send email in WordPress using the Gmail SMTP server. You may also want to see our list of the best contact form plugins for WordPress, and our comparison of the best email marketing services for small business.

If you liked this article, then please subscribe to our YouTube Channel for WordPress video tutorials. You can also find us on Twitter and Facebook.

The post How to Send Email in WordPress using the Gmail SMTP Server appeared first on WPBeginner.

How to Email Google Form Notifications to Multiple People

Tara Harris writes - “I have created a Google Form, and when someone fills out the form, I would like that submission to go to myself and 4 other people. Is there a way for me to implement that?”

The Google Forms Email add-on can be used to email form data to one or more people. Install the Forms add-on and create a rule for sending email notifications (video tutorial).

A: Send Email to One or More Recipients

In the Email addresses to Notify field, you can put one or more email addresses of people who should receive the notifications.

Google Forms Email

B: Send Email to the Form Submitter

Suppose you have a question - Email Address - in your Google Form where you ask the submitter to provide their email address. You can put {{Email Address}} in the notify field to send a confirmation email to the person who filled that form.

If your Google Form requires the submitter to login into their Google Account before they can complete the form and you are also collecting email addresses, the field {{Username}} will automatically hold the respondent’s email address. In that case, you can put {{Username}} in the notify emails field to send an auto-response to the submitter.

C: Notify Form Submitter

There’s another easy way to send email notifications to the Form Submitter. Check the Notify Submitter box and select the field in the drop-down where you are asking the respondent to fill their email address.

Notify Google Forms Submitter

How to Resend Email Notifications to Google Form Respondents

Google Forms have a daily sending limit for email notifications. If you have too many people responding to your Google Form in a 24 hour period, the daily quota may be exceeded and no email may go out to the new form respondents.

If emails were not sent to any of the form respondents, you can manually trigger the email notifications inside the Google Forms add-on. This is available with the premium version.

Manually Respond to Form Responses

Before you trigger emails, go to your Gmail sent items and confirm that emails have not been sent to a particular form respondent else you may end up sending a duplicate email to the same person.

Then open the Google Form, go to the addons menu, choose troubleshoot and here you’ll see an option to resend email notifications.

resend-email-notifications.png

Click the “Resend Notifications” button and you’ll get a list of all form responses received in the reverse chronological order (newest listed at the top).

You can click “View Response” to check the original responses while the “Send Email” button will actually trigger the instant email notification.

send-email-to-form.png