Content sliders are everywhere these days! They can also be very polarizing. Tons of people love them, while others despise them. But it’s important to realize that sliders aren’t a cure, they are merely a tool. This means that they need to be used appropriately and populated with great content in order for you to realize their main […]
Whether you prefer to build sites from scratch, use a theme/page builder, or a combination of the two, WPMU DEV’s site template features can save you considerable time and needlessly repetitive efforts. Learn how in this post.
Minimize efforts and maximize profits when building new client websites by harnessing time-saving templates…even if you’re a die-hard, from-the-ground-up coder!
In this article, we’re showing how easy it is to create and use WPMU DEV site templates for instant availability on your web development jobs.
You’ll learn how to create your own or use our pre-made templates as a starting point – all of which are perfectly suited for eCommerce stores, portfolio sites, professional services, and more.
We’ll also cover how to bring templates from Elementor and other page builders, saving designs you’ve tailor-made to use for future site builds.
Here’s what we’ll be covering:
Skip ahead if a particular section sounds more relevant to you.
How you use and get the most out of our site templates will largely depend on what kind of web development approach you take.
When polling our 50,000+ strong web dev members, results showed there are three distinct types when it comes to profiting as a WordPress website builder:
Custom web development
Template web development
Hybrid of both types
You probably already know which of these approaches resonates with you the most, but just in case you’re not sure what the pros and cons of the other approaches are, let’s review these briefly.
Custom Web Development
Custom WordPress development typically involves wireframing, designing, and building a website to the specific needs of a business.
As a web developer, the pros of providing custom WordPress development services include being in complete control of all aspects of the website, and tailoring the site to your client’s unique needs, goals, & preferences.
Because you are building the site to spec, only essential features are included, eliminating the bloat caused by having unnecessary elements added to the site — resulting in a better product overall.
“I build custom websites from scratch. I don’t use themes or page builders. I have found my clients don’t want a raft of features and bloat they neither understand nor are able to update themselves. So I build with Gutenberg blocks and they have features and flexibility for only what they need. This obviously makes each website very specific to each case.” – David (WPMU DEV Member)
The cons of this approach are that it takes a lot longer to plan and build a custom website from scratch.
Also, because custom development is time intensive, it can drive up the cost for your clients significantly.
Template-based Website Development
Template-based web development typically involves starting with a ready-made free or premium WordPress theme purchased from a marketplace such as ThemeForest, or using a page builder like Elementor, Divi, WP Bakery, etc, then modifying and customizing the theme and its settings.
The pros of using ready-made themes to build a WordPress site include saving money.
It typically costs less than $100 to buy a pre-built theme, which means that you can mark up your costs and make higher margins), saving time (you are using pre-built pages and elements that may only need some tweaking), and being able to choose from thousands of ready-made WordPress themes. Sites built using existing themes are less costly and faster to build.
“Having a starter theme that I can launch a new website from each time is hugely beneficial. The current option of templates is a great idea and will definitely help…” – David (WPMU DEV Member)
The cons of working with pre-built themes include having to learn how the theme and its options work, “bloating” from unnecessary code (themes usually cram loads of features you may not need), performance issues due to poor coding quality (affecting security and page speed), and lack of support if the theme developer doesn’t keep up with new WordPress releases or goes out of business.
Hybrid Website Development
“A good thing for page design (which is what takes me most of my time) will be to have pre-set “modules” that I can use, duplicate, modify, and then insert them into my pages.” – Guigro (WPMU DEV Member)
The hybrid approach involves starting with custom-built time-saving presets or pre-built/boilerplate templates to help speed up your custom development work.
These templates then act as springboards for building fully customized and uniquely designed sites for clients.
This approach can involve fine tuning or creating customized templates using a “page builder” framework application (e.g. Divi, Elementor).
Or, depending on the kind of sites you build, integrating ready-made processes like sales funnels or eCommerce workflows into your custom-built structures.
The pros of using the hybrid model are that you can target your services to specific niches and offer your clients unique sites built on proven designs or processes shown to be effective with previous clients, at a lower pricing point and faster delivery timeframe than building full custom websites from scratch.
The cons of the hybrid model are the time you will need to invest into learning to use whatever application you choose to build your customized templates with and building your templating processes.
“I would need to invest time in building out various templates that could be reused.” – Phil M. (WPMU DEV Member)
How All Web Developer Types Can Benefit From WPMU DEV Templates
All these approaches have advantages and disadvantages and no matter what your preference is, we have an option to complement your site builds.
Here’s a look at how different web development approaches can benefit from using our templates:
Doing It Yourself from Scratch with a Boost from WPMU DEV
If you prefer to take the custom approach to web development, you can create, save, and reuse your very own custom templates, essentially acting as your own master to use on any sites going forward.
And when we say save, we mean it in the fully encompassing sense.
It’s not just a snapshot of the surface view. Yes, we save the theme, placement of elements, customizations, etc. But beyond that, our templates create a full backup of your existing site, meaning they include everything.
From plugins, user settings, and configs, to license keys, and data – every detail is preserved at the moment you save it.
Let’s create a new site from a template now. You can follow the video walkthrough, or the written tutorial below it.
Creating your very own custom template in The Hub.
Navigate to The Hub > Sites > Site Templates.
(If you’re unfamiliar, The Hub is WPMU DEV’s unified dashboard to monitor, optimize, and update unlimited sites from one location.)
Here you will see two tabbed sections: My Templates, and WPMU DEV Templates. Click on My Templates.
Click Create Template.
Select a hosted site, add a template title, and a description (if desired).
It’s that easy!
In a matter of minutes your template will be created, and ready for use in your My Templates section.
Whenever you want to create a new site from this template, simply click on its Create Site button, then follow steps 5-8 below for Creating A New Site From A Template.
Creating your own site template in WPMU DEV.
Creating your own templates gives you two major benefits:
You can create a library of up to 25 of your own custom templates – completely free – making new site creation a breeze.
The My Templates method explained above will easily fit the needs of someone taking a hybrid approach.
When you get to step 4, selecting a WPMU DEV hosted site, simply choose one that you created using any WordPress page/theme builder tool (e.g., Elementor, Divi, Kadence, WP Bakery, etc), and create your template from that.
The site selector allows you to choose any of your WordPress sites, regardless of what method, theme or builder plugin you used to create it.
Creating a template from a site made with Elementor.
Voila… you’ve got a quick template for any future site builds, based on a blended creation where you put your own special touches on a page builder or theme builder base.
Creating with WPMU DEV From the Onset
“…Having a starter theme that I can launch a new website from each time is hugely beneficial. The current option of templates is a great idea and will definitely help… The plugin settings and saving a default setting is already in operation so that is nice.” – David (WPMU DEV Member)
For those who prefer to work with templates, we have over two dozen site templates with diverse visual and structural appeal for various industries, like Freelancer, Blogger, and eCommerce.
WPMU DEV has plenty of options when it comes to ready-made site templates.
Let’s create a new site from a pre-made template now. You can follow the video walkthrough, or the written tutorial below it.
Creating a new site with WPMU DEV’s pre-made templates.
Navigate to The Hub > Sites > Site Templates.
There are two tabbed sections: My Templates, and WPMU DEV Templates.
Click on WPMU DEV Templates. You’ll see the Template collection here.
Note that you can see a full, multi-page preview of any template by clicking its Preview button.
Once you’ve selected the template you want, click the Create Site button.
On the next screen, you’ll select what hosting plan you want for this site. There are details and prices listed for each, visit the WPMU DEV Hosting page if you’d like to learn more. Once you’ve selected a plan, click the Continue button.
Create your temporary website URL by typing a name (appended by .tempurl.host). While you’ll be able to name your site what you want, and you’ll be able to point it to a custom domain, this temp URL will be permanent, so make sure you choose a naming convention you are comfortable keeping.
On the next screen, you’ll create your WordPress administration account. Enter the email address, username, and password you’ll be associating it with.
Finally, you’ll choose the server location for your site. Select the one closest to you geographically
That’s it! In a few minutes, your template-based site will load up, and be ready and waiting in your list of Hub sites.
From here, you can click on it any time to view or adjust settings, or open the site in WordPress to tweak and customize as desired.
With templates covered, we’ll take a look at a few other site building, time-saving features available through WPMU DEV.
3 Additional Time-Saving WPMU DEV Tools
This section will spotlight the other web development game changers included with our platform.
These additional features are helpful to all of the Web Developer types we highlighted.
Apply Plugin Settings To All Sites Fast With WPMU DEV Configs
Part of your WPMU DEV Hosting or membership benefits is full access to our a full suite of reliable WordPress plugins.
WPMU DEV Configs allow you to create specific preset settings for WPMU DEV plugins, and apply them to any or all of your sites instantly. This saves you a lot of setup time, as you only have to create your ideal plugin settings once, then apply to unlimited sites
Applying a preset config immediately overwrites all settings and options on the chosen site for any given plugin.
As well as creating and tweaking your own Config settings, you can also apply our recommended configs – which our plugin experts have curated specifically. Saving you even more time if you’re unsure of the ideal settings for any plugin.
Here’s a quick walkthrough and example on creating and applying Configs:
Navigate to The Hub > Sites > Configs.
From the Default Configs tab, you’ll see six plugins listed. Each has had configurations set by our expert development team.
To inspect the details of any of these, click on the vertical ellipsis icon, then click on Details.
You will see the full list of specific configurations listed here, along with the date it was created.
Default configurations for Hummingbird Pro.
If you want to apply these settings from detail view mode, simply click the Apply button.
On the next screen, select the site (or sites) you’d like to apply these configs to, then finish by clicking on the Apply to # sites button.
To apply any of these defaults from the main Default Configs tab, click on the text Apply to site(s) >, and select any or all sites to apply these configs to.
Click on the Apply to # sites > to finish.
Default Configs are a quick way to apply the basic tech-recommended plugin settings.
To make your own configs, go to the WP Dashboard of your site first, and customize any of the settings for any plugins that you want to create custom configs for.
Afterwards, head back to The Hub > Sites > Configs > My Configs.
Click on the Create config button. Input a name, select a site, and a plugin or service; click Save.
You’ll get a notification that the config has been created, and you’ll see it populate in your My Configs tab.
My Configs are saved and ready to apply to any sites from The Hub.
Applying your own configs works in the exact same manner as applying default configs.
You will have some additional menu items when you click on the vertical ellipsis icon for any of your Custom Configs. In addition to Details, you’ll also see options to Rename, and Delete.
New configs can be created in WordPress or The Hub, and they will automatically sync from one to the other.
Make Identical Copies with Cloning
We saw the positives of being able to create your own site templates. There are times when it would be really handy to duplicate entire websites.
WPMU DEV’s Cloning feature generates an exact copy of a site’s files and database (including themes, plugins, content, and site settings), then uses them to create a brand new WordPress installation. The new site is identical to the original, but with a different domain name.
Once the cloning process is complete, you can use our Adding Domains guide to point to the new site’s permanent domain.
Cloned sites can be added to your account with any hosting tier, which can be upgraded or downgraded at any time from your account.
In addition to not copying domains, cloning does not copy SFTP/SSH users or staging configurations.
You can clone any existing WPMU DEV hosted site, or create and use your own custom templates. You can even clone pre-configured WPMU DEV templates with theme and plugins pre-installed.
Here’s a walkthrough of how easy cloning sites is.
There are three different menu access points to get to the Cloning process.
All begin with navigating to The Hub > Sites > My Sites.
Option 1 – Clone From Your Hub Dashboard
Click on the +Add Site button at the top right of the page.
From the next modal window, click on the Clone button.
From here, you can Clone from a site or a template. For this tutorial, we’re going to click on Clone from my sites.
Choose the site you want to clone from the dropdown menu.
Type in a name for your temporary URL.
Select your server location from the dropdown.
The cloning process is super simple, and only takes a few minutes.
Aaaand you’re done. In just a few minutes your cloned site will be created and ready for action.
Option 2 – Clone Directly From a Selected Site:
Click on the vertical ellipsis icon at the right of the row of any of your listed sites, then click Clone site from the dropdown menu.
Then follow the same steps 3-6 from above.
Cloning directly from a selected site.
Option 3 – Clone From The Hosting Area
Click on any of your sites, then click Hosting, then click Clone in the top menu bar. Follow steps 3-6 from above.
Cloning from your hosting area.
Managing and Installing WordPress Plugins Directly From Your WPMU DEV Dashboard
Gone are the hours of jumping from the WordPress Dashboard to the WordPress repository, hunting for your must-have plugins, and installing each one individually.
WPMU DEV’s built-in plugin manager comes complete with upload, installation, and activation capabilities.
You can mark your favorite plugins – all of ours, plus any from the WordPress Repository – and quickly select, install, and activate them from one place via The Hub.
Here’s how quick and easy this is:
Navigate to The Hub > Plugins.
From the Add New tab, you will see a sub header with five options: WPMU DEV, WP.org, Favorites, ZIP, and URL.
Click on any WPMU DEV, WP.org, or Favorites to see the plugins specific to each section.
Click on ZIP or URL to add plugins by uploading a zip file or from a URL link.
Plugin management in The Hub saves so much time and aggravation.
From the Manage Existing tab, you can handle a slew of plugin actions, such as:
Favorite – click any star icon in the far left column to favorite that plugin
Status – see exactly which sites have what plugins installed, activated, deactivated, or not installed
Manage – click the vertical ellipses icon to manage the plugin, see related plugin info, or remove it from favorites
Manage existing plugins from a single spot in The Hub.
You can also hover your cursor over any of the plugin status columns, and the popup will display site-specific activations for that plugin — including what version it is.
Viewing plugin status & version number in The Hub.
If you select Manage from the above menu dropdown, you can Add configs or Deactivate that particular plugin from any of your sites.
Config & Deactivation options are available per plugin.
See below video for a quick walkthrough on Plugin options in The Hub.
Plugin options aplenty in The Hub.
Plugins that have been installed to your sites from a source other than WPMU DEV or WordPress.org can’t be installed to your other sites from the Hub’s plugin management section.
Use Templates To Improve Your Workflow No Matter Your Web Development Approach
No matter what your preferred site building method is, everyone can benefit from time saving tools.
Templates are a huge help in the field of web development work, whether you initially build your own creation, craft from a page or theme builder, or tweak a pre-made one.
Whatever your path, you can save your template(s) for handy use at any future date, using WPMU DEV’s template tools.
Add to that our one-click Configs, Cloning Tools, and Plugin shortcuts, and you’ve got an A+ process for building quality sites with speed, efficiency, and finesse.
Interested in using WPMU DEV Templates or any other tool mentioned in this article? The easiest place to start is taking WPMU DEV Hosting for a free trial. There’s no risk, plus, you also get access to our best site management tools, plugins, and support.
Do you want to save time by automatically tagging your WordPress posts?
Tags help websites visitors easily find the content on your website. However, making sure all your content is properly tagged can be time-consuming, especially if you’ve already published lots of content without adding tags.
In this article, we will show you how you can automatically tag your WordPress posts.
While categories are meant to group your posts broadly, you can use tags to describe the specific details of a post.
For example, your WordPress blog might have a ‘Sports’ category. You can add detailed tags such as ‘football,’ ‘UEFA Champions League,’ and ‘European cup’ to help users find specific topics in that category.
Adding tags to your posts can take a lot of time, especially if you use lots of different tags on your website.
You may also miss opportunities to add a relevant tag, which can stop visitors from finding what they’re looking for on your site.
With that in mind, let’s see how you can tag your posts automatically.
How to Automatically Tag Your WordPress Posts and Save Time
The easiest way to tag your WordPress posts automatically is by using TaxoPress.
If a word or phrase in a new blog post’s title or content matches one of your tags, TaxoPress will add that tag to the post.
Let’s look at an example. On your website, imagine you have several tags including recipe, chocolate, and pasta.
If you publish a new post with the title ‘Best Chocolate Cake Recipe,’ then TaxoPress will see two matches in the title and automatically add the tags ‘recipe’ and ‘chocolate.’
To get started with automatically tagging your posts, you’ll need to install and activate the TaxoPress plugin. If you need more help, then please see our guide on how to install a WordPress plugin for more details.
In this tutorial, we’re using the free version of TaxoPress which limits you to a single rule for tagging posts. This is enough to automatically tag all your WordPress posts. However, if you want to create multiple rules to use in different ways, then you’ll need to upgrade to TaxoPress Pro.
With that said, your first task upon activation is to create a rule that will automatically tag your WordPress posts. This rule is called an ‘Auto Term.’
To get started, go to TaxoPress » Auto Terms in your WordPress admin area. After that, you need to click on the ‘Add New Auto Terms’ button.
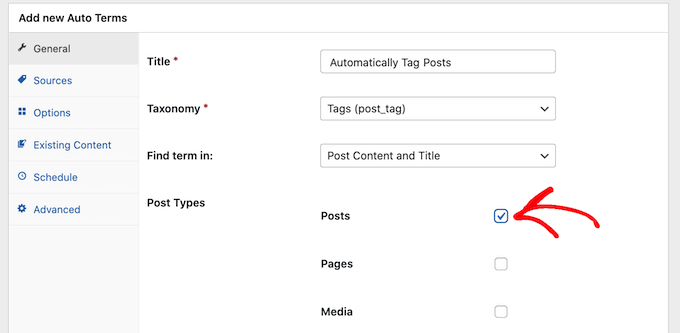
Next, you will need to type in a title for the new auto term.
The title is just for your reference, so you can use anything you want.
TaxoPress can automatically tag more than just posts. It can also tag images and pages.
For this article, we will only automatically tag WordPress posts, so just check the ‘Posts’ box.
Next, you can open the ‘Taxonomy’ dropdown.
In the list that appears, click on ‘Tags (post_tag).’
When searching for content to tag, TaxoPress will scan a post’s title and content by default. You can change that in the ‘Find term in:’ dropdown and select ‘Post Content’ or ‘Post Title’ only.
Once you’re done selecting options, go ahead and click on the ‘Sources’ tab.
This is where we’ll select the tags that we want to use in this auto term.
By default, TaxoPress will pull from every tag you’ve ever created on your site. For some sites, that will be way too many.
You can set which ones the plugin has access to by checking the ‘Use only some terms in the selected taxonomy’ box.
Now, in the ‘Choose the terms to use’ field, start typing in the name of a tag.
When the right tag shows up, click on it. Repeat this for all the tags you want to include in this auto term.
Once you’ve done all that, click on the ‘Options’ tab.
This screen is where you can fine-tune the automatic tagging process.
By default, TaxoPress will add tags for partial matches. This means that if you have a post on your food blog called ‘The best chocolate cake recipes’, then the ‘recipe’ tag will be added even though ‘recipes’ is not an exact match.
If you only want TaxoPress to add tags when there’s an exact match, go ahead and check the ‘Whole words’ box.
When you’re happy with the settings, click on the ‘Save Auto Terms’ button.
Now, every time you publish a new post in WordPress, TaxoPress will check the post’s content and title. If it finds a match, then it will add one or more tags to the post automatically.
How to Automatically Tag Your Published WordPress Posts
By default, TaxoPress will tag new posts as you publish them. Additionally, the plugin will try to add missing tags when you update an existing post.
TaxoPress can also tag posts that you’ve already published on your site, using the same auto terms you’ve created using the process above.
To get started, go to TaxoPress » Auto Terms. You can then click on the auto term we created earlier.
Once you’ve done that, click on the ‘Existing Content’ tab.
You will now see all of the settings and rules that you previously created.
If you have lots of content on your site, then it may take TaxoPress a long time to process it all. While the plugin is tagging existing posts, your site may run slower.
To speed up WordPress performance, it’s a good idea to configure TaxoPress to scan your posts in smaller batches with a longer interval between them.
By default, TaxoPress will scan your content in batches of 20 posts every 10 seconds. You can decrease the number of posts in a batch by simply typing a lower number into the ‘Limit per batches’ field.
You can then increase the time between batches by typing a higher number into the ‘Batches wait time’ field.
Another option is to only scan posts that were published within a certain timeframe.
For example, to only tag posts that were published within the last 6 months, simply open the ‘Limit Auto Terms, based on published date’ dropdown and select ‘6 months ago.’
When you’re happy with these settings, you’re ready to scan the content that’s already live on your website.
To start the process, simply click on the ‘Add Auto Terms to existing content’ button.
Once the plugin has finished automatically tagging existing content, you’ll see an ‘All done’ message onscreen. Below that, TaxoPress will show how many posts it checked and how many tags it added to your WordPress posts.
WordPress is undoubtedly a powerful tool in building websites and managing their content. Its power lies in its versatility to create almost all kinds of websites, from blogging to e-commerce, business, membership, portfolio, forum and...
Have you ever wanted to schedule coupons on your online store?
Scheduling coupons allows you to easily run seasonal or time-sensitive sale campaigns without having to worry about turning it on / off at specific times.
In this guide, we’ll share our step by step process on how to easily schedule coupons in WooCommerce (and save time).
Why Create Scheduled Coupons in WooCommerce?
Coupons are a great way to promote your online store and make more sales.
However creating coupons for different holiday campaigns, making the sale go live at certain times, and then turning it off at the deadline can be a lot of work.
This is why all smart store owners schedule coupons and promotion campaigns (like popups, notice bars, etc), so they can automatically start and end at specific date / time without any manual intervention.
For instance, you can schedule coupons for top holidays like Black Friday, Christmas, New Years, Mother’s day, Valentine’s day, and so on.
This allows you to save extra time, so you can focus on promoting the sale to get maximum results.
Or if it’s a holiday promotion, then you can use this extra time and spend it with your family and friends.
That being said, let’s take a look at how to easily schedule coupons in WooCommerce.
The first part of the tutorial covers scheduling coupons in WooCommerce, and the second part covers how to schedule coupon promotional material such as alert bars, popups, etc, so you can automate the entire process.
Creating a Scheduled Coupon in WooCommerce
For this tutorial, we’ll be using the Advanced Coupons plugin. It is the best WooCommerce coupon code plugin on the market, and it adds tons of powerful features to the default WooCommerce coupon functionality.
Upon activation, you need to visit WooCommerce » Coupons page in your WordPress dashboard.
Next, you need to click the ‘Add Coupon’ button to create a new coupon. You will be asked to type in the coupon code you want to use at the top of the screen.
After that you need to decide what type of coupon you want to use.
For this tutorial, we’re going to use a percentage discount. You can select the ‘Discount Type’ from the dropdown list and then type in the percentage.
Next, we need to click on the Scheduler tab that’s added by the Advanced Coupon and enter a start date / end date for your coupon.
If you want, you can also change the default error messages that will be shown if customers try to use the coupon code too soon or too late.
Tip: The coupon will start at 12:00:00 on the start date and will expire at 23:59:59 on the day before the end date. Advanced Coupons uses the timezone that you’ve set in WordPress. You can check or change this under Settings » General in your WordPress admin area.
Once you’re done, you can go ahead and publish the coupon. If a customer tries to use it before the correct date, then they’ll see the error message on the shopping cart page.
Aside from saving you time, another benefit of scheduling coupons is that you can use it to boost your marketing efforts. For example, you can use your email marketing service to send a bulk email to all your affiliates / partners, and let them know about the upcoming promotion and the code, so they can share it with their audience.
With Advanced Coupons plugin, you can schedule as many coupon codes as you want, so you can save time and use it to grow your business.
For our eCommerce sites, we plan our sales calendar at the beginning of the year. Since we run a lot of the same sales, this helps us automate parts of the operation process.
Promoting Your Scheduled Coupons in WooCommerce
Now that you have scheduled coupons for different sale campaigns in your store, you still need to promote them.
Often popular stores use dynamic website elements like floating header bar, exit intent popups, slide-in scroll boxes, etc to highlight their sales and promotions.
The best part is that you can automate these too with OptinMonster. It is the best conversion optimization software on the market that helps you convert website visitors into email subscribers and paying customers.
OptinMonster comes with countdown timers, coupon code popup, slide-in boxes, and other tools that help you promote your sales and boost conversion.
You can use their powerful display rules technology to not only schedule each campaign, but you can even use it to personalize them based on user’s geolocation. For example, you can automatically schedule a Christmas Sale for US and schedule a Diwali sale in India.
Have you ever heard of the Seahawks’ 12th Man? Those who follow football know that only 11 players from each team are allowed on the field at any given time. However, Seattle’s fans have been branded as the “12th Man” ( or “the 12s” for legal reasons) because of the profound effect their vocal presence and support has had on the Seahawks’ games.
That’s how we feel about websites.
They might not be a living, breathing team member who can call leads and attend company meetings – but they are still an incredibly important part of a business’s sales, marketing, and customer relationship efforts.
When executed well, a WordPress website will help businesses achieve a number of those goals.
While the goals may vary based on the type of business or services offered, there is one universal goal that every website strives for:
Lead generation.
And to generate leads, you need to offer a way for customers to engage with you – whether that be through a phone call, email, live chat, social media inquiry, or by filling out a form.
It’s the latter that we’re going to focus on today.
More specifically, we’ll be diving into the benefits of using contact forms on your WordPress site, and what type of form is the best for various occasions.
Well, consumers want options. Gone are the days of phone book searches in order to find a business’s contact info.
There are now more options available –and consumers expect to have access to them.
That’s why a website is an essential contact point for every business – from the independent blogger to the multi-chain retailer.
When someone Googles the type of service or information they’re looking for and finds your website, that’s the first step in their customer journey.
It’s then your job to guide them through the rest of that journey and to the end-goal: contacting you.
Regardless of which method of communication visitors to your WordPress site prefer, it’s important to have contact forms at the ready.
It’s even more important to make sure your contact forms are engaging. After all, research shows that 81% of people abandon a form after beginning to fill it out.
The good news is, once you’ve planned out your contact form strategy properly, landing those conversions should be a piece of cake.
7 Reasons You Need Contact Forms On Your WordPress Website
Every business and, consequently, every website, wants to achieve the same thing.
They want to reach the right audience—the audience who needs their services, information, or products and are willing to contact you to learn more.
There is a lot of work that goes into driving the right traffic to your site, but once they’re there, it’s your job to call them to action.
Contact forms are a very popular form of CTA as their inherent nature is to help businesses and customers (or prospects) more easily engage with one another.
And because of this, there are a number of advantages you can expect from using contact forms on your WordPress website:
The Little-Known Benefits Of Using Contact Forms
1.Increase Your Site UX / Audience Satisfaction:
By including simple forms that require minimal contact info in exchange for what visitors want, you’re giving them a no-fuss solution to reach you. It also puts the onus on you to make that phone call or send that email, which many customers will find an attractive option.
2.Protect Yourself:
Spammers and spambots are known for sweeping websites in search of mailto: tags, so publishing your email address information on your website may be opening you up to a number of vulnerabilities. To save yourself the hassle (and possible security threats), contact forms are a great alternative for the visitors who want to message you online.
3.Save Time:
There are many ways contact forms help businesses save time: 1) Less of a need for cold calling. 2) Less data entry when contact forms are linked to a CMS. 3) Less need for back-and-forth when FAQs and next steps can be shared during or after the contact form submission process.
4.Collect Consistent Information:
Whatever information is needed from a visitor (general contact info or perhaps more comprehensive answers regarding their needs), contact forms ensure that businesses are collecting the same info from everyone, every time.
5.Stay Organized:
Contact forms are a great way to help businesses keep their customer and lead information organized with electronic records from every submission.
6.Generate Leads:
Even if you’re using forms for content giveaways, surveys, or some other more creative purpose, contact forms still provide you with a way to collect new lead information for future use. (e.g. If they signed up for a white paper in the past, they may be interested in hearing about your services when you contact them in the future).
7.Increase Engagement:
If there’s anything social media has taught us, it’s that consumers want to engage with brands.
A contact form offers them an easy way to do that and demonstrates to your visitors that you’ll be there when they’re ready to take that next step.
Remember: when used correctly, contact forms can be a very powerful sales and marketing tool; i.e. your 12th Man.
Now it’s time to figure out what type of form will work best for your site.
How To Choose The Right Type Of Contact Form
Many websites will use a mix of contact forms in order to convert visitors through different means.
What you end up choosing for your website will depend on what you have to offer.
Consider the following WordPress form options:
The Basic Contact Form
This is the generic form you’ll find on every website. It usually appears on the Contact page, but will also be present after blog posts and at the bottom of special landing pages that want visitors to take a specific action.
If your purpose is to entice visitors to contact you, this is the form to use.
The Giveaway Form
The giveaway form is for businesses or marketers who can give something away for free and get visitors’ contact info in exchange for it. So for marketers, you usually see this in the form of a “Free White Paper” that requests an email address in exchange for the free collateral piece.
HubSpot always do a great job with their lead magnets and forms.
For other businesses, the perfect example of this is when a website offers up a chance to win a free trip [gift, assessment, etc.] in exchange for the contestant’s email address as an “entry fee.”
The Purchase Form
Any website dealing in the selling of goods or services online will have an order form.
Depending on how extensive the ordering process is, these types of forms can become quite lengthy and this is usually where you’ll find multi-page forms put to use.
The Calculator Form
When sales people talk to customers about how their product will help them save X amount of dollars every month, they will almost always have a tried-and-true formula in place to back that up.
So for websites hoping to land sales (or just get the conversation started), having a calculator form on the site is a great way to get those prospects interacting, discovering what they can gain from those services (or lose without them), and ultimately reaching out for more info.
The Login Form
For websites that offer memberships or special access to parts of their website to partners, customers, suppliers, etc., a sign-up and login form is a necessary piece of that process.
Make login forms as simple as possible to keep your audience coming back!
The Survey Form
Survey forms can serve a number of purposes. They can serve as a way to get visitors engaged with an interesting or informative topic.
They can serve as a way to help you collect information for building case studies and reports.
And they can serve as a way to learn more about what your audience wants and help you adjust your business model accordingly.
The Subscription Form
Websites that produce regular updates to their content will usually offer short subscription forms.
So for someone who produces a lot of blog posts or a regular newsletter, this form is a great way to stay top-of-mind with visitors as new updates are pushed out while collecting information for future use.
Our own subscription form for the WPMU DEV blog.
The Google Form
Google contact forms can be a handy way to put out event invites and more. (Image: https://zapier.com/learn/google-sheets/how-to-use-google-forms/)
Chances are you’ve seen a Google form recently. They’re very easy to set up and very flexible in terms of the type of information you want to collect (job applications, surveys, service requests, etc).
Stored in the cloud with all your other Google documentation, these forms provide websites with a free way to collect information from customers (as opposed to a CMS) and keep it all in one place.
The Pop-Up Form
For those trying to maintain a minimal site design or for those simply wanting to put a form in a hard-to-miss location, pop-ups are a great alternative.
The Multi-Page Form
Many of the form types above could potentially take up multiple pages (especially anything having to do with the ordering process).
The ultimate purpose is spreading a form submission out across many pages is to make the process of filling out so many fields a little less daunting for customers.
It also helps to ease them through different (but logical) phases in order to reach the end-goal.
The Easiest Way To Create Your Own Contact Forms in WordPress
Contact forms should always be reflective of what your business does and what sort of information you need from visitors in order to take the appropriate next steps in building a relationship with them.
Regardless of how extensive your needs are, the following three step guide and suggested tools will set you well on your way to getting the most out of the contact forms on your site.
Step 1: Select a Contact Form Plugin
There are plenty of great contact form plugins to choose from in the WP Directory.
If you want to create a contact form, the easiest way to do it, is to use a plugin.
You’ll want to first identify what sort of form you need from the list of form types we talked about earlier. It will also of course depend on the context of how the form fits in with your website.
Even better, you can check out this full video tutorial breakdown if you’re a more visual type of guy or gal.
Step 3: Close The Contact Form Loop
The last step in the setup of any form is to make sure you’ve provided a quality experience for your site’s visitors from start-to-finish.
So that doesn’t just mean having a fully functioning form that provides them with the product, service, or phone call which they had sought out.
That means that once they submit that form, they’re redirected to another well-thought-out page.
Does the contact form leave visitors wondering what’s next? Send them to a landing page that explains next steps or contains a comprehensive FAQ.
Does the form complete a purchase? Send them to a confirmation page.
Or is the form just a subscription to your blog? Then direct them to a Thank You page or to a blog post that may be of interest.
You’ve spent so much time designing a great website. There’s no reason to lose your visitors’ interest once you’ve got their info.
Well Executed Forms Are Your Express Ticket To More Leads And a Better UX
Ultimately, the purpose of a WordPress contact form is to give visitors a chance to reach out to you when they’re ready.
Regardless of the type of form (or forms) you use, keep in mind the following before you begin to build any of these out:
Try to only have one form on any given page. Too many competing CTAs can create a confusing and negative experience for visitors.
Keep the number of form fields to a minimum. The less work visitors have to do, the more receptive they’ll be to give you their information.
Create strong, but simple messaging within the form. You want to draw in their attention and hold it until they submit their information.
Part of the reason you’re using forms is to cut down on the amount of data entry required of you, so make sure to link your forms to a CMS or payment process for easy data collection and processing.
For some of these forms (like the Contact page form), you’ll want to include alternate contact info alongside it so your visitors are still presented with a variety of contact options.
In terms of where to place your form, you really won’t know what works best until it’s been on your site. While above-the-fold forms do seem to perform better, that’s not always the case. Consider using A/B testing to find the optimum spot.
If you’re ever collecting customer information (in this case, you definitely are), make sure you have a privacy statement set up and that you have provided proof of it near the form.
Always, always, always make sure it’s responsive. If your contact form doesn’t properly work on mobile devices, you’ll be missing out on a huge opportunity to convert.
Follow most of the tips above and you’ll be well on your way to collecting new leads with ease.
As an added bonus, you’ll improve UX and potential customers will already be impressed by your brand before they officially reach your doors.


 Content sliders are everywhere these days! They can also be very polarizing. Tons of people love them, while others despise them. But it’s important to realize that sliders aren’t a cure, they are merely a tool. This means that they need to be used appropriately and populated with great content in order for you to realize their main […]