Make WordPress Sites Load Faster Than Ever With New Hummingbird Critical CSS

With Hummingbird’s much anticipated Critical CSS feature, you can expect faster-loading pages and better performing WordPress sites. Here’s why render-blocking resources are now a thing of the past…

Hummingbird Optimization - Before and After Results
Ace Google’s PageSpeed performance scores with Hummingbird’s Critical CSS feature.

If you care about page loading speed (and you should if you want visitors to stay on your website for longer than two seconds), then it’s vitally important to understand how CSS affects site performance and how to speed up your page loading time using an optimization task known as Critical CSS.

In this article, we’ll cover the following topics:

Let’s dive in…

What is Critical CSS and How Does it Improve Performance?

When users arrive on a website, all they can see initially is the content displayed on their screen before scrolling.

This area is referred to as being “above the fold.”

Image explaining above and below the fold.
All site visitors see at first is the content above the fold.

Positive user experience can be measured by how quickly users perceive content to load on a web page. The faster a page loads (or is perceived by the user as loading quickly), the better the user experience. Conversely, the slower the page loads (or is perceived by the user to load slowly), the poorer the experience.

Since all the visitor sees when they land on a page is the content above the fold before they start scrolling down, it makes sense to make the content above the fold load as quickly as possible before loading the rest of the page.

Critical CSS (also known as Critical Path CSS or Critical CSS Rendering Path) is a technique that extracts the bare minimum CSS required to render content above-the-fold as quickly as possible to the user.

While the user viewing the above-the-fold content perceives the page to be loading quickly, the rest of the CSS can load, and user experience is not impacted.

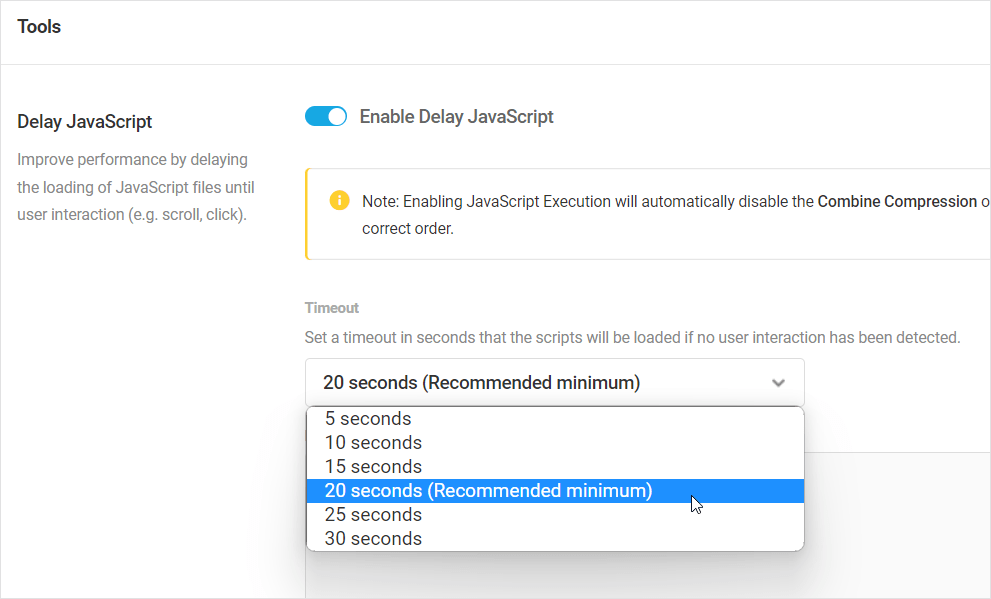
Techniques like image lazy loading, delaying JavaScript execution, and critical CSS are all ways to optimize the sequence of steps the browser goes through to convert the HTML, CSS, and JavaScript into pixels on the screen.

This sequence is referred to as the Critical Rendering Path (CRP) and includes the Document Object Model (DOM), CSS Object Model (CSSOM), render tree, and layout.

Optimizing the critical render path improves render performance.

Advantages of Critical CSS

Critical CSS can improve site performance through:

  • Faster initial rendering
  • Improved user experience
  • Better SEO performance
  • Reduced page weight
  • Simplified maintenance
  • Progressive enhancement
  • Positive impact on Core Web Vitals (especially First Contentful Paint and Speed Index)
  • Higher PageSpeed Insights scores

Note: The content displayed above-the-fold on page-load before scrolling will differ depending on the device and screen size being used to view web pages. For this reason, there is no universally defined pixel height of what can be considered above-the-fold content.

Implementing Critical CSS

So you’ve run your site through the PageSpeed Insights tool and the report recommends eliminating render-blocking resources.

Now what? How do you actually implement the recommendations?

Well, you can try to fix things manually (tedious, time-consuming, and not recommended), use web development tools (if you have technical skills), or use a WordPress plugin like Hummingbird to automatically identify, address, and resolve any issues.

We recommend using the plugin method. It’s the quickest and smartest option to get the job done.

While Critical CSS refers mostly to above-the-fold CSS, Hummingbird can extract and inline all used CSS on the page, while delaying/removing the rest.

Hummingbird not only tackles render-blocking and unused CSS for full-page optimization, it also handles above-the-fold optimization by eliminating render-blocking resources using built-in features like Critical CSS (see below), Delay JavaScript Execution for JavaScript assets, and other areas that affect Core Web Vitals results on WordPress sites.

How To Optimize WordPress Using Hummingbird’s Critical CSS feature

Note: Critical CSS is a Pro feature, so make sure you have Hummingbird Pro installed on your site.

Let’s go through the steps on how to get the most benefit from using Hummingbird’s new critical CSS feature.

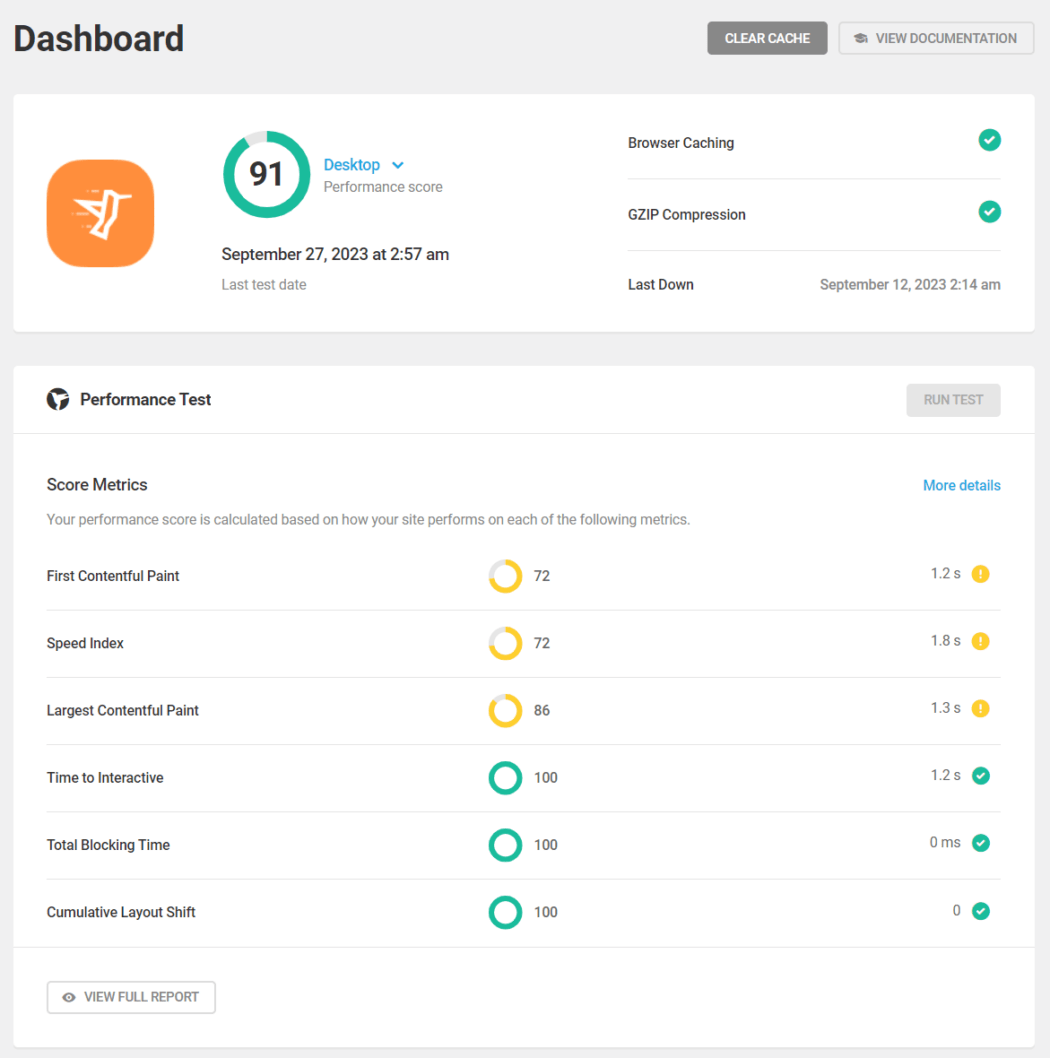
First, start by running a performance test.

Hummingbird - Start Performance Test
Start optimizing your site with Hummingbird by running a performance test.

Make sure to note the initial results so you can compare before and after results.

Hummingbird performance test results
Note down Hummingbird’s performance test results before enabling critical CSS.

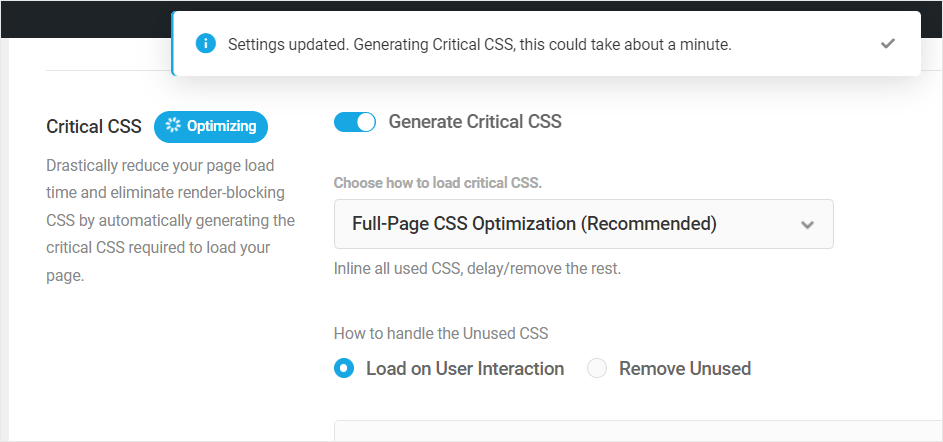
Next, navigate to Hummingbird > Asset Optimization > Extra Optimization and enable Critical CSS.

Hummingbird-Asset Optimization - Extra Optimization - Critical CSS
Turn on Critical CSS in the Asset Optimization > Extra Optimization screen.
Critical CSS Options
Hummingbird gives you options to control the implementation of Critical CSS on your site.

After enabling the feature, you’ll see different options for loading Critical CSS and for handling Unused CSS.

Loading Critical CSS

This section gives you the option to select Full-Page CSS Optimization (default) or Above-the-Fold CSS Optimization.

Critical CSS
Select one of the options from the drop-down menu.

We recommend choosing the default Full-Page CSS Optimization with Load on User Interaction option selected for most sites as this will provide the best results and address both issues of eliminating render-blocking resources and reducing unused CSS audits while maintaining the integrity of all the site’s visual elements.

Full-Page CSS Optimization inlines all used CSS and delays/removes loading the rest.

Choosing the Above-the-Fold CSS Optimization method is recommended for larger sites with loads of complex CSS if the default option does not give the desirable results. This method will inline all above-the-fold CSS and load the rest asynchronously.

Handling Unused CSS

Hummingbird gives you the option to load the unused CSS On User Interaction to fix any rendering issues or Remove Unused which trims unused CSS, keeping only what’s necessary and loading it inline.

Additionally, you can toggle the feature for specific post types.

Unusued CSS Post Types
Select the post types to remove unused CSS.

While the post type toggles are available for both the Full-Page CSS Optimization and Above-the-Fold CSS Optimization methods, only the Full-Page CSS method handles unused CSS.

Critical CSS - Above The Fold Method option selected.
If Above-the-Fold CSS Optimization method is selected, the option to remove unused CSS does not display.

Both optimization methods also provide an advanced option to add custom CSS manually within the <head> section of the page(s).

Unused CSS - manual inclusions
Add critical custom CSS elements manually.

Note: If you have used the legacy CSS above the fold feature in earlier versions of Hummingbird to manually feed the critical path CSS, the existing data will be automatically migrated to the Manual Inclusions box when you upgrade the plugin to the latest version and switch to using the new feature.

After configuring your options, click Save Changes. Hummingbird will start implementing Critical CSS automatically as per your settings.

Critical CSS Optimizing
Wait a few seconds for Critical CSS to optimize your site before continuing.

After you see the completion message, visit your site and confirm that everything on the front end is displaying as it should.

Critical CSS Generated message.
Wait until you see the “Critical CSS Generated” message before refreshing the page.

Refresh the page, let the cache build up again, and then run another performance test in Hummingbird so you can compare the before and after results.

Hummingbird performance test results
Compare Hummingbird’s performance test results before and after running Critical CSS.

Regenerate Critical CSS

After applying Critical CSS on your site, a “Regenerate Critical CSS” button will display at the top of the Extra Optimization screen.

Click on this button to purge the cache, clear all local or hosted assets, and automatically regenerate all required assets for your site or homepage.

Regenerate Critical CSS
Regenerate your site’s Critical CSS at any time with a simple click.

Hummingbird’s Critical CSS is Compatible with Everything WordPress

We have tested Hummingbird’s Critical CSS feature extensively and found it to be compatible with all WordPress versions and themes, page builders, fonts, WooCommerce, Learning Management Systems (LMS), etc.

It’s important to note, however, that installing poorly-coded themes or plugins containing CSS with invalid code or invalid strings on your site could cause issues and result in a Critical CSS error message.

Critical CSS error message.
Using poorly-coded themes or plugins can lead to Critical CSS errors.

If you do experience errors using Critical CSS, try the following:

  1. Click on the “Regenerate Critical CSS”  button and see if this fixes the issue.
  2. If you get the same error again, we suggest changing the theme (use a staging site if your site is live), and run Critical CSS on the new theme. If there are no problems, then the issue is most likely the theme.
  3. If you experience issues after installing a different theme, we recommend troubleshooting your plugins.
  4. If the error still persists after trying all of the above, note the error message, disable Critical CSS temporarily on your site, and contact our support team for assistance fixing the issue.

You can rest assured, however, as Hummingbird’s Critical CSS feature has been designed with the focus to preserve your site’s visual integrity while bumping performance. The feature handles errors well and and will rarely break a site, even in case of errors.

For additional information on using the Critical CSS feature, refer to the plugin documentation.

Switch On All Of Hummingbird’s Optimization Features For Best Results

If getting maximum speed and performance out of your WordPress site(s) is critically important to you, using Hummingbird’s Critical CSS is definitely a feature you shouldn’t ignore.

Hummingbird report - passed audits.
Optimizes site performance and ace Google’s PageSpeed recommendations with Hummingbird’s Critical CSS feature.

For best performance and savings, we recommend using Critical CSS with page caching and all of the asset optimization features the plugin makes available, including CDN, and Delay JavaScript Execution.

Hummingbird - Asset Optimization
For best results, enable all of Hummingbird’s asset optimization features.

In most cases, combining all of Hummingbird’s optimization features should help your site achieve PageSpeed scores of 90+ or bring it closer to a perfect 100 if your site is already performing well.

Hummingbird-100 Score PageInsights
Use all of Hummingbird’s optimization features to get the perfect performance score!

As mentioned earlier, Critical CSS is a Hummingbird Pro feature and its available to all WPMU DEV members.

If you are currently using our free Hummingbird plugin, consider becoming a member for affordable and risk-free access to our all-in-one WordPress platform. It has everything you need to launch, run, and grow your web development business.

And if you are an Agency member, you can even white label and resell Hummingbird (plus hosting, domains, our entire suite of PRO plugins, and more) all under your own brand.

How to Optimize WordPress Site Performance Using Delay JavaScript Execution

Looking for ways to further optimize your WordPress site’s performance? Easy…switch on Hummingbird‘s new Delay JavaScript Execution feature!

Most sites nowadays are laden with JavaScript files and inline scripts, which can be resource intensive and affect site performance and PageSpeed scores in areas like site rendering and load time.

As you will learn in this article, delaying the execution of JavaScript files to prioritise the load of more critical elements first can keep the overall load time of your site in check and improve your PageSpeed scores.

Even better, we’ll show you how to automate the whole process with just one click using our WordPress optimization plugin, Hummingbird.

In this article, we’ll look at:

Let’s jump right in…

Why Delaying JavaScript Execution Helps To Optimize Site Performance

As mentioned earlier, sites nowadays are loaded with 3rd-party scripts for serving advertisements, tracking engagement, security verification, etc., which can block pages from rendering quickly on users’ browsers and affect your site’s user experience and search engine rankings.

Holding these scripts off from loading on your site until there’s actual user interaction with the page can significantly improve areas of your site’s performance like:

1. Faster Page Loading Times

By delaying the execution of JavaScript files until users interact with the page, web pages will load faster, allowing users to access and interact with the site more quickly. This helps improve user experience and increase user engagement.

2. Improved Rendering Performance

Browser rendering engines need to process JavaScript before they can display the page content. Delaying JavaScript execution until after users interact the page content has been loaded helps the browser render the page more quickly and efficiently. This means users can see and interact with the web page sooner.

3. Reduced HTTP Requests

Combining JavaScript files and loading them asynchronously can reduce the number of HTTP requests made to the server, which also helps to speed up page loading times.

4. Increased Google PageSpeed Insights Score

Google considers page speed as a ranking factor for search results, and delaying JavaScript execution can improve your site’s PageSpeed Insights score, potentially leading to better search engine rankings.

5. Lower Server Load

By loading JavaScript asynchronously and combining files, fewer requests are made to the server, reducing its workload, and helping to prevent server crashes or slow responses during high-traffic situations.

Improving PageSpeed Score Recommendations

PageSpeed Insights score
Want to improve your PageSpeed Insights score? Try delaying JavaScript file execution.

Delaying JavaScript execution on your site can improve your Google PageSpeed score by addressing the following recommendations:

Remove unused JavaScript

This recommendation suggests eliminating unused or unnecessary JavaScript code from your web pages. Unused JavaScript can increase your page’s load time, as the browser has to download, parse, and execute the code even if it’s not being used.

By removing any unused JavaScript code, you can decrease the file size and improve your website’s overall performance.

Total blocking time

Total blocking time is a metric that measures the amount of time between the First Contentful Paint (FCP) and the Time to Interactive (TTI) during which the main thread was blocked for long enough to prevent input responsiveness.

In simple terms, it quantifies the duration when the page becomes unresponsive due to processing heavy JavaScript tasks. Lowering the total blocking time makes your website more responsive and improves user experience.

Minimize main thread work

The main thread is responsible for executing JavaScript, style calculations, layout, and other tasks required to display a web page. Minimizing main thread work refers to the process of optimizing the code and reducing the time the main thread spends on heavy tasks. This can be done by removing unnecessary JavaScript, splitting long tasks into smaller chunks, and optimizing the code’s execution.

A lighter workload on the main thread results in faster page loading, improved rendering, and enhanced user experience.

Time to interactive (TTI)

This performance metric measures the time it takes for a web page to become fully interactive and responsive to user input. A page is considered interactive when the main thread is free from heavy tasks, and users can interact with the elements on the screen, such as clicking buttons or scrolling.

Improving the TTI by optimizing JavaScript, splitting large tasks, and reducing render-blocking resources ensures a better user experience by allowing users to interact with the page more quickly.

Reduce JS execution time

Reducing JavaScript execution time involves optimizing the code to execute faster and use fewer resources. This can be achieved through techniques such as code minification, removing unused JavaScript, and optimizing algorithms.

Reducing the execution time leads to faster rendering, decreased total blocking time, and better responsiveness, providing a better user experience.

First Contentful Paint (FCP)

This is a performance metric that measures the time it takes for the browser to render the first visible element (text, image, or other content) of a web page. A faster FCP equates to a quicker initial page load, providing users with a visual feedback that the page is loading. Improving FCP requires optimizing critical rendering paths, delaying non-critical JavaScript execution, and prioritizing the loading of visible content.

A faster FCP significantly contributes to a better user experience and improved web page performance.

Delaying JavaScript Execution Methods

While faster page load times, reduced render-blocking, and prioritized content loading provide many benefits to users and can deliver higher PageSpeed scores, the actual methods available for delaying JavaScript execution on WordPress sites can be challenging for users without technical knowledge or web optimization skills.

For example, these methods can include:

  • Implement async or defer attributes: This requires you to manually add async or defer attributes to your JavaScript files in the HTML header, which tells the browser not to block the page rendering while processing the JavaScript files.
  • Combine JavaScript files: Use online tools or WordPress plugins to combine multiple JavaScript files into a single file, helping to reduce the number of HTTP requests and speed up page loading times.
  • Minify JavaScript files: Use online tools or WordPress plugins to reduce JavaScript file size, which helps to improve page loading times.
  • Prioritize critical JavaScript: Identify the critical JavaScript that needs to be loaded immediately to ensure proper functionality, and then load the remaining JavaScript files after the page content has been rendered.

While there are a few WordPress plugins available that can handle some of these tasks for you and help you to delay or defer JavaScript execution, our Hummingbird plugin does all of the above and more with the click of a button.

How to Use Hummingbird’s Delay JavaScript Execution Feature

The new optimization feature of Hummingbird delays the loading of all JavaScript files and inline scripts until there is user interaction on the page (e.g. mouse movement, keyboard action or screen tap) and improves all of the PageSpeed recommendations described earlier.

To enable this feature, make sure that Hummingbird is installed and activated on your site, then navigate to Hummingbird > Asset Optimization > Extra Optimization in your WordPress admin and switch on the Enable Delay Javascript toggle button in the Tools > Delay Javascript section, then click Save Changes.

Hummingbird's Delay JavaScript feature.
Enable Hummingbird’s Delay JavaScript feature to improve your site’s performance.

Alternatively, you can enable the feature from the plugin’s main dashboard.

Hummingbird dashboard: Asset Optimization - Delay JavaScript Execution
Enable Delay JavaScript Execution from Hummingbird’s dashboard.

Once the Delay JavaScript Execution feature has been enabled, it automatically goes to work, delaying the loading of any non-critical JavaScript files on your page that are not required above-the-fold.

The feature’s settings give you access to options like being able to specify a timeout for the scripts to load if no user interaction is detected, and the option to exclude critical JavaScript files from from being delayed on load by specifying their URLs or keywords.

Hummingbird's Delay JavaScript settings
Hummingbird delays the loading of JavaScript files until a set timeout limit is reached or a user interacts with the page.

If enabling this feature breaks something on your site and you identify additional critical Javascript resources which are essential to render the page, simply add them to the Excluded JavaScript Files area to exclude them from being delayed.

If there is no user interaction on the page beyond a set threshold, the JavaScript assets are forced to load. The default timeout is set to 20 seconds, but you can select a different value from the Timeout dropdown menu (currently ranging between 5-30 seconds).

Hummingbird's Delay JavaScript Timeout options
Select a timeout option from the dropdown menu.

Notes

  • Enabling JavaScript Execution will automatically disable the Combine Compression option to ensure that your site’s scripts are loaded in their correct order.
  • The feature will only work when you’re connected to The Hub, as it pulls the list of continuously updated predefined exclusions from the API.
  • You can easily reverse any changes made by this feature by simply disabling the toggle and clicking save.

Delay JavaScript and Speed Up WordPress

Hummingbird’s Delay JavaScript feature is available in both the Pro and free versions of the plugin. We recommend enabling this feature and testing your site using the PageSpeed Insights tool.

If you experience any issues using Hummingbird, check out the plugin’s documentation or contact our 24/7 support team for immediate expert support.

How To Create A Fully-Branded, Customized Client Portal With WPMU DEV

Learn how to give your clients an easy and professional white label portal experience where they can access their account, sites, and pay you via a secure and self-hosted checkout.

Imagine having your own unique portal where your clients can login, access their billing accounts, even make payments – all hosted on your own site, with your own branding.

Well, good news, with WPMU DEV it’s possible and simple! And in this article we’re showing you how to create the client portal of your dreams.

You’ll learn:

  • How to create custom login pages for clients,
  • How to invite clients to your portal using branded emails,
  • How clients can make payments to you quickly and easily.

By the end of this article you will have set up a sleek portal under your own brand that clients can use to access information about their sites and make secure payments for your services.

Here are the section breakouts:

And we’re off!

What You Will Need To Create Your Portal

Before we get started, here’s what you’re gonna need if you want to follow along, or eventually create your own portal:

1. The Hub, to establish the base of your portal and integrate billing tools

The Hub is your central interface as a WPMU DEV user, and it’s where our web developer members manage every aspect of their client sites.

You can learn more about how it works in our how to get the most out of The Hub article.

This all-in-one site interface also includes a built-in client management and billing dashboard – where you can invoice clients, set up subscriptions, track monthly recurring revenue (MRR), and more.

And most importantly and relevant to this article… you can invite your clients to have customized access to your billing dashboard (and specific areas of your overall Hub), where they can view their account and subscription info, and even pay invoices directly via a built-in Stripe checkout.

All of the above lays the groundwork for your white label client portal. But it’s still all under WPMU DEV’s branding up until this point.

That’s where this next tool comes into the equation…

2. The Hub Client, to brand your portal as your own

The Hub Client allows you to take your Hub interface, including billing tools and checkout, and white label the entire thing with your own branding, logos, etc.

This instance will be on your own site at your own domain, so when your clients login they see your brand, not ours.

3. A Hosted Site For Your Portal

Finally, you’ll also need a hosted site to host your client portal…

This can be either a 3rd-party hosted site, or there’s always our own dedicated WordPress hosting, which you can also manage right from your Hub dashboard.

All of the above tools are included with the WPMU DEV Agency plan, which you can also trial for free right now.

Okay, now that you know what’s needed, we’ll get down to it!

How To Create and Brand Your Client Portal

Okay, first things first… since the white label client experience comes courtesy of The Hub Client, we want to install and configure that straight away.

Once you’ve signed up for a paid WPMU DEV membership, The Hub Client plugin will be available to install for free via the plugin landing page, The Hub plugin manager, or the WPMU DEV dashboard plugin (shown below).

hub client wpmudev dashboard install
Installing The Hub Client from the WPMU DEV WordPress dashboard.

Once activated, click on it to see the Welcome screen, then click on Get Started. This puts you directly into Settings.

By default, your Hub Client will inherit the Brand Name and Logo you have set in your own Hub, but you can customize it to be whatever you like.

hub client branding page & preview
The Hub Client settings in WordPress, default view.

We’ll quickly set up our first three brand customizations under Site Profile.

  1. Click the arrow icon for Brand name, type what you’d like to call it, and Save Changes.
  2. Next, click the arrow icon for Your Logo, upload your graphic, and Save Changes.
  3. Under Color Scheme, click the arrow icon for Navigation Background, select desired shade from the color picker, then Save Changes. You can also select your Navigation text and Navigation text selected & hover colors here, to match your fully branded color scheme.

You can see all of your changes in real-time via the Preview strip at the top of the Settings page.

the hub client settings wp dashboard
The Hub Client Settings main screen, customized to your brand.

Configuring Menu Navigation Items

We want to make getting around in our branded portal a satisfying, sensible experience for our clients.

We can easily accomplish this through the Hub Client’s settings.

Let’s look at personalizing the rest of the branded portal for your clients.

First up, we’re going to set up what will be displayed as the main menu of your branded portal.

From the main screen in The Hub Client; scroll down to Configuration, and click the chevron arrow to the right of Navigation.

Select from the dropdown options, or create a site specific menu in WordPress’ Appearance > Menus, then come back to this page and select it.

select the Navigation menu in client portal
Selecting the Navigation menu in your client portal.

Now we’ll set the client page as the hub.

Click the chevron arrow to the right of Client Page, and from the resultant popup, select as desired from the dropdown options, then Save.

select Client Page to be replaced with your client hub
Selecting the Client Page to be replaced with your client hub.

Now you’ll see this additional linked text – View Page, next to Client Page, along with the name of the page you selected to the right. In this case, “hub”.

config nav client page view page text in menu
We’ve set the client page as the hub.

Click on View Page and it will open this instance of the Hub in a new webpage, where you’ll see the page you selected, with the menu you selected at the top of the site.

branded hub client view
The Client’s view of your branded hub.

You can also customize the link used for the Back text on your Client Login page. We’ll knock that out right now.

From the WP Dashboard > The Hub Client > Settings > Configurations > Home Site URL, click Add to open the configuration module.

Enter the site URL and site name (Title), and Save changes. (You can also click the checkbox to Open in a new tab prior to saving, if you prefer.)

customizing site home URL for back button
Customizing the site home URL for the back button in the Hub Client.

Note: if no customizations are made here, the back button will direct to the default home page for that site.

If you ever want to revert back to the default state, simply click the Reset button.

Setting Up a Help Button

Having help resources readily available for your clients is a big plus. It goes a long way to making them feel calm and collected, knowing answers are just a click away.

“Provide enough customization options so that we can tweak the look and feel of the interface to some degree. And the ability to put in our own info, such as contact info and links to our own help pages/customer support and things like that.” – Julian (WPMU DEV member)

Getting the Help Button in The Hub Client is a cinch. I’ll walk you through how to do that now.

From the WP Dashboard > The Hub Client > Settings > Configuration; to the right of the Help Button, click Add.

Enter the URL for your Help page, then Save Changes.

Tada! You’ll now have a floating help bubble on your Hub page that when clicked, will direct the user to your chosen URL. By default, the Help page will be opened in a new tab.

Once you’ve set up your Help Button, it will display in the lower right corner of The Hub main page, ready for action.

help button client portal view
Adding a Help button to your sites in The Hub.

Integrating Live Chat

Live Chat is a fantastic feature to provide to your clients. And The Hub Client offers three highly-rated chat platform integrations to choose from.

If you head over to the WordPress dashboard, The Hub Client > Settings > Integrations, you can configure a Live Chat widget on your Hub Client.

Three of the most popular third-party services are available: LiveChat, Tawk.To, and HubSpot.

Live Chat logging in for Tawk.to
Live Chat in the Hub Client, logging in for Tawk.to.
tawk.to customized live chat preview
Tawk.to’s live chat appearance settings and preview.

Depending on which live chat service you choose, the setup will vary.

If you’d like a basic walkthrough on setting these up in The Hub Client, read How to Set Up Live Chat on WordPress. Or get the full rundown in our Integrations help docs.

Inviting Clients To Your Custom Portal

Time to roll out the red carpet! With customizations set, we’re ready to bring our clients inside.

Let’s start by manually adding a new client.

Navigate to The Hub > Clients & Billing, and click + New Client.

adding a new client
Getting a client set up takes only a few clicks.

Enter all the client’s required (and optional, as desired) information in the form fields.

User Roles play a very significant part in Client setup. Basically, these decide what each client will have access to in your hub, in terms of viewing and taking action. You have full control on these by selecting permissions.

We’ll take a deep dive into User Roles in our upcoming Clients & Billing article. For now, click on the dropdown arrow under User Role, and select View All & Access billing.

add client user role dropdown
You decide what your client has access to by applying a user role.

If you opt for a Custom Role – you can make one on the spot by clicking on + Create custom user role.

This will bring up the screen where you can select options from the main and nested menus. Name your new role, and save it.

Now if you go back to that client, you can assign this custom role to them.

While adding a client, you will also determine what Primary Hub they’re associated with.

If you have more than one Hub, it will be available in the dropdown. If you are using The Hub Client on a site, and select it as the Primary Hub, when that client clicks on a Confirm Invitation or Pay Invoice link from your Client & Billing automated email, they’ll be taken to the your white labeled Hub site instead of wpmudev.com.

add client select primary hub
Whatever Primary Hub you choose will sync the communication preferences that will occur from that Hub (e.g. emails, invoices, etc.).

At the bottom, switch the Invite Client toggle to on, then click Add.

invite client from add client window
Invite a client from the Add client window.

Boom! Client has been added, and sent a white-labeled invitation to your client portal, which will look like this:

email confirm invitation

Once the client confirms by clicking the Confirm Invitation link in your email, they’ll have access to your branded portal.

If they already had an existing Hub account with you, it will take them directly to the login page of the Hub they were invited from.

If they’re new to your account, they’ll be taken to the account creation page of that Hub instance.

From the account creation page, they’ll get a popup modal with their email address already in the form field. They’ll just need to create a password, then click the Create Account button.

create account (from email invite)
Client account creation in your Hub.

What Your Clients Will See Inside Their Portal

Every client experience in your portal will be unique to them.

Your branding will be prevalent throughout, and what your clients will be able to view and access is dependent on the permissions you’ve granted them through User Roles.

It’s a fantastic way to custom serve each client a perfect fit for your combined business interests and needs.

The Client Dashboard

Once your clients have logged into your client portal, they’ll be greeted by a dashboard with access to any content you’ve given them permissions for.

portal initial view
A client’s-eye view of your custom branded portal.

Clients can organize single or multiple sites in your portal, and organize them in their dashboard area as they see fit.

portal multi sites
Clients can favorite sites, color labels, and more in your branded Hub.

The roles you’ve assigned to a client are editable by you and can be changed at any time in the management and billing platform.

For example, if we assign Billing permissions to a client, he/she will have the ability to view and edit anything in that section, but they’ll be cut off from any other pages/screens in Client Billing.

plugins, manage existing
Clients can be given access to modify and view, or view only, making it possible to hide screens like Plugins entirely.

Read this post for a closer look at User Roles and Permissions.

Letting your clients view and manage their own billing details saves you the time and effort you would otherwise spend on their admin activities, and allows them to feel connected to their account.

There is a lot your clients can accomplish here. For example, managing their billing info and account details, viewing their services and subscriptions, filtering on payment status (due or paid), assessing what their average spend is, and much more.

billing details client view
The Billing Overview section gives clients a quick but informative top-level view of their account(s).

In the billing section, clients can see all of the details by drilling down through the various menu options.

current subscriptions
The Products & Services page allows views by breakout sections for subscriptions, both active & inactive, and one-time services as well.

Any line item here can be clicked on for full details, and/or to take certain actions. For example, canceling a subscription.

view subscription details
Details on a particular client subscription, with an option to cancel it.

Invoices can also be examined in full detail.

invoices summary list mixed pay status
The client invoice summary list, with easily visible status and amounts for each.

The built-in filter functionality is great, offering distillation options for date, payment status, and website.

filter on invoices
Even archived invoices can be located fast using the robust filter.

If you’ve given them permissions to do so, clients can view details and take action on services and bills, such as making payments or downloading PDF versions of invoices.

filter on invoice menu options
Every line item has quick actions via the popup menu, such as making a payment or viewing a subscription.

Client Profile

Clients can freely edit their personal content – profile info (including their profile pic, if they have one set in Gravatar), make a password change, setup 2FA (requires an authenticator app), or sign out, all through the cog icon menu in the upper right corner.

client profile edit
Clients can easily edit their own profile information.

Everything updates in real time. For example, if the client changes the email addy in their profile, it will also update in their billing profile, since the Hub and Clients & Billing profiles are synced. Easy peasy!

Clients Can Pay Invoices via The Client Portal

With the Clients & Billing modal, your client will have the convenience of paying you directly through your branded client portal (with secure Stripe checkout fully integrated)!

As mentioned earlier, all client management activities including payments take place securely inside your own domain and fully custom-branded screens.

hub URL
Everything happens at your chosen domain URL.

Throughout the course of their business journey with you, clients are kept in the loop with automated emails, which reflect your custom brand and company details.

email pay invoice
Email communications and invoices are triggered automatically and remain on-brand, taking that task off your plate.

Clients can readily make payments by clicking on the invoiced email link, taking them to the payment portal.

client invoice payment in portal 1
Clients give a final check to their invoice details, then click the Make Payment button.

The client can enter their payment information, then click the Pay button, which will have specific information on it regarding the amount of money and service they are approving.

Note, if they previously added a payment method, it will auto populate here, with an option to change it if desired.

client invoice payment in portal 2
Client payment process in The Hub, continued.

The client can check all of their info on the next page, then click to pay.

client invoice payment in portal 3
Client payment process in The Hub; one last visual check, pre-pay.

With the payment made, the invoice will load up, reflecting the details and paid status.

client invoice post payment details
Client invoice details; status: paid.

Now if you go to the Invoices tab, you’ll see all current and outstanding invoices.

invoice summary list status all paid
Client invoice summary list in the Hub.

In the Status column, red indicates payment is due, and green indicates payment has been made.

The top-level Invoices menu has a notifier icon (a number in a red circle), indicating the quantity of outstanding invoices – for quick visual reference.

The client can download a copy of any paid invoice by clicking the PDF Invoice button at the top-right of the invoice screen.

Clients Can Access Invoices Directly in The Billing Modal of The Hub

Your clients can easily view and manage billing activities from any sites in their Hub, related to specific billing. It will be nearly identical to what you see in your Hub Billing area, of course specific only to their site(s).

Clients can use the left sidebar menu to navigate to their billing section.

Clients need only click the Billing link in the sidebar menu of any site they’re viewing to get started. Any invoices you’ve sent to them will be accessible to them here.

client billing overview with sidebar
Client overview screen in your branded Hub.

Clients who you’ve added a website for but haven’t yet sent an invoice to will still see the site, it just won’t have any specific billing info.

Once the first site-specific invoice has been paid, data will immediately populate in the Summary section, along with the Products & Services and Invoices sections’ Status, which will reflect as Active and Paid.

If you’ve stuck with us through the full breakdown, congrats! You’re now very well versed in many of the great features in the Client Portal – ie your branded Hub. We have no doubt you’re going to do amazing things.

If you do ever need an assist, reach out to our highly-trained (and top-rated) support team. They’re always on, 24/7/365.

For a complete guide to everything on the client portal, see The Hub Client documentation.

Giving Your Clients a More Customized Experience with The Hub Client from WPMU DEV

The Hub Client lets you run WPMU DEV on your own domain as a 100% white label experience for your clients.

You can fully customize your branding, colors, links, logins, emails, and users access…even allow clients to edit certain areas at your discretion.

“It’s like giving your clients backstage access, but as a VIP experience.” – Josh Hall (JoshHall.co)

Check out our Hub Client plugin through a trial of one of our paid plans, or our Hosting – fully dedicated and optimized for WordPress. We offer a 100% satisfaction guarantee, and our support team helps with all things WordPress, not just our products and services.

See you on the inside!

How to Fix the “Sorry, You Are Not Allowed to Access This Page” Error in WordPress

Are you frustrated by the “Sorry, you are not allowed to access this page” error in WordPress?

This error usually displays when you’re trying to see a page in your WordPress dashboard that your user role doesn’t have permission to see.

However, you might see the error sometimes even when you’re supposed to have access to that page. This error can be caused by lot of different reasons which makes it tricky for beginners to troubleshoot.

In this article, we’ll show you how to fix the “Sorry, you are not allowed to access this page” error in WordPress.

How to Fix the 'Sorry, You Are Not Allowed to Access This Page' Error in WordPress

What Causes the “Sorry, You Are Not Allowed to Access This Page” Error in WordPress?

WordPress user roles and permissions define what your users can and can’t do in WordPress. For example, an author on your site wouldn’t be able to edit the post of another author, only their own posts.

If someone gave an author the link to edit someone else’s post, then they would see the “Sorry, you are not allowed to access this page” WordPress error when following the link.

However, sometimes you might see “Sorry, you are not allowed to access this page” when you should have access to view the page.

If you’re not the site owner or administrator, and you’re seeing this error, then you should contact the site owner or admin to let them know. They can explain why you don’t have access to the page, or they can change your role to grant you access.

If you are the site owner or have an admin role, but you’re still seeing the “Sorry, you are not allowed to access this page” error when trying to log in to your own website, then something has gone wrong with the permissions.

Maybe there was an issue with a WordPress update. Maybe there was a problem when a theme or plugin was updated. Or maybe something has gone wrong with your configuration.

If you’re seeing this error when you try to log in, then you won’t be able to fix the error by changing your WordPress settings in the dashboard. You’ll have to work with the files and databases directly.

This can be tricky for beginners and making a mistake could make things worse. As a precaution, we recommend you first make a complete backup of your WordPress website.

You could also start by contacting your hosting provider. They may be able to fix the problem for you.

That being said, here are some steps you can follow to troubleshoot and fix the “Sorry, you are not allowed to access this page” error in WordPress.

Checking You Have the Correct WordPress Role

If you’re able to log in to the WordPress dashboard, but can’t access specific pages, then the issue could be that your WordPress user role was changed, and you’re no longer an admin.

From the WordPress dashboard, you can see your user role by visiting the Users » All Users page, and looking under the ‘Role’ column.

View all users and user roles in WordPress

If you don’t have access to the Users page, then this means that you are not an administrator.

If you or someone else accidentally deleted your administrator account or changed your user role, then you can add a new admin user with phpMyAdmin.

Checking for a Corrupt .htaccess File

If you have an admin user role, and you’re still seeing the “Sorry, you are not allowed to access this page” error, then it could be caused by a corrupt .htaccess file. We can check this by renaming the file.

You will need to use an FTP client or the file manager feature in your WordPress hosting account. If you haven’t used FTP before, then you may want to see our guide on how to use FTP to upload files to WordPress.

Using your FTP client, you need to navigate to the root folder containing all your WordPress files. Once you find the .htaccess file you need to rename it to something else, such as .htaccess.old.

Right Click to Rename .htaccess

If you cannot find your .htaccess file, then see our guide on how to find .htaccess in WordPress.

Once you rename the file, try logging onto your WordPress site to see if that has fixed the problem. If it hasn’t, then rename it back to .htaccess and move on to the next step.

If you can log in, then you fixed the problem. The next step is to generate a new .htaccess file. To do that, navigate to the Settings » Permalinks page in WordPress.

Click Save Changes

Simply click on the Save Changes button at the bottom of the page and WordPress will generate a fresh .htaccess file.

Checking for Incorrect File Permissions

While you have your FTP client open, we’ll check to make sure there isn’t a problem with your file permissions. File permissions control who can access files and folders on your website.

The following settings are recommended for most users:

755 for all folders and sub-folders.
644 for all files.

Using your FTP client, you need to navigate to the root folder containing all your WordPress files and select the wp-admin, wp-content and wp-includes folders. Then you need to right click and select ‘File Permissions’.

Right Click to Select File Permissions

This will bring up the file permissions dialog box.

Now you need to enter 755 in the numeric value field. After that, you can click on the ‘Recurse into subdirectories’ checkbox and then select ‘Apply to directories only’ option.

Folders Should Have Permissions of 755

Click on the OK button to continue. Your FTP client will start setting file permissions to folders and sub-folders. You will need to wait for it to finish.

Next, you need to select all files and folders in the root folder of your WordPress site and then right click to select file permissions.

Right Click to Select File Permissions

The file permissions dialog box would appear.

This time you need to enter 644 in numeric value. After that you need to click on ‘Recurse into subdirectories’ checkbox and then select ‘Apply to files only’ option.

Files Should Have Permissions of 644

Click on OK to continue and your FTP client will now start setting file permission to all files on your WordPress site.

Once you’ve done this, try logging into your WordPress website again. If you’re successful, then you’ve fixed the problem. If not, then move on to the next step.

Deactivating All Plugins Using FTP

If the steps above haven’t resolved the issue, then our next step is to check whether a faulty WordPress plugin is causing the error. We’ll do that by temporarily deactivating all plugins.

First, you need to connect to your website using an FTP client. Once connected, you need to navigate to the /wp-content/ folder.

Right Click to Rename the Plugins Folder

Once there, you will see a folder called plugins. This is where WordPress stores all plugins installed on your website.

You need to right click on the plugins folder and select Rename. Next, you should type in a different name. We will call it ‘plugins.deactivate’.

The Folder is Now Named plugins.deactivated

All of your plugins have been deactivated. Now try to log into your WordPress site to see if this has fixed the problem.

If you still receive the “Sorry, you are not allowed to access this page” error, then the problem isn’t caused by a plugin. You’ll need to rename the ‘plugins.deactivate’ folder back to ‘plugins’ and move on to the next step.

If you can now log in, then you know that one of the plugins is causing the error. We just have to find out which one.

Using your FTP client, rename the ‘plugins.deactivate’ folder back to ‘plugins’ then navigate inside the plugins folder. Now rename the first plugin to something like ‘plugin-name.deactivate’.

Now go back to your site to see if you can log in. If you can’t, then change the plugin’s name back and move on to the second plugin. Repeat the process until you find the one that caused the issue.

Once you’ve found the faulty one, you can switch to a different plugin that doesn’t cause the problem. Or you can contact the plugin author and work with them to come up with a solution.

Activating the Default Theme Using FTP

If the plugin solution didn’t work for you, then we’ll need to check if your WordPress theme could be causing this issue.

This step is similar to deactivating your plugins. You’ll need to connect to your website using an FTP client and navigate to the wp-content folder.

Right Click to Rename the Themes Folder

Once there, you will see a folder called themes. This is where WordPress stores all themes installed on your website.

This time you need to right-click on the plugins folder and select Rename. We’ll call it ‘themes.deactivate’.

This will activate the default theme. Now try to log into your WordPress site to see if this has fixed the problem.

If you still receive the “Sorry, you are not allowed to access this page” error, then the problem isn’t caused by a theme. You need to rename the ‘themes.deactivate’ folder back to ‘themes’ and move on to the next step.

If you can log in, then the previous theme caused the problem and you can start to troubleshoot. You could try using a different theme or reinstall the same theme and carefully configure it.

If the error returns, then report it to the theme author. They may be able to help you solve the problem or fix a bug in the theme.

Final Troubleshooting Steps

If you’re still reading, then unfortunately the other steps haven’t solved your problem. Here are a few more things you can try.

Check Error Log

You may be able to check an error log for clues about what went wrong. Your hosting provider may be keeping logs, or you may have previously set WordPress up to keep them.

For more details, check our guide on how to set up WordPress error logs, or contact your hosting provider.

Update to Latest PHP

If your WordPress site is running an older version of PHP, then it may be causing problems. Upgrading to the latest version may be helpful.

For more information, check our guide on how PHP updates by your web host impact your WordPress site, or contact your hosting provider.

Restore Your Most Recent Backup

If you’ve made a recent backup of your WordPress website, then restoring it to an earlier version is likely to fix the “Sorry, you are not allowed to access this page” error.

The problem is, you will lose any changes to your settings and content made after the backup.

For more information, check our beginner’s guide on how to restore WordPress from backup.

Contact Your Hosting Provider

If you are unable to fix the error on your own, then you should contact your WordPress hosting company to see if there is anything they can do.

Many providers offer excellent technical support and may be able to solve the problem for you.

For example, they may be able to check their server error logs or have created their own backups of your WordPress site. They will be able to advise you on how they can help and what you should do next.

For the best results, make sure you check our guide on how to properly ask for WordPress support and get it.

We hope this tutorial helped you learn how to fix the “Sorry, you are not allowed to access this page” error in WordPress. You may also want to bookmark our ultimate troubleshooting guide of the most common WordPress errors, or see our guide on how to get a free email domain.

If you liked this article, then please subscribe to our YouTube Channel for WordPress video tutorials. You can also find us on Twitter and Facebook.

The post How to Fix the “Sorry, You Are Not Allowed to Access This Page” Error in WordPress appeared first on WPBeginner.

How to Change or Remove ‘Howdy Admin’ in WordPress (Easy Way)

Do you want to change or remove the ‘Howdy’ greeting that is displayed on the WordPress admin bar after logging in?

Many people never use that word in real life. You might like to change it to a greeting that sounds more familiar.

In this article, we’ll show you how to change or remove ‘Howdy Admin’ with 3 easy solutions.

How to Change or Remove Howdy Admin in WordPress

Why Change or Remove ‘Howdy Admin’?

Whenever a user logs into the dashboard of their WordPress website, they are greeted by the word ‘Howdy’ followed by their display name.

For example, if John Smith logged in, then he’d see the words ‘Howdy, John Smith’ near the top right of the screen.

Howdy, John Smith

That greeting might not sound natural to some users. ‘Howdy’ is short for ‘How do you do?’, but many English speakers never use the word. It may sound out of place, outdated, or even a bit annoying.

Luckily, you can change the greeting to something that sounds more familiar, like Welcome, Hello, Hey, or Hi. You can also leave it out entirely, so you’ll just see the user’s display name.

There are a few ways to change or remove ‘Howdy Admin’ and we’ll show you three. The first two methods are easiest and use a plugin.

You only need to use one of these methods. Simply click the link below to skip to the method that best suits your needs:

Method 1: Removing ‘Howdy Admin’ Using a Plugin

First, you need to install and activate the Admin Trim Interface plugin. For more details, see our step by step guide on how to install a WordPress plugin.

The Admin Trim Interface plugin lets you remove features you don’t need from the WordPress admin area, including the ‘Howdy’ greeting. Once you remove it, you’ll just see the username with no greeting.

Once you activate the plugin, go to the Appearance » Admin Trim Interface page in your WordPress dashboard. Here you will see the list of ten interface elements that can be hidden.

Admin Trim Interface Page

All you need to do now is click the Hide “Howdy” checkbox, and then click the Save Changes button.

Click the Hide Howdy Checkbox

When you look at the top of the screen now, you’ll notice that the ‘Howdy’ greeting has been removed.

Howdy Is Removed

Method 2: Changing ‘Howdy Admin’ Using a Plugin

For the second method, you need to install and activate the Admin Customizer plugin. For more details, see our step by step guide on how to install a WordPress plugin.

Admin Customizer lets you customize your WordPress login screen and admin area, including changing the word ‘Howdy’ to something else.

Once you activate the plugin, go to the Settings » AS Admin Customizer page in your WordPress dashboard. To change the greeting, you’ll need to click on the Dashboard Section button.

Click on the Dashboard Section Button

Next, type your preferred greeting in the Update the Howdy Text text box and make sure you click the Save Changes button. We’ll type the word ‘Welcome’.

Type Welcome in the Update the Howdy Text Box

Tip: You don’t need to type a comma. That will be added automatically.

Now you can see in your dashboard that the ‘Howdy’ greeting has been changed to ‘Welcome’.

The Howdy Greeting Has Been Changed to Welcome

Method 3: Change or Remove ‘Howdy Admin’ Using Code

You can also change or remove ‘Howdy Admin’ without using a plugin by adding a custom code snippet to your theme’s functions.php file. We don’t recommend this method to inexperienced users, because even a small mistake could break your website.

If this is your first time adding code to your WordPress files, then you should check out our guide on how to copy and paste code snippets in WordPress.

We’ll use the Code Snippets plugin mentioned in that guide, so you’ll need to install that first. For more details, see our step by step guide on how to install a WordPress plugin.

Upon activation, the plugin will add a new menu item labeled Snippets to your WordPress admin bar. When you click it, you’ll see a list of example custom code snippets.

Go ahead and click on the Add New button to add your first custom code snippet in WordPress.

Click the Add New Button to Add a Custom Code Snippet

This will bring you to the ‘Add New Snippet’ page.

You need to start by entering a title for your custom code snippet. Let’s call it Howdy Admin. After that, copy and paste the code snippet below into the code box.

add_filter( 'admin_bar_menu', 'replace_wordpress_howdy', 25 );
function replace_wordpress_howdy( $wp_admin_bar ) {
$my_account = $wp_admin_bar->get_node('my-account');
$newtext = str_replace( 'Howdy,', 'Welcome,', $my_account->title );
$wp_admin_bar->add_node( array(
'id' => 'my-account',
'title' => $newtext,
) );
}</code>

Paste the Code Snippet Into the Code Box

Notice that Line 4 replaces the word ‘Howdy’ with ‘Welcome’.

When you come across this snippet in the future, you may not remember what it’s for. So it’s a good idea to type something helpful in the description as a reminder.

Type Something Helpful in the Description

You can also assign tags to your code snippet. This will help you sort your code snippets by topic and functionality.

Finally, you can click on the ‘Save Changes and Activate’ button. Once the snippet is activated, the ‘Howdy’ greeting will be replaced with ‘Welcome’.

The Howdy Greeting Will Be Replaced with Welcome

To use a different greeting, just replace the word ‘Welcome’ on Line 4 with something else, such as ‘Hello’. To remove the greeting altogether, delete the word ‘Welcome’ and the comma so there is nothing between the second set of quotes on Line 4, like this.

add_filter( 'admin_bar_menu', 'replace_wordpress_howdy', 25 );
function replace_wordpress_howdy( $wp_admin_bar ) {
$my_account = $wp_admin_bar->get_node('my-account');
$newtext = str_replace( 'Howdy,', '', $my_account->title );
$wp_admin_bar->add_node( array(
'id' => 'my-account',
'title' => $newtext,
) );
}

If you’d like to return to the ‘Howdy’ greeting, then just turn off the switch on the Snippets page.

Return to Howdy by Turning off the Switch

Alternatively, you can click the Save Changes and Deactivate button at the bottom of the Edit Snippet page.

Return to Howdy by Deactivating the Code Snippet

We hope this article helped you learn how to customize the greeting in the WordPress backend. Next, see our guide on how to choose the best WordPress hosting, or check out our list of must have WordPress plugins to grow your website.

If you liked this article, then please subscribe to our YouTube Channel for WordPress video tutorials. You can also find us on Twitter and Facebook.

The post How to Change or Remove ‘Howdy Admin’ in WordPress (Easy Way) appeared first on WPBeginner.

Here’s Something That Will Captcha Your Attention: Defender’s New Google reCAPTCHA Feature!

Defender, our answer to WordPress security, just beefed things up even more with his new Google reCAPTCHA feature! Google reCAPTCHA ensures that it’s a human that enters your site instead of automated spammers that can wreak havoc.

As you’ll see, it’s as easy as ever to get reCAPTCHA activated in just a few clicks. We’ll break it all down and show you how.

Defender's Google reCAPTCHA announcement.
You might be aware of this feature if you’ve logged in to Defender recently. He’s pretty excited about it.

We’ll take a look at how to:

By the end of this brief article, you’ll know how to put the cap on bots and spammers with reCAPTCHA.

Activate Google reCAPTCHA

To get started, you’ll need to activate reCAPTCHA from Defender’s dashboard. That’s as easy as going to Tools, then Google reCAPTCHA.

Once there, click Activate.

Where you activate reCAPTCHA.
One click is all it takes to get started.

As soon as you hit activate, it’s not ready to go unless you have your Site and Secret keys set up. Defender will let you know if you don’t.

The message from Defender that says Google reCAPTCHA is inactive.
If you get the yellow exclamation mark, you still need to set up your keys.

No keys? Let’s create them. Defender makes this easy by having a link to get the keys created. Just click, you guessed it, Click Here.

Where you click to get your recaptcha keys from Google.
This is located directly below the yellow exclamation mark.

Clicking this opens up a new tab on Google’s reCAPTCHA page.

The first thing you’ll do is name the Label. The Label helps you identify the site for future reference.

Where you label your recaptcha.
Label it something you can associate with.

Once you have a label, the next part leads us to…

Choose a reCAPTCHA Type

You now choose a reCAPTCHA Type in Defender and Google.

It’s important to note that during registration in Google, you’ll need to select the same reCAPTCHA type you selected in the Defender interface, as each reCAPTCHA type requires a different set of API keys.

It’s up to you if you want to pick a type in Defender or Google first. Either way, it doesn’t matter as long as they’re the same.

Since we’re already in Google, we’ll select a type here first. You have the option of reCAPTCHA v3 (verifies requests with a score) and reCAPTCHA v2 (verifies requests with a challenge).

Whatever you choose will create a unique key.

Once you decided which type is best for you, you’ll enter the domain and accept the reCAPTCHA Terms of Service. You can also opt to have alerts sent to the owner (you and your email).

Hit Submit, and it will generate your keys.

A look at the generated recaptcha keys.
As you can see, two unique keys were created.

It’s now time to implement them in Defender, so we’ll head on back into Defender’s dashboard and get these activated!

For this example, I chose to create keys using reCAPTCHA v2. Therefore, I’ll select the same option in Defender.

You can pick between v2 Checkbox or v2 invisible for reCAPTCHA v2. For this demonstration, I’ll use v2 Invisible (I’ll touch more on v2 Checkbox and v3 a bit later).

Where you choose what style you want.
The choice is yours on what style you’d like.

Enter the site keys from Google in the spaces provided, click Save Changes at the bottom of the screen, and Defender will give you a preview of what your reCAPTCHA will look like.

The captcha preview.
You get a great glimpse of how your reCAPTCHA will appear.

Now that you know how to set up specific reCAPTCHA types, let’s…

Configure reCAPTCHA

There’s a lot you can do when it comes to configuring Defender’s reCAPTCHA. We’ll take a look at how to edit:

  • Language
  • Error Message
  • reCAPTCHA Locations

As you’ll see, each customization option is simple to adjust however you’d like.

Language

You can pick what language you want your reCAPTCHA to be in. By default, it’s on Automatic. That means that whatever language your WordPress site is in — the reCAPTCHA will be that language, too.

That being said, choose from tons of other languages in the dropdown. Or type in a language in the search bar.

As you can see, there are quite a few languages to choose from.

Once you have the language set up how you want it, click Save Changes.

Error Message

It’s easy to create a custom error message to display when a user’s reCAPTCHA verification fails.

Just add the message you want and hit Save Changes.

Where you edit your captcha error message.
This will tell your users what happened and what to do next.

Edit and change this message at any time.

reCAPTCHA Locations

reCAPTCHA Locations is where you choose the forms where reCAPTCHA human verification will be required. You can choose to have reCAPTCHA implemented for WordPress Login, Register, and Lost Password forms.

It’s just a matter of clicking which ones where you want reCAPTCHA to be deployed.

One-click is all it takes!

Style reCAPTCHA

With Defender’s v2 Checkbox, you can style the reCAPTCHA in several ways.

The Size can be adjusted to either Normal or Compact from the dropdown menu.

Where you choose a size for your captcha.
Choose a size that suits you best.

When it comes to the Theme, you can pick between Light and Dark.

Where you choose between a light or dark theme.
It’s all quick to get to in the dropdown menu.

Check out how your reCAPTCHA looks by hitting Save Changes. Once doing so, it’ll show you a preview.

A look at a styled captcha box.
This is a look at a standard size with a light theme.

If all looks awesome, you’re all set! You can also go in and edit at any time if you’d like to make some adjustments.

Adding a reCAPTCHA Score

reCAPTCHA v3 returns a score that is based on user interactions. This score can be adjusted and changed to wherever you want the verification to fail.

Change the Score Threshold to 0-1. One is very probable it’s a good interaction, and zero is very likely it’s a bot.

It can be changed quickly in Defender’s dropdown.

Pick a threshold between zero and one.

Hit Save Changes and your threshold is saved.

Defender’s reCAPTHCA is CAPTCHA-vating

To help defend your site against bots and spammers, it’s as captivating as ever to use Defender’s Google reCAPTCHA for your WordPress site!

It will help ensure that your site is used by real humans for your forms, logins, and visitors — which assists with preventing abuse, stopping hackers from harvesting email addresses, and putting a hault to automated signups & registrations.

If you don’t have Defender, give it a try today for free. Also, for upgraded security features, try out Defender Pro with a free WPMU DEV 7-day trial. You’ll also get access to all of our other premium plugins, 24-7 service, our all-in-one WordPress site manager, The Hub, and more.

reCAPTCHA later!

How to Hide a Mobile Menu in WordPress (Beginner’s Guide)

Do you want to hide a mobile menu in WordPress?

Most WordPress themes come with built-in styles that automatically transform your navigation menus into a mobile menu. However, you may not wish to use the same menu on mobile or may want to use a different menu style.

In this article, we will show you how to easily hide a mobile menu in WordPress using a plugin or code method.

Hiding a WordPress menu on mobile

Method 1. Hide a Mobile Menu in WordPress using a Plugin

This method is easier and is recommended for beginners. We’ll use a plugin to hide your existing mobile menu provided by your WordPress theme and then use a different menu or no menu at all on mobile devices.

First, you need to visit the Appearance » Menus page and create a new navigation menu that you would like to display on mobile devices.

Create a new menu to be used on mobile devices

On the next screen, you need to provide a name for your new menu that helps you identify it later. We’ll call it ‘Mobile Menu’. After that, you can select the items you want to add to your menu from the left column.

Adding menu items

Once you are finished adding items to your menu, don’t forget to click on the Save Menu button to save your menu.

If you need help creating a new navigation menu, then follow our beginner’s guide to creating a navigation menu in WordPress.

Next, you need to install and activate the WP Mobile Menu plugin. For more details, see our step by step guide on how to install a WordPress plugin.

Upon activation, you need to visit Mobile Menu Options page to configure plugin settings. From here, you need to select whether you want to display your mobile menu on the right or to the left by turning the toggle On.

Choose mobile menu and its direction

From the drop-down menu, select the mobile menu you created earlier.

Next, you need to scroll down to the ‘Hide Original Theme Menu’ section. This is where you can tell the plugin to hide a mobile menu created by your WordPress theme.

Hide theme mobile menu in WordPress

By default, the plugin will use commonly used element identifiers used by most popular WordPress themes. Most users wouldn’t need to do anything here.

However, if the plugin fails to hide your theme’s menu, then you can come back here and click on the ‘Find Element’ button to simply point to your theme’s navigation menu.

Don’t forget to click on the Save Changes button to store your settings.

Now that we have set up the plugin, we need to tell WordPress site to display our mobile menu to the new menu location added by the plugin.

Simply, go to the Appearance » Menus page. Make sure the mobile menu you created earlier is selected in the drop down menu. Below your menu item choose the location you selected in the plugin settings (e.g. Left Mobile Menu or Right Mobile Menu).

Menu location

You can now visit your website to see your new menu in action. The plugin will now hide your theme’s mobile menu and display a custom menu instead.

Mobile menu replaced

WP Mobile Menu plugin allows you to change the color of the menu bar, change opacity, add icons, and more in the settings. Feel free to play around with those settings.

Method 2. Hide Mobile Menu using CSS Code

This method is a bit advanced and requires some custom CSS to be used.

For this method, you can choose to use two different approaches. You can just hide a complete mobile menu using CSS, or you can hide individual menu items on mobile devices.

1. Hiding a complete menu on mobile devices using CSS

First, you need to figure out the element you need to modify using custom CSS. To do that, simply go to your website and take the mouse over to your navigation menu. After that, right click and select Inspect tool.

Inspect tool

Your browser screen will split into two, and you’ll see the source code of your webpage. Now this navigation menu is not the one you need to target because it is visible on the desktop screen.

Source code while viewing your desktop menu

You need to rearrange your browser screen by dragging it from the corner to a smaller size until the desktop navigation menu is replaced by the mobile menu.

Mobile menu identifier

You need to figure out the identifier and CSS class used by your WordPress navigation menu. You can do that by moving your mouse on the source code until the menu area is highlighted.

As you can see in the screenshot above, our test theme is using the navbar-toggle-wrapper class.

After that, you need to go to Appearance » Customize page in WordPress admin area to launch theme customizer. Here, you need to switch to the ‘Additional CSS’ tab and click on the mobile icon at the bottom right corner of the left panel.

Adding custom CSS to hide complete menu

The customizer will now show a preview of how your site will look on mobile devices. You can now enter the following CSS code and see your mobile menu disappear in the preview panel.

.navbar-toggle-wrapper { 
display:none; 
} 

Don’t forget to replace the .navbar-toggle-wrapper with the identifier used by your WordPress theme.

After that, click on the ‘Publish’ button at the top to save your changes.

2. Hiding specific menu items in mobile menu using CSS

This method allows you to create a navigation menu and then selectively show or hide items that you don’t want to display on mobile or desktop devices.

The advantage of this method is that you can use the same navigation menu for mobile and desktop and simply hide the items that you don’t want to be seen.

First, you need to go to Appearance » Menus page and click on the Screen Options button at the top right corner of the screen. From here, you need to check the box next to the ‘CSS Classes’ option.

Screen Options

After that. you need to scroll down to a menu item that you want to hide on mobile devices and click to expand it. In the menu item settings, you’ll now see the option to add a CSS class. Go ahead and add .hide-mobile CSS class there.

Add CSS class

Repeat the process for all menu items you don’t want to show on mobile.

Similarly, you can also click on the menu items that you want to hide on desktop computers. This time, add the .hide-desktop CSS class instead.

Once you are finished, don’t forget to click on the Save Menu button to store your changes.

Now we will add custom CSS to hide these menu items. Simply go to the Appearance » Customize page to launch the Theme Customizer and click on the Additional CSS tab.

You need to add the following CSS code in the CSS box.

@media (min-width: 980px){

    .hide-desktop{
    display: none !important;
    }

}

    @media (max-width: 980px){
    .hide-mobile{
    display: none !important;
    }

}

Add your custom CSS

Don’t forget to click on the Publish button to save your changes.

You can now visit your website and you will notice that items that you wanted to hide on desktop are no longer visible in the menu. Adjust your browser screen to a smaller size and you will notice the same for the mobile menu as well.

Different menus on desktop and mobile screens

We hope this article helped you learn how to easily hide a mobile menu in WordPress. You may also want to see our article on how to create custom pages in WordPress or how to create a custom theme from scratch without writing code.

If you liked this article, then please subscribe to our YouTube Channel for WordPress video tutorials. You can also find us on Twitter and Facebook.

The post How to Hide a Mobile Menu in WordPress (Beginner’s Guide) appeared first on WPBeginner.

How to Create a Sticky Floating Navigation Menu in WordPress

Recently, one of our users asked us how to create a sticky navigation menu for their site?

Sticky navigation menus stay on the screen as users scroll down the page. This makes the top menu always visible, which is good for user experience because it contains links to the most important sections of your website.

In this article, we’ll show you how to easily create a sticky floating navigation menu in WordPress.

Creating a sticky floating navigation menu in WordPress

What is a Sticky Floating Navigation Menu?

A sticky or floating navigation menu is one that ‘sticks’ to the top of the screen as a user scrolls down. This makes your menu visible to users at all times.

Here’s a sticky menu in action. We’re going to show you how to create a menu exactly like this for your own site:

A sticky navigation menu in action on our demo website

Why and when sticky menus can be useful?

Usually, the top navigation menu contains links to the most important sections of a website. A floating menu makes those links always visible, which saves users from scrolling back to the top. It is also proven to increase conversions.

If you run an online store, then your top navigation menu likely include links to the cart, product categories, and product search. Making this menu sticky, can help you reduce cart abandonment and increase sales.

Some of the best WordPress themes have built-in support for a sticky navigation menu. Simply see your theme settings under Themes » Customize to enable this feature.

If your theme does not have this option, then keep reading, and we’ll show you how to easily create a sticky floating navigation menu in any WordPress theme or WooCommerce store.

Method 1: Add Your Sticky Floating Navigation Menu Using a Plugin

This is the easiest method. We recommend it for all WordPress users, particularly for beginners.

If you haven’t set up your navigation menu yet, go ahead and do that using our instructions on how to add a navigation menu in WordPress.

After that, you need to install and activate the Sticky Menu (or Anything!) on Scroll plugin. For more details, see our step by step guide on how to install a WordPress plugin.

Upon activation, you need to visit the Settings » Sticky Menu (or Anything!) page to configure the plugin settings.

The Sticky Menu plugin's settings page

First you need to enter the CSS ID of the navigation menu that you want to make sticky.

You will need to use your browser’s inspect tool to find the CSS ID used by your navigation menu.

Simply visit your website and take your mouse to the navigation menu. After that, you need to right-click and select Inspect from your browser’s menu.

Inspecting the navigation menu element on your website

This will split your browser screen, and you will be able to see the source code for your navigation menu.

You need to find a line of code that relates to your navigation, or your site header. It will look something like this:

<nav id="site-navigation" class="main-navigation" role="navigation">

If you’re struggling to find it, bring your mouse cursor over the different lines of code in the Inspect pane. The navigation menu will be fully highlighted when you have the right line of code:

Finding the navigation menu ID using the inspect tool

In this case, our navigation menu’s CSS ID is site-navigation.

All you need to do is enter your menu’s CSS ID in the plugin settings with a hash at the start. In this case, that’s #site-navigation.

Entering the ID of the element that you want to make sticky (in this case, the navigation menu)

Don’t forget to click the ‘Save Changes’ button at the bottom of the page.

Now, go ahead and check out your sticky menu live on your WordPress website. It should stay on the page as you scroll down, like this:

Viewing the sticky menu on your website

The next option on the plugin’s settings page is to define the space between the top of your screen and the sticky navigation menu. You only need to use this setting if your menu is overlapping an element that you do not want to be hidden. If not, then ignore this setting.

We recommend leaving the box checked next to the option: ‘Check for Admin Bar’. This allows the plugin to add some space for the WordPress admin bar, which is only visible to logged-in users.

Here, you can see that the admin bar on our test site is correctly displaying above the sticky menu:

The WordPress admin bar appears above the sticky menu

The next option allows you unstick the navigation menu if a user is visiting your website using a smaller screen such as a mobile device:

The sticky menu plugin offers further options too

You can test how your site looks on mobile devices or tablets. If you don’t like how it looks, simply add 780px for this option.

Don’t forget to click on the Save Changes button after making any changes to your options.

Method 2: Manually Add a Sticky Floating Navigation Menu

This method requires you to add custom CSS code to your theme. We don’t recommend it for beginners.

We also recommend that you take a look at our guide on how to easily add custom CSS to your WordPress site before you begin.

First, you need to visit Appearance » Customize to launch the WordPress theme customizer.

Adding custom CSS in WordPress theme

Next, click on ‘Additional CSS’ in the left pane and then add this CSS code.

#site-navigation {
    background:#00000;
    height:60px;
    z-index:170;
    margin:0 auto;
    border-bottom:1px solid #dadada;
    width:100%;
    position:fixed;
    top:0;
    left:0;
    right:0;
    text-align: center;
}

Note: This will produce a navigation menu with a black background. If you want a different color, change the number next to background. For example, using background: #ffffff will give you a white menu background.

Just replace #site-navigation with the CSS ID of your navigation menu then click on the Publish button at the top of the screen.

Go ahead and visit your website to see your sticky floating navigation menu in action:

A sticky / floating navigation menu created using CSS

What if your navigation menu normally appears below the site header instead of above it? If so, this CSS code could overlap the site title and header or appear too close to it before the user scrolls:

The sticky navigation menu is slightly overlapping the site title

This can be easily adjusted by adding a margin to your header area using some additional CSS code:

.site-branding {
margin-top:60px !important;
}

Replace site-branding with the CSS class of your header area. Now, the sticky navigation menu will no longer overlap your header before the user scrolls down:

There's now room for the title below the sticky navigation menu

We hope this article helped you add a sticky floating navigation menu to your WordPress site. You may also want to see our guide on how to create a custom WordPress theme without writing any code, and our comparison of the best WordPress page builder plugins.

If you liked this article, then please subscribe to our YouTube Channel for WordPress video tutorials. You can also find us on Twitter and Facebook.

The post How to Create a Sticky Floating Navigation Menu in WordPress appeared first on WPBeginner.

How to Fix Render-Blocking JavaScript and CSS in WordPress

Do you want to eliminate render-blocking JavaScript and CSS in WordPress?

If you test your website on Google PageSpeed insights, then you will likely see a suggestion to eliminate render-blocking scripts and CSS. However, it does not provide any details on how to do that on your WordPress site.

In this article, we’ll show you how to easily fix render-blocking JavaScript and CSS in WordPress to improve your Google PageSpeed score.

How to fix render blocking JavaScript and CSS in WordPress

What is Render-Blocking JavaScript and CSS?

Render blocking JavaScript and CSS are files that prevent a website from displaying a web page before loading these files.

Every WordPress site has a theme and plugins that add JavaScript and CSS files to the front-end of your website. These scripts can increase your site’s page load time, and they can also block rendering of the page.

Render blocking issue highlighted in Google Pagespeed Insights

A user’s browser will have to load those scripts and CSS before loading the rest of the HTML on the page. This means that users on a slower connection will have to wait a few milliseconds more to see the page.

These scripts and stylesheets are referred to as render-blocking JavaScript and CSS.

Website owners who are trying to achieve the Google PageSpeed score of 100 will need to fix this issue to attain that perfect score.

What is Google PageSpeed Score?

Google PageSpeed Insights is a website speed test tool created by Google to help website owners optimize and test their websites. This tool tests your website against Google’s guidelines for speed and offers suggestions to improve your site’s page load time.

It shows you a score based on the number of rules that your site passes. Most websites get somewhere between 50-70. However, some website owners feel compelled to achieve 100 (the highest a page can score).

Do You Really Need the Perfect “100” Google PageSpeed Score?

The purpose of Google PageSpeed insights is to provide you guidelines to improve the speed and performance of your website. You are not required to follow these rules strictly.

Remember that speed is only one of the many website SEO metrics that help Google determine how to rank your site. The reason speed is so important is because it improves user experience on your site.

Better user experience requires a lot more than just speed. You also need to offer useful information, a better user interface, and engaging content with text, images, and videos.

Your goal should be to create a fast website that offers a great user experience.

During the last WPBeginner redesign, we kept our focus on speed as well as improving user experience.

We recommend that you use Google Pagespeed rules as suggestions, and if you can implement them easily without ruining user experience, then that’s great. Otherwise, you should strive to do as much as you can, and then don’t worry about the rest.

Having said that, let’s take a look at what you can do to fix render-blocking JavaScript and CSS in WordPress.

We will cover two methods that will fix the render-blocking JavaScript and CSS in WordPress. You can choose the one that works best for your website.

1. Fix Render Blocking Scripts and CSS with WP Rocket

For this method, we’ll be using the WP Rocket plugin. It is the best WordPress caching plugin on the market and allows you to quickly improve your website performance without any technical skills or complicated set up.

First, you need to install and activate the WP Rocket plugin. For more details, see our step by step guide on how to install a WordPress plugin.

WP Rocket works out of the box, and it will turn on caching with optimal settings for your website. You can learn more about it in our complete guide on how to properly install and set up WP Rocket in WordPress.

By default, it does not turn on JavaScript and CSS optimization options. These optimizations can potentially affect your website’s appearance or some features, which is why the plugin allows you to enable these settings optionally.

To do that, you need to visit Settings » WP Rocket page and then switch to the ‘File Optimization’ tab. From here, scroll to the CSS Files section and check the boxes next to Minify CSS, Combine CSS Files, and Optimize CSS Delivery options.

CSS Optimization settings in WP Rocket

Note: WP Rocket will attempt to minify all your CSS files, combine them, and only load CSS needed for the visible part of your website. This could affect your website’s appearance, so you need to thoroughly test your website on multiple devices and screen sizes.

Next, you need to scroll to the JavaScript Files section. From here, you can check all the options for maximum performance improvement.

JavaScript optimization

You can minify and combine JavaScript files like you did for CSS.

You can also stop WordPress from loading jQuery Migrate file. It is a script that WordPress loads to provide compatibility for plugins and themes using old versions of jQuery.

Most websites don’t need this file, but you would still want to check your website to make sure that removing it does not affect your theme or plugins.

Next, scroll down a little further and check the boxes next to ‘Load JavaScript Defered’ and ‘Safe Mode for jQuery’ options.

Optimize JavaScript delivery

These options delay loading non-essential JavaScripts, and the jQuery safe mode allows you to load jQuery for themes that may use it inline. You can leave this option unchecked if you are certain that your theme does not use inline jQuery anywhere.

Don’t forget to click on the Save Changes button to store your settings.

After that, you may also want to clear cache in WP Rocket before testing your website again with Google Page Speed Insights.

On our test site, we were able to achieve 100% score on Desktop and render-blocking issue was solved in both mobile and desktop scores.

Fixed render-blocking issue to achieve perfect page speed score

2. Fix Render Blocking Scripts and CSS with Autoptimize

For this method, we will be using a separate plugin made specifically for improving delivery of your website’s CSS and JS files. While this plugin gets the job done, it does not have the other powerful features that WP Rocket has.

First thing you need to do is install and activate the Autoptimize plugin. For more details, see our step by step guide on how to install a WordPress plugin.

Upon activation, you need to visit the Settings » Autoptimize page to configure the plugin settings.

First, you need to check the box next to ‘Optimize JavaScript Code’ option under the JavaScript Options block. Make sure that ‘Aggregate JS-files’ option is unchecked.

Optimize JS files in Autoptimize

Next, scroll down to the CSS Options box and check the ‘Optimize CSS Code’ option. Make sure that ‘Aggregate CSS-files’ option is unchecked.

Optimize CSS in Autoptimize

You can now click on the ‘Save Changes and Empty Cache’ button to store your settings.

Go ahead and test your website with the Page Speed Insights tool. On our demo site, we were able to fix the render-blocking issue with these basic settings.

Fixed render blocking issue in WordPress with Autoptimize plugin

If there are still render-blocking scripts, then you need to come back to the plugin’s settings page and review options under both JavaScript and CSS options.

For instance, you can allow the plugin to include inline JS and remove scripts that are excluded by default like seal.js or jquery.js.

Click on the ‘Save changes and Empty Cache’ button to save your changes and empty plugin cache.

Once you are done, go ahead and check your website again with the Page Speed tool.

How does it work?

Autoptimize aggregates all enqueued JavaScript and CSS. After that, it creates minified CSS and JavaScripts files and serves cached copies to your website as async or deferred.

This allows you to fix the render-blocking scripts and styles issue. However, please keep in mind that it can also affect the performance or appearance of your website.

Troubleshooting

Depending on how the plugins and your WordPress theme uses JavaScript and CSS, it could be quite challenging to completely fix all render-blocking JavaScript and CSS issues.

While the above tools can help, your plugins may need certain scripts at a different priority level to work properly. In that case, the above solutions can break the functionality of such plugins, or they could behave unexpectedly.

Google may still show you certain issues like optimizing CSS delivery for above the fold content. WP Rocket allows you to fix that by manually adding Critical CSS required to display the above fold area of your theme.

However, it could be quite difficult to find out what CSS code you will need to display above the fold content.

We hope this article helped you learn how to fix render-blocking JavaScript and CSS in WordPress. You may also want to see our ultimate guide on how to speed up WordPress performance for beginners, and our comparison of the best managed WordPress hosting companies.

If you liked this article, then please subscribe to our YouTube Channel for WordPress video tutorials. You can also find us on Twitter and Facebook.

The post How to Fix Render-Blocking JavaScript and CSS in WordPress appeared first on WPBeginner.

How to Create a Powerful and Secure Customized Firewall with Defender

Hackers can be persistent at trying to get into your site and drop malicious code, figuring out your credentials, and leaving spam. Thankfully, with WPMU DEV’s 5-star security plugin, Defender, you can set up a firewall, block IP addresses with customized lists, and more…leaving troublemakers unable to take even the first step into your WordPress site.

This tutorial will demonstrate how easy it is to set up Defender’s IP banning and keep your WordPress site safe.

Here are 8 areas we’ll be covering (jump to a specific topic by clicking on it):

  1. Automatically Identify Bad Acting IP Addresses
  2. Creating a Custom Blocklist & Allowlist
  3. Active Lockout Displays
  4. Unlocking IP Addresses
  5. Location Banning
  6. Creating Custom Message for Banned Users
  7. Importing and Exporting Custom Blocklist & Allowlist
  8. Check Your Lockout Log for Suspicious Activity

Most areas of this tutorial are accessible in Defender under the Firewall and IP Banning section unless specified differently.

Let’s get started with the best and most powerful feature of Defender’s firewall…

1. Automatically Identify Bad Acting IP Addresses

Defender automatically identifies bad acting IP addresses and adds them to a firewall, providing your site with ongoing security and protection.

You can lock out users who attempt a number of failed login attempts. Defender gives you control over the threshold and duration of the lockout in the Login Protection screen (Defender > Firewall > Login Protection).

Defender Login Protection screen.
Defender lets you set how many failed login attempts will trigger a lockout for a user’s IP address.

You can view how many IP addresses have been temporarily blocked in the Active Lockouts section of the IP Banning screen (Defender > Firewall > IP Banning > Active Lockouts). You can also unblock IP addresses here.

Defender Active Lockouts
View and release temporarily blocked IP addresses in the Active Lockouts section.

You can also enable 404 detection (Defender > Firewall > 404 Detection), and Defender will automatically block IP addresses that repeatedly request pages on your website that don’t exist. It will also temporarily block these offending IP addresses from accessing your site.

Defender 404 Detection
Defender’s 404 detection blocks IP addresses that repeatedly request pages on your site that don’t exist.

Tip: You can use the 404 detection feature in combination with Defender’s login masking feature to immediately identify and block IP addresses requesting your site’s login page.

In addition to Defender’s automatic IP blocking features, you can also block IPs manually, as the next section explains.

2. Creating a Custom Blocklist & Allowlist

Creating a custom blocklist & allowlist with Defender will keep unwanted IPs from accessing your site.

It’s done by easily entering any IP addresses. This includes admins, too.

The first area is for your Blocklist.

The area to enter your blocklisted IPs.

You can type out any IPs you want to be blocked, and they’ll no longer be able to access your site.

When you scroll down a bit further, you’ll have the option to add IP addresses to your Allowlist.

The Allowlist area.
The Allowlist area.

It’s the same as the blocklist, where you just enter the IP addresses that you’d like to always have access to your WordPress site.

IPv4 and IPv6 are both supported for the blocklist and allowlist.

Note: We recommend adding your own IP to avoid getting locked out by accident. Your current IP address will be shown below the allowlist and you can easily copy and paste it in.

When you have all the information added to the blocklist and allowlist, there’s a Save Changes button at the bottom of the screen that will save everything.

Unwanted IPs are no longer going to be stopping by your WordPress site.

3.Active Lockout Displays

You can easily view any IP addresses that are blocked from accessing your site based on your rules.

Active lockouts screen.

Once you start having lockouts, they’ll all be compiled here. You can see how many IP addresses are currently blocked.

And if you need to unblock any IPs, there’s…

4. Unlocking IP Addresses

Sometimes an IP is blocked or banned and you need to unblock it for many reasons.

Defender makes it simple to release any IP addresses from the Active Lockout area by hitting the Unlock IPS button.

Unlock IPs area.
You can see there are 30 IP addresses currently blocked here.

This will reveal all of the blocked IP addresses and it’s one-click to unblock them by clicking Unblock.

Where you’ll unblock an IP address.

There’s no need to hit anything further after this. It will unblock the IP and you’re all set.

You can also search for specific IPs in the search area if you’re having difficulty locating them on the list.

5. Location Banning

Along with IP addresses, you can also ban entire countries with Defender. This feature is handy when you don’t want or expect traffic from specific locations and want to put a stop to hackers and bots visiting from certain areas.

All of this can be achieved in the Locations section.

Defender works with a company called MaxMind, so it can have access to the GeoLite2 Database. It’s free to set up an account and will ask you to do so when first setting up location banning.

The Locations area. When you get started with Defender, it asks you to set up an account with MaxMind.

There are prompts for a free account. From there, they’ll email you steps to set up a password. Once you login in, you click the link for a new license key in Defender’s dashboard.

Create a new license key in MaxMind and then it will be ready to copy and paste into Defender.

Where a new key is produced.

Once your new license key is pasted, you’ll be all set once you hit the Download button. It may take a few minutes for the key to register, so keep that in mind.

Now you have the option to Blocklist & Allowlist any country.

There is a drop-down menu that displays them. Once you start typing, it will populate any corresponding countries that start with that letter.

The drop-down menu of countries. Select as many as you’d like to blocklist or allowlist.

They’ll all appear in the box below your choice of blocklist or allowlist. You can also take them off the list by clicking on the ‘X’ next to the country’s name.

Blocklist of countries.
List of the countries added so far.

When completed, it’s all saved by hitting the Save Changes button.

6. Creating Custom Messages for Banned Users

Give any locked out hacker a customized message from Defender himself. All of this can be done in the Message area.

You have the ability to add a customized message in this space.

Customized blocklist message.
Where you’ll type in a customized message.

And after that, anyone that is on the blocklist will be greeted by Defender.

A message from Defender.
Defender is here to tell them what’s happening.

After clicking the Save Changes button, the message will be functioning and unwelcome guests will know why they’re IP isn’t making the cut.

7. Importing and Exporting Blocklist & Allowlist

If you have a blocklist or allowlist from another website and want to import them, it’s quick and easy to do. Likewise, you can export your list that you have for blocklist and allowlist to use on another website.

All of this is under Import and Export in Defender.

Where you can import and export blocklist and allowlist.

There’s an Import button to import and Export button to export a list.

Importing will not remove existing IPs. Also, when you export, it will include the blocklist and allowlist.

8. Check Your Lockout Log for Suspicious Activity

You can view all of your lockouts and quickly ban, allowlist, or delete the list in just a couple of clicks. Plus, you can easily download your activity logs of IP lockouts.

This, unlike the previous sections, is located in Firewall and Logs on Defender’s dashboard.

Where you can view all of your lockout activity.

Once here, you can sort logs by the latest, oldest, or IP address. You can also export them as a CSV and adjust the date range.

Where you can sort the logs.

Also, take care of the issues in one-click with Bulk Update. You can ban, allowlist, or delete just by checking the boxes individually or by the dropdown to take care of them all.

Take care of things in bulk with the bulk update.

You can also get more detailed information by clicking on the arrow dropdown next to the issue. There, you’ll also have an option to allowlist or blocklist.

And just like that, all of your lockouts are now taken care of.

Setting Up a Lockout Firewall Can’t Get Any Easier

Unwanted guests won’t get far with Defender’s custom IP address lockout.

And it’s more than just customized IP address lockout — there’s custom messages, location banning, logs, and much more with Defender.

To learn more tips on using Defender, check out our article about finding & deleting suspicious code and all about how to stop hackers in their tracks.

For more information, check out Defender’s documentation page.

How to Setup Delivery Time Slots in WooCommerce (Step by Step)

Have you ever needed to set up delivery time slots for your online store?

Creating delivery time slots allows you to keep up with customer demand for more convenient delivery. At the same time, it also allows you to create a more manageable schedule to match your delivery capacity.

In this guide, we’ll share our step by step process on how to easily set up delivery time slots in WooCommerce.

Setting up delivery time slots in WooCommerce

What are Delivery Slots and Why Set Them up in WooCommerce?

Delivery slots allow customers on an online store to select a specific time and date ‘slots’ for delivery.

This convenient delivery model allows customers to know exactly when they’re going to receive their goods, which in turn increases customer satisfaction and confidence in your brand.

For store owners, offering specific delivery time slots for customers can drastically reduce non-deliveries. As a result, you can save money on delivery costs and make your store more profitable.

On a smaller scale, offering delivery or collection slots to customers allows store owners to manage their schedule and optimize delivery times. They can complete more orders quickly and deliver them on-time.

With that in mind, let’s take a look at how to easily add delivery or collection time slots in WooCommerce.

Creating Delivery Time Slots in WooCommerce

For this tutorial, we’ll be using the WooCommerce Delivery Slots plugin. It is a powerful plugin that adds the essential date and time-based features to the default WooCommerce delivery functionality.

First, you need to install and activate the WooCommerce Delivery Slots plugin. For more details, see our step by step guide on how to install a WordPress plugin.

Upon activation, you need to visit WooCommerce » Delivery Slots page in your WordPress dashboard.

Delivery slots menu

Next, you need to select the General Settings tab. From here you can change where to display the date and time fields and which shipping methods to offer.

Delivery slots settings

After that, switch to the Date Settings tab. On this screen, you can select the days of the week you’ll be offering delivery slots. You’ll also be able to add a maximum number of orders per day, set additional fees for same-day or next-day delivery, and more.

Delivery days

Now you can switch to the Time Settings tab to create your delivery time slots.

Time slot settings

Make sure to ‘Enable Time Slots’ is checked and scroll down to the ‘Time Slot Configuration’ section to customize.

Here you’ll be able to fill the Slot Duration and Slot Frequency fields to dynamically generate slots. You can also leave them empty to create a single time slot.

For this tutorial, we’re creating time slots every 30 minutes from 6 am – 10 am every day of the week. We’re also creating premium time slots every 30 minutes from 10 am – 12 p.m noon on Thursdays and Fridays which costs an extra fee.

Time slot configuration

Tip: WooCommerce Delivery Slots allows you to fully customize your time slots, so you can add additional fees for certain slots, offer slots only for specific shipping methods, and set the maximum number of orders per slot.

Once you’re done creating your delivery time slots, go ahead and click Save Changes.

On the checkout page, your customers will now be able to select a delivery date and time slot to suit them.

Delivery slots on the checkout page

Once the customer has selected their time slot and purchased their items, they’ll be presented with an ‘Order received’ page after checkout.

This page contains a confirmation of their order, and the time slot they selected which will also be confirmed in their order email.

Delivery details

Tip: Make sure your WooCommerce email notifications are working. See our guide on how to fix WordPress not sending emails issue to set up and test your email notifications.

As the store owner, you will be able to see the selected delivery date in the orders overview and details. You can also go to WooCommerce » Delivery Slots » Deliveries page to see all deliveries.

Upcoming deliveries

Creating a Reservation Table in WooCommerce

The WooCommerce Delivery Slots plugin also allows you to enable delivery reservation. This enables customers to reserve a delivery slot in advance.

Simply go to WooCommerce » Delivery Slots page and switch to the ‘Reservation Table’ tab.

Reserve time slots in advance

From here you’ll be able to adjust the settings for your table including setting limits on how long a reservation lasts before a purchase is made and changing its style to suit your store.

Once happy, click Save Changes and copy the shortcode [jckwds] at the top of this settings page.

You can now add this shortcode to any page in your site to allow customers to reserve their delivery time slot before purchase.

Adding reservation table for delivery slots

We hope this article helped you learn how to easily set up delivery time slots in WooCommerce. You might also like our list of the best WooCommerce plugins for your store and best email marketing services to grow your sales.

If you liked this article, then please subscribe to our YouTube Channel for WordPress video tutorials. You can also find us on Twitter and Facebook.

The post How to Setup Delivery Time Slots in WooCommerce (Step by Step) appeared first on WPBeginner.

How to Turn Off Comments Notifications in WordPress

Do you want to turn off comment notifications on your WordPress site?

By default, WordPress notifies the site administrators when there is a new comment on the site.

If you are just starting a new blog, then this feature will alert you of new comments that you can respond to and increase user engagement.

However, these comment notifications could become annoying as your blog grows because you would start getting a lot of them.

Luckily, there is an easy way to disable WordPress comment notification emails. In this article, we will show you how to easily turn off comment notifications in WordPress.

Turning Off Comment Notification Emails in WordPress

How to Turn Off Comment Notification in WordPress (Step by Step)

First of all, you need to login to your WordPress admin area and go to Settings » Discussion page. From here, scroll down to ‘E-mail me whenever’ section where you will see these two checkbox options:

  • Anyone posts a comment
  • A comment is held for moderation

Default WordPress comment email notifications

As shown in the image above, the comment notification emails are enabled by default in WordPress.

Disable Comment Notification Emails in WordPress

To disable comment notifications, you need to uncheck both boxes, and then click on the ‘Save Changes’ button at the bottom of the page.

That’s all!

WordPress will now stop sending comment notification emails to the site administrators and post authors.

If you want more tips to improve your WordPress comment notifications, then you can see our guide on how to how to manage WordPress comment notifications emails.

Turning Off Comment Notification Emails from Other WordPress Websites

Are you receiving comment notification emails from websites other than yours?

If you have commented on a post on another blog and subscribed to its comments, then you will receive comment notification emails every time a new comment is added to the post.

Many blogs nowadays use a plugin like Subscribe to Comments Reloaded to add a comment subscription option in their comment box.

You probably checked or forgot to uncheck the comment subscribe option.

For example, you can see ‘subscribe to comments’ option under the comments section of this article.

Subscribe to Comments in WPBeginner Blog

It is useful if you have asked a support question and waiting for a response from the post author. But if you posted a general feedback comment, then it can distract you unnecessarily.

You can unsubscribe to such comment notification emails by merely clicking on the unsubscribe link in the email.

We hope this article helped you to learn how to turn off comment notifications in WordPress. You may also want to see our guide on how to completely disable comments in WordPress.

If you liked this article, then please subscribe to our YouTube Channel for WordPress video tutorials. You can also find us on Twitter and Facebook.

The post How to Turn Off Comments Notifications in WordPress appeared first on WPBeginner.

How to Completely Disable Comments in WordPress (Ultimate Guide)

Are you wondering how to turn off WordPress comments? While comments are a great way to interact with your site visitors, some website owners don’t want to allow comments on their site.

Thanks to WordPress, you have the ability to either disable comments on specific posts, pages, custom post types, or even completely remove comments from your entire website.

In this article, we’ll show you the step by step process on how to disable comments in WordPress.

How to Completely Disable Comments in WordPress

Why Disable Comments in WordPress?

Many small business owners use WordPress to create their website. These business websites often doesn’t have a blog section and mostly has static pages like services, about us, contact, etc. In such cases, it doesn’t make sense to allow comments at all.

In other cases, bloggers may publish certain posts like announcements that they don’t want to allow comments to trolls. In these cases, you can easily disable comments on those specific posts or pages.

The other scenario is some business blogs choose to disable comments entirely to prevent spam. Although you can always use spam protection techniques (which we’ll share later in this article), disabling the comment section will definitely solve the problem.

Whatever your reason may be, you can certainly disable comments and even remove the comment section from your WordPress site.

Here’s a quick overview of what you’ll learn in this article:

The first few methods will explain how you can disable comments on pages, posts, or media without using a plugin. We’ll later explain how to remove the comment section from your WordPress site with the help of a plugin.

With that said, let’s take a look at various ways to disable comments in WordPress.

Disable Comments on Future Posts

If you’ve just started your WordPress site, you can easily stop comments on your future posts.

To do that, go to Settings » Discussion from the left sidebar of your WordPress admin panel.

On this page, you need to uncheck the option that says “Allow people to post comments on new articles” and then click on the Save Changes button to store your settings.

Disable comments on future posts

This will disable comments on all your future posts. However, if you want to allow or disallow comments on a specific post, then you can still do it without changing this setting.

We’ll cover that in the next section.

Disable Comments on a Specific Page or Post

By default, comments are turned off on all your pages.

However, WordPress gives you the freedom to enable or disable comments on individual pages and posts.

Simply head over to Pages » All Pages from the left sidebar. On the next page, you need to hover your mouse cursor over the title of a page that you want enable or disable comments and click the Edit link.

WordPress Page edit option

On the top-right corner of your page, you’ll see the 3 vertical dots icon. You need to click on it to open a dropdown menu and then click on Options.

This will open a popup box, and you need to make sure the Discussion box is enabled here.

Page document options

Once you close this modal box, you’ll see the Discussion meta box on the right side of your editor. If you don’t see it, then please make sure that you click on the Document tab to view it.

Discussion meta box

Now, you can uncheck the Allow Comments box to disable comments on this page and click on Update to save the changes.

On the other hand, if you want to selectively enable comments, then you can just check the box to enable it for certain pages.

You can follow the same process for turning off comments on individual posts or other custom post types.

Disable Comments on Pages and Posts in Bulk

Want to disable comments on all your published posts and pages without doing it individually? You can do that without the use of a plugin.

First of all, go to Posts » All Posts to see all your articles.

Next, select all the posts, choose Edit from the Bulk Actions dropdown box, and click on Apply.

Edit Posts in bulk

You’ll now be able to perform bulk actions including changing the author name and turning off comments for all the selected posts.

Select Do not allow from the comments dropdown box and click on Update. This will disable comments on all your selected posts.

Disable comments on posts in bulk

You can follow the same process to turn off comments on your pages.

Delete All WordPress Comments

While the above methods will disable comments on your posts and pages, it will not remove the existing comments from your WordPress site.

To delete all the comments from your site, click on Comments from the left sidebar of your admin panel.

Delete all WordPress comments

Next select all the comments, choose Move to Trash option from the Bulk Actions dropdown box, and click on Apply. This will delete all the existing comments from your site.

If your website has a lot of comments, then you will have to repeat this step multiple times.

Disable Comments on Media

If you are looking to disable comments on media pages, then there are two ways to go about it.

You can either manually disable comments on individual media attachment files by following the methods we discussed above but that can be really time consuming.

The easier way to bulk disable comments on all media attachments is by using a code snippet. Simply paste the following code in your theme’s functions.php file or a site-specific plugin.

function filter_media_comment_status( $open, $post_id ) {
    $post = get_post( $post_id );
    if( $post->post_type == 'attachment' ) {
        return false;
    }
    return $open;
}
add_filter( 'comments_open', 'filter_media_comment_status', 10 , 2 );

In case you’re not comfortable with the above solution, you can check out the next section where we’ll show you how to use a plugin to disable comments on Media attachments.

Disable WordPress Comments the Easy Way Using a Plugin

If you don’t want to disable comments manually, then you can use the Disable Comments plugin to do it with just a click.

It allows you to completely disable comments everywhere on your WordPress site. You can also disable them on specific post types like posts, pages, media, and others. It also removes the comment form and stops displaying existing comments.

Disable Comments Plugin

First thing you need to do is install and activate the Disable Comments plugin. You can follow our step by step guide on how to install a WordPress plugin for detailed instructions.

After activating the plugin, head over to Settings » Disable Comments from the left sidebar of your admin panel.

Selecting the first option allows you to disable comments on your WordPress site. The plugin will also remove the comments menu item from your WordPress admin area.

Disable Comments Plugin Settings

Using the second option, you can selectively disable comments on your posts, pages, or media.

If you want to remove comments only from the media attachments, then you can select On certain post types radio button and then check the Media checkbox.

You can do the same if you only want to turn off comments on WordPress pages. Using the plugin is the easiest way to disable comments on WordPress pages.

When you’re done, simply click on the Save Changes to complete the process.

Remove “Comments Are Closed” in WordPress

If your WordPress theme is not checking the comment status properly, then it may still display the comment form, existing comments, or even show the “Comments are closed” message.

You can ask your theme developer to fix this because this is not a standard compliant approach.

Alternatively, you can also try fixing it yourself by following the instructions below.

First, connect to your WordPress site using FTP Client or the File Manager in your WordPress hosting control panel. Now navigate to your current theme folder which will be located in /wp-content/themes/ folder.

In your theme folder, you need to locate the file comments.php, right-click on that file, and rename it to comments_old.php.

Rename comments php file

Next, you need to right-click in the right panel of your FTP client and select Create new file option. And then, name your new file as comments.php and click the OK button.

Create a new comments file

This trick simply serves an empty comments template to your WordPress theme, so no comments or comment related messages will be shown.

If your WordPress theme does not have the comments.php file, then you need to ask your theme developer which file you need to edit.

Spam Protection Techniques

If you’re planning to disable WordPress comments just for the sake of protecting your site from spammers and link builders, then we would rather recommend you to use some of the following techniques to combat spam.

Akismet

Akismet WordPress Plugin

Akismet is one of the best plugins for dealing with spam comments. And the best part is it has been built by the team behind WordPress.

This plugin checks each comment on your site and verifies whether it’s spam or not. For more details, you can check out our guide on the Akismet plugin.

Closing Comments

Did you know that you can close comments after a certain period of time?

Close comments after a specific period

Head over to Settings » Discussion and check the field that says “Automatically close comments on articles older than 14 days”.

This will close the comments form after 14 days automatically. You can also change the number of days based on your needs.

Typically spammers target older posts, so several users change this setting to 180 days which significantly reduces spam.

Honeypot with Antispam Bee

On WPBeginner, we have found it helpful to add a second plugin called Antispam Bee which works alongside with Akismet to significantly reduce comment spam on your site.

It adds an invisible honeypot that blocks 99% of spam bot comments.

Comment Captcha

Though adding a captcha to your comment form is not user-friendly, it still helps you to protect your site from spammers.

You can use the Advanced noCaptcha and Invisible Captcha plugin to add Google reCaptcha just before the submit button of your comment form.

Remove Website URL Form Field

Another way to deal with link builders and spammers is to remove the website URL field from the comment form. Here’s an example from the WPForms website:

Remove Website URL field from comment form

And you can use the Comment Link Remove and Comments Tool plugin for this purpose. It allows you to remove the website URL field from your comment form without touching a single line of code. Isn’t that great?

Blocking Bad IPs

You can also block bad IP addresses from accessing your WordPress site. This will help you to block spammers and hacking attacks.

To do that, you can check our guide on how to block IP addresses in WordPress.

Anyways, we hope this detailed guide helped you to understand how to completely disable comments in WordPress with and without using a plugin.

If you liked this article, then please subscribe to our YouTube Channel for WordPress video tutorials. You can also find us on Twitter and Facebook.

The post How to Completely Disable Comments in WordPress (Ultimate Guide) appeared first on WPBeginner.

How to Change the Number of Posts Displayed On Your WordPress Blog Page

Do you want to change the number of posts displayed on your WordPress blog page? By default, all WordPress archive pages show a maximum of 10 posts per page.

However, you can change them easily from your dashboard settings and show as many articles as you like.

In this article, we will show you how to easily change the number of posts displayed on your WordPress blog page with just 2 simple steps.

Change the Number of Posts Displayed on Your WordPress Blog Page

The first thing you need to do is login to your WordPress dashboard and go to Settings » Reading page. Next, you need to change the value of ‘Blog pages show at most’ option to any number of posts you want to display.

Change Number of Posts on Your Blog Page in WordPress

Don’t forget to click on the ‘Save Changes’ button to store your settings.

Now your WordPress blog and archive pages will show the number of posts that you want to display.

How Many Posts Should I Display on My Blog Page?

Usually, bloggers display 10 posts per page as set by default. It seems an appropriate number to show from the user-experience and SEO (Search Engine Optimization) perspective.

You can display as many posts as you like, but we do not recommend choosing a number higher than 10 especially when you are not showing excerpts.

Mainly because the more posts you display on a page, the bigger the page size will be, which makes it slower to load.

On WPBeginner’s Blog and Archive pages, we show 10 posts with an excerpt and the featured image. This makes it easier for our users to browse the archives quickly, and it offers a better user experience.

We hope this article helped you change the number of posts displayed on your blog page. You may also want to see our guide on how to schedule your posts in WordPress to be published at a future time.

If you liked this article, then please subscribe to our YouTube Channel for WordPress video tutorials. You can also find us on Twitter and Facebook.

The post How to Change the Number of Posts Displayed On Your WordPress Blog Page appeared first on WPBeginner.

How to Create an Online Marketplace using WordPress

Do you want to create an online marketplace using WordPress? An online marketplace website allows users to buy and sell items by setting up their own mini-stores within your eCommerce platform.

It allows you to make money by sharing your online marketplace platform. Due to low overhead costs, it has become a popular online business idea.

In this article, we will show you how to easily create an online marketplace using WordPress without spending thousands of dollars.

Building an online marketplace using WordPress

What Do You Need to Start an Online Marketplace using WordPress?

First, you need to make sure that you are using the right website platform, and since you’re reading this article, you’re in the right place.

There are two types of WordPress available: WordPress.com vs WordPress.org. One is a limited blog hosting service while the other is known as the self-hosted WordPress which you’ve likely heard tons about. See the full comparison between WordPress.com vs WordPress.org.

We recommend using WordPress.org because it gives you the freedom and access to all WordPress features out of the box.

You will need the following items to build an online marketplace website using self-hosted WordPress.

  • A domain name (For example, wpbeginner.com)
  • Web hosting account (This is where your website’s files are stored)
  • SSL Certificate (To securely accept online payments)
  • WooCommerce (best WordPress eCommerce addon)
  • Online marketplace addon

The entire setup can take up to 40 minutes, and we will walk you through every step one by one.

Ready? Let’s get started.

Step 1. Setting up Your Ecommerce Platform

The first step is to buy a domain name and a web hosting account. You don’t just need a web hosting, but you will need a service that specializes in WooCommerce hosting because this is the software that we will be using as our eCommerce platform.

Typically a domain name costs $14.99/year, web hosting 7.99/month, and SSL certificate 69.99/year.

Now, this seems like a lot of money if you are just starting out.

Fortunately, Bluehost an officially recommended WordPress and WooCommerce hosting provider has agreed to offer our users free domain + SSL and discount on their cloud WordPress hosting.

Basically, you can get started for $6.95 / month.

→ Click Here to Claim This Exclusive Bluehost Offer ←

Once you have purchased hosting, then follow our step by step tutorial on how to start an online store for complete setup instructions.

You would now have a WordPress website with WooCommerce installed on it.

However, by default WooCommerce assumes that your website is a single vendor website, so it is not possible for other users to add their own products and services to your website.

Let’s change this.

Step 2. Turn Your WooCommerce Site into an Online Marketplace

First, you need to install and activate the WC Vendors plugin. For more details, see our step by step guide on how to install a WordPress plugin.

WC Vendors is a marketplace solution for WooCommerce. It simplifies building a marketplace website by turning WooCommerce into a multi-vendor platform.

Each vendor can sell their products while you keep full control of the website as the marketplace owner. You can choose your own business model, payment methods, product types, and more.

Upon activation, head over to WC Vendors » Settings page to configure marketplace settings.

WC Vendors settings

First, you will see the general items. You need to make sure that the ‘Vendor Registration’ box is checked to allow users to sign up as Vendor on your website.

You can review other items on the page and then click on the ‘Save Changes’ button to store your settings.

Next, you need to click on the ‘Commission’ tab to set a commission rate for vendors across your website. This is the amount you’ll pay to the vendor for each sale.

WC Vendors commission settings

Note: The global commission rate can be overridden for individual vendors and products.

Next, you need to click on the ‘Capabilities’ tab to set sitewide rules for vendors. This part of settings comes with three sections.

Set capabilities for Vendors

The general capabilities include allowing vendors to view and edit products and orders. The default options would work for most sites.

Next, switch to the ‘Products’ section and from here you can select which type of products vendors can add. For example, you can limit vendors to only add digital downloads or a physical product.

You can also select which data Vendors can see and use on the ‘Add Products’ page.

Set product rules

Lastly, switch to the ‘Orders’ section under ‘Capabilities’ to select what information vendors can see about the orders.

Set vendor permissions for orders

After setting up the capabilities, it is time to set up marketplace related pages on your website.

Switch to the ‘Display’ tab under plugin settings to set up pages. You can simply go to Pages » Add New to create a new page for each item and add the shortcode displayed in the settings to the page’s content area.

Set up marketplace pages

After creating all the pages and adding shortcodes to them, you can select them here.

Below the pages, you will also find ‘Store settings’ option on the same page. This where you can select a prefix to use in Vendor shop URLs, allow them to set custom headers for their shop pages, and use HTML in shop description.

Store settings for vendors

Next step is to set up payments for your vendors. Most marketplace websites set a minimum threshold for their vendors and pay them on a monthly or weekly basis.

We recommend using manual payments to vendors as this gives customers enough time to request refunds or give feedback about the products.

WC Vendors payments

However, if you want to payment withdrawal system for vendors, then you can buy premium add-ons. WC Vendors has add-ons available for Stripe, MangoPay, Escrow, and Manual Payouts.

Depending on the payment gateway you choose, you will need to set up a payment gateway by entering your API keys. Don’t forget to click on the ‘Save Changes’ button to store your settings.

Now that WC Vendors is ready, let’s set up WooCommerce for a multi-vendor environment.

Step 3. Enable Account Management in WooCommerce

First you need to visit WooCommerce » Settings page and click on the ‘Accounts’ tab. From here you need to check the boxes next to customer registration option.

Allow customers to create an account in WooCommerce

Don’t forget to save your changes.

Step 4. Setting Up Navigation Menus

Now that your multi-vendor marketplace setup is finished. It is time to make it easy for your users to find their way around your website.

To do that, go to Appearance » Menus page. From here you need to add your user account and checkout pages to the navigation menu.

Add to menu

Don’t forget to click on the ‘Save Menu’ button to store your changes. For more detailed instructions, see our guide on how to add navigation menus in WordPress.

If you don’t have a My Account page, then simply create a new page in WordPress and add the following shortcode in the post editor
.
[woocommerce_my_account]

Step 5. Testing Your Marketplace Website

Your online marketplace website is now ready for testing. You can visit your website in a new browser window and create a new account by clicking on the My Account link at the top.

Testing your marketplace website

From here, both customers and vendors can log in to their accounts as well as create a new account.

Register as vendor

Once users create a new account, you will receive an email notification. If you are unable to receive email notifications, then take a look at our guide on how to fix WordPress not sending email issue.

You can also view new vendor applications by visiting Users » All Users page. You will see all new vendor requests as ‘pending vendor’, and you can approve or deny applications by clicking the link under their username.

Approve vending vendors

Once approved, these vendors can log in to their accounts and add their products by visiting their vendor dashboard. They can also view their orders and sales reports.

Vendor dashboard

The first thing your vendors need to do is to set up their shop settings by clicking on the ‘Store Settings’ link.

Vendor shop settings

Depending on the payment methods you set up, they will need to provide their PayPal or Stripe email address to receive payments. They will also be able to provide bank account information for direct manual payments.

Once a vendor adds a new product, you will get a notification email and see an icon next to the products menu. You can then edit a product, approve it, or delete it.

Pending products

Your shop page will clearly show the products sold by vendor’s shop name.

Sold by vendor

Step 6. Growing your Online Marketplace Website

First, you may want to choose a design for your marketplace website. WordPress comes with thousands of free and paid themes but not all of them are eCommerce ready.

See our pick of the best WooCommerce themes to find a suitable theme for your marketplace platform.

After that, you would want to add new features to your website. For example, making it a multi-vendor auction site or a membership community.

You would want to track which products are getting more traffic and which vendors are bringing more users. For that you will need to enable customer tracking in WooCommerce on your website.

The biggest hurdle in growing any eCommerce website is abandoned cart sales. Learn how to recover abandoned cart sales like a pro to increase your profits.

We hope this article helped you learn how to create an online marketplace using WordPress. You may also want to see our ultimate WooCommerce SEO guide to get search traffic to your website.

If you liked this article, then please subscribe to our YouTube Channel for WordPress video tutorials. You can also find us on Twitter and Facebook.

The post How to Create an Online Marketplace using WordPress appeared first on WPBeginner.