Due to its agile, flexible, and cost-efficient services, cloud solutions are inevitable for business operations and so are the unavoidable security risks and the probability of malicious attacks that you might have to endure. Cloud security threats are plenty. CSA’s nefarious twelves have listed and positioned Cloud API and insecure interfaces in the number three among the other persistent risk factors that are associated with cloud computing and the OWASP Top Ten report also acknowledged it as a primary security concern that demands intensive risk mitigation efforts.
A Cloud Application Programming Interface (Cloud API) is what facilitates the cloud services by enabling the development of applications and services provisioning the cloud hardware, software, and platforms. Cloud API is a gateway that provides access to the direct and indirect cloud infrastructures and software as the services. Cloud APIs are the means to interact with the cloud infrastructure to designate the computing, storage, and network resources for the concerned cloud applications or services. A key element in provisioning the cloud services cloud APIs are primarily based on the REST and SOAP frameworks. Along with cross-platform and cloud providers' APIs, there are also open APIs and vendor-specific APIs that helps to control the cloud resources and their distribution.
When you talk about API design, the first thing that probably comes to mind is Representational State Transfer (REST). A standard for data retrieval from the server, it’s based on accessing data by URLs.
In 2000, when REST was developed, client applications were relatively simple, development pace wasn’t nearly where it is today, and, as a result, REST was a good fit for many applications. REST gave us important concepts for API design – stateless servers and structured access to resources. However, since that time APIs have gotten more complex and data-driven affected by the following factors:
Spring Boot offers fantastic support for accessing data with JPA through the use of interfaces that extends to the repository. If we add to this the ease with which REST services are created, as explained in this entry, we can make an application that offers an API to access our preferred database very easily.
But if we want to implement HATEOAS in our project or if there are a lot of entry points in our API, we must write a lot of code. To solve this problem, Spring Boot offers the library Spring Data Rest. With it, we can write an API REST to access our database easily and without writing much code.
Zuul is part of the Spring Cloud Netflix package and allows redirect REST requests to perform various types of filters.
In almost any project where we use microservices, it is desirable that all communications between those microservices go through a communal place so that the inputs and outputs are recorded and can implement security or redirect requests, depending on various parameters.
GraphQL is a query language for APIs. Generally, while making REST endpoints in our APIs, the normal trend is to make an endpoint for a requirement. Let's say your endpoint is returning a list of employees, and each employee has general properties, such as name, age, and address (suppose address is another model mapped to the employee in such a way that each employee has an address). Now, at one point in time, you require data only for their address i.e. a list of all addresses in the database (only country, city, and street). For this, you will require an all-new endpoint in your service.
Here comes the power of GraphQL, which lets you deal with only a single endpoint and that changes its output based on the body of the request. Each request will call the same endpoint but with a different RequestBody. It will receive only the result that it requires.
A remote code execution (RCE) vulnerability was recently discovered in Drupal's core code. Drupal was alerted to the vulnerability and started taking action on February 20th. Users potentially affected by the vulnerability include those with 8.6.x and 8.5.x installations. Drupal 7 installations that use the same REST module may also be vulnerable.
In the last article, I shared some courses to learn Microservices development with Spring, and today, I'll talk about RESTful web service development. REST APIs and RESTful web services need no introduction; they're everywhere now and driving a new internet revolution. Most software development in the web space now also involves REST APIs.
Gone are the days where the only interface for a web application is the browser. Now, most of them support REST APIs, which allows them to be accessible on any device like mobile devices, tablets, Apple watches, or any other digital gadget.
Why Wouldn't There Be Any More Developers to Train?
Didn't you notice several strange effects? Experienced developers with high salaries? Older developers are more common? Young developers who are very hard to find? Atypical profiles are being recruited more and more often? More and more bad developers who don't even know how to handle the HTTP verbs of REST? The need for developers is becoming more and more widespread, and, at the same time, they seem to be becoming more difficult to find. We even have this unpleasant impression that young people are less and less interested in pursuing software development. And we can understand that. When I was young, I went through two Amstrad computers at home before upgrading to a Pentium 60Mhz PC with 8 MB of RAM, which I used to tweak config files to be able to launch my games, and for which it was necessary to configure IRQs to install a new sound card.
My children, meanwhile get a tablet in their hands at a very young age (perhaps too young), and have no questions about installing a game, launching it, playing it, or watching videos on the Internet. In short, they don't ask questions! And they don't feel the need to understand how this can work. It was certainly very exciting to understand how a TV or radio works when it came out, but did you feel the need to know? The image of the "great technician" manipulating computers for everyday use has long since disappeared, leading to a loss of the desire to know more.
As enterprises modify and optimize their architecture for the customer-centric digital commerce boom, many enterprises lack the institutional knowledge necessary to quickly make the transformation. Here at commercetools, we have built a cloud-first API only commerce architecture that most companies wish to emulate within their own ecosystem. Thus, our customers frequently ask us to help guide them in their transformation.
This leaves us in a difficult position. Developers are always trying to find the balance between extremely opinionated systems and being forced to reinvent the wheel. commercetools strives to allow developers total flexibility when leveraging its API, from programming language, to SDK options, to choosing REST or GraphQL. The unopinionated nature of commercetools leaves developers with the responsibility of choosing frameworks, cloud architecture, and configuring all the tooling necessary in between.
An API is the communication channel for an application to load data from the server. In the world of APIs, REST has been the more established methodology, but has lately been overshadowed by GraphQL, which offers important advantages over REST. Whereas REST requires multiple HTTP requests to fetch a set of data to render a component, GraphQL can query and retrieve such data in a single request, and the response will be exactly what is required, without over or under-fetching data as typically happens in REST.
In this article, I will describe another way of fetching data which I have designed and called “PoP” (and open sourced here), which expands on the idea of fetching data for several entities in a single request introduced by GraphQL and takes it a step further, i.e. while REST fetches the data for one resource, and GraphQL fetches the data for all resources in one component, the component-based API can fetch the data for all resources from all components in one page.
Using a component-based API makes most sense when the website is itself built using components, i.e. when the webpage is iteratively composed of components wrapping other components until, at the very top, we obtain a single component that represents the page. For instance, the webpage shown in the image below is built with components, which are outlined with squares:
The page is a component wrapping components wrapping components, as shown by the squares. (Large preview)
A component-based API is able to make a single request to the server by requesting the data for all of the resources in each component (as well as for all of the components in the page) which is accomplished by keeping the relationships among components in the API structure itself.
Among others, this structure offers the following several benefits:
A page with many components will trigger only one request instead of many;
Data shared across components can be fetched only once from the DB and printed only once in the response;
It can greatly reduce — even completely remove — the need for a data store.
We will explore these in details throughout the article, but first, let’s explore what components actually are and how we can build a site based on such components, and finally, explore how a component-based API works.
A component is simply a set of pieces of HTML, JavaScript and CSS code put all together to create an autonomous entity. This can then wrap other components to create more complex structures, and be itself wrapped by other components, too. A component has a purpose, which can range from something very basic (such as a link or a button) to something very elaborate (such as a carousel or a drag-and-drop image uploader). Components are most useful when they are generic and enable customization through injected properties (or “props”), so that they can serve a wide array of use cases. In the utmost case, the site itself becomes a component.
The term “component” is often used to refer both to functionality and design. For instance, concerning functionality, JavaScript frameworks such as React or Vue allow to create client-side components, which are able to self-render (for instance, after the API fetches their required data), and use props to set configuration values on their wrapped components, enabling code reusability. Concerning design, Bootstrap has standardized how websites look and feel through its front-end component library, and it has become a healthy trend for teams to create design systems to maintain their websites, which allows the different team members (designers and developers, but also marketers and salesmen) to speak a unified language and express a consistent identity.
Componentizing a site then is a very sensible way to make the website become more maintainable. Sites using JavaScript frameworks such as React and Vue are already component-based (at least on the client-side). Using a component library like Bootstrap doesn’t necessarily make the site be component-based (it could be a big blob of HTML), however, it incorporates the concept of reusable elements for the user interface.
If the site is a big blob of HTML, for us to componentize it we must break the layout into a series of recurring patterns, for which we must identify and catalogue sections on the page based on their similarity of functionality and styles, and break these sections down into layers, as granular as possible, attempting to have each layer be focused on a single goal or action, and also trying to match common layers across different sections.
Note: Brad Frost’s “Atomic Design” is a great methodology for identifying these common patterns and building a reusable design system.
Brad Frost identifies five distinct levels in atomic design for creating design systems. (Large preview)
Hence, building a site through components is akin to playing with LEGO. Each component is either an atomic functionality, a composition of other components, or a combination of the two.
As shown below, a basic component (an avatar) is iteratively composed by other components until obtaining the webpage at the top:
Sequence of components produced, from an avatar all the way up to the webpage. (Large preview)
The Component-Based API Specification
For the component-based API I have designed, a component is called a “module”, so from now on the terms “component” and “module” are used interchangeably.
The relationship of all modules wrapping each other, from the top-most module all the way down to the last level, is called the “component hierarchy”. This relationship can be expressed through an associative array (an array of key => property) on the server-side, in which each module states its name as the key attribute and its inner modules under the property modules. The API then simply encodes this array as a JSON object for consumption:
The relationship among modules is defined on a strictly top-down fashion: a module wraps other modules and knows who they are, but it doesn’t know — and doesn’t care — which modules are wrapping him.
For instance, in the JSON code above, module module-level1 knows it wraps modules module-level11 and module-level12, and, transitively, it also knows it wraps module-level121; but module module-level11 doesn’t care who is wrapping it, consequently is unaware of module-level1.
Having the component-based structure, we can now add the actual information required by each module, which is categorized into either settings (such as configuration values and other properties) and data (such as the IDs of the queried database objects and other properties), and placed accordingly under entries modulesettings and moduledata:
Following, the API will add the database object data. This information is not placed under each module, but under a shared section called databases, to avoid duplicating information when two or more different modules fetch the same objects from the database.
In addition, the API represents the database object data in a relational manner, to avoid duplicating information when two or more different database objects are related to a common object (such as two posts having the same author). In other words, database object data is normalized.
This JSON object is already the response from the component-based API. Its format is a specification all by itself: As long as the server returns the JSON response in its required format, the client can consume the API independently of how it is implemented. Hence, the API can be implemented on any language (which is one of the beauties of GraphQL: being a specification and not an actual implementation has enabled it to become available in a myriad of languages.)
Note: In an upcoming article, I will describe my implementation of the component-based API in PHP (which is the one available in the repo).
API response example
For instance, the API response below contains a component hierarchy with two modules, page => post-feed, where module post-feed fetches blog posts. Please notice the following:
Each module knows which are its queried objects from property dbobjectids (IDs 4 and 9 for the blog posts)
Each module knows the object type for its queried objects from property dbkeys (each post’s data is found under posts, and the post’s author data, corresponding to the author with the ID given under the post’s property author, is found under users)
Because the database object data is relational, property author contains the ID to the author object instead of printing the author data directly.
Differences Fetching Data From Resource-Based, Schema-Based And Component-Based APIs
Let’s see how a component-based API such as PoP compares, when fetching data, to a resource-based API such as REST, and to a schema-based API such as GraphQL.
Let’s say IMDB has a page with two components which need to fetch data: “Featured director” (showing a description of George Lucas and a list of his films) and “Films recommended for you” (showing films such as Star Wars: Episode I — The Phantom Menace and The Terminator). It could look like this:
Components 'Featured director' and 'Films recommended for you' for the next-generation IMDB site. (Large preview)
Let’s see how many requests are needed to fetch the data through each API method. For this example, the “Featured director” component brings one result (“George Lucas”), from which it retrieves two films (Star Wars: Episode I — The Phantom Menace and Star Wars: Episode II — Attack of the Clones), and for each film two actors (“Ewan McGregor” and “Natalie Portman” for the first film, and “Natalie Portman” and “Hayden Christensen” for the second film). The component “Films recommended for you” brings two results (Star Wars: Episode I — The Phantom Menace and The Terminator), and then fetches their directors (“George Lucas” and “James Cameron” respectively).
Using REST to render component featured-director, we may need the following 7 requests (this number can vary depending on how much data is provided by each endpoint, i.e. how much over-fetching has been implemented):
GET - /featured-director
GET - /directors/george-lucas
GET - /films/the-phantom-menace
GET - /films/attack-of-the-clones
GET - /actors/ewan-mcgregor
GET - /actors/natalie-portman
GET - /actors/hayden-christensen
GraphQL allows, through strongly typed schemas, to fetch all the required data in one single request per component. The query to fetch data through GraphQL for the component featuredDirector looks like this (after we have implemented the corresponding schema):
query {
  featuredDirector {
    name
    country
    avatar
    films {
      title
      thumbnail
      actors {
        name
        avatar
      }
    }
  }
}
PoP will issue only one request to fetch all the data for all components in the page, and normalize the results. The endpoint to be called is simply the same as the URL for which we need to get the data, just adding an additional parameter output=json to indicate to bring the data in JSON format instead of printing it as HTML:
GET - /url-of-the-page/?output=json
Assuming that the module structure has a top module named page containing modules featured-director and films-recommended-for-you, and these also have submodules, like this:
Let’s analyze how these three methods compare to each other, in terms of speed and the amount of data retrieved.
Speed
Through REST, having to fetch 7 requests just to render one component can be very slow, mostly on mobile and shaky data connections. Hence, the jump from REST to GraphQL represents a great deal for speed, because we are able to render a component with only one request.
PoP, because it can fetch all data for many components in one request, will be faster for rendering many components at once; however, most likely there is no need for this. Having components be rendered in order (as they appear in the page), is already a good practice, and for those components which appear under the fold there is certainly no rush to render them. Hence, both the schema-based and component-based APIs are already pretty good and clearly superior to a resource-based API.
Amount of Data
On each request, data in the GraphQL response may be duplicated: actress “Natalie Portman” is fetched twice in the response from the first component, and when considering the joint output for the two components, we can also find shared data, such as film Star Wars: Episode I — The Phantom Menace.
PoP, on the other hand, normalizes the database data and prints it only once, however, it carries the overhead of printing the module structure. Hence, depending on the particular request having duplicated data or not, either the schema-based API or the component-based API will have a smaller size.
In conclusion, a schema-based API such as GraphQL and a component-based API such as PoP are similarly good concerning performance, and superior to a resource-based API such as REST.
If a component-based API is not necessarily better in terms of performance than a schema-based API, you may be wondering, then what am I trying to achieve with this article?
In this section, I will attempt to convince you that such an API has incredible potential, providing several features which are very desirable, making it a serious contender in the world of APIs. I describe and demonstrate each of its unique great features below.
The Data To Be Retrieved From The Database Can Be Inferred From The Component Hierarchy
When a module displays a property from a DB object, the module may not know, or care, what object it is; all it cares about is defining what properties from the loaded object are required.
For instance, consider the image below. A module loads an object from the database (in this case, a single post), and then its descendant modules will show certain properties from the object, such as title and content:
While some modules load the database object, others load properties. (Large preview)
Hence, along the component hierarchy, the “dataloading” modules will be in charge of loading the queried objects (the module loading the single post, in this case), and its descendant modules will define what properties from the DB object are required (title and content, in this case).
Fetching all the required properties for the DB object can be done automatically by traversing the component hierarchy: starting from the dataloading module, we iterate all its descendant modules all the way down until reaching a new dataloading module, or until the end of the tree; at each level we obtain all required properties, and then merge all properties together and query them from the database, all of them only once.
In the structure below, module single-post fetches the results from the DB (the post with ID 37), and submodules post-title and post-content define properties to be loaded for the queried DB object (title and content respectively); submodules post-layout and fetch-next-post-button do not require any data fields.
"single-post"
  => Load objects with object type "post" and ID 37
  modules
    "post-layout"
      modules
        "post-title"
          => Load property "title"
        "post-content"
          => Load property "content"
    "fetch-next-post-button"
The query to be executed is calculated automatically from the component hierarchy and their required data fields, containing all the properties needed by all the modules and their submodules:
SELECT
  title, content
FROM
  posts
WHERE
  id = 37
By fetching the properties to retrieve directly from the modules, the query will be automatically updated whenever the component hierarchy changes. If, for instance, we then add submodule post-thumbnail, which requires data field thumbnail:
"single-post"
  => Load objects with object type "post" and ID 37
  modules
    "post-layout"
      modules
        "post-title"
          => Load property "title"
        "post-content"
          => Load property "content"
        "post-thumbnail"
          => Load property "thumbnail"
    "fetch-next-post-button"
Then the query is automatically updated to fetch the additional property:
SELECT
  title, content, thumbnail
FROM
  posts
WHERE
  id = 37
Because we have established the database object data to be retrieved in a relational manner, we can also apply this strategy among the relationships between database objects themselves.
Consider the image below: Starting from the object type post and moving down the component hierarchy, we will need to shift the DB object type to user and comment, corresponding to the post’s author and each of the post’s comments respectively, and then, for each comment, it must change the object type once again to user corresponding to the comment’s author.
Moving from a database object to a relational object (possibly changing the object type, as in post => author going from post to user, or not, as in author => followers going from user to user) is what I call “switching domains”.
Changing the DB object from one domain to another. (Large preview)
After switching to a new domain, from that level at the component hierarchy downwards, all required properties will be subjected to the new domain:
name is fetched from the user object (representing the post’s author),
content is fetched from the comment object (representing each of the post’s comments),
name is fetched from the user object (representing the author of each comment).
Traversing the component hierarchy, the API knows when it is switching to a new domain and, appropriately, update the query to fetch the relational object.
For example, if we need to show data from the post’s author, stacking submodule post-author will change the domain at that level from post to the corresponding user, and from this level downwards the DB object loaded into the context passed to the module is the user. Then, submodules user-name and user-avatar under post-author will load properties name and avatar under the user object:
"single-post"
  => Load objects with object type "post" and ID 37
  modules
    "post-layout"
      modules
        "post-title"
          => Load property "title"
        "post-content"
          => Load property "content"
        "post-author"
          => Switch domain from "post" to "user", based on property "author"
          modules
            "user-layout"
              modules
                "user-name"
                  => Load property "name"
                "user-avatar"
                  => Load property "avatar"
    "fetch-next-post-button"
Resulting in the following query:
SELECT
  p.title, p.content, p.author, u.name, u.avatar
FROM
  posts p
INNER JOIN
  users u
WHERE
  p.id = 37 AND p.author = u.id
In summary, by configuring each module appropriately, there is no need to write the query to fetch data for a component-based API. The query is automatically produced from the structure of the component hierarchy itself, obtaining what objects must be loaded by the dataloading modules, the fields to retrieve for each loaded object defined at each descendant module, and the domain switching defined at each descendant module.
Adding, removing, replacing or altering any module will automatically update the query. After executing the query, the retrieved data will be exactly what is required — nothing more or less.
Observing Data And Calculating Additional Properties
Starting from the dataloading module down the component hierarchy, any module can observe the returned results and calculate extra data items based on them, or feedback values, which are placed under entry moduledata.
For instance, module fetch-next-post-button can add a property indicating if there are more results to fetch or not (based on this feedback value, if there aren’t more results, the button will be disabled or hidden):
Implicit Knowledge Of Required Data Decreases Complexity And Makes The Concept Of An “Endpoint” Become Obsolete
As shown above, the component-based API can fetch exactly the required data, because it has the model of all components on the server and what data fields are required by each component. Then, it can make the knowledge of the required data fields implicit.
The advantage is that defining what data is required by the component can be updated just on the server-side, without having to redeploy JavaScript files, and the client can be made dumb, just asking the server to provide whatever data it is that it needs, thus decreasing the complexity of the client-side application.
In addition, calling the API to retrieve the data for all components for a specific URL can be carried out simply by querying that URL plus adding the extra parameter output=json to indicate returning API data instead of printing the page. Hence, the URL becomes its own endpoint or, considered in a different way, the concept of an “endpoint” becomes obsolete.
Requests to fetch resources with different APIs. (Large preview)
Retrieving Subsets Of Data: Data Can Be Fetched For Specific Modules, Found At Any Level Of The Component Hierarchy
What happens if we don’t need to fetch the data for all modules in a page, but simply the data for a specific module starting at any level of the component hierarchy? For instance, if a module implements an infinite-scroll, when scrolling down we must fetch only new data for this module, and not for the other modules on the page.
This can be accomplished by filtering the branches of the component hierarchy that will be included in the response, to include properties only starting from the specified module and ignore everything above this level. In my implementation (which I will describe in an upcoming article), the filtering is enabled by adding parameter modulefilter=modulepaths to the URL, and the selected module (or modules) is indicated through a modulepaths[] parameter, where a “module path” is the list of modules starting from the top-most module to the specific module (e.g. module1 => module2 => module3 has module path [module1, module2, module3] and is passed as a URL parameter as module1.module2.module3).
For instance, in the component hierarchy below every module has an entry dbobjectids:
Then requesting the webpage URL adding parameters modulefilter=modulepaths and modulepaths[]=module1.module2.module5 will produce the following response:
In essence, the API starts loading data starting from module1 => module2 => module5. That’s why module6, which comes under module5, also brings its data while module3 and module4 do not.
In addition, we can create custom module filters to include a pre-arranged set of modules. For instance, calling a page with modulefilter=userstate can print only those modules which require user state for rendering them in the client, such as modules module3 and module6:
Similar to module filters userstate and page described above, we can implement any custom module filter and create rich user experiences.
The Module Is Its Own API
As shown above, we can filter the API response to retrieve data starting from any module. As a consequence, every module can interact with itself from client to server just by adding its module path to the webpage URL in which it has been included.
I hope you will excuse my over-excitement, but I truly can’t emphasize enough how wonderful this feature is. When creating a component, we don’t need to create an API to go alongside with it to retrieve data (REST, GraphQL, or anything at all), because the component is already able to talk to itself in the server and load its own data — it is completely autonomous and self-serving.
Each dataloading module exports the URL to interact with it under entry dataloadsource from under section datasetmodulemeta:
To make my point that fetching data in a component-based API is highly decoupled and DRY (Don’t Repeat Yourself), I will first need to show how in a schema-based API such as GraphQL it is less decoupled and not DRY.
In GraphQL, the query to fetch data must indicate the data fields for the component, which may include subcomponents, and these may also include subcomponents, and so on. Then, the topmost component needs to know what data is required by every one of its subcomponents too, as to fetch that data.
For instance, rendering the <FeaturedDirector> component might require the following subcomponents:
In this scenario, the GraphQL query is implemented at the <FeaturedDirector> level. Then, if subcomponent <Film> is updated, requesting the title through property filmTitle instead of title, the query from the <FeaturedDirector> component will need to be updated, too, to mirror this new information (GraphQL has a versioning mechanism which can deal with this problem, but sooner or later we should still update the information). This produces maintenance complexity, which could be difficult to handle when the inner components often change or are produced by third-party developers. Hence, components are not thoroughly decoupled from each other.
Similarly, we may want to render directly the <Film> component for some specific film, for which then we must also implement a GraphQL query at this level, to fetch the data for the film and its actors, which adds redundant code: portions of the same query will live at different levels of the component structure. So GraphQL is not DRY.
Because a component-based API already knows how its components wrap each other in its own structure, then these problems are completely avoided. For one, the client is able to simply request the required data it needs, whichever this data is; if a subcomponent data field changes, the overall model already knows and adapts immediately, without having to modify the query for the parent component in the client. Therefore, the modules are highly decoupled from each other.
For another, we can fetch data starting from any module path, and it will always return the exact required data starting from that level; there are no duplicated queries whatsoever, or even queries to start with. Hence, a component-based API is fully DRY. (This is another feature that really excites me and makes me get wet.)
(Yes, pun fully intended. Sorry about that.)
Retrieving Configuration Values In Addition To Database Data
Let’s revisit the example of the featured-director component for the IMDB site described above, which was created — you guessed it! — with Bootstrap. Instead of hardcoding the Bootstrap classnames or other properties such as the title’s HTML tag or the avatar max width inside of JavaScript files (whether they are fixed inside the component, or set through props by parent components), each module can set these as configuration values through the API, so that then these can be directly updated on the server and without the need to redeploy JavaScript files. Similarly, we can pass strings (such as the title Featured director) which can be already translated/internationalized on the server-side, avoiding the need to deploy locale configuration files to the front-end.
Similar to fetching data, by traversing the component hierarchy, the API is able to deliver the required configuration values for each module and nothing more or less.
The configuration values for the featured-director component might look like this:
Please notice how — because the configuration properties for different modules are nested under each module’s level — these will never collide with each other if having the same name (e.g. property classes from one module will not override property classes from another module), avoiding having to add namespaces for modules.
Higher Degree Of Modularity Achieved In The Application
The degree to which a system’s components may be separated and recombined, often with the benefit of flexibility and variety in use. The concept of modularity is used primarily to reduce complexity by breaking a system into varying degrees of interdependence and independence across and ‘hide the complexity of each part behind an abstraction and interface’.
Being able to update a component just from the server-side, without the need to redeploy JavaScript files, has the consequence of better reusability and maintenance of components. I will demonstrate this by re-imagining how this example coded for React would fare in a component-based API.
Let’s say that we have a <ShareOnSocialMedia> component, currently with two items: <FacebookShare> and <TwitterShare>, like this:
Render <ShareOnSocialMedia>:
  <ul>
    <li>Share on Facebook: <FacebookShare url={window.location.href} /></li>
    <li>Share on Twitter: <TwitterShare url={window.location.href} /></li>
  </ul>
But then Instagram got kind of cool, so we need to add an item <InstagramShare> to our <ShareOnSocialMedia> component, too:
Render <ShareOnSocialMedia>:
  <ul>
    <li>Share on Facebook: <FacebookShare url={window.location.href} /></li>
    <li>Share on Twitter: <TwitterShare url={window.location.href} /></li>
    <li>Share on Instagram: <InstagramShare url={window.location.href} /></li>
  </ul>
In the React implementation, as it can be seen in the linked code, adding a new component <InstagramShare> under component <ShareOnSocialMedia> forces to redeploy the JavaScript file for the latter one, so then these two modules are not as decoupled as they could be.
In the component-based API, though, we can readily use the relationships among modules already described in the API to couple the modules together. While originally we will have this response:
And just by iterating all the values under modulesettings["share-on-social-media"].modules, component <ShareOnSocialMedia> can be upgraded to show the <InstagramShare> component without the need to redeploy any JavaScript file. Hence, the API supports the addition and removal of modules without compromising code from other modules, attaining a higher degree of modularity.
Native Client-Side Cache/Data Store
The retrieved database data is normalized in a dictionary structure, and standardized so that, starting from the value on dbobjectids, any piece of data under databases can be reached just by following the path to it as indicated through entries dbkeys, whichever way it was structured. Hence, the logic for organizing data is already native to the API itself.
We can benefit from this situation in several ways. For instance, the returned data for each request can be added into a client-side cache containing all data requested by the user throughout the session. Hence, it is possible to avoid adding an external data store such as Redux to the application (I mean concerning the handling of data, not concerning other features such as the Undo/Redo, the collaborative environment or the time-travel debugging).
Also, the component-based structure promotes caching: the component hierarchy depends not on the URL, but on what components are needed in that URL. This way, two events under /events/1/ and /events/2/ will share the same component hierarchy, and the information of what modules are required can be reutilized across them. As a consequence, all properties (other than database data) can be cached on the client after fetching the first event and reutilized from then on, so that only database data for each subsequent event must be fetched and nothing else.
Extensibility And Re-purposing
The databases section of the API can be extended, enabling to categorize its information into customized subsections. By default, all database object data is placed under entry primary, however, we can also create custom entries where to place specific DB object properties.
For instance, if the component “Films recommended for you” described earlier on shows a list of the logged-in user’s friends who have watched this film under property friendsWhoWatchedFilm on the film DB object, because this value will change depending on the logged-in user then we save this property under a userstate entry instead, so when the user logs out, we only delete this branch from the cached database on the client, but all the primary data still remains:
In addition, up to a certain point, the structure of the API response can be re-purposed. In particular, the database results can be printed in a different data structure, such as an array instead of the default dictionary.
For instance, if the object type is only one (e.g. films), it can be formatted as an array to be fed directly into a typeahead component:
[
  {
    title: "Star Wars: Episode I - The Phantom Menace",
    thumbnail: "..."
  },
  {
    title: "Star Wars: Episode II - Attack of the Clones",
    thumbnail: "..."
  },
  {
    title: "The Terminator",
    thumbnail: "..."
  },
]
Support For Aspect-Oriented Programming
In addition to fetching data, the component-based API can also post data, such as for creating a post or adding a comment, and execute any kind of operation, such as logging the user in or out, sending emails, logging, analytics, and so on. There are no restrictions: any functionality provided by the underlying CMS can be invoked through a module — at any level.
Along the component hierarchy, we can add any number of modules, and each module can execute its own operation. Hence, not all operations must necessarily be related to the expected action of the request, as when doing a POST, PUT or DELETE operation in REST or sending a mutation in GraphQL, but can be added to provide extra functionalities, such as sending an email to the admin when a user creates a new post.
So, by defining the component hierarchy through dependency-injection or configuration files, the API can be said to support Aspect-oriented programming, “a programming paradigm that aims to increase modularity by allowing the separation of cross-cutting concerns.”
The names of the modules are not necessarily fixed when printed in the output, but can be shortened, mangled, changed randomly or (in short) made variable any way intended. While originally thought for shortening the API output (so that module names carousel-featured-posts or drag-and-drop-user-images could be shortened to a base 64 notation, such as a1, a2 and so on, for the production environment), this feature allows to frequently change the module names in the response from the API for security reasons.
For instance, input names are by default named as their corresponding module; then, modules called username and password, which are to be rendered in the client as <input type="text" name="{input_name}"> and <input type="password" name="{input_name}"> respectively, can be set varying random values for their input names (such as zwH8DSeG and QBG7m6EF today, and c3oMLBjo and c46oVgN6 tomorrow) making it more difficult for spammers and bots to target the site.
Versatility Through Alternative Models
The nesting of modules allows to branch out to another module to add compatibility for a specific medium or technology, or change some styling or functionality, and then return to the original branch.
For instance, let’s say the webpage has the following structure:
In this case, we’d like to make the website also work for AMP, however, modules module2, module4 and module5 are not AMP compatible. We can branch these modules out into similar, AMP-compatible modules module2AMP, module4AMP and module5AMP, after which we keep loading the original component hierarchy, so then only these three modules are substituted (and nothing else):
This makes it fairly easy to generate different outputs from a single codebase, adding forks only here and there as needed, and always scoped and restrained to individual modules.
Demonstration Time
The code implementing the API as explained in this article is available in this open-source repository.
I have deployed the PoP API under https://nextapi.getpop.org for demonstration purposes. The website runs on WordPress, so the URL permalinks are those typical to WordPress. As noted earlier, through adding parameter output=json to them, these URLs become their own API endpoints.
Example of JSON code returned by the API. (Large preview)
Conclusion
A good API is a stepping stone for creating reliable, easily maintainable and powerful applications. In this article, I have described the concepts powering a component-based API which, I believe, is a pretty good API, and I hope I have convinced you too.
So far, the design and implementation of the API have involved several iterations and taken more than five years — and it’s not completely ready yet. However, it is in a pretty decent state, not ready for production but as a stable alpha. These days, I am still working on it; working on defining the open specification, implementing the additional layers (such as rendering) and writing documentation.
In an upcoming article, I will describe how my implementation of the API works. Until then, if you have any thoughts about it — regardless whether positive or negative — I would love to read your comments below.
A REST API is a service on the web that works on representational state transfer technology. It is basically a communication’s approach that has usually been employed in the development of web services.
An API based on REST uses HTTP to make requests for functioning with data. REST uses very little bandwidth and is, therefore, more preferable for internet usage. API is the aptest code through which two different software programs can communicate with each other.
I don’t really like talking about “productivity.” The very word sounds callous to me, as if it was invented by some micromanagement freak that wants to squeeze every last drop of energy from their employees.
Instead, let us talk about working smarter, not harder — or, in other words, about avoiding burnout in the burnout-prone IT world.
Writing A Multiplayer Text Adventure Engine In Node.js
Writing A Multiplayer Text Adventure Engine In Node.js
Fernando Doglio
Text adventures were one of the first forms of digital role-playing games out there, back when games had no graphics and all you had was your own imagination and the description you read on the black screen of your CRT monitor.
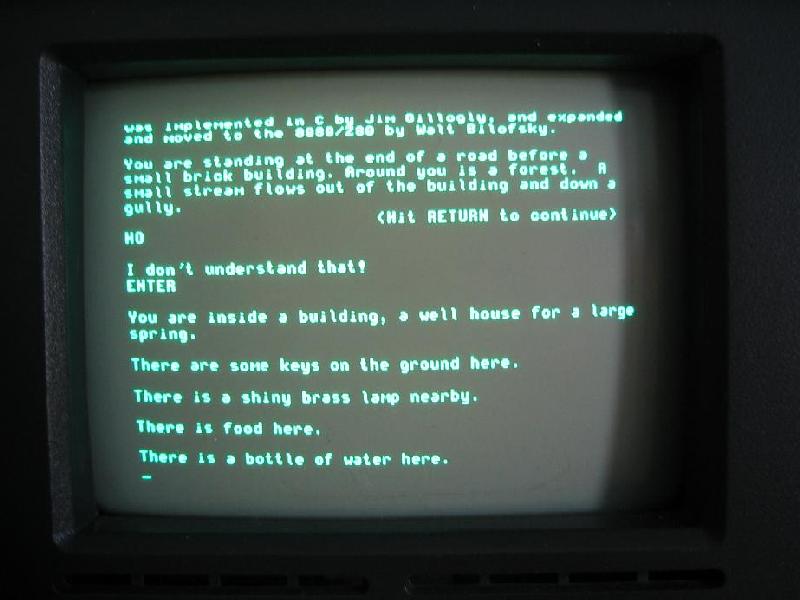
If we want to get nostalgic, maybe the name Colossal Cave Adventure (or just Adventure, as it was originally named) rings a bell. That was the very first text adventure game ever made.
A picture of an actual text adventure from back in the day. (Large preview)
The image above is how you’d actually see the game, a far cry from our current top AAA adventure games. That being said, they were fun to play and would steal hundreds of hours of your time, as you sat in front of that text, alone, trying to figure out how to beat it.
Understandably so, text adventures have been replaced over the years by games that present better visuals (although, one could argue that a lot of them have sacrificed story for graphics) and, especially in the past few years, the increasing ability to collaborate with other friends and play together. This particular feature is one that the original text adventures lacked, and one that I want to bring back in this article.
Our Goal
The whole point of this endeavour, as you have probably guessed by now from the title of this article, is to create a text adventure engine that allows you to share the adventure with friends, enabling you to collaborate with them similarly to how you would during a Dungeons & Dragons game (in which, just like with the good ol’ text adventures, there are no graphics to look at).
In creating the engine, the chat server and the client is quite a lot of work. In this article, I’ll be showing you the design phase, explaining things like the architecture behind the engine, how the client will interact with the servers, and what the rules of this game will be.
Just to give you some visual aid of what this is going to look like, here is my goal:
General wireframe for the final UI of the game client (Large preview)
That is our goal. Once we get there, you’ll have screenshots instead of quick and dirty mockups. So, let’s get down with the process. The first thing we’ll cover is the design of the whole thing. Then, we’ll cover the most relevant tools I’ll be using to code this. Finally, I’ll show you some of the most relevant bits of code (with a link to the full repository, of course).
Hopefully, by the end, you’ll find yourself creating new text adventures to try them out with friends!
Design Phase
For the design phase, I’m going to cover our overall blueprint. I’ll try my best not to bore you to death, but at the same time, I think it’s important to show some of the behind-the-scenes stuff that needs to happen before laying down your first line of code.
The four components I want to cover here with a decent amount of detail are:
The engine
This is going to be the main game server. The game rules will be implemented here, and it’ll provide a technologically agnostic interface for any type of client to consume. We’ll implement a terminal client, but you could do the same with a web browser client or any other type you’d like.
The chat server
Because it’s complex enough to have its own article, this service is also going to have its own module. The chat server will take care of letting players communicate with each other during the game.
The client
As stated earlier, this will be a terminal client, one that, ideally, will look similar to the mockup from earlier. It will make use of the services provided by both the engine and the chat server.
Games (JSON files)
Finally, I’ll go over the definition of the actual games. The whole point of this is to create an engine that can run any game, as long as your game file complies with the engine’s requirements. So, even though this will not require coding, I’ll explain how I’ll structure the adventure files in order to write our own adventures in the future.
The Engine
The game engine, or game server, will be a REST API and will provide all of the required functionality.
I went for a REST API simply because — for this type of game — the delay added by HTTP and its asynchronous nature will not cause any trouble. We will, however, have to go a different route for the chat server. But before we start defining endpoints for our API, we need to define what the engine will be capable of. So, let’s get to it.
Feature
Description
Join a game
A player will be able to join a game by specifying the game’s ID.
Create a new game
A player can also create a new game instance. The engine should return an ID, so that others can use it to join.
Return scene
This feature should return the current scene where the party is located. Basically, it’ll return the description, with all of the associated information (possible actions, objects in it, etc.).
Interact with scene
This is going to be one of the most complex ones, because it will take a command from the client and perform that action — things like move, push, take, look, read, to name just a few.
Check inventory
Although this is a way to interact with the game, it does not directly relate to the scene. So, checking the inventory for each player will be considered a different action.
A Word About Movement
We need a way to measure distances in the game because moving through the adventure is one of the core actions a player can take. We will be using this number as a measure of time, just to simplify the gameplay. Measuring time with an actual clock might not be the best, considering these type of games have turn-based actions, such as combat. Instead, we’ll use distance to measure time (meaning that a distance of 8 will require more time to traverse than one of 2, thus allowing us to do things like add effects to players that last for a set amount of “distance points”).
Another important aspect to consider about movement is that we’re not playing alone. For simplicity’s sake, the engine will not let players split the party (although that could be an interesting improvement for the future). The initial version of this module will only let everyone move wherever the majority of the party decides. So, moving will have to be done by consensus, meaning that every move action will wait for the majority of the party to request it before taking place.
Combat
Combat is another very important aspect of these types of games, and one that we’ll have to consider adding to our engine; otherwise, we’ll end up missing on some of the fun.
This is not something that needs to be reinvented, to be honest. Turn-based party combat has been around for decades, so we’ll just implement a version of that mechanic. We’ll be mixing it up with the Dungeons & Dragons concept of “initiative”, rolling a random number in order to keep the combat a bit more dynamic.
In other words, the order in which everyone involved in a fight gets to pick their action will be randomized, and that includes the enemies.
Finally (although I’ll go over this in more detail below), you’ll have items that you can pick up with a set “damage” number. These are the items you’ll be able to use during combat; anything that doesn’t have that property will cause 0 damage to your enemies. We’ll probably add a message when you try to use those objects to fight, so that you know that what you’re trying to do makes no sense.
Client-Server Interaction
Let’s see now how a given client would interact with our server using the previously defined functionality (not thinking about endpoints yet, but we’ll get there in a sec):
The initial interaction between the client and the server (from the point of view of the server) is the start of a new game, and the steps for it are as follows:
Create a new game.
The client requests the creation of a new game from the server.
Create chat room.
Although the name doesn’t specify it, the server is not just creating a chatroom in the chat server, but also setting up everything it needs in order to allow a set of players to play through an adventure.
Return game’s meta data.
Once the game has been created by the server and the chat room is in place for the players, the client will need that information for subsequent requests. This will mostly be a set of IDs the clients can use to identify themselves and the current game they want to join (more on that in a second).
Manually share game ID.
This step will have to be done by the players themselves. We could come up with some sort of sharing mechanism, but I will leave that on the wish list for future improvements.
Join the game.
This one is pretty straightforward. Ince everyone has the game ID, they’ll join the adventure using their client applications.
Join their chat room.
Finally, the players’ client apps will use the game’s metadata to join their adventure’s chat room. This is the last step required pre-game. Once this is all done, then the players are ready to start adventuring!
Once the prerequisites have all been met, players can start playing the adventure, sharing their thoughts through the party chat, and advancing the story. The diagram above shows the four steps required for that.
The following steps will run as part of the game loop, meaning that they will be repeated constantly until the game ends.
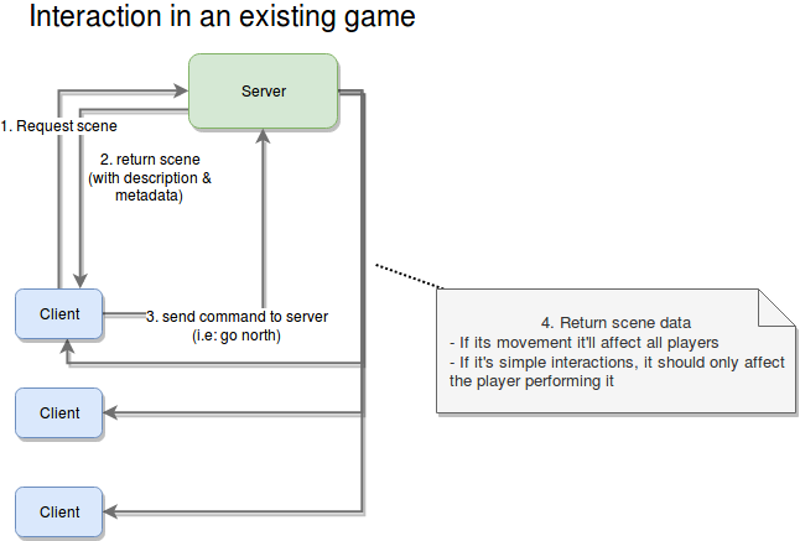
Request scene.
The client app will request the metadata for the current scene. This is the first step in every iteration of the loop.
Return the meta data.
The server will, in turn, send back the metadata for the current scene. This information will include things like a general description, the objects found inside it, and how they relate to each other.
Send command.
This is where the fun begins. This is the main input from the player. It’ll contain the action they want to perform and, optionally, the target of that action (for example, blow candle, grab rock, and so on).
Return the reaction to the command sent.
This could simply be step two, but for clarity, I added it as an extra step. The main difference is that step two could be considered the beginning of this loop, whereas this one takes into account that you’re already playing, and, thus, the server needs to understand who this action is going to affect (either a single player or all players).
As an extra step, although not really part of the flow, the server will notify clients about status updates that are relevant to them.
The reason for this extra recurring step is because of the updates a player can receive from the actions of other players. Recall the requirement for moving from one place to another; as I said before, once the majority of the players have chosen a direction, then all players will move (no input from all players is required).
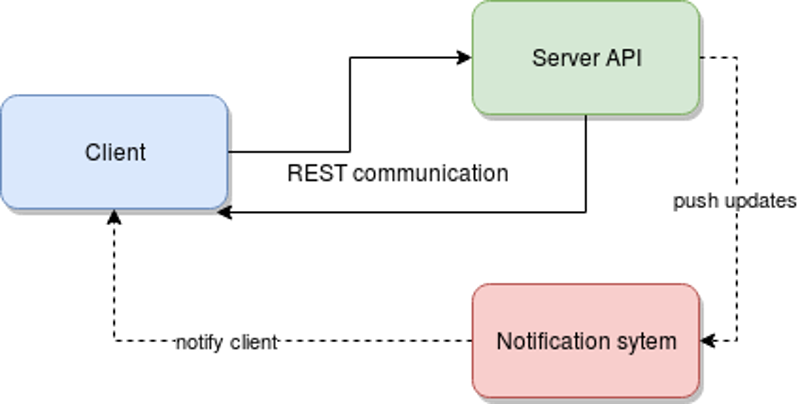
The interesting bit here is that HTTP (we’ve already mentioned that the server is going to be a REST API) does not allow for this type of behavior. So, our options are:
perform polling every X amount of seconds from the client,
use some sort of notification system that works in parallel with the client-server connection.
In my experience, I tend to prefer option 2. In fact, I would (and will for this article) use Redis for this kind of behavior.
The following diagram demonstrates the dependencies between services.
Interactions between an client app and the game engine (Large preview)
The Chat Server
I will leave the details of the design of this module for the development phase (which is not a part of this article). That being said, there are things we can decide.
One thing we can define is the set of the restrictions for the server, which will simplify our work down the line. And if we play our cards right, we might end up with a service that provides a robust interface, thus allowing us to, eventually, extend or even change the implementation to provide fewer restrictions without affecting the game at all.
There will be only one room per party.
We will not let subgroups be created. This goes hand in hand with not letting the party split. Maybe once we implement that enhancement, allowing for subgroup and custom chat room creation would be a good idea.
There will be no private messages.
This is purely for simplification purposes, but having a group chat is already good enough; we don’t need private messages right now. Remember that whenever you’re working on your minimum viable product, try to avoid going down the rabbit hole of unnecessary features; it’s a dangerous path and one that is hard to get out of.
We will not persist messages.
In other words, if you leave the party, you’ll lose the messages. This will hugely simplify our task, because we won’t have to deal with any type of data storage, nor will we have to waste time deciding on the best data structure to store and recover old messages. It’ll all live in memory, and it will stay there for as long as the chat room is active. Once it’s closed, we’ll simply say goodbye to them!
Communication will be done over sockets.
Sadly, our client will have to handle a double communication channel: a RESTful one for the game engine and a socket for the chat server. This might increase the complexity of the client a bit, but at the same time, it will use the best methods of communication for every module. (There is no real point in forcing REST on our chat server or forcing sockets on our game server. That approach would increase the complexity of the server-side code, which is the one also handling the business logic, so let’s focus on that side for now.)
That’s it for the chat server. After all, it will not be complex, at least not initially. There is more to do when it’s time to start coding it, but for this article, it is more than enough information.
The Client
This is the final module that requires coding, and it is going to be our dumbest one of the lot. As a rule of thumb, I prefer to have my clients dumb and my servers smart. That way, creating new clients for the server becomes much easier.
Just so we’re on the same page, here is the high-level architecture that we should end up with.
Final high level architecture of the entire development (Large preview)
Our simple ClI client will not implement anything very complex. In fact, the most complicated bit we’ll have to tackle is the actual UI, because it’s a text-based interface.
That being said, the functionality that the client application will have to implement is as follows:
Create a new game.
Because I want to keep things as simple as possible, this will only be done through the CLI interface. The actual UI will only be used after joining a game, which brings us to the next point.
Join an existing game.
Given the game’s code returned from the previous point, players can use it to join in. Again, this is something you should be able to do without a UI, so this functionality will be part of the process required to start using the text UI.
Parse game definition files.
We’ll discuss these in a bit, but the client should be able to understand these files in order to know what to show and know how to use that data.
Interact with the adventure.
Basically, this gives the player the ability to interact with the environment described at any given time.
Maintain an inventory for each player.
Each instance of the client will contain an in-memory list of items. This list is going to be backed up.
Support chat.
The client app needs to also connect to the chat server and log the user into the party’s chat room.
More on the client’s internal structure and design later. In the meantime, let’s finish the design stage with the last bit of preparation: the game files.
The Game: JSON Files
This is where it gets interesting because up to now, I’ve covered basic microservices definitions. Some of them might speak REST, and others might work with sockets, but in essence, they’re all the same: You define them, you code them, and they provide a service.
For this particular component, I’m not planning on coding anything, yet we need to design it. Basically, we’re implementing a sort of protocol for defining our game, the scenes inside it and everything inside them.
If you think about it, a text adventure is, at its core, basically a set of rooms connected to each other, and inside them are “things” you can interact with, all tied together with a, hopefully, decent story. Now, our engine will not take care of that last part; that part will be up to you. But for the rest, there is hope.
Now, going back to the set of interconnected rooms, that to me sounds like a graph, and if we also add the concept of distance or movement speed that I mentioned earlier, we have a weighted graph. And that is just a set of nodes that have a weight (or just a number — don’t worry about what it’s called) that represents that path between them. Here is a visual (I love learning by seeing, so just look at the image, OK?):
That’s a weighted graph — that’s it. And I’m sure you’ve already figured it out, but for the sake of completeness, let me show you how you would go about it once our engine is ready.
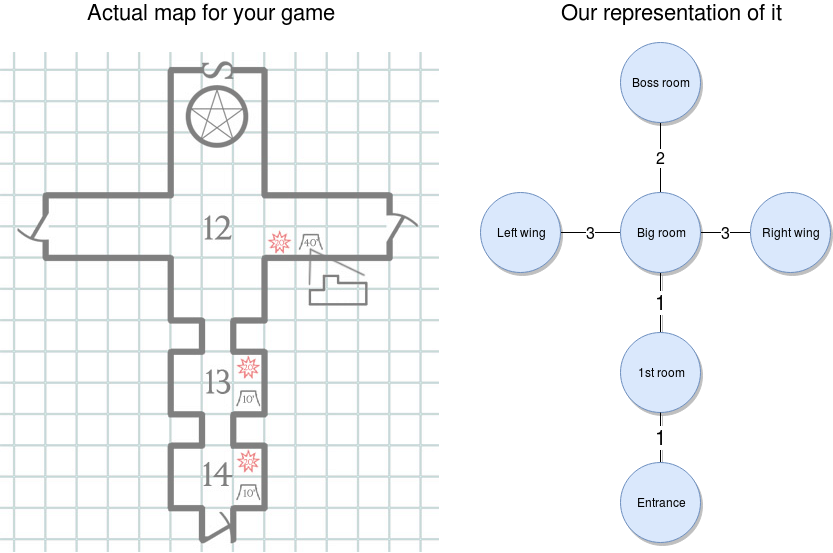
Once you start setting up the adventure, you’ll create your map (like you see on the left of the image below). And then you’ll translate that into a weighted graph, as you can see on the right of the image. Our engine will be able to pick it up and let you walk through it in the right order.
With the weighted graph above, we can make sure players can’t go from the entrance all the way to the left wing. They would have to go through the nodes in between those two, and doing so will consume time, which we can measure using the weight from the connections.
Now, onto the “fun” part. Let’s see how the graph would look like in JSON format. Bear with me here; this JSON will contain a lot of information, but I’ll go through as much of it as I can:
{
    "graph": [
            { "id": "entrance", "name": "Entrance", "north": { "node": "1stroom", "distance": 1 } },
     { "id": "1st room", "name": "1st Room", "south": {"node": "entrance", "distance": 1} , "north": { "node": "bigroom", "distance": 1} } ,
     { "id": "bigroom",
       "name": "Big room",
       "south": { "node": "1stroom", "distance": 1},
       "north": { "node": "bossroom", "distance": 2},
       "east":  { "node": "rightwing", "distance": 3} ,
       "west":  { "node": "leftwing", "distance": 3}
     },
     { "id": "bossroom", "name": "Boss room", "south": {"node": "bigroom", "distance": 2} }
     { "id": "leftwing", "name": "Left Wing", "east": {"node": "bigroom", "distance": 3} }
     { "id": "rightwing", "name": "Right Wing", "west": { "node": "bigroom", "distance": 3 } }
    ],
    "game": {
     "win-condition": {
       "source": "finalboss",
       "condition": {
         "type": "comparison",
         "left": "hp",
         "right": "0",
         "symbol": "<="
       }
     },
     "lose-condition": {
       "source": "player",
       "condition": {
         "type": "comparison",
         "left": "hp",
         "right": "0",
         "symbol": "<="
       }
     }
    },
    "rooms": {
     "entrance": {
       "description": {
         "default": "You're at the entrance of the dungeon. There are two lit torches on each wall (one on your right and one on your left). You see only one path: ahead."
       },
       "items": [
         {
           "id": "littorch1",
           "name": "Lit torch on the right",
           "triggers": [
             {
               "action": "grab", //grab Lit torch on the right
               "effect":{
                 "statusUpdate": "has light",
                 "target": "game",
               }
             }
           ] ,
           "destination": "hand"
         },
         {
           "id": "littorch2",
           "name": "Lit torch on the left",
           "triggers": [
             {
               "action": "grab", //grab Lit torch on the left
               "effect":{
                 "statusUpdate": "has light",
                 "target": "game",
               }
             }
           ] ,
           "destination": "hand"

         }
       ]
     },
     "1stroom": {
       "description": {
         "default": "You're in a very dark room. There are no windows and no source of light, other than the one at the entrance. You get the feeling you're not alone here.",
         "conditionals": {
           "has light": "The room you find yourself in appears to be empty, aside from a single chair in the right corner. There appears to be only one way out: deeper into the dungeon."
         }
       },
       "items": [
         {
           "id": "chair",
           "name": "Wooden chair",
           "details": "It's a wooden chair, nothing fancy about it. It appears to have been sitting here, untouched, for a while now.",
           "subitems": [
             {    "id": "woodenleg",
               "name": "Wooden leg",
               "triggeractions": [
                 { "action": "break", "target": "chair"},  //break
                 { "action": "throw", "target": "chair"} //throw
               ],
               "destination": "inventory",
               "damage": 2
             }
           ]
         }
       ]
     },
     "bigroom": {
       "description": {
         "default": "You've reached the big room. On every wall are torches lighting every corner. The walls are painted white, and the ceiling is tall and filled with painted white stars on a black background. There is a gateway on either side and a big, wooden double door in front of you."
       },
       "exits": {
         "north": { "id": "bossdoor",  "name": "Big double door", "status": "locked", "details": "A aig, wooden double door. It seems like something big usually comes through here."}
       },
       "items": []
     },
     "leftwing": {
       "description": {
         "default": "Another dark room. It doesn't look like it's that big, but you can't really tell what's inside. You do, however, smell rotten meat somewhere inside.",
         "conditionals": {
           "has light":  "You appear to have found the kitchen. There are tables full of meat everywhere, and a big knife sticking out of what appears to be the head of a cow."
         }
       },
       "items": [
         { "id": "bigknife", "name": "Big knife", "destination": "inventory", "damage": 10}
       ]
     },
     "rightwing": {
       "description": {
         "default": "This appear to be some sort of office. There is a wooden desk in the middle, torches lighting every wall, and a single key resting on top of the desk."
       },
       "items": [
         {     "id": "key",
           "name": "Golden key",
           "details": "A small golden key. What use could you have for it?",
           "destination": "inventory",
           "triggers": [{
             "action": "use", //use  on north exit (contextual)
             "target": {
               "room": "bigroom",
               "exit": "north"
             },
             "effect": {
               "statusUpdate": "unlocked",
               "target": {
                 "room": "bigroom",
                 "exit": "north"
               }
             }
           }
         ]
         }
       ]
     },
     "bossroom": {
       "description": {
         "default": "You appear to have reached the end of the dungeon. There are no exits other than the one you just came in through. The only other thing that bothers you is the hulking giant looking like it's going to kill you, standing about 10 feet from you."
       },
       "npcs": [
         {
           "id": "finalboss",
           "name": "Hulking Ogre",
           "details": "A huge, green, muscular giant with a single eye in the middle of his forehead. It doesn't just look bad, it also smells like hell.",
           "stats":  {
             "hp": 10,
             "damage": 3
           }
         }
       ]
     }
    }
}
I know it looks like a lot, but if you boil it down to a simple description of the game, you have a dungeon comprising six rooms, each one interconnected with others, as shown in the diagram above.
Your task is to move through it and explore it. You’ll find there are two different places where you can find a weapon (either in the kitchen or in the dark room, by breaking the chair). You will also be confronted with a locked door; so, once you find the key (located inside the office-like room), you’ll be able to open it and fight the boss with whatever weapon you’ve collected.
You will either win by killing it or lose by getting killed by it.
Let’s now get into a more detailed overview of the entire JSON structure and its three sections.
Graph
This one will contain the relationship between the nodes. Basically, this section directly translates into the graph we looked at before.
The structure for this section is pretty straightforward. It’s a list of nodes, where every node comprises the following attributes:
an ID that uniquely identifies the node among all others in the game;
a name, which is basically a human-readable version of the ID;
a set of links to the other nodes. This is evidenced by the existence of four possible keys: north”, south, east, and west. We could eventually add further directions by adding combinations of these four. Every link contains the ID of the related node and the distance (or weight) of that relation.
Game
This section will contain the general settings and conditions. In particular, in the example above, this section contains the win and lose conditions. In other words, with those two conditions, we’ll let the engine know when the game can end.
To keep things simple, I’ve added just two conditions:
you either win by killing the boss,
or lose by getting killed.
Rooms
Here is where most of the 163 lines come from, and it is the most complex of the sections. This is where we’ll describe all of the rooms in our adventure and everything inside them.
There will be a key for every room, using the ID we defined before. And every room will have a description, a list of items, a list of exits (or doors) and a list of non-playable characters (NPCs). Out of those properties, the only one that should be mandatory is the description, because that one is required for the engine to let you know what you’re seeing. The rest of them will only be there if there is something to show.
Let’s look into what these properties can do for our game.
The Description
This item is not as simple as one might think, because your view of a room can change depending on different circumstances. If, for example, you look at the description of the first room, you’ll notice that, by default, you can’t see anything, unless of course, you have a lit torch with you.
So, picking up items and using them might trigger global conditions that will affect other parts of the game.
The Items
These represent all the things” you can find inside a room. Every item shares the same ID and name that the nodes in the graph section had.
They will also have a “destination” property, which indicates where that item should be stored, once picked up. This is relevant because you will be able to have only one item in your hands, whereas you’ll be able to have as many as you’d like in your inventory.
Finally, some of these items might trigger other actions or status updates, depending on what the player decides to do with them. One example of this are the lit torches from the entrance. If you grab one of them, you’ll trigger a status update in the game, which in turn will make the game show you a different description of the next room.
Items can also have “subitems”, which come into play once the original item gets destroyed (through the “break” action, for example). An item can be broken down into several ones, and that is defined in the “subitems” element.
Essentially, this element is just an array of new items, one that also contains the set of actions that can trigger their creation. This basically opens up the possibility to create different subitems based on the actions you perform on the original item.
Finally, some items will have a “damage” property. So, if you use an item to hit an NPC, that value will be used to subtract life from them.
The Exits
This is simply a set of properties indicating the direction of the exit and the properties of it (a description, in case you want to inspect it, its name and, in some cases, its status).
Exits are a separate entity from items because the engine will need to understand if you can actually traverse them based on their status. Exits that are locked will not let you go through them unless you work out how to change their status to unlocked.
The NPCs
Finally, NPCs will be part of another list. They are basically items with statistics that the engine will use to understand how each one should behave. The ones we’ve defined in our example are “hp”, which stands for health points, and “damage”, which, just like the weapons, is the number that each hit will subtract from the player’s health.
That is it for the dungeon I created. It is a lot, yes, and in the future I might consider creating a level editor of sorts, to simplify the creation of the JSON files. But for now, that won’t be necessary.
In case you haven’t realized it yet, the main benefit of having our game defined in a file like this is that we’ll be able to switch JSON files like you did cartridges back in the Super Nintendo era. Just load up a new file and start a new adventure. Easy!
Closing Thoughts
Thanks for reading thus far. I hope you’ve enjoyed the design process I go through to bring an idea to life. Remember, though, that I’m making this up as I go, so we might realize later that something we defined today isn’t going to work, in which case we’ll have to backtrack and fix it.
I’m sure there are a ton of ways to improve the ideas presented here and to make one hell of an engine. But that would require a lot more words than I can put into an article without making it boring for everyone, so we’ll leave it at that for now.
I think many WordPress users probably underestimate the amount of data that is made available via the REST API. Just about everything is available to anyone or anything that asks for it: posts, pages, categories, tags, comments, taxonomies, media, users, settings, and more. For most of these types of data, public access is useful. For example, if you have a JSON-powered news reader, it can basically replicate your entire site structure virtually anywhere. But that easy access invites potential abuse. Just like with RSS feeds, RESTfully delivered JSON content is easily scraped and used for spam, phishing, plagiarism, adsense, and other foul things.
User Data = Public Domain?
Beyond content theft, plagiarism, and such, the REST API opens the door to another potential security slash privacy concern over user data. By default every WordPress site delivers a significant amount of user data to anyone or anything that asks for it. For any user (of any role) that is the author of at least one post, their personal information is openly available to literally everyone.
So exactly which user data are exposed via the REST API? As explained in the documentation, the /users endpoint delivers basically everything except for user email addresses and passwords. Everything else — ID, Name, Website, Description, URL, Metadata and more — all public domain thanks to REST API.
To give you a more concrete example of the data that is shared publicly via the REST API, consider the following URL:
https://digwp.com/wp-json/wp/v2/users/3
Here we are invoking the REST API by calling a specific user endpoint (i.e., user ID = 3). Requesting that URL in a browser, the following data are returned:
{
	"id": 3,
	"name": "Jeff Starr",
	"url": "https:\/\/perishablepress.com",
	"description": "Jeff Starr is a professional web developer and book author with over 15 years of experience...",
	"link": "https:\/\/digwp.com\/author\/jeffstarr\/",
	"slug": "jeffstarr",
	"avatar_urls": {
		"24":"https:\/\/secure.gravatar.com\/avatar\/...",
		"48":"https:\/\/secure.gravatar.com\/avatar\/...",
		"96":"https:\/\/secure.gravatar.com\/avatar\/..."
	},
	"meta": [],
	"_links": {
		"self":       [{"href":"https:\/\/digwp.com\/wp-json\/wp\/v2\/users\/3"}],
		"collection": [{"href":"https:\/\/digwp.com\/wp-json\/wp\/v2\/users"}]
	}
},
This same information also is available at other endpoints, for example:
https://digwp.com/wp-json/wp/v2/users
There you will find the same amount of information provided for every qualified user. Note that you can try this on your own WordPress-powered site. Simply replace digwp.com with your own domain name, and remember to include the subdirectory path if WordPress is installed in a subdirectory.
What's the Risk?
So WP REST API and security. For everything except the user data, the main risks basically are the same as for RSS feeds. Scrapers and content thieves are savvy enough to steal your content regardless of format. If you make it easy for people to steal your content, they will. So whether they're grabbing the data via RSS or JSON format, content is content, and the REST API makes it easier than ever for anyone and anything to manipulate your site's content, categories, tags, meta, and much more. Is that acceptable? Totally your call.
Now for user data, we enter a whole new level of risk. With user data, the information is personal, so there is a potential privacy risk. Even worse, for every user, their "Name" by default is their "Display Name", which defaults to the registered Username unless otherwise specified. This means that your site's registered usernames are publicly available, so there is a potential security risk.
Privacy Risk
For the privacy risk, perhaps it is a non-issue for most WordPress sites. But for the percentage of sites that must abide by an official privacy policy or other company rules and regulations (GDPR, anyone?), publicly sharing information about every qualified user is gonna be a problem. Or maybe your site needs to keep all author information private for legal or political reasons (like at a news reporting or government site). In many such cases REST's default functionality may present serious privacy risk. As someone said somewhere on social media1:
A lot of institutions use WordPress for their staff or students or even patients/clients. They probably have no idea this is exposed and they also probably have some level of security policy that doesn't allow names to be listed publicly. I think it's a problem and should be opt-in.
Security Risk
For the security risk, the significance and extent of the issue is up for debate1,2,3. In general, bad actors require at least two things to gain access to your site4:
Username
Password
And thanks to the WP REST API, they now have half of what they need. So the REST API introduces a security vulnerability by making it easier for attackers to brute-force their way into your site5,6. Instead of having to guess the correct username AND password, now they just have to guess the password. Which unfortunately for many user accounts is just too ridiculously easy to do.
Another on-topic post from social media1:
Its one-half of the puzzle in acquiring unauthorized credentials. If you're trying to follow best practices, you don't expose sensitive data. If you've worked to remove all leakage of user names from your site, this just re-exposed all that data.
How to Secure the REST API
So at this point, you should have a pretty good understanding of how the WordPress REST API works and why it can be considered a privacy and/or security risk for probably a vast percentage of WordPress sites. Now you get to decide whether or not it is necessary to take action and secure your site against unsafe data exposure. Fortunately, there are a couple of easy ways to lock it down using a WordPress plugin. Here are a couple of free options:
Disable REST API — Disable REST completely for all non-logged users
Full disclosure, the first option listed here, Disable WP REST API, is one of my own plugins. It is designed to be super lightweight and effective. That in mind, either of these plugins is gonna do the job to protect against unwanted REST exposure. If you know of other/better techniques, share ’em in the comments.
WordPress Team On Point
The WordPress team is aware of this potential privacy/security risk and already has taken steps to lock it down. For example, before the WP 4.7.1 update, the REST API exposed sensitive data for ALL registered users, regardless of whether or not they are credited as Author for any post(s).
So thanks to improvements made in version 4.7.1, WordPress now displays user data ONLY for users (of any role) who are credited as author for registered post types. This important step helps to reduce user data exposure, and tells us that the WP team is actively working to keep WordPress as safe and secure as possible. Hopefully they will take further steps to eliminate unnecessary exposure of sensitive user information.
Closing Thoughts
As simple as it is to properly address the fundamental vulnerabilities inherent in the WP REST API, unfortunately most WordPress users will remain blissfully unaware and do nothing. This is why the REST API should disable the public view of most if not all user data.
Sensitive information should be exposed only to authenticated users. Disabling exposure of user data by default helps to protect the vast majority of WordPress users, and of course developers always will be savvy enough to enable the user data endpoints if/when needed. It's a win win! :)
Footnotes
Here are some related materials and resources FYI: