Every respectable software project needs a README. This file provides crucial information about what the project is, how to work with it, and other relevant information for developers. README files are written in markdown, a special markup syntax. The syntax for markdown is simple enough, but it can be a pain to manually type out, and it’s easy to make simple mistakes and typos.
Wouldn’t you like to just use the Cmd+B keyboard shortcut to bold some text instead of typing ** around your text? Or what about creating a nicely formatted table in your README, especially when editing an existing table? Wouldn’t it be nice if the table formatting and column width adjustments were taken care of for us? Markdown is wonderful, but it’s not exactly as easy as working with a Google doc when applying formatting.
Whether you like it or not, GitHub has become the primary provider to host one's code. You or your company is probably using GitHub. I want to highlight some files to beautify your GitHub repository in this post.
Read Mes
I hope that by now, everybody is familiar with READMES. If one places a README file at the root of one's repo, GitHub will display its content on the repo's homepage.
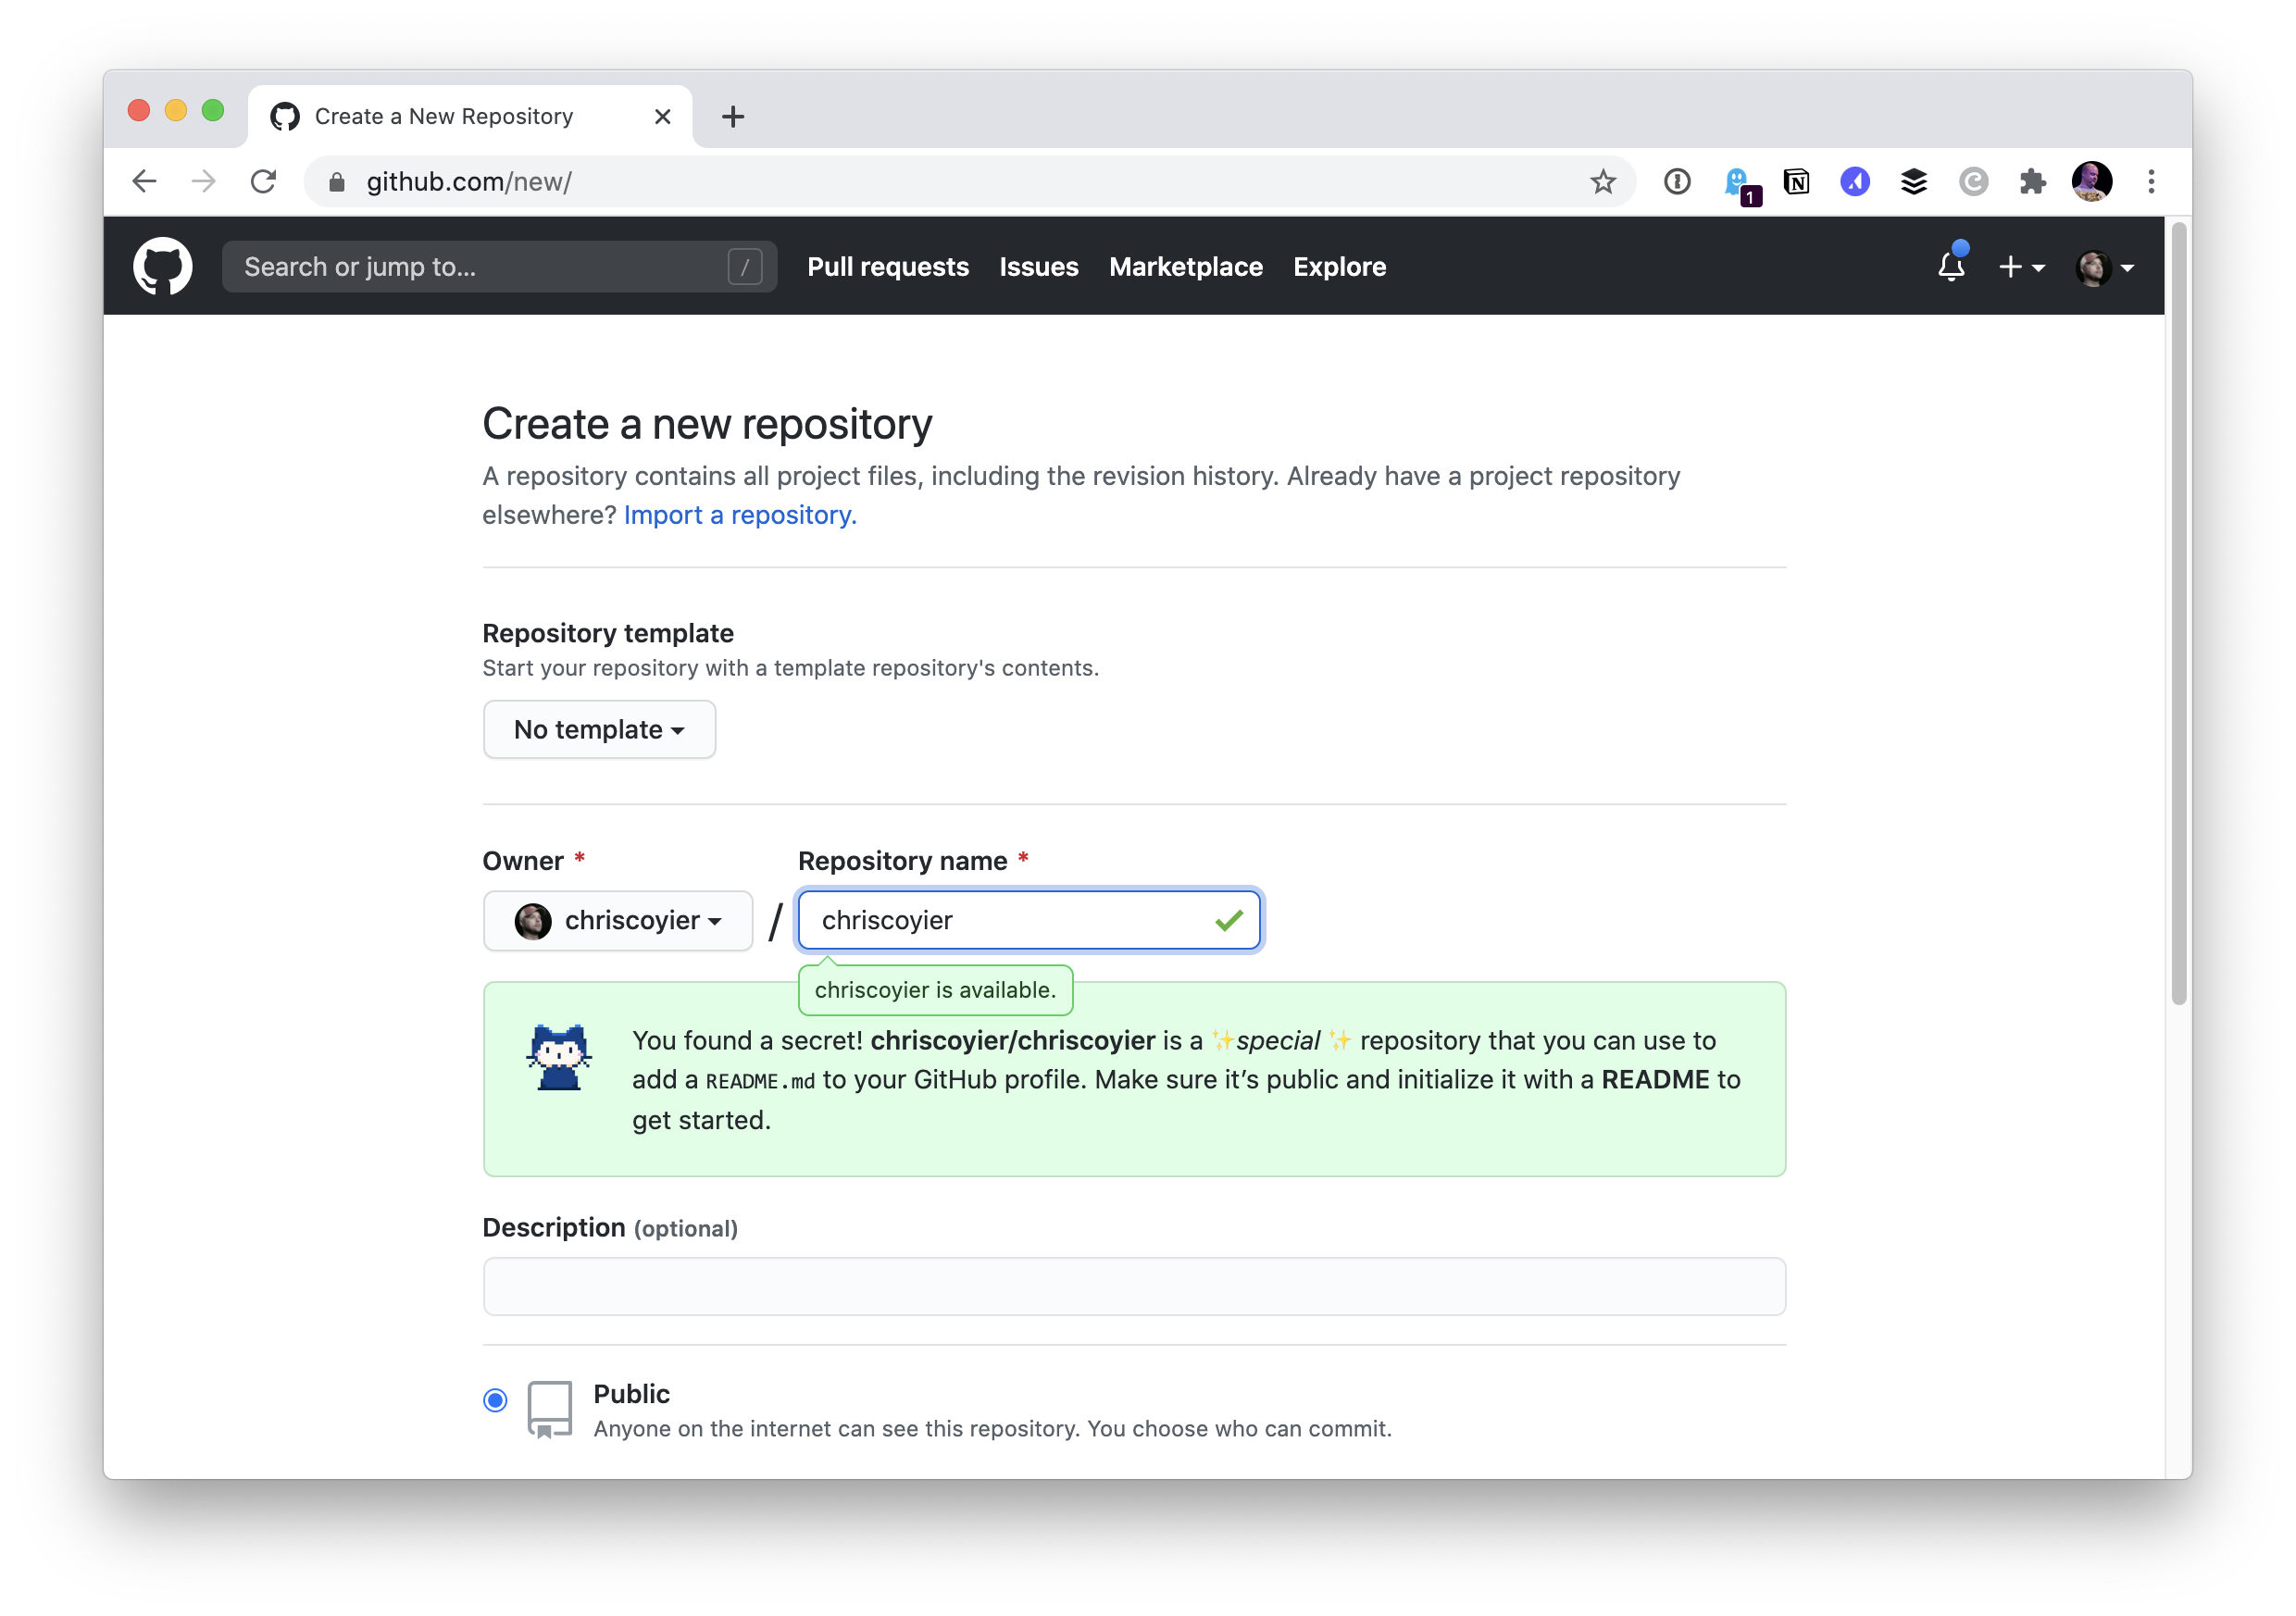
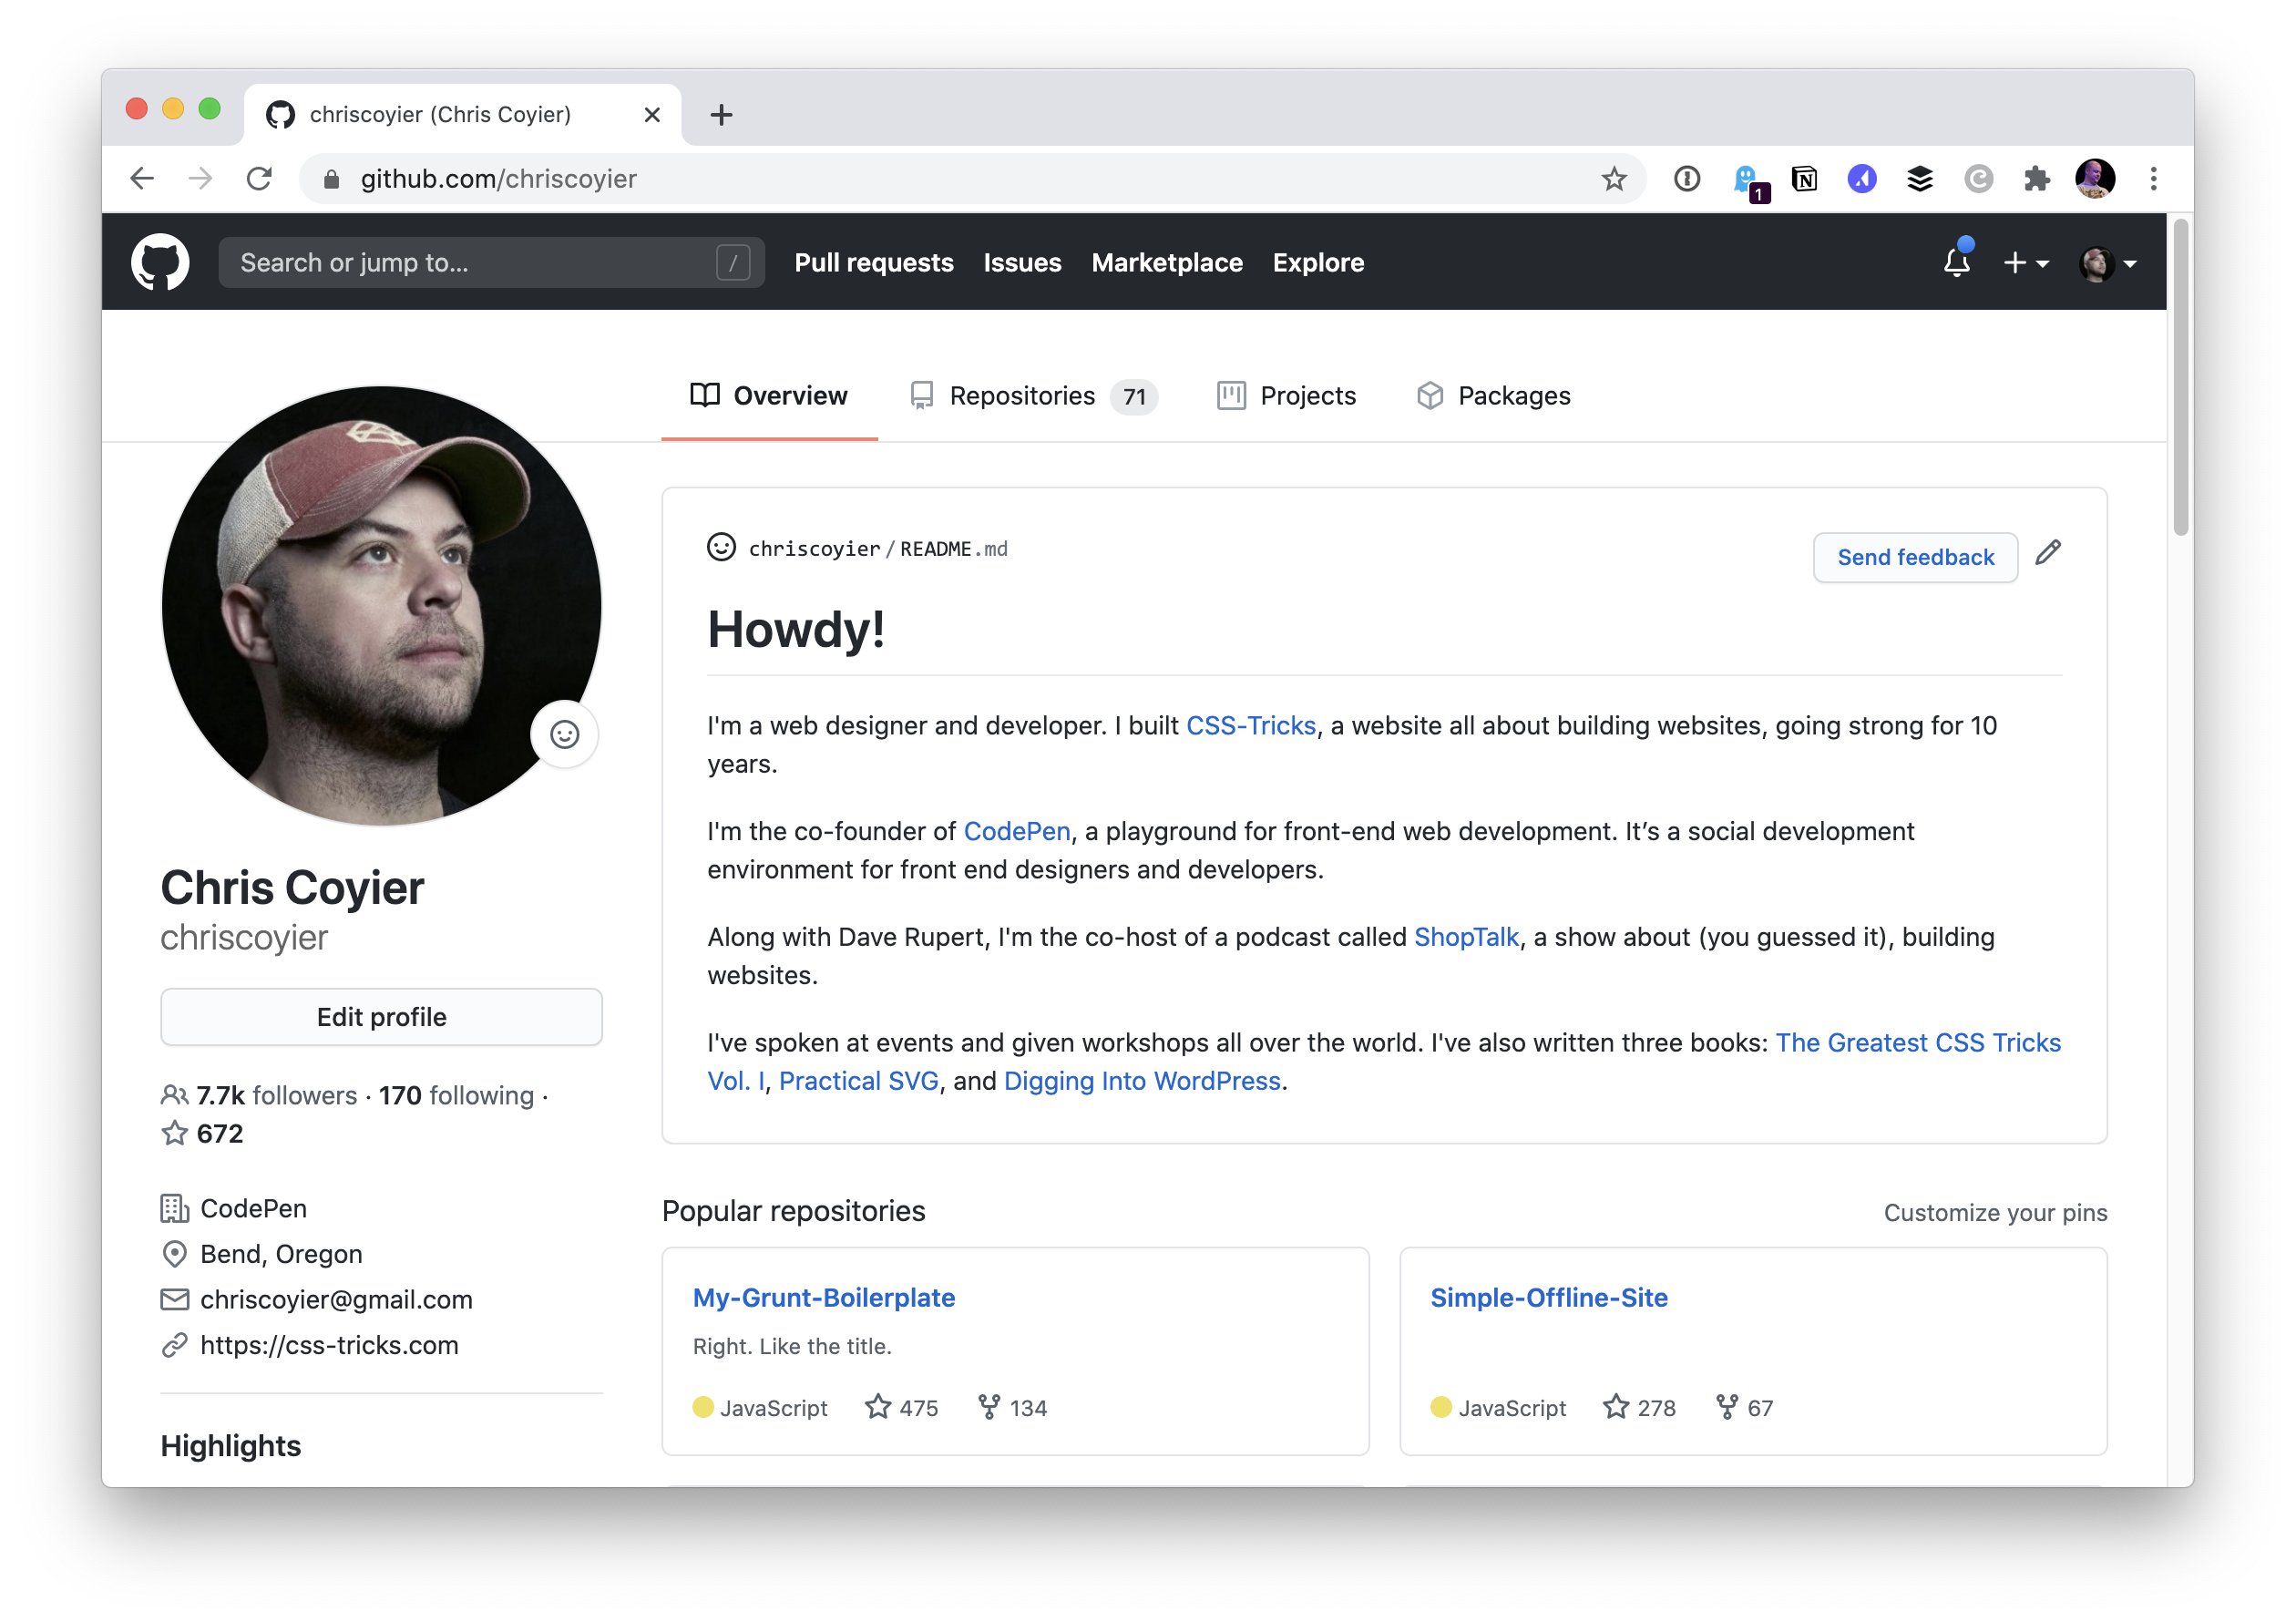
The profile README is created by creating a new repository that’s the same name as your username. For example, my GitHub username is m0nica so I created a new repository with the name m0nica.
Now the README.md from that repo is essentially the homepage of her profile. Above the usual list of popular repos, you can see the rendered version of that README on her profile:
Lemme do a lame version for myself real quick just to try it out…
OK, I start like this:
Then I’ll to go repo.new (hey, CodePen has one of those cool domains too!) and make a repo on my personal account that is exactly the same as my username:
I chose to initialize the repo with a README file and nothing else. So immediately I get:
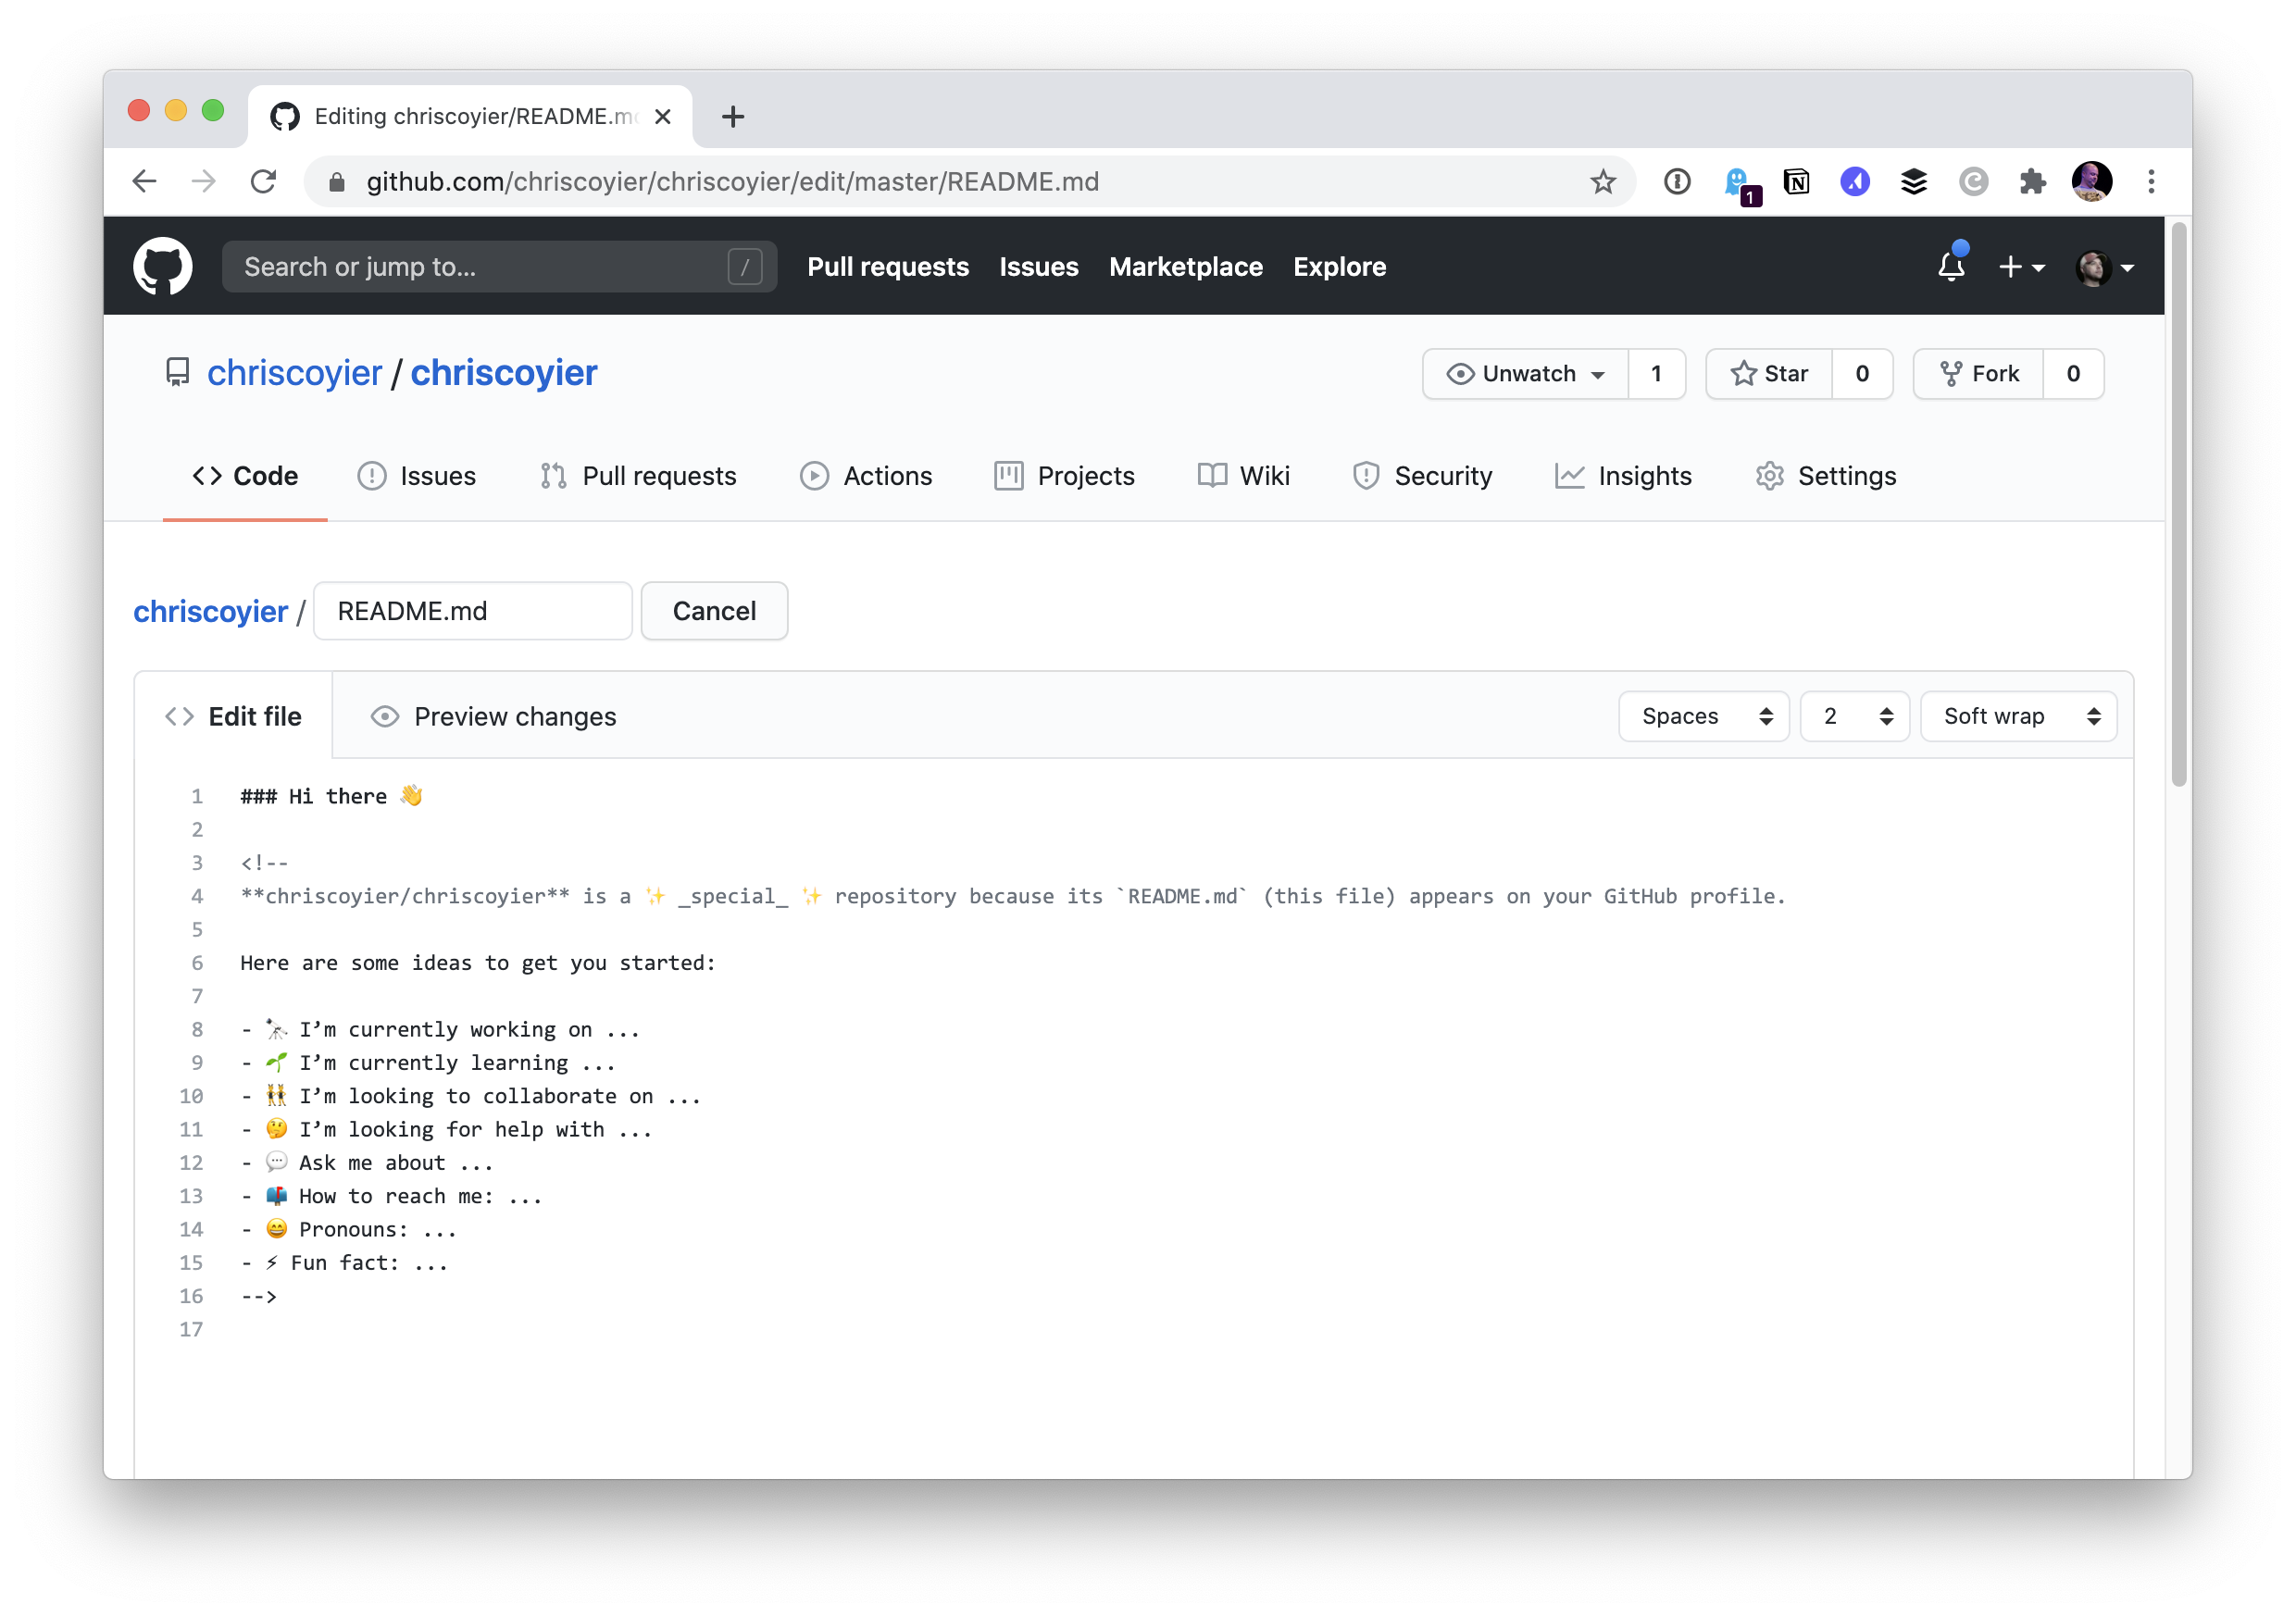
I can edit this directly on the web, and if I do, I see more helpful stuff:
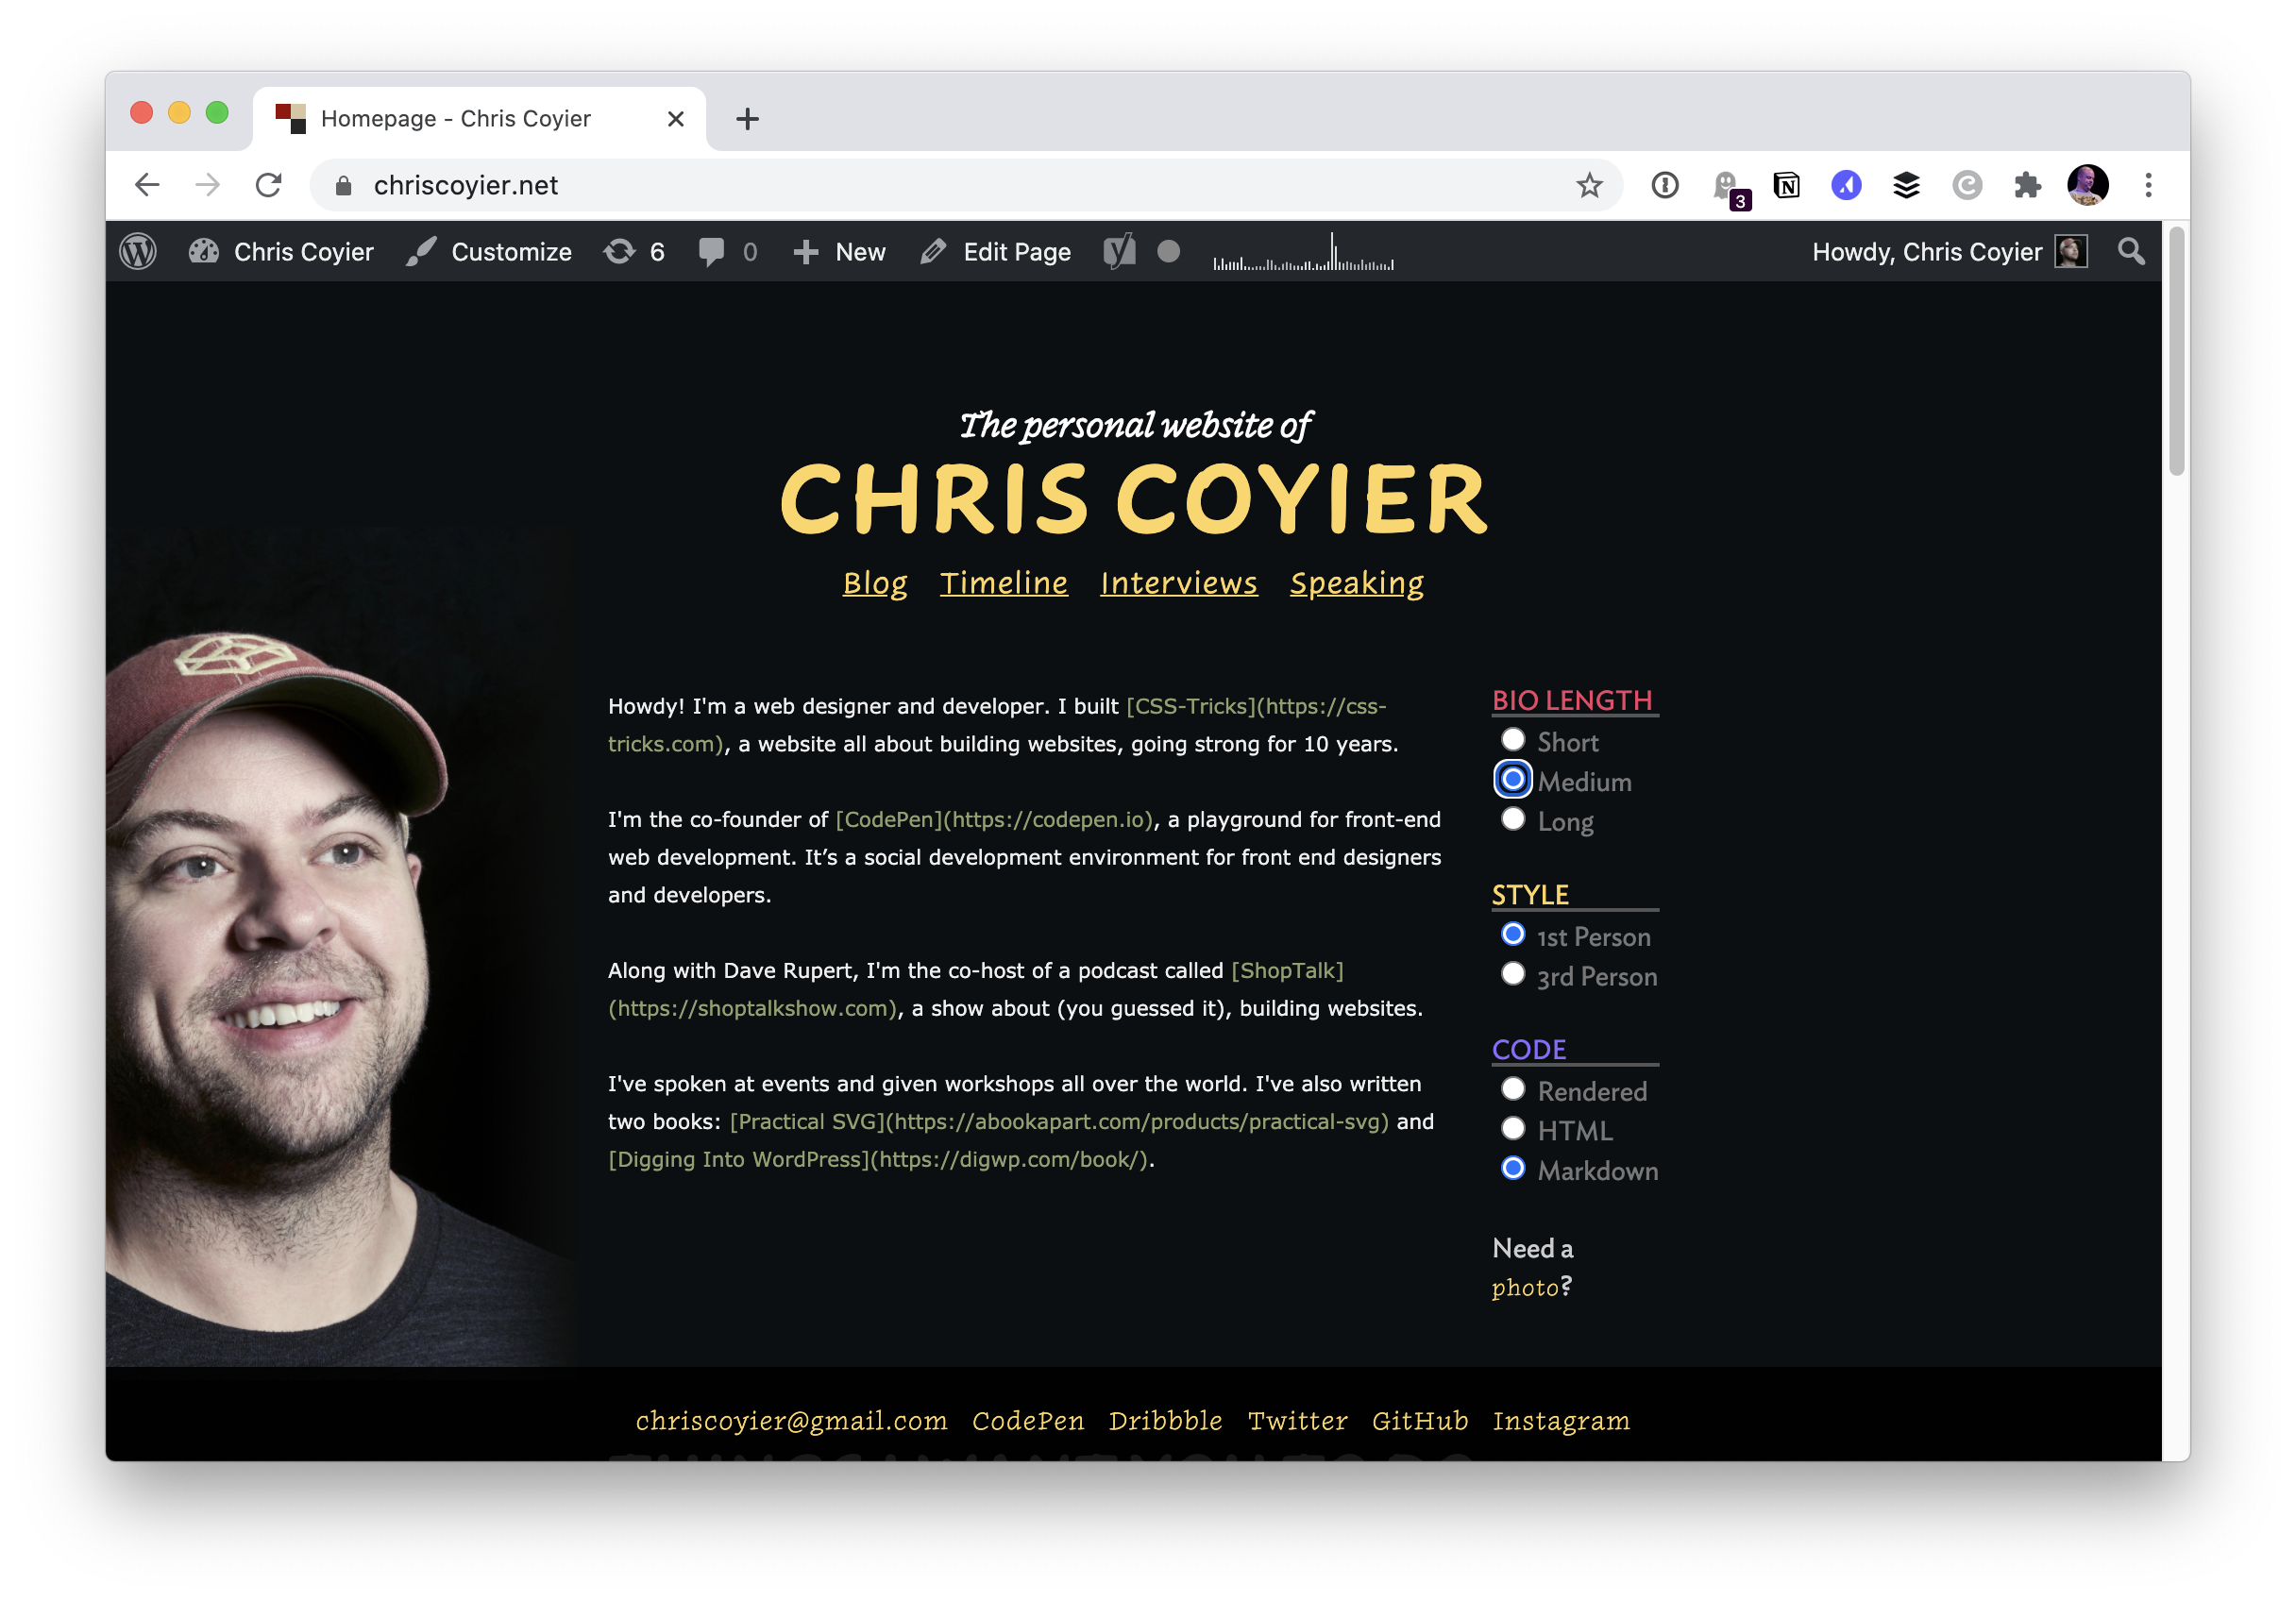
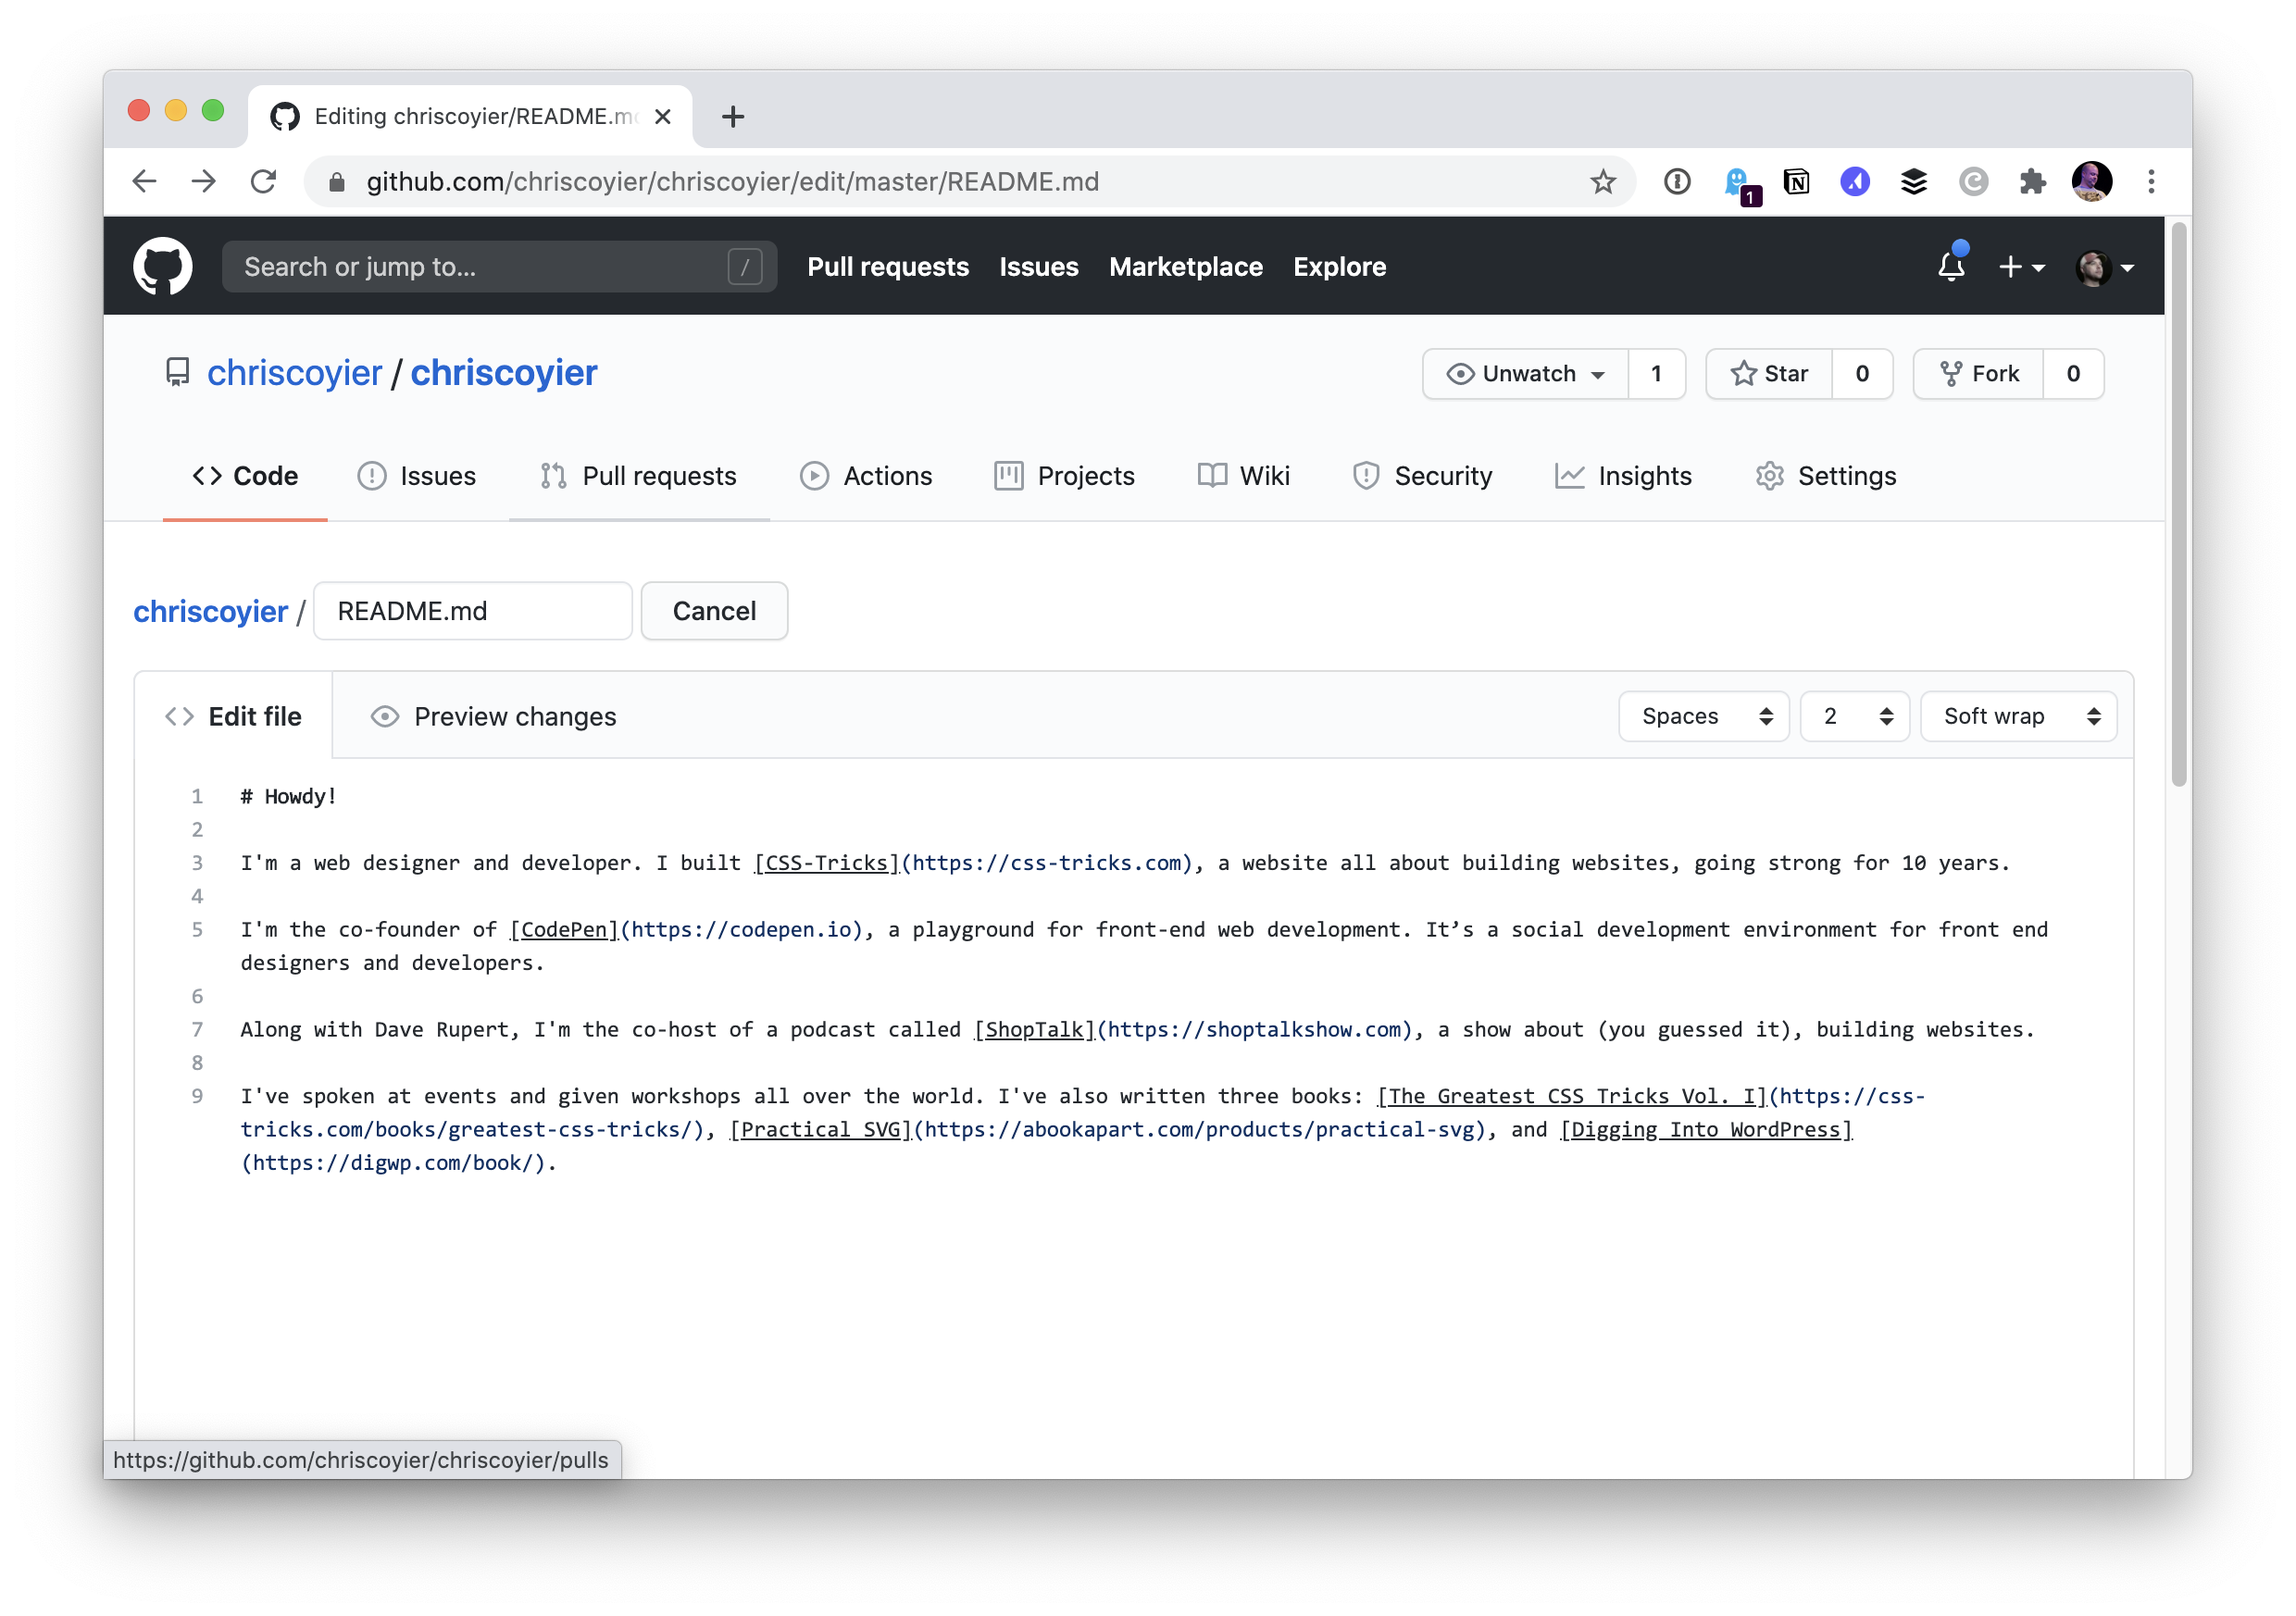
Fortunately, my personal website has a Markdown bio ready to use!
I’ll copy and paste that over.
After committing that change, my own profile shows it!
Maybe I’ll get around to doing something more fun with it someday. Monica’s post has a bunch of fun examples in it. My favorite is Kaya Thomas’ profile, which I saw Jina Anne share:
You can’t use CSS in there (because GitHub strips it out), so I love the ingenuity of using old school <img align="right"> to pull off the floating image look.
In this article, Ahmad Shadeed explains the background-image property in detail, and provides a visual explainer on how multiple backgrounds can be stacked.
Understanding Machines: An Open Standard For JavaScript Functions
Understanding Machines: An Open Standard For JavaScript Functions
Kelvin Omereshone
As developers, we always seek ways to do our job better, whether by following patterns, using well-written libraries and frameworks, or what have you. In this article, I’ll share with you a JavaScript specification for easily consumable functions. This article is intended for JavaScript developers, and you’ll learn how to write JavaScript functions with a universal API that makes it easy for those functions to be consumed. This would be particularly helpful for authoring npm packages (as we will see by the end of this article).
There is no special prerequisite for this article. If you can write a JavaScript function, then you’ll be able to follow along. With all that said, let’s dive in.
What Are Machines?
Machines are self-documenting and predictable JavaScript functions that follow the machine specification, written by Mike McNeil. A machine is characterized by the following:
It must have one clear purpose, whether it’s to send an email, issue a JSON Web Token, make a fetch request, etc.
It must follow the specification, which makes machines predictable for consumption via npm installations.
As an example, here is a collection of machines that provides simple and consistent APIs for working with Cloudinary. This collection exposes functions (machines) for uploading images, deleting images, and more. That’s all that machines are really: They just expose a simple and consistent API for working with JavaScript and Node.js functions.
Features of Machines
Machines are self-documenting. This means you can just look at a machine and knows what it’s doing and what it will run (the parameters). This feature really sold me on them. All machines are self-documenting, making them predictable.
Machines are quick to implement, as we will see. Using the machinepack tool for the command-line interface (CLI), we can quickly scaffold a machine and publish it to npm.
Machines are easy to debug. This is also because every machine has a standardized API. We can easily debug machines because they are predictable.
Are There Machines Out There?
You might be thinking, “If machines are so good, then why haven’t I heard about them until now?” In fact, they are already widely used. If you’ve used the Node.js MVC framework Sails.js, then you have either written a machine or interfaced with a couple. The author of Sails.js is also the author of the machine specification.
In addition to the Sails.js framework, you could browse available machines on npm by searching for machinepack, or head over to http://node-machine.org/machinepacks, which is machinepack’s registry daemon; it syncs with npm and updates every 10 minutes.
Machines are universal. As a package consumer, you will know what to expect. So, no more trying to guess the API of a particular package you’ve installed. If it’s a machine, then you can expect it to follow the same easy-to-use interface.
Now that we have a handle on what machines are, let’s look into the specification by analyzing a sample machine.
The Machine Specification
    module.exports = {
  friendlyName: 'Do something',
  description: 'Do something with the provided inputs that results in one of the exit scenarios.',
  extendedDescription: 'This optional extended description can be used to communicate caveats, technical notes, or any other sort of additional information which might be helpful for users of this machine.',
  moreInfoUrl: 'https://stripe.com/docs/api#list_cards',
  sideEffects: 'cacheable',
  sync: true,

  inputs: {
    brand: {
      friendlyName: 'Some input',
      description: 'The brand of gummy worms.',
      extendedDescription: 'The provided value will be matched against all known gummy worm brands. The match is case-insensitive, and tolerant of typos within Levenstein edit distance <= 2 (if ambiguous, prefers whichever brand comes first alphabetically).',
      moreInfoUrl: 'http://gummy-worms.org/common-brands?countries=all',
      required: true,
      example: 'haribo',
      whereToGet: {
        url: 'http://gummy-worms.org/how-to-check-your-brand',
        description: 'Look at the giant branding on the front of the package. Copy and paste with your brain.',
        extendedDescription: 'If you don\'t have a package of gummy worms handy, this probably isn\'t the machine for you. Check out the `order()` machine in this pack.'
      }
    }
  },

  exits: {
    success: {
      outputFriendlyName: 'Protein (g)',
      outputDescription: 'The grams of gelatin-based protein in a 1kg serving.',
    },
    unrecognizedFlavors: {
      description: 'Could not recognize one or more of the provided `flavorStrings`.',
      extendedDescription: 'Some **markdown**.',
      moreInfoUrl: 'http://gummyworms.com/flavors',
    }
  },

  fn: function(inputs, exits) {
    // ...
    // your code here
    var result = 'foo';
    // ...
    // ...and when you're done:
    return exits.success(result);
  };
}
The snippet above is taken from the interactive example on the official website. Let’s dissect this machine.
From looking at the snippet above, we can see that a machine is an exported object containing certain standardized properties and a single function. Let’s first see what those properties are and why they are that way.
friendlyName
This is a display name for the machine, and it follows these rules:
is sentence-case (like a normal sentence),
must not have ending punctuation,
must be fewer than 50 characters.
description
This should be a clear one-sentence description in the imperative mood (i.e. the authoritative voice) of what the machine does. An example would be “Issue a JSON Web Token”, rather than “Issues a JSON Web Token”. Its only constraint is:
It should be fewer than 80 characters.
extendedDescription (optional)
This property provides optional supplemental information, extending what was already said in the description property. In this field, you may use punctuation and complete sentences.
It should be fewer than 2000 characters.
moreInfoUrl (optional)
This field contains a URL in which additional information about the inner workings or functionality of the machine can be found. This is particularly helpful for machines that communicate with third-party APIs such as GitHub and Auth0.
sideEffects (optional)
This is an optional field that you can either omit or set as cacheable or idempotent. If set to cacheable, then .cache() can be used with this machine. Note that only machines that do not have sideEffects should be set to cacheable.
sync (optional)
Machines are asynchronous by default. Setting the sync option to true turns off async for that machine, and you can then use it as a regular function (without async/await, or then()).
inputs
This is the specification or declaration of the values that the machine function expects. Let’s look at the different fields of a machine’s input.
brand
Using the machine snippet above as our guide, the brand field is called the input key. It is normally camel-cased, and it must be an alphanumeric string starting with a lowercase letter.
No special characters are allowed in an input key identifier or field.
friendlyName
This is a human-readable display name for the input. It should:
be sentence-case,
have no ending punctuation,
be fewer than 50 characters.
description
This is a short description describing the input’s use.
extendedDescription
Just like the extendedDescription field on the machine itself, this field provides supplemental information about this particular input.
moreInfoUrl
This is an optional URL that provides more information about the input, if needed.
required
By default, every input is optional. What that means is that if, by runtime, no value is provided for an input, then the fn would be undefined. If your inputs are not optional, then it’s best to set this field as true because this would make the machine throw an error.
example
This field is used to determined the expected data type of the input.
whereToGet
This is an optional documentation object that provides additional information on how to locate adequate values for this input. This is particularly useful for things like API keys, tokens, and so on.
whereToGet.description
This is a clear one-sentence description, also in the imperative mood, that describes how to find the right value for this input.
extendedDescription
This provides additional information on where to get a suitable input value for this machine.
exits
This is the specification for all possible exit callbacks that this machine’s fn implementation can trigger. This implies that each exit represents one possible outcome of the machine’s execution.
success
This is the standardized exit key in the machine specification that signifies that everything went well and the machine worked without any errors. Let’s look at the properties it could expose:
outputFriendlyName
This is simply a display name for the exit output.
outputDescription
This short noun phrase describes the output of an exit.
Other exits signify that something went wrong and that the machine encountered an error. The naming convention for such exits should follow the naming convention for the input’s key. Let’s see the fields under such exits:
description
This is a short description describing when the exit would be called.
extendedDescription
This provides additional information about when this exit would be called. It’s optional. You may use full Markdown syntax in this field, and as usual, it should be fewer than 2000 characters.
You Made It!
That was a lot to take in. But don’t worry: When you start authoring machines, these conventions will stick, especially after your first machine, which we will write together shortly. But first…
Machinepacks
When authoring machines, machinepacks are what you publish on npm. They are simply sets of related utilities for performing common, repetitive development tasks with Node.js. So let’s say you have a machinepack that works with arrays; it would be a bundle of machines that works on arrays, like concat(), map(), etc. See the Arrays machinepack in the registry to get a full view.
Machinepacks Naming Convention
All machinepacks must follow the standard of having “machinepack-” as a prefix, followed by the name of the machine. For example, machinepack-array, machinepack-sessionauth.
Our First Machinepack
To better understand machines, we will write and publish a machinepack that is a wrapper for the file-contributors npm package.
Getting Started
We require the following to craft our machinepack:
Note: I am assuming that Node.js and npm are already installed on your machine.
Generating Your First Machinepack
Using the CLI tools that we installed above, let’s generate a new machinepack using the machinepack generator. Do this by first going into the directory that you want the generator to generate the files in, and then run the following:
yo machinepack
The command above will start an interactive process of generating a barebones machinepack for you. It will ask you a couple of questions; be sure to say yes to it creating an example machine.
Note:I noticed that the Yeoman generator has some issues when using Node.js 12 or 13. So, I recommend using nvm, and install Node.js 10.x, which is the environment that worked for me.
If everything has gone as planned, then we would have generated the base layer of our machinepack. Let’s take a peek:
The above are the files generated for you. Let’s play with our example machine, found inside the machines directory. Because we have the machinepack CLI tool installed, we could run the following:
machinepack ls
This would list the available machines in our machines directory. Currently, there is one, the say-hello machine. Let’s find out what say-hello does by running this:
machinepack exec say-hello
This will prompt you for a name to enter, and it will print the output of the say-hello machine.
As you’ll notice, the CLI tool is leveraging the standardization of machines to get the machine’s description and functionality. Pretty neat!
Let’s Make A Machine
Let’s add our own machine, which will wrap the file-contributors and node-fetch packages (we will also need to install those with npm). So, run this:
npm install file-contributors node-fetch --save
Then, add a new machine by running:
machinepack add
You will be prompted to fill in the friendly name, the description (optional), and the extended description (also optional) for the machine. After that, you will have successfully generated your machine.
Now, let’s flesh out the functionality of this machine. Open the new machine that you generated in your editor. Then, require the file-contributors package, like so:
Note:We are using node-fetch package and the global.fetch = fetch workaround because the file-contributors package uses windows.fetch() internally, which is not available in Node.js.
The file-contributors’ getFileContributors requires three parameters to work: owner (the owner of the repository), repo (the repository), and path (the path to the file). So, if you’ve been following along, then you’ll know that these would go in our inputs key. Let’s add these now:
...
 inputs: {
    owner: {
      friendlyName: 'Owner',
      description: 'The owner of the repository',
      required: true,
      example: 'DominusKelvin'
    },
    repo: {
      friendlyName: 'Repository',
      description: 'The Github repository',
      required: true,
      example: 'machinepack-filecontributors'
    },
    path: {
      friendlyName: 'Path',
      description: 'The relative path to the file',
      required: true,
      example: 'README.md'
    }
  },
...
Now, let’s add the exits. Originally, the CLI added a success exit for us. We would modify this and then add another exit in case things don’t go as planned.
exits: {

    success: {
      outputFriendlyName: 'File Contributors',
      outputDescription: 'An array of the contributors on a particular file',
      variableName: 'fileContributors',
      description: 'Done.',
    },

    error: {
      description: 'An error occurred trying to get file contributors'
    }

  },
Finally let’s craft the meat of the machine, which is the fn:
And voilà! We have crafted our first machine. Let’s try it out using the CLI by running the following:
machinepack exec get-file-contributors
A prompt would appear asking for owner, repo, and path, successively. If everything has gone as planned, then our machine will exit with success, and we will see an array of the contributors for the repository file we’ve specified.
Usage In Code
I know we won’t be using the CLI for consuming the machinepack in our code base. So, below is a snippet of how we’d consume machines from a machinepack:
    var FileContributors = require('machinepack-filecontributors');

// Fetch metadata about a repository on GitHub.
FileContributors.getFileContributors({
  owner: 'DominusKelvin',
  repo: 'vue-cli-plugin-chakra-ui',
   path: 'README.md'
}).exec({
  // An unexpected error occurred.
  error: function (){
  },
  // OK.
  success: function (contributors){
    console.log('Got:\n', contributors);
  },
});
Conclusion
Congratulations! You’ve just become familiar with the machine specification, created your own machine, and seen how to consume machines. I’ll be glad to see the machines you create.
Markdown has traditionally been a favorite format for programmers to write documentation. It’s simple enough for almost everyone to learn and adapt to while making it easy to format and style content. It was so popular that commands from Markdown have been used in chat applications like Slack and Whatsapp as document applications, like Dropbox Paper and Notion. When GitHub introduced Markdown support for README documentation, they also rendered HTML content from it — so, for example, we could drop in some link and image elements and they would render just fine.
Even though Markdown isn’t broken by any stretch of the imagination, there’s always room for improvement. This is where Markdown Extended (MDX) comes in.
When would we consider MDX over Markdown? One thing about MDX is that JavaScript can be integrated into cases where normal Markdown is used. Here are few examples that illustrate how handy that is:
Frontend Armory uses MDX on its education playground, Demoboard. The playground supports MDX natively to create pages that serve both as demo and documentation, which is super ideal for demonstrating React concepts and components..
Brent Jackson has a brand new way of building websites pairing MDX and Styled System. Each page is written in MDX and Styled System styles the blocks. It’s currently in development, but you can find more details on the website.
Using mdx-deck or Spectacle could make your next presentation more interesting. You can show demos directly in your deck without switching screens!
MDX Go, ok-mdx and Docz all provide tools for documenting component libraries in MDX. You can drop components right in the documentation with Markdown and it will just work™.
MDX shines in cases where you want to maintain a React-based blog. Using it means you no longer have to create custom React component pages when you want to do something impossible in Markdown (or create a plugin). I have been using it on my blog for over a year and have been loving the experience One of my favorite projects so far is a React component I call Playground that can be used to demo small HTML/CSS/JavaScript snippets while allowing users to edit the code. Sure, I could have used some third-party service and embed demos with it, but this way I don’t have to load third party scripts at all.
Speaking of embedding, MDX makes it so easy to embed iFrames created by third-party services, say YouTube, Vimeo, Giphy, etc.
Use it alongside Markdown
You’ll know a file is written in MDX because it has an .mdx extension on the filename. But let’s check out what it looks like to actually write something in MDX.
import InteractiveChart from "../path/interactive-chart";


# Hello - I'm a Markdown heading


This is just markdown text


<InteractiveChart />
See that? It’s still possible to use Markdown and we can write it alongside React components when we want interactive visualizations or styling. Here is an example from my portfolio:
Another benefit of MDX is that, just like components, the files are composable. This means that pages can be split into multiple chunks and reused, rendering them all at once.
import Header from "./path/Header.mdx"
import Footer from "./path/Footer.mdx"

<Header />

# Here goes the actual content.

Some random content goes [here](link text)

<Footer />
Implementing MDX into apps
There are MDX plugins for most of the common React based integration platforms, like Gatsby and Next.
To integrate it in a create-react-app project, MDX provides a Babel Macro that can be imported into the app:
You can also try out MDX on the playground they created for it.
MDX contributors are very actively working on bringing support for Vue. A sample is already available on GitHub. This is though in Alpha and not ready for production.
Editor support
Syntax highlighting and autocomplete have both been increasing support for VS Code, Vim, and Sublime Text. However,in use, these do have some sharp edges and are difficult to navigate. A lot of these come from the inability to predict whether we are going for JavaScript or Markdown within the context of a page. That’s something that certainly can be improved.
MDX plugins and extensions
A key advantage of MDX is that it is part of the unified consortium for content that organizes remark content. This means that MDX can directly support the vast ecosystem of remark plugins and rehype plugins — there’s no need to reinvent the wheel. Some of these plugins, including remark-images and remark-redact, are remarkable to say the least. To use a plugin with MDX, you can add them to them to your corresponding loader or plugin. You can even write your own MDX plugins by referring to the MDX Guide for creating plugins.
MDX is only a few years old but its influence has been growing in the content space. From writing blog posts and visualizing data to creating interactive demos and decks, MDX is well suited for many uses — well beyond what we have covered here in this introduction.
Just yesterday, Ali Churcher shared a neat way to make a resume using a CSS Grid layout. Let’s build off that a bit by creating a template that we can spin up whenever we want using the command line. The cool thing about that is that you’ll be able to run it with just one command.
I know the command line can be intimidating, and yes, we’ll be working in Node.js a bit. We’ll keep things broken out into small steps to make it easier to follow along.
Like many projects, there’s a little setup involved. Start by creating an empty folder in your working directory and initialize a project using npm or Yarn.
Whatever name you use for "your-project" will be the name of your package in the npm registry.
The next step is to create an entry file for the application, which is index.js in this case. We also need a place to store data, so create another file called data.json. You can open those up from the command line once you create them:
touch index.js && touch data.json
Creating the command line interface
The big benefit we get from creating this app is that it gives us a semi-visual way to create a resume directly in the command line. We need a couple of things to get that going:
The object to store the data
An interactive command line interface (which we’ll build using the Inquirer.js)
Let’s start with that first one. Crack open data.json and add the following:
{
  "Education": [
    "Some info",
    "Less important info",
    "Etc, etc."
  ],
  "Experience": [
    "Some info",
    "Less important info",
    "Etc, etc."
  ],
  "Contact": [
    "A way to contact you"
  ]
}
This is just an example that defines the objects and keys that will be used for each step in the interface. You can totally modify it to suit your own needs.
That’s the first thing we needed. The second thing is the interactive interface. Inquirer.js will handle 90% of it., Feel free to read more about this package, cause you can build more advanced interfaces as you get more familiar with the ins and outs of it.
yarn add inquirer chalk
What’s that chalk thing? It’s a library that’s going to help us customize our terminal output by adding some color and styling for a better experience.
Now let’s open up index.js and paste the following code:
#!/usr/bin/env node
"use strict";
const inquirer = require("inquirer");
const chalk = require("chalk");
const data = require("./data.json");
// add response color
const response = chalk.bold.blue;
const resumeOptions = {
type: "list",
name: "resumeOptions",
message: "What do you want to know",
choices: [...Object.keys(data), "Exit"]
};
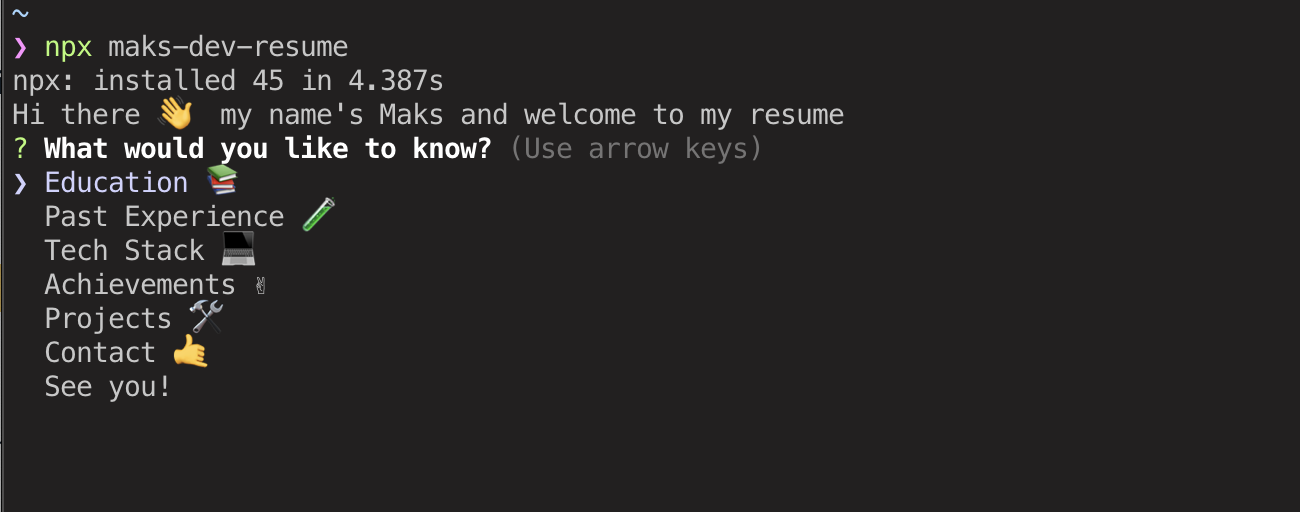
function showResume() {
console.log("Hello, this is my resume");
handleResume();
}
function handleResume() {
inquirer.prompt(resumeOptions).then(answer => {
if (answer.resumeOptions == "Exit") return;
const options = data[`${answer.resumeOptions}`]
if (options) {
console.log(response(new inquirer.Separator()));
options.forEach(info => {
console.log(response("| => " + info));
});
console.log(response(new inquirer.Separator()));
}
inquirer
.prompt({
type: "list",
name: "exitBack",
message: "Go back or Exit?",
choices: ["Back", "Exit"]
}).then(choice => {
if (choice.exitBack == "Back") {
handleResume();
} else {
return;
}
});
}).catch(err => console.log('Ooops,', err))
}
showResume();
Zoikes! That’s a big chunk of code. Let’s tear it down a bit to explain what’s going on.
At the top of the file, we are importing all of the necessary things needed to run the app and set the color styles using the chalk library. If you are interested more about colors and customization, check out chalk documentation because you can get pretty creative with things.
const inquirer = require("inquirer");
const chalk = require("chalk");
const data = require("./data.json");

// add response color
const response = chalk.bold.blue;
Next thing that code is doing is creating our list of resume options. Those are what will be displayed after we type our command in terminal. We’re calling it resumeOptions so we know exactly what it does.
const resumeOptions = {
  type: "list",
  name: "resumeOptions",
  message: "What do you want to know",
  choices: [...Object.keys(data), "Exit"]
};
We are mostly interested in the choices field because it makes up the keys from our data object while providing us a way to "Exit" the app if we need to.
After that, we create the function showResume(), which will be our main function that runs right after launching. It shows sorta welcome message and runs our handleResume() function.
function showResume() {
  console.log("Hello, this is my resume");
  handleResume();
}
OK, now for the big one: the handleResume() function. The first part is a conditional check to make sure we haven’t exited the app and to display the registered options from our data object if all is good. In other words, if the chosen option is Exit, we quit the program. Otherwise, we fetch the list of options that are available for us under the chosen key.
So, once the app has confirmed that we are not exiting, we get answer.resumeOptions which, as you may have guessed, spits out the list of sections we defined in the data.json file. The ones we defined were Education, Experience, and Contact.
That brings us to the Inquirer.js stuff. It might be easiest if we list those pieces:
Did you notice that new inquirer.Separator() function in the options output? That’s a feature of Inquirer.js that provides a visual separator between content to break things up a bit and make the interface a little easier to read.
Alright, we are showing the list of options! Now we need to let a a way to go back to the previous screen. To do so, we create another inquirer.prompt in which we’ll pass a new object, but this time with only two options: Exit and Back. It will return us the promise with answers we’ll need to handle. If the chosen option will be Back, we run handleResume() meaning we open our main screen with the options again; if we choose Exit, we quit the function.
Lastly, we will add the catch statement to catch any possible errors. Good practice. :)
Publishing to npm
Congrats! Try running node index.js and you should be able to test the app.
That’s great and all, but it’d be nicer to make it run without having to be in the working directly each time. This is much more straightforward than the functions we just looked at.
Register an account at npmjs.com if you don’t have one.
Add a user to your CLI by running npm adduser.
Provide the username and password you used to register the npm account.
Go to package.json and add following lines:
"bin": {
  "your-package-name": "./index.js"
}
Add a README.md file that will show up on the app’s npm page.
Publish the package.
npm publish --access=public
Anytime you update the package, you can push those to npm. Read more about npm versioning here.
npm version patch // 1.0.1
npm version minor // 1.1.0
npm version major // 2.0.0
And to push the updates to npm:
npm publish
Resume magic!
That’s it! Now you can experience the magic of typing npx your-package-name into the command line and creating your resume right there. By the way, npx is the way to run commands without installing them locally to your machine. It’s available for you automatically, if you’ve got npm installed.
This is just a simple terminal app, but understanding the logic behind the scenes will let you create amazing things and this is your first step on your way to it.
When I was looking through the documentation of git commands, I noticed that many of them had an option for <pathspec>. I initially thought that this was just a technical way to say “path,” and assumed that it could only accept directories and filenames. After diving into the rabbit hole of documentation, I found that the pathspec option of git commands are capable of so much more.
The pathspec is the mechanism that git uses for limiting the scope of a git command to a subset of the repository. If you have used much git, you have likely used a pathspec whether you know it or not. For example, in the command git add README.md, the pathspec is README.md. However, it is capable of much more nuance and flexibility.
So, why should you learn about pathspecs? Since it is a part of many commands, these commands become much more powerful with an understanding of pathspecs. With git add, you can add just the files within a single directory. With git diff, you can examine just the changes made to filenames with an extension of .scss. You can git grep all files except for those in the /dist directory.
In addition, pathspecs can help with the writing of more generic git aliases. For example, I have an alias named git todo, which will search all of my repository files for the string 'todo'. However, I would like for this to show all instances of the string, even if they are not within my current working directory. With pathspecs, we will see how this becomes possible.
File or directory
The most straightforward way to use a pathspec is with just a directory and/or filename. For example, with git add you can do the following. ., src/, and README are the respective pathspecs for each command.
git add src/ server/ # adds both src/ and server/ directories
Sometimes, you may see a -- preceding the pathspec of a command. This is used to remove any ambiguity of what is the pathspec and what is part of the command.
Wildcards
In addition to files & directories, you can match patterns using *, ?, and []. The * symbol is used as a wildcard and it will match the / in paths — in other words, it will search through subdirectories.
git log '*.js' # logs all .js files in CWD and subdirectories
git log '.*'   # logs all 'hidden' files and directories in CWD
git log '*/.*' # logs all 'hidden' files and directories in subdirectories
The quotes are important, especially when using *! They prevent your shell (such as bash or ZSH) from attempting to expand the wildcards on their own. For example, let’s take a look at how git ls-files will list files with and without the quotes.
Since the shell is expanding the * in the first command, git ls-files receives the command as git ls-files package-lock.json package.json. The quotes ensure that git is the one to resolve the wildcard.
You can also use the ? character as a wildcard for a single character. For example, to match either mp3 or mp4 files, you can do the following.
git ls-files '*.mp?'
Bracket expressions
You can also use “bracket expressions” to match a single character out of a set. For example, if you'd like to make matches between either TypeScript or JavaScript files, you can use [tj]. This will match either a t or a j.
git ls-files '*.[tj]s'
This will match either .ts files or .js files. In addition to just using characters, there are certain collections of characters that can be referenced within bracket expressions. For example, you can use [:digit:] within a bracket expression to match any decimal digit, or you can use [:space:] to match any space characters.
git ls-files '*.mp[[:digit:]]' # mp0, mp1, mp2, mp3, ..., mp9
git ls-files '*[[:space:]]*' # matches any path containing a space
To read more about bracket expression and how to use them, check out the GNU manual.
Magic signatures
Pathspecs also have the special tool in their arsenal called “magic signatures” which unlock some additional functionality to your pathspecs. These “magic signatures” are called by using :(signature) at the beginning of your pathspec. If this doesn't make sense, don't worry: some examples will hopefully help clear it up.
top
The top signature tells git to match the pattern from the root of the git repository rather than the current working directory. You can also use the shorthand :/ rather than :(top).
This will list all files in your repository that have an extension of .js. With the top signature this can be called within any subdirectory in your repository. I find this to be especially useful when writing generic git aliases!
You can use git js anywhere within your repository to get a list of all JavaScript files in your project using this.
icase
The icase signature tells git to not care about case when matching. This could be useful if you don't care which case the filename is — for example, this could be useful for matching jpg files, which sometimes use the uppercase extension JPG.
git ls-files ':(icase)*.jpg'
literal
The literal signature tells git to treat all of your characters literally. This would be used if you want to treat characters such as * and ? as themselves, rather than as wildcards. Unless your repository has filenames with * or ?, I don't expect that this signature would be used too often.
git log ':(literal)*.js' # returns log for the file '*.js'
glob
When I started learning pathspecs, I noticed that wildcards worked differently than I was used to. Typically I see a single asterisk * as being a wildcard that does not match anything through directories and consecutive asterisks (**) as a “deep” wildcard that does match names through directories. If you would prefer this style of wildcards, you can use the glob magic signature!
This can be useful if you want more fine-grained control over how you search through your project’s directory structure. As an example, take a look at how these two git ls-files can search through a React project.
Using the attr magic signature can set attribute requirements for your pathspec. For example, we might want to ignore the above files from a vendor.
git ls-files ':(attr:!vendored)*.js' # searches for non-vendored js files
git ls-files ':(attr:vendored)*.js'  # searches for vendored js files
exclude
Lastly, there is the “exclude'” magic signature (shorthand of :! or :^). This signature works differently from the rest of the magic signatures. After all other pathspecs have been resolved, all pathspecs with an exclude signature are resolved and then removed from the returned paths. For example, you can search through all of your .js files while excluding the .spec.js test files.
git grep 'foo' -- '*.js' ':(exclude)*.spec.js' # search .js files excluding .spec.js
git grep 'foo' -- '*.js' ':!*.spec.js' .       # shorthand for the same
Combining signatures
There is nothing limiting you from using multiple magic signatures in a single pathspec! You can use multiple signatures by separating your magic words with commas within your parenthesis. For example, you can do the following if you’d like to match from the base of your repository (using top), case insensitively (using icase), using only authored code (ignoring vendor files with attr), and using glob-style wildcards (using glob).
The only two magic signatures that you are unable to combine are glob and literal, since they both affect how git deals with wildcards. This is referenced in the git glossary with perhaps my favorite sentence that I have ever read in any documentation.
Glob magic is incompatible with literal magic.
Pathspecs are an integral part of many git commands, but their flexibility is not immediately accessible. By learning how to use wildcards and magic signatures you can multiply your command of the git command line.
Creating Your Own React Validation Library: The Developer Experience (Part 3)
Creating Your Own React Validation Library: The Developer Experience (Part 3)
Kristofer Selbekk
If you’ve been following along this little article series, you’ve now learned how to put together your very own validation library. It can handle almost any challenge you can throw at it, and it even helps out with accessibility concerns! Its only downfall is that it sucks to work with.
Yep, that’s right. The user experience from a developer point of view is seriously lacking. We don’t get any helpful warnings when we misspell words, misuse APIs or, well, anything, really!
This article will guide you through how you can improve the developer experience of your validation library — or any library for that sake.
Since the last part of this article, we’ve pulled out all library code into its own files. Take a look at the CodeSandbox demo to see what we’re starting out with.
Convenience Functions
We want our library to be as simple as possible to use for the most common cases. A way to move towards that goal is to add convenient utility functions for certain functionality.
One such feature could be to check if our form is valid — that is, if all error messages are null. This is something you typically check in your onSubmit handler, but it could be useful in your render-method too. Let’s implement it!
There are plenty more of these that could be written, but I’ll let that be an exercise for the reader.
Development Warnings And Invariants
One of React’s greatest features is its many helpful console warnings while developing. We should provide the same sort of quality to our users as well.
To get started, we’ll create two functions — warning for logging warnings to the console, and invariant for throwing an error — both if a given condition is not met.
function warning(condition, message) {
  if (process.env.NODE_ENV === 'production' || condition) {
    return;
  }

  console.warn('useValidation: ' + message);
}
function invariant(condition, message) {
  if (process.env.NODE_ENV === 'production' || condition) {
    return;
  }

  throw new Error('useValidation: ' + message);
}
You want to use invariant if the error is going to crash your library (or render it useless), and warning for bad practices or other advice.
When To Warn
Deciding when to warn is pretty important. Too many, and you’re just annoying. Too few, and you let critical bugs ship to production. Therefore, we need to be smart with our warnings.
Since our library accepts a pretty large configuration object, it makes sense to validate this somehow — at least while developing. We could solve it by using a type system like TypeScript or Flow, but that excludes all regular ol’ JavaScript users.
Instead, let’s create a runtime schema checker, where we validate that the config contains the correct fields, and print relevant warnings.
function validateConfigSchema(config) {
  if (process.env.NODE_ENV === 'production') {
    return;
  }
  if (typeof config === 'function') {
    config = config({});
  }

  invariant(
    typeof config === 'object',
    `useValidation should be called with an object or a function returning an object. You passed a ${typeof config}.`,
  );

  invariant(
    typeof config.fields === 'object',
    'useValidation requires a `field` prop with an object containing the fields and their validators. Please refer to the documentation on usage: https://link.to/docs'
  );


  invariant(
    Object.values(config.fields).every(field => typeof field === 'object'),
    'useValidation requires that the `field` object only contains objects. It looks like yours isn\'t. Please refer to the documentation on usage: https://link.to/docs'
  );

  warning(
    ['always', 'blur', 'submit', undefined].includes(config.showError),
    'useValidation received an unsupported value in the `showError` prop. Valid values are "always", "blur" or "submit".'
  )

  // And so on
}
We could probably go on doing this for a while if we wanted to spend the time. And you should! It’s a great way to improve the developer experience of your app.
You don’t have to be writing these by hand, however. There’s a browser-port of the popular object schema validation library joi that could help out with creating a really nice runtime validation check. Also, as previously mentioned, a type system would help catch configuration errors at compile time for the users that use that type system.
Allow For Flexibility
A good developer experience is in large part not getting in the way of the developers. Let’s look at a few ways we can improve that experience.
Compose Conflicting Props
First, our prop getters apply some props to our inputs and forms that can be accidentally overridden by our consumers. Instead, let’s add a prop override object to our prop getters, which will compose any conflicting props together.
Here’s how we can implement this in our getFieldProps:
getFieldProps: (fieldName, overrides = {}) => ({
  onChange: e => {
    const { value } = e.target;
    if (!config.fields[fieldName]) {
      return;
    }
    dispatch({
      type: 'change',
      payload: { [fieldName]: value },
    });
    if (overrides.onChange) {
      overrides.onChange(e);
    }
  },
  onBlur: e => {
    dispatch({ type: 'blur', payload: fieldName });
    if (overrides.onBlur) {
      overrides.onBlur(e)
    }
  },
  name: overrides.name || fieldName,
  value: state.values[fieldName] || '',
}),
A similar approach can be followed in getFormProps.
Help Avoid Prop Drilling
Some forms might be large and split up into several components. Instead of making our consumers’ drill props down the tree, we should provide a context. This way, they can access all the stuff we return from our custom hook anywhere in the tree below.
First, let’s create a ValidationContext with React’s createContext method:
Now, instead of calling useValidation directly, we’d wrap our form in a ValidationProvider component, and get access to the validation props (getFormProps, errors etc) by use of the useContext hook. You’d use it like this:
This way, you get the best of both worlds! You get a simple hook for those simple scenarios, and you get the flexibility you need for those complex parts.
Documentation Is Key 🔑
Whenever I’m using a library I didn’t write myself, I love great documentation. But what should you focus on, and where should you document?
A first step should be to put together a simple to understand README, with the most basic usage examples readily available. Andrew Healey wrote an amazing piece on how to write a good README, which I highly recommend you read.
When you’ve created a good README to get people going, a documentation website might be a good idea. Here, you can put a more in-depth API documentation, recipes for typical use cases and a good ol’ FAQ.
There are great tools out there for generating documentation websites. My favorite is docusaurus from Facebook (humble brag: we used it when creating the create-react-app website), but there are several good alternatives out there.
Through this article series, we’ve created a pretty decent validation library. It has a pretty simple API, flexibility for when you need it, a good developer experience, and a lot of pretty dank features.
We’ve gone through how we implemented things step by step, and I hope you got a deeper understanding of how you can make your own library, and how you make it something people would love to use.
Please let me know in the comments what you think, and if there were some parts you got stuck on or had a hard time understanding. I’ll try my best to update the article as feedback trickles in.
To end this article off — here’s the final version: