How To Start a Lifestyle Blog in 10 Simple Steps

When starting a blog, our recommendation for most people is WordPress with Hostinger because it has great features and affordable plans and is easy to use and learn. You can get started with Hostinger for 80% off with our Quick Sprout code. 

Starting a lifestyle blog is fun, flexible, and exciting. You get to talk about whatever you want and get creative, sharing your life and ideas with your audience. And if you’re lucky, you can turn your blog into a career and make your passion a successful income. 

But because lifestyle blogs don’t have as clearly defined a niche as other blogs do, it can be hard to set one up that doesn’t quickly become overwhelming. Getting the foundations right is important for making sure your blog has the potential to stay successful and fulfilling. Read on for our step-by-step guide on starting a lifestyle blog that stays fun and relevant. 

How To Start a Lifestyle Blog in 10 Simple Steps

The 5 Best Blogging Platforms For Starting a Lifestyle Blog

We’ve researched the best blogging platforms for starting a blog that is affordable, easy to use, flexible, and trustworthy. Here are our top picks based on all the ones we tried:  

You can read the full review here to choose the best blogging platform for your goals. 

Start a Lifestyle Blog in 10 Easy Steps

Setting up a blog is easy if you take it step-by-step, research, think strategically, and use the right tools. Here are the steps we’ll be breaking down in our tutorial: 

  1. Get Signed Up With WordPress on Hostinger 
  2. Do Market Research
  3. Choose a Blog Name
  4. Set Up Your Site and Activate Your SSL
  5. Get a Theme
  6. Customize Your Blog
  7. Plan Your First Few Posts
  8. Add Plugins
  9. Add Legal Pages
  10. Set Up Social Media

For this tutorial, we’re using Hostinger because our research found that it’s the easiest for new bloggers, comes with templates and security features, and has some of the best rates for hosting plans. You can get started with Hostinger for 80% off with our Quick Sprout code.

Step 1: Get Signed Up With WordPress on Hostinger 

The first thing you need to do when starting a lifestyle blog is get set up with a hosting platform. In our case, it’s Hostinger.  

Go to Hostinger’s home page, and sign up for an account by clicking on Hosting in the menu bar and then WordPress Hosting

Then, choose your hosting plan. We recommend selecting the WordPress Starter Pack because you’ll get access to a free domain for the first year, and it has everything you need to run a blog. 

Hostinger WordPress hosting plans
Hostinger offers affordable and flexible plans for new bloggers.

Once you’ve made your choice, add it to your cart, and choose how many months you want to subscribe for. You get a bigger discount the longer your plan is, but if you want to start with just a year, that’s fine too. 

Next, add your payment information and buy your plan. 

Hostinger WordPress Starter plan pricing
Hostinger offers discounts on long term plans for new users.

You can now log in to your Hostinger dashboard to see your plan and the option to Set Up. 

We’ll cover that in a moment. First, there are a few other steps you need to complete.

Step 2: Do Market Research

The next thing you’ll need to do before you even decide on a name or a theme is to get clear on who your blog will be for. 

With a lifestyle blog, you are dealing with the extra challenge of having a broad niche. You’re not just talking about one thing, like food, travel, or fashion—you’re talking about them all. This means that getting clear on WHO your blog is for and which readers will want to live a similar lifestyle is crucial. 

So, for example, is your lifestyle blog focusing on outdoor living? A lifestyle based mostly around being active, spending time in nature, eating clean, and staying fit? Then your content needs to be more targeted towards that type of reader, all the way down to the type of language you use. 

On the flip side, if your content focuses on minimalism with capsule wardrobes, no-waste cooking, or simple furniture, you will target a different audience. 

Let’s take a look at examples of two very different lifestyle blogs:

The Skinny Confidential homepage
The Skinny Confidential is a great example of a lifestyle blog targeted at young women.
Wit & Delight homepage
Wit and Delight is a great example of a lifestyle blog that is mature and calming.

We can see that one is targeted toward a younger audience, maybe more towards women and that the topics, language, and branding are all done with that type of reader in mind. The other is more understated, aimed at a very different group of people, covering more conservative topics. 

Both are great, but they work because they understand their audience. You need to get clear on who your target reader is and spend some time researching the topics they are interested in. What do they talk about on social media? What content do they like and share? 

You also want to think about the kind of topics they’ll be interested in reading about and that you’ll be interested in writing about. Once you know who will read your blog and have created an avatar for your target reader, you can move on to the next step. 

Step 3: Choose a Blog Name 

Once you know who your blog will be aimed at and what you will write about, it’s time to choose your blog name. Your blog name and domain name don’t have to be the same, but it’s better if they are. 

You want to choose a name that reflects your brand, but these are the other things you want in a name: 

  • A name that is relevant to your target audience 
  • Something short and easy to remember 
  • A name that is easy to spell and type
  • A name with an available domain
  • A .com domain name (not a .net) 
  • A blog name that is available as a social media handle on all platforms
  • A unique name that isn’t too close to any other blogs  

Hostinger has a domain name search tool to help you check if your domain is available. 

Hostinger domain name search
Hostinger lets users check whether their domains are available using it’s free tool.

One thing to note is that no matter how much you like a name, if someone else has a similar name, go with something else. Anything too close to an established blog name can get you in trouble when it comes to copyright or trademark.  

If you create a distinctive blog name from the start, you don’t risk having to change it later on and losing the brand or audience you’ve built. 

Once you’ve chosen a domain name and verified that it’s available, go to Set Up in your Hostinger dashboard and claim your free domain. Then, choose Build a New Website and move on to the next step.  

Step 4: Set Up Your Site and Activate Your SSL

Once you’ve set up an account with Hostinger and chosen a name, it’s time to set up your site. 

In your Hostinger Setup, once you select Build a New Website, you’ll be asked to choose a hosting platform. Select WordPress, then set a login and password for your WordPress account. 

Hostinger dashboard to select a platform with red arrow pointing to WordPress
You can create a WordPress account straight from your Hostinger dashboard.

You can then choose your theme. If you look in the search bar, you can browse through different layouts, including ones specifically for blogging. We’ll look at how you can edit or choose a better theme later in this tutorial, but for now, choose a premade one and continue. 

Once you choose your theme, you’ll get to a page that says your site is ready. Before you go to your WordPress Dashboard, you’ll want to ensure your SSL certificate is installed. Go to the option that says Control Panel and click Manage Site

Hostinger dashboard with red arrow pointing to Control Panel
Users can manage their content and setting from the Hostinger Control panel.

If you need to set up your SSL, you’ll see a yellow button that says Finish Domain Registration. Click it. You’ll then be asked to add your personal details like name, address, phone number, etc. When you’re finished, click Set Up, and then Continue to Control Panel

Hostinger Advanced settings with red arrow pointing to SSL
Users can update their SSL certificates directly through their Hostinger control panel.

Then go to Hosting in the top menu bar, and click Manage next to your website. Next, from the Hosting Account page, scroll through the different icons until you reach the advanced section, where you’ll see the SSL icon. Select it. 

Then click Set Up, then Activate, then Install. Your site is finally set up and ready to be customized!

Once you’re finished, you can move on to the next step. 

Step 5: Get a Theme 

Once you’ve finished setting up the technical parts of your blog, you can move on to making your blog look the way that you want, 

For many blogs, the appearance doesn’t really matter, and the content is king. However, when it comes to lifestyle blogs, there’s a little more pressure to create a brand and a full experience for people when they visit your blog. 

When choosing a new theme, you have a few options. 

You can go to your WordPress dashboard by adding /wp-admin to the end of your URL. If you go to Appearance, you’ll have the option to choose a new theme from the WordPress library. These can be paid or free, but they tend to be a little simplistic. 

If you want something a bit more complex, you can buy a theme from a third party. You can easily buy themes from Etsy or stores like Hello You Designs

Hello You Designs themes page
Customers can buy beautiful themes from Hello You Designs without having to learn coding.

The prices can range from $10 up to $100+, but you can choose whatever suits your blog. Once you buy these themes, you can upload them to your site by going to Appearance, Themes, then Upload. They’ll be detailed instructions for the seller of your theme, walking you through how to migrate it to your site.  

If you want to give yourself a real challenge, you can try building your own theme with a drag-and-drop site builder like Elementor or Divi. These offer lots of flexibility on how your site will look, but they are much more compact and time-consuming, so we don’t recommend them for new bloggers. 

Once you’ve chosen a theme and you’re happy with it, you can move on to step 6. 

Step 6: Customize Your Blog 

Now that you’ve chosen a theme, you can start to customize your blog. 

This includes changing the images to your own or at least to stock photos that reflect your branding and audience. You also need to change the content and the copy on the theme. For example, changing the menu content or the buttons, the about me copy, or the home page intro. 

This can be a little tricky if you don’t know too much about copywriting, but if you browse through blogs you admire, you should get an idea of what kind of content people usually share on these pages. Of course, copying is never okay, but it’s fine to take some inspiration for your own writing. 

You can also play with creating a brand color scheme here and even creating logos with a free tool like Canva. A great tool for creating a brand color scheme is Coolors, which can help you generate color palettes and find colors that go together. 

Coolors color generator
Coolors lets you generate and create your own color palette for free.

Once you’ve added, copied, and customized all your blog pages, you can move on to the next step. 

Step 7: Plan Your First Few Posts 

The next step is to plan out what you’ll write about. 

You can launch a site without adding content, but then you’ll have nothing to show your audience or post on social media. 

Planning posts is a good way to avoid writer’s block down the line. As long as you plan posts that can relate to other ones (known as a site map), you’re on the right track. You want to make it easy for your audience to stay on your blog and move from post to post. 

Spend some time thinking about which posts you want to create first. What is very relevant and helpful for people in your niche? What is the essence of your brand? Try to create evergreen posts (not trend pieces, but posts that will stay relevant) that are central to your brand. 

For example, if you are going to blog about minimalism, you might have a few core posts about what minimalism is or how to become a minimalist. These will probably be the first things people look for on your site and will always be relevant to your audience. Then, plan the rest of your content from there based on what can be linked to the post. 

Once you’ve planned at least five pieces of content, you can sit down and write first drafts for them. You can come back to these and edit as you go, but they’ll make it easier for you to plan social media content once you’ve launched your blog. 

Step 8: Add Plugins 

Next, you need to add some plugins to your blog. 

Plugins will help you add extra features to your site, like pop-ups, sticky menus, or quizzes. Some plugins will already be included in WordPress, but if you need other plugins for your site, you may have to download them from the plugin store.

You can see your active plugins in your WordPress dashboard by looking for plugins in the menu. You’ll then see a list of the plugins you already have and a button at the top of the page that says Add New

WordPress user dashboard for adding plugins
You can upload and find plugins directly in the WordPress dashboard.

If you click through to Add New, you can search different plugins or upload your own. You can include anything you want, although you may want to start by keeping it basic, as too many plugins can slow down your site. Here are our recommended essential plugins you need for a blog: 

You can add as many plugins as you need, depending on what features you want for your blog. If you want help choosing plugins, we have an extensive guide to the best WordPress plugins here

Once you’ve added your plugins, you can move on to the next step. 

It’s easy to overlook legal pages, but you shouldn’t. 

These are pages like your Privacy Policy and Terms and Conditions, and you are legally required to have these on a website. 

A Privacy Policy lets users know how their data is handled and which third-party plugins they use. Many countries and states require that you have these and that they are easy to find, so make sure yours are displayed somewhere obvious, like your footer menu. 

Some states also require a terms and conditions page, which is a page that lets users know any rules you have for your blog, like how old someone should be to access it. 

Termly website footer with red arrow pointing to links to legal pages
Termly can help you generate legal pages like the ones displayed on it’s own website.

For these pages, you can use a generator like Termly, or Terms Feed. These will give you templates that you can use and edit. However, as a disclaimer, these are not the same as getting official pages drawn up by a lawyer. To ensure your legal pages are correct, you should always consult a legal professional. 

Once you’ve set your legal pages up and created clearly visible page links, you can move on to the last step. 

Step 10: Set Up Your Social Media 

Once you’ve set up your blog, you can set up social media accounts using your blog name. 

We recommend setting up business accounts from the start, as these will let people know you are a blogger and make it easier for you to analyze your audience. Instagram and TikTok will probably be where most of your audience is hanging out if you are a lifestyle blogger, but there’s no harm in setting up a Twitter or a Facebook, too. 

Instagram user settings with red arrow pointing to Professional account and another red arrow pointing to Category
Users can set up a free business account with Instagram to analyze traffic and views.

Once you’ve set up your site, you can add your domain to your bio and even an email address so people know how to contact you for partnerships or media inquiries. 

Once you have set up your socials, you can publish and promote your first few pieces of content. You’ve finally finished setting up your blog, and now you just get to move on with building an audience and creating content! 

Final Thoughts About Starting a Lifestyle Blog 

You might hear a lot of people saying that lifestyle blogs are hard to start, but they are interesting, fun, and rewarding.

Lifestyle blogs can also be easy to monetize, as so many brands can sponsor or partner with your content, and you have access to a broad audience. Just follow our steps to get the foundations for your blog right, and you should have no trouble transitioning your blog into a side hustle, or even a career, in the future. 

Amazon FBA vs. Dropshipping: 6 Key Differences

ShipBob simplifies ecommerce fulfillment as it supports dropshipping from multiple channels and integrates with Amazon. Request a free quote and unlock two-day free shipping today.

Amazon FBA and dropshipping are two of the most popular fulfillment options for online sellers. While the two may seem similar at first glance, they’re actually very different. So whether you’re new to ecommerce or simply looking for an alternative fulfillment option, this guide has you covered. We’ll compare the key differences between Amazon FBA and dropshipping so you can determine which one is right for your business. 

The 5 Best Ecommerce Fulfillment Services For Selling Online

Our team here at Quick Sprout has researched and identified the best fulfillment solutions for ecommerce. Here’s a quick summary of our top recommendations:

1. Costs

The upfront investment cost is the first thing you need to consider when evaluating Amazon FBA vs. dropshipping. 

Amazon FBA requires a significantly larger investment than dropshipping. That’s why this option is typically better for existing businesses that are already profitable and have cash in the bank to buy inventory. 

Amazon FBA is more expensive than dropshipping because it requires you to purchase your inventory in advance. With dropshipping, you’re not paying for any inventory upfront—you only pay for items once a customer makes a purchase. 

Getting the lowest possible rate per unit on your inventory typically requires bulk purchases. So you may need to purchase hundreds or thousands of items at once, which can cost you thousands or tens of thousands, depending on what you’re selling. 

In addition to purchasing inventory, Amazon FBA charges for inventory storage, fulfillment fees, return processing fees, and more. There’s also a $39.99 monthly fee for the Professional seller plan. 

List of Amazon FBA storage and fulfillment fees
Use the FBA revenue calculator to estimate your fees from your Seller Central dashboard.

So right off the bat, if you don’t have the funds to purchase inventory in bulk, then Amazon FBA may not be right for you.

You’re also capped at 1,000 units of storage with Amazon FBA, meaning you may need to find a secondary storage facility to keep your overflow. 

The overhead costs associated with dropshipping are significantly lower. You just need to pay for the website expenses and ecommerce platform. You can get all of this set up for less than a couple hundred dollars, and the ongoing costs will likely be under $100 per month. 

Dropshipping doesn’t require any pre-payments for inventory. When someone buys something from your ecommerce shop, you just get charged for the items sold by your supplier.

2. Logistics

With dropshipping, you never need to touch your products. You don’t own or stock the inventory; you’re simply a middleman between the supplier and the customer.

After an item is purchased from your site, you need to notify the supplier of the order details, and they’ll ship directly to your customer. This process can be automated, so you won’t have to manually notify your supplier after every order. 

The logistics for dropshipping are very simple, and the effort is minimal compared to alternative fulfillment solutions. 

With Amazon FBA, there’s an extra step in the process that does require a little more legwork.

Your supplier isn’t shipping directly to the end customer. Instead, you need to purchase the inventory and then send that inventory to an Amazon fulfillment center. 

It’s your responsibility to ensure all products are packed, shipped, and routed to the fulfillment centers per Amazon’s guidelines. Products must be labeled correctly, have the right barcodes, and adhere to dozens of other strict rules and requirements. This can be tedious when you’re first starting out, but you’ll get the hang of it as time goes on.

If the Amazon FBA requirements don’t work well for your products or business, there are other fulfillment services that you can consider. ShipBob is an omnichannel fulfillment solution that offers two-day free shipping and simple inventory storage. 

How ShipBob fulfillment works in three steps
ShipBob is an alternative ecommerce fulfillment solution to consider vs. Amazon FBA.

The logistics are straightforward, and ShipBob syncs with your sales channels. So, whether you’re selling through your website, Facebook, or Amazon, they’ll be notified of the details and ship directly to your customers. 

3. Returns and Customer Support

Dealing with customers is an important aspect of running any ecommerce business, and returns are just part of the game when you’re selling online. Both of these elements are handled differently for Amazon FBA and dropshipping. 

Amazon FBA manages returns and customer support for you. If customers have questions about the status of an order or need to set up a return, everything is handled directly through Amazon.

An explanation of how customers get Amazon's trusted customer service and returns with FBA
Support and returns are handled for you with Amazon FBA.

Will you have to answer any questions sent to your seller profile? Sure. But that’s relatively easy and doesn’t require too much work. It barely falls under the scope of “customer support.”

As a dropshipper, you’ll have to handle all returns and support on your own. This may require you to get customer service software for your website to manage tickets, returns, and live chat. You’ll also have to figure out how you’ll handle return logistics.

Return arrangements can vary based on different suppliers and the types of products you’re selling. In some cases, the cost associated with a return isn’t worth it for sellers, and you might be better off just refunding your customers or shipping them a brand-new item. 

You’ll have to crunch the numbers and see what kind of offers or guarantees you’re getting from your suppliers. But for low-ticket items, you may ultimately choose not to accept the items back to save money and avoid logistical headaches. 

4. Profitability

Dropshipping offers a faster path to profitability. Since your overhead costs are so low and you’re not paying for inventory, you can potentially turn a profit with your first sale. At worst, it will take you a handful of conversions to cover the costs of running your website.

With that said, dropshipping profits might be slim. This all depends on how well you can find suppliers offering good prices and how well you do with pricing and marketing. But generally speaking, the profit margins are lower with dropshipping because you’re not getting bulk inventory prices. 

Amazon FBA allows you to earn higher margins per item sold, but it may take longer to break even. 

For example, let’s say 1,000 units at an Amazon warehouse that you’re selling via Amazon FBA. Your breakeven point might be 600 units. This could take months for you to reach, but the total profit on your 1,000 units can be high once you break even—potentially higher than selling the same 1,000 units via dropshipping. 

5. Competition

There’s always going to be competition when you’re selling online, regardless of the method. But the type of competition you’ll have will vary depending on your fulfillment method.

If you’re using Amazon FBA, there’s a good chance you’ll want to be selling on Amazon. Depending on your products, you could have high competition here. That’s because people won’t necessarily be searching directly for your specific brand and product. Instead, they’ll search for broad terms and then compare the options.

This means that your products will be showcased side-by-side with your competitors. Customers will have a quick, at-a-glance view of what you’re selling, along with the price and rating. So if you’re not competitively priced or your ratings are subpar, it could be difficult to stand out from other options on the platform. 

You might also find yourself in direct competition with Amazon, as Amazon has its own brand of products. It’s common for these Amazon-branded products to appear first in the search results, right alongside the sponsored products.

Amazon search results for office chairs with a red box around an Amazon Basics brand chair
Some products have lots of competition in Amazon’s marketplace.

If you’re dropshipping, you’re still going to have competition. But you’ll be competing with other brands on different channels. To gain the edge here, you need to be good at SEO and learn how to market your products to prospects. 

One method isn’t necessarily easier than the other. It’s just all about the path you prefer to take.

The cool part about using an omnichannel fulfillment option like ShipBob is that your fulfillment can be handled regardless of where you’re selling. So if you want to sell through Amazon, ShipBob can still handle your fulfillment. 

But if you also want to sell on your website or through third-party channels like Facebook or Walmart, everything can be handled from a single fulfillment service. This helps you stand out from competitors on every channel and benefit from ShipBob’s two-day shipping. 

How to drive revenue through two-day express fulfillment with ShipBob
ShipBob offers fast two-day shipping options across the US.

In short, Amazon FBA isn’t the only way to provide fast shipping. So you can stay competitive no matter where you’re selling. 

6. Brand Control

Dropshipping gives you much more control over your brand. If you’re not selling on Amazon, you can essentially do whatever you want with your website and sales channels. 

This takes a bit more work than simply having an Amazon seller profile, but it’s great for businesses that want to be unique. 

Since Amazon FBA has such strict packaging requirements, shipping products to customers in custom-branded boxes is harder. It’s possible, but it’s likely in your best interest to let Amazon handle this for you, and your products will be delivered in Amazon’s packaging. Otherwise, you’ll have to do more legwork before shipping your inventory to an Amazon fulfillment center. 

Alternatively, other fulfillment solutions on the market have better brand customization options than Amazon FBA. ShipBob gives you full control over your boxing and packaging, so customers are immersed in your brand image when deliveries arrive at their doors. 

How branded packaging works using ShipBob
ShipBob is an excellent solution for ecommerce fulfillment with branded packaging.

ShipBob also offers customized kitting, marketing inserts, custom notes, and other enhancements to truly make your packages unique. Custom order labels and custom-branded boxes are offered at no additional cost. 

If you care about the unboxing experience for your customers, this will likely be a better option than Amazon FBA. 

The Similarities Between Amazon FBA and Dropshipping

Contrary to popular belief, you can use Amazon FBA even if you’re not selling through Amazon’s marketplace. So one similarity between Amazon FBA and dropshipping is that both can be used for omnichannel ecommerce, including sales directly from your website. 

Amazon FBA multi-channel fulfillment landing page
Amazon FBA also offers multi-channel ecommerce fulfillment.

It’s also possible to sell products via Amazon using dropshipping—without having to go through Amazon FBA. 

Both Amazon FBA and dropshipping give you total control over your customer price points. So while your costs may vary based on your logistics, you still have the final say over the sales price of your products. 

You don’t fulfill orders or ship products to customers with either of these methods. If you’re using Amazon FBA, the shipment is coming from an Amazon fulfillment center. If you’re using dropshipping, fulfillment and shipping are handled by your supplier. 

Final Thoughts About Amazon FBA vs. Dropshipping

Amazon FBA and dropshipping can both be lucrative options for online sellers. Generally speaking, Amazon FBA is better for brands that already have cash flow and either want to expand sales channels or improve fulfillment processes. Dropshipping is a safer and more cost-effective alternative for people new to selling online. 

Dropshipping offers more flexibility for those who want more control over their brand. Just remember that you’d need to handle customer service independently if you go this route, whereas Amazon FBA would handle support and returns for you. 

If it sounds like dropshipping is right for you, check out our step-by-step guide to starting a dropshipping business. For help finding suppliers and managing your operations, we also have in-depth reviews of the best dropshipping companies. These resources will help set your business up for success.

How to Import Content in WordPress in 7 Simple Steps

Importing content in WordPress is simple when you use WordPress with Hostinger because it’s easy to get started and ensures you have the right capacity to manage your content. Start using WordPress with Hostinger now for $1.99 per month

WordPress is the world’s most popular CMS platform for a good reason. It’s an excellent option for blogging or any other type of content-heavy site. Switching to WordPress is a great idea if you run a website on another platform. 

But switching to WordPress doesn’t mean you have to start from scratch. You can simply import the content from your existing site to your new WordPress website. This step-by-step guide will walk you through that process. 

How to Import Content in WordPress

The Top Tools to Import Content in WordPress

Our team here at Quick Sprout has extensively researched the best tools to import content in WordPress. Take these into consideration as you’re going through this process. 

Import Content to WordPress in 7 Easy Steps

Importing content in WordPress might seem like a daunting task at first glance. But it’s actually fairly simple, and the entire process can be summarized in the seven easy steps below:

  1. Sign Up For WordPress with Hostinger
  2. Backup Your Site Files and Databases
  3. Make Sure You Have Sufficient Memory Space for the Import
  4. Identify Where You’re Importing Content From
  5. Export and Review the File You Want to Import
  6. Configure a New WordPress Import
  7. Backup Your New WordPress Content

The bulk of this guide will focus on using WordPress with Hostinger to complete these steps. That’s because Hostinger offers WordPress-specific hosting plans at an affordable rate with all the tools and features you need to seamlessly import your content and continue running your WordPress site with success in the long run. Get started today with WordPress and Hostinger for just $1.99 per month.

Step 1 – Sign Up For WordPress with Hostinger

The first thing you need to do is sign up for WordPress. Unlike other website platforms, WordPress is only a CMS—meaning it does not have web hosting built into the system. So for your site to be live on the web, you also need to secure a web hosting solution during this step.

While there are dozens of different routes you can take here, using WordPress with Hostinger is by far the best and simplest choice. This is especially true if you’re starting a brand new WordPress site and importing content from another site. 

One of the top reasons why Hostinger is ideal for this process is because they offer WordPress-specific hosting packages, so your hosting solution is optimized for WordPress out-of-the-box, and it comes with all of the great features you need to run a successful WordPress site. 

Hostinger for WordPress-Powered Websites webpage
Hostinger’s WordPress plans simplify the content import process.

All of these plans come with a one-click WordPress installer. You’ll also benefit from 24/7 WordPress support by the experts at Hostinger. So if you have any questions or need help during this process, they’re just a click away via live chat.

It’s also worth noting that every WordPress hosting plan from Hostinger comes with a free migration. So if you’re moving your site from another web host, they’ll take care of the technical complexities for you as your site gets transferred to its new servers. 

Best of all, this option is affordable for anyone. Hostinger’s WordPress plans start at just $1.99 per month. All purchases are backed by a 30-day money-back guarantee. 

Once you’ve signed up for Hostinger and installed WordPress, you can proceed with the remaining content import steps. 

Step 2 – Backup Your Site Files and Databases

Next, you need to switch over to the platform where your content currently lives. It could be a website platform or another CMS, and this step will look a little different for everybody. 

Regardless of where your content is, the platform should have some type of documentation that explains how to back up the data. In some instances, this will be handled for you automatically on a nightly or weekly basis, and other platforms require manual backups or third-party plugins.

While importing content into WordPress is generally safe and should not impact the data that’s hosted elsewhere, it’s always a good practice to back up your files before proceeding. Weird things can happen, and it’s better to be safe than sorry. 

So if something goes awry during the import process, you can always restore the content from your latest backup. 

Make sure the backup includes all of your website files and MySQL databases. This can typically be handled directly from your website platform or web host’s control panel. 

Let’s say you were already using Hostinger to power another WordPress site. This process would be as simple as navigating to the Backup Wizard on your cPanel. 

Example of cPanel with red arrow pointing to Backup Wizard button
Backing up your files helps keep your data safe in case something goes wrong during the import.

From here, you can generate full backups, partial backups, and even download your backups with just a few clicks. There’s a good chance that whatever platform you’re using also has a similar backup feature that should be easily accessible. 

Step 3 – Make Sure You Have Sufficient Memory Space for the Import

This next step requires you to do two things. First, you have to check the size of the content you’re going to import. Then you must verify that the file size is less than the allowed memory space for your import. 

If the import is too big, you’ll get an error message or fatal error code from your servers. Even if the import fails, some of your files might be partially imported to WordPress. This can be problematic when you try again a second time, as you’ll end up with duplicate data.

That’s why it’s so important to verify your memory space before you attempt a new import. 

Be aware that your maximum file upload size may not necessarily be the same as the SSD storage that’s offered in your selected plan from your hosting provider. 

Start by going to the backup that you generated in the previous step. You should see the file size displayed if you download it or attempt to download it.

To check or modify your maximum file upload size via Hostinger, simply navigate to your PHP Configuration and select PHP options

Example of Hostinger's Advanced screen with red boxes around PHP Configuration and PHP options buttons
Hostinger makes it easy to adjust your max file upload size through the PHP Configuration.

By default, there’s a good chance this will be set to 512 MB. But you can adjust it as needed. Make sure you adjust both the uploadMaxFilesize and postMaxSize fields. 

If you’re uncomfortable doing this alone, you can always contact Hostinger’s support team for assistance. They’ll likely be able to change this for you on your behalf. Just let them know the file size that you’re going to import, and they’ll ensure the space is sufficient. 

Step 4 – Identify Where You’re Importing Content From

To simplify imports, WordPress has several built-in importers. This is a great option for those of you who are importing specific posts or comments that are currently hosted on other platforms.  

Those options include:

  • Blogger — Use this tool to import posts, comments, and users from your Blogger site to WordPress. 
  • Blogroll — This tool imports links using OPML formatting.
  • Categories and Tags Converter — Allows you to bring your existing content categories and tags to WordPress.
  • LiveJournal — You can use the LiveJournal API to import posts in WordPress.
  • Movable Type and Typepad — Import blog posts and comments on either of these blog platforms. 
  • RSS — Use your current blog’s RSS feed to import content in WordPress.
  • Tumblr — Move posts and other media from Tumblr to WordPress using the Tumblr API.
  • WordPress — If you’re moving content from one WordPress site to another, you can import posts, pages, comments, categories, tags, and custom fields directly from an exported WordPress file. 

The steps for each of these options are different. But it’s as simple as following the instructions on the screen as you’re prompted. If your content currently lives on one of the platforms above and you’d like to proceed using one of these methods, navigate to Tools on the left side of your WordPress dashboard and select Import from the expanded menu. 

WordPress dashboard with Tools selected and Import screen displayed
The Tools import screen is an easy way to import content in WordPress.

Before you proceed, there are a few things you should know. First, if you’re importing content from one WordPress site to another, your web host should be able to help you. 

Hostinger offers free site migrations, which bring your site from your current servers to their servers. Depending on your situation, the migration alone could help you bypass some of the import steps. So it’s always in your best interest to check with your web host to see if they can save you from going through unnecessary steps or handle some or all of the importing on your behalf.

If you don’t see the importer on this page that matches where your content is coming from, there’s no need to panic. You can always install a WordPress plugin to facilitate the import. This can either be a plugin offered directly by the provider you’re currently using or a third-party plugin that works as an intermediary between multiple platforms and WordPress. 

This option all depends on the type of content you’re trying to import.

For example, some options will be better for blogs and comments, while others will be better for importing users, customer information, media, and widgets. 

Step 5 – Export and Review the File You Want to Import

If you’re not going to connect through an API or direct importer, you should be able to export your existing content via XML or CSV file. 

This is typically a better option for larger sites, as using plugins can create some errors. So a manual import can give you more control over exactly what you’re importing and how it’s formatted. 

Again, this step will look different for everyone. It all depends on where your current content is located. If you’re unsure how to export that content, there should be sufficient documentation for you to follow directly from that provider. 

Step 6 – Configure a New WordPress Import

Once your file is ready, go back to WordPress. You can use the WP All Import Plugin to configure your content after the import is completed. 

This plugin is regularly updated and has more than 200,000 active installations. 

From your WordPress dashboard, you can navigate directly to the plugin. Then drag and drop the file you exported in the previous step. 

The cool part about using this plugin is that it does more than just add your files and content to WordPress. It also gives you the ability to configure how everything looks once it’s moved over. 

WP All Import Drag & Drop screen
Configuring your content is easy and doesn’t require any technical expertise with this plugin.

This step helps ensure that the formatting in your XML or CSV file doesn’t get messed up during the import. Things like this could easily happen if the header title on a single column doesn’t align with what you want. 

This plugin allows you to create WordPress content using the format and template you create now. Then you can choose which type of data to include with the import.

For example, maybe you want to import everything, or maybe you only want the blog posts and images. 

Step 7 – Backup Your New WordPress Content

Once the import is complete, make sure you back up your WordPress site.

Every Hostinger plan supports weekly backups. If you upgrade to a Hostinger Business WordPress plan or higher, you’ll benefit from automated daily backups. 

If you’re on a lower-tiered plan, you shouldn’t risk waiting a week for the next backup. Instead, you can generate a new backup manually directly from your Hostinger account. 

Simply click on Manage and select Backups from the sidebar. Then click Generate new backup

Hostinger Backups Screen with red arrow pointing to "Select" button under "Generate new backup"
Creating a manual backup keeps your newly imported content safe.

Now you’re done! You can repeat this process as needed any time you want to import new content in WordPress. 

Final Thoughts About Importing Content in WordPress

Successfully importing content in WordPress all starts with the right web hosting solution. Using a WordPress-specific plan, like Hostinger, will simplify the process and ensure you have all the tools at your fingertips to import content without losing data. 

Keeping backups of your content is also crucial to avoid data loss. If you have a large file to import, make sure your plan has enough memory and storage space to accommodate your import. Just follow the step-by-step instructions in this guide, and you’ll be all set. 

VoIP Starter Guide: Learn the Basics

After several weeks of in-depth research, we found Nextiva to be the best VoIP provider because of its high performance and quality standards. Get a free trial to experience the platform today.

If you’ve ever used a service like Zoom or Google Voice, you’ve already experienced the convenience and cost-saving benefits of Voice over Internet Protocol (VoIP). In this article, we’ll explore what VoIP is and how it works and discuss key VoIP features that make it an extraordinary telephone service.

If you‘re a business owner looking to cut costs or simply looking for an alternative to traditional phone service, read on to get a comprehensive understanding of VoIP and its potential advantages for your business.

The Best 12 VoIP Phone Services for VoIP Calling

To experience the benefits of VoIP, you have to choose a reliable phone service provider. The good news is we‘ve already reviewed over 25 brands to shortlist the best VoIP phone services that are worthy of your time and money.

  • Nextiva — Best Overall VoIP Provider
  • RingCentral — Best for Hybrid and Remote Work Environments
  • Ooma — Best for Small Businesses That Want Simple Setups
  • 8×8 — Best VoIP Provider for International Calling
  • Dialpad — Best AI Functionality for VoIP Phone Systems
  • GoTo Connect — Best Feature-Packed Entry-Level VoIP Plan
  • Phone.com — Best For Businesses on a Tight Budget
  • Google Voice — Best Simple and Lightweight VoIP Phone Service
  • Aircall — Best Built-In Call Management Tools
  • CallHippo — Best VoIP Phone System for Industry-Specific Compliance
  • 11Sight — Best One-Click Audio and Video Calling for Sales and Marketing Teams
  • Zoom — Best Call Monitoring Features For Business Users

What is VoIP?

Voice over Internet Protocol, or VoIP, lets you make phone calls using a broadband internet connection instead of a regular phone line. It’s an advanced technology that converts your voice into a digital signal and then transmits it over the internet instead of traditional phone lines. It can be on-premise or hosted in the cloud by a VoIP provider.

One of the (many) reasons VoIP has become increasingly popular in recent years is it offers several advantages over traditional phone service. 

For example, it’s cheaper (at times, even free!), especially for making long-distance or international calls. It also offers a range of features, such as the ability to forward calls to multiple devices and conduct conference calls with multiple participants, which isn’t available with traditional phone service. 

It’s also incredibly flexible, where you can use a VoIP app on your computer or smartphone or a VoIP adapter to connect your regular phone to the internet.

How Does VoIP Work?

Here’s a quick rundown of how a VoIP call works:

  1. Your call is passed from your device to a router.
  2. The router passes your call over the internet, reaching a VoIP phone service server.
  3. Your call is then transmitted via local internet to the other end of the receiver’s router.
  4. Your call connects to the receiver’s IP device. 

As long as you have a high-speed internet connection (a router and modem), you’re ready to use VoIP.

Nextiva infographic explaining how VoIP works
Nextiva offers an easy-to-use VoIP system that can be managed from a single portal.

Generally speaking, a VoIP configuration involves a desk phone and a session initiation protocol (SIP) server, which is also your VoIP service provider. 

As VoIP runs over the internet, your data is stored in the cloud. You can manage the VoIP system through an online dashboard. You can adjust contacts, forward calls, and add new phone numbers directly on the dashboard.

Overall, VoIP is a convenient and simple way to make phone calls using the internet. You can communicate with anyone, anywhere in the world—provided both parties have a stable internet connection and a VoIP service-compatible device.

What are the Advantages of VoIP? 

The following are a few reasons why you should choose a VoIP service over traditional phone lines: 

Value for Money

Most VoIP phone providers offer unlimited missed calls for free. While international calls are chargeable, it’s still quite cheap. 

Moreover, most VoIP services are cloud-based, which means they don’t require hardware. This saves you money on repairs and maintenance, which you likely pay to your landline phone provider.

Greater Flexibility

VoIP eliminates the need to be at a specific place to make or receive phone calls. 

Instead of being in an office, on-premise, or sitting by your desk, you can take calls from anywhere using the app on your device. This is a big advantage for remote or hybrid teams or f you travel frequently.

List of benefits of using Nextiva's VoIP phone system
Companies like Nextiva offer advanced features with their VoIP phone systems.

Improved Scalability

With VoIP, you can grow easily and cost-effectively, whether you’re opening a new office in a new city or hiring more staff.

Unlike a traditional phone service that typically involves spending more money on expensive hardware to get a dedicated line, you can add team members with just a few clicks inside your VoIP service‘s account dashboard. 

The fact that VoIP works on all smartphones means you don’t have to spend more on additional equipment costs while freeing up disk space.

Improved Privacy 

VoIP allows you to add a second line to your cell phone, helping you avoid sharing your personal number with strangers.

Small business owners wanting to protect their privacy can set up a VoIP line for their customers in minutes. This is a great security feature keeping in mind the recent rise of phone hacking.

What are the Disadvantages of VoIP?

Next, let’s review the disadvantages of VoIP:

Lack of Offline Functionality

This is the obvious disadvantage of VoIP.

If you don’t have reliable internet, your clients and team members cannot reach you through your business number. But the good news is VoIP systems will directly send the caller to voicemail if service is unavailable.  

In addition to a good internet connection, you also need a continuous power supply. Otherwise, you’ll have to wait until power is restored or invest in a backup power supply.

If you receive VoIP calls through Wi-Fi, you may also have to step out of the office, depending on the provider, and switch to your data plan to talk. 

Potential Connection Issues

As mentioned, VoIP sends small packets of data across the internet and reassembles those packets at the recipient’s IP address. 

This creates three potential issues:

  • Packet loss: occurs when data packets fail to reach their destination, resulting in dropped calls. 
  • Jitter: when packets reach the destination but arrive in the wrong order, resulting in unintelligible calls. 
  • Latency: the lag in time between when you speak and when the person on the other line hears what you say.

No Built-in Emergency Services

The good thing about non-fixed VoIP phones is they aren’t tied to a physical location. But this also means there’s no way for emergency services like 911 to trace your location. 

Suppose you have a physical address linked to your VoIP account. When you’re on the go, emergency workers may be dispatched to the wrong location.

The 11 Key VoIP Features that Help Boost Productivity 

VoIP’s advanced feature set is one of the main reasons it’s currently the most popular phone system in use. Here are some of its best features in detail to help you understand how your business can benefit from this technology:

  1. Interactive Voice Response (IVR): This feature uses pre-recorded voice prompts and speech recognition to allow customers to interact via a dial pad and direct their calls to the proper departments or individual agents. In other words, it automates business processes that either eliminate the need for your callers to speak to a live agent or drastically cut down call times.
  2. Call forwarding: This feature lets you easily forward calls to another number or device when you’re unable to answer a call or are away from your desk.
  3. Virtual receptionist: Certain VoIP services offer a virtual receptionist feature for small businesses that don’t have a dedicated receptionist. This means you can set up an automated greeting and menu system for incoming calls. 
  4. Call blocking: This feature allows you to block unwanted calls from specific numbers.
  5. Conference calls: Thanks to this feature, you can conduct conference calls with multiple participants at once. This facilitates collaboration with remote coworkers or clients.
  6. Integration with other tools: VoIP services are also incredibly flexible, meaning you can integrate the tech with other business tools, such as customer relationship management (CRM) software and project management software, to streamline communication and improve overall productivity.
  7. Voicemail: Voicemail allows you to receive and listen to messages when you cannot answer a call.
  8. Call waiting: This feature will notify you of all incoming calls if you or your team members are already on the phone, ensuring you don’t miss out on important calls.
  9. Call transfer: With VoIP, you can transfer calls to other extensions or numbers to ensure your caller is talking to a suitable person or department for their query.
  10. Call holding: The call hold feature allows you to temporarily put a call on hold and return to it later. 
  11. Auto-dialers: This feature simplifies reaching out to potential customers from a list of leads and extends the duration of calls. It eliminates the need for agents to manually dial phone numbers, allowing them to connect to calls only when a prospect is available to speak. 

What to Look for in a VoIP Provider?

Now that you know the key advantages of VoIP for your business, let’s quickly review how we at Quick Sprout identified the best VoIP providers.

The following are our core criteria for a good VoIP phone service:

  • User-friendly
  • Stress-free administration
  • Service quality and reliability
  • Mobile access
  • Simple call management features
  • Number porting options
  • International call capabilities
  • Reasonable pricing
  • Excellent customer service

While your individual use case may differ, ensure your shortlisted phone service provider has the above functionalities.

Final Thoughts About VoIP

Switching to VoIP is a no-brainer if you want a cost-effective and user-friendly option to make phone calls without being confined to a specific area. While there are a few drawbacks, VoIP is still a reliable technology that’s revolutionizing how we communicate compared to the traditional landline.

Once you optimize your VoIP network, you can stay connected and streamline customer interactions to enhance your workflows and improve productivity.

Compare the Best Business Text Messaging Services

Our recommendation for the best business text messaging service is SimpleTexting because of its versatility, reliability, ease of use, and fair pricing. Start your 14-day free trial today.

With consumers bombarded with dozens of promotional emails on a daily basis, it’s become increasingly difficult for organizations to reach their audience. Emails get ignored, deleted, or go straight to the spam folder. 

But texting is much more effective, as the message goes straight to someone’s phone—ensuring the message gets read. The business text messaging services in this guide will help you improve engagement, increase sales, and enhance customer service.

The Top 5 Best Business Text Messaging Services

The five text messaging services reviewed below are excellent options, and they each stand out for different reasons. SimpleTexting is the most versatile on the list, as it can be used for sales, marketing, mass messaging, and one-on-one texting. Try it free for 14 days

  • SimpleTexting – Best texting service for marketing and sales
  • Textedly – Best for bulk texting
  • OpenPhone – Best for unlimited calling and texting
  • Podium – Best for text-to-pay
  • Sendinblue – Best for texting combined with email services
Company logos for our best business text messaging services reviews.

Continue below for our business text messaging service reviews and buyer’s guide.

Match Your Scenario to the Right Business Text Messaging Solution

Our research team here at Quick Sprout identified the top five reasons why an organization would need a business text messaging service. Then we found the best texting solutions that fit within that category—making it easy for you to find the best texting service for your needs. If you see a scenario below that best describes what you’re looking for, you can jump straight to that section to see our top recommendations. 

You want to run SMS marketing campaigns

Best Option: SimpleTexting

SimpleTexting has customizable user segments and custom fields to help personalize your marketing campaigns. It integrates seamlessly with more than 1,000+ tools, so you can create automated workflows and connect data between your email marketing software and CRM.

Another standout feature is SimpleTexting’s results tracking. You can use it to monitor KPIs like deliverability, CTR, subscriber growth, and more. 

Another Great Choice: Textedly

Textedly has a unique feature for loyalty marketing. You can set up campaigns that reward customers based on visits or spending and track everything from their phone numbers. Then you can automatically send marketing messages to users, keeping them updated on their rewards and even letting them claim rewards via text. 

For SMS marketing campaigns, look for:

  • User segments: Ensuring the right message is delivered to the right person at the right time.
  • CRM integrations: So you can align your marketing campaigns across all communication channels with your customer database.
  • Analytics: To see what’s working, what’s not, and look for ways to make improvements.
  • Automation: So you can put campaigns on autopilot and schedule drips.

You have high-volume texting needs

Best Option: Textedly

With plans that support up to 240,000 messages per month, Textedly has the ability to accommodate organizations with massive contact lists. If 240,000 isn’t enough for you, Textedly will set you up with a customized plan—making it possible to send millions of messages every month.

You don’t have to worry about paying for contacts, either. Since Textedly plans are based on outbound messages, you can add an unlimited number of subscribers to your database at no extra cost. 

Another Great Choice: OpenPhone

Every OpenPhone plan comes with unlimited texting and calling in the US and Canada. So you can send as many texts as you want without having to ever worry about the cost. Every user on your account will also have a dedicated line.

For high-volume business texting, keep an eye on:

  • Reliability: Sending 200,000 texts is useless if only half are getting delivered.
  • Monthly limits: You don’t want the service to cap you at a maximum number of text messages every month.
  • Subscriber limits: Ensuring you won’t outgrow the platform. 
  • Auto reply: Because it can be tough to respond manually to recipients when you’re sending hundreds of thousands of messages simultaneously. 
  • Cost structure: Typically, the price per text should get cheaper as your volume increases.

You want a complete CRM to manage contacts

Best Option: Sendinblue

Sendinblue is a complete email marketing and SMS messaging platform with a built-in CRM. So you won’t have to integrate your software with a third-party tool to manage your contacts with multi-channel marketing. 

The software makes it easy for you to identify wins with each customer interaction, and you can quickly use it to close open deals in the sales pipeline. Users love Sendinblue’s ability to add notes, attach documents, and assign tasks to each contact so the entire team can be informed about a contact’s history.

Another Great Choice: Podium

Podium is a CRM built for local businesses. The platform makes it easy to track all of your customer interactions from every channel, and it keeps a full history of every conversation and payment. You can even use Podium’s CRM to segment your customers based on location, behavior, preferences, the amount they spend, and more. 

For CRM contact management, make sure you consider:

  • Built-in CRM: Eliminating the need to integrate with third-party platforms.
  • User segmentation: Ensuring your contacts are getting highly personalized messages.
  • Multi-channel support: So every text and email interaction is tracked from the same place.

You need to send texts internationally

Best Option: Sendinblue

Sendinblue makes it easy to pre-pay for SMS credits in different countries. So if you have customers or prospects overseas, you can still target them with text messaging campaigns. The credits never expire, so you’re not required to use all of them within a month, quarter, or year—which is great if you’re not planning on exhausting those credits immediately.

Another cool part about Sendinblue is the ability to purchase credits for WhatsApp messaging campaigns as well. This is one of the most popular messaging solutions worldwide and is great for contacts who may prefer WhatsApp over texting. 

Another Great Choice: OpenPhone

OpenPhone supports unlimited texts in the US and Canada. But they offer per-usage rates on texts in other countries worldwide—starting as low as $0.02 per text. You can send SMS messages anywhere and only get charged based on the country and how many texts you’re sending internationally.

If you’re sending international texts, be aware of:

  • Cost structure: SMS rates typically vary by location, so you’ll want to pay close attention to how you’re being charged to send international texts. 
  • Countries supported: The ability to text people internationally is useless if the countries you want to reach aren’t available. 

You need to send custom texts to single recipients

Best Option: Textedly

While Textedly is best known for its ability to send bulk texts, the platform is versatile enough to support one-on-one messaging as well. All of your subscribers have the option to reply to a text, making it easy to accommodate two-way chat. 

This is ideal if they need questions answered or want to continue moving through the sales process. Textedly sends you an instant notification whenever you get an inbound message so you can reply ASAP. You can also set up automatic replies that are delivered within three to five seconds of the inbound message. 

Another Great Choice: SimpleTexting

SimpleTexting makes it easy to have two-way conversations with people, which is perfect for sales teams. All incoming SMS messages are free and won’t count toward your monthly credits. You can also lend longer messages to your contacts and include phones, documents, zip files, and other MMS content. 

If you’re sending individual texts to one person, pay attention to:

  • 2-way messaging: So when the recipient replies, you can have a complete conversation via text.
  • Autoresponders: To ensure your audience gets a quick reply, even while your agents are away.
  • Extended messaging: So you’re not limited to just 160 characters or SMS only.

Business Text Messaging Services Company Reviews

Below you’ll find our in-depth reviews of the best business texting services on the market. Each solution shines above the crowd for a particular reason, a unique feature, or a use case, which we’ve highlighted in the review. 

Read on to learn more about these top business text messaging solutions. We’ll even call out areas where a particular service could use some improvements and give you more information on pricing so you can find the best value for your needs. 

SimpleTexting – Best texting service for marketing and sales

SimpleTexting, one of the best business text messaging services.

SimpleTexting lives up to its name in the sense that it’s ultra-easy to use. But don’t let that simplicity fool you. It’s still a feature-packed texting service that can be used for virtually any use case.

What makes SimpleTexting unique compared to other options on the market is its ability to accommodate multiple departments and needs within an organization. Your marketing team can use it for drip campaigns and bulk messaging. But your sales team can also use it to nurture leads with one-to-one conversations and two-way messaging.

The service can even be used for appointment reminders, interview scheduling, and HR job recruiting. It’s worth noting that SimpleTexting doesn’t have a built-in CRM or email marketing solution. But you can integrate it with the tools that you’re already using. 

What Makes SimpleTexting Great

When it comes to text campaigns, sales and marketing teams have very different approaches. Sales reps need to personalize messages and have two-way conversations with leads, while marketers need to blast bulk campaigns to thousands of people. Fortunately, SimpleTexting can handle both of these needs from a single platform.

Screenshot of SimpleTexting's features web page.
SimpleTexting supports both sales and marketing initiatives.

This really isn’t something that you’ll find from many other business text messaging services on the market, as most platforms tend to lean in one direction or the other. 

You can use it to announce sales promotions, improve customer satisfaction, find new customers, and follow up with leads faster than email. SimpleTexting supports more than 1,000+ integrations, making it easy for you to connect with business software you’re already using and create automated with a hands-off approach.

Pricing is based on how many texts you’re sending per month, and all incoming SMS messages are free. Plans start at $29 per month for 500 messages, and the price per message gets cheaper as your monthly volume increases. Try SimpleTexting free for 14 days—no credit card required

Textedly – Best for bulk texting

Textedly, one of the best text messaging services.

Most business text messaging services cap you at around 50,000 messages per month. Some let you go up to 100,000 texts with enterprise plans. But Textedly blows all of those out of the water with the ability to send up to 240,000 text messages each month.

This is an excellent option for large organizations with massive customer databases. If you want to take advantage of your existing contact list, Textedly won’t hold you back.

But it’s also a great tool for businesses with growing contact lists. You’ll never have to worry about outgrowing Textedly. Even if you need to send more than the 240,000 monthly texts available in the Textedly Champion plan, you can just give them a call for a customized solution. 

One downside of Textedly is its lack of built-in features. But it does integrate with more than 3,000+ third-party tools for sales, marketing, CRM, and automation.

What Makes Textedly Great

The great part about Textedly is that you’re not locked into a contract. If you double your database overnight or you want to ramp up the frequency of your campaigns, you can upgrade to a bigger texting plan at any time. 

Screenshot of Textedly's home page.
You’ll never outgrow Textedly, regardless of your contact list size or monthly volume.

When you’re sending tens of thousands or potentially hundreds of thousands of texts, you need to consider how much it’s going to cost you if those conversations continue. Textedly gives you some relief here, as all incoming SMS messages are always free.

You can add an unlimited number of subscribers to your account at no extra cost. So if you end up with two million phone numbers in your database, you won’t be paying more than someone who has 200 numbers—making it easy to grow without limits. 

Plans are based on monthly messaging and range from $24 per month for 1,200 texts to $2,800 per month for 240,000 messages. You can try Textedly free for 14 days and send your first 50 texts at no charge.

OpenPhone – Best for unlimited calling and texting

OpenPhone, one of the best business text messaging services.

OpenPhone is an all-in-one solution for business text messaging, calling, and contact management. Every plan supports unlimited calling and messaging within the US and Canada.

All OpenPhone plans come with one local or toll-free number per user, so everyone on your team can have their own line. It’s the perfect solution for organizations seeking a complete business phone solution with the ability to send texts as well.

While OpenPhone has all of the standard features you’d expect in a business text messaging service, it does lack some of the more advanced marketing and sales features you’ll find from alternatives. That’s because the business phone solution is the primary service, and texting is somewhat secondary.

What Makes OpenPhone Great

One of the coolest features of OpenPhone is the ability for teams to simultaneously manage two-way texts with recipients. This is a huge bonus when you need someone from the right department to reply or the original sender is out sick or on vacation.

Screenshot of OpenPhone's home page.
Get the whole team involved, and your customers will never know the difference.

As a phone and text messaging service from a single platform, you can use OpenPhone to automatically send texts directly after a call. For example, you can follow up with surveys and post-sales campaigns. Or if you miss a call, you send an automated text apologizing for the delay and set up the engagement via text. 

Beyond SMS messaging, OpenPhone supports MMS messages, videos, files, GIFs, and more. You can even use it for group messaging—which is great for sales teams that want to keep multiple stakeholders involved in the process. 

OpenPhone plans start at $10 per user per month. Try it free for seven days to get started.

Podium – Best for text-to-pay

Podium, one of the best business text messaging services.

Podium is a versatile business solution that supports a wide range of features, from messaging to online reviews and more. It’s also a complete CRM that makes it easy to manage contact lists and keep track of interactions at every touchpoint.

But Podium stands out from the crowd with its built-in text-to-pay feature. This is handled directly through Podium’s platform, so you won’t have to set up any third-party integrations. 

One potential drawback of Podium is its pricing structure. It’s a bit more expensive than other services that are strictly for business texting. 

You’re getting so much more than just basic business texting. But the pricing is definitely something to consider if you’re not planning to take advantage of Podium’s other robust features. Organizations seeking a solution that’s strictly for text messaging should look elsewhere. 

What Makes Podium Great

Podium’s integrated text-to-pay feature is definitely its shining star. This capability is available on every Podium plan, including the entry-level tier. 

Screenshot of Podium's text payments web page.
Use Podium to get paid quickly via text.

This is so much better than emailing customers to collect payments or sending paper invoices through the mail. Podium says that the average text is opened within 15 minutes of delivery, ensuring you’re getting paid quickly. This also makes things easier for your customers, as they can pay for goods and services using a few clicks from their phones.

Text-to-pay works great within industries like healthcare, automotive, home services, dental, professional services, and more. 

After customers pay you via text, you can automatically send them a follow-up message asking them to leave a review. The message will include a link directly to the review platform of your choosing. 

Plans start at $289 per month for up to three team members and $449 per month for unlimited team members and unlimited contacts. Text-to-pay processing rates range from 2.5% + $0.30 per transaction to 2.7% + $0.30 per transaction, depending on your plan. Read our full Podium review to learn more

Sendinblue – Best for texting combined with email services

Sendinblue, one of the best business text messaging services.

Most business texting messaging tools do just what you’d expect—they allow you to send text messages. But Sendinblue is unique in the sense that you’re getting a text messaging service and email marketing solution from a single platform.

This means that you won’t have to worry about setting up integrations between your text service and email platform or CRM. You’re getting all the tools you need from a single interface.

It’s worth noting that Sendinblue is generally considered an email marketing platform first, with SMS messaging capabilities second. While the text messaging service is not an afterthought by any stretch of the imagination, it does lack some of the features you’ll see from platforms that are strictly for business text messaging. 

What Makes Sendinblue Great

The great part about using Sendinblue is that all of your contacts can be managed in one place. So you’ll see exactly how your database interacts with both email campaigns and targeted SMS messages.

Screenshot of Sendinblue's sms marketing web page.
Get SMS marketing and email under one roof with Sendinblue.

This is great information, as you can adjust your strategy to see when emails are more appropriate and when texts are more effective. Whether you’re sending texts, emails, or both, your team can keep track of all customer interactions from a single inbox with every interaction in a customer’s history.

Another cool part of Sendinblue is the ability to set up powerful marketing automation that moves customers through your flow based on their engagement and interactions. You can even set up both emails and texts from a single campaign or automation so your database gets a mix of both.

Plans start at $25 per month for the email marketing platform, with SMS credits available as an add-on. Rates are based on volume and country, such as $5.45 per month to send 500 texts in the US. Try Sendinblue for free today

Quick Sprout Business Text Messaging Services Related Content

For more about business messaging, how it works, and how to succeed with it, check out the related resources below—hand-picked from the Quick Sprout blog:

Business Text Messaging Services Guides and How-Tos

Business Text Messaging Services Company Reviews

Business Text Messaging Services Related Top Lists

The Top Business Text Messaging Services in Summary

SimpleTexting is the best business text messaging service for most organizations because it’s versatile enough to support both sales and marketing initiatives. You can use it to send mass messages to your entire contact list or start two-way conversations with individual recipients. 

But that doesn’t necessarily mean that SimpleTexting is right for you. Use the reviews, recommendations, and considerations highlighted in this guide to make sure you find a business text messaging service that aligns with your needs. 

How to Use Heading Tags to Get More Search Engine Traffic

I wrote a ton of blog posts.

Over the last year alone, I’ve published a minimum of three blogs per week here at Quick Sprout. Some weeks it was even more, at times with multiple posts per day.

If you’ve been reading my blogs for a while now, you know that everything I produce is long-form content—just like the post you’re currently reading.

This means it falls somewhere in the 1.800-3,000+ word range. I’m not writing quick 500-word pieces for the sake of publishing at a high rate.

Over the years, I’ve covered lots of in-depth topics about content marketing, website optimization, conversions, SEO, and other related subjects. But today I want to share with you a seemingly small and subtle SEO hack that can drastically improve the performance of your content.

I’m referring to heading tags.

Some of you might be more familiar with these than others. I’m sure some of you even use them in your posts, whether you realize their SEO value or not.

I use heading tags in everything that I publish, including this post that you’re reading right now.

In fact, you’ll see them throughout the post as we continue. I’ll make sure to bring attention to them so you know exactly what I’m talking about. So follow along this guide to see how you can improve your content with heading tags.

What is a heading tag?

Before we go any further, let’s make sure we’re all on the same page here. So far in this guide, I’ve used two heading tags:

  • H1 for the title at the top of the page (How to Use Heading Tags to Get More Search Engine Traffic)
  • H2 for this subsection (What is a heading tag?)

There will be several more used throughout the guide as well.

By definition, these are HTML tags that specify headers on a website. Let me break that definition down for you even further.

HTML (hypertext markup language) is the language used to create pages on websites. Tags are the code that tells a web browser how the content should be displayed on the page. There are six types of heading tags; H1-H6.

Each tag can be ranked from highest to lowest in the order of significance, which is clearly illustrated by the size.

Heading Tags

You can add these tags to your content before you publish your work.

Here at Quick Sprout, we use WordPress. But I don’t typically write my blogs directly in that platform. I work in Google Docs, just because I think it’s more user-friendly for writing long-form content.

Whether you’re using Docs, Microsoft Word, or another platform to produce content, you’ll be able to find those header options in the menu bar. Here’s what it looks like in Google Docs:

Google Docs Heading Tags

It’s very straightforward.

The options for H4 and higher won’t appear until after you add H3 tags to your content.

Here’s what the tags look like if you’re working directly in WordPress.

Wordpress Heading Tags

Again, it’s about as straightforward as it gets.

You can verify that the headers are applied properly into your content by viewing the source code of a page. In WordPress, just switch from the visual editor to the text editor to see the HTML code.

You can also view the source code of any page, even after it’s been published.

For example, let’s look at some previously published content here at Quick Sprout. Here is a post I wrote about online marketing for beginners.

Heading Tag Example

I’ve pointed out the different headers above. I’m sure you’re used to seeing content like this (especially on Quick Sprout).

Now, you might look at this and just think the font is larger. All of the main text is written in size 11, the title is size 20, and the subheader is size 16. While this might be the case, it’s not that simple.

Changing the size of the font alone doesn’t equate to a heading tag.

If you check the source code of the page, you’ll see what I mean.

Right click on any web page to see the source code. In fact, you can do it with what you’re reading right now. Then just click “view page source” and it will bring you to the source code. Here’s what that looks like for the Beginners Guide to Online Marketing.

Heading Tag Html Code

Finding those h tags in the source code is like a needle in a haystack. So use “command + f” to your advantage. Then just search for h1, h2, h3, etc…

I pointed out the tags to make it obvious.

As you can see, H1 tags were used for the title, and an H3 tag was used for the first subheader on the page.

SEO value for heading tags

Now let’s get into how heading tags are connected to SEO. By the way, here’s another heading tag (above) that I used for this subsection.

There has been a debate for quite some time amongst SEO experts about how much of an impact heading tags actually have on SEO.

You can’t compare their value to things like domain authority or backlinks, but heading tags still play a factor in your search ranking. That’s because they make it easier for search engines to read and interpret your content.

If you just have big walls of text without subheaders, it’s going to be difficult for bots to know what your page is about.

This can be compared to your overall website architecture as well.

Just like your homepage and top-level content have a hierarchy that makes it easy for crawlers to index pages, the heading tags explain the importance of topics on the page.

Without headers, you’re relying on search engines to take all of your text at the same face value, which won’t help your search ranking.

John Mueller, the senior webmaster trends analyst at Google was quoted saying that Google uses H tags to understand the structure of text on a page.

So it’s clear that they provide some SEO value.

Furthermore, research from the Hook Agency shows some of the most important factors of on-page SEO.

Important SEO Factors

Two of the top ten factors are related to your heading tags.

I’ve found some really great case studies on the web that back up this claim as well. Here’s one of my favorites conducted by Search Eccentric.

The study is about a company called Motorcars Ltd.

They’ve been in business for over 40 years, but in the digital era, they struggled to rank in search engines for their keywords. After analyzing the website, it was clear that there was plenty that could be improved upon.

One of the things that they changed was adding H1 and H2 tags to the site.

The purpose of this was to improve the visibility and make the content more SEO friendly; simple, right? Take a look at the results of this tactic.

The changes had a huge impact on their search results.

Ranking Improvements

After the heading tags were added, the company held the top ranking spot for two of their targeted keywords. They held a top three position for five of their top keywords.

As you can see from the chart, they jumped hundreds of ranking spots.

Now, all of this can’t be attributed to the header tags alone. They also removed dead links and fixed some navigation issues. But the heading tags definitely played a huge role in their success.

How heading tags impact user experience

In addition to the SEO benefits of heading tags, adding these to your site will also help improve the user experience.

As a result, you’ll get more traffic to your site, frequent repeat visitors, and people will stay on your site for longer stretches of time. This simultaneously adds more SEO value as well.

How can heading tags benefit visitors on your website?

For starters, it just makes your content cleaner and more organized. 43% of people say that they skim blog posts. You need to make your content easy to skim by adding headers.

Take this post you’re reading now as an example.

Let’s say you already knew what heading tags were before you started reading. You may not think it’s necessary to read the first section. It would be very easy for you to skip over it because the tags are clear.

But if I eliminated all heading tags from the post, it would create a large wall of text that is extremely difficult to read. Here’s an example to show you what I mean.

No Heading Tag Example

This content is not scannable, and it’s just one excerpt of several pages in the same format.

Now, let’s look at another example, only this time with heading tags used by Conversion XL.

Conversion-XL

This is much easier to scan, and it’s visually appealing.

Now, is it possible to get this same effect just by making the font bigger and bolder? Sure, but why wouldn’t you take advantage of the header tags to get the SEO benefits as well?

In case you’re wondering if these are actual heading tags or just larger font, I checked the source code to prove it.

Conversion-XL code

As you can see, they used H2s and H3s for this part of the post. Although it’s not pictured in this screenshot, an H1 tag was used for the title.

Heading tags best practices

Now that you know why you need to add heading tags on your website, I’ll go through some of the best practices to follow.

Each best practice on my list is going to have a heading tag as well. You’ll see what I mean as you continue reading.

Only use one H1 tag per page

H1 tags should be saved for the title.

By default, the title of your post should automatically become an H1. But you can view the page source code and the text editor to verify that.

If for some reason that’s not the case, you can always add it in yourself.

The idea here is that the H1 tag is the most important. Adding more than one will not only be less visually appealing, but it could potentially confuse crawlers when they’re indexing your content.

Use natural keywords in headers

When possible, you’ll always want to have keywords in your headers.

However, it’s a common misconception that every heading tag needs to be stuffed with keywords. That’s just not the case.

As with all of the content you create, the text needs to be natural and readable. If you can get some keywords in there, that’s great. If not, don’t try to force it.

A great resource for finding keywords to put in your headers is Google. Just scroll to the bottom of the page and look for related searches.

Let’s say you were writing a blog post about the benefits of yoga. Here’s what those related searches look like.

Search Examples

These keywords could be potential H2s or H3s of your post.

You wouldn’t put “benefits of yoga Wikipedia” in one of your headers, because that’s not natural and doesn’t make sense. But things like yoga benefits for men, benefits of yoga in the morning, or how to maximize yoga benefits would all be appropriate.

Use heading tags generously

Some people will tell you to use heading tags sparingly, but I think that’s another misconception.

I’m not saying you should have them every other line, but use them as you see fit. If a post calls for three, then use three. If it calls for 10 or 20, then use 10 or 20.

In most cases, the longer a post is, the more heading tags you can use.

Google Advice

Here’s another quote from John Mueller at Google. He says you can use as many heading tags as you want.

Again, I’d still stick with just one H1 tag. But for H2, H3 (and so on), use as many as you need.

In most cases, I don’t find it necessary to go beyond H3 or H4. SEO aside, I think that’s too complex for the reader. So find other ways to organize your content instead.

You could always use bold or italics to emphasize something, as opposed to getting all the way to H6.

Conclusion

Heading tags are a subtle, yet powerful, SEO hack.

In addition to showcasing important content to search engine crawlers, they also make it easier for website visitors to consume content on your page.

I highly recommend adding heading tags to your content. As you can see from this blog, I use them all of the time.

So use this post as a reference for implementing heading tags and following the best practices.

How to Create Predictably Popular Link Bait Posts

Link building can become a time-consuming process. Sometimes you spend hours exhausting all of your strategies and still fall short of your benchmark target.

This can be extremely frustrating.

Yet other times, certain pieces of content seem to effortlessly attract links. Before you know it, you might have dozens, hundreds, or even thousands of backlinks for one post without even putting in too much effort.

Wouldn’t it be great if that was the case for all of your content? Fortunately, the possibility is more realistic than you might realize. That’s why you need to learn how to create link bait posts.

What is link bait?

Some of you might have created link bait in the past by accident, without fully understanding what you were doing. Don’t worry; this is a good thing.

In short, link bait is content that’s specifically designed to build links. The idea here is that any blogger, journalist, or influencer in your industry would feel obligated to share your link because the information is so valuable.

Creating link bait content will do wonders for your website.

First of all, this will benefit your website visitors by providing them with high-quality content. But once you start building links at scale with link bait, your site traffic will continue to rise and your search ranking will skyrocket as well.

Here’s something else to keep in mind. If you spend more time creating link bait content, you can spend less time trying to build links. All of your links will start to come organically.

This is much better than producing mediocre or sub-par content and then wasting your efforts trying to build links that nobody wants. I’ll show you everything you need to know about creating predictably popular link bait posts in this guide.

Link bait best practices

In my experience, all link bait content typically has certain characteristics in common.

With that said, you don’t necessarily need to apply all of these best practices to each post. But you can use these elements as a reference to help you come up with ideas and decide which direction you’re going to take whenever you produce new content.

Provide value

Why should someone view or read your post?

If it’s nothing but fluff and long blocks of text that’s stuffed with keywords and designed strictly for SEO purposes, it’s not actually providing value to anyone. This type of content won’t go viral or become link bait.

Instead, you need to ask yourself two questions before you create anything.

  • Who benefits from this content?
  • How will this content help those people?

If you’re unable to answer these questions, then it’s probably not worth continuing in that direction. But when you’re able to use these questions to guide you throughout the process, it adds great value to the audience.

Value means going the extra mile. Don’t just tell someone why a certain idea works. Show them by using a case study with statistics and examples.

Then other websites will be able to use those figures a reference. Here’s an example to show you what I’m talking about.

Provide Value

Here’s a backlink for Quick Sprout.

The article above talks about the best times to post on Facebook. So the author used a study from one of my old posts to validate their point.

My original content was valuable because it included statistics and research. If I just said, “I think you should post to Facebook on Wednesdays,” it doesn’t provide any value.

But since I took the time to create a link bait post, other sites used it as a reference without me having to go out and ask for the link.

This is common with the majority of the posts here at Quick Sprout. Just look at what happens when you search the web for “according to Quick Sprout.”

According to Quicksprout

I get links like this all of the time.

For those of you who are still unconvinced, just take a look at these metrics from the backlink checker tool at Ahrefs.

backlink profile

Quick Sprout has more than 2.2 million backlinks from over 24,000 referring domains.

Trust me, I didn’t go out there and ask webmasters for backlinks 2 million times. The majority of this happened organically with link bait because all of the content on our blog provides so much value.

Add visuals

Even if you’re a blogger and a master with words, you still need to use visuals to spice up your content.

Here’s the thing. Large blocks of text in paragraph form just won’t get read. In fact, 73% of readers skim through articles as opposed to thoroughly reading them.

So if your posts aren’t reader-friendly, nobody has a reason to link to them.

But adding visuals breaks up the content and makes it easier for people to skim. Plus, visuals grab attention and add value.

Take a look at this research about blog posts from Orbit Media.

What-Does a Typical Post Include

Images ranked highest as the most common element found in blog posts for the past five years in a row.

That’s because people are more drawn to visuals.

According to HubSpot, 32% of marketing professionals say that visuals are the most important type of content for their brands, which was the number one response in the survey.

Furthermore, content with visuals gets up to 94% more views compared to posts with just text.

This is definitely a recipe for increasing your chances of creating content that will ultimately turn into link bait. There are plenty of ways to add visuals to your posts.

  • Screenshots
  • Original photos
  • Infographics
  • Graphs
  • Charts
  • Videos
  • GIFs

These are a handful of ideas to get you started in the right direction. You can check out my full guide on how to use visual elements to enhance your blogs for more information on this.

Invoke emotion

Create content that will make people feel a certain type of way.

Write a “feel good” post that will make readers jump for joy. Or go the other way and tell a sad story of pain and agony.

Create content funny. Share something sexy. Be inspirational. Make a claim that raises some eyebrows.

Don’t be afraid to bring up topics that are controversial. Just make sure that you’re not offending anyone or doing something that will damage your brand image.

I usually recommend staying away from topics that involve politics, religion, race, and things of that nature.

But with that said, controversial content tends to go viral. Just look at this research from Backlinko.

controversial content

These are some analytics from a post about racial tolerance in America. The article has been linked to more than 6,000 times.

This is a great example because the post itself doesn’t make any racist claims or anything like that.

Instead, it analyzes data, which refers back to one of our previous points about adding value. The study examined derogatory language from state to state based on Twitter locations. All of the data is shown in graphs, which adds visuals to the piece.

Based on everything we’ve discussed so far, this is a recipe for a predictably popular post.

If you want to learn more about the right emotions to invoke when you’re creating content, I recommend this post on how to guide people’s emotions to drive sales. The same concepts can be applied to link bait content.

Keep it relevant

Link bait needs to be relevant in two ways.

First and foremost, every piece of content that you produce needs to related to your niche. If you’re a fashion blogger, you shouldn’t be posting video tutorials about how to surf.

The timing of your posts needs to be relevant as well. Nobody is interested in hearing the same news story that broke six months ago. If you’re too late to the party, then sites won’t have a reason to use your link as a reference unless you find some type of new and valuable information.

On the flip side, if you’re the first to report something, then you essentially become the source. This is one of the best ways to create link bait.

Here’s an example from Forbes Magazine.

Forbes

On March 5, 2019, Forbes announced that Kylie Jenner became the youngest self-made billionaire in the world.

The content is relevant to their site, but more importantly, the timing was everything.

They were the first major publication to report this story. Since Kylie Jenner is such a well-known public figure, everyone seemed to have an opinion on the topic.

Bloggers and journalists needed to weigh in. But it would be an injustice to readers if they didn’t cite their sources.

So what did they do? Everyone used Forbes as a reference.

Forbes reference links

That’s why this link has more than 34,000 backlinks in just two months. This is a great example of how to create timely content that’s highly relevant.

Types of link bait content

Now that you know what your link bait posts should include, it’s time to show you some examples of the types of posts you can create using this formula.

  • Lists
  • Guides
  • Infographics
  • Videos and images
  • Interactive content

We’ll go through each one of these to give you a better grasp on how these posts can attract links.

List posts

One of the reasons why list posts can be great for link bait is because they provide value.

Lists give you the opportunity to outperform everyone else on the web who has covered a certain topic.

Plus, headlines with numbers are preferred over other types of posts.

Headline Preferences

Check out my guide on tips for getting more conversions with headlines.

To get the most value out of your list posts, you can curate content from other sources. Let’s say you want to create a list of the best software for something in your industry.

Google that term and see how long other lists are. You might see lists of five, eight, ten, or twelve. This is your chance to create something that’s better than all of them.

Your list post can be the top 25 or 30 software systems. This can become the ultimate reference for people, which will quickly turn into link bait.

Comprehensive guides

Comprehensive guides are popular link bait sources because they are so thorough.

Take this post you’re reading right now as an example. I could have just defined link bait and then used bullet points for best practices and wrapped up the whole thing in less than 500 words.

But that doesn’t add any value, and nobody is going to read it. Instead, I go into lots of detail in each section, using plenty of visuals and statistics to back up my claims.

So teach people how to do something.

Here’s another example of the beginner’s guide to online marketing that was previously published on Quick Sprout.

guides backlinks

As you can see, this post is approaching 4,000 backlinks.

Comprehensive guides will always perform well because it’s easier for you to include all of the common features in a link bait post.

In addition to the value and visuals, you can also find ways to stimulate certain emotions while prioritizing relevance and timing.

Infographics

We briefly talked about infographics earlier when we covered visual content. But it’s definitely worth mentioning again on its own.

As we previously discussed, images are the most popular element included in blog posts.

This means that bloggers and journalists need to find images on the web. Most of them aren’t going to take the time to create original content. It’s much easier to just find an infographic online and cite the source with a backlink.

So if you can create infographics that people will use to enhance their own content, you’ll be able to build tons of backlinks at scale.

Just make sure that your information is always accurate and up to date, which is when the relevancy factor comes into play.

If you’re using a study from 2011 to create an infographic in 2019, it’s not going to become link bait. But if you update your study and infographics each year, you’ll become an authoritative source for information.

Videos, images, and gifs

Again, these are more examples of visual content.

Depending on the type of website you have, some of these formats will be more beneficial to you than others.

For example, if you’re a photographer, you’ll definitely want to share your original photos. Then other sites can use them as a reference (similar to infographics) which will build backlinks.

Some of you could use humor to your advantage and create viral GIFs.

Giphy

But that’s not necessarily a winning strategy for everyone.

Let’s say your website is more serious and professional, you’d be better off creating video tutorials of how to do something that’s related to your niche.

Interactive content

This isn’t necessarily the most common type of link bait, and it won’t be something that’s relevant for all of you.

But with that said, you can build tons of backlinks with interactive posts like a quiz or calculator.

For example, let’s say your website is in the real estate industry. You could create a home mortgage calculator tool. Now other websites can use your tool as a reference since it’s much easier than building their own.

Here’s another example of an emotional intelligence test.

Interactive Content Links

Any post discussing emotional intelligence can link to the test for people to take. That’s why this particular test has over 1,800 backlinks.

Conclusion

Creating link bait content is arguably the best way to build backlinks. As discussed earlier, we’ve built more than 2.2 million backlinks here at Quick Sprout using this strategy.

While link bait usually sells itself, it doesn’t mean you should sit back and do absolutely nothing once your content has been published.

You still need to take steps to increase its exposure and boost the chances of it going viral.

Email the post to your email subscribers. Share it on social media. Incorporate it with your other link building strategies.

If you follow the best practices that I’ve outlined above, it will much easier for you to create link bait posts.

How to Use Tumblr To Drive Traffic and Land New Customers

With millions of passionate users, Tumblr is a social media powerhouse that can’t be ignored.

Even if you’ve never read a Tumblr blog, I’ll walk you through the steps you need to take to create an awesome Tumblr blog from scratch.

I’ll also go over how you can promote your blog within Tumblr without being pushy or salesy.

Your first step is to head over to Tumblr.com and sign up on the home page. So you put in your email, your password, and your username, and your username is really important so just like at any social media site, like Pinterest or Facebook or Twitter, you want your username to be a brand name.

So if we are signing up for Quick Sprout, you would want to make it Quick Sprout and click “Sign up,” and then put your age, and agree to the terms and services and click done. And you’re in.

Y next step once you have your account is to look for other blogs in your niche and then follow them because Tumblr is all about following other people’s blogs and sharing their content on your blog. Head over to the search bar here and put in a keyword related to what your blog is going to be about.

Let’s say that I search for marketing, and then you just want to find blogs that look like a good fit for the type of traffic that I want, they produce good content, and they are related to what your blog is going to be about. When you find some, just click on the little blue plus sign and you will be following them. Just do it until you’ve found five, and then click on next step.

Next you want to add some more details about you and your brand. So if you’re creating a Tumblr around a brand, you want to add your logo, but if it was more of a personal brand, you’d want to upload a head shot. So we’re going to add a picture of Neil, and you can adjust it, then click “Save” when it looks good, and then under title, you want to add your title and a description. You can put a little description about what your brand is about, and you can put something like a slogan or something that is associated with your brand.

Then click “Next step.” And if you want, you can download their app depending on what mobile device that you use but I’m just going to click I’ll get it later. So once you see this screen you’re good. You officially have a Tumblr blog. So your next step is to find a theme that’s in line with your brand and what your Tumblr blog is going to be all about. So to do that, click on the picture here, and this will actually take you to your blog. So this is what it looks like right now.

Now to find a theme, click on the “Customize” button in the top right corner, and then click on themes. And then you can choose from hundreds of different themes that Tumblr has, just like with Word Press. So, if you want a free theme, you can click on “Free,” or if you have an idea of what you want your blog to look like, whether it’s single-column or two-column, you can choose that. But let’s just choose free themes to get started.

Now when you find one that looks nice, just click on it, and Tumblr will show you a live preview of what your blog would look like with that theme. So depending on your brand, this might be the perfect theme, or, maybe this one, Esquire theme, might work better for you. OK? So when you find one that looks nice, click on the “Use” button, and from here you can make any changes to your theme that you want. So if you wanted to change the background color from yellow to another color, you click on the color, and then choose one that works best for you.

Or if you want to change the accent color, you can do the same thing. And if you want to get really hard core about changing the themes to make sure it’s super in line with what the brand is all about, you can click on “Edit HTML,” and you can actually edit the HTML of the document. When you make a change, click on update preview, and it will show you what that change will look like on your blog.

So once everything looks good, click on save, then go back to appearance, click on “Save” again, and then click on close and you’ll see what your blog looks like with that theme. So obviously, it’s a little bit bare here, so you want to start adding some content to make your blog a real blog. So to do that, click on the “Dashboard” button, and that will take you back to your Tumblr dashboard. Now, there’s a number of different ways to add content to Tumblr.

So if you wanted to add text, you could add text. Now unlike other blogging platforms, you don’t want to do things like 5 tips for whatever at Tumblr. That’s not the kind of content that tends to perform well. It’s more eye-catching and engaging stuff. So you want to do like, “Four Examples of Bad-ass Marketing.” OK, because that’s the type of audience that tends to hang out on Tumblr. And then you can add content, just like you would on any blog post, and when it looks good, click on “Publish,” and then if you want to see what it looks like, on your site, you can always click on your face or your logo and it will take you back to your blog. So this is what it looks like.

Now there are some other ways to add content to your Tumblr blog, one of the most important of which is reblogging other people’s content. So when we first signed up, we followed some bloggers, but now we want to be a little more particular about who we’re following so then we can get their feed. So when you follow someone, their feed ends up here on your dashboard. OK, so what you want to do is follow people strategically who are going to post content that your audience would be interested in and then you can reblog it. So to do that, click on “Find blogs,” and Tumblr will show you some of the most popular blogs.

So what you want to do is look on the right hand side of the page and find a category that fits best with your blog’s topic, so in the case of Quick Sprout, we choose business. And then you want to find blogs in that space that publish content that your audience would be interested in. And when you find a blog that looks like a good fit, hover over it and click on the “Follow” button. And now you will follow that blog.

So, when you go into your Tumblr dashboard, and that blog publishes something new, so in the case of Planet Money they just published this, and if you think it’s cool and something that your audience would want to see, just like with any other social media network, you want to share it. So what you do is you click these little arrow buttons, and that will reblog the post. So now when you go back to your Tumblr blog, the post is here.

So when your audience sees this and they think that it’s cool, they’ll appreciate it just like they would if you shared a great piece of content on Twitter or Facebook. Reblogging also puts you on the radar screen of influential Tumblr blogs, because when you reblog someone else’s content, they are notified. So when we reblogged this piece of content from Planet Money, if we go to the page where the content originally appeared, we can see that it shows that Quick Sprout reblogged it. So, when they see that, they say hey, what’s Quick Sprout? Then they click on it, and when they go to your blog and they see something cool, they reblog to return the favor.

But obviously, for them to do that, you need to have great original content and that’s what I’m going to show you how to do right now. As I mentioned earlier, not all content performs well on Tumblr. In general, pictures perform really well, so let’s say that you wanted to announce that you just opened a forum on Tumblr. Now instead of heading back to your dashboard, clicking the text button and making a text-based announcement like, “Hey, we just launched a forum.” You wouldn’t want to do that.

You would want to announce it with a picture. So you head back to your site, and take a picture of whatever it is you’re announcing, copy the image location, and then click photo, and then click URL, and then enter the image URL, and the image will be the centerpiece of your post. So, whenever you want to publish something, whether it’s tips on how to do something or an announcement for your company, you want to make it image-focused.

So if you were going to do, like five tips for getting more Twitter followers, you would want to put that as five different images or one big image instead of making that text. And to explain what your images are about, you can add a caption here. So, put something like “Announcing for Quick Sprout forum,” and then click “Publish.” And then when you go back to your blog by clicking on your face or logo, you’ll see, it’s right here. It has a nice little frame around it, thanks to the theme.

So, that’s all there is to marketing your business on Tumblr, and just like with any social media site, the most important thing is to get involved with the community and share great content. And the only twist is that when you share content on Tumblr, make sure it’s images most of the time.

How to Find ClickBank Products to Promote

ClickBank is a minefield of shady offers and over-hyped information products.

But within the ebook jungle there are several world-class products that you can promote to your email list or website visitors.

I’ll you how to sift through the low-quality junk so that you can find top-notch products that you can make money from while adding value to your site’s community.

Your first step is actually to go to your own site to get an idea of what types of people tend to visit your site and read your content. For example at Quick Sprout, we obviously have a lot of entrepreneurs, a lot of small business owners, a lot of bloggers, a lot of social media professionals that tend to visit Quick Sprout most often. It’s just a good idea to go to your site and just think of the type of people that visit it, because that’s going to guide you when choosing your Clickbank products. Once you’ve done that, your next step is to create a simple but effective spreadsheet just to keep track of all the products that you’ll be looking at.

It doesn’t have to be anything fancy. We just want the product name, the gravity, which I’ll explain in a little bit, how much the product costs, and a link to the sales page. This is what you want, because what’s going to happen is when you head over to Clickbank and click on the Marketplace tab at the top of the homepage, there are dozens of potential products that you could promote on your site. Unless you have this spreadsheet, it’s really hard to keep track of what products you’ve seen, their price, their gravity, and all the other variables that go into choosing a Clickbank product that I’m going to go over in this video.

Once you’ve landed on the Marketplace and you have your spreadsheet setup, your next step is to take a look at the categories in the left-hand sidebar. For a site like Quick Sprout, it’s pretty straightforward: Business, investing, computers, internet, e-business, and e-marketing. Those are categories that would fit well with the audience at Quick Sprout. Depending on what your site is, you may have a category too that really jumps out at you. You don’t just want to stop at the categories that fit best, you want to look at other categories that might be in line with something else your target audience wants. Sometimes, you can find your best products using that. You definitely want to start with the categories that seem to make the most sense.

What we’re going to look at is one category, e-business and e-marketing. When you click on that category, Clickbank automatically sorts the results by popularity. Popularity is basically how many sales that product is getting. As an affiliate, you definitely want to sort the results by gravity. Click on this little dropdown menu and choose Gravity. Gravity is complicated, but it’s basically how many different affiliates are making sales from that product. That’s important for you as an affiliate, because the more different people are making money from that product, that really shows that it’s a proven winner.

Next, I’m going to walk you through the information that’s in this box, because this is a lot of information in this little box and it can get overwhelming if you don’t know what all these terms mean. The first thing you want to pay attention to is the average amount of money per sale. This is not how much the product costs; this is how much an affiliate makes on average for one sale of that product. When you look at the stats line, this basically drills that down into a little bit more detail. The initial sale is $20.65. Why does this go all the way up to $26.80? That’s because there’s a re-bill feature. What that is, is basically they buy the product, and then there’s an add-on or another option for that person to sign up to some membership site, and that’s how much they make on average from the re-bill. If you average everything together, this is how much the affiliate makes with everything considered.

The average percentage per sale is the average commission that you make. In this case, for every sale that they make, you get half, and it’s the same story with the average percentage of re-bill. No matter what; when you sell, you get 50%. Typically, the average percentage for a sale and the average percentage for a re-bill are exactly the same. The Gravity, again, is basically how many different affiliates are making sales, in this case over 300, which is very good.

The other things you want to pay attention to are these little icons. If you hover over them, they actually explain them. It basically shows the language, whether it’s one-time billing, recurring billing, or both, so if you see both icons it’s both; whether they have a $1 trial, which is a feature that not all products in Clickbank have, whether there is PitchPlus, which is basically an up-sell, and finally, whether or not they have basically a separate HopLink target URL, which is your affiliate link that can bring people to a mobile-optimized page. You can have your regular HopLink which will take people to the general sales page, or if they have this special one, it means they have a link that will go directly to a page that’s designed for mobile devices. This isn’t really crucial unless you have a lot of people that use mobile devices, plus more and more sales pages are responsive, so you don’t really have to worry about this.

If this looks like a product that you might want to promote, you want to head over to your spreadsheet and enter all the information here in the different categories. Of course, you want to take a good look at the sales page to make sure that product is a good fit for your audience. To do that, click on the link at the top of the box. In this case, the sales page is a video, which is very common for Clickbank products. You just want to watch the video and see if it’s something that your audience would appreciate. If you get to the point where the product seems like a good fit, the sales page is a good fit, then you want to buy the product just to make sure. A lot of times on Clickbank, there are products with really great sales pages that make all these promises, and then when you buy the product, it’s actually not very good. Just to make sure you don’t burn any bridges with your audience, just buy the product. It’s usually pretty affordable, just to make sure that it’s something that they will appreciate if they end up investing in it.

The next thing you want to take a look at is the bottom of the page. At the bottom of almost every page for Clickbank products, whether it’s a video sales letter like this or more of a text-based sales letter like this, there’s usually a little affiliates link. Basically, that’s a link to a number of affiliate resources that help you promote the product. You want to look for that, and then click on the link if it’s there. You want to take a look at basically what they offer you; so whether it is some banners to help you out, whether it’s a dedicated affiliate manager. If they make you sign up, you usually don’t have to do that. They usually have this ‘Already a member? Click here’, and you can just click on that and get access to the resources right away. In some cases, they have contest like this, and a lot of times they actually offer you a lot of things that can help you, like swipes and banners. Just look for things like banners, or creatives as they’re often called, and just take a look at them and see if they would be a good fit for your site. If not, no big deal; you can always go to Fiverr and get a banner made pretty cheaply. In general, I’ve found the more stuff that they give you to help you promote their product, the better, especially because when you’re first stating out, you don’t really know whether or not this is going to go well. It helps if they give you a quick banner that you can just throw up on your site to test the waters and see how well it converts on your site. If you see that they give you a lot of support in terms of creatives, then that’s a good sign that they’re going to be helpful when you actually sign up as an affiliate. Even if you don’t see a lot of banners, it’s not a deal-breaker; it’s just something that helps make the process of promoting that product a bit easier.

That’s all there is to finding Clickbank products that are a good fit for you site. As you can see, the most important thing is to see whether or not it’s something that your audience would like, and then you want to check out the sales page and the product to make sure that it’s legit. See whether or not they offer a lot of affiliate support.

35 Content Marketing Lessons Learned

Not everyone will have to solve a specific problem for their content marketing, but most companies will.

You can often learn methods to make your current or prospective content marketing more effective.

The way to achieve this is to study other people who have successfully used content marketing to grow their own or their client’s business.

There are 2 schools of thought:

Study companies similar to yours and emulate their strategy. Or study companies different from yours and apply their tactics to your niche.

Both have their merits.

You need a complete view of content marketing as a whole, and to get that, you need to study a wide variety of ­­examples.

For instance, you should study how different companies use content marketing for different purposes.

According to a recent report, the top 3 goals of content marketing are:

  • lead generation
  • thought leadership
  • brand awareness

There are many different ways to achieve each of these 3 broad goals.

Some will come to you naturally, but others won’t make sense until you see the successful example of others.

The problem is that you can’t study just any random company because most don’t understand what your objective is.

In another report, it was found that only 30% of B2B marketers thought that their organization used content marketing effectively.

image25

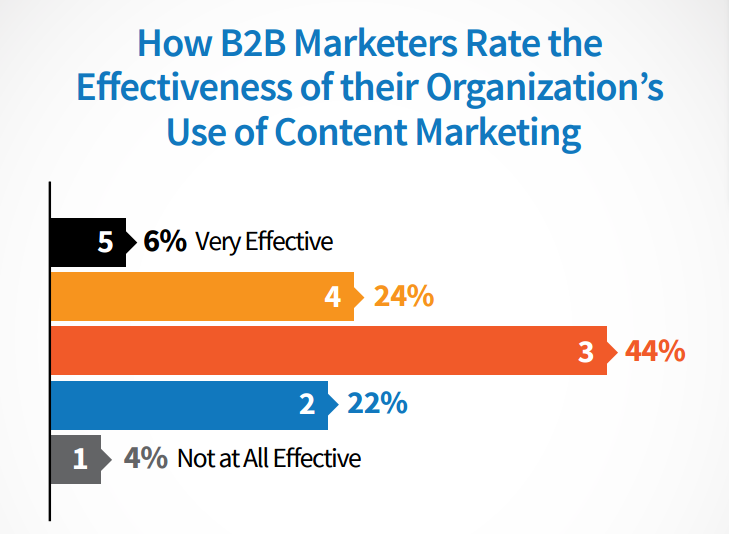
Although that’s a respectable percentage, it means that at the same time, there’s a lot of poor content being produced.

You want to steer clear of that since there isn’t much to learn from it.

This is where case studies come in. Typically, only businesses with something to actually show off create public case studies.

I’ve rounded up some of the best case studies I’ve come across that illustrate some important aspects of content marketing.

I’m going to be breaking down 12 lessons from five case studies to show you how you can apply them to your content marketing efforts.

Some may just be good refreshers, while others may be brand new for you. I think most marketers will be able to learn at least a few substantial things from these case studies.

After we explore the specific case studies I am going to give you 23 more lessons that I have learned though years of content marketing and testing too.

Let’s get started.

Case Study #1: PTC used content marketing to go from 0 to 100,000 visitors per month

(Original case study)

For me, crossing the 100,000 visitor per month threshold has always been an important goal.

If you can get to that level, you can sustainably grow just about any kind of business.

This content marketing campaign was more about brand awareness than anything else.

PTC wanted to create awareness for their new product launch in a very crowded space and had the secondary goal of getting initial sales for this product.

Most successful products aren’t brand new inventions. It’s likely that you’ll never sell one.

Nevertheless, you may sell products that are innovative—that improve upon others. Your challenge will be breaking into a crowded market.

You just may be able to learn from this case study.

A quick overview: I’m not going to go into too much depth, but let me give you a quick rundown of what PTC is.

It’s a huge software company that sells software to other companies in a variety of high-tech niches.

First, they decided to try to use content marketing to improve awareness of a new product they were about to launch—Creo.

Creo is a design software that solves many of the problems that other types of CAD software often have.

image22

Without a doubt, it’s a quality product, which is where you should always begin.

Lesson #1 – Outsourcing content marketing can work

One of the reasons that companies are afraid to really invest in content marketing is because they believe it will take away from their existing marketing efforts.

They believe that they need to get employees to spend time creating blog posts and promoting them.

Understandably, it’s tough to make this kind of commitment when most employees are already overworked.

On top of that, most employees don’t know how to create effective posts that will get results.

The companies that do try content marketing usually conclude that it’s not effective.

There are 2 good reasons to outsource your content marketing:

  1. You don’t have the manpower to execute a content strategy
  2. You don’t have the expertise to develop or execute a content strategy

Lesson #2 – Know your content marketing goals

Content marketing can fulfill many different goals.

The actual goals that you are trying to accomplish will influence what type of content you produce and your overall content strategy.

Let’s take the company PTC as an example. PTC had one main goal that was made clear from the start:

Goal: To create buzz and launch the new Creo product (in the following 8-9 months).

At that point, their target audience had never even heard of Creo, which was another important factor.

If you create a blog for a popular product (e.g., Canva’s design school), you can be successful writing content such as product tutorials.

If you don’t have a product yet, tutorials aren’t going to draw much attention. Instead, you will need to educate the market to provide value.

As you become more trusted, you can steer attention toward a product launch.

Goals dictate what type of content to produce, but also how much to produce.

Since there was a limited amount of time before the launch, Robert and Joe were fairly aggressive with their editorial calendar. They published around a post a day (although the posts were on the shorter side).

Lesson #2b – Goals can change

Your content marketing strategy should always be evolving and growing with your business.

Once the product launch was complete, they shifted  towards improving sales and market share.

If you go to the Creo blog today, you’ll see a different type of content:

image00

Now that Creo is well known (and multiple versions of it have been released), content can also include product tutorials that show in what way Creo is better than its competitors.

If PTC didn’t re-evaluate their goals, they would have stopped the blog after the product launch.

Instead, they were able to continue to grow the blog and hit 100,000 visitors per month in a pretty “unsexy” niche.

Over 70% of those visitors are also new to PTC and are potential leads.

Case Study #2: Growing to $100,000 per month in revenue behind content marketing

(Original case study)

If you ever want to study a recent example of growing a business using content marketing, Groove is an excellent place to start (also check out my 0 to $100,000 case study posts).

Groove was far from a struggling company when they began their content marketing, but it still had a long way to go in order to hit their goal of $100,000 in monthly revenue:

image03

If you’re not familiar with Groove, they sell help-desk software, which means that users pay a regular subscription fee every month.

Since they started blogging back in 2013, they’ve easily surpassed their original goal, which shows the effect content marketing can have on sales:

image23

Lesson #3 – Content marketing isn’t always slow

One of the things I always make sure to mention when I write about content marketing is that it usually takes time to produce results.

You’re not going to get tens of thousands of readers overnight, but it also doesn’t necessarily have to take months to get any traction.

Groove was one of the very notable exceptions to the normal growth of a blog.

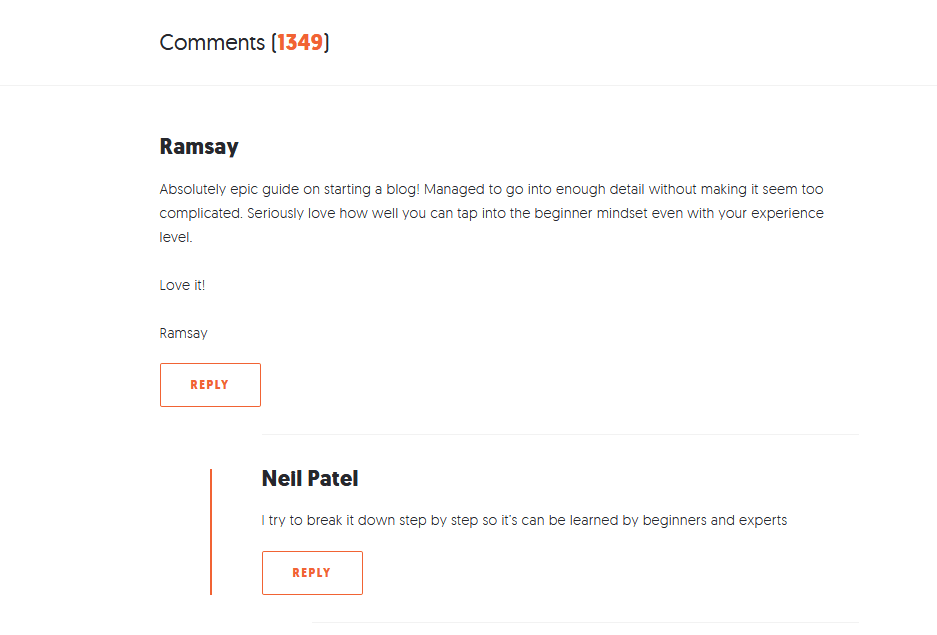
On the very first post they published, they received more than 100 comments:

image10

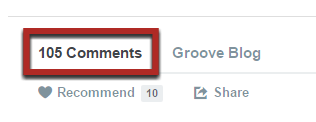
You can check out the dates on these comments, but most of them were made when it was first published.

And it wasn’t just random people. They even got Gary Vaynerchuk to chime in:

image04

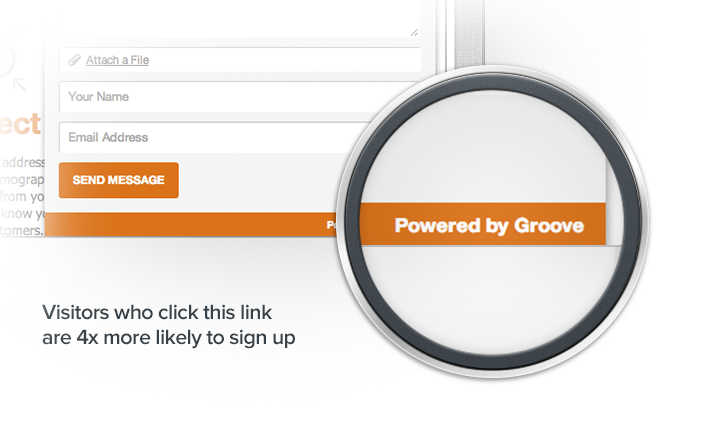
Considering that these influencers not only commented on the post but shared it as well, it’s not surprising that they were able to pass 1,000 subscribers from that single post.

These aren’t typical results, but they’re possible if you have 2 things:

  1. A really interesting idea
  2. Extensive promotion

One of the key things for Groove was being able to pitch the idea of a behind-the-scenes look at how they were growing their income. Even experienced marketers are interested in that if it’s executed well.

As for the second part, they identified a ton of relevant influencers and found ways to connect with them.

After that, they sent a really well-done email to formally introduce the idea and post:

image20

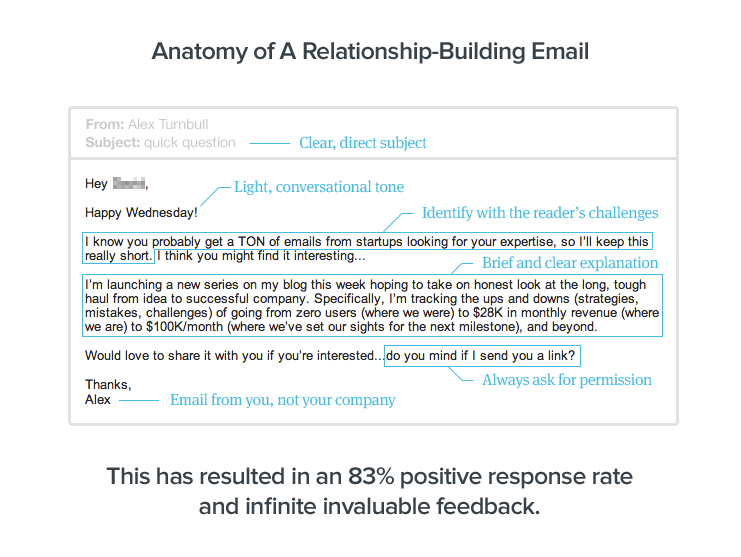
If you want big results quickly, you need to implement content marketing tactics better than everyone else.

Lesson #4 – Transparency and content marketing should go hand in hand

If you look at just about any of the content that Groove has published on their blog since its inception, you will get smacked over the head by the transparency (in a good way).

Now that transparency is more common these days (thanks to marketers like Pat Flynn), Groove took it a step further.

Instead of just showing their successes, like most “transparent” bloggers do (which is still pretty interesting), Groove doesn’t hide much of anything.

As long as it adds value to content, they include it for the reader.

When they try different experiments, they share the results of all of them, even the bad ones:

image19

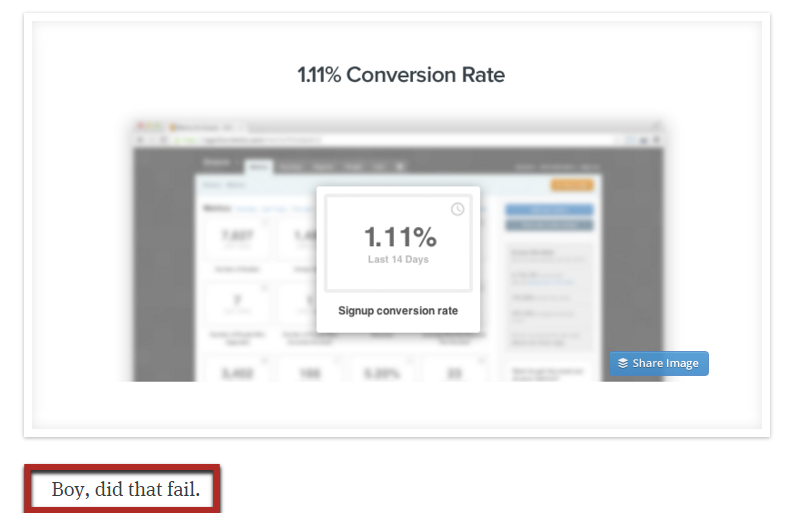
The real value is in explaining how they overcame their challenges and achieved their successes.

And, of course, they share that too.

image07

One final note on this: Don’t be transparent for the sake of it. Be transparent if it adds value to your content.

Since Groove usually focuses on their marketing efforts and experiments, the private data behind them actually adds a lot of value to the content, so it makes sense to include it.

Decide what parts of your business your readers would actually be interested in, and don’t be afraid to shed some light on them.

Lesson #5 – Always be actionable

In theory, it’s fairly simple to succeed using content marketing. Just create content that is as valuable as possible.

Of course, it’s more complicated than that in practice because there are many ways to go about it.

There are many key factors behind valuable content, but none is probably as important as its ability to be actionable.

If you can get readers to take action and achieve success with it, you will make your content extremely valuable to them.

By continuously providing actionable content, you attract loyal hordes of readers.

Any chance they get at the Groove blog, they show exactly how they tested something.

image17

Case Study #3: 1,000 new email subscribers with one content marketing tactic

(Original case study)

This case study isn’t of an overall content marketing strategy—it’s of one specific content marketing tactic.

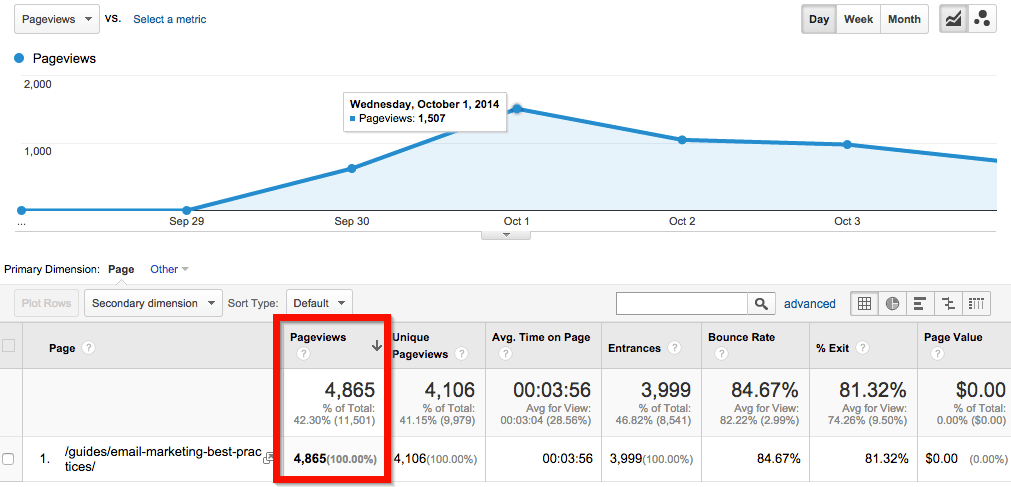
Jimmy Daly of Vero used Brian Dean’s skyscraper technique and got some amazing results:

  • 30,000 page views
  • 1,000 new email subscribers
  • #2 Google ranking for a fairly competitive term

I think most content marketers would be happy to get these kinds of results with a single piece of content.

image14

Lesson #6 – Quality always makes the difference

The key principle of the skyscraper technique is to look at the content that contains a particular keyword or subject and then create something on a much higher level.

If you truly have the highest quality content, along with good promotion, you’ll get great results on a consistent basis.

If you’d like to take a look, here’s the post that Jimmy made. Judge the quality for yourself, but I think it’s very high, especially compared to his competition back then.

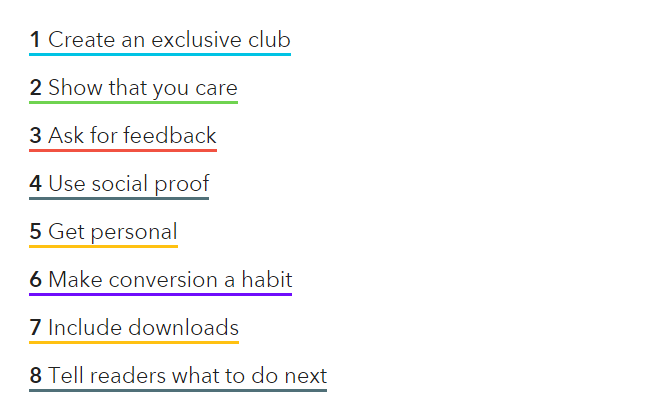
At the time, he had the following table of contents for the post, which I think is very creative:

image12

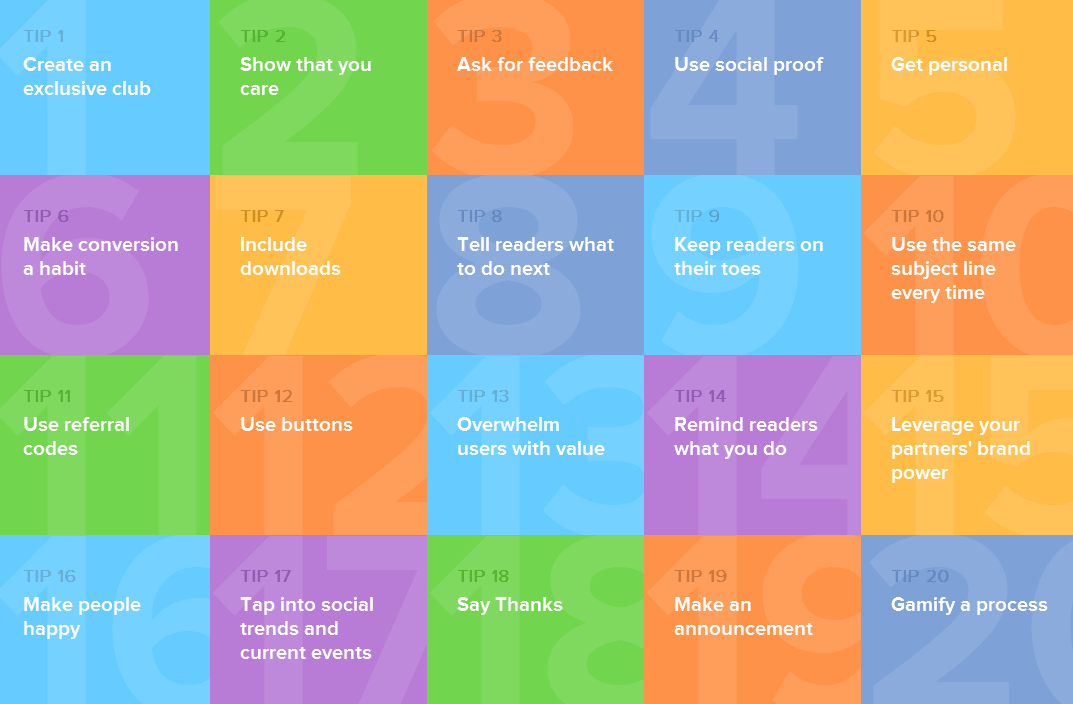
I’ve actually used this table of contents as an example of an effective formatting tactic a few times in the past.

Compare that to your typical table of contents modeled on Wikipedia:

image15

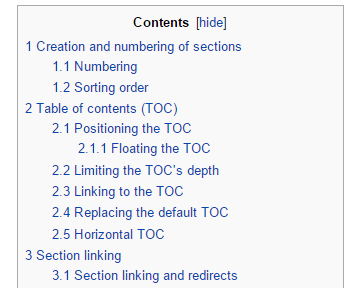
Sure, it’s still useful, but it’s not of the same level of quality.

Show the 2 different tables of contents to a reader, and most will be unimpressed by the second one, but really impressed by the quality of the first.

If you actually check out his article now, he’s changed his table of contents to this:

image11

It’s still more attractive than a typical table of contents, even if it’s simpler. I suspect that the reason for this change is to increase usability for mobile readers.

Regardless of the outcome, the intention was good. Jimmy was trying to make his content as high in quality as possible.

If you improve the quality of your content in as many ways as you can, you’ll get amazing results with your content marketing.

Lesson #7 – Influencers can drive explosive results

There are many different ways to grow a website (or more specifically, a blog’s readership).

There are 2 main types of successful blogs.

The first is the grinding blog. They do all the promotion themselves, find their readers, and convince them to come to the blog.

It works, but it can take a very long time.

The other type is the one that comes out of nowhere and becomes very popular in its niche.

Those are the ones that other established influencers love.

Once you can get influencers to support you, they can send you a great deal of consistent, high-quality traffic quickly. If you have enough influencers supporting you, you’ll have everything you need to become one yourself.

This is the ideal case; it’s very difficult to actually implement unless you’re offering something truly exceptional.

But it’s not an all-or-nothing situation.

Just because an influencer isn’t mentioning you at every opportunity doesn’t mean they won’t mention you at all.

Getting a few shares or article mentions from an influencer is a much more realistic, but still really effective, way to grow your blog.

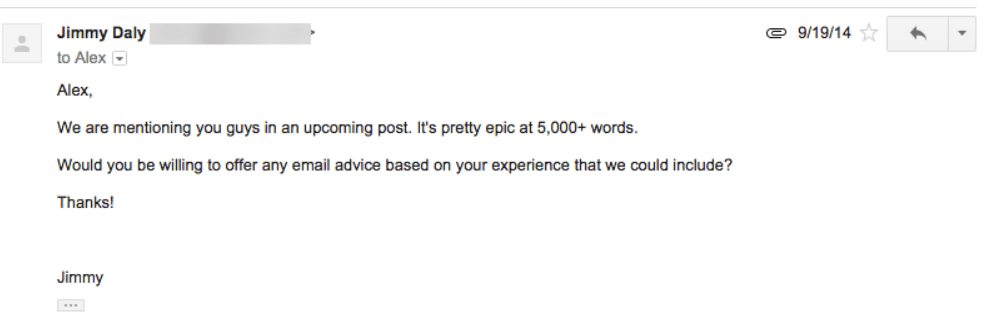
One of the reasons why Jimmy was able to drive the initial burst of traffic to his post was that he connected with a few key influencers.

He emailed them beforehand, telling them about the post, and asked for a short piece of advice to feature in the article.

One of the influencers was Alex (the chief contributing blogger) at Groove:

image13

Guess what happens when you feature someone in an article like that?

They are much more likely to share and help you promote the article (at least in little ways).

Look for ways to connect with influencers in your niche, and give value to them (in some form). That’s how you start to gain their support, which can accelerate the growth of your blog.

Case Study #4: 500-700 organic search traffic visitors per day with a simple strategy

(Original case study)

The first 2 case studies focused on the results that you can achieve with a great content marketing strategy, but I understand that not everyone is at the level where they’re aiming for hundreds of thousands of visitors per month.

This case study features good results, but nothing anyone else couldn’t achieve too.

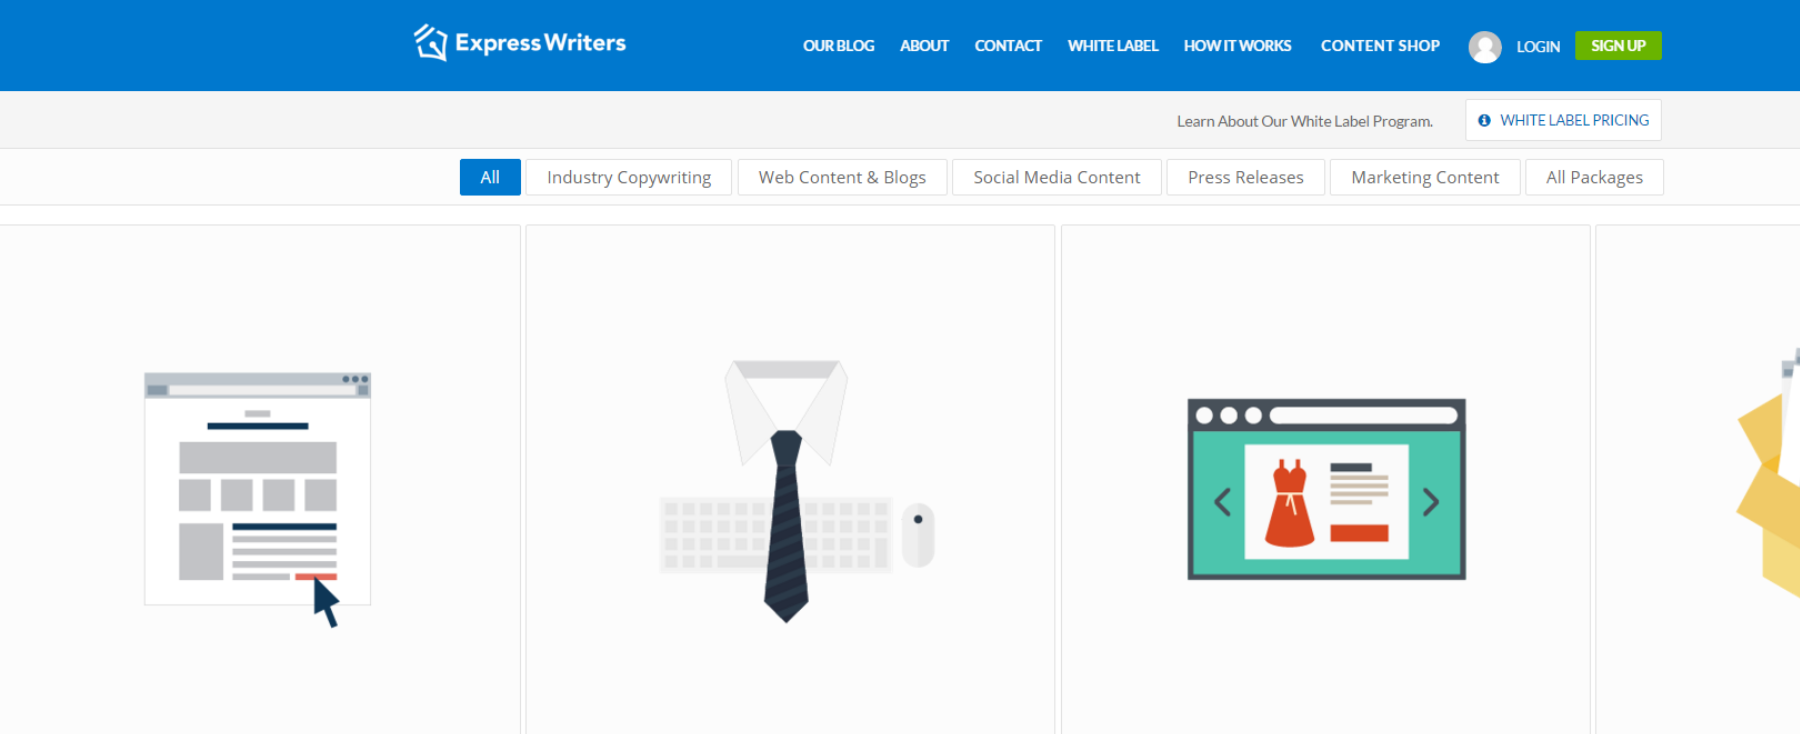
After following their content marketing strategy, Express Writers were able to get about 18,000 search visitors per month to their blog—definitely a solid number, but nothing incredibly difficult for someone else.

They are in a fairly crowded niche: selling writing.

They offer a wide variety of writing services to businesses, such as blog post creation, press release writing, etc.

What was the strategy? In the words of one of their bloggers, Julia McCoy:

Four 2000-word pieces per week for our own blog, along with 4-6 more pieces per week for major guest blogs including such high-authority sites as Search Engine Journal, Site Pro News, SEM Rush and Content Marketing Institute.

The result of following that strategy was being able to outrank most of their competitors and getting consistent search traffic:

image06

Lesson #8 – Successful content marketing is consistent

Unlike a few of the case studies we’ve looked at already, there’s nothing big or peculiar about this strategy.

That’s actually a really good thing.

You don’t want to count on going viral to succeed. It’s nice if it happens, but if you need it to grow your blog significantly, you have other problems.

Most marketers should be growing their blogs by consistently producing high quality content.

Express Writers created 8-10 strong posts every single week, and it led to these results. Keep in mind that the average visitor in this niche is a high value one. A business hiring a writer can spend thousands of dollars on a regular basis.

Additionally, from their regular readers, new readers from search engine results, and visitors from other places, they are able to get about 700 visits a day to their content shop (main sales page).

image09


With a decent conversion rate, they are generating solid, consistent, and recurring revenue.

Lesson #9 – Practice what you preach

On top of driving traffic to their website with this content marketing strategy, the company enjoyed one other huge benefit—proof of success.

Since Express Writers is a company that sells content creation services, mainly to help clients improve their own traffic, this is a big deal.

A potential client can land on the blog, see that they know what they’re doing, and eventually end up hiring them based on that impression.

image05

That’s huge.

Even more than that, I think that you should always be able to demonstrate to yourself that your product performs.

When you do that, you will never turn to cheap sales tricks to sell products; you will truly believe (and have the data to back it up) that your product or service is valuable.

It’s easy for this team of writers to sell their content and assert that it’s some of the best out there because it actually gets the results they claim it does.

If you’re advising leads or customers to do or buy something, make sure you’re the one to do it first. It will add an element of power and persuasiveness to your message.

Case Study #5: Image based content marketing tactic to increase overall organic traffic by 175%

(Original case study)

This fifth case study is one shared by Brian Dean again, but it’s his own results.

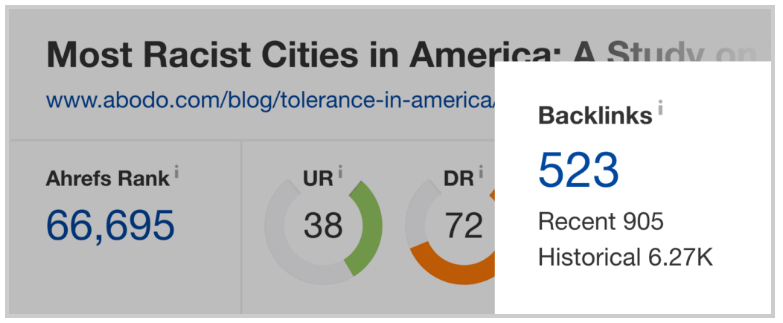
He used a technique for which he coined a term, guestographics, in order to get more backlinks for a page and improve its search engine rankings.

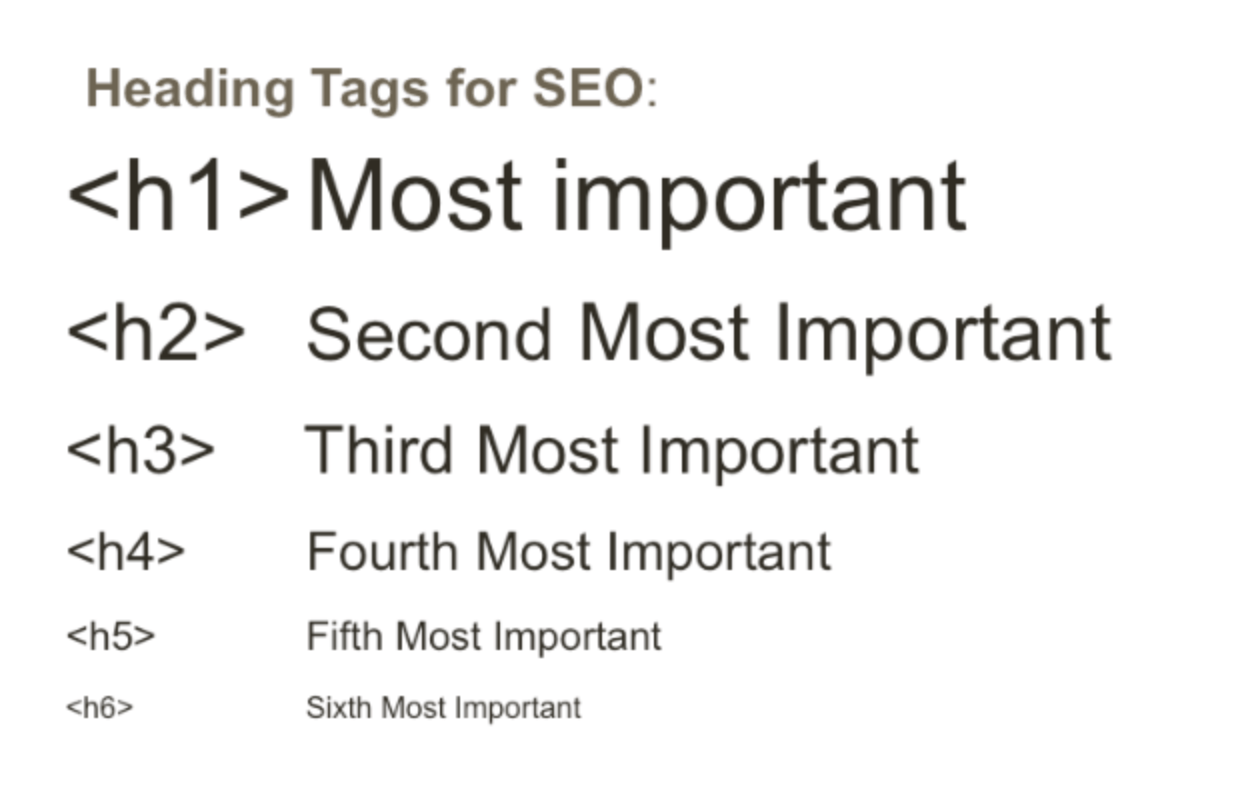
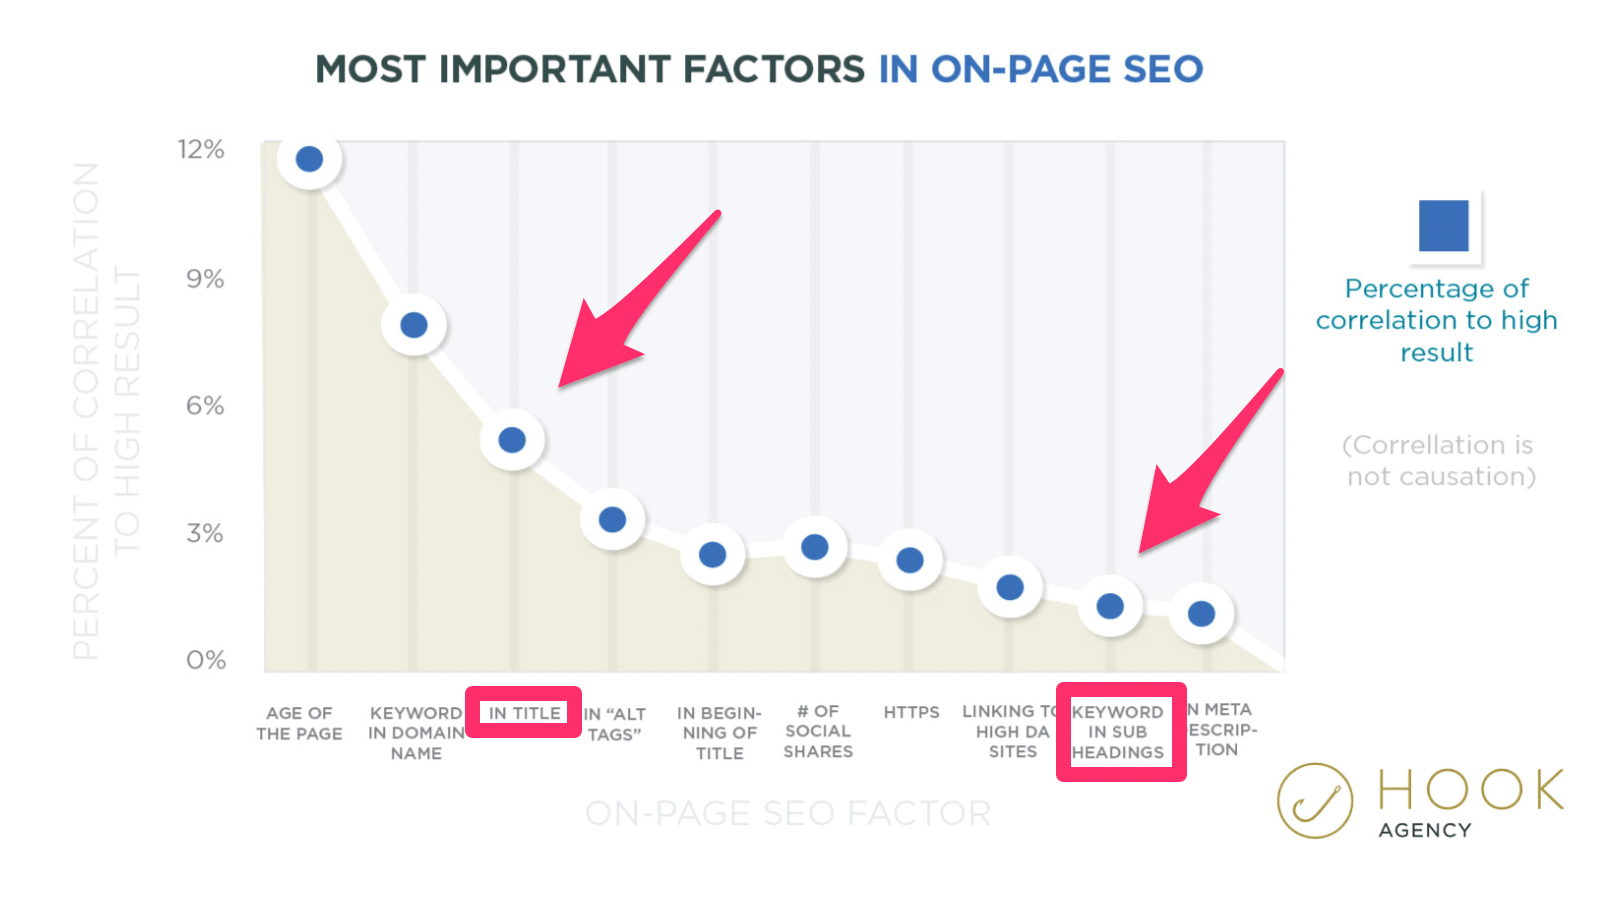
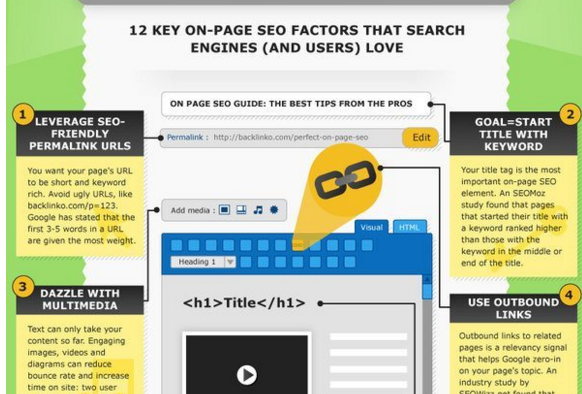
Originally, he wrote a post about on-page SEO.

image16

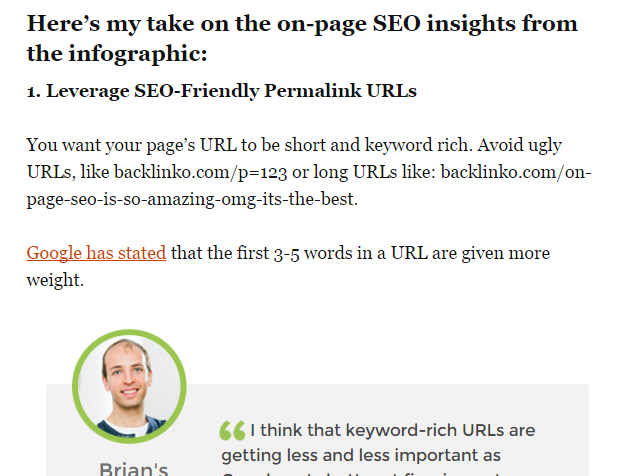
As any other article he posts, this was a high-quality article.

It was getting a bit of search traffic, but not as much as Brian had hoped. So, he used this technique and was able to increase organic search traffic by 175.59%.

image02

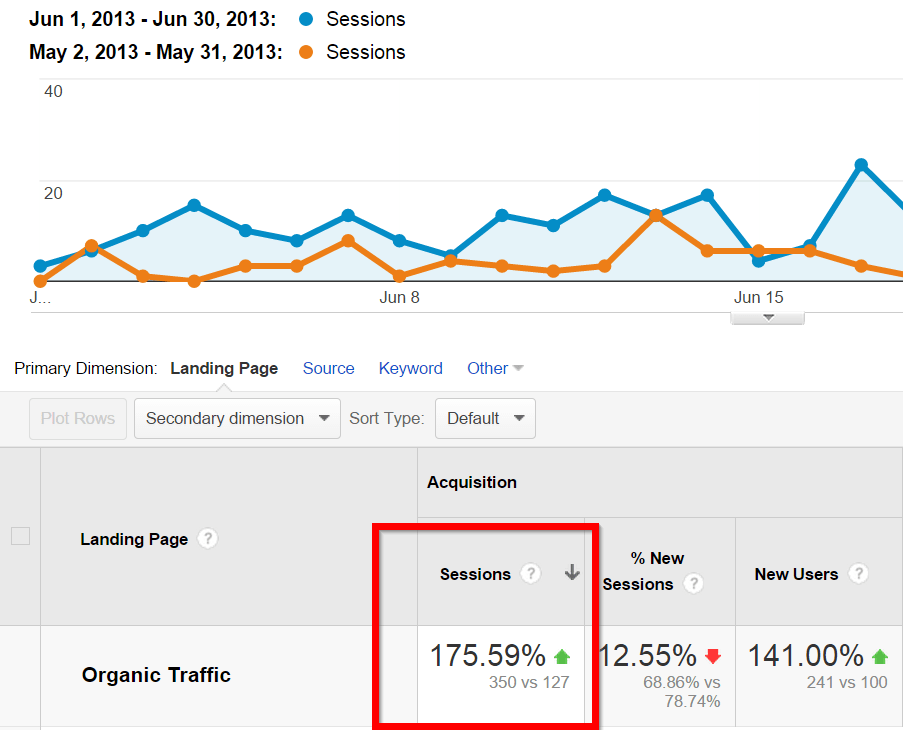
Not too shabby. And it also would have improved his rankings for other related posts on his site.

The tactic itself is pretty simple:

  1. Create a great infographic.
  2. Create a list of sites that write about whatever topic you covered.
  3. Send them a link to your infographic.
  4. Offer to write a custom intro if they agree to post it on their site.

Lesson #10 – Different types of content lets you expand your reach

So far, we’ve mainly looked at standard blog posts being used in content marketing.

Yes, those may make up a larger percentage of the content you end up producing, but there are many other types of content that you can produce.

image24

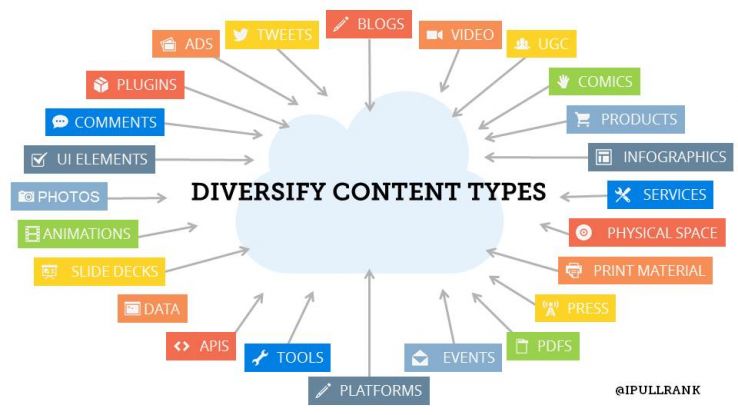
For some messages, there are better forms of content than just standard blog posts.

In this case, Brian created an infographic.

image01

And then, he combined it with his original article.

By doing this, he was able to promote his post again and further improve its rankings. He was able to take the original message of the article and reproduce it in an easier to digest format, which benefits his readers.

The takeaway from this case study is that whenever you create content, you should be thinking of 2 things:

  • What is the best way to cover this topic? (to your readers)
  • Would creating this content in multiple forms enhance the reading experience?

If you said yes to the second, you can get creative with your repurposing to create extra promotional opportunities.

Also, by creating different forms of content, you can expose your content to a new audience that you may not normally reach.

Lesson #11 – Great content is nothing without promotion

One of the biggest aspects of successful content marketing that you need to have drilled into your head until it’s habit is that all content needs promotion.

The only exception is when you have a large audience, because your audience will essentially promote your content for you by sharing it.

Other than that, there’s no point creating content if it isn’t getting in front of new readers.

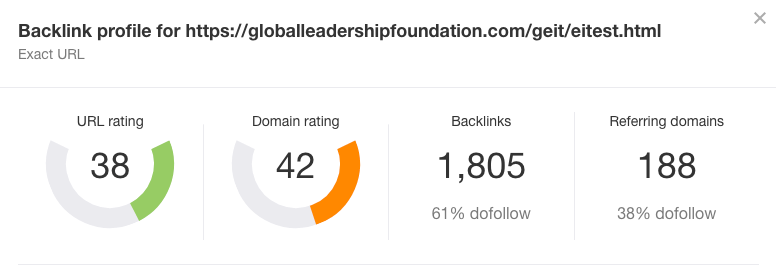
When Brian created the infographic, he was able to email new sites who didn’t already link to him, and get them to link to his article. Check out what his referring domains graph looked like shortly after:

image18


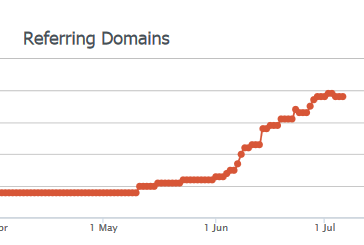
That’s a lot of new backlinks and the reason why his organic traffic increased.

Lesson #12 – Good marketing can be simple

You see popular blogs all the time and may think that they must be using some secret marketing techniques.

But the truth is that marketing comes down to building connections with the right people.

In most cases, there’s nothing secret or advanced going on.

In his case study, Brian shared the simple email template that he sent to various website owners to get them to post his infographic on their sites and link to him:

image21

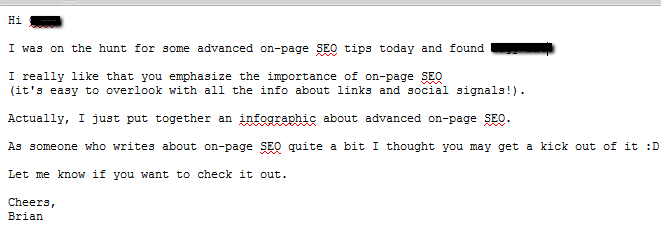
You could write something like that, couldn’t you?

The difference between someone like Brian and a mediocre marketer is one of the lessons we have already studied—consistency.

He doesn’t just send these types of articles out to 10 or 20 website owners; he sends it out to hundreds.

He doesn’t just do it for one of his posts; he does it for every single post he creates.

This kind of consistent promotion is how you get the backlinks and the search traffic that comes with them.

Don’t stop yourself from taking action just because the content marketing strategy seems too simple or because you think there must be more to it.

Simple strategies are good. Execute them consistently and improve them when you can, and you will get the results you’re looking for.

Next up I am going to provide you with 23 more lessons that I have learned from other case studies and a lot of testing, and that are just as important to know.

I may have touched on some of these in the case studies above but will go into some more detail to help reinforce the ones that really matter.

Lesson #13 – Quantity over quality

I myself prefer writing high quality posts instead of writing large quantities of content, but that strategy doesn’t work well if you are trying to hit 5 or even 10 million unique visitors a month.

All of the 20 blogs I worked with focused on quantity first and then quality. They made sure crap wasn’t thrown onto their blogs, but they had quantity goals…such as posting 4 blog posts a day.

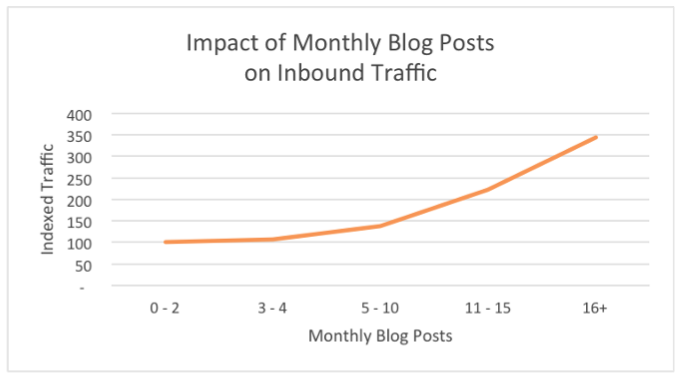
When I had access to all of their analytics stats, I saw there was a direct correlation between how many posts they released a day and how much traffic they received. The blogs that wrote more content tended to be the most popular.

It wasn’t because of social media. It was because of Google. The sites that published over 4 pieces of content a day typically received 55% or more of their traffic from search engines.

growth graph

If you look at the graph above, you’ll notice two lines. The first one shows general traffic growth of their core user base at 8% each month as content is continually published each week.

The second line represents hit content pieces that caused traffic spikes. Because the blog published content so frequently, chances of hitting these traffic spikes increased, which helped take their growth rate from 8% to 10%.

Lesson #14 – Your influence affects your blog’s popularity

Most blog owners who have popular blogs are well networked. Sure, their blogs helped grow their network, but even before they had a successful blog, they were still pretty well connected.

These connections helped them break stories and get more social media traffic. From getting their friends to tweet stuff to having them share it on Facebook, these blog owners leveraged their connections to get as much traffic as possible.

If you want to create a popular blog, you need to work on your networking. The more influential people you get to know, the more social traffic you will generate.

Lesson #15 – Hire influential writers

None of the blogs I worked with were “one-man” shows. It is simply impossible to be that popular with just one writer. There is no way one person can write 10 or even 4 quality blog posts a day.

So, you will have to staff writers to produce more content. When hiring writers, don’t just evaluate their writing ability, but look at how influential they are.

Bigger blogs love hiring people who are well-known. When I started my first blog, Pronet Advertising, I hired MG Siegler because he was a top Digg user, which helped me generate more traffic.

TechCrunch later hired MG as well, and it didn’t hurt that he had a ton of social clout as it can be leveraged to drive traffic. For this reason, he is also one of the more popular tech bloggers on the web.

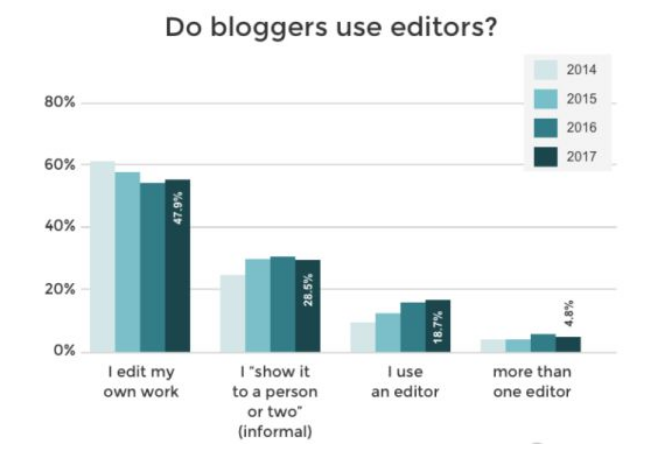
Lesson #16 – Edit everything, no matter who the author is

If you don’t edit a submitted copy before it goes live, you won’t know if the author has linked to bad sites, submitted a plagiarized copy, or made statements that you don’t agree with.

At the end of the day, you are responsible for the content that gets published on your blog. It doesn’t matter if you were the author or someone else was. It’s your job to make sure it lives up to your standards and company values.

Lesson #17 – Follow the data, not your gut

It’s rare that blogs get popular accidentally or by luck. In most cases, the big blogs are using data to figure out how they can grow their traffic.

One of the main metrics these blogs look at is author stats. They analyze the average traffic, number of comments and social shares per post for each author.

By breaking it down from an author level, they can see which writers drive the most traffic. They then use averages to see which authors drive the most traffic per post. This is important because some will write less than others, and the ones that have a higher traffic-per-post ratio are the ones you want to encourage to write more frequently.

This also helps them determine which writers they should fire. The last thing you want to do is pay a writer who can’t generate traffic.

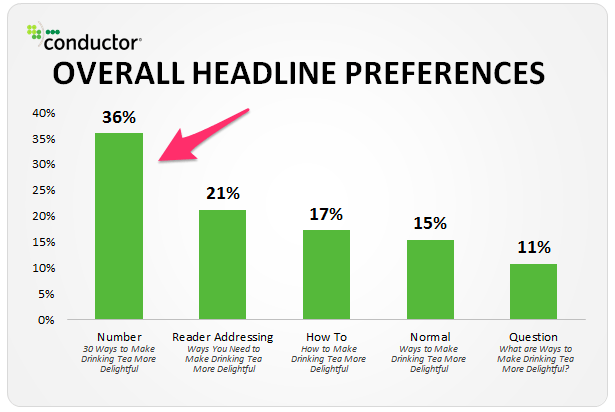
Lesson #18 – It’s all about the headline

Some editors spend as much time editing as they do helping massage the headline so it hits hard. Without a good headline, your content won’t be read. That is why editors are so picky about post titles.

If you want to get to mass scale, you should hire a good editor who focuses on correcting other people’s posts and ensures that the headlines that are being used on the blog appeal to both users and search engines.

This isn’t an easy skill to acquire or train someone in; instead, you need to look for editors who are creative. It’s extremely hard to teach someone to be creative, so make sure you hire someone who knows what they are doing out of the gate.

In most cases, you can find a good editor by taking someone from the magazine world.

Lesson #19 – Acquire to grow

Once you have the traffic and your high authority in Google, consider acquiring other blogs to fuel your growth. GigaOM acquired The Apple Blog years ago, which helped them drastically increase their Apple traffic.

When they combined all of the blogs – both the ones they started and acquired – under one domain name gigaom.com, they were able to increase their authority in the eyes of Google, which eventually helped them increase their overall traffic.

Acquisitions don’t have to be pricey. Blogs that generate 50,000 or even 100,000 visitors can be bought for five figures or less. You can do that because most of these blogs don’t make any money, so when you offer someone $10,000 for their blog, they get intrigued.

When I bought Gym Junkies, it was generating 170,000 visits a month, and I spent $30,000. That’s not a bad deal considering the site was making $30,000 in profit each year… so, in essence I bought it for one year’s profit.

Lesson #20 – Quality doesn’t guarantee traffic, but it does build loyalty

You can write great content, but it doesn’t mean you will see an increase in traffic. You can write crap content in large quantities, and you are more likely to see your traffic numbers go up.

In the long run, however, crap content will lead to disappointed readers, which hurts your long term traffic. Yes, in the short term, things will grow like a hockey stick, but once search engines continue to see that users are bouncing away and no one is willing to tweet your content or even link to it, eventually your traffic will tank.

You have to consider your strategy not just from a direct traffic standpoint but also from a search engine standpoint. Google looks at the number of pages you have indexed, the number of sites that are linking back, and even the number of social shares you are generating. If you have a good ratio, Google will reward you with higher rankings. If you don’t, you’ll eventually see your rankings tank.

If you want to build a long term blogging strategy like the big boys, you have to focus on high quality content. Quality will help bring loyal readers who will continually share your content via the social web, and these readers will increase your overall word of mouth rate. This will help increase your direct traffic and your referring traffic.

Lesson #21 – Aggressiveness may tick off users, but it usually doesn’t slow down growth

Being aggressive with growth strategies is usually forgiven by your readers if your content is great. I’ve used aggressive strategies in the past with Quick Sprout, and I’ve continually grown. From multiple pop-ups to content blockers, I tested it all. Every time I have done so, I saw that this approach does tick off a few readers, but my traffic continually climbs up and to the right.

Another good example of a blog that uses aggressive strategies is Upworthy. Their blog is extremely popular even though they use popups to try to convince you to friend or like them on Facebook.

upworthy popup

Now, I am not saying you should be aggressive, but the data shows it typically doesn’t increase bounce rates or cause an overall traffic decrease. Upworthy is the fastest growing blog that ever hit the web, and they are extremely aggressive.

Lesson #22 – User-generated content creates a lot of spam

You might now know it but we used to have a forum on Quicksprout. It that contained 346,299 users, 2,788 threads, and 12,731 replies.

forum traffic

The number of users may seem impressive, but over 95% of them were spam users. My developer and I kept fighting these users off, but they found more ways to sign up.

Luckily, through Akismet, very few of these spammers were able to participate. Every once in a while, however, a few would get through, and I would get notified by Google Webmaster Tools through a message similar to the one you saw at the beginning of the post.

Additionally, spam comments went through the roof. Quick Sprout used to generate 1,000 or so spam comments a day, so it was possible for me to have someone go through them to make sure legitimate comments weren’t marked as spam.

Now, I was generating 50,000 to 60,000 spam comments a day, and it’s nearly impossible for me to have someone go through them. This was preventing legitimate comments from being posted on the blog.

For this reason, I removed the forum as the traffic wasn’t substantial and it was creating too many warnings from Google.

Lesson #23 – People are inherently lazy

There is nothing wrong with this as I am inherently lazy too.

But with user-generated content, it’s hard to get people to add large quantities of high quality text. This caused forum pages to have on average 327 words, which doesn’t help very much with search rankings.

As I’ve mentioned in the past, Google tends to rank pages with 2,000+ words of content on page 1.

In order to help boost the word count, I was responding to every single thread. In addition, I recruited moderators to help respond to user questions with high quality content.

But I still couldn’t get the word count high enough without adding tons of fluff, which I didn’t want to do.

For this reason, I wasn’t able to create detailed, Wikipedia-like user-generated content. When you consider that Quick Sprout gets at least 500,000 visitors on a bad month, it shows that you need a lot of traffic to build tons of high quality user-created content.

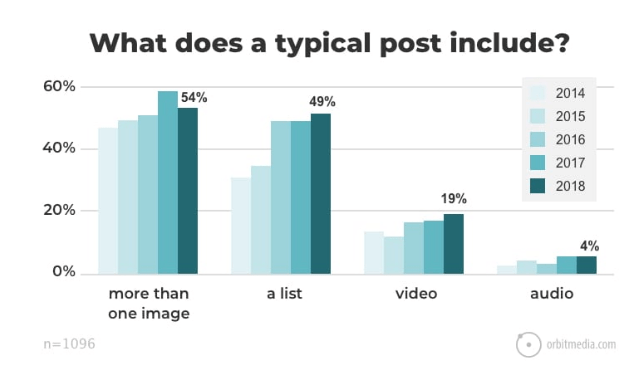
Lesson #24 – Infographics do extremely well

Infographics tend to get shared 42.4% more times than an average blog post. However, they receive 129% fewer comments. Additionally, every time I send out an email with an infographic, I receive 28.3% less traffic from emails.

Nonetheless, infographics do well overall. You might wonder why I would say that when most of the numbers point to them doing poorly.

The reason they still do well is that on average, an infographic generates 37.5% more backlinks than a standard blog post.

So, what does that mean? During the first 3 months after being released, infographics typically receive 22.6% less traffic than regular blog posts. Over a course of a year, however, infographics receive 35.1% more traffic.

In other words, infographics are great at bringing in long-term traffic. They continually produce even when they get old, whereas standard text-based blog posts don’t perform as well when they age.

Lesson #25 – People enjoy reading personal and controversial stories

My most popular posts by far tend to be both controversial and personal. Examples include:

Those three stories have done exceptionally well. I received a lot of hate email and comments from those stories, and in many cases, I may have been wrong, which is fine. But those posts have received more traffic than other posts I have published.

One thing I learned is that people judge you based on the titles of your blog posts. Many people don’t even read the content within the post—they just make assumptions based on the headline.

From a social traffic standpoint, these types of stories do exceptionally well. The one on clothes received almost double the number of social shares compared to the second most popular post on Quick Sprout.

This has taught me that if I want to grow my traffic at a fast pace, I have to write controversial stories that are personal. When doing so, I have to be careful not to cross any lines or offend people. I also need to make sure the content stays educational.

Lesson #26 – Timing does matter

Over the years, I have tested posting during different days and times. The winner tends to be Monday through Thursday, at 8:00 AM PST. This doesn’t mean that 8:00 AM PST is necessarily the ideal time for every blog, but it is for Quick Sprout.

I’ve tested posting during other days and times, but the 8:00 AM slot tends to perform really well. Monday in particular seems to be the best day of the week, but Tuesday through Thursday are not far behind.

I haven’t experimented much with posting on Saturday and Sunday, but with all of my other blogs, those days tend to be bad traffic days, especially in the business-to-business sector. For that reason, I never post on weekends on Quick Sprout.

The exception to that are news posts

And not just any news…but mainstream news because more people search for it, which means the potential traffic opportunity is greater. For news posts you must actively follow trends and breaking news and post as quickly as you can find them.

One site that leveraged this strategy in the past was Mahalo. They built up a lot of their traffic when they started out by writing about everything mentioned on Google Trends.

mahalo alexa

They don’t leverage this strategy as frequently anymore; hence, you see the drop in traffic when you look at the graph. But as you can notice, it was very effective before.

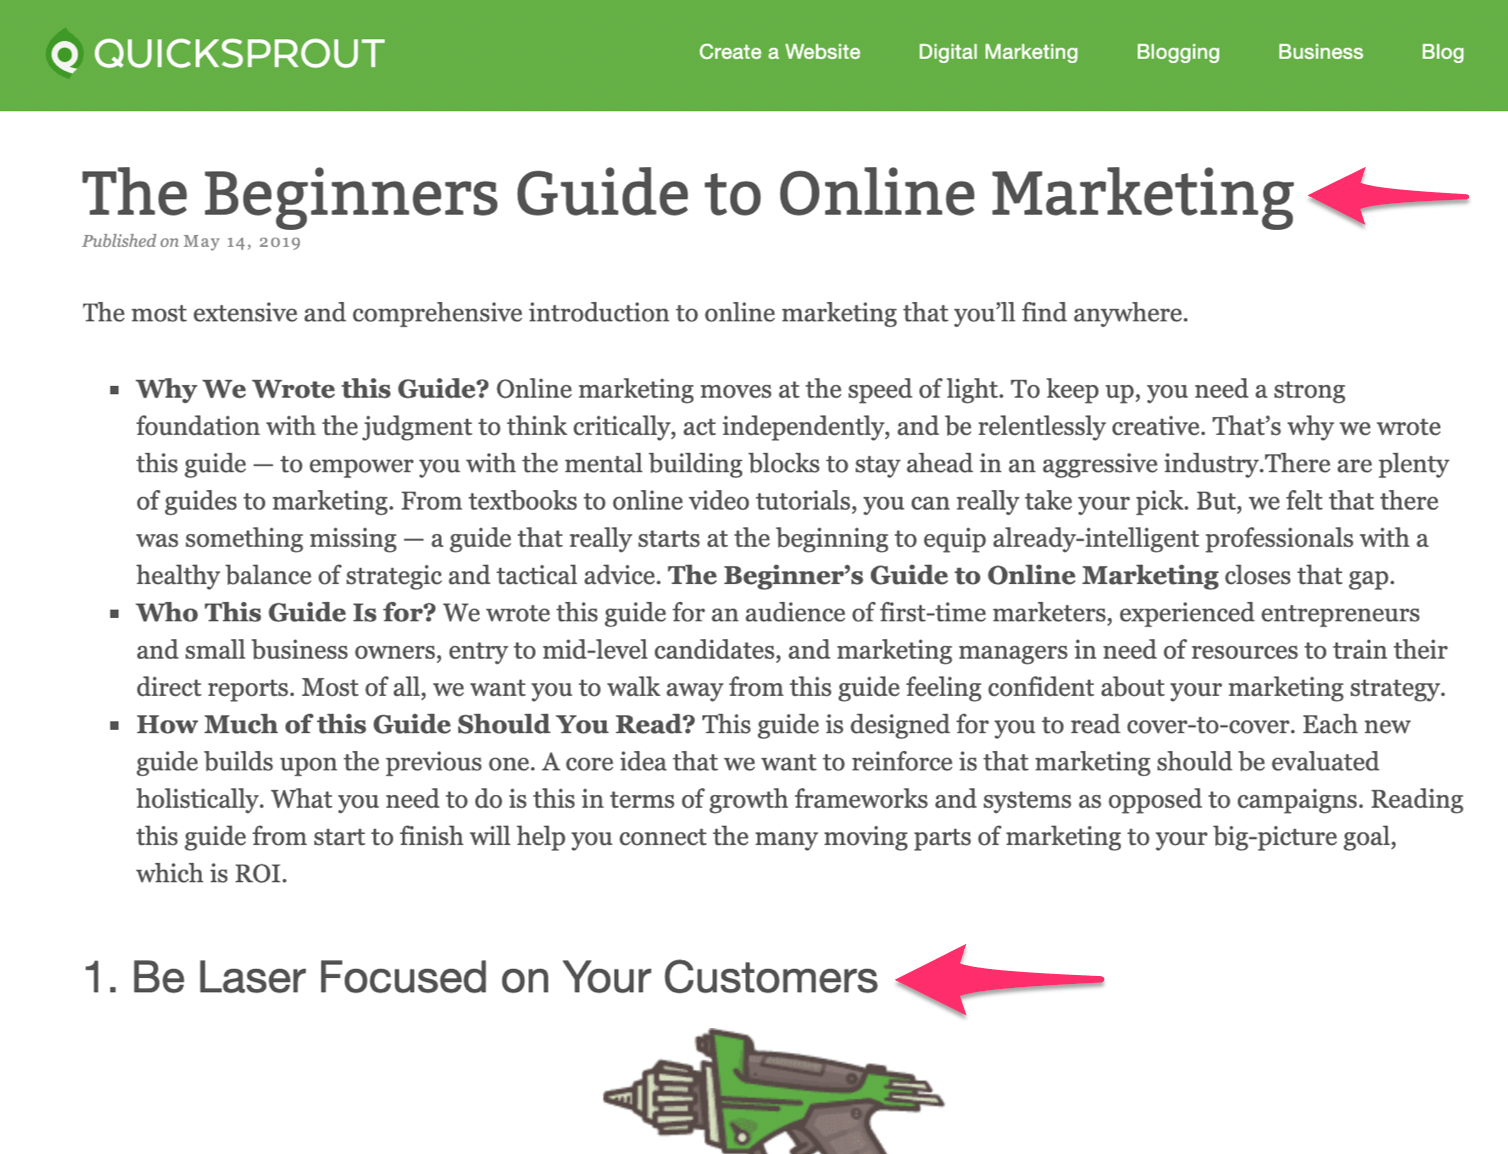
Lesson #27 – Guides rank better than posts (but for a different reason than you think)

On Quick Sprout, guides rank better for head terms. At first, I thought this was because they get a ton of inbound links and social shares and they contain over 30,000 words on average, but that’s not the case.

All of those factors do help, but when I went back to see what caused them to rank for terms like “online marketing,” it was one specific change that I made that caused all of the guides to rank better.

Can you guess what that change was? I added a link to each and every guide in the sidebar of Quick Sprout. Within 30 days, the rankings started to shoot up, and within 3 months, I noticed a huge increase in search traffic to those guides.

If you want to increase the rankings of your high quality posts, add links to them within the sidebar of your blog.

Lesson #28 – People love data

Out of all the text-based content I wrote on Quick Sprout, I noticed one thing. Blog posts that contained stats and data received 149% more social shares and 283% more backlinks.

This makes sense since posts that contain images such as charts and graphs also get more trackbacks and social shares.

A lot of my blog posts, including this one, start out containing lots of stats and data, so I don’t have to do much more here. Instead, I just have to continue the trend of writing more data-driven posts.

I should also consider hiring a full-time stats guy to dig up data for me to increase the quality of my posts.

The one thing I haven’t been doing is including enough graphs and charts within my posts. For example, this post contains a lot of data, and I could have inserted charts to make the post more visual and easy to understand.

I’ve just been getting too lazy, which is something I need to fix. Failing that, I can always pay someone to go into my posts and add charts/graphs for me.

Lesson #29 – Don’t rely completely on the marketing department

The first and most common mistake is dumping everything on the marketing department. Compared to other departments in the company, the marketing department would be the most logical choice for the job if look at it from the outside. If your company does this, you’re not alone:

content marketing ownership

Content marketing, however, shouldn’t be thought of as purely an extension of marketing, editorial or public relations departments. It should pull from various departments, including design, engineering and even sales, to name a few.

Why? Because the marketing department won’t always know what the best type of content you should be creating. For example, at KISSmetrics, our engineering and design departments recommended various types of content:

  • How to track people –  one of the most common questions we get at KISSmetrics is “how do we track people?”. The marketing department can’t write a piece like this as it would require a deep understanding of our technology.
  • How design affects conversion – a lot of our ideal customers are trying to boost their conversion rates. The design team is not only better suited to write a piece like this, but they can also create design examples.
  • How to delay the loading of external javascripts – a lot of people are concerned about their website load time, so one way to improve the speed is to delay external javascripts. An engineer can not only explain how to do this, but he/she can also break down the code you need to use to accomplish this task.

As you can see from the examples above, the marketing department wouldn’t be able to write all of those content pieces. For that reason, it’s important to have many departments in your company involved in your content marketing strategy. Here’s how you can get the other departments involved:

  • Encourage other departments – tell them the benefits of content marketing for the company and for them personally such as increasing their personal brand. An easy way to do this is to also look for people in the company who are already communicating to customers as they are going to be more open to blogging.
  • Create an editorial board for all content pieces – this will act as both a springboard for ideas and a way to keep the brand and voice consistent through all content marketing channels.
  • Create an email alias or Skype group – add all these members so that you can easily communicate with each other the moment an idea hits or a concept piece is finished.

Lesson #30 – Win customers over

You have the content, but is it really winning customers over? One very common content marketing mistake that’s made with even the best of intentions is to put a positive spin on every piece. For one, your customers aren’t buying it. You and they both know the product or service has flaws or isn’t right for everyone. Every content marketing effort feels more like a sales pitch.

To help avoid this, you may want to invite users to participate in your content marketing efforts. A Vermont ski resort Jay Peak did this by encouraging their users to tag Jay Peak in their instagram photos describing what they love about the mountain. The mention of Jay Peak is secondary to the users emphasizing what they love about skiing there, but the campaign does a great job of sharing the enthusiasm without hyping up the location.

So, how do you do it? You could:

  • Encourage users to pose with your product or showcase your brand name in an unusual way. Nylabone invites their users to post pictures of their dogs using the product, with captions, providing real social proof in a way that marketing videos or photos can’t.
  • Give a shout out to the submitters when you do post their content, since they’re very likely to show both the content and your response to their friends.
  • Focus on feelings rather than the brand itself. Coke’s Happiness Tumblr page and Chobani Greek Yogurt’s Pinterest Page don’t always mention the products themselves, but by interacting with the pages, customers grow to associate the brand with those feelings.

Don’t make the mistake of relying completely on user-generated content. Make sure that you check the sources of uploaded pictures or videos before posting and let the customers know upfront that any content they submit becomes the property of your company to do with as you wish. This will help prevent any controversial or legal issues that could crop up if the campaign truly takes on a life of its own.

If you really want to harness the benefits of user-generated content, you should ask for (and respond) to reviews, both good and bad. For many users, knowing that the company cares and is willing to work with them to resolve the issue will diffuse any anger or frustration, which can be the spark that leads to other disgruntled customers jumping on the bandwagon.

Lesson #31 – Measure the results

The easiest way to gather usable content marketing metrics is to figure out which pages or promotions have the biggest impact on customers, and why. Measuring things like the click-through rate, time spent on site, bounce rate and unique visitors are all sales-focused metrics. You should also look at:

  • The type of media customers engaged with the most – this is a simple metric and boils down to the number of pages, downloads or other raw data. You can use basic tools like Google Analytics to determine this.
  • Where and how the content was shared socially – you can use services like Hootsuite to track the number of social shares and the channels used to share the content.
  • Whether or not content converted into customers – all your content marketing efforts are wasted if your visitors are not turning into paying customers. Start off by learning who’s doing what on your site, how often they participate, and how soon they made a purchase.

Here is an example of what we track on our KISSmetrics blog:

kissmetrics cohort

As you can see from the image above, content URLs are placed on the left and number of times people visit the blog after reading one of those URLs is at the top. So the higher the percentage, the better the content. If you are writing content that causes a low return visit percentage, it means that you are publishing content that people don’t care to read.

At KISSmetrics we try to optimize our blog for return visits because we know it helps create brand loyalty. In the long run, those visitors are more likely to turn into customers.

Lesson #32 –  Don’t just focus on traffic, focus on building the right audience

Another lesson I learned from running the KISSmetrics blog is that traffic isn’t everything. Many of our most popular posts are on social media and content marketing. But there is an issue with these topics and the type of visitors they attract.

Sure, these visitors are interested in online marketing, but very few of them buy our product. Why? Because they are not our ideal customers. E-commerce and SaaS companies are.

So, instead of focusing on building a marketing audience, we should focus on analytics-based content for our target audience. We would probably do well even with providing general marketing advice to them.

Our blog editor is doing a great job at releasing more blog posts that are targeted towards our audience. He is super picky about what he publishes on the blog. He also knows that you can’t just flip a switch and release a different type of content the next day: you have to transition slowly.

If I had to start the KISSmetrics blog all over again, I would focus on helping SaaS and e-commerce companies with their online marketing. This would help generate more qualified leads for our sales team.

Focus on creating the right audience for your blog and not just on building up your traffic.

Lesson #33 – Don’t take your foot off the gas pedal

One of the best strategies we used to grow the KISSmetrics blog was infographics. We’ve probably produced more infographics than anyone else in the marketing space.

Boy, did it pay off. As I explained in this blog post, it is the primary reason for the growth of the blog.

Within the two-year period, we’ve generated 2,512,596 visitors and 41,142 backlinks from 3,741 unique domains, all from those 47 infographics.

But the mistake we made is that we slowed down on infographics.

It wasn’t that we ran out of ideas. We simply shifted our design resources to other projects. Because we are a well-funded startup, cash has never been an issue for us. Even if it cost $5,000 or $10,000 a month, we should have hired a company or an individual to produce more infographics for the blog.

We are getting back into our routine of generating infographics once a week, but if I had to do things over, I wouldn’t have slowed down in the first place.

If you want to grow your blog at a rapid pace, consider creating infographics. They tend to get shared more than text-based blog posts.

Lesson #34 – Monetize early

I used to believe that you should get to 100,000 visitors before you monetize your blog. That way you can focus on building an audience without being distracted.

We actually waited till we hit 200,000 plus visitors a month before we started to generate leads from our KISSmetrics blog. The big problem we ran into was that we found that certain types of content generate better quality leads than others.

For example, webinars convert well. If we monetized early enough, we would have had this data, which would have helped shape the blog from the get go. Now we have to clean up and readjust the type of content we produce and the methods we use to generate leads.

You don’t want to monetize your blog if you have a few thousand visitors a month, but once you hit 10,000 monthly visitors, you should run tests. From there, you can shape your blog and audience the way you want.

You can turn off your monetization after the tests are complete, but before you do, try different methods to see where you stand.

Lesson #35 – Utilize tools (like BuzzSumo)

I use a lot of different tools and various software for marketing. But one of my absolute favorites is BuzzSumo.

I love it!

At this point, I consider it a linchpin useful for several different aspects of marketing.

And apparently I’m not alone.

Big name brands, such as TechRadar, TechTarget and even Rolling Stone magazine, use BuzzSumo to optimize their campaigns.

And because I tend to be compulsive about certain things, I’ve gotten into the habit of checking BuzzSumo every single day.

As you might imagine, I’ve come up with some pretty interesting insights along the way.

In this post, I’ll share with you what I learned from checking BuzzSumo every day for a month.

It’ll tell you, without a doubt, which influencers to target

One of the major selling points of BuzzSumo is it allows me to perform streamlined influencer research.

If you’re wondering whom to target for a guest post, brand endorsement, etc., BuzzSumo will let you know.

Here’s an example of how to use it.

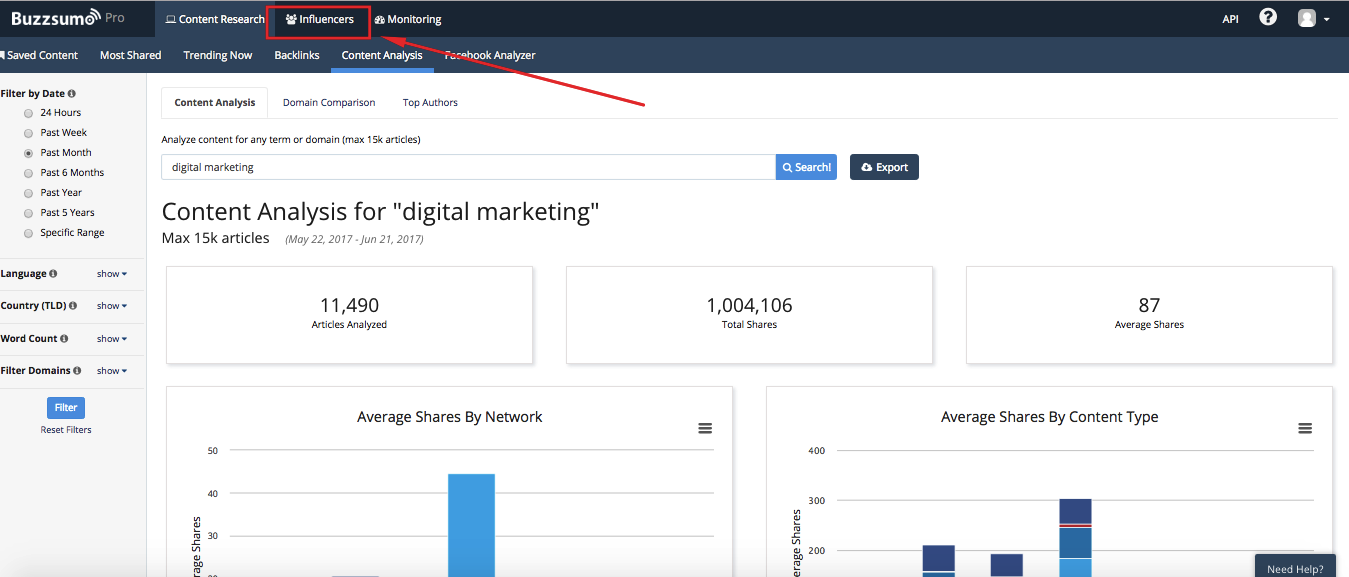
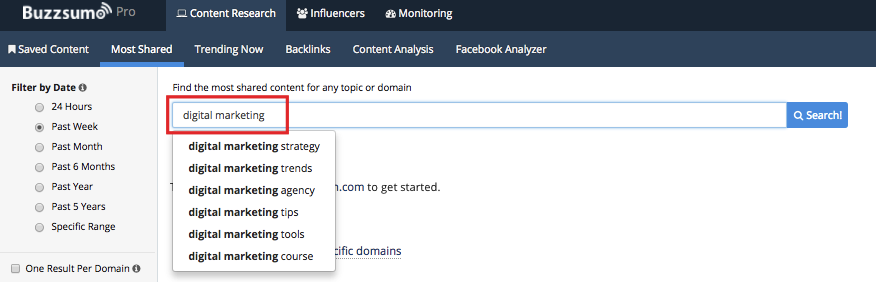
From the dashboard, enter the topic or keyword you’re interested in.

In my case, it’s “digital marketing”:
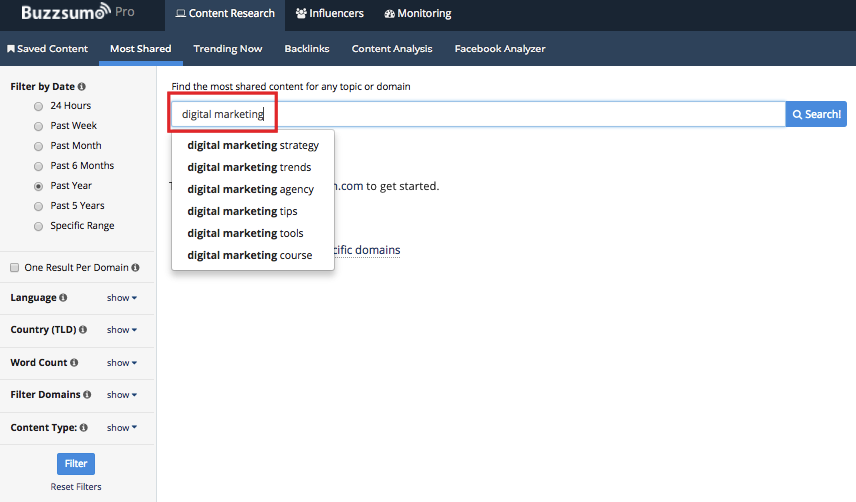
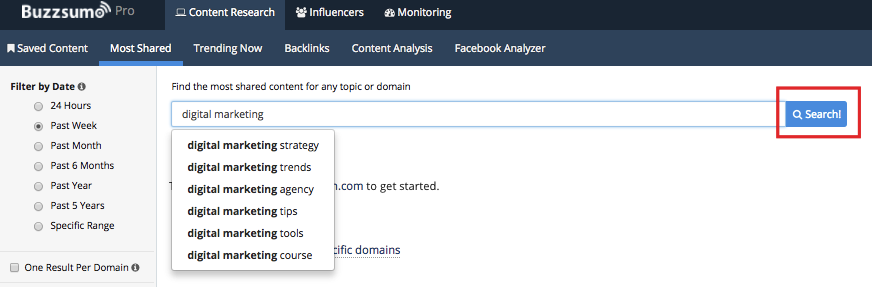
Click “Search”:

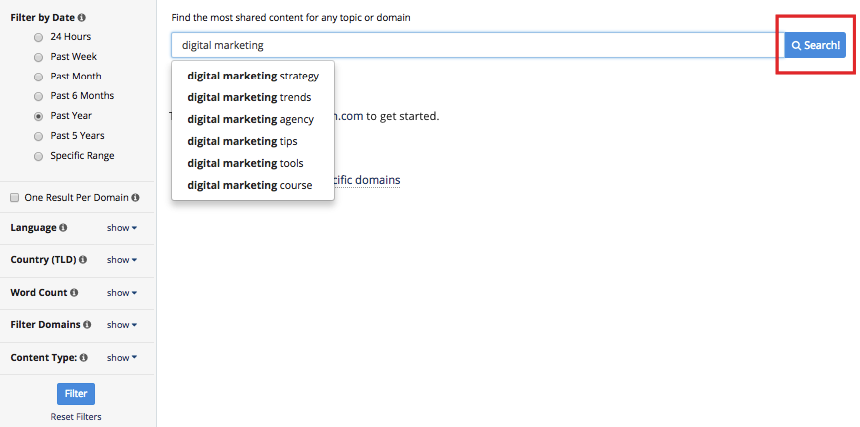
This will show you which content has received the most shares.

But I want to take it one step further, so I’m going to click on “Content Analysis” at the top:

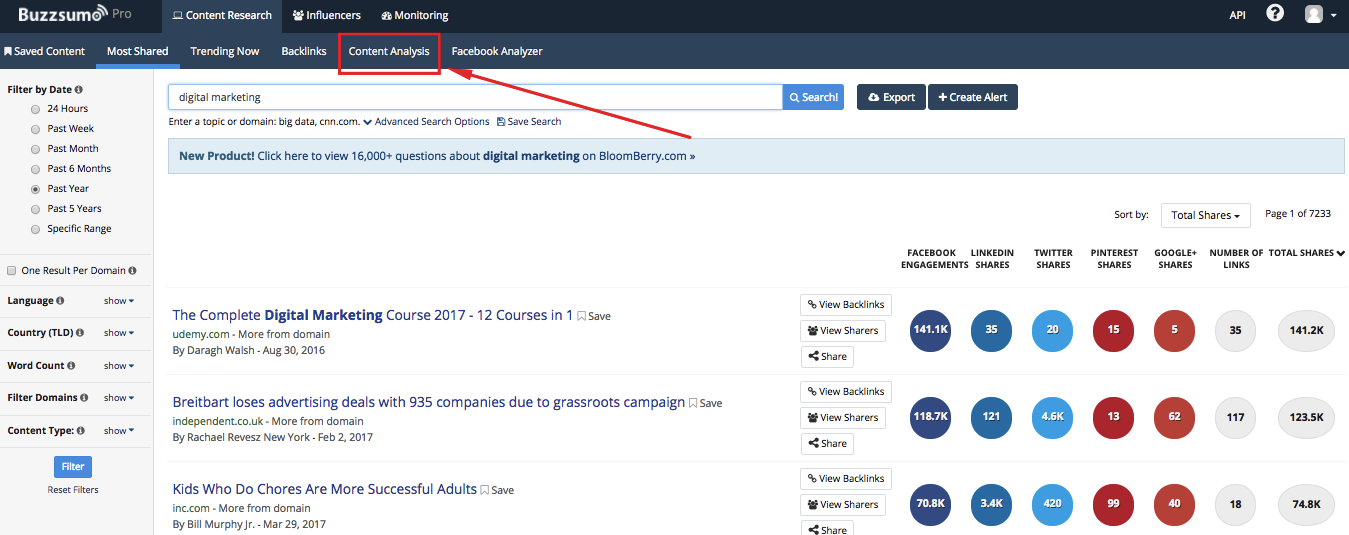
Scroll down a bit, and you’ll see a section called “Most Shared Domains by Network”:

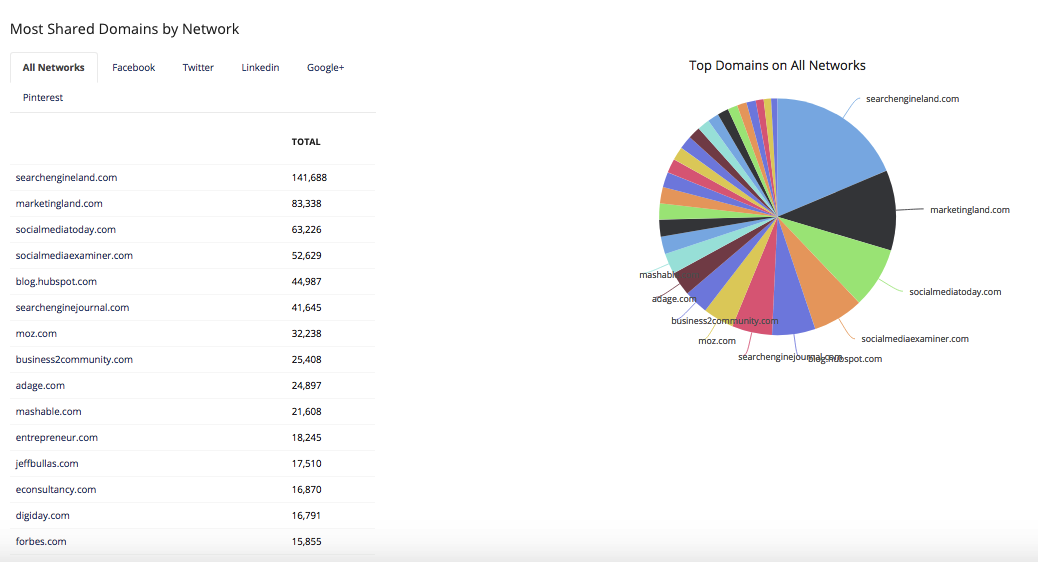
This lets me know which publications, websites and blogs are getting the most shares, telling me how influential they are.

I also like the pie chart, quickly showing me how things stack up.

If I wanted to pitch a few brands with a guest-posting idea, I would want to aim for some of the top brands on the list, like Search Engine Land, Marketing Land, Social Media Today and so on.

But wait, there’s more.

Go back to the top, and click on “Influencers.”

Here’s what I get:

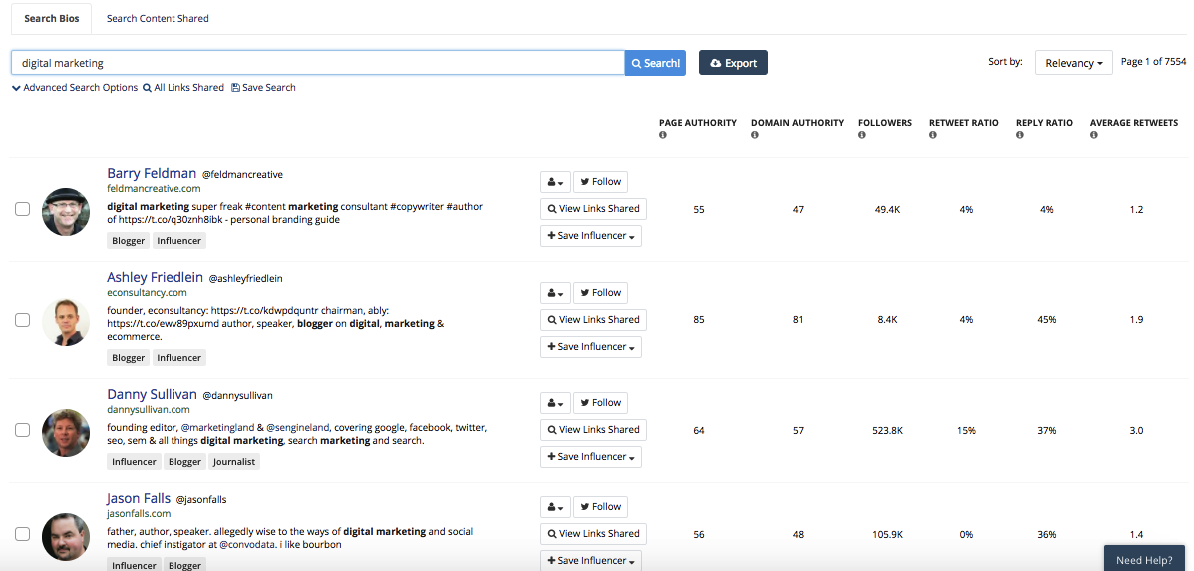
It’s a massive list of influencers along with accompanying key metrics such as their page authority, domain authority, follower count, etc.

I can literally find thousands of influencers in the digital marketing niche.

I can then reach out to any of them by visiting their website or contacting them on Twitter (BuzzSumo provides links to both).

I honestly can’t think of a more streamlined and efficient way to find the top influencers.

If influencer marketing is your bread and butter, BuzzSumo is a godsend.

You can see where competitors are getting their links from

Backlinks are everything.

It’s a toss up as to which is more important: content or links.

But I think we can all agree that the quality and relevancy of the sites linking to you impact your search rankings heavily.

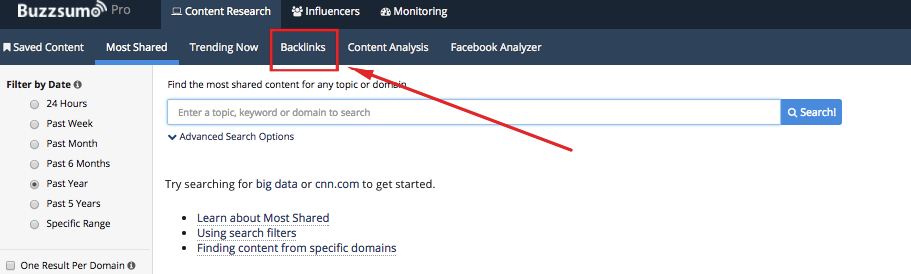
One of my favorite features on BuzzSumo is “Backlinks.”

With a simple search, you can find out who’s linking to your competitors and which specific pieces of content those links are coming from.

Here’s how you do it.

First, click on “Backlinks” from your dashboard:

Now, enter the URL of the competitor you want to check out.

I’ll use Kissmetrics as an example:

Click on “Search.”

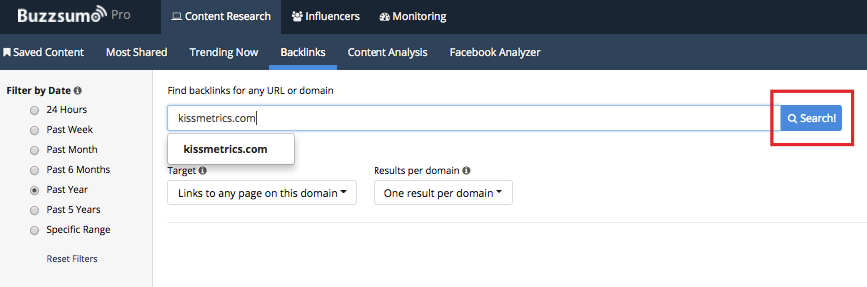
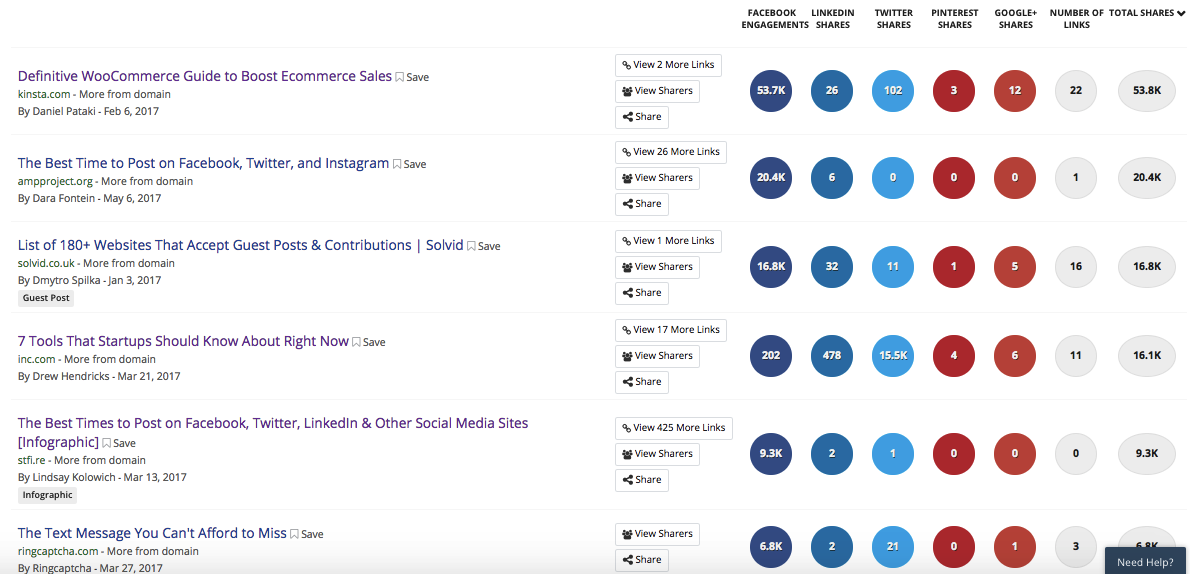
Voila! Just like that, I can see where their backlinks are coming from.

Here are just a few:

And I can take it one step further by checking the rest of the backlinks coming from a particular website.

Just look at “View [X] More Links”:

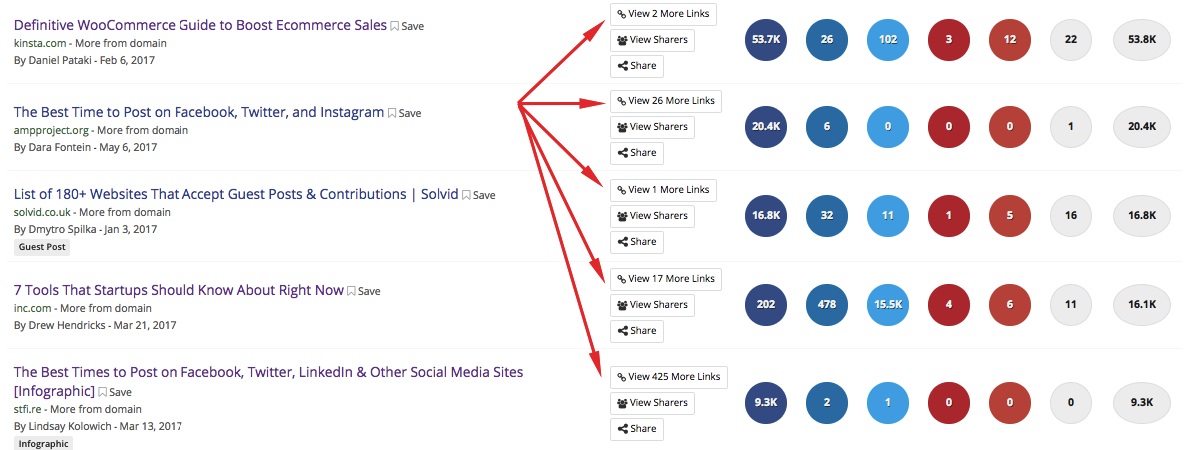
If you see that a particular site is linking to your competitor like crazy, this is a good indicator they may be willing to link to you as well.

This is helpful because it gives me plenty of ideas for backlink opportunities.

By knowing who’s most likely to link to content in my industry, I know to whom I should reach out and who’s most worth my time.

You can tell which topics are trending in your industry

Evergreen content is definitely important and serves its purpose.

In particular, I’m a fan of long-form evergreen pieces.

But as good as evergreen content is, it’s also important to cover the hot topics trending right now.

This is especially true for fast-moving niches like news and politics.

Striking while the iron is hot is a surefire way to bring attention to your brand and grow your audience.

And it just so happens that BuzzSumo is perfect for determining which topics are trending in your industry.

All it takes is a quick search.

You first want to go to your dashboard and filter by a recent date.

I usually look at content from the previous week, but a month or even 24 hours can work as well, depending on your industry.

Click on the filter you want to use:

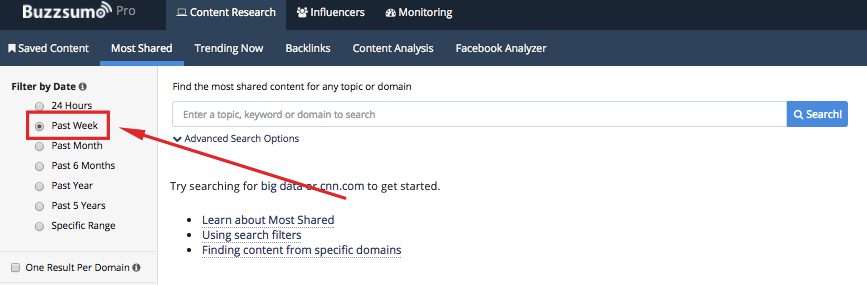
Type in your keyword:

Now click “Search.”

Within seconds, I can see which topics are trending and the number of shares each piece of content has received:

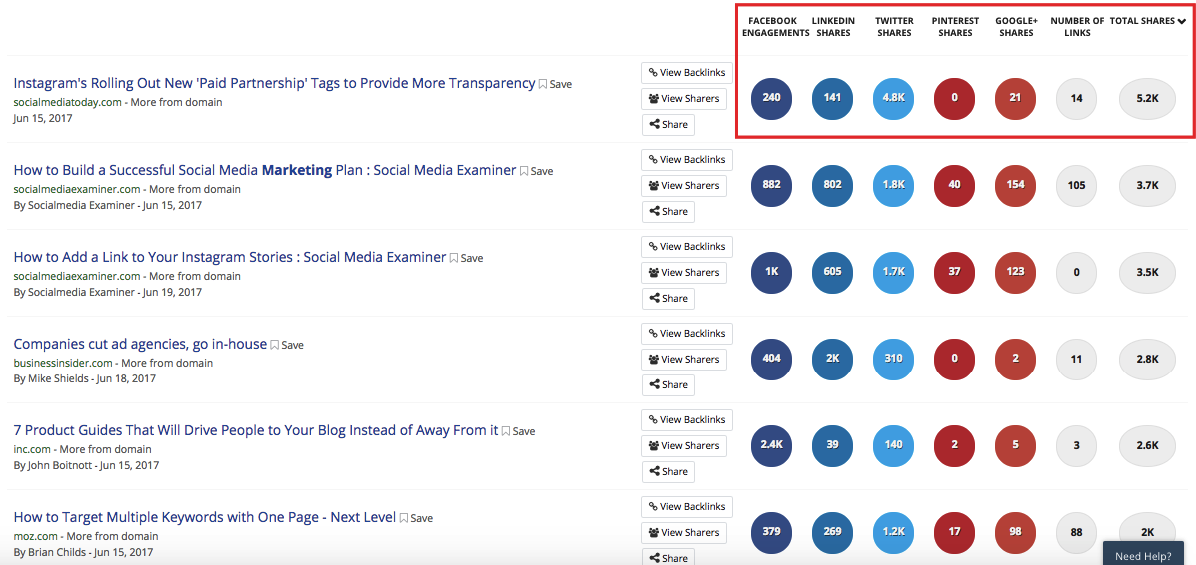
The more engagement content receives, the more interested I am in it because people are obviously responding to it favorably.

I know for a fact this content is resonating with my audience at this particular moment.

If I create a similar post or skyscraper it, I’ve got a good chance of getting positive results.

And believe me, this beats the heck out of manually scouring the Internet, trying to figure out what’s working.

Going that route is incredibly arduous and labor intensive.

It also involves too much guesswork for my taste.

By using BuzzSumo, I know for sure what’s trending and have access to several helpful metrics, which means I’m basing my findings on concrete data—not just a hunch.

You can determine which content formats to use

This one’s a biggie.

Which content formats should you use to reach your audience most effectively?

You could always experiment and base your content strategy on speculation.

Or you could use data to guide your strategy.

Although I think most successful marketing campaigns do require a certain amount of experimentation, I’m a fan of using data whenever it’s available.

And in this case, BuzzSumo makes it readily available.

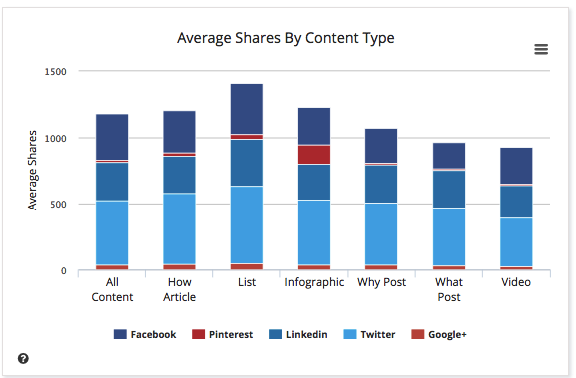
This information is also available in the “Content Analysis” section.

Just look for “Average Shares By Content Type.”

For digital marketing, a list format is your best bet:

For “IoT” (the Internet of Things), it’s video:

Just plug your industry/niche into the search box, and you can instantly tell which type of format is resonating the most with your audience.

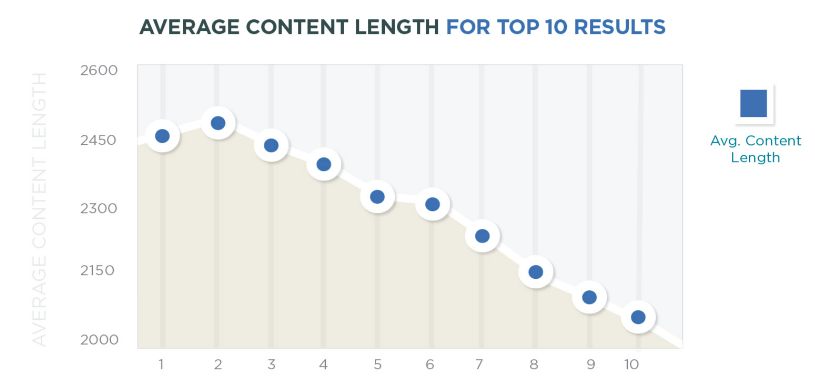
You can use it to find the sweet spot for content length

I’ve written quite a bit on choosing the right length for your content.

I even published an article that specifically points out what the ideal word count is according to your industry.

And quite frankly, word count is one of the most widely discussed topics in the content marketing world.

If you’re not quite sure how long your posts should be, BuzzSumo can definitely point you in the right direction.

Again, you’ll want to go to “Content Analysis.”

Then scroll down until you reach the section called “Average Shares By Content Length.”

Here’s what pops up for digital marketing:

I can see that aiming for over 3,000 words is my best bet for maximizing shares.

But this isn’t the case for all industries.

Here are the results I got when searching for IoT:

In this case, I’m better off aiming for 2,000-3,000 words.

And here’s one more random example—marathon running:

In this niche, 1,000-2,000 words would be best.

This shows you how this feature can work for almost any industry.

It lets you know which social networks produce the most shares

Another question many marketers have is which social networks they should focus on.

Should you stick with the biggest user base and put the bulk of your attention on Facebook?

Or are you better off opting for another network?

BuzzSumo will let you know for sure which platforms are best for your industry.

Just look for “Average Shares By Network” on the “Content Analysis” page.

Here’s what I got for IoT:

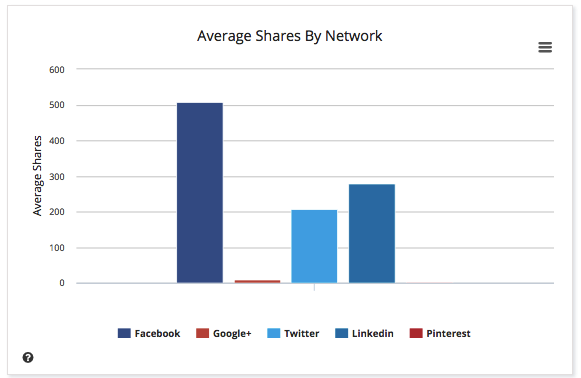
It’s clear that Facebook is bringing in the most shares, followed by LinkedIn and Twitter.

I would probably want to focus on those networks in that order.

Here’s what I got for digital marketing:

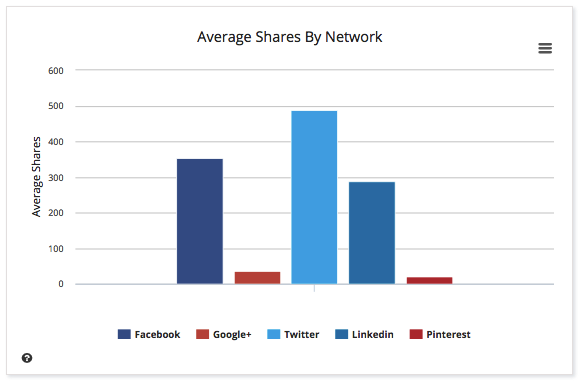
For this industry, Twitter is actually bringing in the most shares, followed by Facebook and LinkedIn.

You get the idea.

The only catch is you’re limited to these five platforms because BuzzSumo doesn’t currently feature Instagram, Snapchat, Tumblr, etc.

But it’s still a good way to gauge which major networks are most worth your time.

Conclusion

If you ever get overwhelmed or confused during your content marketing journey, take a step back.

No matter what niche you’re in and no matter what type of business you run, someone has done it before.

This means that you can study them, learn from them, and use this information to overcome any obstacles that stand in your way.

In this post, I went over 12 lessons from 5 awesome content marketing case studies. These are lessons that apply to just about any content marketing strategy.

I also gave you 23 more lessons that I have learned over the years, for a grand total of 35 content marketing lessons for you to learn by.

I know it is a lot but I strongly encourage you to implement these lessons as soon as you can.

You’ll reach your goals faster because of it.

Ecommerce Beginners Guide

Thanks to Ecommerce platforms like Shopify, BigCommerce and Wix, creating an online store has never been easier.

Even with a full staff of developers and designers, we still use Shopify for our Ecommerce websites.

The downside here is that the barrier to entry is low, which creates more competition. It might be easier than ever to launch an Ecommerce website, but it is harder than ever to make sales.

On this page, you’ll find everything you need to start and grow your online store.

The best place to start if you don’t already have an Ecommerce website:

How to Start an Online Store

How to Create an Ecommerce Website

The Best Ecommerce Platforms

If you’re looking for products to sell, then you’ll find our review on the best dropshipping companies helpful.

We highly recommend Shopify for Ecommerce, despite the fact that we use WordPress for everything else. Here’s our take on WordPress Ecommerce, and here’s a guide on how to transfer your website to Shopify. If you decide to go with WordPress for Ecommerce, here are the Themes we think are best.

Some more guides on getting started with Ecommerce:

Best Ecommerce Website Builder

Ecommerce Color Schemes

Checkout Process Design

Running A Successful Ecommerce Website

Marketing and growing your online store

You need traffic to get sales.

We have many hundreds of digital marketing guides on Quick Sprout. Here are just a few that are specific to Ecommerce.

Ecommerce Conversion Rate Optimization

Boost Ecommerce Sales

How to Create a Trust Seal On Checkout Page

Mobile Commerce App Features

Target Mobile Customers With Push Notifications

Grow Email List as Ecommerce Brand

Increasing Average Order Value

Building Hype For Holiday Season as Ecommerce Brand

Leveraging Social Commerce

Shoppable Posts on Instagram For Ecommerce

How to Get First Sale on a New Ecommerce Website

Ecommerce SEO

Create a Website

Creating a website is overwhelming. Don’t worry, that’s completely natural when building your first website.

When we built our first sites, it was so complicated. And so many articles and YouTube videos on how to create a website made it seem a lot easier than it ended up being.

We’ve outlined all the specific steps below on how to create your own website. We included everything that we learned over the years from building hundreds of sites.

We’re here to help.

This page is a collection of 70+ guides.You won’t need to read them all in order to build your website. Browse through and read what’s relevant to your situation. This will save you countless hours of frustration.

Our General Take on Building A Website

Don’t get confused by all of the different options for creating a website.

WordPress is King

In most cases, we highly recommend to build your website with WordPress. It’s an open source platform that allows you to run your website with very little technical expertise.

Some of the biggest websites on the Internet are built on WordPress. TechCrunch, The New Yorker, Variety and MTV News, just to name a few.

It’s also the most popular blogging platform, so there are hundreds of thousands of smaller websites that use WordPress.

WordPress is used by 33.4% of all the websites, and has a content management system market share of 60.3%.

Much of our content is centered around WordPress because we use it for all of our websites outside of Ecommerce.

Here’s the guide on how to create your website on WordPress.

Shopify for Ecommerce

For Ecommerce, we like Shopify — which is an Ecommerce website builder that allows you to get an online store up and running quickly.

The reality is that creating and running an online store can be a huge pain. Shopify takes that pain away. That’s probably why they are growing so quickly, and so many great online stores are popping up on the platform.

Here’s the guide on how to create your website on Shopify.

The Dozens of Other Options

If you’re reading this right now, then you most definitely fall into the category of someone that should be using WordPress or Shopify.

In rare cases, it might make sense to create a website using Wix or a similar website builder.

In other (very) rare cases, it might make sense to have a custom built website.

How to Create a Website

Start with our guide on how to create a website in 120 minutes. Along with that, there are a number of useful guides to consider as you start working on your website.

How to Plan Out Your New Website

How to Buy The RIGHT Domain Name – A Detailed Guide

How to Develop Your First Brand Identity on a Budget

The 5 Best Website Builders

The 5 Best Domain Registrars

10 Trending 2019 Website Color Schemes

9 Places To Get Website Images (Paid and Free)

The Best Website Fonts That Go Together in 2019

13 Website Design Best Practices

7 Reasons Why You Do NOT Need to Hire a Website Designer

The 22 Key Elements of a High Quality Website

How Much Copy Should You Write on Your Homepage?

10 Contact Page Techniques That Make People Contact You

How To Create an About Page That Matters

How to Make a Wix Website in 6 Easy Steps

Some useful guides for optimization as your site gets up and running:

Website Speed

Website Usability

Website Security

Website Mobile Friendliness

5 Easy Steps to Creating a Sitemap For a Website

Should You Switch Your Site to HTTPS? Pros and Cons

The Top 10 Principles That Boost Your Website Loading Time

Web Hosting

You need a web hosting provider in order to have a website.

We recommend SiteGround for most people. For advanced WordPress users, with high traffic websites, it could make sense to move to WP Engine at some point.

More about The Best Web Hosting Companies here.

Here are some additional guides to help you learn more about web hosting:

Everything You Need To Know About Web Hosting

The Best Web Hosting for Small Business

The Best Web Hosting for WordPress

The Best Free Web Hosting

The Best Cheap Web Hosting

The Hidden Costs of Website Hosting

Analytics and Reporting

An analytics tool is important if you want to know what’s happening on your website. It tells you how much traffic you’re getting, where it’s coming from, and what people do on your site. Google Analytics is the standard. That’s what we use for Quick Sprout.

Read more about why Google Analytics is the best.

Installing Google Analytics is easy. Consuming the reports is a bit more complicated.

Here are some guides to help:

The 2 Website Analytics Tools Pros Actually Use in 2019

Setup Google Analytics in 3 Steps – The Beginner’s Guide

10 Vital Customizations to Make in Google Analytics

A Guide to Google Analytics Add-on for Google Sheets

How to Track Your Leads with UTM Parameters

Building and Optimizing With WordPress

A WordPress website is basically made from what’s called a WordPress Theme and WordPress Plugins. All of the features of your website will come either from the theme or the plugins you install.

To help you get started, we reviewed all of the best WordPress Plugins across the most popular categories.

Here’s an in-depth review for each category:

Best SEO Plugins for WordPress

Best WordPress Gallery Plugin

Best WordPress Backup Plugin

Best Form Plugin WordPress

Best WordPress Cache Plugin

Best WordPress Security Plugin

Best WordPress Calendar Plugin

Best Google Analytics Plugins for WordPress

Best WordPress Popup Plugin

Best WordPress Directory Plugin

Best WordPress Booking Plugin

Best Membership Plugins for WordPress

Best Social Media WordPress Plugin

Ecommerce Websites

If the primary purpose of your website is to sell products, you’ll need an ecommerce website. We recommend keeping it simple and going with Shopify.

Read our full review on Shopify to see why.

Check out our review of the Best Ecommerce Platforms, to get a comparison to the other options out there.

Get the step-by-step on how to start an online store.

Our guide on how to create an Ecommerce website.

More useful guides on building an Ecommerce website:

WordPress Ecommerce

How to Transfer Your Website to Shopify

Best Ecommerce WordPress Themes

Best Ecommerce Website Builder

Checkout Process Design

Ecommerce Color Schemes

How to Create a Trust Seal On Checkout Page

Starting a Blog

When you really break it down — most websites are blogs, and blogs are websites. They have become one and the same. The most popular blogging platform is WordPress, and that is also the same platform we use for any other website, blog or otherwise.

If you’re thinking about starting a blog specifically, and that is why you’re trying to figure out how to create a website…we have over 40 guides on blogging.

Here are the blogging guides specific to getting started, and building your blog:

How to Start a Blog

Best Blogging Platforms / Blog Sites

Best WordPress Themes for Blogs

Blog Design

11 Things I Wish I Knew Before I Started My First Blog

The Top 12 Tips for Running a Successful Video Blog

10 Lessons Seth Godin Can Teach You About Blogging

100 Lessons Learned from 10 Years of Blogging

Creating Your Own Website: In Summary

Creating your website might seem overwhelming at first. It really comes down to starting with these simple steps:

  1. Is your primary purpose to sell things on your website? If yes, then focus on Shopify, if no, then focus on WordPress.
  2. Use the guides on Quick Sprout to help you through the process. It’s a learning curve for sure. Taking the time to set up everything correctly will help you grow your business and your traffic much faster later on.
  3. Don’t hesitate to reach out to us directly via email with questions. We’ll help however we can.

Optimal Blog Design: 11 Elements and Examples of Blog Layouts and Designs

design

Are you trying to create the perfect blog design?

You know, one that encourages people to read your content and share it on the social web and, most importantly, gets high rankings in the search engines?

If you are trying to create a popular blog, here are the 11 essential elements (and examples of each) that you need within your blog design.

Element #1: Threaded comments

There are a lot of commenting systems out there. From Disqus to Facebook comments, the options are endless. But do you know what the best commenting system is?

Threaded comments like this.

Threaded Comments

“Why?” you may ask. Because threaded comments will typically increase the number of comments you receive per post by 16% to 33%. The more comments you receive, the more text you’ll have on each page. And the more text you have on each page, the more long tail keywords you will rank for.

Stick with threaded comments no matter what. Even if you have an active Facebook community, don’t use Facebook comments. Facebook owns that content, and it won’t help you get more search engine traffic.

Element #2: Snippets

Have you noticed that I don’t list the full post on the Quick Sprout’s blog homepage? I only show you a few paragraphs (a snippet), which prompts you to respond to the call to action “click to continue” to read the rest of the post.

You want to have snippets instead of full posts because of two main reasons:

  1. People have short attention spans – you have an attention span of 8 seconds, and so do your readers. By only showing them snippets, you allow your readers to choose from a number of posts. They will scroll until they find a post that piques their interest, and then they’ll read it.
  2. Duplicate content – if you place your full post on your homepage, you will create duplicate content, which will hurt your search rankings. This is another reason why you want to use snippets.

On your homepage, you can test the call-to-action text to find out which version maximizes the number of people clicking through and reading your post. I’ve tested the phrases:

  • Continue reading
  • Read more
  • Click to continue
  • Continue

The text “click to continue” outperformed the other variations by at least 10%. You should, of course, test this as what works on my blog may not work on yours.

For example, I noticed that GotchSEO uses “Continue Reading” on is blog and I would bet that he has tested many alternatives to find what performed best for him.

Snippets

Element #3: Scrolling social buttons

I’ve tested a lot of social buttons on Quick Sprout. I have had buttons at the beginning of the posts and at the end, and I have asked people to tweet about a post from within the blog post. The one design that continually outperforms the others is scrolling social buttons.

Plugins like Sharebar and Flare have increased my social traffic by 27%.

Backlinko uses a nice share bar that is clean and scrolls nicely for an example.

Social Buttons

When using a scrolling social plugin, make sure you limit the number of options to three. In other words, pick the three most popular social networks your readers are using. For me, it’s Facebook, Twitter and Google Plus.

If you add too many options, in my experience, it will decrease your social traffic.

Element #4: 11-point font size or larger

About a month ago, I wrote a blog post on how text size affects readability.

I did a test on 13 blogs, and I found that by increasing font size from 8 to 9, I was able to increase the time readers spend on site by 13 seconds. I saw another 8-second increase when I went to size 10. And I gained another 6 seconds by going to font size 11.

I have noticed that the Smart Passive Income Blog uses some nice large fonts in their headings and content. Check them out for another example I like.

Large Font Size

Granted, this only works if you are using a readable font type like Arial or Times. If your font type is hard to read, increasing the size won’t help much.

When in doubt, use a bigger font size.

Element #5: A sidebar on the right

Have you noticed that some blogs have their sidebars on the left? Or even worse, some have two sidebars? I’ve played around with different layout types, and I’ve found that the optimal layout is to have your content on the left side and one sidebar on the right side.

This way people can focus on reading your content, yet you’ll have the flexibility of promoting other things within your sidebar. Just make sure the main content area takes up at least 60% of your design. People come to blogs to read, so you don’t want to distract them with other elements.

If you want to place your sidebar on the left-hand side, you can. But what I’ve found is that it typically decreases the number of people who read your content by 15% to 25%.

I prefer the look of a blog where a sidebar is on the right side, but it tends to convert better when it is on the left.

Here’s what I learned…

When you place your sidebar on the left-hand side, you will get more email opt-ins, and more people will read your bio and do whatever else you promote through your sidebar. But you will also get fewer people to read your content.

I’ve found that having a sidebar on the left side of Quick Sprout causes a 9% drop in people reading the blog posts. On the other hand, it increases the number of sidebar opt-ins by 13%.

Overall, I decided to place my sidebar on the right-hand side even though it generates 13% fewer opt-ins.

Why did I do it anyway? Because it increased the number of blog post reads by 9%. In the end, the purpose of a blog is to educate you through content… so why would I take that away?

Here is another simple, yet effective, example from the A Better Lemonade Stand Blog. They use their right sidebar to display their featured posts and offers in a way that is very user friendly and that does not take away from their content.

Right Sidebar

In general, you should consider keeping your sidebar on the right-hand side even though it will cause fewer conversions. People are coming to your blog to read, so your primary goal should be to make your content as easy to read as possible.

Although I recommend using a sidebar, you don’t need one on each of your pages. For example, the homepage of Quick Sprout doesn’t have a sidebar.

Consider not having a sidebar on the pages you are trying to improve conversions on or make money from. Why? Because it makes people focus their attention on the area you want—the area where you make money.

So, for my “money” pages, I tend to have no sidebars.

Also, for any page that has a defined goal, you should consider removing unnecessary distractions such as a sidebar.

Element #6: Your bio

Whether you have a corporate blog or a personal blog, you want to build a connection with your readers. Without that personal connection, people are less likely to comment or buy from you.

One way you can create a bond with your readers is by opening up. Within your sidebar, put a short bio of yourself, and then link it to your full bio.

Marie Forleo does a nice job of presenting her bio in her left sidebar (however, as mentioned above, I would suggest putting you sidebar on the right)

Bio Box

If you have a corporate blog, put the bio of your founders or the team that manages the blog in the sidebar. Make sure you include a picture right above your bio. People need to see you in order to connect with you.

Element #7: Email subscription options

I’ve mentioned this before: collecting emails is one of the most important things you need to do if you want to grow your traffic. Your options vary from an opt-in at the top of your sidebar to a pop-up if you want to be more aggressive.

I like the way that FireNation has their email box setup as a popup. It really grabs your attention and makes you want to input your email. Who doesn’t want financial freedom??

Email Subscription Box

You’ll also notice that by offering a free e-book or a course, you’ll get a good number of email subscribers. You will also see that if you ask only for people’s email addresses instead of their names and emails, you’ll get roughly 10% more opt-ins.

For the month of June, emails made up 28% of Quick Sprout’s overall traffic. That’s not too shabby. Those users also generate the majority of my comments and social shares.

No matter what, start collecting email addresses of your readers. That way you can notify them when you publish a new blog post.

Element #8: Most popular widget

Can you guess what the most-clicked area on the blog is? It’s actually not the content.

Within my sidebar is an area that showcases all of my guides, my most popular posts, and my current hits.

That’s the most popular clicked-through area on the blog. Not only does it help drive traffic to my most important posts, but it also helps with search engine rankings because of the way I cross-link.

Check out how I Will Teach You To Be Rich uses their right sidebar to display their guides and most popular posts in the screenshot below.

Popular Posts

You too can have this on your blog if you use the popularity contest plugin. You’ll have to get a developer to modify it so that you can have tabs similar to mine.

Element #9: Yoast SEO plugin

This is probably the simplest tweak you need to make to your blog. In the long run, you’ll notice that it will help your search engine traffic grow by leaps and bounds.

If you are running a WordPress blog, download and install the Yoast SEO plugin. If you are not running a WordPress blog, you’ll have to optimize your site for search engines manually by following the steps in this post.

Element #10: Keep your color scheme and design simple

Different colors have different meanings. Make sure you pick the colors for your blog carefully. They matter, and not just from a psychological standpoint. Some colors make it easy for your readers to read your content, while others don’t.

For example, red text on a black background isn’t as easy to read as black text on a white background.

Keep things simple by creating as much white space within your blog design as possible, and use black for your text color. There’s no need to make your design complex because at the end of the day people are coming to read your content. Your goal should be to make your content readable.

The ahrefs blog does a good job of this and keep an ultra clean blog design that is easy to read on any device.

Simple Blog Color Scheme

Element #11: Images

Have you noticed that I place an image at the beginning of every blog post? I didn’t always do that, but from testing, I found that it increases the number of people who click through from my blog homepage to a post.

Can you guess by how much? A whopping 37%. All from just one image. If the image you are using is appealing, you’ll see good results. If the image you use sucks, fewer people will click through.

I prefer using stock photography images. You can also use royalty-free images, but the quality of those images typically isn’t as high.

The Duct Tape Marketing Blog usually uses some stellar images in their posts that I bet improve their click through rates as well.

Blog Post Image

Infographic: The blue print of an optimal blog design

For a visual roadmap I have also created this infographic that breaks down the blueprint of an optimal blog design. Use this as a guide to improve and optimize your blog.

The Blueprint of an Optimal Blog Design

Conclusion

Designing a blog that can boost your traffic isn’t that hard. All you have to do is follow the steps above. If you do, you should see an increase in traffic.

If you don’t have time to make all of the adjustments above, start with installing a scrolling social plugin and threaded comments. Those two simple changes will increase your social media traffic and search traffic in the long run.

If you implement the advice provided in this post and the infographic above, you’ll see an increase in your readership.

Trust me, it works. I’ve tested a lot of these design elements on Quick Sprout, and the tweaks helped me grow my readership to the size it is today.

How to Write Blog Posts Faster Without Sacrificing Quality

I write a ton of blog posts.

By the end of 2018, I’ll have published over 150 posts on Quick Sprout alone. Once you factor in the posts on my other websites and my guest posts, that number roughly doubles.

People ask me all the time how I manage to produce such a large amount of quality content.

With all my in-depth and informative guides backed up with good research, people assume it takes me 10 hours to write one post. That’s not the case.

It takes me significantly less than half of that time to do so.

Blogging is like anything else. The more you do something, the better you get at it.

That said, there is definitely a formula behind producing effective blog content.

As a business owner, you recognize the benefits of blogging in terms of SEO, driving traffic to your website, and increasing conversions.

traffic

This graph clearly shows there is a direct correlation between publishing frequency and website traffic. That’s why you can scale lead generation through blogging.

You know you want to publish more content. But there are only so many hours in the day, and you have a business to run.

It’s a common problem I see in my consulting work.

As a result, businesses usually resort to one of two solutions. They either don’t blog as often as they should be, or they rush through writing to meet a certain benchmark. But neither of these approaches are effective.

You need to learn how to write more posts faster without sacrificing the quality of your work.

Use this guide as a blueprint for producing quality content for your blogs. Here’s what you need to do.

Have your blog topics ready

When you sit down to write a post, you shouldn’t be asking yourself what you’ll be writing about that day. This is not an efficient use of your time.

I like to have lists of topics ready for me to choose from.

Spend 30 minutes to an hour once a month coming up with a long list of titles, depending on your publishing frequency.

I usually have lists with 20 or 30 topics at a minimum. Once I start running low, I go through this process again.

Coming up with this many subjects is easier than you think.

I recommend looking at some of your competitors’ sites to see what they’re blogging about. You can use their posts as an inspiration for your own.

You’ll have a big advantage here. Since their content is already published, you can make your posts even better and more informative than theirs.

Take advantage of online tools that will help you come up with new titles to write about, such as the blog ideas generator from HubSpot:

hubspot

Write posts that tell a story about a personal experience.

Look through comments on social media and your previously published posts for inspiration for new ones. Turn other content you’ve already created into a post. Here are some examples of content you can repurpose:

  • YouTube videos
  • podcasts
  • ebooks
  • webinars
  • slideshows

There are tons of opportunities here.

If you’re having trouble coming up with a list of blog topics, refer to my guide on the best ways to come up with new content ideas.

When you do this work ahead of time, you’ll make your writing process much easier. Rather than wasting 15 minutes on brainstorming, you can pull a topic from your list and get straight to work.

Always start with an outline

Starting to write with a blank page, trying to go from beginning to end without a plan, will hurt your quality and productivity.

All too often I see new writers skip the outline process because they think it’s extra work. But the outline will save you time in the long run.

Your outline will give you an idea of the flow of your post.

At a minimum, you should have all your subheaders determined with some notes for each section. But you don’t have to stop there.

The more detailed your outline is, the faster you’ll be able to write.

I like to jot down my thoughts in short bullet points for each section. I can expand on those notes when I’m writing the final copy.

Outlining will also make it easier for you to reach your desired word count. Here’s a look at the average content length for the top results of a Google search:

content length

As you can see from this graph, longer posts have higher rankings. On average, all the top ten posts are over 2,000 words.

You should have a word length range for each post you write.

Obviously, this won’t be exact every time. By nature, some posts will be longer than others, depending on the subject matter.

But let’s say you want all your posts to be a minimum of 2,000 words.

If you’ve got eight subheadings in your outline, you know that each section needs to be roughly 250 words to meet that 2,000-word minimum.

This is a highly effective way to write quality content. It will prevent you from rambling, repeating yourself, and filling the post with useless information.

If you’re starting with a blank page and no outline, you’ll have no sense of how long each section should be or how many sections you should have in the first place.

Using an outline will help you not only write faster but also produce better quality and longer blog posts, which will be great for SEO purposes.

Finish writing in one sitting

Blogging effectively is all about time management. I do not recommend multi-tasking when writing.

Writing posts will require your complete focus and attention.

Put your phone on silent. Don’t check your emails. Stop taking breaks for snacks or lunch in the middle of your post.

Just sit down and write.

It might be taking some of you longer than necessary to write posts because you’re getting distracted by other things.

Here’s a look at the average time people take to write a blog post to give you a better idea of how long it should take you:

time

In just four years, it’s taking bloggers roughly an hour longer to write each post.

You can aim to spend 3.5 hours writing a post, but you can write even faster than that. However, I don’t want you to over-focus on the time right now.

When you start looking at the clock instead of focusing on your work, the quality of your work begins to suffer. Here’s why.

When you hit the three-hour mark with only 70% of the post done, you might start thinking the post needs to be finished within the next 30 minutes. Under such pressure, the quality of your content might start to go down.

So what if some posts take you a little bit longer? It’s not the end of the world.

I write very efficiently, but every once in a while, it takes me upward of four or more hours to write a post.

Am I happy when this happens? I can’t say I’m thrilled. But I refuse to let my quality suffer.

Other times, I’ll knock out a post in 2.5 hours, so it balances out.

You also need to make sure you’re in the mood to write. Find a time of day that works best for you.

People differ in their preferences for writing. I know bloggers who write first thing in the morning while they’re still in bed, others who write at their offices, and still others who write late at night.

No matter when you write, make sure you’re in the right mindset.

If your mind is elsewhere and you can’t focus, pick another time to write. Put it off until you’re mentally able to concentrate to complete the post in one sitting.

Writing a post over the course of several days typically adds at least 20 minutes to each sitting.

Write while everything is fresh in your mind. The words will flow better, and it will be easier for you to work faster.

Conduct relevant research

Adding statistics and relevant data to your content will drastically improve its quality. It gives your audience proof you know what you are talking about.

Plus, citing and linking to authority websites is great for SEO purposes.

However, I see many bloggers shy away from this tactic because they think research is too time-consuming. That’s not the right way to think.

Sure, it may require a little extra work, but it’s not that difficult to conduct a quick Google search.

Including research in your blog gives you something to talk about. You’d be surprised how much easier it is to write about a subject when you have something to reference.

Let me give you an example.

Here’s an excerpt from a recent blog post I wrote about how blockchain is changing the digital marketing industry:

blockchain

By taking the time to conduct some research, I was able to find an image and statistic, which are both highlighted above.

These two pieces of information allowed me to write an entire section.

When you have a reference to help you make a point, you’ll find the words to describe it. A statistic from a recent study may just be one sentence, but you can write paragraphs before and after that one piece of information explaining it and talking about its application.

If you’re familiar with my content, you know I use research and images in all my posts.

Even if this is the first time you’re reading one of my blogs, you can see I’ve used research throughout this post to illustrate my points.

Edit your own work

You don’t need an editor to review your posts.

You can do it on your own.

In fact, studies show that the majority of bloggers don’t use editors for content published on their websites.

editors

Using editors is another example of something I see people do because they think it will save them time. But ultimately, it ends up being inefficient.

If you send your work to an editor, you need to rely on their schedule to get the post finished.

When I write something, I want to make sure it’s done.

You don’t want your posts sitting in limbo waiting to be edited and then sent back for feedback and other revisions. By the time you get those notes back, the topic is no longer fresh in your mind.

Instead of using an editor, put your posts through editing software, such as Grammarly.

You don’t need to make all the recommended changes. Just see whether there are any glaring errors that need to be fixed.

After that, read your post out loud to yourself.

This is the best way to catch any other mistakes before you publish your content. You’ll be able to tell whether something sounds funny and needs to be rewritten.

Depending on the length of your content, editing should take no longer than 10 or 20 minutes.

If you’re using an editor or spending much longer than this, you need to look at how you can improve the efficiency of your editing process.

Conclusion

It shouldn’t be taking you all day to write a blog post. At the same time, you don’t want to write so fast that the quality of your content suffers.

Fortunately, there are ways for you to write quality content at a reasonable speed.

Make sure you have a list of blog topics to choose from so you’re not wasting time figuring out what to talk about when you sit down to write.

Outline your posts before you start writing.

Blogging requires your full attention. Try to write when you can complete a post in one sitting.

Add research, statistics, and images to your posts. This will improve the quality and give you something to talk about.

Don’t use an editor. This will prolong the process. You can do this yourself.

If you follow the tips I’ve covered in this guide, you’ll be able to write high quality blog posts faster than ever before.

By the way, for those of you who are curious, I finished writing this post in less than three hours.

How long does it typically take you to write a high quality blog post?